

Page 1
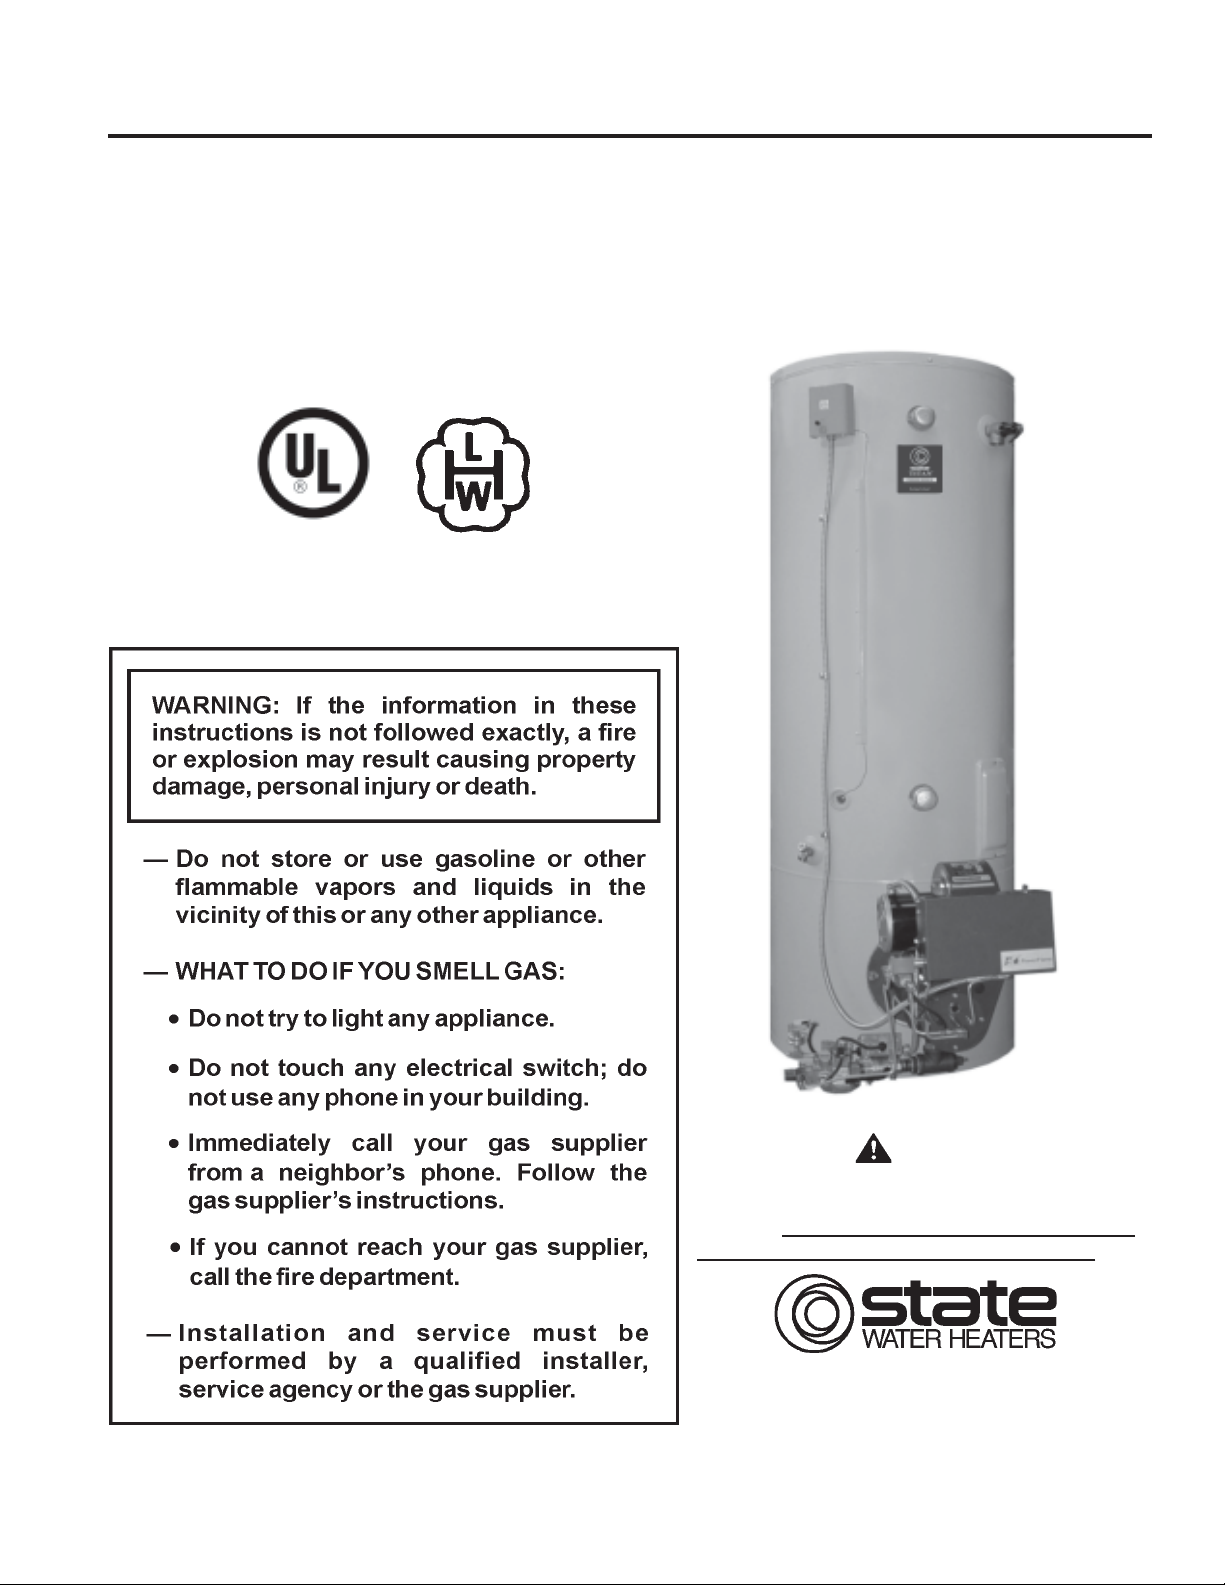
MODELS GPG/GPV-540A, 650A AND 740A
COMMERCIAL GAS, GLASS-LINED, TANK-TYPE LOW NOx
WATER HEATER
• INSTALLATION • OPERATION • MAINTENANCE • LIMITED WARRANTY
PRINTED IN U.S.A. 1004
CAUTION
TEXT IN BLACK BOLD TYPE OR UNDERLINED
CONT AINS INFORMATION RELA TIVE T O YOUR
SAFETY . PLEASE READ THOROUGHL Y BEFORE
INSTALLING AND USING THIS APPLIANCE.
ASHLAND CITY , TN
www.statewaterheaters.com
PLACE THESE INSTRUCTIONS ADJACENT TO HEATER AND
NOTIFY OWNER TO KEEP FOR FUTURE REFERENCE.
PART NO. 195047-000
1
Page 2
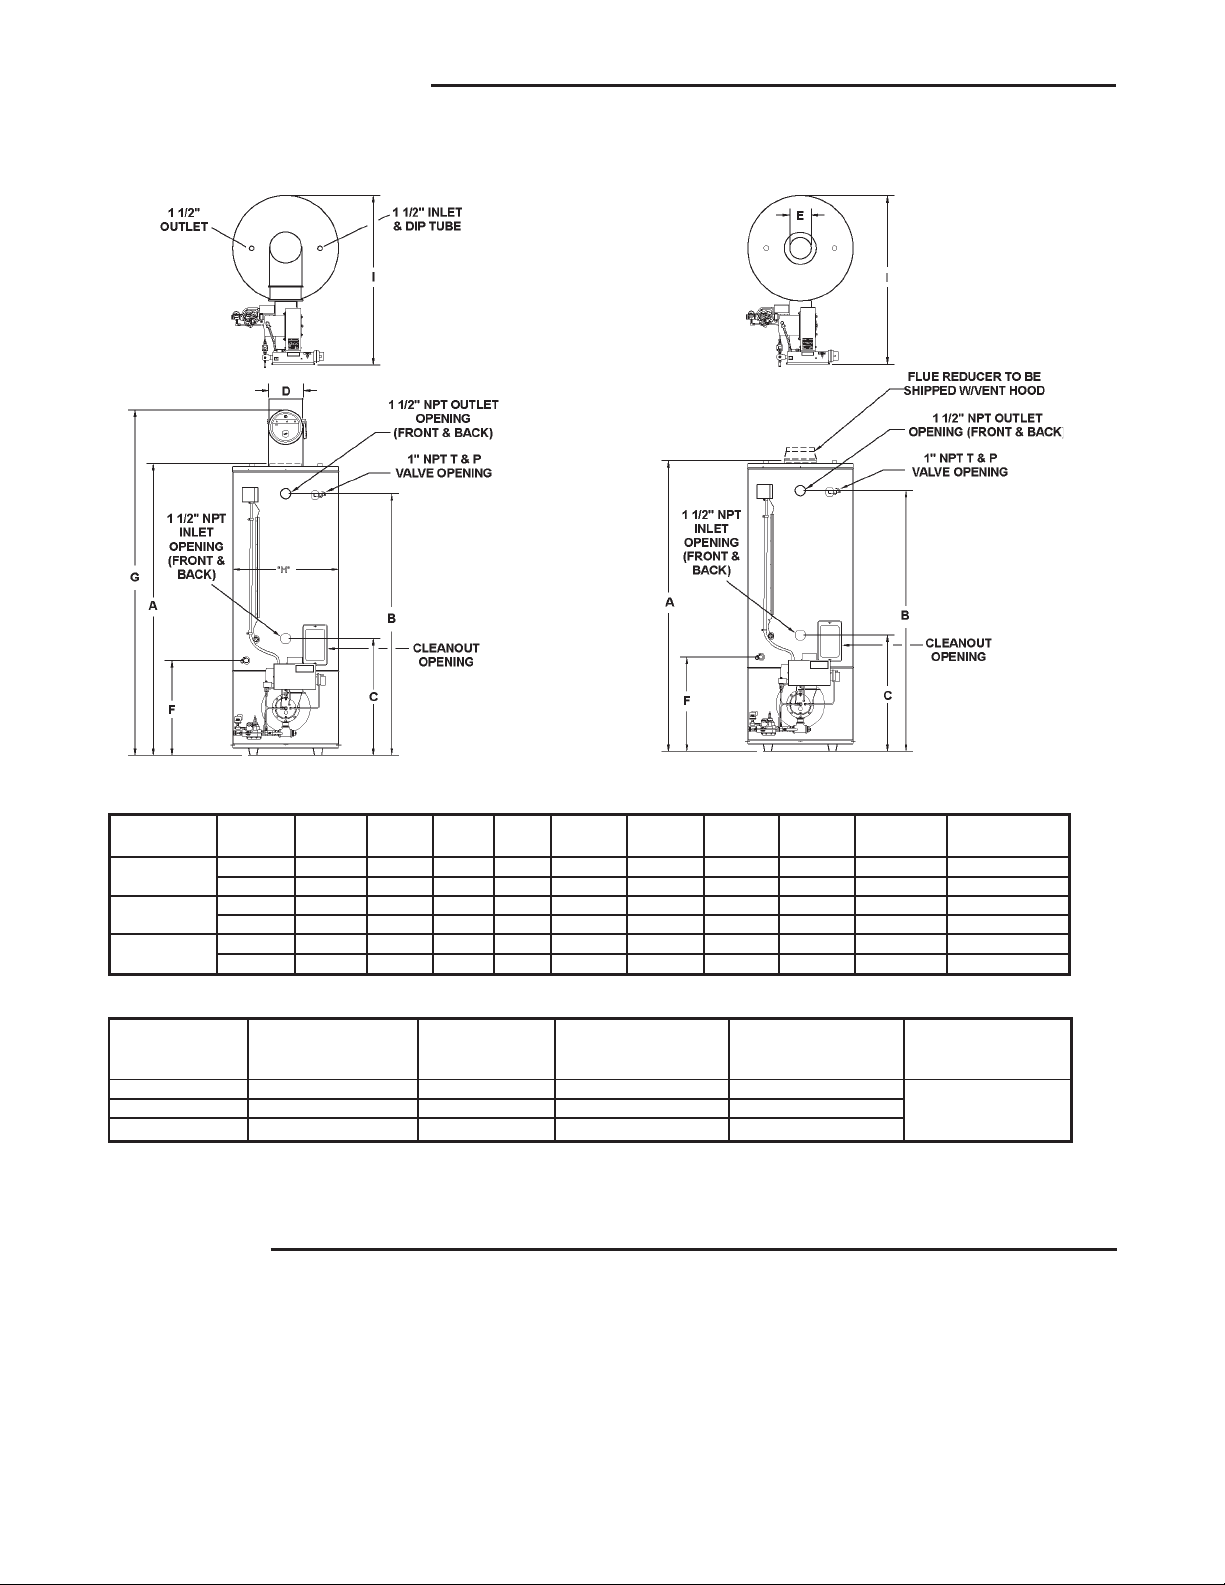
ROUGH-IN DIMENSIONS
STANDARD BAROMETRIC DRAFT CONTROL
GPG MODELS
HORIZONT AL & DIRECT VENTING
GPV MODELS
MAXIMUM TOTAL 75 EQUIVA LE N T
FEET INTAKE AND EXHAUST
ALLOWED.
ALL DIMENSIONS IN INCHES (MILLIMETERS)
Models A B C D E F G H I Conn. Ship. Wt.
GPG/GPV 80 3 / 4 73 32 1 / 4 9 6 26 1/2 93 29 1/ 2 48 1 / 2 1 * 950
540A 2,051 1,854 819 229 152 673 2,362 749 1,232 25.4 431 kg
GPG/GPV 80 3 / 4 7 3 32 1/ 4 9 8 2 6 1 /2 93 29 1/ 2 48 1 / 2 1 * 950
650A 2,051 1,854 819 229 203 673 2,362 749 1,232 25.4 431 kg
GPG/GPV 80 3 / 4 7 3 32 1/ 4 9 8 2 6 1 /2 93 29 1/ 2 48 1 / 2 1 * 950
740A 2,051 1,854 819 229 203 673 2,362 749 1,232 25.4 431 kg
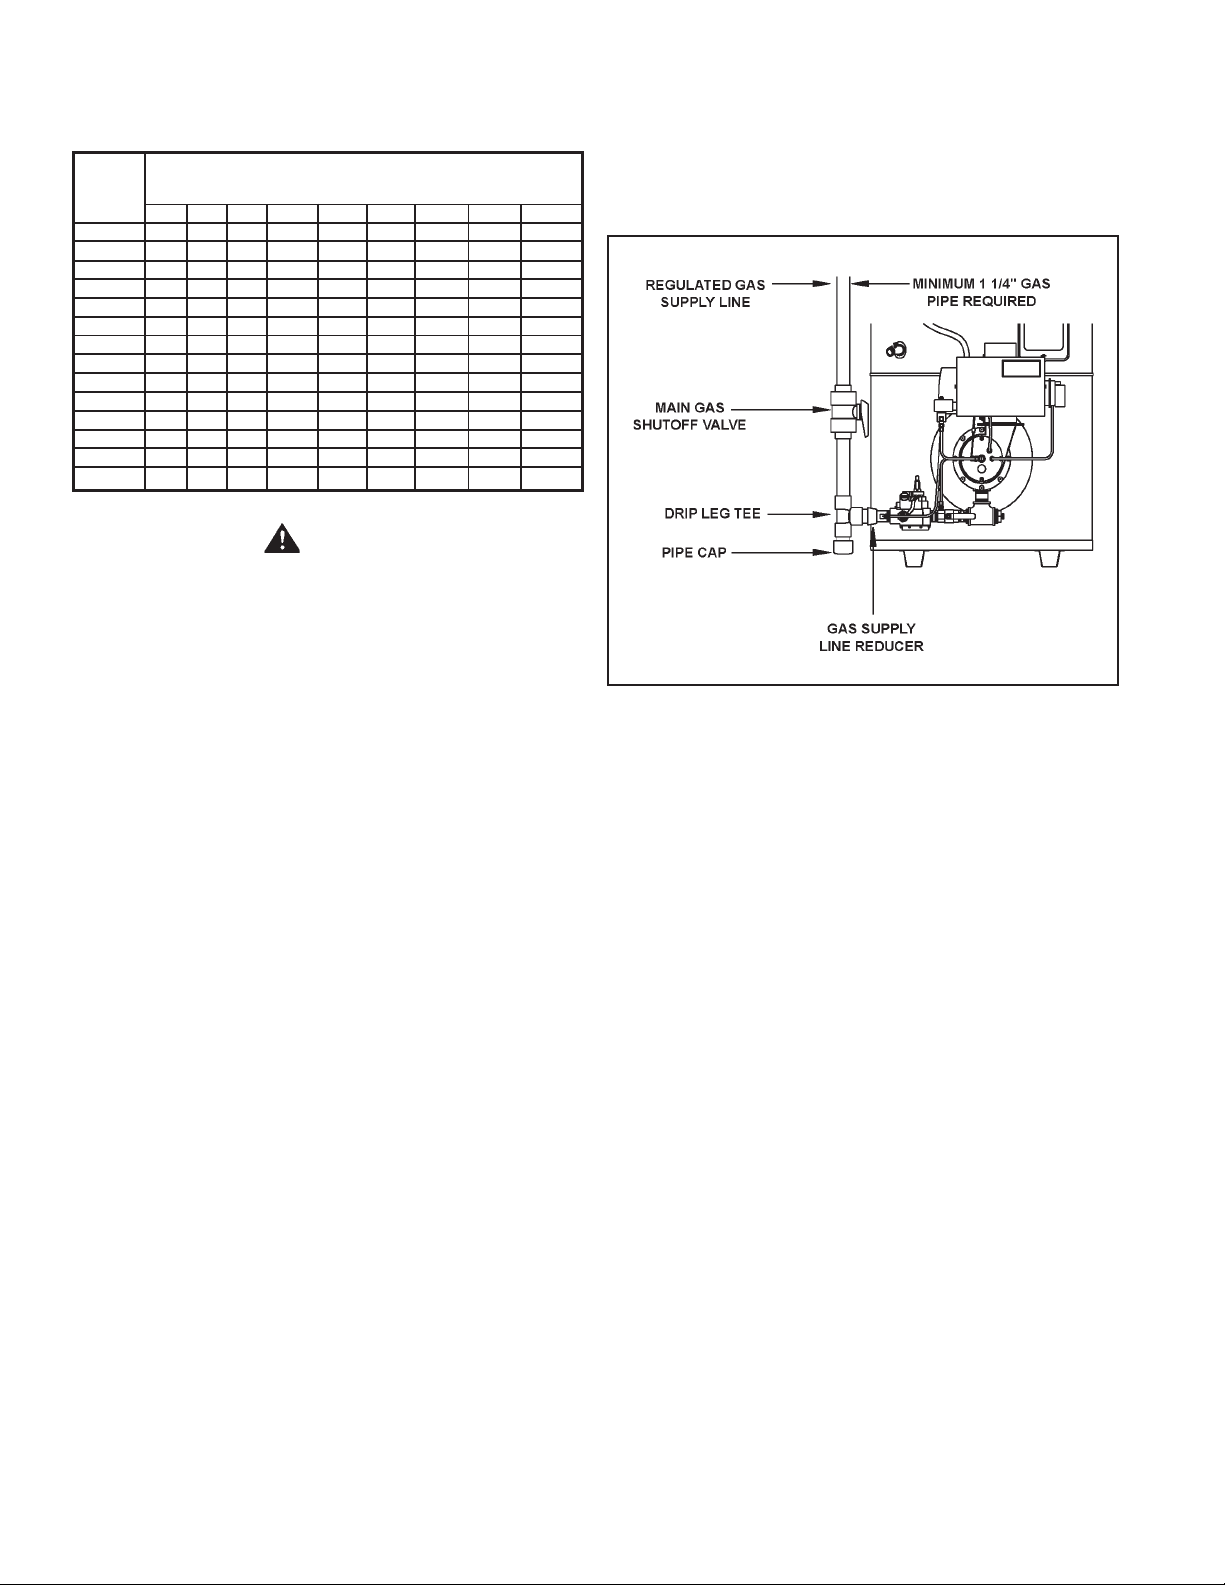
*Minimum gas supply pipe is 1 1/4”, reference Table 7 for gas supply pipe size.
Storage Input Rating Recovery Rating Recovery Rating Current Draw
Capacity BTU/HR. GPH GPH 120V
Models U.S. Gals. (Litres) Nat. 100°F Rise 140°F Rise 60Hz 1 Phase
GPG/GPV-540A 85 (261) 540,000 523.6 374
GPG/GPV-650A 85 (261) 650,000 630 450
GPG/GPV-740A 85 (261) 740,000 718 512
Based on 80% thermal efficiency obtained in State engineering laboratories.
NOTE: To compensate for the effects of high altitude areas above 2000 feet, recovery ratings should be reduced approximately
4% for every 1000 feet above sea level.
Gas Approx.
FOREWORD
The design of the GPG 540A through 740A models complies
with ANSI Z21.10.3/CSA 4.3 as an automatic circulating tank
and an automatic instantaneous type heater. The GPV 540A
through 740A models are designed for sidewall venting and
direct venting applications and are certified under UL 795.
Particular attention should be given to the installation of
thermometers at the locations indicated on the diagrams, as
these are necessary for checking the proper functioning of the
heater.
6.0 Amps
Detailed installation diagrams are found in this manual. These
diagrams will serve to provide the installer with a reference for
the materials and methods of piping necessary. It is highly
essential that all water, gas piping and wiring be installed as
shown on the diagrams.
THE HEA TER IS DESIGNED TO OPERA TE ONL Y ON NA TURAL
GAS.
THESE HEATERS MUST NOT BE INSTALLED ON
COMBUSTIBLE FLOORS.
2
Page 3

In addition to these instructions, the equipment shall be installed
in accordance with those installation regulations in accordance
with those installation regulations in force in the local area where
the installation is to be made. These shall be carefully followed
in all cases. Authorities having jurisdiction should be consulted
before installations are made.
TABLE OF CONTENTS
ROUGH-IN-DIMENSIONS ........................................................................2
FORE WORD ....................................................................................... 2,3
TABLE OF CONTENTS........................................................................... 3
GENERAL SAFETY INFORMA TION .......................................................3
Precautions ...................................................................................3
Liquid Petroleum Models................................................................3
Chemical Vapor Corrosion ........................................................ 3,4
Improper Combustion ....................................................................4
EXTENDED NON-USE PERIODS ............................................................. 4
Cathodic Protection .......................................................................4
Insulation Blankets.........................................................................4
High Altitude Installations ..............................................................4
FEATURES ............................................................................................. 4
Low Emmission Control.................................................................4
High Limit Switch (E.C.O.) ......................................................... 4,5
Dishwashing Machine Requirement .............................................5
INSTALLA TION INSTRUCTIONS .............................................................5
Required Ability .............................................................................5
Uncrating ....................................................................................... 5
Locating the Heater ................................................................... 5,6
Hard Water ....................................................................................6
Clearances ....................................................................................6
Air Requirements...........................................................................6
Venting....................................................................................... 6,7
Vertical Venting - For GPG Models ...............................................7
Horizontal (Side-wall) Venting - For GPV Models .................... 7,8
Direct Venting - For GPV Models ............................................ 9-11
Gas Piping ............................................................................. 11-12
Gas Meter Size............................................................................12
Gas Pressure Regulation ............................................................12
Gas Valves ............................................................................ 12,13
Water Line Connections..............................................................13
Thermometers .............................................................................13
Relief Valve .................................................................................13
INSTALLA TION DIAGRAMS........................................................... 14-17
Manifold Kits ................................................................................18
In the absence of local codes, the installation must conform with
the instructions as outlined in the latest publication of National
Fuel Gas Code (NFPA-54/ANSI Z223.1) and National Electric
Code (NFPA-70). These manuals can be purchased from the
Canadian Standards Association Laboratories, 8501 East
Pleasant Valley Road, Cleveland, OH 44131, National Fire
Protection Association, 1 Batterymarch Park, Quincy MA 02269.
P AGEP AGE
Heater Wiring...............................................................................19
ST ART UP ............................................................................................ 19
Important ......................................................................................19
Filling ............................................................................................ 19
Purging.........................................................................................19
Wiring Diagram ...................................................................... 20,21
Lighting and Operating Label ......................................................22
Sequence of Operation ............................................................... 23
Water Temperature Control .........................................................23
Adjustment Procedure (Initial Start-Up) ................................ 23,24
Adjustment Procedure for Fire-Rate, Low Nox and
High Elevation (Fine-Tune) .................................................... 24-26
GENERAL INFORMATION ....................................................................27
Power Burner ..............................................................................27
Thermostat ..................................................................................27
High Limit......................................................................................27
MAINTENANCE ....................................................................................27
General ........................................................................................27
Maintenance Schedule................................................................27
Electrical Servicing ......................................................................27
Flushing .......................................................................................27
Draining........................................................................................28
Sediment Removal .......................................................................28
Lime Scale ...................................................................................28
Relief Valve ........................................................................... 28,29
Circulating Pump ..........................................................................29
Low Emission Power Burner ......................................................29
Cleaning Flues .............................................................................29
Barometric Draft Control .............................................................29
Vent System ................................................................................ 29
CHECKLIST AND SERVICE INFORMA TION ....................................29-30
TROUBLESHOOTING ..................................................................... 30-32
Replacement Parts ......................................................................32
WARRANTY ........................................................................................33
PARTS LIST.................................................................................... 34-39
GENERAL SAFETY INFORMATION
PRECAUTIONS
DO NOT USE THIS APPLIANCE IF ANY PA RT HAS BEEN UNDER
WA TER. Immediately call a qualified service technician to inspect
the appliance and to replace any part of the control system and
any gas control which has been under water.
IF THE UNIT IS EXPOSED TO THE FOLLOWING, DO NOT
OPERATE HEATER UNTIL ALL CORRECTIVE STEPS HAVE
BEEN MADE BY A QUALIFIED SERVICEMAN.
1. EXTERNAL FIRE.
2. DAMAGE.
3. FIRING WITHOUT WA TER.
4. SOOTING.
LIQUID PETROLEUM MODELS
WARNING
Water heaters for propane or liquefied petroleum gas (LPG)
are different from natural gas models. A natural gas heater
will not function safely on LP gas and no attempt should be
made to convert a heater from natural gas to LP gas.
GPG/GPV-540A, 650A & 740A models are not available for use
with Liquefied Petroleum or LP gas. If you have obtained a
GPG/GPV-540A, 650A or 740A model with the intent to use it
with Liquefied Petroleum, LP gas - STOP! Immediately contact
your dealer to obtain a correct model.
CHEMICAL VAPOR CORROSION
WARNING
CORROSION OF THE FLUEWAYS AND VENT SYSTEM MAY
OCCUR IF AIR FOR COMBUSTION CONTAINS CERTAIN
CHEMICAL VAPORS. SUCH CORROSION MAY RESULT IN
FAILURE AND RISK OF ASPHYXIA TION.
Spray can propellants, cleaning solvents, refrigerator and air
conditioning refrigerants, swimming pool chemicals, calcium
3
Page 4
and sodium chloride (water softener salt), waxes, and process
chemicals are typical compounds which are potentially corrosive.
Do not store products of this sort near the heater . Also, air which
is brought in contact with the heater should no contain any of
these chemicals. If necessary, uncontaminated air should be
obtained from remote or outside sources. The limited warranty
is voided when failure of water heater is due to a corrosive
atmosphere. (Refer to the limited warranty for complete terms
and conditions).
2. INSULATION BLANKETS CAN RESTRICT THE AIR FLOW
NEEDED FOR PROPER OPERA TION OF THE COMBUSTION
SYSTEM AND COULD RESULT IN FIRE, ASPHYXIATION,
SERIOUS PERSONAL INJURY OR DEATH.
WARNING
FAILURE T O FOLLOW THESE INSTRUCTIONS CAN RESULT IN
SERIOUS PERSONAL INJURY OR DEATH.
IMPROPER COMBUSTION
WARNING
ATTIC AND OR EXHAUST F ANS OPERATING ON THE PREMISES
WITH A WA TER HEATER CAN RESUL T IN CARBON MONOXIDE
POISONING AND DEATH.
OPERATION OF THESE FANS CAN PRODUCE A NEGATIVE
DRAFT IN THE AREA OF THE WATER HEA TER PREVENTING
THE PRODUCTS OF COMBUSTION FROM EXHAUSTING
THROUGH THE CHIMNEY OR VENT PIPE.
The venting of the water heater should be inspected by a qualified
service technician at the time of installation and periodically
thereafter to ensure a down-draft condition does not exist.
DO NOT OBSTRUCT THE FLOW OF COMBUSTION AND
VENTILATION AIR, ADEQUATE AIR FOR COMBUSTION AND
VENTILATION MUST BE PROVIDED FOR SAFE OPERA TION.
EXTENDED NON-USE PERIODS
CATHODIC PROTECTION
CAUTION
HYDROGEN GAS CAN BE PRODUCED IN A HOT W A TER SYSTEM
SERVED BY THIS HEA TER THA T HAS NOT BEEN USED FOR A
LONG PERIOD OF TIME (GENERALL Y TWO WEEKS OR MORE).
HYDROGEN GAS IS EXTREMEL Y FLAMMABLE. T o reduce the
risk of injury under these conditions, it is recommended that a
hot water faucet be opened for several minutes before using any
electrical appliance connected to the hot water system. If
hydrogen is present, there will probably be an unusual sound
such as air escaping through the pipe as the water begins to
flow. There should be not smoking or open flame near the
faucet at the time it is open.
INSULA TION BLANKETS
HIGH ALTITUDE INSTALLATIONS
Y our S tate water heater has been designed to operate at altitudes
below 2000 Ft. (609.6 m), for appliance installation locations
with elevations above 2000 Ft. (609.6 m), special considerations
need to be taken. Adjustments for high altitude can only be made
by a State authorized GPG/GPV Start-up Agent. To ensure your
water heater operates properly at high elevation, a State
authorized GPG/GPV Start-up Agent will readjust the air-intake
damper setting and the gas manifold pressure (if required).
NOTE: Some gas utility companies derate the heating value of
the supplied gas at high elevation. Y our authorized st art-up agent
must adjust for actual heating value of the gas at the time of start
up.
FEATURES
LOW EMISSION CONTROL
Your State water heater has been designed to comply with
standards established by California South Coast Air Quality
Management District (SCAQMD), the most stringent emissions
control agency in the nation. To ensure compliance with SCAQMD
Rule 1 146.2, your heater is equipped with an internal recirculation
premix power burner, and must be started/adjusted by a
State Authorized GPG/GPV Start-Up Agent.
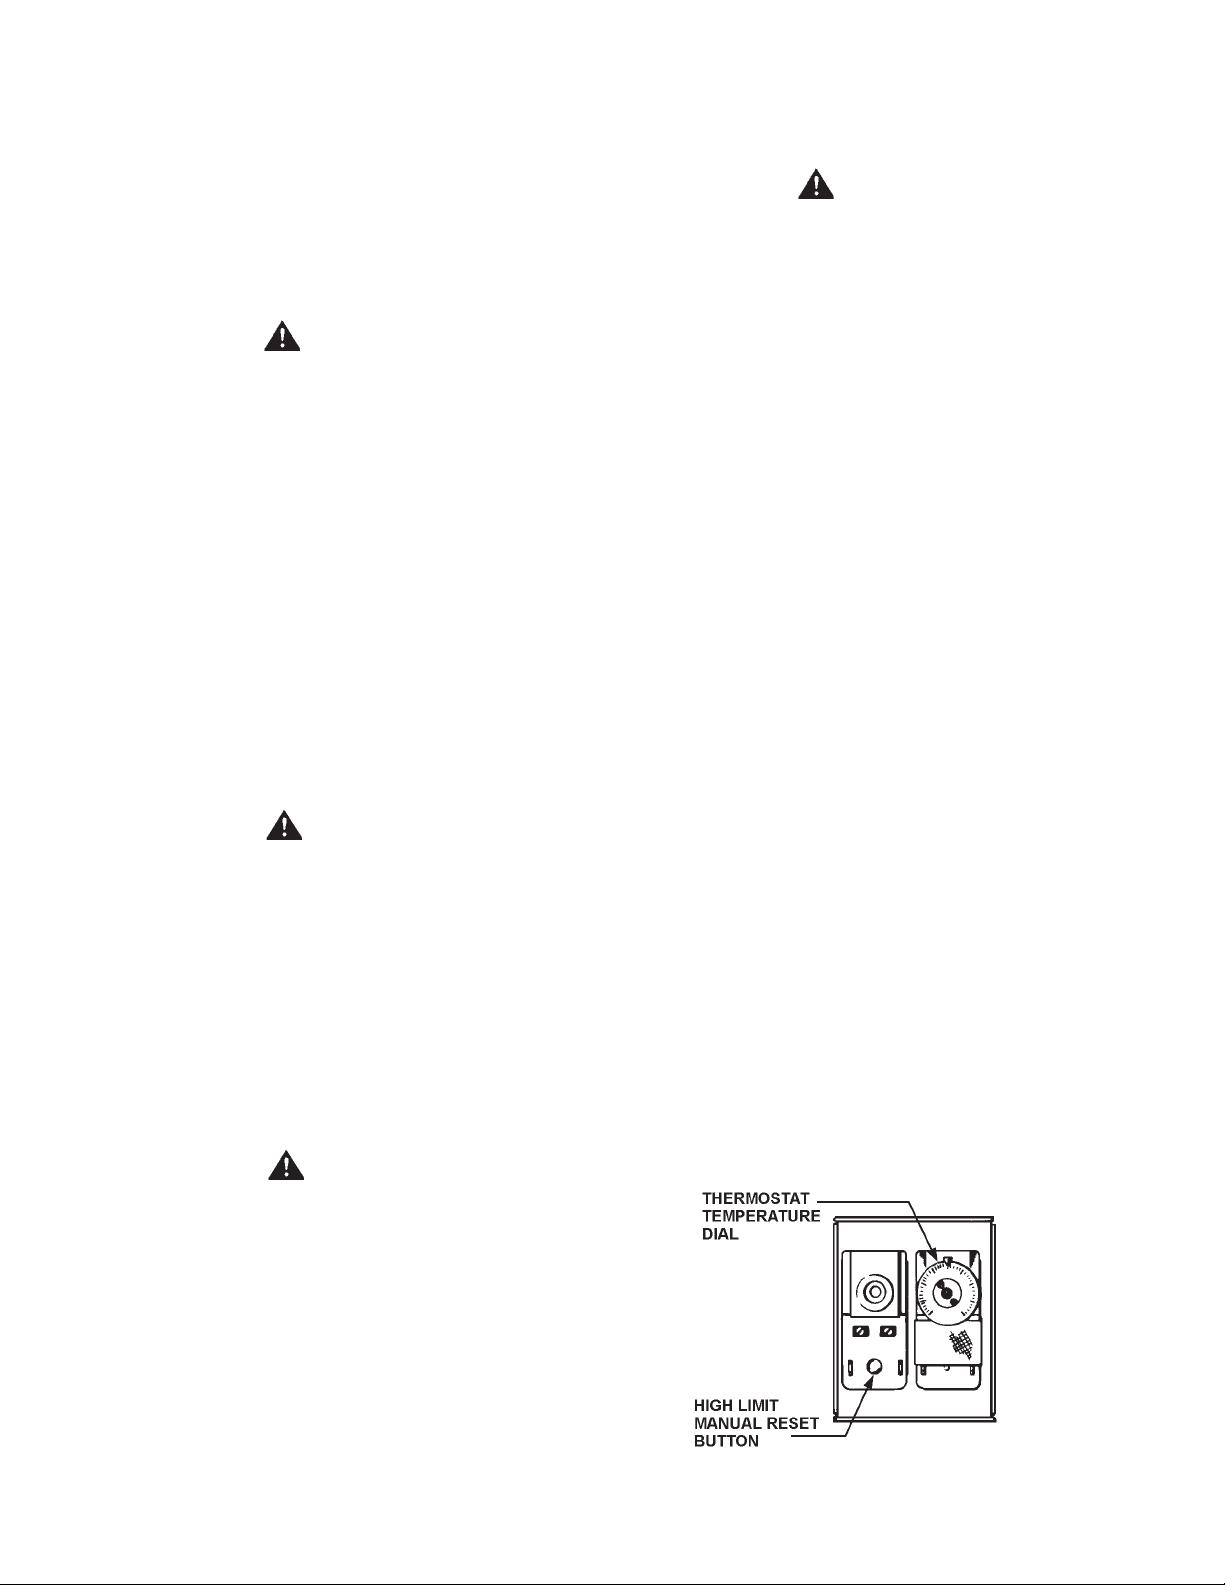
HIGH LIMIT SWITCH (E.C.O.)
The dual bulb controller also contains the high limit (energy
cutoff) sensor. The high limit switch interrupts main burner gas
flow should the water temperature reach 205°F (96°C).
In the event of high limit switch operation, the appliance cannot
be restarted unless the water temperature is reduced by 20°F
(11°C) approx. and the high limit reset button on front of limit
control is depressed, see Figure 1.
WARNING
INSULA TION BLANKET A VAILABLE T O THE GENERAL PUBLIC
FOR EXTERNAL USE ON GAS WATER HEATERS ARE NOT
APPROVED FOR USE ON YOUR ST A TE W ATER HEA TER. THE
PURPOSE OF AN INSULA TION BLANKET IS TO REDUCE THE
STANDBY HEA T LOSS ENCOUNTERED WITH STORAGE T ANK
WATER HEATER. YOUR STA TE W ATER HEATER MEETS OR
EXCEEDS THE ASHRAE/IES 90.1B 2001 STANDARDS WITH
RESPECT TO INSULATION AND STANDBY LOSS
REQUIREMENTS, MAKING AN INSULATION BLANKET
UNNECESSARY. THE USE OF INSULATION BLANKETS IN
CONJUNCTION WITH A STA TE WA TER HEATER WILL ALSO VOID
THE ST ATE W ARRANTY FOR THE FOLLOWING REASONS:
1. INSULATION BLANKETS COVER IMPORT ANT OPERA TING
INSTRUCTIONS AND SAFETY LABELS.
FIGURE 1.
4
Page 5

Continued manual resetting of high limit control, preceded by
higher than usual water temperature is evidence of high limit
switch operation. The following are possible reasons for high
limit switch operation.
• A malfunction in the thermostatic controls would allow the
gas valve to remain open causing water temperature to exceed
the thermostat setting. The water temperature would continue
to rise until high limit switch operation.
• An improper thermostat setting for a short repetitive usage
pattern may lead to a stacking effect. This causes a
temperature gradient increasing from the bottom to the top of
the tank. It is possible that the water at the high limit switch
sensor could reach its maximum temperature before the water
temperature at the thermostat reaches the dial setting,
causing the high limit switch to activate.
• A warming of ambient conditions associated with seasonal
change could magnify the stacking process described above
to the point where high limit switch operation would occur.
Contact your dealer or servicer if continued high limit switch
operation occurs.
DISHWASHING MACHINE REQUIREMENT
All dishwashing machines meeting the National Sanitation
Foundation requirements are designed to operate with water
flow pressures between 15 and 25 pounds per square inch.
Flow pressures above 25 pounds per square inch, or below
15 pounds per square inch, will result in improperly sanitized
dishes. Where pressures are high, a water pressure reducing
or flow regulating control valve should be used in 180°F (82°C)
line to the dishwashing machine, and should be adjusted to
deliver water between these limits.
The National Sanitation Foundation also recommends
circulation of 180°F (82°C) water. Where this is done, the
circulation should be very gentle so that it does not cause any
unnecessary turbulence inside the water heater. The circulation
should be just enough to provide 180°F (82°C) water at the point
of take-off to the dishwashing machine. Adjust flow by means of
the plug cock in the circulating line.
INSTALLATION INSTRUCTIONS
REQUIRED ABILITY
INSTALLATION OR SERVICE OF THIS WATER HEATER
REQUIRES ABILITY EQUIVALENT TO THAT OF A LICENSED
TRADESMAN IN THE FIELD INVOLVED. PLUMBING, AIR
SUPPL Y , VENTING , GAS SUPPL Y AND ELECTRICAL WORK ARE
REQUIRED. NOTE: AUTHORIZED ST ART-UP IS REQUIRED.
UNCRATING
The heater is shipped in standard form for vertical venting with a
barometric draft control assembly in a separate carton.
Optional horizontal vent models are shipped with one (1) exhaust
vent hood and one (1) flue reducer in a separate carton. Optional
direct vent models are shipped with two (2) vent hoods in separate
cartons. The exhaust vent hood carton contains one (1) exhaust
vent hood and one (1) flue reducer. The intake vent hood carton
contains one (1) intake vent hood and one (1) inlet adapter. All
parts should be installed as received without alteration.
LOCATING THE HEATER
When installing the heater, consideration must be given to proper
location. Location selected should be as close to the stack
chimney as practicable, with adequate air supply and as
centralized with the piping system as possible.
WARNING
THERE IS A RISK IN USING FUEL BURNING APPLIANCES SUCH
AS GAS WA TER HEA TERS IN ROOMS, GARAGES OR OTHER
AREAS WHERE GASOLINE, OTHER FLAMMABLE LIQUIDS OR
ENGINE DRIVEN EQUIPMENT OR VEHICLES ARE STORED,
OPERATED OR REP AIRED. FLAMMABLE V APORS ARE HEA VY
AND TRAVEL ALONG THE FLOOR AND MA Y BE IGNITED BY THE
HEATER’S IGNITER OR MAIN BURNER FLAMES CAUSING FIRE
OR EXPLOSION. SOME LOCAL CODES PERMIT OPERA TION OF
GAS APPLIANCES IF INST ALLED 18 INCHES OR MORE ABOVE
THE FLOOR. THIS MA Y REDUCE THE RISK IF LOCATION IN SUCH
AN AREA CANNOT BE AVOIDED.
THE HEA TER SHALL BE LOCATED OR PROTECTED SO IT IS
NOT SUBJECT TO PHYSICAL DAMAGE BY A MOVING VEHICLE.
WARNING
FLAMMABLE ITEMS, PRESSURIZED CONTAINERS OR ANY
OTHER POTENTIAL FIRE HAZARDOUS ARTICLES MUST NEVER
BE PLACED ON OR ADJACENT TO THE HEATER. OPEN
CONTAINERS OF FLAMMABLE MA TERIAL SHOULD NOT BE
STORED OR USED IN THE SAME ROOM WITH THE HEA TER.
THE HEATER MUST NOT BE LOCA TED IN AN AREA WHERE IT
WILL BE SUBJECT TO FREEZING.
LOCA TE IT NEAR A FLOOR DRAIN. THE HEA TER SHOULD BE
LOCATED IN AN AREA WHERE LEAKAGE FROM THE HEA TER
OR CONNECTIONS WILL NOT RESULT IN DAMAGE TO THE
ADJACENT AREA OR TO LOWER FLOORS OF THE
STRUCTURE.
WHEN SUCH LOCATIONS CANNOT BE A VOIDED, A SUIT ABLE
DRAIN PAN SHOULD BE INST ALLED UNDER THE HEA TER. Such
pans should be fabricated with sides at least 2” (50.8 mm) deep,
with length and width at least 2” (50,8 mm) greater than the
diameter of the heater and must be piped to an adequate drain.
THE P AN MUST NOT RESTRICT COMBUSTION AIRFLOW.
Water heater life depends upon water quality, water pressure
and the environment in which the water heater is installed. Water
heaters are sometimes installed in locations where leakage
may result in property damage, even with the use of a drain pan
piped to a drain. However, unanticip ated damage can be reduced
or prevented by a leak detector or water shut-off device used in
conjunction with a piped drain pan. These devices are available
from some plumbing supply wholesalers and retailers, and
detect and react to leakage in various ways:
• Sensors mounted in the drain pan that trigger an alarm or turn
off the incoming water to the water heater when leakage is
detected.
• Sensors mounted in the drain pan that turn off the water supply
to the entire home when water is detected in the drain pan.
• Water supply shut-off devices that activate based on the water
pressure differential between the cold water and hot water
pipes connected to the water heater.
• Devices that will turn off the gas supply to a gas water heater
while at the same time shutting off its water supply.
5
Page 6
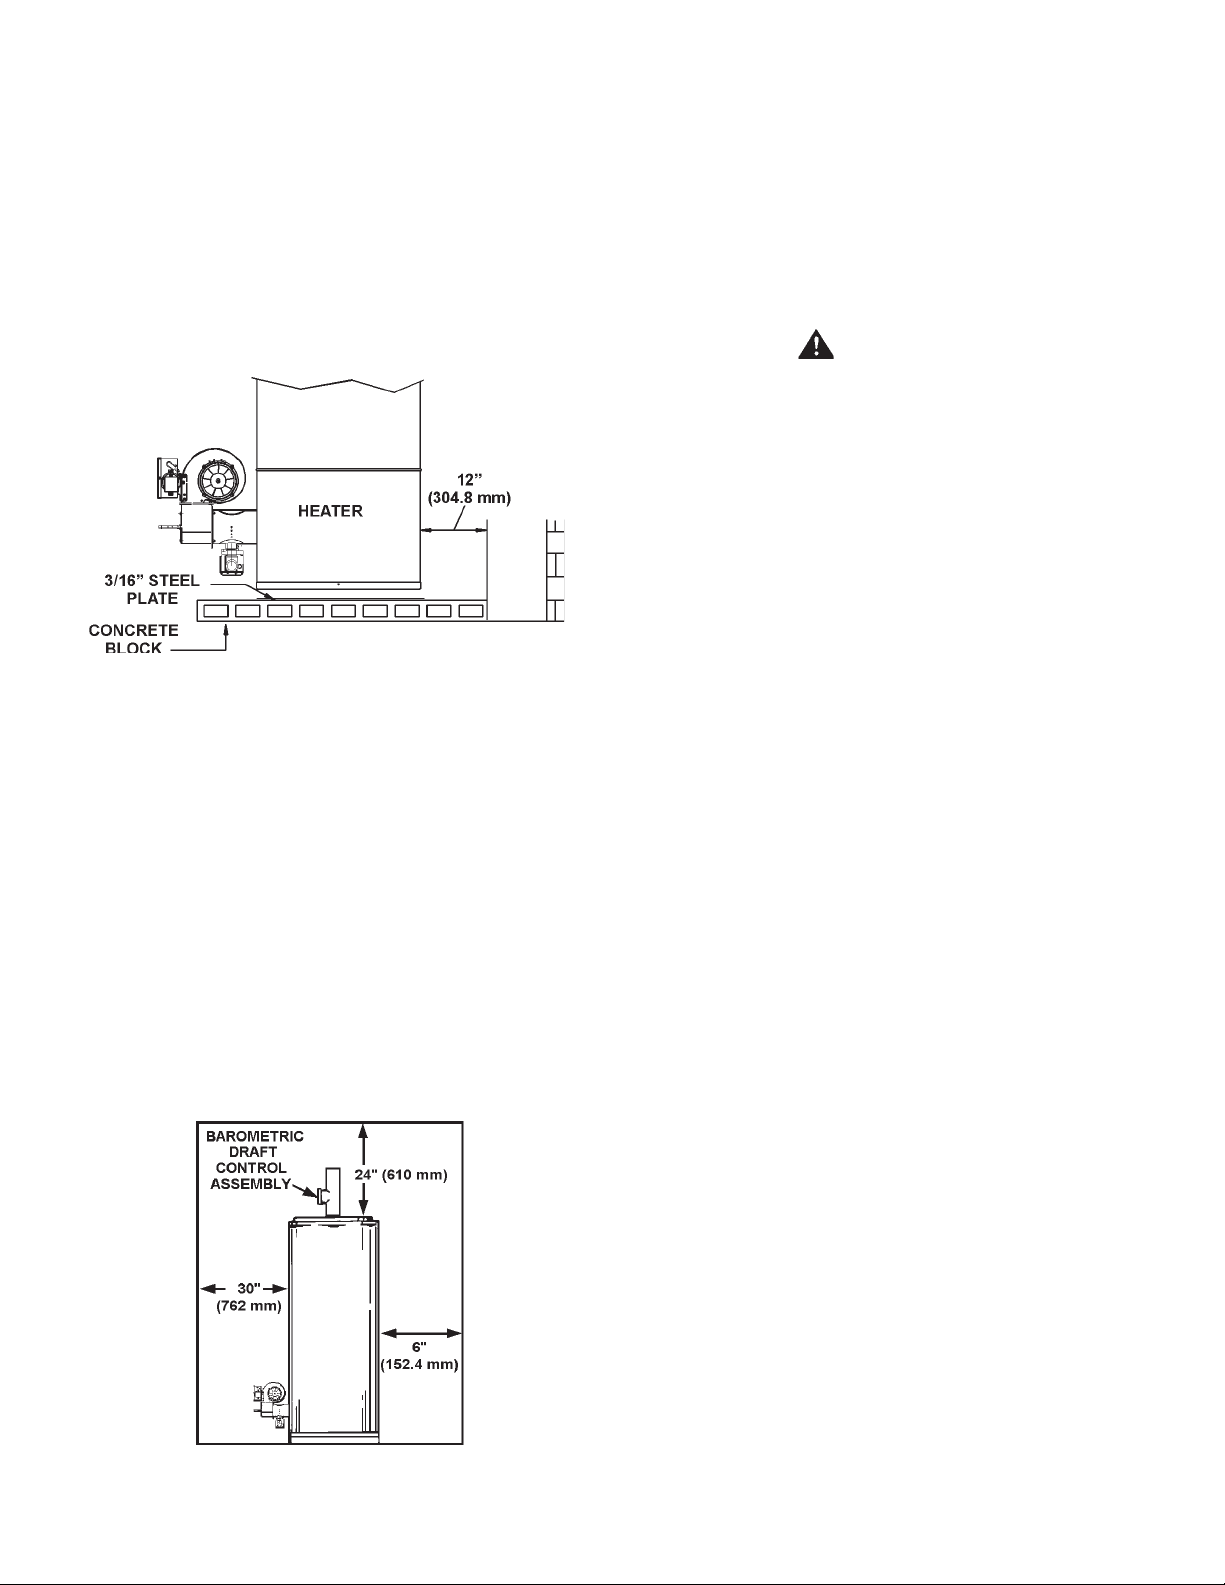
Units, which are to be installed on combustible flooring, must
be supported by a full layer of hollow concrete blocks, from
8” (203.2 mm) to 12” (304.8 mm) thick and extending
12” (304.8 mm) minimum beyond the heater in all directions.
The concrete blocks must provide an unbroken concrete surface
under the heater with the hollows running continuously and
horizontally. A 3/16-inch steel plate must cover the concrete
blocks, see Figure 2.
NOTE: If electrical conduits run under the floor of the proposed
heater location, insulate the floor as recommended above.
For appliances installation locations with elevations above 2000
feet (609.6 m), refer to HIGH AL TITUDE INST ALLA TIONS section.
PROPER INSTALLA TION ON COMBUSTIBLE FLOORING
FIGURE 2.
HARD W A TER
Where hard water conditions exist, water softening or the
threshold type of water treatment is recommended. This will
protect the dishwasher, Coffee urns, water heaters, water piping
and other equipment.
See MAINTENANCE section for details of tank cleanout
procedure.
CLEARANCES
These heaters are designed for installation on non-combustible
flooring in an alcove with clearances to combustible construction
of 6” (152.4 mm) from the sides and rear, 24” (610 mm) from the
top with a 6” (152.4 mm) minimum between vent pipe and ceiling.
Minimum clearance from flue pipe to combustible material is
6” (152.4 mm), see Figure 3.
A clearance of 30” (762 mm) shall be maintained from
serviceable parts, such as power burners, relief valves flue
baffles, thermostats or drain valves.
AIR REQUIREMENTS
KEEP APPLIANCE AREA CLEAR AND FREE OF COMBUSTIBLE
MA TERIALS, GASOLINE AND OTHER FLAMMABLE VAPORS AND
LIQUIDS.
DO NOT OBSTRUCT THE FLOW OF COMBUSTION OR
VENTILATING AIR.
WARNING
FOR SAFE OPERATION PROVIDE ADEQUATE AIR FOR
COMBUSTION AND VENTILA TION. AN INSUFFICIENT SUPPL Y
OF AIR WILL CAUSE RECIRCULATION OF COMBUSTION
PRODUCTS RESULTING IN AIR CONTAMINA TION THA T MA Y BE
HAZARDOUS TO LIFE. SUCH A CONDITION OFTEN WILL RESUL T
IN A YELLOW, LUMINOUS BURNER FLAME, CAUSING
CARBONING OR SOOTING OF THE COMBUSTION CHAMBER,
BURNERS AND FLUE TUBES AND CREATES A RISK OF
ASPHYXIA TION.
Where an exhaust fan is installed in the same room with a heater ,
sufficient openings for air must be provided in the walls.
UNDERSIZED OPENINGS WILL CAUSE AIR TO BE DRA WN INTO
THE ROOM THROUGH THE CHIMNEY, CAUSING POOR
COMBUSTION. SOOTING MA Y RESUL T IN SERIOUS DAMAGE
TO THE HEA TER AND RISK OF FIRE OR EXPLOSION.
UNCONFINED SP ACE
In buildings of conventional frame, brick or stone construction,
unconfined spaces may provide adequate air for combustion
and ventilation.
If the unconfined space is within a building of tight construction,
(building using the following construction: weather stripping,
heavy insulation, caulking, vapor barrier , etc.), air for combustion
and ventilation must be obtained from outdoors or spaces freely
communicating with the outdoors. The installation instructions
for confined spaces in tightly constructed buildings must be
followed to ensure adequate air supply.
CONFINED SP ACE
When drawing combustion and dilution air from inside a
conventionally constructed building to a confined space, such a
space shall be provided with two permanent openings, ONE IN
OR WITHIN 12 INCHES (304.8 mm) OF THE ENCLOSURE TOP
AND ONE IN OR WITHIN 12 INCHES (304.8 mm) OF THE
ENCLOSURE BOTTOM. Each opening shall have a free area of
at least one square inch per 1000 Btuh of the total input of all
appliances in the enclosure, but not less than 100 square inches.
PROPER INSTALLA TION CLEARANCES
FIGURE 3.
If the confined space is within a building of tight construction, air
for combustion and ventilation must be obtained from outdoors.
When directly communication with the outdoors through vertical
ducts, two permanent openings, located in the above manner,
shall be provided. Each opening shall have a free area of not
less than one square inch per 4000 Btuh of the total input of all
appliances in the enclosure.
VENTING
THE INSTRUCTIONS IN THIS SECTION ON VENTING MUST BE
FOLLOWED TO AVOID CHOKED COMBUSTION OR
RECIRCULATION OF FLUE GASES. SUCH CONDITIONS CAUSE
SOOTING OR RISKS OF FIRE AND ASPHYXIA TION.
6
Page 7

Heater must be protected from freezing downdrafts during
shutdown periods.
The GPG 540A, 650A and 750A water heater are classified as a
category I appliance (non-positive vent pressure, noncondensing) when installed with the supplied barometric draft
control assembly in a vertical vent installation.
The GPV 540A through 740A heater is classified as a category
III appliance (positive vent pressure, non-condensing) when
installed with supplied sidewall vent kits or direct vent kit.
All regulations pertaining to the venting of these heaters must
be followed.
The following vent installation instructions cover vertical,
horizontal, and direct vent applications.
VERTICAL VENTING - FOR GPG MODELS
BAROMETRIC DRAFT CONTROL ASSEMBL Y
A double-acting barometric draft control assembly is provided
with any unit intended for chimney venting. The purpose of this
draft control is twofold. During downdrafts it acts as a pressure
relief control to prevent the downdraft from blowing into the heater.
It also allows for makeup air to enter the chimney without being
drawn through the heater. In both cases the control prevent s the
heater performance from being adversely affected by conditions
within the chimney.
NOTE: A NEGA TIVE DRAFT MUST BE MAINT AINED IN VENTING .
A negative draft of 0.02” to 0.04” w.c. Must be maintained in
venting system. Measure draft at the location illustrated in
Figure 4. Adjust the control counter-weights if necessary as
shown in the MAINTENANCE portion of this manual.
Where an existing chimney or vent is to be used, be sure that the
chimney or vent has adequate capacity for the number and sizes
of gas appliances being vented through it. Inspect the chimney
or vent and remove all soot or other obstructions, which will
retard free draft.
Vent connectors making horizontal runs must have a minimum
upward slope toward the chimney or vent of ¼ inch per foot. Vent
connector length should be kept as short as possible. Be sure
that the vent pipe does not extend beyond the inside wall of a
chimney, see Figure 4.
The draft control assembly must be installed without alteration.
This assembly is factory adjusted for horizontal application only
and must be attached to the heater as shown in Figure 4. The
direction in which the outlet to the draft controls assembly faces
is arbitrary . The assembly must be fitted to the jacket cover such
that it is plumb and level to the ground. Fasten the draft control
assembly to the top cover using sheet metal screws at three
locations, or more, as required.
Damper or other obstructions must not be installed between the
heater and the barometric draft control assembly.
Do not adjust settings on gate.
When installed, the damper gate must pivot freely in the ring
guides. This gate will automatically adjust to regulate the
chimney draft imposed on the heater.
VENT CONNECTIONS
Vent connections must be made to an adequate st ack or chimney .
Refer to the National Fuel Gas Code or to the vent pipe
manufacturer’s gas vent and chimney sizing table to properly
design and size the venting system. Refer to Table 1 for the vent
pipe size required for installation to the barometric draft control
assembly outlet.
TABLE 1.
Model Flue Outlet
GPG-540A 9” (228.6 mm)
GPG-650A 9” (228.6 mm)
GPG-740A 9” (228.6 mm)
Single-wall or type B venting may be used with these heaters in
vertical vent installations. All local and utility regulations on
venting must be followed.
FIGURE 4.
In venting systems where a continuous or intermittent back
(positive) draft is found to exist, the cause must be determined
and corrected. In some cases, a special vent cap may be
required.
WARNING
Failure to correct back drafts may cause air contamination
and unsafe conditions.
Do not connect the heater to a common vent or chimney with
solid fuel burning equipment. This practice is prohibited by
many local building codes as is the practice of venting gas fired
equipment to the ductwork of ventilation systems.
Connectors shall not be connected to a chimney, vent or venting
system served by a power exhauster, unless the connection is
made on the negative pressure side of the exhauster.
Do not connect any heater vented by natural draft to any vent
serving mechanical draft equipment operating under positive
vent pressure such as category III or category IV appliances.
HORIZONTAL (SIDE-WALL) VENTING -
FOR GPV MODELS
An exhaust vent hood, vent hood and a flue reducer are supplied
with any unit intended for through-the-wall horizontal venting.
These parts must be installed without alteration. The vent hood
adapter is designed for use with Selkirk Metalbestos Model PS
or Model G venting, see Figure 7 on page 10.
7
Page 8
Refer to Table 2 for limitations of venting system design for
horizontal venting.
TABLE 2
GPV-540A-740A
Flue Outlet Dia. (Inches/mm) 9” (228.6)
Flue Reducer 9” x 8”
Dimensions -Supplied (Inches/mm) 228.6 x 203.2
Minimum Outlet Vent Dia. (Inches/mm) 8” (203.2)
Maximum Number 90° 4
Of Elbows 45° 8
Maximum T ot al Vent System 75
Length, Equiv. Feet/Meters (23 m)
5. Shall not be closer than 3 feet (0.9 m) from the inside corner
of an L- shaped structure.
6. Shall be located above the snow line in geographical areas
where snow accumulates.
VENT SYSTEM INST ALLATION
This heater is a category III appliance when horizontally vented
through a wall using the supplied sidewall vent terminal. All
national and local codes pertaining to the installation of such
venting systems must be followed.
Horizontal portions of the vent system must be installed with a
minimum upward slope of 1/4” per foot of length.
When calculating the equivalent length of a venting system each
90° elbow is equivalent to 10 feet (3 m) of straight pipe. In no
case 45° elbow is equivalent to 5 feet (1.5 m) of straight pipe. In
no case may the sum of the straight pipe lengths and the
equivalent length of the elbows exceeds 80 feet (24.3 m).
Note the minimum vent diameter in Table 2.
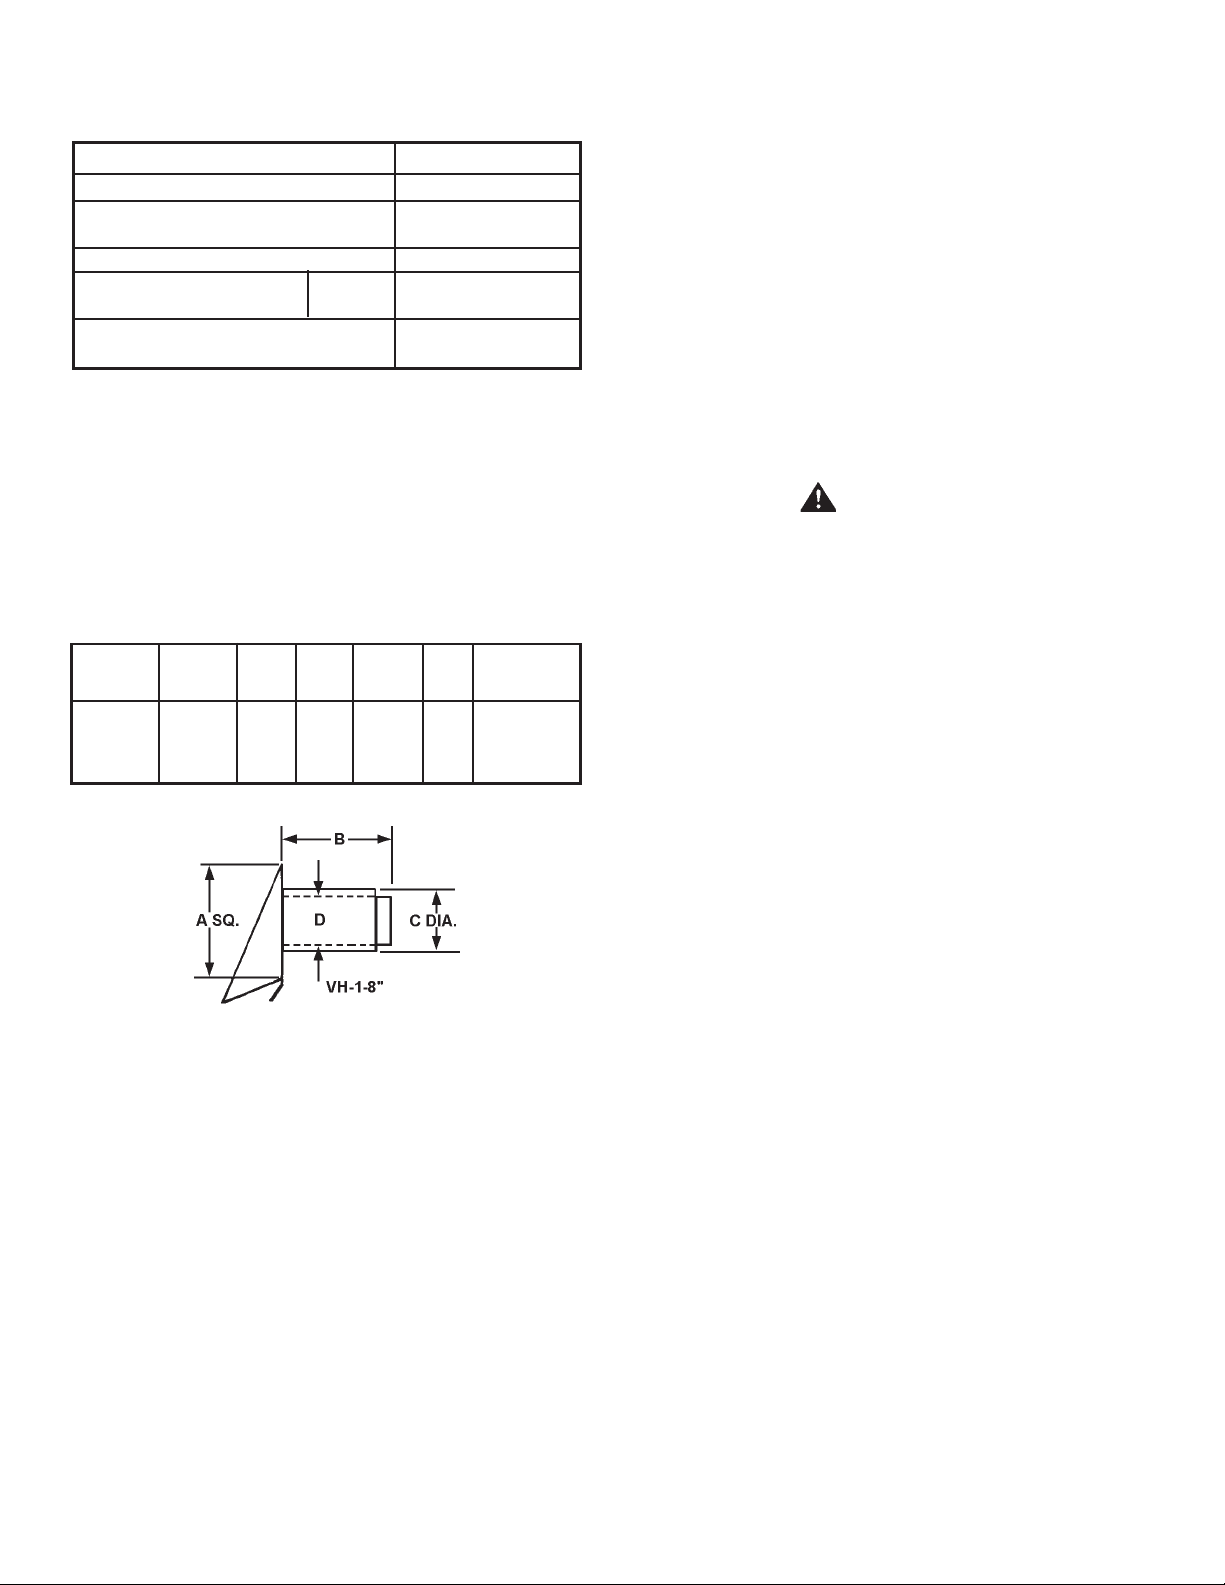
Refer to Table 3 for the correct vent terminal size for each heater.
The dimensions noted in Table 3 refer to Figure 5.
TABLE 3
Heater Terminal Rough-In
Model Model A B C D Dimensions
GPV
540A- VH-1-8” 19-7/8” 13” 10-9/16” 8-5/8” 11-1/16”
740A
All joints and seams in the venting system must be sealed gas
tight. If a silicone sealer is used, it must have a continuous
temperature rating of at least 500°F (260°C); Dow Corning
736 or equivalent must be used.
CAUTION
Use only the vent hood supplied with this kit. Only supplied
hood provides required clearances from combustibles, both
through the wall and the exterior siding. Termination of a
sidewall vent system with a device other than the supplied
vent hood could affect system performance and result in a
safety hazard.
IMPORT ANT
Plan the layout of the vent system backward from the vent
termination to the water heater.
1. Use the layout of the vent system backward from the vent
termination to the water heater.
BEWARE OF CONCEALED WIRING AND PIPING INSIDE OF
WALL. REFER TO TABLE 5 FOR THE MAXIMUM WALL
THICKNESS “B” FOR EACH MODEL.
2. Slide hood through opening from outside. Fasten hood to
exterior wall with anchors and screws supplied.
FIGURE 5
Use only the sidewall vent terminal supplied with the heater.
These terminals are specifically listed for use on these
State heaters.
VENT TERMINAL LOCATIONS-EXHAUST
When considering location for sidewall vent terminals refer to
the latest edition of the National Fuel Gas Code which
recommends that vent terminals:
1. Shall be located not less than 12” (304.8 mm) above grade.
2. Shall be located not less than 7 feet (2.1 m) above grade
when adjacent to a public walkway.
3. Shall terminate at least 3 feet (0.9 m) above any forced air
inlet within 10 feet (3 m).
4. Shall terminate at least 4 feet (1.2 m) below, 4 feet (1.2 m)
horizontally from or 1 foot above any door, window or gravity
air inlet into any building.
3. Install covers plate and fasten to inside wall with 4 screws.
4. Attach a seal ring (Meltalbestos SR or equivalent) to the vent
hood collar, see Figure 7. Attach Selkirk Metalbestos model
PS or model G venting to the seal ring following the venting
manufacturer’s instructions. For total safety, it is
recommended that only venting listed for use with category III
appliances (positive vent pressure, non-condensing) should
be used between the heater and the vent hood, even through
national or local codes may allow the use of type B or singlewall vent.
5. Install the remaining vent sections back to the heater , following
the venting manufacturer’s instructions on assembling and
sealing joints. Follow good venting practice regarding
properly supporting vent system and keeping the number of
offsets to a minimum. See Table 2 for the maximum allowable
number of elbows in venting system.
6. Install the flue reducer included with the exhaust hood between
the vent system and the heater.
7. Seal all vent connections and venting with sealants supplied
by vent pipe manufacturer or with a high-temperature silicone
sealant suitable for continuous temperatures of 500°F
(260°C). Acceptable sealant include Dow Corning 736
or equivalent.
8
Page 9
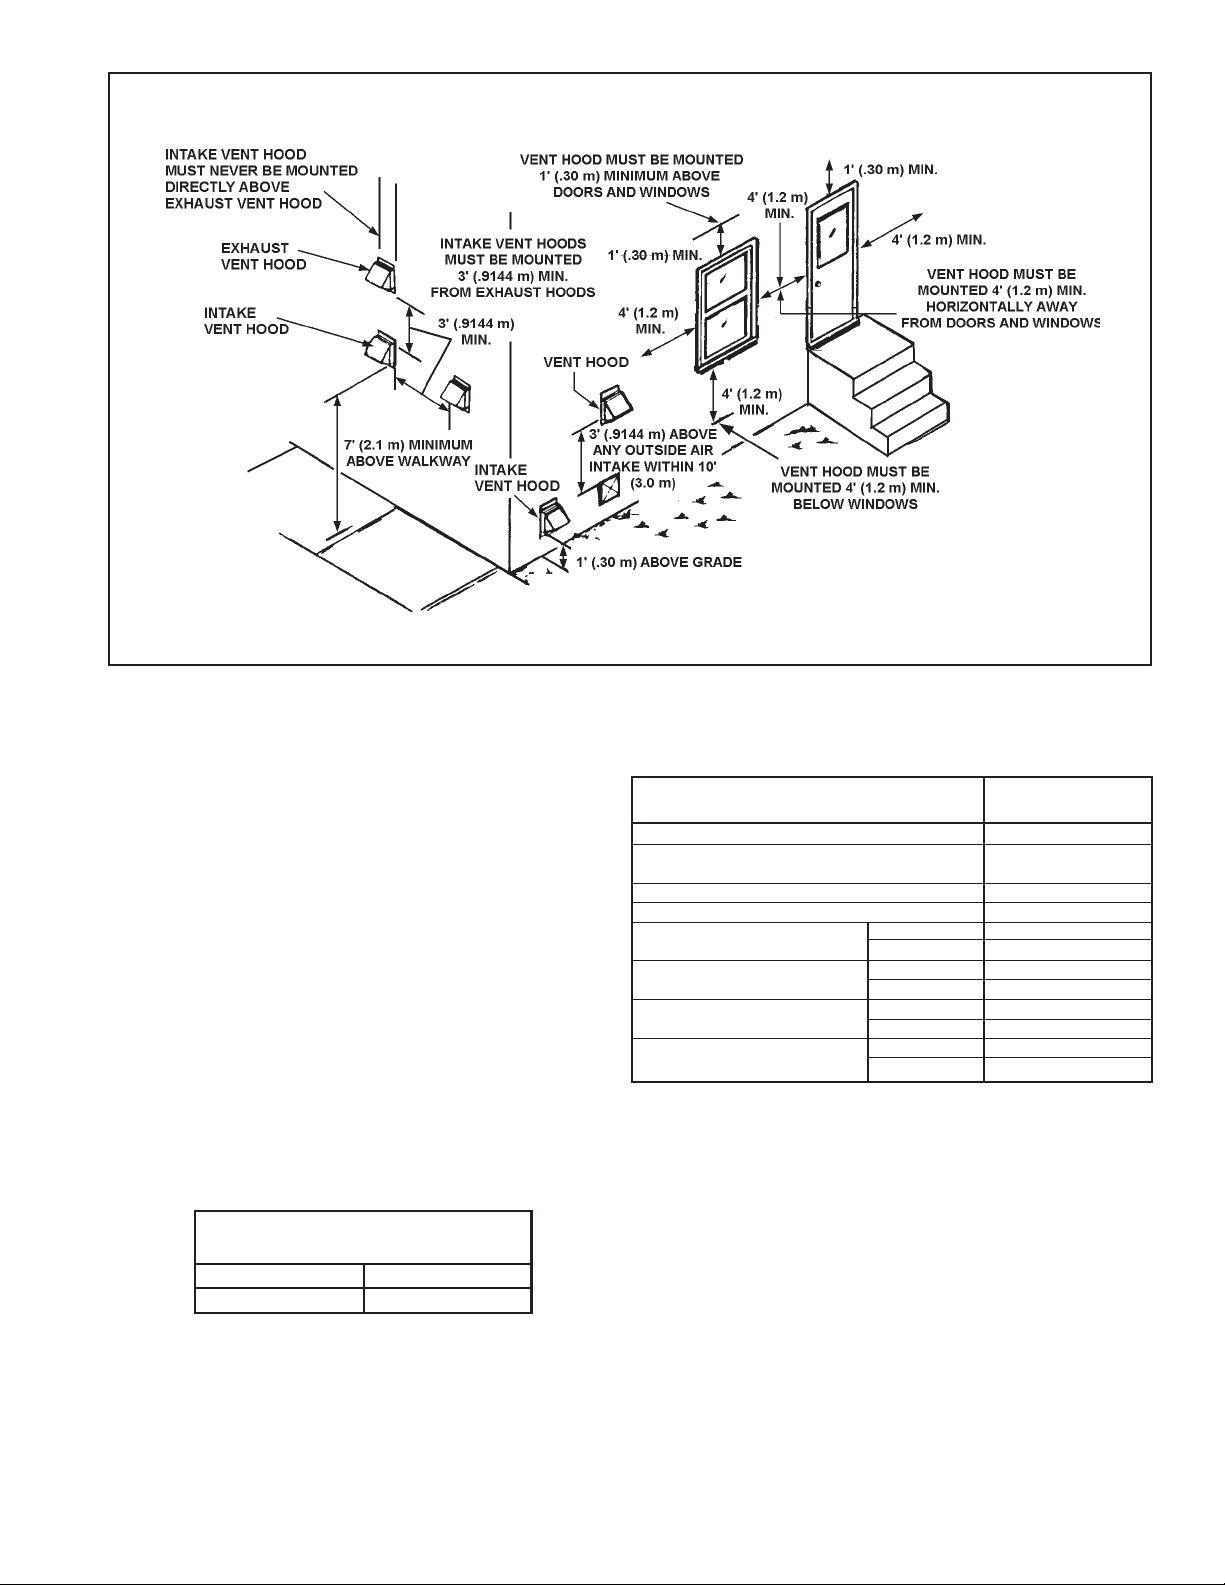
FIGURE 6.
DIRECT VENTING - FOR GPV MODELS
All exhaust vent terminal, flue reducer, and int ake vent terminal
are supplied with any unit intended for direct venting. These
parts must be installed without alteration.
This heater is category III appliance when used in a direct vent
application. All national and local codes pertaining to the
installation of such an appliance must be followed.
Horizontal portions of the exhaust vent system must be installed
with a minimum upward slope of 1/4” (6.35 mm) per foot of
length.
Selkirk metalbestos model PS or G vent is approved for use as
exhaust venting on these models. Model PS is a double-wall
vent with a 1” (25.4 mm) air space between pipes. Model G is a
single-wall variation of model PS for use where combustible
clearance is not a concern, see Table 4.
TABLE 4.
Selkirk Metalbestos Model PS
Clearance to Combustibles
Interior 6” (152.4 mm)
Exterior 6” (152.4 mm)
8” diameter PVC or galvanized pipe is approved for use as
intake venting on these models. Class 63, 100, 125, 200, and
schedule 40 pipe may be used for PVC pipe. Intake venting
must be adequately supported to avoid unnecessary stress on
vent hood, venting, or burner.
TABLE 5.
Dimension in GPV
Inches (mm) 540A -740A
Flue Outlet Dia. 9 (229)
Flue Reducer Dimension 9 x 8
(Supplied) (229 x 203)
Min. Exhaust Vent Dia. Inch (mm) 8 (203)
Min. Intake Vent Dia. Inch (mm) 8 (203)
Maximum Number Of 90° 4
Elbows, Intake 45° 8
Maximum Number Of 90° 4
Elbows, Exhaust 45° 8
Total Intake Vent Max. 75 (23 m)
Length, Equiv. Ft. Min. 3 (1 m)
Total Exhaust Vent Max. 75 (23 m)
Length, Equiv. Ft. Min. 6 (1.8)
Note: Barometric draft control is not used in direct vent installations
as the venting system must be sealed.
When calculating the equivalent length of a venting system each
90 elbow is equivalent to 10 feet of straight pipe. Each 45 elbow
is equivalent to 5 feet (1.5 m) of straight pipe. Do not exceed the
maximum number of elbows as shown in Table 5. In no case may
the sum of the straight pipe lengths and the equivalent lengths of
the elbows exceed the valves in Table 5.
VENT TERMINAL LOCATIONS-EXHAUST
See “Horizontal Venting” in this manual for acceptable locations
for exhaust hoods.
VENT TERMINAL LOCA TIONS-INTAKE
See Table 5 limitations on venting system design for direct vent
installations.
When considering locations for the intake terminal, bear in mind
that the terminal:
9
Page 10
1. Shall be located not less than 12” (304.8 mm) above grade.
DIRECT VENT SYSTEM INST ALLATION
2. Shall be located not less than 3 (.9144 m) feet horizontally
from and not less than 3 feet (.9144 m) below an exhaust vent
terminal.
3. Shall not be located directly above an exhaust terminal.
4. Shall be located 12” (304.8 mm) above the snow line in
geographical areas where snow accumulates.
5. Shall be located not less than 7 feet 2.1 m) above grade
when adjacent to a public walkway.
6. Shall not be closer than 3 feet (.9144 m) from the inside
corner of an L - shaped structure.
7. Shall be located not less than 3 feet (.9144 m) horizontally or
3 feet (.9144 m) vertically from gas line, meter, or other gas
supply entering a structure, see Figure 6.
Plan the vent system backwards from the vent hood to the heater .
1. Use the inside wall cover plate as a template to mark two
holes in the appropriate places on the wall. Cut holes
1/2” (12.7 mm) larger to facilitate easy installation of vent
hoods, see Figures 6 and 7.
BEWARE OF CONCEALED WIRING AND PIPING INSIDE WALL.
REFER TO T ABLE 3 FOR THE MAXIMUM WAL L THICKNESS
“B” FOR EACH MODEL.
2. Slide hoods through openings from outside. Fasten hoods
to exterior wall with anchors and screws supplied.
3. Install cover plate and fasten to inside wall with 4 screws
4. Attach a seal ring (Selkirk Metalbestos Model SR or equivalent)
to the vent hood collar, see Figure 7.
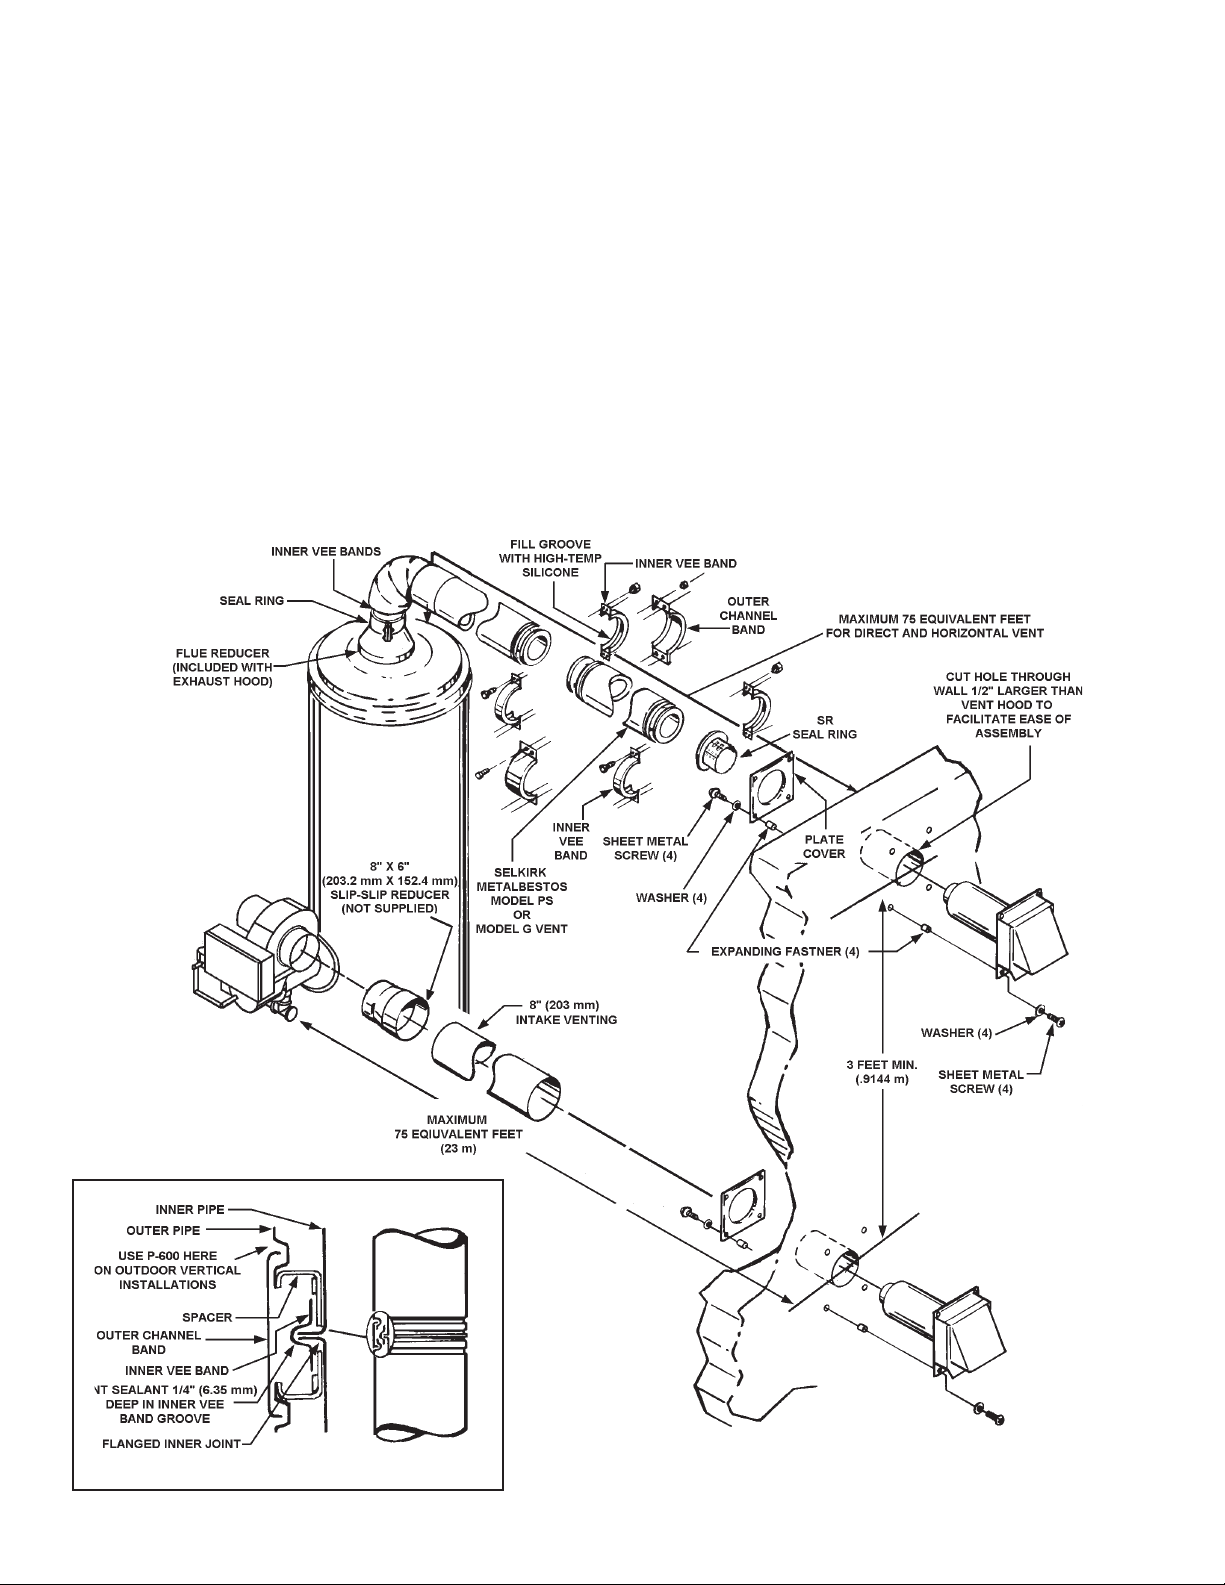
FIGURE 7B.
FIGURE 7.
10
Page 11
5. Attach a properly sized length of Selkirk Metalbestos model
PS or model G venting to the exhaust vent adapter using the
inner vee bands, see Figures 7 and 7B on page 10.
6. Fill the grooves in both inner vee bands with high-temp
silicone sealant, Dow Corning 736 or equivalent.
7. Position the inner vee bands around the inner pipe flanges
and tighten the screws securing the bands.
8. Align the outer channel band with the outer pipe grooves
and tighten the screws securing the bands.
9. Repeat steps 6-8 for each successive pipe length until the
venting reaches the heater.
10. Follow the manufacturer’s instructions for proper support
and guide spacing for horizontal runs of pipe, see Table 6.
TABLE 6.
WARNING
PRIMERS AND CEMENTS ARE EXTREMELY FLAMMABLE, AND
MUST NOT BE STORED OR USED NEAR HEA T OR OPEN FLAME.
ALLOW ADEQUA TE CURING TIME BEFORE OPERATING HEA TER.
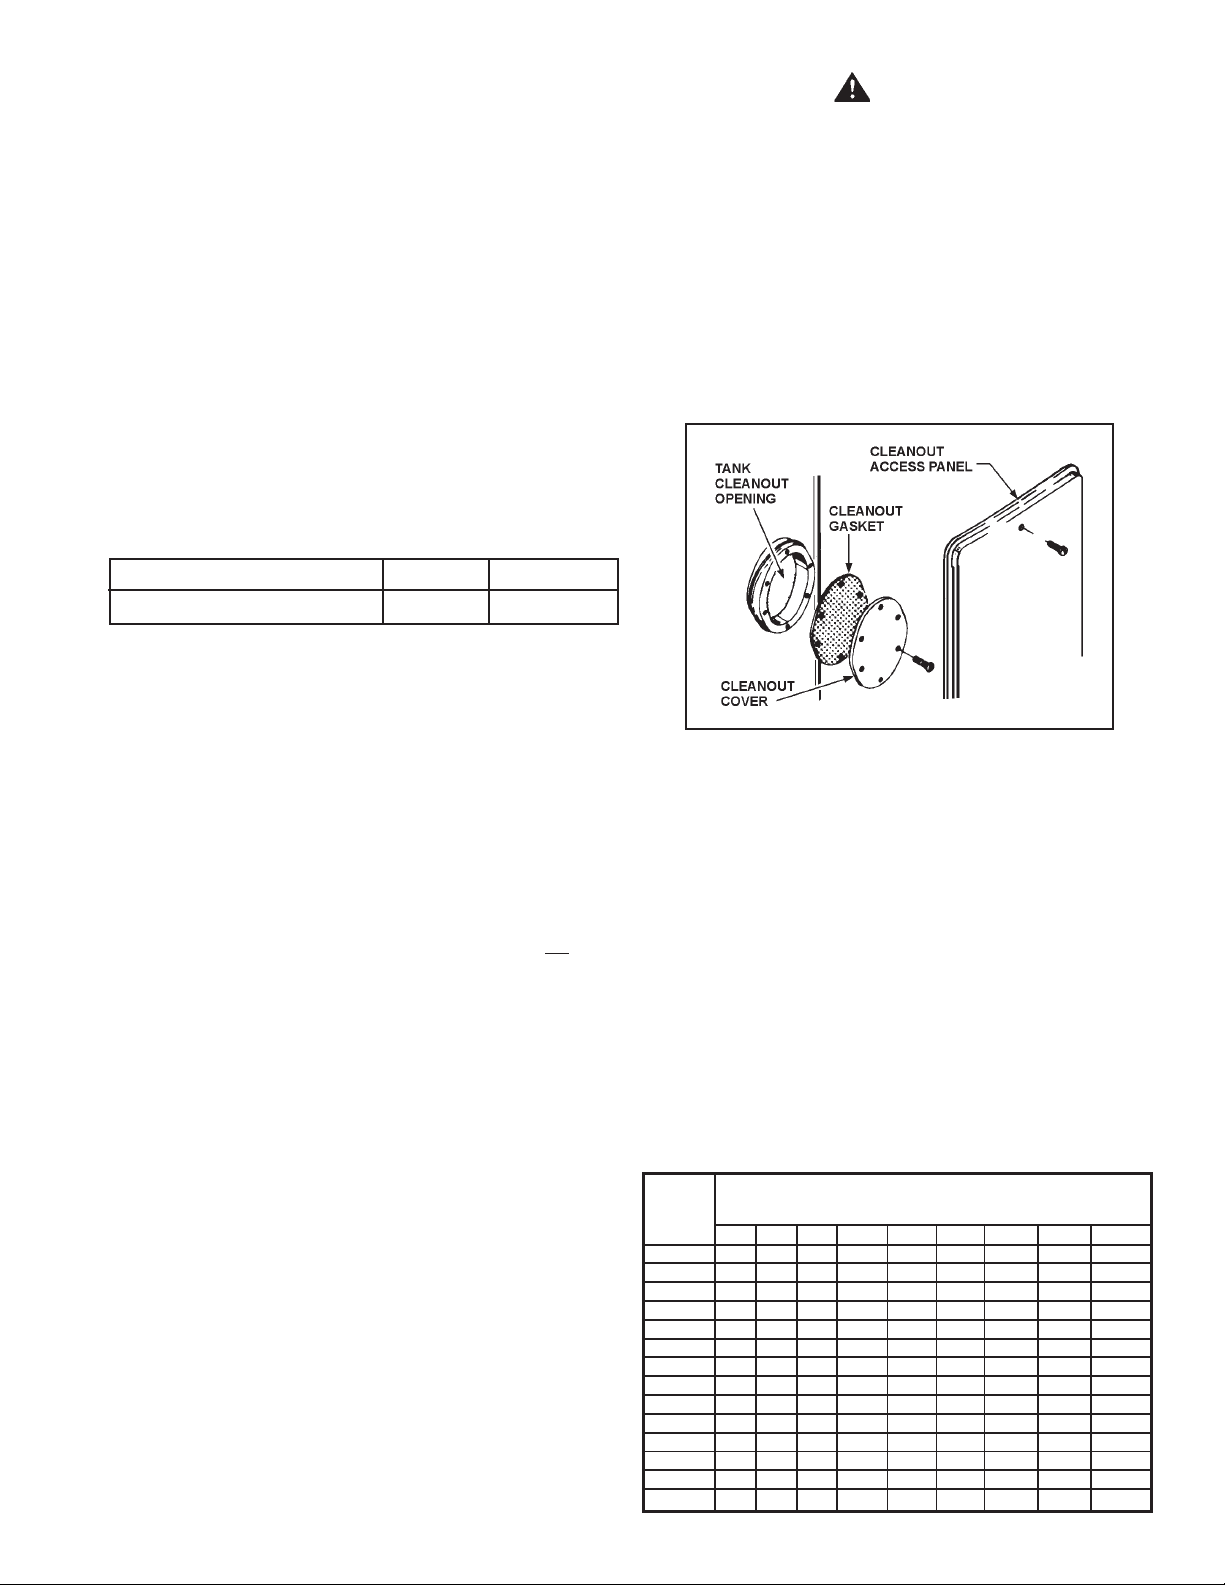
DRAIN V ALVE AND ACCESS PANELS
The heaters are equipped with a 3/4” NPT drain valves mounted
above and to the left of the burner.
An access panel is located above and to the right of the burner,
see Figure 8. This panel covers the cleanout opening in the tank
which is sealed by a gasket and cover. Another cleanout access
panel is located towards the back of the heater.
Vent Diameter S F
8” - GPV -540A, 650A & 740A 15’ 3” 7’ 6”
S = Maximum spacing between two guides or a support
and a guide in either a vertical or horizontal direction.
F = Maximum height above a guide or support for free
standing system above a roof or parapet wall.
11. Use an expansion joint between any two fixed points in the
exhaust venting system wherever the expansion may exceed
1/4”. Selkirk Metalbestos model PS and model G venting
will expand by one inch per 100°F in gas temperature per
100 feet of vent length. The expansion can be calculated by
the following formula:
Expansion, Vent length between
= x
5
Inches two fixed points, feet 100
If the expansion calculated is greater than 1/4”, an expansion
joint must be used between the two fixed points.
12. Attach the flue reducer included in the exhaust vent hood
package to the flue collar on the heater.
13. Attach the flue reducer to the vent system using a seal ring.
Attach this ring to the venting using the inner vee bands as
outlined in Steps 5-7.
14. Attach 8” air-intake connector to intake vent hood collar. It
may be necessary to use a slip-slip coupling to fit the pipe
to the intake vent hood.
15. Attach 8” air-intake connector back to the 6” burner air inlet
with 8” x 6” reducer. Prime and cement each joint to assure
gas-tight construction.
16. Seal all joints at the vent hoods with silicone sealant. Also
seal the joints at the flue collar and air inlet adapter . Joint on
the exhaust side must be sealed with high-temp silicone
sealant, Dow Corning 736 or equivalent.
FIGURE 8.
GAS PIPING
Contact your local gas service company to ensure that adequate
gas service is available and to review applicable installation
codes for your area.
Size the main gas line in accordance with Table 9 and 9A.
Minimum required gas supply pipe size is 1 1/4”. The figures
shown are for straight lengths of pipe at 0.5 in. w.c. pressure
drop, which is considered normal for low pressure systems.
Note that fittings such as elbows and tees will add to the pipe
pressure drop.
T ABLE 9
MAXIMUM CAP ACITY OF PIPE IN CUBIC FEET OF GAS PER HOUR
(Based upon a Pressure Drop of 0.5 inch Water Column
and 0.5 Specific Gravity Gas and max. gas press. of .5 psig)
LENGTH
IN Nominal Iron Pipe Sizes, Inches
FEET 1/2" 3/4" 1" 1 1/4" 1 1/2" 2" 2 1/2" 3" 4 "
10 175 360 680 1400 2100 3960 6300 11000 23000
20 120 250 485 950 1460 2750 4360 7700 15800
30 97 200 375 770 1180 2200 3520 6250 12800
40 82 170 320 660 990 1900 3000 5300 10900
50 73 151 285 580 900 1680 2650 4750 9700
60 66 138 260 530 810 1520 2400 4300 8800
70 61 125 240 490 750 1400 2250 3900 8100
80 57 118 220 460 690 1300 2050 3700 7500
90 53 110 205 430 650 1220 1950 3450 7200
100 50 103 195 400 620 1150 1850 3250 6700
125 44 93 175 360 550 1020 1650 2950 6000
150 40 84 160 325 500 950 1500 2650 5500
175 37 77 145 300 460 850 1370 2450 5000
200 35 72 135 280 430 800 1280 2280 4600
11
Page 12
T ABLE 9A
MAXIMUM CAP ACITY OF PIPE IN CUBIC FEET OF GAS PER HOUR
(Based upon a Pressure Drop of 0.5 inch Water Column
and 0.5 Specific Gravity Gas and max. gas press. of .5 psig)
LENGTH
IN Nominal Iron Pipe Sizes, Millimeters
METERS 1/2" 3/4" 1" 1 1/4" 1 1/2" 2" 2 1/2" 3" 4"
3.0 51 105 199 410 615 1160 1845 3221 6735
6.1 35 73 142 278 428 805 1277 2255 4626
9.1 28 59 110 225 346 644 1031 1830 3748
12.2 24 50 94 193 290 556 878 1552 3192
15.2 21 44 83 170 264 492 776 1391 2840
18.3 19 40 76 155 237 445 703 1259 2577
21.3 18 37 70 143 220 410 659 1142 2372
24.4 17 35 64 135 202 381 600 1083 2196
27.4 16 32 60 126 190 357 571 1010 2108
30.5 15 30 57 117 182 337 542 952 1962
38.1 13 27 51 105 161 299 483 864 1757
45.7 12 25 47 95 146 278 439 776 1610
53.3 1 1 23 42 88 135 249 401 717 1464
61.0 10 21 40 82 126 234 375 688 1347
WARNING
THE HEATER IS NOT INTENDED FOR OPERA TION A T HIGHER
THAN 14” (3.5 kPa) WA TER COLUMN (1/2 POUND PER SQUARE
INCH) SUPPL Y GAS PRESSURE. HIGHER GAS PRESSURES
REQUIRE SUPPLEMENTAL REDUCING SERVICE REGULATION.
EXPOSURE TO HIGHER GAS SUPPL Y PRESSURE MA Y CAUSE
DAMAGE TO THE GAS CONTROLS WHICH COULD RESUL T IN
FIRE OR EXPLOSION. IF OVERPRESSURE HAS OCCURRED
SUCH AS THROUGH IMPROPER TESTING OF GAS LINES OR
EMERGENCY MALFUNCTION OF THE SUPPL Y SYSTEM, THE GAS
V ALVE MUST BE CHECKED FOR SAFE OPERA TION. MAKE SURE
THAT THE OUTSIDE VENTS ON THE SUPPL Y REGULATORS AND
THE SAFETY VENT VALVES ARE PROTECTED AGAINST
BLOCKAGE. THESE ARE P ARTS OF THE GAS SUPPL Y SYSTEM,
NOT THE HEATER. VENT BLOCKAGE MA Y OCCUR DURING ICE
STORMS.
IT IS IMPORTANT T O GUARD AGAINST GAS V AL VE FOULING
FROM CONTAMINANTS IN THE GAS W A YS. SUCH FOULING MA Y
CAUSE IMPROPER OPERATION, FIRE OR EXPLOSION.
IF COPPER SUPPLY LINES ARE USED THEY MUST BE
INTERNALL Y TINNED AND CERTIFIED FOR GAS SERVICE.
BEFORE A TT ACHING THE GAS LINE, BE SURE THA T ALL GAS
PIPE IS CLEAN ON THE INSIDE.
TO TRAP ANY DIRT OR FOREIGN MA TERIAL IN THE GAS SUPPL Y
LINE, A DIRT LEG (SOMETIMES CALLED A SEDIMENT TRAP OR
DRIP LEG) MUST BE INCORPORA TED IN THE PIPING (SEE FIG .
10) THE DIRT LEG MUST BE READIL Y ACCESSIBLE AND NOT
SUBJECT TO FREEZING CONDITIONS. INSTALL IN
ACCORDANCE WITH RECOMMENDATIONS OF SER VING GAS
SUPPLIERS. REFER TO THE NATIONAL FUEL GAS CODE.
ANY SUPPLY PRESSURE TESTING EXCEEDING
1/2 PSIG. GAS SUPPLY LINE MUST BE CAPPED WHEN
DISCONNECTED FROM THE HEATER. FOR TEST
PRESSURES OF ½ PSIG OR LESS, THE APPLIANCE NEED
NOT BE DISCONNECTED, BUT MUST BE ISOLATED FROM
THE SUPPLY PRESSURE TEST BY CLOSING THE MANUAL
GAS SHUT -OFF VAL VE.
GAS PIPING AND DIRT LEG INST ALLA TION
FIGURE 9.
BEFORE PLACING THE HEA TER IN OPERATION, CHECK FOR GAS
LEAKAGE. USE SOAP AND WATER SOLUTION OR OTHER
MATERIAL ACCEPTABLE FOR THE PURPOSE IN LOCATING
GAS LEAKS. DO NOT USE MA TCHES, CANDLES, FLAME OR
OTHER SOURCES OF IGNITION FOR THIS PURPOSE.
GAS METER SIZE – CITY GASES ONLY
Be sure that the gas meter has sufficient capacity to supply the
full rated gas input of the water heater as well as the requirements
of all other gas fired equipment supplied by the meter. If the gas
meter is too small, request the gas company to install a larger
meter having adequate capacity.
GAS PRESSURE REGULATION
Main line gas pressure to the water heater should be between
8” w.c. (2 kPa) minimum (dynamic pressure or net pressure)
and 14” (3.5 kPa) maximum w .c. (st atic pressure). The inlet gas
pressure must not exceed the maximum value. A service
regulator is necessary if higher gas pressures are encountered,
see Table 10.
To prevent damage, care must be taken not to apply too much
torque when attaching gas supply to gas valve inlet.
Apply joint compounds (pipe dope) sparingly and only to the
male threads of pipe joints. Do not apply compound to the first
two threads. Use compounds resistant to the action of liquefied
petroleum gases.
DISCONNECT THE APPLIANCE AND ITS MANUAL GAS SHUTOFF V ALVE FROM THE GAS SUPPL Y PIPING SYSTEM DURING
Due to pressure drop along gas supply line, to maintain
8” w.c. (2 kPa) minimum dynamic pressure, initial gas inlet
pressure must be set at higher than 8” w.c. (2 kPa). The gas
regulator must be properly sized to prevent unstable control or
excessive pressure drop.
GAS V ALVES
Figure 10 shows the gas control valve that is supplied on these
heaters.
12
Page 13

ROBERTSHA W® 7000 DERHC GAS CONTROL V AL VE
FIGURE 10.
to the local code authority having jurisdiction. Good practice
requires that all heavy piping be supported.
THERMOMETERS (Not supplied)
Thermometers should be obtained and field installed as shown
in the installation diagrams.
Thermometers are installed in the system as a means of
detecting the temperature of the outlet water supply.
RELIEF V ALVE
This heater is equipped with an approved temperature and
pressure relief valve. ASME ratings cover pressure relief.
A.G.A ratings cover release rate with temperature actuation.
WATER LINE CONNECTIONS
Following are detailed installation diagrams for typical methods
of application for the water heaters.
The water heater may be installed by itself, or with a separate
storage tank, on both single and two-temperature systems.
When used with a separate storage tank, the circulation may be
either by gravity or by means of a circulating pump. When a
circulating pump is used it is important to note that the flow rate
should be slow so that there will be a minimum of turbulence
inside the heater.
If a water heater is installed in a closed water system, contact
the water supplier or local plumbing inspector on how to control
this situation.
CAUTION
A closed system will exist if a check valve (without bypass)
pressure reducing valve (without bypass), or a water meter
(without bypass) is installed in the cold water line between
the water heater and street main (or well).
Excessive pressure may develop causing premature tank failure
or intermittent relief valve operation.
An expansion tank or a similar device may be required in the
inlet supply line between the appliance and the meter or valve to
compensate for the thermal expansion of water under supply
pressure.
SYSTEM CONNECTIONS
The system installation must conform to these instructions and
This is not a warranty failure.
FOR SAFE OPERATION OF THE W A TER HEA TER, THE RELIEF
VAL VE(S) MUST NOT BE REMOVED OR PLUGGED.
In addition to the appliance relief valve, each remote storage
tank that may be used in conjunction with this appliance shall
also be installed with a properly sized, rated and approved
temperature (ANSI) and pressure (ASME) relief valve(s). This
relief valve shall comply with the standard for relief valves and
automatic gas shut-off devices for hot water supply systems,
ANSI Z21.22/CSA 4.4.
Your local code authority may have other specific relief valve
requirements.
WARNING
THE PURPOSE OF A RELIEF V AL VE IS TO A VOID EXCESSIVE
PRESSURE OR TEMPERATURE INTO THE STEAM RANGE, WHICH
MA Y CAUSE SCALDING A T FIXTURES, T ANK EXPLOSION, AND
SYSTEM OR HEATER DAMAGE. NO V AL VE IS TO BE PLACED
BETWEEN THE RELIEF VAL VE AND THE T ANK.
A DRAIN LINE MUST BE CONNECTED TO THE RELIEF V AL VE TO
DIRECT DISCHARGE TO A SAFE LOCATION TO A VOID SCALDING
OR WA TER DAMAGE. THIS LINE MUST NOT BE REDUCED FROM
THE SIZE OF THE VAL VE OUTLET AND MUST NOT CONT AIN
VALVES, RESTRICTIONS NOR SHOULD IT BE LOCATED IN
FREEZING AREAS. DO NOT THREAD OR CAP THE END OF THIS
LINE. RESTRICTED OR BLOCKED DISCHARGE WILL DEFECT
THE PURPOSE OF THE VAL VE AND IS UNSAFE. DISCHARGE
LINE SHALL BE INST ALLED TO ALLOW COMPLETE DRAINAGE
OF BOTH THE V ALVE AND LINE.
® Robertshaw is a registered trademark of the Robertshaw Controls
Company Corporation.
13
Page 14

INSTALLATION DIAGRAMS
ONE TEMPERA TURE - ONE HEA TER VERTICAL STORAGE T ANK
FORCED CIRCULA TION WITH OR WITHOUT BUILDING RECIRCULATION
NOTE:
WHEN USING A State T-140, 200, 350 OR 400
STORAGE TANK, USE LOWER 3/4” OPENING FOR TANK TEMP. CONTROL
ONE TEMPERA TURE - ONE HEATER HORIZONT AL STORAGE T ANK
FORCED CIRCULA TION WITH OR WITHOUT BUILDING RECIRCULATION
IF BUILDING COLD WATER SUPPLY HAS A
DANGER
BACKFLOW PREVENTER, CHECK VALVE OR
WATER METER WITH CHECK VALVE,
PROVISIONS FOR THERMAL EXPANSION OF
WATER IN THE HOT WATER SYSTEM MUST BE
PROVIDED.
NOTE: CONNECT RETURN LINE FROM HOT
WATER RECIRCULATING LOOP (IF USED) TO
COLD WATER INLET LINE.
DANGER
TEMPERATURE SETTING SHOULD NOT EXCEED SAFE
TEMPERATURE AT FIXTURES. SEE WATER TEMPERATURE
CONTROL WARNING ON PAGE 23. IF HIGHER PREHEAT
TEMPERATURES ARE NECESSARY TO OBTAIN ADEQUATE
BOOSTER OUTPUT, ADD AN ANTI-SCALD VALVE FOR HOT
WA TER SUPPLIED T O FIXTURES.
*PIPE TO OPEN DRAIN INSTALL IN ACCORDANCE WITH LOCAL CODES
14
CIRCULA TING PUMP WIRING DIAGRAM
Page 15

TWO TEMPERA TURE - ONE HEATER HIGH TEMPERA TURE
WITH OR WITHOUT BUILDING RECIRCULATION
*PIPE RELIEF VALVE TO OPEN DRAIN
NOTE: IF TEMPERED WATER IS
INSTALL IN ACCORDANCE WITH LOCAL
CODES
TEMPERATURE SETTING SHOULD NOT
EXCEED SAFE TEMPERATURE AT
FIXTURES. SEE WATER TEMPERATURE
CONTROL WARNING ON PAGE 23. IF
HIGHER PREHEAT TEMPERATURES ARE
NECESSARY TO OBTAIN ADEQUATE
BOOSTER OUTPUT, ADD AN ANTI-SCALD
VALVE FOR HOT WATER SUPPLIED TO
FIXTURES.
CAUTION: IF BUILDING COLD WATER
SUPPLY HAS A BACKFLOW PREVENTER,
CHECK VALVE OR WATER METER WITH
CHECK VALVE, PROVISIONS FOR
THERMAL EXPANSION OF WATER IN THE
HOT WATER SYSTEM MUST BE
PROVIDED.
WIRING DIAGRAM FOR TEMPERED WATER LOOP (IF USED)
CIRCULATING PUMP WIRING DIAGRAM
RECIRCULATED, RETURN LINE
SHOULD BE CONNECTED AT
POINT “A”.
DANGER
TWO TEMPERATURE - TWO HEA TERS HIGH TEMPERA TURE
WITH OR WITHOUT BUILDING RECIRCULATION
15
Page 16

TWO TEMPERA TURE - THREE HEATERS (TWO PRE-HEA TERS/ONE BOOSTER)
WITH OR WITHOUT BUILDING RECIRCULATION
CAUTION: IF BUILDING COLD WATER SUPPLY HAS A
BACKFLOW PREVENTER, CHECK VALVE OR WATER
METER WITH CHECK VALVE, PROVISIONS FOR
THERMAL EXPANSION OF WATER IN THE HOT WATER
SYSTEM MUST BE PROVIDED.
FOR MULTIPLE HEATER INSTALLATION SEE
MANIFOLD KIT SPECIFICATIONS, PAGE 18.
TWO TEMPERA TURE - TWO HEATERS (ONE PRE-HEA TER/ONE BOOSTER HEA TER)
WITH OR WITHOUT BUILDING RECIRCULA TION
TEMPERATURE SETTING SHOULD NOT EXCEED SAFE TEMPERATURE AT
DANGER
FIXTURES. SEE WATER TEMPERATURE CONTROL WARNING ON PAGE 23. IF
HIGHER PREHEAT TEMPERATURES ARE NECESSARY TO OBTAIN ADEQUATE
BOOSTER OUTPUT , ADD AN ANTI-SCALD VAL VE FOR HOT WATER SUPPLIED TO
FIXTURES.
* PIPE RELIEF V ALVE TO OPEN DRAIN.
** 140°F TO 150°F SHOULD BE MAXIMUM
WA TER TEMPERA TURE MAINTAINED IN THE
PRE-HEATERS.
120°F SHOULD BE THE MINIMUM
TEMPERA TURE OF WA TER IN THE PREHEA TERS.
CIRCULATING PUMP WIRING DIAGRAM
CONNECT CIRCULA TING LINE FROM FIXTURES, IF
USED, TO COLD WATER SUPPLY LINE OF PREHEATER.
CONNECT CIRCULATING LINE OF 180°F OR BOOSTED
WA TER, IF USED, TO INLET WA TER LINE TO BOOSTER.
INSTALL IN ACCORDANCE WITH LOCAL CODES.
16
Page 17

TWO TEMPERA TURE - ONE HEATER HIGH TEMPERA TURE
WITH RECIRCULATION OF SANITIZING LOOP
TEMPERATURE SETTING SHOULD NOT EXCEED SAFE TEMPERATURE
AT FIXTURES. SEE WATER TEMPERATURE CONTROL WARNING ON
PAGE 23. IF HIGHER PREHEAT TEMPERATURES ARE NECESSARY TO
OBTAIN ADEQUATE BOOSTER OUTPUT, ADD AN ANTI-SCALD VALVE
FOR HOT WATER SUPPLIED TO FIXTURES.
CAUTION: IF BUILDING COLD WATER SUPPLY HAS A BACKFLOW
PREVENTER, CHECK VALVE OR WATER METER WITH CHECK VALVE,
PROVISIONS FOR THERMAL EXPANSION OF WATER IN THE HOT
WATER SYSTEM MUST BE PROVIDED.
*PIPE TO OPEN DRAIN
INSTALL IN ACCORDANCE WITH LOCAL CODES
DANGER
NOTE 1: TOGGLE SWITCH CONTROLS 180° WA TER CIRCULA TION.
INSTALL ON OR CLOSE TO DISHWASHING MACHINE.
TOGGLE SWITCH MUST BE CLOSED (ON) DURING THE RINSE
OPERATION AND OPEN (OFF) WHEN DISHWASHER IS NOT
OPERATING OR WHEN ON LONG ST ANDBY.
NOTE 2: INSTALL LINE TEMPERATURE CONTROL IN AN UNINSULA TED
TEE BEYOND THE DISHWASHING MACHINE TAKEOFF IN THE
SANITIZING LOOP . CONTROL SHOULD BE SET A T 185°F .
NOTE 3: ADJUST PLUG COCK SO THE SANITIZING LOOP FLOW RA TE
DOES NOT CAUSE UNNECESSARY TURBULENCE IN THE
TANK.
NOTE 4: IF TEMPERED WATER IS RECIRCULATED, RETURN LINE
SHOULD BE CONNECTED A T POINT “’A”.
17
Page 18

MANIFOLD KITS
Precision cut type “L” all copper State manifold kits assure water
flow balance of all units. Without this balance, the full water
heating and storage potential of the system cannot be achieved.
Plus, the units with the higher water flow may have a shortened
life. Unions shown in piping diagrams are not included in the
manifold kits.
Dimensions shown are for minimum space occupied by the
water heaters assemblies.
Space for the barometric draft control assemblies, combustion
clearances and servicing must be added.
WARNING
FAILURE TO PROPERLY MANIFOLD MULTIPLE WATER
HEATERS AND PROVIDE ADEQUA TE STORAGE CAPACITY IN
ACCORDANCE WITH PROPER SIZING TECHNIQUES CAN RESULT
IN IMPROPER OPERA TION AND POSSIBLE FIRE RESUL TING IN
PROPERTY DAMAGE, PERSONAL INJURY OR DEATH.
HEATERS SHOULD BE MANIFOLDED IN PARALLEL FOR
UNIFORM HYDRONIC LOADING PER THE DIAGRAMS SHOWN
IN THIS MANUAL.
THREE UNIT MANIFOLD KIT
PART NO. 195703
TWO UNIT MANIFOLD KIT
PART NO. 195702
FOUR UNIT MANIFOLD KIT
PART NO. 195704
18
Page 19

HEATER WIRING
IF ANY OF THE ORIGINAL WIRE AS SUPPLIED WITH THE
APPLIANCE MUST BE REPLACED, IT MUST BE REPLACED
WITH 105°C WIRE OR ITS EQUIVALENT, EXCEPT IN THE
BURNER HOUSING USE 200°C WIRE.
2. Open a nearby hot water faucet to permit the air in the system
to escape.
3. Fully open the cold water inlet pipe valve allowing the heater
and piping to be filled.
4. Close the hot water faucet as water starts to flow.
The power burner is wired to the heater as shown in Figure 11
for GPG models and Figure 12 for GPV models. The model
and rating plate provided the electrical information needed
to size the complete heater branch supply.
All electrical work must be installed in accordance with the
National Electrical Code and local requirements.
When installed, the appliance must be electrically grounded in
accordance with local codes or, in the absence of local codes,
with the National Electrical Code, ANSI/NFPA 70-1987.
DO NOT ENERGIZE THE BRANCH CIRCUIT BEFORE THE HEA TER
T ANK IS FILLED WITH WA TER.
START UP
IMPORTANT
AUTHORIZED START-UP REQUIRED. Start-up by a State
Authorized GPG/GPV Start-Up Agent is required on the model
covered by this manual. Start-up and Operation of this unit by
other than an Authorized GPG/GPV Start-Up Agent will void the
warranty.
If you have not already done so, contact your local State Sales
Representative or Authorized GPG/GPV Start-Up Agent and
set-up a date for the start-up service.
The time to ask any questions you may have about your unit is
when the State Authorized GPG/GPV Start-Up Agent is there.
Please do not hesitate to ask the agent any questions which you
may have regarding the units start-up, operation or maintenance.
CAUTION
BEFORE PROCEEDING WITH THE OPERATION OF THE UNIT,
MAKE SURE HEA TER AND SYSTEM ARE FILLED WITH W A TER
AND ALL AIR IS EXPELLED FROM HEATER AND PIPING .
5. The heater is ready to be operated.
PURGING
Gas line purging is required with new piping or systems in which
air has entered.
CAUTION
PURGING SHOULD BE PERFORMED BY PERSONS EXPERIENCED
IN THIS TYPE GAS SERVICE. TO AVOID RISK OR FIRE OR
EXPLOSION, PURGE DISCHARGE MUST NOT ENTER CONFINED
AREA OR SP ACES WHERE IGNITION CAN OCCUR. THE AREA
MUST BE WELL VENTILA TED AND ALL SOURCES OF IGNITION
MUST BE INACTIVA TED OR REMOVED.
The following test equipment should be on hand: (all test
equipment must be acclimated to ambient temperature before
calibration and use.)
–CO2 indicator (Fyrite or similar) or O2 analyzer
– CO indicator (Monoxor or similar)
– Stack thermometer
– Draft Gauge or inlined manometer
– Two U-Tube manometers or calibrated 0-10” and 0-35” w.c.
pressure gauges
– Combination volt/ammeter
• Attach a gas pressure gauge or manometer to upstream
side of main gas cock and a gas pressure gauge or
manometer to the manifold pressure tapping.
• Check voltage at disconnect switch to make certain that it
matches that shown on the burner label.
NEVER OPERATE THE HEATER WITHOUT FIRST BEING
CERTAIN IT IS FILLED WITH WATER AND A TEMPERATURE
AND PRESSURE RELIEF VAL VE IS INST ALLED IN THE RELIEF
VALVE OPENING OF THE HEA TER.
FILLING
1. Close the heater drain valve by turning handle clockwise.
• Apply a few drops of No. 20 SAE non-detergent oil to motor
bearings.
• Drill max. 5/16” hole in breeching as close as possible to flue
connection on heater to install stack thermometer and
combustion analyzing equipment, see Figure 4.
• You are now ready to begin the burner start-up procedure.
19
Page 20

FIGURE 11.
20
Page 21

FIGURE 12.
21
Page 22

FOR YOUR SAFETY READ BEFORE LIGHTING
WARNING: If you do not follow these instructions exactly, a fire or
explosion may result causing property damage, personal injury
or loss of life.
BEFORE OPERATING: ENTIRE SYSTEM MUST BE FILLED WITH W A TER AND AIR PURGED FROM ALL LINES.
A. This appliance is equipped with an ignition device which
automatically lights the burner.
Do NOT try to light burner by hand.
B. BEFORE LIGHTING: Smell all around the appliance area for
gas. Be sure to smell next to the floor because some gas is
heavier than air and will settle on the floor.
WHAT TO DO IF YOU SMELL GAS:
• Do not try to light any appliance.
• Do not touch any electric switch;
do not use any phone in your building.
• Immediately call your gas supplier from a neighbor’s
phone. Follow the gas supplier’s instructions.
• If you cannot reach your gas supplier, call the fire
department.
C . Use only your hand to push in or turn the gas control knob.
Never use tools. If the knob will not push in or turn by hand,
don’t try to repair it, call a qualified service technician. Force
or attempted repair may result in a fire or explosion.
D . Do not use this appliance if any part has been under water.
Immediately call a qualified service technician to inspect the
appliance and to replace any part of the control system and
any gas control which has been under water.
E . Do not operate appliance unless unit is filled with water and
inlet lines are fully open.
FIGURE “A”
“OFF POSITION”
OPERA TING INSTRUCTIONS
1. STOP! Read the safety information above on this
label.
2. Remove appliance thermostat cover. Rotate thermostat dial
counterclockwise
3. Turn off all electric power to the appliance.
4. This appliance is equipped an ignition device which
automatically lights the burner. Do
by hand.
5. Refer to diagrams above. Turn top knob of gas control
clockwise to “OFF” position (Figure A).
6. Wait five (5) minutes to clear out any gas. If you then smell
gas,
STOP! Follow “B” in the safety information above
on this label. If you don’t smell gas, go to next
step.
7. Turn top knob of gas control counterclockwise
“ON” (Figure B).
to lowest setting.
NOT try to light the burner
to
FIGURE “B”
“ON POSITION”
8. Turn on all electric power to the appliance.
9. Set thermostat to desired setting.
10. Turn switch to “ON” position.
11. Heater will automatically begin operation. Blower motor will
run approximately 40 seconds, then pilot gas valve will
open. Upon confirming the pilot flame the main gas valve
will open and the heater will operate in heating mode.
Reference “Sequence of Operation” section of manual for
details.
12. Heater is equipped with an ignition module which locks out
after one (1) unsuccessful ignition attempt. Blower motor
will continue to run. If lockout occurs, turn burner switch to
“OFF” position for at least one minute, then turn the switch
back to “ON”. Heater will automatically begin operation.
13. Replace thermostat control cover.
14. If the appliance will not operate, follow the instructions “TO
TURN OFF GAS APPLIANCE” and call your service
technician or gas supplier.
TO TURN OFF GAS TO APPLIANCE
1. Remove thermostat control cover.
2. Set thermostat to lowest setting.
3. Turn burner switch to “OFF”.
4. Turn off all electric power to the appliance if service is to
be performed.
5. Turn top knob of gas control to the “OFF” position. Refer to
Step 5 of ‘OPERA TING INSTRUCTION” above.
6. Replace thermostat control cover.
22
Page 23

SEQUENCE OF OPERA TION
– Power on.
– Heater in standby mode.
– Thermostat calls for heat.
– Blower motor starts.
– Blower operation closes the normally open blower prover/
blocked outlet safety pressure switch.
– On proof of airflow, Honeywell S8680J flame control module
energized.
– 45 seconds prepurge cycle begins.
– Following prepurge cycle, the pilot gas valve is energized.
– At the same time, the electronic spark generator in the module
produces a high voltage spark pulse output.
– The voltage generates a spark at the ignitor that lights the
pilot.
– If the pilot does not light (or flame signal is less than 1 micro
A) within 15 seconds system locks out and must be reset by
turning burner switch “OFF” for a minimum of 1 minute. During
system lockout, blower still runs.
– When the pilot flame is established (flame is sensed by flame
rod), the main gas valve is energized.
– Main gas flows to main burner where it’s ignited by the pilot
flame. Now heater is in Heating Mode.
– During the Heating Mode:
If gas line pressure drops below the setting point, the flame
module is de-energized, gas valves closed, blower still runs.
If gas line pressure drops below the setting point then gas
line pressure increases to above the setpoint, heater starts
again from purging cycle.
If gas line pressure fluctuates around the setpoint too quick
(less than a second) burner may still run with excessive gas
valve ON/OFF cycle you must turn off the unit immediately,
re-adjust the gas line regulator and/or install a larger gas
supply line!
If the blower inlet and/or intake hood, or flue outlet/hood is/
are blocked for any reason, the safety switches will open,
which will de-energize the flame control module.
– The spark generator is off.
– The flame module monitors pilot flame current. Should the
flame failure occur during the Heating Mode, the unit will start
again from purging cycle.
– Thermostat is satisfied, switch opens.
– Power is interrupted to the flame control module and blower
motor. Gas valves are closed.
– Heater is in Standby Mode.
– Thermostat is satisfied, switch opens.
– Power is interrupted to burner, turning off blower and ignition
control module. Solenoid and main gas valves are closed.
– Insufficient blower pressure causes safety pressure switches
to open.
WA TER TEMPERA TURE CONTROL
DANGER
THIS WATER HEATER IS EQUIPPED WITH AN ADJUST ABLE
THERMOSTAT TO CONTROL WATER TEMPERATURE. HOT
WATER TEMPERATURES REQUIRED FOR AUTOMATIC
DISHWASHER AND LAUNDRY USE CAN CAUSE SCALD BURNS
RESULTING IN SERIOUS PERSONAL INJURY AND/OR DEATH.
THE TEMPERATURE A T WHICH INJURY OCCURS V ARIES WITH
THE PERSON'S AGE AND TIME OF EXPOSURE. THE SLOWER
RESPONSE TIME OF CHILDREN, AGED OR DISABLED PERSONS
INCREASES THE HAZARDS TO THEM. NEVER ALLOW SMALL
CHILDREN TO USE A HOT WATER TAP, OR T O DRA W THEIR
OWN BA TH WATER. NEVER LEAVE A CHILD OR DISABLED
PERSON UNATTENDED IN A BA THTUB OR SHOWER.
THE WA TER HEATER SHOULD BE LOCA TED IN AN AREA WHERE
THE GENERAL PUBLIC DOES NOT HAVE ACCESS TO SET
TEMPERATURES.
SETTING THE WA TER HEA TER TEMPERA TURE A T 120°F (49°C)
WILL REDUCE THE RISK OF SCALDS. Some states or provinces
require settings at specific lower temperatures.
Below you will find listed the approximate time-to-burn
relationship for normal adult skin. Short repeated heating cycles
caused by small hot water uses can cause temperatures at the
point of use to exceed the thermostat setting by up to 20F°. If you
experience this type of use, you should consider using lower
temperature settings to reduce scald hazards.
Temperature Time to Produce 2nd & 3rd
Setting Degree Burns on Adult Skin
180°F (82°C) Nearly instantaneous
170°F (77°C) Nearly instantaneous
160°F (71°C) About 1/2 second
150°F (66°C) About 1-1/2 seconds
140°F (60°C) Less than 5 seconds
130°F (54°C) About 30 seconds
120°F (49°C) More than 5 minutes
Valves for reducing point-of-use temperature by mixing cold and
hot water are available. Also available are inexpensive devices
that attach to faucets to limit hot water temperatures. Contact a
licensed plumber or the local plumbing authority.
The water temperature is controlled by a thermostat, fig. 2, which
has two sensing elements. One sensor is located near the top
of the tank and the other is near the center . The thermostat is set
in the lowest position before the heater leaves the factory.
0
The dial is adjustable and may be set for 120
(49°C) to 1800F
(82°C) water temperature, but 1200F (49°C) is the recommended
starting point. It is suggested the dial be placed on the lowest
setting which produces an acceptable hot water supply. This
will always give the most energy efficient operation. The
temperature control has a 4F° fixed differential.
ADJUSTMENT PROCEDURE (Initial Start-Up)
A minimum dynamic gas supply pressure of 8” w.c. for natural
gas is required before making any adjustment to the gas control
pressure regulator. Attempts to adjust the regulator during
periods of low gas supply pressure could result in overfiring of
the heater when the gas supply pressure returns to normal.
23
Page 24

1. Check gas line pressure with a manometer.
Set initial gas line pressure at 9-10” w.c. before turning the
heater “ON”.
it’s a high elevation application and/or a direct vent (long air
intake vent) application.
1. Fire Rate Adjustment (including direct vent installation).
Read gas line pressure and gas manifold pressure when
the heater main gas is “ON”.
Adjust gas line regulator setting if the gas line pressure drops
below 8” w.c. when heater main gas is “ON”.
Check heater gas manifold pressure (see Table 10) using a
manometer connected to the manifold pressure tap on the
Robertshaw gas control valve, see Figure 10.
Important Note: Use gas manifold pressure as initial setup
only. The final air and gas settings should be based on fire rate
and flue gas 02/C02 reading, see Table 10 for normal 02/C0
reading.
WARNING
Excessive gas line pressure drop and/or burner manifold
pressure too low may cause burner start/operate with
excessive noise!
2. Cycle the burner “ON” and “OFF” several times to check its
operation. Make sure the gas line pressure is below
14” w.c. when burner is “OFF”. If gas line pressure exceeds
14” w.c. when the burner is off, the gas supply line size must
be increased to correct this problem (see Table 9 for gas
pipe size).
3. Check the operation of the limiting and operating controls.
a. Make sure the gas supply line pressure reads
8” w.c. (2 kPa) or higher when the heater is running.
b. Remove the pressure regulator cover screw
(Figure 10) and adjust the pressure by tuning the
adjustment screw w/a small screwdriver clockwise to
increase gas pressure into the burner and fire rate.
Counterclockwise to decrease gas pressure and input
rate.
c. Clock gas meter, repeat above Step (b) to achieve the
specific input rate.
2
d. Measure flue gas O
acceptable O
If the O
then proceed to Step (f).
/CO2 range.
2
or CO2 reading is within the acceptable range,
2
and/or CO2 (see Table 10) for
2
If the O2 or CO2 reading is out of range, adjust air
damper is required.
e. Repeat Steps (b), (c), (d) if air damper is adjusted.
f. Cycle heater ON/OFF.
g. Replace the gas regulator cover, pressure tap and
tighten the damper center bolt.
4. Check the vent system seams and joints and ensure that
there is no discharge of flue products into the room. For
standard vertical vent systems, check the barometric damper
control to make sure it operates freely and there is no
discharge of flue products into the room.
5. Check the input rate by clocking the gas meter.
ADJUSTMENT PROCEDURE FOR FIRE-RATE,
LOW NOX AND HIGH ELEVATION (Fine-Tune)
An acceptable input rate is within 2% of the rated input for the
model. Should it be necessary to adjust the gas pressure to the
burner and/or air damper of the blower to obtain the full input
rate, these steps should be followed:
WARNING
Never set burner combustion too lean (causing noisy
operation) or too rich (causing combustion chamber premature
failure) see T able 10 for proper settings.
WARNING
Never set air damper outside of its adjustment range of the
rated fire rate unless authorized by a State Service Center.
Important Note: Final gas and air settings should be based on
flue gas CO
manifold pressure will increase fire rate and flue gas CO2 reading.
Increase air damper setting will decrease fire rate and decrease
flue gas CO2 reading. Adjustable air damper is preset for the
rated fire-rate prior to delivery, should not be re-adjusted unless
or O2 reading (see Table 10). Increase burner
2
2. Adjustment for Low NOx Emission Application.
The water heater is preset at factory for Low Nox emission
combustion. Due to the installation variations, fine-tune
adjustments may be required. To lower NOx emission level
(30PPM corrected at 3% O
air damper setting may need to be slightly increased. To
or lower is required by SCAQMD),
2
increase air damper setting, loosen the center nut of the inlet
air damper, rotate the damper clockwise slightly, then tighten
the center nut. After re-set the air damper, cycle heater
ON/OFF and check fire-rate and flue gas CO
2/O2
reading.
3. Adjustment for High Elevation Application
Installation above 2000 feet sea level require new air damper
settings. All the final settings should be based on flue gas
reading, see Table 10. To increase air damper setting,
CO
2/O2
loosen the center bolt of the inlet air damper, rot ate the damper
clockwise slightly, then tighten the center bolt. After re-setting
the air damper, cycle heater ON/OFF and check fire-rate and
flue gas CO
2/O2
reading.
WARNING
UNDER NO CIRCUMST ANCES SHOULD THE INPUT RATE EXCEED
THE INPUT RATE SHOWN IN THE HEATER RATING PLATE.
OVERFIRING COULD RESUL T IN DAMAGE OR SOOTING OF THE
HEA TER.
SHOULD OVERHEA TING OCCUR OR THE GAS SUPPLY FAIL
TO SHUT OFF , TURN OFF THE MANUAL GAS CONTROL V AL VE
TO THE APPLIANCE.
24
Page 25

PREMIX LOW NOx BURNER - EXPLODED VIEW FOR GPG MODELS
FIGURE 13.
25
Page 26

PREMIX LOW NOx BURNER - EXPLODED VIEW FOR GPV MODELS
FIGURE 14.
26
Page 27

GENERAL INFORMATION
POWER BURNER
The initial start-up procedure of the gas power burner is provided
on page 18 thru 21. Refer to Figure 12, burner exploded view for
burner components location.
The sequence of operation of the power burner is provided on
page 15. For detailed Power Burner Operation, Maintenance
and Troubleshooting refer to the separate Power Burner Manual
provided with this water heater.
to the following table. A periodic inspection of the venting system
should be made. Where used the water heating system
circulating pump should be oiled.
MAINTENANCE SCHEDULE
Following are the instructions for performing some of the
recommended maintenance. Power burner inspection and
adjustment should be performed by a competent technician.
MAINTENANCE SCHEDULE
Component Operation Interval Required
THERMOSTAT
It is suggested the thermostat be turned to the lowest setting,
which satisfies the hot water requirements of the system. This
helps minimize scale formation in the heater.
HIGH LIMIT
The high limit (not adjustable) is factory set to cutout at 205°F
(96°C). The high limit switch must be manually reset by
depressing the reset button on front of the control when water
temperature drops to about 180°F (82°C).
GAS AND AIR SUPPL Y SPECIFICA TIONS TABLE 10
Model GPG/GPV-540A GPG/GPV-650A GPG/GPV-750A
Min. Dynamic Gas
Supply Line 8” w.c. (2 kPa) When heater is ON
Pressure
Max. Static Gas
Supply Line 14” w.c. (3.5 kPa) When heater is OFF
Pressure
Gas Manifold
Pressure
Gas Orifice Size 1/2” 11/16” N/A
Air Inlet Damper
Dial Setting
Combustion
Emissions
Range
4.7”w.c. (1.1 kPa)
(Ref.)*
3**
4.7”w.c. 1.1 kPa)
(Ref.)*
4.7”w.c. (1.1 kPa)
4.5** 5.6**
Flue Gas O2: 5 - 6.5%**
(or CO2 reading 8 - 9%)
(Ref.)*
Sediment
Tank Removal Monthly Flushing
Lime Scale UN-LIME®
Removal Semi-Annually Delimer
Relief Valve Inspect Semi-Annually
SAE No. 20
Circulating Pump(1) Oiling Four Months non-detergent
motor oil
Clean Inlet
Power Burner Blower Screen and As Required Soft Brush
Blower Wheel
Power Burner and
Ignition Device(2) Inspection Semi-Annually
Make sure gate
Barometric Damper Inspect Every 3 swings freely,
Months no spillage
into room
Flue Cleaning As Required Wire Brush
Every 3 Joints should
Vent System Inspect Months be sealed
* Note: Flue gas excess O2 below 3% may cause combustion
chamber premature failure; flue gas excess O2 above 7%
may cause rough operation or incomplete combustion. Final
manifold pressure settings should be based on flue O2/CO
reading!
** Note: Air inlet damper setting needs to be adjusted at field for
direct vent and/or high elevation installations.
MAINTENANCE
GENERAL
KEEP APPLIANCE AREA CLEAR AND FREE FROM COMBUSTIBLE
MATERIALS, GASOLINE AND OTHER FLAMMABLE VAPORS AND
LIQUIDS. (SEE WARNING P AGE 6).
Water heater maintenance includes periodic tank flushing and
cleaning, and removal of lime scale. The power burner should
be inspected and adjusted to maintain proper combustion. Refer
(1 ) If furnished with oiling provisions.
(2 ) If flange gasket is damaged, it must be replaced.
2
ELECTRICAL SERVICING
CAUTION
LABEL ALL WIRES PRIOR TO DISCONNECTION WHEN
SERVICING CONTROLS. WIRING ERRORS CAN CAUSE
IMPROPER AND DANGEROUS OPERA TION.
VERIFY PROPER OPERATION AFTER SERVICING .
FLUSHING
1. Turn off the heater electrical disconnect switch.
2. Open the drain valve and allow water to flow until it runs clean.
3. Close the drain valve when finished flushing.
4. Turn on the heater electrical disconnect switch.
27
Page 28

DRAINING
The heater must be drained if it is to be shut down and exposed
to freezing temperatures. Maintenance and service procedures
may also require draining the heater.
State UN•LIME
grade acid formulated specifically for lime scale removal from
all types of water using equipment. Available in 1 gallon (part
no. 4763) and 5 gallon (part no. 4813) sizes. Hydrochloric base
acids are not recommended for use on glass-lined tanks.
®
Delimer is an easy to handle patented food
1. Turn off the heater electrical disconnect switch.
2. Close the cold water inlet valve to heater.
3. Open a nearby hot water faucet to vent the system.
4. Open the heater drain valve.
5. If the heater is being drained for an extended shutdown, it is
suggested the drain valve be left open this period.
• Follow FILLING instructions when restoring hot water service.
SEDIMENT REMOVAL
Waterborne impurities consist of the particles of soil and sand
which settle out and form a layer of sediment on the bottom of
the tank.
For convenience, sediment removal and lime scale removal
should be performed at the same time.
LIME SCALE REMOVAL
The amount of calcium carbonate (lime) released from water is
in direct proportion to water temperature and usage. The higher
the water temperature or water usage, the more lime deposits
are dropped out of the water. This is the lime scale which forms
in pipes, heaters and on cooking utensils.
State Form No. 4800 entitled “Why, When and How”, describes
tank cleaning methods and materials. UN•LIME
may be obtained through your State dealer or distributor.
The cleanout opening is shown in Figure 9.
To clean heater through cleanout opening, proceed as follows:
1. Turn off water inlet valve, the heater electrical disconnect
switch and open drain valve.
2. Remove outer cover plate from lower side of heater jacket.
3. Remove cover from cleanout opening.
4. Remove lime, scale or sediment using care not to damage
the glass lining.
5. Inspect cleanout plate gasket; if new gasket is required,
replace with State part no. 99038.
6. Install cleanout plate. Be sure to draw plate up tight by
tightening screws securely.
7. Close drain valve, open water inlet line and turn on the burner
electrical disconnect switch.
8. Check for water leakage.
9. Replace outer jacket cover plate.
®
and the booklet
Lime accumulation not only reduces the life of the equipment
but also reduces efficiency of the heater and increases fuel
consumption.
The usage of water softening equipment greatly reduces the
hardness of the water. However, this equipment does not always
remove all of the hardness (lime). For this reason it is
recommended that a regular schedule for deliming be
maintained.
The depth of lime build-up should be measured periodically.
Heaters will have about 3” (76 mm) of lime build-up when the
level of lime has reached the bottom of the cleanout opening or
about 1” of lime build-up if it has reached the drain valve opening.
A schedule for deliming should be set up; based on the amount
of time it would take for a 1” (25.4 mm) build-up of lime.
Example 1 – Initial inspection shows 1/2” (12.7 mm) of lime
accumulation. Therefore, the heater can be
delimed once a year.
Example 2 – Initial inspection shows 2” (50.8 mm) of lime
accumulation. Therefore, the heater should be
delimed every 3 months.
Sediment and lime scale removal may be accomplished through
the cleanout opening furnished on the heater, see FEATURES.
The heater must be drained. See DRAINING, before removing
cleanout cover on tank.
RELIEF VAL VE
At least twice a year, the temperature and pressure relief valve
should be checked to ensure that it is in operating condition. To
check the relief valve, lift the lever at the end of the valve several
times. The valve should seat properly and operate freely.
CAUTION
BEFORE MANUALL Y OPERA TING A RELIEF V AL VE, MAKE SURE
THAT A DRAIN LINE HAS BEEN A TT ACHED TO THE V AL VE TO
DIRECT THE DISCHARGE TO AN OPEN DRAIN. FAILURE TO TAKE
THIS PRECAUTION COULD MEAN CONT ACT WITH EXTREMELY
HOT WATER, PASSING OUT OF THE VALVE, DURING THIS
CHECKING OPERA TION.
If the temperature and pressure relief valve on the heater
discharges periodically or continuously, it may be due to thermal
expansion of water in a closed water supply system, or , it may be
due to faulty relief valve.
Thermal expansion is the normal response of water when it is
heated. In a closed system, thermal expansion will cause the
system pressure to build until the relief valve actuation pressure
is equaled. Then, the relief valve will open, allowing some water
to escape, slightly lowering the pressure.
Contact your water supplier or local plumbing inspector on how
to control this situation.
To dissolve and remove the more stubborn mineral deposits,
State UN•LIME® Professional delimer should be used.
Two common corrections are listed in the CHECKLIST AND
SERVICE INFORMATION that appears later in this manual.
28
Page 29

ABOVE ALL, DO NOT PLUG THE TEMPERA TURE AND PRESSURE
RELIEF V ALVE. THIS IS NOT A SOLUTION AND CAN CREATE A
HAZARDOUS SITUATION.
CIRCULATING PUMP
The water heating system may include a circulating pump. Where
used, it should be lubricated as directed by the circulator
manufacturer.
LOW EMISSION POWER BURNER
KEEP THE AREA AROUND THE BURNER CLEAR AND FREE OF
COMBUSTIBLE MA TERIALS, GASOLINE OR OTHER FLAMMABLE
LIQUIDS OR VAPORS. DO NOT OBSTRUCT BURNER AIR
OPENINGS OR VENTILA TION GRILLES FOR COMBUSTION AIR.
REMOVE LINT ACCUMULA TION FROM AIR INT AKE GRILL.
The main burner flame should be visually checked once a year
for proper operation. This can be observed through the “peep
sight” port on the burner mounting plate. Burner flame should
be kept blue.
At least annually, contact a qualified service agency for burner
cleaning and other routine maintenance. For burner related
Maintenance Schedule, Troubleshooting, Flame Rod, Ignitor,
Thermal Cut-Off Switch Replacement Procedures, use burner
Operation & Maintenance Manual provided with this heater.
CLEANING FLUES
The following describes how to gain access to the tank flues for
cleaning if necessary.
1. Turn off the heater electrical disconnect switch.
2. Remove the vent connector from on top of the heater.
FIGURE 15
T o test gate for operation, gently tap gate and observe. DO NOT
OIL.
Adjust the number of counter-weight washers on the control to
maintain a negative draft of 0.02” to 0.04” w .c. in the venting. See
VERTICAL VENTING, page 8.
NOTE THAT THIS CONTROL WILL ONLY BE PRESENT IN A
VERTICAL VENT INST ALLATION.
VENT SYSTEM
Examine the vent system every 3 months. Points of inspection
are as follows:
1. Check for obstructions and/or deterioration of vent piping and
vent hood. Replace immediately where needed.
2. Vent pipe and vent hood screen should be cleaned of foreign
material and soot. The screen is located inside the vent
hood outlet and is accessible from the outside of the hood.
Do not reach inside the vent when the heater is in operation.
3. Remove the jacket top from the heater by taking out the screws
and lifting it off.
4. Remove the insulation from the top of the heater.
5. Remove the inner cover by taking out the pipe collar around
the water inlet and outlet nipple.
6. The flue baffles may now be removed by lifting out.
7. Using a wire brush, a nylon brush must not be used, remove
soot from flue passages in heater tank.
CAUTION
While cleaning tank flue passages, care must be taken that
brush does not come in contact with neither the combustion
chamber lining nor the baffle or funnel which are an integral
part of the combustion chamber, as damage could occur . The
flue passages are 48-1/2” (1,232 mm) long x 3” (76.2 mm)
diameter.
8. Upon completion of cleaning, return heater to operation by
following this procedure in reverse.
BAROMETRIC DRAFT CONTROL
- FOR GPG MODELS
The heater is equipped with a double acting barometric draft
control as shown in Figure 15. The damper gate must pivot
freely in the ring guides.
3. Check all vent system connections for leakage and re-seal
as required using Hi Temp Silicone sealer or equivalent.
CHECKLIST AND SERVICE
INFORMATION
IMPORTANT
The installer may be able to observe and correct certain problems
which might arise when the unit is put into operation or when it is
re-fired after a prolonged shutdown. HOWEVER, it is
recommended that only qualified servicemen, using appropriate
test equipment, be allowed to service the heater.
BE SURE TO TURN OFF THE ELECTRICITY WHENEVER
POSSIBLE OR APPROPRIA TE WHILE CHECKING EQUIPMENT .
BURNER OPERATIONAL PROBLEMS
1. Refer to TROUBLESHOOTING for comprehensive service
information provided with both heater and burner manuals.
NOT ENOUGH OR NO HOT WA TER
1. Be certain the electrical disconnect switch serving the water
heater is in the ON position.
29
Page 30

2. Check the fuses.
• Excessive water pressure
• The electrical disconnect switch usually contains fuses.
3. The capacity of the heater may have been exceeded by a
large demand for hot water.
4. Colder incoming water temperature will lengthen the time
required to heat water to the desired temperature.
• If the heater was installed when incoming water
temperature was warm, colder water creates the effect
of less hot water.
5. Look for hot water wastage and leaking or open hot water
faucets.
6. Sediment or lime scale may be affecting water heater
operation. Refer to MAINTENANCE for details.
7. Heater or burner may be dirty.
• Clean all heater flue pipes and flue connector, see
MAINTENANCE.
• Have burner properly cleaned and readjusted.
8. Burner may not be firing at proper rate.
• Check gas pressure
9. Burner fan wheel may be dirty.
• Clean fan wheel with a soft brush.
• Excessive water temperature
• Faulty relief valve
Excessive water pressure is the most common cause of relief
valve leakage. It is often caused by a “closed system”. If a check
valve, back flow preventer, or pressure-reducing valve is in the
inlet system it will not permit the expanded hot water volume to
equalize pressure with the main. The relief valve must release
this water or the water heater or plumbing system will be
damaged. Refer to MAINTENANCE – RELIEF V AL VES.
When such a condition is encountered, local codes or inspection
agency should be consulted to determine which system is
acceptable in your area. These may consist of:
• Installation of a second relief valve with lower setting than the
primary relief valve.
• An expansion tank of suitable size and pressure rating and
provision to avoid water logging.
HOT W ATER ODOR
On occasion, hot water may develop a strong odor . If this occurs,
drain the heater completely, flush thoroughly, and refill. If the
problem persists, chlorinating of the heater and replacement of
the factory installed magnesium anodes with aluminum anodes
may correct the condition.
Occasionally water softener companies recommend removal of
heater anodes for odor reasons.
10. Reset button on high limit control (Figure 1) has operated.
Press reset button.
WA TER IS TOO HOT
1. Refer to WA TER TEMPERATURE CONTROL.
WA TER HEA TER MAKES SOUNDS
1. Sediment or lime scale accumulation cause rumbling and
pounding noises when the heater is operating.
• The sounds are normal, however, the tank bottom should
be cleaned. Refer to MAINTENANCE for details.
2. Some of the electrical components of the water heater make
sounds which are normal.
• Contacts click or snap as the heater starts and stops.
• Transformers often hum.
WA TER LEAKAGE IS SUSPECTED
1. Check to see if the water heater drain valve is tightly closed.
Also check the cleanout opening for leakage.
2. The apparent leakage may be condensation that forms on
cool surfaces of the heater and piping.
3. If the outlet of the relief valve is leaking it may represent:
CAUTION
Unauthorized removal of the anode(s) will void the warranty .
For further information contact your dealer .
TROUBLESHOOTING
WARNING
JUMPING OUT COMPONENTS AND/OR CIRCUITS DURING
TROUBLESHOOTING CAN CAUSE SERIOUS PROBLEMS WITH
THE POWER BURNER’S OPERATING SEQUENCE AND IGNITION
SAFETY . IF YOU DO NOT HA VE THE PROPER TEST EQUIPMENT ,
I.E. A VOLT-OHM METER AND A MICRO-AMMETER DO NOT
A TTEMPT TO TROUBLESHOOT OR REP AIR STA TE EQUIPMENT .
AL TERING THE IGNITION MODULE AND/OR CONTROL BOX
WIRING IN ANY W A Y COULD RESULT IN INTERNAL DAMAGE TO
THE MODULE CIRCUITS, POSSIBL Y ALTERING THE IGNITION
SEQUENCE ALLOWING GAS V AL VES TO OPEN BEFORE THE
HOT SURFACE IGNITER IS UP T O IGNITION TEMPERATURE.
NOTE: ANY BYP ASS OR AL TERA TION OF THE UNITS SAFETIES
WILL RESUL T IN VOIDING THE APPLIANCE W ARRANTY .
Before performing any troubleshooting familiarize yourself with
the particular appliance. State power burners are supplied with
Honeywell® ignition control systems and Robertshaw® gas
control valves, see Figures 10 and 11.
Refer to the SEQUENCE OF OPERA TION and burner exploded
view, see Figure 12 and the wiring diagram located on page 20,
®Honeywell is a registered trademark of Honeywell International Inc.
30
Page 31

and the troubleshooting section of burner manual before
continuing.
Make sure the appliance is connected to a 120 V ac power supply ,
burner switch is “ON” and manual gas valve is in the “ON”
position, and all electrical connections are secure before
continuing to troubleshoot this appliance.
• Check for the continuity between the flame rod and
sensor connection at Honeywell flame control module
by the ohm meter.
• Check for ignitor wire connections and spark leakage
(call AOS service center for steps of spark leakage
checking).
MOTOR WILL NOT RUN
1. Confirm 120 Vac. Also, to verify correct polarity, check for
120 Vac between black wire and G.
If there is no voltage, check for a loose connection or open
switch at the high limit or thermostat.
2. If there is 120 volts between black wire and white wire, check
for loose connections or a locked rotor. If the rotor cannot be
freed the motor and blower assembly must be replaced.
BURNER LOCKOUT ONCE IN A WHILE
Under this condition, the burner operates properly for days, and
burner lockout occurs once in a while. The root causes for the
burner occasional lockout include: (1) Gas inlet pressure too
low; (2) Condensation over the ignitor area; (3) the pilot flame is
too weak to light the main flame reliably; (4) the pilot air/gas ratio
is out of range causing pilot flame to be unreliable.
1. Turn burner switch to “OFF” position and turn off the main
gas valve (Robertshaw
®
).
2. Install manometers for gas inlet pressure, manifold pressure,
and pilot gas pressure, see Figure 12 for the pressure ports
location).
3. Check for the gas inlet pressure, reset the service regulator
(if required) to get 9” w.c. (2.2 kPa) - 10” w.c. (2.4 kPa) inlet
pressure while the burner is in the “OFF” position.
• Following burner manual instructions to re-install the
pilot assembly.
6. Turn on the Robertshaw gas valve, turn the burner switch to
“ON” position. Cycle the heater ON/OFF several times to
ensure the problem is solved.
MOTOR RUNS CONTINUOUSL Y , PREPURGE TIME ELAPSES BUT
MAIN FLAME NOT ESTABLISHED (BURNER LIGHT NEVER ON)
1. When the heater is first installed, gas line must be purged
properly prior to start-up. This heater is equipped with a flame
control module that only allows one “trial for ignition” for
15 seconds and locks out if no flame signal is detected. For
initial start-up, two or more resets may be required to ensure
that all the air has been purged from the gas pilot line. To
reset the heater, turn the burner power switch to “OFF” position
for at least one minute, then turn it back “ON”.
2. Check for gas supply line manual valves in “ON” position,
and line pressure. Make sure the pilot manual gas cock
(nearby the main gas valve) is fully open.
3. After the 45-seconds prepurge cycle, the pilot gas valve
(mounted on the panel) “click” sound should be heard. If you
hear the pilot gas energized, proceed to Step 5.
4. Check 24 Vac control circuit in the following systematic
approach:
4. Turn the burner “ON”,
• Take blower pressure at the pressure port during the
purge cycle, see Figure 12 for location.
• Take the pilot gas pressure at the same pressure port
during the ignition period (following 45 seconds purge
cycle).
• The pilot gas pressure should be 0.6” - 0.9” w.c. higher
than blower pressure, if not, adjust the pilot gas regulator
(during the ignition cycle, see Figure 12.
• If burner lights on during the ignition cycle, cycle the
unit on/off several times to ensure pilot system is
reliable. Turn off the burner, then follow Step 6.
5. Turn the burner “OFF”, follow burner manual instructions to
remove the pilot assembly (also refer to Figure 12 in this
manual) and procedures to check pilot assembly. Items to
check for the pilot system include:
• Check for condensation over ignitor area.
• Check for the ignitor gap (1/8” - 3/16”).
• Check for the thermal cutoff continuity by ohm meter,
replace it if the thermal cutoff is open.
• Check for the low gas pressure switch by ohm meter
(while pilot gas pressure is 7” w.c. [1.7 kPa] or higher).
• Check for 24V between “24V” and “GND” of Honeywell Flame
Control Module, which is located inside the burner control
panel. If voltage is OK, proceed to Step 5.
• If there’s no voltage, check for 24V between the air switch
“COM” terminal and GND (the air switch is mounted on the
control panel, the switch cover needs to be removed to access
the wiring terminal “COM” and “NO”). If there’s no 24 V, check
for a loose connection between the 24V transformer and air
switch, or a defective transformer.
• If there’s 24V at “COM” terminal, check for 24V between the
air switch terminal “NO” (normally open) and GND. If there’s
no 24V, the air switch pressure may be set too high or a
defective air switch or loose connections of pressure sensing
tubings. To lower the air switch setting, make sure the blower
is running and blower wheel and air inlet are free from dirt,
counterclockwise turn the switch setting-screw until the switch
is closed. Call the State Technical Center before you reset
the switch.
• If there’s 24V at “NO” terminal of the air switch, check for 24V
at the air intake pressure switch connectors, (this switch is
only supplied for direct vent systems). If there’s no 24V at the
switch connectors, check for loose connections, air intake
blockage, or a defective air switch.
• Do not proceed to Step 5 unless 24V is detected at “24V”
terminal of the Honeywell Module.
31
Page 32

5. As soon as the pilot gas valve is energized, check for the
burner pilot flame through the burner peek-hole. If the pilot
flame is established inside the burner, then proceed to
Step 6.
• Turn the burner switch to “OFF” position for at least one minute
to reset the heater.
• Check for 24V between “PV” terminal and “MV/PV” terminal
after 45 seconds prepurge cycle (this 24V may only last
15 seconds starting after 45S prepurge). If there’s no 24V at
the “PV” terminal ever, and there’s 24V at “24V” terminal, the
Honeywell flame control module needs to be replaced.
• If 24V is detected for a period of 15 seconds, check for the
changes of gas supply line pressure when the pilot gas valve
is energized. If no visible pressure change during the pilot
ignition period, check for loose connection of the pilot valve or
a defective pilot gas valve.
• Adjust the pilot gas regulator setting during the pilot ignition
period (15 seconds). Do not set too much or too little pilot
gas. This adjustment should only be performed during the
15 seconds ignition period. A clockwise or counter-clockwise
0.5 to 1 turn should be able to correct the problem. Refer to
burner manual for detailed pilot gas setting procedure.
2. Check for 24V at the Robertshaw gas valve when the main
gas light is on. If there’s no 24V at the valve, check loose wire
connection.
3. Check for gas supply line pressure. The gas line pressure
before the valve should be maintained at minimum
8” w.c. when main flame is “ON”. If the gas line pressure
drops below 8” w.c. (2 kPa), the service regulator pressure
setting must be increased to keep 8” w.c. (2 kPa) minimum
gas pressure. After adjusting the gas regulator setting, turn
off the heater, make sure the gas line pressure does not
exceed 14” w.c. (3.5 kPa) if it does exceed 14” w.c. (3.5 kPa)
static pressure, the gas supply line size must be increased
accordingly to avoid gas line pressure exceeding 14” w.c.
(3.5 kPa)
4. Check the gas valve manifold pressure (refer to Table 10),
see ADJUSTMENT PROCEDURE to adjust the manifold
pressure.
5. Check for defective gas valve for failing to open or shut off.
6. Verify that the air supply is adequate. The air inlet screen or
blower wheel may be restricted.
7. Check the installation for proper ventilation, see AIR
REQUIREMENTS.
• If still no pilot flame inside the burner, check for the spark
ignitor wiring, ignitor tip location and visually check the spark
(burner pilot assembly needs to be taken out for the visual
check). Refer to the burner manual for detailed spark ignition
troubleshooting procedures.
6. Pilot flame established but not detected by the flame control
module. Use Micro Amp meter to measure flame signal during
the pilot ignition period. Refer to burner manual for testing
procedures.
• If pilot flame is confirmed visually through the burner peek
hole, and the flame signal is zero, the thermal-cutoff safety
switch (mounted nearby the flame rod, inside the burner mixing
chamber) may be broken or check for loose wire connections
or low gas switch (mounted inside control panel) may be
broken. If the thermal cutoff switch or low gas switch is broken
(by checking the switch continuity), the switches must be
replaced before the heater can operate again.
• If it’s confirmed that the thermal cutoff switch is damaged
(open), call the State Technical Center to analyze the root
cause (too lean combustion) and proper gas/air ratio
adjustment. Flashback will cause the thermal cutoff switch
broken (open).
• If the flame signal is not zero but below 1µA, relocate flame
rod or replace flame rod will be required. Refer to burner
manual for detailed procedure of replacing flame rod.
MOTOR RUNS CONTINUOUSL Y , BURNER LIGHTS ON
MOMENT ARILY THEN LOCKS OUT OR EXCESSIVE
ON/OFF CYCLE
Under this condition, the burner will start the purge cycle again,
then pilot ignition and main flame cycle. If main flame cannot be
sustained:
1. Make sure main manual gas valve (right after the Robertshaw
gas valve) is fully open;
8. Verify the air switch setting is not too high.
9. Check the venting system for the correct sizing, excessive or
insufficient draft, and proper operation of the barometric draft
control, see VENTING.
NOISY BURNER OPERA TION
1. Check for flue gas excess O
10). If combustion is too lean (flue gas O2 reads more than
or CO2 reading (refer to Table
2
7.5%), the combustion flame front may not be stable, which
will cause noisy operation. See ADJUSTMENT.
2. Check the venting system for the correct sizing, excess or
insufficient draft, and proper operation of the barometric draft
control, see VENTING.
3. If the burner operation is still noisy, then remove the burner,
examine the burner diffuser, blast-tube tip, anti-flashback
corrugated tube, center mixing, refer to the burner manual for
details.
GAS FAILS T O SHUT OFF
Check for defective gas valve or thermostat. If operation is
incorrect, replace.
REPLACEMENT P ARTS
Replacement parts may be ordered through State
dealers, unauthorized servicers or distributors. Refer to
the Yellow Pages for where to call or contact the State Water
Heaters, 500 Lindahl Parkway, Ashland City, TN 37015, 1-800821-2017 or visit our website at www.statewaterheaters.com
When ordering parts be sure to state the quantity, part number
and description of the items including the complete model and
serial number as it appears on the product. Refer to the parts
list for more information.
32
Page 33

Model GPG/GPV Limited Warranty
State Industries, Inc., the warrantor, extends the following LIMITED WARRANTY to the owner of this water heater.
1. THE T ANK
If the glass-lined tank in this water heater shall prove upon examination by the warrantor to have leaked due to the natural corrosion from potable
water therein, during the first THREE years after installation, the warrantor will supply a complete new State water heater of equivalent size and
current model. Some government agencies are requiring energy efficient standards for water heaters. In the event regulations prohibit sale of
a model of equivalent size and construction, State will provide a model which complies with the regulations of your area, in which case the
consumer will be charged the difference in price between the like replacement and the energy efficient model required. The warranty on the
replacement water heater will be limited to the unexpired term of the original warranty.
2. ALL OTHER P ARTS
If within ONE year after initial installation of this water heater, any part or portion shall prove upon examination by the warrantor to be defective
in material or workmanship, the warrantor will repair or replace such part or portion at its option.
3. CONDITIONS AND EXCEPTIONS
This warranty shall supply only when the water heater is installed in accordance with local plumbing and building codes, ordinances and
regulations, the printed instructions provided with it and good industry practices. In addition, a temperature and pressure relief valve, certified by
A.G.A and approved by the American Society of Mechanical Engineers, must have been installed.
a) This warranty shall apply only when the heater is used:
(1 ) used at temperatures not exceeding the maximum calibrated setting of its thermostat;
(2 ) used at water pressure not exceeding the working pressure shown on the heater;
(3 ) filled with potable water, free to circulate at all times and with the tank free of damaging water sediment or scale deposits;
(4 ) used in a non-corrosive and non-contaminated atmosphere;
(5 ) used with factory approved anode(s) installed;
(6) in its original installation location;
(7 ) in the United States, its territories or possessions, and Canada;
(8 ) sized in accordance with proper sizing techniques for commercial and/or residential water heaters;
(9 ) bearing a rating plate which has not been altered, defaced or removed, except as required by the warrantor;
(10) operated with properly installed dirt leg;
(11) fired with the fuel for which it was factory built;
(12) fired at the factory rated input;
b) Any accident to the water heater, any misuse, abuse (including freezing) or alteration of it, any operation of it in a modified form, or any
attempt to repair tank leaks will void this warranty.
c ) This warranty is voided if a device as a backflow prevention device (check valves etc.) is installed in the cold water supply the heater is
connected to unless an effective method of controlling thermal expansion is also installed at the heater(s) and operational at all times. The
relief valve installed on the heater is not an acceptable method.
4. SERVICE AND REP AIR EXPENSES
Under the limited warranty the warrantor will provide only a replacement water heater or part thereof. The owner is responsible for all other
costs. Such costs may include bat are not limited to:
a) Labor charges for services removal, repair or reinstallation of the water heater or any component part;
b) Shipping, delivery, handling, and administrative charges for forwarding the new heater or replacement part from the nearest distributor and
returning the claimed defective heater or part to such distributor.
c ) All cost necessary or incidental for material and /or permits required for installation of the replaced heater or part.
5. LIMIT A TIONS ON IMPLIED W ARRANTIES
Implied warranties, including the warranty of merchantability imposed on the sale of this heater under state law are limited to one (1) year duration
for the heater or any of its parts. Some states do not allow limitation on how long an implied warranty lasts, so the above limitation may not apply
to you.
6. CLAIM PROCEDURE
Any claim under the warranty should be initiated with the dealer who sold the heater, or with any other dealer handling the warrantor’s products.
If this is not practicable, the owner should contact:
State Water Heaters
500 Lindahl Parkway
Ashland City, TN 37015
Telephone 1-800-323-2636
a) The warrantor will only honor replacement with identical or similar water heater or parts thereof which are manufactured or distributed by
the warrantor.
b) Dealer replacements are made subject to in-warranty validation by warrantor.
7. DISCLAIMERS
NO OTHER EXPRESS WARRANTY HAS BEEN OR WILL BE MADE IN BEHALF OF THE W ARRANTOR WITH RESPECT TO THE MERCHANT ABILITY
OF THE HEATER OR THE INSTALLATION, OPERA TION, REPAIR OR REPLACEMENT OF THE HEA TER. THE W ARRANTOR SHALL NOT B E
RESPONSIBLE FOR WA TER DAMAGE, LOSS OF USE OF THE UNIT , INCONVENIENCE, LOSS OR DAMAGE TO PERSONAL PROPERTY OR OTHER
CONSEQUENTIAL DAMAGE. THE WARRANTOR SHALL NOT A LIABLE BY VIRTUE OF THIS WARRANTY OR OTHERWISE FOR DAMAGE TO ANY
PERSONS OR PROPERTY , WHETHER DIRECT OR INDIRECT , AND WHETHER ARISING IN CONTRACT OR IN TOR T .
Fill in the warranty for your own reference. Keep it. Registration is not a condition of warranty. The model and serial number are found on the
heater’s rating plate.
Model No.____________________________________ Serial No. ________________________________Date Installed_____________________
Dealer’s Name ________________________________________________________________________________________________________
Dealer’s Address ______________________________________________________________________Phone No._______________________
City and State_________________________________________________________________________Zip _____________________________
KEEP THIS WARRANTY POSTED ADJACENT TO THE HEA TER FOR FUTURE REFERENCE.
33
Page 34

COMMERCIAL TANK TYPE WATER HEATER
REPLACEMENT PARTS LIST
MODELS GPG/GPV-540A THRU 740A
3
SERIES 104
5
4
6
7
11
9
9B
11B
CLEANOUT ASSEMBL Y
4
9A
GPV VENT KIT
11A
11C
12
10
RELIEF
VALVE
8
(Part numbers are listed on page 35)
STATE WATER HEATERS
500 Lindahl Parkway, Ashland City, TN 37015
Phone: 1-800-821-2017 • Fax: 1-800-6449306
website: www.statewaterheaters.com
34
BAROMETRIC
DRAFT CONTROL
Page 35

PART LIST FOR PAGE 34
Item Description GPG-540A GPG-650A GPG-740A
1 ........Anode, Plug ........................................................................ 183523-48(4)...............183523-48(4) ................ 83523-48(4)
2 ........Baffle, Flue ........................................................................... 194974(16) ................. 194974(16) ...................194974(16)
3 ........Cover , Jacket ........................................................................... 195046 ........................195046 ......................... 195046
4 ........Valve, Relief ............................................................................99465-3 .......................99465-3 ....................... 99465-3
5 ........Thermostat W.E.C.O. ................................................................ 192828 ........................192828 .........................192828
6 ........Cover , Front ............................................................................. 181260 ........................181260 ......................... 181260
7 ........Valve, Drain .............................................................................26273-6....................... 26273-6 ....................... 26273-6
8 ........Jacket Base............................................................................. 195045 ........................195045 .........................195045
10 ......Burner Assembly ....................................................................195036-2 ..................... 195036-1 .......................195036
11.......Cleanout Assembly
..........(includes the following items)
..........11A.... Cleanout Cover............................................................. 99037 ..........................99037 ...........................99037
..........11B.... Gasket .......................................................................... 99038 ..........................99038 ...........................99038
..........11C .... Screw - Thread Rolling.................................................69852-1 ....................... 69852-1 ....................... 69852-1
12 ......
Barometric Draft Control..........................................................170777-5 ..................... 170777-5 ..................... 170777-5
Item Description GPV-540A GPV-650A GPV-740A
1 ........Anode, Plug ........................................................................ 183523-48(4) ............ 183523-48(4) ................... 83523-48(4)
2 ........Baffle, Flue ........................................................................... 194974(16) ...............194974(16) ...................... 194974(16)
3 ........Cover , Jacket ........................................................................... 195046 .....................195046 ............................ 195046
4 ........Valve, Relief ............................................................................99465-3 .................... 99465-3 .......................... 99465-3
5 ........Thermostat W.E.C.O................................................................. 192828 ..................... 192828 ............................192828
6 ........Cover , Front ............................................................................. 181260 .....................181260 ............................ 181260
7 ........Valve, Drain .............................................................................26273-6.................... 26273-6 .......................... 26273-6
8 ........Jacket Base............................................................................. 195045 ..................... 195045 ............................ 195045
9 ........GPV Vent Kit...........................................................................192049-1 ....................192049 ............................192049
..........(includes the following items, 2 pieces of hood required for direct vent)
..........9A ..... Hood, Vent - Side Wall .................................................. 191235 ..................... 191235 ............................191235
..........9B ..... Reducer - Flue ............................................................. 191981 ..................... 191981 ............................191981
10 ......Burner Assembly ....................................................................196795-2 .................. 196795-1 ..........................196795
11.......Cleanout Assembly
..........(includes the following items)
..........11A....
..........11B.... Gasket .......................................................................... 99038 .......................99038 ..............................99038
..........11 C.... Screw - Thread Rolling.................................................69852-1 .................... 69852-1 .......................... 69852-1
Cleanout Cover............................................................. 99037 .......................99037 .............................. 99037
GPG
GPV
*Items not illustrated.
# Quantities, if more than one, shown in parenthesis next to part number.
Part numbers underlined are recommended stock items for emergency replacement.
35
Page 36

GPG BURNER ASSEMBLY
(Part numbers are listed on page 37)
36
Page 37

PART LIST FOR BURNER (see drawing on page 36)
Item Description GPG-540A GPG-650A GPG-740A
1 .......Ignition Control .................................................................................. 6207 ............................. 6207 ............................ 6207
2 .......Motor - 1/4 HP 3450 RPM ................................................................ 6207-1 ..........................6207-1 .......................... 6207-1
3 .......Valve 24/60.................................................................................... 6207-2 ..........................6207-2 .......................... 6207-2
4 .......Gas Valve ...................................................................................... 6207-4 ..........................6207-4 .......................... 6207-4
5 .......Air Switch ...................................................................................... 6207-5 ..........................6207-5 .......................... 6207-5
6 .......Transformer 120/24 ....................................................................... 6207-6 ..........................6207-6 .......................... 6207-6
7 .......Low Gas Pressure Switch............................................................. 6207-8 ..........................6207-8 ..........................6207-8
8 .......Flame Rod ...................................................................................... 6207-9 ..........................6207-9 .......................... 6207-9
9 .......Igniter ............................................................................................ 6207-10....................... 6207-10........................ 6207-10
10 ....... Thermostat .................................................................................... 6207-11 ........................6207-11........................6207-1 1
11........ Regulator 3/8" ............................................................................... 6207-12 ....................... 6207-12........................6207-12
12 ....... Grounding Lug .............................................................................. 6207-13....................... 6207-13........................ 6207-13
13 ....... Std Hardware - Purchase Locally .................................................. - - - - - ..........................- - - - - .......................... - - - - -
14 ....... Tubing - 3/8 X 1/4.......................................................................... 6207-14...................
15 ....... Brass Reducer 3/8 X 1/4............................................................... 6207-15 ....................... 6207-15........................6207-15
16 ....... Brass T ee - 1/4” ............................................................................ 6207-47 ....................... 6207-47........................ 6207-47
17 ....... Brass Tube 1/4 X 1/8 .................................................................... 6207-17 ....................... 6207-17 ........................6207-17
18 ....... Std Hardware - Purchase Locally (2)............................................. - - - - - ..........................- - - - - ..........................- - - - -
19 ....... Std Hardware - Purchase Locally .................................................. - - - - - ..........................- - - - - .......................... - - - - -
20 ....... Std Hardware - Purchase Locally .................................................. - - - - - ..........................- - - - - .......................... - - - - -
21 ....... Pipe Plug 1 1/4" Drilled & T apped ................................................... 6207-18 ....................... 6207-18 ........................6207-18
22 ....... Orifice Spring ................................................................................ 6207-19 ....................... 6207-19 ........................6207-19
23 ....... Junction Box ................................................................................. 6207-20 ....................... 6207-20........................6207-20
24 ....... Junction Box Cover....................................................................... 6207-21 ....................... 6207-21........................ 6207-21
25 ....... Ball Valve - 1"................................................................................ 6207-22 ....................... 6207-22........................ 6207-22
26 ....... Pilot Ass’y (Includes Items 8, 9 & 10) ............................................ 6207-23 ....................... 6207-23........................6207-23
27 ....... Air Staging Band ........................................................................... 6207-24 ....................... 6207-24........................6207-24
28 ....... Frame Motor Plate ......................................................................... 6207-25 ....................... 6207-25........................6207-25
29 ....... Damper Stop ................................................................................. 6207-26 ....................... 6207-26........................6207-26
30 ....... 90 Degree Adapter Ass’y ............................................................. 6207-27 ....................... 6207-27 ........................6207-27
31 ....... Housing Ass’y............................................................................... 6207-28 ....................... 6207-28 ........................6207-28
32 ....... Back Mount Panel Ass’y................................................................ 6207-29 ....................... 6207-29........................6207-29
33 ....... Premix Air Housing Wheel ............................................................. 6207-30 ....................... 6207-30 ........................6207-30
34 ....... Panel Box Door ............................................................................. 6207-31 ....................... 6207-31........................6207-31
35 ....... Pie Damper Inner Plate................................................................... 6207-32 ....................... 6207-32........................6207-32
36 ....... Pie Damper Middle Plate ................................................................. 6207-33 ....................... 6207-33........................ 6207-33
37 ....... Outer Pie Damper .......................................................................... 6207-34 ....................... 6207-34........................6207-34
38 ....... Wheel ............................................................................................ 6207-36....................... 6207-36........................ 6207-36
39 ....... Amber Light................................................................................... 6207-37 ....................... 6207-37........................6207-37
40 ....... Std Hardware - Purchase Locally .................................................. - - - - - ..........................- - - - - .......................... - - - - -
41 ....... Flat Washers, 3/8” ........................................................................ 6207-49 .....................
42 ....... Tubing to FP 90° 70-42, 1/4” X 1/8” ............................................... 6207-50 ....................... 6207-50........................ 6207-50
43 ....... El Fitting 1/4 X 1/8 .......................................................................... 6207-40 ....................... 6207-40 ........................6207-40
44 ....... Hex Nipple, 1/4” ............................................................................. 6207-51 ....................... 6207-51........................6207-51
45 ....... Ball V alve, Model 740, 1/4”............................................................ 6207-52 ....................... 6207-52........................ 6207-52
46 ....... Std Hardware - Purchase Locally .................................................. - - - - - ..........................- - - - - .......................... - - - - -
47 ....... Orifice - Aluminum 1 1/4"............................................................... 6207-42 ....................... 6207-42........................6207-42
48 ....... Std Hardware - Purchase Locally .................................................. - - - - - ..........................- - - - - .......................... - - - - -
49 ....... Conduit Clamp ............................................................................... 6207-43 ....................... 6207-43........................ 6207-43
50 ....... Premix Diffuser Ass’y ................................................................... 6207-53 ....................... 6207-53........................6207-53
51 ....... Pilot Tubing (3) .............................................................................. 6207-54....................... 6207-54........................ 6207-54
52 ....... Rocker Switch ..............................................................................6207-46 ....................... 6207-46 ........................6207-46
53 ....... O Ring Seal ................................................................................... 6207-55 ....................... 6207-55........................6207-55
54 ....... Plastic Cap, SC-1 1” Pipe ............................................................... 6207-56 ....................... 6207-56........................620
GPG
.... 6207-14........................ 6207-14
GPG
GPG
.. 6207-49........................ 6207-49
GPG
7-56
37
Page 38

GPV BURNER ASSEMBLY
(Part numbers are listed on page 39)
38
Page 39

PART LIST FOR BURNER (see drawing on page 38)
Item Description GPV-540A GPV-650A GPV-740A
1 .......Ignition Control ..................................................................................6207 ............................. 6207 ............................ 6207
2 .......Motor - 1/4 HP 3450 RPM ................................................................ 6207-1 ..........................6207-1 ..........................6207-1
3 .......Valve 24/60.................................................................................... 6207-2 ..........................6207-2 ..........................6207-2
4 .......Gas Valve ...................................................................................... 6207-4 ..........................6207-4 ..........................6207-4
5 .......Thermodisk Relay ............................................................................12S10........................... 12S10 .......................... 12S10
6 .......Transformer 120/24 ....................................................................... 6207-6 ..........................6207-6 .......................... 6207-6
7 .......Low Gas Pressure Switch............................................................. 6207-8 ..........................6207-8 ..........................6207-8
8 .......Flame Rod ...................................................................................... 6207-9 ..........................6207-9 ..........................6207-9
9 .......Igniter ............................................................................................ 6207-10....................... 6207-10........................ 6207-10
10 ....... Thermostat .................................................................................... 6207-11 ........................6207-11........................6207-1 1
11........ Regulator 3/8" ............................................................................... 6207-12 ....................... 6207-12........................6207-12
12 ....... Grounding Lug .............................................................................. 6207-13....................... 6207-13........................ 6207-13
13 ....... Std Hardware - Purchase Locally .................................................. - - - - - ..........................- - - - - ..........................- - - - -
14 ....... Tubing - 3/8 X 1/4.......................................................................... 6207-14...................
15 ....... Brass Reducer 3/8 X 1/4 ............................................................... 6207-15 ....................... 6207-15........................6207-15
16 ....... Brass Tee - 1/4” ............................................................................ 6207-47 ....................... 6207-47........................6207-47
17 ....... Brass Tube 1/4 X 1/8 .................................................................... 6207-17 ....................... 6207-17 ........................6207-17
18 ....... Std Hardware - Purchase Locally (2)............................................. - - - - - ..........................- - - - - ..........................- - - - -
19 ....... Std Hardware - Purchase Locally .................................................. - - - - - ..........................- - - - - ..........................- - - - -
20 ....... Std Hardware - Purchase Locally .................................................. - - - - - ..........................- - - - - ..........................- - - - -
21 ....... Pipe Plug 1 1/4" Drilled & T apped ................................................... 6207-18 ....................... 6207-18 ........................6207-18
22 ....... Orifice Spring ................................................................................ 6207-19 ....................... 6207-19 ........................6207-19
23 ....... Junction Box ................................................................................. 6207-20 ....................... 6207-20........................6207-20
24 ....... Junction Box Cover....................................................................... 6207-21 ....................... 6207-21........................ 6207-21
25 ....... Ball Valve - 1"................................................................................ 6207-22 ....................... 6207-22........................6207-22
26 ....... Pilot Ass’y (Includes Items 8, 9 & 10) ............................................ 6207-23 ....................... 6207-23........................6207-23
27 ....... Air Staging Band ........................................................................... 6207-24 ....................... 6207-24........................6207-24
28 ....... Frame Motor Plate ......................................................................... 6207-25 ....................... 6207-25........................6207-25
29 ....... Damper Stop ................................................................................. 6207-26 ....................... 6207-26........................6207-26
30 ....... 90 Degree Adapter Ass’y ............................................................. 6207-27....................... 6207-27........................ 6207-27
31 ....... Housing Ass’y............................................................................... 6207-28 ....................... 6207-28 ........................6207-28
32 ....... Back Mount Panel Ass’y................................................................ 6207-29 ....................... 6207-29 ........................6207-29
33 ....... Premix Air Housing Wheel ............................................................. 6207-30 ....................... 6207-30 ........................6207-30
34 ....... Panel Box Door ............................................................................. 6207-31 ....................... 6207-31........................6207-31
35 ....... Pie Damper Inner Plate................................................................... 6207-32 ....................... 6207-32........................6207-32
36 ....... Pie Damper Middle Plate ................................................................. 6207-33 ....................... 6207-33........................ 6207-33
37 ....... Outer Pie Damper .......................................................................... 6207-34 ....................... 6207-34........................6207-34
38 ....... Air Intake Kit .................................................................................. 6207-48....................... 6207-48........................ 6207-48
39 ....... Wheel ............................................................................................ 6207-36....................... 6207-36........................ 6207-36
40 ....... Amber Light................................................................................... 6207-37 ....................... 6207-37 ........................6207-37
41 ....... Std Hardware - Purchase Locally .................................................. - - - - - ..........................- - - - - ..........................- - - - -
42 ....... Flat Washers, 3/8” ........................................................................ 6207-49 ....................... 6207-49........................ 6207-49
43 ....... Tubing to FP 90° 70-42, 1/4” X 1/8” ............................................... 6207-50 ....................... 6207-50........................ 6207-50
44 ....... El Fitting 1/4 X 1/8.......................................................................... 6207-40 ....................... 6207-40 ........................6207-40
45 ....... Hex Nipple, 1/4” ............................................................................. 6207-51 ....................... 6207-51........................6207-51
46 ....... Ball V alve, Model 740, 1/4”............................................................ 6207-52 ....................... 6207-52........................ 6207-52
47 ....... Std Hardware - Purchase Locally .................................................. - - - - - ..........................- - - - - ..........................- - - - -
48 ....... Orifice - Aluminum 1 1/4" ............................................................... 6207-42 ....................... 6207-42........................6207-42
49 ....... Std Hardware - Purchase Locally .................................................. - - - - - ..........................- - - - - ..........................- - - - -
50 ....... Conduit Clamp ............................................................................... 6207-43 ....................... 6207-43........................ 6207-43
51 ....... Premix Diffuser Ass’y ................................................................... 6207-53 ....................... 6207-53........................6207-53
52 ....... Pilot Tubing (3) .............................................................................. 6207-54....................... 6207-54........................ 6207-54
53 ....... Rocker Switch ..............................................................................6207-46 ....................... 6207-46 ........................6207-46
54 ....... O Ring Seal ................................................................................... 6207-55 ....................... 6207-55........................6207-55
55 ....... Plastic Cap, SC-1 1” Pipe ............................................................... 6207-56 ....................... 6207-56........................6207-56
56 ....... IS2 Air Switch, +0.3” (Blocked Flue)............................................... 171040 ......................... 171040 ........................ 171040
57 ....... IS2 Air Switch, +0.9” (Blower Proof)..............................................171080 ......................... 171080 ........................ 171080
58 ....... IS2 Air Switch, -0.3” (Air Intake) .................................................... 171070 ......................... 171070 ........................ 171070
59 ....... NPM Panel Bracket .........................................................................K10304......................... K10304 ........................ K10304
GPV
.... 6207-14........................ 6207-14
GPV
GPV
GPV
STATE WATER HEATERS
500 Lindahl Parkway, Ashland City, TN 37015
Phone: 1-800-821-2017 • Fax: 1-800-6449306
website: www.statewaterheaters.com
39
Page 40

500 Lindahl Parkway, Ashland City, TN 37015
Phone: 800-821-2017 Fax: 800-644-9306
www.statewaterheaters.com
40
 Loading...