


.
Portable Solar
System Model
Instruction Manual
v1-20718

STARWADERS Portable Solar System Model
Table of Contents
1 PREFACE 4
1.1 The Structure of this Booklet? 4
1.2 Contact Starwaders 4
2 The Design 5
2.1 Cutouts 5
2.2 The Planets 6
2.3 The Sun 6
3 Assembling the Model 7
4 Using the Model 9
4.1 Setting Up 9
4.2 The View from the Top – or the Bottom? 10
4.3 Orientation 10
4.4 Mimicking Sunset 11
4.5 Planet Positions 13
4.6 Early Evening Planet Positions 14
4.7 9pm Planet Positions 15
4.8 Midnight Planet Positions 16
4.9 3am Planet Positions 17
4.10 Dawn Planet Positions 18
4.11 The Morning and Evening Stars 19
4.12 Earth’s Moon 19
4.13 Venus Transit 20
4.14 Solar Eclipse 21
v1-20718 Page
2

STARWADERS Portable Solar System Model
4.15 Other Solar System Phenomena 21
5 Packing Away 22
6 A Short History of the PSSM 23
6.1 The Value of Understanding 23
6.2 Models 23
6.3 Traveling 24
Version History:
V1-20714 – Introduction of PVC model
V1-20714 – Added stabilizer cord
v1-20718 Page
3

STARWADERS Portable Solar System Model
1 PREFACE
This user manual shows how to build the model and how to use it to
explain why we see the planets where they appear in the sky.
1.1 The Structure of this Booklet?
• Following this introductory preface is a general description of the
model.
• Thereafter follow instructions on how to use the model.
1.2 Contact Starwaders
• jen@starwaders.com
•
www.starwaders.com
• Tel: 083 303 2840
v1-20718 Page
4

STARWADERS Portable Solar System Model
2 The Design
• The planet orbits are made of concentric hoops, which fit onto a
frame comprising four arms.
• The planets are made of hollow plastic balls with a slot halfway
through them, so that they can easily slide onto the concentric
hoops.
• There is no attempt to scale the orbits and planets proportionally.
When thought about carefully, this would require a model as
large as a football stadium and the smaller planets would be no
larger than the period at the end of this sentence. There is a LOT
of Space out there!
A revealing analogy to show how much space there really is,
is to hold your hands outstretched to your sides with palms up.
If the Sun and the Earth were placed on opposite palms, what
size should they be in proportion to the distance between
them?
The Sun would be the size of a pea and the Earth would fit
inside the thickness of a standard sheet of 80gram printing
paper!
Venus would be about the same size and would be placed on
the shoulder closest to the Earth.
2.1 Cutouts
On the grey stiff board supplied with the model are cutouts of a rotation
ring and the rings of Saturn. See the instructions on the cutout boards.
v1-20718 Page
5

STARWADERS Portable Solar System Model
2.2 The Planets
The objects representing the planets are balls of different sizes in
appropriate colours which allows a school child with a little
knowledge to identify them easily.
The planets each have a slot cut in one half of the sphere allowing
them to be mounted onto the hoop.
Planet Colour
Mercury Purple
Venus White
Earth Earth Map
Mars Red
Jupiter Orange
Saturn Apricot
Uranus Green
Neptune Blue
2.3 The Sun
The Sun is made from a yellow plastic hemisphere. It fits over the
central frame axis.
v1-20718 Page
6

STARWADERS Portable Solar System Model
3 Assembling the Model
When children are part of the audience, this is time for fun. They can
build the tripod, frame and attach the orbit hoops. Show them the
planets and tell them to get on with building the Solar System. This
activity provokes lively argument amongst the children as they put
the hoops into the correct slots and decide which planet goes where.
The structure is made from PVC pipe held in place by various PVC
joining pieces.
v1-20718 Page
7

STARWADERS Portable Solar System Model
The Parts of the PSSM
Follow these instructions to assemble the model:
• Build the stand by inserting the legs into the
base.
• Insert the lower upright into the neck on top of
the base. Align the hole near the bottom end of
the lower upright with the hole in the neck.
Insert the pin into the hole to lock the lower
upright in place. This allows the built model to
be picked up and moved if necessary, without
sliding off the base and legs. It also ensures
that the upright does not slide all the way through the base onto the
ground.
• Fit the upper upright into the top of the lower upright.
• Fit the axis into the top of the upper upright.
NOTE: Normally use the Tilted Mode axis. For use where the frame is
horizontal, use the Horizontal Mode axis.
• Fit the neck of the hub onto the axis with the side where the screws are
facing forwards.
Note that the height of the frame can be made lower for young childre n
by only using one of the uprights.
• Insert the arms into th e sleeves around the hub. Ensure that the slits in
the arms are facing towards the front.
v1-20718 Page
8

STARWADERS Portable Solar System Model
The Hoops
• The folded hoops are springy and the tightly folded Mars hoop can
spring open. When loosening the strap that holds the hoops together,
take care that the Mars hoop does not spring open. For this reason,
mount the Mars hoop onto the arms first.
• Mount the hoops by centering them over the frame and press the hoop
into the corresponding slots on each arm. This can be made slightly
easier by gently but imperceptibly bending the arm backwards at the
slot. This opens the slot enough to allow the hoop to pop into the slot.
• Do the same with the other 7 orbit hoops.
• Fit the ‘Direction of Rotation’ sign over the hub and then mount the Sun
into the neck on the front of the hub.
• Mount the planets anywhere on the correct hoop. Fit the set of rings
onto Saturn.
An artificial horizon is included in the kit. It can also be used as a pointer.
Join the two halves using the pointer joining block. (Insert the end of the rods
with a slit into the joining piece.)
NOTE: In cases where a breeze perhaps sways the frame to and fro,
connect the supplied stabiliser cord from the small hole in foot to the
small hole in the axis.
4 Using the Model
4.1 Setting Up
Children have a lot of fun fitting the
hoops onto the frame, determining which
ball represents which planet and then
placing the planets on the hoops. They
have to know the order of the planets
and must be careful not to skip a hoop
or to put two planets on one hoop. They
find it amusing when it is pointed out to
them that two planets in the same orbit
will crash into each other.
v1-20718 Page
9

STARWADERS Portable Solar System Model
4.2 The View from the Top – or the Bottom?
We are in the Southern Hemisphere. The classical view of the Solar
System is looking down from above the North Pole, in which case
the planet’s orbits are anti-clockwise. Viewers looking towards the
ecliptic (the path along which the planets move) in the northern
hemisphere will stand with their backs facing the North Pole and be
able to imagine the planets moving against the background stars
along their orbits from west to east or right to left.
However, looking down on the Solar System from above the South
Pole, the planets orbit in a clockwise fashion. Thus, in the southern
hemisphere with our backs to the South Pole when viewing the
ecliptic, the planets will still move from west to east but now from left
to right.
This instruction manual is applicable to a viewer in the southern
hemisphere.
Beware of confusing the movement across the night sky from dusk till
dawn with the motion of the planets along their orbits. The former daily
movement is due to the rotation of the Earth on its own axis. The latter
orbital movement is due to the movement of the planets in their orbits
4.3 Orientation
The whole idea behind this Solar System model is to help viewers to
relate their horizontal feet-on-the-ground position on Earth to the
orbits of the planets ‘out in space’.
The frame is tilted so that its plane aligns roughly with the plane of
the real solar system. Consider the following situations. At the
equator, the plane of the the model orbits would then stand vertically
like a wall. Viewing from the poles (not likely!) the plane of the model
orbits would be positioned horizontally like a tabletop. The tilt for you
varies according to your latitude between those two extremes. The
tilt of the model is designed for approximately 30º. In the southern
hemisphere, when facing the model with your back to the south, the
left hand side of the model will be to your west and the right hand
side of the model will be to your east.
v1-20718 Page
10

STARWADERS Portable Solar System Model
4.4 Mimicking Sunset
In the evening as the sun sets in the west, place Earth on a level with
the Sun on the eastern side of the model. This means that little
humans living on the surface of the model Earth will see their plastic
Sun in the west. The relative orientations of the real Earth and Sun
are now the same as the relative orientations of the model Earth and
Sun.
The little humans on their plastic world stand more-or-less ‘upright’,
orientated similarly to the real world viewer. This overcomes the
difficulty of having to imagine the disorientating situation where a
person is ‘standing’ horizontally or ‘upside down’.
v1-20718 Page
11

STARWADERS Portable Solar System Model
With the model in this orientation, and the horizon pointer placed
from Earth to the Sun, allow the viewer to look from east along the
model ‘horizon’. They can easily see that the real Sun and the model
‘Sun’ are disappearing below the horizon. Put some action into the
observation and keeping the ‘horizon’ at a tangent to the “Earth’,
rotate the ‘horizon’ clockwise from a little below the ‘Sun’ until the
‘Sun’ disappears below the ‘horizon’. This observation mimics a
sunset.
This picture and some others show the original prototype model
v1-20718 Page
12

STARWADERS Portable Solar System Model
4.5 Planet Positions
We now place the planets in the positions on the hoops
corresponding to their actual positions. To do this (unless you know
them well enough to keep their movements in your head) you will
need a Solar System chart for that evening. You are more than likely
to have your own preferred astronomy program to do this for you, but
in case not, go to www.heavens-above.com and scroll down to the
Solar System Chart link to see the positions as shown in this picture.
Bear in mind that the heavens-above diagram shows the orbits from
the North and that movement of the planets is in a clockwise
direction of the orbits. Simply make a mirror image in your mind and
swop each planet left to right and visa versa. Your own astronomy
program will probably be able to show you the orbits viewed from the
south.
v1-20718 Page
13

STARWADERS Portable Solar System Model
4.6 Early Evening Planet Positions
The planet positions used in these instructions are those of the 6th of
September 2009.
With the model orientated so that it is parallel to the real Solar
System, it now is roughly a miniature Solar System. In the diagram,
when the Earth observer looks to the West along the horizon, the
Sun has dipped below the horizon. Looking to the East, Jupiter has
just risen. Uranus will rise soon and Neptune is about 20° above that
horizon. As the horizon swivels clockwise, Mercury is heading to set
in the West.
It is quite obvious that Mars, Saturn and Venus are on the far side of
the Earth where they cannot be seen.
We can now swivel the horizon pointer clockwise – mimicking Earth’s
rotation - to see where the planets will be above the horizon as the
night progresses.
v1-20718 Page
14

STARWADERS Portable Solar System Model
4.7 9pm Planet Positions
Three hours after sunset, the horizon shows that Jupiter and
Neptune are nearly overhead. Uranus has just risen. Mercury has
set.
v1-20718 Page
15
STARWADERS Portable Solar System Model
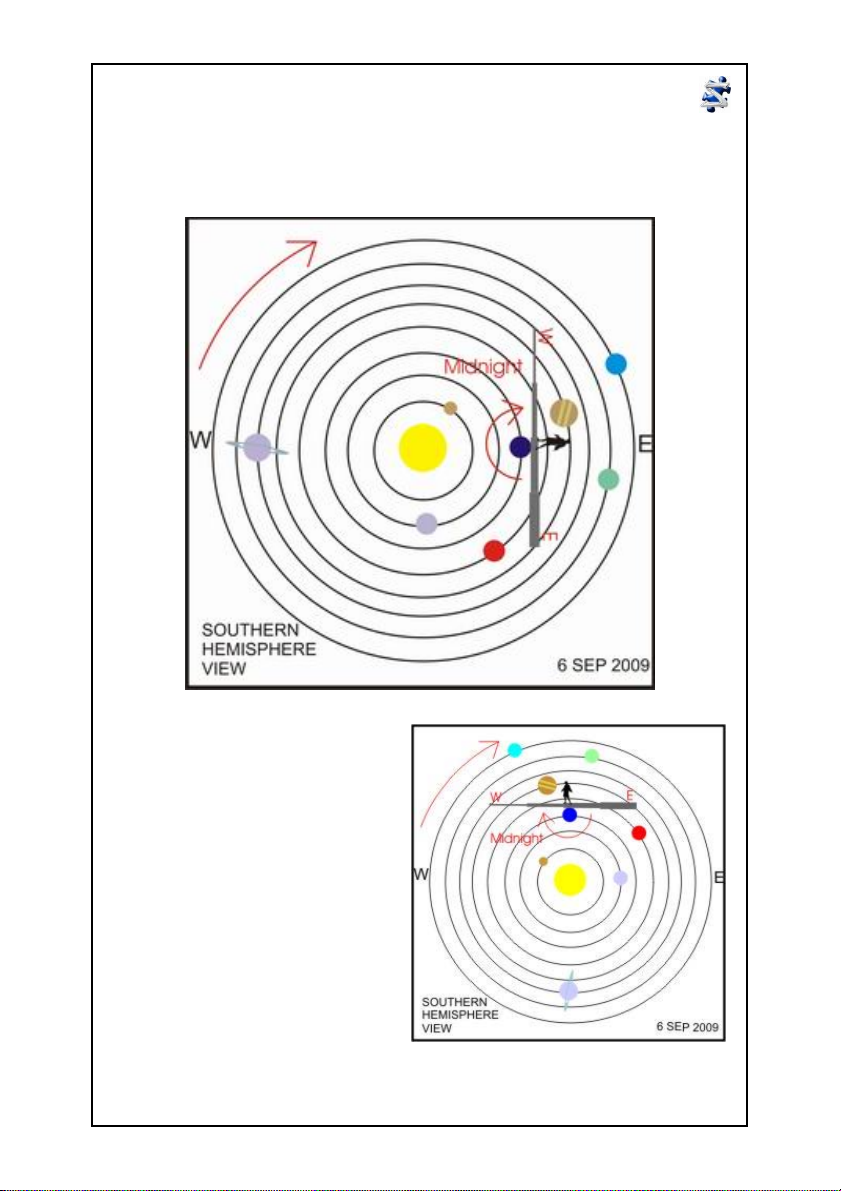
4.8 Midnight Planet Positions
At midnight the visible planets have moved a further 45° across the
sky. No other planets have risen yet.
Note the special feature of the
PSSM that to avoid the
disconcerting effects of
‘standing sideways’, rotate the
frame of the model anticlockwise (in this case) until the
model horizon is again level
with the real horizon. Jupiter,
Uranus and Neptune can
clearly be seen to be overhead,
as they are in the real
overhead view.
This feature applies to all the
planet position images in this
manual.
v1-20718 Page
16

STARWADERS Portable Solar System Model
4.9 3am Planet Positions
At 3am, Jupiter and Neptune are about to set while Uranus is still
high in the sky. Mars has now risen and Venus will rise shortly.
The PSSM rotated to the viewer
upright position.
v1-20718 Page
17

STARWADERS Portable Solar System Model
4.10 Dawn Planet Positions
Just before sunrise, Mars is high in the sky and Venus is well up.
Note that Saturn has not been visible at any time during the night
because it is so close to the Sun.
Remember that the PSSM to can be rotated to the viewer upright
position.
v1-20718 Page
18

STARWADERS Portable Solar System Model
4.11 The Morning and Evening Stars
Probably the most common question a layman asks is “Where is the
evening star?” or “Oh, Venus is the evening star?” The Solar System
model illustrates and explains how Venus is sometimes the evening
star and at other times is the morning star. In fact, Jupiter can also
be bright enough in the dawn or evening sky to deserve those titles.
In the first diagram, Venus is at a position where the viewer can see
it 45° up in the evening sky and watch it set in the next few hours. It
is thus the Evening Star. When it is the evening star, Venus trails the
Earth in its orbit.
When Venus leads the Earth, as shown in the second diagram, it is
seen the morning sky as shown in the second diagram. It is then
called the Morning Star.
4.12 Earth’s Moon
An idea presented here to show where the
Earth’s Moon is is to use a tiny white
polyball in the kit representing the Moon
and sticking it in place using the short stick
and a small blob of Prestik.
Note that at this scale, the Moon would be a
little bigger and 1.2meters away from the Earth!!
v1-20718 Page
19

STARWADERS Portable Solar System Model
4.13 Venus Transit
The Solar System model can be used in a special way to illustrate
and explain how Venus moves across the face of the Sun and why it
happens so seldom.
The planets do not all lie in the
same orbital plane. The Earth’s
orbit is defined to be the
standard plane of the solar
system (called the ecliptic) and
the orbital planes of all other
planets are measured with
respect to this ecliptic. At some
point in their orbits, a planet will
dip below the Earth’s orbital
plane and at other times will rise above it.
The only way Venus (or Mercury) will be seen from Earth to pass in
front of the Sun is for it to be in exactly the same line from the Sun
AND to be in the Earth’s orbital plane. Every 588 days Venus does
pass in between Earth and the Sun, but it is usually above or below
the Sun when seen from Earth because Venus is either above or
below the Earth’s orbital plane. Only very seldom are they in line
AND in the same orbital plane. For complex mathematical reasons it
did so in 2004 and again in 2012 but will only do so again in 2117
and 2125.
How can the Solar System model demonstrate this?
Demonstrating the Venus transit only requires two hoops – one for
Earth and one for Venus. Use the outer hoop (hoop 8) for Earth’s
orbit and hoop 6 Venus. Instead of fitting the hoop on top of the
frame as usual, slide the Venus hoop over two opposite arms during
assembly so that it dips below the frame on the one side and is tilted
above the frame on the other side. The points where it mounts on the
other two arms provides exactly the line-of-site orientation needed.
v1-20718 Page
20

STARWADERS Portable Solar System Model
4.14 Solar Eclipse
Solar and Lunar eclipses can also be demonstrated by taking the
Moon (the tiny polystyrene ball) and moving it around the Earth by
hand.
4.15 Other Solar System Phenomena
The model can be used to demonstrate many configurations and
movements of the solar system. Another example is the movement
of Jupiter’s moons. Ways to demonstrate further phenomena will be
added to the www.starwaders.com
.
v1-20718 Page
21

STARWADERS Portable Solar System Model
5 Packing Away
If there are still young people around when it is time to go home, they
can have some fun dismantling and packing the model away.
The plastic planets and Sun are packed into the bag first, (preferably
a separate bag that itself is packed into the model’s carry bag).
The hoops provide the fun. In order for all except the small orbits to
fit into the carry bag, they need to be folded down to a smaller size.
The method is to twist one side while holding the other side still. The
twist automatically makes the hoop contract into 3 smaller rings.
The outer orbits are too big to hold in two hands. Let the hoop dangle
from one hand and place your foot on the end that is touching the
ground. Twist the top end just more than half a turn while
simultaneously lowering the hand to the ground – this allows the
hoop to fold to the smaller size.
Once the hoops are packed away, disassemble the model.
v1-20718 Page
22

STARWADERS Portable Solar System Model
6 A Short History of the PSSM
6.1 The Value of Understanding
I have always found more value in understanding the night sky as
opposed to simply remembering star patterns. The movements of the
planets between the stars confuses the general public while many an
amateur astronomer has been known to find it difficult to interpret.
In my experience, people will remember something much better if they
understand what and how it works. It does not help to tell the person that
the Southern Cross will be on the other side of the sky in 6 months time
– one has to explain how it moves and why it moves in that way.
6.2 Models
Being a practical guy, I needed a hands-on way to assist my
explanations to others, let alone helping me to understand.
The first model I built was a simple one to demonstrate not only how the
Southern Cross helps to find South, but also how it changes its
orientation through the night and through the seasons.
The next model I built was to help explain retrograde movement of
planets – that is, why they stop their usual movement among the stars
going from west to east and for a short while move from east to west
before resuming their usual movement.
When explaining the positions and movements of planets, it helps to be
able to imagine yourself rising millions of kilometers towards the north or
south celestial pole and looking down on the solar system. That mind
experiment helps make sense of a planet’s path across the sky – one
can even imagine the planetary orbits being hoops straddling the night
sky or, in the case of Venus and Mercury, slipping between Earth and
the Sun.
Humans are Earth bound and ‘down’ is in the direction of the ground
beneath one’s feet. It takes very difficult mental gymnastics for many,
especially the beginner, to imagine the actual orientation of the solar
system where they are standing ‘sideways’ on the side of the Earth or
‘upside-down’ on the ‘underside’ of the Earth. This model helps to
overcome this hurdle.
The closest I could get to this mind experiment was to build a model,
which shows how the planets move and where their orbits are relative to
Earth’s orbit. This model easily explains why Venus is never seen
overhead and why it alternates between being a morning star and at
other times an evening star.
v1-20718 Page
23

STARWADERS Portable Solar System Model
6.3 Traveling
I built my model in 1999. It is 2012
as I write. The
model went
with me to
view a Total
Solar Eclipse
in Southern
Africa on
December 4,
2002. The
picture shows
me
addressing a large crowd of 300
people the night before the eclipse,
with the help of the mode
In June 2004 Venus passed across
the surface of the Sun. Our
astronomy club set up telescopes
on the lawns of the local university.
The model was there once again to
help explain the phenomenon.
l.
The local astronomy club goes to
shopping centres to raise awareness
of the club and astronomy. At one of
these events, I noticed a mother
helping her apparently blind daughter
to feel the solar system. A special
moment that was!
In November 2005 I traveled
hundreds of kilometers to a mountain
desert called the Richtersveld to show
the stars to a select group of high
school pupils.
Manual compiled by Neville Young
info@starwaders.com www.starwaders.com 083 303 2840
v1-20718 Page
24
 Loading...