


PCALLINONE
UserManual
Thankyouforbuyingthisproduct-themostfashionablePCallinone.ToenjoyyourPCall
inonetothefullfromtheverybeginning,pleasereadthismanualcarefullyandkeepit
handyforfuturereference.
Gatheryourcomputerandthepartsasshownintheillustration.You'llneedtheseto
completethestepsforthecomputerset-upprocedurethatfollow,ifyoufoundanylost,
pleasecontactwiththedistributorandaskforthem.
UNPACKINGTHEBOXCONTENTS
Computer Keyboard
Mouse DriverCD Powercord
Poweradapter
Usermanual
Qualitycertificate
Qualitycertificate
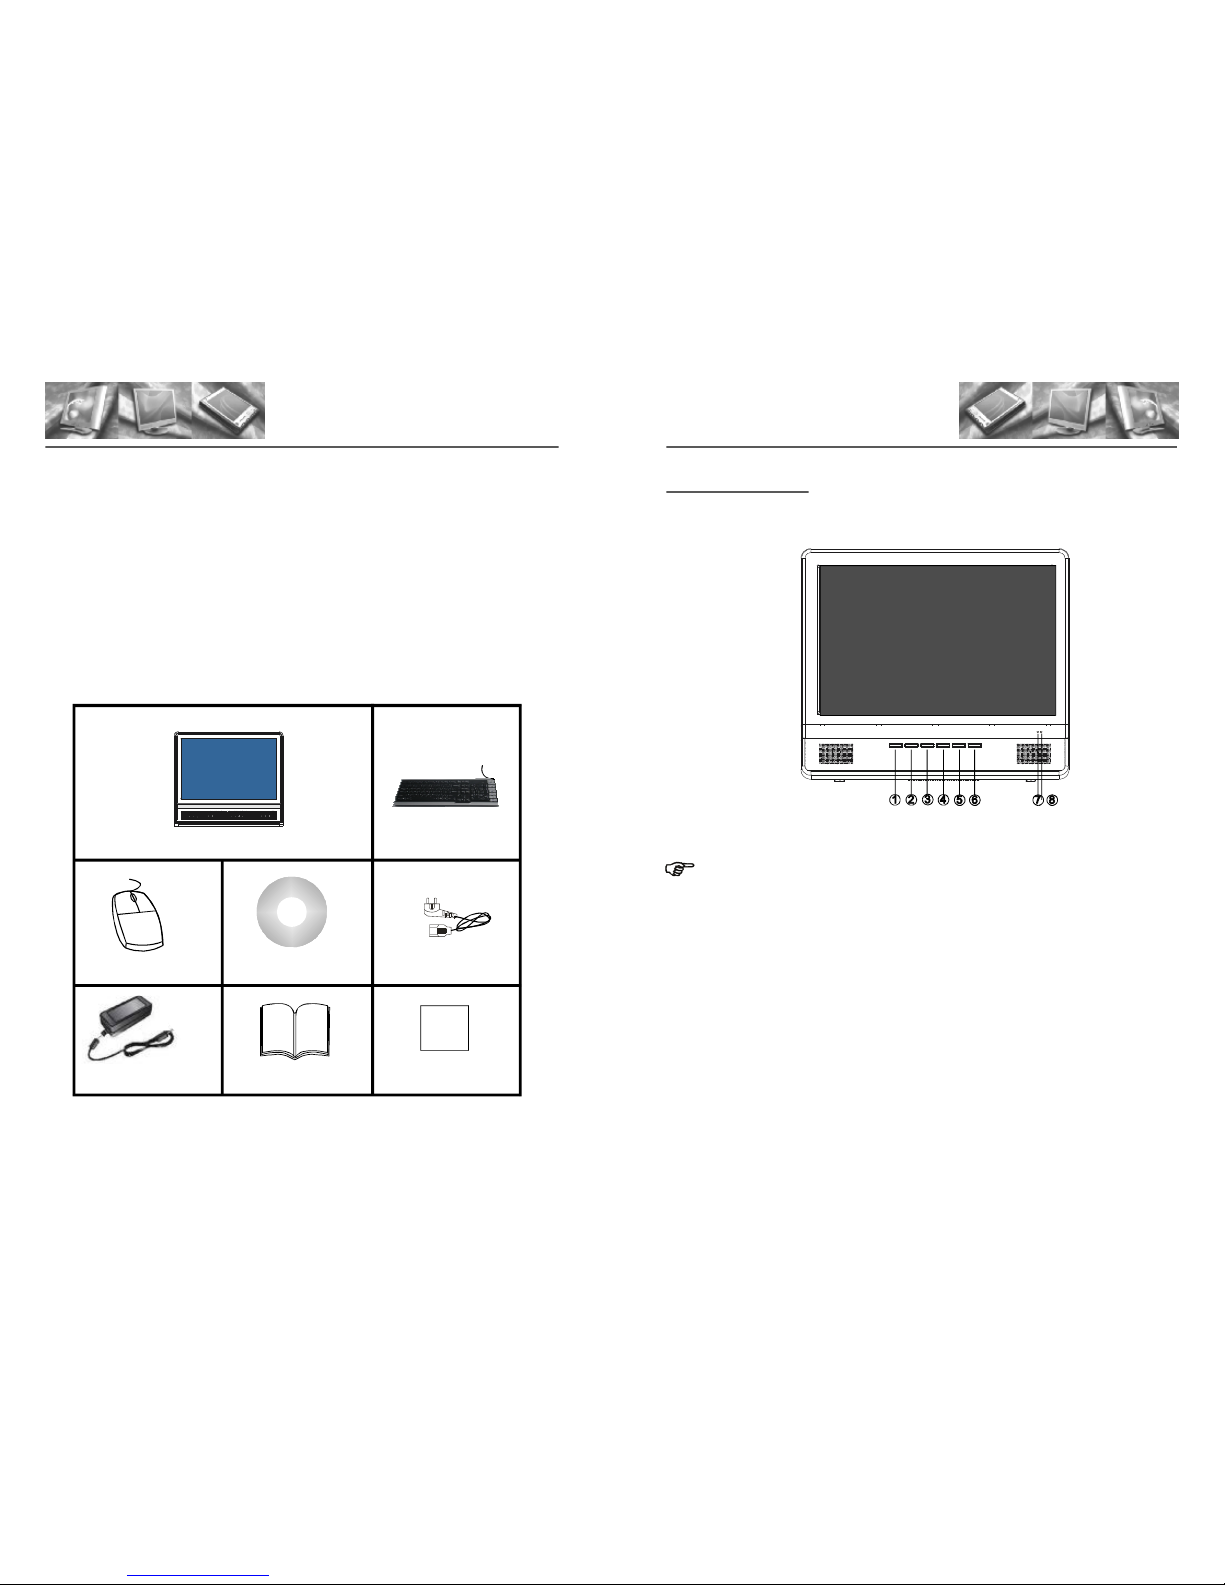
Frontview(1)
Keysinstruction:
1.AUTO:Toresizedisplayareatofitforfullscreenofpanel.OrtoexitSETUPmenu.
2.MENU:ToenterMENUsettingmode,ortoconfirmmenusetting
3.-:Volumedownormovedownthehighlightbarduringmenusetting
4.+:Volumeupormoveupthehighlightbarduringmenusetting
5.MUTE:Tomutetwobuilt-infrontspeakersofthecomputer,butkeepsoundoutput
statusofsideLineoutjack.
6.POWER:Topoweronorpoweroffthecomputer
7.HDDindicator(BlueLEDlight):ToshowtheworkingstatusoftheHDD
8.POWERindicator(YellowLEDlight):ToshowtheworkingstatusofthePOWERof
computer.
1 2

Keys instruction:
Front view (2)
1. AUTO: To resizedisplay area tofit for fullscreen of panel.Or to exitSETUP menu.
2. MENU: To enter MENU setting mode, orto confirm menu setting
3. -: Volume down ormove down thehighlight bar duringmenu setting
4. +: Volume up ormove up thehighlight bar during menu setting
5. MUTE: To mute two built-in front speakersof the computer, but keep sound output
status ofside Line outjack.
6. POWER: To power on or power off the computer
7. HDD indicator(BlueLED light): To show the working status ofthe HDD
8. POWER indicator(YellowLED light): To show theworking status of the POWER of
computer.
1
3
2
6
7
Left view
1.Line in/Rearspeaker
2.Line out/Frontspeaker
3.Microphone/Center speaker
4.KEYBOARD
5.MOUSE
6.RJ45(LAN)
7.USB 1/2/3/4
1 234
5 6 7 8
34
Keys instruction:
4
5

1
2
3
4
5
Rearview(withexternalpowersupply)
Rearview
1.USB5/6
2.POWERSWITCH(ON/OFF):theGeneralPowerswitchbutton
3.DCjackforDCterminaloftheAdapter
4.Computerstand
5.VentilationholeforFAN
6.Opticaldiscdrive(ODDdrive)
Note:
1.Thepictureillustratedaboveisforreferenceonly.Theactualspecificationor
appearancemaybedifferentsubjecttorequirementsofthecustomer.
2.TherearetwokindsofOpticaldiscdrivesforthiscomputer,itdependsonyour
specification,oneisslimtrayODD,andtheotherisslimslot-inODD,FortrayODD,
PleasepressEXITbuttontopop-upthetray,andthenputthediscwithnon-dataside
facingyou,andthenpushthetray.Forslimslot-inODD,pleaseinsertthediscdirectly
withnon-datasidefacingyou,toexitthedisc,presstheEXITbutton.
QuickstartGuide
Step1.Unpackthegiftboxcontentstogatheryourcomputerandrelevantaccessories,
thenpositionthecomputerinasuitableplace,insertDCterminaloftheadaptertoDC
jackofthecomputer,andfinallyfinishtheconnectionbetweenadapterandwalloutlet.
Step2.InserttheUSBterminalsofkeyboardandmousetotheUSBportinthebackofthe
computer.
Step3.SwitchonthePOWERSWITCHatthebackofthecomputer.PressPOWER
buttononthefrontkeypadofthecomputertoturnonthecomputer,andinsertthe
OS(operatingsystem)installationdisctotheODDdrive,thecomputerwillbootfromthe
disc,pleasefinishtheinstallationofOSbyfollowingtheinstallationguideoftheOS
installationCD.
Step4.AfterinstallationoftheOS,pleaseinsertthedriverCDintotheODDdriveand
choosethesuitabledriversforyourOStoinstall,pleasefollowthestepsshownbelowfor
drivers'installation,andrestartyourcomputerafterinstallation.
1.M/Bdriver(driverformotherboardchipset)
2.VGAdriver(driverforbuilt-inVideoprocessingcard)
3.Sounddriver(driverforsoundchipset)
4.LANdriver(driverforlocalnetworkcard)
5.WIFIdriver(driverforwirelessnetworkcard)
Note:PleasemakesurethecomputerisatPOWEROFFstatuswhenyouconnectthe
cableorterminaltothecomputereachtimebyswitchingoffthePOWERSWITCH
atthebackofthecomputer.
Note:ThecomputerBIOSdefaultbootsequenceisfromODDdrive,ifyoufailedto
bootthecomputerfromthenormalbootdiscorOSinstallationdiscwhichisinserted
totheODDdrive,firstpleasecheckifthereareanyproblemswithyourdisc,orelse,
pressCTRL+ALT+DELETEtorestartthecomputer,andholdDELETEkeyfora
fewsecondstoentertheBIOSsettinginterfaceduringBIOSPOST(power-on-selftest)procedure,andthenpressF9andENTERtoloadtheoptimaldefaults,press
F10andENTERtosaveconfigurationchangesandexitsetup,thecomputerwill
restartonceagainandtrytosearchbootdiscsfromtheODDdriveandbootthe
computer.
NOTE:Pleaseinstalltheproperdriversforyourcomputerbasingonthe
specificationofyourcomputer.
5
6

Step 5.Please set resolutionof your operatingsystem to 1440*900@60HZ,and then
install yoursoftwares and enjoyour fashionable computer.
Step 6.To poweroffthe computer,please follow these steps, firstly, turn off the operating
system, secondly, press the POWER switchon the backof the computer. If you can't turn
off the operatingsystem, please pressthe POWER buttonfor four secondsand the
computer willbe forced toshut down, andtwo seconds afterwards,the computer will
restart onceagain.
NOTE:
1.After installation ofthe sound driver, the default sound player of the computeris
two built-infront speakers of computer. If you want to use externalactive
loudspeaker,please connect the terminal to LINEOUT jack of thecomputer and
press MUTE keyon the front keypad tomute the built-in front speakers. After the
computer enter power saving modeor standby mode, thebuilt-in front speakers will
stop workingtemporarily, if you want to playmusic under these modes,please use an
external activeloudspeaker.
2.After initial installationof the sounddriver, thedefault setting of the microphone
is mute,please turn onit manually before using it.
7
FCC NOTE:
This devicecomplies with Part15 of theFCC Rules. Operationis subject to the following
two conditions:(1)thisdevice may notcause harmful interference,and (2) thisdevice
must acceptany interference received,including interference thatmay cause undesired
operation.
The manufactureris not responsiblefor any radioor TV interference caused by
unauthorized modificationsto this equipment.Such modifications couldvoid the user's
authority tooperate the equipment
For aClass B digitaldevice or peripheral,the instructions furnishedthe user shallinclude
the followingor similar statement,placed in aprominent location inthe text ofthe
manual:
NOTE: This equipmenthas been testedand found tocomply with thelimits for a
Class Bdigital device, pursuantto Part 15of the FCCRules.These limits are
designed toprovide reasonable protectionagainst harmful interferencein a
residential installation.This equipment generates, usesand can radiateradio
frequency energy and, ifnot installed and used in accordancewith the
instructions, maycause harmful interferenceto radio communications.However,
there isno guarantee thatinterference will notoccur in aparticular installation.
If thisequipment does causeharmful interference toradio or televisionreception,
which canbe determined byturning the equipmentoff and on, theuser is
encouraged totry to correctthe interference byone or moreof the following
measures:
-- Reorientor relocate thereceiving antenna
-- Increasethe separation betweenthe equipment andreceiver.
-- Connectthe equipment intoan outlet ona circuit different
from thatto which thereceiver is connected.
-- Consultthe dealer oran experienced radio/TVtechnician for help.
8
 Loading...