

Page 1
Page 2

Introduction 1
Overview 1
Notice to Parents 2
Battery Installation
2
Battery Precautions
2
AC Adaptor
3
AC Adaptor Precautions
3
Care and Maintenance
3
Getting Started 4
General Operation
4
ON/OFF/Auto Power OFF /Detachable Mouse/ROM Card
4
Activity Selection 6
Scoring
6
Special Features & Keyboard Layout 7
Description of Activities 10
My Laptop 10
Utilities 11
Diary
11
Schedule (Weekly)
13
Schedule (Daily)
14
Address book
14
Conversions
16
Calculator
17
Budget planner
17
To-Do list
18
Personal profi le
19
My dictionary
20
Memo freehand 21
Content
Page 3

Vocabulary & Grammar 21
Opposites
21
Missing letter
21
Missing letters
21
Complete the sentence
21
Letter eliminator
21
Capitals
22
Which word
22
Wrong letter
22
Singular
22
Plural
22
Adjectives
22
Verbs
22
Collective nouns
22
Prepositions
22
Anagrams
23
Continuous tense
23
Past tense 23
Past perfect tense 23
Math 23
Addition
23
Subtraction
24
Multiplications
24
Divisions
24
Disappearing digits
24
Rounding
24
Greater than & less than
24
Decimals
25
Ratios
25
Fractions
26
Percentages
26
Disappearing operators
26
Page 4

Geometry 26
Word problems
26
Word
Processor 26
Languages 27
Language learner
27
Spanish
27
French
27
English
27
Translation test
28
Spanish
28
French
28
English
28
Trivia
29
Science
29
Nature 29
History
29
Geography 29
Entertainment
29
Miscellaneous
29
Games 30
Tic-Tac-Toe
30
Snake game
30
Memory beat
30
Block warp
30
Bop it
31
Memory match
31
Rebound
32
Music 32
Music tutor
32
Page 5
Vocabulary
Grammar Math Shape
Trivia
Music
Personal
Organization
Learn:
Logic
Creation time 33
Music download
33
Typing
33
Touch type
33
Speed typing
34
Specifi cations
34
Page 6
1
Thank you for selecting this Multi-Lingual Laptop Pro™ unit.
This box contains one (1) Multi-Lingual Laptop Pro™ unit, one
(1) adaptor (optional), and a user instruction guide.
Please read the Notice to Parents carefully before you allow your
child to use this unit. Reading through this User Instruction Guide
with your child can be a valuable learning experience.
Please discard of any packing materials such as plastic sheets,
wire ties, tags etc for your child’s safety.
Introduction
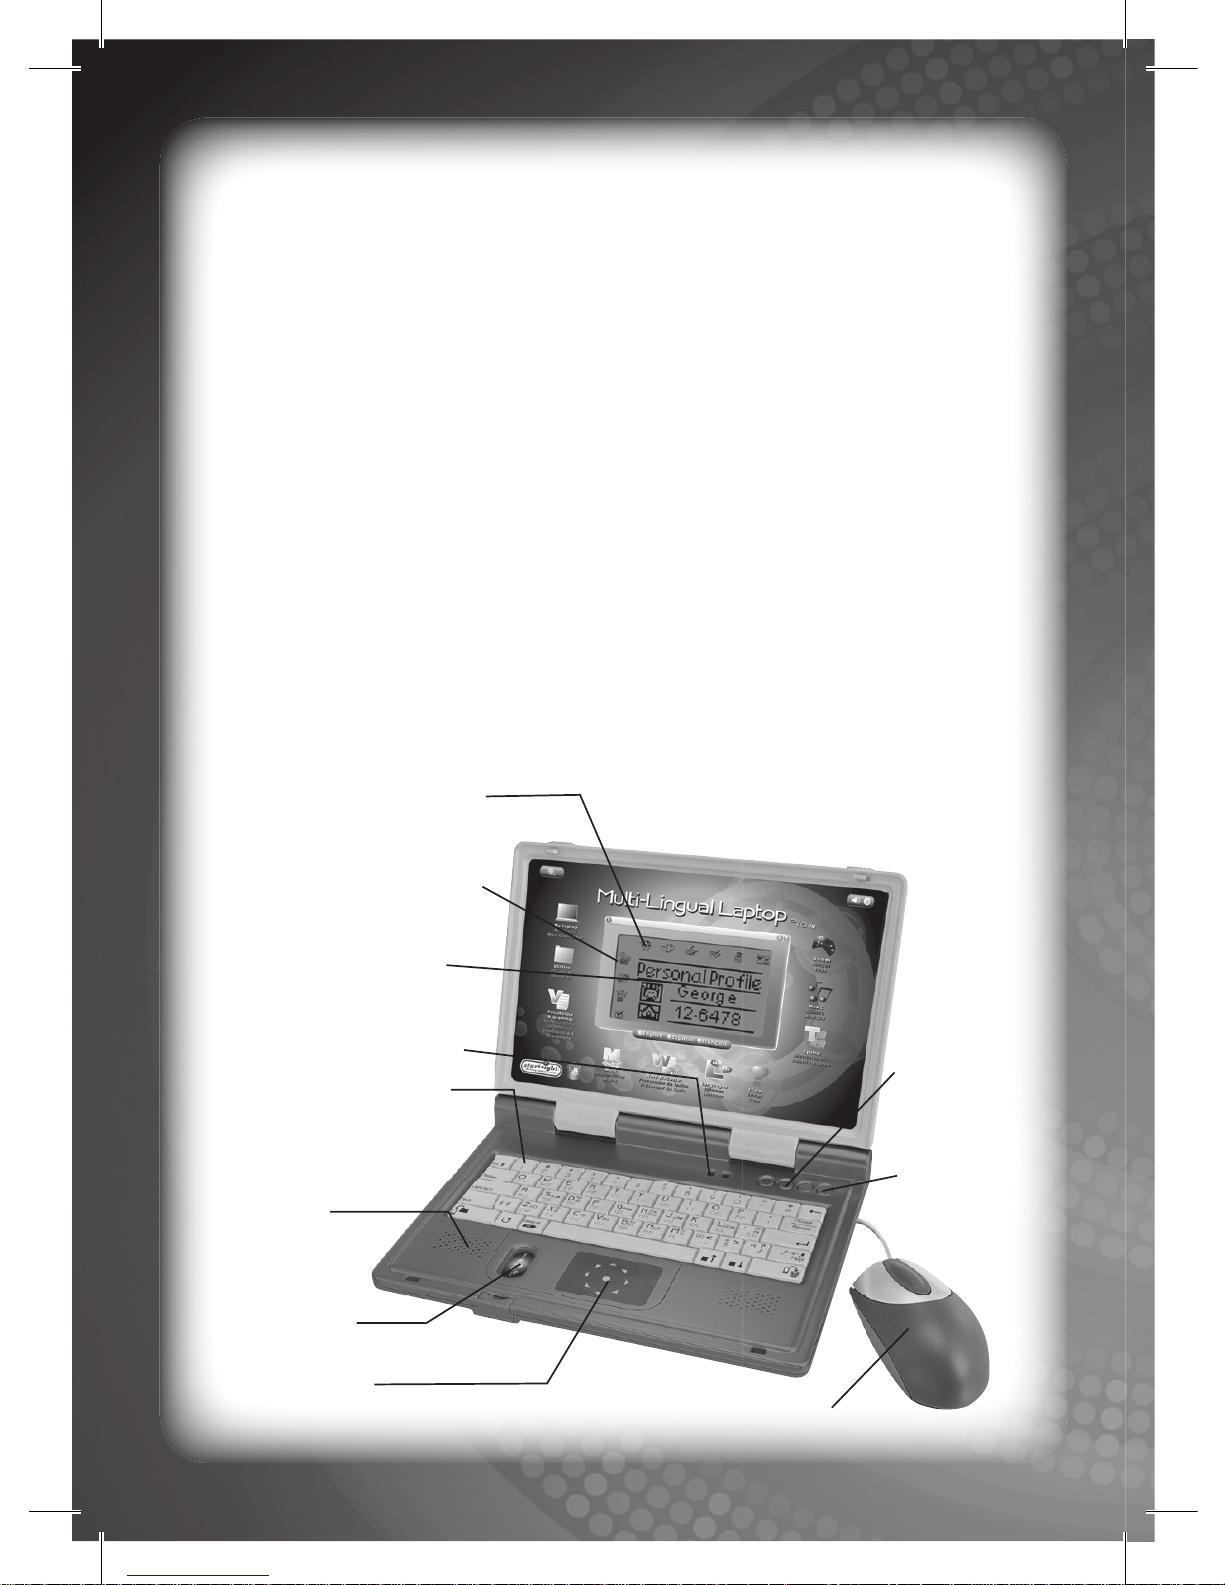
LCD Screen Icons
Touch-Screen Icons
High-Resolution
LCD Screen
Power and Data
Reading Indication
Real QWERTY
Keyboard
Language
Selection
Keys
Power Key
Real Ball Detachable Mouse
Speaker
ROM Card
Touch-pad
Multi - Lingual Laptop
Pro
TM
Overview
Page 7
Battery Installation
NOTE: Do not allow children to install batteries.
• This unit requires four (4)AA batteries (Included for demonstration
purpose only). We recommend alkaline batteries.
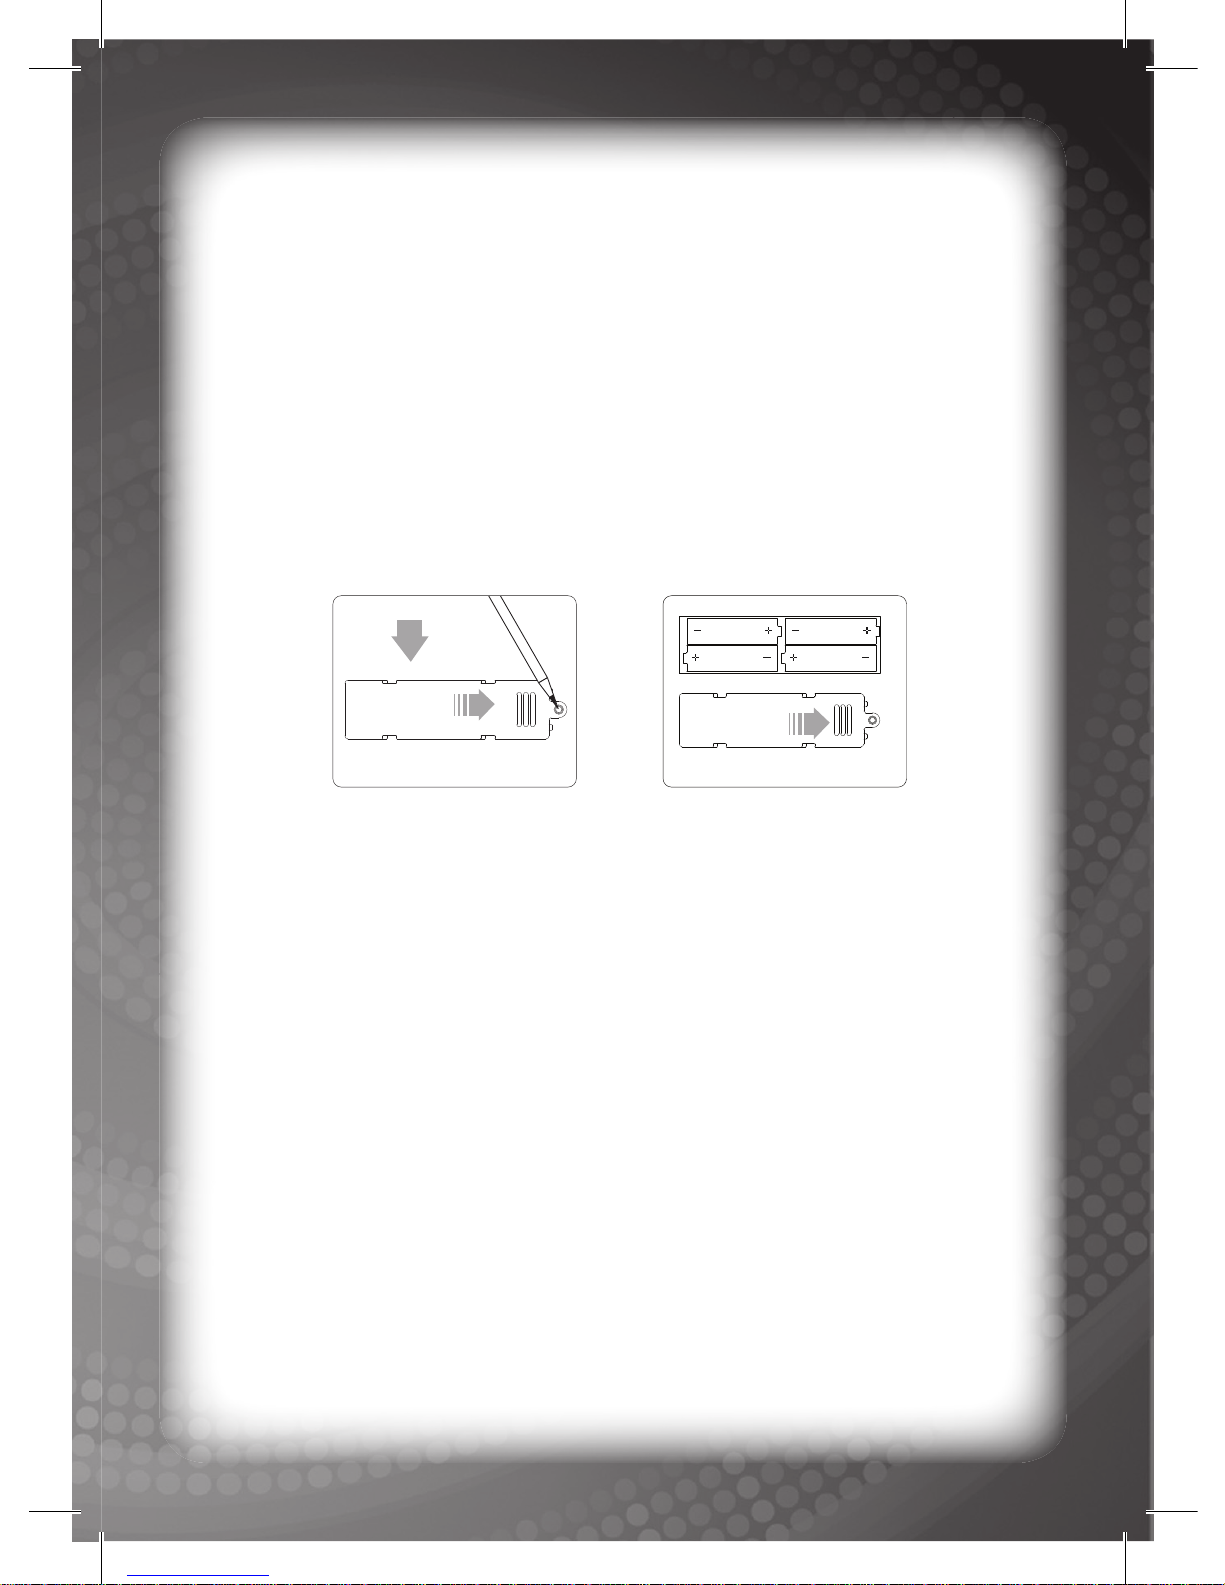
• Open the battery compartment found on the back of the unit.
(See Figure 1)
• Insert the batteries correctly, as indicated by the polarity symbols
(+) and (-) marked inside the battery compartment. (See Figure 2)
• Make sure to correctly replace the battery compartment door and
push it fi rmly back in place.
Battery Precautions
• Install batteries for your child.
• Do not use rechargeable batteries.
• Do not recharge non-rechargeable batteries.
• Do not mix old and new batteries.
• Do not mix alkaline, standard (Carbon-Zinc), or rechargeable
(Nickel-Cadmium) batteries.
• Do not short circuit the supply terminals.
• Only use batteries of the same type or equivalent as
recommended.
• For best operation, always use new alkaline batteries.
• Insert batteries following the correct polarity.
• Replace the batteries if the sound weakens or the display dims.
• Remove exhausted or weak batteries from the unit.
• Remove batteries if you are not going to use the unit for more
than one (1) week.
• This unit is not to be connected to more than the recommended
number of power supplies.
2
Notice to parents
Figure 2
Figure 1
Page 8

3
AC Adaptor
Using the Adaptor (Optional)
NOTE: The use of an adaptor will override the batteries. When this
unit is not going to be in use for an extended period of time, we
recommend unplugging the adaptor.
• Use a standard 6V
---
300mA AC/DC adaptor recommended for
this unit.
• Make sure the unit is turned OFF.
• Plug the power jack into the 6V DC socket located at the back of
the unit.
• Plug the AC adaptor into a wall socket.
AC Adaptor Precautions
• Do not hold the adaptor with wet hands.
• Do not use an adaptor if it has damaged, split or broken wires or
cords.
• Do not play with the adaptor or cable. Do not wrap the adaptor or
cords around your neck as strangulation might result.
• Do not insert many plugs into one connection.
• When disconnecting the adaptor, pull it out by the plug. Never
pull by the cord.
• Do not wind the adaptor cable around the adaptor.
• Do not place furniture or any heavy objects on top of the adaptor
or adaptor cable.
• Do not use more than one (1) adaptor for the unit simultaneously
• Do not plug in the adaptor for extended periods of time.
• For safety purposes this adaptor is not intended for use by children
under the age of three years old.
• The adaptor is not a toy.
• Adaptors used with this unit are to be regularly examined for
damage to the cord, plug enclosure and other parts; and in the
event of such damage, this unit must not be used with the
adaptor until such damage has been repaired.
• This unit must only be used with the recommended adaptor.
• The adaptor must be disconnected before cleaning this unit.
Care and Maintenance
• Clean this unit with a slightly damp cloth.
Page 9

4
Getting Started
General Operation
ON/OFF/Auto Power OFF /Detachable Mouse/ROM
Card
ON/OFF: Press the power key to turn this unit ON. Press the same
key once more to turn the unit OFF.
Auto Power OFF: A screen saver will be activated when you do not
press a key on this unit for more than two (2) minutes. This screen
saver will continue to be displayed for a further one (1) minute before
this unit automatically turns OFF. Please note that when this unit
automatically turns OFF, any created data that has not yet been
saved to the ROM card will be deleted.
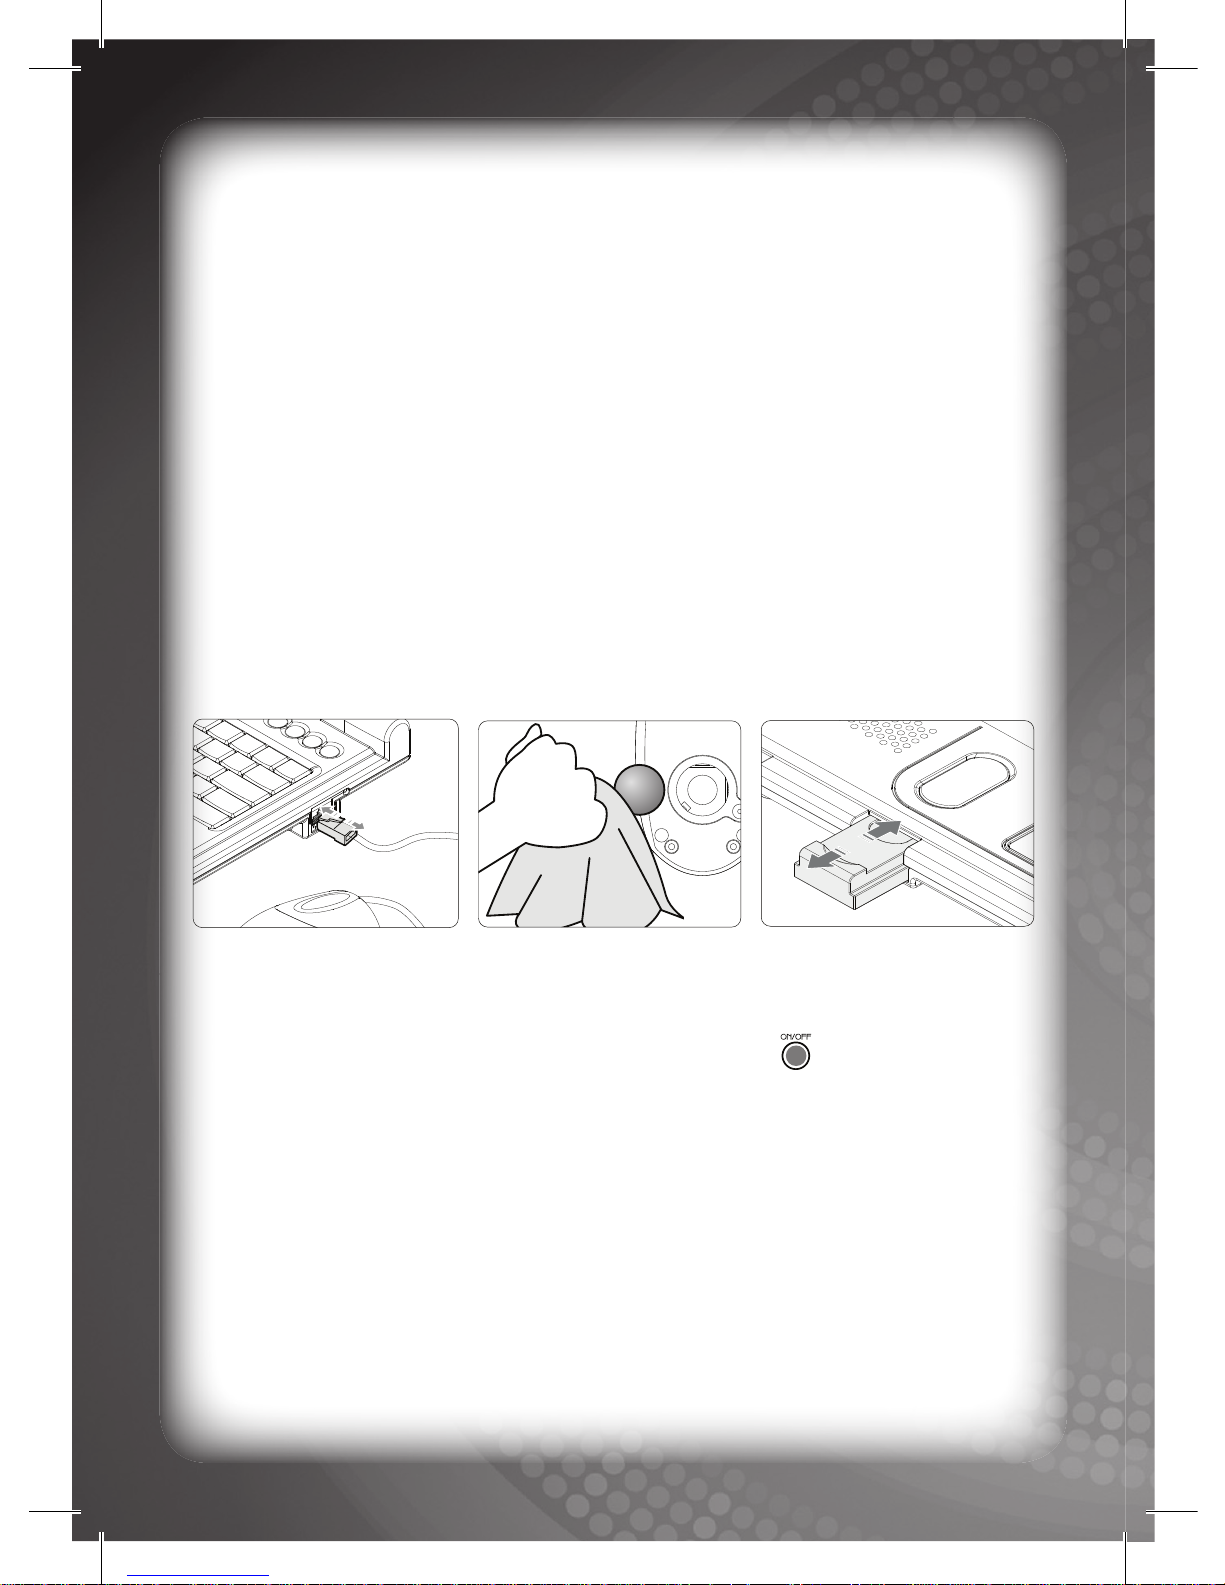
Detachable Mouse: Included with this unit is a real-ball detachable
mouse. To attach/detach this mouse, please follow the illustrations
shown in Figure 3.
The real-ball mouse has two (2) buttons. The left button of the
mouse can be used to select text or to confi rm your selection (same
operation as the Enter key on the keyboard). The right button of the
mouse can be used to exit the current activity or folder (same operation
as the Escape key on the keyboard).
• Do not use any chemical solvents or abrasives on this unit.
• Do not spill any liquids on this unit.
• Avoid dropping this unit on hard surfaces.
• Do not expose this unit to moisture or immerse it in water.
• Do not try to dismantle this unit.
• It is best to switch off this unit when your child is not playing with
it. Please remind your child to do so.
• Use only a soft cloth for cleaning the LCD. Never use solvents,
abrasives or a moist cloth.
Page 10
5
To clean the ball of the mouse, unscrew the cover found on the
underside of the mouse (See Figure 4) and clean with a soft cloth.
Return the ball back into the compartment and screw the cover fi rmly
back into position.
ROM Card:
Included with this unit is one (1) ROM Card. The ROM
Card is designed for use only with the Multi-Lingual Laptop Pro™
and is not to be used with any other device unless specifi ed. To
insert the ROM Card into this unit, please follow the illustrations
shown in Figure 5. Refer to each activity for further details on saving
and deleting data on the ROM Card.
NOTE: For those activities which the ROM Card is used, you must
fi rst insert the ROM Card before selecting the activity. The unit will
detect the ROM Card automatically and give further instructions.
First-Time Use
After reading through the Notice to Parents and installing the
batteries correctly, please press the Power key once to turn ON
the Multi-Lingual Laptop Pro™. The Multi-Lingual Laptop Pro™
unit will welcome you in English, Spanish, and French. Select your
desired operating language from the Language Selections keys. The
unit will then prompt you to “Enter User Setup”. You can either select
to do this at the current time or later. To enter the user setup, simply
click on “NOW”. The unit will require you to complete the following
steps:
1. Enter user name - For fi rst-time use the default name will be
automatically displayed (ABCDEF (uppercase letters)). To
change this default user name, refer to the My Laptop section
Figure 5
Figure 3
Figure 4
Page 11
6
for further details.
2. Input Password - For fi rst-time use you must enter the default
password which is “123456”. To change this default password,
refer to the My Laptop section for further details. The unit will
then read this information and will then enter the main menu.
Activity Selection
To select an activity or folder, you can either use the touch-pad and
keyboard or the mouse. If you choose to use the touch-pad, scroll
up or down to select a folder. To enter folders press the center of the
touch-pad or press the “Enter” key on the keyboard. Alternatively,
the left button on the mouse can also be used to enter into a folder.
To exit a folder at any time, press the “Escape” key on the
keyboard or alternatively press the right button on the mouse. If
you only use the mouse, move the cursor into the scroll bar (on the
right-hand side of the screen) and click above the scroll indicator
to move up or below the scroll indicator to move down. When the
desired folder is highlighted, click the left mouse button to enter. To
exit a folder at anytime, click on the right mouse button or click on
the right-hand corner of the screen on the .
Scoring
Each question is worth ten (10) points unless otherwise stated. If
you score 70 points or more in one (1) level, you can then move up
to the next level. If you use the Answer key or the help key, no points
are awarded to you. If your answer is incorrect, you will be given
another chance at the question. Refer to each activity for further
details.
Page 12
7
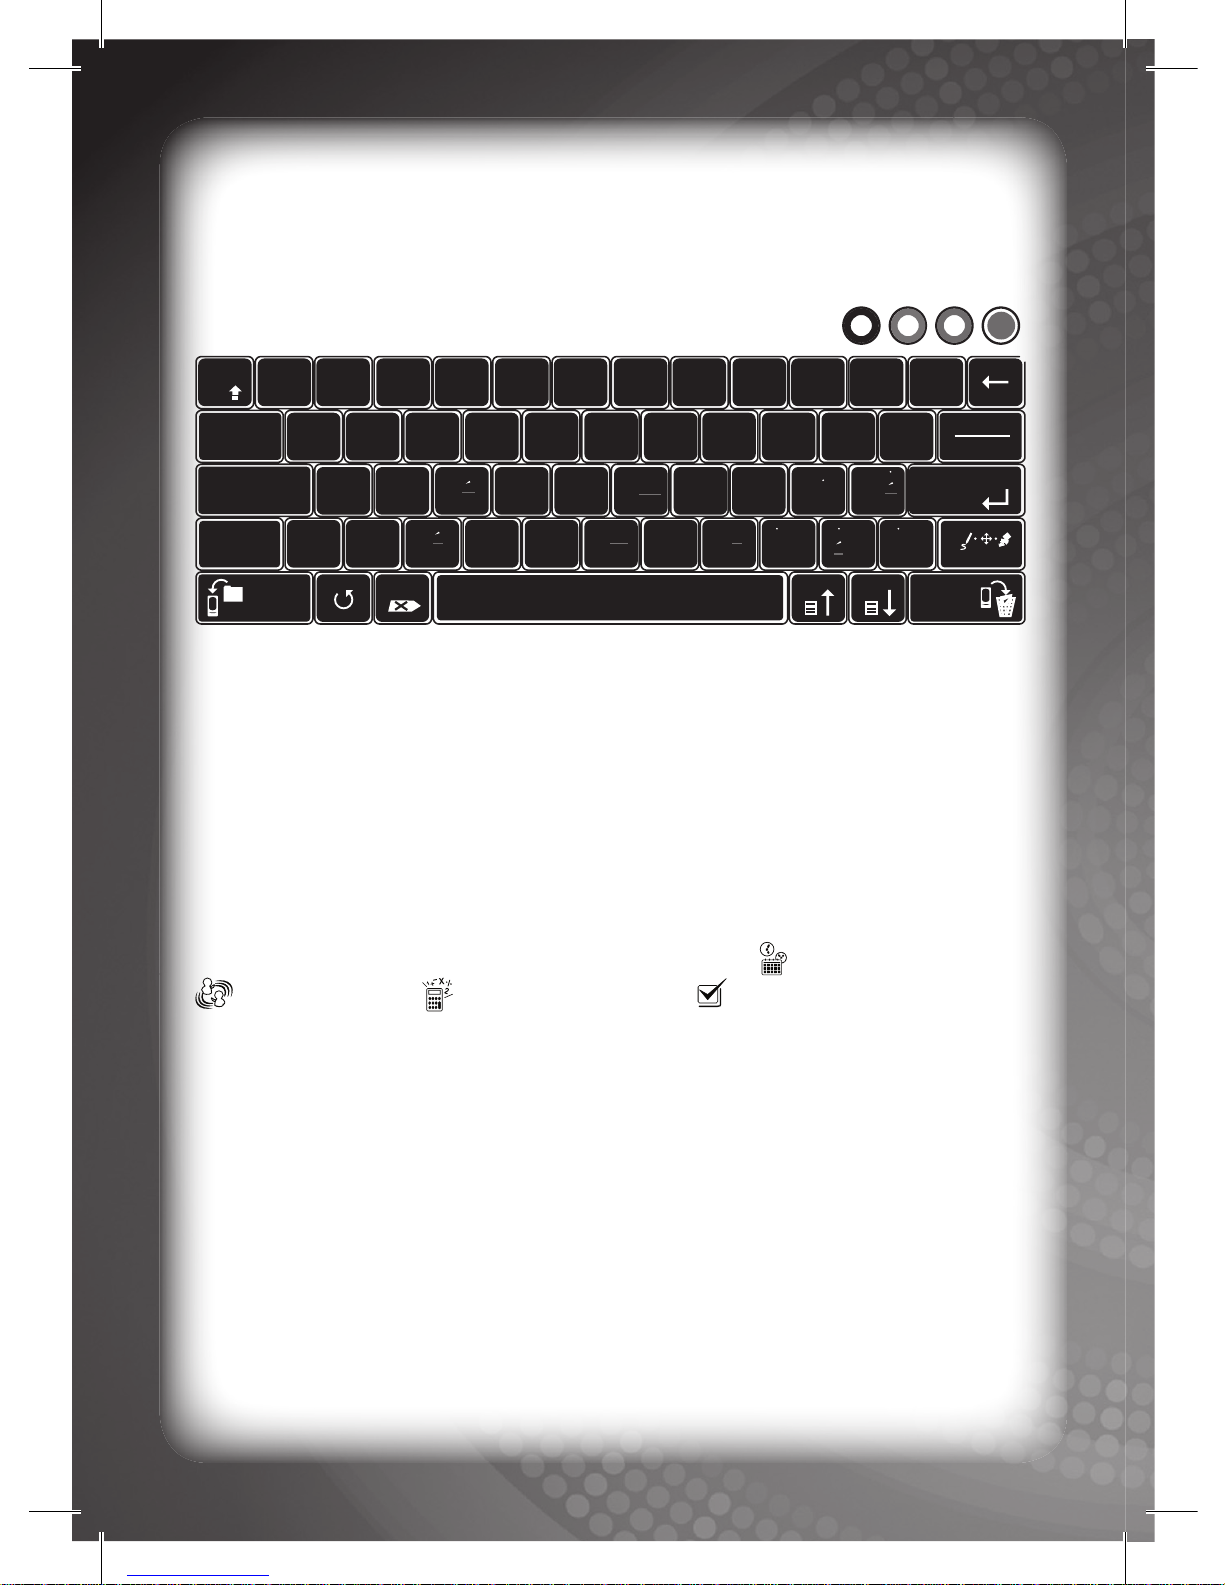
SPECIAL FEATURES &
KEYBOARD LAYOUT
Power Key: Press this key to either turn the unit ON or OFF.
Language Selection Keys: Three (3) language selection keys can
be found to the left of the Power key. Press one (1) of the three (3)
language selection keys to select the operating language.
Touch-Screen Icons: Four (4) touch-screen icons can be found on
the left-hand side of the LCD screen. From top to bottom these icons
will directly take you to the following activities: Schedule (weekly),
Address book, Calculator, and the To-Do list.(Refer to each
activity for further details).
Power and Data Reading Indication lamps: When the green-colored
lamp on the left is illuminated the unit is reading or saving data
(either internal or external). When the red colored lamp is illuminated
the unit’s power is on.
Touch-pad: The nine (9) pressure point touch-pad can be used to
move the cursor on the screen. The pressure point in the centre of
the touch-pad can be used as an Enter key to confi rm a selection.
1 2 3 4 5 6 7 8 9 0
-
Q
A
ZW
Q
W
E R T Y U I O P
E R T Y U I O P
E R T Y U I O P
AAQ
S
D F G H
J
K
L
S
D F G H
J
K
L
S
D F G H
J
K
L
N
M
;
:
‘
“
Z
Z
X
W
C V
B
N
M
X C V B N M
X C
V
B
N
,
<
.
>
/
?
=
! @ # $ %
^
&
*
( )
-
+
shift
caps lock
answer
esc
delete all
help!
Accent
Record
£ ¥
~
DO# FA#
SO#/
SOL#
LA#
DO#
DO
RE
MI FA LA
SO/
SOL
TI/
SI
DO MI
RE
RE
RE
RE#
RE#
RE#
RE#
English ON/OFF
Español Français
Page 13
8
ROM Card: The ROM card (included) can be used to save personal
data in the following activities: Diary, Schedule, Address book, To-Do
list, and Word processor. (Refer to each activity for further details).
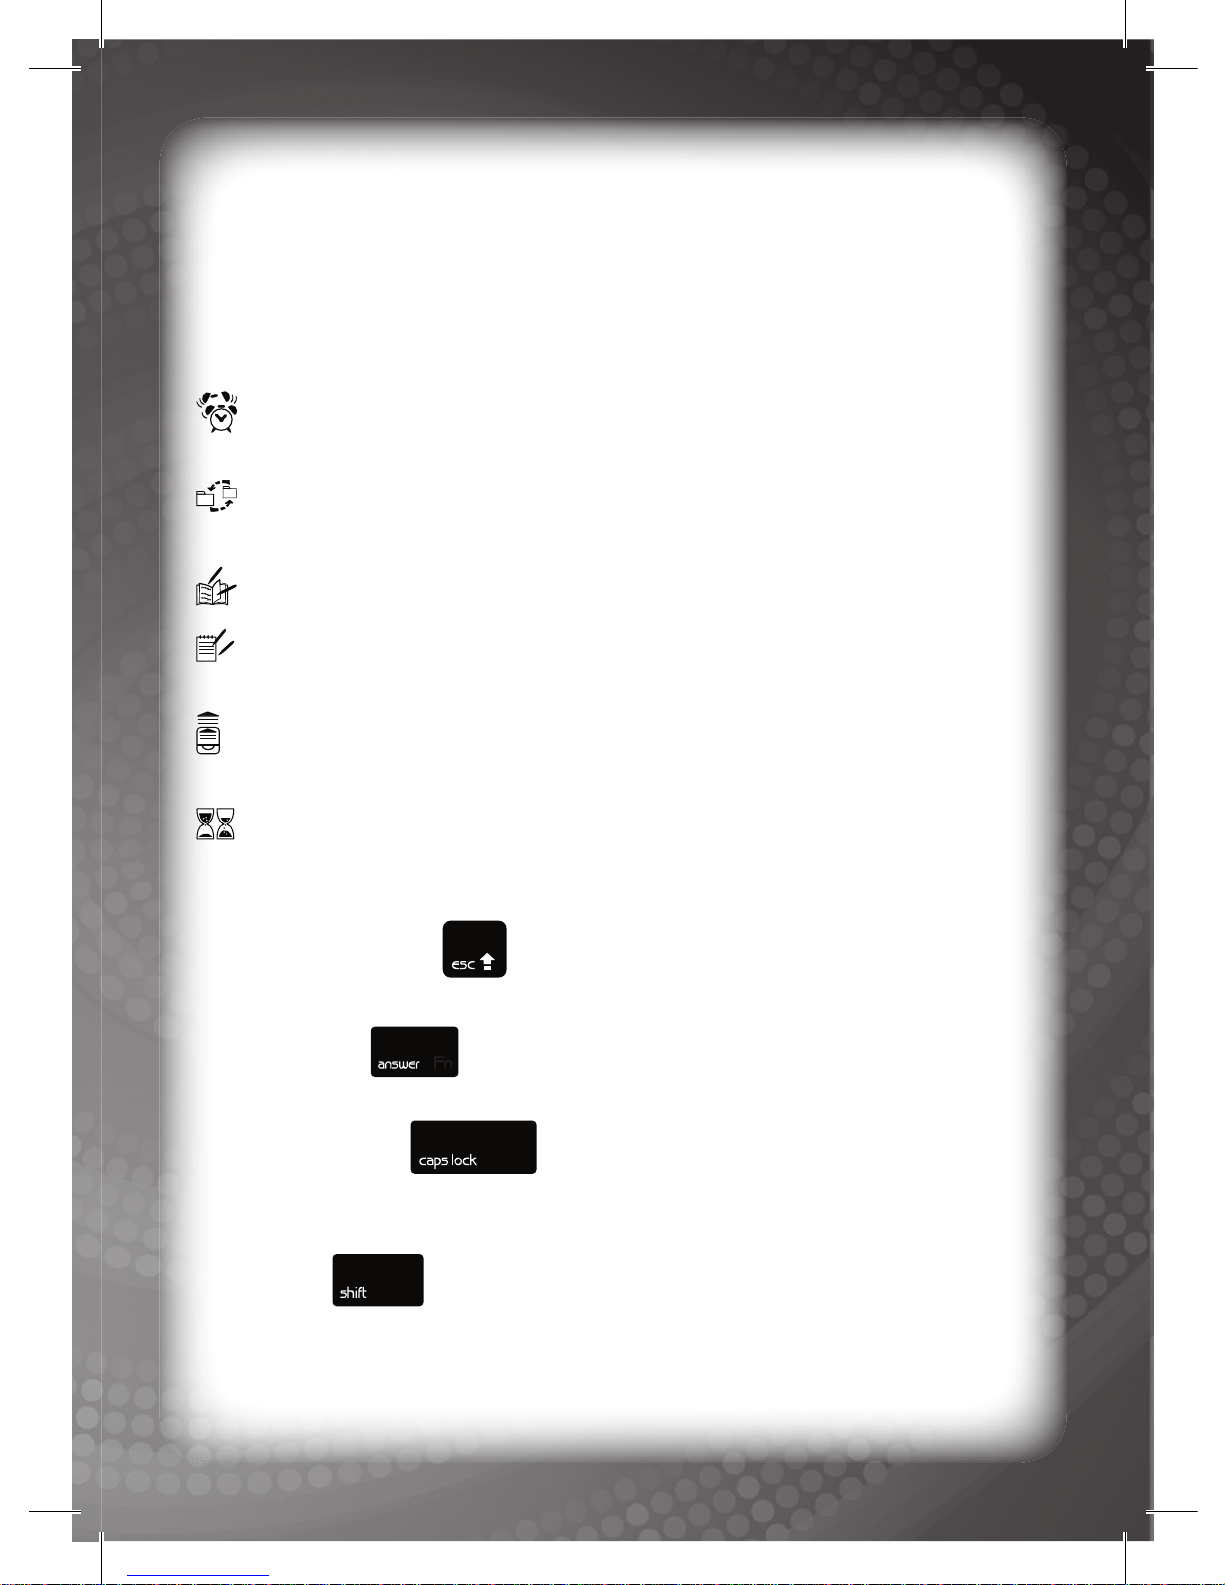
LCD Screen Icons: The six (6) LCD screen icons can be found
along the top of the LCD screen. The icons are as follows (from left
to right):
Alarm clock: Displayed when the alarm clock has been set.
(Refer to the section “My Laptop” for further details).
Saving data: Displayed when data is being saved (either i
nternal or external).
Typing: Displayed when you are typing text.
To-Do list: Displayed when there is an entry in the to-do list.
(Refer to the section “Utilities” for further details).
ROM card: Displayed when you want to save data on the ROM
card when the ROM card is not inserted into the unit.
Downloading: Displayed when the unit is reading data from the
ROM card or you are downloading music from the Music Download
activity. (Refer to the section “Music” for further details).
Esc (Escape) Key:
Press this key to escape from the current activity.
Answer Key:
Press this key to receive the answer during a learning activity.
Caps Lock Key:
Press this key to turn the caps lock on. Press once more to turn the
caps lock OFF.
Shift Key:
Hold down this key and press an alphabet key to display the upper
case of the selected letter. Hold down this key and press any number
key to display the related symbol shown on the selected key.
Page 14
9
Monetary Key:
Press this key in any typing activity to display a list of monetary
symbols.
ROM Card Data Save Key:
Press this card to save data onto the ROM card.
Repeat Key:
Press this key to repeat a question or to repeat music.
Delete All Key:
delete all
Press this key to delete all the displayed text that you have typed on
the screen.
Backspace Key:
Press this key to delete the letter to the left of the fl ashing cursor.
Accent/Record Key:
Press this key in any typing activity to display a list of accented
letters (Spanish and French).
Press this key to record music. (Refer to the section “Music” for
further details).
Enter Key:
Press this key to confi rm your selection or press to use as an Enter
key in any typing activity.
Draw/Help Key:
Press this key during any learning activity to display the answer to
the question for a short period of time.
Press this key in the Trivia activities to receive a hint.
Press this key in the Memo Freehand activity to change the stroke of
the pen, move the cursor, or select the eraser. (Refer to the section
“Utilities” for further details).
Page 15
10
Description of
Activities
My Laptop
Enter this top folder to access the following subfolders
Display brightness
Click on the icon to change the brightness of the LCD. Use the
mouse or touch-pad to make and confi rm your selection.
Volume
Click on the icon to change the volume level. Use the mouse or
touch-pad to make and confi rm your selection.
Clock
Click on this folder to access the following subfolders.
Date set
Click on the icon to set the date. Use the touch-pad to input the
day, month and year.
Page Up Key:
Press this key to move to the top of the displayed page.
Page Down Key:
Press this key to move to the bottom of the displayed page.
ROM Card Delete Key:
Press this key to delete all the saved data from the ROM card.
NOTE: When operating this unit in Spanish, please refer to the alphabet
letters printed in blue color or underlined with a blue line. When operating
this unit in French, please refer to the alphabet letters printed in red color
or underlined with a red line.
Page 16
11
Clock set
Click on the icon to set the clock. Use the touch-pad to select
PM or AM and then to input the hours and minutes.
Alarm set
Click on the icon to set the clock. Use the touch-pad to input the
hours and minutes. Hours will be input in the 24-hour clock format.
Click in the square to turn the alarm clock on or off. When the alarm
is set, the alarm icon will be displayed on the top of the LCD screen.
User setup
Click on the icon to change your user name and password details.
Your previously saved user name will be displayed at the top of
the screen. If no username has been saved, the default user name
will be displayed. (Default user name = ABCDEF). You now need
to input your previously saved password. If no password has been
saved, please input the default password and press the Enter key.
(Default password = 123456). If your details are correct, you can
now input your new user name here and your new password
here . This unit will automatically update your new settings.
Click on the icon to delete all the saved data on your ROM card.
This unit will need confi rmation before any data from the ROM card
is deleted. Click YES to delete all data or NO to cancel this operation.
NOTE: Please note that any deleted data from the ROM card cannot
be retrieved. Please also note that the user name and password will
return to the orig inal default setting when all data is deleted from the
ROM Card.
Utilities
Diary
If this folder is entered without entering the user setup, you will be
required to input your password for private security reasons. (Refer
Page 17
12
to First-Time Use for further details). If the user setup has been
completed, this folder can be entered directly. This unit can save
up to three (3) diary entries each with a total character count of 250
characters (including spaces). If no diary has been saved you will
only see the diary titles as DD/MM/YY (day/month/year). However if
a diary has been previously saved the unit will display the title with
a date, for example, 25/12/05. Click on a new title to create a new
entry or click on a previously saved title to read the diary.
Creating a new diary:
After clicking on the title, the unit will then display a new diary with
the current date automatically displayed at the top. You can also
select from four (4) different weather icons depending on the days
weather. The four (4) icons are rainy, sunny, cloudy, and
stormy. A small character counter will also be displayed showing how
many characters (or letters) have been typed.
Saving a diary:
To save a created diary press the ROM Card Data Save key .
To confi rm, press YES. Your personal diary will then be saved onto
the ROM card.
Modifying the contents of a saved diary:
Insert the ROM card and open the diary to be modifi ed and make
any necessary modifi cations. Press the ROM Card Data Save key
. To confi rm, press YES. Your diary will then be updated and
saved onto the ROM card. Please note that the date the diary was
modifi ed will not affect the title of the diary.
Deleting a saved diary:
To delete a diary entry, highlight the title of the diary that you want to
delete and then simply press the ROM Card Delete key .
To confi rm, press YES. Your selected diary will then be deleted from
the ROM card.
Page 18
13
Schedule (Weekly)
If this folder is entered without entering the user setup, you will be
required to input your password for private security reasons. (Refer to
First-Time Use for further details). If the user setup has been completed,
this folder can be entered directly. If no schedule has been saved, you
will see an empty weekly schedule. Monday through to Thursday will
be displayed on the screen and to view Friday through to Sunday click
on the right touch-pad key. If a schedule (daily) has been previously
saved the unit will display the selected icon which you saved (refer
below for further details). Click on a day of the week to create a new
entry or to view a previously saved entry.
Creating a new schedule:
After clicking on a day of the week, the unit will then display a new
schedule entry for the selected day with the date automatically displayed
at the top. A square box will be displayed on the left where you can
select from eight (8) different icons depending on your schedule. You
can also type in your schedule details. (Please note that the length of
the name can only be 16 characters long, inclusive of spaces).
Saving a schedule:
To save a new schedule press the ROM Card Data Save key
.
To confi rm, press YES. Your schedule will then be saved onto the
ROM card. The unit will display the top menu of the weekly schedule.
Modifying the contents of a schedule:
Insert the ROM card and select the date of the schedule to be modifi ed
and make any necessary modifi cations. Press the ROM Card Data
Save key . To confi rm, press YES. Your schedule will then be
updated and saved onto the ROM card.
Deleting a saved schedule:
To delete a schedule entry, select the date of the schedule to be
deleted and then simply press the ROM Card Delete key .
To confi rm, press YES. Your selected schedule will then be deleted
from the ROM card.
Page 19

14
Schedule (Daily)
When this folder is opened the unit will display a full monthly calendar.
The month and the year can be seen at the bottom of the screen. To
enter a selected day you will be required to input your password for
private security reasons if you have not completed the user setup.
(Refer to First-Time Use for further details). If the user setup has
been completed, the day can be entered directly.
Creating a new schedule:
(Refer to details on creating a new schedule under the Weekly
Schedule).
Saving a schedule:
(Refer to details on saving a schedule under the Weekly Schedule).
Modifying the contents of a schedule:
(Refer to details on modifying the contents of a schedule under the
Weekly Schedule).
Deleting a saved schedule:
(Refer to details on deleting a saved schedule under the Weekly
Schedule).
Address book
If this folder is entered without entering the user setup, you will be
required to input your password for private security reasons. (Refer
to First-Time Use for further details). If the user setup has been
completed, this folder can be entered directly. This unit can save up
to eight (8) personal address entries. If no address has been saved,
you will only see a numbered title. However, if an address has been
previously saved, the unit will display the name of the person’s address which you have previously saved. Click on a new title to create
a new entry or click on a previously saved title to read the address
and other personal information.
Creating a new address:
After clicking on the blank title, the unit will then display a new address
entry.
Page 20
15
Row 1: Star icon . This is where you need to type in the name.
If you want to change the star icon, click on the star icon to
select if the person is a boy or a girl . (Please note
that the length of the name can only be 15 characters long,
inclusive of spaces).
Row 2: The house icon is for the address. (Please note that
the length of the address can only be 48 characters long,
inclusive of spaces).
Row 3: The telephone icon is for the telephone number. (Please
note that the length of the telephone number can only be 16
characters long, inclusive of spaces).
Row 4: The mobile telephone icon is for the mobile telephone
number. (Please note that the length of the mobile telephone
number can only be 16 characters long, inclusive of
spaces).
Row 5: The email icon is for the email address. (Please note
that the length of the email address can only be 24
characters long, inclusive of spaces).
Row 6: The cake icon is for the person’s birthday. (Please note
that the length of the birthday date can only be 16
characters long, inclusive of spaces).
Row 7: The note pad icon is for any additional notes. (Please
note that the length of the additional notes can only be 40
characters long, inclusive of spaces).
Saving an address:
To save a created address press the ROM Card Data Save key
. To confi rm, press YES. The address will then be saved onto
the ROM card.
Page 21
16
Modifying the contents of a saved address:
Insert the ROM card and open the address to be modifi ed and make
any necessary modifi cations. Press the ROM Card Data Save key
. To confi rm, press YES. The address will then be updated
and saved onto the ROM card.
Deleting a saved address:
To delete an address entry, highlight the title of the address to be
deleted and then simply press the ROM Card Delete key .
To confi rm, press YES. The selected address will then be deleted
from the ROM card.
Conversions
When the conversions folder is opened, you will be required to enter
a quantity to convert with. You will then have to select a measurement
to convert from. A selection of fi ve (5) different measurements will
be displayed for you to select from. Once the fi rst measurement has
been confi rmed, select a second measurement to convert to. The
conversion will be displayed on-screen. Refer to the following chart
for the various measurements:
Conver From:
Convert To:
Weight
Kilogram
Weight
Kilogram
Gram Gram
Pound Pound
Ton Ton
Ounce Ounce
Temperature
Degree Celsius
Temperature
Degree Celsius
Degree Fahrenheit Degree Fahrenheit
Speed
Kilometer per hour
Speed
Kilometer per hour
Mile per hour Mile per hour
Page 22
17
Length
Inch
Length
Inch
Centimeter Centimeter
Foot Foot
Yard Yard
Mile Mile
Kilometer Kilometer
Millimeter Millimeter
Meter Meter
Quantity
Gallon
Quantity
Gallon
Cup Cup
Liter Liter
Ounce Ounce
Tablespoon Tablespoon
Teaspoon Teaspoon
Calculator
A calculator will be displayed when this folder is opened. You can
either click on the numbers and symbols displayed or input the
calculation directly using the keyboard. Please note that a maximum
number of eight (8) digits (including decimal points) can be input for
one calculation.
Budget planner
Control and budget your pocket money with this built-in budget
planner. If this folder is entered without entering the user setup, you will
be required to input your password for private security reasons. (Refer
to First-Time Use for further details). If the user setup has been
completed, this folder can be entered directly. This unit can save up to
eight (8) budget planner entries.
Page 23

18
Row 1: The current date will be displayed. (Refer to the section “My
Laptop” for further details on setting the time and date).
Row 2: The fi nal sum will be displayed in this row.
Row 3: Here you can insert any particulars regarding what you spend
your money on or alternatively from where you receive any
extra money. The fi rst particular will have a default of “cash”.
Please insert the amount of money you have as a starting
point to create your budget. (Please note that the length of
the particulars can only be nine (9) characters long, inclusive
of spaces).
Row 4: Insert the amount here that was spent or received. If the
money was received then press the minus key (-) and
change it to a plus symbol (+). (Please note that the length of
the numerals can only be seven (7) numbers long, inclusive
of the decimal point).
Continue to add more particulars where needed. Each time an amount
is added or subtracted, the total amount on row two (2) will change. If
the plus symbol (+) changes to a minus symbol (-) in row two (2) this
means that you will have spent more money than you can!
To-Do list
If this folder is entered without entering the user setup, you will be
required to input your password for private security reasons. (Refer
to First-Time Use for further details). If the user setup has been
completed, this folder can be entered directly. This unit can save up
to eight (8) personal to-do list entries. If no to-do list entries have
been saved, you will only see a numbered title. However if a to-do list
entry has been previously saved the unit will display the contents of
the list.
Creating a new to-do list entry:
Click on a new title to create a new entry. A check box is displayed
on the right. Once you have completed one of the tasks in your to-do
list you can check it so you know it has been done. (Please note that
the length of each entry can only be 15 characters long, inclusive of
spaces).
Page 24
19
Saving a to-do list entry:
To save a created to-do list press the ROM Card Data Save key
. To confi rm, press YES. Your personal to-do list will then be
saved onto the ROM card.
Modifying the contents of a to-do list entry:
Insert the ROM card and click on an entry to be modifi ed and make
any necessary modifi cations. Press the ROM Card Data Save key
. To confi rm, press YES. Your to-do list entry will then be
updated and saved onto the ROM card.
Deleting the contents of the to-do list:
To delete contents, simply press the ROM Card Delete key .
To confi rm, press YES. Your to-do list contents will then be deleted
from the ROM card.
Personal profi le
If this folder is entered without entering the user setup, you will be
required to input your password for private security reasons. (Refer
to First-Time Use for further details). If the user setup has been
completed, this folder can be entered directly. In this folder you can
save all your personal information.
Creating your new personal profi le:
Row 1: The star icon will show you where you need to type your
name. If you want to change the star icon, click on the star
icon to select a boy icon or a girl icon . (Please note
that the length of the name can only be 15 characters long,
inclusive of spaces).
Row 2: The house icon for the name of the city or town you live
in. (Please note that the length of the name can only be 48
characters long, inclusive of spaces).
Row 3: The cake icon is for your birthday. First-time use of the
unit will display the format for how the date needs to be
input, DD-MM-YYYY (day-month-year); for example, 12-
08-2000. Once the date has been entered with the correct
Page 25
20
format, you will be able to scroll down to see what your star
sign is. If no birthday date is input, your star sign will not be
displayed.
Row 4: You can select the type of pet you own. Simply click on
the small scroll icon located on the left of this row to fl ick
through the various types of pets. The following pets can be
selected: Dog, cat, bird, fi sh, rabbit, horse, mouse, turtle,
pig, or other.
Saving your personal profi le:
To save your personal profi le press the ROM Card Data Save key
. To confi rm, press YES. Your personal profi le will then be
saved onto the ROM card.
Modifying the contents of your personal profi le:
Insert the ROM card, open your personal profi le, and make any
necessary modifi cations. Press the ROM Card Data Save key
. To confi rm, press YES. Your personal profi le will then be
updated and saved onto the ROM card.
Deleting the contents of your personal profi le:
To delete your personal profi le, open your profi le and simply press
the ROM Card Delete key .
To confi rm, press YES. Your personal profi le will then be deleted
from the ROM card.
My dictionary
This folder contains a built-in basic dictionary. When this folder is
opened, a list of letters alphabetically arranged will be displayed
from A to Z. Use the touch-pad or the mouse to scroll down the list
to fi nd the desired letter. You can also use the keyboard to type in
the fi rst letter to jump directly to the letter. Once you have entered
the selected letter the unit will then show you all the built-in words
starting with your chosen letter. All the other words will be displayed
in alphabetical order. Click a word to see the picture and defi nition of
the word. The following letters in brackets can also be seen:
(n) = Noun (v) = Verb (adj) = Adjective
Page 26
21
Memo freehand
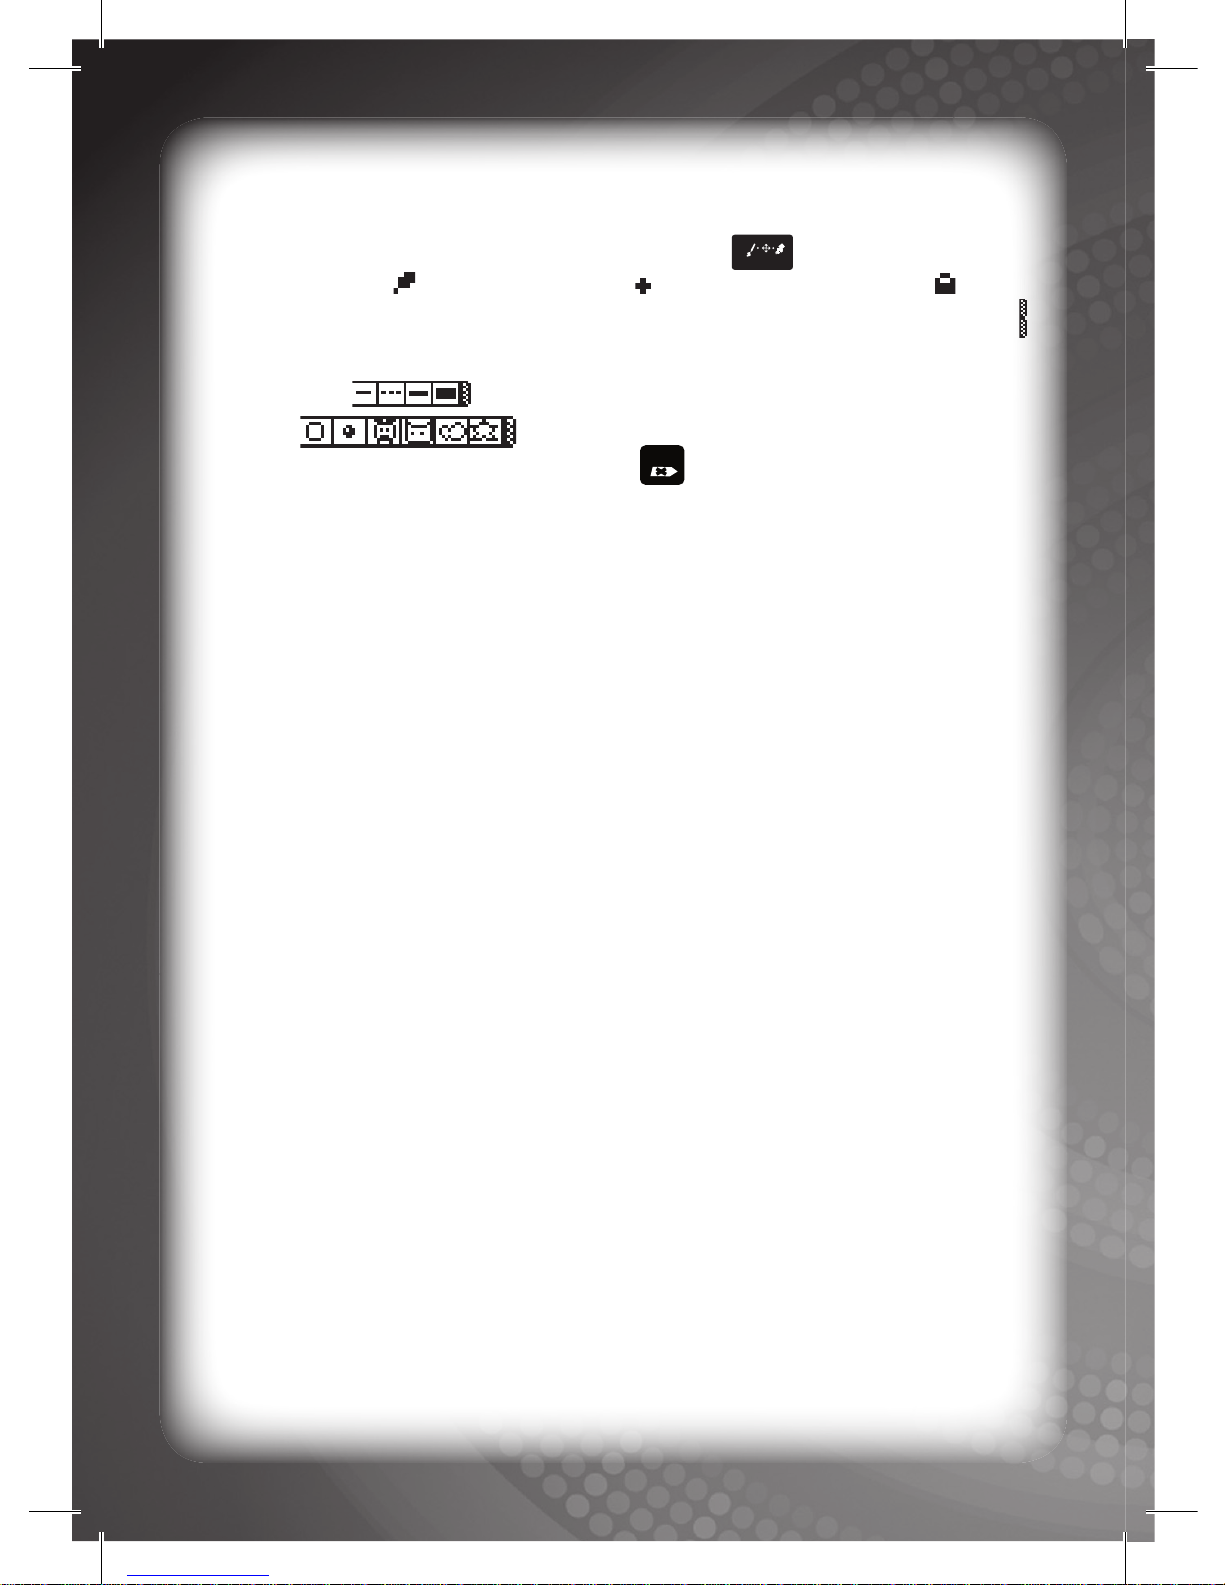
Open this folder to create a freehand drawing. Use the mouse or the
touch-pad to draw while using the Draw key
help!
to select between
the Draw cursor , the Move cursor , and the Erase cursor .
When using the Move cursor, click on one (1) of two (2) side panels
to view and select from different pen strokes and stamps.
Pen strokes:
Stamps:
At any time, press the Delete All key
delete all
to clear the screen. Please
note that Memo freehand creations cannot be saved.
Vocabulary & Grammar
Opposites
A question will scroll across the top of the screen. You are required
to type in the opposite word in the space provided near the highlighted
word displayed in the question.
Missing letter
A word, with one letter missing, will be displayed with a related
picture. You are required to type in the correct answer.
Missing letters
A word, with two (2) letters missing, will be displayed. You are
required to type in the correct answers.
Complete the sentence
A sentence will scroll across the top of the screen. You are required
to select the correct word(s) to complete the sentence from a choice
of three (3) answers.
Letter eliminator
A word with an extra letter will be displayed with a related picture.
You are required to select the extra letter and press the Enter key.
Page 27

22
Capitals
A question will be displayed across the top of the screen. You are
required to move the arrow displayed under the question to select
which letter(s) should be in capitals. Use the keyboard to type in the
correct capital letter(s).
Which word
A sentence will scroll across the top of the screen. You are required
to select the correct word from a choice of three (3) answers.
Wrong letter
A question will be displayed across the top of the screen. You are
required to select which letter is incorrect by moving the arrow to the
incorrect letter. Use the keyboard to type in the correct letter.
Singular
A sentence will scroll across the top of the screen. You are required
to type in the singular form of the highlighted word in the sentence.
Plural
A sentence will scroll across the top of the screen. You are required
to type in the plural form of the highlighted word in the sentence.
Adjectives
A sentence will scroll across the top of the screen. You are required
to select the correct adjective from a choice of three (3) answers.
Verbs
A sentence will scroll across the top of the screen. You are required
to select the correct verb from a choice of three (3) answers.
Collective nouns
A sentence will scroll across the top of the screen. You are required
to select the correct collective noun from a choice of three (3) answers.
Prepositions
A sentence will scroll across the top of the screen. You are required
to select the correct preposition from a choice of three (3) answers.
Page 28

23
Anagrams
A word will be displayed at the top of the screen with a related picture.
This picture and the given word will disappear. In the space provided
you are required to make an anagram, or a new word with the same
letters. If the answer is correct, a new picture for the new word will be
displayed.
Continuous tense
A word will be displayed at the top of the screen with a space below
for you to type in the continuous tense of the given word; for example,
the continuous tense of “sink” would be “sinking”. The past and past
perfect tenses for the given word will also be displayed on the screen
to help you.
Past tense
A word will be displayed at the top of the screen with a space below
for you to type in the past tense of the given word; for example, the
past tense of “sink” would be “sank”. The continuous and past
perfect tenses for the given word will also be displayed on the
screen to help you.
Past perfect tense
A word will be displayed at the top of the screen with a space below
for you to type in the Past perfect tense of the given word; for
example, the Past perfect tense of “sink” would be “sunk”. The
continuous and past tenses for the given word will also be displayed
on the screen to help you.
Math
Addition
An addition equation will be displayed on the screen. You can either
use the keyboard to input the answer directly or use the special
panel provided on-screen . The decimal point key on the panel
can only be used in a decimal point equation. The left arrow key can
be used to delete your last input number. The All Clear key (C) can
Page 29

24
be used to clear all input numbers. If the equals key (=) is pressed,
the answer will be given to you and no point will be gained.
Subtraction
A subtraction equation will be displayed on the screen. For further
details of key usage; please refer to the details described in activity
“Addition” directly under the “Math” folder.
Multiplications
A multiplication equation will be displayed on the screen. For further
details of key usage; please refer to the details described in activity
“Addition” directly under the “Math” folder.
Divisions
A division equation will be displayed on the screen. For further
details of key usage; please refer to the details described in activity
“Addition” directly under the “Math” folder.
Disappearing digits
A mixture of the above addition, subtraction, multiplication, and division
equations will be randomly displayed on the screen. For further details
of key usage; please refer to the details described in activity “Addition”
directly under the “Math” folder.
Rounding
A rounding equation will be displayed on the screen. You are required
to round up or down the displayed number. For further details of key
usage; please refer to the details described in activity “Addition” directly
under the “Math” folder.
Greater than & less than
Two equations will be displayed on the screen. You are required to
calculate the two (2) equations and decide if the fi rst equation is less
than, greater than, or equal to the second equation. You can either
use the keyboard to input the answer directly or use the special panel
provided on-screen . The right arrow key (>) is used for greater than
Page 30

25
and the left arrow key (<) is used for less than. The equals key (=) is
used if the two (2) equations are equal.
Decimals
Click on this folder to access the subfolders.
Addition
An addition equation using a decimal point will be displayed on the
screen. For further details of key usage; please refer to the details
described in activity “Addition” directly under the “Math” folder.
Subtraction
A subtraction equation using a decimal point will be displayed on
the screen. For further details of key usage; please refer to the
details described in activity “Addition” directly under the “Math”
folder.
Multiplications
A multiplication equation using a decimal point will be displayed
on the screen. For further details of key usage; please refer
to the details described in activity “Addition” directly under the
“Math” folder.
Divisions
A division equation using a decimal point will be displayed on the
screen. For further details of key usage; please refer to the details
described in activity “Addition” directly under the “Math” folder.
Mixed decimals
A mixture of the above addition, subtraction, multiplication, and
division equations will be randomly displayed on the screen. For
further details of key usage; please refer to the details described
in activity “Addition” directly under the “Math” folder.
Ratios
A graph will be displayed on the screen and you are required to use
the keyboard and type in the correct answer.
Page 31
26
Fractions
A mixture addition, subtraction, multiplication, and division fraction
equations will be randomly displayed on the screen. For further
details of key usage; please refer to the details described in activity
“Addition” directly under the “Math” folder.
Percentages
A graph will be displayed on the screen and you are required to use the
keyboard and type in the correct percentage of the colored area of the
graph. Levels two (2) and three (3) will be in the form of an equation.
Disappearing operators
An equation with its answer will be displayed on the screen but
the operator will be missing. You are required to work out what the
missing operator is and either use the keyboard to directly type the
correct answer or press the Enter key when the correct operator is
displayed. (If using the keyboard, press this key
-
-
for minus, hold
the Shift key and press this key for plus, hold the shift key and
press this key for multiply, and press this key for divide).
Geometry
A geometric equation will be displayed and you are required to use
the keyboard and type in the correct answer.
Word problems
A mathematical question will scroll across the top of the screen.
You are required to select the correct answer to the question from a
choice of three (3) answers.
Word Processor
When this folder is opened, you will need to input their previously
saved password. If no password was saved, please input the default
password. (Default password = 123456). If the correct password was
input, one empty word fi le will be displayed. Click on this word fi le
to input text. Once this fi le has been opened, you will be able to freely
type text. Each word fi le can save 250 characters (including spaces)
Page 32
27
and a total of three (3) word fi les can be saved. To save a word fi le,
simply press this key . To confi rm, click YES to save or NO
to
return to the fi le. The saved word fi le will be displayed like this
.
To open a previously saved fi le, click on the desired fi le and select
“Open”. To delete a previously saved word fi le, click on the desired
fi le and select “Delete”. To confi rm, click YES to save or NO to return
to the “Open/Delete” selection screen.
Languages
Language learner
Click on this folder to access the subfolders.
Spanish
Click on this folder to learn words from the current operating
language to Spanish. Select a word from the dictionary list and
press Enter to confi rm. The selected word will be displayed in
both languages. Press the Enter key once more to return to the
dictionary list and select another word to learn.
NOTE: The unit will not display this folder when the unit is operating
in Spanish.
French
Click on this folder to learn words from the current operating
language to French. Select a word from the dictionary list and
press Enter to confi rm. The selected word will be displayed in
both languages. Press the Enter key once more to return to the
dictionary list and select another word to learn.
NOTE: The unit will not display this folder when the unit is operating
in French.
English
Click on this folder to learn words from the current operating
language to English. Select a word from the dictionary list and
Page 33

28
press Enter to confi rm. The selected word will be displayed in
both languages. Press the Enter key once more to return to the
dictionary list and select another word to learn.
NOTE: The unit will not display this folder when the unit is operating
in English.
Translation test
Click on this folder to access the subfolders.
Spanish
You can click on this folder to test yourself on the words learnt
from the Language Learner folder. A word will be randomly
selected and displayed in the current operating language and you
are required to type the displayed word in Spanish in the space
provided. Press the accent key to view a list of all accented
characters if needed.
NOTE:The unit will not display this folder when the unit is operating
in Spanish.
French
You can click on this folder to test yourself on the words learnt
from the Language Learner folder. A word will be randomly
selected and displayed in the current operating language and
you are required to type the displayed word in French in the
space provided. Press the accent key to view a list of all accented
characters if needed.
NOTE: The unit will not display this folder when the unit is operating
in French.
English
You can click on this folder to test yourself on the words learnt
from the Language Learner folder. A word will be randomly
selected and displayed in the current operating language and you
are required to type the displayed word in English in the space
Page 34
29
provided.
NOTE: The unit will not display this folder when the unit is operating
in English.
Trivia
When this folder is entered the unit will display six (6) icons. Each
icon represents a trivia category. Click on an icon to enter the
selected category. The six (6) categories are:
Science
A question relating to science will scroll across the top of the screen.
You are required to select the correct answer from a choice of three
(3) answers.
Nature
A question relating to nature will scroll across the top of the screen.
You are required to select the correct answer from a choice of three
(3) answers.
History
A question relating to history will scroll across the top of the screen.
You are required to select the correct answer from a choice of three (3)
answers.
Geography
A question relating to geography will scroll across the top of the
screen. You are required to select the correct answer from a choice
of three (3) answers.
Entertainment
A question relating to entertainment will scroll across the top of the
screen. You are required to select the correct answer from a choice
of three (3) answers.
Miscellaneous
A question will scroll across the top of the screen. You are required
to select the correct answer from a choice of three (3) answers.
Page 35
Games
NOTE: For all games in this folder, you will be given the option to
choose between 1-player or 2-player modes. Player 1 will
play fi rst and when the game is over Player 2 will then play. At the
end of the game the unit will display the scores for both Player 1 and
Player 2.
Tic-Tac-Toe
When the 1-player mode is selected you will have the fi rst move and
will always be represented by a . To select a space on the grid
you can either use the mouse to move the cursor and click the left
button to select a location, or use the touch-pad to move the cursor
and click the center key to select a location. The unit will then make
a move and will be represented by a . If you or the unit can make
a row (horizontal, vertical or diagonal) the game will be won. If not,
the game will be a tie.
Snake game
When the 1-player mode is selected you will need to use the touch-pad
to control the direction of the snake. The aim of this game is to eat
as many balls without the snake touching any part of its own body
or the four (4) sides of the screen. As the snake eats balls, its body
length will gradually become longer. At times a heart will appear
for a few seconds. If the snake can successfully eat this, the length
of its body will become shorter.
Memory beat
When the 1-player mode is selected you need to use the touch-pad
or the mouse to copy the pattern in the correct order fi rst displayed
by the unit. If you make one (1) incorrect choice, the game will be
over.
Block warp
When the 1-player mode is selected you need to use the touch-pad
or the mouse to move the character around various obstacles
on the screen and collect as many blocks and diamonds as
30
Page 36
possible within the 30 second time limit (60 seconds for level four (4))
.
Once all the blocks and diamonds on one (1) screen have successfully
been collected you can then move onto the next screen. For every
block collected you can gain ten (10) points, and for every diamond
20 points. However if you touch a monster you will lose ten (10)
points. In some screens there will be black-holes
that if you fall
into you will be warped into a different area of the screen. After a
total
of fi ve (5) screens have successfully been completed, you will move
onto the next level. There are a total of four (4) levels in this game.
Bop it
When the 1-player mode is selected you need to use the touch-pad
or the mouse to move the hammer over the various blocks and
smash any unwanted blocks. The aim of this game is to smash any
extra letters in the displayed word to create one (1) single word within
the time limit. Concrete blocks and secret blocks will also be
displayed. Concrete blocks can be smashed out and secret blocks
can also be smashed to reveal a new block. Each secret block may
contain bomb blocks , time freeze blocks , or extra letter blocks.
If a bomb block is revealed the user will need to complete the displayed
word within ten (10) seconds before the bomb detonates and the
game is lost. If a time freeze block is revealed the time countdown
clock (displayed on the top left of the screen) will be frozen for fi ve
(5) seconds giving you an advantage. If an extra letter block is
revealed you may want to keep this block to complete the word or
smash it with the hammer if it’s not required.
After a total of ten (10) words have successfully been completed,
you will move onto the next level. There are a total of four (4) levels
in this game.
Memory match
When the 1-player mode is selected you need to use the touch-pad or
the mouse to select one of the ten (10) cards displayed on the screen.
This card will be fl ipped over to display a picture. You then need to
select one more card. If the two (2) cards match they will disappear.
If the pictures do not match however, the cards will be fl ipped over
again and you need to try once more. Once all the cards have been
suc
cessfully matched, the game will enter the next level. This game
31
Page 37
has four (4) levels.
Rebound
When the 1-player mode is selected you need to use the touch-pad
or the mouse to move the bar located at the lower section of the
screen to catch the falling ball. This ball will bounce off the bar and
surrounding walls and rebound off the two (2) obstacles located in
the middle of the screen. When one of the shapes is hit by the ball
the shape will fl ash and you can gain ten (10) points. However if a
shape is hit too often it will turn into a monster and if this is hit
you will lose ten (10) points. This game will be over if you cannot
successfully catch the ball.
Music
Music tutor
Click on this folder to access the subfolders.
The musical staff
When this folder is open you can learn all the basics about music.
The folders below (Clefs, Notes, Rests, the Musical alphabet,
Symbols, and the Music test) can also be accessed through this
folder or by each individual folder as necessary. Read through
each page to learn all about music. At the end you can take a
simple test to see how much you have learned. To take the test,
simply click on the square box at the end of the lesson (end of the
Symbols folder). For further details, refer to the Music Test folder.
Clefs
Learn all about musical clefs here.
Notes
Learn all about the types of musical notes here.
Rests
Learn all about the types of musical rests here.
Musical alphabet
Learn about the musical alphabet here.
32
Page 38
Symbols
Learn about some common types of musical symbols here.
Music test
Answer ten (10) questions related to the information learnt in the
Music Tutor folder. You are required to select the correct answer
from a choice of three (3) answers with your high score being
displayed at the end of the test. Each correct answer is worth
ten (10) points.
Creation time
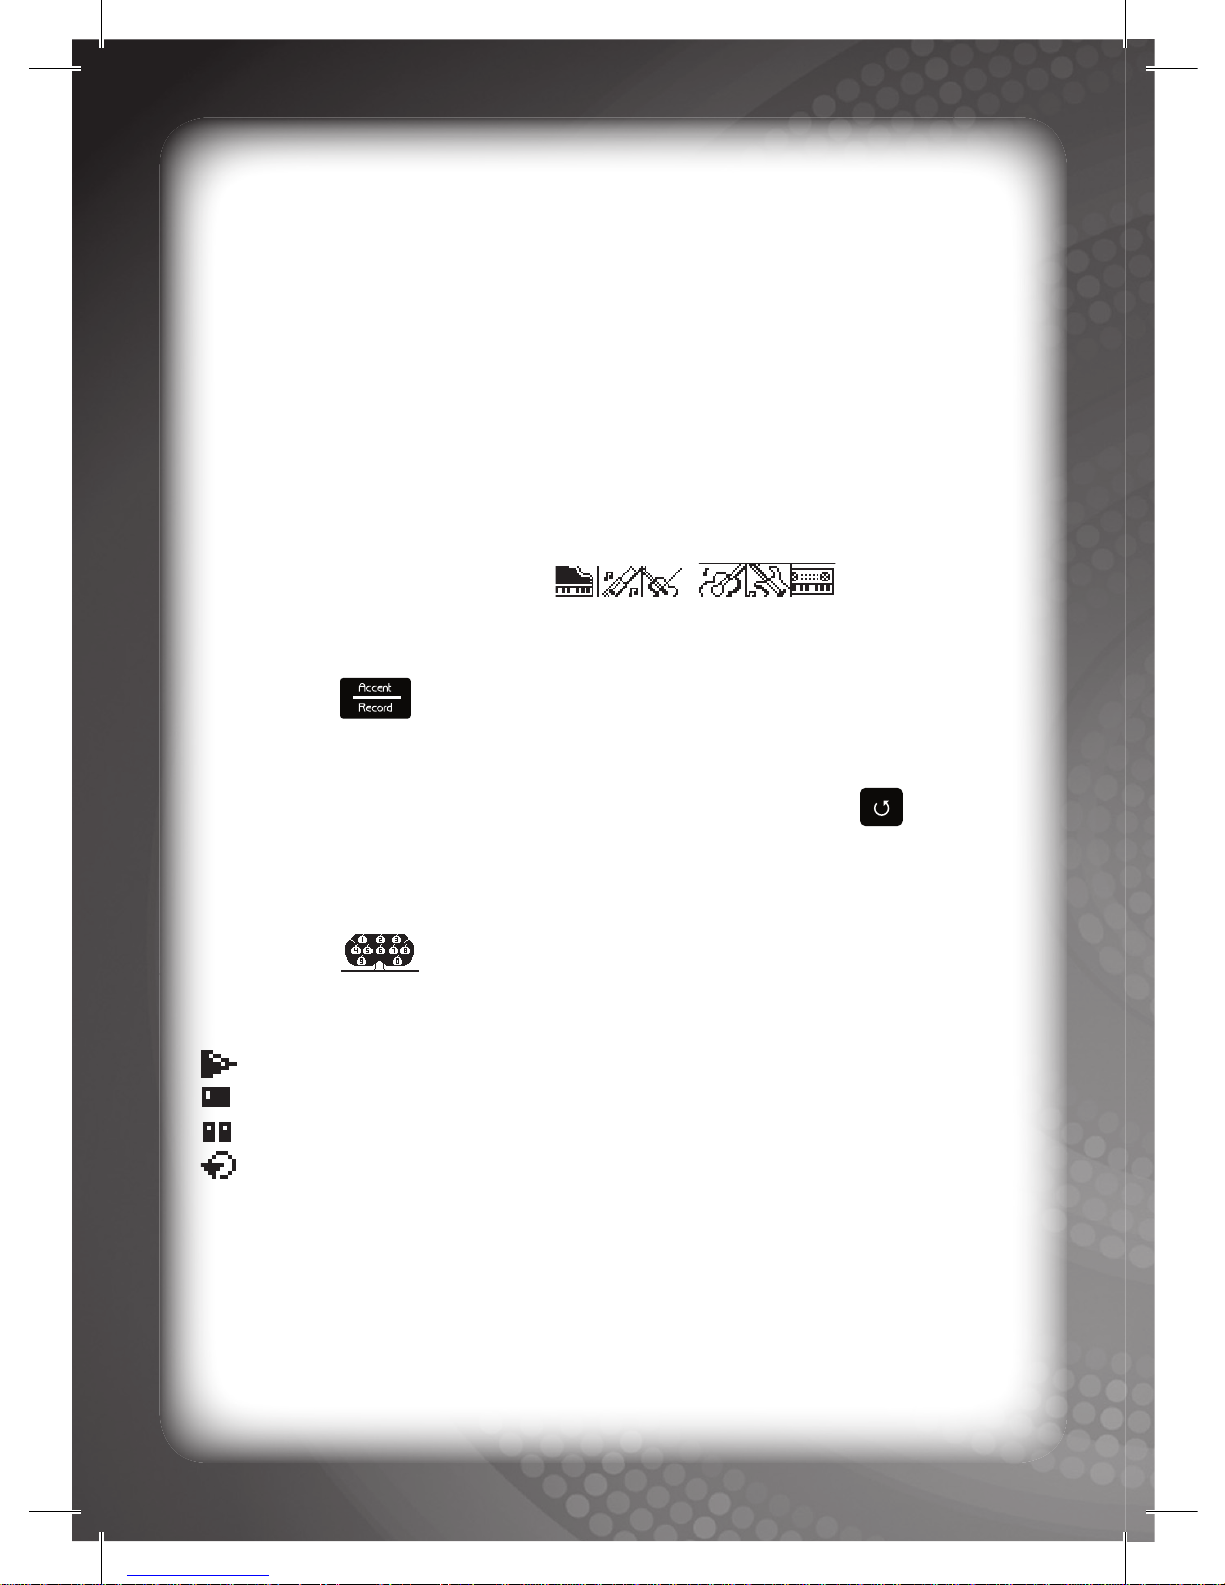
You can create and record musical creations in this folder. Select
one of the six (6) instruments (Piano,
Bassoon, Violin, Guitar, Bass and Electronic organ). Use the
keyboard to play musical notes. To record your music, press the
Record key on the keyboard before creating your musical
piece and then play freely changing instruments when needed. A
total of 127 notes can be recorded in one (1) musical piece. To
playback your creation, simply press the Playback key .
Music download
When this folder is entered a selection of ten (10) different songs will
be displayed . To download a song simply click on any
number and wait for the song to download (a few seconds). When
the song is playing, you can use the following functions:
Click this to play the song.
Click this to stop the song.
Click this to pause the song.
Click this to repeat the song (continuously).
Typing
Touch type
A word will be displayed on the screen and you are required to touch
type (i.e. type without looking at the keyboard where possible) the
same word within the one (1) minute time limit.
33
Page 39
Speed typing
A sentence will be displayed and you are required to type the same
sentence using upper case letters where displayed within the one (1)
minute time limit. After one (1) minute you will be given a score relating
to how many letters were typed correctly. If you could type more than
70 characters within the time limit, the unit will move on to the next
level.
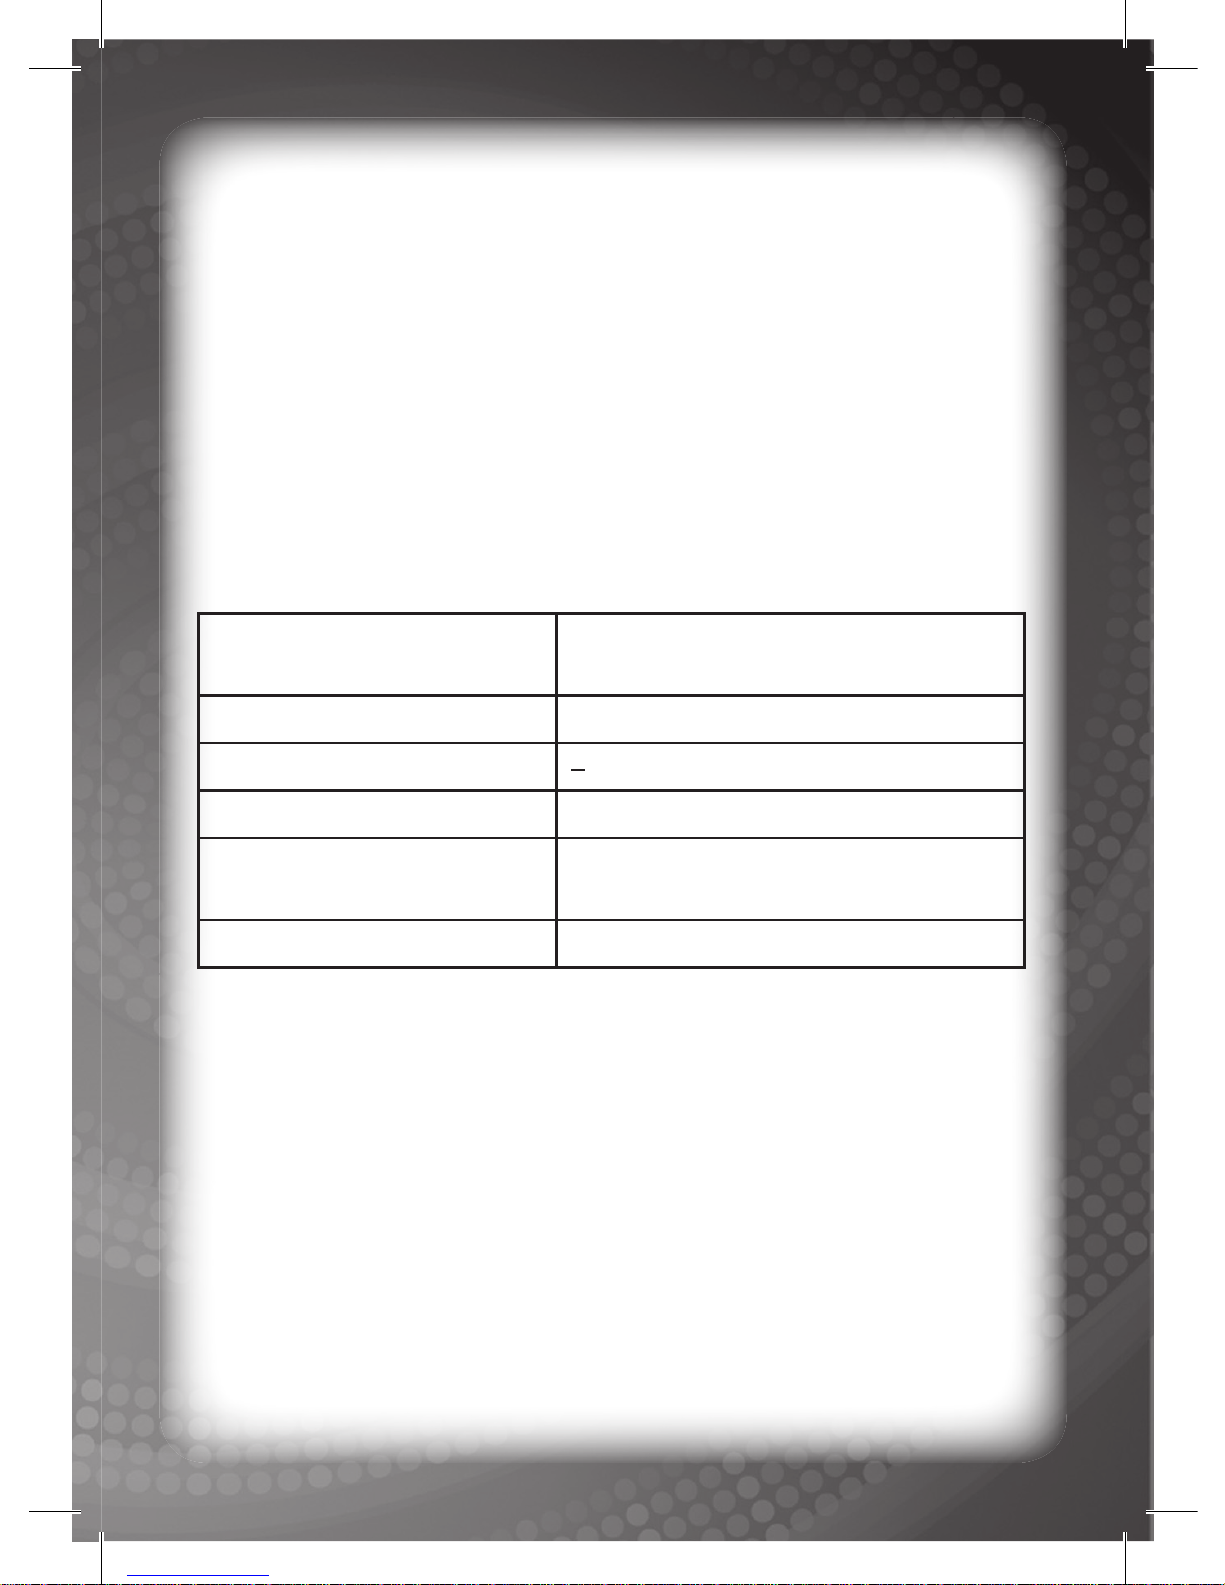
Specifications
Battery Size AA 1.5V (Included for demonstration
purpose only)
Operating Voltage
1.5V x 4
Power Consumption
~
0.45W
Operation Temperature
10°C to 40°C (50°F to 104°F)
Unit Dimensions 226.7mm(L) x 190.5mm(W)
x 50.8mm(H)
Weight
(without batteries) 0.9Kg
NOTE:
Specifi cations and functions are subject to change without
prior notice.
Check out our other NEW educational toys!
Startright®
www.startright-kids.com
34
Page 40

#11874
English
Printed in China
Copyright © 2008
HANZAWA (HK) LTD.
World Commerce Centre
Harbour City, 11 Canton Road
Tsim Sha Tsui, Kowloon
Hong Kong
www.hanzawa.com.hk
 Loading...