

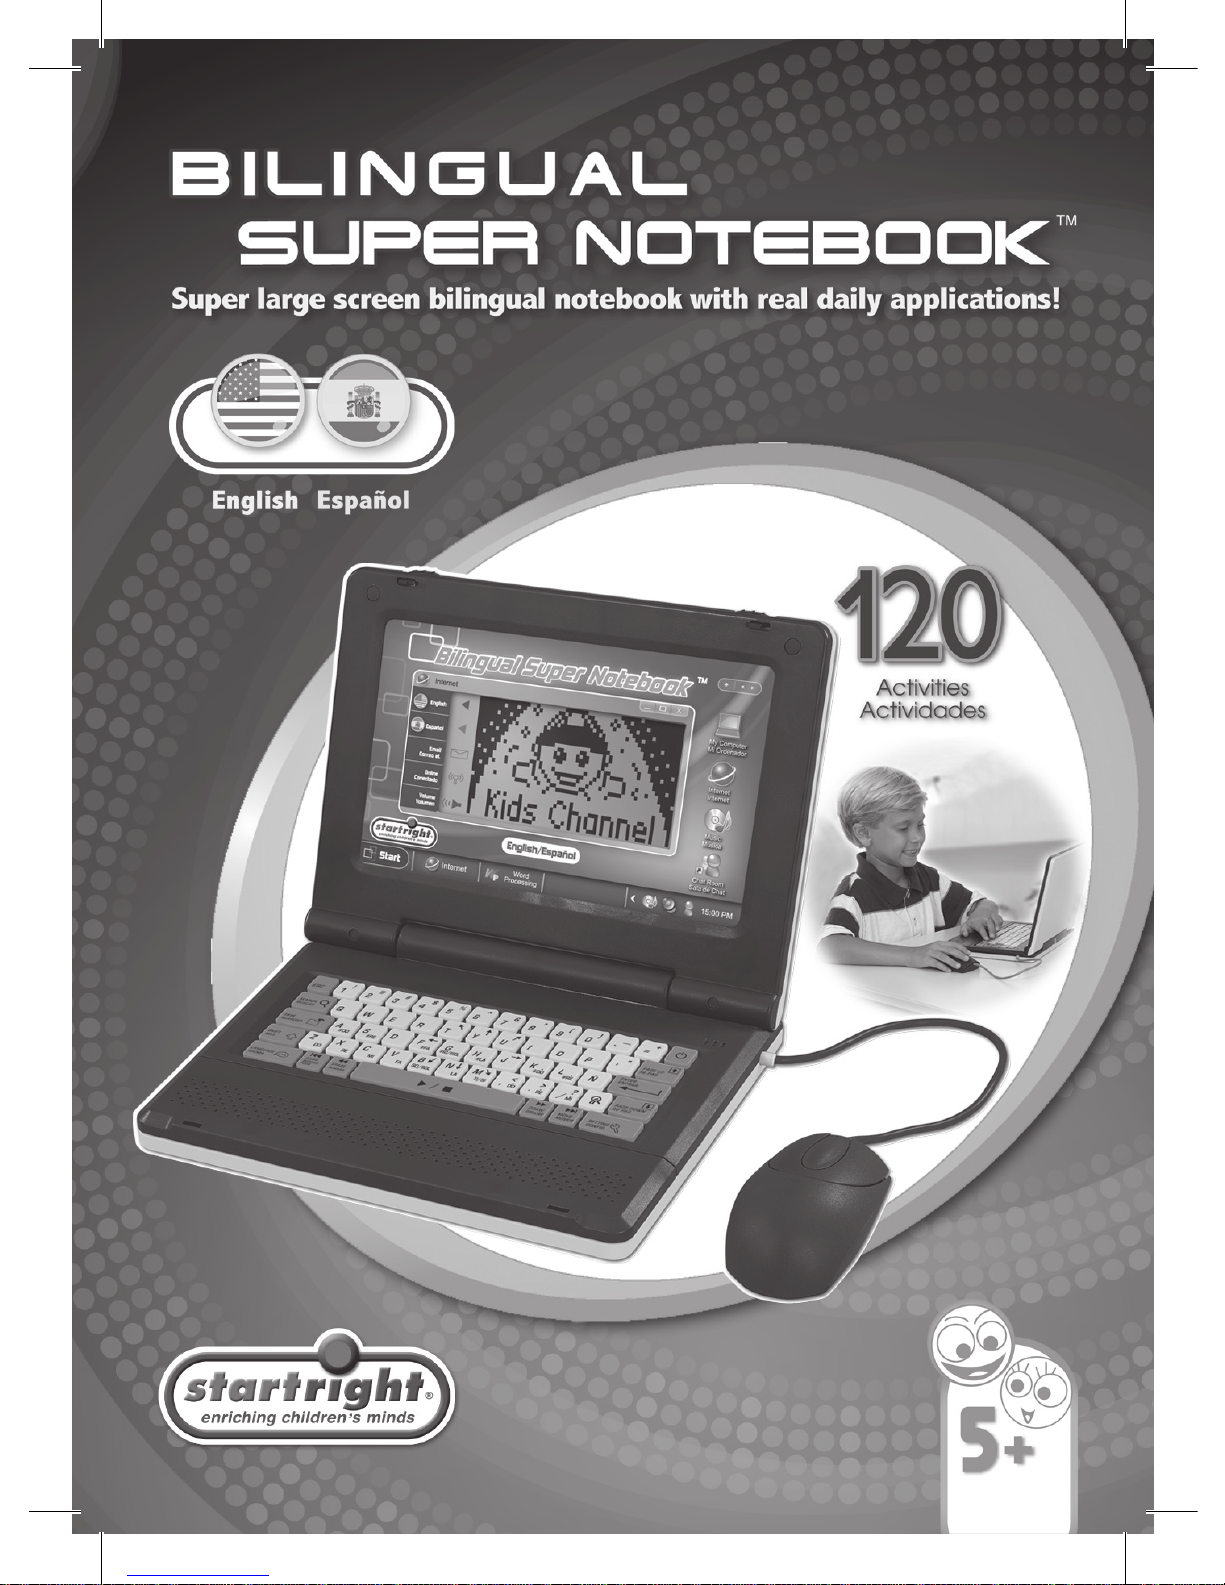
Page 1
Page 2

Introduction 1
Overview 1
Notice to Parents 2
Battery Installation
2
Battery Precautions
2
Care & Maintenance 3
Getting Started 3
General Operation 3
On/Off / Auto Power Off / 2-Button Mouse 3
First-Time Use
4
Log In 4
Activity Selection 5
Scoring 5
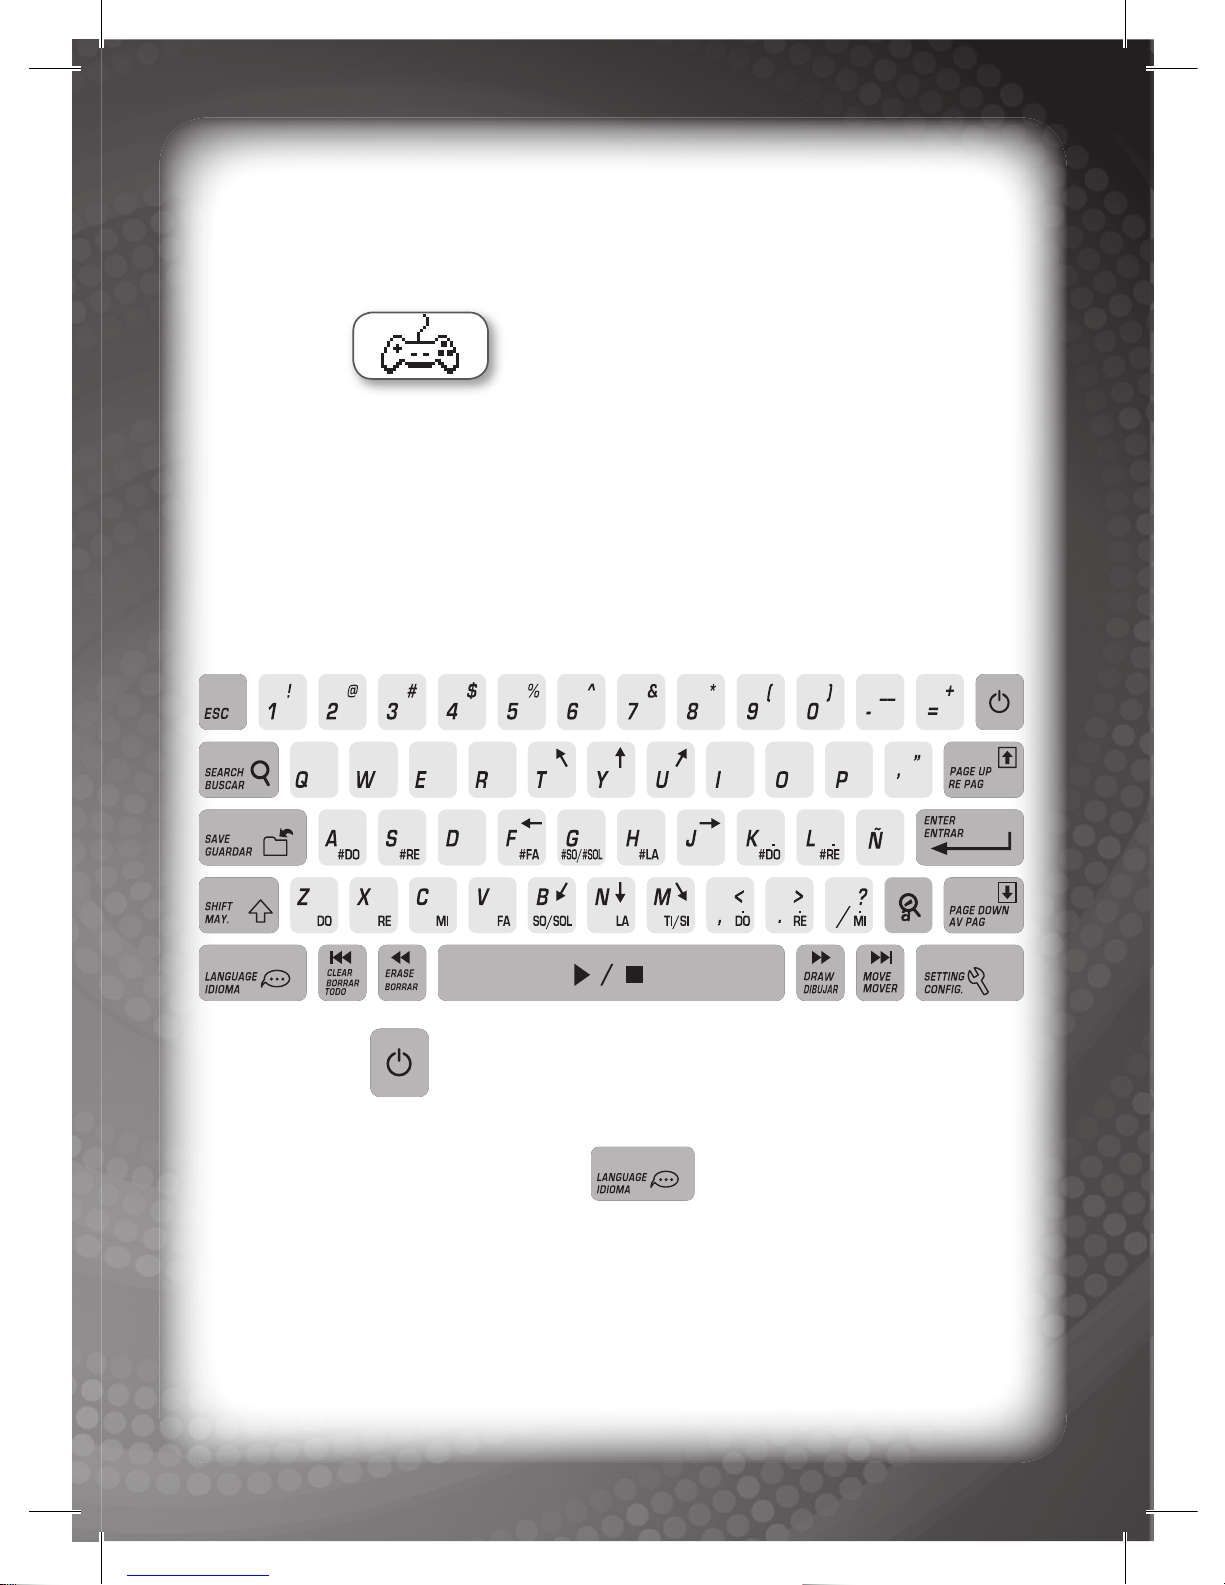
Special Features & Keyboard Layout 6
Description of Activities 9
Learning Center 9
Vocabulary & Grammar 9
Languages 10
Math 10
Logic 11
Trivia 12
Typing 13
Utilities 13
Bilingual Dictionary 13
My Dictionary 14
Calculator 14
Conversions 15
Budget Planner 15
Word Processor 16
Organizer 17
Diary 17
Phone Book 17
To-Do-List 18
Memo Freehand 18
Calendar 19
Contents
Page 3

Multimedia Center 20
Painter 20
Photo Viewer 20
Photo Editor 21
Music Player 21
Music Composer 22
Kids Channel 22
Video Editor 22
Setting 23
My Icon 23
My Profi le 23
Password 24
Screen Saver 24
Volume 25
Online Connection 25
Search & Download 25
Photo 25
Music 26
Kids Cartoon 27
Communication 27
Email 27
Chat Room 28
Blog 2
9
Online Fun 29
Game Zone
29
Fortune Telling 31
Jokes of Today 3
1
Specifi cations
32
Grammar Math Typing Creative Drawing
Logic
Translation
Personal
Organization
Learn:
Music
Page 4

1
Thank you for selecting Bilingual Super Notebook™.
This box contains one (1) Bilingual Super Notebook™ unit and
this User Guide.
Please read the Notice to Parents carefully before allowing your
child to use Bilingual Super Notebook™. Reading through the
User Guide with your child can be a valuable learning experience.
For your child’s safety, please discard any packing materials such
as plastic sheets, wire ties, tags, etc.
Introduction
High-Resolution
LCD Screen
Quick Search Key
Real QWERTY
Keyboard
Language
Selection
Key
Power Key
2-Button Mouse
Speaker
Bilingual Super
Notebook
TM
Overview
LCD Screen
Icons
Personal Settings Key
Multimedia
Control Keys
Page 5
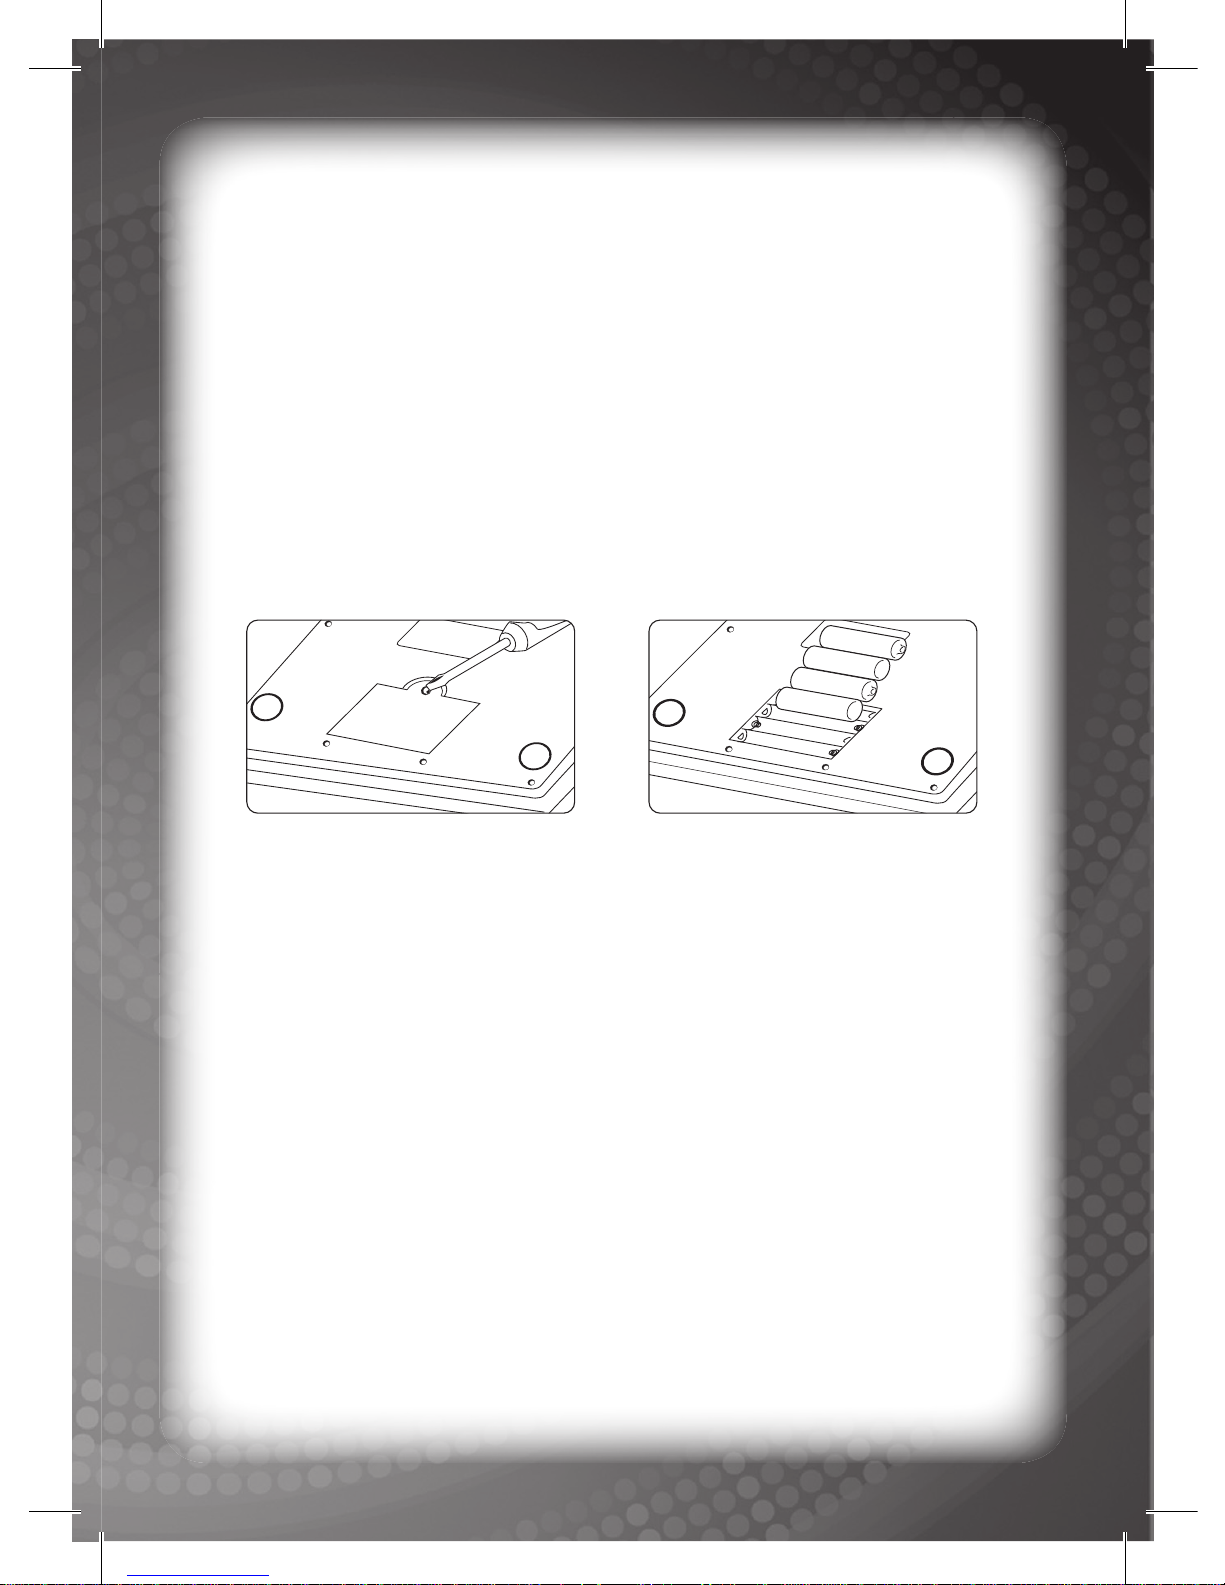
Battery Installation
Note: Do not allow children to install batteries unsupervised.
• This unit requires four (4) AAA batteries (not included). We
recommend alkaline batteries.
• Open the battery compartment on the back of the unit.
(See Figure 1.)
• Insert the batteries correctly, as indicated by the polarity symbols
(‘+’ and ‘-’) marked inside the battery compartment. (See Figure 2.)
• Replace the battery compartment door and push it fi rmly back in
place.
Battery Precautions
• Install batteries for your child.
• Do not use rechargeable batteries.
• Do not try to recharge non-rechargeable batteries.
• Do not mix old and new batteries.
• Do not mix alkaline, standard (carbon-zinc) or rechargeable
(nickel-cadmium) batteries.
• Do not short-circuit the supply terminals.
• Only use recommended batteries.
• For optimum operation, always use new alkaline batteries.
• Replace the batteries if the sound weakens or the display dims.
• Remove exhausted or weak batteries from the unit.
• Remove batteries if you are not going to use the unit for more
than one (1) week.
• This unit must not be connected to more than the recommended
number of power supplies.
2
Notice to parents
Figure 1
Figure 2
+
--
-
A
AA
+
--
-
A
A
A
+
--
-
A
AA
+
-
-
-
A
AA
Page 6
3
Care & Maintenance
• Clean this unit with a slightly damp cloth.
• Do not use chemical solvents or abrasives on this unit.
• Do not spill liquids on this unit.
• Avoid dropping this unit on hard surfaces.
•
Do not expose this unit to excessive moisture or immerse it in water.
• Do not try to dismantle this unit.
• It is best to switch off this unit when your child is not playing with
it. Please also remind your child to do so.
• Use only a dry, soft cloth for cleaning the LCD. Never use
solvents, abrasives or a wet cloth.
Getting Started
General Operatio
n
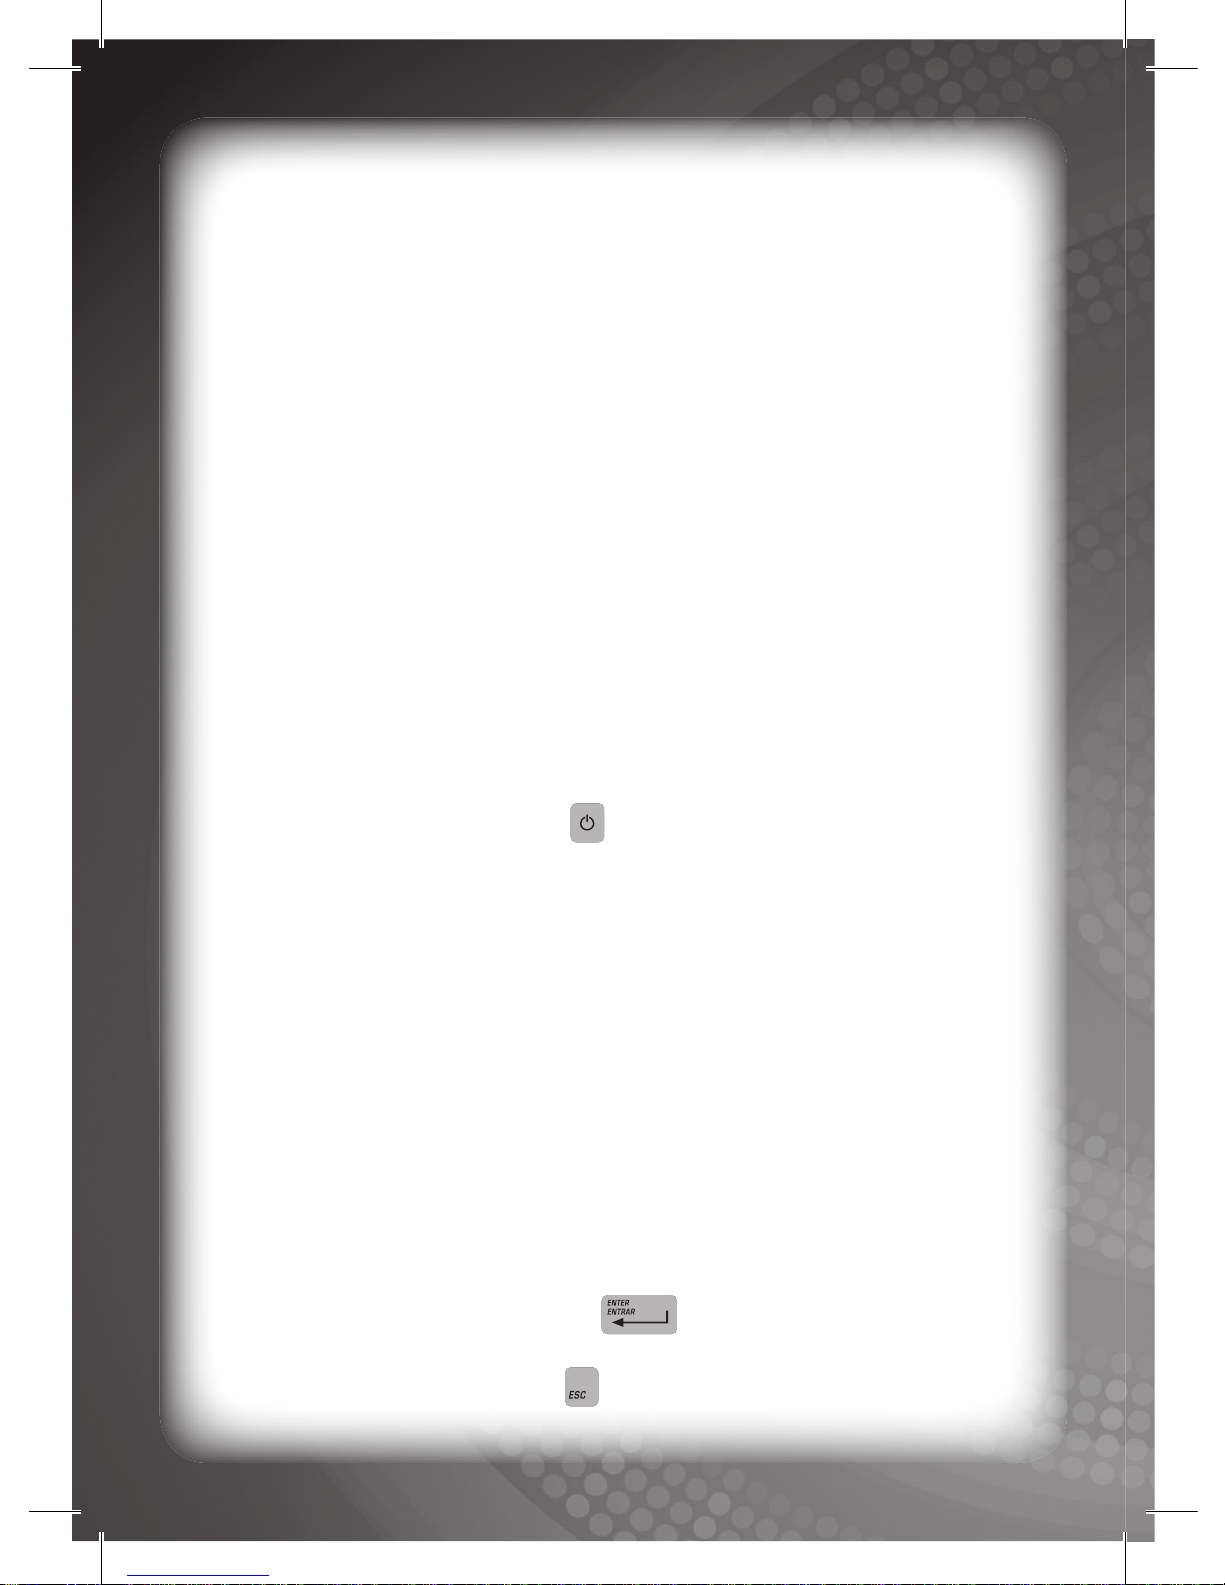
On/Off / Auto Power Off / 2-Button Mouse
On/Off: Press the POWER key to turn this unit on. Press the same
key to access the Log Out or Shut Down option. If you choose Log
Out, the current user will be logged out and the Log In screen will
appear. If you choose Shut Down, the unit will turn off.
Auto Power Off: A screen saver will be activated automatically when
no key is touched for more than ninety (90) seconds. This screen
saver will be displayed for a further three (3) minutes before the unit
turns itself off. Please note that when the unit automatically turns off,
any created data that has not yet been saved to the main unit will
be lost.
2-Button Mouse: This unit comes with a 2-button mouse. The left
button can be used to select text or to confi rm a selection (serving the
same function as the ENTER key on the keyboard). The right
button can be used to exit the current activity or folder (serving the
same function as the ESC key on the keyboard).
Page 7
4
First-Time Use
After reading through the Notice to Parents and installing the batteries
correctly, please press the POWER key once to turn on the
Bilingual Super Notebook™. A login screen will be displayed, and
you will be required to complete the following steps:
1. New name – You can input up to six (6) characters as your user
name (case sensitive). The user name “123456” cannot be used.
You can edit it using the ERASE key or the CLEAR key .
Press the ENTER key to confi rm it.
2. New password – You must input three (3) characters as your
password. You can edit it using the ERASE key or the CLEAR
key . Press the ENTER key to confi rm it. You will be
required to input your new password again so the unit can verify it.
Log In
There are three (3) different modes when you log in on the Bilingual
Super Notebook™.
Normal Mode
Each time you turn the unit on, you have to log in by inputting your
user name and password. If both are correct, the unit will log in in
Normal Mode and access the main menu. You can access all activity
modes and save all data in Normal Mode.
To edit your current password, select the Setting Mode and then
enter
your original password in the Password Mode followed by your
new password.
Default Mode
If you forget your user name or password, you can use the default name
(“123456”) and password (“123”). The unit will log in in Default Mode.
You can access all activity modes but cannot save data in Default Mode.
To check and display your current user name and password, select the
Setting Mode and then enter the My Profi le Mode to display the user
name or the Password Mode to display the password.
Unknown Mode
If your user name, password or both are incorrect, the unit will log in in
Unknown Mode. You cannot access some activity modes and cannot
Page 8

5
save data in Unknown Mode. For details, please refer to the activity
modes in Description of Activities.
Activity Selection
There are one hundred and twenty (120) activity modes available in
two (2) languages. To select an activity or folder, you can either use
the keyboard, mouse or quick search key. If you choose to use the
keyboard, press the LEFT or RIGHT ARROW key to select a
category. Press the ENTER key to confi rm the category.
Repeat the same steps to enter a sub-category. To choose an activity
mode, press the PAGE UP key or PAGE DOWN key. Press
the ENTER key to confi rm the activity mode. Press the ESC
key to exit a category/sub-category/activity mode.
If you choose to use the mouse, the left button serves the same
function as the ENTER key , and the right button serves
the same function as the ESC key .
If you are familiar with the category/sub-category/activity mode
titles, you may choose to use quick search. Press the QUICK
SEARCH key once and a search screen will appear. When you
type a letter, the Bilingual Super Notebook™ will display a list of
category/sub-category/activity mode titles that start with that letter.
You can either type the complete title or press the PAGE UP/PAGE
DOWN keys / to select your desired title. Press the ENTER
key to confi rm the title and enter the relevant category/
sub-category/activity mode directly.
Scoring
You can score points in most activity modes in the Learning Center
, as well as in the games in the Game Zone of Online
Fun
.
Learning Center
In the LEARNING CENTER category , you will be awarded
ten (10) points for each correct answer, unless otherwise stated. You
Page 9
6
must score thirty (30) points or more to move up to level 2, seventy
(70) points or more to move up to level 3 and one hundred and ten
(110) points or more to pass all levels and quit the mode. Refer to
individual activities for further details.
Game Zone
In the Game Zone , your score will be converted into virtual money.
You can use virtual money to download photos/music/
cartoons as a reward. Please refer to the description in the relevant
activity modes for further details.
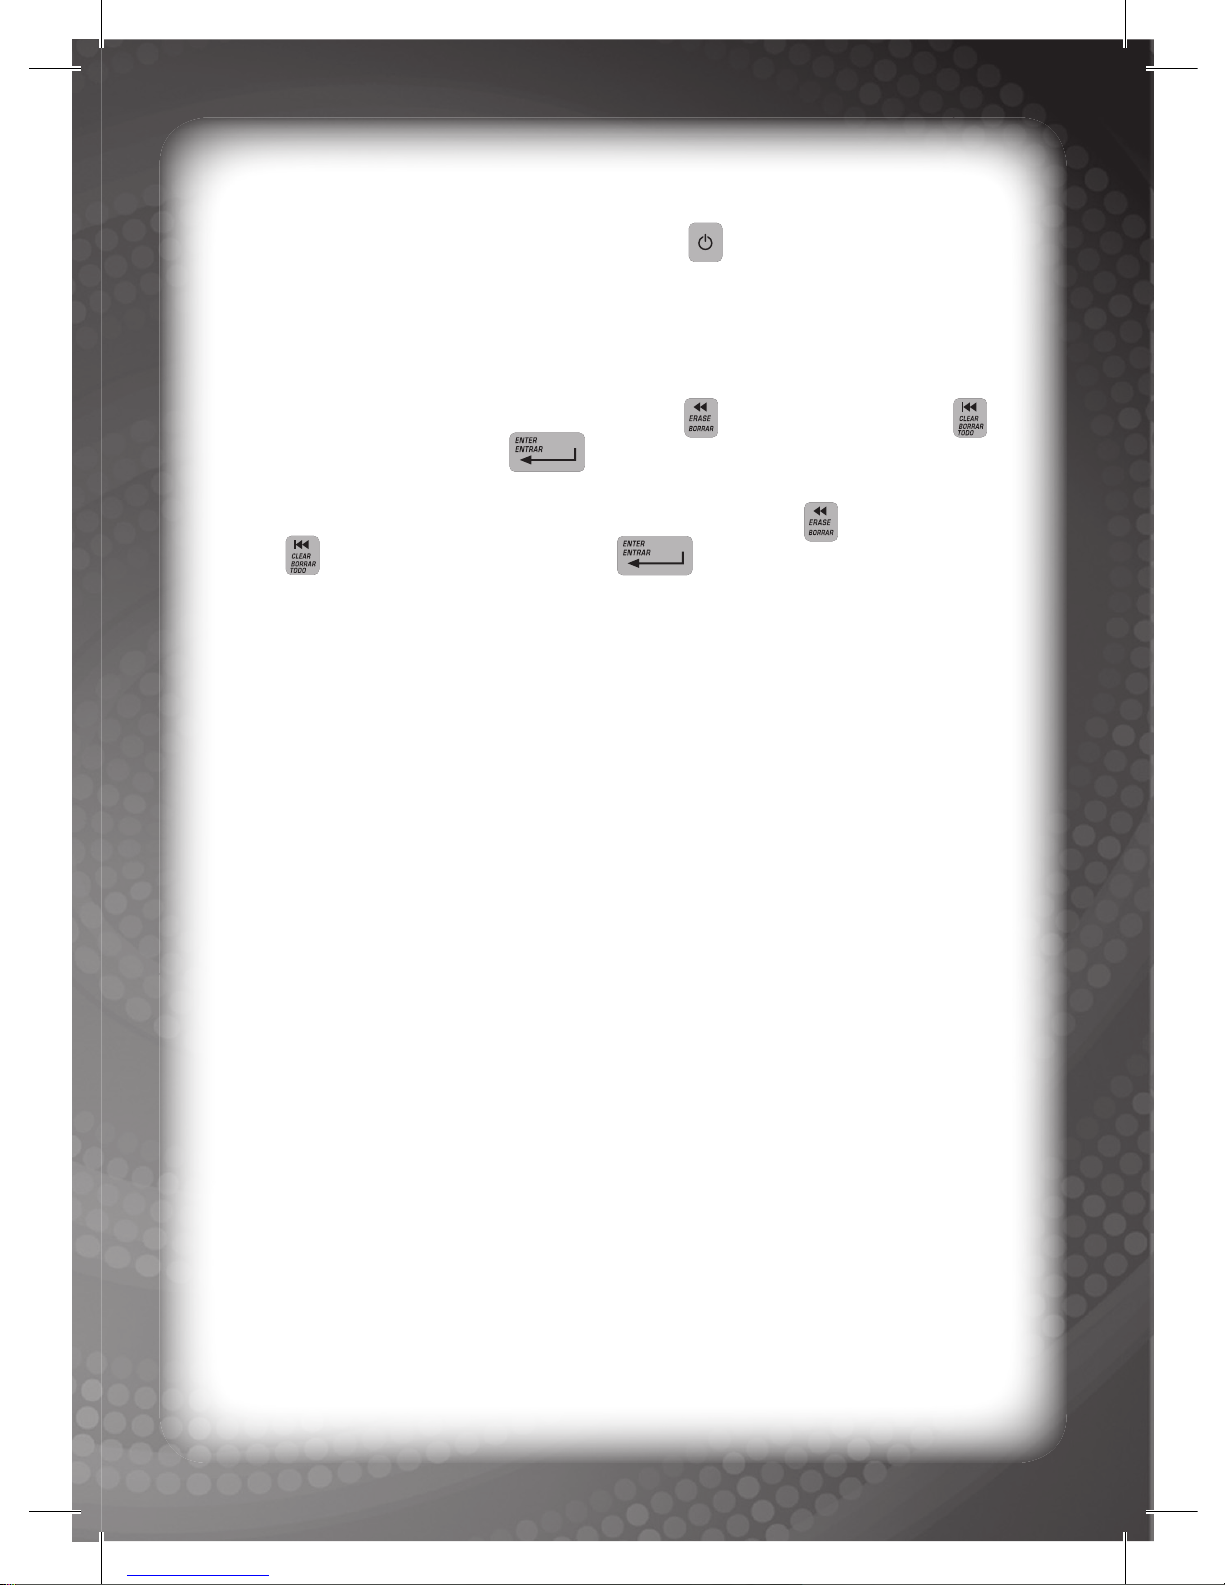
SPECIAL FEATURES &
KEYBOARD LAYOUT
POWER Key:
Press this key to turn the unit ON or OFF.
LANGUAGE SELECTION Key:
Press this key once to access the language selection window.
You can select one of two (2) languages as the default operating
language.
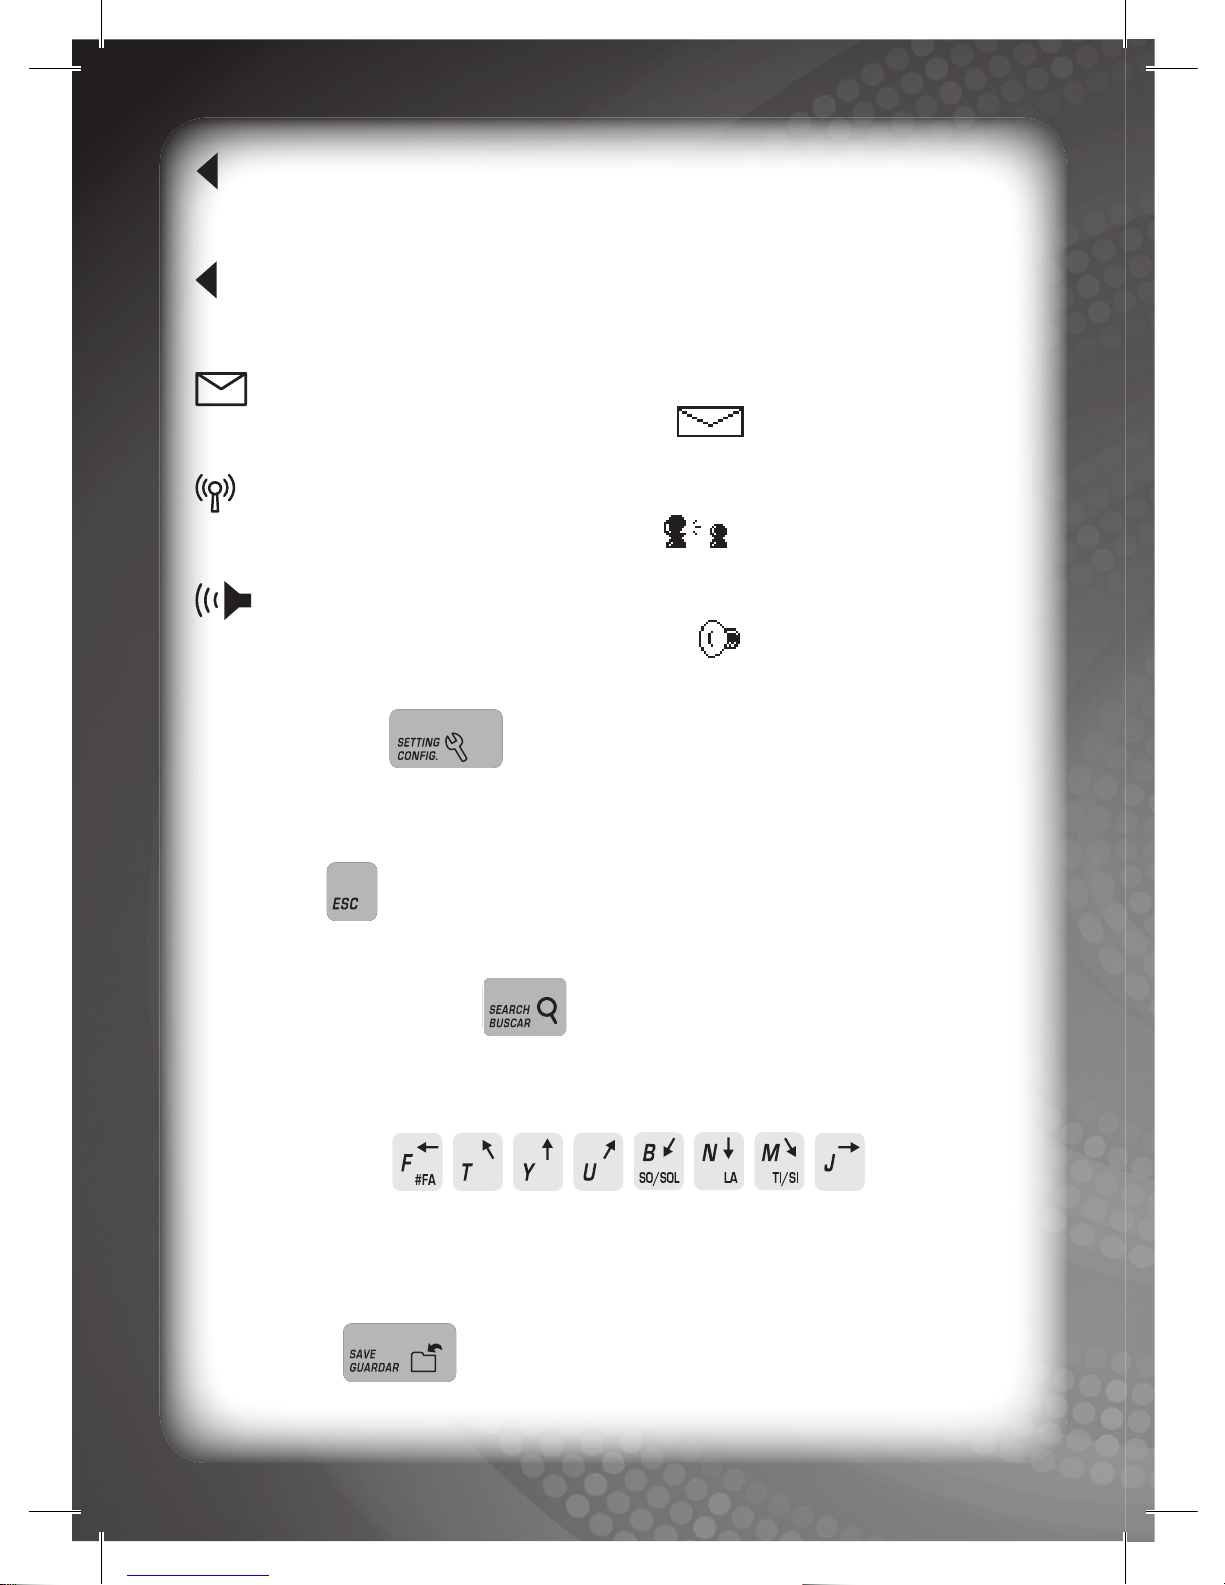
LCD Screen Icons: Five (5) LCD screen icons can be found on the
LCD screen. The icons are as follows (from top to bottom):
Page 10
7
Language 1: Displayed when language 1 is selected as the
operating language.
Language 2: Displayed when language 2 is selected as the
operating language.
New Message: Displayed when you have a new message. For
details please refer to the EMAIL mode .
Online Connection: Displayed when you choose the ONLINE
CONNECTION icon in the main menu .
Volume: Displayed when the volume is on. You can choose
the volume level in the VOLUME mode . The icon will indicate
the relevant volume level.
SETTING Key:
Press this key to change your settings. For details, please refer to
Description of Activities.
ESC Key:
Press this key to escape from the current activity.
QUICK SEARCH Key:
Press this key to access a category/sub-category/activity mode
quickly. For details, please refer to Activity Selection.
ARROW Keys:
Press these letter keys (‘T’, ‘Y’, ‘U’, ‘J’, ‘M’, ‘N’, ‘B’, and ‘F’) to select
an option or control the cursor in certain activities. For details, please
refer to Description of Activities.
SAVE Key:
Press this key to save all your data in the Bilingual Super Notebook™.
Page 11

8
SHIFT Key:
Hold down this key and press an alphabet key to display the upper
case of the selected letter. Hold down this key and press a number
key to display the symbol shown on the selected key.
ACCENT Key:
Press this key after inputting certain letter keys (‘A’, ‘E’, ‘I’, ‘O’, and
‘U’) in any typing activity to select from a list of accented letters.
PAGE UP/DOWN Keys: /
Press these keys to scroll up or down in certain activity modes. For
details, please refer to Description of Activities.
ENTER Key:
Press this key to confi rm a selection.
FIRST FILE/CLEAR Key:
Press this key to select the fi rst fi le or clear the screen in
certain activity modes. For details, please refer to Description of
Activities.
PREVIOUS FILE/ERASE Key:
Press this key to select the previous fi le or use the cursor to erase in
certain activity modes. For details, please refer to Description of
Activities.
PLAY/STOP/SPACE Key:
Press this key to play/stop a music clip or animation in certain
activity modes or to input a space in any typing activity modes. For
details, please refer to Description of Activities.
NEXT FILE/DRAW Key:
Press this key to select the next fi le or use the cursor to draw in
certain activity modes. For details, please refer to Description of
Activities.
Page 12

9
LAST FILE/MOVE Key:
Press this key to select the last fi le or move the cursor in certain
activity modes. For details please refer to Description of Activities.
Description of
Activities
Learning Cente
r
Enter this category to access the sub-categories below.
Vocabulary & Grammar
Enter this sub-category to access the activity modes below. There
are three (3) levels in each activity mode.
Missing Letters
A word and related picture will be displayed. One letter will be
missing from the word. You are required to input the correct
missing letter.
Extra Letters
A word and related picture will be displayed. The word will contain
one extra letter. You are required to identify the extra letter. Use
the ARROW keys to select the extra letter
and press the ENTER key to confi rm your selection.
Which Word
A picture will be displayed with three (3) words to choose from. You
are required to select the correct word. Use the PAGE UP / PAGE
DOWN keys / to select the correct word and press the
ENTER key to confi rm your selection.
Opposite
A word will be displayed with three (3) answers to choose from. You
are required to select the word with the opposite meaning. Use the
PAGE UP / PAGE DOWN keys / to select the word with the
opposite meaning and press the ENTER key to confi rm
your selection.
Page 13

10
Plurals
A sentence will scroll across the top of the screen with a missing word.
There will be three (3) words to choose from. You are required to
select the word with the correct plural form. Use the PAGE UP
/ PAGE
DOWN keys / to select the correct word and press the
ENTER key to confi rm your selection.
Tenses
A verb will be displayed on the screen along with a tense. You are required
to choose the correct form of the given verb from three (3) choices.
Use the PAGE UP / PAGE DOWN keys / to select the correct
form or the given verb and press the ENTER key
to confi rm
your selection.
Languages
Enter this sub-category to access the activity modes below. There are
three (3) levels in each activity mode.
Language Learner
A picture will be displayed on the screen, along with the corresponding
word in the operating language. Then the same word in Spanish will
be displayed on the screen (The word will be displayed in English when
operating in Spanish). You are required to re-type the displayed word.
Language Test
A picture will be displayed on the screen, along with by three (3)
words in Spanish (The word will be displayed in English when
operating in Spanish). You are required to choose the correct word.
Math
Enter this sub-category to access the activity modes below. There are
three (3) levels in each activity mode.
Addition
An addition equation will be displayed on the screen. You are
required to input the correct answer.
Subtraction
A subtraction equation will be displayed on the screen. You are
required to input the correct answer.
Page 14

11
Greater Than / Less Than
Two (2) numbers will be displayed on the screen. You are required
to evaluate the relationship between the two (2) numbers. You can
either press the LEFT ARROW key or RIGHT ARROW key to
choose a symbol (‘<’, ‘=’ or ‘>’) or input the symbol using the keyboard.
Formula
A formula will be displayed on the screen. You are required to solve
the formula and select the correct answer. You can press the LEFT
ARROW key or RIGHT ARROW key to make your selection.
Geometry
A geometry formula will be displayed on the screen, followed by a
question. Press the PAGE UP key or PAGE DOWN key
to move between the formula and the question. You are required to
input the correct answer.
Logic
Enter this sub-category to access the activity modes below.
Number Logic
A number sequence will be displayed on the top row of the screen.
Three (3) numbers will be displayed on the bottom of the screen.
You are required to select the correct answer to complete the
sequence. You can press the LEFT ARROW key or RIGHT
ARROW key to choose an answer. There are three (3) levels in
this activity mode.
Shape Logic
Four (4) shapes will be displayed on the screen. One (1) shape is
different from the others. You are required to select the odd shape.
You can press the UP , DOWN , LEFT or RIGHT ARROW
keys to choose an answer. You will win the game if you answer
correctly ten (10) times.
Picture Logic
Two (2) pictures will be displayed on the screen. Each picture is
divided into nine (9) sections, with the picture of the right displaying
Page 15

12
a hidden section which is different to the picture on the left. You are
required
to select the odd section. You can press the
UP , DOWN
,
LEFT or RIGHT ARROW keys to choose a section. You
will win the game if you answer correctly ten (10) times.
Trivia
Enter this sub-category to access the activity modes below.
Language Trivia
A question relating to language will scroll across the top of
the screen. You are required to select the correct answer from
a choice of three (3). Press the PAGE UP key or PAGE
DOWN key to choose an answer or view the question
again. The question will scroll faster if you hold down the
SPACE key.
Math Trivia
A question relating to mathematics will scroll across the top of
the screen. You are required to select the correct answer from
a choice of three (3). Press the PAGE UP key
or PAGE
DOWN key to choose an answer or view the question
again. The question will scroll faster if you hold down the
SPACE key.
Social Science Trivia
A question relating to social science will scroll across the top of
the screen. You are required to select the correct answer from
a choice of three (3). Press the PAGE UP key or PAGE
DOWN key to choose an answer or view the question
again. The question will scroll faster if you hold down the
SPACE key.
Geography Trivia
A question relating to geography will scroll across the top of the
screen. You are required to select the correct answer from a choice
Page 16

13
of three (3). Press the PAGE UP key or PAGE DOWN key
to choose an answer or view the question again. The question will
scroll faster if you hold down the SPACE key.
Miscellaneous Trivia
A question will scroll across the top of the screen. You are required
to select the correct answer from a choice of three (3). Press the
PAGE UP key or PAGE DOWN key to choose an answer
or view the question again. The question will scroll faster if you hold
down the SPACE key.
Typing
Enter this sub-category to access the activity modes below.
Touch Type
A selection of characters will be displayed on the screen. You are
required to read the characters displayed and retype them. Two (2)
hand icons at the bottom of the screen indicate the correct fi nger
with which to type each character. The typing practice will be over
when all characters have been typed once.
Speed Type
A few sentences will be displayed on the screen. You are required
to read the sentences displayed on the screen and retype them. A
timer in the top right corner of the screen will show how long you
remain. There are three (3) levels in this activity mode.
Utilities
Enter this category to access the activity modes below.
Bilingual Dictionary
Searching for vocabulary
A library will be displayed on the screen with more than two hundred
(200) vocabulary items. You can search for a vocabulary item by
Page 17

14
typing letters at the top of the screen. When you type a letter, the
Bilingual Super Notebook™ will display the vocabulary items that
start with the letter you typed. You can either type the complete
word, or press the PAGE UP/ PAGE DOWN keys / to select
a word from a list of words with similar spelling.
Viewing the details
Press the ENTER key to confi rm the selected word, and the
Bilingual Super Notebook™ will open a new screen and show you
the same word in Spanish, followed by a picture of the vocabulary
item (The word will be displayed in English when operating in
Spanish). You can press the ESC key any time to search for
another vocabulary item.
My Dictionary
Searching for vocabulary
Please refer to the procedure described in Searching for vocabulary
in the Bilingual Dictionary activity mode.
Checking the meaning
Press the ENTER key to confi rm the selected word, and the
Bilingual Super Notebook™ will open a new screen and give the
meaning of the vocabulary item. You can press the ESC key any
time to search for another vocabulary item.
Calculator
Inputting an equation
A screen will be displayed with number and operator panels. You can
input a mathematical equation at the top of the screen using either
the keyboard or the ARROW keys (‘F’, ‘J’, ‘Y’ and ‘N’ ) to
select a number or an operator.
Checking the answer
Press the ‘=’ key or select the ‘=’ icon on the operator panel.
The Bilingual Super Notebook™ will display the answer on the
Page 18

15
screen. You can press the letter key ‘C’ or select the ‘C’ icon
on the operator panel to clear the screen and input another equation.
Conversions
Selecting a category
Five (5) different icons will be displayed on the screen, each
representing a category as follows:
Weight (Kilogram, Gram, Pound, and Ton)
Temperature (Degree Celsius, and Degree Fahrenheit)
Speed (Km/hour, and Mile/hour)
Length (Inch, Centimeter, Foot, Yard, Kilometer, and Millimeter)
Quantity (Gallon, Cup, Liter, Tablespoon, and Teaspoon)
Press the ARROW keys (‘F’ and ‘J’ ) to select a category, and
press the ENTER key to confi rm the selection.
Converting a quantity
After you enter a category, different measurements will be displayed
on the screen. Select the measurement you want to convert then
press the ENTER key . You will be required to input the
quantity then press the ENTER key again. Finally you will be
required to select a second measurement to convert to. The
conversion will be displayed on the screen. You can press the ESC
key any time to convert another measurement.
Budget Planner
Note: You cannot access this activity mode if you log in in Unknown
Mode.
Two (2) icons will be displayed on the screen. You can choose either
the EDIT or VIEW icon.
Adding/Editing new item(s)
Choose EDIT to add a new item or edit your budget. You will be
required to input the name of any new item, then press the ENTER
Weight (Kilogram, Gram, Pound, and Ton)
Quantity (Gallon, Cup, Liter, Tablespoon,
Page 19

16
key . Then you need to select either the EARN (‘+’) or
SPEND (‘-’) icon so the Bilingual Super Notebook™ can
calculate your income and spending. After you have selected an
icon, press the ENTER key . A new screen will be displayed.
Insert the amount that was spent or received. Bilingual Super
Notebook™ will show you the sum of the new item. Then the fi nal
sum will be displayed in a new screen automatically. If all the information
is correct, press the SAVE key to save the records. You can
press the ESC key to add a new item or edit the fi nal amount.
Viewing your budget
Choose VIEW to view the total of your most up-to-date budget
record any time.
Word Processor
Two (2) icons will be displayed on the screen. You can choose either
the NEW or OPEN icon.
Opening a new word fi le
If you choose NEW , a screen with dashes will be displayed.
You can type words on the screen up to a maximum of fi fty-six (56)
characters. You can press the PAGE UP key or PAGE DOWN
key to scroll in order to view the text. Press the SAVE key
if you want to save the word fi le on the Bilingual Super Notebook™.
You will be required to input a fi lename then press the SAVE key
or the ENTER key . The fi le will be saved. Only one (1)
word fi le can be saved. Each time the SAVE key is pressed,
the old fi le will be overwritten.
Viewing a word fi le
If you choose OPEN , the saved word fi le title and its contents can
be viewed. You can press the PAGE UP key or PAGE DOWN
key to scroll in order to view the text. Press the ESC key any
time to select an option. Press the CLEAR key to delete a
saved fi le.
Page 20

17
Organizer
Enter this category to access the activity modes below.
Diary
Note: You cannot access this activity mode if you log in in Unknown
Mode.
Two (2) icons will be displayed on the screen. You can choose either
the READ or WRITE icon.
Creating a new diary
If you choose WRITE , a screen with dashes will be displayed. You
will be required to input the month and date and choose a weather
icon from separate screens. Press the ENTER key after each
selection. You can type words on the screen up to a maximum of
sixty (60) characters. You can press the PAGE UP key or PAGE
DOWN key to scroll and view the diary. Press the SAVE key
if you want to save the diary on the Bilingual Super Notebook™.
Up to fi ve (5) diaries can be saved.
Read a diary
Choose READ to view all diary records. You can press the PAGE
UP key or PAGE DOWN key to select a diary record. Press
the ENTER key to enter and view a diary. You can press the
PAGE UP key or PAGE DOWN key to scroll and view the
diary content. Press the CLEAR key to delete a saved diary.
Phone Book
Note: You cannot access this activity mode if you log in in Unknown
Mode.
Two (2) icons will be displayed on the screen. You can choose either
the EDIT or VIEW icon.
Creating a new record
If you choose EDIT , a screen with dashes will be displayed.
You will be required to input a name. Press the ENTER key to
confi rm the name. A new screen will then be displayed, and you will
be required to input a phone number. Press the ENTER key
or
Page 21

18
SAVE key
to confi rm the phone number. You can then record
a new phone book entry. You can press the ESC key
any time to
escape EDIT
.
Viewing the phone book record
Choose VIEW
to view all phone records. You can press the
ARROW keys ‘F’ or ‘J’ to select a phone book record to view.
Press the CLEAR key if you want to delete a record. You can
press the ESC key any time to escape VIEW
.
To-Do-List
Note: You cannot access this activity mode if you log in in Unknown
Mode.
Two (2) icons will be displayed on the screen. You can choose either
the TO DO or DONE icon.
Creating a new to-do item
If you choose TO DO , a new screen will be displayed. You will be
required to input an event description up to a maximum of fi fteen (15)
characters. Press the ENTER key and a confi rmation window
will be displayed. If you select YES and press the ENTER key
,
the Bilingual Super Notebook™ will save the new to-do item; if you
select NO, you can edit another to-do item. You can press the ESC
key any time to escape TO DO .
Completing a to-do item
If you choose
DONE , all the inputted to-do items will be displayed
on the screen. Press the PAGE UP key or PAGE DOWN key
to view each to-do item. Press the ENTER key if an item has
been completed. A pop-up window will appear, and the selected item
will be deleted from the record.
Memo Freehand
Note: You cannot access this activity mode if you log in in Unknown
Mode.
Two (2) icons will be displayed on the screen. You can choose either
the NEW or DELETE icon.
Page 22

19
Creating a new memo
If you choose NEW , a memo will be displayed in the middle
of the screen. You will see a fl ashing dot. You can control this dot
using the ARROW keys to write a memo
freehand. You can also press the ERASE key to delete a dot(s),
the MOVE key to move the fl ashing dot and the CLEAR key to
clear the memo. To resume writing, press the DRAW key . When
you have fi nished the memo, press the SAVE key or the
ENTER key to save it. Only one (1) memo can be saved.
Activating a memo
The freehand memo will activate itself once you have saved it in the
Bilingual Super Notebook™. Each time you turn on the Bilingual
Super Notebook™, the memo will be displayed in the main menu.
You can press any key to close the memo.
Deleting a memo
If you choose DELETE , a pop-up window will appear with YES
and NO options. If you select YES and press the ENTER key ,
the memo will be deleted and will not be activated when the unit is on.
Calendar
Selecting a date
A window will be displayed on the screen. The user can select the
year, month and day on the screen following the sequence YYYY/
MM/DD. Press the ARROW key ‘Y’ to select previous year. Press
the ARROW key ‘N’ to select next year. Press the ARROW key ‘J’
and ARROW key ‘F’ to move between year, month and day.
The method for selecting a month or day is the same as for selecting
a year.
Viewing the calendar
After you have selected the date and pressed the ENTER key ,
the calendar with the selected date will be displayed on the screen.
You can press the ESC key any time to go back to the calendar.
Page 23

20
Multimedia Center
Enter this category to access the activity modes below.
Painter
Two (2) icons will be displayed on the screen. You can choose either
the DRAW or VIEW icon.
Creating a new drawing
If you choose DRAW , a black screen with a cursor will be
displayed. You can move the cursor to any point on the screen by
pressing the ARROW keys . There are
three (3) different tools:
Cursor: This is the default tool. You can move the cursor without
draw or erase. Press the MOVE key to activate the cursor.
Select another tool to deactivate the cursor.
Pen: You can draw dots or lines using this tool. Press the DRAW
key to activate the pen. Select another tool to deactivate the pen.
Eraser: You can erase dots or lines using this tool. Press the
ERASE key to activate the eraser. Press another tool to
deactivate the eraser.
If you want to clear the whole screen, press the CLEAR key ,
and the screen will be cleared after a short animation. After you
have fi nished the drawing, press the SAVE key or the ENTER
key to save it on the Bilingual Super Notebook™. Only one
(1) drawing can be saved.
Viewing the drawing
Choose VIEW to view the drawing.
Photo Viewer
Viewing a photo
A screen with various icons will be displayed. Each icon represents a
different photo fi le. You can select a fi le by pressing the ARROW key
‘J’ or ARROW key ‘F’ . Once you have selected a fi le, press
Page 24

21
the ENTER key . The selected photo will be displayed in full
screen size. You can press the ESC key any time to go back to
the selection menu and select another fi le to view.
Photo Editor
Two (2) icons will be displayed on the screen. You can choose either
the EDIT or VIEW icon.
Editing a photo
If you choose EDIT , the photo will be displayed in full screen
size. You can select a photo to edit by pressing the ARROW key
‘J’ or ARROW key ‘F’ . Once you have selected a fi le, press
the ENTER key . The cursor will appear. You can follow
the same procedure described in Creating a New Drawing in the
Painter activity mode to edit the selected photo.
Viewing the edited photo
If you choose VIEW , you can view the saved edited photo. Only
one (1)
edited photo can be saved in EDIT .
Music Player
Playing music
A screen with various icons will be displayed. Each icon represents
a different music clip. You can select a clip by pressing the ARROW
key ‘J’ or ARROW key ‘F’ . Once you have selected a fi le, press
the ENTER key or the SPACE key , and
the selected music clip will be played. There are fi ve (5) different tools:
Play/Stop: Press this key once to stop the music
clip. Press it again to replay the clip.
Previous Clip: Press this key once to jump to the previous musi clip.
Next Clip: Press this key once to jump to the next music clip.
First Clip: Press this key once to jump to the fi rst music clip.
Last Clip: Press this key once to jump to the last music clip.
Page 25

22
Music Composer
Two (2) icons will be displayed on the screen. You can choose either
the NEW or PLAY icon.
Composing music
If you choose NEW , a window with four (4) different instruments
will
be displayed on the screen. You can choose between the piano ,
trumpet , xylophone and violin . Press the ENTER
key after an instrument has been selected. A new window
will appear. Press the MUSICAL NOTE keys ... to compose
music. Only one (1) music clip can be saved. The maximum length is
ninety-eight (98) notes. Press the SAVE key or the ENTER
key when you have fi nished composing.
Playing back music
If you choose PLAY , the saved music clip will be played once
and return to the selection menu.
Kids Channel
Playing a video
A screen with various icons will be displayed. Each icon represents a
different video fi le. You can select a fi le by pressing the ARROW key
‘J’ or ARROW key ‘F’ . Once you have selected a fi le, press
the ENTER key or the SPACE key . The
selected video will be played on the screen repeatedly. You can press
the ESC key any time to go back to the selection menu and select
another animation. There are fi ve (5) different tools. Refer to Playing
Music under the Music Player activity for further details.
Video Editor
Two (2) icons will be displayed on the screen. You can choose either
the NEW or VIEW icon.
Editing a video
If you choose NEW , a screen with four (4) frames will be displayed.
Press the ENTER key to enter a frame. There are three (3) options:
Picture: Select this icon to select a picture from the library.
Page 26

23
Animation: Select this icon to select an animation clip from
the library.
Text: Select this icon to input text (up to a maximum of 40
characters).
After you have selected an option, press the ENTER key
to
confi rm your selection. The unit will return to the selection screen.
Press the ARROW key
‘J’ to continue to the next frame. Repeat
the same procedure until all four (4) frames are fi lled. A pop-up window will appear allowing you to add background music (optional). If
you select YES, you can add background music from the library. After
you have made a selection, the video clip will be played once and you
will be asked whether you want to save the fi le or not. If you
select
YES and press the ENTER key
, the video will be saved in the
library.
Only one video can be saved.
Playing video
If you select VIEW , the saved video will be played once then the
unit will return to the selection menu.
Setting
Enter this category to access the activity modes below.
My Icon
Note: You cannot access this activity mode if you log in in Unknown
Mode.
Changing user icon
A window with your user icon will be displayed. This is the icon that
will appear when you log in on the
Bilingual Super Notebook™
.
There is a default user icon, but you can select an alternative here.
You can press the ARROW key ‘F’ or ARROW key ‘J’ to view
the choices. Press the ENTER key or SAVE key to
confi rm your selection, and your new user icon will be saved.
My Profi le
Note: You cannot access this activity mode if you log in in Unknown
Mode.
Page 27

24
Personalize your profi le
A window with different profi le settings will be displayed.
Name: Input user name here.
Age: Input your age here.
Sex: Select your gender here.
Home Tel.: Input your home phone number here.
Nationality: Input your nationality here.
You can press the PAGE UP key
or PAGE DOWN key
to view different profi le settings. Press the SAVE key
or
ENTER key to save each profi le setting.
Password
Note: You cannot access this activity mode if you log in in Unknown
Mode.
Changing your password
A window will be displayed. In order to change your password, you
will be required to input your old password. Press the ENTER key
after inputting the old password. You can then input the new
password, and press the ENTER key after confi rming. You
will
be required to retype the new password before it can be validated.
If
the two passwords match, the new password will be saved. If you
forget your User Name or Password, log in through the Default Mode.
Screen Saver
Note: You cannot access this activity mode if you log in in Unknown
Mode.
Changing the screen saver
A window with a screen saver preview picture will be displayed.
The screen saver will run automatically if the
Bilingual Super
Notebook™
is left untouched for a certain time. There is a default
screen saver animation, but you can select an alternative here. You
can press the PAGE UP
or PAGE DOWN key to view the
choices. Press the SPACE key
to play or stop
Page 28

25
the selected screen saver animation. To save a new screen saver,
press the ESC key to stop playing the screen saver, then press
the SAVE key or ENTER key to save.
Volume
Note: You cannot access this activity mode if you log in in Unknown
Mode.
Changing the volume
A window with a speaker will be displayed. You can press the PAGE
UP key or PAGE DOWN key to change the volume level.
There are four (4) different volume levels (high, normal, low and
mute). Press the SAVE key or ENTER key to save the
new volume setting.
Online Connection
After entering this mode, the Bilingual Super Notebook™ will
switch from offl ine to online mode. You can access the following
categories:
Search & Download
Communication
Online Fun
Search & Download
Enter this category to access the activity modes below.
Notes: You can use virtual money in this category to download
photos/music/cartoons as a reward. Virtual money is earned by
playing games in the Game Zone in Online Fun
.
Please refer to the description in the relevant activity modes for
further details.
Photo
Note: You cannot access this activity mode if you log in in Unknown
Mode.
Page 29

26
Searching for a photo
The amount of virtual money you have will be displayed in the lower
screen. The fi gure indicates the amount you can currently spend
to download a fi le. A search window will be displayed in the upper
screen. It allows you to search for a photo from the photo library.
Type any letter in the search window then press the ENTER key
. The search result will be displayed in a new screen. If there
is no photo fi lename beginning with the letter you input, ‘No Search
Result’ will appear on the screen and the unit will automatically
return to the search mode. If photos are located, the fi lename and
value of each will be displayed on the screen. Press the ARROW
keys ‘F’ and ‘J’ to view all the search results.
Downloading a photo
After you have selected a photo, press the ENTER key , and
a download window will pop up. Select YES if you want to download
the photo. If you have enough money, the fi le will be downloaded
and saved in the library; if you do not have enough money, a warning
window will be displayed, and the Bilingual Super Notebook™ will
suggest you to go to Game Zone to earn more virtual money.
Select YES if you want to go to Game Zone . If you select
NO, you can search for another photo.
Viewing downloaded photo
After a photo has been downloaded, you can view it any time in the
activity mode 36 Photo Viewer .
Music
Note: You cannot access this activity mode if you log in in Unknown
Mode.
Searching for music
Please follow the steps described in Searching for a photo in the
activity mode 47 Photo . All steps are the same except that
you are searching for music instead of a photo.
Page 30

27
Downloading music
Please follow the steps described in Downloading a photo in the
activity mode 47 Photo . All steps are the same except that
you are downloading music instead of a photo.
Playing downloaded music
After the music has been downloaded, you can view it any time in
the activity mode 38 Music Player .
Kids Cartoon
Note: You cannot access this activity mode if you log in in Unknown
Mode.
Searching for a cartoon
Please follow the steps described in Searching for a photo in the
activity mode 47 Photo . All steps are the same except that
you are searching for a kids’ cartoon instead of photo.
Downloading a cartoon
Please follow the steps described in Downloading a photo in the
activity mode 47 Photo . All steps are the same except that
you are downloading a kids’ cartoon instead of a photo.
Playing downloaded cartoon
After a kids cartoon has been downloaded, you can view it any time
in the activity mode 40 Kids Channel .
Communication
Enter this category to access the activity modes below.
Email
Two (2) icons will be displayed on the screen. You can choose either
the NEW or READ icon.
Page 31

28
Writing a new email
If you choose NEW , a black screen will be displayed. You can
write the email content here. After you have fi nished the email, press
the ENTER key , and a pop-up will ask you whether you want
to send. Select YES if you want to send the email out.
Reading an email
If you choose READ , a screen with some envelope icons will
be displayed. Each icon represents an email. A closed envelope icon
indicates an unread email while an open envelope icon indicates a
read one. Press the ARROW key ‘J’ or ‘F’ to select an email,
and press the ENTER key to enter and view the email.
You can scroll using the PAGE UP and PAGE DOWN keys .
Press the ESC key any time to select another email. Press the
ENTER key again to select from the “reply” or “delete” option.
Chat Room
Searching for a friend
A window will be displayed on the screen with two (2) search columns.
You can select the age group and also the gender of a new friend.
Press the PAGE UP key or PAGE DOWN key to select a
column, and press ARROW key ‘F’ or ‘J’ to select a value/
gender. Press the ENTER key to confi rm your selection. The
Bilingual Super Notebook™ will help you to search for a friend
online.
Chatting with a friend
When a friend is found, you can have a conversation with him/her in
a dialogue screen. Sometimes your friend will ask you questions, and
you can use the keyboard to type the answers. Press the ENTER key
to jump to the next dialogue. You can press the ESC key
any time to quit the chat and search for another friend. Or you can
chat until your friend quits the chat.
Page 32

29
Blog
Searching for a friend
A window will be displayed indicating the different friends online. You
can view his/her face and name. Press ARROW key ‘F’ or ‘J’
to select a friend. Press the ENTER key to confi rm your
selection. Then the Bilingual Super Notebook™ will enter his/
her blog.
Chatting with a friend
To view the blog, press the PAGE UP key or PAGE DOWN key
to scroll. Press the ESC key to quit the blog anytime.
Note: You can only view the same blog content each time you log in
on the Bilingual Super Notebook™.
Online Fun
Enter this category to access the sub-categories below.
Game Zone
Enter this sub-category to access the activity modes below.
Toy Catch
When the game starts, you will see a moving clamp. Your task is to
catch a toy (represented by a circle icon) using the clamp. Press the
ENTER key or the SPACE key to lower the
clamp. You need to get the timing and position right in order to catch
a toy. Each time you catch a toy, you will earn ten (10) points (or $10
in virtual money). The game will be over if you miss three (3) times.
Long Jump
When the game starts, you will see a sports fi eld and a player. Your
task is to make the player jump as far as possible. Press the
ARROW keys ‘F’ and ‘J’ once, and the player will start to run.
The faster you press the keys, the faster the player will run. You
Page 33

need to make sure the player runs fast enough to do a good long
jump. If the player jumps far enough, you will earn ten (10) points
(or $10 in virtual money). If the player jumps further, you will earn
twenty (20) points (or $20 in virtual money). The game will be over
after the jump.
Hunger Hunt
When the game starts, you will see a white worm and black worm
moving across the screen. Your task is to make the white worm eat
as much food (represented by white dots) as possible. Press the
ARROW keys to control the white worm’s direction.
There is a life counter in the upper left corner. If you are hit by the
black worm, one (1) life will be deducted from the life counter. Each
time you eat some food, you will earn ten (10) points (or $10 in
virtual money). The game will be over if you lose three (3) times.
Music Jamming
When the game starts, you will see four (4) drums. Different musical
notes will fall from the top screen on to the drums. Your task is to
catch as many notes as possible by hitting the drum that it touches.
You can press the NUMBER keys 5 , 6 , 7, 8 to hit the
drums from far left to far right. If you press the correct NUMBER
key when the musical note has just touched a drum, a sound will be
played and the note will be cleared from the screen. You will earn
two (2) points (or $2 in virtual money). The game will be over if you
miss three (3) notes.
Sound Search
When the game starts, you will be asked to listen to an animal
sound. After that, four (4) animal faces will be displayed on the
screen. Your task is to select the animal face that matches the
sound. Press the ARROW keys ‘F’ , ‘J’ , ‘Y’ and ‘N’ to
select an animal face, then press the ENTER key to
confi rm your selection. If you select the wrong animal, one (1) life
will be deducted from the counter. Each time you select the correct
30
Page 34

animal, you will earn ten (10) points (or $10 in virtual money). The
game will be over if you lose three (3) times.
Memory Match
When the game starts, you will be shown four (4) covered cards.
Your task is to uncover the cards and pair up the matching ones.
Press the ARROW keys ‘F’ , ‘J’ , ‘Y’ and ‘N’ to select a
card. Then press the ENTER key to uncover it. When a pair is
uncovered, it will remain uncovered. When all the cards have been
uncovered, you will earn some points (level 1 - ten (10) points, level
2 - twenty (20) points, level 3 - thirty (30) points) and proceed to the
next level. There are three (3) levels in this game. The game will be
over if you lose three (3) times in one level.
Fortune Telling
An opening animation will play, then a START screen will appear.
Press the ENTER key and the Bilingual Super Notebook™
will scroll randomly between ‘Bad’, ‘Not Bad’, ‘Fair’, ‘Good’ and
‘Very Good’. Finally a fortune and some tips will be displayed on the
screen. Press the PAGE UP key or PAGE DOWN key to
scroll through the tips. Press the ENTER key again to get your
fortune told again.
Jokes of Today
When the game starts, a joke question will scroll across the screen.
It will loop repeatedly unless you press the ENTER key .
Then two (2) new icons will be displayed on a new screen. Press
REPEAT on the left hand side to repeat the question. Press
ANSWER on the right hand side to discover the answer. You
can press the ENTER key any time to see another joke.
31
Page 35

32
Specifications
Battery Size AAA x 4 (Not Included)
Operating Voltage
1.5 V x 4
Power Consumption
~
0.45W
Operation Temperature
10°C to 40°C (50°F to 104°F)
Unit Dimensions 259.80mm(L) x 231.14mm(W) x
35.56mm(H)
Weight
(without batteries) 0.98Kg
Note: Specifi cations and functions are subject to change without
prior notice.
Check out our other NEW educational toys!
Startright®
www.startright-kids.com
Page 36

#11800
English
Printed in China
Copyright © 2008
HANZAWA (HK) LTD.
World Commerce Centre
Harbour City, 11 Canton Road
Tsim Sha Tsui, Kowloon
Hong Kong
www.hanzawa.com.hk
 Loading...