

Page 1

STAR TRAC
14410 Myford Road
Irvine, California 92606
Telephone: (800) 228-6635, (714) 669-1660
Fax:(714) 508-3303
http://www.startrac.com
email: support @star trac.com
September 2006
Star T rac Instinct
™
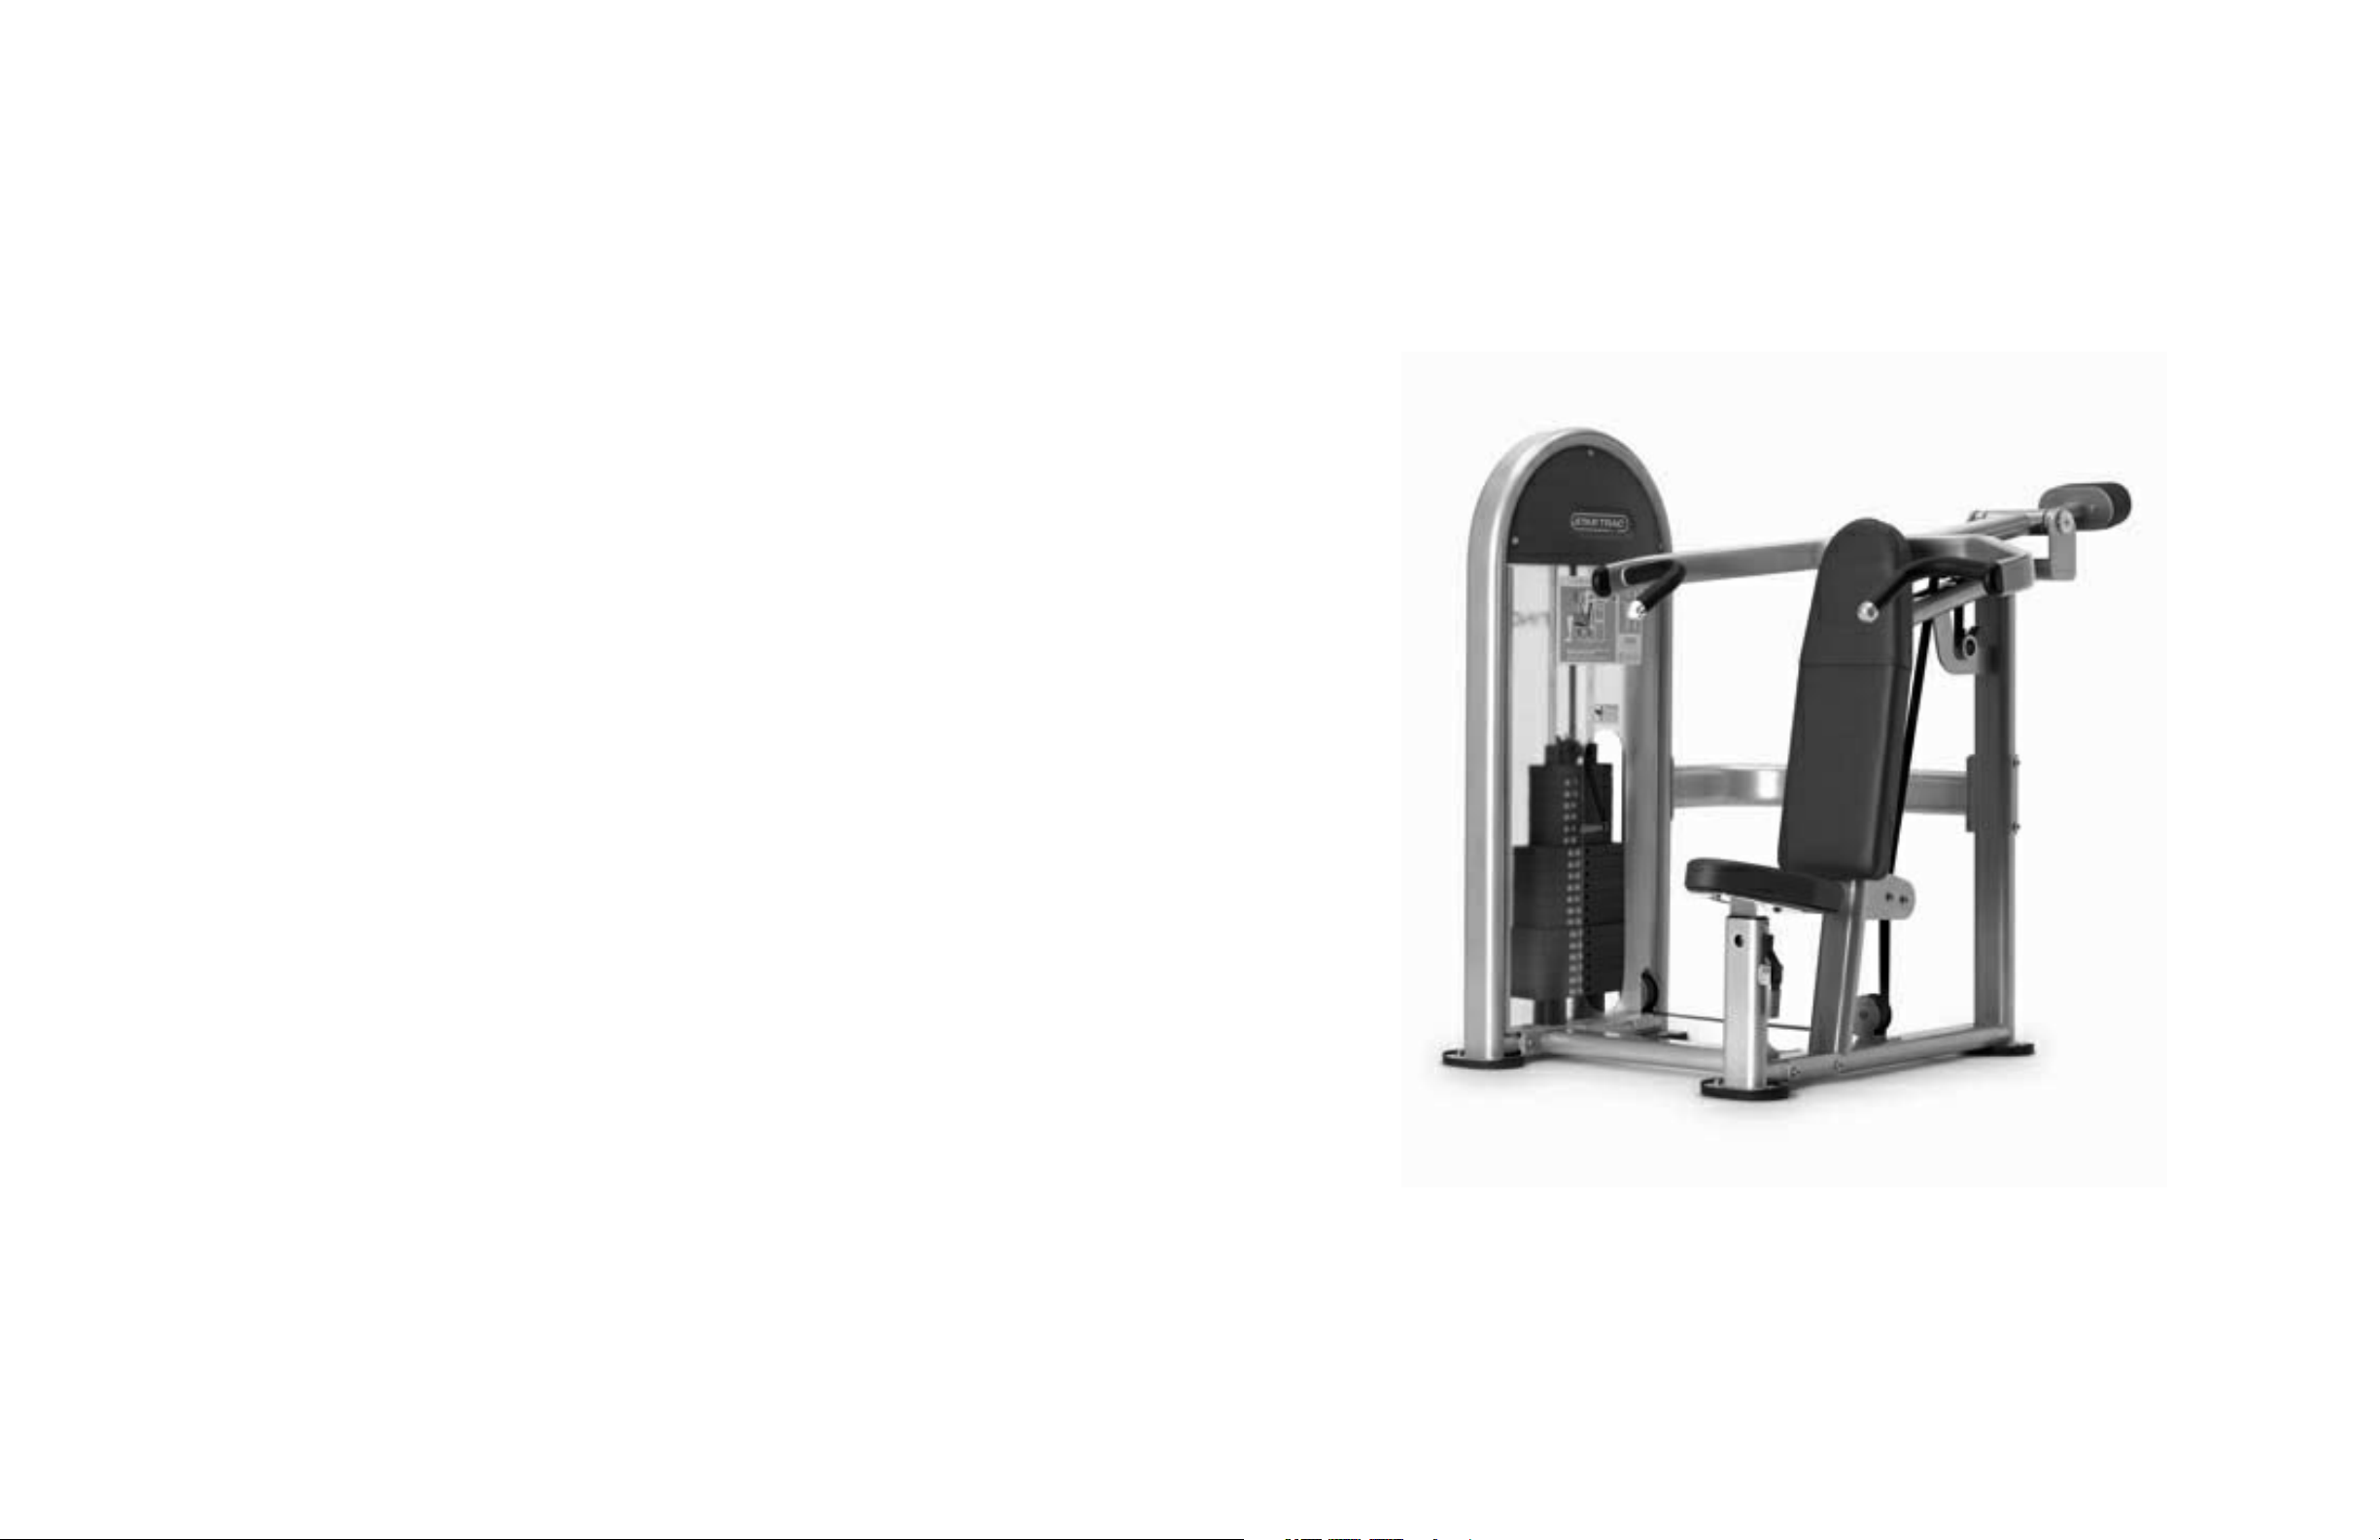
Shoulder Press
OWNER’S MANUAL
Page 2

2 STAR TRAC INSTINCT SHOULDER PRESS O
WNER’SMANUAL
STAR TRAC INSTINCT SHOULDER PRESS O
WNER’SMANUAL
19
Introduction
. . . . . . . . . . . . . . . . . . . . . . . . . . . . . . . . . . . . . . . . . . . . . . . . . . . . . . . . . . . . . . . . . . . . . . . . . . . . . . . . . . 4
About This Manual . . . . . . . . . . . . . . . . . . . . . . . . . . . . . . . . . . . . . . . . . . . . . . . . . . . . . . . . . . . . . . . . . . . . 4
Safety Instructions . . . . . . . . . . . . . . . . . . . . . . . . . . . . . . . . . . . . . . . . . . . . . . . . . . . . . . . . . . . . . . . . . . . . . . . . . . . . . 5
Assembly and Setup
. . . . . . . . . . . . . . . . . . . . . . . . . . . . . . . . . . . . . . . . . . . . . . . . . . . . . . . . . . . . . . . . . . . . . . . . . . . 6
Parts and Materials . . . . . . . . . . . . . . . . . . . . . . . . . . . . . . . . . . . . . . . . . . . . . . . . . . . . . . . . . . . . . . . . . . . . 6
Siting Requirements . . . . . . . . . . . . . . . . . . . . . . . . . . . . . . . . . . . . . . . . . . . . . . . . . . . . . . . . . . . . . . . . . . . 6
Unpacking . . . . . . . . . . . . . . . . . . . . . . . . . . . . . . . . . . . . . . . . . . . . . . . . . . . . . . . . . . . . . . . . . . . . . . . . . . . 6
Assembly . . . . . . . . . . . . . . . . . . . . . . . . . . . . . . . . . . . . . . . . . . . . . . . . . . . . . . . . . . . . . . . . . . . . . . . . . . . . 7
Anchoring . . . . . . . . . . . . . . . . . . . . . . . . . . . . . . . . . . . . . . . . . . . . . . . . . . . . . . . . . . . . . . . . . . . . . . . . . . . 11
Exercise Guidelines . . . . . . . . . . . . . . . . . . . . . . . . . . . . . . . . . . . . . . . . . . . . . . . . . . . . . . . . . . . . . . . . . . . . . . . . . . . . 11
General Guidelines . . . . . . . . . . . . . . . . . . . . . . . . . . . . . . . . . . . . . . . . . . . . . . . . . . . . . . . . . . . . . . . . . . . . 11
Product Use and Maintenance . . . . . . . . . . . . . . . . . . . . . . . . . . . . . . . . . . . . . . . . . . . . . . . . . . . . . . . . . . . 11
Preventative Maintenance . . . . . . . . . . . . . . . . . . . . . . . . . . . . . . . . . . . . . . . . . . . . . . . . . . . . . . . . . . . . . . . . . . . . . . . 12
Maintenance Schedule . . . . . . . . . . . . . . . . . . . . . . . . . . . . . . . . . . . . . . . . . . . . . . . . . . . . . . . . . . . . . . . . . . 12
Maintenance Procedures . . . . . . . . . . . . . . . . . . . . . . . . . . . . . . . . . . . . . . . . . . . . . . . . . . . . . . . . . . . . . . . . 13
Labels and Placards . . . . . . . . . . . . . . . . . . . . . . . . . . . . . . . . . . . . . . . . . . . . . . . . . . . . . . . . . . . . . . . . . . . . . . . . . . . . 15
Warranty and Disclaimer . . . . . . . . . . . . . . . . . . . . . . . . . . . . . . . . . . . . . . . . . . . . . . . . . . . . . . . . . . . . . . . . . . . . . . . . 16
T
ABLE OF
C
ONTENTS
Copyright 2006. Star Trac by Unisen, Inc.All rights reserved, including those to reproduce this book or par ts thereof in any form without first obtaining written permission
from Star Trac.
Every effort has been made to keep this information current; however, periodically, changes are made to the information herein, and these changes will be incorporated into
new editions of this publication.All product names and logos are trademarks of their respective owners. Printed in the USA.
Page 3
STAR TRAC INSTINCT SHOULDER PRESS O
WNER’SMANUAL
318 STAR TRAC INSTINCT SHOULDER PRESS O
WNER’SMANUAL
Page 4

STAR TRAC INSTINCT SHOULDER PRESS O
WNER’SMANUAL
174 STAR TRAC INSTINCT SHOULDER PRESS O
WNER’SMANUAL
Thank you for choosing the STAR TRAC INSTINCT SHOULDER PRESS. This unit has been designed to provide the user the
most rewarding experience based upon the carefully planned features it possesses. The design elements of this product will provide you with a comfortable, intuitive, safe and reliable experience, guiding you to a habit-forming lifestyle. Our mission is to provide products to mold lifelong habits for health and fitness, and the INSTINCT SHOULDER PRESS will provide the path to
meet your goals.
ABOUT THIS MANUAL
This manual is applicable to the INSTINCT SHOULDER PRESS. The manual is divided into eight sections, as follows:
Introduction
Provides an overview of each section within the manual.
Safety Instructions
Provides guidelines for safely operating the INSTINCT SHOULDER PRESS.
Assembly and Setup
Provides instructions for unpacking, assembling and setting up the INSTINCT SHOULDER PRESS.
Exercise Guidelines
Provides general guidelines to be followed when using the INSTINCT INCLINE PRESS.
Preventative Maintenance
Describes the preventative maintenance measures required to keep the INSTINCT SHOULDER PRESS in top condition.
Labels and Placards
Provides illustrations and part number information for labels and placards used on STAR TRAC INSTINCT products.
Regulatory Information
Provides warrant and servicing information for the INSTINCT SHOULDER PRESS.
I
NTRODUCTION
Page 5

STAR TRAC INSTINCT SHOULDER PRESS O
WNER’SMANUAL
516 STAR TRAC INSTINCT SHOULDER PRESS O
WNER’SMANUAL
Read this Owner's Manual carefully before assembling, servicing or using your STAR TRAC INSTINCT SHOULDER PRESS.
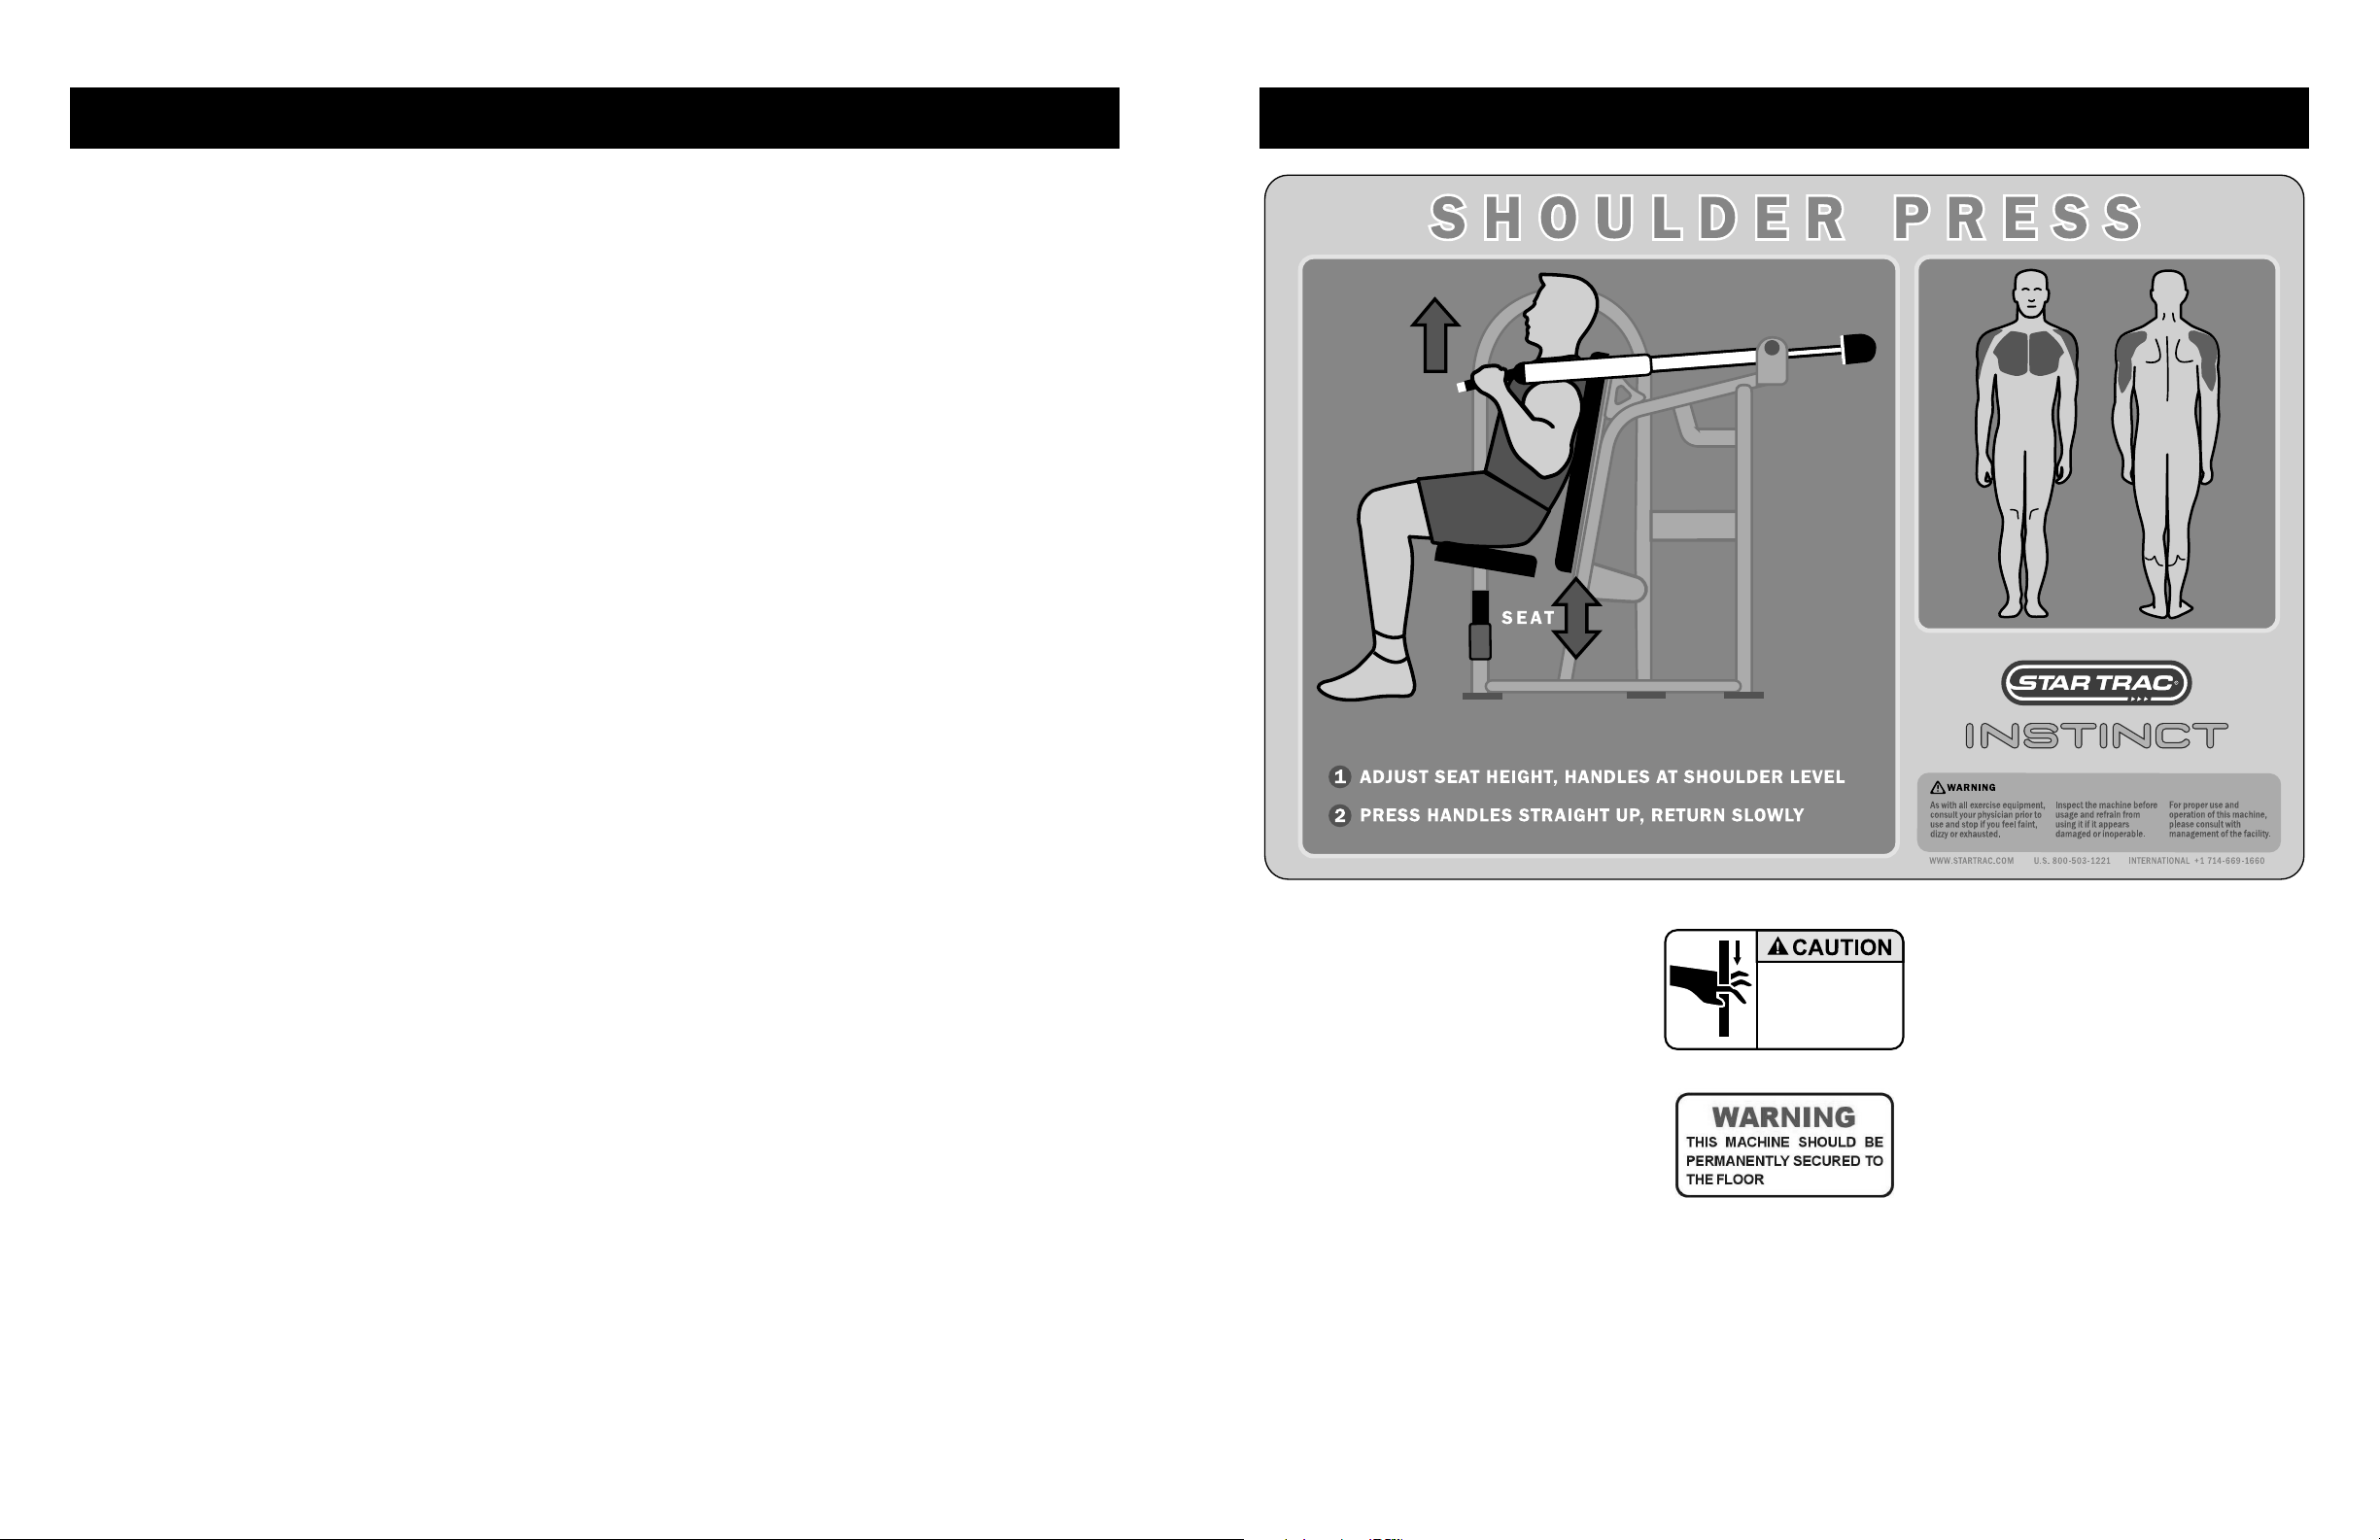
WARNING: SERIOUS INJURY MAY OCCUR IF THESE SAFETY PRECAUTIONS ARE NOT OBSERVED.
UNDERSTANDING EACH AND EVERY WARNING TO THE FULLEST IS IMPORTANT. IF ANY OF THESE WARN-
INGS ARE UNCLEAR, CONTACT STAR TRAC PRODUCT SUPPORT FOR CLARIFICATION.
S
AFETYINSTRUCTIONS
1. Do not use any equipment in any way other than
designed or intended by the manufacturer. It is imperative that weight stack machines as well as any other
STAR TRAC INSTINCT equipment is used properly to
avoid injury.
2. Make sure there is enough room for safe access and
operation of the INSTINCT SHOULDER PRESS.
3. Keep hands, feet, head, limbs, fingers and hair clear at
all times from moving parts to avoid injury. Use appropriate positioning, speed and controlled movements.
4. DO NOT use any equipment that is damaged and or has
worn or broken parts. Use only replacement parts supplied by STAR TRAC.
5. DO NOT wear loose or dangling clothing while using the
INSTINCT SHOULDER PRESS. Keep away from all
moving parts.
6. Obtain a medical examination prior to beginning an
exercise program.
7. If at any time during exercise you feel faint, dizzy or
experience pain, STOP IMMEDIATELY and consult
your physician before continuing.
8. Children must NOT be allowed to operate the
INSTINCT SHOULDER PRESS. Adolescents must be
supervised when using the INSTINCT SHOULDER
PRESS.
9. DO NOT attempt to fix a broken or jammed unit. Notify
authorized personnel.
10. Use the INSTINCT SHOULDER PRESS only for the
intended use. Obtain instruction on proper use of the
unit. It is the purchaser's sole responsibility to properly
instruct end users and supervising personnel as to the
proper operating procedures of all STAR TRAC
INSTINCT equipment. DO NOT modify the unit.
11. Load plates evenly and carefully to avoid tipping equip-
ment and possible crushing injuries.
12. DO NOT use the INSTINCT SHOULDER PRESS if
guards or shrouds are missing or damaged.
13. USE A SPOTTER.
14. DO NOT add incremental weights, except those provid-
ed by STAR TRAC.
15. MAINTAIN PLACARDS AND LABELS: Do not remove
labels for any reason; they contain important information. If illegible or missing, contact the STAR TRAC
Parts Department for replacement.
16. SECURING EQUIPMENT: The INSTINCT SHOUL-
DER PRESS MUST be secured to the floor to stabilize
and eliminate rocking or tipping over. This must be performed by a licensed contractor. DO NOT use the UNIT
if it is not set up and located on a solid level surface.
17. Make sure that each machine is set up and operated on
a solid level surface. DO NOT install equipment on an
uneven surface.
18. MAINTAIN ALL EQUIPMENT: Preventative maintenance is the key to ensuring smooth and reliable operation of the INSTINCT SHOULDER PRESS as well as
keeping your liability to a minimum. Inspect the unit
prior to use. Give particular attention to the areas most
susceptible to wear. DO NOT use if the unit is damaged
or inoperable.
19. Ensure that adjustment, maintenance and/or repair of
the INSTINCT SHOULDER PRESS is performed by
qualified personnel ONLY. Immediately replace worn or
damaged components. If unable to immediately replace
worn or damaged components then remove the
INSTINCT SHOULDER PRESS from service until
repairs are made.
20. Keep a repair log of all maintenance activities.
21. Routinely inspect all accessory clips that join attachments to weight belts or cables, and replace at the first
sign of wear.
22 Use only weight selector pins supplied by STAR TRAC
on weight stacks. Substitutes are forbidden.
23. Cables and belts pose an extreme liability if used when
frayed. Always replace any cable or belt at first sign of
wear (consult STAR TRAC Product Support if uncertain).
24. Fully insert the weight selector pin when selecting the
desired weight. Partially inserted pins can cause
weights to fall unexpectedly. NEVER remove the weight
selector pin if any weights are suspended. NEVER
attempt to release jammed weights or parts.
25. DO NOT use Lat Pulldown Bars on Multi-jungle
Crossover cable systems or any other pulley systems.
These bars are designed for lat pulldown machines
ONLY. If improperly used, the Lat Bar could fall unexpectedly, striking the user when weight selector pin is
removed.
26. Lat Pulldown Machines pose a danger if used with
worn or damaged cables and connecting links. The user
can be struck in the head if the cable or related parts
break during use.
27. When adjusting any seat, knee hold down pad, range of
motion limiter, foothold pad or any other type of
adjuster, make certain that the adjusting pin is fully
engaged in the retainer hole to avoid injury.
NOTE: It is the sole responsibility of the user/owner or facility
operator to ensure that regular maintenance is performed.
STAR TRAC warrants all frameworks for a period of 10 years. All moving parts are warranted for 1 year. 10 year limited warranty on structural frame not including coatings. 90 days on upholstery stitching only, cables and belts. Warranty is for parts only. Warranty is good and available
to the original purchaser only as noted by STAR TRAC invoice and is not transferable nor assumable. STAR TRAC cannot warrant products that
have been abused, neglected and or poorly maintained. All equipment should be reviewed at the time of delivery for damage, breakage, loosening
of nuts and bolts, components and or any other moving parts. Any and all claims for warranty must be received in writing within 70 days of defect.
Do not alter, modify or redesign any STAR TRAC products or use any replacement parts or materials other that those components original to
STAR TRAC as it will limit the warranty and liability of STAR TRAC. STAR TRAC reserves the right to change, replace or modify products,
parts, accessories and or design without notice. Deposits on cancelled orders will be subject to handling and restocking charges.
W
ARRANTY
& D
ISCLAIMER
WHAT IS COVERED
This STAR TRAC INSTINCT SHOULDER PRESS is warranted to
be free of all defects in material and workmanship.
WHO IS COVERED
The original purchaser or any person receiving the Product as a gift
from the original purchaser.
WHO PAYS TRANSPORTATION & INSURANCE FOR SERVICE
If the Product or any covered part must be returned to a service facility for repairs, We, STAR TRAC, will pay all transportation and insur-
ance charges for the first year. You are responsible for transportation
and insurance charges for all subsequent years.
WHAT WE WILL DO TO CORRECT COVERED DEFECTS
We will ship to you any new or rebuilt replacement part or component,
or, at our option, replace the Product. Such replacement parts are warranted for the remaining portion of the original warranty period.
WHAT IS NOT COVERED
Any failures or damage caused by unauthorized service, misuse, accident, negligence, improper assembly or installation, debris resulting
from any construction activities in the Products environment, rust or
corrosion as a result of the Product(s) location, alterations or modifications without our written authorization or by failure on your part to
use, operate and maintain the Product as set out in your Owners
Manual.
OWNERS MANUAL
It is VERY IMPORTANT THAT YOU READ THIS MANUAL before
operating the Product. Remember to perform the periodic maintenance
requirements specified in the Manual to assure proper operation and
your continued satisfaction.
HOW TO GET PARTS & SERVICE
Simply call Customer Support Services at (800) 966-3539 or (951) 6003800, Monday through Friday from 8:00 a.m. to 5:00 p.m. Pacific
Standard Time, and tell them your name, address and the model number of your Product. They will tell you how to get a replacement part,
or, if necessary, arrange for service where your Product is located or
advise you on how and where to ship the Product for service. You can
also contact us via Fax at (951) 600-1706 or e-mail us at
Before shipping:
1. Obtain a Return Authorization Number (RA#) from Customer
Support Services
2. Securely pack your Product (use the original shipping carton, if possible)
3. Write the RA# on the outside of the carton
4. Insure the Product, and
5. Include a letter explaining the defect or problem and a copy of your
proof of purchase if you believe the service is covered by warranty.
EXCLUSIVE WARRANTY
THIS LIMITED WARRANTY IS IN LIEU OF ALL OTHER WARRANTIES OF ANY KIND EITHER EXPRESSED OR IMPLIED,
INCLUDING BUT NOT LIMITED TO THE IMPLIED WARRANTIES
OF MERCHANTABILITY AND FITNESS FOR A PARTICULAR PURPOSE, AND ALL OTHER OBLIGATIONS OR LIABILITIES ON OUR
PART. We neither assume nor authorize any person to assure for us
any other obligation or liability concerning the sale of this Product.
Under no circumstances shall we be liable under this warranty, or otherwise, of any damage to any person or property, including any lost
profits or lost savings, for any special, indirect, secondary, incidental or
consequential damages of any nature arising out of the use of or inability to use this Product. Some states do not allow the exclusion or limitation of implied warranties or of liability for incidental or consequential damages, so the above limitations or exclusions may not apply to
you.
CHANGES IN WARRANTY NOT AUTHORIZED
No one is authorized to change, modify or extend the terms of this limited warranty.
EFFECT OF STATE LAWS
This warranty gives you specific legal rights and you may have other
rights, which vary, from state to state.
OUR PLEDGE TO YOU
Our Products are designed and manufactured to the highest standards.
STAR TRAC wants you completely satisfied with our Products and
will do everything possible under the terms of this warranty to keep
you secure in knowing you have bought the best!
Page 6
PARTS AND MATERIALS
The following parts are included with the STAR TRAC INSTINCT SHOULDER PRESS
T
OOLSREQUIRED
Most STAR TRAC INSTINCT machines can be assembled using the following tools:
Your INSTINCT SHOULDER PRESS includes a hex key set and combination open-end wrench.
SITING REQUIREMENTS
Your INSTINCT SHOULDER PRESS requires approximately 32 square feet of floor space to ensure safe operation of the unit.
UNPACKING
Your INSTINCT SHOULDER PRESS is shipped in one or more shipping cartons. Each carton will generally contain one subassembly of the entire unit. To unpack:
■
Remove the shipping straps from the outside of each shipping carton.
■
Open the top of each carton and fold back all four flaps.
■
Remove the packing materials, foam inserts, and ALL parts from each shipping carton. Keep the contents of each carton in
a separate area to facilitate assembly. To ensure personal safety during assembly, place all packing materials outside the
assembly area.
■
Verify that all parts listed above are included in your shipment.
Take time now to enter your INSTINCT SHOULDER PRESS serial number in the space below. If parts are missing, or if you
have any operational questions, please call Star Trac’s Service department at (800) 503-1221; have your serial number ready.
Serial No. __________________________________________
STAR TRAC INSTINCT SHOULDER PRESS O
WNER’SMANUAL
156 STAR TRAC INSTINCT SHOULDER PRESS O
WNER’SMANUAL
A
SSEMBLY AND
S
ETUP
1 Frame, Weight Stack 1
2 Crossbeam, Upper 1
3 Frame, Main 1
5 Leverage Arm 1
6 Crossbeam, Lower 1
9 Shroud, Lower, Front 1
10 Plate, Top, Weight Stack 1
11 Selector Pin 1
13 Shaft, Leverage Arm 1
14 Guide Post, Weight Stack 2
15 End Cap 2
16 Weight, 10lb 3
25 Cushion, Seat 1
26 Cushion, Back 1
27 Shroud, Lower, Rear 1
28 Shroud, Upper 2
29 Support, Weight Stack 2
31 Cap, Rubber 2
32 Retainer, Belt 2
33 Belt 1
34 Nut, Tapped Hole 6
35 Screw, Button Head Socket Cap, 10X130M 6
36 Screw, Button Head Socket Cap, 10X80M 3
38 Screw, Button Head Socket Cap, 10X35M 4
40 Screw, Button Head Socket Cap, 8X20M 6
42 Screw, Flat Head Socket, 10X30M 2
43 Screw, Retaining 2
48 Lock Nut, Nylon Insert, 10M 8
51 Washer, 11M 22
52 Washer, 9M 6
62 Screw, Button Head Socket Cap, 10X30M 2
63 Weight, 5lb 3
64 Weight, 15lb 9
■
Metric Hex Key Wrenches - 2.5mm, 5mm,6mm, 8mm, 10mm
■
Metric Open-End Wrenches - 10mm, 15mm, 17mm
■
Metric Ratchet Socket Wrench Set (including 17mm socket)
■
Torque Wrench
■
Channel Lock Pliers
■
Vice Grip Pliers
■
Rubber Mallet
■
Phillips Head Screwdriver - #2
L
ABELS AND
P
LACARDS
Pinch Points.
Keep hands away
from moving parts.
Page 7
W
EIGHTBELTINSPECTIONREQUIREMENTS
WARNING: REPLACE WORN WEIGHT BELTS IMMEDIATELY. FAILURE TO COMPLY CAN RESULT IN HAZ-
ARDOUS CONDITIONS FOR USERS OR OTHER BYSTANDERS.
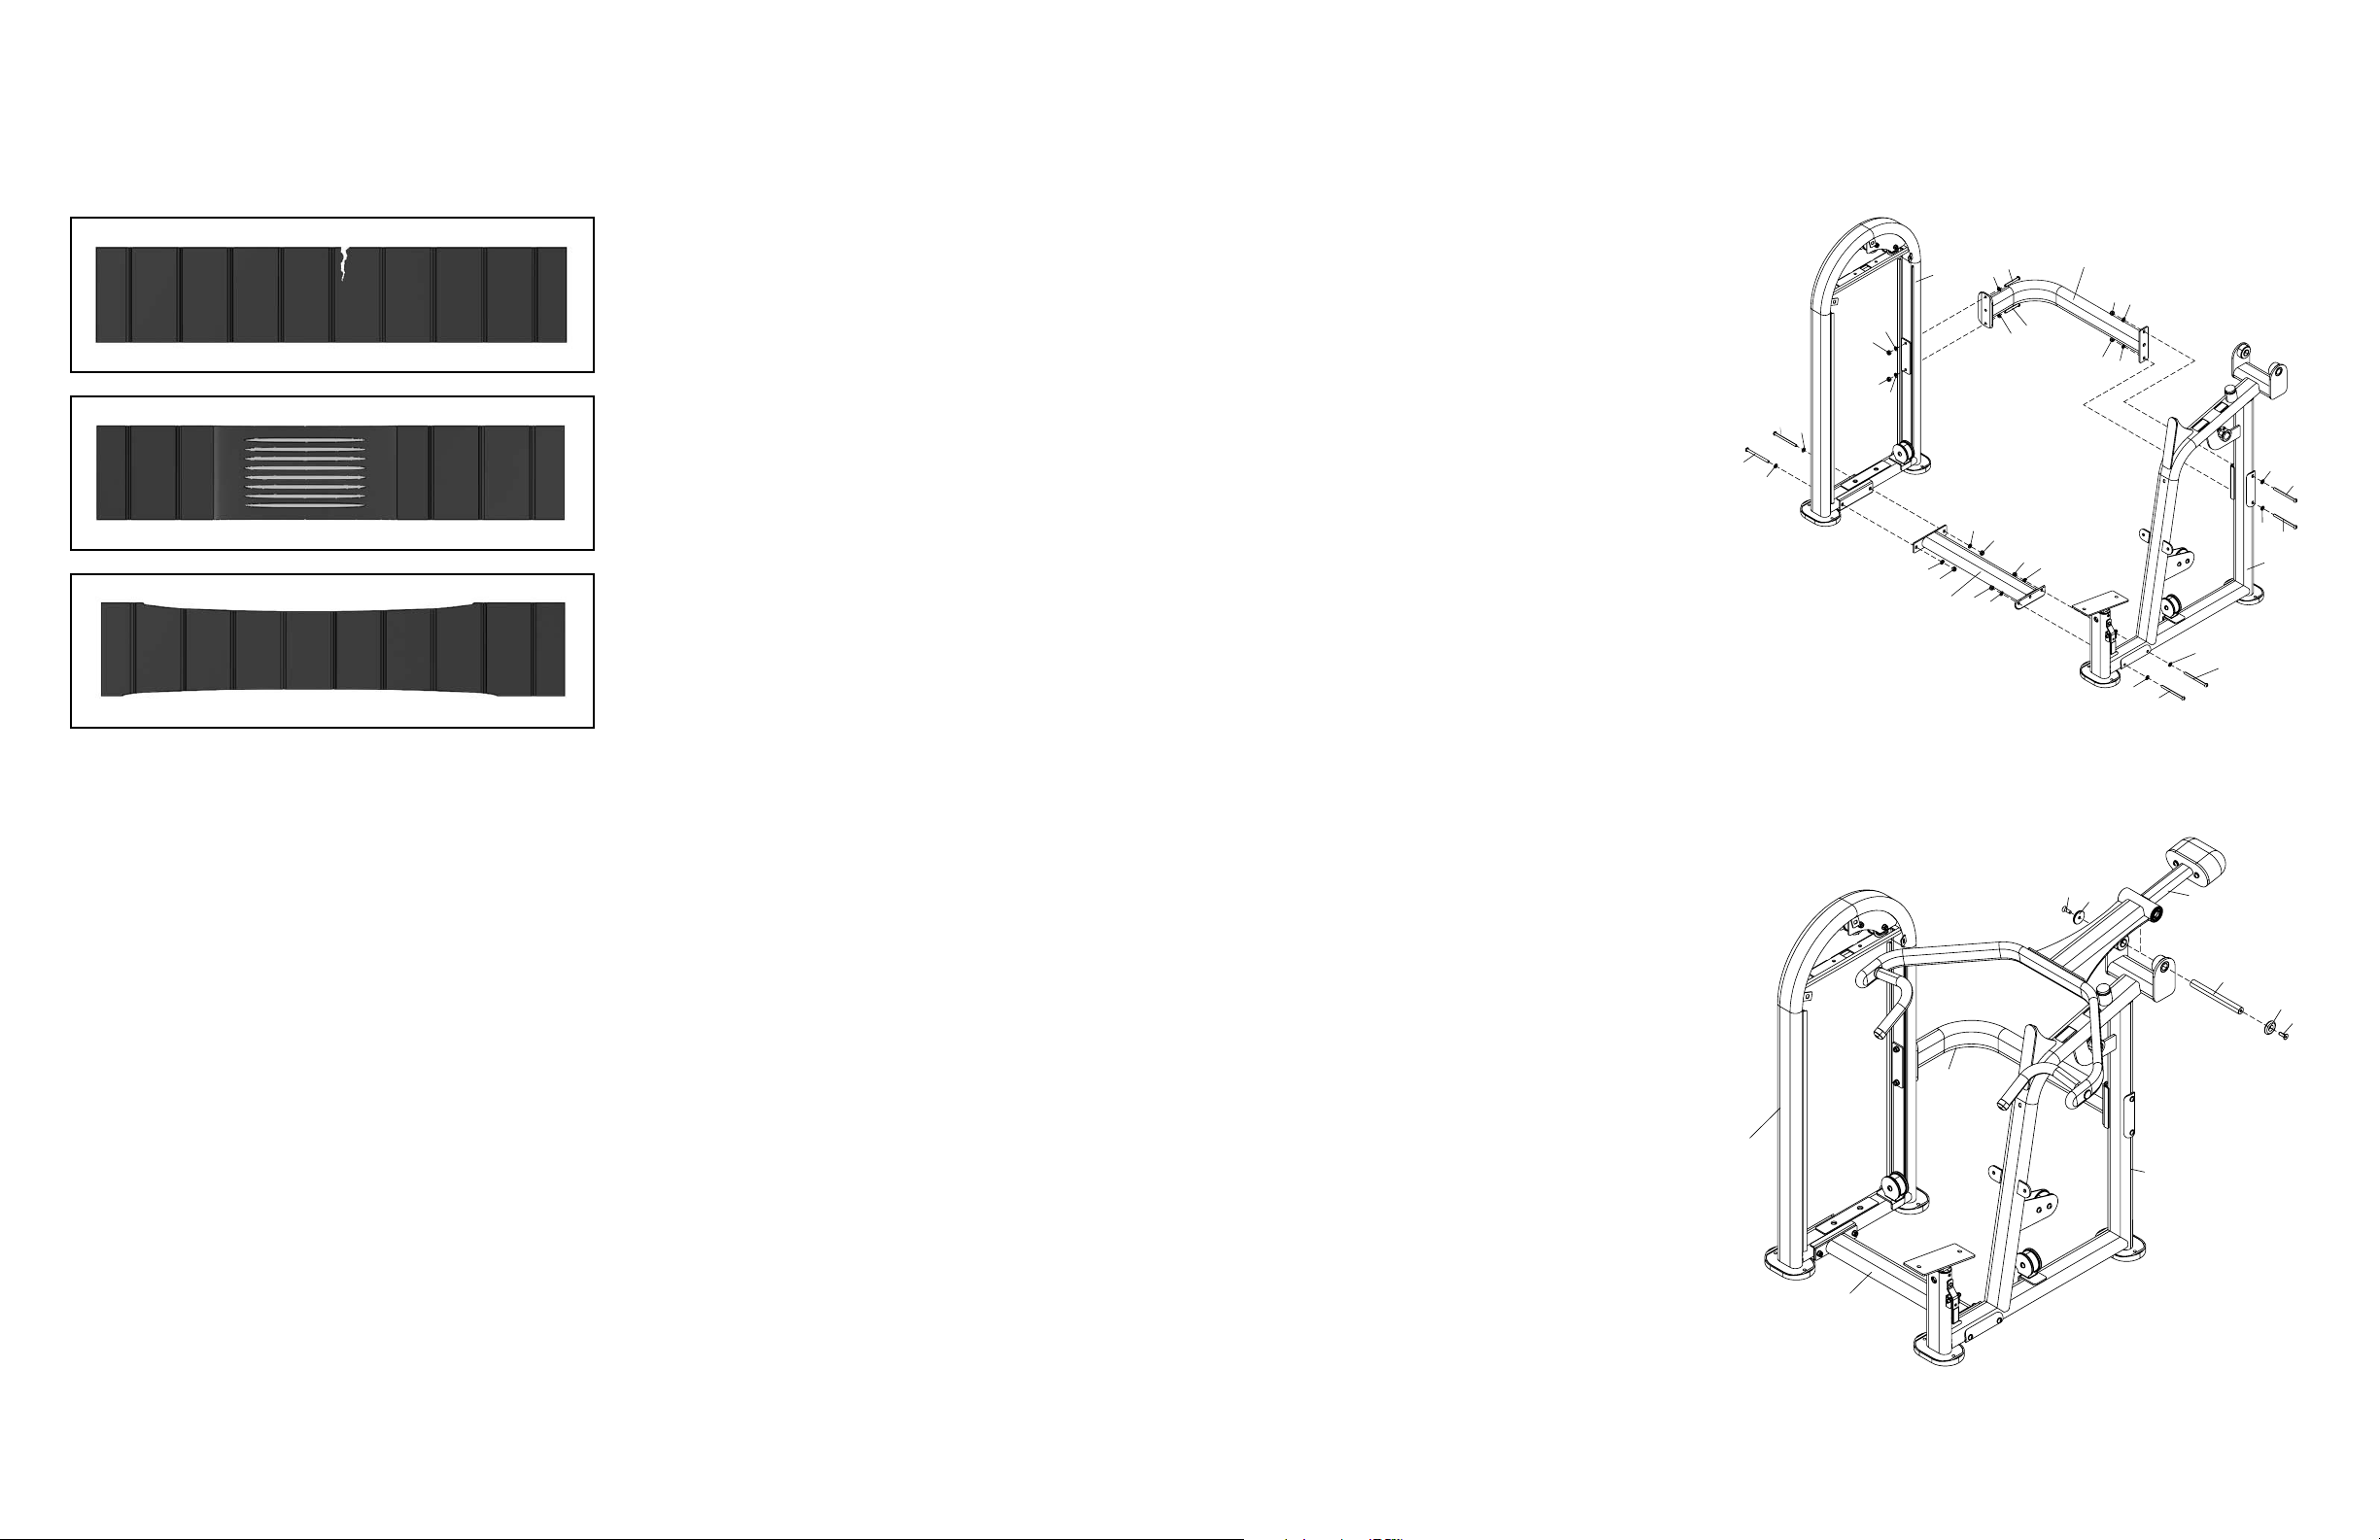
Inspect all weight belts for evidence of excessive wear or other damage. Give particular attention to the following conditions:
■
Torn or cracked belt
■
Exposed belt cords
■
Worn edges
ASSEMBLY
1. Assemble the Main Frame to the
Weight Frame
Align the two drilled holes in the lower crossbeam (6) with the mating holes in the bottom
of the weight stack frame (1). Secure the
crossbeam to the weight frame using two
screws (35), four washers (51), and two lock
nuts (48). Tighten the nuts securely.
Align the two drilled holes in the upper crossbeam (2) at the "short leg" with the mating
holes in the side beam of the weight stack
frame (1). Secure the crossbeam to the weight
frame using two screws (37), four washers (51),
and two lock nuts (48). Tighten the nuts
securely.
Position the main frame (3) so the two drilled
holes in the lower crossbeam (6) and the two
drilled holes in the upper crossbeam (2) are
aligned with the mating holes in the main
frame.
Secure the main frame to the lower crossbeam
using two screws (35), four washers (51), and
two lock nuts (48). Tighten the nuts securely.
Secure the main frame to the upper crossbeam
using two screws (35), four washers (51), and
two lock nuts (48). Tighten the nuts securely.
2. Install the Leverage Arm
NOTE:
Two people are required to install the
leverage arm; one to hold the leverage arm in
position, and one to install the leverage arm
shaft.
Hold the leverage arm (5) in position between
the two shaft support bearings.
Insert the leverage arm shaft (13) through the
leverage arm and both support bearings.
Secure the leverage arm shaft (13) to the main
frame (3) using two screws (42) and end caps
(15).
Rotate the leverage arm down until it rests
against the stop on the main frame.
STAR TRAC INSTINCT SHOULDER PRESS O
WNER’SMANUAL
714 STAR TRAC INSTINCT SHOULDER PRESS O
WNER’SMANUAL
35
51
35
51
48
48
51
51
51
48
51
2
48
51
48
51
51
35
51
35
3
51
35
51
35
36
51
1
36
51
51
48
48
6
48
51
42
15
2
1
6
5
13
15
42
3
Page 8
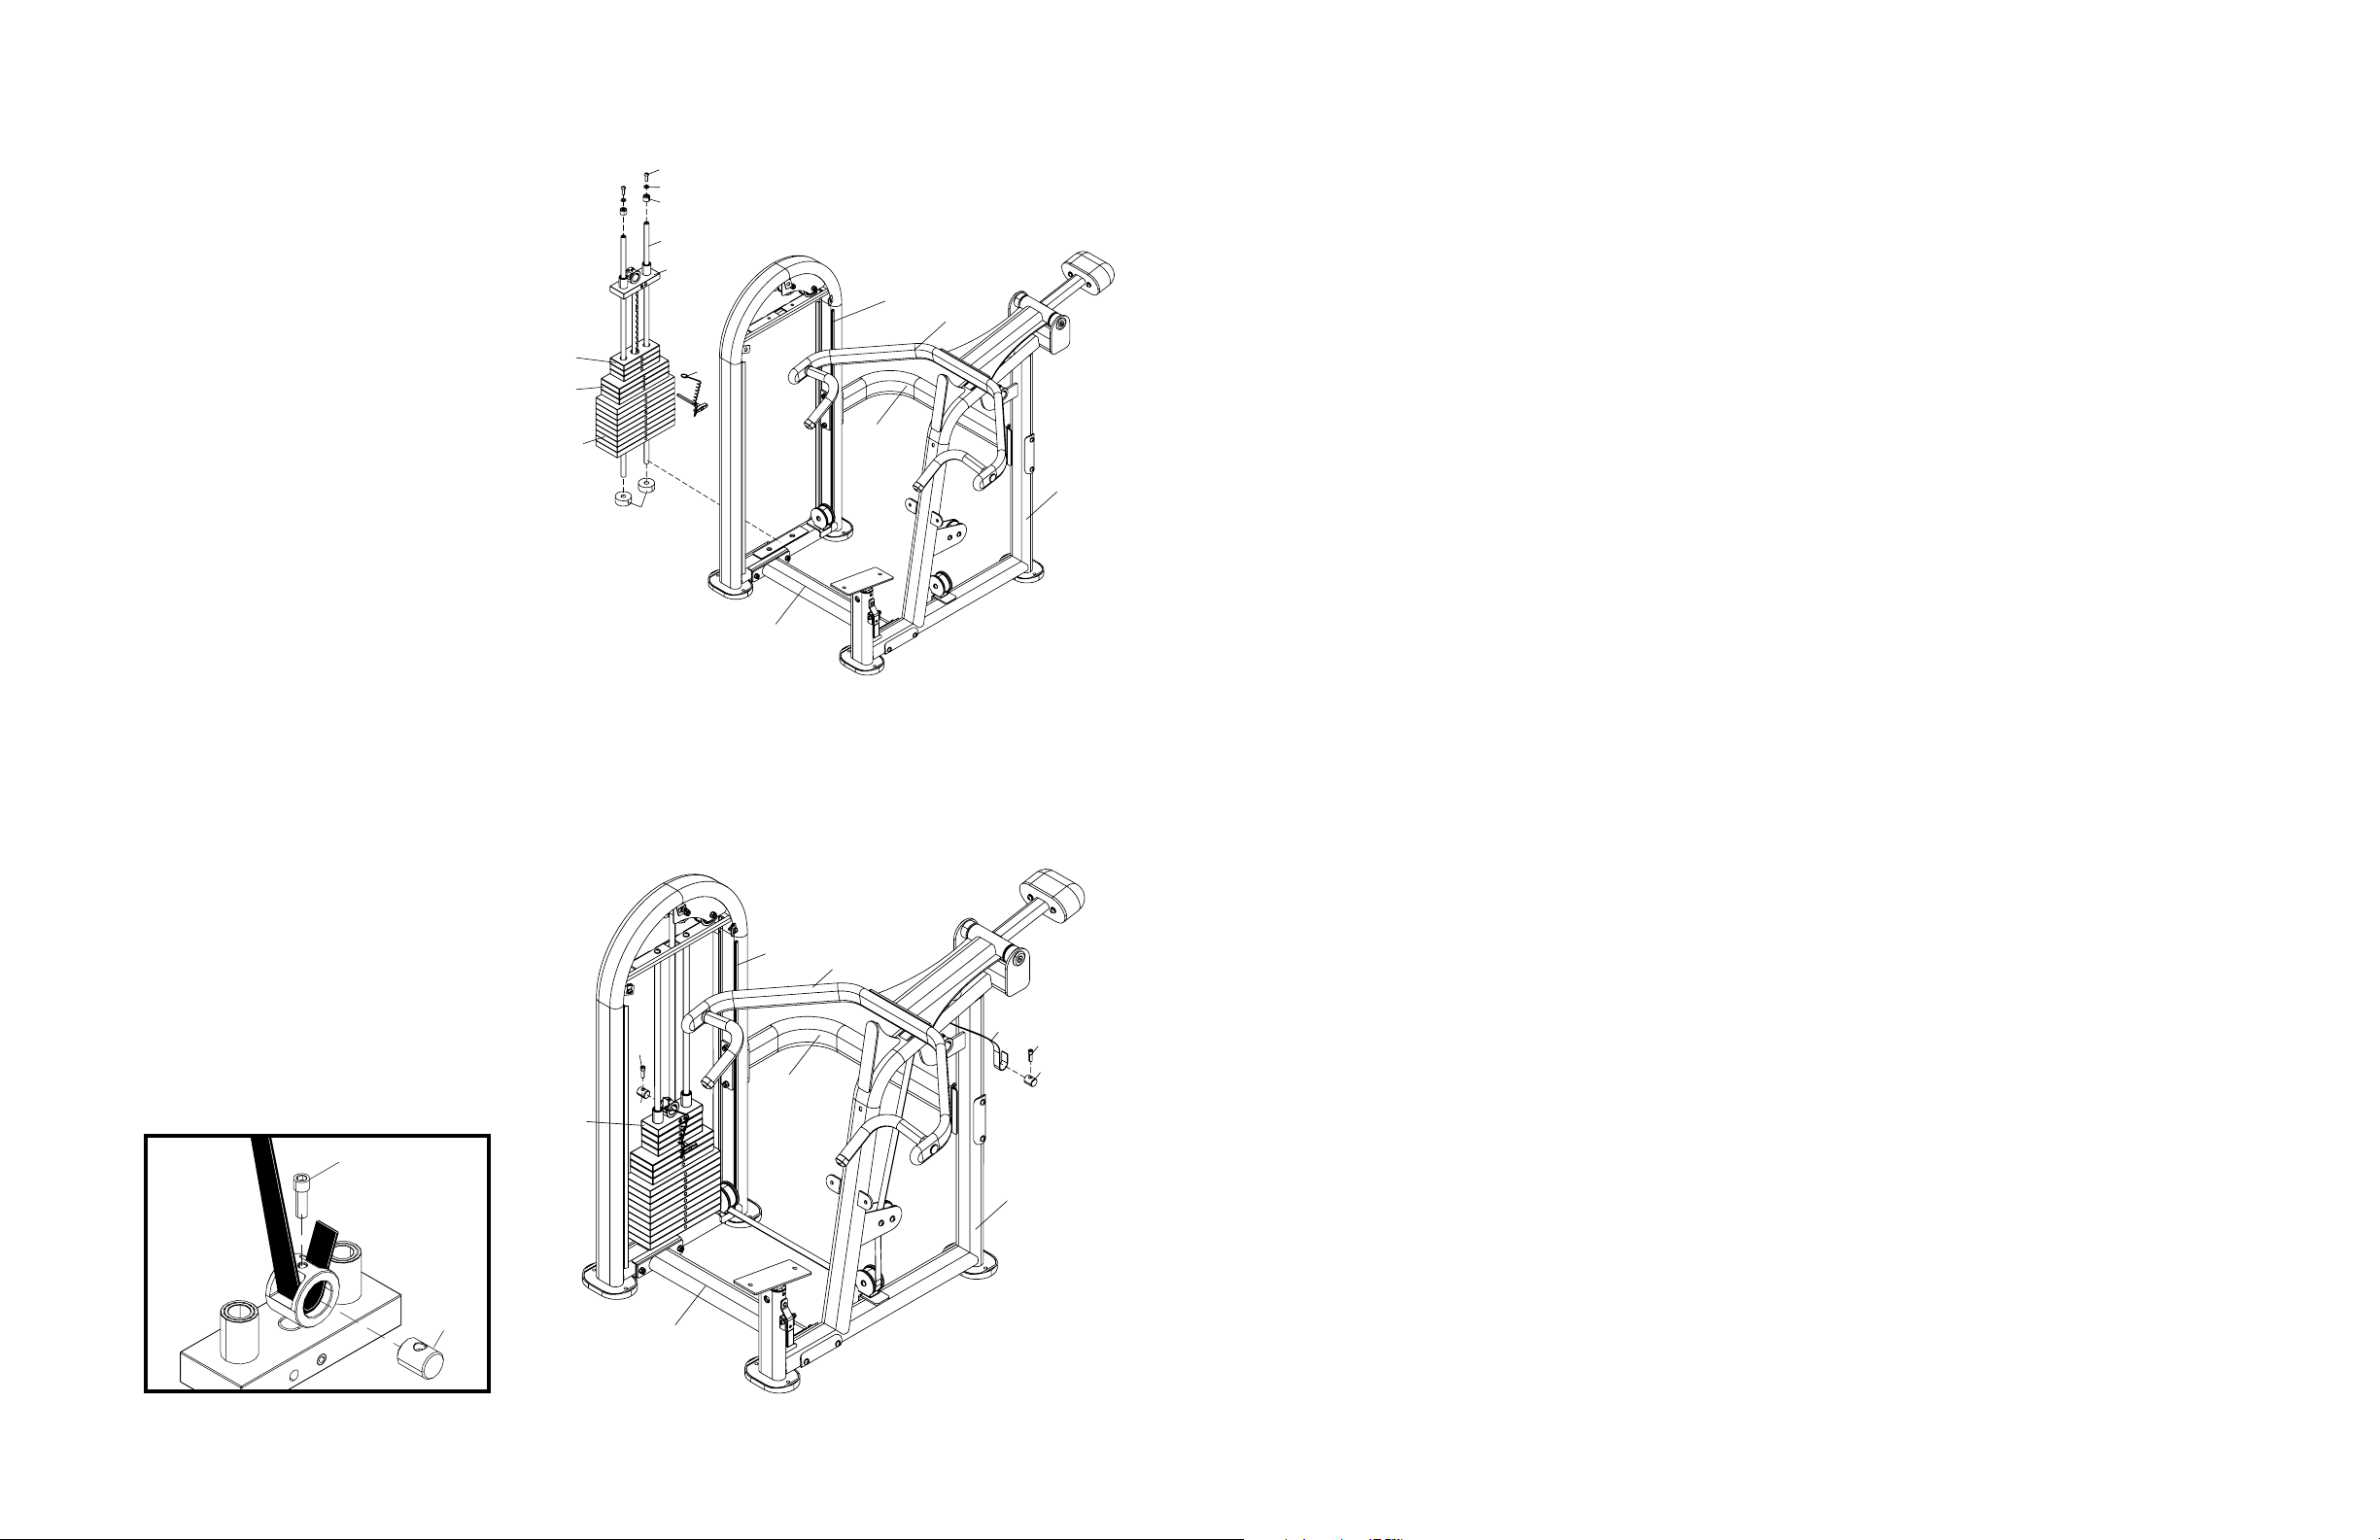
3. Assemble the Weight Stack
NOTE:
Two people are required to assemble
the weight stack; one to hold the weight stack
guide posts in position, and one to assemble the
weight stack components onto the posts.
Slide one weight stack support (29) onto each
weight stack guide post (14).
Insert the weight stack guide posts (14) into
the retaining holes in the base of the weight
stack frame (1). BE SURE the drilled ends of
the weight stack guide posts face upwards,
toward the top of the weight stack frame.
WARNING: TO PREVENT INJURY, INSTALL THE WEIGHTS ONE AT A TIME.
Install weights (63, 16, 64) on the weight stack
guide posts (14), one at a time, in the following
sequence:
■ Weight, 15lb (64) - nine required
■ Weight, 10lb (16) - three required
■ Weight, 5lb (63) - three required
Slide the looped end of the lanyard on the
selector pin (11) onto the shaft of the top plate
(10).
NOTE:
BE SURE to hold the lanyard in place
when installing the top plate..
Install the top plate (10) on the weight stack guide posts (14), inserting the top plate shaft through the holes in the
weights. Insert the selector pin (11) through one weight until it engages the top plate shaft.
Install one rubber cap (31) onto each weight stack guide post (14).
Lift up on one weight stack guide post (14) until the rubber cap (31) contacts the underside of the weight stack frame
crossmember. Secure the post to the weight stack with one screw (62) and one washer (51). Repeat for the remaining guide
post.
4. Install the Weight Belt
NOTE:
The weight belt (33) is attached to the
top plate (10) and main frame (3) using cinch
fasteners (see detail below). Two people may be
required to properly install and tension the
weight belt.
Remove the retaining screws (43) and belt
retainers (39) from the belt clamps on the
weight stack top plate (10) and main frame (3).
Insert one end of the weight belt (33) through the slot in the top plate belt clamp until approximately one inch of the free
end of the belt protrudes from the slot in the opposite side of the clamp.
MAINTENANCE PROCEDURES
F
RAMEWORKMAINTENANCE
CAUTION: DO NOT use lacquer thinner, acetone, or other solvents to clean powder-coated finishes on the framework
or other structural components. Solvents will dull the finish, and contain components that may remove the epoxybased powder from the frame.
Framework and other structural components should be wiped down on a daily basis using a moistened with water. This will
increase the longevity of protective powder-coat finishes. The framework should be inspected while cleaning for evidence of fatigue
cracks, scratches or chips in the finish, loose hardware, worn or damaged weight belt, and other areas that may require attention.
Apply easy-application car wax to all powder-coated surfaces quarterly. Regular waxing will aid in preventing premature rusting
due to corrosives found in perspiration, and will allow loose particles to be removed more easily when performing the daily wipedown.
Procedures to repair scratches and chips depend on the severity of the damage:
■
Surface scratches can generally be repaired by polishing with an automotive rubbing compound.
■
Deep scratches and chips must be repaired by filling the damaged area using a “touch-up” bottle of color-matched paint
(available through the STAR TRAC Parts Department). Fill the damaged area sparingly, using two or more coats. Allow
the area to dry thoroughly between coats. Once the touch-up is complete, it can be left “as is”, or it can be blended and colorsanded to the surrounding surface.
NOTE: The process of blending and sanding repaired areas to the surrounding surface is difficult. It should be attempted ONLY
by persons knowledgeable in this area.
The weight stack shrouds are made of PETG (glycol-modified polyethylene terephthalate). Proper cleaning is necessary to preserve the appearance of the shrouds. The following cleaners are compatible with PETG: Original Dawn®, Freon® T.F., Palmolive
Liquid®, Top Job® and Windex® with Ammonia D.
CAUTION: Use ONLY recommended cleaning agents and procedures when cleaning the weight stack shrouds:
■
DO NOT use abrasive or highly alkaline cleaners to clean the shrouds.
■
DO NOT use scrape the shrouds with squeegees, razor blades or other sharp instruments. DO NOT scrub or use
brushes on the shrouds.
■
DO NOT use Benzene, gasoline, acetone or tetrachloride to clean the shrouds.
■
DO NOT clean the shrouds in hot sun or at elevated temperatures.
Wash the shrouds using a clean sponge or soft cloth, and a solution of mild soap or detergent and lukewarm water. Rinse well with
clean water, and dry thoroughly with a chamois or moist cellulose sponge to prevent water spots.
Remove stubborn accumulations (paint, grease, scuff marks) before drying by rubbing lightly with Isopropyl alcohol. Remove
labels, placards or other adhesive residue using kerosene. If solvent does not penetrate the adhesive, heat the area using a handheld blow dryer to soften the adhesive and aid in removal.
Clean all areas treated with solvent using a clean sponge or soft cloth, and a solution of mild soap or detergent and lukewarm
water. Rinse thoroughly with clean water.
U
PHOLSTERY
M
AINTENANCE
CAUTION: DO NOT use cleaners such as Lysol®, Armor All®, Windex®, or other abrasive detergents to clean uphol-
stered surfaces. These products will remove moisture from the Naugahyde® upholstery, resulting in premature
cracking.
Upholstered cushions should be cleaned on a daily basis to prevent damaged due to corrosives found in perspiration.
Wipe the top and sides of upholstered cushions using a cloth moistened with a solution of one part lanolin hand cleaner to nine
parts water. After cleaning, wipe down using a dry towel to remove any residue.
STAR TRAC INSTINCT SHOULDER PRESS O
WNER’SMANUAL
138 STAR TRAC INSTINCT SHOULDER PRESS O
WNER’SMANUAL
63
16
64
62
51
31
14
10
1
4
11
2
29
6
43
10
43
32
1
4
33
2
3
43
32
3
32
6
Page 9
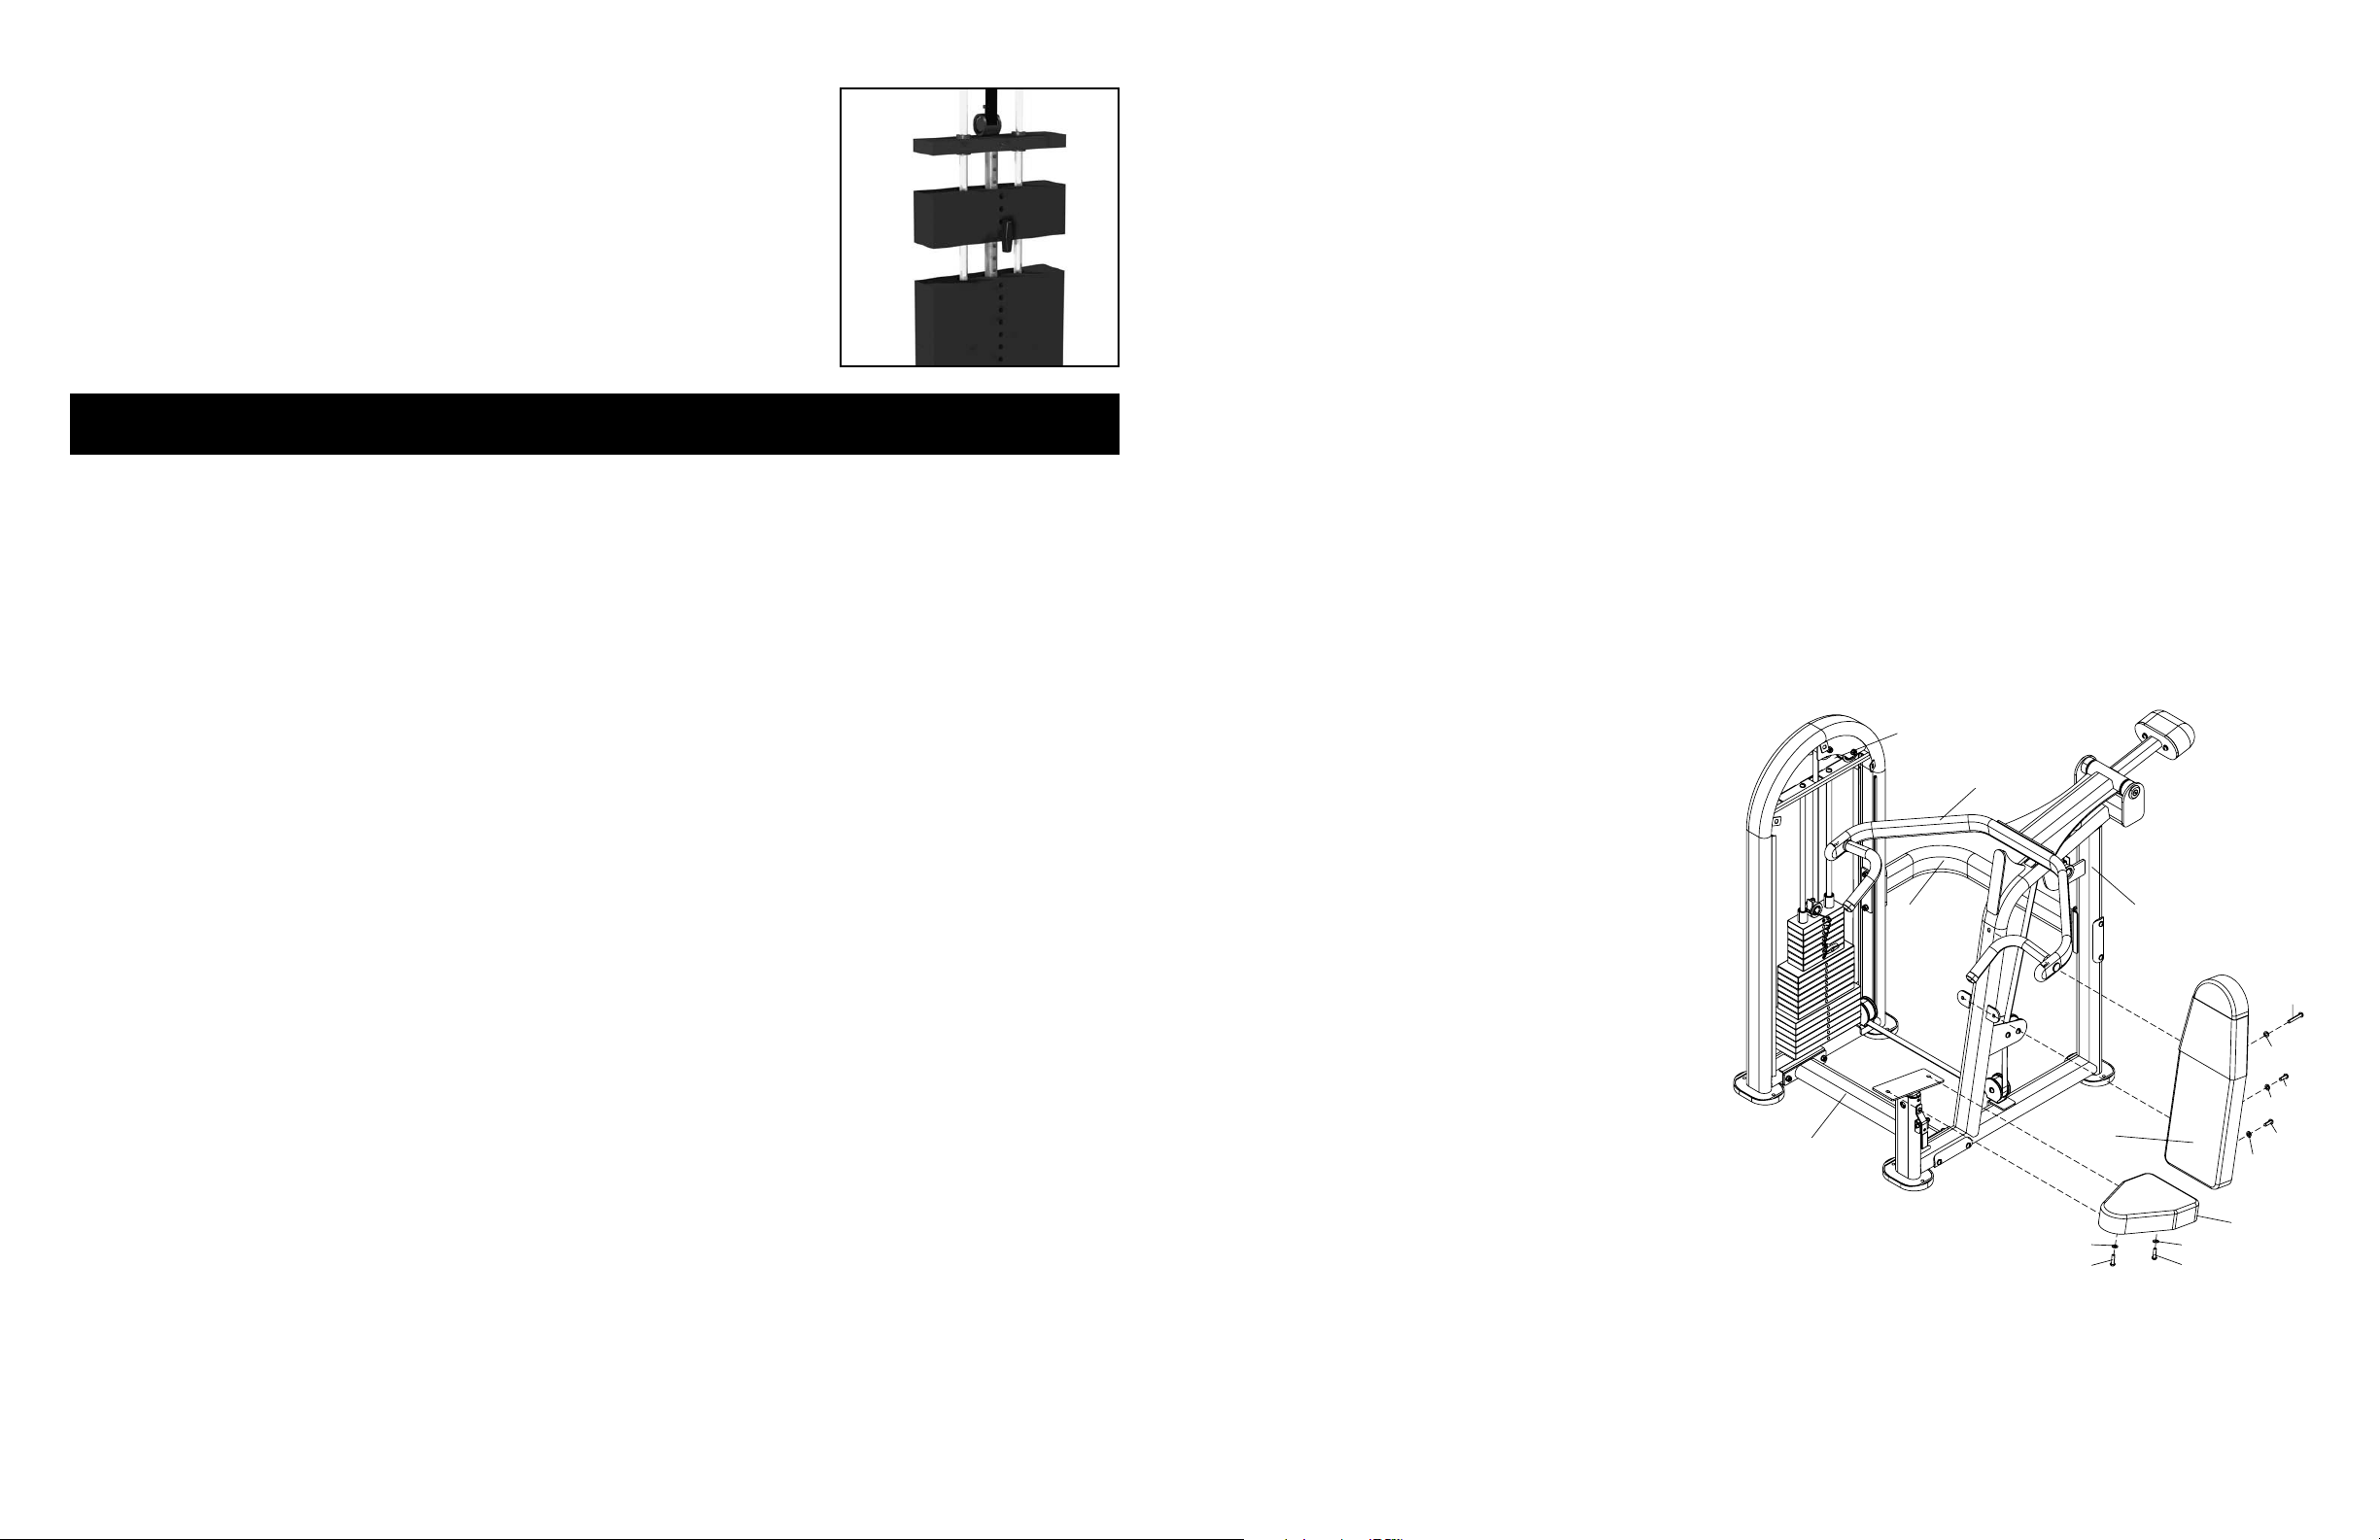
CAUTION: Do not "high pin" and/or "double pin" a weight stack. This action is considered to be dangerous to users, and bystanders, and may damage your INSTINCT
SHOULDER PRESS. Aside from the mechanical damage that may result, such
action(s), in part, may cause the weight stack to crush or pinch fingers, hands
and/or extremities. DO NOT use the unit if the top plate is elevated and/or pinned
in a raised position. Seek assistance from authorized personnel to correct such a
condition.
While holding the free end of the belt, press down on the opposite side of the belt so it lays flat against the inside of the
clamp.
Insert the belt retainer (32) into the belt clamp. BE SURE the tapped hole in the belt retainer is aligned with the mating
hole in the belt clamp.
CAUTION: BE SURE to keep the weight belt straight when installing the retaining screw (43) in the belt
retainer (32). Misalignment of the weight belt may bias the top plate, which can cause excessive contact of
the top plate shaft with the weights, resulting in excessive noise during use, and potential hazards to the
user or other bystanders.
Thread the retaining screw (43) through the belt clamp and into the belt retainer (32). Tighten the retaining screw to 400
inch-pounds.
Route the weight belt (33) over six pulleys, as illustrated.
Insert the free end of the weight belt (33) through the slot in the leverage arm belt clamp, and pull through the opposite
slot just until force is applied against the top plate (10). This will eliminate any slack in the belt and ensure proper tensioning.
While maintaining tension on the weight belt, press down on the free end of the belt so it lays flat against the inside of
the belt clamp.
Insert the belt retainer (32) into the belt clamp. BE SURE the tapped hole in the belt retainer is aligned with the mating
hole in the belt clamp.
Thread the retaining screw (43) through the belt clamp and into the belt retainer (32). Tighten the retaining screw to 400
inch-pounds.
Check for proper tensioning of the weight belt by applying lateral pressure to the belt at a point midway between two pulleys. Deflection of the weight belt should be less than 25 mm. Loosen the retaining screw (43) and adjust belt tension as
needed.
5. Install the Seat and Back
Cushions
Hold the back cushion (26) in place on the
main frame (3). Secure the back cushion to the
main frame with two screws (38), one screw
(36), and three washers (51). Tighten the
screws securely.
Hold the seat cushion (25) in place on the seat
post (factory-installed). Secure the seat cushion to the main frame with two screws (38) and
two washers (51). Tighten the screws securely.
STAR TRAC INSTINCT SHOULDER PRESS O
WNER’SMANUAL
912 STAR TRAC INSTINCT SHOULDER PRESS O
WNER’SMANUAL
P
REVENTIVE
M
AINTENANCE
MAINTENANCE SCHEDULE
Star Trac strongly recommends performing regular preventive maintenance on your STAR TRAC INSTINCT SHOULDER
PRESS. Without regularly scheduled maintenance, normal wear and tear may cause cumulative effects, such as misalignment or
premature wear, resulting in downtime. For this reason, we highly recommend following the maintenance schedules. Additionally,
unusual symptoms, such as excessive noise during use, stiffness or free play in moving parts, etc., should be investigated and necessary corrective actions (adjustment or parts replacement) should be performed. If any components are found to be worn or damaged, the unit should be removed from service until repairs can be made. Only components supplied or approved by Star Trac shall
be used to maintain and/or repair the unit.
D
AILY
M
AINTENANCE
■
Wipe down and inspect the framework and other structural components (see FRAMEWORK MAINTENANCE on page 13 for
requirements). Check all attaching hardware for security. Tighten as needed.
■
Clean and inspect the upholstered cushions and the hand grips (see UPHOLSTERY MAINTENANCE on page 13 for requirements).
■
Clean and lubricate guide rods using a cotton cloth and break-free lubricant. Apply the lubricant to the cloth, then wipe up
and down the guide rods as needed.
■
Inspect weight belt for excessive wear or other damage. Check weight belt for proper tension (weight belt deflection at any point
should not exceed 25 mm); adjust as needed. (See WEIGHT / BELT INSPECTION REQUIREMENTS on page 14 for requirements.)
■
Check leverage arm for evidence of sticking or binding; lubricate as needed bearings are equipped with fitting to facilitate
lubrication).
W
EEKLY
M
AINTENANCE
■
Check the retainer screws at the weight stack top plate and main frame for security (retainer screws should be torqued to
400 inch-pounds). Tighten as needed.
■
Check all labels and placards affixed to the unit for legibility and security. Replace illegible labels and placards as needed
(see LABELS AND PLACARDS on page 15 for illustrations and part numbers of standard labels and placards used on
STAR TRAC INSTINCT products).
M
ONTHLY
M
AINTENANCE
■
Clean tops of bearings at weight stack top plate. Check for heavy buildup on guide rods below top plate (lift half of weight
stack to perform a visual inspection and clean as necessary).
Q
UARTERLY
M
AINTENANCE
■
Apply wax to powder-coated areas of the framework and other structural components.
1
4
26
3
36
51
38
51
38
51
25
51
38
2
6
51
38
Page 10
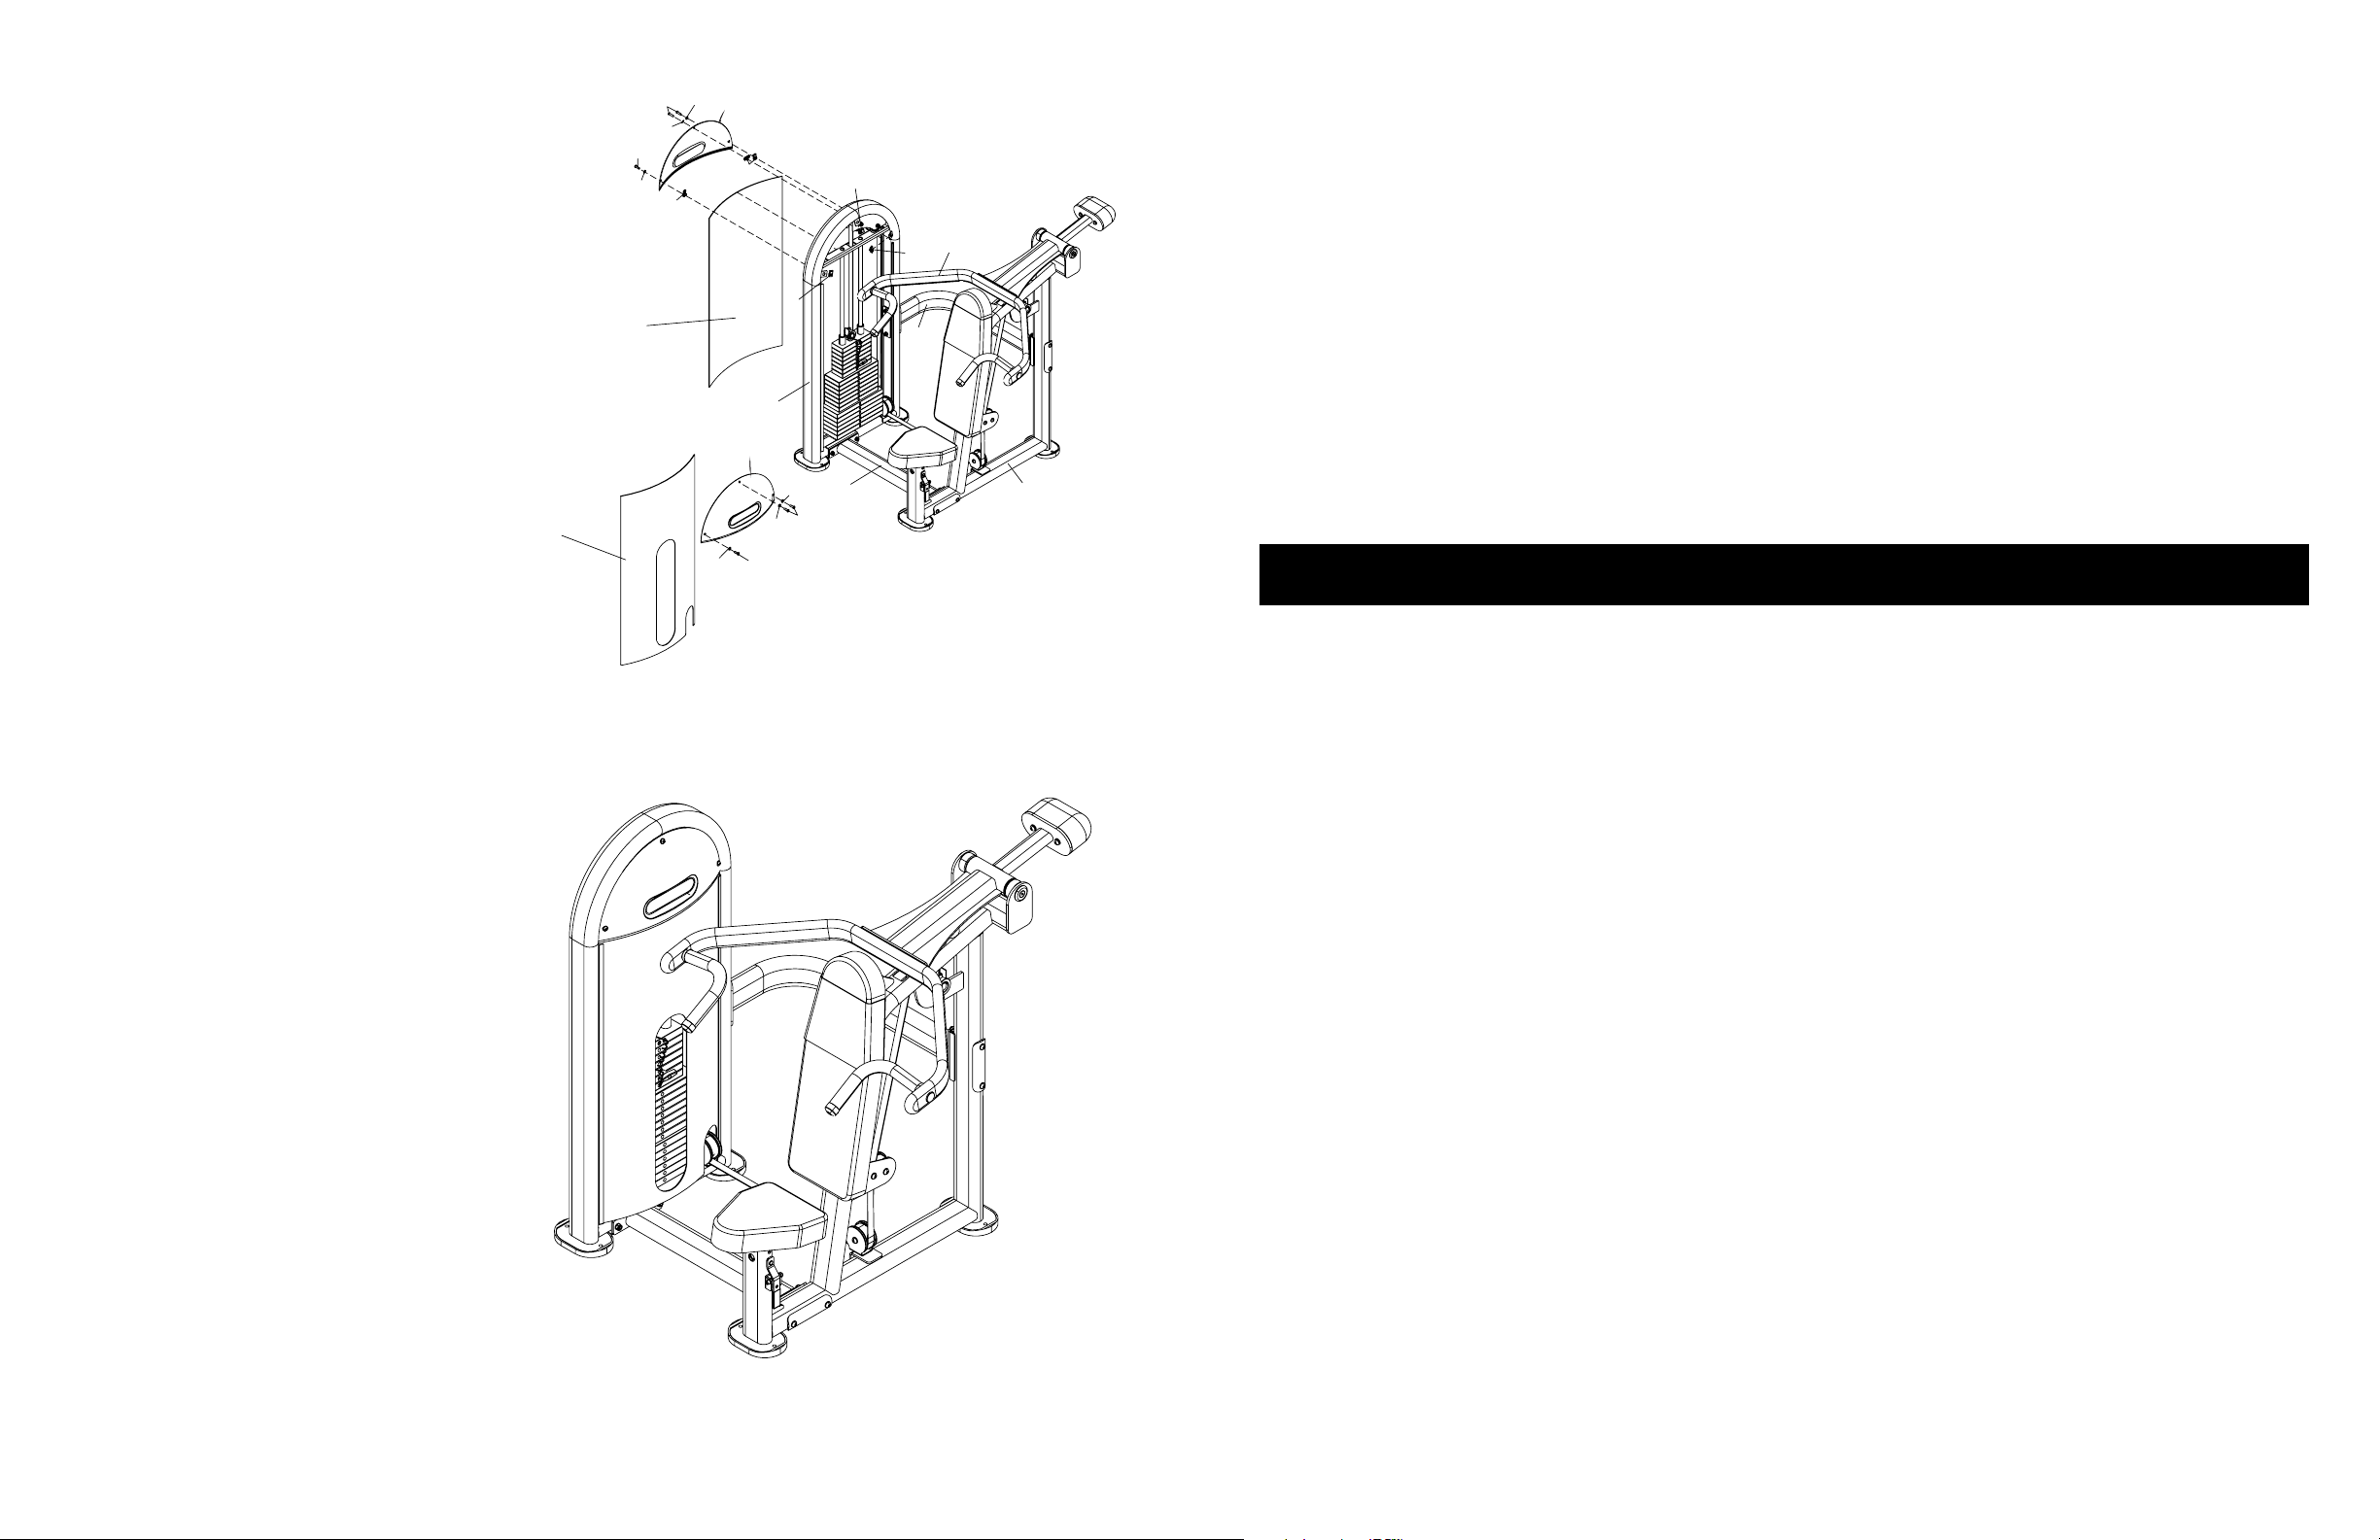
6. Install the Weight Stack Shrouds
NOTE:
It is necessary to flex the lower
shrouds (9, 27) slightly to engage the mating
grooves in the weight stack frame (1).
Slide the lower front shroud (9) into the mating grooves in the weight stack frame (1). Slide
the lower rear shroud (27) into the mating
grooves in the weight stack frame.
Install one tapped hole nut (34) onto each of
the six upper shroud mounting tabs on the
weight stack frame (1).
Hold one upper shroud (28) in position against
the weight stack frame (1), and secure the
shroud to the frame using three screws (40)
and washers (52).
Repeat for the remaining upper shroud (28).
7. Final Assembly and Testing
Check all attaching parts to ensure they are
tightened securely.
Verify operation of the seat post:
■ Mount the unit. While holding the seat
post, press the ratchet handle to retract
the locking pin, and raise the seat. Release
the ratchet handle, and verify the locking
pin engages the first drilled hole at the
first seat position.
■ Repeat to verify the locking pin engages
the drilled hole at all seat positions.
■ Return the seat post to the "stowed" posi-
tion.
■ Verify the seat post slides smoothly, with-
out evidence of sticking or binding.
Mount the unit. Engage the selector pin at a
comfortable weight.
Operate the leverage arm and check the following:
■ Verify operation of the leverage arm is
smooth, without evidence of sticking or
binding.
■ Verify there is no evidence of "free play"
when actuating the leverage arm from the
"stowed" position.
■ Verify there is no evidence of excessive
noise during operation.
Return the leverage arm to the "stowed" position.
You have now completed assembly of your INSTINCT SHOULDER PRESS.
ANCHORING
IMPORTANT:
The INSTINCT SHOULDER PRESS must be secured to the floor to stabi-
lize and eliminate rocking or tipping over. This must be performed by a licensed con-
tractor. Failure to anchor the unit will void the warranty. STAR TRAC shall not be
liable for damage or injury caused by unanchored or improperly anchored units.
The INSTINCT SHOULDER PRESS must be anchored to the floor using through bolts or anchoring studs. Each foot pad on
the unit provides two anchoring holes that will accommodate bolts of up to 12mm (7/16") diameter. Only one hole in each foot
pad is required during anchoring. The holes used for anchoring may be selected based on installation site requirements or customer preference.
Anchoring bolts/studs must meet the following requirements:
■
Anchor bolts shall be Grade 8.8 or Grade SAE 5.
■
Anchoring bolts or studs shall have a minimum size of 6mm (1/4") diameter; 8mm (5/16") diameter bolts/studs are recommended.
■
Pull-out force shall be 100kg (2201 lbs) minimum for any single anchor. This will ensure a secure anchoring system and
safe operation of the unit by all users.
STAR TRAC INSTINCT SHOULDER PRESS O
WNER’SMANUAL
1110 STAR TRAC INSTINCT SHOULDER PRESS O
WNER’SMANUAL
40
E
XERCISE
G
UIDELINES
GENERAL GUIDELINES
As with any exercise program, strength training involves an element of risk. The information provided in this section will help you
and/or your members make safe and productive use of your INSTINCT SHOULDER PRESS.
■
ALWAYS consult a physician before beginning any strength-training program. This is particularly important for persons
with known health conditions and/or persons that are not familiar with the risks involved with weight training.
■
All training sessions should be supervised by trained personnel.
■
BE SURE that all warning labels and placards affixed to the INSTINCT SHOULDER PRESS remain on the unit. DO
NOT alter warning labels and placards. BE SURE that each user reads and understands the information shown on all
labels and placards (safety, instructional and/or other).
■
Instruct all users on the proper use of the INSTINCT SHOULDER PRESS, as well as those actions that should be avoided.
■
Your INSTINCT SHOULDER PRESS has been designed to accommodate a wide variety of body types. Prior to use,
mount the unit and adjust the seat height to ensure comfortable operation of the leverage arm.
To minimize user and/or bystander injury:
■
Do not lean the against framework, weight stack or any component, regardless of whether it is dynamic or static.
■
Stay clear of all components while in a dynamic state of motion. Keep hands and feet away from cables, belts, cams and
pulleys and/or any converging action. The convergence of these transmission-based components can cause serious injury.
■
Exercising on free weight and selectorized products should be performed with the assistance of a spotter.
PRODUCT USE AND MAINTENANCE
Repair of the INSTINCT SHOULDER PRESS should be performed only by authorized persons.
NEVER modify the INSTINCT SHOULDER PRESS or attempt to make adjustment(s) to, or the repair of, the unit equipment without first calling STAR TRAC Product Support. Always notify authorized personnel to make such repairs.
Instruct all users to report any equipment or training irregularities to supervisory personnel IMMEDIATELY.
52
40
52
9
34
27
52
52
28
34
28
40
1
52
34
52
40
34
4
34
2
6
3
 Loading...