

Page 1
620 -8173
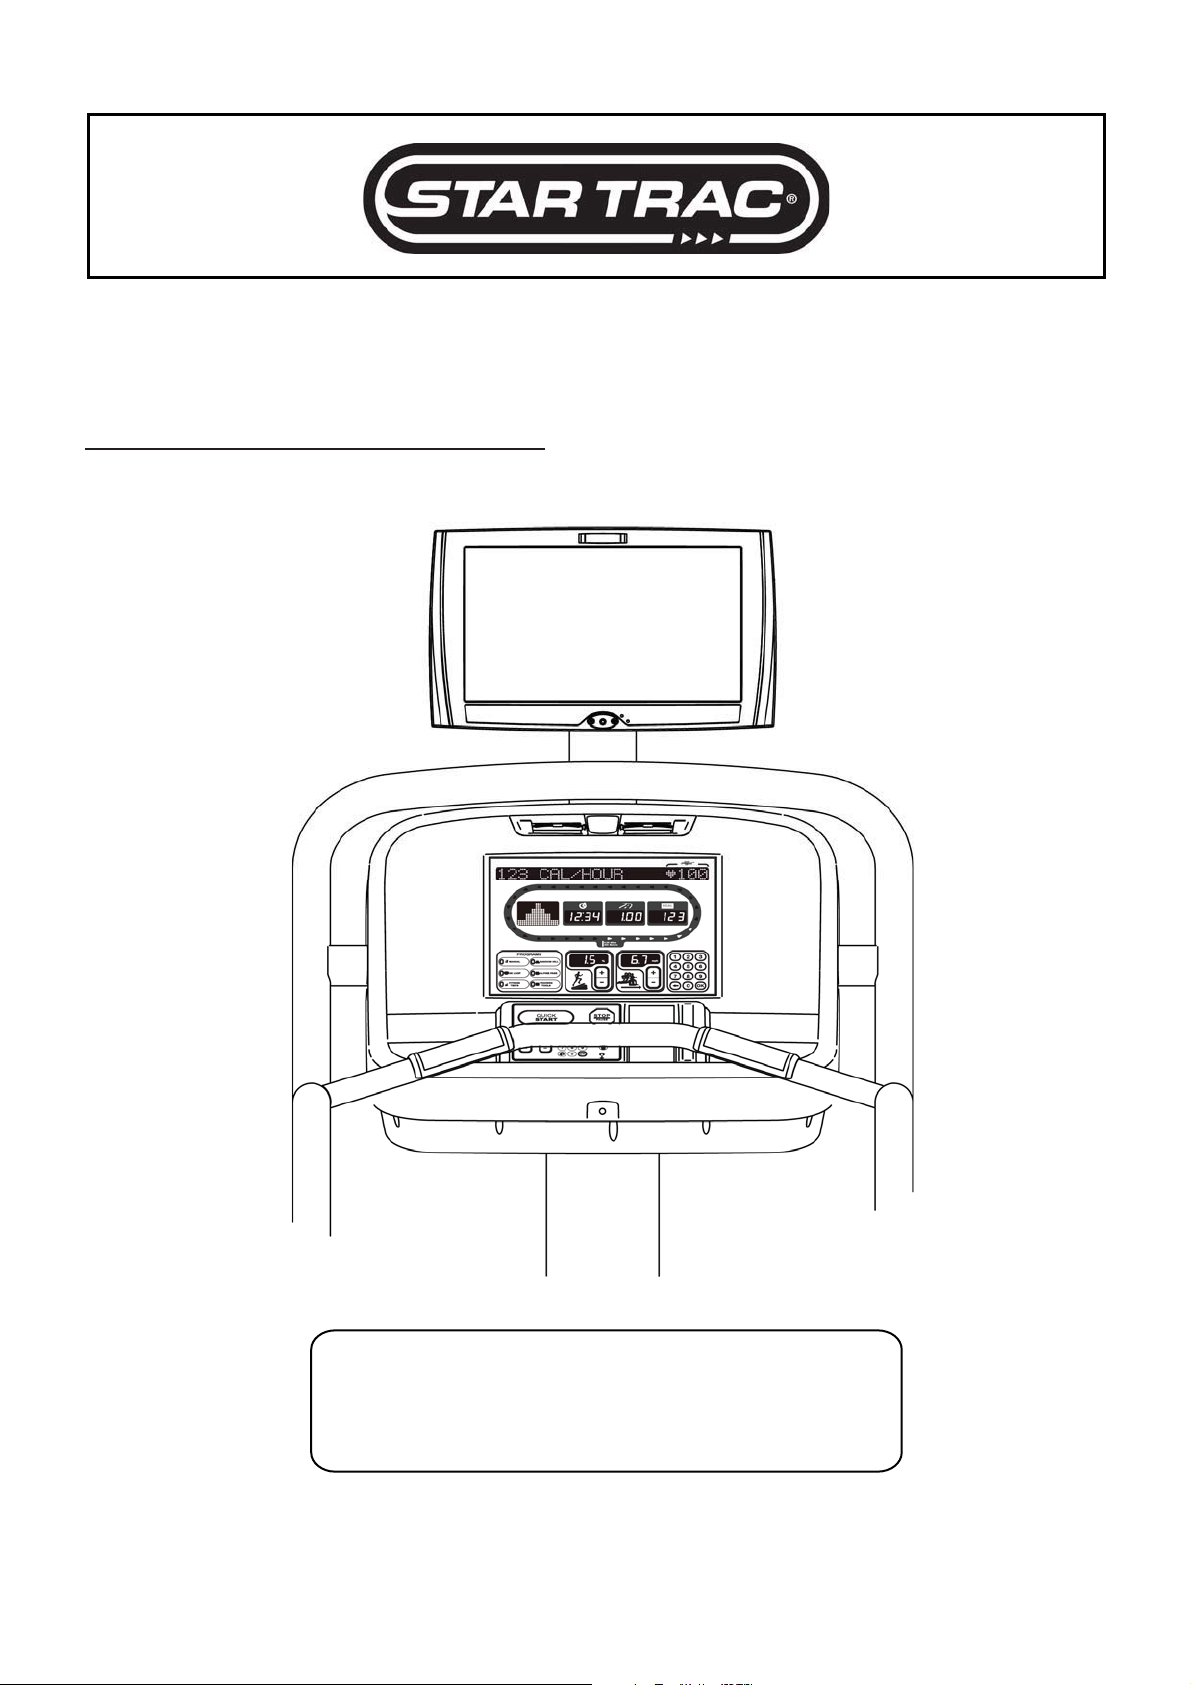
STAR TRAC FITNESS
TM
PERSONAL VIEWING SCREEN
O
WNER’S MANUAL
Installation Notice
Instant Channel Programming Feature
Complete the Signal / Power Connections and
Press 0001 to Begin Channel Programming Scan
%)"*5HG7#BHG7#E5A
Page 2

Page 3

CONTENTS
page(s)
GENERAL SAFETY and CARE 3 - 5
FCC Statement…………………………………. 4
MENU: SETUP and OPERATION 7
7 sseccA – UNEM niaM
1 MAIN SETUP AND OPERATION 7 - 8
1 - 0 Channel Menu………………… 7 1 - 1 Tuning Band………..…. 7
1 - 2 Auto Program ....……………... 7 1
2 VIDEO MENU 9 - 11
1 - 0 Video Menu..………………….. 9 1 - 1 Aspect Ratio………….. 9
1 - 2 Picture Mode………………….. 9 1
1 - 4 Brightness.…………………….. 10 1 - 5 Sharpness…………….. 10
1 - 6 Color…..……………………….. 10 1 - 7 Tine……………………. 11
3 AUDIO MENU 12 - 13
1 - 0 Audio Menu……….…………… 12 1
1 - 2 Balance……………..…………. 12 1 - 3 Equalizer…..………….. 12
4 SETUP MENU - USER 14 - 15
1 - 0 Setup Menu.………………….. 14 1 - 1 Language…….….……. 14
1 - 2 Childlock………………………. 14 1
1 - 4 Clock…………………………... 15 1 - 5 Sleep Timer………….... 15
5 PARENTAL LOCK MENU 16 - 17
1 - 0 Parental Lock Menu………….. 16 1 - 1 Parental Lock………….. 16
1 - 2 Change Password……………. 16 1
1 - 4 TV Rating-Children…………… 17 1 - 5 TV-Rating-General……. 17
1 - 6 Aux Block Sources...…………. 17
6 CUSTOM FEATURES ACCESS 18 - 20
7 Headphone Jack Replacement 21
8 Docking Station Installation 22
9 Specifications 23
10 Assembly Drawing
11 Contact Information 27
24
-
3 Manual Program .....…. 8
-
3 Contrast..……………… 10
-
1 AVL….……….………… 12
-
3 Caption………………… 15
-
3 Mpaa Rating…………… 17
page
5 ......……………………………………xoB eht nI
5 .………………………….neercS eht gnitnuoM
8 .…………………..tsiL margorP 4 - 1
11 .……………erutarepmeT roloC 8 - 1
31 ..………...……………dnuorruS 4 - 1
51 .……....……………peelS otuA 6 - 1
October, 2012 (Version 7) STAR TRAC PERSONAL VIEWING SCREEN OWNER’S GUIDE
2
Page 4

GENERAL SAFETY and CARE
Thank you for your purchase of the Star Trac personal viewing screen.
This product has been designed specifically for use in the health & fitness industry, ensuring maximum
performance and longevity in the harsh fitness club environment. Properly cared for, this product will
provide years of high-quality entertainment.
Prepare an area in which to place the product components as they
are removed from the box prior to installation. The surface of the
work area should be clean so as not to damage the screen and
associated components.
Do not open package using sharp instruments or tool.
Inspect all shipping carton for signs of damage and to ensure that the
contents of the carton have not broken loose during shipping.
October, 2012 (Version 7) STAR TRAC PERSONAL VIEWING SCREEN OWNER’S GUIDE
3
Page 5
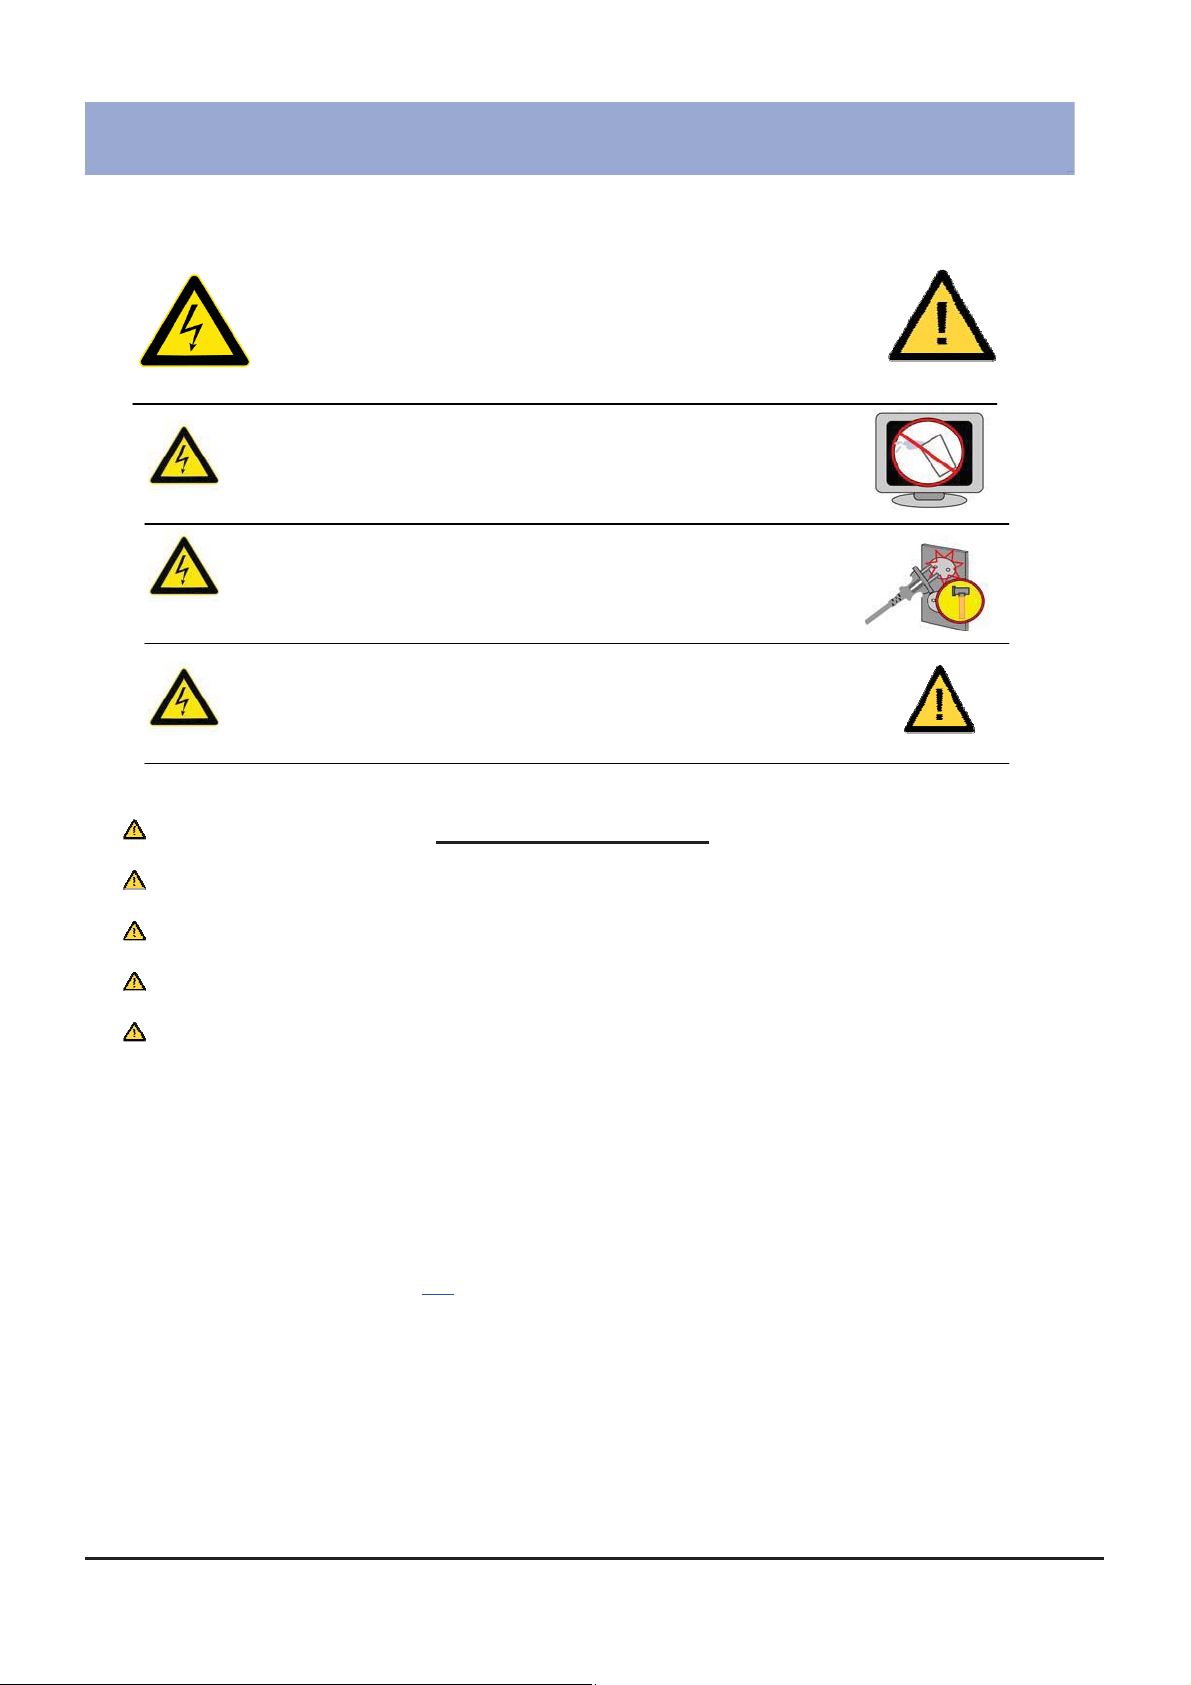
Important Safety Instructions
Before you begin, read all warnings.
CAUTION!
RISK OF ELECTRICAL SHOCK
Do not attempt to disassemble, open or otherwise service the
product. There are no user-serviceable parts inside.
Do not expose unit to liquid, rain, excessive moisture
or areas of high humidity.
Do not use bent, damaged or modified power cords.
Discontinue use and contact your technician.
Do not spray cleaner directly onto monitor. Clean only with a
dry, soft cloth.
Only use the power adapter supplied with this product! Use of non-approved power
adapters may result in personal injury or damage to the product.
This product should be installed using a manufacturer-approved mounting method ONLY.
Use of unapproved mounting brackets may damage the product and void the warranty.
Route all cables safely per mounting situation. Ensure that the cables are routed in a manner
as to avoid being damaged by personnel or equipment.
Ensure the product has adequate ventilation so as not to overheat the product. Do not place
anything on the product that may impede proper air circulation and thus damage the product.
Avoid extreme temperatures. Locate the equipment away from sources of heat, such as
radiators and heat registers.
FCC Statement
Radio Frequency Interference (RFI) Federal Communications Commission, Part 15
This device complies with Part 15 of the FCC
1. This device may not cause harmful interference, and
2. This device must accept any interference received, including interference that may cause undesired operation.
This product generates and utilizes radio frequency energy. If not installed and maintained in accordance with the installation &
maintenance procedures as prescribed by STAR TRAC, there is a possibility of causing interference with other services.
In order to determine whether or not this product is generating harmful interference, try performing the following steps:
x Try turning off the product by unplugging it from the AC power receptacle.
x Try powering the product from another AC power receptacle.
x Relocate or turn the antenna of the receiving device.
x Increase the distance between this product and the receiving device.
If these steps do not resolve the interference, please contact your local installing company or STAR TRAC at 1-800-228-6635.
Rules (47CFR15). Operation is subject to the following two conditions:
October, 2012 (Version 7) STAR TRAC PERSONAL VIEWING SCREEN OWNER’S GUIDE
4
Page 6
IN THE BOX…
1) LCD Personal Viewing Screen
2) Manual
G
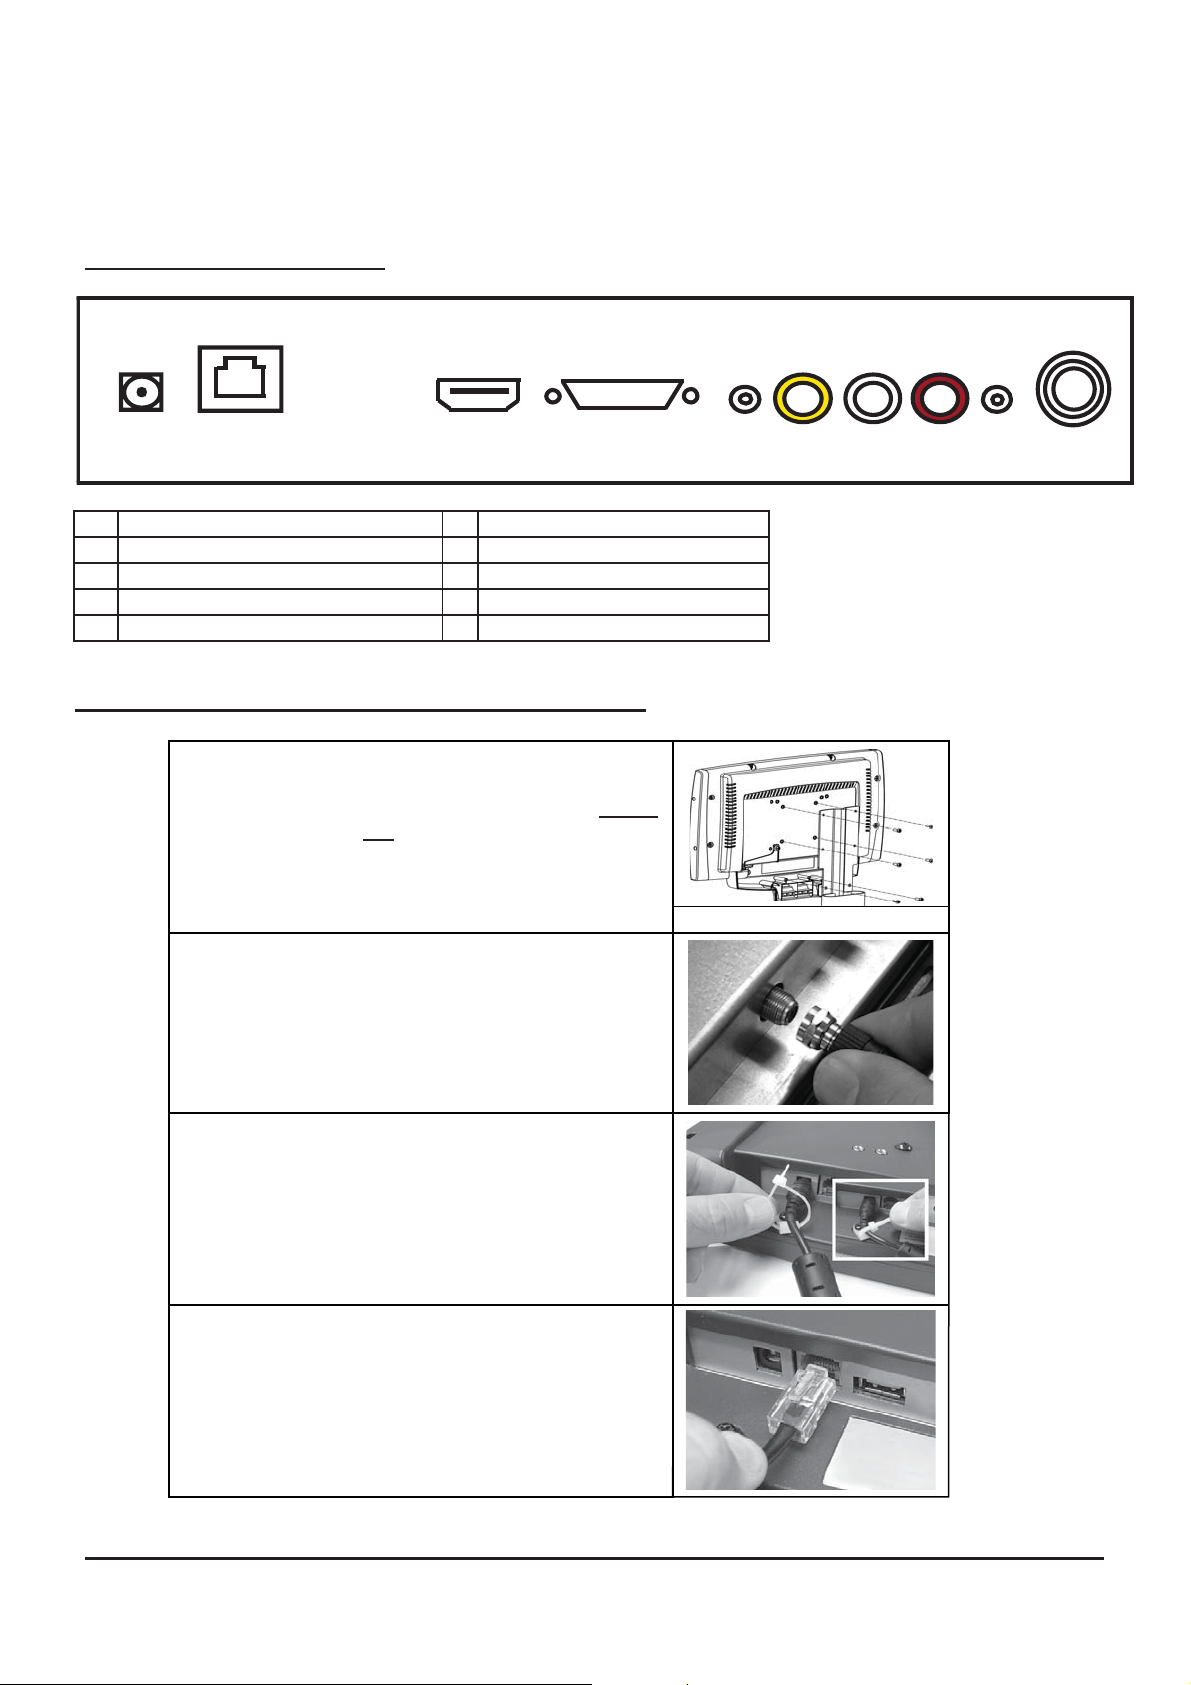
CONNECTION IDENTIFICATION
GGGG
1 2 3 4 5 6 7
1 DC Power In. 2.5mm DC jack 6 AUX Audio/Video Input. RCA jacks
2 AUX TV Controller Cable port. RJ45 jack 7 AUX Audio Output. 2.5mm stereo jack
3 Firmware Download USB jack 8 RF Signal Input. TYPE “F Connector
4 AUX RGB In. HD-15 jack
5 AUX Audio Input. 2.5mm stereo jack
Mounting the Screen and Making the Connections
Use the four screws (included) to fasten the screen to
the mount. Using screws other than those supplied,
may result in damage to the screen. It is highly
recommended to not use a power tool when
tightening these screws, as this may result in
damage to the screen. Use a #2 Phillips screwdriver,
taking care not to over-tighten! (SEE PAGE 24)
Fasten the F-connector of the coaxial cable on to the
fitting on the rear of the screen. It is important that
care be taken with this connector, as
over-tightening will result in serious damage to
the screen. This connector should be started using
only fingers and then tightened to 20 inch-pounds of
torque, slightly more than finger-tight.
8
For Strain Relief slide the DC power plug through the
pre-installed wire tie and insert it into the DC jack on
the TV. Pull the nylon tie snug around DC cable. This
will also prevent the cable from becoming accidentally
unplugged during use.
When the Star Trac TV secondary TV controller is
installed, insert the controller cable’s RJ45 plug into
the jack on the back of the TV. Confirm that the plug’s
spring clip snaps into place and the plug is seated
properly and securely in place.
October, 2012 (Version 7) STAR TRAC PERSONAL VIEWING SCREEN OWNER’S GUIDE
5
Page 7
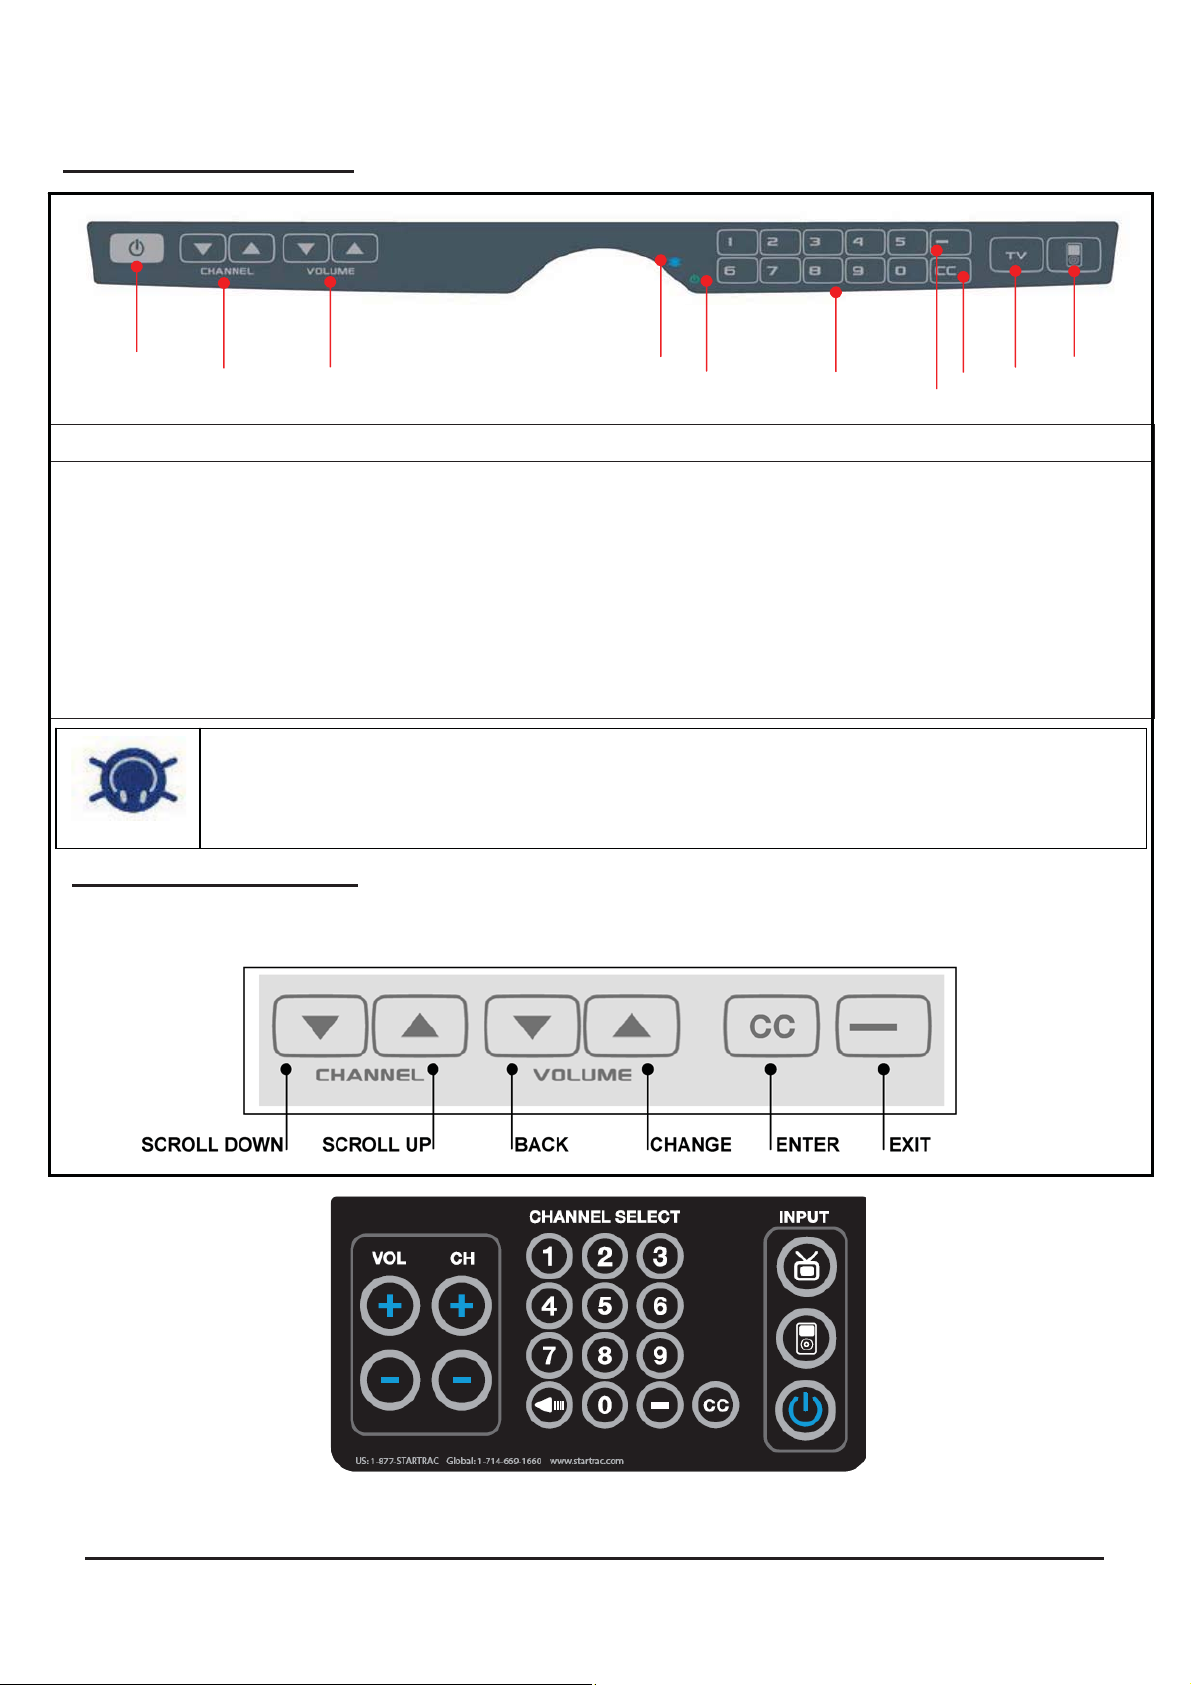
Key Pad Orientation
1
KEY PAD ORIENTATION
1 Power (On / Off)
2 Channel (Up / Down)
3 Volume (Up / Down)
4* Intellijack Faulty Headphone Jack Indicator* ( Blue = Faulty Headphone Jack Detected)(See below)
5 TV Status (Green = TV On) (Red = TV Stand by)
6 Direct Channel Access (1-0)
7 Direct Digital Channel Access / MENU EXIT (Ex: 88 - 2)
8 Closed Caption / ENTER (Closed Caption / MUTE)
9 View TV
10 View Docking Station
Intellijack Icon
2
*The IntelliJack self diagnostic headphone circuit detects when the headphone jack has failed or been damaged.
When a faulty headphone jack is detected, a BLUE “headphone” icon appears on the keypad (see #4 above). It will
remain on until a new jack is installed and the circuit is reset. (See page 21). To reset the faulty headphone jack
circuit, insert a known good pair of headphones for 5 seconds.
3
4*
56
8
7
MAIN MENU ACCESS (No IR remote is required to access the TV MENU)
To access the MENU for SET UP and TV ADJUSTMENTS press “0002”
To navigate through the MENU use Channel Up / Down and Volume Up / Down and CC /
Ƶ
10
9
<E SERIES MODELS HAVE A SECONDARY CONTROLLER>
October, 2012 (Version 7) STAR TRAC PERSONAL VIEWING SCREEN OWNER’S GUIDE
6
Page 8
1. MAIN SETUP AND OPERATION
Once the unit has been connected, a setup procedure is required for optimal operation
There are three Key Codes for quick access to TV features.
QUICK KEY CODES
0001 INSTANT CHANNEL PROGRAMMING FEATURE (DEFAULT: CABLE AUTO / QAM)
0002 MENU (Channel - Video - Audio - Set up)
0003 CUSTOM FEATURES (See Page 18)
MAIN MENU ACCESS
To access all MENU functions you must enter MENU mode.
To ENTER MENU
1. Push 0002 on the keypad
2. Use VOLUME keys to select SUB-MENU
3. Press CHANNEL key to enter SUB-MENU
SUB-MENU pages are:
•Picture
•Sound
•Channel
•Setup
•Parental Lock
To EXIT MENU(Push CC Key)
1. Push VOLUME key to exit MENU
Enter MENU and SUB-MENU page
1. Use CHANNEL keys to select PROGRAM
2. Push VOLUME key enter change setting
VOLUME AIR-CABLE(CATV)
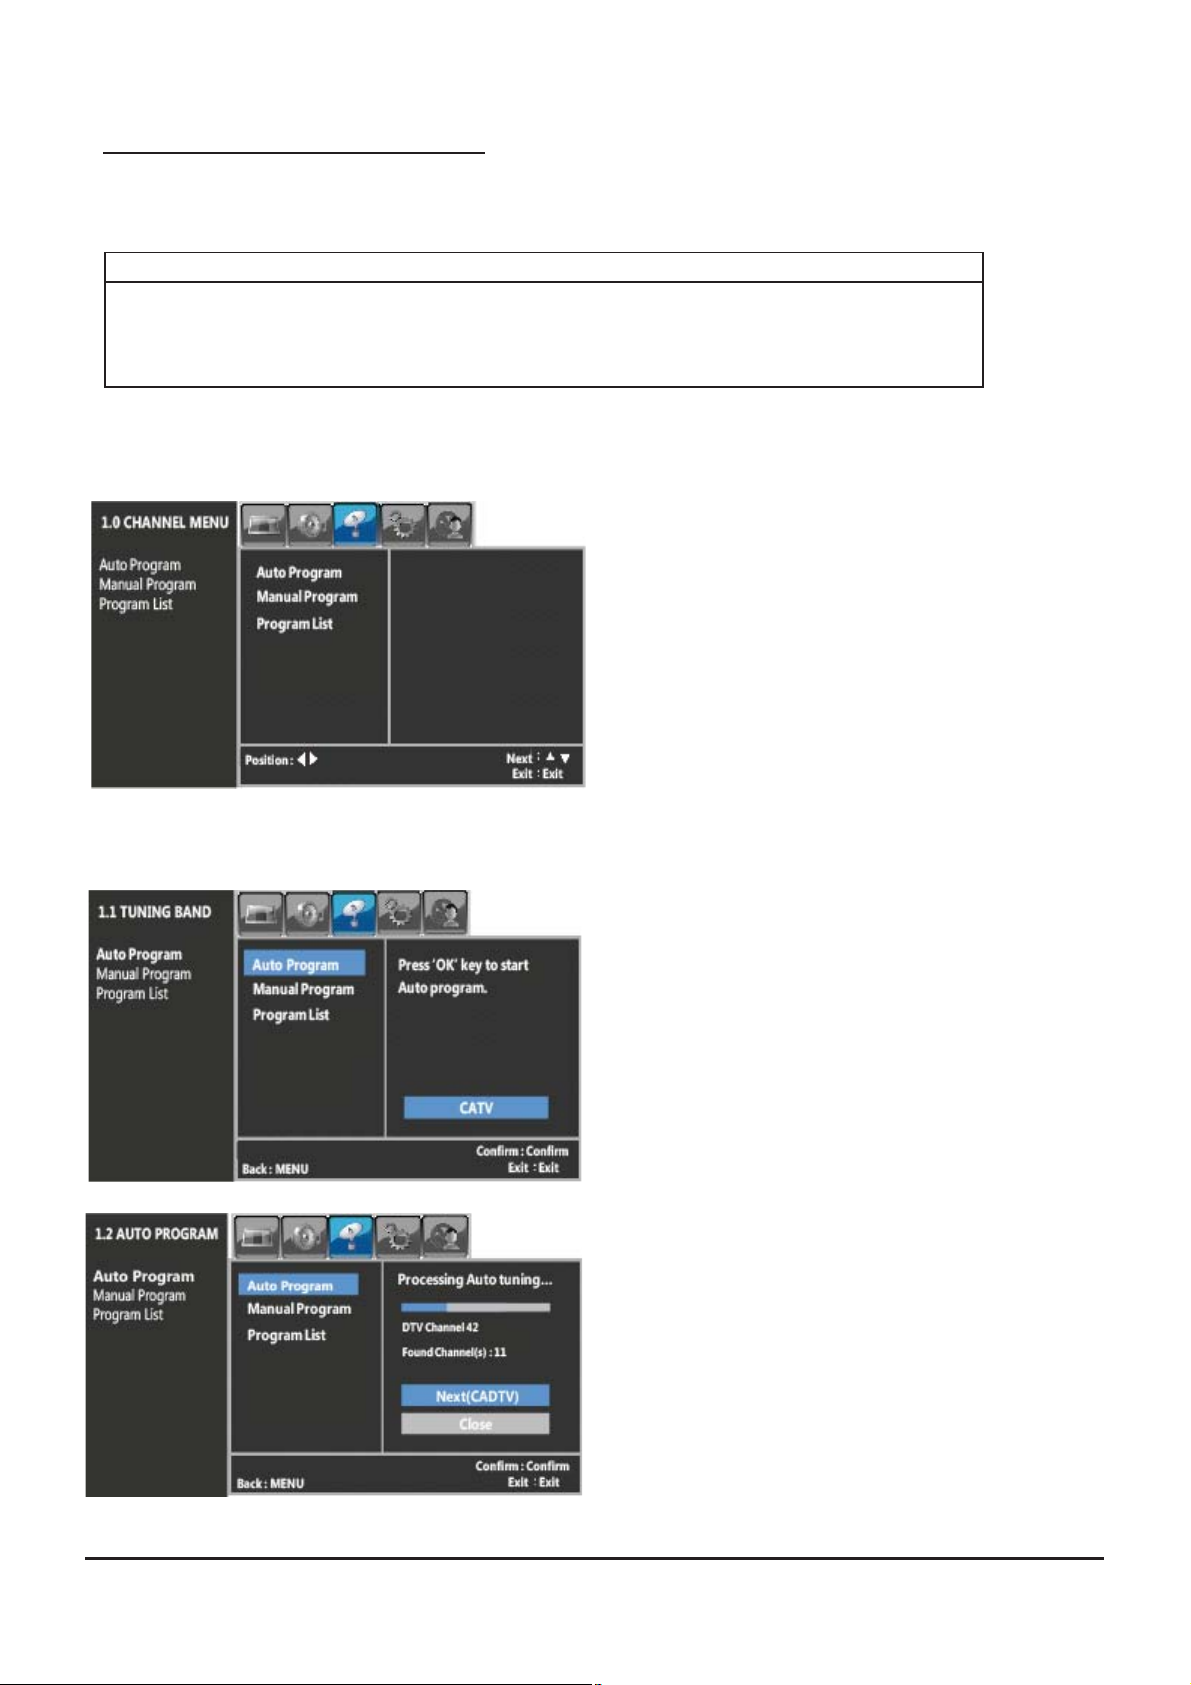
Enter MENU and SUB-MENU page
1. Use VOLUME keys to select PROGRAM MENU
2. Push CHANNEL key to enter PROGRAM MENU
3. Use CHANNEL keys to select AUTO PROGRAM
4. Push VOLUME keys to select
5 .Push CC key to enter
October, 2012 (Version 7) STAR TRAC PERSONAL VIEWING SCREEN OWNER’S GUIDE
7
Page 9
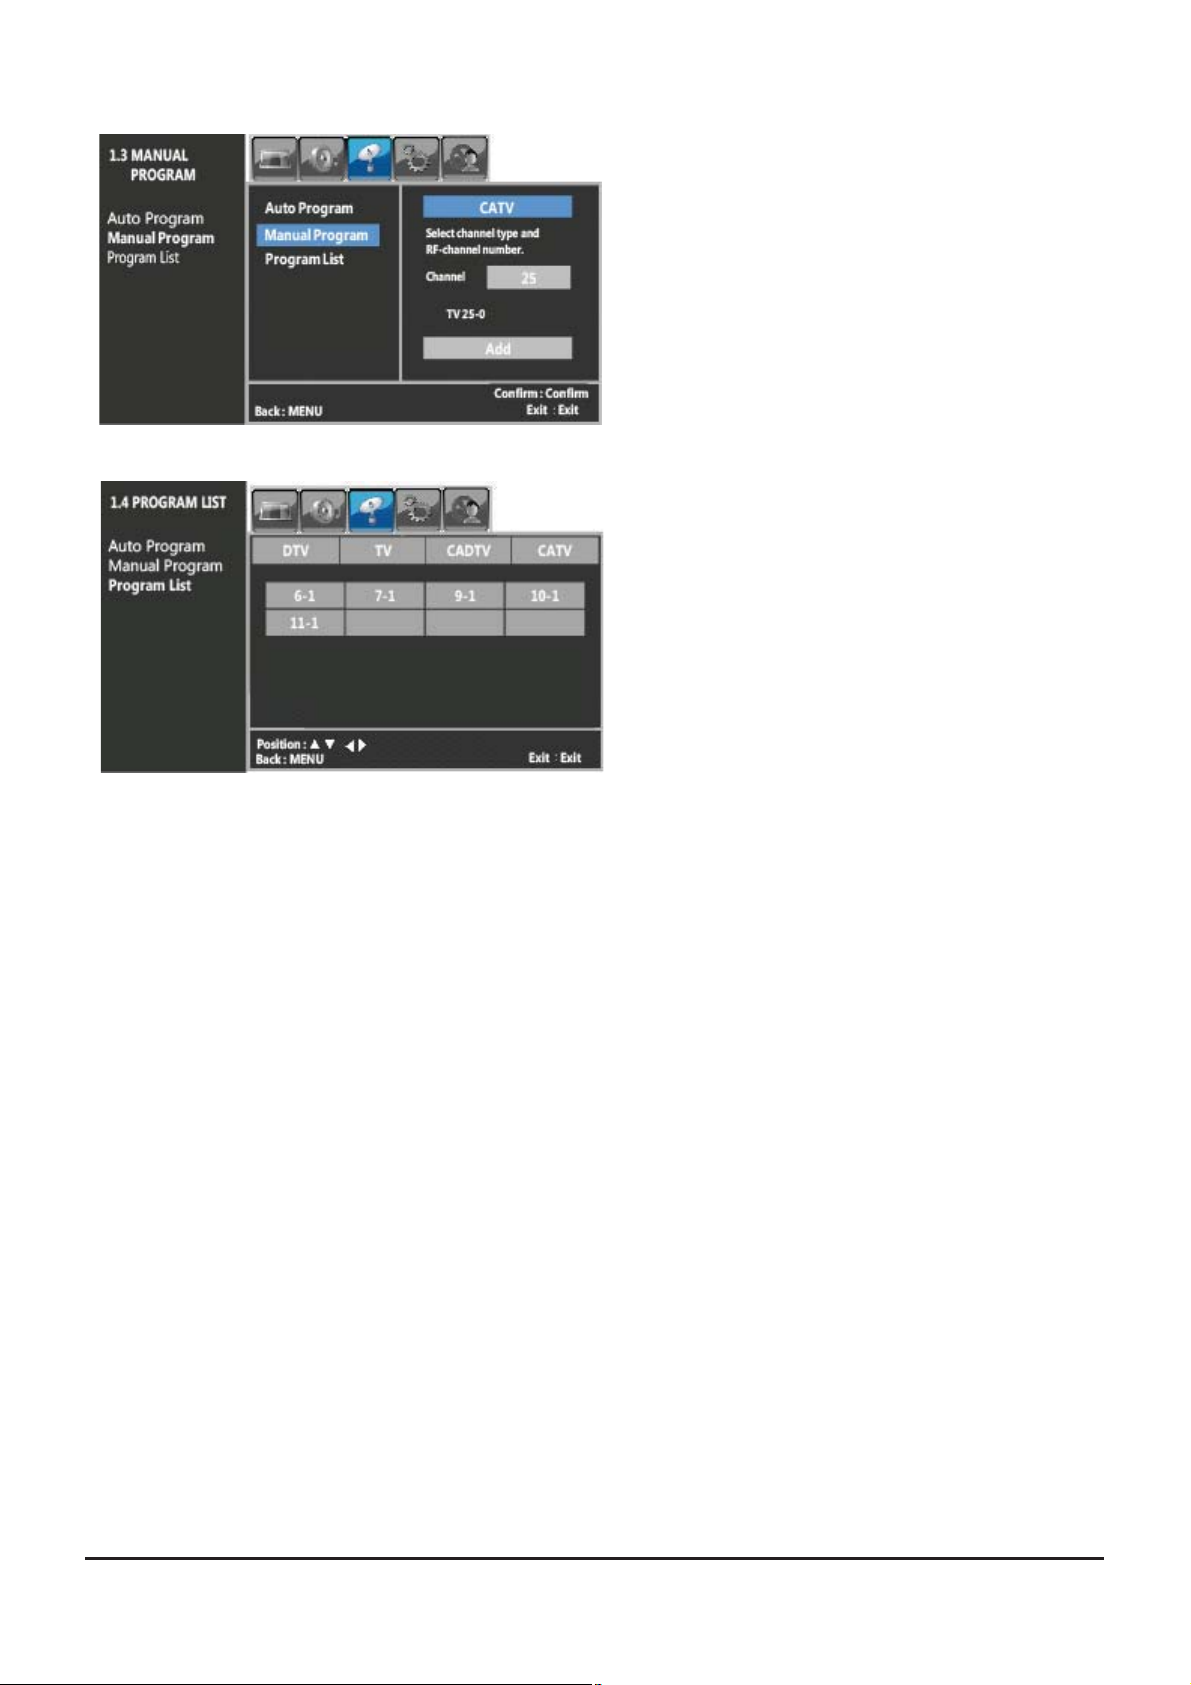
Enter MENU and SUB-MENU page
y by
1. Use CHANNEL keys to select MANUAL PROGRAM
2. Push VOLUME key to move to channel list
3. Use VOLUME keys to select
TV-CADTV-CATV-DTV
4. Use CHANNEL keys to select channel
5. Push CC key to Delete or Add
Enter MENU and SUB-MENU page
1. Use CHANNEL keys to select PROGRAM LIST
2. Push VOLUME key to move to channel list
3. Use VOLUME , CHANNEL keys to select
channel
Broadcasting frequency is automatically searched and saved. The search stats from analog TV (NTSC) to digital
TV(VSB/QAM) and takes from 2 to 4 minutes. Channel numbers are allocated for weak signals from analog
broadcasting. In DTV, weak signals or signals without broadcasting are ignored.
Depending on the content provided by the cable or satellite company, there may be some content received that is
inappropriate for your intended viewing audience. Once channel scanning is complete, these channels can be
deleted as necessar
INPUT SIGNAL LEVEL REQUIREMENTS
Common sources of television signal are cable, satellite or over-the-air antenna systems. Many of these choices
will provide signal in analog, digital or both even both formats. In order to provide high-quality images, the signal
level supplied to each screen should be in the range of +5dBmV to +15 dBmV when read on analog channels. A
signal level outside of this range will provide less than optimum results. In order to ensure the highest degree of
satisfaction, StarTrac recommends using a StarTrac Certified Installer for installation & ongoing maintenance.
using the IR remote control.
October, 2012 (Version 7) STAR TRAC PERSONAL VIEWING SCREEN OWNER’S GUIDE
8
Page 10

2. VIDEO MENU – USER
p
Contains 4 presets (Aspect Ratio, Picture Mode, Picture Setting, Color Temperature)
PICTURE SUB-MENU pages are:
1. Aspect Ratio
2. Picture Mode
3. Picture Setting
4. Color Tem
Enter MENU and SUB-MENU page
1. Use CHANNEL keys to select ASPECT RATIO
2. Push VOLUME key to enter / change setting
(16:9 – 4:3)
erature
Aspect Ratio can only be changed in DTV mode and when
it is available as part of the original programming.
Enter MENU and SUB-MENU page
1. Use CHANNEL keys to select PICTURE MODE
2. Push VOLUME key to enter / change setting
PICTURE MENU contains 5 video presets (Vivid, Flat,
Cinema, Sport, Game)
October, 2012 (Version 7) STAR TRAC PERSONAL VIEWING SCREEN OWNER’S GUIDE
9
Page 11

Enter MENU and SUB-MENU page
1. Use CHANNEL keys to select CONTRAST
2. Push VOLUME key to enter / change setting
3. Use VOLUME keys to adjust level
Enter MENU and SUB-MENU page
1. Use CHANNEL keys to select BRIGHTNESS
2. Push VOLUME key to enter / change setting
3. Use VOLUME keys to adjust level
Enter MENU and SUB-MENU page
1. Use CHANNEL keys to select SHARPNESS
2. Push VOLUME key to enter / change setting
3. Use VOLUME keys to adjust level
Enter MENU and SUB-MENU page
1. Use CHANNEL keys to select COLOR
2. Push VOLUME key to enter / change setting
3. Use VOLUME keys to adjust level
October, 2012 (Version 7) STAR TRAC PERSONAL VIEWING SCREEN OWNER’S GUIDE
10
Page 12

Enter MENU and SUB-MENU page
1. Use CHANNEL keys to select TINE
2. Push VOLUME key to enter / change setting
3. Use VOLUME keys to adjust level
Enter MENU and SUB-MENU page
1. Use CHANNEL keys to select COLOR
TEMPERATURE
2. Push VOLUME key to enter / change setting
3. Use VOLUME keys to change color temperature
COLOR TEMPERATURE MENU contains 3 Color presets
(Cool, Medium, Warm)
October, 2012 (Version 7) STAR TRAC PERSONAL VIEWING SCREEN OWNER’S GUIDE
11
Page 13

3. AUDIO MENU – USER
)
Contains 4 audio presets(AVL, BALANCE, EQUALIZER, SURROUND
1. Use VOLUME keys to select AUDIO MENU
2. Push CHANNEL key to enter AUDIO MODE
Enter MENU and SUB-MENU page
1. Use CHANNEL keys select AVL
2. Push VOLUME key to enter / change setting
3. Use CHANNEL keys to ON/OFF
AVL(Auto Volume Level) function is the ability to automatically
adjust volume level
Enter MENU and SUB-MENU page
1. Use CHANNEL keys select BALANCE
2. Push VOLUME key to enter / change setting
3. Use VOLUME keys to adjust level
Enter MENU and SUB-MENU page
1. Use CHANNEL keys select EQUALIZER
2. Push VOLUME key to enter / change setting
3. Use CHANNEL keys to adjust level
EQUALIZER contains 5 audio options (Flat, Music, Cinema,
Sport, Game)
October, 2012 (Version 7) STAR TRAC PERSONAL VIEWING SCREEN OWNER’S GUIDE
12
Page 14

Enter MENU and SUB-MENU page
1. Use CHANNEL keys select SURROUND
2. Push VOLUME key to enter / change setting
3. Use VOLUME keys to treble and bass adjust level,
ON/OFF and Use CHANNEL keys select
October, 2012 (Version 7) STAR TRAC PERSONAL VIEWING SCREEN OWNER’S GUIDE
13
Page 15

4. SETUP MENU - USER
Contains 6 various function presets (Language, Childlock, Caption, Clock, Sleep Timer, Auto Sleep)
1. Use VOLUME keys to select SETUP MENU
2. Push CHANNEL key to enter / change setting
Enter MENU and SUB-MENU page
1. Use CHANNEL keys to select LANGUAGE
2. Push VOLUME key to enter / change language
• English
• Spanish
• French
• Korean
Audio Language supports digital broadcasting audio as digital
broadcasting include several kinds of audio. Audio Language
is set to Default. In some digital channels, audio language is
not English although English is set as audio language. It can
be regarded as an error in terms of broadcasting information,
but there will be no problem in functioning.
Enter MENU and SUB-MENU page
1. Use CHANNEL keys to select CHILDLOCK
2. Push VOLUME key to enter / CHANNEL keys to
select change ON/OFF
October, 2012 (Version 7) STAR TRAC PERSONAL VIEWING SCREEN OWNER’S GUIDE
14
Page 16

Enter MENU and SUB-MENU page
1. Use CHANNEL keys to select CAPTION
2. Push VOLUME key to enter / VOLUME keys to
select change ON/OFF and caption style
• Text 1, Text 2, Text 3, Text 4 mode
• Service 1, Service 2, Service 3, Service 4, Service 5,
Service 6 mode
• CC 1, CC 2, CC 3, CC 4 mode.
Enter MENU and SUB-MENU page
1. Use CHANNEL keys to select CLOCK
2. Push VOLUME key to enter CLOCK (Auto/Manual)
3. Use CHANNEL keys to select setting:
• Year •Minute
• Month •Time Zone
•Date •Daylight Saving
•Hour
4. Push VOLUME key to adjust
Enter MENU and SUB-MENU page
1. Use CHANNEL keys to select SLEEP TIMER
2. Push VOLUME key to enter SLEEPTIMER
3. Use VOLUME keys to select time
(Off - 15 - 30 - 60 - 90 - 120 - 180 min.)
Enter MENU and SUB-MENU page
1. Use CHANNEL keys to select AUTO SLEEP
2. Push VOLUME key to enter/change ON/OFF, 10 minutes
with no signal, the screen off
October, 2012 (Version 7) STAR TRAC PERSONAL VIEWING SCREEN OWNER’S GUIDE
15
Page 17

5. PARENTAL LOCK MENU
Contains 6 function presets (Parental lock, Change Password, MPAA Rating, TV Rating-Children, TV Rating- General,
Aux. Block Sources)
1. Use VOLUME keys to select PARENTAL LOCK
2. Push CHANNEL key to enter PARENTAL LOCK
3. Factory set password is 0-0-0-0
Enter MENU and SUB-MENU page
1. Use CHANNEL keys to select PARENTAL LOCK
2. Push VOLUME key to enter/change ON/OFF
Enter MENU and SUB-MENU page
1. Use CHANNEL keys to select CHANGE
PASSWORD
2. Push VOLUME key to enter/change NEW PASSWORD
3. Use NUMBER keys to enter NEW PASSWORD
(Factory set password is 0-0-0-0)
4. Confirm password
October, 2012 (Version 7) STAR TRAC PERSONAL VIEWING SCREEN OWNER’S GUIDE
16
Page 18

Enter MENU and SUB-MENU page
1. Use CHANNEL keys to MPAA RATING
2. Push VOLUME key to enter/change setting
3. Use CHANNEL keys to select MPAA Rating
Rating G : General audiences
PG : Parental guidance suggested
PG-13 : Parents strongly cautioned
R : Restricted
NC-17 No One 17 and under admitted
X : Adult Only
Blocking ON/OFF select
Enter MENU and SUB-MENU page
1. Use CHANNEL keys to TV RATING-CHILDREN
2. Push VOLUME key to enter/change setting
3. Use CHANNEL keys to select TV RATING-Children
Rating Age
Fantasy Violence
Enter MENU and SUB-MENU page
1. Use CHANNEL keys to TV RATING-GENERAL
2. Push VOLUME key to enter/change setting
3. Use CHANNEL keys to select TV RATING-General
Rating Age
Dialogue
Language
Sex
Violence
Enter MENU and SUB-MENU page
1. Use CHANNEL keys to AUX. BLOCK SOURCES
2. Push VOLUME key to enter/change setting
3. Use CHANNEL keys to change options
4. Use VOLUME keys to select ON/OFF
October, 2012 (Version 7) STAR TRAC PERSONAL VIEWING SCREEN OWNER’S GUIDE
17
Page 19

6. CUSTOM FEATURES – ACCESS
To enter CUSTOM FEATURES menu
1. Enter the code “0-0-0-3” on the number keypad
2. CUSTOM FEATURES menu (OSD) will appear
• Detect Vibration • Auto Power On
• Channel Default Time • Manual Channel Setting
• Channel Default • Set Factory Default (Reset)
• Auto Default
Used to set a vibration monitoring time. When no vibration is
detected on the cardio equipment after the assigned
monitoring time the TV will automatically turn Off.
In CUSTOM FEATURES menu
1. Press CHANNEL keys to select DETECT VIBRATION
2. Press CC key to cycle through and select the desired
Vibration monitoring time in minutes (1-8). When no vibration
is detected on the cardio equipment for the assigned number
of minutes the TV will automatically turn off.
Program any channel for one touch Home channel access.
Popular Home channels include child care camera and digital
signage.
• Program any designated Home Channel
In CUSTOM FEATURES menu
1. Press CHANNEL keys to CHANNEL DEFAULT TIME
Activate Default Channel
1. Press CHANNEL keys to CHANNEL DEFAULT
2. Press VOLUME key to cycle through and select ON
Deactivate Auto Default
1. Press CHANNEL keys to AUTO DEFAULT
2. Press VOLUME key to cycle through and select OFF
Go to TV Channel List
1. Press CHANNEL keys to MANUAL CH SETTING
2. Press VOLUME key to enter TV CHANNEL LIST
3. Press CHANNEL keys to select desired channel to be
used as HOME channel
4. Press VOLUME keys to select channel mode
Set the HOME Default Channel
1. Press VOLUME key to cycle through / select CH Def.
& Auto Def
a. This channel is now assigned as the channel the TV will
default to upon being turned on
2. Press CC key
October, 2012 (Version 7) STAR TRAC PERSONAL VIEWING SCREEN OWNER’S GUIDE
18
Page 20

Exclusive feature works with in-club private TV networks
including ClubCom™ and Digital Signage systems.
When turned on the TV will automatically go the club
promotional channel.The user cannot change the channel
until the promotional programming has ended. The TV then
changes to the secondary club “Home Channel” at which time
the user can change to any desired TV channel
Enter the CUSTOM FEATURES menu page and then:
Set the TV’s Vibration Detection Circuit
1. Press CHANNEL keys to highlight DETECT VIBRATION
(Detects vibration or use of the cardio equipment)
2. Press VOLUME key to cycle through and select the
desired vibration time in minutes (1-8). When no vibration
is detected on the cardio equip-ment for the assigned
number of minutes the TV will automatically switch to the
club Home channel
Set the Channel Default Time
1. Press CHANNEL keys to highlight CHANNEL DEFAULT
TIME and set the desired viewing time of the Promotional
Network Channel.
2. Press VOLUME key to cycle through and select time setting
(Off - 10 - 20 - 30 - 40 - 50 - 60 seconds)
a. During this programmed time the viewer will be unable to
navigate off the Promotional Network Channel
Activate Channel Default
1. Press CHANNEL keys to highlight CHANNEL DEFAULT
2. Press VOLUME key to cycle through and set to ON
Activate Auto Default
1. Press CHANNEL keys to highlight AUTO DEFAULT
2. Press VOLUME key and cycle through and set to ON
Go to TV Channel List
1. Press CHANNEL keys to highlight MANUAL CH SETTING
2. Press VOLUME key to enter and go to TV CHANNEL
LIST Set the HOME channel
1. Press CHANNEL keys to scroll to the desired channel
to be set as he HOME channel
2. Press VOLUME key to cycle through / select
AUTO DEFAULT
a. This channel is now assigned as the channel the TV will
switch to when no vibration is detected on the cardio
equipment
Set the Promotional Network channel
1. Press CHANNEL keys to scroll to desired channel to
be set as the Promotional Network Channel at TV start up
2. Press CC key to cycle through / select Channel Default
a. This channel is now assigned as the channel the TV will
default to upon being turned on
b. Users will be unable to navigate off this channel during the
preset Channel Default Time
October, 2012 (Version 7) STAR TRAC PERSONAL VIEWING SCREEN OWNER’S GUIDE
19
Page 21

Used to change the TV POWER ON from factory setting
OFF. Upon being energized from a NO POWER state the
TV will automatically turn on
In CUSTOM FEATURES menu
1. Press CHANNEL keys to select AUTO POWER ON
2. Press VOLUME key to enter / change setting
(ON - OFF)
October, 2012 (Version 7) STAR TRAC PERSONAL VIEWING SCREEN OWNER’S GUIDE
20
Page 22

7. Intellijack - Headphone Jack Replacement
*The IntelliJack self diagnostic headphone circuit detects when the headphone jack has failed or
been damaged. When a faulty headphone jack is detected, a BLUE “headphone” icon appears on
the keypad (see #4 above). It will remain on until a new jack is installed and the circuit is reset. To
Intellijack Icon
1) UNSCREW THE JACK ASSEMBLY SCREWS, ALTERNATING LEFT AND RIGHT IN ORDER TO BACK THE ASSEMBLY OUT.
2) REMOVE JACK ASSEMBLY, TIPPING THE FRONT FORWARD SO THE ASSEMBLY WIRES CLEAR THE OPENING.
3) UNPLUGTHE OLD HEADPHONE JACK AND DISCARD. PLUG IN NEW HEADPHONE JACK TO WIRE HARNESS.
4) INSERT NEW HEADPHONE JACK ASSEMBLY, TIPPING IT FORWARD SO ASSEMBLY WIRES CLEAR THE OPENING.
5) ALIGN AND SCREW IN THE HEADPHONE JACK ASSEMBLY SCREWS.
6) RESET HEADPHONE JACK ICON BY INSERTING A KNOWN-GOOD HEADPHONE PLUG INTO THE JACK FOR 10 SECONDS.
reset the faulty headphone jack circuit, insert a known good pair of headphones for 10 seconds.
HEADPHONE JACK SCREWS
IMPORTANT: Faulty headphones can trigger the headphone jack icon. It is important to test the headphone jack
prior to replacement. If the headphone jack is deemed OK , simply reset the faulty headphone jack (STEP 6).
October, 2012 (Version 7) STAR TRAC PERSONAL VIEWING SCREEN OWNER’S GUIDE
21
Page 23

8. DOCKING STATION INSTALLATION (*OPTIONAL)
REMOVE ALL POWER BEFORE YOU BEGIN
DO NOT USE POWER TOOLS
1) REMOVE ENDCAP FROM TV ENCLOSURE BY UNSCREWING 2 SIDE SCREWS.
FRONT VIEW
1
2) CONNECT DOCKING STATION PLUG TO MATING CONNECTOR ON TV.
3) CAREFULLY PUSH ACCESS WIRE BACK INTO DOCK CAVITY AND ATTACH DOCKING STATION TO TV ENCLOSURE.
4) INSERT AND CAREFULLY TIGHTEN REAR DOCK TOP AND BOTTOM SCREWS.
5) INSERT AND CAREFULLY TIGHTEN DOCKING STATION SIDE SCREWS.
6) RETURN POWER TO TV AND TEST.
REAR VIEW
2
OPERATION:
1) TURN TV POWER ON
2) INSERT iPod® -iPhone® INTO DOCKING STATION
3
4 5
3) SELECT CONTENT FROM THE iPod -iPhone
4) PRESS “DOCK” KEY TO VIEW
5) INSERT HEADPHONES TO TV HEADPHONE JACK
PATENT PENDING
VIEW DOCK VIEW TV POWER HEADPHONES
October, 2012 (Version 7) STAR TRAC PERSONAL VIEWING SCREEN OWNER’S GUIDE
22
Page 24

9. Specifications
STAR TRAC 15.6 Wide LCD TV Specifications
700-0157(M156TV-NAQ2) rebmuN ledoM
LCD Module 15.6 Inch Color Active Matrix TFT-LCD
Active Area 344.232 X 193.536 mm
Resolution 1366 X 768 (WXGA)
Pixel Pitch 0.252 X 0.252 mm
LCD Screen
TV Tuner
Connections
Special
Function
STAR TRAC Custom Features
Color Depth 16.7M
Contrast Ratio 600 : 1
Brightness
Backlight
Response Time 8 ms
View Angle
ATSC (Digital)
NTSC (Analog) RF Frequency Range – 54Mhz ~ 820Mhz
RGB RGB (15P D-sub), Up to 1360 X 768 Resolution
RJ45 Port For Cardio Console Keypad Commands or optional Wired Controller
Video CVBS (Composite Video)
Audio Headset (Stereo Jack), Mono, Stereo, SAP, Nicam
U. S. A
250 cd/
ั
2 CCFL or LED Backlight
(CR>10) : 45(Left), 45(Right), 15(Up), 35(Down)
ISO-13818-2 MPEG-2 MP@HL, MP@ML / ALL ATSC Compliant Format
Tuning Band – Air / Cable / Cable HRC / Cable IRC / Cable Auto
Cable Mode – Digital (VSB / QAM) / (Analog)
Closed Caption (CC1 / CC2 / CC3 / CC4 / Text1 / Text2 / Text3 / Text4)
Parental Control (MAPP / TV Rating)
Quick Programming Channel Search Key – Reduces Installation Time
Auto Power OFF Vibration Sensor – Program to turn off between 1 to 8 minutes after
no cardio machine usage.
Faulty Headphone Jack Alert – Flashing LED signifies jack needs replacement
Auto Channel Default / Channel Default Timer – Programmable to switch to default
channel between 1-8 minutes after no cardio machine usage.
Optional Docking Kit for iPhone / iPod – Easily added at any time
Additional Functions
Vibration & Shock Test Average 4.0G between 10~100Hz run for 2 hours
Environment & Reliability
Channel Auto / Manual Scan, Channel Edit , PIP (Optional)
Image Aspect ratio : 4:3 or 16:9
A3.3 / V21 ,zH06/05 V042 ~ 011 tupnI rewoP
0Ȕ ~ 50Ȕ (Optional) / -10Ȕ ~ 60Ȕ (Storage) / Life Time : 50,000Hrs
October, 2012 (Version 7) STAR TRAC PERSONAL VIEWING SCREEN OWNER’S GUIDE
23
Page 25

10. Assembly Drawing
1
3
2
1 SCREW PH M5 X 8 (BLACK) ROHS 4PCS•
2 SCREW PH T25 4.0 X 10 (BLACK) ROHS 2PCS•
3 SCREW PH M5 X 18 (BLACK) ROHS 4PCS•
4 SCREW PH T25 4.0 X 14 (BLACK) ROHS 4PCS•
4
October, 2012 (Version 7) STAR TRAC PERSONAL VIEWING SCREEN OWNER’S GUIDE
24
Page 26

Page 27

Page 28

Contact Information
4400 NE 77th Avenue, Suite 300
Vancouver, WA 98662
Telephone: (800) 228-6635,
(714) 669-1660
Fax: (714) 508-3303
October, 2012 (Version 7) STAR TRAC PERSONAL VIEWING SCREEN OWNER’S GUIDE
“Made for “iPod,” and “Made for iPhone” mean that an electrical accessory has been
designed to connect specifically to iPod or iPhone respectively, and has been
certified by the developer to meet Apple performance standards. Apple is not
responsible for the operation of this device or its compliance with safety and
regulatory standards. Please note that the use of this accessory with iPod or iPhone
may affect wireless performance.
iPod, iPhone are trademarks of Apple inc., registered in the U.S. and other countries.
27
 Loading...