


V-bike® Spinner®
Spinner® Pro
Spinner® Elite
Spinner® NXT
OWNER’S GUIDE
Introduction . . . . . . . . . . . . . . . . . . . . . . . . . . . . . . . . . . |
.. . . . . . . . . . . . . . . . . . . . . . . . . . . . . . . . . . . . . . . . . . . . . . . 2 |
Safety Instructions . . . . . . . . . . . . . . . . . . . . . . . . . . . . . |
. . . . . . . . . . . . . . . . . . . . . . . . . . . . . . . . . . . . . . . . . . . . . . . 3 |
Assembly and Setup . . . . . . . . . . . . . . . . . . . . . . . . . . . |
. . . . . . . . . . . . . . . . . . . . . . . . . . . . . . . . . . . . . . . . . . . . . . . 4 |
V-bike® Spinner® Assembly and Setup . . . . . . . . . . . . |
. . . . . . . . . . . . . . . . . . . . . . . . . . . . . . . . . . . . . . . 4 |
Spinner® Pro / Elite / NXT Assembly and Setup . . . . . |
. . . . . . . . . . . . . . . . . . . . . . . . . . . . . . . . . . . . . . . . 7 |
Instructions for Use . . . . . . . . . . . . . . . . . . . . . . . . . . . . . |
. . . . . . . . . . . . . . . . . . . . . . . . . . . . . . . . . . . . . . . . . . . . . . 13 |
Seat Adjustments . . . . . . . . . . . . . . . . . . . . . . . . . . . . . |
. . . . . . . . . . . . . . . . . . . . . . . . . . . . . . . . . . 13 |
Handlebar Adjustments . . . . . . . . . . . . . . . . . . . . . . . . |
. . . . . . . . . . . . . . . . . . . . . . . . . . . . . . . . . . . 14 |
Pedal Strap Adjustment . . . . . . . . . . . . . . . . . . . . . . . . |
. . .. . . . . . . . . . . . . . . . . . . . . . . . . . . . . . . . 14 |
Resistance Control . . . . . . . . . . . . . . . . . . . . . . . . . . . . |
. . . . . . . . . . . . . . . . . . . . . . . . . . . . . . . . . . . . . . . . . . . . . . . . . . . 14 |
Smart Release™ System . . . . . . . . . . . . . . . . . . . . . . . . |
. . . . . . . . . . . . . . . . . . . . . . . . . . . . . . . . . . . . . . . . . . . . . . . . . . 15 |
Training Information . . . . . . .. . . . . . . . . . . . . . . . . . . . . . . . . . . . . . . . . . . . . . . . . . . . . . . . . . . . . . . . . . . . . . . . . . . . 15
Maintenance . . . . . . . . . . . . . . . . . . . . . . . . . . . . . . . . . . . . . . . . . . . . . . . . . . . . . . . . . . . . . . . . . . . . . . . . . . . . . . . . . 16
Moving and Leveling . . . . . . . . . . . . . . . . . . . . . . . . . . . . . . . . . . . . . . . . . . . . . . . . . . . . . . . . . . . . . . . . . . . . . . . . . . . . . 16
Preventive Maintenance . . . . . . . . . . . . . . . . . . . . . . . . . . . . . . . . . . . . . . . . . . . . . . . . . . . . . . . . . . . . . . . . . . . . . . . . . . . 16
Adjustments . . . . . . . . . . . . . . . . . . . . . . . . . . . . . . . . . . . . . . . . . . . . . . . . . . . . . . . . . . . . . . . . . . . . . . . . . . . . . . . . . . . . 18
Parts Replacement . . . . . . . . . . . . . . . . . . . . . . . . . . . . . . . . . . . . . . . . . . . . . . . . . . . . . . . . . . . . . . . . . . . . . . . . . . . . . . . . 19
Page 2 |
STAR TRAC GROUP CYCLES OWNER’S GUIDE |
INTRODUCTION |
_ |
Welcome to the world of STAR TRAC®. This manual will acquaint you with the assembly, operation and maintenance of your STAR TRAC group cycle.
This manual provides information and instructions for the following group cycle models:
•5700 Series - STAR TRAC V-bike® Spinner®
•6800 Series - STAR TRAC Spinner® Pro
•6900 Series - STAR TRAC Spinner® Elite
•7000 Series - STAR TRAC Spinner® NXT
Be sure to read and follow the information and instructions for your specific model before assembly, using or servicing your cycle.
WARNING
Your STAR TRAC group cycle is designed for aerobic exercise. Please check with your physician before beginning any exercise program. Do not push yourself to excess. Stop if you feel faint, dizzy or exhausted. Use common sense when exercising on the cycle.
Star Trac and V-bike are registered trademarks of Star Trac.
SPIN®, SPINNER® and SPINNING® are registered trademarks of Madd Dogg Athletics, Inc.
Smart Release™ is a registered trademark of Nautilus, Inc.
Page 3 |
STAR TRAC GROUP CYCLES OWNER’S GUIDE |
SAFETY INSTRUCTIONS |
_ |
The following fitness safeguards and operating precautions are directed to purchasers and users of STAR TRAC group cycles. Club Managers should ensure that members and fitness staff are trained to follow these same instructions. Failure to follow these safeguards may result in injury or serious health risk.
FITNESS SAFEGUARDS
•Make your physician aware of any proposed fitness regimen before embarking on any exercise program.
•Discuss any health problems with your physician before beginning an exercise regimen.
•Stop operating the cycle if you feel faint, dizzy or tired.
•Preventive maintenance must be performed in accordance with the guidelines specified in the Preventive Maintenance section of this manual to assure optimum performance of the cycle.
OPERATING PRECAUTIONS
Persons exceeding 350 pounds (159 kg) may not use this product.
Ensure that adjustment knobs (seat height, seat fore-and-aft) are properly secured and do not interfere with range of motion during exercise.
•Do not use the cycle without proper footwear. NEVER operate the cycle with bare feet.
•Do not attempt to ride the cycle in a standing position at high RPMs until you have practiced at slower speeds.
•Never remove feet from the pedals while still in motion.
•Never attempt to abruptly stop the pedals, especially at high RPMs.
•Do not dismount the cycle until the pedals are at a complete STOP.
•After exercising, turn the load adjustment knob clockwise to increase resistance so the pedals will not rotate freely and potentially injure someone.
•Never turn the pedal crank arms by hand.
•Do not insert any object, hands or feet into any openings, or expose hands, arms or feet to the drive mechanism or other potentially moving part of the cycle.
•Keep children and pets away from the cycle whenever the machine is in use.
•Do not let children operate the cycle. The cycle mechanism and ergonomics are designed for adult use only.
Page 4 |
STAR TRAC GROUP CYCLES OWNER’S GUIDE |
ASSEMBLY AND SETUP |
_ |
V-BIKE® SPINNER® ASSEMBLY AND SETUP
Use the following procedures to unpack and assemble your STAR TRAC V-BIKE SPINNER.
UNPACKING
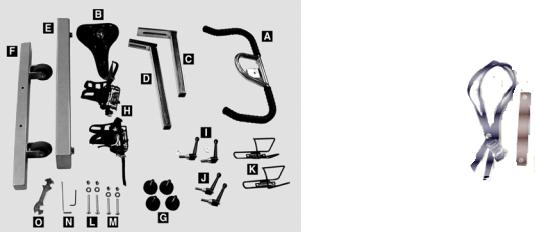
Position the shipping carton so the “Heavy End” logo is located at the bottom. Open the top of the carton and fold back all four flaps. Carefully tilt the box forward so that the box may be lifted to expose the cycle. Remove all parts from the shipping carton and foam inserts, and verify that the following parts are included in your shipment:
Assembly Parts |
|
Spare Parts Kit |
|
|
|
|
|
V-bike Parts List |
|
|
|
Description |
Qty. |
Description |
Qty. |
Main Frame Assembly (not shown) |
1 |
I. Tension Handles w/Washers |
2 |
A. Handlebar |
1 |
J. Tension Handles w/o Washers |
2 |
B. Seat |
1 |
K. Water Bottle Brackets |
2 |
C. Handlebar Post |
1 |
L. 8mm x 70mm (long) w/Washer and Nuts |
2 |
D. Seat Post |
1 |
M. 8mm x 60mm (short) w/o Washer and Nuts |
2 |
E. Back Leg |
1 |
N. Allen Wrenches, Metric |
2 |
F. Front Leg |
1 |
O. Multi-Purpose Wrench |
1 |
G. Leveling Adjusters (pre-installed) |
4 |
P. Spare Parts Kit (includes brake pad and pedal straps) |
1 |
H. Pedals (set of two) |
1 |
|
|
Spare Parts Kit- Save the box of spare parts in a safe place so you have service parts when needed in the future.
Take time now to enter your V-bike® Spinner® serial number in the space below (serial number is located on the bottom cross member). If parts are missing, or if you have any operational questions, please call Star Trac’s Service department at (800) 5031221; have your serial number ready.
Serial No._____________________________________________
Page 5 |
STAR TRAC GROUP CYCLES OWNER’S GUIDE |

ASSEMBLY
1. Install the Back Leg
Place the back leg in position at the rear of the cycle, aligning the two holes in the leg with the mating holes in the frame bracket.
Insert two 8mm x 70mm bolts through the frame bracket and back leg, and install a flat washer and nut on each bolt. Using the #5 Allen Wrench and Multi-Purpose Wrench, tighten the nuts securely.
Step 1
2. Installing the Front Leg
Place the front leg in position at the front of the cycle, with the casters facing forward, aligning the two holes in
the leg with the mating holes in the frame bracket.
Insert the two 8mm x 60mm bolts |
|
through the frame bracket and front |
|
leg, and install a flat washer and nut |
|
on each bolt. Using the #5 Allen |
|
Wrench and Multi-Purpose Wrench, |
Step 2 |
tighten the nuts securely. |
|
3. Install the Pedals |
|
Install the pedals on the pedal cranks |
|
using the Multi-Purpose Wrench. The |
|
closed end of the pedal cage must point |
|
forward, toward the front of the cycle. |
|
NOTE: Turn the left pedal spindle |
|
counterclockwise when threading into |
|
the crank arm; turn the right pedal |
|
spindle clockwise when threading into |
|
the crank arm. |
|
|
Step 3 |
4. Install the Seat |
|
Insert the seat post into the frame |
|
assembly and secure in place using a |
|
tension handle. |
|
Position the seat on top of the seat post |
|
and secure in place using a tension |
|
handle and washer. |
|
NOTE: Tighten the tension handles |
|
firmly. |
|
|
Step 4 |
Page 6 |
STAR TRAC GROUP CYCLES OWNER’S GUIDE |
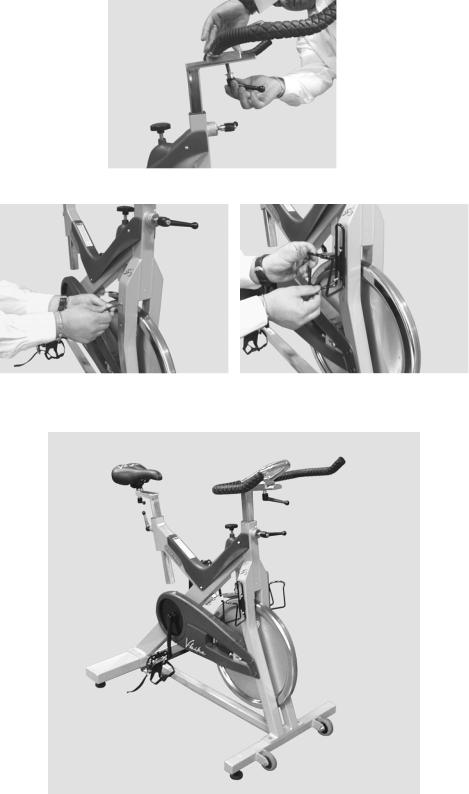
5. Install the Handlebar
Insert the handlebar post into the frame assembly and secure in place using a tension handle.
Position the handlebar on top of the handlebar post and secure in place using a tension handle and washer.
NOTE: Tighten the tension handles firmly.
Step 5
6. Install the Water Bottle
Holders
Using the Allen Wrench, remove the two screws from the right side fork of the frame assembly. Position a water bottle holder in place against the frame assembly, and re-install the two screws to secure.
Repeat to install the left-side water bottle holder.
Step 6
You have now completed the assembly of your STAR TRAC V-BIKE® SPINNER®.
Page 7 |
STAR TRAC GROUP CYCLES OWNER’S GUIDE |
 Loading...