

Page 1
802.11b Wireless Access Point/Bridge
WAP1011BB
Instruction Guide
The Professionals’ Source For Hard-to-Find Computer Parts
WIRELESS ACCESS
POINT
* Actual product may vary from photo
Page 2

FCC COMPLIANCE STATEMENT
This equipment has been tested and found to comply with the limits for a Class B
digital device, pursuant to part 15 of the FCC Rules. These limits are designed to
provide reasonable protection against harmful interference in a residential installation.
This equipment generates, uses and can radiate radio frequency energy and, if not
installed and used in accordance with the instructions, may cause harmful interference
to radio communications. However, there is no guarantee that interference will not
occur in a particular installation. If this equipment does cause harmful interference to
radio or television reception, which can be determined by turning the equipment off
and on, the user is encouraged to try to correct the interference by one or more of the
following measures:
• Reorient or relocate the receiving antenna.
• Increase the separation between the equipment and receiver.
• Connect the equipment into an outlet on a circuit different from that to which the
receiver is connected.
• Consult the dealer or an experienced radio/TV technician for help.
FCC Caution
This equipment must be installed and operated in accordance with provided
instructions and a minimum 20cm (8 inches) spacing must be provided between
computer mounted antenna and a person’s body (including extremities of hands, wrists,
and feet) during wireless modes of operation.
Page 3

1
Table of Contents
Introduction . . . . . . . . . . . . . . . . . . . . . . . . . . . . . . . . . . . . . . . . . . . . . . . . . . . . . . . . . .2
Wireless Access Point Basics . . . . . . . . . . . . . . . . . . . . . . . . . . . . . . . . . . . . . . . . . . . . 3
Getting Started . . . . . . . . . . . . . . . . . . . . . . . . . . . . . . . . . . . . . . . . . . . . . . . . . . . . . . . . 4
Configuring Your Wireless Access Point . . . . . . . . . . . . . . . . . . . . . . . . . . . . . . . . . 4
Home . . . . . . . . . . . . . . . . . . . . . . . . . . . . . . . . . . . . . . . . . . . . . . . . . . . . . . . . . . . . . . . . 5
Wireless Setting . . . . . . . . . . . . . . . . . . . . . . . . . . . . . . . . . . . . . . . . . . . . . . . . . . . . . . . 6
AP Mode . . . . . . . . . . . . . . . . . . . . . . . . . . . . . . . . . . . . . . . . . . . . . . . . . . . . . . 6
Station - Ad Hoc Mode . . . . . . . . . . . . . . . . . . . . . . . . . . . . . . . . . . . . . . . . . . 7
Station - Infrastructure . . . . . . . . . . . . . . . . . . . . . . . . . . . . . . . . . . . . . . . . . . 8
AP Bridge - Point to Point . . . . . . . . . . . . . . . . . . . . . . . . . . . . . . . . . . . . . . . . 9
AP Bridge - Point to Multi-Point . . . . . . . . . . . . . . . . . . . . . . . . . . . . . . . . . 10
AP Bridge - WDS . . . . . . . . . . . . . . . . . . . . . . . . . . . . . . . . . . . . . . . . . . . . . . 11
Advanced Setting . . . . . . . . . . . . . . . . . . . . . . . . . . . . . . . . . . . . . . . . . . . . . . . . . . . . . 12
Security . . . . . . . . . . . . . . . . . . . . . . . . . . . . . . . . . . . . . . . . . . . . . . . . . . . . . . . . . . . . . 13
MAC Filtering . . . . . . . . . . . . . . . . . . . . . . . . . . . . . . . . . . . . . . . . . . . . . . . . . . . . . . . . 15
System Utility . . . . . . . . . . . . . . . . . . . . . . . . . . . . . . . . . . . . . . . . . . . . . . . . . . . . . . . . 16
Configuration Tool . . . . . . . . . . . . . . . . . . . . . . . . . . . . . . . . . . . . . . . . . . . . . . . . . . . 18
Upgrade . . . . . . . . . . . . . . . . . . . . . . . . . . . . . . . . . . . . . . . . . . . . . . . . . . . . . . . . . . . . .19
Reset . . . . . . . . . . . . . . . . . . . . . . . . . . . . . . . . . . . . . . . . . . . . . . . . . . . . . . . . . . . . . . . . 20
Note: Due to firmware upgrades, the information in this Instruction Guide may not be
identical to what you see on your screen. Check www
.startech.com for firmware
upgrades or updates to the Instruction Guide. (October 30, 2003)
Page 4

2
Introduction
Thank you for purchasing a StarTech.com wireless access point (WAP). Based on the
IEEE 802.11b (2.4 GHz) wireless standard, this access point lets you connect your 802.11b
wireless devices to your wired Ethernet LAN or bridge wireless Infrastructure networks
together. The WAP1011BB supports wireless access point roaming and bridging, and
uses 64/128-bit WEP encryption to keep your network transmissions secure. With autorate fallback and web-based configuration control, you’ll be able to seamlessly and
securely integrate your wired and wireless networks.
Features
• Complies with 802.11b (2.4 GHz) specifications
• Supports auto-rate fallback and high data rates of 11/5.5/2/1 Mbits/sec
• Interoperable with other IEEE 802.11b compliant wireless devices
•Allows web-based configuration through Ethernet port
• Uses built-in DHCP server for auto IP address assignment
• Backed by StarTech.com’s two year warranty
Before You Begin
To ensure a quick and easy access point installation, please read through this section
carefully before attempting to install the access point.
System Requirements
•Adesktop or laptop computer with an Ethernet port running Windows XP, 2000,
Me, NT, 98, 95
• Other 802.11b (2.4 GHz) enabled devices
Package Contents
•1 x WAP1011BB wireless access point
•1 x 12V DC 0.5A power adapter
Page 5

3
Wireless Access Point Basics
Back Panel
The back panel is divided into sections: Power, LAN, Reset, and Wireless.
• The 12VDC power adapter plugs into the power port.
•The LAN port connects your wireless access point to your wired LAN.
• The Reset button can be used to reboot the wireless access point if it is experiencing
problems. If you press and hold the reset button for less than four seconds, the
wireless access point will reboot with your settings and configurations intact. If you
hold the reset button for more than four seconds, the wireless access point will reset
itself to the factory default settings and you will lose all your settings and
configurations.
• Screw the wireless antenna into the wireless port.
Front Panel
Power
LAN
Reset
Wireless
LED Color Status Description
PWR Green Lit Power is supplied
Off No power
WLAN Green Flashing Antenna is transmitting/receiving data
Off Antenna is not transmitting/receiving
LAN Green On A valid link is established
Flash LAN is transmitting/receiving
Off No link is established
Page 6

4
Getting Started
The section is designed to assist you in the installation of your WAP1011BB. Please read
through this section carefully and complete each step in the order listed.
1. Locate the optimum location for your Access Point. The best location is usually in the
center of your wireless network, with a clear line of sight to all your wireless stations.
See “Installation Considerations” on page 21 for hints on positioning your access
point.
2. Using a standard UTP cable, connect the access point’s LAN port to your network
switch, hub, or router.
3. Connect the AC power adapter to the access point’s Power port and connect the other
end to an appropriate power source. Only use the power adapter supplied with this
product. Using a different adapter may damage the access point.
4. If not already connected, screw the antenna into the wireless port.
The wireless access point is now online. To associate your wireless devices with your
WAP, make sure that your WAP is powered and your wireless clients are equipped with
802.11b-compatible wireless adapters. From your 802.11b-enabled computer, use the
instructions provided by your wireless adapter manufacturer to connect the computer to
the wireless access point.
The WAP’s default settings are:
ESSID: default
Channel: 1
Encryption Key: None
Note: To ensure the security of your network, StarTech.com recommends that you set up
some form of web encryption as soon as possible. See Security on page 13 for details.
Configuring the Wireless Access Point
Note: To configure the wireless access point, you must be using a client PC that is on the
same subnet as the wireless access point. See Appendix B: Configuring Your PCs on page
22 for details.
1. On one of your client PCs, open your web browser. In the address field, enter the
WAP’s default IP address (192.168.2.1) and press Enter.
2. Once the website has loaded, enter the User Name and Password and click OK. By
default, the User Name is admin and the password is 1234. You should change the
password as soon as possible (see System Utility on page 16 for details). You will
now be on the WAP’s web-based management home page.
Page 7

5
Home
The WAP’s home page gives you information on your current WAP settings.
Parameter Description
Alias Name The alias name for the WAP. See Wireless Setting on page
6 for information on changing the alias name.
Uptime The amount of time WAP has been running.
Runtime Code Version The firmware version the WAP is using. See Upgrade on
page 19 for information on upgrading the firmware.
Mode The mode the WAP is operating in. See Wireless Setting on
page 6 for information on changing the mode.
ESSID The ESSID of the WAP. See Wireless Setting on page 6 for
information on changing the ESSID.
Channel Number The channel the WAP is using. See Wireless Setting on
page 6 for information on changing the channel number.
Security The current security settings for the WAP. See Security on
page 13 for information on changing your security settings.
Associated Clients The number of wireless clients currently associated with the
WAP.
BSSID The BSSID of the WAP. In Access Point mode, the BSSID is
the MAC Address of the WAP.
IP Address The IP address of the WAP.
Subnet Mask The subnet mask used by the WAP.
MAC Address The WAP’s MAC address.
Page 8

6
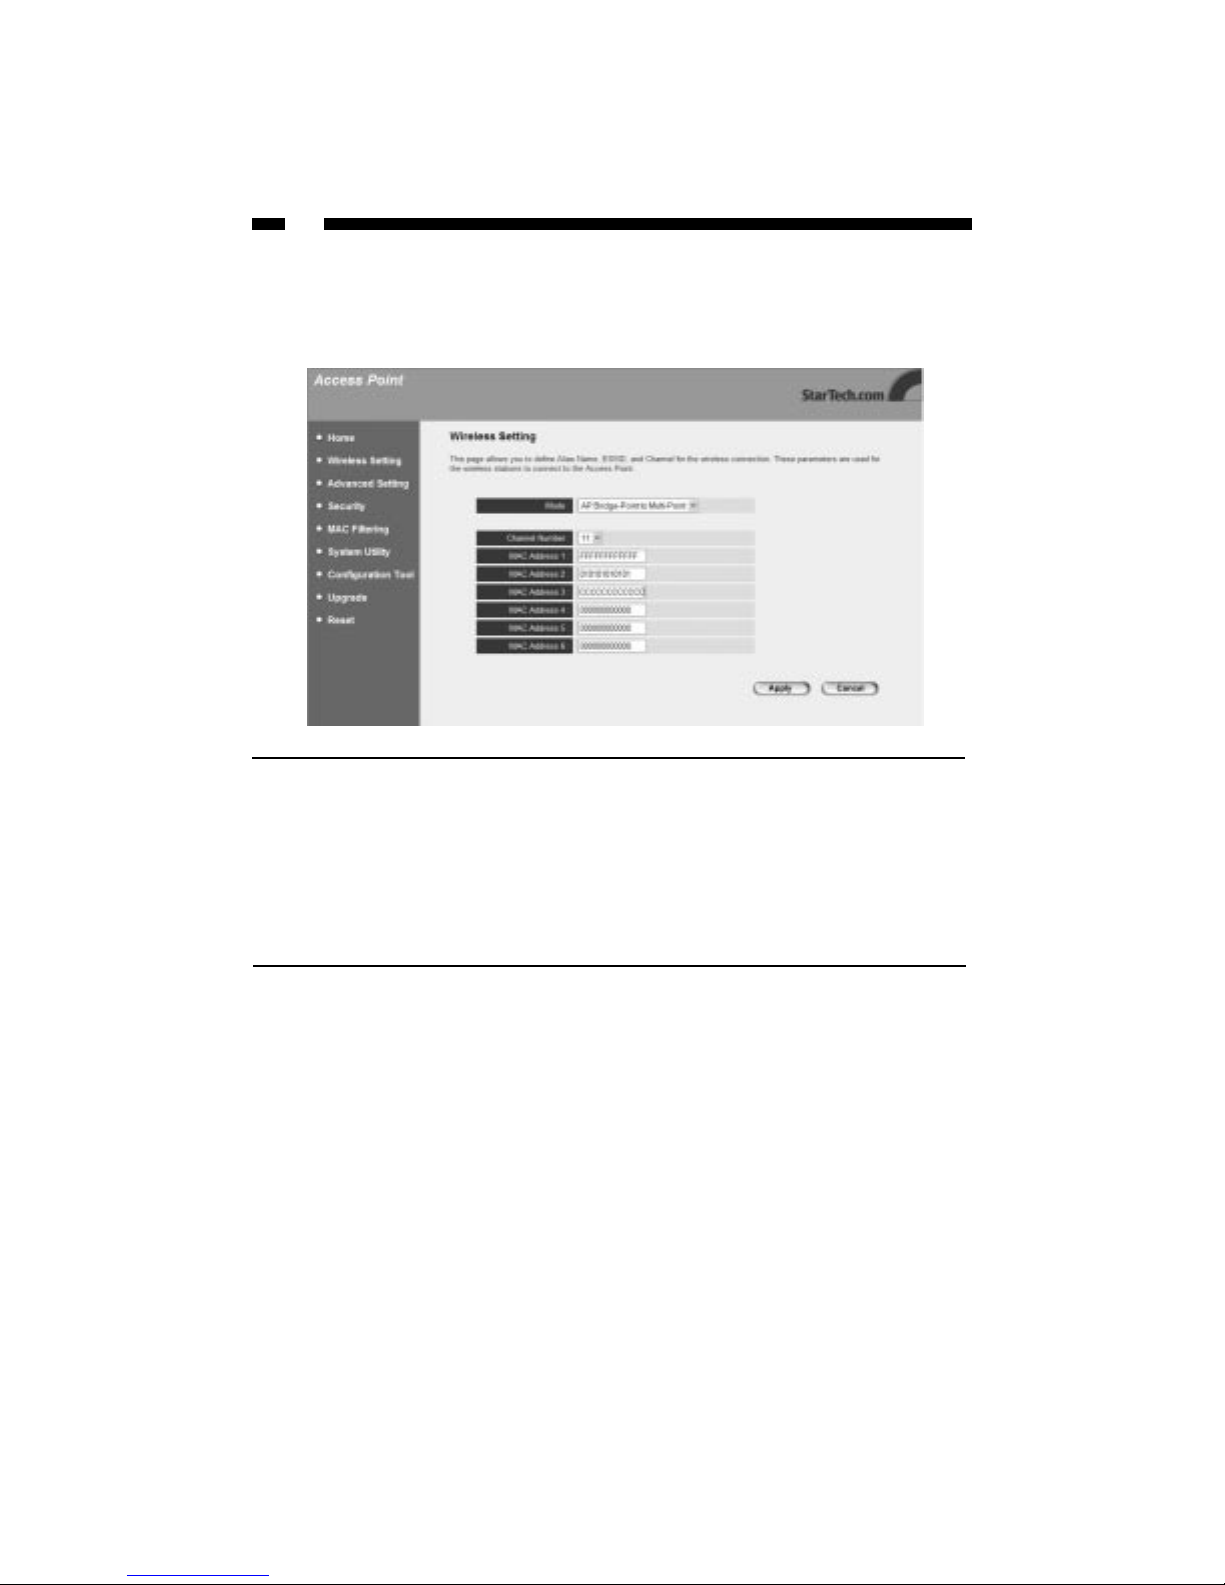
Wireless Setting
The Wireless Setting screen lets you change the mode the WAP is operating in. The
options available on the Wireless Setting screen change depending on the mode you
select.
AP Mode
When you are satisfied with your AP settings, click Apply.
Parameter Description
Mode The mode fields shows that the WAP is in AP (access point)
mode.
Alias Name You can change the alias name of the WAP.
ESSID You can change the ESSID (up to 31 printable ASCII characters)
for your WAP. Remember, in order for your wireless clients to
associate with each other, they must have the same ESSID.
Channel Number You can change the channel the WAP is using. Remember, in
order for your wireless clients to associate with the WAP, they
must have the same channel. Whenever you change the
channel on the WAP, make sure that the channel numbers on
your associated clients are also changed.
Associated Clients Clicking on the Show Active Clients button brings up the
Active Wireless Client Table. The table shows the MAC
Address, number of transmitted packets, number of received
packets, transfer rate, power saving mode, and time expired for
each device associated with the WAP.
Page 9

7
Station - Ad Hoc mode
Both Station - Ad Hoc and Station - Infrastructure mode let your WAP1011BB act like a
wireless adapter for your wired PC. Station - Ad Hoc mode lets you join your
WAP1011BB to a a wireless LAN with peer-to-peer communication.
When you are satisfied with your Ad Hoc settings, click Apply.
Parameter Description
Mode The mode field shows that the WAP is Station - Ad Hoc mode.
Alias Name You can change the alias name of the WAP1011BB.
ESSID You can change the ESSID (up to 31 printable ASCII characters)
for your WAP. Remember, in order for your wireless clients to
associate with each other, they must have the same ESSID.
Channel Number You can change the channel the WAP is using. Remember, in
order for your wireless clients to associate with each other, they
must have the same channel. Whenever you change the
channel on the WAP, make sure that the channel numbers on
your other devices are also changed.
Site Survey Click the Select Site Survey button to view the Wireless Site
Survey table. This table gives you a list of all available access
points in your area. You can then select an access point to
associate with. The table gives you information on the SSID,
BSSID, channel, type, encryption, and signal of each access
point.
Page 10

8
Station - Infrastructure
Both Station - Ad Hoc and Station - Infrastructure mode let your WAP1011BB act like a
wireless adapter for your wired PC. Station - Infrastructure mode lets your PC join a
wireless LAN through another wireless access point.
When you are satisfied with your Infrastructure settings, click Apply.
Parameter Description
Mode The mode fields shows that the WAP is in Station-
Infrastructure mode.
Alias Name You can change the alias name of the WAP.
ESSID You can change the ESSID (up to 31 printable ASCII characters)
for your WAP. Remember, in order for your wireless clients to
associate with each other, they must have the same ESSID.
Site Survey Click the Select Site Survey button to view the Wireless Site
Survey table. This table gives you a list of all available access
points in your area. You can then select an access point to
associate with. The table gives you information on the SSID,
BSSID, channel, type, encryption, and signal of each access
point.
Page 11

9
AP Bridge - Point to Point
The AP Bridge modes let you bridge two or more wired Ethernet networks together. AP
Bridge - Point to Point mode lets you connect to another wireless access point in order to
connect the two wired networks.
Note: AP Bridge - Point to Point mode can only be used to bridge wired networks
together. When in this mode, the WAP1011BB can not accept connections from any other
wireless stations. If you need to be able to bridge wired Ethernet networks and still
provide connection service for other wireless stations, see AP Bridge - WDS on page 11.
When you are satisfied with your AP Bridge - Point to Point settings, click Apply.
Parameter Description
Mode The mode fields shows that the WAP is AP Bridge - Point to
Point mode.
Channel Number You can change the channel the WAP is using. Remember, in
order for your wireless clients to associate with the WAP, they
must have the same channel.
MAC Address Enter the MAC address of the second wireless access point you
want to connect to.
Page 12
10
AP Bridge - Point to Multi-Point
The AP Bridge modes let you bridge two or more wired Ethernet networks together. AP
Bridge - Point to Multi-Point mode lets you connect to other wireless access points in
order to connect their wired networks.
Note: AP Bridge - Point to Multi-Point mode can only be used to bridge wired networks
together. When in this mode, the WAP1011BB can not accept connections from any other
wireless stations. If you need to be able to bridge wired Ethernet networks and still
provide connection service for other wireless stations, see AP Bridge - WDS on page 11.
When you are satisfied with your Point to Multi-Point settings, click Apply.
Parameter Description
Mode The mode fields shows that the WAP is AP Bridge - Point to
Multi-Point mode.
Channel Number You can change the channel the WAP is using. Remember, in
order for your wireless clients to associate with the WAP, they
must have the same channel.
MAC Address Enter the MAC addresses of your other wireless access points
you wan to connect too.
Page 13

11
AP Bridge - WDS
In AP Bridge - WDS, the WAP1011BB is able to bridge wired Ethernet networks and still
provide connection service for other wireless stations. APBridge - WDS mode is a
combination of AP Mode and AP Bridge - Point to Multi-Point mode,
When you are satisfied with your WDS settings, click Apply.
Parameter Description
Mode The mode fields shows that the WAP is AP Bridge - WDS
mode.
Alias Name You can change the alias name of the WAP.
ESSID You can change the ESSID (up to 31 printable ASCII characters)
for your WAP. Remember, in order for your wireless clients to
associate with each other, they must have the same ESSID.
Channel Number You can change the channel the WAP is using. Remember, in
order for your wireless clients to associate with the WAP, they
must have the same channel.
MAC Address Enter the MAC addresses of your other wireless access points
that you want to bridge to.
Page 14
12
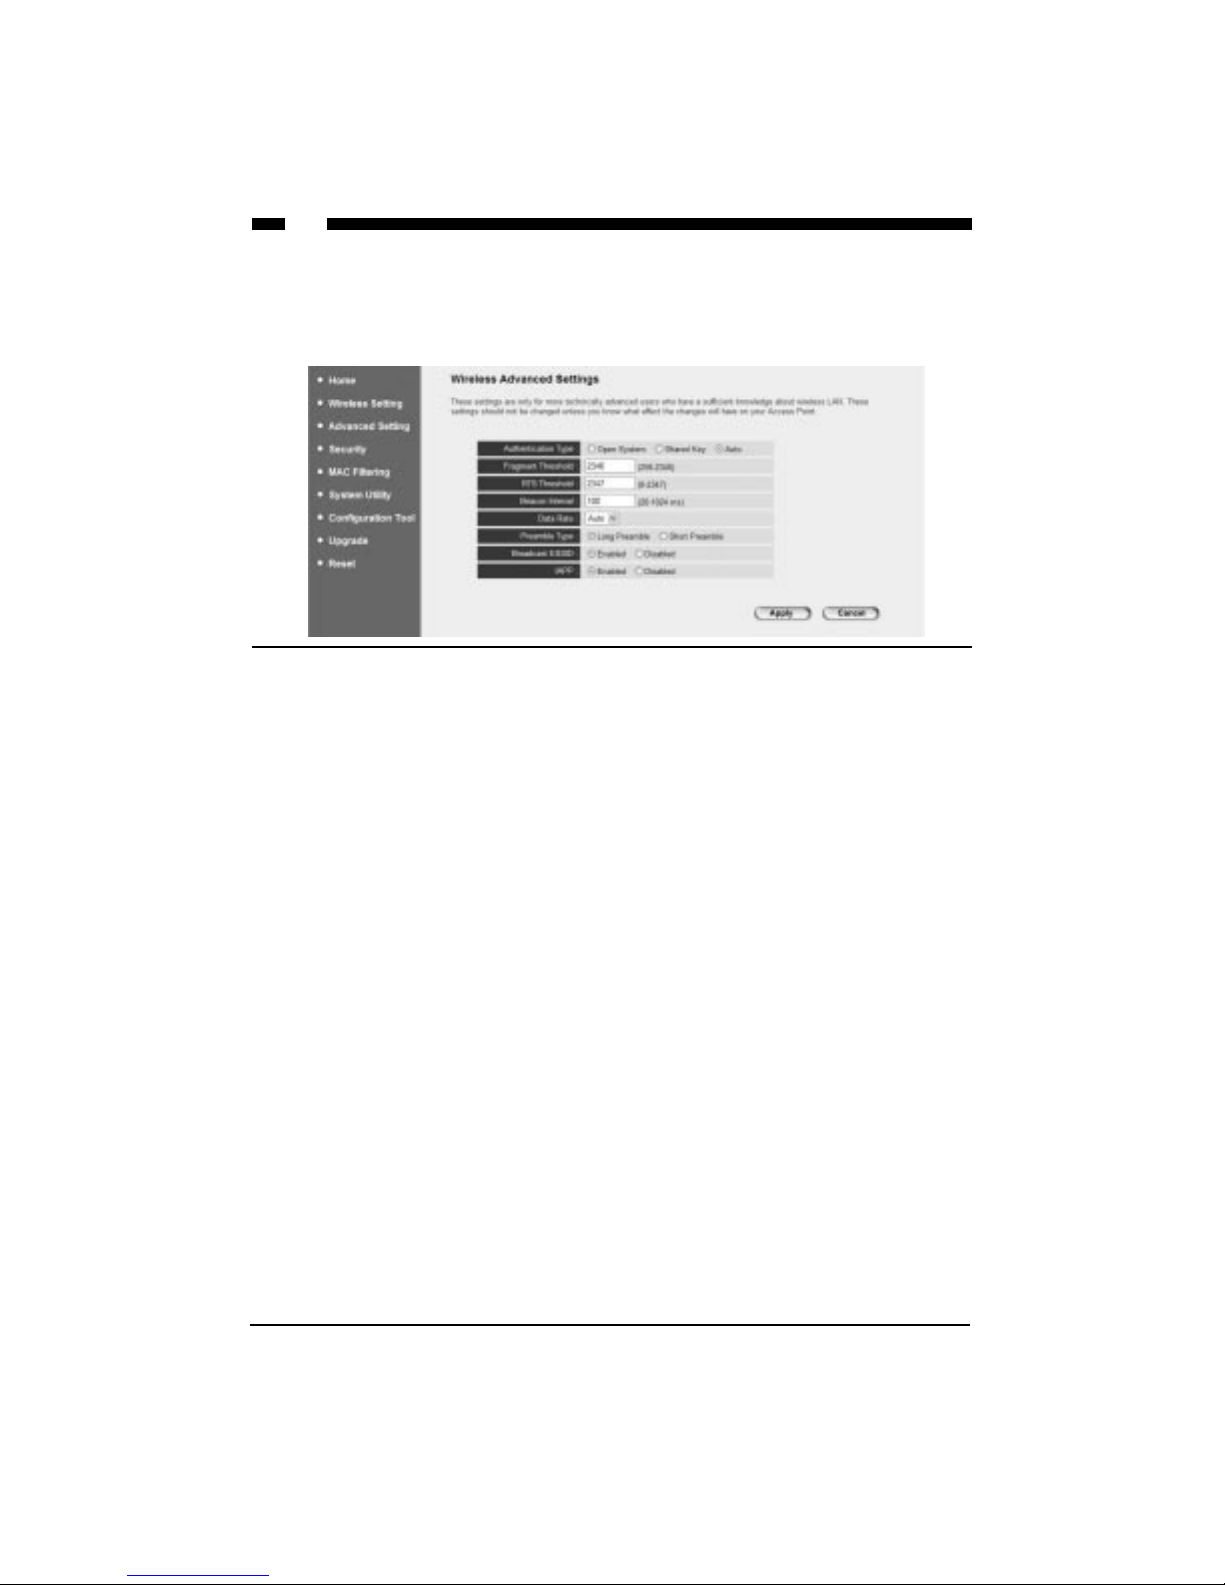
Advanced Setting
The Wireless Advanced Settings page lets you set some advanced wireless LAN
parameters. You should not change these parameters unless you know what effects they
will have on the WAP.
When you are satisfied with your Advance settings, click Apply.
Parameter Description
Authentication Type Choose the type of authentication for your wireless LAN:
Open System: In Open System, wireless stations can associate
with the WAP without any WEP encryption.
Shared Key: With Shared Key, only wireless clients with the
same WEP encryption key will be able to associate with the
WAP. In Shared Key mode, you will need to set up a WEP key
(See Security on page 13 for details).
Both: If you select Both, your wireless clients will be able to
associate with the WAP using either authentication type.
Fragment Threshold Specifies the maximum packet size for data transmission. If
you set this value too low, it will result in bad performance.
RTS Threshold Specifies the RTS threshold for data transmission. When a data
packet is less than the specified RTS threshold, the WAP will
not use the RTS/CT mechanism to send the packet.
Beacon Interval Specifies the amount of time between beacon broadcasts.
Data Rate Choose between transfer rates of Auto (best available rate), 11,
5.5, 2, or 1 Mbits/sec.
Preamble Type Defines the length of the CRC block in the frames during the
wireless transmission. “Short Preamble” is appropriate for high
traffic networks. “Long Preamble” provides more reliable
communication for less busy networks.
Broadcast ESSID Choose whether or not to broadcast the WAP’s ESSID.
IAPP Choose to enable or disable IAPP. Enabling IAPP is
recommended if you have more than one wireless access point
in your WLAN and your wireless stations have roaming
requirements. Disabling this feature provides more security.
Page 15

13
Security
The Security page lets you set up encryption for your wireless network. If you set up an
encryption key, you must use the same key for both your WAP and each of your
wireless clients.
If you select a 64-bit or 128-bit WEP key, you will need to enter the WEP key to encrypt
your data. See the next page for details.
Parameter Default Description
WEP Mode Disable If you enable WEP mode, you can choose either a
64-bit or 128-bit WEP key. The 128-bit key provides
greater security, but a lower throughput. If you
select Disable, your data will be transmitted
without encryption.
Page 16

14
Encryption, continued
When you are satisfied with your encryption settings, click Apply.
Parameter Description
Key Format You can use either ASCII characters (alphanumeric
format) or hexadecimal digits (in the A~F, a~f, and
0~9 range) to be the WEP key. For example:
ASCII: guest
Hexadecimal: 12345abcde
Key Length Choose the length of your WEP encryption key.
Default Key Select one of the four encryption keys to encrypt
your data. Only the key you select in “Default Key”
will take effect.
Key 1 ~ Key 4 Fill in the text box using the rules below:
64-bit WEP: Input a ten-digit hexadecimal value
(example: 12345abcde) or a five-digit ASCII value
(example: guest).
128-bit WEP: Input a 26-digit hexadecimal value
(example: 0123456789abcdef0123456789) or a 13-
digit ASCII value (example: guestpassword).
Page 17

15
MAC Filtering
MAC filtering protects your network by allowing only specified computers to access
your network. Only computers with the specified MAC addresses will be able to
associate with your WAP.
Only the MAC Addresses entered into the MACAddress Filtering Table will be able to
associate with the WAP.
Parameter Description
Enable Wireless Access Control Check this box to allow MAC filtering.
MAC Address Enter the MAC address of the PC that is allowed to
access the Internet
Comment You can use this space to describe the setting.
Add, Clear When you have entered all the above information,
click the Add button to add the setting to the
MAC Filtering Table. To empty all fields, click
Clear.
Delete Selected, Delete All, To remove a setting, select it from the MAC
Reset Filtering Table and click Delete Selected. To delete
all settings, click Delete All. Click Reset to clear
your current selections.
Page 18

16
System Utility
The System Utility page lets you change the WAP’s password, IP address, and Subnet
Mask, or configure the WAP’s DHCP server.
Parameter Description
Current Password Enter your current password.
New Password Enter your new password.
Re-enter Password Re-enter your new password for confirmation.
WARNING! If you forget your password, you will have to
reset the WAP, which will erase all of your configurations.
IP Address Enter a new IP address for the WAP.
Subnet Mask Enter a new subnet mask for the WAP.
DHCP Server Choose whether you want the DHCP server
enabled or disabled.
Default Gateway IP Specify the gateway IP for your network. It must be
different from the IP address.
Domain Name Server IP Enter either the DNS IP Address given to you by your ISP
or the IP address of your preferred DNS server.
Page 19

17
System Utility, continued
When you are satisfied with your System Utility settings, click Apply.
Parameter Description
Start/End IP Designate an IP range for your DHCP server to assign to
your IP clients. By default, the range is 192.168.2.100 to
192.168.2.200.
Domain Name Enter a domain name for your WAP.
Lease Time The DHCP server will temporarily give your LAN clients
an IP address. If you specify a time period in the Lease
Time field, the DHCP server will refresh your IP addresses
once that time period has expired.
Page 20

18
Configuration Tool
The Configuration Tools page lets you save, restore, or reset your router’s configuration
settings.
Parameter Description
Backup Settings Clicking on the Save button will save the router’s
current configuration to a file named “config.bin”.
Restore Settings Click on the Browse button to locate the file and
click Upload to re-load the saved configuration.
Restore to Factory Default Click Reset to force the router to do a power reset
that will clear all configurations and restore the
original factory default settings.
Page 21
19
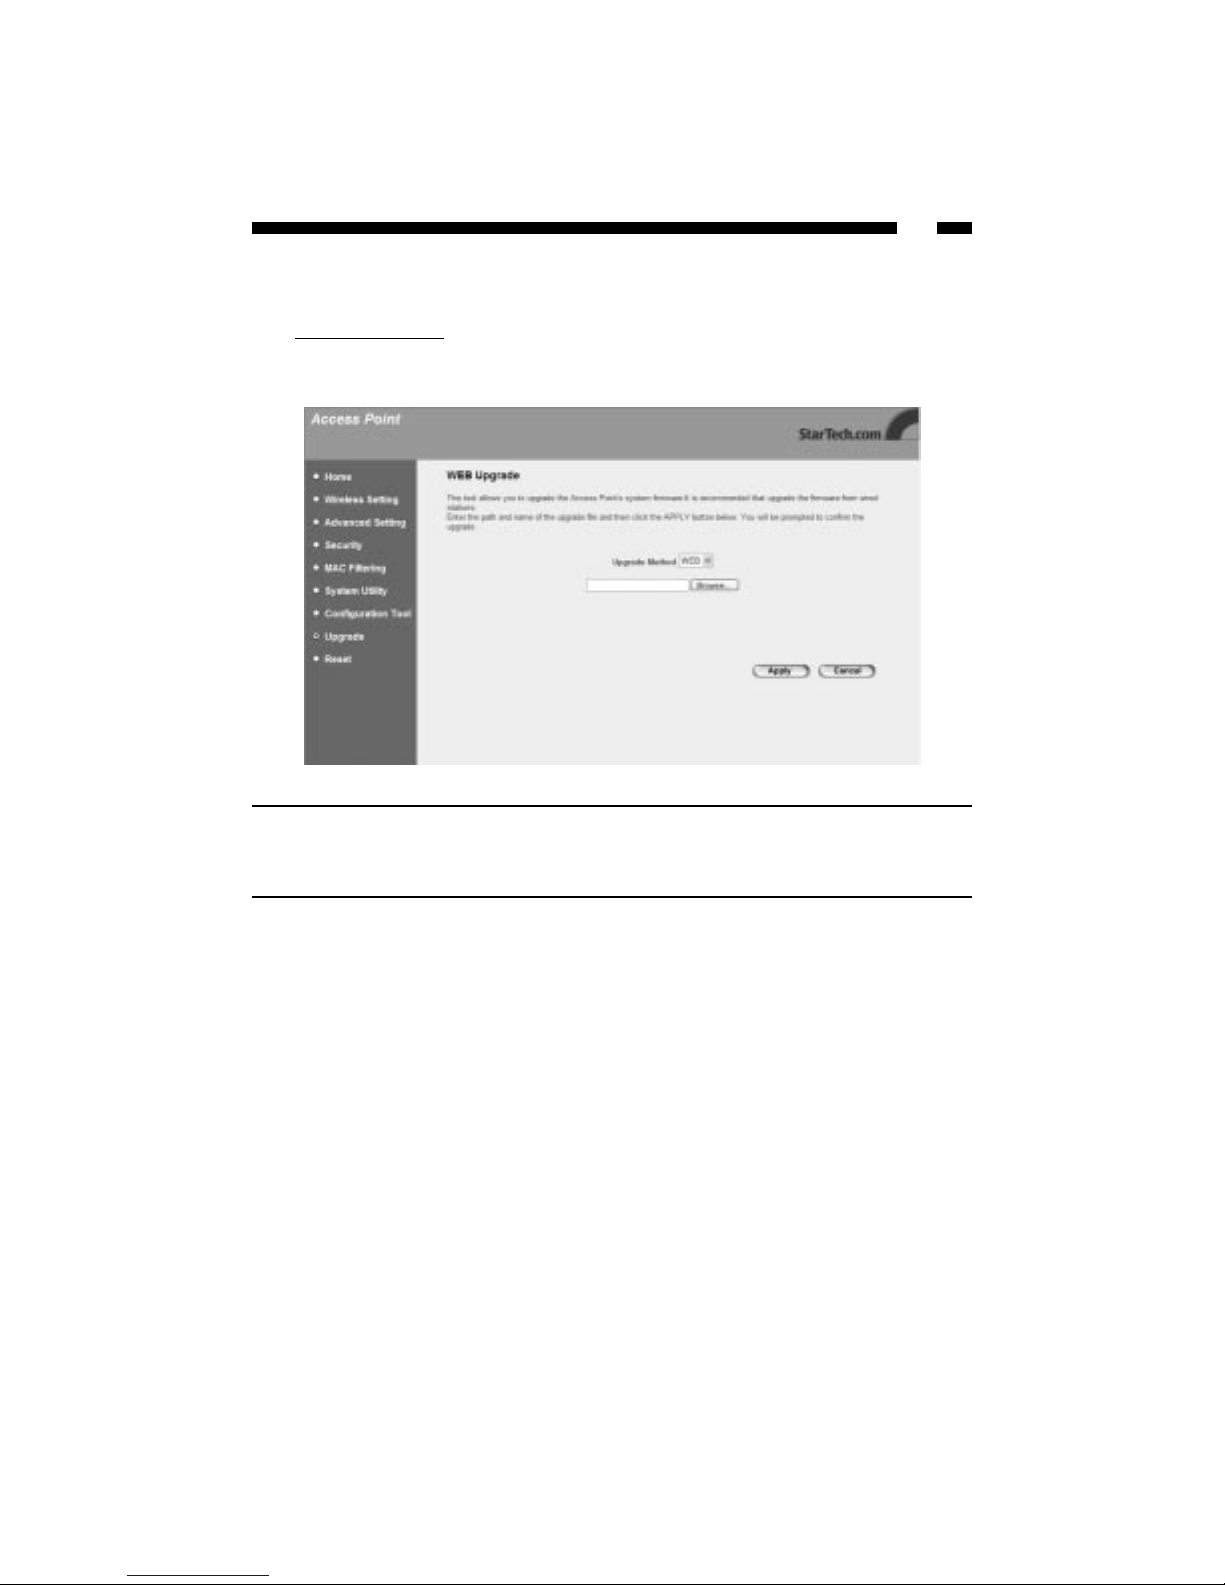
Upgrade
StarTech.com may periodically offer firmware upgrades as a download on our website.
Visit www
.startech.com and click on the Downloads link to check for possible firmware
upgrades for this product. If there is an upgrade available, download the file according
to instructions on the website and then proceed with the following steps.
Parameter Description
Firmware Upgrade Browse to the location of the firmware upgrade and
click the Apply button. You may have to wait a few
minutes for the upgrade to complete.
Page 22

20
Reset
You can reset the WA if you are experiencing any problems. Performing this step will not
change any of your current settings. If you want to reboot to the factory defaults, see
Configuration Tool on page 18.
Click on the Apply button to reset the WAP. You will be asked to confirm your decision.
Once the reset process is complete, you can start using the WAP again.
Page 23

21
Appendix A: Wireless Installation Considerations
There are some factors to keep in mind when attempting to set up a wireless connection.
The wireless signal range can be limited by the number, location, thickness, and material
of ceilings, walls or similar that the signal must pass through. To maximize your wireless
range, keep the following considerations in mind when positioning your antenna:
• The best place for a wireless access point is in the center of your wireless network
with line of sight to all your wireless clients.
•Try to minimize the number of walls, ceilings, and similar between your wireless
devices. Each wall or ceiling the signal must cross can reduce the signal range by
up to 90 feet (30 m). Position your receiving devices so that the path between them is
as unobstructed as possible.
• The type of material the wireless signal must cross through also affects its range. A
solid metal door or concrete wall can decrease the signal’s range. Whenever possible,
position the adapters so that the signal can pass between drywall or open doors.
• Make sure that you are aware of the line the signal must take to travel between
devices. The angle that the signal is on as it travels through a door, wall, or ceiling
affects how thick the obstruction is. For example, if a wall is 1.5 feet thick and the
signal passes through it at a 45-degree angle, the signal must pass through 3 feet (1m)
of wall. At a 2-degree angle, the wall appears to be 42 feet (14m) thick. Always try to
position your devices so that the signal can travel at 90-degree angles.
• Electrical devices or appliances that generate RF noise (such as microwaves, electric
motors or computer monitors) can interfere with the wireless signal. Try to keep your
adapter at least 3-6 feet (1-2 m) away from these types of devices.
Page 24

22
Appendix B: Configuring Your PCs
You can configure your wireless access point from any wired or wireless station that is
on the same subnet as the wireless access point. The default IP address of the WAP is
192.168.2.1 and the default subnet mask is 255.255.255.0. See the section below for
information on how to configure your PCs to be on the same subnet mask as the wireless
access point.
Windows XP
Note: These instructions assume you are using the default Windows XP layout. If you
are using Classic View, the process may vary slightly.
1. Click on Start then Control Panel.
2. Click on Network and Internet Connections, then Network Connections.
3. Right-click Local Area Connection and click Properties.
4. From the “This connection uses the following items:” list, select Internet Protocol
(TCP/IP) and click Properties.
5. Select Use the following IP Address.
6. In the IP Address field, enter an IP address between 192.168.2.2 and 192.168.2.254. In
the Subnet Mask field, enter 255.255.255.0. In the Default Gateway field, enter the IP
address of your network’s gateway (like the IP address of your router). If your
network does not have a gateway, leave this field blank.
Windows 2000
1. Click Start, then Settings, then Control Panel.
2. Double-click Network and Dial-Up Connection, then double-click Local Area
Connection.
3. Click Properties.
4. From the “Network Components” list, select Internet Protocol [TCP/IP] and click
Properties.
5. Select Use the following IP Address.
6. In the IP Address field, enter an IP address between 192.168.2.2 and 192.168.2.254. In
the Subnet Mask field, enter 255.255.255.0.
7. Click OK to confirm the setting.
Page 25

23
Windows Me/98/95
1. Click Start, then Settings, then Control Panel.
2. Double-click Network.
3. From the “Network Components” list, select Internet Protocol [TCP/IP] and click
Properties. (If TCP/IP is not on your list, follow Microsoft’s instructions for details on
how to install it)
4. Check each tab and verify the following:
Bindings: Check “Client for Microsoft Networks” and “File and printer sharing
for Microsoft Networks”
Gateway: All fields are blank.
DNS Configuration: Select “Disable DNS.”
WINS Configuration: Select “Disable WINS Resolution.”
IP Address: Select “Specify an IP Address.” In the IP Address field, enter an IP
address between 192.168.2.2 and 192.168.2.254. In the Subnet Mask field, enter
255.255.255.0.
Troubleshooting
If you are having trouble with your wireless connections, check the following:
• Make sure all your wireless clients are equipped with 802.11b-compatible wireless
adapters.
• Make sure that your WAP and all your wireless clients have the same ESSID and are
on the same channel.
• If you have enabled encryption options, make sure that the same encryption key has
been entered on each device. Make sure that the key selected on your WAP is the
same key entered on the other wireless device you want to connect to.
• If you are experiencing intermittent network connections, try re-orienting the adapter.
See Appendix A: Installation Considerations for more details.
Forgotten Password
• If you have forgotten your password, you have to reset the WAP. Press the reset
button for more than 4 seconds and the WAP will reset itself to the factory default
settings. All your configurations will be replaced with the factory default settings.
Page 26

24
Glossary
802.11b: Afamily of IEEE-defined specifications for wireless networks. The 802.11b
standard supports data transfer rates up to 11 Mbits/sec in the 2.4 GHz band using DSSS
technology. Also known as WiFi.
Access Point: See Wireless Access Point.
Ad Hoc: A wireless computer-to-computer LAN. An Ad Hoc network can consist of two
devices with wireless adapters, and does not require a WAP, router, or gateway. Also
known as peer-to-peer mode. See also infrastructure.
Associated Client: See Client PC.
Beacon: A packet that identifies the location of the base wireless station and allows the
mobile clients to synchronize with the base station.
Bridge: An intelligent, internetworking device that forwards or filters packets between
different networks based on data link layer (MAC) address information.
Broadband: A method of communication where a wide band of frequencies is available
to transmit voice, data, and video signals over a single medium. Information can be sent
on many different channels, allowing more information to be sent in a given period of
time (the same way multiple lanes allow more cars on the road).
BSSID (Basic Service Set Identifier): The MAC address of the wireless router. A BSS
consists of a Wireless Access Point and the adapters associated with it.
Cable Modem: A device that provides Internet access to a user by connecting a computer
to the cable television network, which in turn connects to the Internet. Cable modem
users have a continuous always-on connection to the Internet.
Channel: A specific carrier frequency used in wireless communications. In order to
communication with each other, each wireless device must be on the same channel.
Client PC: Any computer connected to the router, whether wired or wireless.
Daisy Chain: A hardware configuration where devices are connected one after the other
in series. Transmitted signals proceed down the chain from the first device to the second,
and so on.
Default Gateway: A routing device used to forward traffic that is not on the local subnet.
When a network device wants to send an IP packet to a destination that is not on the
same network, the device sends the packet to a default gateway, which will send it out
towards the destination.
Denial of Service Attack: A method used by hackers to prevent legitimate users from
accessing a service or resource. ADoS attack usually involves the hacker sending a large
number of request packets to a targeted network service, making it unusable for other
users.
DHCP (Dynamic Host Configuration Protocol): A protocol that automatically assigns
dynamic IP addresses to PC/LAN clients logging in to a TCP/IP network. Without
DHCP, IP addresses must be logged in manually at each computer.
Page 27

25
DNS (Domain Name System): A system that translates an Internet address (like
www.startech.com) into a proper IP address (like 192.168.2.1). A DNS server keeps a
database of Internet servers and their respective Internet and IP addresses, so that when
you type “www.startech.com” into your web browser, you are sent to the web site
located at 192.168.2.1, for example. Your ISP can provide you with the IP address of the
DNS server you use when connected to the Internet.
DSL Modem (Digital Subscriber Line Modem): A device that provides a user with
Internet access using telephone lines to connect the computer to the Internet at high
speeds.
Dynamic IP Address: A temporary IP address given to a PC/LAN client by the DHCP
server for the duration of an Internet session or some other established period of time.
The IP address is chosen at random from a pool of available IP addresses on the DHCP
server. When the session is concluded or the lease-time has expired, the IP address is
returned to the pool.
Encryption: The transformation of data into encoded ciphertext to ensure data
transmission can not be accessed by users outside the network. Encryption uses an
encryption algorithm and encryption keys to encode and decode the information. See
also WEP.
Encryption Algorithm: A formula used to convert data from understandable “plaintext”
into encoded “ciphertext.” Each algorithm uses a key (a string of bits) to perform the
calculations. The larger the key (most are 64 or 128-bits in length), the more difficult to
break the code.
ESSID (Extended Service Set Identifier): The identifying name of an 802.11b network. An
ESS consists of two or more BSSes in the same subnet. In order to communicate with
each other, each wireless device must have the same ESSID.
Ethernet: A popular network standard of communication using either twisted pair or
coaxial cables. The most widely used LAN access method, Ethernet networks are
connected by special cables and hubs, and can transfer data at speeds up to 10 or 100
million bits per second (Mbits/sec). Also known as IEEE 802.3.
Firewall: A configurable program or hardware device that filters information coming to
your private network or computer from the Internet. If a firewall flags a packet of
information, it does not get through to your network or PC.
Firmware: Programming that is inserted into a device’s read-only memory (ROM) to
become a permanent part of the device. Firmware upgrades are often provided to
upgrade or improve a hardware device.
IAPP (Inter Access Point Protocol): Aprotocol that gives the necessary information that
wireless access points need to support roaming. IAPP automatically broadcasts
information about associate wireless clients. This aids roaming between wireless access
points.
Infrastructure Mode: An 802.11 networking mode where wireless devices communicate
through a wireless access point, instead of directly with each other (Ad Hoc mode).
IP Address (Internet Protocol Address): A unique number that identifies a device on a
network. IP addresses are expressed in decimal form as four numbers between 0 and 255
that are separated by periods. (Example: 192.168.2.1) See also: Dynamic IP Address, Static
IP Address, Public IP Address, Private IP Address.
Page 28

26
ISP (Internet Service Provider): A company that provides individuals or businesses with
access to the Internet.
ISP Gateway Address: The IP address for the Internet router located at the ISP's office.
Your ISP can provide you with this address, if needed.
LAN (Local Area Network): A group of computers and devices connected together in a
relatively small area (such as a house or an office).
MAC Address (Media Access Control Address): Aunique number assigned by the
manufacturer to any Ethernet networking device (such as a network adapter) that allows
the network to identify it at the hardware level. Also known as the physical address or
Ethernet number.
MTU (Maximum Transmission Unit): The largest physical packet size (in bytes) that a
network can transmit. Any messages larger than the MTU are divided into smaller
packets before being sent.
NAT (Network Address Translation): A process that allows a single public IP address to
represent several private IP addresses when accessing the Internet. This allows multiple
users on a network to share an Internet connection without having to purchase multiple
IP addresses from an ISP.
Network Mask: See Subnet Mask.
NIC (Network Interface Card): A circuit board or card that is installed inside a computer
or network device so that the device can be connected to the Internet. Also known as a
network adapter.
Physical Address: See MAC Address.
Private IP Address: An IP address given to a LAN device that is unknown to the
Internet. These are unregistered IP addresses that have been set aside for use in a LAN
environment where constant connection to the Internet is not required. See also: NAT.
Protocol: An objective set of rules for how computers communicate with each other
across networks. Aprotocol describes the form a message must take as well as how that
message is exchanged. Hypertext Transfer Protocol (HTTP), for example, governs the
way information is exchanged on the World Wide Web.
Public IP Address: A unique, “legal” IP address allocated by an ISP that is used when
accessing the Internet. A public IP address can be reached by another device over the
Internet. See also: NAT.
Router: An intelligent network device that forwards packets between different networks
based on network layer address information such as IP addresses.
Static IP Address: A dedicated, unique IP address that has been assigned to a given
computer or server for an extended period of time. Static IP addresses are useful if you
are operating a computer that other Internet users need to access, such as a web server.
SOHO (Small Office/Home Office): Asmall or at-home business.
Page 29

27
Subnet Mask: A technique used by the IP protocol to filter messages into a particular
network segment or subnet. Subnet masks are expressed as four decimal numbers
between 0 and 255 separated by periods. (Example: 255.255.255.1) It is used to create
private IP addresses for use within a particular network. Also known as a network mask.
TCP/IP (Transmission Control Protocol/Internet Protocol): The basic communication
protocol for the Internet. TCP breaks data down into packets, “reassembles” the data at
its destination and verifies delivery. IP determines how to address and forward data and
sets packet size limitations.
WAN (Wide Area Network): A communications network that covers a wide geographic
area (different buildings, cities, countries). The Internet is an example of a WAN.
WAP (Wireless Access Point): A networking device that seamlessly connects wired and
wireless networks. Used in Infrastructure networks, a wireless access point is capable of
connecting to an Ethernet network as well as an 802.11 network.
WEP (Wired Equivalent Protocol): Asecurity protocol designed to provide a wireless
network with the same level of security as a wired LAN. WEP offers protection primarily
by encrypting the information that flows between adapters.
Wi-Fi: See 802.11b.
WLAN (Wireless LAN): A group of computers and devices wirelessly connected together
in a relatively small area (such as a house or an office).
Page 30

28
Technical Specifications
Ethernet Interface 10/100 Mbits/sec
Standards IEEE 802.11b, IEEE 802.3
Radio Technology Direct Sequence Spread Spectrum (DSSS)
Modulation CCK@11/5.5 Mbits/sec, DQPSK@2Mbits/sec, DBSK@1
Mbit/sec
Security 64/128-bit WEP encryption
Frequency 2.4 GHz (ISM band)
Antenna External detachable dipole (with RP-SMA connector)
Transmit Power 18dBm
Power 12V DC, 0.5A
LEDs Power, Wireless LAN, LAN
Supported transfer rates 11, 5.5, 2, 1 Mbits/sec
Data range in close space 115~328 ft (35~100 m)
Data range in open space 328~ 984 ft (100m~300m)
Operating Temperature 32~131ºF (0~55ºC)
Storage Temperature -4~158ºF (-20~70ºC)
Certification FCC, CE Mark
Page 31

29
Technical Support
The following technical resources are available for this StarTech.com product:
On-line help:
We are constantly adding new information to the Tech Support section of our web site. To
access this page, click the Tech Support link on our homepage, www.startech.com. In the
tech support section there are a number of options that can provide assistance with this
product.
Knowledge Base - This tool allows you to search for answers to common issues using
key words that describe the product and your issue.
FAQ - This tool provides quick answers to the top questions asked by our customers.
Downloads - This selection takes you to our driver download page where you can
find the latest drivers for this product.
Call StarTech.com tech support for help:
USA/Canada: 1-519-455-4931
UK/Ireland/Europe: 00-800-7827-8324
Support hours: Monday to Friday 9:00AM to 5:00PM EST (except holidays)
Warranty Information
This product is backed by a one-year warranty. In addition StarTech.com warrants its
products against defects in materials and workmanship for the periods noted,
following the initial date of purchase. During this period, the products may be
returned for repair, or replacement with equivalent products at our discretion. The
warranty covers parts and labor costs only. StarTech.com does not warrant its products
from defects or damages arising from misuse, abuse, alteration, or normal wear and
tear.
Limitation of Liability
In no event shall the liability to StarTech.com Ltd. (or its officers, directors, employees or
agents) for any damages (whether direct or indirect, special, punitive incidental,
consequential, or otherwise), loss of profits, loss of business, or any pecuniary loss,
arising out of related to the use of the product exceed the actual price paid for
the product.
Some states do not allow the exclusion or limitation of incidental or consequential
damages. If such laws apply, the limitations or exclusions contained in this statement
may not apply to you.
Page 32

Revised: October 30, 2003
 Loading...