

Page 1
11 Mbits/sec USB 802.11b Wireless
Mini Adapter
USB511WB
Instruction Guide
The Professionals’ Source For Hard-to-Find Computer Parts
WIRELESS LAN USB
ADAPTER
* Actual product may vary from photo
Page 2

FCC COMPLIANCE STATEMENT
This equipment has been tested and found to comply with the limits for a Class B
digital device, pursuant to part 15 of the FCC Rules. These limits are designed to
provide reasonable protection against harmful interference in a residential installation.
This equipment generates, uses and can radiate radio frequency energy and, if not
installed and used in accordance with the instructions, may cause harmful interference
to radio communications. However, there is no guarantee that interference will not
occur in a particular installation. If this equipment does cause harmful interference to
radio or television reception, which can be determined by turning the equipment off
and on, the user is encouraged to try to correct the interference by one or more of the
following measures:
• Reorient or relocate the receiving antenna.
• Increase the separation between the equipment and receiver.
• Connect the equipment into an outlet on a circuit different from that to which the
receiver is connected.
• Consult the dealer or an experienced radio/TV technician for help.
FCC Caution
This equipment must be installed and operated in accordance with provided
instructions and a minimum 20cm (8 inches) spacing must be provided between
computer mounted antenna and a person’s body (including extremities of hands, wrists,
and feet) during wireless modes of operation.
R&TTE Compliance Statement
This equipment complies with all the requirements of DIRECTIVE 1999/5/CE OF THE
EUROPEAN PARLIAMENT AND THE COUNCIL of March 9, 1999 on radio equipment
and telecommunication terminal Equipment and the mutual recognition of their
conformity (R&TTE).
The R&TTE Directive repeals and replaces in the directive 98/13/EEC
(Telecommunications Terminal Equipment and Satellite Earth Station Equipment) as of
April 8, 2000.
Safety
This equipment is designed with the utmost care for the safety of those who install and
use it. However, special attention must be paid to the dangers of electric shock and
static electricity when working with electrical equipment. All guidelines of this and of
the computer manufacturer must therefore be allowed at all times to ensure the safe use
of the equipment.
EU Countries Intended for Use
The ETSI version of this device is intended for home and office use in Austria, Belgium,
Denmark, Finland, France, Germany, Greece, Ireland, Italy, Luxembourg, the
Netherlands, Portugal, Spain, Sweden, and the United Kingdom. The ETSI version of
this device is also authorized for use in EFTAmember states: Iceland, Liechtenstein,
Norway, and Switzerland.
Potential Restrictive Use
None
Page 3

1
Table of Contents
Introduction . . . . . . . . . . . . . . . . . . . . . . . . . . . . . . . . . . . . . . . . . . . . . . . . . . . . . . . . . .2
Installation . . . . . . . . . . . . . . . . . . . . . . . . . . . . . . . . . . . . . . . . . . . . . . . . . . . . . . . . . . . 3
Using the Configuration Utility . . . . . . . . . . . . . . . . . . . . . . . . . . . . . . . . . . . . . . . . . 4
More Settings . . . . . . . . . . . . . . . . . . . . . . . . . . . . . . . . . . . . . . . . . . . . . . . . . . . . . . . . . 5
WEP Key Settings . . . . . . . . . . . . . . . . . . . . . . . . . . . . . . . . . . . . . . . . . . . . . . . . . . . . . 7
Advanced Settings . . . . . . . . . . . . . . . . . . . . . . . . . . . . . . . . . . . . . . . . . . . . . . . . . . . . . 8
Troubleshooting . . . . . . . . . . . . . . . . . . . . . . . . . . . . . . . . . . . . . . . . . . . . . . . . . . . . . . . 9
Appendix A: Installation Considerations . . . . . . . . . . . . . . . . . . . . . . . . . . . . . . . . 10
Appendix B: Setting Up a Wireless Ad Hoc Network . . . . . . . . . . . . . . . . . . . . . 11
Appendix C: Setting up an Infrastructure Network . . . . . . . . . . . . . . . . . . . . . . . 12
Glossary . . . . . . . . . . . . . . . . . . . . . . . . . . . . . . . . . . . . . . . . . . . . . . . . . . . . . . . . . . . . . 13
Technical Specifications . . . . . . . . . . . . . . . . . . . . . . . . . . . . . . . . . . . . . . . . . . . . . . . 15
Technical Support . . . . . . . . . . . . . . . . . . . . . . . . . . . . . . . . . . . . . . . . . . . . . . . . . . . . 16
Warranty Information . . . . . . . . . . . . . . . . . . . . . . . . . . . . . . . . . . . . . . . . . . . . . . . . . 16
Page 4

2
Introduction
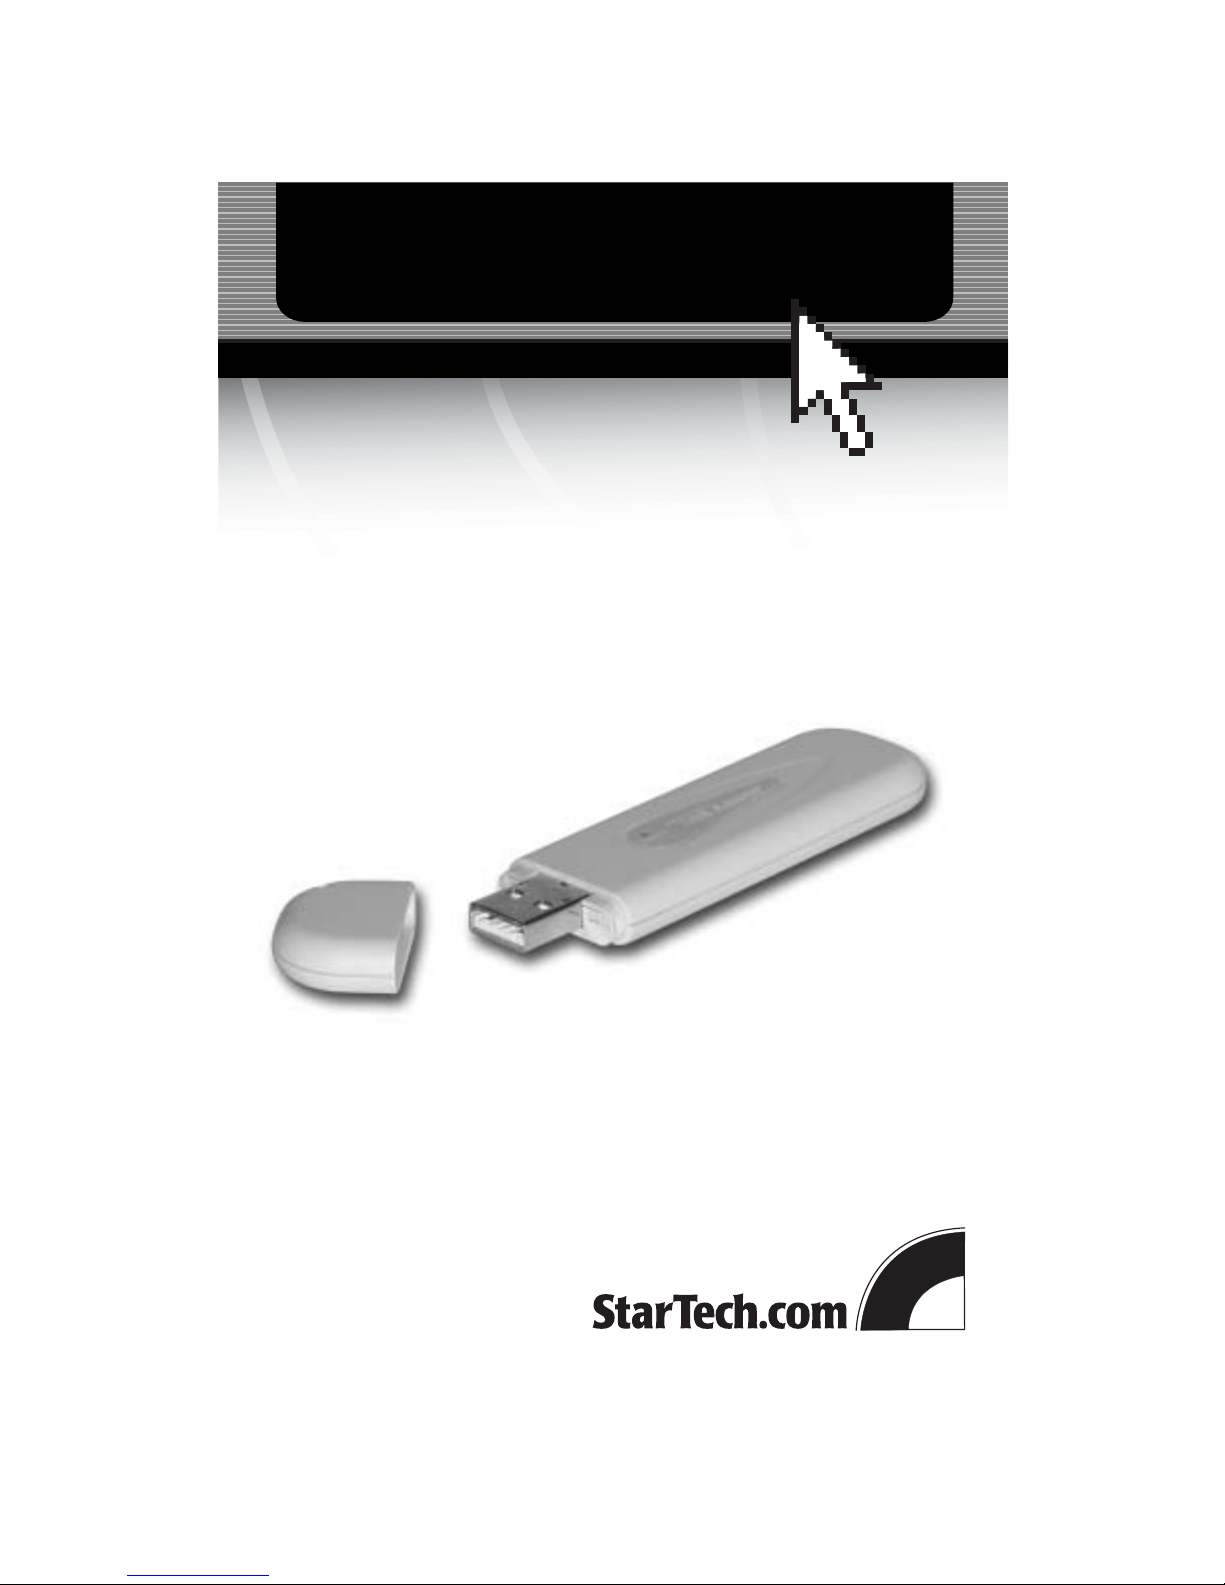
Thank you for purchasing a StarTech.com 11 Mbits/sec USB 802.11b wireless mini
adapter. Based on the IEEE 802.11b 2.4 GHz wireless standard, the USB511WB instantly
provides your USB-enabled desktop or notebook computer with wireless LAN (WLAN)
access. Whether you are setting up a peer-to-peer Ad Hoc network with other computers
using 802.11b devices (like the StarTech.com CB511WB) or setting up an Infrastructure
network with a wireless access point (like the StarTech.com WAP1011BB), this Plug and
Play adapter connects quickly and easily with 11 Mbits/sec of data transfer.
Features
• Complies with IEEE 802.11b (DSSS) 2.4 GHz standard
• Uses high-speed data transfer rate up to 11 Mbits/sec
• Plugs directly into USB port without cables
• Supports 64/128-bit WEP Data Encryption for high security
• Supports peer-to-peer communication between wireless users with no Access Point
required
• Suitable for any notebook or desktop PC
• Supports RTS and CTS threshold control for better throughput
• Automatic rate fallback enables data security and reliability
• Supports Plug and Play specifications
• Backed by StarTech.com’s lifetime year warranty
Before You Begin
To ensure a quick and easy adapter installation, please read through this section carefully
before attempting to install the adapter.
System Requirements
•Adesktop or laptop computer running Windows XP, 2000, Me, 98SE
•An open USB port
Package Contents
•1 x USB511WB wireless LAN USB adapter
•1 x driver/utility CD
•1 x USB cable
Page 5

3
Installation
Installing the Card and Drivers
1. With your computer turned on, insert the adapter into your computer’s USB port.
You can also use the USB cable to adjust the location of the adapter. Make sure that
the adapter is firmly seated.
2. Windows will automatically detect the new device. Insert your driver/utility disk
into the disk drive and direct the system to the appropriate location in the “Driver”
folder on the disk. For example, Windows 2000 users should select the
“Driver\Win2000” folder. The system will now install the necessary drivers.
Installing the Utility
1. Insert your driver/utility disk into the disk drive. From the disk, open the
“Utility” folder and run setup.exe.
2. Click Next.
3. Choose the location where you want the application installed and click Next.
Windows will complete the rest of the installation automatically.
Note: If Windows XP/2000 gives you a “Digital Signature Not Found” message, you can
safely choose “Yes.”
4. To launch the program, click on Start and select “ZyDAS Wireless LAN - USB.”
Removing the Windows XP Wireless Utility
Windows XP has contains a default built-in wireless network utility. It is recommended
that you use the utility provided with the USB511WB. To remove this default utility,
perform the following steps:
1. Click on Start, Control Panel, and select Network Connections.
2. Right click Wireless Network Connection, and click Properties.
3. Click the Wireless Networks tab.
4. Clear the “Use Windows to configure my wireless network settings” checkbox and
click OK.
Page 6
4
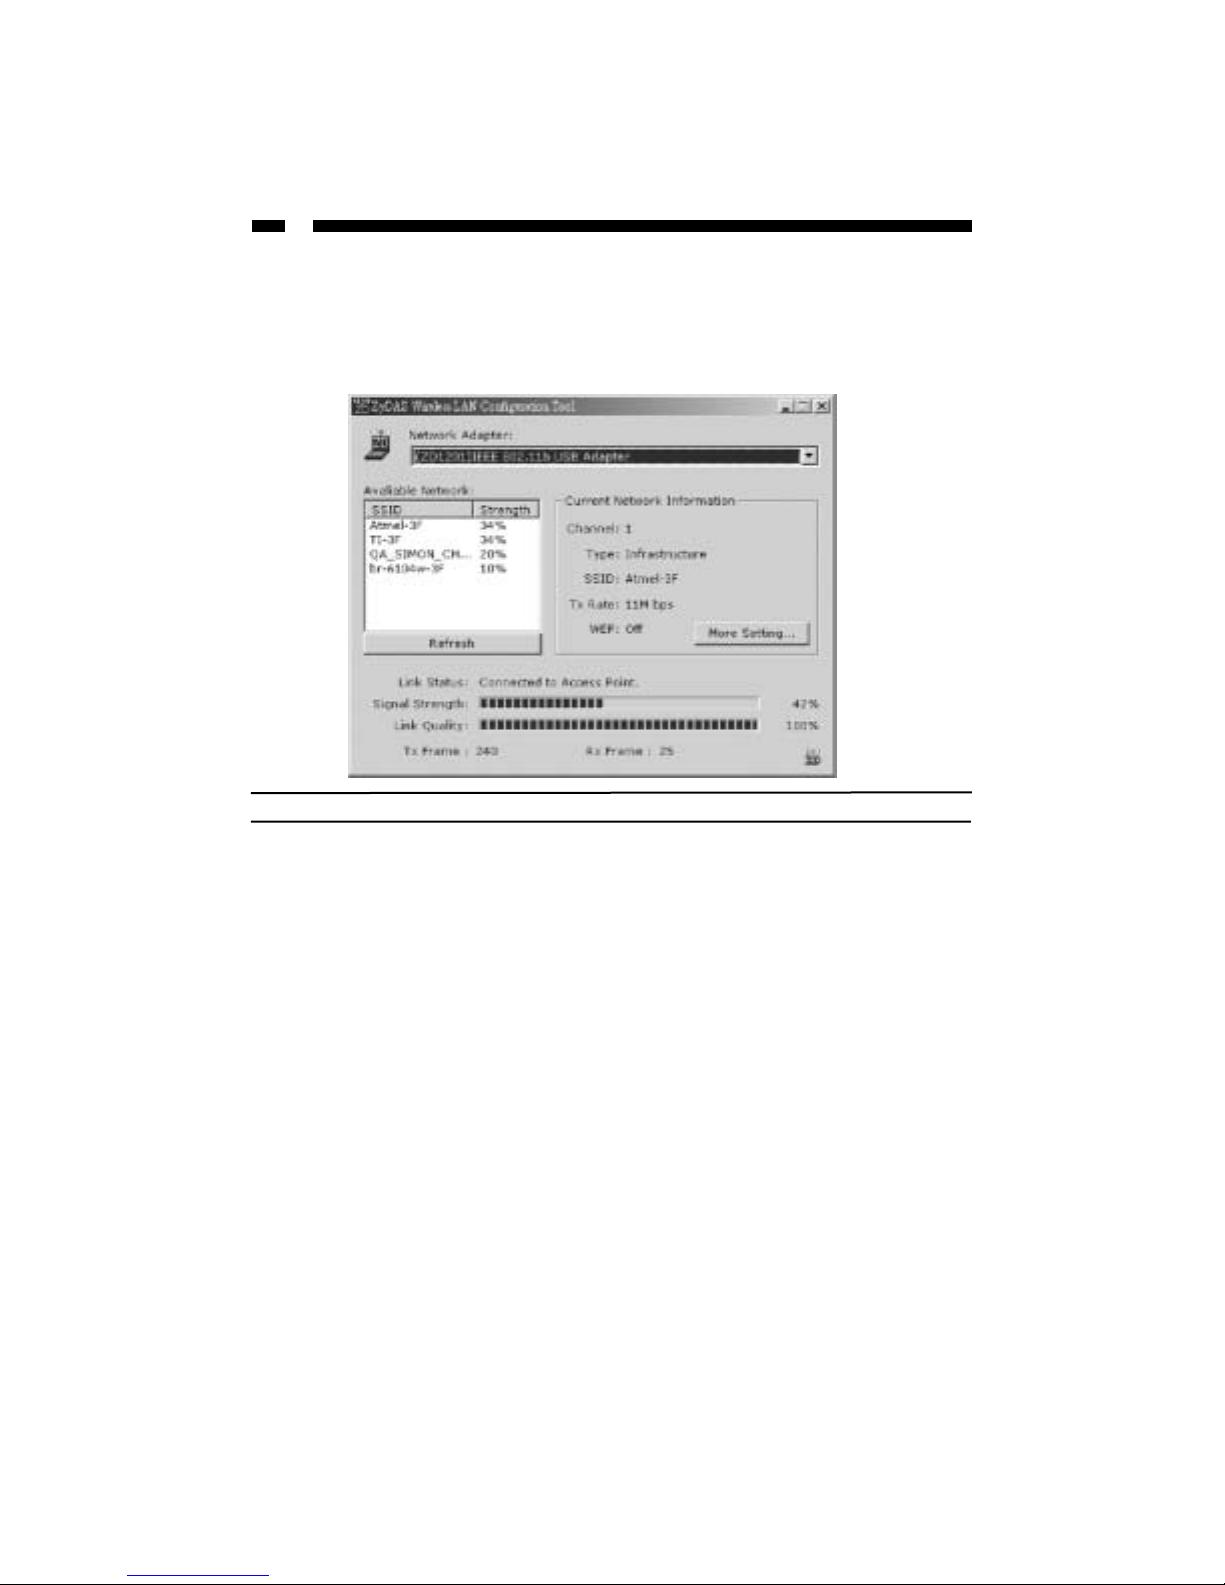
Using the Configuration Utility
The Configuration Utility helps you configure your USB wireless mini adapter and
monitor the communication statistics for the device. You can dynamically configure your
card while the card is operating. From the main screen, you can view information about
your connection and nearby devices.
Parameter Description
Network Adapter Displays the product information about the adapter.
Available Network Displays the SSID and Signal Strength of nearby
wireless devices. Use the Refresh button to re-survey
the area. To make a connection to one of the devices on
the list, double-click on the name of the device, or click
on the name of the device and press the “Connect to this
site” button.
Current Network Displays information about the wireless network the
card is connecting to. You can edit these (and more)
network settings by clicking on the More Settings
button. See “More Settings” on page 5 for more
information.
Link Status Displays the status of the wireless connection.
Signal Strength Displays the signal strength level. The higher the
percentage shown in the bar, the stronger the signal. You
can use this indicator to find the proper position of the
wireless device.
Link Quality Displays the quality of the link. The higher the
percentage shown in the bar, the higher the link quality.
TX/RX Frame Displays the number of data frames successfully
sent/received by the device.
Page 7

5
More Settings
On the More Settings screen, you can configure many aspects of your device, including
the channel, network type, SSID, WEP encryption settings, and profile settings.
Parameter Description
Channel Select the radio channel to use for networking. The channel
should be the same as the other wireless stations you want to
connect to.
Tx Rate Select the transmit rate to be use: 11, 5.5, 2, or 1 Mbits/sec. If
you select Auto, the adapter will automatically adjust to the
highest possible rate available.
SSID Enter an SSID for the device. The SSID can be up to 32
printable ASCII characters. If you specify an SSID for the
device, it must be the same as the other wireless stations you
want to connect to.
Any If you check the Any box, the adapter will survey and connect
to an available wireless station without checking the
consistency of channel and SSID with the wireless station.
Network Type Infrastructure: This mode requires the presence of a wireless
access point or wireless router to create a wireless network.
All communication is processed through the wireless access
point or wireless router.
Ad Hoc: This mode enables wireless network adapters to
connect to each other without a wireless access point or
wireless router.
Change/Apply Before you can change any of these settings, first press the
Change button. When you have made your changes, click
Apply.
Page 8

6
(More Settings, continued)
Parameter Description
Enable WEP Check the Enable WEP box and click WEP More... to set
up your encryption settings. See “WEP Key Settings” on
page 7 for more details.
Profile Name Enter a profile name to save your settings, or enter the
profile name whose settings you want to load.
Load Profile Settings Loads the profile whose name you entered in the Profile
Name box. (For example, to open the settings file named
“Test”, type Test in the Profile name field and click Load
Profile Settings.) The new settings will be active
immediately.
Write Current Settings to Writes the current setting values to a file with the name
Profile you entered in the profile box. (For example, to save
your current settings as “Test”, enter Test in the Profile
Name field and click Write Current Settings to Profile.)
Make sure you record the name of the profile.
Load Factory Default Restores the settings to the factory defaults. The default
values are:
Channel: 6
Tx Rate: Auto
SSID: Any
Network Type: Infrastructure
Advanced Setting Allows you to configure the adapter’s advanced
settings, including power save mode and RTS/CTS
threshold. See “Advanced Settings” on page 8 for more
details.
Information Displays the driver version, firmware version, and MAC
address of the adapter.
Page 9

7
WEP Key Settings
The WEP Key Setting screen lets you configure your WEP encryption settings. WEP
protects authorized LAN users against eavesdroppers. With WEP enabled, your data will
be transmitted over your network more securely.
Parameter Description
Authentication Mode The setting must be consistent with the other wireless stations
you want to connect to.
Open System: No authentication is needed.
Shared Key: Only wireless stations using a shared key (WEP
key identified) are allowed to connect with each other. Set up
the same key with each wireless adapter you want to connect
to.
Auto: Auto switch the authentication algorithm depending on
the wireless stations that the adapter is connecting to.
Key Length Select either 64-bit or 128-bits. The larger key length will
provide more security, but will lower throughput.
Default Key ID Select one of the keys (1~4) as the encryption key.
Key 1 ~ Key 4 For each key, fill in the text box using the rules below:
64-bit: Input a 10-digit hexadecimal value (0~9, a~f). For
example: 01234abcde
128-bit: Input a 26-digit hexadecimal value (0~9, a~f). For
example: 0123456789abcdef0123456789
Page 10

8
Advanced Settings
On the Advanced Settings screen, you can configure your power savings settings, set the
fragmentation threshold, and RTS/CTS threshold of the adapter.
Parameter Description
Power Saving Mode Check the Power Saving Mode box and adjust the power
save level between 0 and 4. The higher the power save
level, the lower the power used. Using lower power may
slow down the adapter ’s transmission rate.
Fragmentation Threshold Defines the maximum size of a packet. Any packet larger
than this value will be fragmented. If you have decreased
this value and are experiencing high packet error rates,
you can increase the rate again, but it will likely decrease
network performance. Minor changes are recommended.
RTS/CTS Threshold Defines the minimum packet size for a Request to
Send/Clear to Send (RTS/CTS). For packets smaller
than this threshold, an RTS/CTS is not sent and the
packet is transmitted directly to the LAN. Minor changes
are recommended when adjusting this value.
Page 11

9
Troubleshooting
If you are experiencing trouble with your USB511WB, first make sure that the adapter is
firmly seated, then try the following:
• Make sure that the IP address, subnet mask, gateway, and DNS settings are correctly
entered for the network. Check with your operating system vendor if you are having
difficulty with these network settings. Remember that each computer must be
configured for networking and file sharing before the wireless network is in place.
• Make sure that you have selected the proper network connection mode. Use Ad Hoc
mode if you are connecting two wireless devices without a wireless access point. Use
Infrastructure mode when you are using a wireless access point.
• If you are in Infrastructure mode, make sure that the same SSID is specified for each
wireless client and access point. In Ad-Hoc mode, make sure both wireless clients
have the same SSID.
• If you have enabled encryption options, make sure that the correct encryption key has
been entered on each device. Make sure that the key selected on your USB511WB is
the same key entered on the other wireless device you want to connect to.
• If your wireless adapter appears as an “Unknown device” in the Device Manager,
remove the device from Device Manager and repeat the installation procedure.
• Make sure that there are no resource conflicts that may exist. Check your Device
Manager to make sure that devices have been installed properly.
• If you are experiencing intermittent network connections, try re-orienting the adapter.
See Appendix A: Installation Considerations on page 10 for more details.
Page 12

10
Appendix A: Installation Considerations
The USB511WB lets you use your desktop or laptop to access your WLAN from virtually
anywhere, but there are some things to keep in mind when attempting to set up a
wireless connection. The wireless signal range can be limited by the number, location,
thickness, and material of ceilings, walls or similar that the signal must pass through. To
maximize your wireless range, keep the following considerations in mind:
•Try to minimize the number of walls, ceilings, and similar between your wireless
devices. Each wall or ceiling the signal must cross can reduce the signal range by
up to 90 feet (30m). Position your receiving devices so that the path between them is
as unobstructed as possible.
• The type of material the wireless signal must cross through also affects its range. A
solid metal door or concrete wall can decrease the signal’s range. Whenever possible,
position the adapters so that the signal can pass through drywall or open doors.
• Make sure that you are aware of the line the signal must take to travel between
devices. The angle that the signal is on as it travels through a door, wall, or ceiling
affects how thick the obstruction is. For example, if a wall is 1.5 feet thick and the
signal passes through it at a 45-degree angle, the signal must pass through 3 feet (1m)
of wall. At a 2-degree angle, the wall appears to be 42 feet (14m) thick. Always try to
position your devices so that the signal can travel at 90-degree angles.
• Electrical devices or appliances that generate RF noise (such as microwaves, electric
motors or computer monitors) can interfere with the wireless signal. Try to keep your
adapter at least 3-6 feet (1-2 m) away from these types of devices.
Page 13

11
Appendix B: Setting Up A Wireless Ad Hoc Network
To install an Ad Hoc network, you need two computers and two wireless adapters.
Follow the instructions below to set up an Ad Hoc network between your two adapters,
using the product Quick Install Guide or Instruction Guide for details when necessary.
1. Install your USB511WB network adapter, drivers, and utility program to your
computer using the instructions provided in the Quick Install Guide.
2. Install your second 802.11b wireless adapter, drivers, and utility program to your
other computer using the instructions provided in the Quick Install Guide.
3. Using your configuration utility, set each adapter to Ad Hoc mode and make sure
that both adapters are on the same Channel and have the same SSID (see
Configuration on page 5 and 6 for details).
4. From your operating system software, make sure that the IP addresses assigned to
each computer are in the same range as (but not identical to) each other and
that the computers use the same subnet mask. Check with your operating system
vendor for information on setting up networking and file sharing.
For example, if your first computer has an IP address of 192.168.0.2 and a subnet
mask of 255.255.255.0, your second computer could be assigned an IP address of
192.168.0.3 with a subnet mask of 255.255.255.0.
5. When you have installed all the proper components, use the instructions on your
Quick Install Guide or Instruction Guide to connect your two devices.
Page 14

12
Appendix C: Setting Up an Infrastructure Network
An Infrastructure network consists of both wired and wireless elements joined by a
wireless access point (WAP). Follow the instructions below to set up an Infrastructure
network between your two adapters, using the product Quick Install Guide or
Instruction Guide for details when necessary.
The example above assumes a previously established wired network with Internet
sharing supplied via a router.
1. Connect your wireless access point to one of your router’s LAN ports using an
Ethernet cable. Use the access point’s instruction guide for installation details.
2. Install your wireless adapters, including their drivers and utility programs using
the instructions provided by the vendor.
3. From your configuration utility, make sure that your Network Type, SSID, Channel,
and Security Settings are all set to the same values for each device on your wireless
network. Also make sure that the IP addresses for each device are in the same range
as (but not identical to) each other and that the computers use the same subnet mask.
Note: You may be able to use your wireless access point to configure these settings
on your wireless adapters. Check with your WAP’s documentation for details.
Page 15

13
Glossary
802.11b: Afamily of IEEE-defined specifications for wireless networks. The 802.11b
standard supports data transfer rates up to 11 Mbits/sec in the 2.4 GHz band using DSSS
technology. Also known as WiFi.
Access Point: See wireless access point.
Ad Hoc: A wireless computer-to-computer LAN. An Ad Hoc network can consist of two
devices with wireless adapters, and does not require a WAP, wireless router, or wireless
gateway. Also known as peer-to-peer mode.
BSS (Basic Service Set): In Infrastructure mode, a BSS consists of a Wireless Access Point
and the adapters associated with it.
DSSS (Direct Sequence Spread Spectrum): A transmission technology used as the basis
for 802.11b wireless transmissions. DSSS helps increase a signal’s resistance to
interference and allows for some data bit recovery.
Encryption: The transformation of data into encoded ciphertext to ensure data
transmission can not be accessed by users outside the network. Encryption uses an
encryption algorithm and encryption keys to encode and decode the information. See
also WEP.
Encryption Algorithm: A formula used to convert data from understandable “plaintext”
into encoded “ciphertext.” Each algorithm uses a key (a string of bits) to perform the
calculations. The larger the key (most are 64 or 128-bits in length), the more difficult to
break the code.
ESS (Extended Service Set): In Infrastructure mode, the ESS consists of two or more
BSSes in the same subnet.
IBSS (Independent Basic Service Set): In Ad Hoc mode, an IBSS consists of two or more
wireless devices that communicate directly and do not use a wireless access point.
Infrastructure: A network configuration that typically combines both wired and wireless
elements. Wireless devices communicate with a WAP in order to communicate with each
other and with the wired elements of the network.
IP Address (Internet Protocol Address): An assigned number used to identify a computer
on a network. An IP address consists of four numbers less than 255 separated by periods
(for example, 192.168.2.1).
LAN (Local Area Network): A group of computers and devices connected together in a
relatively small area (such as a house or an office).
MAC Address (Media Access Control Address): Aunique serial number that identifies a
piece of hardware connected to a network.
Plug and Play: A set of specifications that allows a computer to automatically detect and
configure hardware devices. With Plug and Play computers, any new hardware device
that is connected to a computer will automatically be recognized without the user having
to tell the computer the device has been added.
Page 16

14
SSID (Service Set Identifier): A name that uniquely identifies a WLAN. In order for
wireless devices to communicate with each other, they must have the same SSID.
Subnet: An identifiably separate part of a network that is interconnected with, but still
independent from, the rest of the network. Subnets can help improve network security
and performance and typically use a router.
Subnet Mask: Atechnique used by the IP protocol to filter messages into a particular
network segment or subnet. Subnet masks are expressed as four decimal numbers
between 0 and 255 separated by periods. (Example: 255.255.255.1) It is used to create
private IP addresses for use within a particular network. Also known as a network mask.
WAN (Wide Area Network): A network that connects computers in geographically
separated areas. The Internet is an example of a WAN.
WAP (Wireless Access Point): A networking device that seamlessly connects wired and
wireless networks. Used in Infrastructure networks, a wireless access point is capable of
connecting to an Ethernet network as well as an 802.11 network.
WEP (Wired Equivalent Protocol): Asecurity protocol designed to provide a wireless
network with the same level of security as a wired LAN. WEP offers protection primarily
by encrypting the information that flows between adapters.
Wi-Fi: See 802.11b.
WLAN (Wireless Local Area Network): A local area network that transmits wirelessly
through the air, typically in an unlicensed frequency such as the 2.4GHz band.
Page 17

15
Technical Specifications
Standard IEEE 802.11b, USB v1.1
Bus Type USB Type A
Frequency Band 2.400 ~ 2.4835 GHz (Industrial Scientific Medical Band)
Modulation CCK@11/5.5 Mbits/sec, DQPSK@2Mbits/sec,
DBPSK@1 Mbit/sec
Radio Technology Direct Sequence Spread Spectrum (DSSS)
Media Access Control CSMA/CA
Security 64/128-bit WEP Encryption
Supported OS Windows 98SE, Me, 2000, XP
LED Indicators Link, Activity
Antenna Internal
Supported bit rates 11, 5.5, 2, 1 Mbits/sec
Channels 1-11: North America
Operating Temperature 32~131ºF (0~55ºC)
Storage Temperature -13~149ºF (-25~65ºC)
Certification FCC Class B, CE
Page 18

16
Technical Support
The following technical resources are available for this StarTech.com product:
On-line help:
We are constantly adding new information to the Tech Support section of our web site. To
access this page, click the Tech Support link on our homepage, www.startech.com. In the
tech support section there are a number of options that can provide assistance with this
card.
Knowledge Base - This tool allows you to search for answers to common issues using
key words that describe the product and your issue.
FAQ - This tool provides quick answers to the top questions asked by our customers.
Downloads - This selection takes you to our driver download page where you can
find the latest drivers for this product.
Call StarTech.com tech support for help: 1-519-455-4931
Support hours: Monday to Friday 9:00AM to 5:00PM EST (except holidays)
Warranty Information
This product is backed by a lifetime warranty. In addition, StarTech.com warrants its
products against defects in materials and workmanship for the periods noted below,
following the initial date of purchase. During this period, the products may be
returned for repair, or replacement with equivalent products at our discretion. The
warranty covers parts and labor costs only. StarTech.com does not warrant its products
from defects or damages arising from misuse, abuse, alteration, or normal wear and
tear.
Limitation of Liability
In no event shall the liability to StarTech.com Ltd. (or its officers, directors, employees or
agents) for any damages (whether direct or indirect, special, punitive incidental,
consequential, or otherwise), loss of profits, loss of business, or any pecuniary loss,
arising out of related to the use of the product exceed the actual price paid for
the product.
Some states do not allow the exclusion or limitation of incidental or consequential
damages. If such laws apply, the limitations or exclusions contained in this statement
may not apply to you.
Page 19

Revised: May 28, 2004
 Loading...