

Page 1

USB TV Tuner
USB2TVTUNER
Instruction Manual
Actual product may vary from photo
External USB 2.0 TV Tuner with Remote Control
Page 2

FFCCCC CCoommpplliiaannccee SSttaatteemmeenntt
This equipment has been tested and found to comply with the limits for a Class B digital device,
pursuant to part 15 of the FCC Rules. These limits are designed to provide reasonable protection
against harmful interference in a residential installation. This equipment generates, uses and can
radiate radio frequency energy and, if not installed and used in accordance with the instructions,
may cause harmful interference to radio communications. However, there is no guarantee that
interference will not occur in a particular installation. If this equipment does cause harmful
interference to radio or television reception, which can be determined by turning the equipment off
and on, the user is encouraged to try to correct the interference by one or more of the following
measures:
• Reorient or relocate the receiving antenna.
• Increase the separation between the equipment and receiver.
• Connect the equipment into an outlet on a circuit different from that to which the receiver is
connected.
• Consult the dealer or an experienced radio/TV technician for help.
UUssee ooff TTrraaddeemmaarrkkss,, RReeggiisstteerreedd TTrraaddeemmaarrkkss,, aanndd ootthheerr PPrrootteecctteedd NNaammeess aanndd SSyymmbboollss
This manual may make reference to trademarks, registered trademarks, and other protected names
and/or symbols of third-party companies not related in any way to StarTech.com. Where they occur
these references are for illustrative purposes only and do not represent an endorsement of a
product or service by StarTech.com, or an endorsement of the product(s) to which this manual
applies by the third-party company in question. Regardless of any direct acknowledgement
elsewhere in the body of this document, StarTech.com hereby acknowledges that all trademarks,
registered trademarks, service marks, and other protected names and/or symbols contained in this
manual and related documents are the property of their respective holders.
Page 3

TTaabbllee ooff CCoonntteennttss
Introduction . . . . . . . . . . . . . . . . . . . . . . . . . . . . . . . . . . . . . . . . . . . . . . . . . . . . . .1
Before You Begin . . . . . . . . . . . . . . . . . . . . . . . . . . . . . . . . . . . . . . . . . . . . . . . . . . .1
System Requirements . . . . . . . . . . . . . . . . . . . . . . . . . . . . . . . . . . . . . . . . . . . . . . . . . . .1
Package Contents . . . . . . . . . . . . . . . . . . . . . . . . . . . . . . . . . . . . . . . . . . . . . . . . . . . . . .1
Installation . . . . . . . . . . . . . . . . . . . . . . . . . . . . . . . . . . . . . . . . . . . . . . . . . . . . . . .2
Windows 2000/XP users . . . . . . . . . . . . . . . . . . . . . . . . . . . . . . . . . . . . . . . . . . . . . . . . .2
Application Software Installation . . . . . . . . . . . . . . . . . . . . . . . . . . . .2
Driver Installation . . . . . . . . . . . . . . . . . . . . . . . . . . . . . . . . . . . . . . .6
Windows Vista users . . . . . . . . . . . . . . . . . . . . . . . . . . . . . . . . . . . . . . . . . . . . . . . . . . .7
Application Software Installation . . . . . . . . . . . . . . . . . . . . . . . . . . . .7
Driver Installation . . . . . . . . . . . . . . . . . . . . . . . . . . . . . . . . . . . . . . .8
Connecting the TV Tuner to Your Computer . . . . . . . . . . . . . . . . . . . . . . . . . . . . . . . . .10
Using the TV Tuner Software . . . . . . . . . . . . . . . . . . . . . . . . . . . . . . . . . . . . . . . . .11
General Settings . . . . . . . . . . . . . . . . . . . . . . . . . . . . . . . . . . . . . . . . . . . . . . . . . . . . . .12
Encoder Properties . . . . . . . . . . . . . . . . . . . . . . . . . . . . . . . . . . . . . . . . . . . . . . . . . . . .12
Color . . . . . . . . . . . . . . . . . . . . . . . . . . . . . . . . . . . . . . . . . . . . . . . . . . . . . . . . . . . . . . .12
TV Tuner . . . . . . . . . . . . . . . . . . . . . . . . . . . . . . . . . . . . . . . . . . . . . . . . . . . . . . . . . . . .13
Using the Infrared Remote Control . . . . . . . . . . . . . . . . . . . . . . . . . . . . . . . . . . . .14
Troubleshooting Guide . . . . . . . . . . . . . . . . . . . . . . . . . . . . . . . . . . . . . . . . . . . . .15
Accessory Products from StarTech.com . . . . . . . . . . . . . . . . . . . . . . . . . . . . . . . . .16
Technical Support . . . . . . . . . . . . . . . . . . . . . . . . . . . . . . . . . . . . . . . . . . . . . . . . .17
Warranty Information . . . . . . . . . . . . . . . . . . . . . . . . . . . . . . . . . . . . . . . . . . . . . .17
Instruction Manual
i
Page 4

IInnttrroodduuccttiioonn
Thank you for purchasing a StarTech.com External USB 2.0 TV Tuner. This product allows you to
watch a satellite or cable TV signal on your computer monitor, and offers timeshifting and video
capture/recording capabilities, as well as a host of other features that can help you turn your PC into
the ultimate multimedia environment. Plus, USB2TVTUNER includes an infrared remote control and
an innovative on-screen remote, providing complete, convenient control of options and features that
will change the way you watch TV.
Features
• Includes an external infrared remote control for easy channel switching
• Intuitive, on-screen menu system for previewing and programming channels, screen captures,
parental channel lockout, and more
• Supports inputs from auxiliary A/V devices such as DVD players, VCRs, and game consoles
• Supports multiple video file output formats and resolutions, and includes VideoWorks video
authoring software
BBeeffoorree YYoouu BBeeggiinn
System Requirements
• A PC with an available USB 2.0 port
• OS Requirements: Microsoft Windows 2000, XP (32-bit and 64-bit editions), XP Media
Center Edition, Vista (32-bit and 64-bit editions)
• Windows 2000 computers must have a sound card with a “line in” connector
• Optional: CD/DVD-ROM, or other compatible optical drive (for software installation) or
an active Internet connection (software download)
Package Contents
• 1 x USB 2.0 TV Tuner
• 1 x USB (A-B Male) Cable
• 1 x 3.5 mm male-to-male headphone audio cable
• 2 x Installation CDs (TV Tuner and VideoWorks)
• 1 x Instruction Manual
Instruction Manual
1
Page 5

IInnssttaallllaattiioonn
Instruction Manual
2
Warning! Do not connect the USB 2.0 TV Tuner to the computer, prior to installing the
accompanying software package. Please note that the software must be present, in
order for the operating system to properly detect and make use of the USB2TVTUNER.
Application Software Installation
1. With the host computer in a powered state, ensure that the Multimedia Installation Kit CD
(included with USB2TVTUNER) is in your CD/DVD-ROM drive.
2. a) Double-click on My Computer
b) Open the contents of the CD by double-clicking on the icon that represents your CD/DVD-
ROM drive.
c) Open the NetXTV20 folder.
d) Open the AP Software folder.
e) Open the XTV20 folder.
f) Double-click on the Setup.exe file, to launch the installation program.
3. When you are prompted, please choose the appropriate language for installation, and click Next.
4. You will then be notified that XTV2.0 is preparing
to install the necessary software:
Windows 2000/XP users
Please note: Installation of the USB2TVTUNER External USB 2.0 TV Tuner requires that
two separate components be installed - the XTV2.0 Multimedia Application software and
the device driver files. To ensure successful installation and operation, please follow the
necessary steps in sequence, as indicated below.
Page 6

5. On the screen that follows, you will be asked to
Select the setup type that best suits your needs.
Please select the appropriate location from the list
provided, and click on the Set button.
6. To install the application in the default folder, click on
Next to continue. (
Optional:If you wish to install the
application in a location other than that specified by
default, click on the Browse button, select the
desired location for the files to be copied, then click
on the Next button
.)
7. Windows Media Format 9 Series Runtime
Setup will begin. Click on Yes to continue.
8. The Windows Media Format 9 Series Runtime Setup End User License Agreement will
appear. If you agree to the terms of the agreement, click on Yes to continue.
9. You will be notified that Windows Media Format 9 Series Runtime Setup has completed.
Click on OK to continue.
Instruction Manual
3
Page 7
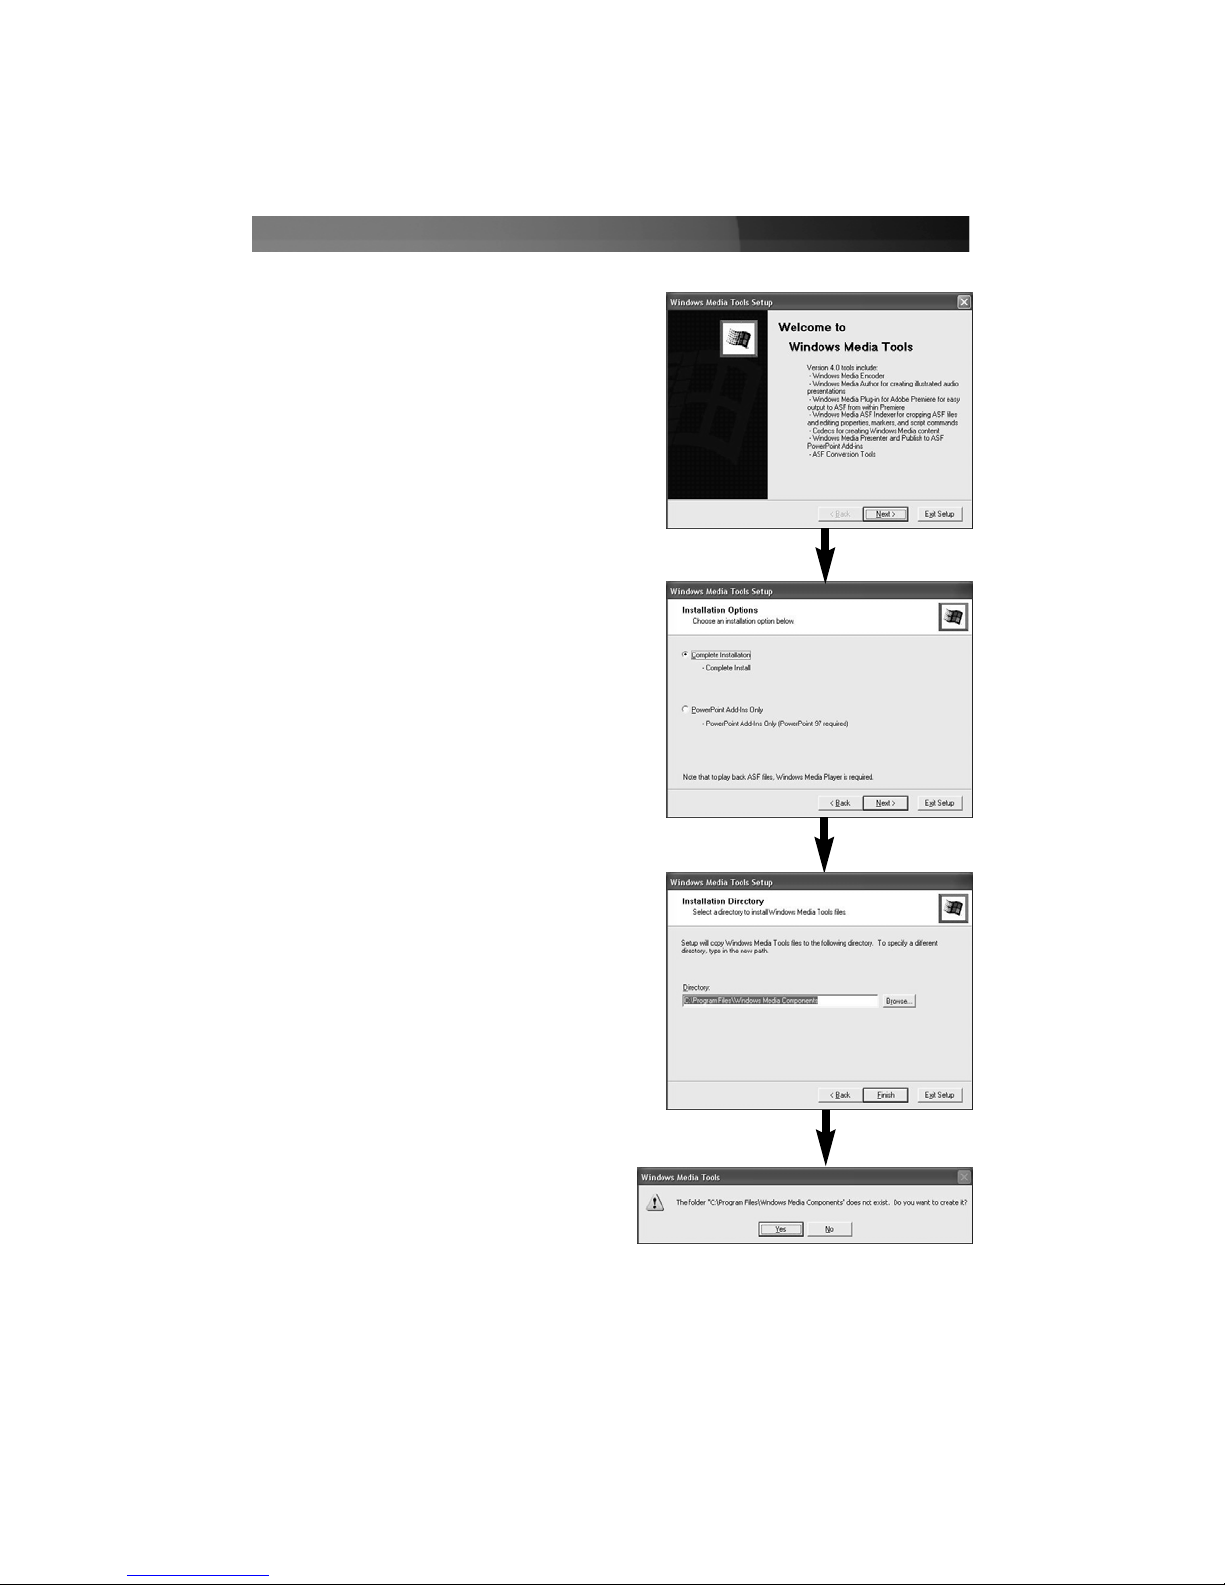
10. When the Windows Media Tools Setup window appears, click on Yes to continue, if you agree
to the terms of the license agreement.
11. The Windows Media Tools welcome page will
appear. Click Next to continue.
12. At the Installation Options window, select Complete
Installation and click on Next to continue.
13. To install the application in the default folder, click on
Finish.(
Optional:If you wish to install the
application in a location other than that specified by
default, click on the Browse button, select the
desired location for the files to be copied, then click
on the Finish button
.)
14. You may be asked if you wish to create a folder
for Windows Media Components. Please
select Yes.
Instruction Manual
4
Page 8

15. Please wait while Windows Media Tools Setup copies
the necessary files...
16. Once Windows Media Tools Setup has completed,
click on OK to continue.
17. The InstallShield Wizard is now finished installing
the XTV2.0 application on your computer. Please
click on Finish.
18. You will be prompted to restart the computer, for the changes to
take effect. Please select Yes, I want to restart my computer
now and click OK.
Once the computer has rebooted, you can proceed to install
the necessary drivers as detailed in the following section.
Instruction Manual
5
Page 9

Instruction Manual
6
Driver Installation
1. Ensure the Multimedia Installation Kit CD is present in your CD/DVD-ROM drive.
2. a) Double-click on My Computer
b) Open the contents of the CD by double-clicking on the icon that represents your CD/DVD-
ROM drive.
c) Open the NetXTV20 folder.
d) Open the Driver folder.
e) Double-click on the Setup.exe file, to launch the
installation program. When the Welcome
screen appears, click on Next to continue.
3. Allow the installation program to complete.
Once the InstallShield Wizard is complete,
please click on Finish.
Following this, you will be asked if you wish to
restart your computer. Please select Yes, I
want to restart my computer now, and click
on OK. Once the computer has fully rebooted,
please advance to the steps outlined in the
section entitled Connecting the TV Tuner to
Your Computer.
Page 10

Instruction Manual
7
Application Software Installation
1. With the host computer in a powered state, ensure that the Multimedia Installation Kit CD
(included with USB2TVTUNER) is in your CD/DVD-ROM drive.
2. a) Double-click on Computer (on the desktop)
b) Open the contents of the CD by double-clicking on the icon that represents your CD/DVD-
ROM drive.
c) Open the NetXTV20 folder.
d) Open the AP Software folder.
e) Open the XTV20 folder.
f) Double-click on the Setup.exe file, to launch the installation program.
3. You will be asked to select the language under which the software will operate. Please make the
appropriate selection, and click OK.
Windows Vista users
4. Windows Vista will then prepare to install
the necessary software, following which you
will be able to select your geographic location.
Please make the appropriate selection, and click
on Next.
5. You will then be given the option to specify the
location into which the software will be installed.
To install in the default location, please click on
Next.
Optional
: If you wish to install the software in an
alternate location, please click on Browse and specify
the location of your choice, and click Next to continue.
Page 11

Instruction Manual
8
6. The installation program will then perform a final
configuration of the software. Once this has
completed, please click on Finish.
7. You will then be asked to restart the computer.
Please select Yes, I want to restart my computer
now, and click on OK. Once the computer has
restarted, please proceed to Driver Installation.
Driver Installation
1. Ensure the Multimedia Installation Kit CD is present in your CD/DVD-ROM drive.
2. a) Double-click on Computer
b) Open the contents of the CD by double-clicking on the icon that represents your CD/DVD-
ROM drive.
c) Open the NetXTV20 folder.
d) Open the Driver folder.
e) Double-click on the Setup.exe file, to launch the installation program.
3. The InstallShield Wizard will then welcome you.
Click Next to continue.
Page 12

Instruction Manual
9
4. Once the InstallShield Wizard is complete, please
click on Finish.
5. When you are prompted to restart the computer,
please select Yes, I want to restart my computer
now, and click on OK. Once the computer has fully
rebooted,please advance to the steps outlined in the
section entitled Connecting the TV Tuner to Your
Computer.
Page 13

Connecting the TV Tuner to Your Computer
NOTE: If at any time Windows prompts you to restart the computer when detecting the TV tuner and
configuring the drivers, do not
restart. Allow Windows to find all drivers, and then restart the
computer manually.
1. Using a length of television coaxial cable (not provided), connect the port marked TV on the TV
tuner to the connector on your wall jack or antenna.
2. (Optional) You can also connect a DVD player, VCR, or game console to the TV tuner using the
S-Video and RCA audio/video connectors. If you would like to take advantage of this feature,
connect the device using the existing cables to the Sin (or Vin, if using composite RCA video)
and the Ain RCA audio connectors.
3. For Windows 2000 users: Since Windows 2000 does not support USB audio for this product,
connect the 3.5mm male-to-male headphone audio cable (provided) to the Aout connector on
the TV tuner. Connect the opposite end to the computer’s sound card using the connector
marked Line In (or similar). Consult your computer’s documentation for assistance, if necessary.
Windows XP users do not need to complete this step.
4. Connect the “D” shaped end of the USB 2.0 cable (provided) into the port marked USB on the
TV tuner. Connect the opposite end to an available USB 2.0 port on the computer. (USB 1.1
ports will not work with the TV tuner.) You may also connect the tuner to a USB 2.0 hub if it has
a power adapter. Once you connect the USB cable to the computer, Windows will detect and
configure the TV tuner. When that process is complete, you can use the product. The green
light on the TV tuner will be lit when it is powered and configured, and the TV tuner software is
loaded.
Instruction Manual
10
Cable/Antenna
USB to Computer
S-Video
Composite
Video
RCA Audio
Audio Out*
* Required for Windows 2000 installations only
Note on usage: If you are connecting the TV tuner to a digital satellite receiver or digital
cable set-top box, the TV tuner will only “see” the channel that the receiver/decoder is
configured to use, normally channel 3 or 4. (This is because these products provide their
own tuning function.) Like viewing channels on a regular TV with these types of product,
you must change channels on the receiver/decoder and leave the TV tuner set to the
appropriate channel. Therefore, any saved recording events in the TV tuner software will
be on the same channel, and you must ensure the receiver/decoder is set to the correct
channel when the recording session is scheduled to begin.
Page 14

UUssiinngg tthhee TTVV TTuunneerr SSooffttwwaarree
1. Double-click on the XTV2.0 icon, located on the desktop. This will prompt the following to be
displayed:
2. To customize the Video Window, move the mouse pointer over the video window and right-click
to get the following setup options: 320x240, 640x480, 720x480, 720x576, full screen and
Always On Top. Select the desired resolution, as well as whether or not you want the Video
Window to remain on top of all other applications.
You can also switch to full screen operation by double-clicking the Video Window. Double-click
on the display area again to return to the initial view.
3. Channel Input : After you select the channel number, click Enter to confirm the Channel input
4. Auto Scan : Scan all TV Channels
5. Time Shifting : Clicking on Time Shifting will pause the display, but will keep recording. When
you click the Continue Playback button, it will playback from the pause time point. To stop video
playback, click the Stop button.
6. Snapshot : When selected, the Snapshot function will capture the image that is displayed within
the Video Window.
7. Video Source Select : TV Tuner/Composite video/S-Video selection
8. Sc
hedule Capture : You can choose One Time, Several Days or Every Week scheduled
recording. After you edit the schedule, please click Add to put the selection into your list,
followed by Save, before you quit.
9. Channel Preview : Allows you to preview the available channels. This function is active in TV
mode only.
Instruction Manual
11
Channel
Up/Down
Air/ Cable
Selection
+/- Favorite
Channels
Favorite
Channel
Switch
Backward
Pause
Playback
Forward
Record
Volume Up
Mute on/off
Volume
adjustment
Volume
Down
Continue
Playback
Stop
Playback
Options
Channel
Preview
Schedule
Recording
Video
Source
Select
Channel
Input
Last
Channel
Snapshot
Time
Shifting
Auto
Scan
Channel
Confirm
Page 15

10. Options :
General Settings:
(1)Channel Preview Windows - Choose from 9, 16 or 25
preview windows
(2)Channel Preview Time - Determine the length of time each
channel is displayed
(3)TimeShift Setting - Select whether or not the temp file is
saved
(4)Work Directory - Directory for Recording files
(5)Schedule Capture - Setup the recording time length
Encoder Property:
(1)Video Setting - Recording format selection. Choose from: MPEG1, MPEG2, VCD-NTSC, SVCD-
NTSC, DVD-NTSC, WMV, VCD-PAL, SVCD-PAL, DVD-PAL.
(2)Profile - (a) Video size selection: 320x240, 640x480, 720x480
(b) Video quality selection: Select the best mix
of video speed and quality
(c) Frame Rate: Select the desired frame rate
Color:
Instruction Manual
12
Brightness / Contrast / Hue / Saturation / Sharpness setup.
To return settings to the factory preset, please click on the
Default button.
Page 16

TV Tuner:
TV System - TV system setup based on geographic location
Video System - S-video & Composite video system setup
TV Type - Cable & Antenna selection
Fine Tune : Fine tune for unclear TV Channel signal
11. +/- Favorite Channel : Add/Remove current channel in favorite list
12. F
av
orite Channel Switch
: Switch favorite channels
13. Record/Stop : (a) During recording, you can click “Stop” to stop recording
(b) File name “mddhhmmss” was saved automatically. m : Month (Jan->1,
Feb->2…..Oct->O, Nov->N, Dec->D); dd : Date ; hh : Hour; mm: Minute;
ss : Second
14. Pause Playback : Pause the video during playback
15. Continue Playback : After “Pause Playback”, click this button to playback continue. After Time
Shifting, click this button to playback continue.
16. Forward : Fast forward video playback
17. Backward : Fast backward video playback
Instruction Manual
13
Page 17

Instruction Manual
14
UUssiinngg tthhee IInnffrraarreedd RReemmoottee
USB2TVTUNER comes with an external infrared remote that mirrors much of the functionality of the
on-screen remote in the TV Tuner software.
Program ON/OFF
Channel Number
Last Channel Return
Snapshot
Playback / Continue Playback
Fast Forward
Channel Preview
Stop
Channel
UP / DOWN
Please note:
The fast forward and rewind functions apply only when the time shifting
feature is active.
Volume
UP / DOWN
Favorite
Channel
Mute
Full Screen
Fast Rewind
Record
Pause
Time Shift
TV/Composite/
S-Video Switch
Page 18

TTrroouubblleesshhoooottiinngg GGuuiiddee
This section lists some suggestions for improving system performance with USB2TVTUNER.
• Close all other programs while using the TV tuner. Running other software while using the TV
tuner may reduce performance. Close all other applications, and make sure that software that
runs in the background (i.e. anti-virus software) is closed to allocate the necessary resources to
the TV Tuner application.
• Ensure that your computer supports USB 2.0. The software will display a warning if you plug the
TV tuner into a USB 1.1 port, and it will not function at all or with diminished performance. If you
are unsure whether your computer has USB 2.0 ports, consult your documentation for more
information.
• Apply all software updates available for Windows and your computer’s BIOS software, along with
chipset and video card drivers, if available.
• Ensure that the correct drivers for your computer’s USB 2.0 ports are installed and functioning
correctly.
• Capturing and viewing video at a lower resolution may improve video flow.
• If you are not hearing sound, ensure you have the correct audio device selected in the Setting
menu.
• Installing RAM and a faster hard drive (7200 RPM or higher) may improve the quality of captured
video.
• If you can preview video but not capture it, try turning off/reducing the hardware acceleration
settings on your video card by going to Settings > Control Panel > Display > Settings >
Advanced > Performance.
Instruction Manual
15
Page 19

AAcccceessssoorryy PPrroodduuccttss ffrroomm SSttaarrTTeecchh..ccoomm
Contact your local StarTech.com dealer or visit www.startech.com for cables or other accessories
that will help you get the best performance out of your new product.
PC2TVSVID10
10 ft. S-Video + 3.5mm Headphone Sound to S-Video + RCA Audio PC to TV A/V Cable
PC2TVSVID3
3 ft. S-Video + 3.5mm Headphone Sound to S-Video + RCA Audio PC to TV A/V Cable
SVID2RCAMM10
10ft S-Video to Composite Video Cable
SVIDMM
S-Video Male to Male Gender Changer
Instruction Manual
16
Page 20

Technical Support
StarTech.com’s lifetime technical support is an integral part of our commitment to provide industryleading solutions. If you ever need help with your product, visit www.startech.com/support and
access our comprehensive selection of online tools, documentation, and downloads.
Warranty Information
This product is backed by a one-year warranty. In addition, StarTech.com warrants its products
against defects in materials and workmanship for the periods noted, following the initial date of
purchase. During this period, the products may be returned for repair, or replacement with equivalent
products at our discretion. The warranty covers parts and labor costs only. StarTech.com does not
warrant its products from defects or damages arising from misuse, abuse, alteration, or normal wear
and tear.
Limitation of Liability
In no event shall the liability of StarTech.com Ltd. and StarTech.com USA LLP (or their officers,
directors, employees or agents) for any damages (whether direct or indirect, special, punitive,
incidental, consequential, or otherwise), loss of profits, loss of business, or any pecuniary loss,
arising out of or related to the use of the product exceed the actual price paid for the product.
Some states do not allow the exclusion or limitation of incidental or consequential damages. If such
laws apply, the limitations or exclusions contained in this statement may not apply to you.
Instruction Manual
17
Page 21

Revised: 3 May 2007 (Rev. F)
AAbboouutt SSttaarrTTeecchh..ccoomm
StarTech.com is “The Professionals’ Source for Hard-to-Find Computer
Parts”. Since 1985, we have been providing IT professionals with the
quality products they need to complete their solutions. We offer an
unmatched selection of computer parts, cables, server management
solutions and A/V products and serve a worldwide market through our
locations in the United States, Canada, the United Kingdom and Taiwan.
Visit www.startech.com for complete information about all our products
and to access exclusive interactive tools such as the Parts Finder and the
KVM Reference Guide. StarTech.com makes it easy to complete almost
any IT solution. Find out for yourself why our products lead the industry in
performance, support, and value.
 Loading...