

Page 1

USB to HDMI Video Adapter
USB 2.0 to HDMI External
Multi Monitor Video Adapter
with Audio
USB2HDMI
Instruction Manual
Manual Revision:11/08/2010
For the most up-to-date information, please visit www.startech.com
Page 2

FCC Compliance Statement
This equipment has been tested and found to comply with the limits for a Class
B digital device, pursuant to part 15 of the FCC Rules. These limits are designed
to provide reasonable protection against harmful interference in a residential
installation. This equipment generates, uses and can radiate radio frequency
energy and, if not installed and used in accordance with the instructions,
may cause harmful interference to radio communications. However, there is
no guarantee that interference will not occur in a particular installation. If this
equipment does cause harmful interference to radio or television reception, which
can be determined by turning the equipment off and on, the user is encouraged
to try to correct the interference by one or more of the following measures:
• Reorient or relocate the receiving antenna.
• Increase the separation between the equipment and receiver.
• Connect the equipment into an outlet on a circuit different from that to which the
receiver is connected.
• Consult the dealer or an experienced radio/TV technician for help.
Use of Trademarks, Registered Trademarks, and other Protected Names and Symbols
This manual may make reference to trademarks, registered trademarks, and other
protected names and/or symbols of third-party companies not related in any way to
StarTech.com. Where they occur these references are for illustrative purposes
only and do not represent an endorsement of a product or service by StarTech.
com, or an endorsement of the product(s) to which this manual applies by the
third-party company in question. Regardless of any direct acknowledgement
elsewhere in the body of this document, StarTech.com hereby acknowledges
that all trademarks, registered trademarks, service marks, and other protected
names and/or symbols contained in this manual and related documents are the
property of their respective holders.
Page 3

i
Table of Contents
Introduction .............................................................................................. 1
Packaging Contents.................................................................................................. 1
System Requirements .............................................................................................. 1
Top View ................................................................................................................... 2
Rear View ................................................................................................................. 2
Installation ................................................................................................ 3
Windows 2000/XP/Vista/7 ........................................................................................ 3
Mac OS X (10.4.11/10.5.6) ....................................................................................... 4
Configuration ........................................................................................... 5
Windows 2000/XP/Vista/7 ........................................................................................ 5
Mac OS X (10.4.11/10.5.6) ....................................................................................... 9
Specifications ........................................................................................... 11
Technical Support .................................................................................... 12
Warranty Information ............................................................................... 12
Page 4

1
Introduction
The USB2HDMI USB HDMI External Dual or Multi Monitor Video Adapter (with Audio)
turns an available USB 2.0 port into an HDMI output with high resolution video support
(up to 1920x1080) and audio.
The USB HDMI video adapter can be used to mirror your primary desktop, showing the
same image on each display, or to extend your desktop to double your workspace and
increase your productivity.
This external graphics card is a cost-saving multi-monitor or dual display solution for
either laptop or desktop applications, offering the ability to connect an additional HDMI
(or DVI) display to your computer setup without the hassle of opening the computer case
to install a new video card.
Backed by a StarTech.com 1-year warranty and free lifetime technical support.
Packaging Contents
• 1 x USB2HDMI video adapter
• 1 x USB cable
• 1 x Installation CD
• 1 x Instruction Manual
System Requirements
• USB 2.0 enabled computer system with available USB port
• HDMI enabled display device (e.g. monitor, projector, HDTV, etc)
• Microsoft® Windows® 2000/XP (32-bit)/Vista/7 (32/64-bit),
or Apple® Mac OS® 10.4.11/10.5.6
Page 5
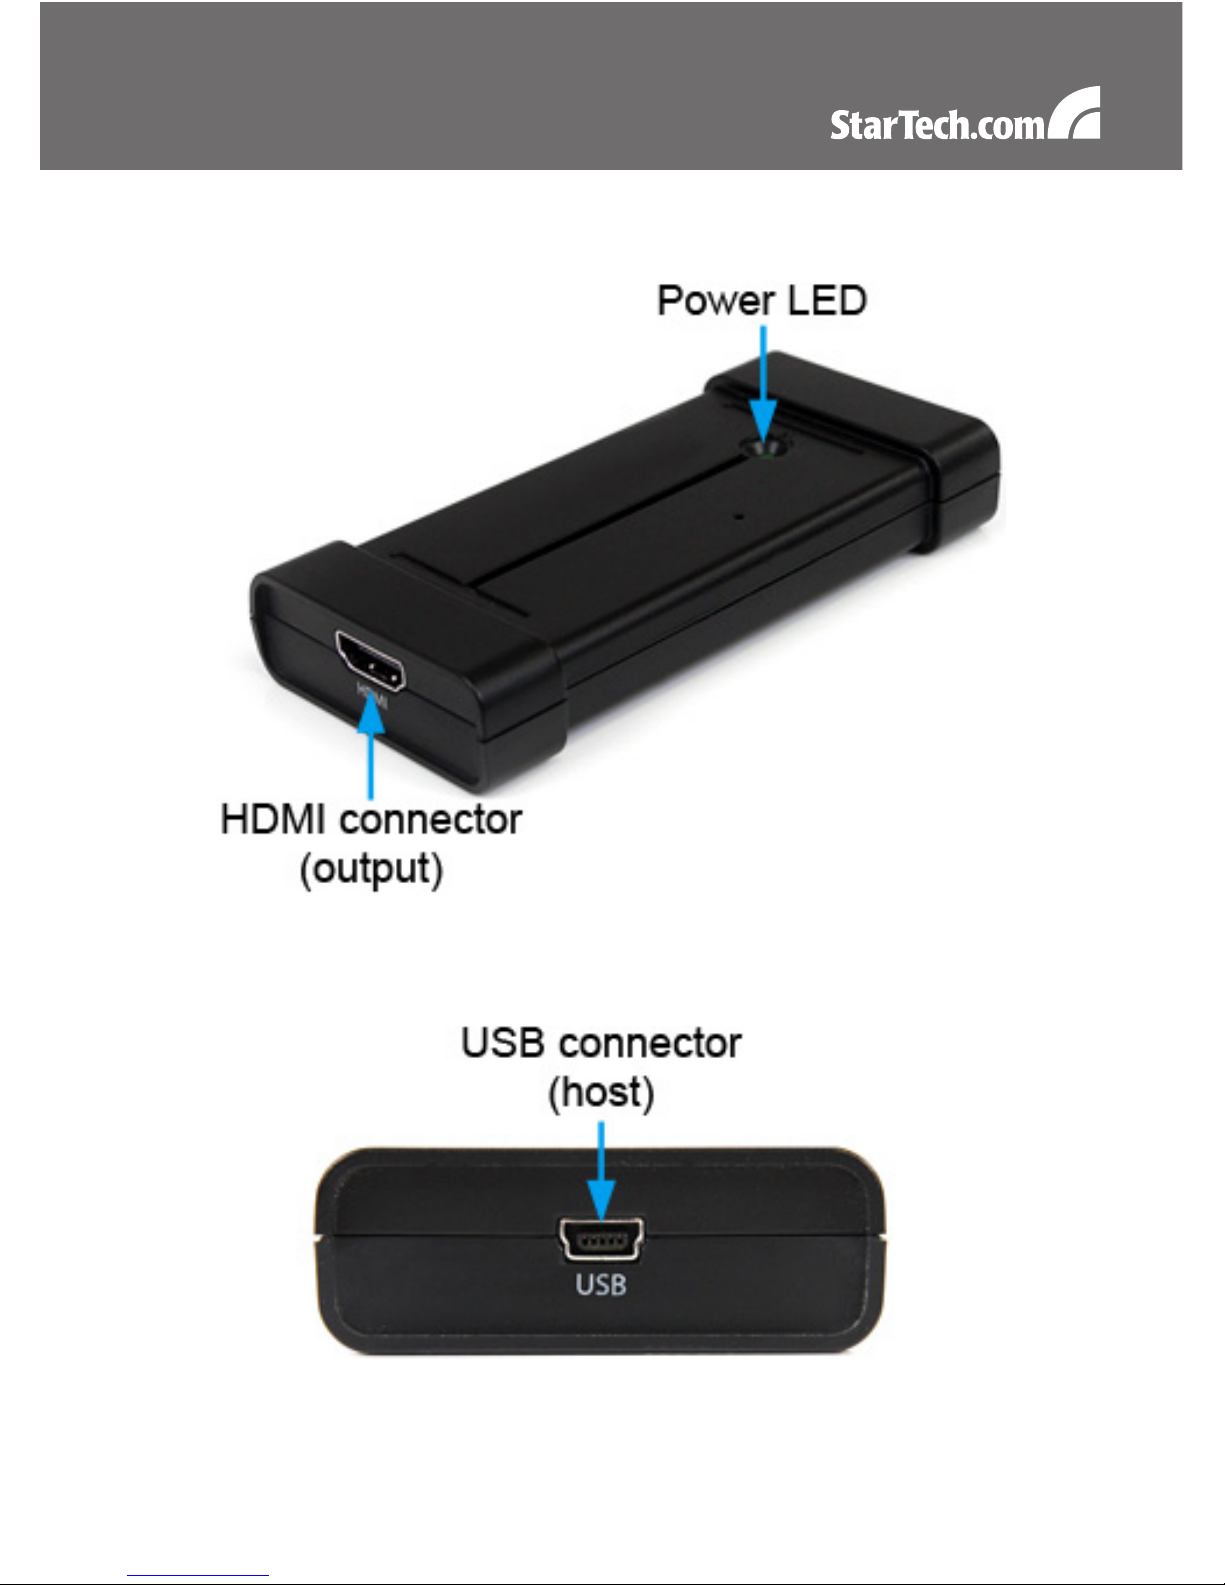
2
Top View
Rear View
Page 6

3
Installation
Please note: The following installation steps must be completed prior to connecting USB
video adapter to the host computer, to ensure proper functionality.
Windows 2000/XP/Vista/7
1. Insert the Driver CD (included) into the CD/DVD-ROM drive.
2. AutoPlay should launch a Window, giving the option to install the drivers. If AutoPlay is
not enabled, browse through the Driver CD and locate the “Setup.exe” file in the USB
2.0 to HDMI folder. Double-click on the installer file to begin the installation process:
*actual file name may vary
3. When the End User License Agreement appears, please read and accept it, then click
Next.
4. Please wait while the installation package copies the necessary files.
5. Once completed, connect the USB video adapter to the computer. Windows should
start to automatically load the drivers. Once complete, you should see this icon in your
System Tray:
6. To verify the installation, right-click on “My Computer” and select Manage to open the
Computer Management window.
Page 7

4
7. In the left pane of the Computer Management window, click on Device Manager.
8. In the right pane of the Computer Management window, click on Universal Serial Bus
Controllers, and ensure that the USB display adapter device is listed underneath.
9. If you wish to add additional USB video adapters, simply plug them into available USB
2.0 ports. A maximum total of 6 USB video adapters can be used on a computer.
Mac OS X (10.4.11/10.5.6)
1. Insert the Driver CD (included) into the CD/DVD-ROM drive.
2. Browse through the Driver CD and locate the “DisplayLink-OSX” .dmg file in the USB
2.0 to HDMI folder. Double-click on this file to begin the installation process:
*actual file name may vary
3. Double Click the “DislpayLink Software Installer.pkg” to install the software.
4. Once the installation is complete, click the “Restart” button. The computer will
automatically reboot, so make sure to close/save any files you have opened, before
pressing this button.
5. After the computer has restarted, plug in the USB video adapter to an available USB
2.0 port. The adapter should now be ready to use.
6. If you wish to add additional USB video adapters, simply plug them into available USB
2.0 ports. A maximum total of 4 USB video adapters can be used on a computer.
Page 8

5
Conguration
Windows 2000/XP/Vista/7
To configure the image being displayed by the
monitor that is connected to the USB video adapter,
right-click on a blank section of the desktop, select
Properties, then click on the Settings tab to display
the following screen:
For Vista, right-click on a blank section of the
desktop and select Personalize, then select Screen
Resolution on the next screen. For Windows 7,
simply right-click and select Screen Resolution.
Configure the secondary display by selecting it from the dropdown menu, then adjusting
the desired settings:
Page 9

6
Using the Second Display in Extended Mode
In Extended Mode, the monitor that is connected to the USB video adapter creates an
extension of the Windows Desktop displayed on the primary monitor. To set the display
to function in this mode (once selected from the dropdown menu), check the box marked
Extend my windows desktop onto this monitor, then arrange its position (virtually) with
respect to the primary monitor by dragging the monitor icons (shown above as Primary/
Secondary orientation) to reflect the physical orientation of the displays.
Using the Second Display in Clone/Mirror Mode (default)
In Clone/Mirror Mode, the monitor that is connected to the USB video adapter simply
mirrors the image displayed on the primary monitor. To set the display to function in this
mode (once selected from the dropdown menu), uncheck the box marked Extend my
windows desktop onto this monitor.
Designating the Primary Display
To select which of the connected monitors will act as the primary display, select the
monitor that will be used as the Primary Display from the Dropdown menu, and place
a checkmark next to Use this device as the primary monitor. On some displays it is
necessary to disable the main display (i.e. uncheck the box marked Extend my Windows
display onto this monitor for the main display).
Following this change, the monitor connected to the USB video adapter will remain
set as the primary display even if the computer enters hibernate mode or operation is
suspended or powered down. If the monitor is disconnected from the USB video adapter,
or the USB video adapter is removed from the host computer, the original monitor will
revert to being the primary display.
Alternate Configuration
Following the software installation for the USB video adapter, you
may have noticed an icon in the taskbar as illustrated below. Clicking
on this icon will open a menu that offers configuration of the display
(connected to the USB video adapter):
Here, you can set the secondary display to act as an extension of
the primary desktop (Extend), or as a mirror image that duplicates
the contents on the primary display (Mirror) or set the display on the adapter as the
primary display (Set as Main Monitor). If using a laptop, once the adapter is set as the
primary display, the screen on the laptop can be disabled (Notebook Monitor Off).
Page 10

7
Similarly, the screen resolution, color quality, position of the screen and rotation of the
screen can be adjusted from this menu.
To disable the secondary display, select Off.
Screen Rotation
Will rotate the entire video output in 90 degree increments.
Media Playback
Please note that while operating in Extended Mode, the USB video adapter can display
media files and DVDs using a broad variety of media players, however in Clone Mode,
limited support is available for video playback.
Audio Playback
The audio component of the USB video adapter adds a new USB sound device to the
system. This will be selected by default, but on some system it may need to be selected
manually through the Sound and Audio Devices in the Control Panel. Audio will only
be passed through the converter to the HDMI display. Any speakers connected directly
to the computer system will not be active, while audio is being sent to the USB video
adapter. If multiple USB video adapters are connected to the computer system, only
one audio device can be used. So audio can only be output to one of the USB video
adapters.
Optimize For Video (Windows Vista/7 only)
Optimize video play back when using Windows Vista/7.
Regular text may appear blurry while this is enabled.
Page 11

8
Fit to TV
When using Extended Mode, if the Windows Desktop screen is not completely visible on
the TV/Monitor, this option can be used to adjust the size of the Windows Desktop.
NOTE: This mode will only work while using Extended mode. If using Mirror mode, this
will automatically change the adapter to Extended mode. This mode cannot be used at
the same time as the Screen Rotation feature.
A red border will appear on the Extended screen that will show the size of the new
Windows Desktop. Use the horizontal and vertical + and - buttons to manually adjust the
size to properly fit the screen.
NOTE: Holding the CTRL key while making adjustments allow for finer control.
Page 12

9
Mac OS X (10.4.11/10.5.6)
To configure the display settings and monitor positions, bring up the Displays
Preferences from the System Preferences menu:
The Display settings for each display will appear on the individual monitors themselves.
To configure them all from a single location, press the “Gather Windows” button and each
screen’s Displays Preferences windows will appear on that display.
All supported video resolutions will appear in the list on the left side. To change the
positioning of each display, click on the “Arrangement“ button (found only on the primary
display) and you can then virtually reposition each display.
Using the Adapter in Extended or Mirror Mode
By default the USB video adapter will be setup as an extended display. To change the
display as a mirrored/cloned display, check the “Mirror Display” box on the “Arrangement”
page for that monitors Displays settings window. To return the monitor to an extended
display, uncheck this option.
Page 13

10
To use both extended and mirrored displays simultaneously, turn off mirroring then in the
“Arrangement” page press and hold the ‘cmd’ and ‘alt’ keys and drag and drop the display
you wish to mirror over the primary display (shown with the white bar).
Repeat this with each display you wish to mirror, all others will act as an extended
display.
Changing the Primary Display
You can change which display is the primary display by moving the Menu Bar between
displays. Changing the primary display affects where new windows appear and the
position of the Dock.
To move the Menu Bar, click the white menu bar and drag it to the display you wish to
become the primary.
Configuring Displays from the Menu Bar
If you have checked the “Show displays in menu bar” in the Display Preferences window,
then you can configure displays by clicking the display icon in the menu bar. This will
show a menu similar to the following:
Media Playback
Please note that while operating in Extended Mode, the USB video adapter can display
media files and DVDs using a broad variety of media players, however in Clone Mode,
limited support is available for video playback.
Audio Playback
The audio component of the USB video adapter adds a new USB sound device to the
system. This will be selected by default, but on some system it may need to be selected
manually through the Sound Preferences in System Preferences. Audio will only be
passed through the converter to the display. Any speakers connected directly to the
computer system will not be active, while audio is being sent to the USB video adapter.
If multiple USB video adapters are connected to the computer system, only one audio
device can be used. So audio can only be output to one of the USB video adapters.
Page 14

11
Specications
Bus Interface
USB 2.0
Video Signal
HDMI 1.2 (digital)
Chipset ID
DisplayLink DL-165
Connectors
1 x HDMI female
1 x USB mini-B female
LEDs
1 x Power
Maximum Video Resolution
1920x1080
Audio Support
Yes (stereo)
HDCP Compliant
No
Supported Number of Adapters
(per system)
6 (Windows)
4 (Mac OS)
Operating Temperature
0°C ~ 70°C (32°F ~ 158°F)
Storage Temperature
0°C ~ 80°C (32°F ~ 176°F)
Humidity
10% ~ 90%
Dimensions (LxWxH)
109.0mm x 52.0mm x 19.0mm
Weight
300 g
Compatible Operating Systems
Windows 2000/XP (32-bit)/
Vista/7 (32/64-bit),
Mac OS 10.4.11/10.5.6
Page 15

12
Technical Support
StarTech.com’s lifetime technical support is an integral part of our commitment to provide
industry-leading solutions. If you ever need help with your product, visit www.startech.
com/support and access our comprehensive selection of online tools, documentation, and
downloads.
Warranty Information
This product is backed by a one year warranty.
In addition, StarTech.com warrants its products against defects in materials and
workmanship for the periods noted, following the initial date of purchase. During this
period, the products may be returned for repair, or replacement with equivalent products
at our discretion. The warranty covers parts and labor costs only. StarTech.com does not
warrant its products from defects or damages arising from misuse, abuse, alteration, or
normal wear and tear.
Limitation of Liability
In no event shall the liability of StarTech.com Ltd. and StarTech.com USA LLP (or their
officers, directors, employees or agents) for any damages (whether direct or indirect,
special, punitive, incidental, consequential, or otherwise), loss of profits, loss of business,
or any pecuniary loss, arising out of or related to the use of the product exceed the actual
price paid for the product. Some states do not allow the exclusion or limitation of incidental
or consequential damages. If such laws apply, the limitations or exclusions contained in
this statement may not apply to you.
Page 16

StarTech.com has been making “hard-to-find easy”
since 1985, providing high quality solutions to a diverse
IT and A/V customer base that spans many channels,
including government, education and industrial facilities
to name just a few. We offer an unmatched selection of
computer parts, cables, A/V products, KVM and Server
Management solutions, serving a worldwide market
through our locations in the United States, Canada, the
United Kingdom and Taiwan.
Visit www.startech.com today for complete information
about all our products and to access exclusive interactive
tools such as the Cable Finder, Parts Finder and the
KVM Reference Guide.
 Loading...