

Page 1
WHDI Wireless HD Extender - 1080p
Wireless High Denition
ST121WHD
*actual product may vary from photos
DE: Bedienungsanleitung - de.startech.com
FR: Guide de l'utilisateur - fr.startech.com
ES: Guía del usuario - es.startech.com
IT: Guida per l'uso - it.startech.com
NL: Gebruiksaanwijzing - nl.startech.com
PT: Guia do usuário - pt.startech.com
For the most up-to-date information, please visit: www.startech.com
Manual Revision: 11/16/2012
Page 2

FCC Compliance Statement
This equipment has been tested and found to comply with the limits for a Class B digital device,
pursuant to part 15 of the FCC rules. These limits are designed to provide reasonable protection
against harmful interference in a residential installation. This equipment generates, uses and can
radiate radio frequency energy and, if not installed and used in accordance with the instructions, may
cause harmful interference to radio communications. However, there is no guarantee that interference
will not occur in a particular installation. If this equipment does cause harmful interference to radio
or television reception, which can be determined by turning the equipment o and on, the user is
encouraged to try to correct the interference by one or more of the following measures:
• Reorient or relocate the receiving antenna.
• Increase the separation between the equipment and receiver.
• Connect the equipment into an outlet on a circuit dierent from that to which the receiver
is connected.
• Consult the dealer or an experienced radio/TV technician for help.
To assure continued compliance, any changes or modications not expressly approved by the
party responsible for compliance could void the user’s authority to operate this equipment.
(Example- use only shielded interface cables when connecting to computer or peripheral devices).
FCC Radiation Exposure Statement
This equipment complies with FCC RF radiation exposure limits set forth for an uncontrolled
environment. This transmitter must not be co-located or operating in conjunction with any
other antenna or transmitter. This equipment complies with Part 15 of the FCC Rules.Operation
is subject to the following two conditions:
1. This device may not cause harmful interference, and
2. This device must accept any interference received, including interference that may
cause undesired operation.
Caution! The manufacturer is not responsible for any radio or TV interference caused
by unauthorized modications to this equipment. Such modications could void the
user authority to operate the equipment.
Use of Trademarks, Registered Trademarks, and other Protected Names and Symbols
This manual may make reference to trademarks, registered trademarks, and other
protected names and/or symbols of third-party companies not related in any way to
StarTech.com. Where they occur these references are for illustrative purposes only and do not
represent an endorsement of a product or service by StarTech.com, or an endorsement of the
product(s) to which this manual applies by the third-party company in question. Regardless
of any direct acknowledgement elsewhere in the body of this document, StarTech.com hereby
acknowledges that all trademarks, registered trademarks, service marks, and other protected
names and/or symbols contained in this manual and related documents are the property of
their respective holders.
Instruction Manual
Page 3

Table of Contents
Introduction ............................................................................................1
Packaging Contents ................................................................................................................................. 1
System Requirements ..............................................................................................................................1
Preparing Your Site ................................................................................ 2
Hardware Installation ............................................................................2
Additional Operation.............................................................................4
IR Remote Control .....................................................................................................................................4
LED Indicator Status Table ....................................................................8
Specications ..........................................................................................8
Technical Support ..................................................................................9
Warranty Information ............................................................................9
Instruction Manual
i
Page 4

Introduction
The ST121WHD Wireless Video, Audio and IR Extender lets you connect a remote
HD display or projector up to 30m (100ft) away from the HD source wirelessly. The
ST121WHD is a bundled kit that includes both a local and a remote unit providing a
complete end to end solution for a single source to display connection. This wireless HD
extender eliminates the need for expensive cable infrastructure, and provides a wireless
solution where cabling is undesirable, i.e. in the middle of a room, or boardroom.
The Wireless HD extender kit is compliant with WHDI and HDCP standards, ensuring
even the latest devices will be able to pass a signal with support for full 1080p
resolutions and the accompanying digital audio. Control your source device remotely
using the IR extender for a complete HD extension solution.
The kit includes the transmitter and receiver units for a cost-eective, ready-to-use
digital signage solution.
Backed by a StarTech.com 2-year warranty and free lifetime technical support.
Packaging Contents
• 1x Wireless HD Transmitter
• 1x Wireless HD Receiver
• 2x Positioning Stand
• 1x HD Cable
• 1x IR Remote Extension Connector
• 2x Universal Power Adapter (NA/UK/EU)
• 1x Instruction Manual
System Requirements
• HD enabled video source device (i.e. computer, Blu-ray Player)
• HD enabled display device (i.e. television, projector)
• Available AC electrical outlet for transmitter and receiver
• HD cable from receiver to display (HD cable from video source to transmitter is provided)
Instruction Manual
1
Page 5
Preparing Your Site
1. Determine where the local video source (i.e. computer, Blu-ray Player) will be
located and set up the device.
2. Determine where the remote display will be located and place/ mount the
display appropriately.
Notes: This product includes optional bases allowing for horizontal or veridical
positioning. It is recommended that both the Transmitter Unit and the Receiver
Unit be positioned in the same fashion. If for example the Transmitter Unit
is placed vertically and the Receiver Unit is positioned horizontally the image
transmission distance may
be compromised.
The maximum distance between the transmitter and the receiver is 30 meters. If
the wireless signal is obstructed by walls, or other interference the signal quality
and maximum distance will likely be reduced.
Ensure the Extender Unit and the Receiver Unit are situated near an available AC
electrical outlet.
Hardware Installation
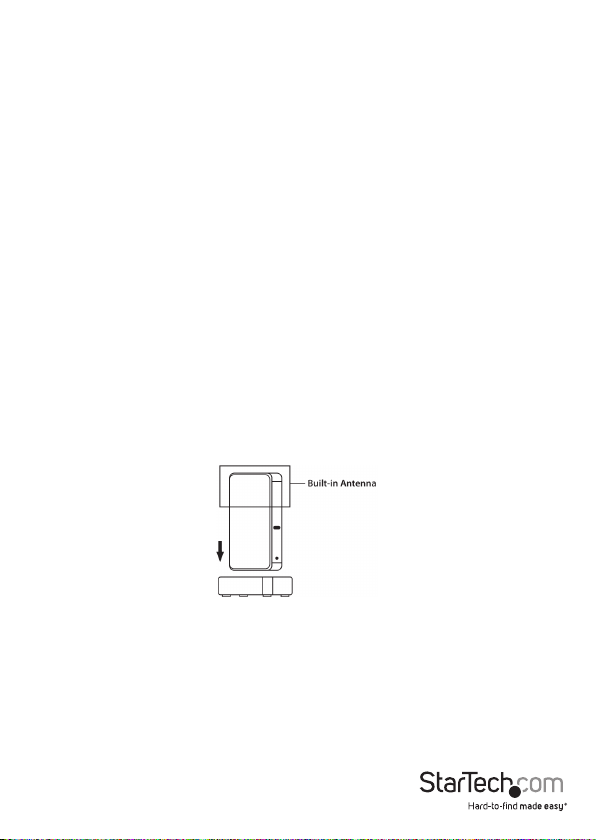
1. Installation of Transmitter Unit
a) Position the Transmitter Unit near the video source (i.e. Computer,
Blu-ray Player).
Note: If the Transmitter Unit is positioned vertically, ensure the built-in antenna is
facing upwards
Instruction Manual
2
Page 6

b) (Optional) If using the ST121WHD to extend an infrared (IR) device signal.
Connect the IR remote extension connector to the IR remote signal output
port on the Transmitter Unit, and Position the extended IR sensor directly in
front of the video source’s IR sensor. Check the manual of your video source
device for the IR sensor location.
Note: This product can only supports an IR signal in 38 kHz carrier
modulation mode.
c) Connect the provided Transmitter Unit power supply.
d) Connect the video source to the HD port on the rear panel of the Transmitter
Unit, using the provided male/male HD cable.
2. Installation of Receiver Unit
a) Position the Receiver Unit near the video display (i.e. television, projector).
Note: If the Receiver Unit is positioned vertically, ensure the built-in antenna is
facing upwards. If an infrared (IR) device is being used direct the IR signal toward
the IR sensor.
b) Connect the provided Receiver Unit power supply. The wireless network
status indicator will turn on after a successful wireless connection between
both units is established. This may take several seconds.
c) Connect the video source to the HD port on the rear panel of the Receiver
Unit, using a male/male HD cable (Not included).
d) The video source will now be displayed on the remote receiver.
Instruction Manual
3
Page 7

Additional Operation
IR Remote Control
Menu – Open on screen display
1
Exit – Close OSD menu / Cancel
2
Source – Switch transmitters (If
3
4 – Move Cursor
5 OK – Select OSD option
6 Delete – Delete a Transmitter
7 Add – Add a Transmitter
8 Guest – Power On/O
9
Note: Before the remote control can operate, the battery protector must be
removed from the battery compartment. Your IR remote control must also be
pointed at the receiver your display is connected to in order to function.
Add Additional Video Transmitter Sources (Must have multiple transmitting units)
By default the ST121WHD’s transmitter and receiver units are paired together. If you
have more than one transmitter, you can add additional transmitters to one receiver and
switch between video sources.
1. Using the IR remote control, press MENU - > Select Add new Video Source
(OSD) menu
connection
more than one is connected)
Input Devices – Select
to switch between added
Transmitters
Instruction Manual
4
Page 8

2. Please Activate Registration on Transmitter Unit will now appear
on the display. Physically return to the transmitter unit hold down the
reset button on the transmitter for 3 seconds to activate registration.
3. The additional transmitter is now registered. This action can be performed for up to
2 additional transmitters for a total of 3.
Remove Video Transmitters (Must have multiple transmitting units)
1. Using the IR remote control, Press MENU - > Select Remove Video Source
2. Move the cursor and select the desired transmitter to be remove
Modify Video Source Name
To more easily distinguish between added transmitters, the generic hardware name,
given during the “Add additional Video Transmitter Sources” steps, can be modied.
1. Using the IR remote control, Press MENU - > Select Modify Video Source Name
2. Using the cursor select a name that better suits specic transmitter.
Instruction Manual
5
Page 9
Trouble Shooting
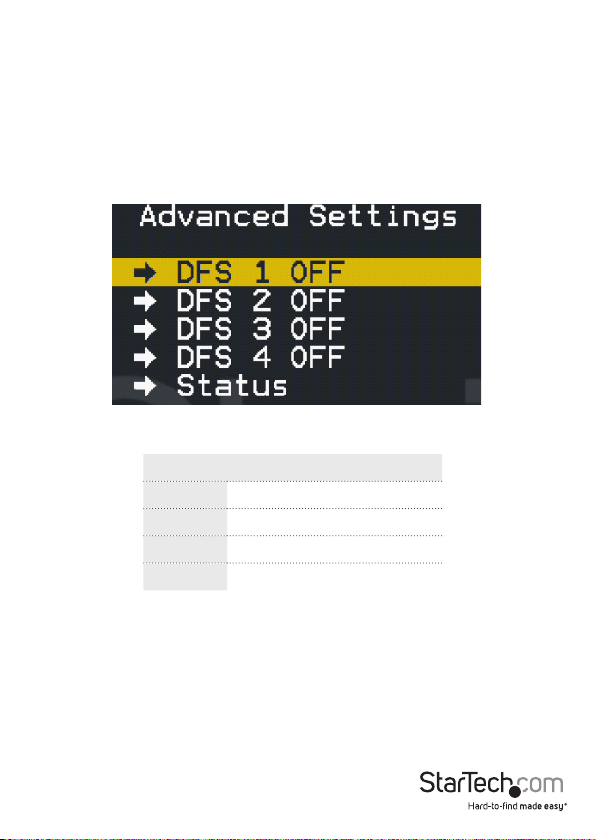
1. Improve Signal Quality
Environments with large amounts of 5GHz wireless trac (such as an oce), DFS1
(5150-5250 MHz -non DFS band) and DFS4 (5725-5850 MHz-non DFS band) should be
disabled by setting to ON in the Advanced Settings to yield better performance.
a. Using the IR remote control, Press MENU- > Select Advanced Settings -> DFS 1 to
change to ON. The unit will restart when completed.
b. Repeat step (a) this time selecting DFS 4 to ON. The unit will restart when
completed.
Note: OFF indicates the band is enabled. ON indicates the Band is disabled. For
reference the frequencies of each band option is listed below.
Frequency Table
DFS 1 5150-5250 MHz (non DFS band)
DFS 2 5250-5350 MHz (DFS band)
DFS 3 5470-5725 MHz (DFS band)
DFS 4 5725-5850 MHz (non DFS band)
Instruction Manual
6
Page 10

2. Review Wireless Link Quality
You can view the wireless link quality to determine if there may be interference
preventing the signal from completing, or occasional signal loss.
a. Using the IR remote control, press MENU-> Advanced Settings -> Status - > Link
Quality
b. Several values are now displayed representing the signal quality. See table below
for details.
Title Description Details
SNR (IN/.
OUT)
PIN
Freq
Audio BER
Video Quality Values above 20 are ideal.
Wireless Signal
Quality
Wireless
Frequency
Audio Bit Error
Ratio
Values below 55 are ideal
Displays the wireless Band the
connection is on
Displays Audio Bit Error Ratio
Packet err Packet Loss Displays number of packets dropped
Note: Values outside the “Ideal” threshold may not impact signal quality.
Instruction Manual
7
Page 11

LED Indicator Status Table
Indicator LED Activity Status
Wireless
Connection Status
Indicator
(Transmitter Unit)
Video indicator
(Transmitter Unit)
Wireless
Connection Status
Indicator (Receiver
Unit)
Video Indicator
(Receiver Unit)
On (Green)
O
Flash rapidly The Device is faulty
On (Green)
O The video source has failed to connect
On (Green)
O
Flash Rapidly The Device is faulty
On (Green)
O The video source has failed to connect
The transmitter is connected successfully
in the wireless mode
The transmitter has failed to connect in
the wireless mode
The video source is connected
The Receiver is connected successfully in
the wireless mode
The transmitter has failed to connect in
the wireless mode
The video source is connected
Specications
Max Distance 30m (100ft)
Maximum Digital Resolutions 1920 x 1080
Supported Resolutions
Frequency 5.1-5.9GHz
TV: 1080p, 1080i, 720p, 480p
PC: VGA(640X480), SVGA(800X600),
XGA(1024X768), SXGA(1280X1024)
successfully
successfully
Instruction Manual
8
Page 12

Technical Support
StarTech.com’s lifetime technical support is an integral part of our commitment to
provide industry-leading solutions. If you ever need help with your product, visit
www.startech.com/support and access our comprehensive selection of online tools,
documentation, and downloads.
For the latest drivers/software, please visit www.startech.com/downloads
Warranty Information
This product is backed by a two year warranty.
In addition, StarTech.com warrants its products against defects in materials
and workmanship for the periods noted, following the initial date of purchase.
During this period, the products may be returned for repair, or replacement with
equivalent products at our discretion. The warranty covers parts and labor costs only.
StarTech.com does not warrant its products from defects or damages arising from
misuse, abuse, alteration, or normal wear and tear.
Limitation of Liability
In no event shall the liability of StarTech.com Ltd. and StarTech.com USA LLP (or their
ocers, directors, employees or agents) for any damages (whether direct or indirect,
special, punitive, incidental, consequential, or otherwise), loss of prots, loss of business,
or any pecuniary loss, arising out of or related to the use of the product exceed the
actual price paid for the product. Some states do not allow the exclusion or limitation
of incidental or consequential damages. If such laws apply, the limitations or exclusions
contained in this statement may not apply to you.
Instruction Manual
9
Page 13

Hard-to-nd made easy. At StarTech.com, that isn’t a slogan. It’s a promise.
StarTech.com is your one-stop source for every connectivity part you need. From
the latest technology to legacy products — and all the parts that bridge the old and
new — we can help you nd the parts that connect your solutions.
We make it easy to locate the parts, and we quickly deliver them wherever they need
to go. Just talk to one of our tech advisors or visit our website. You’ll be connected to
the products you need in no time.
Visit www.startech.com for complete information on all StarTech.com products and
to access exclusive resources and time-saving tools.
StarTech.com is an ISO 9001 Registered manufacturer of connectivity and technology
parts. StarTech.com was founded in 1985 and has operations in the United States,
Canada, the United Kingdom and Taiwan servicing a worldwide market.
 Loading...