

Page 1
Instruction Manual
XGI Volari Z7 16 MB PCI VGA Video Adapter Card
PCIVGA7
Hardware Installation
DE: Bedienungsanleitung - de.startech.com
FR: Guide de l'utilisateur - fr.startech.com
ES: Guía del usuario - es.startech.com
IT: Guida per l'uso - it.startech.com
NL: Gebruiksaanwijzing - nl.startech.com
PT: Guia do usuário - pt.startech.com
Introduction
Thank you for purchasing a StarTech.com PCIVGAV7 PCI VGA Video Card.
This convenient video card is fully compliant with PCI 2.2 and provides
high quality 2D display at resolutions of up to 1600 x 1200 pixels.
1. Make sure that your system is unplugged and you are grounded.
2. Remove the cover of your system (see your computer’s user
manual for details, if necessary) and gently turn your computer
onto its side, so that the PCI expansion slot openings on the
motherboard are facing upwards.
3. Locate an empty PCI slot (usually white in color) and remove the
metal plate that covers the corresponding rear bracket. You may
need a Phillips screwdriver to perform this step. Retain the screw!
You will need it to secure the card later.
4. Gently insert the card into the empty slot, making sure it is rmly seated.
5. Secure the card in place using the screw you removed in Step 3, as
applicable.
6. Replace and secure the computer cover.
Features
• Compliant with PCI 2.2 (33/66 MHz)
• Maximum 2D Resolution for 32-bit (1280x1024 @60Hz) and 16-bit
(1600x1200 @ 75Hz)
• Maximum color depth up to 16.7M colors output
Package Contents
• 1 x PCI Video Card
• 1 x Driver CD
• 1 x Instruction Manual
Hardware Guide
1
2
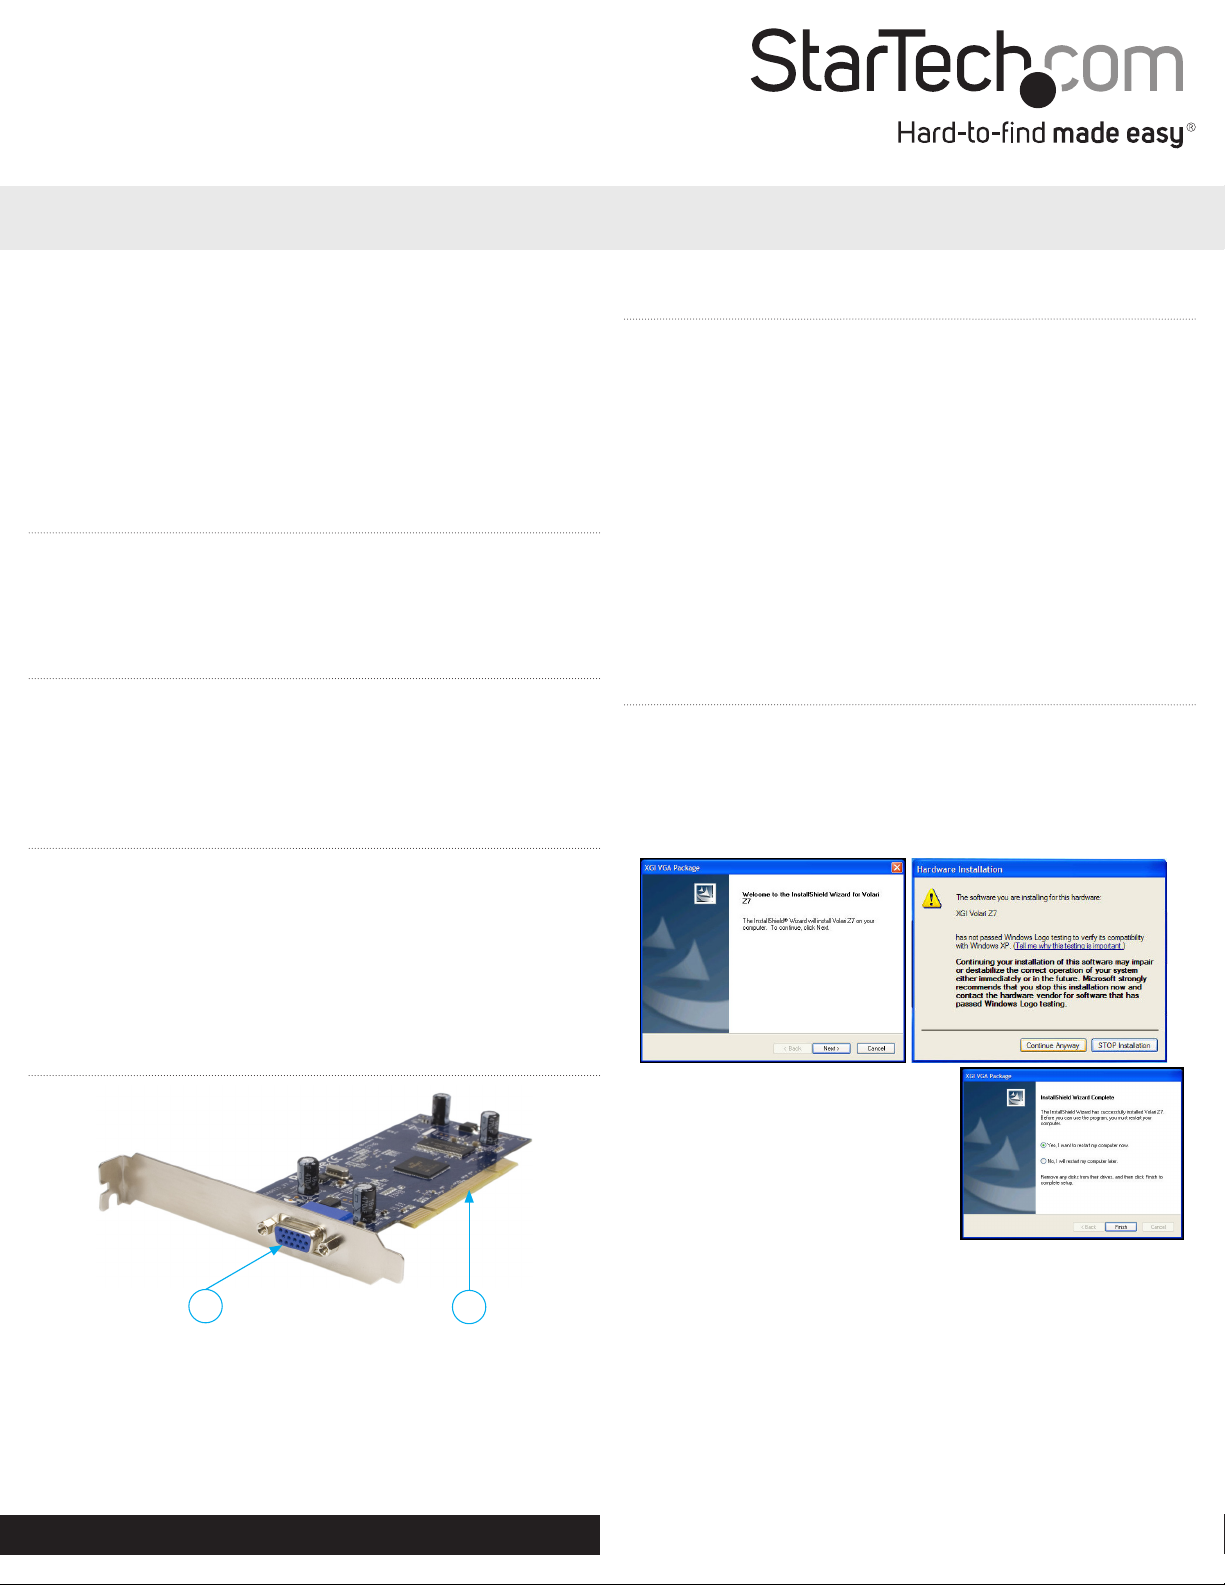
Driver Installation
1. Open the Setup.exe le located in the following path: X:\Windows
2000_XP\setup.exe, where X: designates the CD/DVD-ROM drive.
2. When the InstallShield welcome screen appears, click Next. If you
receive a notication that the software has not passed Windows
Logo testing, click Continue Anyway to proceed with the
installation.
3. Once all files have been installed,
select Yes, I want to restart my
computer now, and click Finish to restart
your computer and complete the installation
process. If you wish to verify the installation,
open the Device Manager and check that the
drivers have been recognized.
4. Once the computer has successfully
rebooted, your new VGA port is ready for use.
1. D-Sub RGB (VGA) Connector
2. PCI Interface
For the most up-to-date information, please visit: www.startech.com
Manual Revision: 02/23/2012
Page 2

Specications
Specication
Interface
Chipset
Memory
Port Type
Power Consumption
OS Support
Environment
PCIVGAV7
32-bit PCI v2.2 (3.3V/ 5V)
33MHz/ 66MHz
XGI Volari™Z7
16MB DDR RAM
D-Sub RGB (VGA) Connector
1.4W
Windows XP/200/Vista™; Linux
Operating Temperature : -10C ~ 85C
Store Temperature: -20C ~ 90C
Operating Humidity: 5% ~ 95% RH
FCC Compliance Statement
This equipment has been tested and found to comply with the limits for a Class B digital device, pursuant to part 15 of the FCC Rules. These limits are designed to provide reasonable protection against
harmful interference in a residential installation. This equipment generates, uses and can radiate radio frequency energy and, if not installed and used in accordance with the instructions, may cause
harmful interference to radio communications. However, there is no guarantee that interference will not occur in a particular installation. If this equipment does cause harmful interference to radio or
television reception, which can be determined by turning the equipment o and on, the user is encouraged to try to correct the interference by one or more of the following measures:
• Reorient or relocate the receiving antenna.
• Increase the separation between the equipment and receiver.
• Connect the equipment into an outlet on a circuit dierent from that to which the receiver is connected.
• Consult the dealer or an experienced radio/TV technician for help.
Use of Trademarks, Registered Trademarks, and other Protected Names and Symbols
This manual may make reference to trademarks, registered trademarks, and other protected names and/or symbols of third-party companies not related in any way to
StarTech.com. Where they occur these references are for illustrative purposes only and do not represent an endorsement of a product or service by StarTech.com, or an endorsement of the product(s)
to which this manual applies by the third-party company in question. Regardless of any direct acknowledgement elsewhere in the body of this document, StarTech.com hereby acknowledges that all
trademarks, registered trademarks, service marks, and other protected names and/or symbols contained in this manual and related documents are the property of their respective holders.
Technical Support
StarTech.com’s lifetime technical support is an integral part of our commitment to provide industry-leading solutions. If you ever need help with your product, visit www.startech.com/support and access
our comprehensive selection of online tools, documentation, and downloads.
For the latest drivers/software, please visit www.startech.com/downloads
Warranty Information
This product is backed by a two year warranty.
In addition, StarTech.com warrants its products against defects in materials and workmanship for the periods noted, following the initial date of purchase. During this period, the products may be returned
for repair, or replacement with equivalent products at our discretion. The warranty covers parts and labor costs only. StarTech.com does not warrant its products from defects or damages arising from
misuse, abuse, alteration, or normal wear and tear.
Limitation of Liability
In no event shall the liability of StarTech.com Ltd. and StarTech.com USA LLP (or their ocers, directors, employees or agents) for any damages (whether direct or indirect, special, punitive, incidental,
consequential, or otherwise), loss of prots, loss of business, or any pecuniary loss, arising out of or related to the use of the product exceed the actual price paid for the product. Some states do not allow
the exclusion or limitation of incidental or consequential damages. If such laws apply, the limitations or exclusions contained in this statement may not apply to you.
 Loading...