

Page 1
1:7 Standalone USB Duplicator
and Eraser
USBDUPE17
*actual product may vary from photos
FR: Guide de l’utilisateur - fr.startech.com
DE: Bedienungsanleitung - de.startech.com
ES: Guía del usuario - es.startech.com
NL: Gebruiksaanwijzing - nl.startech.com
PT: Guia do usuário - pt.startech.com
IT: Guida per l’uso - it.startech.com
For the latest information, technical specications, and support for
this product, please visit www.StarTech.com/USBDUPE17.
Manual Revision: 08/25/2017
Page 2

FCC Compliance Statement
This equipment has been tested and found to comply with the limits for a Class B digital
device, pursuant to part 15 of the FCC Rules. These limits are designed to provide reasonable
protection against harmful interference in a residential installation. This equipment
generates, uses and can radiate radio frequency energy and, if not installed and used in
accordance with the instructions, may cause harmful interference to radio communications.
However, there is no guarantee that interference will not occur in a particular installation. If
this equipment does cause harmful interference to radio or television reception, which can
be determined by turning the equipment o and on, the user is encouraged to try to correct
the interference by one or more of the following measures:
• Reorient or relocate the receiving antenna.
• Increase the separation between the equipment and receiver.
• Connect the equipment into an outlet on a circuit dierent from that to which the
receiver is connected.
• Consult the dealer or an experienced radio/TV technician for help
This device complies with part 15 of the FCC Rules. Operation is subject to the following
two conditions: (1) This device may not cause harmful interference, and (2) this device must
accept any interference received, including interference that may cause undesired operation.
Changes or modications not expressly approved by StarTech.com could void the user’s
authority to operate the equipment.
Industry Canada Statement
This Class B digital apparatus complies with Canadian ICES-003.
Cet appareil numérique de la classe [B] est conforme à la norme NMB-003 du Canada.
CAN ICES-3 (B)/NMB-3(B)
Use of Trademarks, Registered Trademarks, and other Protected Names and Symbols
This manual may make reference to trademarks, registered trademarks, and other
protected names and/or symbols of third-party companies not related in any way to
StarTech.com. Where they occur these references are for illustrative purposes only and do not
represent an endorsement of a product or service by StarTech.com, or an endorsement of the
product(s) to which this manual applies by the third-party company in question. Regardless
of any direct acknowledgement elsewhere in the body of this document, StarTech.com hereby
acknowledges that all trademarks, registered trademarks, service marks, and other protected
names and/or symbols contained in this manual and related documents are the property of
their respective holders.
Instruction manual
Page 3

Table of Contents
Product diagram ....................................................................................1
Top view .......................................................................................................................................................1
Back view...................................................................................................................................................... 1
Package contents ...................................................................................2
Requirements .........................................................................................2
About the LED indicators ......................................................................2
Set up the duplicator and eraser .........................................................3
Changing the device settings ..............................................................3
Change the startup function ................................................................................................................ 3
Turn o the audio feedback feature ...................................................................................................3
Change the LCD display language ......................................................................................................4
Restore the default factory settings ................................................................................................... 4
Copying USB ash drive data ...............................................................4
Change the copy area ..............................................................................................................................4
Check the ash drive capacity .............................................................................................................. 5
Set the target tolerance .......................................................................................................................... 5
Change the copying speed ................................................................................................................... 6
Change the time between copy and compare...............................................................................6
Set the device to automatically check the USB ash drive ........................................................ 7
Complete a synchronous copy .............................................................................................................7
Complete an asynchronous copy ........................................................................................................ 8
Interrupt the copying process .............................................................................................................. 8
Disable the asynchronous feature ...................................................................................................... 9
Copy to an HDD or SSD ........................................................................................................................... 9
Instruction manual
i
Page 4

Compare USB ash drives ...................................................................................................................... 9
Copy and compare USB ash drives ................................................................................................... 9
Formatting a USB ash drive ................................................................10
Auto format a USB ash drive ............................................................................................................... 10
Format a USB ash drive to FAT16 ....................................................................................................... 10
Format a USB ash drive to FAT32 ....................................................................................................... 11
Set the FAT16 cluster size ....................................................................................................................... 11
Set the FAT32 cluster size ....................................................................................................................... 12
Erasing USB ash drives ........................................................................12
Perform a quick erase .............................................................................................................................. 12
Perform a full erase ................................................................................................................................... 13
Perform a DoD erase ................................................................................................................................ 13
Update the system rmware ................................................................14
Calculate the checksum number .........................................................14
Measure read and write speeds ...........................................................14
Analyzing the quality of a USB ash drive .........................................15
Perform a media check ........................................................................................................................... 15
Change the range limit percentage ................................................................................................... 15
Change the MB range limit .................................................................................................................... 16
Change the error limit ............................................................................................................................. 16
View information about a USB ash drive .........................................16
View system information ......................................................................17
Technical support ................................................................................... 18
Warranty information ............................................................................18
Instruction manual
ii
Page 5
Product diagram
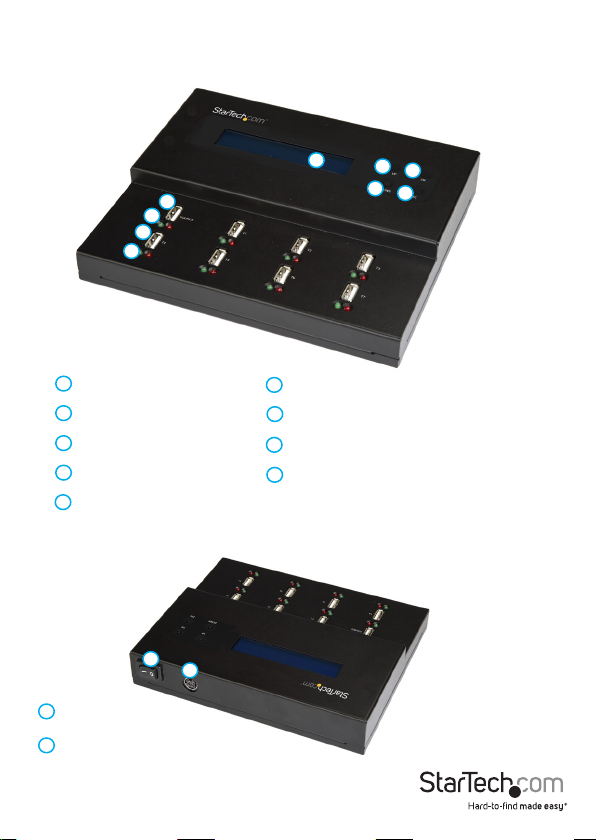
Top view
1
LCD display
2
UP button
3
DOWN button
4
OK button
5
ESC button
Back view
10
Power switch
11
Power adapter port
1
6
7
8
9
6
Source USB ash drive port
7
Source USB ash drive LED indicators
8
Destination USB ash drive port
9
Destination USB ash drive LED indicators
10
11
2
4
3
5
Instruction manual
1
Page 6

Package contents
• 1 x duplicator and eraser
• 1 x universal power adapter (NA/JP, UK, EU, ANZ)
• 1 x quick-start guide
Requirements
• 1 source USB ash drive
• 1 to 7 destination USB ash drives
To connect an SD, an SDHC, a microSD, a miniSD, an MMC, or a CF card, you require a
USB multimedia card reader for each of the USB ash drive ports.
Requirements are subject to change. For the latest requirements, please visit
www.StarTech.com/USBDUPE17.
About the LED indicators
Each of the eight USB ash drive ports feature a detection/activity LED and an
error LED.
LED behavior Signicance
Green LED is blinking Command is being executed
Warning! Do not remove the USB ash drive
when the green LED is blinking.
Green LED is illuminated USB ash drive is detected
OR
Process is complete
Red LED is illuminated An error occurred
For more information, see the LCD display.
Instruction manual
2
Page 7

Set up the duplicator and eraser
1. Connect the universal power adapter to the Power adapter port on the duplicator
and eraser and to a power source.
2. Use the Power switch to turn on the duplicator and eraser.
3. Press the UP and DOWN buttons to navigate the menu and highlight selections.
4. Press the OK button to make selections.
5. To exit a menu selection, press the ESC button.
For more information about the features and functions of the duplicator and eraser,
see the applicable sections of the manual.
Changing the device settings
In the Setup menu, you can change the settings of the duplicator and eraser, including
the button sound, display language, and so on.
Change the startup function
You can select the function that is displayed when you turn on the duplicator and
eraser. By default, the copy function is displayed when you turn on the device.
1. Highlight Setup and press the OK button.
2. Highlight Start-up Menu and press the OK button.
3. Highlight the function that you want displayed when you turn on the duplicator
and eraser, and press the OK button.
Turn o the audio feedback feature
By default, the audio feedback feature is enabled.
1. Highlight Setup and press the OK button.
2. Highlight Button Sound and press the OK button.
3. Highlight OFF and press the OK button.
Instruction manual
3
Page 8

Change the LCD display language
1. Highlight Setup and press the OK button.
2. Highlight Language and press the OK button.
3. Highlight English or Japanese and press the OK button.
Restore the default factory settings
1. Highlight Setup and press the OK button.
2. Highlight Set to Default and press the OK button.
3. When the conrmation message appears, press the OK button.
Copying USB ash drive data
Each USB ash drive port on the duplicator and eraser has an independent control
processing unit and supports asynchronous and synchronous copying.
Change the copy area
You can set the duplicator and eraser to copy the system and les or all of the data on
the USB ash drives.
System and Files
If you select System and Files as the copy area, the system analyzes the le format of
the source USB ash drive and if the format is recognizable (for example, FAT16,
FAT32, NTFS, Linux ext. 2, and so on), the system will only copy the data and not the
entire USB ash drive. If the system doesn’t recognize the le format, it will copy the
entire storage capacity of the source USB ash drive, including any empty space. This
type of copy is also known as “quick copy.”
Whole Media
If you select Whole Media as the copy area, the system copies the entire source USB
ash drive, including les and empty space. This option is useful if you’re copying the
entire source USB ash drive or if you don’t know the format of the USB ash drive.
Copying the whole media area of a source USB ash drive takes longer to complete
than copying the system and les area.
By default, System and Files is set as the copy area.
Instruction manual
4
Page 9

1. Highlight Setup and press the OK button.
2. Highlight Copy Area and press the OK button.
3. Do one of the following:
• Highlight System and Files and press the OK button.
• Highlight Whole Media and press the OK button.
Check the ash drive capacity
If a USB ash drive passes the capacity check, the green LED indicator next to the USB
ash drive port illuminates. If a USB ash drive fails the capacity check, the red LED
indicator next to the USB ash drive port illuminates.
1. Use the Power switch to turn on the duplicator and eraser.
2. Insert up to eight USB ash drives in any of the USB ash drive ports.
3. Highlight Capacity Check and press the OK button.
4. To view the capacity of the USB ash drives, use the UP and DOWN arrows to
navigate through the list of USB ash drive ports.
Tip! This feature supports asynchronous operation, which means that the system
checks each USB ash drive separately. You can remove a USB ash drive after it has
been checked and insert a dierent USB ash drive and the check will continue.
Set the target tolerance
You can set the capacity tolerance range between the source USB ash drive and
the target USB ash drive, and if the capacity of the USB ash drive is outside of the
tolerance range, the data won’t be copied. For example, if you set the target tolerance
to ±1% and the source USB flash drive is 2GB and the destination USB flash drive is
2.02GB, the data won’t be copied to the destination USB flash drive.
By default, the target tolerance is set to No Limit.
1. Highlight Setup and press the OK button.
2. Highlight Target Tolerance and press the OK button.
3. Do one of the following:
• To disable the capacity tolerance range, highlight No Limit and press the OK
button.
Caution! If the amount of data on the source USB ash drive is larger than the
Instruction manual
5
Page 10

data capacity of the destination USB ash drive and there is no limit to the
capacity tolerance range, the copying process will fail or be incomplete.
• To set the data capacity of the destination USB ash drive to be the exact same
as the source USB ash drive, highlight 100% Same and press the OK button.
Caution! If the data capacities of the source USB ash drive and destination
USB ash drive aren’t equal, the copying process won’t begin.
• To set the high and low range of the capacity tolerance range between the
source USB ash drive and the destination USB ash drive, highlight Allow
Tolerance and press the OK button. To set the maximum capacity dierence,
highlight No Limit or a numeric value between 0 and 50%, and press the
OK button. To set the minimum capacity dierence, highlight No Limit or a
numeric value between 0 and 50%, and press the OK button.
Change the copying speed
For most types of USB ash drives, you should set the copy speed to Normal.
1. Highlight Setup and press the OK button.
2. Highlight Working Mode and press the OK button.
3. Highlight one of the following and press the OK button:
• Fastest Mode
• Faster Mode
• Normal Mode
• Slower Mode
• Slowest Mode
Tip! If you’re experiencing a high failure rate when you’re copying USB ash drives, try
using a slower copying speed.
Change the time between copy and compare
By default, the duplicator and eraser is set to wait 3 seconds after a copy process
completes before beginning the compare process.
1. Highlight Setup and press the OK button.
2. Highlight Power O Time Between Copy&Compare and press the OK button.
3. Highlight a numeric value between 0 and 15 and press the OK button.
Instruction manual
6
Page 11

Set the device to automatically check the USB ash drive
By default, the duplicator and eraser doesn’t check the USB ash drive before it begins
to copy it.
1. Highlight Setup and press the OK button.
2. Highlight Check Before Copy and press the OK button.
3. Highlight Do Check and press the OK button.
Complete a synchronous copy
When you complete a synchronous copy, all of the connected USB ash drives are
copied or compared simultaneously. You can’t remove any of the connected USB ash
drives until the process is complete.
Note: If the data size of the source USB ash drive is larger than the buer memory
of the system, the device will complete a synchronous copy even if the asynchronous
copy feature is enabled.
Caution! To avoid any copying errors, the source USB ash drive should be larger than
or the same size as the destination USB ash drive.
1. Use the Power switch to turn on the duplicator and eraser.
2. If the asynchronous copy feature is enabled, disable the feature. For more
information about how to do this, see the “Disable the asynchronous feature”
section of the manual.
3. If necessary, change any of the copying settings (for example, copy area, copy
speed, target tolerance, and so on).
4. Insert the source USB ash drive into the Source USB ash drive port.
5. Insert up to seven destination USB ash drives into the Destination USB ash drive
ports.
6. Highlight Copy and press the OK button.
7. If you’re copying to less than seven destination USB ash drives, when the
conrmation message appears, press the OK button.
Warning! If the green LED indicator is blinking, do not remove the USB ash drive. If
you do so, you will interrupt the copying process and you could experience lost or
corrupted data as a result.
Instruction manual
7
Page 12

Complete an asynchronous copy
When you complete an asynchronous copy, the USB ash drives are copied or
compared independently, one at a time. When the green LED indicator next to a USB
ash drive stops blinking, you can remove the USB ash drive even if the other USB
ash drives are not done being copied or compared.
Note: If the data size of the source USB ash drive is larger than the system’s buer
memory, the system will automatically copy in synchronous mode.
Caution! To avoid any copying errors, the source USB ash drive should be larger than
or the same size as the destination USB ash drive.
1. Use the Power switch to turn on the duplicator and eraser.
2. If necessary, change any of the copying settings (for example, copy area, copy
speed, target tolerance, and so on).
3. Insert the source USB ash drive into the Source USB ash drive port.
4. Insert up to seven destination USB ash drives into the Destination USB ash drive
ports.
5. Highlight Copy and press the OK button.
6. If you’re copying to less than seven destination USB ash drives, when the
conrmation message appears, press the OK button.
7. When the green LED indicator stops blinking, you can remove the destination USB
ash drive and insert another USB ash drive and the process will continue.
8. To check the copy status and progress for each of the USB ash drives, use the UP
and DOWN buttons to move through the USB ash drive ports.
Warning! If the green LED indicator is blinking, do not remove the USB ash drive. If
you do so, you will interrupt the copying process and you could experience lost or
corrupted data as a result.
Interrupt the copying process
1. To stop the copying process while it’s in progress, do one of the following:
• To stop copying data to the slowest USB ash drive port, press and hold the UP
and DOWN buttons for 5 seconds.
• To stop copying data to all of the USB ash drive ports, press and hold the ESC
button for 5 seconds.
Instruction manual
8
Page 13

Disable the asynchronous feature
By default, the asynchronous feature is enabled.
1. Highlight Setup and press the OK button.
2. Highlight Asynchronous and press the OK button.
3. Highlight Disable and press the OK button.
Copy to an HDD or SSD
1. Connect a USB to SATA hard drive docking station or a USB to SATA drive enclosure
to the duplicator and eraser.
2. Use the Power switch to turn on the duplicator and eraser.
3. Use the UP and DOWN buttons to navigate the device menu, highlight Setup, and
press the OK button.
4. Highlight Set HDD Mode and press the OK button.
5. Highlight Active and press the OK button.
Compare USB ash drives
After you have copied USB ash drives, you can use the compare feature to make sure
that the data was copied successfully.
1. When the copying process is complete, highlight Compare and press the OK button.
2. Use the UP and DOWN buttons to navigate through the USB ash drive ports.
Copy and compare USB ash drives
For increased eciency, you can set the duplicator and eraser to automatically
compare the USB ash drives after the copying process is complete.
1. Highlight Copy+Compare and press the OK button.
2. Use the UP and DOWN buttons to navigate through the USB ash drive ports.
Instruction manual
9
Page 14

Formatting a USB ash drive
Warning! When you format a USB ash drive, all of the data on your USB ash drive will
be deleted. If your USB ash drive has data on it that you require, you should create a
backup le or use a dierent USB ash drive.
Auto format a USB ash drive
When you auto format a USB ash drive, the system determines the capacity of the
USB ash drive and formats it accordingly.
Consult the table below for more information about the format that the USB ash drive
will be formatted to.
Original format After auto formatting
FAT16 No change to format
FAT32 No change to format
NTFS, Linux, multi-partition FAT equal
to or greater than 2GB
NTFS, Linux, multi-partition FAT less
1. Use the Power switch to turn on the duplicator and eraser.
2. To auto format a USB ash drive, insert up to seven USB ash drives into the
Destination USB ash drive ports.
3. Highlight Utility and press the OK button.
4. Highlight Do Format and press the OK button.
5. Highlight Auto Format and press the OK button.
6. When the conrmation message appears, press the OK button.
7. To check the formatting status, progress, and information about the USB ash
drives, use the UP and DOWN arrows to navigate through the USB ash drive ports.
than 2GB
FAT32
FAT16
Format a USB ash drive to FAT16
1. Use the Power switch to turn on the duplicator and eraser.
2. Insert USB ash drives into the USB ash drive ports.
Instruction manual
10
Page 15

3. Highlight Utility and press the OK button.
4. Highlight Do Format and press the OK button.
5. Highlight FAT16 Format and press the OK button.
6. When the conrmation message appears, press the OK button.
7. To check the formatting status, progress, and information about the USB ash
drives, use the UP and DOWN arrows to navigate through the USB ash drive ports.
Format a USB ash drive to FAT32
1. Use the Power switch to turn on the duplicator and eraser.
2. Insert USB ash drives into the USB ash drive ports.
3. Highlight Utility and press the OK button.
4. Highlight Do Format and press the OK button.
5. Highlight FAT32 Format and press the OK button.
6. When the conrmation message appears, press the OK button.
7. To check the formatting status, progress, and information about the USB ash
drives, use the UP and DOWN arrows to navigate through the USB ash drive ports.
Set the FAT16 cluster size
1. Use the Power switch to turn on the duplicator and eraser.
2. Insert USB ash drives into the USB ash drive ports.
3. Highlight Utility and press the OK button.
4. Highlight Do Format and press the OK button.
5. Highlight Set FAT16 Cluster Size and press the OK button.
6. Highlight any of the following and press the OK button:
• Auto
• 4KB
• 8KB
• 16KB
• 32KB
• 64KB
Instruction manual
11
Page 16

Set the FAT32 cluster size
1. Use the Power switch to turn on the duplicator and eraser.
2. Insert USB ash drives into the USB ash drive ports.
3. Highlight Utility and press the OK button.
4. Highlight Do Format and press the OK button.
5. Highlight Set FAT32 Cluster Size and press the OK button.
6. Highlight any of the following and press the OK button:
• Auto
• 4KB
• 8KB
• 16KB
• 32KB
• 64KB
Erasing USB ash drives
The duplicator and eraser features three dierent types of erasing: quick erase, full
erase, and DoD erase.
Perform a quick erase
When you perform a quick erase, the entire contents of the USB ash drive are erased
and the USB ash drive is left unformatted. This type of erase process is the fastest.
Warning! When you complete the following steps, all of the data on your USB ash
drive is deleted. If your USB ash drive has data on it that you require, you should
create a backup le or use a dierent USB ash drive.
1. Use the Power switch to turn on the duplicator and eraser.
2. Insert up to eight USB ash drives into any of the USB ash drive ports.
3. Highlight Utility and press the OK button.
4. Highlight Quick Erase and press the OK button.
5. When the conrmation message appears, press the OK button.
Tip! To check the status of the erase process, use the UP and DOWN buttons to move
through the list of the USB ash drive ports.
Instruction manual
12
Page 17

Perform a full erase
When you perform a full erase, the system completes a single-pass overwrite and
erases the entire contents and format of the USB ash drive. This type of erase process
can take longer to complete than the quick erase process.
Warning! When you complete the following steps, all of the data on your USB ash
drive is deleted. If your USB ash drive has data on it that you require, you should
create a backup le or use a dierent USB ash drive.
1. Use the Power switch to turn on the duplicator and eraser.
2. Insert up to eight USB ash drives into any of the USB ash drive ports.
3. Highlight Utility and press the OK button.
4. Highlight Full Erase and press the OK button.
5. When the conrmation message appears, press the OK button.
Tip! To check the status of the erase process, use the UP and DOWN buttons to move
through the list of the USB ash drive ports.
Perform a DoD erase
When you perform a DoD erase, the system completes a three-pass overwrite and
erases the entire contents and format of the USB ash drive. This type of erase process
can take longer to complete than the quick erase and full erase processes.
Warning! When you complete the following steps, all of the data on your USB ash
drive will be deleted. If your USB ash drive has data on it that you require, you should
create a backup le or use a dierent USB ash drive.
1. Use the Power switch to turn on the duplicator and eraser.
2. Insert up to eight USB ash drives into any of the USB ash drive ports.
3. Highlight Utility and press the OK button.
4. Highlight DoD Erase and press the OK button.
5. When the conrmation message appears, press the OK button.
Tip! To check the status of the erase process, use the UP and DOWN buttons to move
through the list of the USB ash drive ports.
Instruction manual
13
Page 18

Update the system rmware
1. Save the rmware update onto a USB ash drive that is formatted to FAT32.
Note: Make sure that the rmware update le is unzipped and not in a folder.
2. Use the Power switch to turn on the duplicator and eraser.
3. Insert the USB ash drive into one of the USB ash drive ports.
4. Highlight Utility and press the OK button.
5. Highlight System Update and press the OK button.
6. When the conrmation message appears, press the OK button.
7. When the rmware update is complete, move the Power switch to the o position.
8. Wait a couple of minutes and then turn on the duplicator and eraser again.
Calculate the checksum number
You can calculate the checksum number of the source USB ash drive. The checksum
area that is calculated is based on the copy area that is set.
1. Use the Power switch to turn on the duplicator and eraser.
2. Insert a USB ash drive into the Source USB ash drive port.
3. Highlight Utility and press the OK button.
4. Highlight Calc. Checksum and press the OK button.
When the calculation is complete, the checksum is displayed on the LCD display.
Measure read and write speeds
You can measure the read and write speeds of the destination USB ash drives.
1. Use the Power switch to turn on the duplicator and eraser.
2. Insert up to seven USB ash drives into the Destination USB ash drive ports.
3. Highlight Utility and press the OK button.
4. Highlight Measure Speed and press the OK button.
5. To view the read and write speeds for each of the USB ash drives, use the UP and
DOWN buttons to move through the list of the USB ash drive ports.
Instruction manual
14
Page 19

Analyzing the quality of a USB ash drive
You can use the media check feature on the duplicator and eraser to check the quality
of a USB ash drive. You can also change the range and error limit of the media check
feature.
Perform a media check
There are three types of media checks that you can perform: H3 Safe, H5 RW, and H6
SafeRW. When you select the H3 Safe media check, the system reads the USB ash
drive to assess its quality. When you select the H5 RW or H6 SafeRW, the system reads
and writes to the USB ash drive to assess its quality.
Warning! When you complete the following steps, some or all of the data on your USB
ash drive might be deleted. If your USB ash drive has data on it that you require, you
should create a backup le or use a dierent USB ash drive.
1. Use the Power switch to turn on the duplicator and eraser.
2. Insert up to seven USB ash drives into the Destination USB ash drive ports.
3. Highlight Utility and press the OK button.
4. Highlight Media Check and press the OK button.
5. Do one of the following:
• Highlight H3 Safe and press the OK button.
• Highlight H5 RW and press the OK button.
• Highlight H6 SafeRW and press the OK button.
When the process is complete, you can view the number of bad sectors detected and
the read/write speed of the USB ash drive on the LCD display.
Change the range limit percentage
You can select the percentage of the USB ash drive that you want to quality check.
1. Highlight Utility and press the OK button.
2. Highlight Media Check and press the OK button.
3. Highlight Setup Range % and press the OK button.
4. Highlight a percentage between 1 and 100 and press the OK button.
Instruction manual
15
Page 20

Change the MB range limit
1. Highlight Utility and press the OK button.
2. Highlight Media Check and press the OK button.
3. Highlight Setup Range MB and press the OK button.
4. Highlight a number between 1 and 9000MB and press the OK button.
Change the error limit
You can set the tolerance range when you check for errors on the USB ash drive.
1. Highlight Utility and press the OK button.
2. Highlight Media Check and press the OK button.
3. Highlight Set Error Limit and press the OK button.
4. Do one of the following:
• Highlight Sector and press the OK button.
• Highlight KB and press the OK button.
• Highlight MB and press the OK button.
• Highlight GB and press the OK button.
5. Highlight a number and press the OK button.
View information about a USB ash drive
You can use this feature to view information about a USB ash drive, including drive
type, content size, total capacity, and port number.
1. Use the Power switch to turn on the duplicator and eraser.
2. Insert up to seven USB ash drives into the Destination USB ash drive ports.
3. Highlight Information and press the OK button.
4. Highlight USB Info. and press the OK button.
5. Use the UP and DOWN buttons to move through the USB ash drive ports.
Instruction manual
16
Page 21

View system information
You can use this feature to view information about the system, including the model
number and current rmware version.
1. Highlight Information and press the OK button.
2. Highlight System Info. and press the OK button.
3. Use the UP and DOWN buttons to move through the USB ash drive ports.
Instruction manual
17
Page 22

Technical support
StarTech.com’s lifetime technical support is an integral part of our commitment to
provide industry-leading solutions. If you ever need help with your product, visit www.
startech.com/support and access our comprehensive highlightion of online tools,
documentation, and downloads.
For the latest drivers/software, please visit www.startech.com/downloads
Warranty information
This product is backed by a two-year warranty.
StarTech.com warrants its products against defects in materials and workmanship
for the periods noted, following the initial date of purchase. During this period,
the products may be returned for repair, or replacement with equivalent
products at our discretion. The warranty covers parts and labor costs only.
StarTech.com does not warrant its products from defects or damages arising from
misuse, abuse, alteration, or normal wear and tear.
Limitation of Liability
In no event shall the liability of StarTech.com Ltd. and StarTech.com USA LLP (or their
ocers, directors, employees or agents) for any damages (whether direct or indirect,
special, punitive, incidental, consequential, or otherwise), loss of prots, loss of business,
or any pecuniary loss, arising out of or related to the use of the product exceed the
actual price paid for the product. Some states do not allow the exclusion or limitation
of incidental or consequential damages. If such laws apply, the limitations or exclusions
contained in this statement may not apply to you.
Instruction manual
18
Page 23

Hard-to-nd made easy. At StarTech.com, that isn’t a slogan. It’s a promise.
StarTech.com is your one-stop source for every connectivity part you need. From
the latest technology to legacy products — and all the parts that bridge the old and
new — we can help you nd the parts that connect your solutions.
We make it easy to locate the parts, and we quickly deliver them wherever they need
to go. Just talk to one of our tech advisors or visit our website. You’ll be connected to
the products you need in no time.
Visit www.startech.com for complete information on all StarTech.com products and
to access exclusive resources and time-saving tools.
StarTech.com is an ISO 9001 Registered manufacturer of connectivity and technology
parts. StarTech.com was founded in 1985 and has operations in the United States,
Canada, the United Kingdom and Taiwan servicing a worldwide market.
 Loading...