

Page 1
Quick-start guide
USB to mSATA Converter for Raspberry Pi and Development Boards
PIB2MS1
FR: Guide de l’utilisateur - fr.startech.com
DE: Bedienungsanleitung - de.startech.com
ES: Guía del usuario - es.startech.com
NL: Gebruiksaanwijzing - nl.startech.com
PT: Guia do usuário - pt.startech.com
IT: Guida per l’uso - it.startech.com
Introduction
You can use the PIB2MS1 to connect an mSATA drive to a
development board to increase data storage capacity and
performance. The PIB2MS1 supports SATA I, SATA II, and SATA III
drives, mini mSATA drives, and mSATA SSDs.
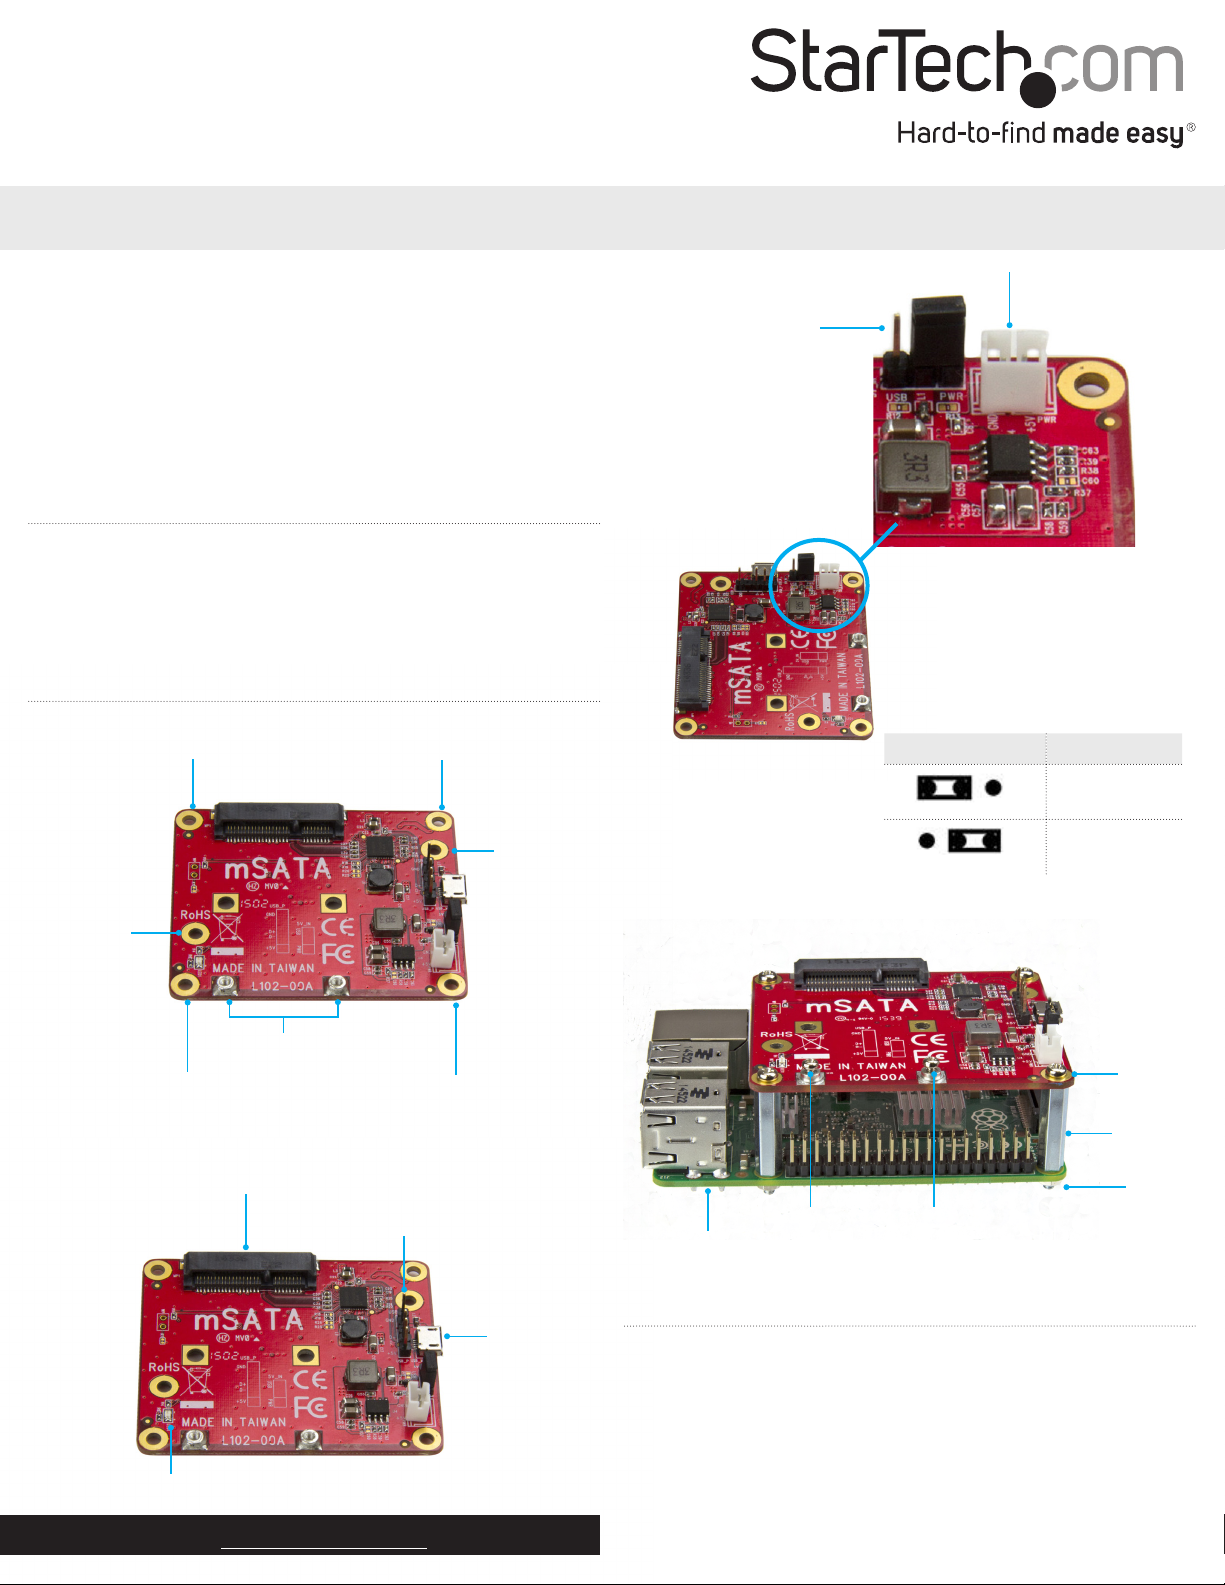
Product diagram
Primary installation hole
Primary installation hole
Secondary
installation hole
AUX power connector
Jumper
Use to control
which interface
power is drawn
from
Jumper position Mode
USB powered
AUX powered
Secondary
installation hole
mSATA mounting
holes
Primary installation hole
mSATA port
LED
For the latest information, technical specications, and support for
this product, please visit www.StarTech.com/PIB2MS1.
Primary installation hole
*actual product may vary from photos
USB 2.0 header
USB 2.0 port
Converter installed on a development board
Screw
Stando
Nut
mSATA mounting hardware
Development board
(not included)
Package contents
• 1 x USB to mSATA converter
• 1 x USB-A to Micro-B cable
• 4 x standos
• 4 x nuts
• 4 x screws
• 2 x mSATA mounting screws
• 1 x quick-start guide
Manual Revision: 01/10/2017
Page 2
About the LED indicator
The PIB2MS1 has a green LED indicator that illuminates to indicate
activity.
Requirements
• mSATA drive
• Development board, for example, Raspberry Pi (not included)
• Screwdriver
This converter is OS independent and doesn’t require any additional
drivers or software.
Requirements are subject to change. For the latest requirements,
please visit www.StarTech.com/PIB2MS1.
Install a drive in the converter
1. Use a screwdriver (not provided) to remove the two mSATA
mounting screws from the mSATA mounting holes on the
converter.
2. Gently slide the mSATA connector on your drive into the
corresponding connector on the mSATA port on the converter.
Note: The connector on your drive is keyed so that it only ts one
way.
3. Insert the mSATA mounting screws that you removed in
step 1 through the mounting holes on the drive and into the
mSATA mounting holes on the converter, and tighten the screws
in place.
To remove a drive, use a screwdriver to remove the mSATA
mounting hardware that is holding the drive in place and pull the
drive out of the converter.
Install the converter
Warning! Drives and converters should be handled carefully,
especially when they’re transported. If you’re not careful with your
drives, you may lose data as a result. Always handle storage devices
with caution. Make sure that you’re properly grounded by wearing
an anti-static strap when you install any computer component. If an
anti-static strap isn’t available, touch a large, grounded metal surface
for several seconds to discharge any built-up static electricity.
1. Place the provided standos into the installation holes on the
development board (not included).
2. To ax the standos in place, screw the provided nuts onto the
stando threads on the reverse side of the development board.
3. Line up the Installation holes on the converter with the standos
axed to the development board.
4. Insert the provided screws into the Installation holes on the
converter and into the standos, and tighten them in place.
5. Connect the provided USB-A to Micro-B cable to the USB 2.0 port
on the converter and to the USB port on the development board.
FCC Compliance Statement
This equipment has been tested and found to comply with the limits for a Class B digital device,
pursuant to part 15 of the FCC Rules. These limits are designed to provide reasonable protection
against harmful interference in a residential installation. This equipment generates, uses and can
radiate radio frequency energy and, if not installed and used in accordance with the instructions,
may cause harmful interference to radio communications. However, there is no guarantee that
interference will not occur in a particular installation. If this equipment does cause harmful
interference to radio or television reception, which can be determined by turning the equipment
o and on, the user is encouraged to try to correct the interference by one or more of the
following measures:
• Reorient or relocate the receiving antenna.
• Increase the separation between the equipment and receiver.
• Connect the equipment into an outlet on a circuit dierent from that to which the receiver is
connected.
• Consult the dealer or an experienced radio/TV technician for help
This device complies with part 15 of the FCC Rules. Operation is subject to the following two
conditions: (1) This device may not cause harmful interference, and (2) this device must accept
any interference received, including interference that may cause undesired operation. Changes or
modications not expressly approved by StarTech.com could void the user’s authority to operate
the equipment.
Industry Canada Statement
This Class B digital apparatus complies with Canadian ICES-003.
Cet appareil numérique de la classe [B] est conforme à la norme NMB-003 du Canada.
CAN ICES-3 (B)/NMB-3(B)
Use of Trademarks, Registered Trademarks, and other Protected Names
and Symbols
Raspberry Pi is a trademark of the Raspberry Pi Foundation.
This manual may make reference to trademarks, registered trademarks, and other protected
names and/or symbols of third-party companies not related in any way to
StarTech.com. Where they occur these references are for illustrative purposes only and do not
represent an endorsement of a product or service by StarTech.com, or an endorsement of the
product(s) to which this manual applies by the third-party company in question. Regardless
of any direct acknowledgement elsewhere in the body of this document, StarTech.com hereby
acknowledges that all trademarks, registered trademarks, service marks, and other protected
names and/or symbols contained in this manual and related documents are the property of their
respective holders.
Technical Support
StarTech.com’s lifetime technical support is an integral part of our commitment to provide
industry-leading solutions. If you ever need help with your product, visit www.startech.com/
support and access our comprehensive selection of online tools, documentation, and downloads.
For the latest drivers/software, please visit www.startech.com/downloads
Warranty Information
This product is backed by a two-year warranty.
StarTech.com warrants its products against defects in materials and workmanship for the periods
noted, following the initial date of purchase. During this period, the products may be returned for
repair, or replacement with equivalent products at our discretion. The warranty covers parts and
labor costs only. StarTech.com does not warrant its products from defects or damages arising from
misuse, abuse, alteration, or normal wear and tear.
Limitation of Liability
In no event shall the liability of StarTech.com Ltd. and StarTech.com USA LLP (or their ocers,
directors, employees or agents) for any damages (whether direct or indirect, special, punitive,
incidental, consequential, or otherwise), loss of prots, loss of business, or any pecuniary loss,
arising out of or related to the use of the product exceed the actual price paid for the product.
Some states do not allow the exclusion or limitation of incidental or consequential damages. If
such laws apply, the limitations or exclusions contained in this statement may not apply to you.
 Loading...