

Page 1
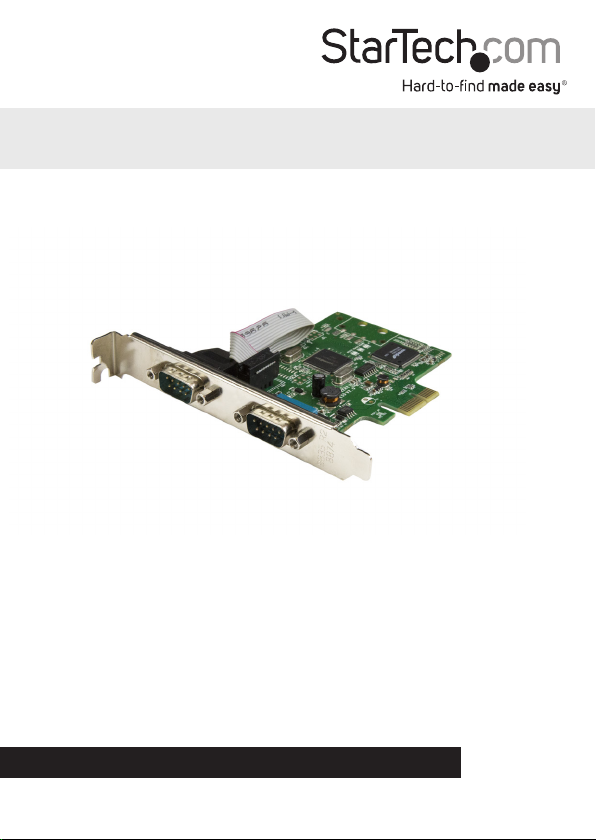
2-Port Serial Card with 16C1050 UART RS232 – PCIe
PEX2S1050
*actual product may vary from photos
FR: Guide de l’utilisateur - fr.startech.com
DE: Bedienungsanleitung - de.startech.com
ES: Guía del usuario - es.startech.com
NL: Gebruiksaanwijzing - nl.startech.com
PT: Guia do usuário - pt.startech.com
IT: Guida per l’uso - it.startech.com
For the latest information, technical specications, and support for
this product, please visit www.startech.com/PEX2S1050
Manual Revision: 11/25/2016
Page 2

FCC Compliance Statement
This equipment has been tested and found to comply with the limits for a Class B digital
device, pursuant to part 15 of the FCC Rules. These limits are designed to provide reasonable
protection against harmful interference in a residential installation. This equipment
generates, uses and can radiate radio frequency energy and, if not installed and used in
accordance with the instructions, may cause harmful interference to radio communications.
However, there is no guarantee that interference will not occur in a particular installation. If
this equipment does cause harmful interference to radio or television reception, which can
be determined by turning the equipment o and on, the user is encouraged to try to correct
the interference by one or more of the following measures:
• Reorient or relocate the receiving antenna.
• Increase the separation between the equipment and receiver.
• Connect the equipment into an outlet on a circuit dierent from that to which the
receiver is connected.
• Consult the dealer or an experienced radio/TV technician for help
This device complies with part 15 of the FCC Rules. Operation is subject to the following
two conditions: (1) This device may not cause harmful interference, and (2) this device must
accept any interference received, including interference that may cause undesired operation.
Changes or modications not expressly approved by StarTech.com could void the user’s
authority to operate the equipment.
Industry Canada Statement
This Class B digital apparatus complies with Canadian ICES-003.
Cet appareil numérique de la classe [B] est conforme à la norme NMB-003 du Canada.
CAN ICES-3 (B)/NMB-3(B)
Use of Trademarks, Registered Trademarks, and other Protected Names and Symbols
This manual may make reference to trademarks, registered trademarks, and other
protected names and/or symbols of third-party companies not related in any way to
StarTech.com. Where they occur these references are for illustrative purposes only and do not
represent an endorsement of a product or service by StarTech.com, or an endorsement of the
product(s) to which this manual applies by the third-party company in question. Regardless
of any direct acknowledgement elsewhere in the body of this document, StarTech.com hereby
acknowledges that all trademarks, registered trademarks, service marks, and other protected
names and/or symbols contained in this manual and related documents are the property of
their respective holders.
Windows is a trademark of Microsoft Corporation.
Linux is a trademark of Linus Torvalds.
Quick-start guide
Page 3

Table of Contents
Introduction ............................................................................................1
Product diagram ........................................................................................................................................ 1
Package contents ...................................................................................................................................... 2
Requirements ............................................................................................................................................. 2
Hardware installation ............................................................................3
Install the low-prole brackets ............................................................................................................. 3
Install the PCIe Card ................................................................................................................................. 3
Software installation .............................................................................4
Install the driver - Windows ...................................................................................................................4
Install the driver - Mac OS ...................................................................................................................... 4
Technical support ................................................................................... 5
Warranty information ............................................................................5
Quick-start guide
i
Page 4
Introduction
This serial card lets you add two RS232 serial ports to your full or small form-factor
computer through a PCI Express expansion slot. It features a dual-channel 16C1050
UART for compatibility with 16C1050 serial devices. It’s a convenient solution for
connecting modern or legacy serial devices to your computer, with support for data
transfer rates up to 460Kbps.
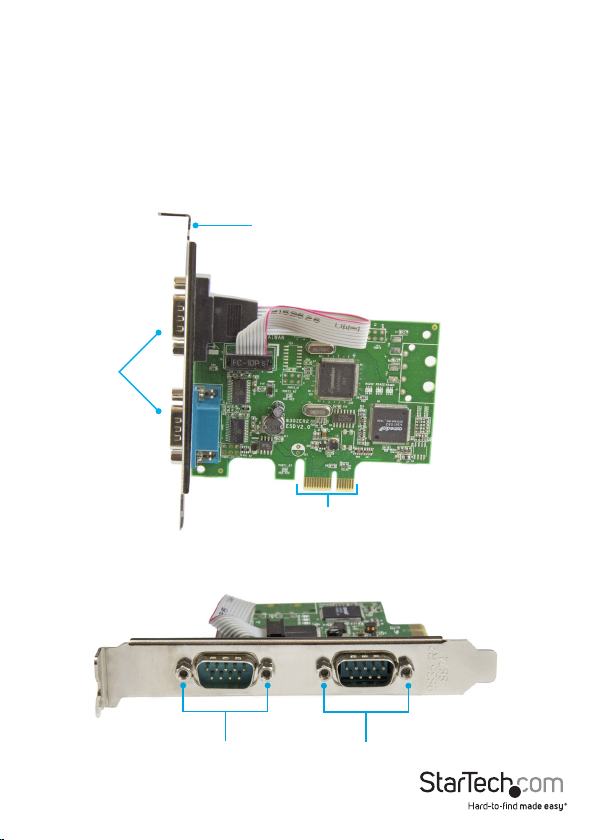
Product diagram
Top view
Bracket (full-prole pictured)
DB9 ports
PCI Express x1 connector
Front view
Quick-start guide
Screw locks Screw locks
1
Page 5
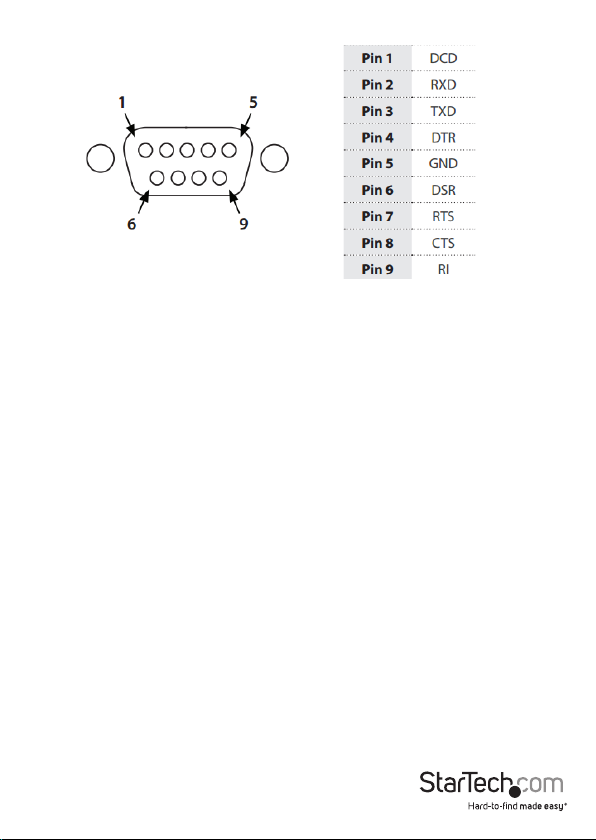
DB9 RS232 connector pinout - male
Package contents
• 1 x serial card
• 2 x low-prole brackets
• 1 x driver CD
• 1 x quick-start guide
Requirements
• A host computer with a PCI Express x1 slot (two expansion slots are required for
installation into a low-prole computer)
• A CD-ROM, DVD-ROM, or other compatible optical drive (for driver CD installation)
• RS232 serial cables (DB9)
• Any of the following operating systems:
• Windows® 10
• Windows 8.1
• Windows 8
• Windows 7
• Windows Server® 2012
• Mac OS 10.11
• Mac OS 10.10
• Mac OS 10.9
• Mac OS 10.8
• Linux® 2.4.x and later (tested up to 4.04)
Quick-start guide
2
Page 6

Hardware installation
Install the low-prole brackets
The serial card can be installed in a low-prole (half-height) or a full-prole computer.
The full-prole bracket comes preinstalled on the card, but if you have a small formfactor computer, you can install the two low-prole brackets instead.
1. Remove the four screw locks that are securing the DB9 serial ports to the full-prole
bracket.
2. Remove the full-prole bracket from the card.
3. Align the low-prole bracket’s DB9 port holes with the DB9 ports on the card.
4. Insert one DB9 serial port into the DB9 port hole on each of the two low-prole
brackets using the screw locks from step 1.
5. Insert the two screw locks from step 1 and tighten them into place on each low-
prole bracket.
Install the PCIe Card
Warning! PCIe cards can be severely damaged by static electricity. If an anti-static strap
isn’t available, discharge any built-up static electricity by touching a large grounded
metal surface for several seconds.
1. Turn o your computer and any devices or peripherals that are connected to it, such
as printers or external storage devices.
2. Unplug the power cable from the back of your computer.
3. Disconnect any peripheral devices that are connected to your computer.
4. Remove the cover from your computer case. Consult the documentation that came
with your computer for details about how to do this safely.
5. Locate an open PCIe slot and remove the corresponding metal cover plate from
the back of your computer case. Consult the documentation that came with your
computer for details about how to do this safely. This card works in PCIe slots of x1,
x4, x8, or x16 lanes.
6. Gently insert the card into the open PCIe slot and fasten the bracket to the back
of the case. For low-prole installations, two open slots on your computer case are
required, one for the PCIe card, and one additional open slot for the second low prole bracket.
Note: If you install the card into a low-prole (small form-factor) desktop system,
it might be necessary to replace the preinstalled full-prole bracket with the two
included low-prole installation brackets. See “Install the low-prole brackets” for
instructions on how to do this.
Quick-start guide
3
Page 7

7. Place the cover back onto your computer case.
8. Reconnect the power cable to the back of your computer.
9. Reconnect all of the peripheral devices that you disconnected in step 3.
10.Turn on your computer.
Software installation
Install the driver - Windows
1. Insert the provided driver CD into your computer’s CD-ROM or DVD-ROM drive.
2. Navigate to and open Device Manager.
3. Under Other devices, right-click on the PCI Serial Port device then click Update
Driver Software.
4. Click the Browse my computer for driver software button.
5. Click the Browse button.
6. Navigate to your CD-ROM or DVD-ROM location.
7. Select the Windows folder that’s applicable to the operating system running on
the computer. For 32-bit versions of Windows select the Win2000,XP,2003,Vista,2008,7
folder. For 64-bit versions of Windows select the WinXP,2003,Vista,2008,7 x64 folder,
then click the OK button.
8. Click the Next button to complete the installation process.
Install the driver - Mac OS
The card is natively supported by the following Mac operating systems:
• Mac OS 10.11
• Mac OS 10.10
• Mac OS 10.9
• Mac OS 10.8
After the card is installed inside your Mac computer, the drivers will automatically
install.
Quick-start guide
4
Page 8

Technical support
StarTech.com’s lifetime technical support is an integral part of our commitment to
provide industry-leading solutions. If you ever need help with your product, visit
www.startech.com/support and access our comprehensive selection of online tools,
documentation, and downloads.
For the latest drivers/software, please visit www.startech.com/downloads
Warranty information
This product is backed by a two-year warranty.
StarTech.com warrants its products against defects in materials and workmanship
for the periods noted, following the initial date of purchase. During this period,
the products may be returned for repair, or replacement with equivalent
products at our discretion. The warranty covers parts and labor costs only.
StarTech.com does not warrant its products from defects or damages arising from
misuse, abuse, alteration, or normal wear and tear.
Limitation of Liability
In no event shall the liability of StarTech.com Ltd. and StarTech.com USA LLP (or their
ocers, directors, employees or agents) for any damages (whether direct or indirect,
special, punitive, incidental, consequential, or otherwise), loss of prots, loss of business,
or any pecuniary loss, arising out of or related to the use of the product exceed the
actual price paid for the product. Some states do not allow the exclusion or limitation
of incidental or consequential damages. If such laws apply, the limitations or exclusions
contained in this statement may not apply to you.
Quick-start guide
5
Page 9

Hard-to-nd made easy. At StarTech.com, that isn’t a slogan. It’s a promise.
StarTech.com is your one-stop source for every connectivity part you need. From
the latest technology to legacy products — and all the parts that bridge the old and
new — we can help you nd the parts that connect your solutions.
We make it easy to locate the parts, and we quickly deliver them wherever they need
to go. Just talk to one of our tech advisors or visit our website. You’ll be connected to
the products you need in no time.
Visit www.startech.com for complete information on all StarTech.com products and
to access exclusive resources and time-saving tools.
StarTech.com is an ISO 9001 Registered manufacturer of connectivity and technology
parts. StarTech.com was founded in 1985 and has operations in the United States,
Canada, the United Kingdom and Taiwan servicing a worldwide market.
 Loading...