

Page 1
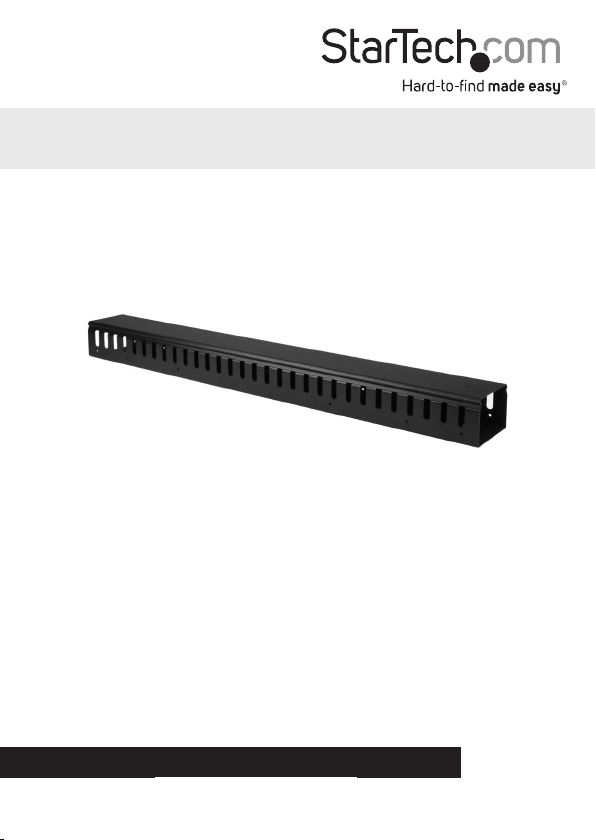
Vertical Cable Organizer with Finger
Duct - 20U
CMVER20UF
*actual product may vary from photos
FR: Guide de l’utilisateur - fr.startech.com
DE: Bedienungsanleitung - de.startech.com
ES: Guía del usuario - es.startech.com
NL: Gebruiksaanwijzing - nl.startech.com
PT: Guia do usuário - pt.startech.com
IT: Guida per l’uso - it.startech.com
For the latest information, technical specications, and support for this
product, please visit www.StarTech.com/CMVER20UF.
Manual Revision: 05/25/2016
Page 2

Use of Trademarks, Registered Trademarks, and other Protected Names and Symbols
This manual may make reference to trademarks, registered trademarks, and other
protected names and/or symbols of third-party companies not related in any way to
StarTech.com. Where they occur these references are for illustrative purposes only and do not
represent an endorsement of a product or service by StarTech.com, or an endorsement of the
product(s) to which this manual applies by the third-party company in question. Regardless
of any direct acknowledgement elsewhere in the body of this document, StarTech.com
hereby acknowledges that all trademarks, registered trademarks, service marks, and other
protected names and/or symbols contained in this manual and related documents are the
property of their respective holders.
Instruction manual
Page 3

Table of Contents
Introduction ............................................................................................1
Product diagram ........................................................................................................................................ 1
Package contents ...................................................................................................................................... 3
Installation requirements ....................................................................................................................... 3
Tool-less installation ..............................................................................4
Relocate the mounting buttons ...........................................................4
Installation using tools ..........................................................................4
Remove the mounting buttons ........................................................................................................... 5
Route the cables ........................................................................................................................................ 5
Attach the cable organizer .................................................................................................................... 6
Installation options ................................................................................6
Technical support ................................................................................... 8
Warranty information ............................................................................8
Instruction manual
i
Page 4
Introduction
The CMVER20UF is a vertical cable organizer that works with virtually any two-post,
four-post, or enclosed server rack or cabinet. The CMVER20UF provides an ideal
solution for organizing the cables in your server rack or cabinet, and you can mount
the cable organizer in dierent ways to suit your needs. The nger ducts provide an
easy and eective way to manage your cables and you can use them to run cables
down the length of the server rack or cabinet.
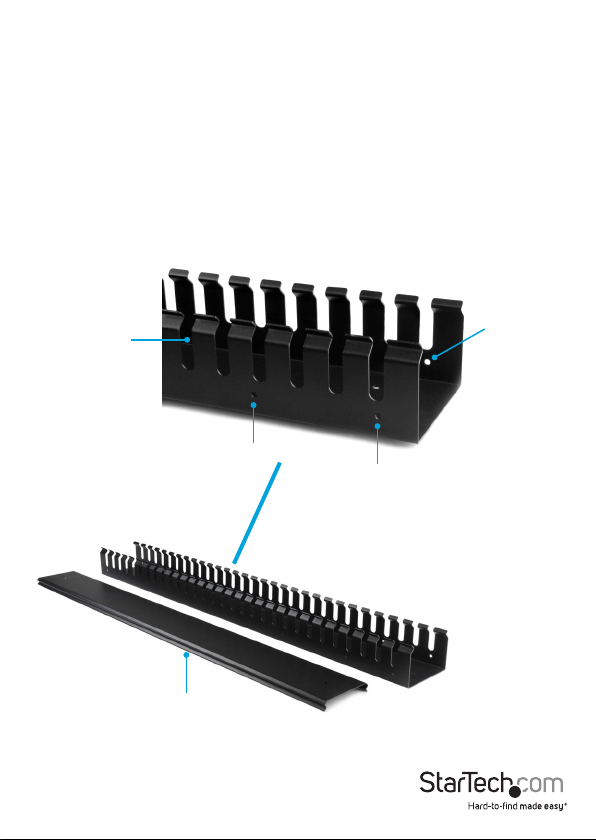
Product diagram
Front
Finger duct
Instruction manual
Mounting hole
Mounting hole
Mounting hole
Removable cover
1
Page 5

Back
Mounting hole
Mounting hole
Removable cover
Mounting hole
Instruction manual
Mounting button
Mounting hole
2
Page 6

Package contents
• 1 x vertical cable organizer
• 4 x M5 cage nuts
• 4 x M5 cage screws
• 2 x M4 nuts
• 1 x instruction manual
Installation requirements
• If you relocate the mounting buttons, a Phillips screwdriver is required.
Installation requirements are subject to change. For the latest requirements, please
visit www.StarTech.com/CMVER20UF.
Instruction manual
3
Page 7

Tool-less installation
If you don’t need to move the mounting buttons, you don’t require any tools to attach
the cable organizer to a server rack or cabinet.
You can attach the cable organizer to the outside or the inside of the server rack or
cabinet.
Note: If you’re attaching the cable organizer to a rack or cabinet with a roof, you should
slide the removable cover down and remove it from the cable organizer before you
install it.
• Attach the cable organizer to the server rack or cabinet so that the mounting
buttons t into the keyhole-shaped mounting holes on the server rack or cabinet.
Relocate the mounting buttons
The mounting buttons come preinstalled but you can move them to any of the holes
on the cable organizer.
1. Slide the removable cover down to remove it from the cable organizer.
2. Use a Phillips screwdriver to remove the screw from the mounting button.
3. Select a mounting hole on the back or sides of the cable organizer.
4. Line up the mounting button with the hole and use a Phillips screwdriver to
insert the screw that you removed in step 1 into the mounting button and cable
organizer.
5. On the other side of the mounting button, thread one of the M4 nuts onto the
screw.
6. Slide the removable cover back onto the cable organizer.
Tip! If you misplace the mounting buttons, you can use the provided M5 cage nuts and
screws instead.
Installation using tools
If your server rack doesn’t have keyhole-shaped mounting holes, you need to remove
the mounting buttons and use the included hardware to attach the cable organizer to
your server rack.
Instruction manual
4
Page 8
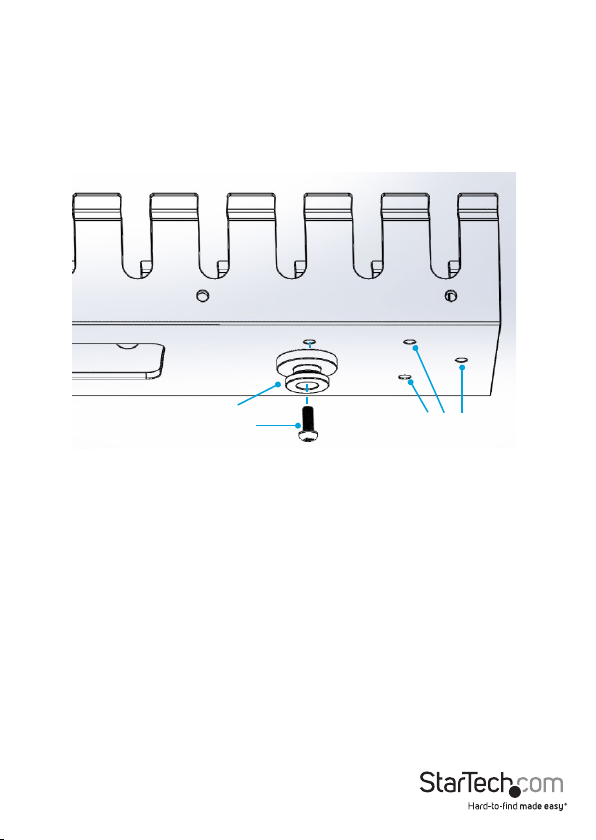
Remove the mounting buttons
If you want to use the holes that the mounting buttons are in to attach the cable
organizer to your server rack, you need to remove the mounting buttons.
• Use a Phillips screwdriver to remove the screws from the mounting buttons.
Note: Make sure that you store the mounting buttons and screws in a safe place so
that you can use them again.
Mounting button
Screw
Mounting holes
Route the cables
1. Slide the removable cover down to remove it from the cable organizer.
2. Thread the cables through the nger ducts on the cable organizer in the way that
works best for your setup.
3. Slide the removable cover back onto the cable organizer.
Instruction manual
5
Page 9

Attach the cable organizer
After you remove the mounting buttons, complete the following to attach the cable
organizer to your server rack:
1. Line up the mounting holes on the cable organizer with the mounting holes on any
of the following on your server rack:
• The vertical mounting plates.
• The horizontal mounting rails.
• The equipment-mounting holes.
Note: To view images of some of the dierent installation options mentioned above,
see the “Installation options” section.
2. Insert two of the M5 cage nuts into the server rack where you want to attach the
cable organizer.
3. Insert two M5 cage screws through the cable organizer and into the cage nuts in
the server rack.
Installation options
The following images show some of the CMVER20UF installation options.
Attached to a vertical mounting plate
Instruction manual
6
Page 10
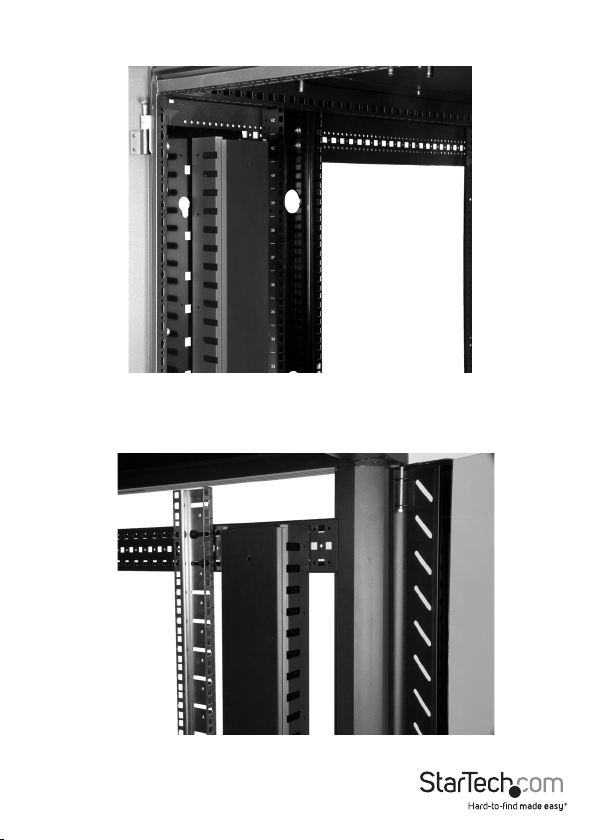
Attached to a vertical mounting plate
Attached to a horizontal mounting rail
Instruction manual
7
Page 11

Technical support
StarTech.com’s lifetime technical support is an integral part of our commitment to
provide industry-leading solutions. If you ever need help with your product, visit
www.startech.com/support and access our comprehensive selection of online tools,
documentation, and downloads.
For the latest drivers/software, please visit www.startech.com/downloads
Warranty information
This product is backed by a two-year warranty.
StarTech.com warrants its products against defects in materials and workmanship
for the periods noted, following the initial date of purchase. During this period,
the products may be returned for repair, or replacement with equivalent
products at our discretion. The warranty covers parts and labor costs only.
StarTech.com does not warrant its products from defects or damages arising from
misuse, abuse, alteration, or normal wear and tear.
Limitation of Liability
In no event shall the liability of StarTech.com Ltd. and StarTech.com USA LLP (or their
ocers, directors, employees or agents) for any damages (whether direct or indirect,
special, punitive, incidental, consequential, or otherwise), loss of prots, loss of business,
or any pecuniary loss, arising out of or related to the use of the product exceed the
actual price paid for the product. Some states do not allow the exclusion or limitation
of incidental or consequential damages. If such laws apply, the limitations or exclusions
contained in this statement may not apply to you.
Instruction manual
8
Page 12

Hard-to-nd made easy. At StarTech.com, that isn’t a slogan. It’s a promise.
StarTech.com is your one-stop source for every connectivity part you need. From
the latest technology to legacy products — and all the parts that bridge the old and
new — we can help you nd the parts that connect your solutions.
We make it easy to locate the parts, and we quickly deliver them wherever they need
to go. Just talk to one of our tech advisors or visit our website. You’ll be connected to
the products you need in no time.
Visit www.startech.com for complete information on all StarTech.com products and
to access exclusive resources and time-saving tools.
StarTech.com is an ISO 9001 Registered manufacturer of connectivity and technology
parts. StarTech.com was founded in 1985 and has operations in the United States,
Canada, the United Kingdom and Taiwan servicing a worldwide market.
 Loading...