

Page 1
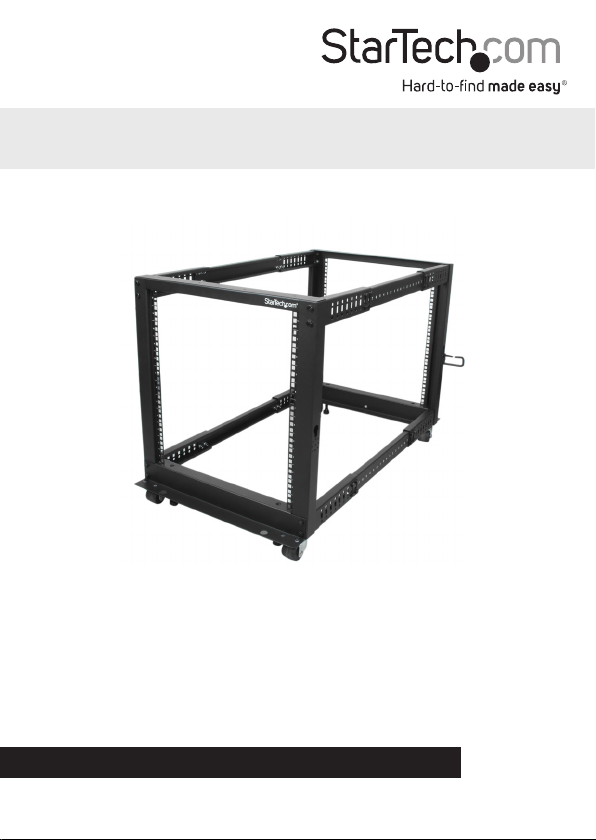
12U Adjustable 4 Post Open Frame
Server Rack
4POSTRACK12U
*actual product may vary from photos
DE: Bedienungsanleitung - de.startech.com
FR: Guide de l'utilisateur - fr.startech.com
ES: Guía del usuario - es.startech.com
IT: Guida per l'uso - it.startech.com
NL: Gebruiksaanwijzing - nl.startech.com
PT: Guia do usuário - pt.startech.com
For the most up-to-date information, please visit: www.startech.com
Manual Revision: 09/09/2014
Page 2

Use of Trademarks, Registered Trademarks, and other Protected Names and Symbols
This manual may make reference to trademarks, registered trademarks, and other
protected names and/or symbols of third-party companies not related in any way to
StarTech.com. Where they occur these references are for illustrative purposes only and do not
represent an endorsement of a product or service by StarTech.com, or an endorsement of the
product(s) to which this manual applies by the third-party company in question. Regardless
of any direct acknowledgement elsewhere in the body of this document, StarTech.com hereby
acknowledges that all trademarks, registered trademarks, service marks, and other protected
names and/or symbols contained in this manual and related documents are the property of
their respective holders.
Instruction Manual
Page 3

Table of Contents
Introduction ............................................................................................2
Packaging Contents ................................................................................................................................. 2
Installation ..............................................................................................3
Optional Component Installation ....................................................................................................... 5
Specications ..........................................................................................6
Technical Support .................................................................................. 7
Warranty Information ............................................................................7
Instruction Manual
i
Page 4

Introduction
Packaging Contents
ID Name Qty
Rack Components
1 Left Vertical Rail 2
2 Right Vertical Rail 2
3 Base Bracket 2
4 Corner Section 8
5 Center Section 4
6 Top Bracket 2
Rack Assembly Hardware
10 M8 Bolt 48
11 M8 Washer 48
Rack Assembly Tool
12 M8 (13 mm) Wrench 1
13 M6 (10 mm) Wrench 1
14 Phillips Screwdriver 1
Equipment Mounting Hardware
15 M6 Cage Nut 24
16 PVC Cup Washer 24
17 M6 Philips-Head Screw 24
Cable Management Hardware
18 Cable Management Hook 4
19 Hook Mounting Screw 4
Casters and Hardware
20 Casters 4
21 Levelling Feet 4
22 M6 Screw 16
23 M6 Flat Washer 16
24 M6 Flange Nut 16
25 Grounding Wires 4
21
20
10 11 12
15 16 17
18 19
20
13 14
22
21
23 24
25
Instruction Manual
1
Page 5

Installation
Verify packaging contents before proceeding with assembly.
1. Assemble the Top and Bottom Beams (4 total) as shown below, adjusting for your
desired mounting depth using the numbers indicated on the center section pieces
(see chart below)
Mounting Depth Index Numbers Mounting Depth Index Numbers
22 in. 0 and 0 31 in. 4 and 5
23 in. 1 and 0 32 in. 5 and 5
24 in. 1 and 1 33 in. 5 and 6
25 in. 1 and 2 34 in. 6 and 6
26 in. 2 and 2 35 in. 6 and 7
27 in. 2 and 3 36 in. 7 and 7
28 in. 3 and 3 37 in. 7 and 8
29 in. 3 and 4 38 in. 8 and 8
30 in. 4 and 4 39 in. 8 and 9
40 in. 9 and 9
NOTE: Depth from 22 to 40 inches is available by adjusting the beams at
corresponding silkscreen numbers on the beams.
Instruction Manual
2
Page 6

2. Using two of the Beams assembled in the previous step, line up one set of Left
and Right Vertical Rails, followed by the Base and Top Bracket pieces and fasten as
shown.
NOTE: In order to ensure all of the screw holes will line up easily, it is recommended
to hand-tighten the nuts through the entire assembly process, and then fully
tighten once all bolts have been inserted.
Assembled Beam
111110
Assembled Beam
3. Using the remaining two Beams assembled in step 1, line up the other set of Left
and Right Vertical Rails and fasten them to the Base and Top Brackets as shown.
Assembled Beam
10
Assembled Beam
Instruction Manual
3
Page 7

Optional Component Installation
1. Install the Casters (4pcs) and Leveling Feet (4pcs) as shown.
2. Stand the rack upright and install the included Cable Management Hooks in your
desired locations as shown.
WARNING! Please ensure that the rack is fully assembled with all included parts and
fasteners before attempting to mount any rack equipment. Failure to install and fully
tighten any hardware could severely compromise the structural integrity of the rack. If
any hardware is missing, please contact StarTech.com customer service immediately.
Instruction Manual
4
Page 8

Specications
U Height
Material
Rack Type
Frame Type
Colour
Minimum Mounting Depth
Maximum Mounting Depth
Dimensions (WxHxD)
Weight
12U
Steel
4-Post
Open Frame
Black
22in (558.8mm)
40in (1016mm)
23.62 x 25.1 x 26.06in (600 x 637.5 x 661.8mm)
37.48lbs (17kg)
Instruction Manual
5
Page 9

Technical Support
StarTech.com’s lifetime technical support is an integral part of our commitment to
provide industry-leading solutions. If you ever need help with your product, visit
www.startech.com/support and access our comprehensive selection of online tools,
documentation, and downloads.
For the latest drivers/software, please visit www.startech.com/downloads
Warranty Information
This product is backed by a two year warranty.
In addition, StarTech.com warrants its products against defects in materials
and workmanship for the periods noted, following the initial date of purchase.
During this period, the products may be returned for repair, or replacement with
equivalent products at our discretion. The warranty covers parts and labor costs only.
StarTech.com does not warrant its products from defects or damages arising from
misuse, abuse, alteration, or normal wear and tear.
Limitation of Liability
In no event shall the liability of StarTech.com Ltd. and StarTech.com USA LLP (or their
ocers, directors, employees or agents) for any damages (whether direct or indirect,
special, punitive, incidental, consequential, or otherwise), loss of prots, loss of business,
or any pecuniary loss, arising out of or related to the use of the product exceed the
actual price paid for the product. Some states do not allow the exclusion or limitation
of incidental or consequential damages. If such laws apply, the limitations or exclusions
contained in this statement may not apply to you.
Instruction Manual
6
Page 10

Hard-to-nd made easy. At StarTech.com, that isn’t a slogan. It’s a promise.
StarTech.com is your one-stop source for every connectivity part you need. From
the latest technology to legacy products — and all the parts that bridge the old and
new — we can help you nd the parts that connect your solutions.
We make it easy to locate the parts, and we quickly deliver them wherever they need
to go. Just talk to one of our tech advisors or visit our website. You’ll be connected to
the products you need in no time.
Visit www.startech.com for complete information on all StarTech.com products and
to access exclusive resources and time-saving tools.
StarTech.com is an ISO 9001 Registered manufacturer of connectivity and technology
parts. StarTech.com was founded in 1985 and has operations in the United States,
Canada, the United Kingdom and Taiwan servicing a worldwide market.
 Loading...