

Start TDA150 series User Manual
TDA150 Series

CONTENTS
Read this user’s manual before use to ensure proper operation. Keep the manual on hand
for reference in case there is a problem.
Warranty Information
Features
Notes
Setup Operations
Specications
Quick Start Guide
Trouble Shooting
Preventive Maintenance
Exploded Views
Parts List
Page 2
Page 3
Page 3
Page 4
Page 4
Page 5
Page 6
Page 6
Page 7 - 11
Page 12 - 18
WARRANTY POLICY FOR LD SERIES LABEL DISPENSERS
START International warrants all parts on TDA080 series tape dispensers against defects in design,
materials and work manship for a period of 360 days. Parts excluded from this are: cutting blades,
silicone rollers and cutter liners; these parts are considered “wear parts”. Labor to replace defective
parts will be performed at no charge for the rst 180 days after date of purchase. Warranty does not
cover transportation costs.
START International’s sole obligation under this warranty is limited to repair, replacement or credit
of the purchase price, at our option, which do not properly perform the function for which they were
designed.
Warranty repair is contingent upon START’s examination and determination that alleged defects have
not been caused by misuse, abuse, improper installation or application, repair, alteration, accident or
neglect in use, storage, transportation or handling.
The above warranty and remedy constitutes START International’s sole liability hereunder and are in
lieu and exclusive of all other warranties and remedies expressed, implied, or statutory , including, but
not limited to, those of merchantability and tness for a particular purpose.
REPAIR POLICY
Contact START INTERNATIONAL to determine nature of problem.
Furnish START with the following information:
1. Who the unit was purchased from.
2. Model number and serial number.
3. Date purchased (copy of invoice or packing slip required).
START will issue an RMA (Return Material Authorization) for the repair. Return machine to START
by freight, insured and prepaid. START will notify the customer if there is a repair charge.A $25.00
evaluation charge will apply to all non-warranty repairs, which will be applied to repair change.
For the full Warranty & Repair policy please visit www.STARTinternational.com
2
FEATURES
• When using automatic feed, remove the rst piece of tape, the unit will automatically feed
and cut the next piece at the preset length.
• Feed length can be easily set using thumbwheel controls.
• Hold down shaft increases accuracy by maximizing tape adhesion to the feed rollers.
• The blade is easy to remove and replace.
• Optional serrated blades for hard to cut materials.
NOTES
• Do not leave tape dispenser in direct sunlight.
• Wipe with dry cloth only.
• Do not drop the dispenser or subject it to heavy shock.
• Turn off machine when not in use.
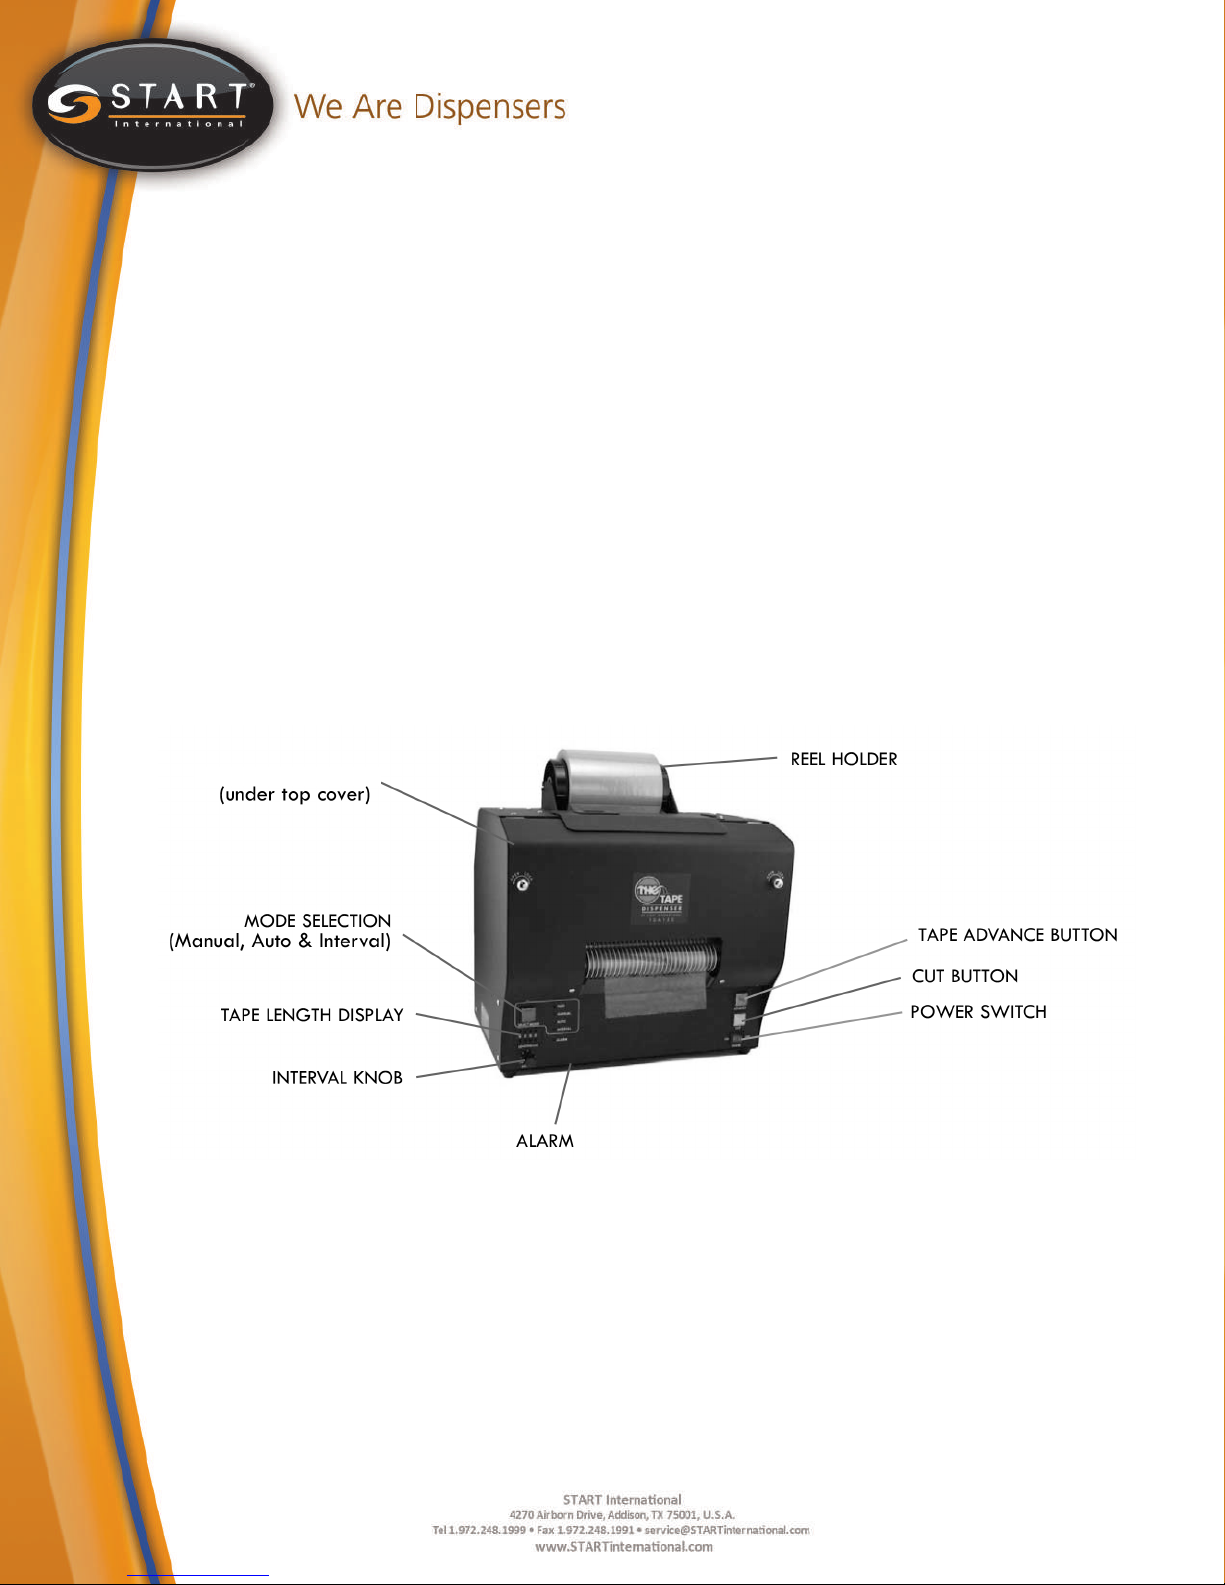
HOLD DOWN SHAFT
• Tape Length Display – Shows preset feed length. Four-digit display can be set from 50-9999mm.
• Interval Knob – Sets delay time before dispensing next piece.
• Auto/Manual Switch – Toggles operating mode between Manual (press Tape Advance button to
dispense) and Auto (automatic feed and cut when piece is removed)
• Power Switch – Press to turn power On and Off.
• Tape Advance Button – Press to feed and cut one piece of tape to the preset length.
• Hold Down Shaft – Increases adhesion to feed roller.
• Reel Holder – 3” core to hold material.
• Alarm – Lights when there is a malfunction in the unit.
3
SET-UP
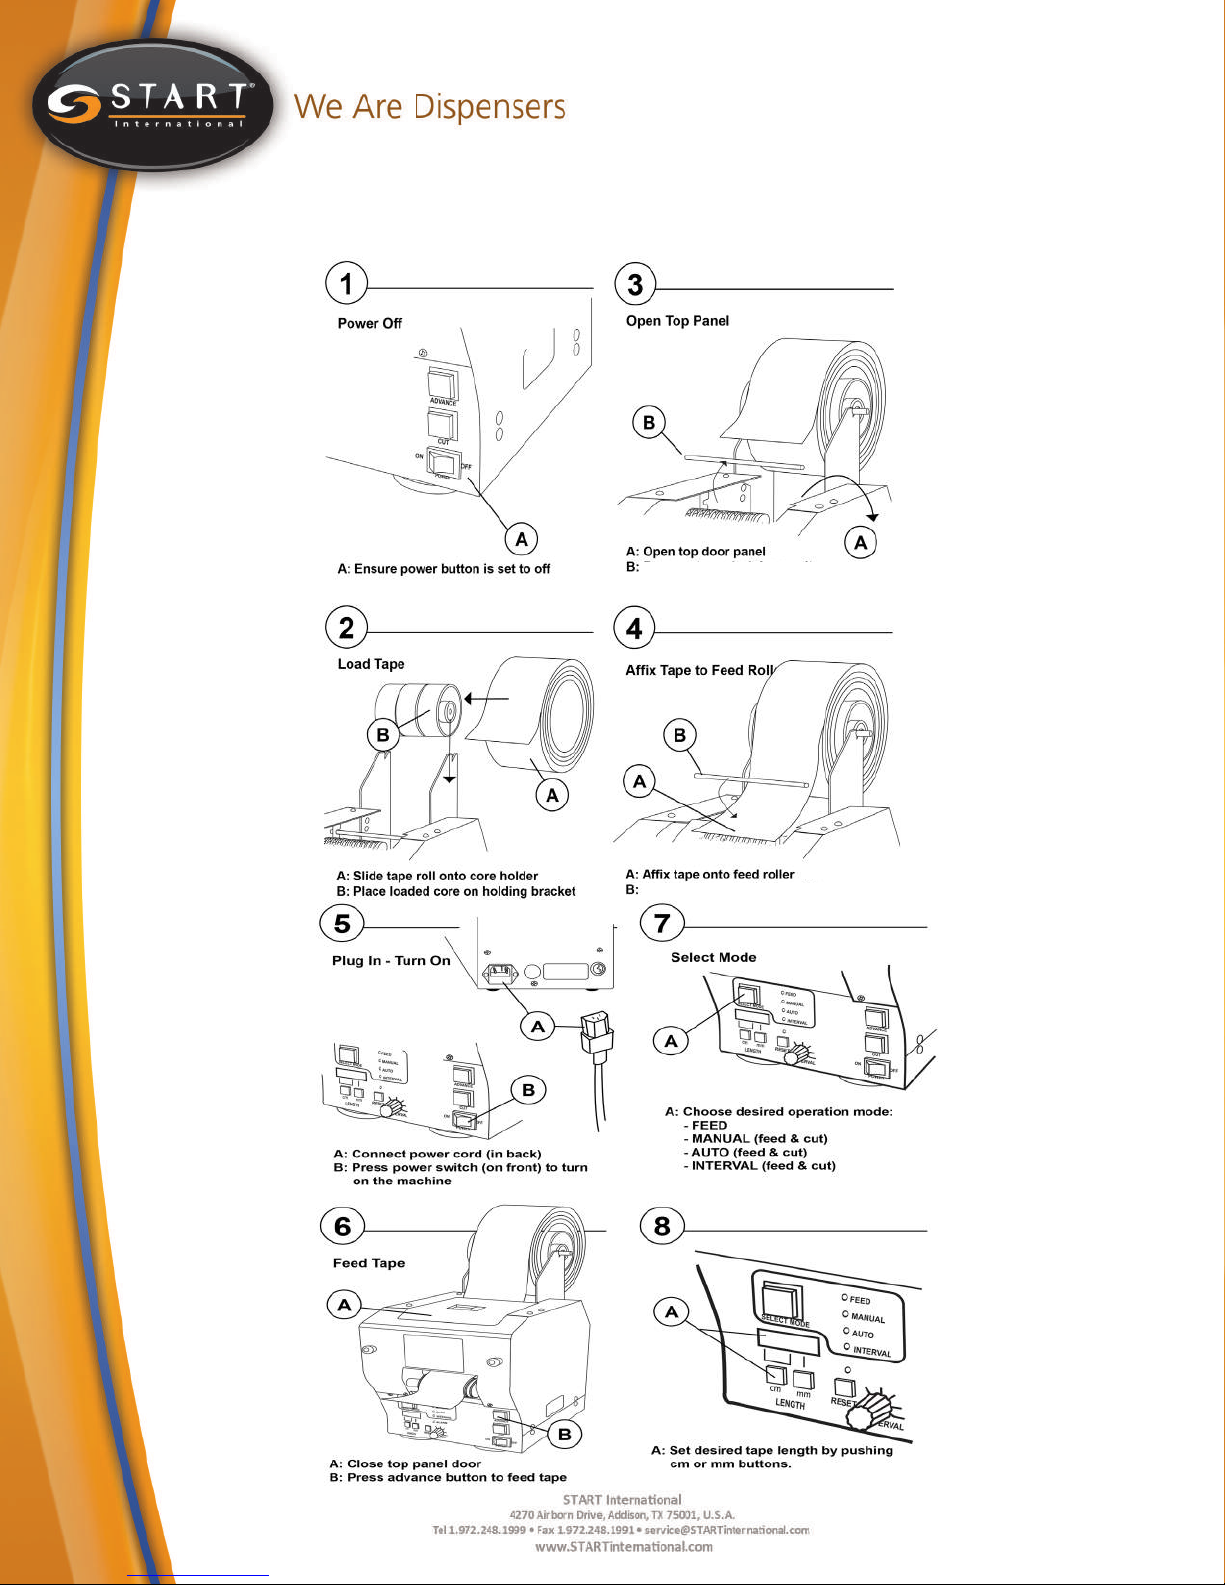
1. With Power Switch off, plug power cord into dispenser and then into wall outlet.
2. Make sure machine is grounded properly.
3. Set the Tape Length Display to 200mm.
4. Set the Auto/Manual Switch to Manual.
5. Turn dispenser Power Switch on, switch will be illuminated.
6. Place tape roll on Reel Holder.
7. Put Reel Holder into reel holder slots.
8. Open latched top cover and remove metal Hold Down Shaft.
9. Press end of tape rmly onto metal feed roller, then replace Hold Down Shaft over tape and
close top cover.
10. Press T ape Advance Button.
11. Remove tape then press Tape Advance Button again to ensure proper feeding.
OPERATION
• After tape has been loaded and fed, turn Power Switch off.
• Set Tape Length Display to required length using the push buttons above and below
the numerical display. ** The length shown is in millimeters.**
• Push button Auto/Manual Switch to desired location.
AUTO: When the cut piece of tape is removed from the machine, the next piece is automatically fed and cut. The Interval Knob will set the time delay before the next piece
is dispensed. Maximum delay is 25 seconds.
MANUAL: The Tape Advance Button must be pressed each time a piece of tape is
needed. The tape will then be fed and cut.
• Turn Power Switch on.
• Press Tape Advance Button to begin dispensing tape.
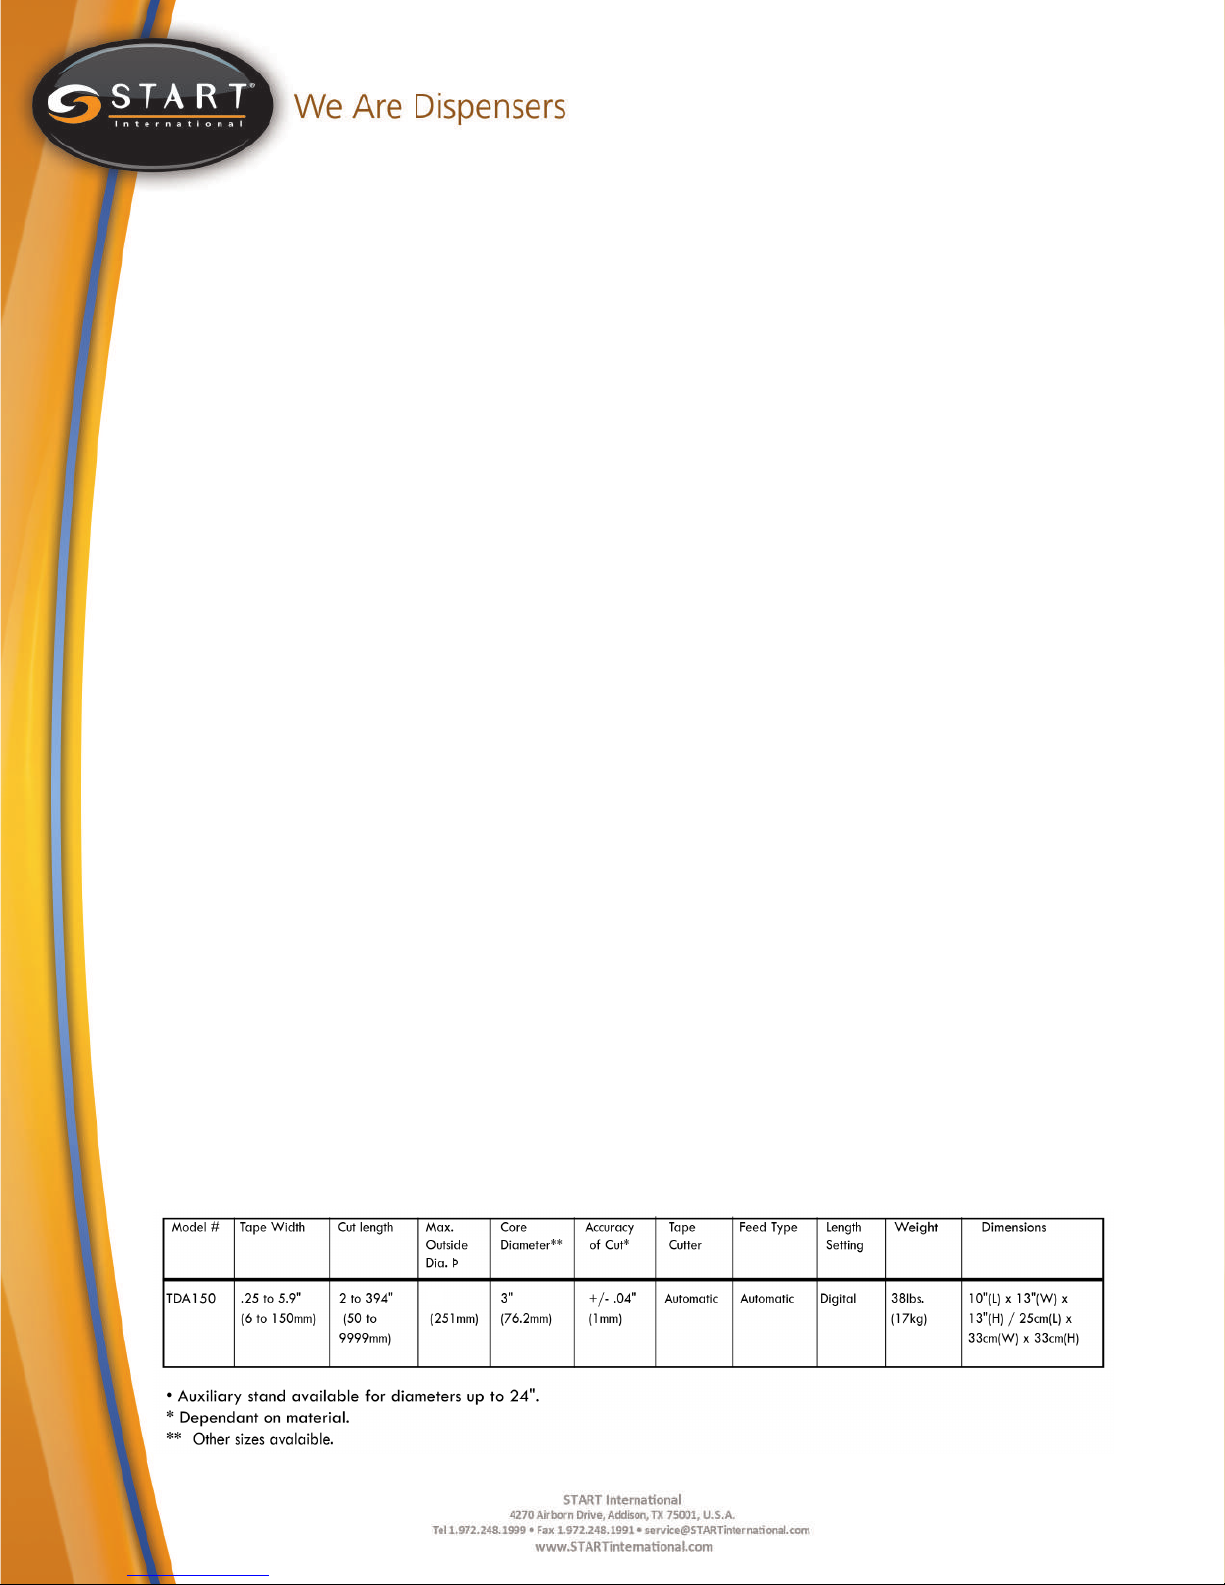
SPECIFICATIONS
7”
4
QUICK START GUIDE
Remove hold down shaft guide from unit.
Re-insert hold down shaft into guide.
5

TROUBLESHOOTING
When problems occur, carry out the following procedures. If the tape dispenser does
not operate normally after following the troubleshooting procedures, contact your supplier or Start International.
No power light / Tape does not feed
• Unplug unit and plug in again.
• Turn power switch off, wait 5 seconds, turn unit back on.
• Check that front panel is closed securely, and safety interlock is engaged.
• Verify that the fuse has not blown.
• Check that Tape Length Display is 40mm or greater.
Tape does not feed when unit is in AUTO mode
• Check that Auto/Manual Switch is in correct position.
• Turn Interval Knob all the way counterclockwise.
• Wait 1 full second after tape is cut before removing tape from machine.
Blade sticks in closed position
• Apply silicon oil to #242 Blade Roller.
Tape is not cut all the way through
• Replace #279 blade with #279S serrated blade.
PREVENTIVE MAINTENANCE
WEEKLY – Wipe feed rollers and blade with proper solvent to remove adhesive build-
up.
MONTHLY – Apply silicon oil (available from Start International) to #242 blade roller.
Inspect pressure rollers and cutting blade for wear.
6
 Loading...