

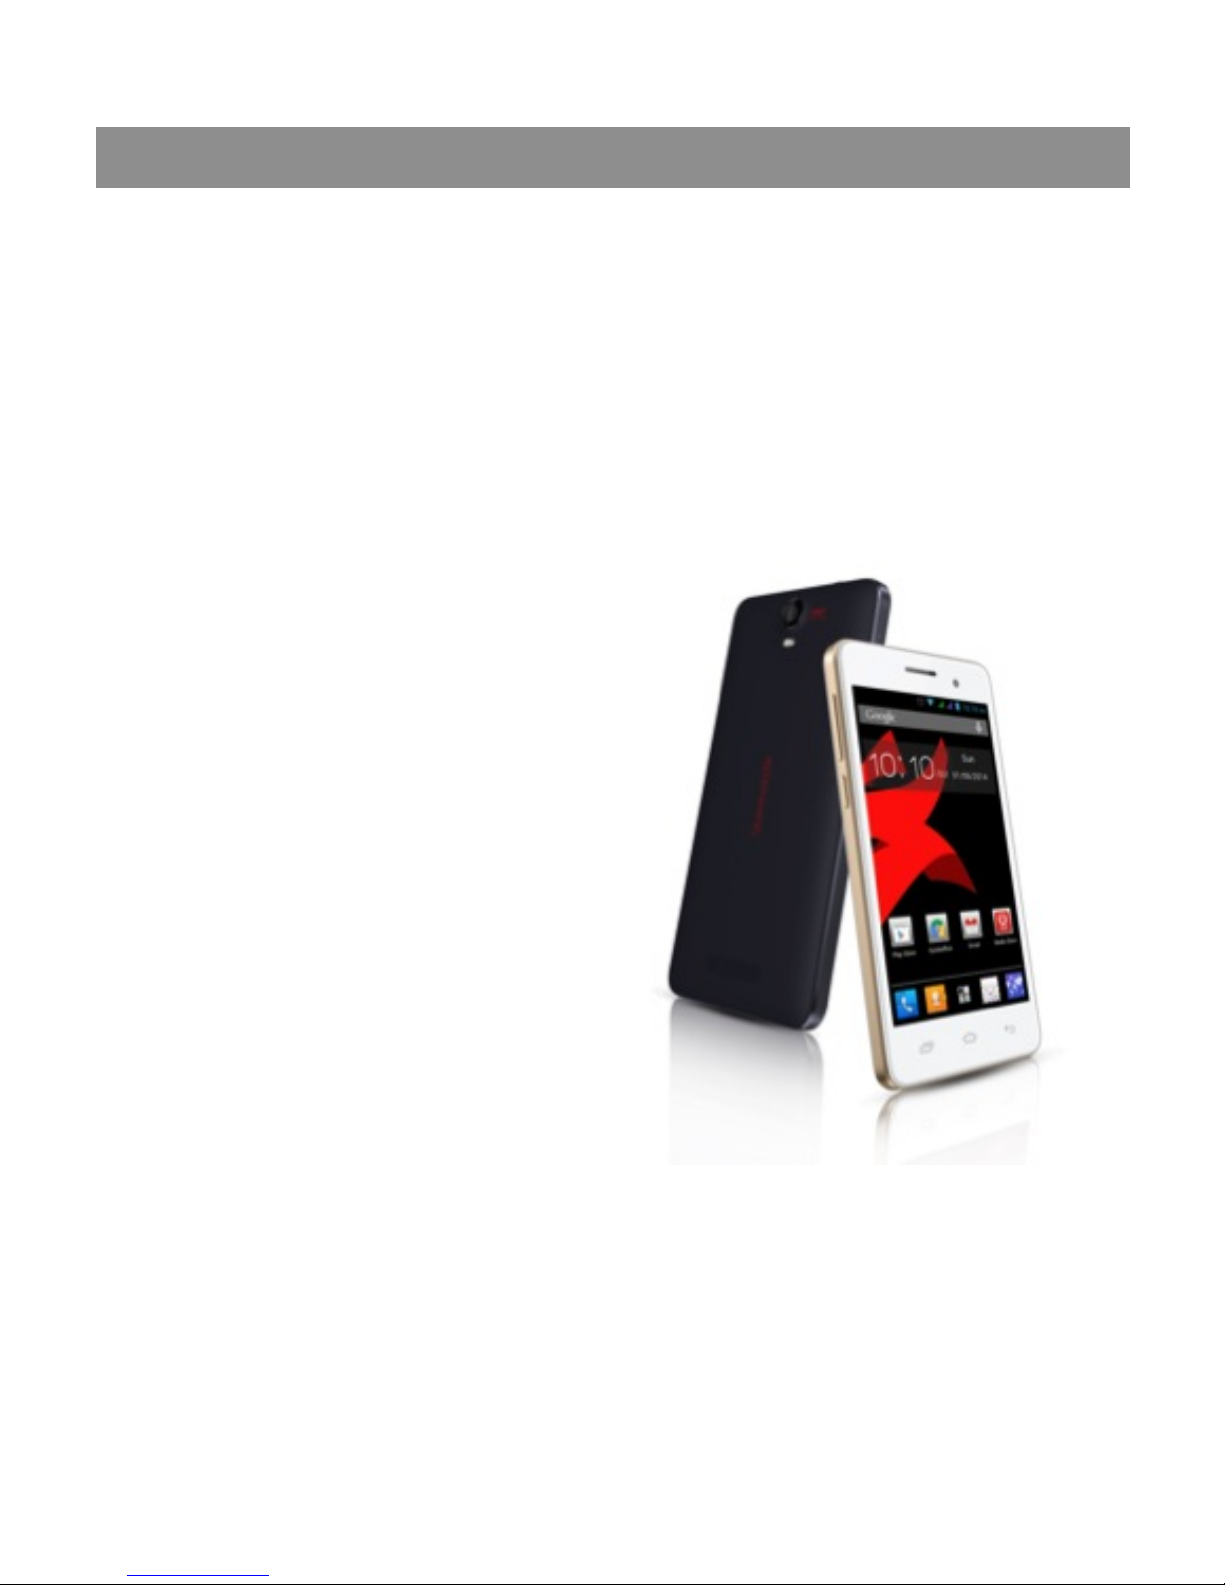
Starmobile ROAR User Manual

ROAR
User Manual

Starmobile ROAR
2
TABLE OF CONTENTS
I. Introduction .............................................................. 5!
II. About Android ......................................................... 6!
What’s New With 4.2 ‘Jelly Bean’? .............................. 9!
III. Battery Information ............................................. 11!
Installing the Battery ................................................. 11!
Removing the Battery ............................................... 11!
Charging the Battery ................................................ 11!
Optimizing Battery Performance ............................... 13!
IV. Inserting the SIM and Memory Card/s ............... 14!
Installing the SIM Card .............................................. 14!
Installing the Memory Card ....................................... 14!
V. Device Controls ..................................................... 15!
Ports And Keys ......................................................... 15!
Navigation Buttons ................................................... 16!
Favorites Tray ............................................................ 17!
Home Screen ............................................................ 17!
Notifications Bar ....................................................... 18!
VI. Basic Operation .................................................... 18!
Turning The Power On and Off ................................. 18!
Using the Lock Screen ............................................... 19!
Touchscreen Gestures ............................................... 20!
Google Search .......................................................... 21!
Changing The Wallpaper .......................................... 22!
VII. Connecting to the Internet ................................. 22!
Wi-Fi Connection ...................................................... 22!

Starmobile ROAR
3
Cellular Connection (SIM) ......................................... 23!
Wi-Fi Tethering (Hotspot) .......................................... 24!
VIII. Setting Up Your Google Account ..................... 25!
Why use a Google Account? ..................................... 26!
IX. Communication .................................................... 27!
X. Built-In Apps and Functions ................................. 29!
XI. USB and Bluetooth ............................................... 36!
Connecting To A Computer via USB ......................... 36!
Connecting a Device via USB OTG ............................ 36!
Connecting To Bluetooth Devices ............................. 37!
XII. Android Settings ................................................. 38!
Profiles ..................................................................... 40!
Storage ..................................................................... 40!
Battery ...................................................................... 40!
Accounts & Sync ....................................................... 41!
Language & Input ..................................................... 41!
XIII. Special Features ................................................. 42!
3G SIM Selection ...................................................... 42!
One Click Boosters .................................................... 42!
Over-The-Air (OTA) Update ....................................... 42!
Pop Out Video .......................................................... 43!
QR Code Camera ...................................................... 43!
Starmobile App Store ................................................ 43!
Starmobile Sync ........................................................ 43!
Talk-to-Unlock .......................................................... 44!
Transfer Apps to SD .................................................. 44!
Wave Controls .......................................................... 44!
XIV. Safety and Notice .............................................. 44!

Starmobile ROAR
4
XV. Troubleshooting ................................................. 47!
XVI. Warranty ............................................................ 50!
Terms And Conditions .............................................. 50!
Note On Defective/Dead LCD Pixels ........................... 52!
Starmobile ROAR
5
I. Introduction
Thank you for purchasing the Starmobile ROAR.
Please read the instructions in this user manual prior to
operating your device. Starmobile does not assume any
liability from improper operation or accidental damage of
the unit.
If setup and usage of your
unit differ from what is
detailed in this user
manual, please visit the
Starmobile website
(www.starmobile.com.ph)
for the latest product
information or email us at
info@starmobile.com.ph
NOTE: Copyright laws and
regulations protect the
content of this user
manual. You may not, by any means, copy any part of
this guide in any form or through any cable or wireless
network for transmission, or have this user manual
translated into any language without permission from
Starmobile.

Starmobile ROAR
6
II. About Android
Introducing Android: The world's most
powerful mobile platform
There's no other software quite like
Android. Google engineered Android,
and Google’s own apps run best on it.
And with millions of apps, games,
songs, and videos on Google Play,
Android is great for fun, and for getting things done.
Android devices come in all kinds of sizes, with all sorts of
features, and at all sorts of prices. With Android, you’re in
control of your mobile experience.
Your stuff, always available, no wires needed
When you sign in to your phone or tablet with Google,
you can access all of your Google stuff (contacts, photos,
Gmail and more) quickly and easily. You can also enjoy all
of your favorite entertainment across your Android
devices and even your computer — no wires, no syncing.

Starmobile ROAR
7
Play Everywhere You Go
Google Play is the easiest way to enjoy all your favorites:
more than 700,000 apps and games, millions of songs,
thousands of movies and TV shows, the world's largest
collection of eBooks, and a growing selection of
magazines. With Google Play, there's no wires, no hassle,
just pure entertainment. You can now read, listen and
watch anywhere you want—on your tablet, phone, or in
any browser at play.google.com.
Powerful, Simple, and Beautiful
Millions of people use Android because it’s so powerful
yet still so easy. The home screen, apps, and widgets are
simple to use right out of the box, but completely
customizable. With Android, you can create a unique
mobile experience that’s just right for you.
Widgets
Put the important stuff right within reach and interact
with your favorite apps directly from your home screen
with widgets — see the latest sport scores, view your
favorite photos, check the weather or peek at your inbox
all without having to open different apps or leave the
home screen.

Starmobile ROAR
8
Notifications
An easy-to-read notification tray gives you quick access to
your calls, incoming texts, and new emails in a nonintrusive way.
Multi-tasking
With Android, you can quickly and seamlessly switch
between apps and pick up whatever you were doing.
Juggling multiple tasks at once on a mobile device has
never been easier.
Voice Typing and Actions
Control your Android device with your voice. Simply
touch the microphone on the keyboard and start talking
to write emails, SMS, or any other text — more than 30
languages supported. Text appears in real time, so there’s
no waiting.
Photos and Videos
Capture special moments with great photos and videos,
explore your shots and quickly share your favorites in any
way that you want.

Starmobile ROAR
9
What’s New With 4.2 ‘Jelly Bean’?
Source: www.android.com
Share what’s on your device on the big
screen
*Android 4.2 allows devices to enable
wireless display. You can share movies,
YouTube videos, and anything that’s on your screen on
an HDTV. Just connect a wireless display adapter to any
HDMI-enabled TV to mirror what’s on your screen quickly
and easily.
Daydream
*Daydream lets your Android device display useful and
delightful information when idle or docked. Show off
your photo albums, get the latest news from Google
Currents, and more.
Expandable, actionable notifications
*Android has always put you in control when it comes to
staying notified and connected. Just swipe down from the
top of the screen to see all your notifications in one place.
Late for a meeting or missed a call? Take action in an
instant directly from the notifications shade.
Widgets work like magic

Starmobile ROAR
10
*With Jelly Bean it's now even easier to personalize your
home screen. As you place widgets on the screen,
everything else automatically moves to make room. When
they're too big, widgets resize on their own. Interacting
with your favorite apps and customizing your home
screen has never been easier.
Improved dictionaries
*Android's dictionaries are now more accurate and
relevant. With improved speech-to-text capabilities, voice
typing on Android is even better. It works even when you
don't have a data connection, so you can type with your
voice everywhere you go.
Magnification
*Zoom in on your screen by triple tapping on the touch
panel. While on magnification mode, you can pan by
dragging two fingers across the screen and adjust zoom
levels by pinching your fingers. This feature works
everywhere except on the keyboard and on the
navigation bar.
Talkback
*Provides spoken feedback to help blind and low vision
users. Talkback describes what to touch, select, and
deactivate.

Starmobile ROAR
11
Full Screen Viewfinder
*Use the entire screen as a widescreen viewfinder when
using the camera. (Note: may reduce maximum
resolution)
III. Battery Information
Installing the Battery
1. Make sure the unit is turned off.
2. Gently lift the battery cover.
3. Align the metal connectors of the battery with the
terminals.
4. Push the battery in until it locks into the slot.
5. Put the battery cover back in place.
Removing the Battery
1. Make sure the unit is turned off.
2. Gently lift the battery cover.
3. Raise the battery from one end to remove it from the
slot.
4. Put the battery cover back in place.
Charging the Battery
The Starmobile ROAR needs to be fully charged for first
use.
1. Make sure the unit is turned off.

Starmobile ROAR
12
2. Plug one end of the charger into the USB/charging port
then plug the other end into a standard AC power outlet.
3. Once connected, the battery icon will repeatedly flash
on the screen.
4. If the device has been depleted of battery life, it will
take a while before a charging indicator appears on
screen after it has been plugged to a power source.
5. When the battery level icon has stopped flashing, this
means that charging is complete. Disconnect the charger
from both the electrical outlet and the device.
ATTENTION
*Charging must be performed in well-ventilated areas
with temperatures ranging between -10 degrees Celsius
and +45 degrees Celsius.
*It is normal for the device and charger to become warm
during charging.
*Use only the supplied Starmobile charger
*Using accessories of other manufacturers or vendors
may invalidate any approval or warranty applicable to the
device. It may result in non-operation of the device or loss
of information.
*If the device shuts down automatically or indicates
“Battery is Low”, charge the battery.
*If the battery has not been entirely used up before
recharging, the charging time may decrease.

Starmobile ROAR
13
Optimizing Battery Performance
You can extend your battery's life between charges by
turning off features that are not in use. You can also
monitor how apps and system resources consume battery
power.
To adjust the settings described here, first touch the
Settings icon on the Home or All Apps screen.
Extending Battery Life
1. If Wi-Fi, Bluetooth, or GPS are not in use, disable or
deactivate the function. The GPS setting is located in
Settings > Personal > Location services.
2. Don't leave the Maps or Navigation apps open on the
screen when not in use. They use GPS (and thus more
power) only when they're running.
2. Don't leave the Maps or Navigation apps open on the
screen when not in use.
3. Turn down screen brightness and set a shorter Sleep
timeout: Settings > Device > Display.
4. If you don't need it, turn off automatic syncing for all
apps: Settings > Personal > Accounts & Sync. Note that
this means you need to sync manually to collect
messages, email, and other recent information, and won't
receive notifications when updates occur.

Starmobile ROAR
14
5. If a mobile or Wi-Fi network is inaccessible, switch to
Airplane mode. Press and hold the power switch until the
options dialog appears. Select Airplane Mode.
IV. Inserting the SIM and Memory Card/s
Installing the SIM Card
The Starmobile ROAR can accommodate two SIM cards (1
Micro SIM + 1 Regular SIM).
1. To install the SIM cards, make sure that the unit is
turned off.
2. Open the back casing gently and remove the battery.
3. Slide in the SIM cards with the beveled edges properly
aligned with the card slot/s.
4. Once the SIM card/s are in place, reinstall the battery
and the cover.
Installing the Memory Card
The Starmobile ROAR supports Micro SD cards of up to
32GB in capacity.
1. To install, make sure that the unit is turned off.
2. Open the back casing gently and remove the battery.
Starmobile ROAR
15
3. Insert the memory card into the designated slot with
the beveled edge properly aligned.
4. Slide the card tray back into place to lock.
5. Once the memory card is in place, reinstall the battery
and the cover.
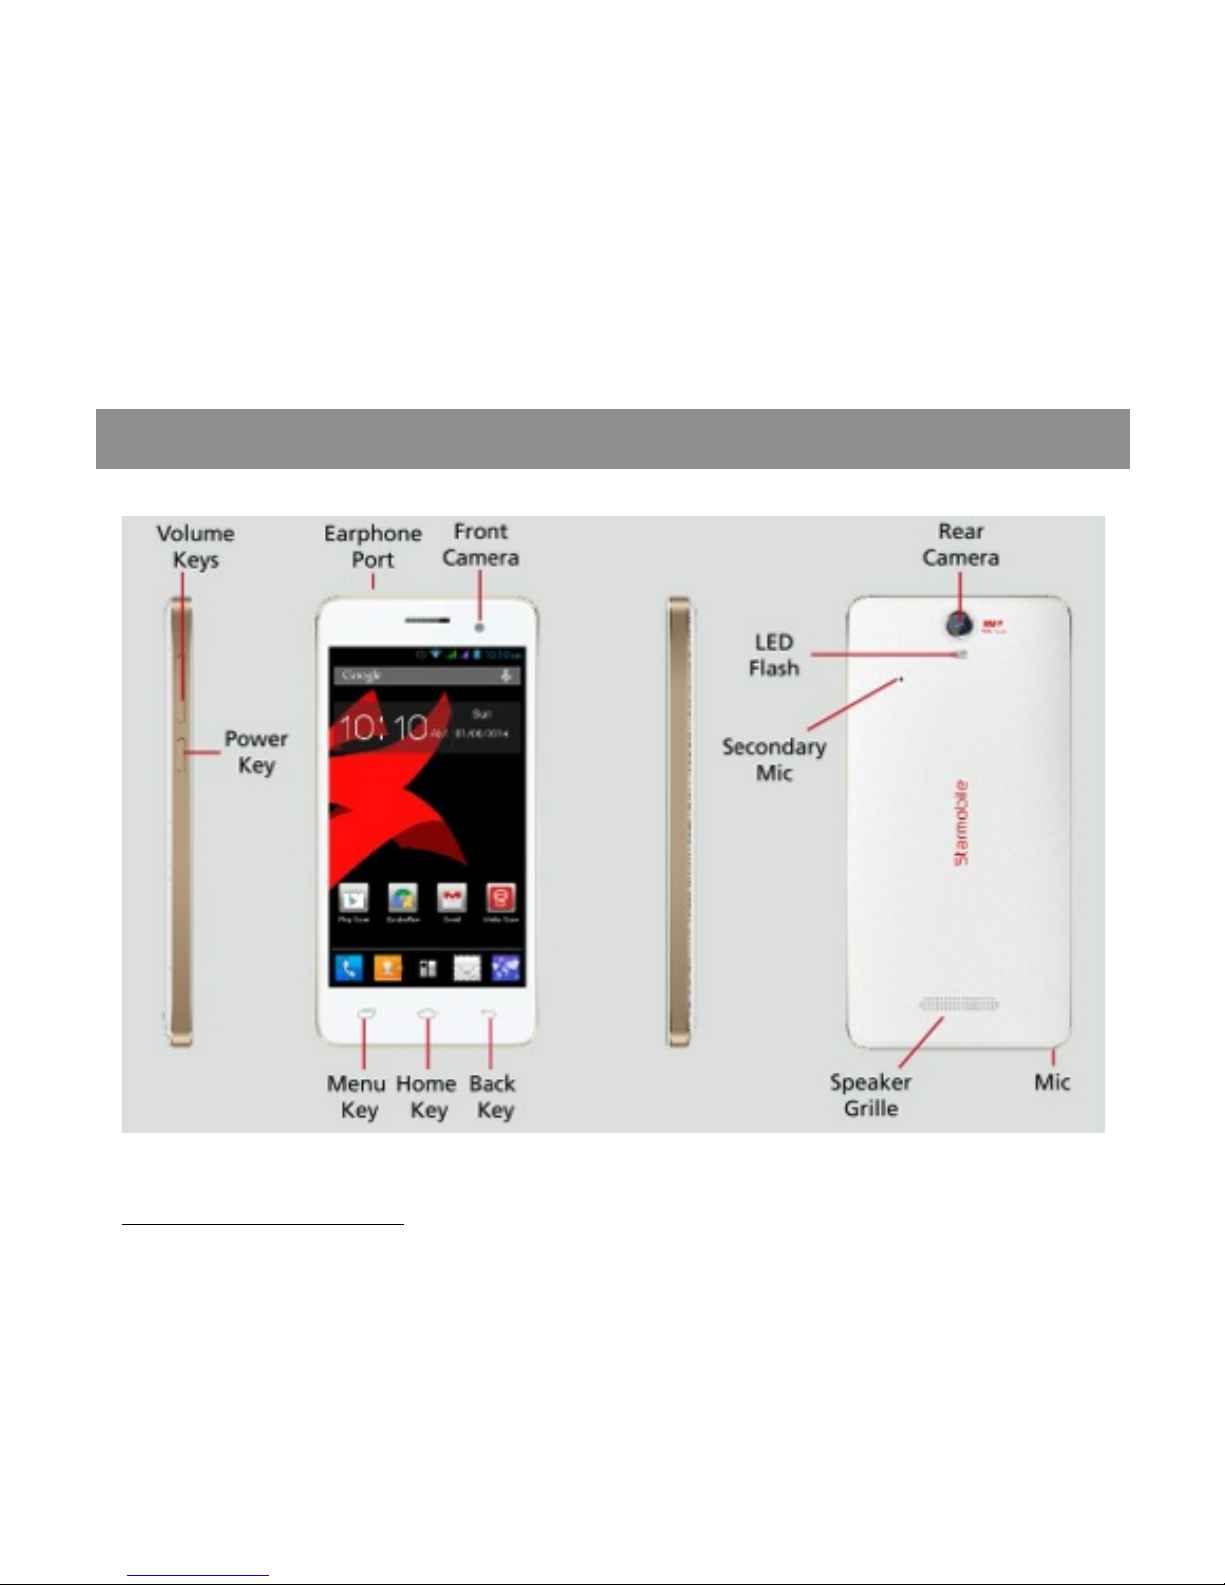
V. Device Controls
Ports And Keys
Please refer to the Quick Start Card (included in the box)
for the location of control keys and ports.

Starmobile ROAR
16
Power Key
* Press and hold to switch on/off the device. If device is in
use, press once to turn off screen backlight. If device is on
sleep mode, press once to activate screen display.
Volume Key
* Press to adjust ringer volume, call volume, and media
volume during music and video playback.
Micro USB Port
*Allows you to connect a Micro USB cable for charging or
for data exchange/transfer.
Charging Port
*Plug in the supplied adapter to charge the device.
Earphone Port
*Allows you to plug in an earphone or any external audio
device with a 3.5mm jack.
Navigation Buttons
The navigation buttons are located below the screen.
Back Key
*Touch to return to the previous screen you were
working in, even if it was in a different app. Once you
 Loading...