

Page 1
Quick Guide
D
1
Page 2

Page 3

TABLE OF CONTENTS
1. Your Phone
1.1. Phone Overview
1.2. Battery
1.3.1. Installing and Removing the Battery
1.3.2. Charging the Battery
1.3. Preparing your Phone
1.3.1. Inserting the SIM Cards
1.3.2. Inserting the Memory Card
1.3.3.Turning Power On and Off
2. Getting Started
2.1. Setting up your Phone
2.2. Screen Control
2.3. Changing the Wallpaper
2.4. Touch & Type
2.5. Using the Lock Screen
2.6. Searching the Phone & the Web
3. Troubleshooting
4. Safety & Notice
1
1
3
3
3
4
4
4
4
5
5
6
7
8
8
9
10
13
Page 4

Page 5
Enjoy a smarter mobile experience with the Android Operating
System. Featuring all Google apps plus more than 1,000,000 apps,
songs, books, movies and games ready for download on the Play
Store, the Android mobile platform extends your mobile device’s
functionality—keeping you connected, entertained, and informed.
Source: Android Website (www.android.com)
What’s new with Android 4.2 “Jelly Bean”?
About Android
1
Share what’s on
your phone on
the big screen
Daydream
Expandable,
actionable
notications
Android 4.2 allows devices to enable
wireless display. You can share movies,
YouTube videos, and anything that’s on
your screen on an HDTV. Just connect a
wireless display adapter to any
HDMI-enabled TV to mirror what’s on
your screen quickly and easily.
Daydream lets your Android device display
useful and delightful information when
idle or docked. Show off your photo
albums, get the latest news from Google
Currents, and more.
Android has always put you in control
when it comes to staying notied and
connected. Just swipe down from the top
of the screen to see all your notications in
one place. Late for a meeting or missed a
call? Take action in an instant directly from
the notications shade.
D
1
Page 6
Widgets work
like magic
Improved
Dictionaries
Magnication
Talkback
Full Screen
Viewnder
Source: www.android.com
With Jelly Bean it's now even easier to
personalize your home screen. As you place
widgets on the screen, everything else
automatically moves to make room. When
they're too big, widgets resize on their
own. Interacting with your favorite apps
and customizing your home screen has
never been easier.
Android's dictionaries are now more
accurate and relevant. With improved
speech-to-text capabilities, voice typing
on Android is even better. It works even
when you don't have a data connection, so
you can type with your voice everywhere
you go.
Zoom in on your screen by triple tapping on
the touch panel. While on magnication mode,
you can pan by dragging two ngers across the
screen and adjust zoom levels by pinching your
ngers. This feature works everywhere except
on the keyboard and on the navigation bar.
Provides spoken feedback to help blind and
low vision users. Talkback describes what to
touch, select, and deactivate.
Use the entire screen as a widescreen viewnder
when using the camera. (Note: may reduce
maximum resolution)
D
1
Page 7
1
Thank you for purchasing the Starmobile DIAMOND D1. This Quick
Guide contains important and useful information regarding the use
and operation of this mobile device.
Note: The contents of this Quick Guide is protected by copyright laws and
regulations. You may not by any means, copy any part of this manual in any
form or through any cable or wireless network for transmission, or have this
Quick Guide translated into any language without permission from the
company.
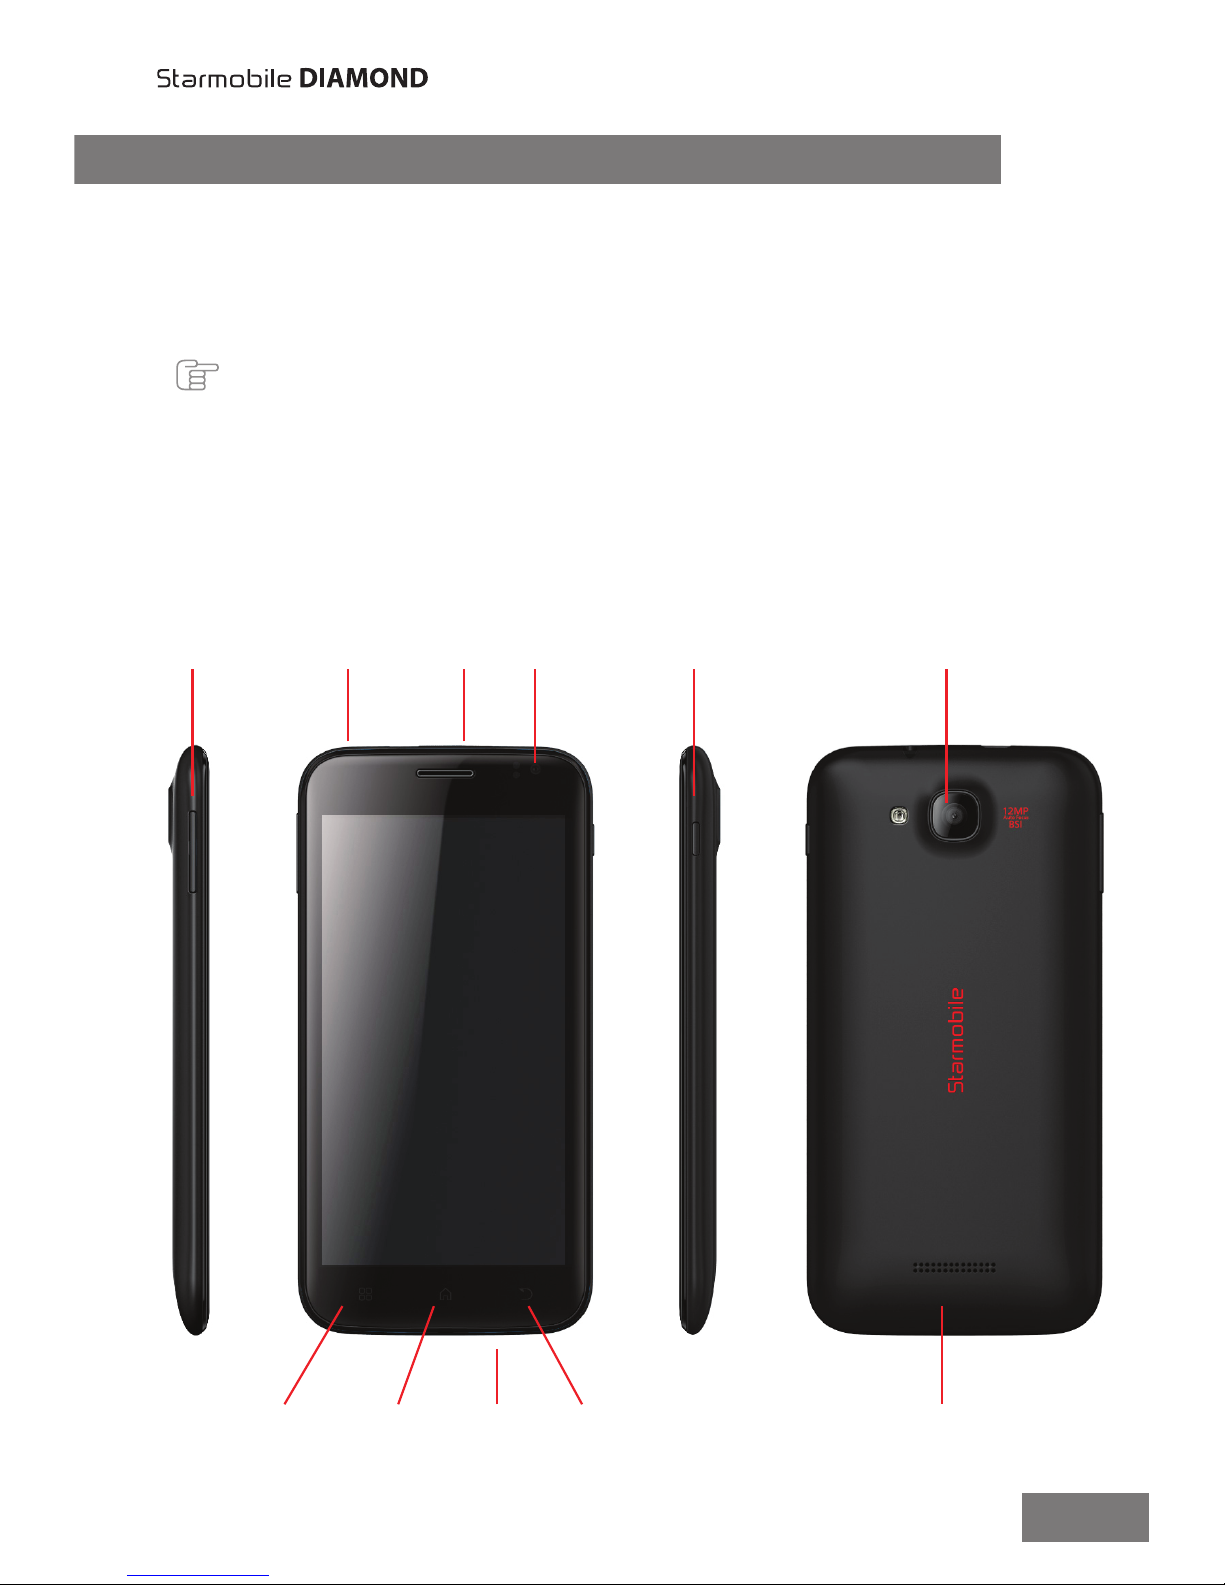
1.1 Phone Overview
1. Your Phone
Menu Key Home Key Mic Back Key Speaker
Power Key Rear Camera
Front
Camera
Earphone
Jack
Charger/
USB
Volume
Keys
D
1
Page 8
2
Volume Keys Press to adjust ringer volume,
call volume, and media volume
during music and video playback.
Power Lock Key Press and hold to open phone
options menu: Power Off, Reboot,
Screen Capture or Airplane Mode
Home Key Touch to return to Home screen;
Press and hold to open a window
showing your most recently used
applications
Back Key Touch to return to the previous
screen or close the on-screen
keypad, dialog box, options menu,
or the Notication panel
Menu Key Opens a list of options available in
the current screen or application
Headset Port Allows you to plug in an earphone
Charger/USB Port Allows you to connect charger or
USB cable for data exchange
D
1
Page 9

3
1.2 Battery
Note: Your Starmobile phone needs to be fully charged for rst time use.
1.2.1 Installing and Removing the Battery
• To install the battery:
Align the metal connectors of the battery with the battery
terminals. Push the battery in until it locks into the slot and
put the battery cover back in place.
• To remove the battery:
Lift the battery cover. Raise the bottom of the battery to
remove it from the battery slot.
1.2.2 Charging the Battery
• Plug one end of the charger into the USB/charging port then
plug the other end into a standard AC power outlet.
• Once connected, the battery icon will ash repeatedly on the
screen. When the battery level icon has stopped ashing, this
means that the battery is fully charged. It is normal for the
mobile phone and charger to become warm during charging.
• When charging is complete, disconnect the charger from both
the electrical outlet and the mobile phone.
ATTENTION:
• Charging must be performed in a well-ventilated area with a
temperature between -10°C and +45°C.
• Use only the supplied battery and charger. Using accessories of
other manufacturers or vendors may invalidate any approval or
warranty applicable to the device. It may result in non-operation of
the mobile phone or loss of information.
• If the mobile phone automatically shuts down or indicates that
“Battery is low”, it is advisable to charge your battery. If the battery
has not been entirely used up before recharging, the charging time
will automatically decrease.
D
1
Page 10

4
1.3 Preparing your Phone
1.3.1 Inserting SIM cards
Your Starmobile phone allows use of two separate SIM cards
at the same time.
• To install, make sure that the unit is turned off.
• Slide in the SIM card with its gold chip facing downward.
Make sure the beveled edge of the SIM card is properly
aligned with the card slot.
• Once the SIM card is in place, put in the battery and replace
the cover.
1.3.2 Inserting the Memory Card
Your mobile phone supports Micro SD cards up to 32GB.
• To install, make sure that the unit is turned off.
• Open the back casing gently. Slide the memory card into the
designated slot.
• Ensure that the beveled edge is properly aligned with the card
slot.
1.3.3 Turning Power On and Off
• Press and hold the Power key until the phone switches on.
• If you turn on the mobile phone without having inserted a
SIM card, the phone will display “Emergency call”.
• If a SIM card has been inserted, the phone will automatically
check if the SIM is useable.
D
1
Page 11

5
2. Getting Started
2.1 Setting Up Your Phone
The rst time you turn on the phone, you'll see a Welcome screen.
• To choose a different language, go to Menu > Settings >
Personal > Language and input.
• To set up your phone, touch Start and follow the instructions.
A series of screens takes you through the setup process. If you already
have a Google or Gmail account, use your Gmail address and
password to log in. If you don't have Gmail or any other Google
Account, you may create one at www.gmail.com.
2.1.1 Why use a Google Account?
AGoogleAccountletsyouorganizeandaccessyourpersonal
informationfromanycomputerormobiledevice:
• Never lose your contacts again. When you sign into your
phone with a Google account, all the contacts associated
with that account in the Contacts application are automati cally backed up. As a result, they're always accessible through
your Gmail account from any computer.
• Synchronize and back up everything. Whether you draft
an email, add a phone number, add an event to your
calendar, or take a photo, your work gets backed up
continuously by Google and synchronized with any computer
where you use the same Google Account.
• Access from anywhere. Check your latest calendar, email,
text messages, or social stream wherever you are, no matter
what computer or mobile device you're using.
• Keep your information secure and available. Google
works round the clock to protect your personal data from
unauthorized access and to ensure that you get it when you
need it, wherever you need it.
• Use other Google services. Your Google Account also lets
you take full advantage of any other Google apps and
services that you may want to use, such as Gmail, Google
D
1
Page 12
6
Maps, Navigation, Play Store, YouTube, Google Hangouts,
Messaging, and many more.
2.2 Screen Control
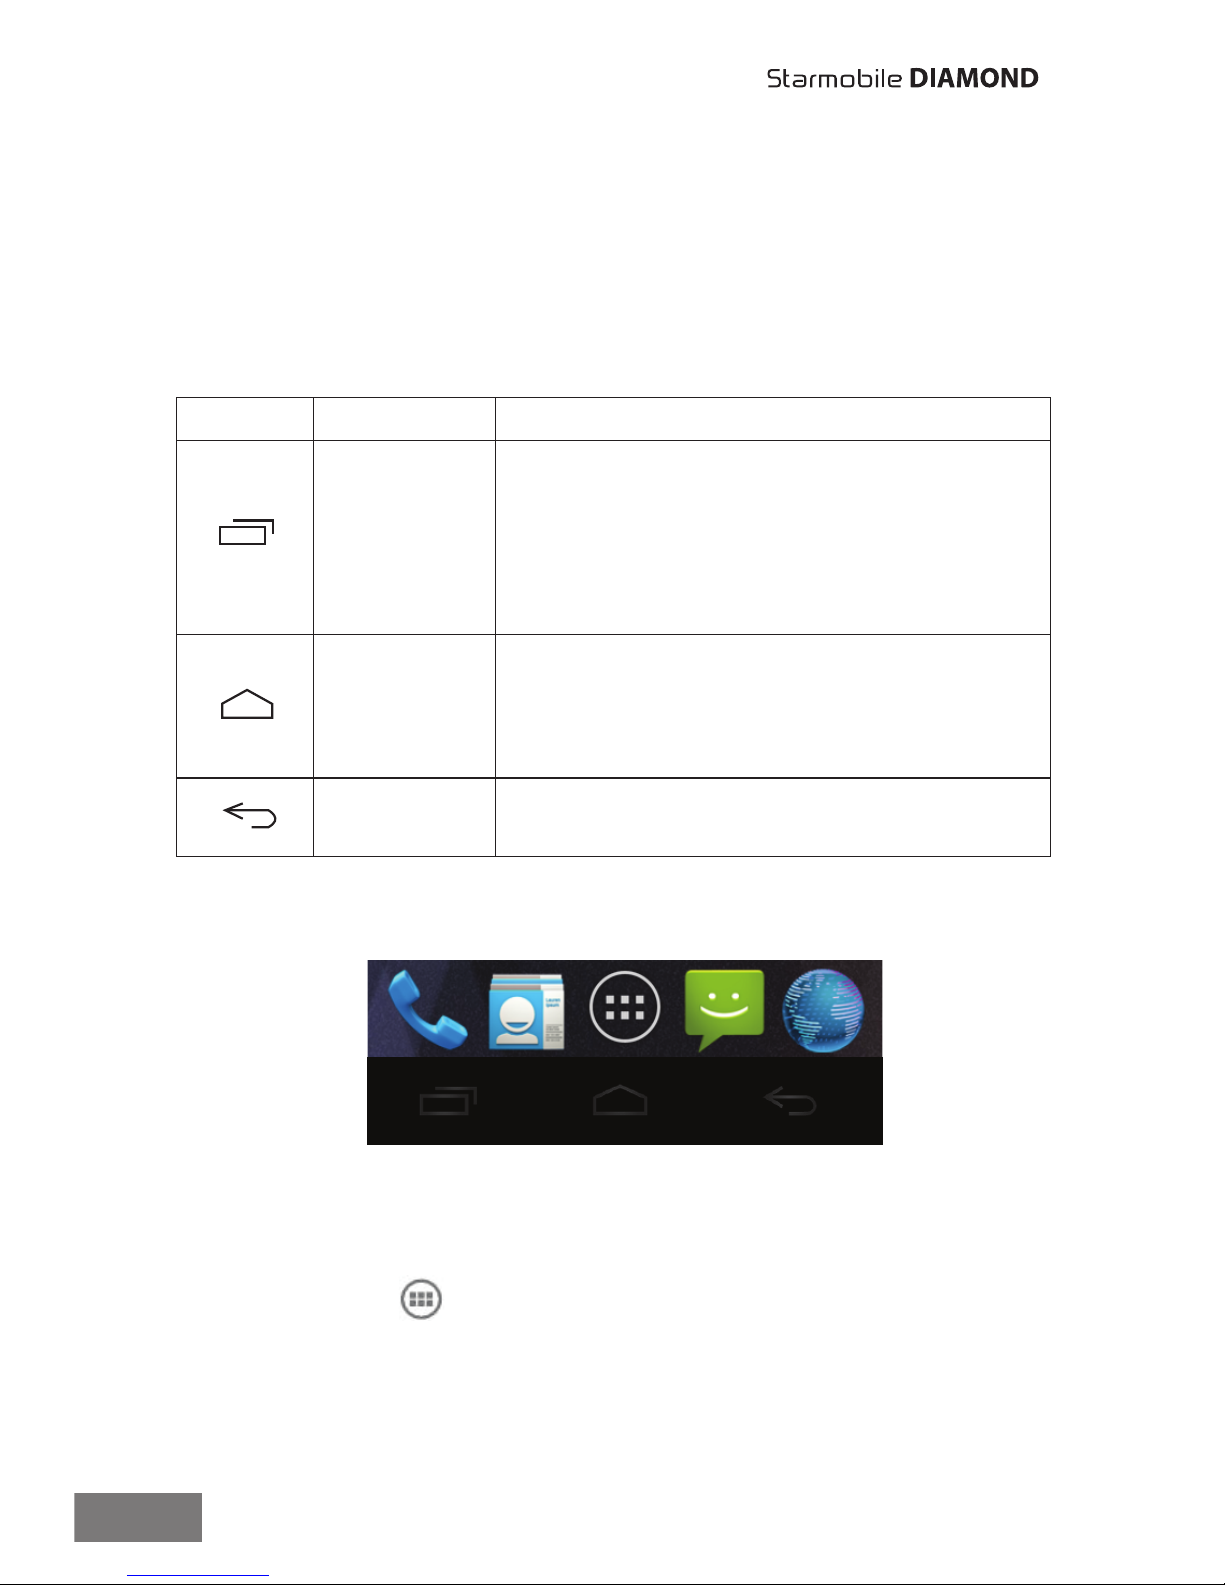
Once you have nished setting up your phone, the Home screen
opens. At the bottom of the screen, you'll nd three Navigation
buttons that will always be available.
The Favorites tray is located just above the Navigation buttons:
The app icons you keep in the tray remain visible on every Home
screen.
The All Apps icon in the center is permanent. Touch it to see all
your apps and widgets.
The middle of your Home screen can hold app and widget icons, plus
folders.
Icon Name Description
Back
Opens the previous screen you were
working in, even if it was in a different
app. Once you back up to the Home
screen, you can’t go back any further in
your history.
Home
Opens Home. If you're viewing a left or
right Home screen, this opens the
central Home screen.
Menu Pop-up menu options.
D
1
Page 13
3 4
7
• To open an app, folder, or widget, touch its icon.
• To see additional Home screens, swipe your nger quickly left or
right.
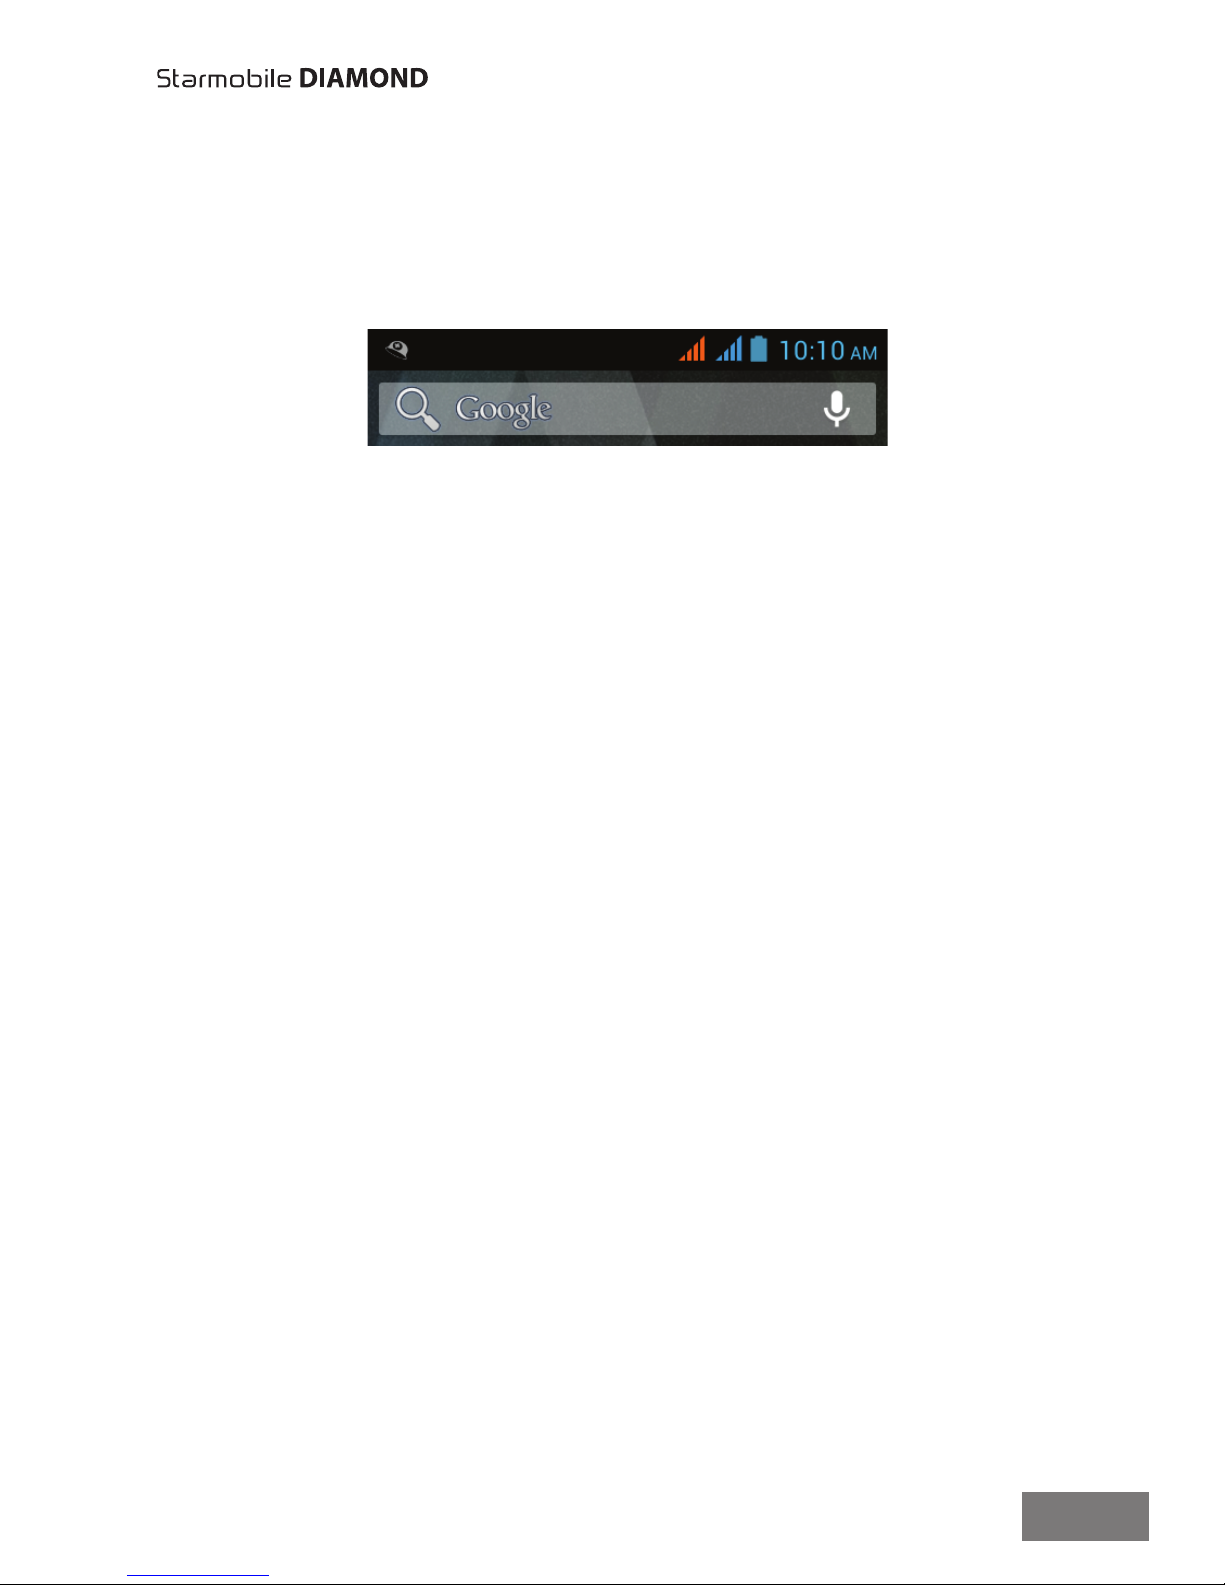
At the top of the screen, you'll see this display:
Status icons on the left tell you which apps have sent you
notications; for example, that a message has arrived, or it's time for a
meeting.
• To see your notications, swipe your nger down from the top
of the screen.
System icons on the right display the current wireless and network
connection strength, battery level, time, and more.
The Google Search option just below the status and system icons lets
you search within your phone or on the Internet.
2.3 Changing the Wallpaper
Wallpapers are images that take the place of the default background
for your Home screens. To customize your wallpaper:
• Touch & hold anywhere on a Home screen that's not occupied.
A list of options will appear shortly.
• Select a wallpaper source:
o Gallery: displays pictures that you've taken with your Camera
or downloaded to your device
o Video Wallpapers: displays selection of videos stored in your
phone. Select the Camera icon to capture and record a new
video.
o Live Wallpapers: displays a scrolling list of animated wallpapers
o Wallpapers: displays thumbnails of default images. Touch a
thumbnail to see a larger version.
D
1
Page 14

45
8
• For wallpapers selected from the Gallery, you will be asked to
crop out the desired portion of the image before setting it as
your wallpaper.
2.4 Touch & Type
Touch or tap to manipulate icons, buttons, menus, the onscreen
keyboard, and other items on the touchscreen. You can also change
the screen's orientation.
To select or activate something onscreen, touch it. To type something
such as a name, password, or search terms, just tap where you want
to type. A keyboard pops up that lets you type into the eld.
Other common gestures include:
• Touch & hold: Touch & hold an item on the screen by touching
it and not lifting your nger until an action occurs.
• Drag: Touch & hold an item for a moment and then, without
lifting your nger, move your nger on the screen until you reach
the target position. For example, you can drag to reposition
shortcuts on the Home screen.
• Swipe or slide: Quickly move your nger across the surface of
the screen, without pausing when you rst touch (so you don't
drag something instead). For example, you can slide a Home
screen left or right to view the other Home screens.
• Double-tap: Quickly tap a screen to zoom in. Double tap again
to zoom out.
• Pinch: When viewing maps, web pages or photos, place two
ngers on the touchscreen at once and pinch them together to
zoom out or spread them apart to zoom in.
• Rotate the screen: The orientation of the screen rotates with
the phone as you turn it from upright to its side and back again.
You can turn this feature on and off.
2.5 Using the Lock Screen
To protect personal information, you can adjust your phone's lock
settings:
• From the Home or All Apps screen, touch the Settings icon .
D
1
Page 15
9
• Scroll down and touch Security.
• Touch Screen lock.
• Touch the type of lock you'd like to use.
Once enabled, a lock screen display will show up whenever your
screen wakes up, prompting you to enter the pattern, PIN, or other
specied key.
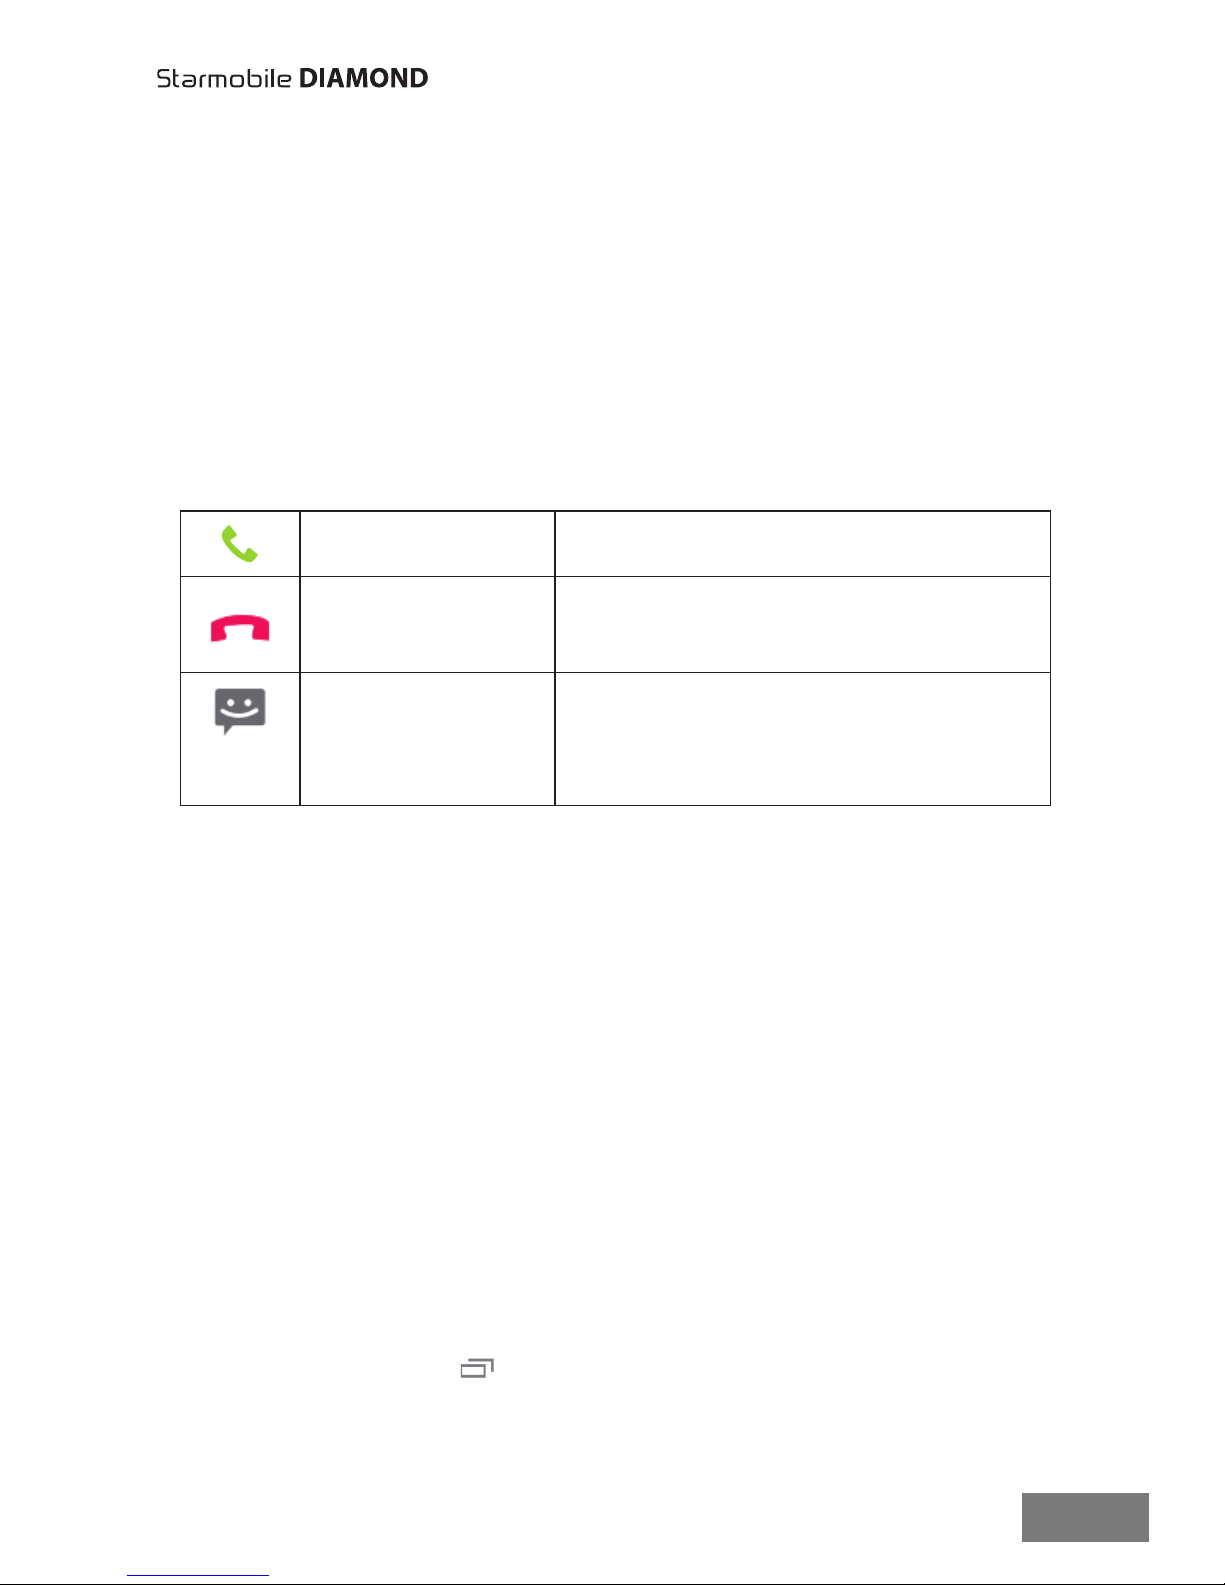
While the screen is locked, you can respond to incoming calls in three
ways. Touch the white phone icon and slide over one of these icons:
2.6 Searching Your Phone & the Web
Google Search can help you nd anything you need on your phone or
the web:
• At the top of any Home screen, touch Google to type your search
term, or the Microphone button to make a voice command.
As you type, suggestions from Google web search will appear below
the Search box, and results from your phone (such as apps and
contacts) below that.
Touch a suggestion to search for it immediately, or touch its arrow just
to add the term to the search eld without starting to search.
To change the way Google searches on your phone or the web:
• Touch Google at the top of the screen.
• Touch the Menu key at the lower left corner of the screen.
• Select Settings.
• Choose either Searchable items or Google Search.
Answer call Start talking to the caller.
Reject call Decline the call.
Send a message Opens a list of default text
messages. Touch one to send it
to the caller immediately.
D
1
Page 16
10
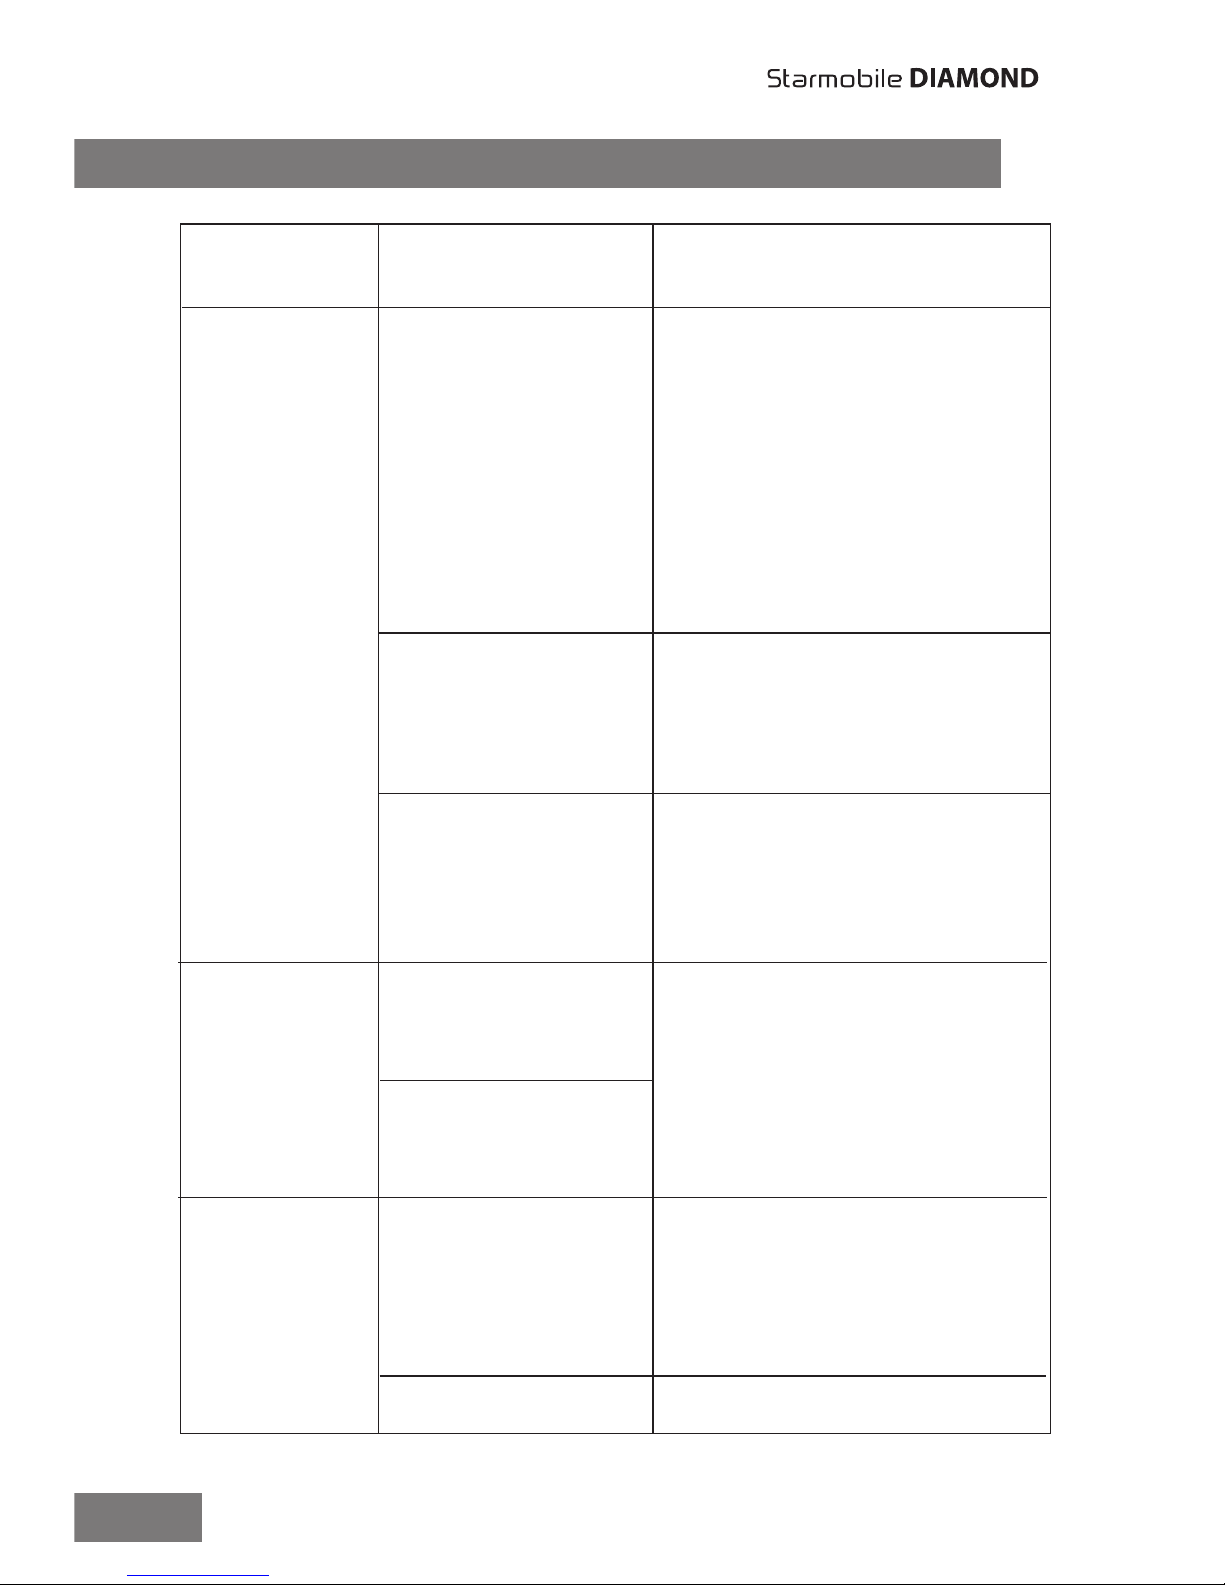
3. Troubleshooting
Possible
Concerns
How to Fix
Move to an area with
a stronger signal or
temporarily turn off your
smartphone.
Try again at a less congested
time.
Using your mobile
phone in an area
with poor
reception such as
near tall buildings
or in a basement
where radio waves
cannot be
transmitted.
Using the mobile
phone during
network peak
hours.
Poor
reception
You can request for the
network service provider to
provide you with a service
area plan.
Distance from the
base station built
by the network is
too great.
Temporarily turn off your
mobile phone, as you are
located in an area with poor
reception.
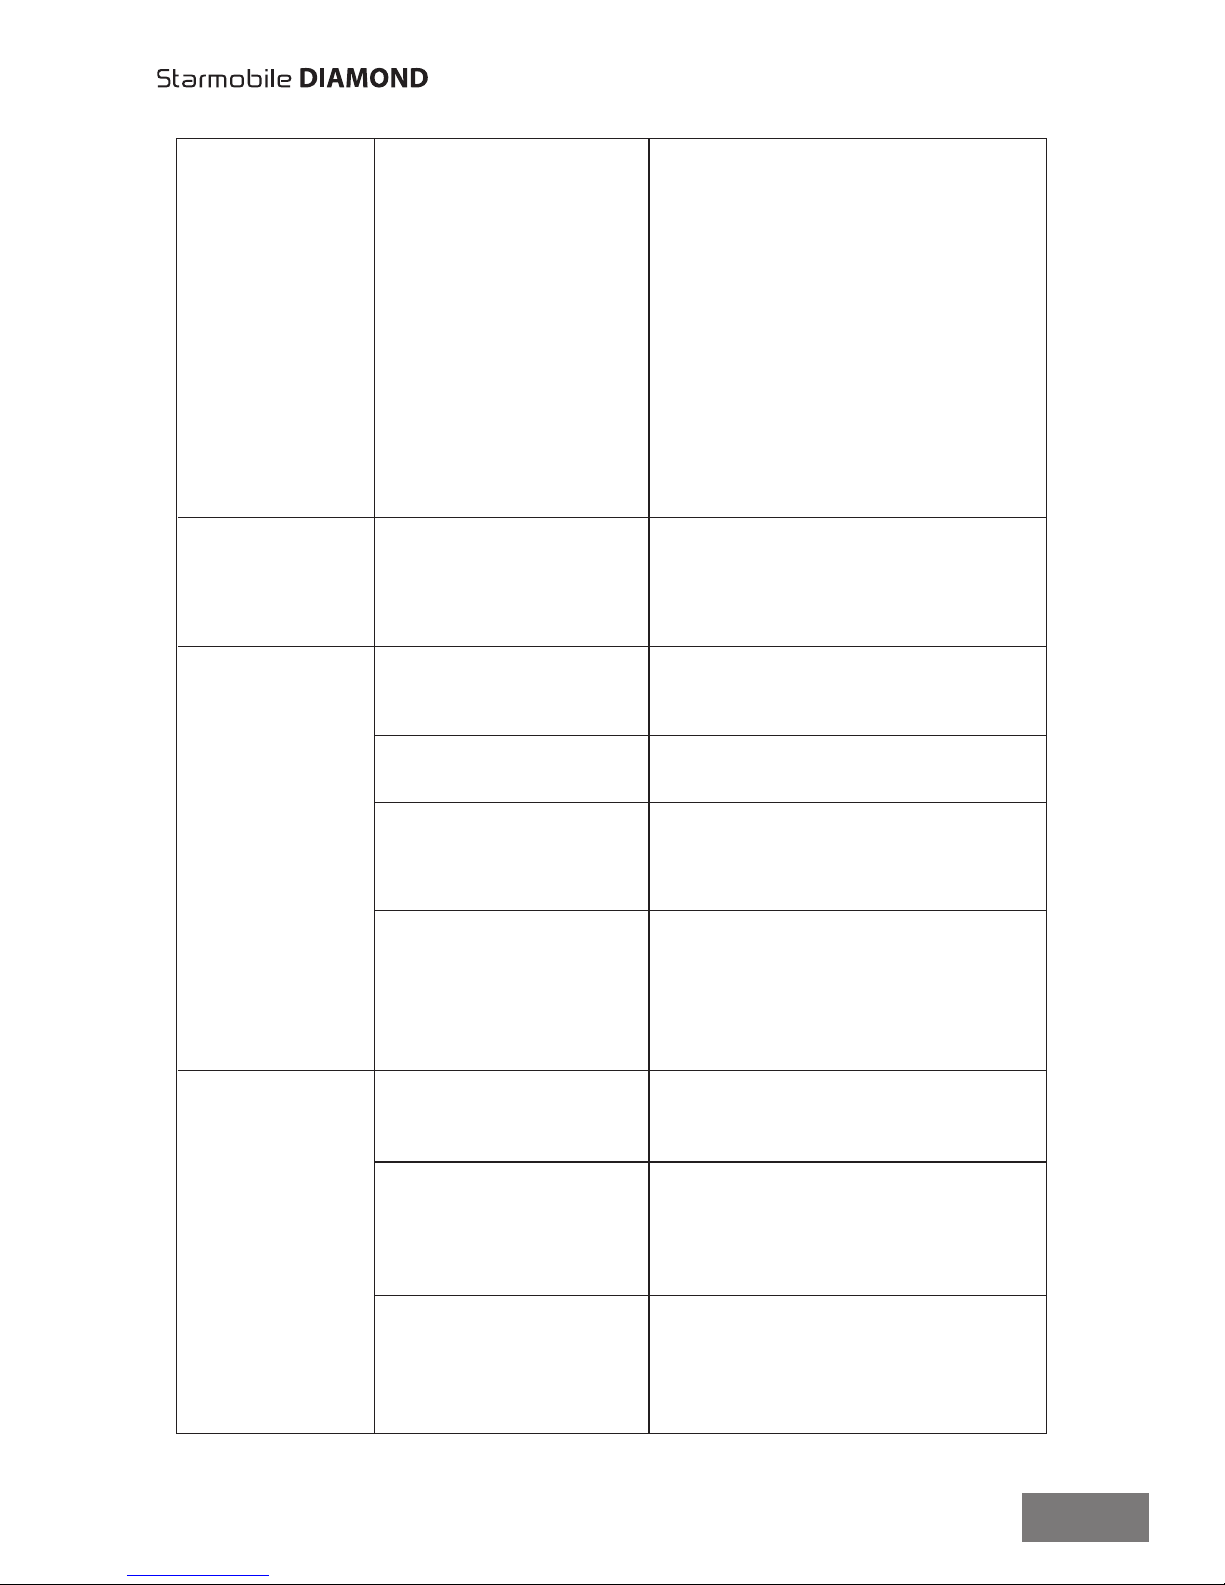
Move to an area with a
Standby time is
related to the
network system.
When you cannot
Shortening
of the
standby
time
Hang up and redial. If the
relay is changed then the
line may be better.
Poor network relay.
Some calling areas
have poor quality.
Echo or
noise
Possible
Cause/s
D
1
Page 17
11
stronger signal or temporarily
turn off your mobile phone.
get a signal, the
phone will continue
to transmit in order
to nd a base
station, thereby
consuming large
amounts of power
which will cause
the standby time
to decrease.
Look at the remaining
electricity or recharge status
to conrm. Charge battery.
The battery is
depleted.
Unable to
turn on the
phone
Contact your network
provider.
SIM card is
damaged.
Replace with a new one.Battery is dead.
Conrm if SIM card is
properly inserted.
Use a clean, dry cloth to
wipe off the metal contact
point of the SIM card.
SIM card is not
properly inserted.
There is visible dirt
on the metal
surface of the
SIM card.
SIM card
malfunction
Contact your network
provider.
Expired SIM card or
load credits.
Consult your network
provider regarding the
service area.
Move to a place with
stronger signal and try
again.
Outside the GSM
service area.
Poor signal.
Unable to
connect
with the
network
D
1
Page 18
912
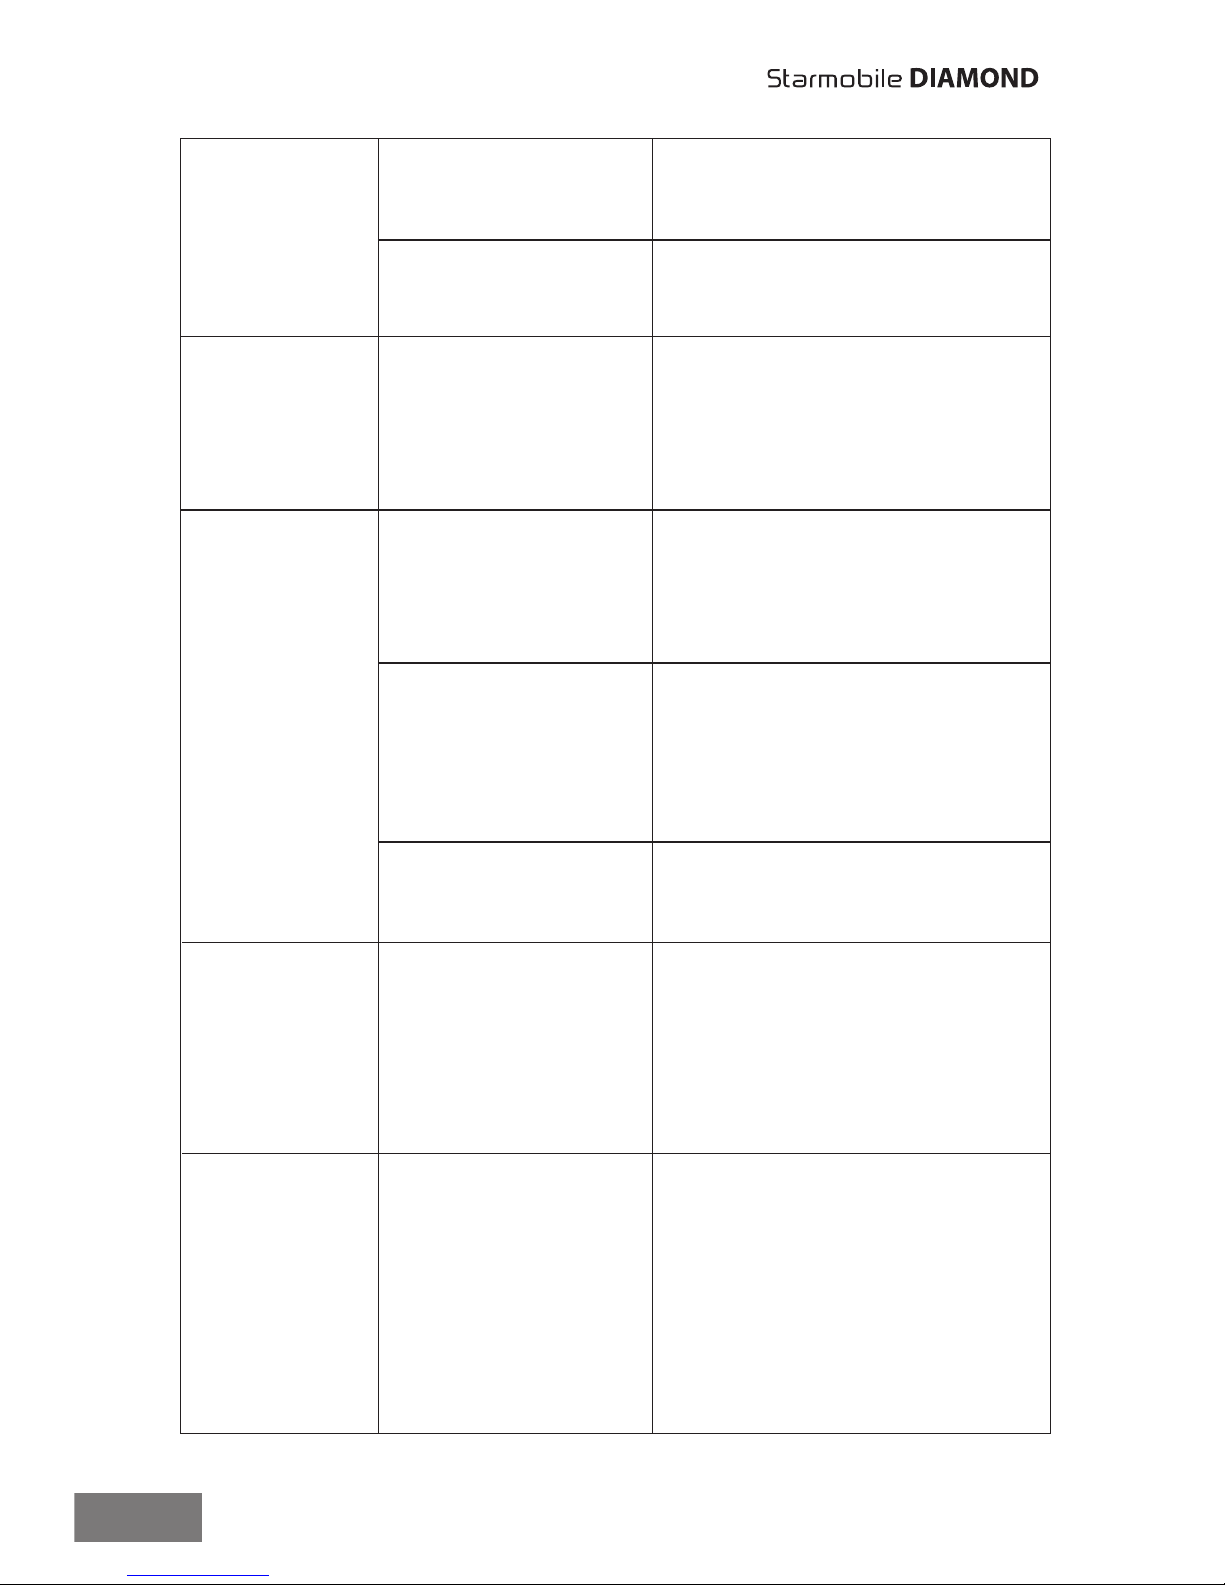
Cancel the call bar function.Using the call bar
function.
Cancel the xed call setting.Using the xed dial
function.
Unable to
make a call
Contact your network
provider.
Consecutively
entering the
wrong password
three times.
Incorrect PIN
Immediately have the
battery or charger replaced.
The battery or
charger is
damaged.
Unable to
charge
Move out of the area and
try again.
Ensure that the plug is
properly connected.
Recharging in an
environment of less
than -10 or higher
than 55 .
Poor contact with
the power outlet.
o
o
Delete some of the phone
number entries.
Contact your network
provider.
The storage space
of your phone
book is full.
Your network
provider does not
support this
function or you
have not applied
for it.
Unable to
add new
phone
book
entries
Unable to
set certain
functions
D
1
Page 19
13
D
1
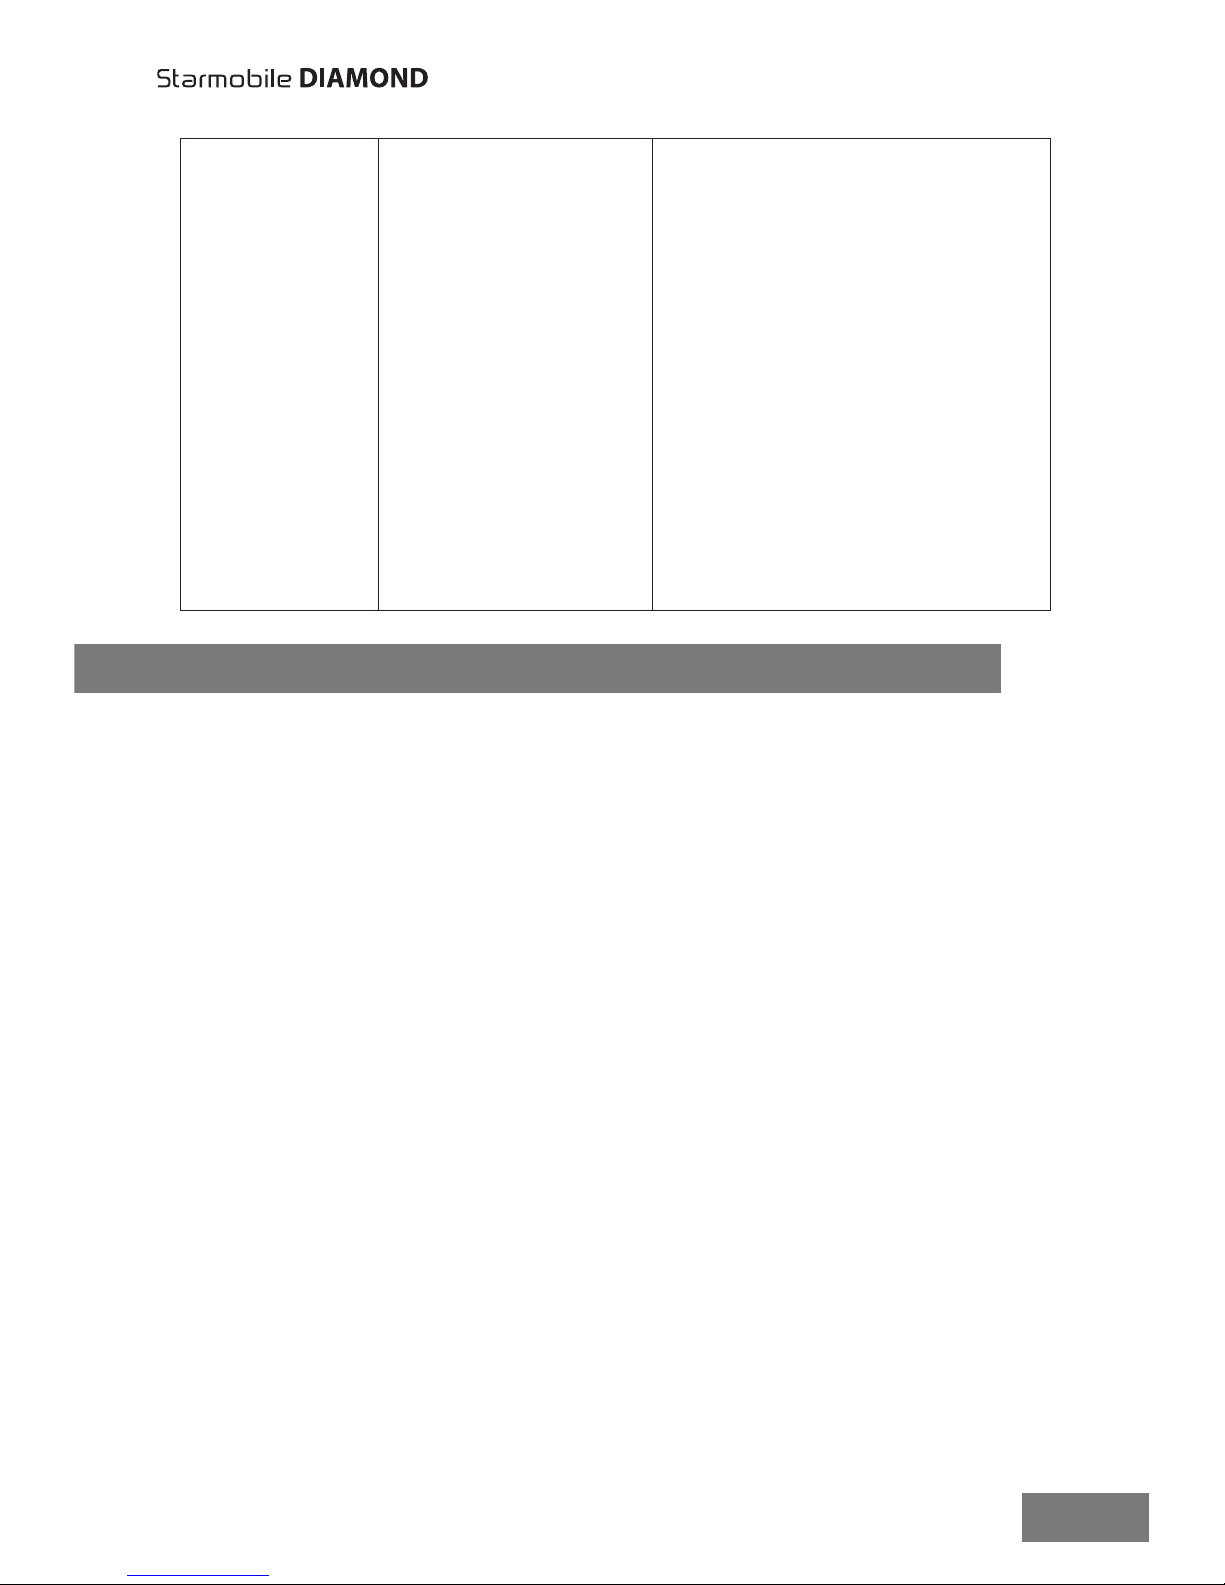
4. Safety & Notice
If your device has 4 or fewer
defective pixels per 1 million
pixels, third-party detection
and remedy apps are readily
available from Google Play.
Note: Starmobile shall not
be held liable for problems,
which may arise from using
said third-party apps.
International
standards allow for
a maximum of 5
defective pixels per
1 million pixels (ISO
9241-302:2008).
As such, only units
with 6 or more
defective pixels per
1 million pixels are
qualied for repair
or replacement.
Defective/
dead pixels
on the
device’s
screen
This section contains important information pertaining to correct and
safe usage of your mobile phone. Read carefully before using your
device.
• Your Starmobile phone supports an “Airplane mode” function.
Set your phone to “Airplane mode” when boarding an
aircraft or completely switch it off. Using wireless devices in an
aircraft may be dangerous to the operation of the aircraft,
disrupt pilot-ground communications, and may be considered
illegal.
• Power off your device in all fuel, chemicals, or blasting areas.
Keep the device away from children.
• Observe local laws and regulations when using your Starmobile
device. Do not talk on your mobile phone while driving. Use
hands-free accessories.
• When under poor driving conditions, park your vehicle before
making or answering a call.
• Switch off your mobile phone in the hospital or other areas that
prohibit the use of mobile devices. These may adversely affect
electronic equipment and medical devices, such as pacemakers,
hearing aids, and other similar equipment.
Page 20

14
D
1
• Non-original accessories and components do not qualify for
warranty repair.
• Do not dismantle the device or accessories. Otherwise,
Starmobile will not be held liable for damages as the device and
accessories will not be covered by the warranty.
• Please do not charge the smartphone before the battery is
installed. This may short-circuit the battery.
• Smartphones must be charged in a well-ventilated and cool
environment, and away from ammable and explosive materials.
• In order to prevent demagnetization, please keep your
smartphone away from all magnetic sources, such as disks, credit
cards, etc.
• Keep the device dry. Precipitation, humidity, and all types of
liquids or moisture can contain minerals that may corrode
electronic circuits. If your device gets wet, contact a Starmobile
authorized service center.
• Do not use the smartphone in very high or very low temperature
environments, or expose it to strong sunlight or high humidity.
• Do not use any kind of liquid, or wet cloth with strong detergent,
to clean the device.
• Your Starmobile phone comes with photo, video recording, and
sound recording functions. Please follow the relevant laws and
regulations for using these. Photo, video and/or sound recording
of certain places, people, or events without authorization may
violate laws and regulations.
• While using the network functions, please do not download les
suspected of having viruses. Do not install any photos and ring
tones that were downloaded from dubious sources. Starmobile
will not be held responsible for any erratic phone behavior arising
from these actions.
• Please dispose of batteries according to local regulations, and
recycle whenever possible. Do not dispose of your batteries like
common household waste.
STATEMENT: Starmobile reserves the right to revise the contents of this Quick
Guide without prior notice.
Page 21

Page 22
happymanph
 Loading...