

Page 1

USER’S MANUAL
GUIDE D’UTILISATION
BEDIENUNGSHANDBUCH
MANUALE OPERATIVO
LC-4511
LC-4521
DOT MATRIX PRINTERS
IMPRIMANTES MATRICIELLES
PUNKT-MATRIX-DRUCKER
STAMPANTI AD AGHI
HBA15 80825362-A
Page 2

CE
Manufacturer’s Declaration of Conformity
EC Council Directive 89/336/EEC of 3 May 1989
This product, has been designed and manufactured in accordance with the
International Standards EN 50081-1/01.92 and EN 50082-1/01.92, following the
provisions of the Electro Magnetic Compatibility Directive of the European
Communities as of May 1989.
EC Council Directive 73/23/EEC and 93/68/EEC of 22 July 1993
This product, has been designed and manufactured in accordance with the
International Standards EN 60950, following the provisions of the Low Voltage
Directive of the European Communities as of July 1993.
The above statement applies only to printers marketed in EU.
Ambient Noise Statement
Machine Noise Information Ordinance 3. GSGV, January 18, 1991: The sound
pressure level at the operator position is equal or less than 70 dB(A) according to
ISO 7779.
The above statement applies only to printers marketed in EU.
Trademark acknowledgments
IS-8H192, IS-32H768, LC-4511, LC-4521, LC24-30, LC24-300, NX-2450, NX2480, PT-15HA, SF-15HA, SPC-8K:
Star Micronics Co. Ltd.
LQ-850, LQ-860, LQ-1050, LQ-1060: Seiko Epson Corporation
IBM PC, IBM Proprinter X24E, IBM Proprinter XL24E, IBM Proprinter
X24, IBM Proprinter XL24, OS/2:
International Business Machines Corporation
TrueType: Apple Computer Inc.
MS-DOS, Microsoft Windows, Windows 3.1, Windows 95: Microsoft Corporation
Notice
• All rights reserved. Reproduction of any part of this manual in any form
whatsoever, without STAR’s express permission, is strictly forbidden.
• The contents of this manual are subject to change without notice.
• All efforts have been made to ensure the accurac y of the contents of this manual
at the time of printing. However, should any errors be found, STAR would
greatly appreciate being informed of them.
• The above notwithstanding, STAR can assume no responsibility for any errors in
this manual.
Déclaration de conformité CE du fabricant
Directive du conseil de la CE 89/336/EEC du 3 mai 1989
Ce produit a été conçu et fabriqué en accord avec les normes internationales EN
50081-1/01.92 et EN 50082-1/01.92, selon les dispositions de la Directive de mai
1989 de la CE, relative à la compatibilité électromagnétique.
Directives du conseil de la CE 73/23/EEC et 93/68/EEC du 22 juillet 1993
Ce produit a été conçu et fabriqué en accord avec les normes internationales EN
60950, selon les dispositions de la Directive de juillet 1993 de la CE, relative à la
basse tension.
Valable pour les imprimantes commercialisées en Europe seulement.
Déclaration sur les bruits ambiants
Ordonnance 3, GSVG,18 janvier 1991 Informations sur les bruits de machine: Le
niveau de pression acoustique à la position de l’opérateur est égal ou inférieur à 70
dB(A), conformément à la norme ISO 7779.
Valable pour les imprimantes commercialisées en Europe seulement.
Renseignements sur les marques de fabrique
IS-8H192, IS-32H768, LC-4511, LC-4521, LC24-30, LC24-300, NX-2450, NX2480, PT-15HA, SF-15HA, SPC-8K:
Star Micronics Co.Ltd.
LQ-850, LQ-860, LQ-1050, LQ-1060: Seiko Epson Corporation
IBM PC, IBM Proprinter X24E, IBM Proprinter XL24E, IBM Proprinter
X24, IBM Proprinter XL24, OS/2:
International Business Machines Corporation
True Type: Apple Computer Inc.
MS-DOS, Microsoft Windows, Windows 3.1, Windows 95: Microsoft Corporation
Remarque
• Tous droits réservés. La reproduction d’une partie de ce manuel sous quelque
forme que ce soit, sans la permission expresse de STAR, est strictement
interdite.
• Le contenu de ce manuel peut être modifié sans préavis.
• Des précautions ont été prises lors de l’impression de ce manuel pour garantir la
précision de son contenu. Cependant, en cas d’erreur dans ce manuel, STAR
apprécierait grandement d’en être informé.
• Cependant, STAR n’assume aucune responsabilité en cas d’erreurs dans ce
manuel.
© Copyright 1995 Star Micronics Co., Ltd
© Copyright 1995 Star Micronics Co., Ltd.
Page 3

CE
Konformitätserklärung des Herstellers
Direktive des EG-Rats 89/336/EEC vom 3. Mai 1989
Dieses Produkt, konstruiert und hergestellt entsprechend den internationalen
Normen EN 50081-1/01.92 und EN 50082-1/01.92, entspricht den Vorschriften der
Direktive für elektromagnetische Verträglichkeit der Europäischen Gemeinschaft,
Stand Mai 1989.
Direktive des EG-Rats 73/23/EEC und 93/68/EEC vom 22. Juni 1993
Dieses Produkt, konstruiert und hergestellt entsprechend den internationalen
Normen EN 60950, entspricht den Vorschriften der Direktive für Niederspannungen
der Europäischen Gemeinschaft, Stand Juli 1993.
Die obigen Feststellungen gelten für Drucker, die in der EU vertrieben werden.
Betriebsgeräusch
Maschinenlärminformationsverordnung 3. GSVG, 18.01, 1991: Der
arbeitsplatzbezogene Schalldruckpegel beträgt 70 dB(A) oder weniger gemäß ISO
7779.
Die obigen Feststellungen gelten für Drucker, die in der EU vertrieben werden.
Eingetragene Warenzeichen
IS-8H192, IS-32H768, LC-4511, LC-4521, LC24-30, LC24-300, NX-2450, NX2480, PT-15HA, SF-15HA, SPC-8K:
Star Micronics Co., Ltd.
LQ-850, LQ-860, LQ-1050, LQ-1060: Seiko Epson Corporation
IBM PC, IBM Proprinter X24E, IBM Proprinter XL24E, IBM Proprinter
X24, IBM Proprinter XL24, OS/2:
International Business Machines Corporation.
True Type: Apple Computer Inc.
MS-DOS, Microsoft Windows, Windows 3.1, Windows 95: Microsoft Corporation
Hinweis
• Alle Rechte vorbehalten. Kein Teil dieses Handbuches darf in irgendeiner Form
ohne ausdrückliche Genehmigung der Firma STAR reproduziert werden.
• Änderungen jederzeit ohne Angabe von Gründen möglich.
• Bei der Zusammenstellung von Texten und Abbildungen wurde mit größter
Sorgfalt vorge gangen. T rotzdem können Fehler nicht vollständig ausgeschlossen
werden. Für Hinweise auf eventuell vorgefundene Fehler ist der Herausgeber
dankbar.
• Die Firma ST AR kann nicht für Fehler in diesem Handbuch und e ventuell daraus
entstehende Folgen verantwortlich gemacht werden.
CE
Dichiarazione di conformità del fabbricante
Direttiva del Consiglio CE 89/336/CEE del 3 maggio 1989
Questo prodotto è stato progettato e fabbricato secondo gli Standard Internazionali
EN 50081-1/01.92 e EN 50082-1/01.92, seguendo quanto previsto dalla Direttiva
sulla Compatibilità Elettromagnetica della Comunità Europea del maggio 1989.
Direttiva del Consiglio CE 73/23/CEE e 93/68/CEE del 22 luglio 1993
Questo prodotto è stato progettato e fabbricato secondo gli Standard Internazionali
EN 60950, seguendo quanto previsto dalla Direttiva sulla Bassa Tensione della
Comunità Europea del luglio 1993.
La dichiarazione di cui sopra è applicabile solo ai prodotti in vendita nell’UE.
Dichiarazione sulle emissioni di rumore nell’ambiente
Informazioni sul rumore delle apparecchiature, Decreto 3. GSGV, del 18 gennaio
1991: La soglia di rumore a livello dell’operatore è uguale o inferiore a 70 dB(A)
secondo la norma ISO 7779.
La dichiarazione di cui sopra è applicabile solo ai prodotti in vendita nell’UE.
Riconoscimento di marchio registrato
IS-8H192, IS-32H768, LC-4511, LC-4521, LC24-30, LC24-300, NX-2450, NX2480, PT-15HA, SF-15HA, SPC-8K:
Star Micronics Co. Ltd.
LQ-850, LQ-860, LQ-1050, LQ-1060: Seiko Epson Corporation
IBM PC, IBM Proprinter X24E, IBM Proprinter XL24E, IBM Proprinter
X24, IBM Proprinter XL24, OS/2:
International Business Machines Corporation.
TrueType: Apple Computer Inc.
MS-DOS, Microsoft Windows, Windows 3.1, Windows 95: Microsoft Corporation
Avvertenze
• Tutti i diritti riservati. La riproduzione di qualsiasi parte di questo manuale in
qualsiasi forma o mezzo, senza il diretto consenso della STAR, è severamente
proibita.
• Le informazioni contenute nel presente manuale sono soggette a modifiche
senza preavviso.
• Malgrado siano state prese tutte le precauzioni per garantire l’accuratezza delle
informazioni contenute nel presente manuale al momento della stampa, la ST AR
sarà ben lieta di ricevere segnalazioni degli eventuali errori riscontrati.
• Nonostante quanto citato sopra, la STAR non si assume nessuna responsabilità
per eventuali errori contenuti nel presente manuale.
© Copyright 1995 Star Micronics Co., Ltd.
© Copyright 1995 Star Micronics Co., Ltd.
Page 4

About this manual
A propos de ce manuel
This manual describes how to set up, use, and care for the Star LC-4511 and LC4521 printers. The following is a list of what you can expect to find in each chapter.
Chapter 1 Choosing a place for your printer, unpacking and setup,
ribbon cassette installation, loading paper, connecting to your
computer.
Chapter 2 How to use the control panel
Chapter 3 How to use the printer’s Electronic DIP Switch (EDS) Mode
to set up the printer to match the needs of your system and
software
Chapter 4 Installing, starting up and using the User Setup Utility
Chapter 5 How to set up for printing with Microsoft Windows 3.1, how
to prepare for printing, how to print a document
Chapter 6 How to set up for printing with Microsoft Windows 95, how
to prepare for printing, how to print a document
Chapter 7 How to set up for printing with IBM OS/2 Warp, how to
prepare for printing, how to print a document
Chapter 8 How to set up for printing with MS-DOS
Chapter 9 Selecting the best type of paper, adjusting for paper
thickness, manual sheet feeding, clearing paper jams
Chapter 10 Optional accessories that are available for your printer
Appendix A How to deal with printing problems
Appendix B Specifications
Appendix C Interface information
Appendix D Character sets
Appendix E Printer control codes
Appendix F Control panel operation guide
Ce manuel décrit l’installation, le fonctionnement et l’entretien des imprimantes
LC-4511 et LC-4521 Star. La liste suivante décrit le contenu de chaque chapitre.
Chapitre 1 Choix de l’emplacement de l’imprimante, déballage et
installation, mise en place de la cartouche de ruban,
chargement du papier et raccordement à un ordinateur.
Chapitre 2 Utilisation du panneau de commande
Chapitre 3 Utilisation du mode EDS (Commutateurs DIP électroniques)
pour régler l’imprimante sur la configuration du système
informatique et du logiciel utilisé.
Chapitre 4 Installation, préparatifs et exploitation de l’utilitaire
d’impression
Chapitre 5 Réglage de l’imprimante pour Microsoft Windows 3.1,
préparatifs pour l’impression et impression d’un document
Chapitre 6 Réglage de l’imprimante pour Microsoft Windows 95,
préparation pour imprimer, manière d’imprimer un document
Chapitre 7 Configuration pour imprimer avec Warp OS/2 IBM,
préparation pour imprimer, manière d’imprimer un document
Chapitre 8 Réglage pour imprimer avec MS-DOS
Chapitre 9 Sélection du papier, réglage de l’épaisseur du papier,
alimentation manuelle feuille à feuille et suppression des
bourrages de papier
Chapitre 10 Accessoires en option disponibles pour l’imprimante
Annexe A Résolution des problèmes d’impression.
Annexe B Spécifications
Annexe C Broches du connecteur interface
Annexe D Jeux de caractères
Annexe E Codes de contrôle de l’imprimante
Annexe F Guide d’utilisation des commandes
Page 5

Über dieses Handbuch
Informazioni sul manuale
In diesem Handbuch wird die Vorbereitung, Verwendung und Pflege der Drucker
Star LC-4511 und LC-4521 beschrieben. Es folgt ein kurzer Umriß der Inhalte der
einzelnen Kapitel.
Kapitel 1 W ahl eines Aufstellungsorts für den Drucker , Auspacken und
Aufstellen, Einlegen der Farbandkassette und des Papiers,
Anschluß am Computer
Kapitel 2 Beschreibung des Bedienfelds
Kapitel 3 Einstellung der elektronischen DIP-Schalter (EDS) zur
Anpassung an die Anforderung von vorhandener Hard- und
Software
Kapitel 4 Installation und Inbetriebnahme mit dem Drucker-
Installationsprogramm
Kapitel 5 Grundeinstellungen zum Drucken mit Microsoft Windows
3.1, Vorbereitungen für den Druck, Drucken von
Dokumenten
Kapitel 6 Grundeinstellungen zum Drucken mit Microsoft Windows
95, Vorbereitungen für den Druck, Drucken von Dokumenten
Kapitel 7 Grundeinstellungen zum Drucken mit IBM OS/2 Warp,
Vorbereitungen für den Druck, Drucken von Dokumenten
Kapitel 8 Vorbereitungen zum Drucken mit MS-DOS
Kapitel 9 Wahl des besten Papiertyps, Einstellung der Papierstärke,
Einzelblatteinzug, Beheben von Papierstaus
Kapitel 10 Optionales Zubehör für Ihren Drucker
Questo manuale descrive come installare, usare e mantenere le stampanti Star
LC-4511e LC-4521. Segue una lista del contenuto di ciascun capitolo.
Capitolo 1 Scelta della collocazione per la stampante, disimballaggio
e installazione, inserimento della cartuccia del nastro,
caricamento della carta, collegamento al computer
Capitolo 2 Uso del pannello comandi
Capitolo 3 Uso del modo interruttore DIP elettronico (EDS) della
stampante per configurare la stampante in base alle
esigenze del sistema e del software impiegati
Capitolo 4 Installazione, avvio e impiego dell’User Setup Utility
Capitolo 5 Preliminari per la stampa con Microsoft Windows 3.1,
preparativi per la stampa, come stampare un documento
Capitolo 6 Preliminari per la stampa con Microsoft Windows 95,
preparativi per la stampa, come stampare un documento.
Capitolo 7 Preliminari per la stampa con IBM OS/2 Warp, preparativi
per la stampa, come stampare un documento.
Capitolo 8 Preparativi per la stampa con MS-DOS
Capitolo 9 Selezione del tipo migliore di carta, regolazione per lo
spessore della carta, inserimento fogli manuale,
eliminazione di inceppamenti della carta
Capitolo 10 Accessori opzionali disponibili per la stampante
Anhang A Wie verhält man sich bei Druckproblemen
Anhang B Technische Daten
Anhang C Schnittstelleninformationen
Anhang D Zeichensätze
Anhang E Drucker-Steuercodes
Anhang F Steuerung über Bedienfeld
Appendice A Ricerca e soluzione dei problemi distampa
Appendice B Caratteristiche tecniche
Appendice C Informazioni sull’interfaccia
Appendice D Gruppi di caratteri
Appendice E Codici di controllo stampante
Appendice F Guida all’uso del pannello comandi
Page 6

Contents
Table des matières
Chapter 1: Printer Setup ........................................................................ 1
Choosing a place for the printer .................................................................1
Unpacking the printer ................................................................................. 3
General guide ............................................................................................. 3
Opening the front cover ..............................................................................5
Removing the protective materials ............................................................. 5
Installing the platen knob ...........................................................................7
Installing the ribbon cassette ......................................................................7
Removing the ribbon cassette .................................................................... 9
Installing the paper guide .........................................................................11
Standing up the paper guide .....................................................................11
Connecting to a power outlet and turning power on and off .................... 13
Loading fanfold paper .............................................................................. 13
Printing on fanfold paper ......................................................................... 19
Parking fanfold paper ............................................................................... 19
Unparking fanfold paper .......................................................................... 21
Using the tear-off function ....................................................................... 21
Connecting to your computer ................................................................... 21
Chapter 2: Control Panel Operations ............................................. 25
Switching between on-line and off-line ................................................... 25
Selecting a font ......................................................................................... 27
Entering the Font Lock Mode .................................................................. 27
Setting the character pitch ........................................................................ 29
Entering the Pitch Lock Mode ................................................................. 29
Line feed .................................................................................................. 31
Paper eject (cut-sheet paper) .................................................................... 31
Form feed (fanfold paper) ........................................................................ 31
Parking fanfold paper ............................................................................... 31
Micro feed ................................................................................................ 31
Setting the top of form position ............................................................... 33
Tear-off function (fanfold paper) ............................................................. 33
Selecting the Quiet Print Mode ................................................................ 33
Changing the auto load position ............................................................... 35
Saving a macro ......................................................................................... 37
Clearing the printer’s buffer ..................................................................... 37
Initializing the printer ............................................................................... 39
Entering the Multi-part Mode .................................................................. 39
Chapitre 1: Installation de l’imprimante ........................................ 1
Choix d’un emplacement pour l’imprimante ............................................. 1
Déballage de l’imprimante ......................................................................... 4
Guide général ............................................................................................. 4
Ouverture du capot avant ........................................................................... 6
Retrait des matériaux de protection ........................................................... 6
Montage de la molette du cylindre ............................................................. 8
Mise en place de la cartouche de ruban ..................................................... 8
Retrait de la cartouche de ruban ............................................................... 10
Mise en place du guide-papier ................................................................. 12
Inclinaison du guide-papier ...................................................................... 12
Connexion à une prise secteur et mise sous et hors tension ..................... 14
Chargement du papier continu ................................................................. 14
Impression sur papier continu .................................................................. 20
Mise en attente du papier continu ............................................................ 20
Nouvelle utilisation du papier continu ..................................................... 21
Utilisation de la fonction de découpe ....................................................... 21
Connexion de l’imprimante à l’ordinateur ............................................... 21
Chapitre 2: Utilisation du panneau de commande ................... 25
Alternance entre le mode en ligne et le mode hors ligne ......................... 25
Sélection d’une police de caractères ........................................................ 27
Passage en mode Blocage de police ......................................................... 27
Réglage du pas de caractère ..................................................................... 29
Passage en mode Blocage de pas ............................................................. 29
Saut de ligne ............................................................................................. 31
Ejection du papier (feuilles séparées) ...................................................... 31
Saut de page (papier continu) ................................................................... 31
Mise en attente du papier continu ............................................................ 31
Avance du papier par micro-lignes .......................................................... 31
Réglage du début de page ........................................................................ 33
Fonction de découpe (papier continu) ...................................................... 33
Sélection du mode d’impression silencieuse ........................................... 33
Changement de la position de chargement automatique .......................... 35
Sauvegarde de macro-commandes ........................................................... 37
Vidage de la mémoire tampon de l’imprimante ....................................... 37
Réinitialisation de l’imprimante ............................................................... 39
Entrée en mode multi-feuilles .................................................................. 39
Page 7

Inhaltsverzeichnis
Indice
Kapitel 1: Drucker-Setup ....................................................................... 2
Wahl eines Aufstellungsorts für den Drucker ............................................ 2
Auspacken des Druckers ............................................................................ 4
Allgemeine Anleitung ................................................................................ 4
Öffnen der Frontabdeckung ....................................................................... 6
Entfernen der Transportsicherungen .......................................................... 6
Befestigung des Walzendrehknopfes ......................................................... 8
Einsetzen der Farbbandkassette ................................................................. 8
Entnehmen der Farbbandkassette ............................................................. 10
Einsetzen der Papierführung .................................................................... 12
Aufrichten der Papierführung .................................................................. 12
Anschluß an eine Steckdose und Ein-/Ausschalten der
Netzversorgung ..................................................................................14
Endlospapier einlegen .............................................................................. 14
Drucken auf Endlospapier ........................................................................ 20
Papier-Park Funktion ................................................................................20
Fortsetzung des Endlospapier-Druckbetriebs ...........................................22
Verwendung der Abreißfunktion .............................................................. 22
Anschluß an den Computer ...................................................................... 22
Kapitel 2: Bedienfeld .............................................................................. 26
Umschalten zwischen Online- und Offline-Betrieb ................................. 26
Wahl einer Schriftart ................................................................................ 28
Einschalten des Schriftart-Sperrmodus .................................................... 28
Einstellung des Zeichenabstands ............................................................. 30
Einschalten des Zeichenabstand-Sperrmodus .......................................... 30
Zeilenvorschub ......................................................................................... 32
Blattauswurf (Einzelblattpapier) .............................................................. 32
Blattvorschub (Endlospapier) ................................................................... 32
Die Papier-Park-Funktion ........................................................................ 32
Mikro-Papiertransport .............................................................................. 32
Einstellen des Blattanfangs ...................................................................... 34
Abreißfunktion (Endlospapier) ................................................................ 34
Einstellen des Leisedruckmodus .............................................................. 34
Änderung der automatischen Papiereinzugposition ................................. 36
Speichern der Bedienfeldeinstellungen .................................................... 38
Löschen der Druckpufferdaten ................................................................. 38
Initialisierung des Druckers ..................................................................... 40
Einschalten des Mehrlagen-Druckmodus ................................................ 40
Capitolo 1: Installazione della stampante ....................................... 2
Scelta del luogo dove installare la stampante ............................................ 2
Disimballaggio della stampante ................................................................. 4
Panoramica generale della stampante ........................................................ 4
Apertura del coperchio anteriore ................................................................ 6
Rimozione del materiale di protezione ...................................................... 6
Montaggio della manopola del rullo .......................................................... 8
Installazione della cartuccia del nastro ...................................................... 8
Rimozione della cartuccia del nastro ....................................................... 10
Installazione del guida carta ..................................................................... 12
Inclinazione del guida carta ..................................................................... 12
Collegamento ad una presa elettrica ed accensione e spegnimento ......... 14
Caricamento della carta a modulo continuo ............................................. 14
Stampa su carta a modulo continuo ......................................................... 20
Parcheggio della carta a modulo continuo ............................................... 20
Ripristino del modulo continuo parcheggiato .......................................... 22
Uso della funzione di strappo ................................................................... 22
Collegamento della stampante al computer ............................................. 22
Capitolo 2: Funzioni del pannello di controllo ........................... 26
Passaggio dal modo on-line al modo off-line .......................................... 26
Selezione di un font di caratteri ............................................................... 28
Attivazione del modo blocco font ............................................................ 28
Impostazione del passo del carattere ........................................................ 30
Attivazione del modo blocco passo di stampa ......................................... 30
Avanzamento riga ..................................................................................... 32
Espulsione carta (fogli singoli) ................................................................ 32
Avanzamento pagina (modulo continuo) ................................................. 32
Parcheggio del modulo continuo .............................................................. 32
Avanzamento micrometrico ..................................................................... 32
Impostazione della posizione di inizio pagina ......................................... 34
Funzione di strappo (modulo continuo) ................................................... 34
Selezione del modo di stampa silenziosa ................................................. 34
Modifica della posizione di caricamento automatico ............................... 36
Memorizzazione delle impostazioni del pannello di controllo ................ 38
Svuotamento del buffer di stampa ............................................................ 38
Inizializzazione della stampante .............................................................. 40
Attivazione del modo multi-copia ............................................................ 40
Page 8

Chapter 3: Using the EDS Mode ....................................................... 41
About EDS Mode settings ........................................................................ 41
Entering the EDS Mode ........................................................................... 41
Selecting a bank ....................................................................................... 43
Selecting a switch ..................................................................................... 43
Changing a switch setting ........................................................................ 45
Printing the current switch settings .......................................................... 45
Checking the settings of switches in a bank ............................................ 45
Exiting the EDS Mode ............................................................................. 45
EDS Mode Settings .................................................................................. 47
Chapitre 3: Utilisation du mode EDS ............................................. 41
Au sujet des réglages en mode EDS ........................................................ 41
Entrée en mode EDS ................................................................................ 41
Sélection de groupe .................................................................................. 43
Sélection d’un commutateur .................................................................... 43
Changement de réglage d’un commutateur ............................................. 45
Impression des réglages courants des commutateurs ............................... 45
Vérification des réglages commutateurs d’un groupe .............................. 45
Sortie du mode EDS ................................................................................. 45
Réglages en mode EDS ............................................................................ 47
Chapter 4: User Setup Utility ............................................................. 67
Installing the User Setup Utility ............................................................... 67
Starting up the User Setup Utility ............................................................ 71
Changing the General, Font, Paper and Adjust Settings .......................... 71
To select a window .......................................................................... 71
To select a setting box ..................................................................... 73
To change a setting .......................................................................... 73
Adjusting the dot alignment ..................................................................... 73
Changing the printer port ......................................................................... 75
Saving setup data in a configuration file .................................................. 75
Importing setup data from a configuration file ......................................... 77
Returning to default settings .................................................................... 77
Exiting the User Setup Utility .................................................................. 77
Using the Help menu ................................................................................ 77
Chapter 5: Using the Printer with Windows 3.1 ........................ 79
Setting up for printing with Microsoft Windows 3.1 ............................... 79
Getting ready to print ............................................................................... 85
Printing a document ................................................................................. 87
Installing TrueType fonts ......................................................................... 89
Selecting fonts in Windows applications ................................................. 91
Chapter 6: Using the Printer with Windows 95 ......................... 93
Setting up the printer in Windows 95 .......................................................93
Preparing to print ................................................................................... 101
Printing a document ............................................................................... 105
Installing TrueType fonts ....................................................................... 107
Chapitre 4: Utilitaire d’impression .................................................. 67
Installation de l’utilitaire d’impression .................................................... 67
Exploitation de l’utilitaire d’impression .................................................. 71
Changement des réglages de généralités, de la police, du papier et
des paramètres ................................................................................... 71
Sélection d’une fenêtre .................................................................... 71
Sélection d’une case de réglage ...................................................... 73
Changement d’un réglage ............................................................... 73
Réglage de l’alignement des points ......................................................... 73
Changement du port de l’imprimante ...................................................... 75
Sauvegarde des données dans un fichier de configuration ....................... 75
Importation de données d’un fichier de configuration ............................. 77
Retour aux réglages par défaut ................................................................. 77
Sortie de l’utilitaire d’impression ............................................................ 77
Utilisation du menu d’aide ....................................................................... 77
Chapitre 5: Utilisation de l’imprimante sous Windows 3.1 .. 79
Configuration de l’impression sous Microsoft Windows 3.1 ................... 79
Préparation à l’impression ....................................................................... 85
Impression d’un document ....................................................................... 87
Installation des polices TrueType ............................................................. 89
Sélection des polices dans les applications Windows .............................. 91
Chapitre 6: Utilisation de l’imprimante sous Windows 95 .... 93
Configuration de l’imprimante sous Windows 95 ................................... 93
Préparation en vue d’impression ........................................................... 101
Impression de document ....................................................................... 105
Installation de polices TrueType ............................................................ 107
Page 9

Kapitel 3: Verwendung des EDS-Modus ....................................... 42
Einstellungen des EDS-Modus ................................................................ 42
Einschalten des EDS-Modus .................................................................... 42
Wahl einer Gruppe ................................................................................... 44
Wahl eines Schalters ................................................................................ 44
Änderung der Schaltereinstellung ............................................................ 46
Ausdrucken der gegenwärtigen Schaltereinstellungen ............................ 46
Prüfen der Schaltereinstellung einer Gruppe ........................................... 46
Verlassen des EDS-Modus ....................................................................... 46
EDS-Modus-Einstellungen ...................................................................... 48
Capitolo 3: Uso del modo EDS ........................................................... 42
Le impostazioni del modo EDS ............................................................... 42
Attivazione del modo EDS ....................................................................... 42
Selezione di un gruppo ............................................................................. 44
Selezione di un interruttore ...................................................................... 44
Modifica dell’impostazione di un interruttore ......................................... 46
Stampa delle impostazioni correnti degli interruttori .............................. 46
Controllo delle impostazioni degli interruttori di un gruppo ................... 46
Disattivazione del modo EDS .................................................................. 46
Impostazioni del modo EDS .................................................................... 48
Kapitel 4: Drucker-Installationsprogramm ................................. 68
Installierung des Drucker-Installationsprogramms .................................. 68
Starten des Drucker-Installationsprogramms ........................................... 72
Änderung der Einstellungen unter Allgem., Font, Papier,
Justage und Port ................................................................................. 72
Wahl eines Fensters ......................................................................... 72
Wahl eines Feldes ........................................................................... 74
Änderung der Einstellung ............................................................... 74
Änderung des Bidirektionalen Druckertests ............................................ 74
Änderung der Schnittstelle ....................................................................... 76
Speichern der Einstelldaten in einer Konfigurationsdatei ........................ 76
Einlesen von Einstelldaten aus einer Konfigurationsdatei ....................... 78
Rückstellung auf die Standardeinstellungen ............................................ 78
Verlassen des Drucker-Installationsprogramms ....................................... 78
Verwendung der Hilfe .............................................................................. 78
Kapitel 5: Einsatz des Druckers unter Windows 3.1 ............... 80
Grundeinstellung (Setup) zum Drucken unter Microsoft Windows 3.1 .. 80
Vorbereitung für den Druck ..................................................................... 86
Drucken eines Schriftstücks ..................................................................... 88
Installieren von TrueType-Schriftarten .................................................... 90
Wahl von Schriftarten in Windows-Anwendungen .................................. 92
Kapitel 6: Drucker mit Windows 95 anwenden ......................... 94
Einstellung des Druckers für Windows 95 .............................................. 94
Ausdruck vorbereiten ............................................................................ 102
Ausdruck eines Dokumentes ................................................................. 106
TrueType Fonts installieren ................................................................... 108
Capitolo 4: User Setup Utility ............................................................ 68
Installazione di User Setup Utility ........................................................... 68
Lancio di User Setup Utility .................................................................... 72
Cambiamento delle impostazioni generali, font, carta e Tarature ............ 72
Per selezionare una finestra ............................................................. 72
Selezione di un riquadro di impostazione ....................................... 74
Per cambiare un’impostazione ........................................................ 74
Regolazione dell’allineamento dei punti .................................................. 74
Cambiamento della porta stampante ........................................................ 76
Salvataggio dei dati di impostazione in un file di configurazione ........... 76
Importazione di dati di impostazione da un file di configurazione .......... 78
Ritorno alle impostazioni default ............................................................. 78
Uscita da User Setup Utility ..................................................................... 78
Uso del menu Help ................................................................................... 78
Capitolo 5: Utilizzo della stampante con Windows 3.1 ........... 80
Installazione della stampante sotto Microsoft Windows 3.1 ....................80
Impostazione della stampante .................................................................. 86
Stampa di un documento .......................................................................... 88
Installazione dei caratteri TrueType ......................................................... 90
Selezione dei caratteri all’interno delle applicazioni Windows ............... 92
Capitolo 6: Utilizzo della stampante con Windows 95 ............ 94
Installazione della stampante sotto Windows 95 ..................................... 94
Preparazione per la stampa .................................................................... 102
Stampa di um documento ....................................................................... 106
Installazione dei caratteri TrueType ....................................................... 108
Page 10

Chapter 7: Using the Printer with OS/2 Warp ......................... 111
Setting up for printing with OS/2 Warp ................................................. 111
Getting ready to print ............................................................................. 113
Printing a document ............................................................................... 113
Chapitre 7: Utiliser l’imprimante avec le logiciel OS/2 Warp... 111
Configurer l’impression avec le logiciel OS/2 Warp IBM ..................... 111
Préparer l’impression ............................................................................. 113
Imprimer un document ........................................................................... 113
Chapter 8: Using the Printer with MS-DOS .............................. 115
Setting up for printing with MS-DOS .................................................... 115
Chapter 9: Paper Handling ............................................................... 119
Selecting paper types .............................................................................. 119
Cut-Sheet Paper (Manual Feed) .................................................... 119
Cut-Sheet Paper (with Optional Automatic Sheet Feeder) ........... 119
Fanfold Paper ................................................................................ 119
Labels ............................................................................................ 121
Adjusting for paper thickness ................................................................ 121
Automatic fanfold feeding ..................................................................... 123
Manual sheet feeding ............................................................................. 123
Clearing paper jams ............................................................................... 125
Chapter 10: Optional Accessories .................................................. 127
Automatic Sheet Feeder (SF-15HA) ...................................................... 127
Pull Tractor Unit (PT-15HA) ................................................................. 127
Serial Interface Unit (IS-8H192 and IS-32H768) ................................. 127
Serial-to-Parallel Converter (SPC-8K) .................................................. 131
Appendix A: Troubleshooting ......................................................... 133
Appendix B: Specifications ............................................................... 155
Appendix C: Interface Pin Outs ..................................................... 161
Appendix D: Character Sets ............................................................ 162
Appendix E: Printer Control Codes ............................................. 167
Appendix F: Control Panel Operation Guide .......................... 171
Chapitre 8: Utilisation de l’imprimante avec MS-DOS ........ 115
Réglage pour l’impression avec MS-DOS ............................................. 115
Chapitre 9: Manipulation du papier ............................................. 119
Sélection du type de papier .................................................................... 119
Feuilles séparées (avance manuelle) ............................................. 119
Feuilles séparées (avec dispositif d’alimentation feuille à
feuille automatique en option) .................................................. 119
Papier continu ................................................................................ 119
Etiquettes ....................................................................................... 122
Réglage en fonction de l’épaisseur du papier ........................................ 122
Avance automatique du papier continu .................................................. 123
Avance manuelle feuille à feuille ........................................................... 123
Décoinçage du papier ............................................................................. 126
Chapitre 10: Accessoires en option ............................................... 128
Alimentation introducteur automatique de feuilles (SF-15HA) ........... 128
Tracteur tirant (PT-15HA) ...................................................................... 128
Interface série (IS-8H192 et IS-32H768) ............................................... 128
Convertisseur interface série - parallèle (SPC-8K) ................................ 132
Annexe A: Dépannage ........................................................................ 133
Annexe B: Caractéristiques techniques ...................................... 155
Annexe C: Broches du connecteur interface ............................ 161
Annexe D: Jeux de caractères ......................................................... 162
Annexe E: Codes de contrôle de l'imprimante ........................ 167
Annexe F: Guide de fonctionnement du panneau
de commande
............................................................ 171
Page 11

Kapitel 7: Der Einsatz des Druckers unter OS/2 Warp ....... 112
Einrichtung für den Druck unter IBM OS/2 Warp ................................. 112
Druckvorbereitungen ..............................................................................114
Druck eines Dokumentes ....................................................................... 114
Capitolo 7: Utilizzo della stampante con OS/2 Warp ............ 112
Installazione della stampante sotto OS/2 Warp ...................................... 112
Impostazione della stampante ................................................................ 114
Stampa di un documento ........................................................................ 114
Kapitel 8: Verwendung des Druckers mit MS-DOS .............. 116
Einstellen zum Drucken unter DOS ....................................................... 116
Kapitel 9: Papierhandhabung ......................................................... 120
Wahl der besten Papiersorte ................................................................... 120
Einzelblattpapier (manueller Einzug) ............................................ 120
Einzelblattpapier (mit optionalem automatischem
Einzelblatteinzug) ..................................................................... 120
Endlospapier .................................................................................. 120
Etiketten ........................................................................................ 122
Einstellen der Papierstärke ..................................................................... 122
Automatische Endlospapierzufuhr ......................................................... 124
Manueller Einzelblatteinzug .................................................................. 124
Beheben von Papierstaus ........................................................................ 126
Kapitel 10: Optionales Zubehör für Ihren Drucker ............. 128
Automatischer Einzelblatteinzug (SF-15HA) ........................................ 128
Zugtraktor (PT-15HA) ............................................................................ 128
Serielle interface (IS-8H192 und IS-32H768) ....................................... 128
Seriell-Parallel-Konverter (SPC-8K) ...................................................... 132
Anhang A: Fehlersuche ...................................................................... 134
Anhang B: Technische Daten .......................................................... 156
Anhang C: Schnittstelleninformationen ..................................... 161
Capitolo 8: Uso della stampante con MS-DOS ......................... 116
Predisposizione per la stampa con MS-DOS ......................................... 116
Capitolo 9: Uso della carta ................................................................. 120
Selezione dei tipi di carta ....................................................................... 120
Carta a fogli singoli (alimentazione manuale) .............................. 120
Carta a fogli singoli (con alimentatore automatico di fogli
singoli opzionale) ...................................................................... 120
Carta a modulo continuo ............................................................... 120
Etichette ......................................................................................... 122
Regolazione per lo spessore della carta ................................................. 122
Alimentazione automatica del modulo continuo ................................... 124
Alimentazione manuale dei fogli singoli ............................................... 124
Eliminazione degli inceppamenti della carta ......................................... 126
Capitolo 10: Accessori opzionali ..................................................... 128
Alimentatore caricatore automatico fogli singoli (SF-15HA) .............. 128
Trattore trascinamento (PT-15HA) ........................................................ 128
Interfaccia seriale (IS-8H192 e IS-32H768) ......................................... 128
Convertitore d’interfaccia seriale-parallelo (SPC-8K) ........................... 132
Appendice A: Soluzione di problemi ............................................ 134
Appendice B: Specifiche tecniche .................................................. 156
Appendice C: Uscite terminali interfaccia ................................ 161
Anhang D: Zeichensätze .................................................................... 162
Anhang E: Drucker-Steuercodes ................................................... 167
Anhang F: Steuerung über Bedienfeld ........................................ 172
Appendice D: Gruppi di caratteri ................................................. 162
Appendice E: Codici di controllo stampante ............................ 167
Appendice F: Guida all’uso del pannello comandi ................ 172
Page 12

Chapter 1: Printer Setup
Chapitre 1: Installation de l’imprimante
This chapter contains important information on setting up your printer. Be sure to
read this chapter carefully before using the printer for the first time. In this chapter
you will learn about:
❏ Choosing a place for the printer
❏ Unpacking and setting up the printer
❏ Installing the platen knob
❏ Installing the ribbon cassette
❏ Loading paper
❏ Connecting to your computer
Choosing a place for the printer
Before actually unpacking the printer, you should take a few minutes to think about
where you plan to use it. Remember the following points when doing this.
✓ Choose a firm, level surface where the printer will not be exposed to vibration.
✓ The power outlet you plan to connect to for power should be nearby and
unobstructed.
✓ Make sure that the printer is close enough to your computer for you to connect
the two with your printer cable.
✓ Allow six inches (15 centimeters) of free space on either side of the printer. If
you are going to use fanfold paper, make sure that there is adequate space for
paper behind the printer.
✓ Make sure that the printer is not exposed to direct sunlight.
✓ Make sure that the printer is well away from heaters.
✓ Make sure that the surrounding area is clean, dry, and free of dust.
✓ Make sure that the printer is connected to a reliable power outlet. It should not
be on the same electric circuit as copiers, refrigerators, or other appliances that
cause power spikes.
✓ Use a po wer outlet that matches the po wer rating noted on the label affix ed to the
bottom of your printer.
✓ Make sure that the room where you are using the printer is not too humid.
Ce chapitre contient des informations importantes concernant l’installation de
l’imprimante. Veuillez lire attentivement ce chapitre avant la mise en service de
l’imprimante. Ce chapitre contient les paragraphes suivants:
❏ Choix d’un emplacement pour l’imprimante
❏ Déballage et installation de l’imprimante
❏ Mise en place de la molette du cylindre
❏ Mise en place de la cartouche de ruban
❏ Chargement du papier
❏ Connexion de l’imprimante à l’ordinateur
Choix d’un emplacement pour l’imprimante
Avant de déballer l’imprimante, prenez le temps de choisir un emplacement
approprié, en tenant compte des points suivants:
✓ Posez l’imprimante sur une surface ferme et à ni v eau où elle ne sera pas soumise
à des vibrations.
✓ Branchez l’imprimante à une prise d’accès facile qui se trouve à proximité.
✓ Assurez-v ous que l’imprimante est assez proche de l’ordinateur pour pouvoir les
raccorder avec le câble de l’imprimante.
✓ Laissez un espace de 15 cm (6 pouces) de chaque côté de l’imprimante. Si vous
prévoyez d’utiliser du papier continu, laissez un espace suffisant à l’arrière de
l’imprimante.
✓ Assurez-vous que l’imprimante n’est pas exposée directement à la lumière du
soleil.
✓ Assurez-vous que l’imprimante ne se trouve pas à proximité d’un chauffage.
✓ Assurez-vous que la zone autour de l’imprimante est propre, sèche et sans
poussière.
✓ Branchez l’imprimante à une prise fiable. Ne la branchez pas à un circuit
électrique qui dessert d’autres appareils générateurs de pointes de tension, tels
qu’un photocopieur ou un réfrigérateur.
✓ Branchez l’imprimante à une prise dont le régime correspond à celui qui est
indiqué sur la plaque signalétique fixée sous l’imprimante.
✓ Assurez-vous que la pièce dans laquelle on utilise l’imprimante n’est pas trop
humide.
1
Page 13

Kapitel 1: Drucker-Setup
Capitolo 1: Installazione della stampante
Dieses Kapitel enthält wichtige Informationen zur Vorbereitung Ihres Druckers.
Bitte lesen Sie dieses Kapitel sorgfältig durch, bevor Sie den Drucker zum ersten
Mal in Betrieb nehmen. In diesem Kapitel erfahren Sie Einzelheiten über:
❏ Wahl eines Aufstellungsorts für den Drucker
❏ Auspacken und Vorbereiten des Druckers
❏ Anbringen des Walzendrehknopfes
❏ Einsetzen der Farbbandkassette
❏ Einlegen von Papier
❏ Anschluß an den Computer
Wahl eines Aufstellungsorts für den Drucker
Bevor Sie den Drucker auspacken, sollten Sie einige Minuten damit verbringen,
einen geeigneten Aufstellungsort auszusuchen. Denken Sie dabei an die folgenden
Punkte:
✓ Stellen Sie den Drucker auf einem flachen, aber festen Unter grund auf, wo k eine
Vibrationen vorhanden sind.
✓ Die verwendete Steckdose soll in der Nähe und frei zugänglich sein.
✓ Stellen Sie sicher, daß der Drucker nahe genug am Computer ist, um die Geräte
mit dem Druckerkabel verbinden zu können.
✓ Lassen Sie ca. 15 cm Abstand zu beiden Seiten des Druckers frei. Wenn Sie
zickzackgefaltetes Endlospapier verwenden wollen, stellen Sie sicher, daß
ausreichend Platz für das Papier hinter dem Drucker vorhanden ist.
✓ Stellen Sie sicher, daß der Drucker vor direktem Sonnenlicht geschützt ist.
✓ Stellen Sie sicher, daß der Drucker ausreichend weit von Heizkörpern entfernt
steht.
✓ Sor gen Sie dafür, daß die Umgebung des Druckers sauber, trocken und staubfrei
ist.
✓ Stellen Sie sicher, daß der Drucker an eine einwandfreie Stromzufuhr
angeschlossen ist. Er sollte nicht an Steckdosen angeschlossen werden, an denen
bereits Geräte mit möglichen Netzstörungen wie Kopierer, Kühlschränke u.a.
angeschlossen sind.
✓ Die Versorgungsspannung muß dem Spannungswert auf dem T ypenschild an der
Unterseite des Druckers entsprechen.
✓ Den Drucker nicht an Orten mit hoher Luftfeuchtigkeit aufstellen.
Questo capitolo contiene informazioni importanti su come installare la stampante.
Leggere attentamente questo capitolo prima di usare la stampante per la prima volta.
Questo capitolo fornisce istruzioni relative ai seguenti argomenti:
❏ Scelta del luogo di lavoro della stampante
❏ Disimballaggio e installazione della stampante
❏ Montaggio della manopola del rullo
❏ Installazione della cartuccia del nastro
❏ Caricamento della carta
❏ Collegamento della stampante al computer
Scelta del luogo dove installare la stampante
Prima di disimballare la stampante, considerare con cura dove si intende utilizzarla,
tendendo presenti le seguenti indicazioni.
✓ Scegliere una superficie solida e piana dove la stampante non sia esposta a
vibrazioni.
✓ La presa elettrica a cui si intende collegare la stampante dovrà trovarsi nelle
vicinanze e non dovrà essere ostruita.
✓ Assicurarsi che la stampante sia sufficientemente vicina al computer per poter
collegare le due apparecchiature con il cavo stampante.
✓ Lasciare almeno 15 centimetri di spazio libero su entrambi i lati della stampante.
Se si intende usare carta a modulo continuo, accertarsi che vi sia spazio
sufficiente per la carta dietro la stampante.
✓ Assicurarsi che la stampante non sia esposta alla luce diretta del sole.
✓ Assicurarsi che la stampante sia lontana da fonti di calore.
✓ Assicurarsi che l’area circostante sia pulita, asciutta e priva di polvere.
✓ Assicurarsi che la stampante sia collegata ad una presa elettrica affidabile,
possibilmente non sullo stesso circuito di fotocopiatrici, frigoriferi o altre
apparecchiature che potrebbero causare sbalzi di tensione.
✓ Usare una presa elettrica di tensione corrispondente a quella indicata
sull’etichetta applicata sul fondo della stampante.
✓ Assicurarsi che il locale in cui si usa la stampante non sia eccessivamente
umido.
2
Page 14
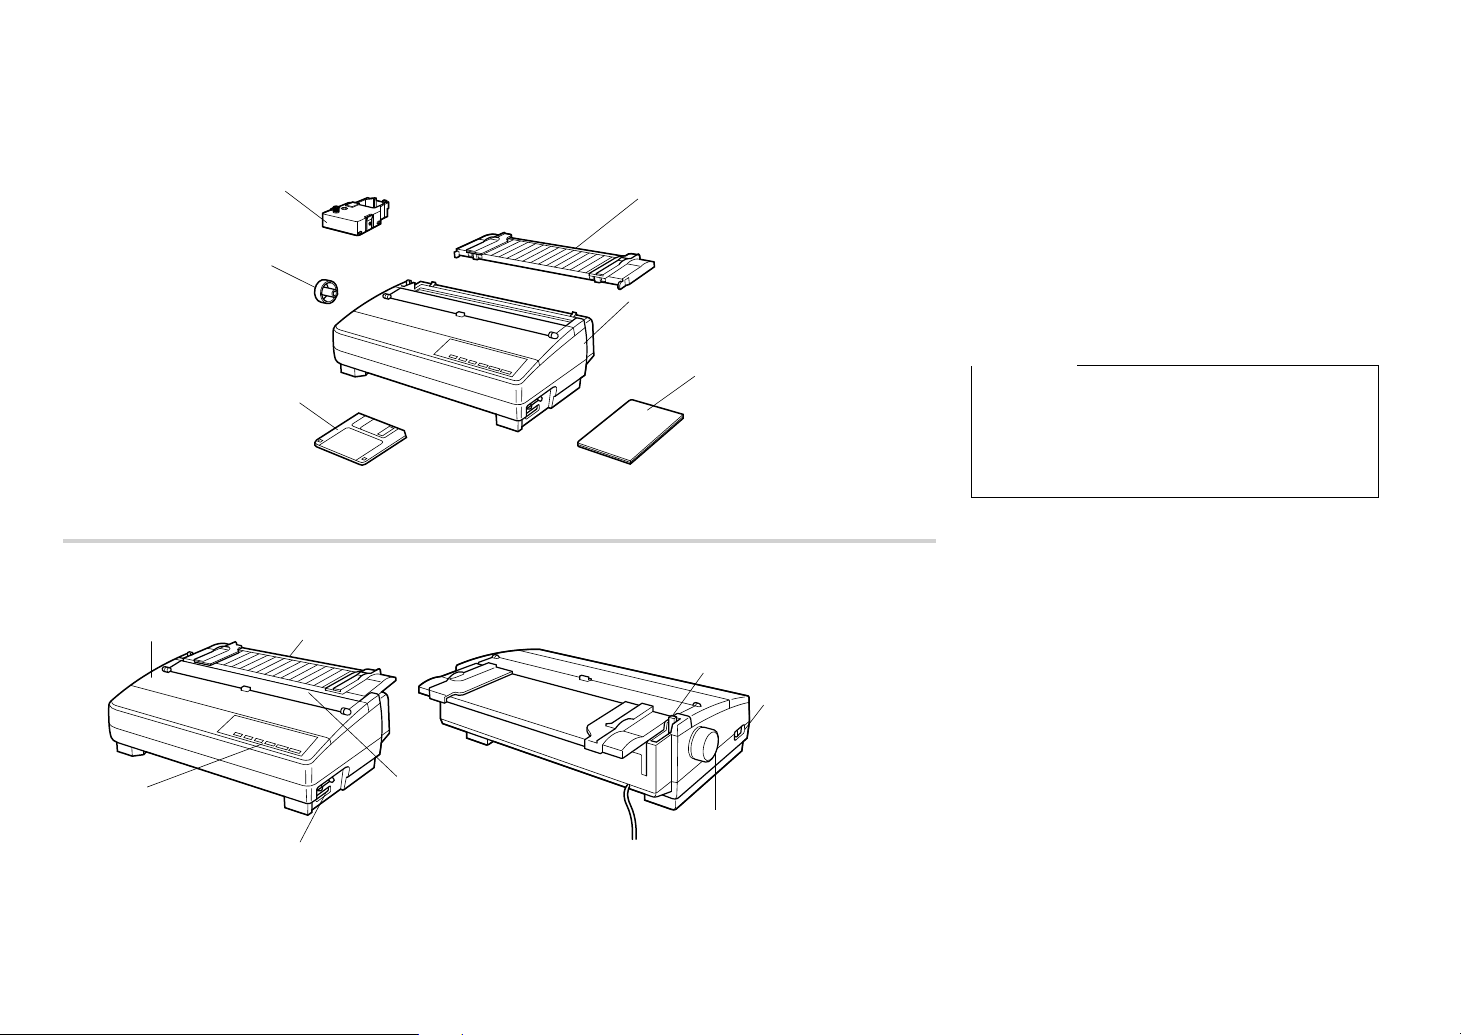
Platen knob
Molette du cylindre
Walzendrehknopf
Manopola del rullo
3.5" Floppy disk
Disquette 3,5"
3,5-Zoll-Diskette
Floppy disk da 3,5"
Front cover
Capot avant
Frontabdeckung
Coperchio anteriore
Control panel
Panneau de commande
Bedienfeld
Pannello comandi
Ribbon cassette
Cartouche de ruban
Farbbandkassette
Cartuccia del nastro
Paper guide
Guide-papier
Papierführung
Guida della carta
Interface connector
Connecteur interface
Schnittstellenanschluß
Connettore interfaccia
Unpacking the printer
Check to make sure that the carton contains each of
the items shown in the following illustration.
If anything is missing, contact the store where you
bought the printer and ask them to supply the missing
part. Note that it is a good idea to keep the original
Paper guide
Guide-papier
Papierführung
Guida della carta
box and all the packing materials just in case you
need to pack the printer up again and send it
somewhere at a later date.
A serial-to-parallel interface converter (SPC-8K), a
serial interface unit (IS-8H192 or IS-32H768), a pull
Printer
Imprimante
Drucker
Stampante
Users manual
Manuel de l’utilisateur
Bedienungsanleitung
Manuale dell’utilizzatore
tractor (PT-15HA), and an Automatic Sheet Feeder
(SF-15HA) are also available as options. Consult
your dealer for details.
Important!
There are several versions of this printer designed
for different voltag es. It is not possible to change the
voltage of a printer. If the voltage shown on the label
on the bottom of your printer does not match the
voltage for your area, contact your dealer
immediately.
General guide
The following illustrations show the major
components of your printer.
Mute cover
Capot de silence
Schalldämpfabdeckung
Coperchio silenziaore
Release lever
Levier de dégagement
Papierwahlschalter
Leva di rilascio
Power switch
Interrupteur d’alimentation
Netzschalter
Interruttore di alimentazione
Platen knob
Molette du cylindre
Walzendrehknopf
Manopola del rullo
3
Page 15

Déballage de l’imprimante
Vérifiez que tous les accessoires illustrés ci-dessous
se trouvent dans le carton.
Si un accessoire manque, contactez immédiatement
le magasin où vous avez acheté l’imprimante pour le
réclamer. Pensez à conserver le carton et les
matériaux d’emballage au cas où vous auriez besoin
de remballer l’imprimante et de la transporter par la
suite.
Un convertisseur interface série-parallèle (SPC-8K),
une interface série (IS-8H192 ou IS-32H768), un
tracteur tirant (PT-15HA) ainsi qu’un dispositif
d’alimentation introducteur automatique de feuilles
(SF-15HA) sont également disponibles en tant
qu’options. Pour plus de détails, contactez votre
revendeur.
Important!
Il existe plusieurs versions de cette imprimante pour
une utilisation avec différentes tensions. La tension
d’une imprimante ne peut pas être changée. Par
conséquent, si la tension indiquée sur la plaque
signalétique fixée sous l’imprimante ne correspond
pas à la tension du courant secteur local, contactez
immédiatement votre revendeur.
Auspacken des Druckers
Überprüfen Sie den Kartoninhalt, und vergewissern
Sie sich, daß alle neben abgebildeten Teile v orhanden
sind.
Falls Teile fehlen, wenden Sie sich zwecks
Nachlieferung bitte an den Fachhandel, bei dem das
Gerät gekauft wurde. Im Hinblick auf einen
eventuellen zukünftigen Transport des Druckers
empfiehlt es sich, den Lieferkarton und das gesamte
Verpackungsmaterial aufzubewahren.
Ein seriell-Parallel-Kon verter (SPC-8K), eine serielle
interface (IS-8H192 oder IS-32H768), ein Zugtraktor
(PT-15HA) und ein automatischer Einzelblatteinzug
(SF-15HA) sind als Sonderzubehör erhältlich.
Nähere Auskünfte gibt Ihr Fachhändler.
Wichtig!
Dieser Drucker ist je nach der benötigten
Betriebsspannung in verschiedenen Modellversionen
erhältlich. Die Betriebsspannung ist nicht am
Drucker einstellbar. Wenden Sie sich deshalb bitte
umgehend an Ihren Fachhändler, falls die auf dem
Typenschild unten am Drucker angegebene
Betriebsspannung nicht der lokalen Netzspannung
entspricht.
Disimballaggio della stampante
Verificare che la confezione contenga tutti i
componenti illustrati nella seguente figura.
Qualora mancasse qualcosa, rivolgersi al negoziante
presso cui si è acquistata la stampante e richiedere il
componente mancante. È consigliabile conservare la
scatola originale e tutto il materiale di imballaggio
nel caso si debba successivamente reimballare la
stampante per trasferirla altrove.
Sono inoltre disponibili accessori come il
convertitore d’interfaccia seriale-parallelo (SPC-8K),
l’unità di interfaccia seriale (IS-8H192 o IS32H768), l’unità di trattore trascinamento (PT15HA) e l’alimentatore caricatore automatico fogli
singoli (SF-15HA). Richiedere al proprio rivenditore
ulteriori informazioni.
Importante!
Esistono varie versioni di questa stampante prodotte
per tensioni diverse. La tensione di una stampante
non può essere cambiata. Se la tensione indicata
sull’etichetta sul fondo della stampante non
corrisponde a quella della propria zona, contattare
immediatamente il proprio rivenditore.
Guide général
Les illustrations suivantes indiquent les pièces
principales de l’imprimante.
Allgemeine Anleitung
Die folgenden Abbildungen zeigen die Hauptbauteile
des Druckers.
Panoramica generale della stampante
Le seguenti figure mostrano i componenti principali
della stampante.
4
Page 16
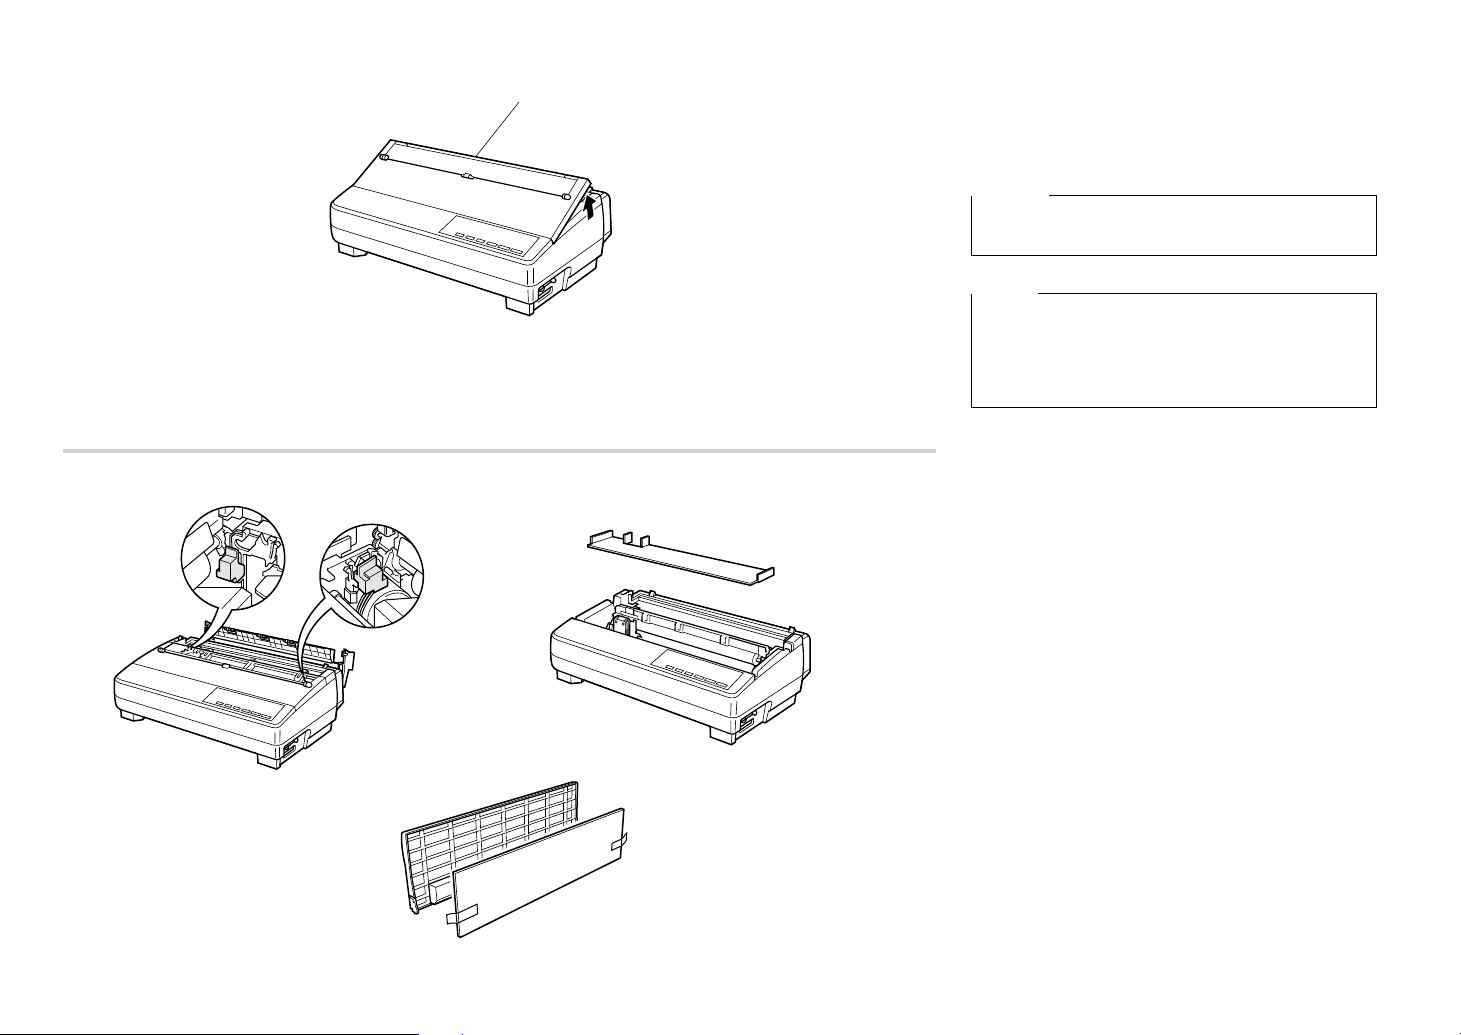
Tear assist edge
Bord de découpe
Abrißkante
Bordo guida di strappo
Opening the front cover
❏ Lift up on the front cover and swing it open until
it stops.
❏ To close the front cover, simply lower it back into
place.
Caution!
The tear assist edge is rather sharp. Take care to
avoid injuring your hands.
Note:
You can completely remove the front cover from the
printer or you can stand it up. You should normally
leave the front cover closed, because it protects
against objects getting into the printer, and it cuts
down on printer noise.
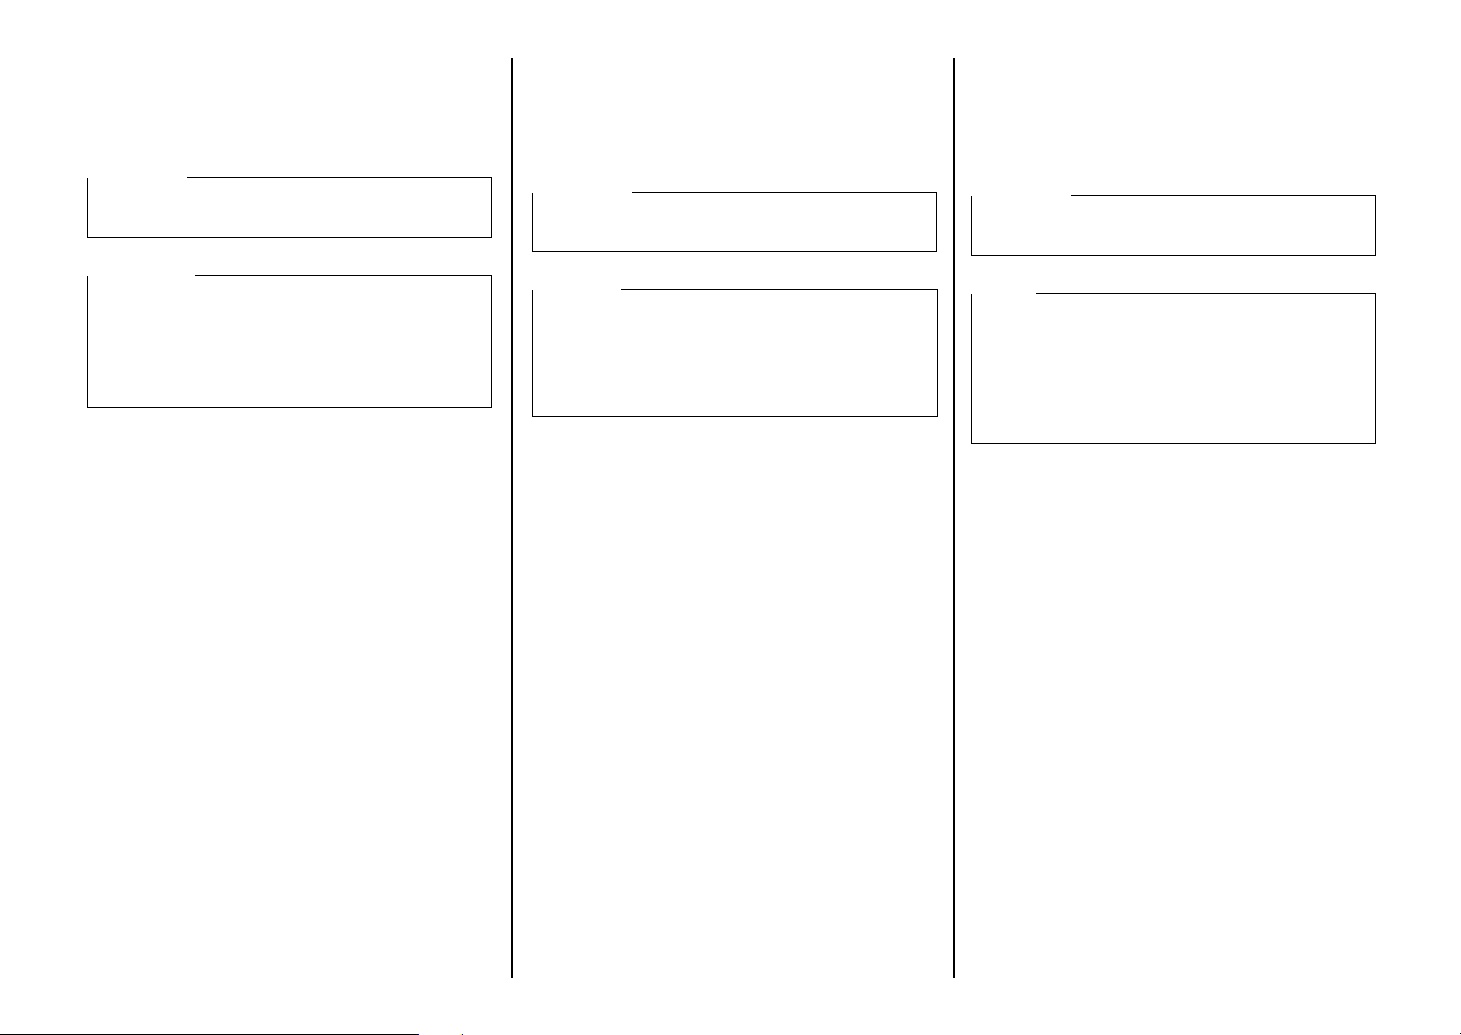
Removing the protective materials
Two small pieces of packing material are inserted
into the printer to protect components during
shipping. Be sure to remove them before using the
printer.
❏ Open the rear co ver by pushing it back so that the
cover swings back and down.
❏ Remove the two white pieces of packing from
inside the printer as shown in the illustration.
A piece of cardboard is inserted into the printer to
protect components during shipping. Be sure to
remove it before using the printer.
❏ Open the front cover.
❏ Remo ve the cardboard from the inside of the
front cover as shown in the illustration.
In addition, remove the cardboard from the back of
the paper guide.
❏ Remove the tape.
❏ Remo ve the cardboard from the paper guide
as shown in the illustration.
5
Page 17
Ouverture du capot avant
❏ Ouvrez le capot avant au maximum.
❏ Abaissez simplement le capot avant pour le
fermer.
Attention!
Le bord de découpe est assez aigu. Prenez soin de ne
pas vous faire mal à la main.
Öffnen der Frontabdeckung
❏ Heben Sie die Frontabdeckung an, und ziehen Sie
sie bis zum Anschlag hoch.
❏ Zum Schließen der Frontabdeckung drücken Sie
sie einfach wieder nach unten.
Vorsicht!
Die Abrißkante ist ziemlich scharf. Achten Sie
darauf, daß Sie sich nicht daran schneiden.
Apertura del coperchio anteriore
❏ Sollevare il coperchio anteriore e aprirlo
facendolo ruotare fino al suo arresto.
❏ Per chiudere il coperchio anteriore, è sufficiente
abbassarlo in posizione.
Attenzione!
Il bordo guida di strappo è piuttosto affilato. Fare
attenzione a non ferirsi le mani.
Remarque:
Vous pouvez entièrement enlever le capot avant de
l’imprimante ou vous pouvez l’incliner. Vous devez
généralement laisser le capot avant fermé, car il
constitue une protection contre l’introduction
d’objets dans l’imprimante, et il réduit le bruit de
l’imprimante.
Retrait des matériaux de protection
Deux petits morceaux d’emballage ont été insérés
dans l’imprimante pour protéger les composants lors
du transport. Veillez à les enlever avant d’utiliser
l’imprimante.
❏ Ouvrez le capot arrière en le poussant de manière
qu’il pivote vers l’arrière et vers le bas.
❏ Enlevez les petits morceaux d’emballage blancs
de l’intérieur de l’imprimante, comme indiqué
sur l’illustration.
Un morceau de carton est inséré dans l’imprimante
afin de protéger les composants pendant le transport.
N’oubliez pas de l’enlever avant d’utiliser
l’imprimante.
❏ Ouvrez le couvercle avant
❏ Enlevez le carton de l’intérieur du couvercle
avant, comme indiqué à l’illustration.
En outre, enlevez le carton de l’arrière du guidepapier.
❏ Enlevez la bande.
❏ Enle vez le carton du guide-papier comme indiqué
à l’illustration.
Hinweis:
Sie können die Frontabdeckung ganz vom Drucker
abnehmen, oder Sie können sie hochklappen.
Normalerweise sollte die Abdeckung geschlossen
gelassen werden, weil sie verhindert, daß
Fremdkörper in den Drucker geraten und das
Arbeitsgeräusch reduziert.
Entfernen der Transportsicherungen
Zwei kleine Transportsicherungen sind im Drucker
eingelegt, um die internen Bauteile beim Transport
zu schützen. Vor der Inbetriebnahme des Druckers
müssen diese Schutzmaterialien entfernt werden, wie
in der Abbildung gezeigt.
❏ Die Traktorabdeckung durch Zurückdrücken
öffnen, so daß die Abdeckung zurück und nach
unten klappt.
❏ Die beiden weißen Transportsicherungen aus dem
Drucker entfernen, wie in der Abbildung gezeigt.
In den Drucker ist ein Stück Pappe als
Transportsicherung eingesetzt worden, um die
einzelnen Komponenten während des Transportes zu
schützen. Stellen Sie sicher, daß Sie diese
Transportsicherung entfernt haben, bevor Sie die
Drucker in Betrieb nehmen.
❏ Öffnen Sie die Druckerabdeckung.
❏ Entfernen Sie die Transportsicherung aus Pappe
von der Innenseite der Druckerabdeckung, wie in
der Abbildung gezeigt.
Entfernen Sie dann die Transportsicherung von der
Rückseite der Papierführung.
❏ Entfernen Sie das Klebeband.
❏ Entfernen Sie die Transportsicherung aus Pappe
von der Rückseite der Papierführung, wie in der
Abbildung gezeigt.
Nota:
Il coperchio anteriore può essere rimosso
completamente dalla stampante oppure può essere
lasciato aperto in posizione verticale. Tuttavia, esso
va tenuto normalmente chiuso, in quanto tale
coperchio funge da protezione contro eventuali
oggetti che potrebbero introdursi nella stampante,
oltre a ridurne la rumorosità.
Rimozione del materiale di protezione
All’interno della stampante sono inseriti due piccoli
pezzi di materiale di imballaggio per proteggere i
componenti durante il trasporto. Accertarsi di averli
rimossi prima di mettere in funzione la stampante.
❏ Aprire il coperchio posteriore spingendolo
indietro e facendolo ribaltare verso il basso.
❏ Estrarre i due pezzi bianchi di imballaggio
dall’interno della stampante come mostrato nella
figura.
All’interno della stampante è inserito un pezzo di
cartone per proteggere i componenti durante il
trasporto. Prima di mettere in funzione la stampante,
assicurarsi di averlo rimosso.
❏ Aprire il coperchio anteriore.
❏ Estrarre il pezzo di cartone dall’interno del
coperchio anteriore come mostrato nella figura.
Rimuovere inoltre il cartone da dietro il guida carta.
❏ Staccare il nastro adesivo.
❏ Rimuovere il cartone dal guida carta come
mostrato nella figura.
6
Page 18
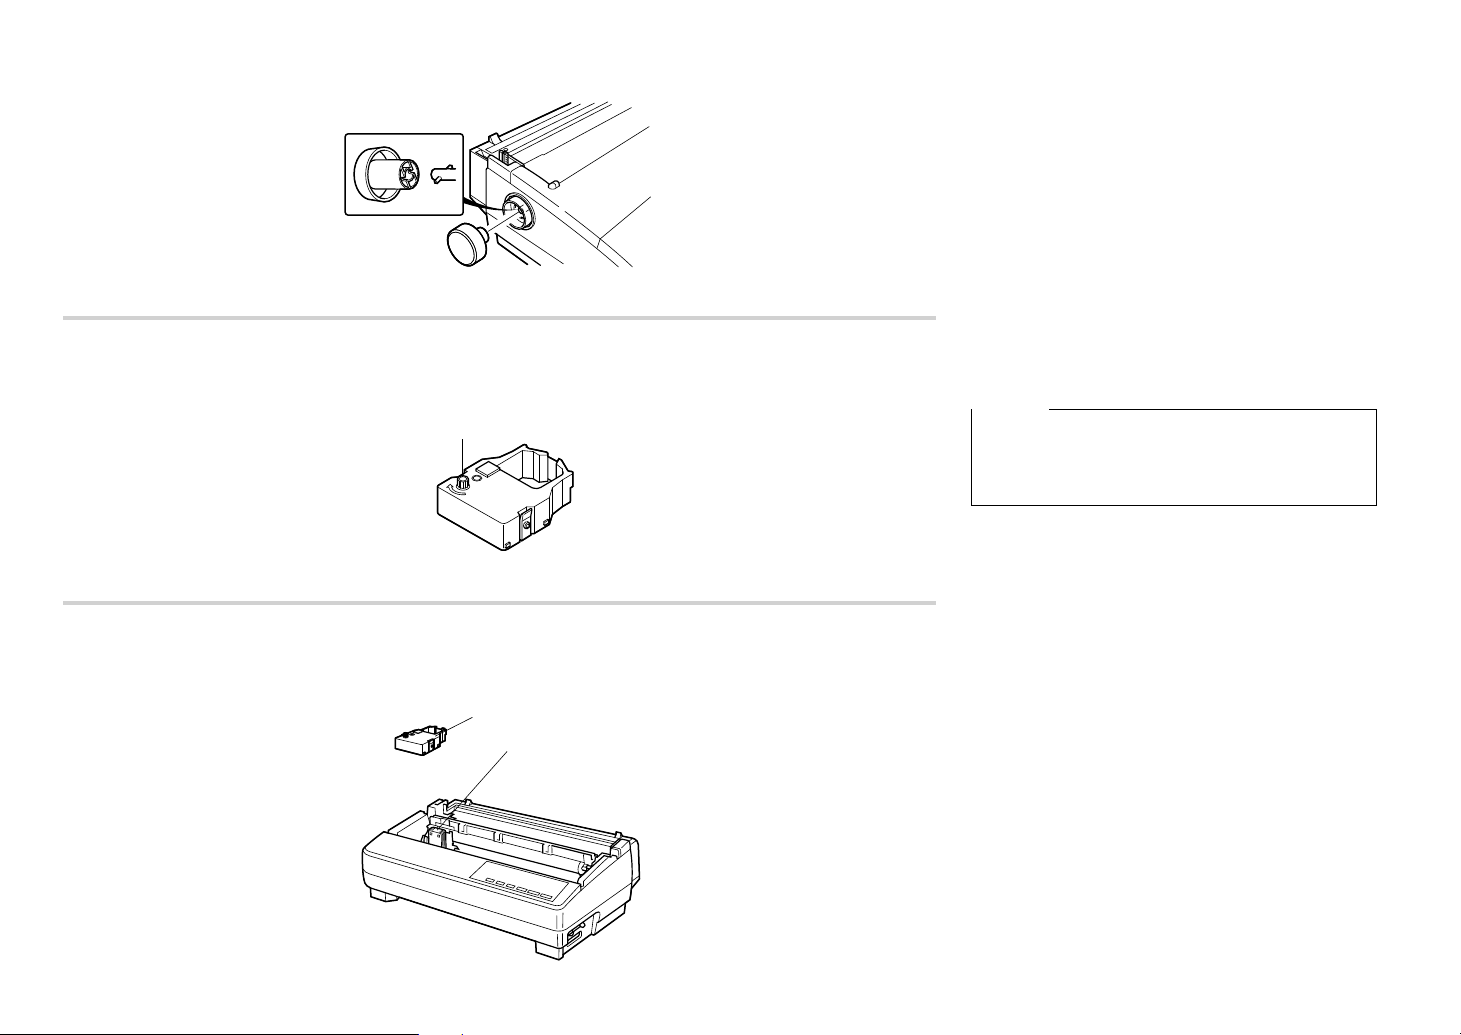
Tension knob
Bouton de tension
Farbbandknopf
Manopla di tensione
Ribbon cassette
Cartouche de ruban
Farbbandkassette
Cartuccia del nastro
Cut-out
Découpe
Ausschnitt
Intaglio
Installing the platen knob
The platen knob is packed into a recess in the
packaging material.
❏ Install the knob on the shaft located inside the
large hole on the left side of the printer. Make
sure that the two splines of the platen shaft inside
the printer fit into the slots inside the knob’s
spindle. Press the knob carefully but firmly into
place as far as it will go.
Installing the ribbon cassette
❏ Make sure the printer is unplugged from its
power outlet.
Caution!
Never move the print head while the printer is turned
on. Doing so can damage the printer. If you have just
finished printing, let the print head cool for a few
minutes before you touch it.
❏ Remove the front cover of the printer.
❏ Remove the ribbon cassette from its package.
❏ Rotate the knob on the ribbon cassette clockwise
to take up any slack in the ribbon.
❏ By hand, move the cartridge holder to the left
side where there is a cut-out in the top guide to
allow easy installation and removal of the ribbon
cassette.
❏ Carefully place the cassette onto the cartridge
holder making sure that the spindle of the holder
fits into the socket on the bottom of the cartridge.
Also make sure that the side tabs fit into the
grooves on the sides of the cartridge holder.
7
Page 19

Montage de la molette du cylindre
La molette du cylindre se trouve dans un creux du
matériel d’emballage.
❏ Installez la molette sur l’axe se trouvant dans le
grand orifice sur le côté gauche de l’imprimante.
Assurez-vous que les deux cannelures de l’axe du
cylindre à l’intérieur de l’imprimante s’adaptent
dans les rainures de la tige de la molette.
Appuyez fermement mais avec précaution sur la
molette pour l’enfoncer complètement.
Befestigung des Walzendrehknopfes
Der Walzendrehknopf befindet sich in einer
Aussparung des Verpackungsmaterials.
❏ Stecken Sie den Walzendrehknopf auf die Welle
in dem großen Loch an der rechten Seite des
Druckers, indem Sie die beiden Nuten der
Walzenwelle im Drucker in die Kerben der
W alzendrehknopfspindel einpassen. Schieben Sie
den Knopf in dieser Position vorsichtig aber fest
bis zum Anschlag auf die Walze.
Montaggio della manopola del rullo
La manopola del rullo è imballata in un incavo del
materiale di imballaggio.
❏ Montare la manopola sull’asta situata all’interno
del foro grande a sinistra della stampante.
Accertarsi che le due punte sporgenti
all’estremità dell’asta del rullo all’interno della
stampante entrino nelle scanalature del perno
della manopola. Premere fino in fondo la
manopola con cura ma con decisione finché non
si blocca.
Mise en place de la cartouche de ruban
❏ Assurez-vous que l’imprimante est débranchée
de la prise secteur.
Attention!
Ne déplacez jamais la tête d’impression lorsque
l’imprimante est allumée. Ceci risquerait en effet
d’endommager l’imprimante. Si vous venez juste de
terminer d’imprimer, attendez quelques minutes que
la tête d’impression refroidisse avant de la toucher.
❏ Otez le capot avant de l’imprimante.
❏ Sortez la cartouche de ruban de son emballage.
❏ Tournez le bouton de la cartouche de ruban dans
le sens des aiguilles d’une montre pour tendre le
ruban.
❏ Amenez le support de cartouche à gauche à
l’endroit où se trouve une découpe dans le guide
supérieur pour permettre d’installer et d’enlever
facilement la cartouche de ruban.
❏ Posez la cartouche sur le support de cartouche
avec tout le soin voulu, en vous assurant que la
tige du support rentre dans l’encoche sous la
cartouche. V eillez à ce que les languettes latérales
s’adaptent dans les rainures des deux côtés du
support de cartouche.
Einsetzen der Farbbandkassette
❏ Achten Sie darauf, daß das Netzkabel aus der
Steckdose gezogen ist.
Vorsicht!
Bewegen Sie den Druckkopf nicht, während der
Drucker eingeschaltet ist. Dadurch könnte der
Drucker beschädigt werden. Wenn der Drucker
gerade in Betrieb war, lassen Sie den Druckkopf vor
dem Anfassen einige Minuten lang abkühlen.
❏ Entfernen Sie die Frontabdeckung des Druckers.
❏ Nehmen Sie das Farbband aus der Verpackung.
❏ Drehen Sie den Knopf an der Farbbandkassette
im Uhrzeigersinn, um das Farbband
straffzuwickeln.
❏ Bewegen Sie den Kassettenhalter mit der Hand
nach links, wo eine Aussparung leichtes
Einsetzen und Entnehmen der Farbbandkassette
erlaubt.
❏ Setzen Sie die Kassette vorsichtig auf den
Kassettenhalter, und stellen Sie sicher, daß die
Spindel in die Spindelfassung an der Unterseite
der Kassette eingreift. Außerdem müssen die
beiden Seitenzapfen in die Rillen an der Seite der
Farbbandkassette passen.
Installazione della cartuccia del nastro
❏ Accertarsi che la stampante non sia colle gata alla
presa elettrica.
Attenzione!
Non spostare mai la testina di stampa mentre la
stampante è accesa, poiché in questo modo si può
danneggiare la stampante. Se si è appena finito di
stampare, lasciare raffreddare la testina di stampa
per qualche minuto prima di toccarla.
❏ Togliere il coperchio anteriore della stampante.
❏ Estrarre la cartuccia del nastro dalla sua
confezione.
❏ Ruotare la manopola della cartuccia in senso
orario per rimettere in tensione il nastro.
❏ Spostare manualmente il supporto cartuccia v erso
sinistra dove un intaglio sulla guida superiore
consente di installare e rimuovere con facilità la
cartuccia del nastro.
❏ Applicare accuratamente la cartuccia sul
supporto cartuccia assicurandosi che il perno del
supporto entri nel foro sul fondo della cartuccia.
Inoltre, accertarsi che le linguette laterali entrino
nelle scanalature poste ai lati del supporto
cartuccia.
8
Page 20
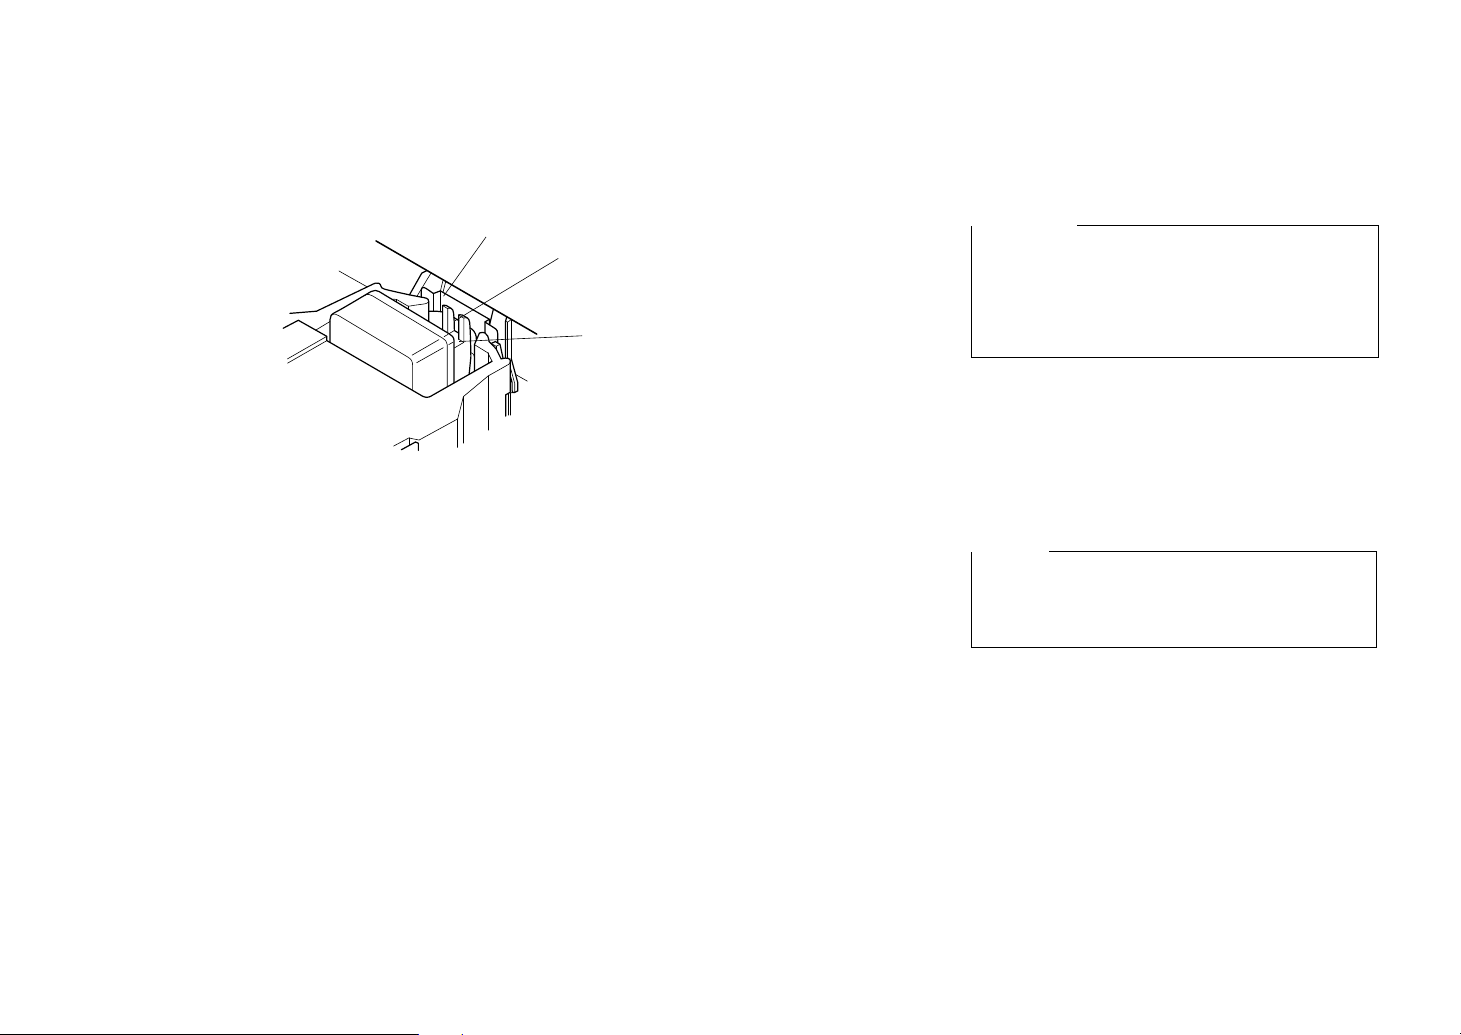
Print head shield
Protecteur de tête d’impression
Druckkopfblende
Piastrina di protezione testina di stampa
Ribbon
Ruban
Farbband
Nastro
Print head
Tête d’impression
Druckkopf
Testina di stampa
❏ While guiding the ribbon between the print head
and print head shield, press down gently but
firmly on the cartridge until the side tabs snap
securely into place.
❏ Rotate the knob on the cassette again to take up
any slack.
❏ Replace the front cover of the printer.
Important!
Printing that is poor quality or too light is almost
always due to a ribbon that is simply worn out or
“used up.” If you experience problems with print
quality, chec k the condition of the ribbon. If the black
part looks gray and well-worn, replace the ribbon
with a new one.
Removing the ribbon cassette
Use the following procedure to remove the ribbon
cassette from the printer when you want to replace it
with a new one.
❏ Make sure that the printer is unplugged from its
power outlet.
Caution!
Never move the print head while the printer is turned
on. Doing so can damage the printer. If you have just
finished printing, let the print head cool for a few
minutes before you touch it.
❏ Open the front cover of the printer.
❏ By hand, move the cartridge holder to the left
side where there is a cutout in the top guide to
allow easy installation and removal of the ribbon
cassette.
❏ Using your thumb and forefinger to squeeze the
two tabs on the ribbon cassette towards the
center, carefully remove the cartridge from the
holder.
❏ Use the procedure under “Installing the ribbon
cassette” on page7 to install a new cartridge.
9
Page 21

❏ Tout en guidant le ruban entre la tête
d’impression et le protecteur de la tête
d’impression, appuyez doucement mais
fermement sur la cartouche jusqu’à ce que les
languettes latérales s’adaptent bien en place.
❏ Tournez de nouveau le bouton de la cartouche
pour tendre le ruban.
❏ Remettez en place le capot avant de
l’imprimante.
Important!
Une impression de mauvaise qualité ou trop claire
provient presque toujours d’un ruban usé ou épuisé.
Lorsque la qualité d’impression est décevante,
vérifiez l’état du ruban. Si la partie noire apparaît
grisâtre et délavée, r emplacez le ruban par un ruban
neuf.
Retrait de la cartouche de ruban
Effectuez les démarches suivantes pour enlever la
cartouche de ruban de l’imprimante afin de la
remplacer par une neuve.
❏ Assurez-vous que l’imprimante est débranchée
de la prise secteur.
Attention!
Ne déplacez jamais la tête d’impression lorsque
l’imprimante est allumée, car sinon l’imprimante
pourrait être endommagée. Si vous venez juste de
terminer d’imprimer, attendez quelques minutes que
la tête d’impression refroidisse avant de la toucher.
❏ Führen Sie das Farbband zwischen Druckkopf
und Druckkopfblende ein, und drücken Sie die
Kassette sanft aber fest auf, bis sie einrastet.
❏ Drehen Sie den Knopf an der Kassette erneut, um
lockeres Farbband aufzuwickeln.
❏ Ersetzen Sie die Frontabdeckung des Druckers.
Wichtig!
Schlechte oder zu schwache Druckqualität ist in
nahezu allen Fällen auf ein verschlissenes oder
“verbrauchtes” Farbband zurückzuführen. Wenn
Sie Probleme mit mangelhafter Druc kqualität haben,
prüfen Sie zunächst den Zustand des Farbbandes.
Wenn schwarze Stellen grau oder verschlissen
wirken, ersetzen Sie die Farbbandkassette.
Entnehmen der Farbbandkassette
Verfahren Sie folgendermaßen, um die
Farbbandkassette zum Austausch aus dem Drucker
zu nehmen.
❏ Stellen Sie sicher, daß der Netzstecker des
Druckers abgezogen ist.
Wichtig!
Verschieben Sie niemals den Druckkopf bei
eingeschaltetem Drucker. Der Drucker kann
hierdurch beschädigt werden. Falls Sie soeben den
Druckbetrieb beendet haben, lassen Sie den
Druckkopf ein paar Minuten abkühlen, bevor Sie ihn
berühren.
❏ Guidando il nastro fra la testina di stampa e la
piastrina di protezione della testina di stampa,
spingere delicatamente ma con decisione la
cartuccia finché le linguette laterali non scattano
in posizione.
❏ Ruotare nuovamente la manopola della cartuccia
in senso orario per tendere il nastro.
❏ Rimettere a posto il coperchio anteriore della
stampante.
Importante!
Una stampa di scarsa qualità o sbiadita è quasi
sempre dovuta ad un nastro consumato o
“esaurito”. Se si verificano problemi di qualità di
stampa, controllare le condizioni in cui si trova il
nastro. Se la parte nera appare grigia e molto
consumata, sostituire il nastro con uno nuovo.
Rimozione della cartuccia del nastro
Utilizzare il seguente procedimento per rimuovere la
cartuccia del nastro dalla stampante quando si
desidera sostituirla con una nuova.
❏ Accertarsi che la stampante non sia colle gata alla
presa elettrica.
Attenzione!
Non spostare mai la testina di stampa mentre la
stampante è accesa, poiché in questo modo si può
danneggiare la stampante. Se si è appena finito di
stampare, lasciare raffreddare la testina di stampa
per qualche minuto prima di toccarla.
❏ Ouvrez le capot avant de l’imprimante.
❏ Amenez le support de cartouche à gauche à
l’endroit où se trouve une découpe dans le guide
supérieur qui permet d’installer et d’enlever
facilement la cartouche de ruban.
❏ Utilisez le pouce et l’index pour comprimer les
deux languettes de la cartouche de ruban vers le
centre, puis enlevez doucement la cartouche de
son support.
❏ Suivez la procédure “Mise en place de la
cartouche de ruban” à la page 8 pour installer une
cartouche neuve.
❏ Klappen Sie die Frontabdeckung des Druckers
auf.
❏ Bewegen Sie den Kassettenhalter mit der Hand
auf die linke Seite, wo eine Aussparung leichtes
Einsetzen und Entnehmen der Farbbandkassette
erlaubt.
❏ Mit Daumen und Zeigefinger die beiden Zapfen
an der Farbbandkassette zur Mitte drücken, und
die Kassette vom Halter abnehmen.
❏ Setzen Sie, gemäß dem Abschnitt “Einsetzen
einer Farbbandkassette” auf Seite 8, eine neue
Kassette ein.
❏ Aprire il coperchio anteriore della stampante.
❏ Spostare manualmente il supporto cartuccia v erso
sinistra dove un intaglio sulla guida superiore
consente di installare e rimuovere con facilità la
cartuccia del nastro.
❏ Usando il pollice e l’indice, premere le due
linguette sulla cartuccia del nastro verso il centro
ed estrarre con attenzione la cartuccia dal
supporto.
❏ Usando il procedimento descritto nella sezione
“Installazione della cartuccia del nastro” a pagina
8 per installare una nuova cartuccia.
10
Page 22
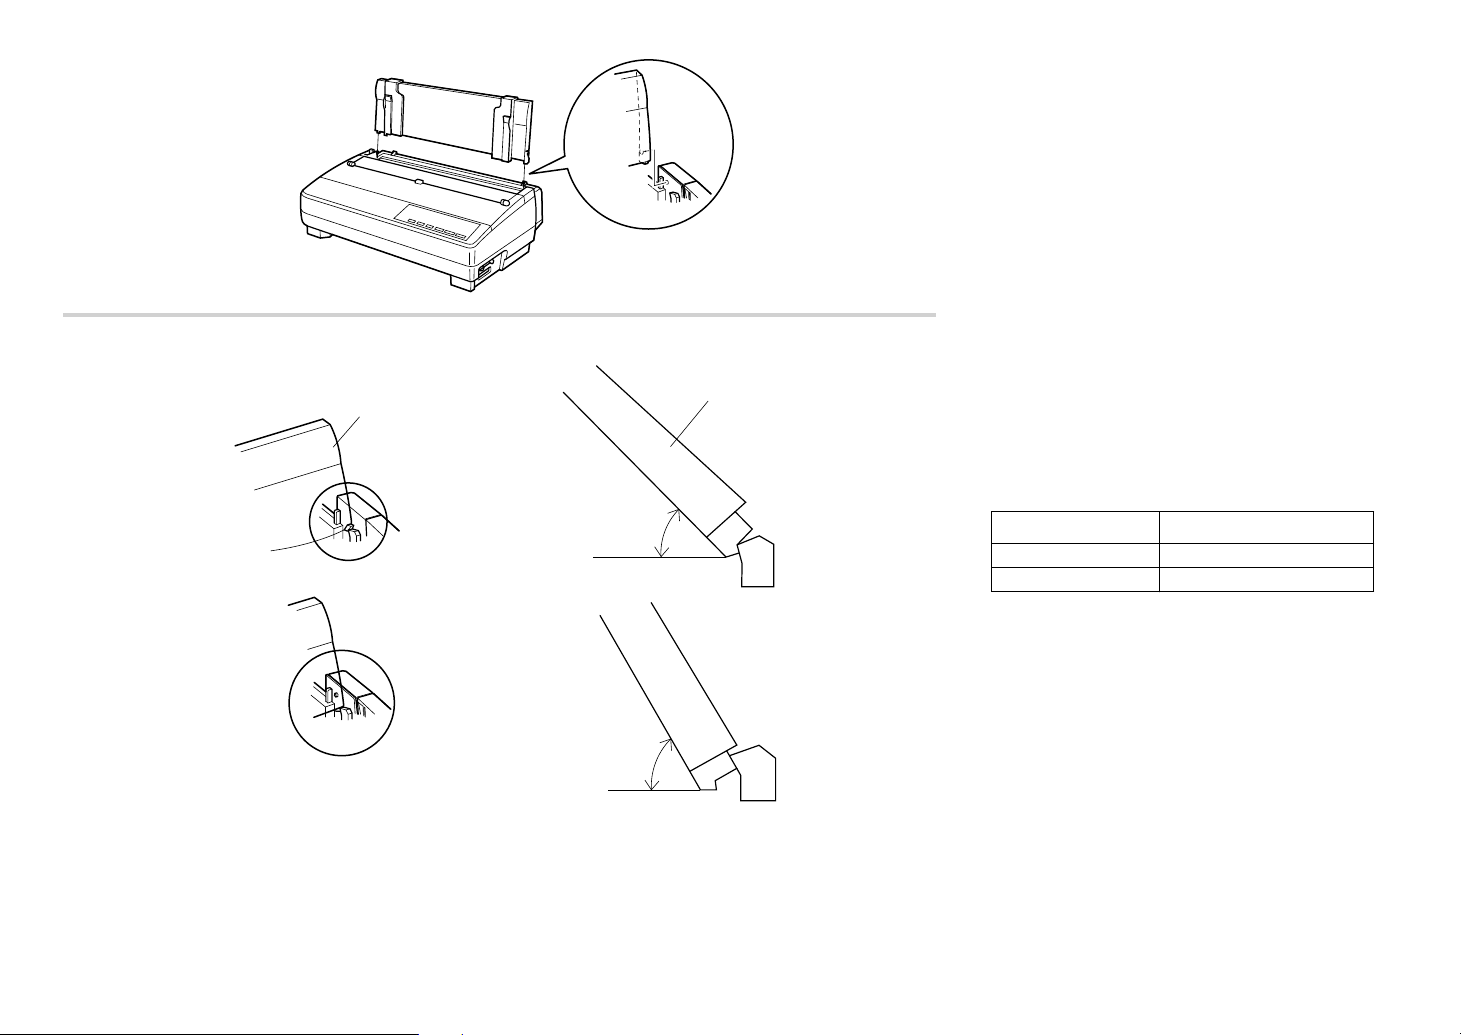
Installing the paper guide
❏ Insert the tw o tabs on the rear cov er of the printer
into the holes in the bottom of the paper guide.
❏ To remove the paper guide from the printer,
simply pull the tabs out of the holes.
Paper guide
Guide-papier
Papierführung
Guida della carta
50-degree angle
Angle de 50 degrés
50-Grad-Winkel
Inclinazione di 50 gradi
70-degree angle
Angle de 70 degrés
70-Grad-Winkel
Inclinazione di 70 gradi
50°
70°
Paper guide
Guide-papier
Papierführung
Guida della carta
Standing up the paper guide
❏ You can move the paper guide so that it is at
angles of 50 or 70 degrees as shown in the
illustrations at the left. The correct angle depends
on the type of paper you are using.
The following table shows the correct angle to use for
each paper type.
Paper Type Paper Guide Angle
Fanfold 50 degrees
Cut-sheet 70 degrees
11
Page 23
Mise en place du guide-papier
❏ Insérez les deux ergots du capot arrière de
l’imprimante dans les trous de la partie inférieure
du guide-papier.
❏ Pour enlever le guide-papier de l’imprimante, il
suffit de retirer les ergots des trous.
Einsetzen der Papierführung
❏ Führen Sie die beiden Zapfen an der
Traktorabdeckung in die Löcher an beiden Seiten
der Papierführung ein.
❏ Zum Abnehmen der Papierführung vom Drucker
ziehen Sie einfach die Zapfen aus den Löchern.
Installazione del guida carta
❏ Inserire i due perni sul coperchio posteriore della
stampante nei fori in fondo al guida carta.
❏ Per rimuovere il guida carta dalla stampante è
sufficiente estrarre i perni dai fori.
Inclinaison du guide-papier
❏ Vous pouvez incliner le guide-papier de manière
qu’il soit à un angle de 50 degrés ou à un angle de
70 degrés, comme indiqué aux illustrations de
gauche. L ’angle correct dépend du type du papier
utilisé.
Le tableau suivant indique l’angle correct à utiliser
pour chaque type de papier.
Type de papier Angle du guide-papier
Papier continu 50 degrés
Feuilles séparées 70 degrés
Aufstellen der Papierführung
❏ Sie können die Papierführung so aufstellen, daß
sie in einem Winkel von 50 oder 70 Grad steht,
wie das in der links dargestellten Abbildung zu
sehen ist. Der korrekt eingestellte Winkel ist v on
der Art und des Papiers abhängig, das Sie
benutzen.
Die folgende Tabelle zeigt die korrekte
Winkeleinstellung der Papierführung für jede
Papiertype.
Papiersorte Winkel der Papierführung
Endlos 50 Grad
Einzelblatt 70 Grad
Inclinazione del guida carta
❏ È possibile spostare il guida carta in modo che
abbia un’inclinazione di 50 o 70 gradi, come
mostrato nelle figure a sinistra. L’inclinazione
corretta dipende dal tipo e dal formato della carta
utilizzata.
La seguente tabella indica l’inclinazione corretta da
utilizzare per ogni tipo di carta.
Tipo carta Inclinazione del guida carta
Modulo continuo 50 gradi
Foglio singolo 70 gradi
12
Page 24
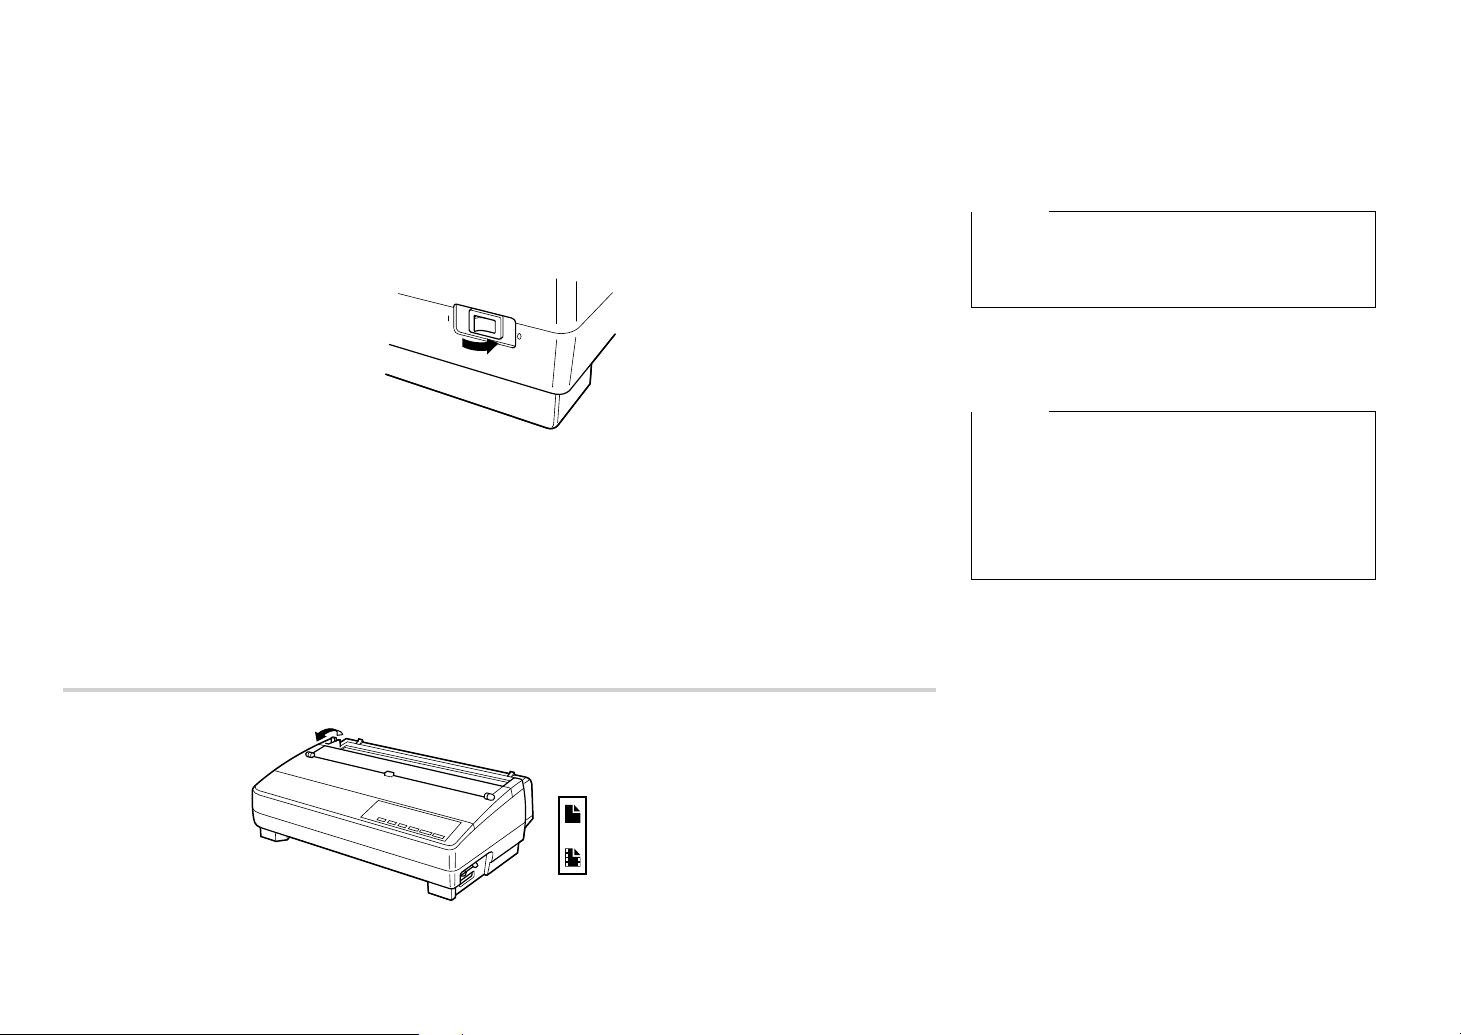
Connecting to a power outlet and turning power on and off
❏ Plug the power cord of the printer into a standard
power outlet whose voltage matches the power
rating noted on the label affixed to the bottom of
your printer.
Caution!
If the voltage marked on the bottom of your printer
does not match the voltage from the outlet you are
using, do not plug in the power cord. Contact your
dealer for assistance.
❏ Set the switch on the left of the printer to 1 (ON)
to turn power on, and to 0 (OFF) to turn power
off.
Caution!
Whenever you turn off the power, wait for at least
five seconds before turning it back on. Otherwise you
may damage the printer. We also recommend that
you unplug the printer from the power outlet
whenever you do not plan to use it for long periods.
Because of this, you should locate the printer so that
the power outlet it is plugged into is nearby and easy
to access.
At this point you may want to perform a test of the
printer to make sure it is working properly. See
“Testing the printer” on page133 for details on how
to perform tests.
13
Cut-sheet
Feuilles séparées
Einzelblätter
Carta in fogli
Fanfold
Papier continu
Endlospapier
Carta in modulo continuo
Loading fanfold paper
This section tells you how to load fanfold paper . Note
that you can also use cut-sheet paper. For details on
using other types of paper, see “Paper Handling” on
page 119 of this manual.
❏ Remove the paper guide from the printer.
❏ Make sure printer power is turned off.
❏ Set the release lever to the fanfold position.
Page 25

Connexion à une prise secteur et mise sous et hors tension
❏ Branchez le cordon d’alimentation de
l’imprimante à une prise de courant secteur dont
la tension correspond à celle indiquée sur la
plaque signalétique fixée sous l’imprimante.
Attention!
Si la tension indiquée sur la plaque signalétique
fixée sous l’imprimante ne correspond pas à la
tension du courant secteur local, ne branchez pas le
cordon d’alimentation. Contactez immédiatement
votre revendeur pour obtenir l’aide requise.
❏ Mettez l’interrupteur d’alimentation à gauche de
l’imprimante sur 1 (ON) pour la mettre sous
tension, ou sur 0 (OFF) pour la mettre hors
tension.
Attention!
Chaque fois que vous éteignez l’alimentation,
attendez au moins cinq secondes avant de la
rallumer. Sinon, vous risquez d’endommager
l’imprimante. Si vous ne comptez pas utiliser
l’imprimante pendant un certain temps, nous vous
conseillons également de la débrancher de la prise
secteur. Par conséquent, installez l’imprimante près
d’une prise de courant d’accès facile.
A ce moment, il est possible que vous désiriez tester
l’imprimante pour vérifier qu’elle fonctionne
correctement. Voir la page 133 “Tests de
l’imprimante” pour plus de détails sur les essais.
Chargement du papier continu
Cette section décrit la manière de charger du papier
continu. Cependant, vous pouvez également charger
des feuilles séparées. Pour plus de détails sur
l’utilisation des autres types de papier, voir
“Manipulation du papier” à la page 119 de ce
manuel.
❏ Enlevez le guide-papier de l’imprimante.
❏ Assurez-v ous que l’alimentation de l’imprimante
est coupée.
❏ Mettez le le vier de dégagement en position papier
continu.
Anschluß an eine Steckdose und Ein-/ Ausschalten der Netzversorgung
❏ Schließen Sie das Netzkabel des Druckers an
eine Steckdose an. Die Spannung der Steckdose
muß der auf dem Etikett am Boden des Druckers
angegebenen Betriebsspannung entsprechen.
Vorsicht!
Schließen Sie das Netzkabel nicht an, wenn die am
Boden des Druckers angegebene Betriebsspannung
nicht der lokalen Netzspannung entspricht. Wenden
Sie sich in diesem Fall umgehend an Ihren
Fachhändler.
❏ Stellen Sie den Netzschalter an der linken Seite
zum Einschalten des Druckers auf 1 (ON) und
zum Auszuschalten auf 0 (OFF).
Wichtig!
Ziehen Sie den Netzstecker aus der Steckdose, wenn
Sie den Drucker längere Zeit lang nicht benutzen.
Der Drucker sollte vorzugsweise an einem Platz
aufgestellt werden, der leichten Zugang zur
Netzsteckdose gewährt.
Zu diesem Zeitpunkt sollten Sie einen Druckertest
ausführen, um sicherzustellen, daß er richtig arbeitet.
Siehe “Testen des Druckers” auf Seite 134 bezüglich
der Einzelheiten zur Durchführung des Tests.
Endlospapier einlegen
Dieser Abschnitt beschreibt das Einlegen von
Endlospapier in den Drucker. In diesem
Zusammenhang sei bemerkt, daß anstelle von
Endlospapier auch jederzeit Einzelblatt. Einzelheiten
hierzu entnehmen Sie bitte dem Abschnitt
“Papierhandhabung” auf Seite 120 dieser Anleitung.
❏ Legen Sie den Papierstapel hinter den Drucker.
❏ Trennen Sie die Netzversorgung des Druckers ab.
❏ Stellen Sie den Papierwahlschalter auf
Endlospapier.
Collegamento ad una presa elettrica ed accensione e spegnimento
❏ Inserire il cavo di alimentazione della stampante
in una normale presa elettrica la cui tensione
corrisponda a quella indicata sull’etichetta
applicata sul fondo della stampante.
Attenzione!
Se la tensione indicata sul fondo della stampante
non corrisponde a quella della presa elettrica da
utilizzare, non inserirvi il cavo di alimentazione.
Richiedere assistenza al proprio rivenditore.
❏ Premere l’interruttore posto sul lato sinistro della
stampante su 1 (ON) per accendere e su 0 (OFF)
per spegnere.
Attenzione!
Ogni volta che si spegne la stampante, attendere
almeno cinque secondi prima di riaccenderla. In
caso contrario si può danneggiare la stampante.
Consigliamo inoltre di scolle gar e la stampante dalla
presa elettrica ogni volta che si prevede di non
utilizzarla per lunghi periodi. Per questo motivo, la
stampante dovrà essere collocata in modo tale che la
presa elettrica a cui è collegata sia vicina e
facilmente accessibile.
A questo punto può essere consigliabile eseguire un
test della stampante per accertarsi che funzioni
correttamente. Leggere la sezione “Esecuzione dei
test di stampa” a pagina 134 per istruzioni su come
eseguire i test.
Caricamento della carta a modulo continuo
Questa sezione spiega come caricare la carta a
modulo continuo. Notare che è possibile stampare
anche su carta a fogli singoli. Per dettagli sull’uso di
altri tipi di carta, vedere il capitolo “Uso della carta”
a pagina 120 di questo manuale.
❏ Rimuovere il guida carta dalla stampante.
❏ Accertarsi che la stampante sia spenta.
❏ Spostare la leva di rilascio sulla posizione
modulo continuo.
14
Page 26
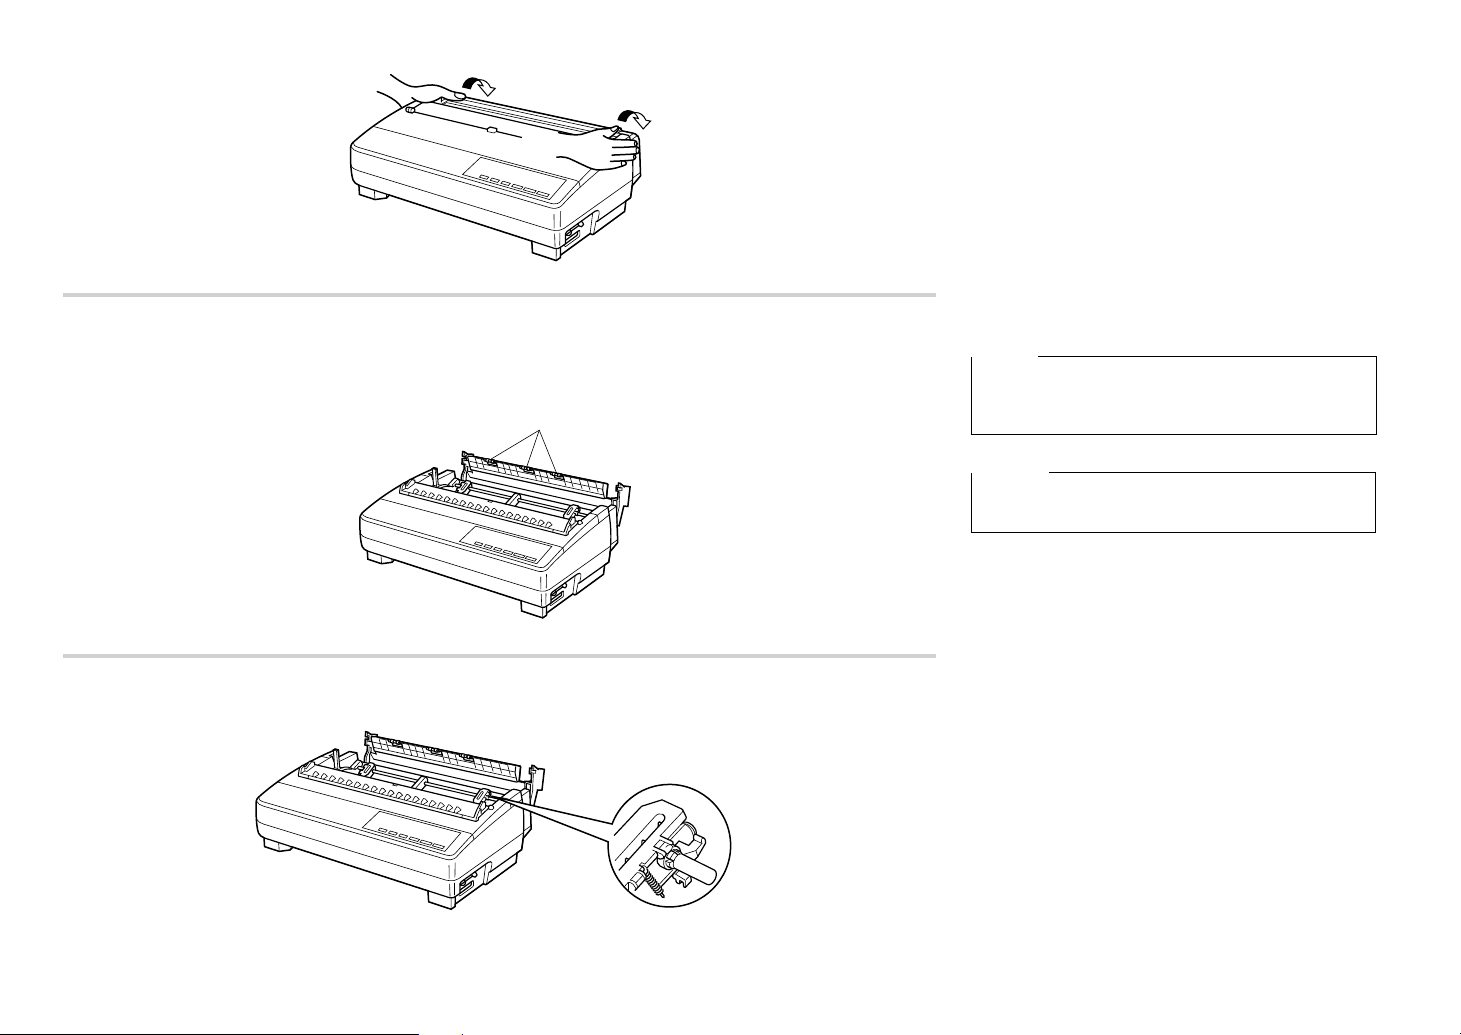
Metal edge
Bord métallique
Metallkante
Bordo di metallo
❏ Grasping the tw o back corners of the printer with
the palms of your hands, press back on the two
raised areas on the top of the rear cover until it
opens.
❏
Swing the rear cover back and down until it stops.
Note:
You can also completely remove the rear cover by
simply pulling it away from the back of the printer
after you open it.
Caution!
The metal edge of the cover is rather sharp. Take
care to avoid injuring your hands when handling it.
15
❏ P ass the fanfold paper through the space between
the printer case and the rear cover.
❏ Unlock the two tractor covers by pulling their
gray levers up, and slide them so they are aligned
approximately with the holes on the sides of the
paper. Also mov e the center paper support so that
it is approximately halfway between the two
tractors.
❏ Open the covers of both tractors and insert the
paper so the tractor pins fit.
Page 27
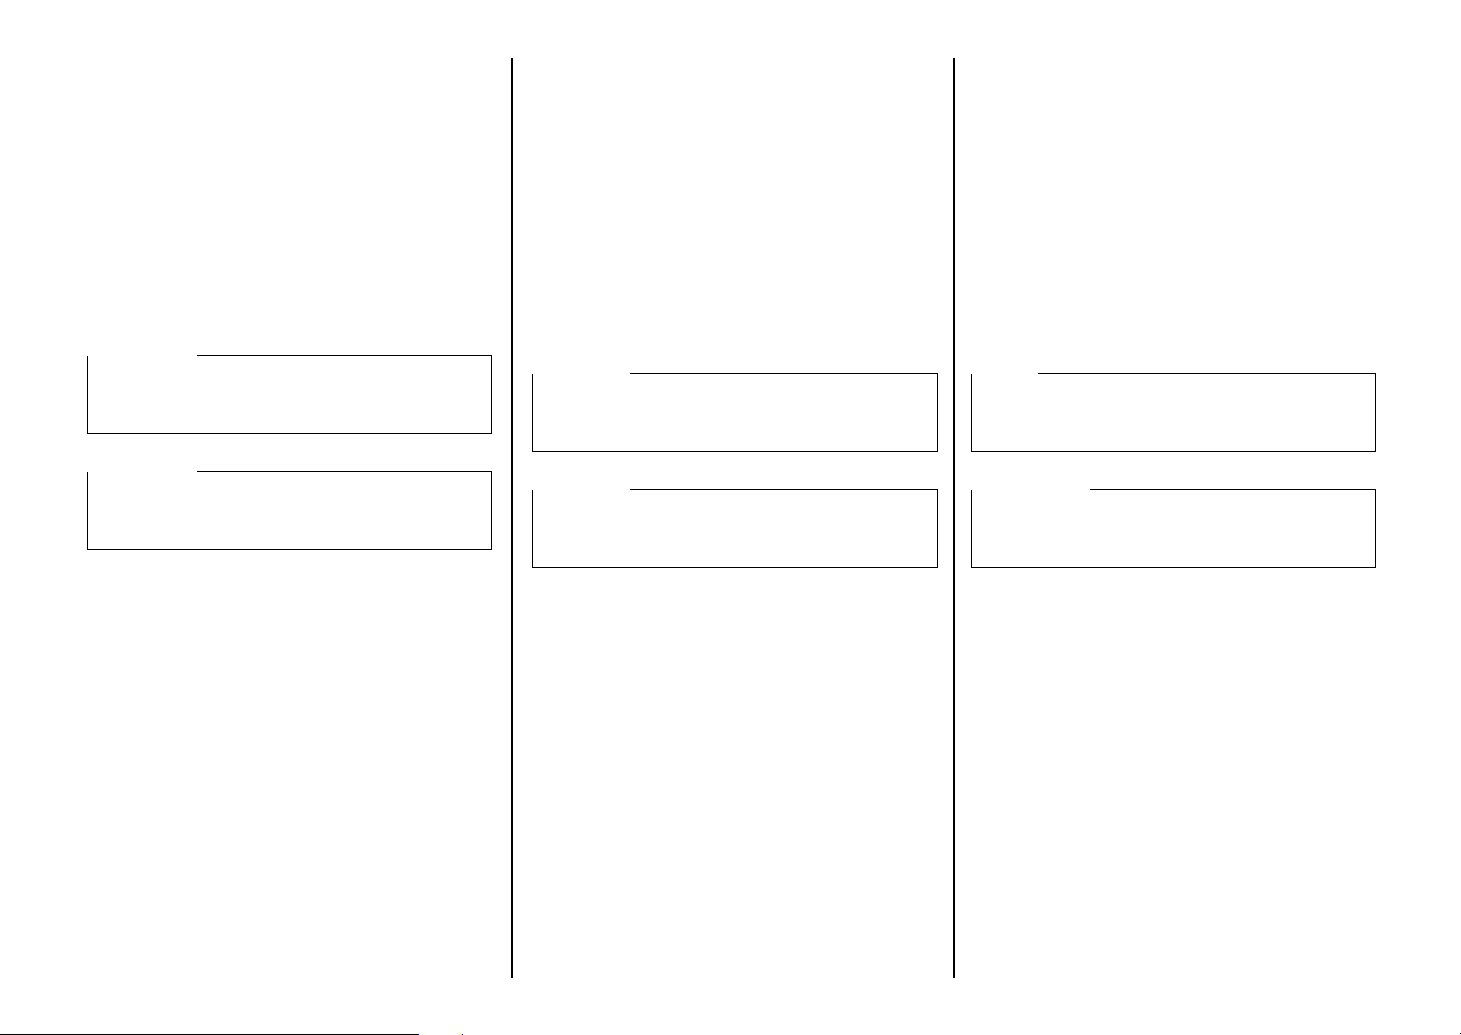
❏ Tout en saisissant les deux coins arrière de
l’imprimante avec les paumes de la main,
appuyez sur les deux parties soulevées du haut du
capot arrière jusqu’à ce qu’il s’ouvre.
❏ Halten Sie die beiden hinteren Ecken des
Druckers mit den Handflächen, und drücken Sie
die beiden angehobenen Stellen oben auf der
Traktorabdeckung, bis sie sich öffnet.
❏ Afferrando i due angoli posteriori della
stampante con il palmo delle mani, spingere
indietro le due zone sollevate in cima al
coperchio posteriore finché questo non si apre.
❏ Ouvrez le capot arrière au maximum.
Remarque:
Vous pouvez également enlever entièrement le capot
arrière en le retirant de l’arrière de l’imprimante
après l’avoir ouvert.
Attention!
Le bord métallique du capot est relativement aigu.
Prenez soin de ne pas vous faire mal à la main
lorsque vous le manipulez.
❏ Faites passer le papier continu par l’espace entre
le boîtier de l’imprimante et le capot arrière.
❏ Débloquez les deux v olets de tracteur en montant
leurs leviers gris, puis faites-les glisser de
manière qu’ils soient pratiquement alignés avec
les perforations des deux côtés du papier.
Déplacez également le support de papier central
de manière qu’il soit pratiquement à mi-chemin
entre les deux tracteurs.
❏ Ouvrez les volets des deux tracteurs, puis insérez
le papier de manière que les broches des tracteurs
s’adaptent correctement.
❏ Schwenken Sie die Traktorabdeckung bis zum
Anschlag zurück und nach unten.
Hinweis:
Sie können die Traktorabdeckung auch ganz
abnehmen, indem Sie sie nach dem Öffnen von der
Druckerrückseite abziehen.
Vorsicht!
Die Metallkante der Abdeckung ist ziemlich scharf.
Achten Sie darauf, daß Sie sich nicht daran
schneiden.
❏ Führen Sie das Endlospapier durch den Spalt
zwischen Druckergehäuse und
Traktorabdeckung.
❏ Entriegeln Sie die beiden Stachelwalzenhalter
durch Hochziehen der grauen Hebel, und stellen
Sie sie so ein, daß sie mit den Transportlöchern
im Papier übereinstimmen. Die Mitte der
Papierstütze sollte so bewegt werden, daß sie
etwa in der Mitte zwischen den beiden
Stachelwalzen ist.
❏ Klappen Sie beide Stachelwalzenhalter zurück
und richten Sie das Papier so aus, daß die
Stacheln in die Löcher im Papier eingreifen.
❏ Ribaltare il coperchio posteriore indietro e verso
il basso finché non si ferma.
Nota:
È possibile anche rimuovere completamente il
coperchio posteriore semplicemente estraendolo dal
retro della stampante dopo averlo aperto.
Attenzione!
Il bordo di metallo del coperchio è piuttosto affilato.
Nel maneggiarlo, fare attenzione a non ferirsi le
mani.
❏ F ar passare la carta a modulo continuo attraverso lo
spazio fra la copertura esterna della stampante ed il
coperchio posteriore.
❏ Sbloccare i due trattori tirando verso l’alto le loro
leve grigie e farli scorrere in modo che siano
allineati approssimativamente rispetto ai fori ai lati
del modulo. Spostare inoltre il supporto carta
centrale in modo che sia quasi equidistante dai due
trattori.
❏ Aprire i coperchi di entrambi i trattori ed inserire la
carta in modo che i perni dei trattori entrino nei
fori.
16
Page 28
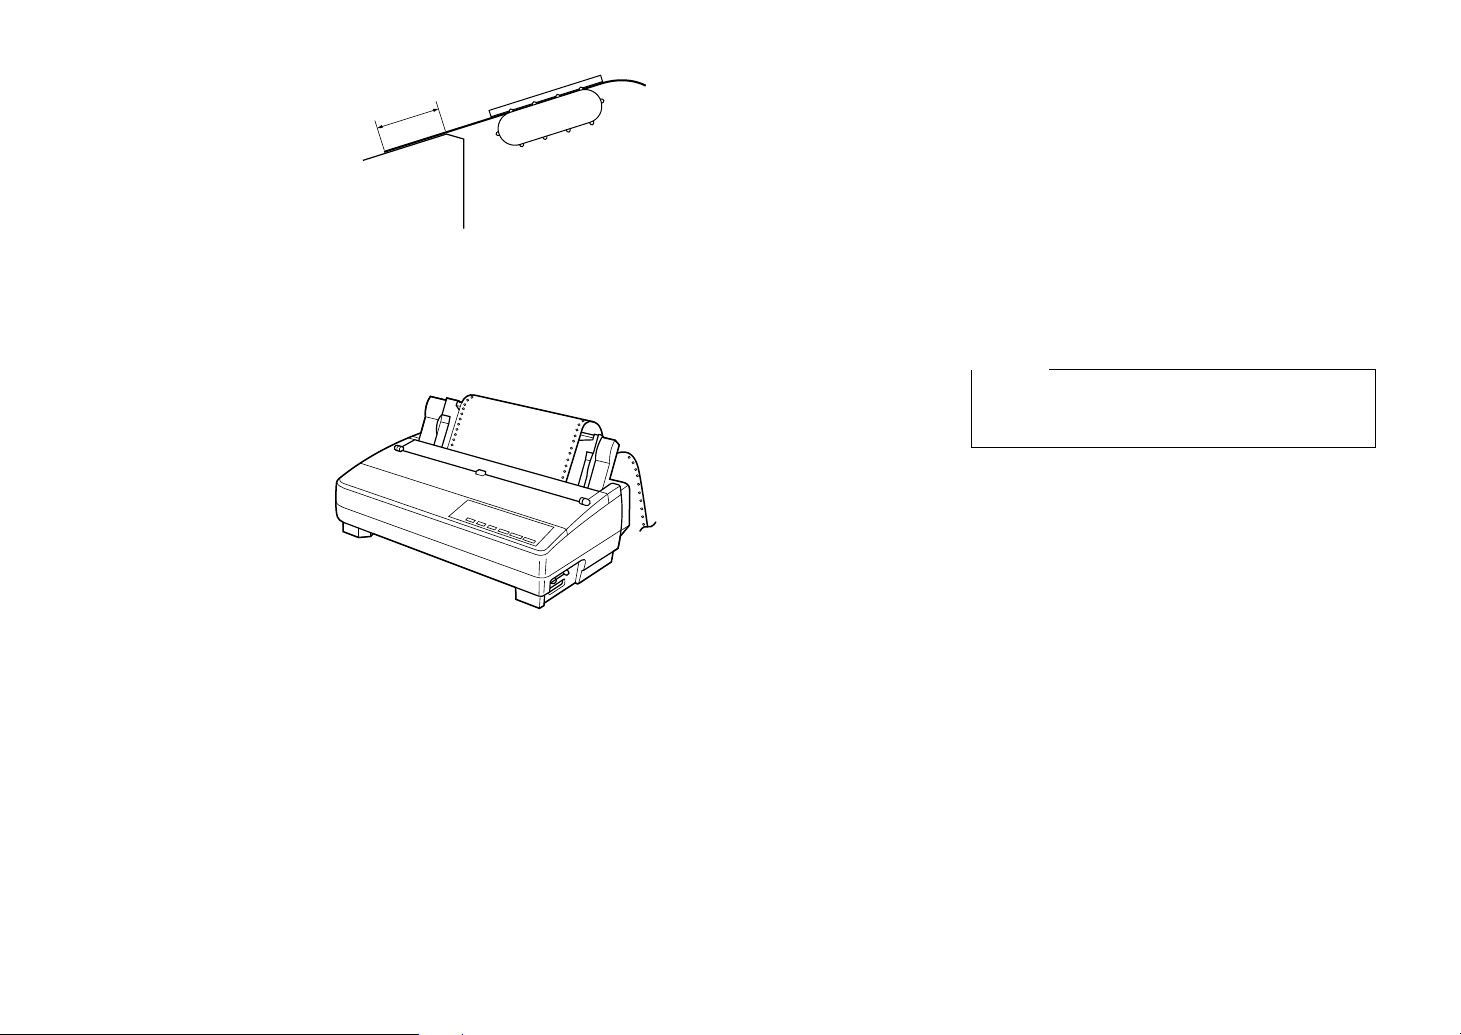
0.8”(2cm)
❏ Close the tractor covers. At this point you can
make final adjustments to the paper position by
releasing the gray levers and moving the tractors.
The paper should lie flat with no buckling or
bulging (tractors too close) or no stretching or
elongation of the holes (tractors too far apart).
After making these adjustments, be sure that you
re-lock the tractors by pushing the gray levers
back into their original positions.
❏ Before printing, make sure that the leading edge
of the fanfold paper extends about 0.8 inch (two
centimeters) past the front the paper chute, as
shown in the illustration below.
❏ Close the rear cover and press down gently on it
until it locks into place with a click.
Caution!
Since printing with an open rear cover may cause
paper feeding problems, be sure to close the rear
cover before printing.
❏ Install the paper guide so that it is standing up (at
a 50-degree angle) as shown on page 11. In this
position, the paper guide keeps the printed paper
separate from the unprinted paper.
Then slide the right and left paper guides apart so
they do not interfere with the fanfold paper
feeding.
❏ Turn on the printer.
The printer will beep a number of times to
indicate that paper is not loaded properly. Also,
the control panel’s POWER indicator flashes
whenever paper is not loaded.
❏ Press the SET/EJECT/PARK button to feed the
paper to the starting position.
17
Page 29

❏ Fermez les volets des tracteurs. Le cas échéant,
actionnez les leviers gris et déplacez les tracteurs
pour que le papier soit bien aligné. Le papier doit
être bien à plat sans gondolement ni froissage
(tracteurs trop près) et sans étirement ou
déformation des perforations (tracteurs trop
éloignés). Lorsque vous avez terminé les
réglages, remettez les leviers gris en position
d’origine pour rebloquer les tracteurs.
❏ Avant d’imprimer, assurez-vous que le bord
d’avance du papier continu dépasse l’avant de la
glissière de papier d’environ deux centimètres
(0.8 pouce), comme indiqué à l’illustration cidessous.
❏ Fermez le capot arrière, puis appuyez doucement
dessus jusqu’à ce que vous entendiez un déclic
indiquant qu’il est bloqué en place.
Attention!
L’impression avec le couvercle arrière ouvert risque
d’entraîner des problèmes d’avance de papier et par
suite vous devez vous assurer de bien fermer le
couvercle arrière avant d’imprimer.
❏ Schließen Sie die Stachelwalzenhalter, und
richten Sie das Papier, falls notwendig, zusätzlich
durch Verschieben der Stachelwalzen (nach
Lösen der grauen Hebel) aus. Das Papier muß
flach liegen, ohne sich auszubuchten
(Stachelwalzen zu eng) und ohne daß
Beschädigung der Perforationslöcher entsteht
(Stachelwalzen zu weit). Nach dieser Einstellung
prüfen Sie, daß die Stachelwalzen sicher
verschlossen sind, indem Sie die grauen Hebel
zurück in Ausgangsposition stellen.
❏ Stellen Sie vor dem Drucken sicher, daß die
Vorderkante des Endlospapiers etwa zwei
Zentimeter vorne über den Schubtraktor
herausragt, wie in der Abbildung neben.
❏ Schließen Sie die Traktorabdeckung, indem Sie
sie vorsichtig aufdrücken, bis sie hörbar einrastet.
Vorsicht!
Da Drucken mit geöffneter Traktorabdeckung
Probleme mit dem Papiereinzug bewirken kann,
immer die Traktorabdeckung vor dem Drucken
schließen.
❏ Chiudere i coperchi dei trattori. A questo punto è
possibile eseguire le regolazioni finali per il
posizionamento della carta sbloccando le leve
grigie e spostando i trattori. La carta dovrà
aderire piatta senza deformazioni o rigonfiamenti
(trattori troppo vicini) e senza stiramenti o
allungamento dei fori (trattori troppo lontani).
Terminate queste regolazioni, assicurarsi di
bloccare nuovamente i trattori spingendo le leve
grigie nella loro posizione originaria.
❏ Prima di iniziare a stampare, accertarsi che il
bordo d’entrata del modulo continuo si estenda
per circa due centimetri oltre il lato anteriore del
piano di scorrimento della carta, come mostrato
nella figura sotto.
❏ Chiudere il coperchio posteriore e spingerlo
delicatamente finché non scatta in posizione.
Attenzione!
Se si stampa lasciando il coperchio posterior e aperto, si
possono verificare dei pr oblemi di avanzamento della
carta; per evitare questo incon veniente, chiuder e sempre
il coperchio posterior e prima di iniziare a stampare .
❏ Montez le guide-papier de manière qu’il soit
incliné à un angle de 50 degrés comme indiqué à
la page 12. Dans cette position, le guide-papier
maintient le papier imprimé séparé du papier non
imprimé. Ecartez ensuite les guides-papier droit
et gauche de manière qu’ils n’entravent pas
l’avance du papier continu.
❏ Allumez l’imprimante.
L’imprimante fera retentir plusieurs bips pour
indiquer que le papier n’est pas chargé
correctement. D’autre part, le voyant POWER
du panneau de commande clignote lorsque le
papier n’est pas chargé.
❏ Appuyez sur la touche SET/EJECT/PARK pour
faire avancer le papier en position de début.
❏ Installieren Sie die Papierführung so, daß sie in
einem Winkel von 50 Grad steht, wie das in der
Abbildung auf der Seite 12 zu sehen ist. In dieser
Position trennt die Papierführung die bedruckten
Blätter von den unbedruckten Blättern. Schieben
Sie dann den rechten und linken Papierhalter so
weit auseinander, daß die Zuführung des
Endlospapiers nicht beeinträchtigt wird.
❏ Schalten Sie den Drucker ein.
Er gibt mehrere Tonsignale aus, um anzuzeigen,
daß Papier nicht richtig eingelegt ist. Außerdem
blinkt die POWER-Anzeige am Bedienfeld,
wenn kein Papier eingelegt ist.
❏ Drücken Sie die Taste SET/EJECT/PARK, und
das Papier wird zur Startposition eingezogen.
❏ Installare il guida carta in modo che abbia
un’inclinazione di 50 gradi, come mostrato a
pagina 12. In questa posizione, il guida carta
mantiene la carta stampata separata dal materiale
non stampato. Quindi, allontanare i due guida
carta destro e sinistro in modo che non
interferiscano con il movimento del modulo
continuo.
❏ Accendere la stampante.
La stampante emetterà un certo numero di
segnali acustici per indicare che la carta non è
caricata. Inoltre, l’indicatore POWER sul
pannello di controllo lampeggerà ogni volta che
la carta non è caricata.
❏ Premere il tasto SET/EJECT/PARK per far
avanzare la carta fino alla posizione di inizio
stampa.
18
Page 30

Perforation
Ligne prédécoupée
Perforation
Perforazione
Perforation
Ligne prédécoupée
Perforation
Perforazione
Bottom of Form
Fin de la page
Unterer Druckrand
Fine della pagina
18 mm
(0.7")
Fanfold paper
Papier continu
Endlospapier
Modulo continuo
4 mm (0.16")
25.4 mm (1")
25.4 mm (1")
25.4 mm (1")
25.4 mm (1")
110 mm (4.3")
First page
Première page
Erste Seite
Primo foglio
18 mm
(0.7")
Last page
Dernière page
Letzte Seite
Ultimo foglio
Cut-sheet paper
Feuilles séparées
Einzelblatt
Fogli singoli
4 mm (0.16")
5 mm
(0.2")
8 mm (0.31")
5 mm
(0.2")
6.35 mm
(0.25")min.
Labels
Etiquettes
Etiketten
Etichette
2.54 mm (0.1") min.
C
C
C
C
Label
C : 2.54 mm (0.1") min.
Perforation
6.35 mm
(0.25")min.
Printing on fanfold paper
When printing on fanfold paper, take care not to print
too close to the perforations that separate each sheet.
The following shows the recommended print area for
fanfold paper, cut-sheet paper and label paper.
Parking fanfold paper
It is not necessary to remove fanfold paper currently
loaded in the printer in order to print on cut-sheet
paper. Instead, simply use the follo wing procedure to
park the fanfold paper.
❏ Tear off the paper at a perforation so there is no
more than half a page sticking out of the front
cover of the printer.
If necessary, you can press the control panel’s
ON LINE button to put the printer off-line. and
then use the LINE FEED button to feed the paper
until a perforation is just past the front cover.
❏ Press the control panel’s ON LINE button to put
the printer off-line.
❏ Press the control panel’s SET/EJECT/PARK
button. The printer automatically reverse feeds
the fanfold paper until it is no longer in contact
with the platen, which is indicated by the printer
beeping a number of times. Also, the control
panel’s POWER indicator starts to flash because
paper is not loaded.
❏ Move the release lever to the cut-sheet position.
❏ Change the paper guide to its upright position.
You can now load cut-sheet paper into the printer
using the procedures under “Manual sheet
feeding” on page123.
19
Page 31

Impression sur papier continu
Lorsque vous imprimez sur papier continu, prenez
soin de ne pas imprimer trop près des perforations
qui séparent chaque feuille. L’illustration ci-dessous
indique la zone d’impression recommandée pour le
papier continu, feuilles séparées et étiquettes.
Drucken auf Endlospapier
Achten Sie beim Drucken auf Endlospapier darauf,
nicht zu dicht an der Perforation am Blattende
entlangzudrucken. Die nebenstehende Abbildung
zeigt den empfohlenen Druckbereich für Endlos- und
Einzelblattpapier, Etiketten und Umschläge.
Stampa su carta a modulo continuo
Quando si stampa su carta a modulo continuo, fare
attenzione a non stampare troppo vicino alle
perforazioni che separano ciascun foglio. Di seguito
è indicata l’area di stampa consigliata per la carta a
modulo continuo, per i fogli singoli e per le etichette.
Mise en attente du papier continu
Il n’est pas nécessaire d’enlever le papier continu
installé dans l’imprimante pour imprimer sur des
feuilles séparées. Effectuez simplement la procédure
suivante pour mettre le papier en attente.
❏ Coupez le papier au ni v eau de la perforation et en
ne laissant pas dépasser plus d’une demi-page du
capot avant de l’imprimante.
Le cas échéant, appuyez sur la touche ON LINE
du panneau de commande pour mettre
l’imprimante hors ligne, puis appuyez sur la
touche LINE FEED jusqu’à ce qu’une ligne de
perforation dépasse juste le capot avant.
❏ Appuyez sur la touche ON LINE du panneau de
commande pour mettre l’imprimante hors ligne.
❏ Appuyez sur la touche SET/EJECT/PARK du
panneau de commande. L’imprimante fait
automatiquement reculer le papier continu pour
qu’il ne soit plus en contact avec le cylindre, ce
qui est indiqué par plusieurs bips que
l’imprimante fait retentir. D’autre part, le voyant
POWER du panneau de commande commence à
clignoter, car il n’y a pas de papier chargé.
❏ Mettez le levier de dégagement en position
feuilles séparées.
❏ Mettez le guide-papier en position inclinée.
Vous pouvez maintenant charger des feuilles
séparées dans l’imprimante en suivant les
démarches indiquées à “Avance manuelle feuille
à feuille”, page 123.
Papier-Park Funktion
Es ist nicht notwendig, das Endlospapier aus dem
Drucker zu entfernen, um zwischendurch auf
Einzelblätter zu drucken. Das Endlospapier kann
stattdessen wie folgt “geparkt” werden.
❏ Reißen Sie das Papier an der Perforation ab, so
daß nicht mehr als ein halbes Blatt aus der
Frontabdeckung des Druckers heraussteht.
Stellen Sie den Drucker, falls notwendig, auf
Offline-Betrieb, indem Sie die Taste ON LINE
am Bedienfeld drücken. Drücken Sie dann die
Taste LINE FEED, um das Papier mit der
Perforation bis kurz über der Frontabdeckung
vorzuschieben.
❏ Drücken Sie die Taste ON LINE am Bedienfeld,
um den Drucker auf Offline-Betrieb zu stellen.
❏ Drücken Sie die Taste SET/EJECT/PARK am
Bedienfeld. Der Drucker zieht das Endlospapier
zurück, bis es nicht mehr in Berührung mit der
Druckwalze ist. Er gibt mehrere Tonsignale aus,
um anzuzeigen, daß Papier nicht die Druckwalze
berührt. Außerdem blinkt die POWER-Anzeige
am Bedienfeld, weil kein Papier eingelegt ist.
❏ Stellen Sie den Papierwahlschalter auf
Einzelblatt-Druckmodus.
❏ Stellen Sie die Papierführung in aufrechte
Stellung.
Sie können jetzt Einzelblattpapier in den Drucker
einlegen, wie unter “Einzelblattzufuhr” auf Seite
124 beschrieben.
Parcheggio della carta a modulo continuo
Per poter stampare su carta a fogli singoli, non è
necessario rimuovere la carta a modulo continuo
caricata in quel momento nella stampante, bensì è
sufficiente utilizzare il seguente procedimento per
parcheggiare il modulo continuo.
❏ Strappare la carta in corrispondenza di una
perforazione in modo che non fuoriesca più di
mezza pagina dal coperchio anteriore della
stampante.
Se necessario, è possibile premere il tasto ON
LINE del pannello di controllo per mettere la
stampante off-line e usare il tasto LINE FEED
per far avanzare la carta finché una linea di
perforazione non oltrepassi appena il coperchio
anteriore.
❏ Premere il tasto ON LINE del pannello di
controllo per mettere la stampante off-line.
❏ Premere il tasto SET/EJECT/PARK del
pannello di controllo. La stampante fa
retrocedere automaticamente la carta a modulo
continuo fino a quando non è più a contatto con il
rullo, il che viene indicato da alcuni segnali
acustici. Inoltre, l’indicatore POWER sul
pannello di controllo inizia a lampeggiare poiché
la carta non è caricata.
❏ Spostare la leva di rilascio sulla posizione foglio
singolo.
❏ Alzare il guida carta in posizione verticale.
A questo punto è possibile caricare nella
stampante dei fogli singoli seguendo il
procedimento descritto nella sezione
“Alimentazione manuale dei fogli singoli” a
pagina 124.
20
Page 32

Unparking fanfold paper
After you are finished printing on cut-sheet paper, use the following procedure to
unpark fanfold paper and make it available for printing.
❏ Remove all cut-sheet paper from the printer.
❏ Move the paper guide so that it is at a 50-degree angle. (Refer to page 11.)
❏ Move the release lever to the fanfold position.
❏ Press the SET/EJECT/PARK button to feed the paper to the starting position.
The printer automatically goes back on-line at this time.
Using the tear-off function
The following procedure makes it easy to tear off fanfold paper.
❏ Check to make sure that the printer is on-line.
❏ Press the FORM FEED button to perform the long tear-off operation, or press
the LINE FEED button to perform the short tear-off operation.
The long tear-off operation causes the paper to be fed automatically so the tear
assist edge of the printer cover is aligned with the paper’s next perforation.
The short tear-off operation causes the paper to be fed automatically so the tear
assist edge of the printer cover is located just below the last line printed on the
paper.
❏ Pull the paper against the tear assist edge to tear it off.
Connecting to your computer
The computer sends data to the printer through a cable. This printer does not come
with a cable, so you must purchase one separately. You will probably want to use a
standard parallel cable for connection, but note that you can also use an optional
serial-to-parallel interface converter (SPC-8K) or an optional serial interface unit
(IS-8H192 or IS-32H768).
Important!
The following instructions apply to the Centronics parallel cable that is used with
an IBM-compatible personal computer. Note that they do not apply to all types of
computers and cables. If you are unsure about what type of cable you should use to
connect with your computer, consult your dealer.
Nouvelle utilisation du papier continu
Lorsque vous avez fini d’imprimer sur des feuilles séparées, ef fectuez les démarches
suivantes pour imprimer de nouveau sur le papier continu.
❏ Enlevez toutes les feuilles séparées de l’imprimante.
❏ Déplacez le guide-papier de manière qu’il soit incliné à un angle de 50 degrés.
(Se référer à la page 12.)
❏ Mettez le levier de dégagement en position papier continu.
❏ Appuyez sur la touche SET/EJECT/PARK pour faire avancer le papier en
position de début.
L’imprimante retourne maintenant automatiquement en ligne.
Utilisation de la fonction de découpe
Effectuez les démarches suivantes pour découper le papier continu facilement.
❏ Assurez-vous que l’imprimante est en ligne.
❏ Appuyez sur la touche FORM FEED pour effectuer l’opération de découpe
longue ou sur la touche LINE FEED pour effectuer l’opération de découpe
courte.
L’opération de découpe longue entraîne l’avance automatique du papier de
manière à aligner le bord de découpe du capot de l’imprimante avec la
perforation suivante du papier.
L’opération de découpe courte entraîne l’avance automatique du papier de
manière que le bord de découpe du capot de l’imprimante soit situé juste endessous de la dernière ligne imprimée du papier.
❏ Tirez le papier contre le bord de découpe pour couper le papier.
Connexion de l’imprimante à l’ordinateur
L’ordinateur transmet des données à l’imprimante via un câble. Ce câble n’est pas
fourni avec l’imprimante et vous devez l’acheter séparément. Vous pouvez utiliser
un câble parallèle standard pour la connexion ou bien un convertisseur interface
série-parallèle (SPC-8K) ou une interface série (IS-8H192 ou IS-32H768) en option.
Important!
Les instructions suivantes s’appliquent à un câble parallèle Centronics destiné à un
ordinateur individuel compatible IBM mais non à tous les modèles d’ordinateurs et
de câbles. Si vous n’êtes pas certain du câble à utiliser pour raccorder votre
ordinateur, consultez votre revendeur.
21
Page 33

Fortsetzung des Endlospapier-Druckbetriebs
Nach beendetem Einzelblattdruck kann wie folgt mit Endlospapier weitergedruckt
werden.
❏ Nehmen Sie das Einzelblatt aus dem Drucker heraus.
❏ Stellen Sie die Papierführung in einem Winkel von 50 Grad auf. (Siehe Seite
12.)
❏ Stellen Sie den Papierwahlschalter auf Endlospapierbetrieb.
❏ Drücken Sie die Taste SET/EJECT/PARK am Bedienfeld, so daß der Drucker
das Endlospapier wieder in Druckposition einzieht.
Der Drucker schaltet jetzt automatisch wieder auf Online.
Ripristino del modulo continuo parcheggiato
Terminata la stampa sui fogli singoli, utilizzare il seguente procedimento per
ricaricare il modulo continuo parcheggiato e renderlo disponibile per la stampa.
❏ Togliere tutti i fogli singoli dalla stampante.
❏ Spostare il guida carta in modo che abbia un’inclinazione di 50 gradi (vedere a
pagina 12).
❏ Spostare la leva di rilascio sulla posizione modulo continuo.
❏ Premere il tasto SET/EJECT/PARK per far avanzare la carta fino alla posizione
di inizio stampa.
In quel momento la stampante torna automaticamente on-line.
Verwendung der Abreißfunktion
Endlospapier läßt sich wie folgt leicht abreißen.
❏ Vergewissern Sie sich, daß der Drucker auf Online-Betrieb gestellt ist.
❏ Drücken Sie die Taste FORM FEED am Bedienfeld, um die lange
Abreißfunktion auszuführen, oder LINE FEED, um die kurze Abreißfunktion
auszuführen.
Die lange Abreißfunktion bewirkt, daß das Endlospapier solange vorgeschoben
wird, bis die Perforation an der Abrißkante des Druckers ist.
Die kurze Abreißfunktion bewirkt, daß das Endlospapier solange vorgeschoben
wird, bis sich die Abrißkante des Druckers unter der letzten gedruckten Zeile
befindet.
❏ Ziehen Sie das Papier gegen die Abrißkante, um es abzureißen.
Anschluß an den Computer
Die Datenübertragung vom Computer zum Drucker erfolgt über ein Kabel. Das
Kabel ist nicht im Lieferumfang dieses Druckers enthalten und muß getrennt
gekauft werden. Normalerweise dient für den Anschluß ein normales Parallelkabel,
jedoch kann stattdessen auch ein Seriell-Parallel-Konverter (SPC-8K) oder eine
serielle interface (IS-8H192 oder IS-32H768) verwendet werden, die beide als
Sonderzubehör erhältlich sind.
Wichtig!
Die folgende Anleitung bezieht sich auf das mit IBM-kompatiblen
Personalcomputern verwendete Centronics-Parallelkabel und ist deshalb nicht auf
alle Computer und Kabel zutreffend. Wenden Sie sich bitte an Ihren Fachhändler,
falls Sie Fragen hinsichtlich des für Ihren Computer geeigneten Kabeltyps haben.
Uso della funzione di strappo
Il seguente procedimento facilita lo strappo del foglio dal modulo continuo.
❏ Accertarsi che la stampante sia on-line.
❏ Premere il tasto FORM FEED per eseguire l’operazione di strappo estesa,
oppure premere il tasto LINE FEED per eseguire l’operazione di strappo
ridotta.
L ’operazione di strappo estesa fa a vanzare la carta automaticamente in modo che
il bordo guida di strappo del coperchio della stampante sia allineato alla linea di
perforazione successiva della carta.
L’operazione di strappo ridotta fa avanzare la carta automaticamente in modo
che il bordo guida di strappo del coperchio della stampante si trovi appena sotto
l’ultima riga stampata sulla carta.
❏ Tirare la carta contro il bordo guida di strappo per strappare il foglio.
Collegamento della stampante al computer
Il computer invia i dati alla stampante tramite un cavo. Questa stampante viene
fornita senza cavo di collegamento, per cui è necessario acquistarne uno
separatamente. Generalmente il collegamento viene effettuato tramite un cavo
parallelo standard, tuttavia è possibile anche applicare un convertitore
d’interfaccia seriale-parallelo opzionale (SPC-8K) oppure una unità di
interfaccia seriale (IS-8H192 o IS-32H768).
Importante!
Le istruzioni che seguono si riferiscono al cavo parallelo Centronics collegato ad
un personal computer IBM compatibile; tali istruzioni non sono valide per tutti i
tipi di computer e di cavi. Se non si è sicuri sul tipo di cavo da adottare per il
collegamento della stampante al computer, consultare il proprio rivenditore.
22
Page 34

For an IBM-compatible personal computer:
✓ Use a standard 36-pin Centronics parallel cable.
✓ The parallel cable should be no longer than six
feet (two meters). Longer cables can result in
poor transfer of information.
Important!
Make sure that the printer and the computer are
turned off before connecting them.
❏ Plug one end of the parallel cable into the parallel
port of your computer. The parallel port should
be labeled “Printer,” “Parallel,” “PRN,” “LPT1,”
or something similar.
❏ Plug the other end of the parallel cable into the
socket on the side of the printer and secure it in
place with the clips.
Note:
Consult your dealer for details on how to set up your
computer when using the optional SPC-8K serial-toparallel interface converter or the IS-8H192 (or IS32H768) serial interface unit.
23
Page 35

Dans le cas d’un ordinateur individuel compatible
IBM:
✓ Utilisez un câble parallèle Centronics standard à
36 broches.
✓ La longueur du câble parallèle ne doit pas être
supérieure à deux mètres (six pieds). Un câble
trop long peut réduire la qualité du transfert de
données.
Important!
Assurez-vous que l’imprimante et que l’ordinateur
sont éteints avant de les raccorder.
❏ Branchez une e xtrémité du câble parallèle au port
parallèle de l’ordinateur. Le port parallèle est
généralement indiqué par “Imprimante”,
“Parallèle”, “PRN”, “LPT1” ou autre nom
similaire.
❏ Branchez l’autre e xtrémité du câble parallèle à la
prise du côté de l’imprimante et immobilisez-le
avec les pinces.
Remarque:
Pour plus de détails sur la configuration de votre
ordinateur dans le cas de l’utilisation d’un
convertisseur interface série-parallèle SPC-8K ou
d’une interface série IS-8H192 ou IS-32H768 en
option, consultez votre revendeur.
Für IBM-kompatible Personalcomputer:
✓ Verwenden Sie ein normales 36poliges
Centronics-Parallelkabel.
✓ Das Parallelkabel sollte nicht länger als zwei
Meter sein, da bei längeren Kabeln die Gefahr
von Übertragungsfehlern besteht.
Wichtig!
Achten Sie darauf, Drucker und Computer vor dem
Kabelanschluß auszuschalten.
❏ Schließen Sie ein Ende des Kabels an den
Parallelanschluß des Computers an. Dieser
Anschluß ist normalerweise mit “Printer”,
“Parallel”, “PRN”, “LPT1” oder dergleichen
gekennzeichnet.
❏ Schließen Sie das andere Kabelende an die
Buchse an der Seite des Druckers an, und sichern
Sie den Stecker mit den Halteclips.
Hinweis:
Einzelheiten zur Verwendung eines Seriell-ParallelKonverters (SPC-8K) oder einer seriellen interface
(IS-8H192 oder IS-32H768) erfragen Sie bitte bei
Ihrem Fachhändler.
Per collegare la stampante ad un personal computer
IBM compatibile:
✓ Utilizzare un cavo parallelo Centronics standard
a 36 pin.
✓ Tale cavo non dovrà essere più lungo di due
metri. L’utilizzo di cavi di lunghezza superiore
può provocare un trasferimento difettoso dei dati.
Importante!
Accertarsi che la stampante ed il computer siano
spenti prima di collegarli fra loro.
❏ Collegare un’estremità del cavo parallelo alla
porta parallela del computer, contrassegnata di
solito “Printer”, “Parallel”, “PRN”, “LPT1” o
diciture simili.
❏ Collegare l’altra estremità del cavo parallelo al
connettore posto sul lato della stampante e
fissarla in posizione con gli appositi fermagli.
Nota:
Consultare il proprio rivenditore per istruzioni su
come configurare il computer quando si utilizza il
convertitore d’interfaccia seriale-parallelo
opzionale SPC-8K o l’unità di interfaccia seriale IS8H192 o IS-32H768.
24
Page 36

Chapter 2: Control Panel Operations
Chapitre 2: Utilisation du panneau de commande
The control panel gives you push-button control over the printer’s operations. It
includes indicator lights, which tell you the current status of the printer at a glance.
PRINT
POWER
ON LINE
EXIT
HS-DRAFT/DRAFT
ROMAN
SANSERIF
COURIER
PRESTIGE
ORATOR
BANK
A
1
B
2
C
3
FONT
EDS c BANK
10 CPI
SW
12 CPI
D
15 CPI
4
E
5
COND
F
6
PROP
SET/EJECT
PITCH
SWITCH
PARK
STATUS
FORM FEED
ON/OFF
MICRO FEED
LINE FEED
This chapter describes control panel functions that can be performed while the
printer is turned on and either on-line or off-line. The buttons perform different
functions in the EDS and Dot Adjustment Modes. Functions of control panel buttons
in these modes are described in the relevant sections covering them.
Switching between on-line and off-line
❏ Press ON LINE to switch the printer between being on-line and off-line.
❏ When the printer is on-line, the ON LINE indicator is lit and the printer can
receive data from the computer. You should make sure that the printer is on-line
whenever you are trying to print.
❏ When the printer is in off-line, the ON LINE indicator goes out, which means
that the printer cannot receive any data.
❏ Note that you can also press ON LINE while a printing operation is in progress
to stop the printing.
Important!
Make sure that the on-line/off-line setting of the printer is corr ect before performing
a control panel operation.
Les touches du panneau de commande permettent de contrôler les fonctions de
l’imprimante. En outre, des voyants s’allument pour vous donner un aperçu rapide
de l’état courant de l’imprimante.
PRINT
POWER
ON LINE
EXIT
HS-DRAFT/DRAFT
ROMAN
SANSERIF
COURIER
PRESTIGE
ORATOR
EDS c BANK
FONT
BANK
A
B
C
10 CPI
SW
12 CPI
D
1
15 CPI
4
E
5
2
COND
F
6
3
PROP
SET/EJECT
PITCH
SWITCH
PARK
STATUS
FORM FEED
ON/OFF
MICRO FEED
LINE FEED
Ce chapitre décrit les fonctions des touches lorsque l’imprimante est sous tension
qu’elle soit en ligne ou hors ligne. Les fonctions des touches sont différentes dans le
mode EDS (commutateurs électroniques) et le mode de réglage de l’alignement des
points. Les fonctions des touches du panneau de commande pour ces modes sont
décrites dans les sections correspondantes.
Alternance entre le mode en ligne et le mode hors ligne
❏ Appuyez sur ON LINE pour faire passer l’imprimante entre le mode en ligne et
le mode hors ligne et réciproquement.
❏ Lorsque l’imprimante est en ligne, le voyant ON LINE est allumé et
l’imprimante peut recevoir des données de l’ordinateur. Par conséquent, assurezvous que l’imprimante est en ligne lorsque vous voulez imprimer.
❏ Lorsque l’imprimante est hors ligne, le voyant ON LINE est éteint, ce qui
signifie que l’imprimante ne peut pas recevoir de données.
❏ Notez que vous pouvez également appuyer sur la touche ON LINE lors de
l’impression pour arrêter l’impression.
Important!
Assurez-vous que le réglage en ligne/hors ligne de l’imprimante est correct avant
d’utiliser les autres touches du panneau de commande.
25
Page 37

Kapitel 2: Bedienfeld
Capitolo 2: Funzioni del pannello di controllo
Sämtliche Druckerbetriebsabläufe sind über das Bedienfeld steuerbar.
Leuchtanzeigen sorgen dafür, daß der je weilige Betriebsstatus des Druckers stets auf
einen Blick erkennbar ist.
PRINT
POWER
ON LINE
EXIT
HS-DRAFT/DRAFT
ROMAN
SANSERIF
COURIER
PRESTIGE
ORATOR
BANK
A
1
B
2
C
3
FONT
EDS c BANK
10 CPI
SW
12 CPI
D
15 CPI
4
E
5
COND
F
6
PROP
SET/EJECT
PITCH
SWITCH
PARK
STATUS
FORM FEED
ON/OFF
MICRO FEED
LINE FEED
Dieses Kapitel beschreibt Bedienfeldfunktionen, die bei eingeschaltetem Drucker
(im Online- oder Offline-Betrieb) ausgeführt werden können. Im EDS- und
Punktjustiermodus steuern die Tasten unterschiedliche Funktionen. Die Funktionen
der Bedienfeldtasten in diesen Betriebsarten sind in getrennten Abschnitten
beschrieben.
Umschalten zwischen Online- und Offline-Betrieb
❏ Drücken Sie die Taste ON LINE, um zwischen Online- und Offline-Betrieb des
Druckers umzuschalten.
❏ Ist der Drucker auf Online-Betrieb gestellt, leuchtet die ON LINE-Anzeige und
zeigt an, daß Daten vom Computer empfangen werden können. Beachten Sie,
daß der Drucker zum Ausdrucken von Daten auf Online-Betrieb gestellt sein
muß.
❏ Bei Umschalten auf Of fline-Betrieb erlischt die ON LINE-Anzeige; der Drucker
kann in diesem Betriebszustand keine Daten empfangen.
❏ Sie können den Druckvorgang unterbrechen, indem Sie während des Druckens
die Taste ON LINE drücken, um den Drucker auf Online-Betrieb zu stellen.
Important!
Achten Sie stets auf die korrekte Online/Of fline-Einstellung des Druc k er s, be vor Sie
weitere Funktionstasten am Bedienfeld drücken.
Il pannello di controllo consente di gestire per mezzo di tasti le varie funzioni della
stampante. Esso dispone di indicatori luminosi che permettono di conoscere con
un’occhiata lo stato in cui si trova la stampante in quel momento.
PRINT
POWER
ON LINE
EXIT
HS-DRAFT/DRAFT
ROMAN
SANSERIF
COURIER
PRESTIGE
ORATOR
EDS c BANK
FONT
BANK
A
B
C
10 CPI
SW
12 CPI
D
1
15 CPI
4
E
5
2
COND
F
6
3
PROP
SET/EJECT
PITCH
SWITCH
PARK
STATUS
FORM FEED
ON/OFF
MICRO FEED
LINE FEED
Questo capitolo illustra le funzioni del pannello di controllo che possono essere
eseguite mentre la stampante è accesa ed è on-line oppure off-line. I tasti hanno
funzioni diverse nei modi EDS e di regolazione punti. Le funzioni dei tasti del
pannello di controllo in questi due modi sono illustrate nelle rispettive sezioni in
questo manuale.
Passaggio dal modo on-line al modo off-line
❏ Premere ON LINE per far passare la stampante dal modo on-line a quello off-
line e viceversa.
❏ Quando la stampante è on-line, l’indicatore ON LINE è illuminato e la
stampante può ricevere dati dal computer. Questo significa che bisogna
accertarsi che la stampante sia on-line ogni qual volta si vuole stampare.
❏ Quando la stampante è off-line, l’indicatore ON LINE si spegne, il che significa
che la stampante non può ricevere dati.
❏ Notare che è possibile anche premere ON LINE mentre la stampa è in corso per
interromperla.
Importante!
Accertarsi che lo stato di on-line/off-line della stampante sia quello corretto prima
di eseguire un’operazione del pannello di controllo.
26
Page 38

Selecting a font
❏ Make sure the printer is off-line (ON LINE indicator is not lit).
❏ Press FONT to change the font selection. An indicator lights to the left of the
name of the font that is currently selected. HS-Draft is selected when all font
indicators on the LC-4521 are off.
Sélection d’une police de caractères
❏ Assurez-vous que l’imprimante est hors ligne (voyant ON LINE éteint).
❏ Appuyez sur la touche FONT pour changer de police de caractères. Un voyant
s’allume à gauche du nom de la police de caractères sélectionnée. Lorsque tous
les voyants de police du LC-4521 sont éteints, la police HS-Draft est
sélectionnée.
Lit Indicator Font
DRAFT Draft
ROMAN Roman
ROMAN + COURIER Sanserif
COURIER Courier
COURIER + ORATOR Prestige
ORATOR Orator
Note:
The font setting you make with the above procedure can be changed if the software
you are using overrides the setting on the control panel. You can prevent this by
using the following procedure to put the printer into the Font Lock Mode when you
turn it on.
Entering the Font Lock Mode
When the printer is in the Font Lock Mode, the font settings you make on the control
panel are used even if your software tries to override the font. Use the following
procedure to enter the Font Lock Mode.
❏ Turn off the printer.
❏ While holding down FONT, turn printer power on.
The printer is now in the Font Lock Mode. You could enter the Font Lock Mode and
Pitch Lock Mode (page29) at the same time by holding down both FONT and
PITCH when you turn on printer power.
To exit the Font Lock Mode, simply turn the printer off.
Important!
Font lock will not function if you are using Windows Truetype fonts.
Voyant allumé Police
DRAFT Draft
ROMAN Roman
ROMAN + COURIER Sanserif
COURIER Courier
COURIER + ORATOR Prestige
ORATOR Orator
Remarque:
Vous avez la possibilité de changer le réglage de police effectué au moyen de la
procédure ci-dessus si le logiciel que vous utilisez neutralise le réglage sur le
panneau de commande. Vous pouvez empêcher cette action en utilisant la procédure
suivante pour mettre l’imprimante en mode Blocage de police lorsque vous
l’allumez.
Passage en mode Blocage de police
Lorsque l’imprimante se trouve en mode Blocage de police, les réglages de police
que vous effectuez sur le panneau de commande sont utilisés, même si votre logiciel
essaie de neutraliser la police de caractères en question. Utilisez la procédure
suivante pour passer en mode Blocage de police.
❏ Eteignez l’imprimante.
❏ Tout en tenant enfoncée la touche FONT, allumez l’imprimante.
L’imprimante se trouve maintenant en mode Blocage de police. Vous avez la
possibilité de passer en mode Blocage de police ainsi qu’en mode Blocage de pas
(page 29) en même temps, en tenant enfoncées les touches FONT et PITCH lorsque
vous allumez l’imprimante.
Pour sortir du mode Blocage de police, il vous suffit d’éteindre l’imprimante.
Important!
Le Blocage de police ne fonctionnera pas si vous utilisez des polices Truetype de
Windows.
27
Page 39

Wahl einer Schriftart
❏ Vergewissern Sie sich, daß der Drucker auf Offline-Betrieb gestellt ist (ON
LINE-Anzeige leuchtet nicht).
❏ Drücken Sie die Schriftarttaste FONT zum Einstellen einer anderen Schriftart.
Links neben der jeweils gewählten Schriftart leuchtet eine Anzeige auf. Wenn
alle Schriftartanzeigen am LC-4521 erloschen sind, ist HS-Draft eingestellt.
Selezione di un font di caratteri
❏ Accertarsi che la stampante sia off-line (l’indicatore ON LINE non è
illuminato).
❏ Premere FONT per cambiare la selezione del font. Un indicatore si illumina a
sinistra del nome del font selezionato in quel momento. Quando tutti gli
indicatori sono spenti sul modello LC-4521, il font selezionato è HS-Draft.
Leuchtende Anzeige Schriftart
DRAFT Draft
ROMAN Roman
ROMAN + COURIER Sanserif
COURIER Courier
COURIER + ORATOR Prestige
ORATOR Orator
Hinweis:
Die oben beschrieben Wahl der Schriftart ändert sich, wenn Ihr Programm einen
anderen Schriftartbefehl an den Druck er sc hic kt. Um diesen Vorgang zu vermeiden,
kann der Drucker wie folgt auf Schriftart-Sperrmodus geschaltet werden.
Einschalten des Schriftart-Sperrmodus
Wenn der Drucker im Schriftart-Sperrmodus ist, können die Schriftarteinstellungen
am Bedienfeld vorgenommen werden, auch wenn die Software versucht, die
Schriftart zu bestimmen. Der Schriftart-Sperrmodus wird auf folgende Weise
aktiviert.
❏ Schalten Sie den Drucker aus.
❏ Schalten Sie den Drucker ein, während Sie FONT gedrückt halten.
Der Drucker ist jetzt im Schriftart-Sperrmodus. Sie können den SchriftartSperrmodus und den Zeichenabstand-Sperrmodus (Seite 30) gleichzeitig
einschalten, indem Sie die T asten FONT und PITCH beim Einschalten des Druck er
gedrückt halten.
Zum Verlassen des Schriftart-Sperrmodus schalten Sie den Drucker einfach aus.
Wichtig!
Schriftart- und Zeichenabstand-Sperrmodus arbeiten nicht bei Verwendung von
Windows TrueType Schriftarten.
Indicatore illuminato Font
DRAFT Draft
ROMAN Roman
ROMAN + COURIER Sanserif
COURIER Courier
COURIER + ORATOR Prestige
ORATOR Orator
Nota:
L’impostazione del font eseguita con questo procedimento può essere modificata se
l’applicazione software che si sta utilizzando annulla l’impostazione del pannello di
controllo. Ciò può esser e evitato utilizzando il se guente pr ocedimento per metter e la
stampante in modo blocco font al momento dell’accensione.
Attivazione del modo blocco font
Quando la stampante è in modo blocco font, il font utilizzato è quello selezionato
tramite il pannello di controllo anche se la propria applicazione software tenta di
modificare il font. Utilizzare il seguente procedimento per attivare il modo blocco
font.
❏ Spegnere la stampante.
❏ Tenendo premuto FONT, accendere la stampante.
La stampante è ora in modo blocco font. È possibile attivare nello stesso momento il
modo blocco font e il modo blocco passo di stampa (pagina 30) tendendo premuto
contemporaneamente i tasti FONT e PITCH all’accensione della stampante.
Per disattivare il modo blocco font è sufficiente spegnere la stampante.
Importante!
Il blocco del font non funzionerà se si utilizzano i font True Type di Windows.
28
Page 40

Setting the character pitch
The character pitch setting controls how many characters are printed per inch. Use
the following procedure to select the pitch you want.
❏ Make sure the printer is off-line (ON LINE indicator is not lit).
❏ Press PITCH to change the pitch selection.
The following shows the meanings of the indicators that light on the control panel
when you press PITCH.
Réglage du pas de caractère
Le réglage de pas de caractère contrôle le nombre de caractères qui sont imprimés
par pouce. Utilisez la procédure suivante pour sélectionner le pas désiré.
❏ Assurez-vous que l’imprimante est hors ligne (voyant ON LINE éteint).
❏ Appuyez sur PITCH pour changer la sélection de pas.
Le tableau suivant indique les significations des voyants qui s’allument sur le
panneau de commande lorsque vous appuyez sur PITCH.
Lit Indicators Meaning
10CPI 10 characters per inch (Pica)
10CPI + 15 CPI 12 characters per inch (Elite)
15 CPI 15 characters per inch
10CPI + COND 17 characters per inch (Condensed Pica)
10 CPI + 15CPI + COND 20 characters per inch (Condensed Elite)
PROP Proportional
COND + PROP Condensed propertional
Note:
The pitch setting you make with the above pr ocedure can be changed if the softwar e
you are using overrides the setting from the control panel. You can prevent this by
using the following procedur e to put the printer into the Pitch Lock Mode when you
turn it on.
Entering the Pitch Lock Mode
When the printer is in the Pitch Lock Mode, the pitch settings you make on the
control panel are used even if your software tries to override the pitch. Use the
following procedure to enter the Pitch Lock Mode.
❏ Turn off the printer.
❏ While holding down PITCH, turn printer power on.
The printer is now in the Pitch Lock Mode. You could enter the Pitch Lock Mode
and Font Lock Mode (page 27) at the same time by holding down both FONT and
PITCH when you turn on printer power.
To exit the Pitch Lock Mode, simply turn the printer off.
Important!
Pitch lock will not function if you are using Windows Truetype fonts.
Voyants allumés Signification
10CPI 10 caractères par pouce (Pica)
10CPI + 15 CPI 12 caractères par pouce (Elite)
15 CPI 15 caractères par pouce
10CPI + COND 17 caractères par pouce (Pica condensé)
10 CPI + 15CPI + COND 20 caractères par pouce (Elite condensé)
PROP Proportionnel
COND + PROP Proportionnel condensé
Remarque:
Vous avez la possibilité de changer le réglage de pas effectué au moyen de la
procédure ci-dessus si le logiciel que vous utilisez neutralise le réglage sur le
panneau de commande. Vous pouvez empêcher cette action en utilisant la procédure
suivante pour mettre l’imprimante en mode Blocage de pas lorsque vous l’allumez.
Passage en mode Blocage de pas
Lorsque l’imprimante se trouve en mode Blocage de pas, les réglages de pas que
vous effectuez sur le panneau de commande sont utilisés, même si votre logiciel
essaie de neutraliser le pas en question. Utilisez la procédure suivante pour passer en
mode Blocage de pas.
❏ Eteignez l’imprimante.
❏ Tout en tenant enfoncée la touche PITCH, allumez l’imprimante.
L ’imprimante se trouve maintenant en mode Blocage de pas. Vous avez la possibilité
de passer en mode Blocage de pas ainsi qu’en mode Blocage de police (page 27) en
même temps, en tenant enfoncées les touches FONT et PITCH lorsque vous
allumez l’imprimante.
Pour sortir du mode Blocage de pas, il vous suffit d’éteindre l’imprimante.
Important!
Le Blocage de pas ne fonctionnera pas si vous utilisez des polices Truetype de
Windows.
29
Page 41

Einstellung des Zeichenabstands
Die Einstellung des Zeichenabstands bestimmt, wie viele Zeichen pro Zoll gedruckt
werden. Stellen Sie den gewünschten Zeichenabstand auf folgende Weise ein.
❏ Stellen Sie sicher, daß der Drucker auf Offline geschaltet ist (Anzeige ON LINE
leuchtet nicht).
❏ Drücken Sie die Taste PITCH zum Ändern des Zeichenabstands.
Die folgenden Anzeigen leuchten bei jedem Drücken von PITCH auf.
Leuchtende Anzeige Bedeutung
10CPI 10 Zeichen/Zoll (Pica)
10CPI + 15 CPI 12 Zeichen/Zoll (Elite)
15 CPI 15 Zeichen pro Zoll
10CPI + COND 17 Zeichen/Zoll (Pica schmal)
10 CPI + 15CPI + COND 20 Zeichen/Zoll (Elite schmal)
PROP Proportional
COND + PROP Proportional, schmal
Hinweis:
Die oben beschrieben Wahl des Zeichenabstands ändert sich, wenn Ihr Programm
einen anderen Zeichenabstandbefehl an den Druck er schic kt. Um diesen Vorgang zu
vermeiden, kann der Drucker wie folgt auf Zeichenabstand-Sperrmodus geschaltet
werden.
Impostazione del passo del carattere
L’impostazione del passo del carattere determina il numero di caratteri che saranno
stampati in un pollice. Utilizzare il seguente procedimento per selezionare il passo di
stampa desiderato.
❏ Accertarsi che la stampante sia off-line (l’indicatore ON LINE non è
illuminato).
❏ Premere PITCH per cambiare la selezione del passo di stampa.
La seguente tabella illustra il significato degli indicatori che si illuminano sul
pannello di controllo quando si preme PITCH.
Indicatori illuminati Significato
10CPI 10 caratteri per pollice (Pica)
10CPI + 15 CPI 12 caratteri per pollice (Elite)
15 CPI 15 caratteri per pollice
10CPI + COND 17 caratteri per pollice (Pica compresso)
10 CPI + 15CPI + COND 20 caratteri per pollice (Elite compresso)
PROP Proporzionale
COND + PROP Condensato proporzionale
Nota:
L’impostazione del passo di stampa ese guita con questo procedimento può essere
modificata se l’applicazione software che si sta utilizzando annulla l’impostazione del
pannello di controllo. Ciò può esser e e vitato utilizzando il seguente procedimento per
mettere la stampante in modo blocco passo di stampa al momento dell’accensione.
Einschalten des Zeichenabstand-Sperrmodus
W enn der Drucker im Zeichenabstand-Sperrmodus ist, können die Einstellungen des
Zeichenabstands am Bedienfeld vorgenommen werden, auch wenn die Software
versucht, den Zeichenabstand zu bestimmen. Der Zeichenabstand-Sperrmodus wird
auf folgende Weise aktiviert.
❏ Schalten Sie den Drucker aus.
❏ Schalten Sie den Drucker ein, während Sie PITCH gedrückt halten.
Der Drucker ist jetzt im Zeichenabstand-Sperrmodus. Sie können die
Zeichenabstand- und Schriftart-Sperrmodi (Seite 28) gleichzeitig einschalten, indem
Sie die Tasten FONT und PITCH beim Einschalten des Drucker gedrückt halten.
Zum Verlassen des Zeichenabstand-Sperrmodus schalten Sie den Drucker einfach
aus.
Wichtig!
Zeichenabstand- und Schriftart-Sperrmodus arbeiten nicht bei Verwendung von
Windows TrueType Schriftarten.
Attivazione del modo blocco passo di stampa
Quando la stampante è in modo blocco passo di stampa, il passo di stampa utilizzato
è quello selezionato tramite il pannello di controllo anche se la propria applicazione
software tenta di modificare il passo. Utilizzare il seguente procedimento per attiv are
il modo blocco passo di stampa.
❏ Spegnere la stampante.
❏ Tenendo premuto PITCH, accendere la stampante.
La stampante è ora in modo blocco passo di stampa. È possibile attivare nello stesso
momento il modo blocco passo di stampa e il modo blocco font (pagina 28)
tendendo premuto contemporaneamente i tasti FONT e PITCH all’accensione della
stampante.
Per disattivare il modo blocco passo di stampa è sufficiente spegnere la stampante.
Importante!
Il blocco del passo di stampa non funzionerà se si utilizzano i font True Type di
Windows.
30
Page 42

Line feed
❏ Make sure the printer is off-line (ON LINE indicator is not lit).
❏ Press LINE FEED once to feed paper one line. Holding down LINE FEED
continually feeds paper, one line at a time, until you release the button.
Saut de ligne
❏ Assurez-vous que l’imprimante est hors ligne (voyant ON LINE éteint).
❏ Appuyez une fois sur LINE FEED pour avancer le papier d’une ligne. Tenez la
touche LINE FEED enfoncée pour que le papier continue d’avancer ligne par
ligne jusqu’à ce que vous relâchiez la touche.
Paper eject (cut-sheet paper)
❏ Make sure the printer is off-line (ON LINE indicator is not lit).
❏ Press SET/EJECT/PARK to eject the paper.
❏ After the paper is ejected, the printer will beep and the POWER indicator will
flash to indicate there is no paper in the printer.
Form feed (fanfold paper)
❏ Make sure the printer is off-line (ON LINE indicator is not lit).
❏ Press FORM FEED and the printer will automatically feed the paper to the top
of the next page.
Parking fanfold paper
❏ Make sure the printer is off-line (ON LINE indicator is not lit).
❏ Press the control panel’s SET/EJECT/PARK button.
❏ The printer automatically reverse feeds the fanfold paper until it is no longer in
contact with the platen.
Micro feed
Use the following operation to feed the paper in very small increments. This makes
it possible to align the print head exactly where you want it.
❏ Make sure the printer is off-line (ON LINE indicator is not lit).
❏ While holding down ON LINE, press LINE FEED to feed the paper forward or
FORM FEED to feed the paper backward.
Ejection du papier (feuilles séparées)
❏ Assurez-vous que l’imprimante est en ligne (voyant ON LINE éteint).
❏ Appuyez sur la touche SET/EJECT/PARK pour éjecter le papier.
❏ Lorsque le papier est éjecté, l’imprimante émet un bip et le voyant POWER
clignote pour indiquer que l’imprimante ne contient plus de papier.
Saut de page (papier continu)
❏ Assurez-vous que l’imprimante est hors ligne (voyant ON LINE éteint).
❏ Appuyez sur la touche FORM FEED pour que le papier avance
automatiquement jusqu’au début de la page suivante.
Mise en attente du papier continu
❏ Assurez-vous que l’imprimante est hors ligne (voyant ON LINE éteint).
❏ Appuyez sur la touche SET/EJECT/PARK du panneau de commande.
❏ L’imprimante fait automatiquement reculer le papier continu jusqu’à ce qu’il ne
soit plus en contact avec le cylindre.
Avance du papier par micro-lignes
Vous pouvez faire avancer le papier par de très petits intervalles pour régler la
position de la tête d’impression plus précisément.
❏ Assurez-vous que l’imprimante est hors ligne (voyant ON LINE éteint).
❏ Tout en tenant la touche ON LINE enfoncée, appuyez sur la touche LINE FEED
pour faire avancer le papier, ou sur FORM FEED pour le faire reculer.
31
Page 43

Zeilenvorschub
❏ Stellen Sie sicher, daß der Drucker auf Offline gestellt ist (Anzeige ON LINE
leuchtet nicht).
❏ Drücken Sie die Taste LINE FEED einmal für eine Zeile. Durch anhaltendes
Drücken der Taste LINE FEED wird das Papier nach 6 Zeilen kontinuierlich
vorgeschoben.
Avanzamento riga
❏ Accertarsi che la stampante sia off-line (l’indicatore ON LINE non è
illuminato).
❏ Premere LINE FEED una volta per far avanzare la carta di una riga. Tenendo
premuto LINE FEED la carta avanza in modo continuo, di una riga per volta,
finché non si rilascia il tasto.
Blattauswurf (Einzelblattpapier)
❏ Vergewissern Sie sich, daß der Drucker auf Online-Betrieb gestellt ist (ON
LINE-Anzeige leuchtet).
❏ Drücken Sie die Taste SET/EJECT/PARK zum Ausgeben des Papiers.
❏ Nachdem das P apier ausge geben ist, gibt der Drucker ein Tonsignal aus, und die
Anzeige POWER blinkt, um anzuzeigen, daß kein Papier im Drucker ist.
Blattvorschub (Endlospapier)
❏ Vergewissern Sie sich, daß der Drucker auf Offline-Betrieb gestellt ist (ON
LINE-Anzeige leuchtet nicht).
❏ Drücken Sie die Taste FORM FEED, um das Papier zum oberen Rand der
nächsten Seite einzuziehen.
Die Papier-Park-Funktion
❏ Vergewissern Sie sich, daß der Drucker auf Offline-Betrieb gestellt ist (ON
LINE-Anzeige leuchtet nicht).
❏ Drücken Sie die Taste SET/EJECT/PARK am Bedienfeld.
❏ Der Papier fährt das Endlospapier zurück, bis es nicht mehr in Berührung mit
der Druckwalze ist.
Mikro-Papiertransport
Verwenden Sie die folgende Funktion, um das Papier in sehr kurzen Abständen voroder zurückzuschieben. Mit Hilfe dieser Funktion kann das Papier entsprechend
ausgerichtet werden, so daß sich der Druckkopfes an einer bestimmten Stelle über
dem Papier befindet.
❏ Vergewissern Sie sich, daß der Drucker auf Offline-Betrieb gestellt ist (ON
LINE-Anzeige leuchtet nicht).
❏ Halten Sie die ON LINE-Taste gedrückt, und drücken Sie gleichzeitig die Taste
LINE FEED, um das Papier vorzuschieben, bzw. die Taste FORM FEED, um
das Papier zurückzuschieben.
Espulsione carta (fogli singoli)
❏ Accertarsi che la stampante sia off-line (l’indicatore ON LINE non è
illuminato).
❏ Premere SET/EJECT/PARK per espellere la carta.
❏ Dopo che la carta è stata espulsa, la stampante emetterà un segnale acustico e
l’indicatore POWER lampe ggerà per indicare che non c’è carta nella stampante.
Avanzamento pagina (modulo continuo)
❏ Accertarsi che la stampante sia off-line (l’indicatore ON LINE non è
illuminato).
❏ Premere FORM FEED e la stampante farà avanzare la carta fino all’inizio della
pagina successiva.
Parcheggio del modulo continuo
❏ Accertarsi che la stampante sia off-line (l’indicatore ON LINE non è
illuminato).
❏ Premere il tasto SET/EJECT/PARK del pannello di controllo.
❏ La stampante fa retrocedere automaticamente la carta a modulo continuo fino a
quando non è più a contatto con il rullo.
Avanzamento micrometrico
Eseguire la seguente operazione per far avanzare la carta con incrementi
piccolissimi. In questo modo è possibile allineare la testina di stampa esattamente
nella posizione desiderata.
❏ Accertarsi che la stampante sia off-line (l’indicatore ON LINE non è
illuminato).
❏ Tenendo premuto SET/EJECT/PARK, premere LINE FEED per far avanzare
la carta oppure FORM FEED per far retrocedere la carta.
32
Page 44

Setting the top of form position
The current position of paper loaded in the printer is automatically set as the top of
the page whenever you turn power on. You can also use the following procedure at
any time to specify a different position as the top of the page.
❏ Make sure the printer is off-line (ON LINE indicator is not lit).
❏ Use the micro feed operations (see above) to move the paper so that the print
head is located where you want the new top of form position to be.
❏ While holding down FONT, press SET/EJECT/PARK.
The printer will beep once to indicate that a new top of form position has been set.
Tear-off function (fanfold paper)
This procedure feeds fanfold paper to a position where it can be torn off easily.
❏ Check to make sure that the printer is on-line.
❏ Press the FORM FEED button to perform the long tear-off operation, or press
the LINE FEED button to perform the short tear-off operation.
The long tear-off operation causes the paper to be fed automatically so the tear assist
edge of the printer cover is aligned with the paper’s next perforation.
The short tear-off operation causes the paper to be fed automatically so the tear
assist edge of the printer cover is located just below the last line printed on the paper.
❏ Pull the paper against the tear assist edge to tear it off.
❏ When you resume printing, the printer reverse feeds the paper to its former
position.
Selecting the Quiet Print Mode
The Quiet Print Mode lets you print with less noise than that produced with normal
printing. Use the following procedure to enter and exit the Quiet Print Mode.
Important!
Though the Quiet Print Mode prints more quietly, it also causes printing to take
considerably longer than normal printing.
Réglage du début de page
A l’allumage, la position courante du papier chargé dans l’imprimante est
automatiquement considérée comme la position de début de page. Vous pouvez
modifier cette position à tout moment en effectuant les démarches suivantes.
❏ Assurez-vous que l’imprimante est hors ligne (voyant ON LINE éteint).
❏ Utilisez la fonction d’a v ance par micro-lignes (voir ci-dessus) pour f aire av ancer
le papier, pour que la tête d’impression soit exactement à l’endroit qui doit
devenir le début de page.
❏ Tout en tenant la touche FONT enfoncée, appuyez sur la touche SET/EJECT/
PARK.
L’imprimante émet un bip pour indiquer qu’une nouvelle position a été sélectionnée
pour le début de page.
Fonction de découpe (papier continu)
Cette procédure fait avancer le papier continu en position où il est facile de le
couper.
❏ Assurez-vous que l’imprimante est en ligne.
❏ Appuyez sur la touche FORM FEED pour effectuer l’opération de découpe
longue ou sur la touche LINE FEED pour effectuer l’opération de découpe
courte.
L’opération de découpe longue entraîne l’avance automatique du papier de manière
à aligner le bord de découpe du capot de l’imprimante avec la perforation suivante
du papier.
L’opération de découpe courte entraîne l’avance automatique du papier de manière
que le bord de découpe du capot de l’imprimante soit situé juste en-dessous de la
dernière ligne imprimée du papier.
❏ Tirez le papier contre le bord de découpe pour couper le papier.
❏ Lorsque l’impression recommence, l’imprimante fait reculer le papier à sa
position précédente.
Sélection du mode silencieux d’impression
Le mode silencieux d’impression permet de réduire considérablement le bruit
d’impression. Effectuez les démarches suivantes pour passer en mode silencieux
d’impression ou pour le quitter.
Important!
Dans ce mode, le bruit d’impression est réduit, cependant le temps d’impr ession est
considérablement plus long qu’en mode normal.
33
Page 45

Einstellen des Blattanfangs
Die derzeitige Position des im Drucker eingelegten Papiers wird beim Einschalten
des Druckers automatisch als Blattanfang eingestellt. Andere Blattanfangpositionen
können jedoch jederzeit wie folgt eingestellt werden.
❏ Vergewissern Sie sich, daß der Drucker auf Offline-Betrieb gestellt ist (ON
LINE-Anzeige leuchtet nicht).
❏ Führen Sie die Bedienschritte für Mikrovorschub (siehe oben) aus, um das
Papier so zu verschieben, daß der Druckkopf an der Stelle liegt, wo der neue
Blattanfang sein soll.
❏ Halten Sie FONT gedrückt und drücken Sie SET/EJECT/PARK.
Der Drucker gibt einen Piepton aus, um anzuzeigen, daß eine neue
Blattanfangposition eingestellt ist.
Impostazione della posizione di inizio pagina
La posizione in cui si trova in quel momento la carta inserita nella stampante viene
automaticamente impostata come posizione di inizio pagina ogni volta che si
accende la stampante. Tuttavia, è possibile utilizzare il seguente procedimento in
qualsiasi momento per specificare una posizione di inizio pagina diversa.
❏ Accertarsi che la stampante sia off-line (l’indicatore ON LINE non è
illuminato).
❏ Eseguire l’operazione di avanzamento micrometrico (vedere sopra) per spostare
la carta in modo che la testina di stampa si trovi nel punto in cui si desidera
specificare la nuova posizione di inizio pagina.
❏ Tenendo premuto FONT, premere SET/EJECT/PARK.
La stampante emetterà un segnale acustico per indicare che è stata impostata una
nuova posizione di inizio pagina.
Abreißfunktion (Endlospapier)
Diese Funktion schiebt das Papier bis zur Papierabrißkante vor.
❏ Vergewissern Sie sich, daß der Drucker auf Online-Betrieb gestellt ist.
❏ Drücken Sie die Taste FORM FEED am Bedienfeld, um die lange
Abreißfunktion auszuführen, oder LINE FEED, um die kurze Abreißfunktion
auszuführen.
Die lange Abreißfunktion bewirkt, daß das Endlospapier solange vorgeschoben
wird, bis die Perforation an der Abrißkante des Druckers ist
Die kurze Abreißfunktion bewirkt, daß das Endlospapier solange vorgeschoben
wird, bis sich die Abrißkante des Druckers unter der letzten gedruckten Zeile
befindet.
❏ Ziehen Sie das Papier gegen die Abrißkante, um es abzureißen.
❏ Beim Fortsetzen des Druckens fährt der Drucker das Papier in die vorherige
Stellung zurück.
Einstellen des Leisedruckmodus
Der Leisedruckmodus ermöglicht das Drucken mit reduziertem Betriebsgeräusch.
Gehen Sie zum Einschalten und Verlassen des Leisedruckmodus wie folgt vor.
Wichtig!
Dieser Druckmodus druckt leiser, jedoch dauert der Druckvorgang hiermit länger.
Funzione di strappo (modulo continuo)
Questo procedimento fa avanzare la carta a modulo continuo fino ad una posizione
in cui può essere strappata con facilità.
❏ Accertarsi che la stampante sia on-line.
❏ Premere il tasto FORM FEED per eseguire l’operazione di strappo estesa,
oppure premere il tasto LINE FEED per eseguire l’operazione di strappo
ridotta.
L’operazione di strappo estesa fa avanzare la carta automaticamente in modo che il
bordo guida di strappo del coperchio della stampante sia allineato alla linea di
perforazione successiva della carta.
L’operazione di strappo ridotta fa avanzare la carta automaticamente in modo che il
bordo guida di strappo del coperchio della stampante si trovi appena sotto l’ultima
riga stampata sulla carta.
❏ Tirare la carta contro il bordo guida di strappo per strappare il foglio.
❏ Quando si riprende la stampa, la stampante fa retrocedere la carta fino alla sua
posizione precedente.
Selezione del modo di stampa silenziosa
Il modo di stampa silenziosa permette di stampare con un livello di rumorosità
inferiore rispetto a quello prodotto dalla stampa normale. Utilizzare il seguente
procedimento per attivare e disattivare il modo di stampa silenziosa.
Importante!
Anche se il modo di stampa silenziosa è meno rumoroso, la stampa impiega molto
più tempo rispetto alla stampa normale.
34
Page 46

❏ Make sure the printer is on-line (ON LINE indicator is lit).
❏ Press SET/EJECT/PARK, to toggle between the Quiet Print Mode and normal
printing.
The printer emits one short beeps when the Quiet Print Mode is selected, and two
short beep when normal printing is selected.
❏ Assurez-vous que l’imprimante est en ligne (voyant ON LINE allumé).
❏ Appuyez sur SET/EJECT/PARK pour alterner entre le mode silencieux
d’impression et le mode normal.
L ’imprimante émet un bip court lors de la sélection du mode silencieux d’impression
et deux bips courts lors de la sélection du mode normal d’impression.
Changing the auto load position
Normally the printer automatically feeds paper to a standard position (1/6-inch from
the top of the paper). This is called the auto load position. You can use the following
procedure to specify a different auto load position.
❏ Make sure the printer is off-line (ON LINE indicator is not lit).
❏ While holding down ON LINE, press SET/EJECT/PARK and then release the
two buttons.
The printer will automatically eject the cut-sheet that is in the printer, or reverse
feed fanfold paper until it is no longer in contact with the platen. Also, all the
font and pitch indicators on the control panel will light.
❏ Press SET/EJECT/PARK to feed the paper to the starting position.
❏ Feed the paper so the print head is located where you want the new auto load
position to be.
Press LINE FEED to feed the paper forward and FORM FEED to feed the
paper backward. This is the micro feed operation.
❏ After you have the paper at the position you want, hold down ON LINE and
press LINE FEED to make the current print head position the new auto load
position. The printer will beep twice to indicate that the new auto load position is
set.
❏ To clear the new auto load position and return to the one that you set previously
(using the above procedure), press ON LINE. T o clear the currently set auto load
position and return to the standard position (1/6-inch from the top of the paper),
hold down ON LINE and press SET/EJECT/PARK.
Note:
The auto load position you set remains in effect until you turn the printer off. If you
want to save the auto load position in memory, press FORM FEED instead of LINE
FEED while holding down ON LINE in the above step.
Changement de la position de chargement automatique
Normalement, l’imprimante avance le papier en position standard (à 1/6 pouce du
haut du papier). Cette position est appelée la position de chargement automatique.
Vous pouvez changer cette position en effectuant les démarches suivantes.
❏ Assurez-vous que l’imprimante est hors ligne (voyant ON LINE éteint).
❏ Tout en tenant la touche ON LINE enfoncée, appuyez sur la touche SET/
EJECT/PARK, puis relâchez les deux touches.
L’imprimante éjecte automatiquement la feuille séparée qui se trouve dans
l’imprimante ou bien elle fait reculer le papier continu de sorte qu’il n’est plus
en contact avec le cylindre. Tous les voyants de police et de pas s’allument sur le
panneau de commande.
❏ Appuyez sur la touche SET/EJECT/PARK pour mettre le papier en position de
début d’impression.
❏ Avancez le papier pour mettre la tête d’impression à l’endroit qui doit devenir la
nouvelle position de chargement automatique.
Appuyez sur la touche LINE FEED pour faire avancer le papier ou sur la touche
FORM FEED pour le faire reculer. C’est la fonction d’a vance par micro-lignes.
❏ Lorsque le papier est en position souhaitée, tenez la touche ON LINE enfoncée
et appuyez sur la touche LINE FEED pour que la position courante de la tête
d’impression devienne la nouvelle position de chargement automatique.
L’imprimante émet deux bips pour indiquer que la nouvelle position de
chargement automatique a été réglée.
❏ Pour annuler la nouvelle position de chargement automatique et revenir à la
position que vous aviez réglée auparavant (en suivant les démarches ci-dessus),
appuyez sur ON LINE. Pour annuler la position de chargement courante et
revenir à la position de chargement standard (à 1/6 pouce du haut du papier),
tenez la touche ON LINE enfoncée et appuyez sur SET/EJECT/PARK.
Remarque:
La position de chargement automatique réglée reste opérationnelle jusqu’à ce
qu’on éteigne l’imprimante. Si vous souhaitez mettre cette position en mémoire,
appuyez sur la touche FORM FEED au lieu de la touche LINE FEED tout en tenant
la touche ON LINE enfoncée à l’instruction ci-dessus.
35
Page 47

❏ Vergewissern Sie sich, daß der Drucker auf Online-Betrieb gestellt ist (ON
LINE-Anzeige leuchtet).
❏ Drücken Sie die SET/EJECT/PARK, um zwischen Leisedruck und normalem
Druckbetrieb umzuschalten.
Der Drucker gibt einen kurzen Piepton aus, wenn der Leisedruckmodus gewählt
ist und zwei kurze Pieptöne, wenn normaler Druck gewählt ist.
❏ Accertarsi che la stampante sia on-line (l’indicatore ON LINE è illuminato).
❏ Premere SET/EJECT/PARK per passare dalla stampa normale al modo di
stampa silenziosa e viceversa.
La stampante emette un segnale acustico breve quando è selezionato il modo di
stampa silenziosa e due segnali acustici brevi quando è selezionata la stampa
normale.
Änderung der automatischen Papiereinzugposition
Normalerweise schiebt der Drucker das Papier automatisch bis zu einer bestimmten
Position vor - die sogenannte automatische Papiereinzugposition (1/6 Zoll von der
Papieroberkante). Diese Einzugposition kann wie folgt geändert werden.
❏ Stellen Sie sicher, daß der Drucker auf Offline geschaltet ist (die Anzeige ON
LINE leuchtet nicht).
❏ Halten Sie die Taste ON LINE gedrückt, drücken Sie SET/EJECT/PARK, und
lassen Sie dann beide Tasten los.
Der Drucker gibt automatisch das Einzelblattpapier aus, das im Drucker
eingelegt ist, oder schiebt das Endlospapier zurück, bis es nicht mehr in
Berührung mit der Druckwalze ist. Alle Anzeigen für Schriftart und
Zeichenabstand am Bedienfeld leuchten auf.
❏ Drücken Sie die Taste SET/EJECT/PARK, um das Papier zur Startposition
einzuziehen.
❏ Ziehen Sie das Papier ein, bis sich der Druckkopf an der Stelle befindet, wo die
neue Automatikeinzugposition sein soll.
❏ Drücken Sie LINE FEED, um das Papier vorzuschieben, und FORM FEED,
um es zurückzuschieben. Dies ist der Mikrovorschub.
❏ Wenn das Papier in der gewünschten Position ist, halten Sie die T aste ON LINE
gedrückt und drücken LINE FEED, um die momentane Druckkopfposition als
neue automatische Papiereinzug-Position einzugeben. Der Drucker gibt zwei
Pieptöne aus, um zu bestätigen, daß die neue automatische PapiereinzugPosition eingegeben ist.
❏ Um die neue automatische P apiereinzug-Position zu löschen und zur v orherigen
zurückzuschalten (auf obige W eise) drück en Sie ON LINE. Um die momentane
automatische Papiereinzug-Position zu löschen und zu der Position zu schalten,
die standardmäßig vorgegeben ist (1/6 Zoll von der Papieroberkante), halten Sie
ON LINE gedrückt und drücken Sie SET/EJECT/PARK.
Hinweis:
Die eingegebene automatische Papiereinzug-Position bleibt gültig, bis Sie den
Drucker ausschalten. Wenn Sie die automatische Papiereinzug-Position dauerhaft
speichern wollen, drücken Sie FORM FEED anstelle von LINE FEED, währ end Sie
ON LINE im obigen Schritt gedrückt halten.
Modifica della posizione di caricamento automatico
Normalmente la stampante fa avanzare automaticamente la carta fino ad una
posizione predeterminata (circa 40 mm dal bordo superiore della carta). Questa è
chiamata posizione di caricamento automatico. È possibile utilizzare il seguente
procedimento per specificare una posizione di caricamento automatico diversa.
❏ Accertarsi che la stampante sia off-line (l’indicatore ON LINE non è
illuminato).
❏ Tenendo premuto ON LINE, premere SET/EJECT/PARK e quindi rilasciare i
due tasti.
La stampante espellerà automaticamente il foglio singolo inserito nella
stampante o farà retrocedere il modulo continuo fino a quando non è più a
contatto con il rullo. Inoltre, si illumineranno tutti gli indicatori di font e passo di
stampa sul pannello di controllo.
❏ Premere SET/EJECT/PARK per far avanzare la carta fino alla posizione di
inizio stampa.
❏ Far avanzare la carta in modo che la testina di stampa si trovi nel punto in cui si
desidera impostare la nuova posizione di caricamento automatico.
Premere LINE FEED per far avanzare la carta oppure FORM FEED per far
retrocedere la carta. Questa è l’operazione di avanzamento micrometrico.
❏ Dopo a ver spostato la carta nella posizione desiderata, tenere premuto ON LINE
e premere LINE FEED per rendere l’attuale posizione della testina di stampa la
nuova posizione di caricamento automatico. La stampante emetterà due segnali
acustici per indicare che la nuova posizione di caricamento automatico è stata
impostata.
❏ Per cancellare la nuova posizione di caricamento automatico e tornare a quella
definita precedentemente (con il procedimento illustrato sopra), premere ON
LINE. Per cancellare la posizione di caricamento automatico definita in quel
momento e tornare alla posizione predeterminata (circa 40 mm dal bordo
superiore della carta), tenere premuto ON LINE e premere SET/EJECT/
PARK.
Nota:
La posizione di caricamento automatico così definita rimane attiva fino a quando
non si spegne la stampante. Se si vuole conservare in memoria la posizione di
caricamento automatico, premere FORM FEED al posto di LINE FEED mentre si
tiene premuto ON LINE al punto sopra.
36
Page 48

Saving a macro
Normally, any settings you make on the control panel are cleared when you turn the
printer off. Use the following procedure to save the current control panel settings so
that they are used whenever you turn the printer on.
❏ Make the control panel settings you want.
❏ Use ON LINE to put the printer off-line (ON LINE indicator is not lit).
❏ Hold down FONT and then PITCH. Keep both buttons held down until the
printer beeps twice.
Pressing FONT normally changes the font setting, so when you press it in the
above step the indicator for the next font lights. Pressing PITCH, however,
returns the font setting to what it was before you pressed FONT.
This procedure saves the following settings.
• Current font and pitch settings
• Quiet Print Mode status
These items can be set separately for the Standard mode and the IBM mode.
❏ To clear saved control panel settings repeat the above procedure, but keep FONT
and PITCH depressed after the printer beeps twice. Soon the printer will beep
again three times to indicate that the saved control panel settings have been
cleared.
Clearing the printer’s buffer
When the printer receives data from a computer , it temporarily stores it in a memory
called a buffer. If you stop a printing job partway through, there is the chance that
some data will remain in the buffer. The following procedure clears the printer’s
buffer by deleting any data that might be there.
❏ Execute the necessary command in the program you are using to stop the print
job.
Important!
Be sure to stop the print job before taking the printer off line. Otherwise, the print
job will resume fr om where you interrupted it when you put the printer back on-line.
❏ Use ON LINE to take the printer off line (ON LINE indicator is not lit).
❏ Hold down FONT and then FORM FEED. Keep both buttons held down until
the printer beeps once, which indicates that the buffer is cleared.
Sauvegarde de macro-commandes
Normalement, les réglages effectués sur le panneau de commande sont annulés
lorsque vous éteignez l’imprimante. Si vous voulez sauvegarder les réglages
effectués sur le panneau de commande pour qu’ils soient opérationnels chaque fois
que vous allumez l’imprimante, effectuez les démarches suivantes.
❏ Réglez le panneau de commande selon les besoins.
❏ Mettez l’imprimante hors ligne au mo yen de la touche ON LINE (indicateur ON
LINE éteint).
❏ Tenez la touche FONT enfoncée, puis la touche PITCH. Tenez les deux touches
enfoncées jusqu’à ce que deux bips soient émis par l’imprimante.
Normalement, le fait d’appuyer sur la touche FONT change la police de
caractères. Par conséquent, lorsque vous appuyez sur FONT à l’instruction cidessus, le voyant de la police suivante est éclairé. Toutefois, lorsque vous
appuyez sur PITCH, l’imprimante revient de nouveau à la police sélectionnée
avant qu’on ait appuyé sur la touche FONT.
Lorsque vous effectuez cette opération, les réglages suivants sont sauvegardés.
• Police et réglages de pas en cours
• Etat du mode silencieux d’impression
Ces paramètres peuvent être réglés séparément pour le mode standard et le mode
IBM.
❏ Pour annuler les réglages du panneau de commande qui ont été sauvegardés,
recommencez les démarches ci-dessus, mais tenez les touches FONT et PITCH
enfoncées après que l’imprimante ait émis deux bips. Peu de temps après,
l’imprimante émet de nouveau trois bips pour indiquer que les réglages du
panneau de commande ont été annulés.
Vidage de la mémoire tampon de l’imprimante
Lorsque l’imprimante reçoit des données d’un ordinateur, elle les stocke
temporairement dans une mémoire appelée mémoire tampon. Si un programme
d’impression est interrompu, il se peut que la mémoire tampon contienne des
données pas encore imprimées. Vous pouvez effacer les données de la mémoire
tampon en effectuant les démarches suivantes.
❏ Exécutez la commande nécessaire du programme utilisé pour interrompre
l’impression en cours.
Important!
Veillez à interrompre l’impression avant de mettre l’imprimante hors ligne, sinon
l’impression se poursuivra à partir de l’endroit où elle a été interrompue, lorsque
vous aurez remis l’imprimante en ligne.
37
❏ Mettez l’imprimante hors ligne au mo yen de la touche ON LINE (indicateur ON
LINE éteint).
❏ Tenez la touche FONT enfoncée, puis la touche FORM FEED. Tenez les deux
touches enfoncées jusqu’à ce que l’imprimante émette un bip pour indiquer que
la mémoire tampon est vidée.
Page 49

Speichern der Bedienfeldeinstellungen
Die am Bedienfeld vorgenommenen Einstellungen werden normalerweise beim
Ausschalten des Druckers gelöscht. Die Einstellungen können jedoch auch
gespeichert werden, so daß sie bei jedem Einschalten des Druckers wieder aktiv
sind. Gehen Sie dazu wie folgt vor.
❏ Nehmen Sie die gewünschten Bedienfeldeinstellungen vor.
❏ Vergewissern Sie sich, daß der Drucker mit der Taste ON LINE auf Offline-
Betrieb gestellt ist (ON LINE-Anzeige leuchtet nicht).
❏ Halten Sie die Taste FONT gedrückt, und drücken Sie dann die Taste PITCH.
Halten Sie beide Tasten gedrückt, bis zwei Tonsignale erklingen.
Durch Drücken der FONT-Taste wird normalerweise auf die nächste Schriftart
umgestellt, bei Drücken der Taste im obigen Schritt leuchtet deshalb die
Anzeige für die nächste Schriftart auf. Durch Drücken von PITCH dagegen wird
zu der vor dem Drücken der FONT-Taste angezeigte Schriftart zurückgestellt.
Dieses Verfahren speichert die folgenden Einstellungen.
• Momentane Schriftart und Druckmodus
• Leisedruck-Einstellung
Diese Parameter können getrennt für Standardmodus und IBM-Modus
gespeichert werden.
❏ Wiederholen Sie zum Löschen gespeicherter Bedienfeldeinstellungen den
obigen Vorgang, aber halten Sie die Tasten FONT und PITCH nach den beiden
Tonsignalen weiterhin gedrückt, bis kurz danach ein drittes Tonsignal erklingt.
Das dritte Tonsignal zeigt an, daß die gespeicherten Einstellungen gelöscht
wurden.
Löschen der Druckpufferdaten
Wenn der Drucker Daten vom Computer empfängt, werden diese vorübergehend in
einem Daten-Zwischenspeicher abgelegt - der sogenannte Puffer. Wird ein
Druckvorgang vorzeitig abgebrochen, ist es möglich, daß sich ein Teil der
Druckdaten noch im Puffer befindet. Der folgende Vorgang dient zum vollständigen
Löschen aller im Puffer abgelegten Daten.
❏ Stoppen Sie den Druckvorgang mit dem entsprechenden Befehl Ihres
Programms.
Wichtig!
Achten Sie darauf, den Druckvorgang zu unterbrechen, bevor Sie den Drucker auf
Offline-Betrieb stellen. Andernfalls wird der Druckvorgang beim Zurückschalten
auf Online-Betrieb an der Stelle, wo er unterbrochen wurde, fortgesetzt.
❏ Drück en Sie die Taste ON LINE, um den Drucker auf Offline-Betrieb zu stellen
(ON LINE-Anzeige leuchtet nicht).
❏ Halten Sie die FONT-Taste gedrückt, und drücken Sie gleichzeitig die Taste
FORM FEED. Halten Sie beide Tasten gedrückt, bis ein einzelnes Tonsignal
anzeigt, daß sämtliche Daten im Puffer gelöscht sind.
Memorizzazione delle impostazioni del pannello di controllo
Normalmente, le impostazioni eseguite sul pannello di controllo vengono cancellate
quando si spegne la stampante. Utilizzare il seguente procedimento per memorizzare
le impostazioni correnti del pannello di controllo in modo che siano attive ogni volta
che si accende la stampante.
❏ Eseguire le impostazioni desiderate sul pannello di controllo.
❏ Premere ON LINE per mettere la stampante off-line (l’indicatore ON LINE non
è illuminato).
❏ Tenere premuto FONT seguito da PITCH. Tenere premuti entrambi i tasti finché
la stampante non emette due segnali acustici.
Premendo FONT normalmente viene cambiata la selezione del font, per cui
quando si preme questo tasto nel punto precedente si illumina l’indicatore del
font successivo. T uttavia, quando si preme PITCH l’impostazione del font torna
a quella precedente alla pressione di FONT.
Questo procedimento memorizza le seguenti impostazioni.
• Font e passo di stampa correnti
• Stato del modo di stampa silenziosa
Queste voci possono essere impostate separatamente per il modo Standard e per
il modo IBM.
❏ Per cancellare le impostazioni del pannello di controllo memorizzate, ripetere il
procedimento sopra, ma mantenere premuti FONT e PITCH dopo che la
stampante ha emesso i due segnali acustici. Dopo un po’ la stampante emetterà
di nuovo tre segnali acustici per indicare che le impostazioni del pannello di
controllo memorizzate sono state cancellate.
Svuotamento del buffer di stampa
Quando la stampante riceve dati da un computer, li immagazzina temporaneamente
in una memoria chiamata buffer. Se si interrompe un’operazione di stampa ad un
certo punto prima della fine, può succedere che alcuni dati restino nel buffer. Il
seguente procedimento svuota il buffer di stampa cancellando eventuali dati
contenuti in esso.
❏ Eseguire all’interno del programma che si sta usando il comando necessario per
interrompere l’operazione di stampa.
Importante!
Accertarsi di interrompere l’operazione di stampa prima di mettere la stampante
off-line. In caso contrario, riportando la stampante on-line, la stampa riprenderà
dal punto in cui era stata interrotta.
❏ Premere ON LINE per mettere la stampante off-line (l’indicatore ON LINE non
è illuminato).
❏ Tenere premuto FONT seguito da FORM FEED. Tenere premuti entrambi i
tasti finché la stampante non emette un segnale acustico, che indica che il buffer
è stato svuotato.
38
Page 50

Initializing the printer
The following procedure initializes the printer to its power-on settings. If you have
control panel settings stored in memory, this procedure sets up the printer using
them.
❏ Use ON LINE to take the printer off line (ON LINE indicator is not lit).
❏ Hold down FONT and then FORM FEED. Keep both buttons held down until
the printer beeps once (indicating the printer buffer is cleared) and then beeps
again three times, which indicates that the printer is reset.
Entering the Multi-part Mode
When the printer is in the Multi-part Mode, the print head prints with greater impact.
It should be noted, however, that printing in the Multi-part Mode also reduces the
life of the print head. Because of this, you should use the Multi-part Mode only for
printing on four or five-ply paper. Return to the normal mode for printing on one to
three-ply paper.
Use the following procedure to enter the Multi-part Mode
❏ Turn off the printer.
❏ While holding down the control panel’s SET/EJECT/PARK button, turn the
printer back on.
❏ To exit the Multi-part Mode, simply turn the printer off and back on again.
Réinitialisation de l’imprimante
Effectuez les démarches suivantes pour réinitialiser l’imprimante aux réglages de la
mise sous tension. Si vous avez mis en mémoire les réglages du panneau de
commande, cette procédure configure l’imprimante en conséquence.
❏ Appuyez sur la touche ON LINE pour mettre l’imprimante hors ligne (voyant
ON LINE éteint).
❏ Tenez la touche FONT enfoncée, puis la touche FORM FEED. Tenez les deux
touches enfoncées jusqu’à ce que l’imprimante émette un bip (indiquant que la
mémoire tampon est vidée), puis trois autres bips pour indiquer que la
réinitialisation est terminée.
Entrée en mode multi-feuilles
Lorsque l’imprimante se trouve en mode multi-feuilles, la tête d’impression
imprime avec impact supérieur. Il faut toutefois préciser qu’en cas d’impression en
mode multi-feuilles, la durée d’utilisation de la tête d’impression sera réduite. C’est
la raison pour laquelle vous devez utiliser le mode multi-feuilles uniquement pour
imprimer sur papier à quatre ou cinq exemplaires. Retournez en mode normal pour
imprimer sur papier de une à trois exemplaires.
Utilisez la procédure suivante pour passer en mode multi-feuilles.
❏ Eteignez l’imprimante.
❏ Tout en maintenant enfoncée la touche SET/EJECT/PARK du panneau de
commande, rallumez l’imprimante.
❏ Pour sortir du mode multi-feuilles, éteignez à nouveau l’imprimante puis
rallumez-la.
39
Page 51

Initialisierung des Druckers
Der folgende Vorgang initialisiert den Drucker auf seinen Einschaltstatus. Falls
bestimmte Bedienfeldeinstellungen gespeichert wurden, sind diese beim Einschalten
des Druckers wieder aktiv.
❏ Drück en Sie die ON LINE-Taste, um den Drucker auf Offline-Betrieb zu stellen
(ON LINE-Anzeige leuchtet nicht).
❏ Halten Sie die FONT-Taste gedrückt, und drücken Sie gleichzeitig die Taste
FORM FEED. Halten Sie beide Tasten gedrückt, bis ein einzelnes Tonsignal
(welches anzeigt, daß sämtliche Daten im Puffer gelöscht sind) erklingt, gefolgt
von drei weiteren Tonsignalen, die anzeigen, daß der Drucker rückgestellt ist.
Inizializzazione della stampante
Il seguente procedimento inizializza la stampante ripristinando le impostazioni
attive al momento dell’accensione. Se si sono memorizzate delle impostazioni del
pannello di controllo, questo procedimento ripristina la stampante su tali
impostazioni.
❏ Premere ON LINE per mettere la stampante off-line (l’indicatore ON LINE non
è illuminato).
❏ Tenere premuto FONT seguito da FORM FEED. Tenere premuti entrambi i
tasti finché la stampante non emette un segnale acustico (che indica che il buffer
è stato svuotato) seguiti da altri tre segnali acustici, che indicano che la
stampante è stata inizializzata.
Einschalten des Mehrlagen-Druckmodus
Wenn der Drucker im Mehrlagen-Druckmodus ist, schlagen die Drucknadeln mit
größerer Kraft auf das Papier. Beachten Sie aber, daß in diesem Modus die
Lebensdauer des Druckkopfes verringert wird. Deshalb sollten Sie den MehrlagenDruckmodus nur für vier- oder fünflagiges Papier verwenden. Schalten Sie zum
Drucken auf ein- bis dreilagigem Papier auf Normalmodus zurück.
Der Mehrlagen-Druckmodus wird auf folgende Weise eingeschaltet.
❏ Schalten Sie den Drucker aus.
❏ Halten Sie die Taste SET/EJECT/PARK am Bedienfeld gedrückt und schalten
Sie den Drucker wieder ein.
❏ Zum Verlassen des Mehrlagen-Druckmodus schalten Sie den Drucker aus und
dann wieder ein.
Attivazione del modo multi-copia
Quando la stampante è in modo multi-copia, la testina di stampa esegue la stampa
applicando un impatto maggiore. Notare tuttavia che la stampa eseguita in questo
modo riduce anche la durata della testina di stampa. Per questo motivo, si dovrà
utilizzare il modo multi-copia solo per stampare su carta composta da quattro a
cinque copie. Riportare la stampante al modo di stampa normale per stampare su
carta da una a tre copie.
❏ Spegnere la stampante.
❏ Tenendo premuto il tasto SET/EJECT/PARK del pannello di controllo,
riaccendere la stampante.
❏ Per disattivare il modo multi-copia, è sufficiente spegnere e riaccendere la
stampante.
40
Page 52

Chapter 3: Using the EDS Mode
Chapitre 3: Utilisation du mode EDS
The letters “EDS” stand for “Electronic DIP Switches.” Just like the small DIP
switches that are used by many computers, printers, and other devices, the EDS
mode lets you configure the printer so that it matches your system and software
needs. This chapter describes how to enter the printer’s EDS Mode and provides
details about available settings and how to change them.
All switch settings are ON when the printer is shipped from the factory.
About EDS Mode settings
EDS Mode settings are grouped among six “banks” (representing banks of switches)
that are identified by the letters A through F. Each bank contains a number of
“switches” numbered 1 through 6 that you can turn on and off to configure the
printer.
Entering the EDS Mode
❏ Make sure that paper is loaded in the printer.
❏ Turn off the printer.
❏ While holding down the control panel’s ON LINE, LINE FEED, and FORM
FEED buttons, turn the printer back on.
This causes the following message to be printed, which indicates the printer is in the
EDS Mode.
Les lettres “EDS” sont l’abréviation de “Electronic DIP Switches” (commutateurs
électroniques). Tout comme les petits commutateurs utilisés par beaucoup
d’ordinateurs, imprimantes et autres appareils, ils permettent de changer la
configuration de l’imprimante en fonction de l’ordinateur et du logiciel utilisés. Ce
chapitre explique la manière de passer en mode EDS, les réglages possibles, ainsi
que la manière de les modifier.
Tous les commutateurs de l’imprimante sont réglés sur ON à la sortie de l’usine.
Au sujet des réglages en mode EDS
Les réglages en mode EDS sont disposés en six groupes (groupes de commutateurs)
qui sont identifiés par les lettres A à F. Chaque groupe contient un nombre de
commutateurs numérotés de 1 à 6 que vous pouvez activer ou désactiver pour
configurer l’imprimante.
Entrée en mode EDS
❏ Assurez-vous que le papier est chargé dans l’imprimante.
❏ Eteignez l’imprimante.
❏ Tout en tenant enfoncées les touches ON LINE, LINE FEED et FORM FEED
sur le panneau de commande, rallumez l’imprimante.
Le message suivant est imprimé, ce qui indique que l’imprimante est en mode EDS.
41
Page 53

Kapitel 3: Verwendung des EDS-Modus
Capitolo 3: Uso del modo EDS
Die Abkürzung “EDS” steht für “Elektronische DIP-Schalter”. Genau wie die
kleinen DIP-Schalter, die an vielen Computern, Druckern und anderen Geräten
vorhanden sind, dienen die EDS zur Konfiguration des Druckers gemäß dem
verwendeten Computersystem und Software-Programm. Dieses Kapitel erklärt wie
der EDS-Modus eingestellt wird und beschreibt die verfügbaren Einstellungen und
wie diese geändert werden können.
Werksseitig sind alle Schalter vor dem Versand des Druckers auf ON gestellt.
Einstellungen des EDS-Modus
EDS-Modus-Einstellungen sind in sechs Gruppen unterteilt (d.h. Gruppen von
Schaltern), die mit den Buchstaben A bis F gekennzeichnet sind. Jede Gruppe
umfaßt eine Reihe von “Schaltern”, die von 1 bis 6 numeriert sind und zur
Konfiguration des Druckers auf Ein (ON) oder Aus (OFF) gestellt werden können.
Einschalten des EDS-Modus
❏ Vergewissern Sie sich, daß Papier im Drucker eingelegt ist.
❏ Schalten Sie den Drucker aus.
❏ Halten Sie die Tasten ON LINE, LINE FEED und FORM FEED am
Bedienfeld gedrückt, und schalten Sie den Drucker gleichzeitig ein.
Der Drucker druckt hiernach die folgenden Informationen aus, die den eingestellten
EDS-Modus bestätigen.
La sigla “EDS” sta per “Electronic DIP Switches” (interruttori DIP elettronici).
Nello stesso modo dei piccoli interruttori DIP usati da molti computer, stampanti ed
altri dispositivi, gli EDS permettono di configurare la stampante in base alle
esigenze del proprio sistema e del software applicativo. Questo capitolo spiega come
attivare il modo EDS della stampante e fornisce dettagli sulle impostazioni
disponibili e su come modificarle.
Tutte le regolazioni degli interruttori sono ON quando la stampante viene spedita
dalla fabbrica.
Le impostazioni del modo EDS
Le impostazioni del modo EDS sono suddivise in sei “gruppi” (che corrispondono a
gruppi di interruttori) identificati dalle lettere da A a F. Ogni gruppo contiene un
certo numero di “interruttori” numerati da 1 a 6 che è possibile impostare su ON o su
OFF per configurare la stampante.
Attivazione del modo EDS
❏ Accertarsi che nella stampante sia caricata della carta.
❏ Spegnere la stampante.
❏ Tenendo premuti i tasti ON LINE, LINE FEED e FORM FEED del pannello di
controllo, riaccendere la stampante.
In questo modo viene emessa la stampa del seguente messaggio, che indica che la
stampante è in modo EDS.
42
Page 54

Selecting a bank
❏ While in the EDS Mode, use the control panel’s BANK button to select a bank.
When the BANK indicator flashes it indicates the current bank selected.
Sélection de groupe
❏ En mode EDS, utilisez la touche BANK du panneau de commande pour
sélectionner un groupe. Lorsque le voyant BANK clignote, il vous indique le
groupe sélectionné.
Lit Indicator Selected Bank
A
1
B
2
3
C
D
4
E
5
F
6
A
B
C
D
E
F
Selecting a switch
❏ While in the EDS Mode, use the control panel’s SWITCH button to select a
switch. When the SW indicator flashes it indicates the current switch selected.
Lit Indicator Selected Switch
A
1
B
2
C
3
D
4
E
5
1
2
3
4
5
Voyant allumé Groupe sélectionné
A
1
B
2
3
C
D
4
E
5
F
6
A
B
C
D
E
F
Sélection d’un commutateur
❏ En mode EDS, utilisez la touche SWITCH du panneau de commande pour
sélectionner un commutateur. Lorsque le v o yant SW clignote, il v ous indique le
commutateur sélectionné.
Voyant allumé Commutateur sélectionné
A
1
B
2
C
3
D
4
1
2
3
4
43
F
6
6
E
5
F
6
5
6
Page 55

Wahl einer Gruppe
❏ Wählen Sie nach dem Einschalten des EDS-Modus eine Gruppe, indem Sie am
Bedienfeld die BANK-Taste drücken. Wenn die BANK-Anzeige blinkt, heißt
das, daß gegenwärtig die Wahl einer Gruppe aktiv ist.
Selezione di un gruppo
❏ Nel modo EDS, usare il tasto B ANK del pannello di controllo per selezionare un
gruppo. L’indicatore BANK lampeggiante sta ad indicare il gruppo selezionato
in quel momento.
Leuchtende Anzeige Gewählte Gruppe
A
1
B
2
3
C
D
4
E
5
F
6
A
B
C
D
E
F
Wahl eines Schalters
❏ Wählen Sie nach dem Einschalten des EDS-Modus einen Schalter, indem Sie
am Bedienfeld die T aste SWITCH drücken. Wenn die SW-Anzeige blinkt, heißt
das, daß gegenwärtig die Wahl eines Schalters aktiv ist.
Leuchtende Anzeige Gewählter Schalter
A
1
B
2
C
3
D
4
1
2
3
4
Indicatore illuminato Gruppo selezionato
A
1
B
2
3
C
D
4
E
5
F
6
A
B
C
D
E
F
Selezione di un interruttore
❏ Nel modo EDS, usare il tasto SWITCH del pannello di controllo per selezionare
un interruttore. L’indicatore SW lampeggiante sta ad indicare l’interruttore
selezionato in quel momento.
Indicatore illuminato Interruttore selezionato
A
1
B
2
C
3
D
4
1
2
3
4
E
5
F
6
5
6
E
5
F
6
5
6
44
Page 56

Changing a switch setting
❏ After selecting a bank and switch, press the control panel’s ON/OFF button to
turn the switch on and off. The current setting of the switch is indicated by the
ON LINE indicator: the indicator is lit when the switch is on, and is not lit when
the switch is off.
Changement de réglage d’un commutateur
❏ Après avoir sélectionné un groupe et un commutateur, appuyez sur la touche
ON/OFF du panneau de commande pour activer ou désactiver le commutateur.
Le réglage courant du commutateur est indiqué par le voyant ON LINE: le
voyant est allumé lorsque le commutateur est activé et éteint lorsqu’il est
désactivé.
Printing the current switch settings
❏ In the EDS Mode, press the control panel’s PRINT button to print out the
current switch settings. Asterisks on the printout show whether a switch is
turned on or off.
Checking the settings of switches in a bank
❏ After selecting a bank, press the control panel’s STATUS button to view the
status of each switch in that bank. The control panel’s font indicator is lit when
the switch is on, and is not lit when the switch is off.
Lit Indicator Selected Switch
1
1
A
B
2
2
C
3
3
D
4
4
E
5
5
F
6
6
Exiting the EDS Mode
❏ Press the control panels EXIT button to exit the EDS Mode.
Impression des réglages courants des commutateurs
❏ En mode EDS, appuyez sur la touche PRINT du panneau de commande pour
imprimer les réglages courants des commutateurs. Des astérisques sont
imprimés pour indiquer si un commutateur est activé ou désactivé.
Vérification des réglages commutateurs d’un groupe
❏ Après avoir sélectionné un groupe, appuyez sur la touche STATUS du panneau
de commande pour visualiser l’état de chaque commutateur de ce groupe. Les
voyants de police du panneau de commande sont allumés lorsque le
commutateur est activé et éteints lorsqu’il est désactivé.
Voyant allumé Commutateur sélectionné
1
1
A
B
2
2
C
3
3
D
4
4
E
5
5
F
6
6
Sortie du mode EDS
❏ Appuyez sur la touche EXIT du panneau de commande pour sortir du mode
EDS.
45
Page 57

Änderung der Schaltereinstellung
❏ Drücken Sie nach der Wahl einer Gruppe und eines Schalters die Taste ON/
OFF, um den gewählten Schalter auf ON oder OFF zu stellen. Die ON LINE-
Anzeige informiert über die jeweilige Einstellung des Schalters: Die Anzeige
leuchtet, wenn der Schalter auf ON gestellt ist und erlischt beim Umstellen des
Schalters auf OFF.
Modifica dell’impostazione di un interruttore
❏ Dopo aver selezionato il gruppo e l’interruttore, premere il tasto ON/OFF del
pannello di controllo per impostare l’interruttore su ON o su OFF.
L’impostazione corrente dell’interruttore viene indicata dall’indicatore ON
LINE: l’indicatore è illuminato quando l’interruttore è su ON ed è spento
quando l’interruttore è su OFF.
Ausdrucken der gegenwärtigen Schaltereinstellungen
❏ Drücken Sie im EDS-Modus am Bedienfeld die Taste PRINT zum Ausdrucken
der gegenwärtigen Schaltereinstellungen. Sternchen unter den gedruckten Daten
zeigen, ob ein Schalter auf ON oder auf OFF gestellt ist.
Prüfen der Schaltereinstellung einer Gruppe
❏ Nach dem Wählen einer Gruppe drücken Sie STATUS am Bedienfeld, um den
Status aller Schalter dieser Gruppe zu sehen. Die Anzeigen leuchten für einen
Schalter, der auf EIN gestellt ist und bleiben erloschen, wenn der Schalter auf
AUS gestellt ist.
Leuchtende Anzeige
A1 1
B
2
2
C
3
3
D
4
4
E
5
5
F
6
6
Schalter der
gewählten Gruppe
Verlassen des EDS-Modus
❏ Drücken Sie die Taste EXIT am Bedienfeld, um den EDS-Modus zu verlassen.
Stampa delle impostazioni correnti degli interruttori
❏ Nel modo EDS, premere il tasto PRINT del pannello di controllo per stampare
le impostazioni correnti degli interruttori. Gli asterischi sulla stampa indicano se
l’interruttore è su ON o su OFF.
Controllo delle impostazioni degli interruttori di un gruppo
❏ Dopo aver selezionato il gruppo, premere il tasto STATUS del pannello di
controllo per visualizzare lo stato di ogni interruttore di quel gruppo. Gli
indicatori sul pannello di controllo sono illuminati quando l’interruttore è su ON
e sono spenti quando l’interruttore è su OFF.
Indicatore illuminato Interruttore selezionato
1
1
A
B
2
2
C
3
3
D
4
4
E
5
5
F
6
6
Disattivazione del modo EDS
❏ Premere il tasto EXIT del pannello di controllo per disattivare il modo EDS.
46
Page 58

EDS Mode Settings
The following details all of the settings you can program in the EDS Mode. You can
print out a detailed overview of all the settings by performing a test of the printer
(page 133).
Réglages en mode EDS
Les paragraphes suivants décrivent tous les réglages que vous pouvez effectuer en
mode EDS. Vous avez la possibilité d’imprimer une vue générale détaillée de tous
les réglages en effectuant un test d’imprimante (page 133).
BANK A
Switch 1: Emulation
Selects Standard emulation (ON) or IBM emulation (OFF). Standard emulation
causes the printer to act like the Epson ESC/P (24-pin), while IBM emulation makes
it act like the IBM Proprinter XL24E.
Switch 2: Character Table
The function of this switch depends on whether you are using IBM or Standard
emulation.
Emulation
Standard
IBM
Switch 3: RAM Usage
Specifies whether RAM should be used as an input buffer (ON) or as a download
buffer (OFF). Selecting input buffer (ON) tells the printer to use available RAM to
store data it receives from the computer, which speeds up the printing. Selecting
download buffer (OFF) tells the printer to use available RAM to store character
patterns.
Switch 4: Automatic Sheet Feeder
Specifies whether the optional SF-15HA Automatic Sheet Feeder is installed (OFF)
or not installed (ON).
Switch 5: Paper Out Detector
Specifies whether the printer’s paper out detector is enabled (ON) or disabled (OFF).
When the paper out detector is enabled (ON), the printer automatically stops
printing whenever it senses there is no more paper. When it is disabled (OFF), the
printer continues printing as long as there is data. Selecting disabled (OFF) makes it
possible to print right up to the bottom of a page, but it also creates the danger of
printing when there is no paper loaded in the printer, which can damage the print
head and platen.
Switch 2
Setting
ON Graphics: IBM Character Set #2
OFF Italics: Italic character table used
ON IBM Character Set #2
OFF IBM Character Set #1
Description
GROUPE A
Commutateur 1: Emulation
Il permet de sélectionner l’émulation standard (ON) ou l’émulation IBM (OFF). En
mode standard, l’imprimante fonctionne comme une Epson ESC/P (24 aiguilles), et
en mode IBM, elle fonctionne comme une imprimante IBM Proprinter XL24E.
Commutateur 2: Tableau de caractères
La fonction de ce commutateur change selon que l’imprimante est en mode standard
ou IBM.
Emulation
Standard
IBM
Commutateur 3: Utilisation de la mémoire vive
Il spécifie si la mémoire vive doit servir de mémoire tampon d’entrée (ON) ou de
téléchargement (OFF). La sélection de la mémoire tampon d’entrée (activée) donne
l’ordre à l’imprimante d’utiliser la mémoire vive disponible pour stocker les
données en provenance de l’ordinateur, ce qui accélère le processus d’impression.
La sélection de la mémoire tampon de téléchargement (désactivée) donnent l’ordre à
l’imprimante d’utiliser la mémoire vive disponible pour stocker des motifs de
caractères.
Commutateur 4: Dispositif d’alimentation automatique feuille à feuille
Il spécifie si le dispositif d’alimentation feuille à feuille automatique SF-15HA en
option est installé (OFF) ou non installé (ON).
Commutateur 5: Détecteur de fin de papier
Il sert à activer (ON) ou à désactiver (OFF) le détecteur de fin de papier. Lorsque le
détecteur de fin de papier est activé (ON), l’imprimante arrête automatiquement
l’impression dès qu’elle détecte la fin du papier. Lorsqu’il est désactivé (OFF),
l’imprimante continue d’imprimer tant qu’il reste des données. Le détecteur
désactivé (OFF) permet d’imprimer jusqu’en bas de la page, cependant la tête
d’impression et le cylindre risquent d’être endommagés si l’imprimante continue
d’imprimer lorsqu’il n’y a plus de papier.
Réglage du
commutateur 2
ON Graphiques: jeu de caractères N˚ 2 IBM
OFF Italiques: tableau de caractères italiques utilisée
ON Jeu de caractères N˚ 2 IBM
OFF Jeu de caractères N˚ 1 IBM
Description
47
Page 59

EDS-Modus-Einstellungen
Nachfolgend sind alle im EDS-Modus möglichen Einstellungen beschrieben. Eine
tabellarische Übersicht kann mit dem kurzen Selbsttest ausgedruckt werden (Seite
134).
Impostazioni del modo EDS
Di seguito sono illustrate tutte le impostazioni programmabili nel modo EDS. È
possibile ottenere una stampa dettagliata di tutte le impostazioni eseguendo un test
della stampante (pagina 134).
GRUPPE A
Schalter 1: Emulation
Wählt Standardemulation (ON) oder IBM-Emulation (OFF). Im
Standardemulationsmodus funktioniert der Drucker wie ein Epson ESC/P (24
Nadeln), während der Drucker im IBM-Emulationsmodus wie ein IBM Proprinter
XL24E funktioniert.
Schalter 2: Zeichentabelle
Die Funktion dieses Schalters richtet sich danach, ob der Drucker auf IBM- oder auf
Standardemulationsmodus gestellt ist.
Emulation
Standard
IBM
Schalter 3: RAM-Verwendung
Die Einstellung dieses Schalters bestimmt, ob das RAM als Eingangspuffer (ON)
oder als Download-Speicher (OFF) dienen soll. Auf Eingangspuffer (ON) gestellt,
speichert der Drucker vom Computer empfangene Daten im verfügbaren RAM und
beschleunigt damit den Druckvorgang. Auf Download-Speicher (OFF) gestellt,
speichert der Drucker Zeichenmuster im verfügbaren RAM.
Schalter 4: Automatischer Einzelblatteinzug
Gibt an, ob der optional erhältliche Einzelblatteinzug SF-15HA installiert ist (OFF)
oder nicht (ON).
Schalter 5: Papier-Ende-Sensor
Die Einstellung dieses Schalters bestimmt, ob der Papier-Ende-Sensor des Druckers
aktiv (ON) oder inaktiv (OFF) ist. Bei aktivem Sensor (ON) stoppt der Drucker den
Druckvorgang automatisch, wenn sich kein Papier mehr im Drucker befindet. Bei
inaktivem Sensor (OFF) druckt der Drucker weiter solange Druckdaten empfangen
werden. Ein inaktiver Sensor (OFF) ermöglicht das Drucken bis an den unteren
Rand des Papiers, birgt jedoch die Gefahr des Weiterdruckens, wenn kein Papier
mehr vorhanden ist, wodurch Druckkopf und Walze beschädigt werden können.
Schalter 2
Einstellung
ON Grafik: IBM-Zeichensatz #2
OFF Kursiv: Kursivzeichensatz verwendet
ON IBM-Zeichensatz #2
OFF IBM-Zeichensatz #1
Beschreibung
GRUPPO A
Interruttore 1: Emulazione
Seleziona l’emulazione Standard (ON) o l’emulazione IBM (OFF). L’emulazione
Standard fa agire la stampante come una Epson ESC/P (24 aghi), mentre
l’emulazione IBM la fa agire come una IBM Proprinter XL24E.
Interruttore 2: Tabella caratteri
La funzione di questo interruttore dipende dall’emulazione selezionata (Standard o
IBM).
Emulazione
Standard
IBM
Interruttore 3: Uso della RAM
Specifica se la RAM deve essere usata come buffer di input (ON) oppure come
buffer di download (OFF). Selezionando il buffer di input (ON), si specifica alla
stampante di utilizzare la RAM disponibile per memorizzare i dati ricevuti dal
computer, velocizzando in questo modo la stampa. Selezionando il buffer di
download (OFF), si specifica alla stampante di utilizzare la RAM disponibile per
memorizzare schemi di caratteri.
Interruttore 4: Alimentatore automatico di fogli singoli
Specifica se l’alimentatore automatico di fogli singoli opzionale SF-15HA è
installato (OFF) o non installato (ON).
Interruttore 5: Sensore fine carta
Specifica se il sensore di fine carta della stampante deve essere abilitato (ON) o
disabilitato (OFF). Quando il sensore di fine carta è abilitato (ON), la stampante
interrompe automaticamente la stampa ogni volta che rileva che non vi è più carta.
Quando è disabilitato (OFF), la stampante continua a stampare fintanto che vi sono
dati. La selezione del modo disabilitato (OFF) permette di stampare fino in fondo ad
una pagina, ma si corre il rischio che la stampa continui ugualmente quando non c’è
più carta inserita nella stampante, danneggiando in questo modo la testina di stampa
e il rullo.
Impostazione
dell’interruttore 2
ON Grafica: Set di caratteri IBM #2
OFF Corsivo: Impiegata la tabella caratteri corsivi
ON Set di caratteri IBM #2
OFF Set di caratteri IBM #1
Descrizione
48
Page 60

Switch 6: Multi-Part Mode
Specifies whether the printer’s Multi-Part Mode is enabled (OFF) or disabled (ON).
When the Multi-Part Mode is enabled (OFF), the impact of the print head is
increased, but head life is decreased. Enable the Multi-Part Mode when printing on
four to five-ply paper. Disable the Multi-Part Mode when printing on 1 to 3-ply
paper.
BANK B
Switch 1: Graphics Direction
Selects uni-directional (OFF) or bi-directional (ON) printing for graphics. Bidirectional printing (ON) is faster, while uni-directional (OFF) printing generally
provides better print quality in the graphics mode.
Switch 2: Auto Tear-off (Long)
Specifies whether the printer’s auto tear-off (long) feature (page 33) is enabled
(OFF) or disabled (ON). Note that this setting controls the application software’s
tear-off function only. It does not affect the manual tear-off function that is
performed using the control panel buttons as described on page 21. The manual tearoff function is always enabled.
Switch 3: Line Spacing
Selects 1/6-inch (ON) or 1/8-inch (OFF) spacing between lines.
Switch 4: Auto LF with CR
Specifies whether auto LF with CR is enabled (OFF) or disabled (ON). When auto
LF with CR is enabled (OFF), the printer automatically performs a line feed
whenever it receives a carriage return from the computer. When it is disabled (ON),
the computer must send both a line feed code and a carriage return code at the end of
each line. Most applications do this automatically. Note the following check points
when trying to figure out which setting to use here:
✓ If you find that your output is double-spaced when it should not be, turn this
switch ON (Disabled).
✓ If you find that lines are printing over each other, turn this switch OFF
(Enabled).
Switch 5: Zero Style
Specifies whether a normal zero (ON) or a slashed zero (OFF) will be used.
Selecting Normal (ON) prints zeros without lines running through them, while
Slashed (OFF) prints zeros with a diagonal slash running through them.
Switch 6: Reserved
Commutateur 6: Mode multi-feuilles
Il spécifie si le mode multi-feuilles de l’imprimante est activé (OFF) ou désactivé
(ON). Lorsque le mode multi-feuilles est activé (OFF), l’impact de la tête
d’impression augmente, mais la durée d’utilisation de la tête diminue. Activez le
mode multi-feuilles en cas d’impression sur papier à quatre ou cinq exemplaires.
Désactivez le mode multi-feuilles lorsque vous imprimez sur du papier de 1 à 3
couches.
GROUPE B
Commutateur 1: Mode d’impression des graphiques
Il permet de sélectionner le mode d’impression, unidirectionnel (OFF) ou
bidirectionnel (ON), pour l’impression des graphiques. En mode bidirectionnel
(ON), l’impression est plus rapide, tandis qu’en mode unidirectionnel (OFF),
l’impression en mode graphique est généralement de meilleure qualité.
Commutateur 2: Découpe automatique (longue)
Il sert à activer (OFF) ou à désactiver (ON) la fonction de découpe (longue)
automatique (page 33) de l’imprimante. Notez que ce réglage contrôle la fonction de
découpe du programme d’application uniquement. Il n’affecte pas la fonction de
découpe manuelle effectuée à l’aide des touches du panneau de commande et décrite
à la page 21. La fonction de découpe manuelle est toujours activée.
Commutateur 3: Espace interligne
Il sert à sélectionner un espace de 1/6 pouce (ON) ou 1/8 pouce (OFF) entre les
lignes.
Commutateur 4: Saut de ligne automatique avec retour de chariot
Il sert à activer (OFF) ou désactiver (ON) la fonction de saut de ligne automatique
avec retour de chariot. Lorsque cette fonction est activée (OFF), l’imprimante saute
automatiquement une ligne lorsqu’elle reçoit un code retour de chariot de
l’ordinateur. Lorsque la fonction est désactivée (ON), l’ordinateur doit envoyer un
code saut de ligne et un code retour de chariot à la fin de chaque ligne. La plupart
des programmes d’application envoient ces codes automatiquement. Vérifiez les
points suivants pour sélectionner le réglage:
✓ Si v ous obtenez un double interligne à la place d’un simple interligne, désactiv ez
cette fonction (ON) au moyen de ce commutateur.
✓ Si les lignes sont superposées, activez la fonction (OFF).
Commutateur 5: Format du zéro
Il sert à sélectionner le zéro normal (ON) ou le zéro barré (OFF). Si le zéro normal
(ON) est sélectionné, les zéros sont imprimés sans barres transversales et si le zéro
barré (OFF) est sélectionné, les zéros imprimés sont barrés.
Commutateur 6: Réservé
49
Page 61

Schalter 6: Mehrlagen-Modus
Die Einstellung dieses Schalters bestimmt, ob der Mehrlagen-Modus aktiv (ON)
oder inaktiv (OFF) ist. Wenn der Drucker im Mehrlagen-Druckmodus ist, schlagen
die Drucknadeln mit größerer Kraft auf das Papier. Beachten Sie aber, daß in diesem
Modus die Lebensdauer des Druckkopfes verringert wird. Deshalb sollten Sie den
Mehrlagen-Druckmodus nur für vier- oder fünflagiges Papier verwenden. Schalten
Sie zum Drucken auf ein- bis dreilagigem Papier auf Normalmodus zurück.
GRUPPE B
Schalter 1: Grafik-Richtung
Wählt Bidirektionaler Druck (ON) oder Unidirektionaler Druck (OFF) für Grafik.
Der Bidirektionaler Druck (ON) ist schneller, jedoch liefert der Unidirektionaler
Druck (OFF) gewöhnlich bessere Druckqualität.
Schalter 2: Automatischer Abriß (lang)
Die Einstellung dieses Schalters bestimmt, ob die automatische Abreißfunktion des
Druckers (lang) (Seite 34) aktiv (OFF) oder inaktiv (ON) ist. Beachten Sie, daß
diese Einstellung nur die Abreißfunktion der Applikationssoftware steuert. Dabei
wird am Ende eines Dokuments automatisch bis zur nächsten Perforation
vorgeschoben. Sie hat keinen Einfluß auf die manuelle Abreißfunktion, die über die
Bedienfeld-Steuertasten ausgeführt wird, wie auf Seite 22 beschrieben. Die
manuelle Abreißfunktion ist immer aktiv.
Schalter 3: Zeilenabstand
Wählt 1/6-Zoll- (ON) oder 1/8-Zoll-Abstand (OFF) zwischen den Zeilen.
Schalter 4: Automatischer Zeilenvorschub (LF) mit Wagenrücklauf (CR)
Die Einstellung dieses Schalters bestimmt, ob der automatische Zeilenvorschub (LF)
mit Wagenrücklauf (CR) aktiv (OFF) oder inaktiv (ON) ist. Bei aktivem (OFF)
automatischen LF mit CR führt der Drucker, jedesmal wenn ein Wagenrücklaufcode
vom Computer eingeht, automatisch einen Zeilenvorschub aus. Bei inaktiver
Funktion (ON) muß der Computer am Ende jeder Zeile sowohl einen
Zeilenvorschubcode als auch ein Wagenrücklaufcode übertragen. Bei den meisten
Anwenderprogrammen erfolgt dieser Vorgang automatisch. Bestimmen Sie mit
Hilfe der folgenden Prüfpunkte, welche Einstellung sich jeweils am besten eignet.
✓ Stellen Sie den Schalter auf ON (inaktiv), wenn sich entgegen Ihrer Absicht
zwischen jeder Zeile eine Leerzeile befindet.
✓ Stellen Sie den Schalter auf OFF (aktiv), wenn Zeilen übereinander gedruckt
werden.
Schalter 5: Null-Darstellung
Die Einstellung dieses Schalters bestimmt, ob der Drucker eine normale Null (ON)
oder eine Null mit Querstrich (OFF) druckt. Bei Einstellung auf Normal (ON)
werden normale Nullen und bei Einstellung auf Querstrich (OFF) werden Nullen
mit einem diagonalen Querstrich gedruckt.
Schalter 6: Reserviert
Interruttore 6: Modo multi-copia
Specifica se il modo multi-copia della stampante è abilitato (OFF) o disabilitato
(ON). Quando il modo multi-copia della stampante è abilitato (OFF), l’impatto della
testina di stampa è maggiore, ma si riduce la durata della testina di stampa. Abilitare
il modo multi-copia quando si stampa su carta composta da quattro a cinque copie.
Disabilitare il modo multi-copia quando si stampa su carta composta da 1 a 3 copie.
GRUPPO B
Interruttore 1: Direzione grafica
Seleziona la stampa monodirezionale (OFF) o bidirezionale (ON) per la grafica. La
stampa bidirezionale (ON) è più veloce, mentre quella monodirezionale (OFF) offre
di solito una qualità di stampa migliore in modalità grafica.
Interruttore 2: Strappo automatico
Specifica se la funzione di strappo automatico (estesa) della stampante (pagina 34) è
abilitata (OFF) o disabilitata (ON). Notare che questa impostazione controlla solo la
funzione di strappo del software applicativo. Essa non influenza la funzione di
strappo manuale eseguita tramite i tasti del pannello di controllo descritta a pagina
22. La funzione di strappo manuale è sempre abilitata.
Interruttore 3: Interlinea
Seleziona un’interlinea di 1/6 di pollice (ON) e di 1/8 di pollice (OFF) tra le righe.
Interruttore 4: Avanzamento riga (LF) automatico con ritorno carrello
(CR)
Specifica se l’avanzamento riga automatico con ritorno carrello è abilitato (OFF) o
disabilitato (ON). Quando l’avanzamento riga automatico con ritorno carrello è
abilitato (OFF), la stampante esegue automaticamente un avanzamento di riga ogni
volta che riceve dal computer un comando di ritorno carrello. Quando è disabilitato
(ON), il computer deve inviare sia un codice di avanzamento riga che un codice di
ritorno carrello alla fine di ogni riga. La maggior parte delle applicazioni invia
questo comando automaticamente. Considerare i seguenti punti quando si deve
stabilire quale impostazione utilizzare:
✓ Se si nota che la stampa viene emessa a spaziatura doppia quando non do vrebbe
esserlo, impostare questo interruttore su ON (disabilitato).
✓ Se si nota che le righe vengono stampate l’una sull’altra, impostare questo
interruttore su OFF (abilitato).
Interruttore 5: Stile dello zero
Specifica se utilizzare lo zero normale (ON) o lo zero barrato (OFF). Selezionando
lo zero normale (ON), gli zeri vengono stampati senza linee trasversali, mentre con
l’impostazione zero barrato (OFF), gli zeri vengono stampati con una barra
diagonale trasversale.
Interruttore 6: Riservato
50
Page 62

BANK C
Switches 1, 2: Print Mode
Turn these switches on or off to select the print mode you want to use.
GROUPE C
Commutateurs 1, 2: Mode d’impression
Activez ou désactivez ces commutateurs pour sélectionner le mode d’impression
souhaité.
Print Mode SW1 SW2
LQ ON ON
Draft OFF ON
HS-Draft* ON OFF
* LC-4521 only. Not used with LC-4511.
Switches 3, 4, 5: Print Pitch
Turn these switches on or off to form the pattern that matches the print pitch setting
you want to make.
Print Pitch SW3 SW4 SW5
10cpi ON ON ON
12cpi OFF ON ON
15cpi ON OFF ON
17cpi OFF OFF ON
20cpi ON ON OFF
Proportional OFF ON OFF
Switch 6: Quiet
When the Quiet Mode is enabled (OFF), the printer prints with less noise than
normal printing. Though the Quiet Mode prints more quietly, it also takes
considerably longer than normal printing.
Mode d’impression SW1 SW2
LQ ON ON
Draft OFF ON
HS-Draft* ON OFF
* LC-4521 uniquement. Non utilisé avec LC-4511.
Commutateurs 3, 4, 5: Pas d’impression
Activez ou désactivez ces commutateurs pour régler le pas d’impression souhaité.
Pas d’impression SW3 SW4 SW5
10cpi ON ON ON
12cpi OFF ON ON
15cpi ON OFF ON
17cpi OFF OFF ON
20cpi ON ON OFF
Proportionnel OFF ON OFF
Commutateurs 6: Mode silencieux d’impression
Lorsque le mode silencieux d’impression est activé (OFF), l’imprimante produit
moins de bruit qu’en mode d’impression normal. En mode silencieux d’impression,
le bruit est considérablement réduit mais l’impression met beaucoup plus de temps
qu’en mode d’impression normal.
51
Page 63

GRUPPE C
Schalter 1, 2: Druckmodus
Stellen Sie diese Schalter in Ein- oder Aus-Stellung, um den gewünschten
Druckmodus zu wählen.
GRUPPO C
Interruttori 1, 2: Modo di stampa
Impostare questi interruttori su ON o su OFF per selezionare il modo di stampa che
si vuole utilizzare.
Druckmodus Schalter 1 Schalter 2
LQ ON ON
Draft OFF ON
HS-Draft* ON OFF
* Nur für LC-4521. Nicht für LC-4511.
Schalter 3, 4, 5: Druckabstand
Stellen Sie diese Schalter je nach dem gewünschten Zeichenabstand auf ON oder
OFF.
Druckabstand Schalter 3 Schalter 4 Schalter 5
10 Zeichen/Zoll ON ON ON
12 Zeichen/Zoll OFF ON ON
15 Zeichen/Zoll ON OFF ON
17 Zeichen/Zoll OFF OFF ON
20 Zeichen/Zoll ON ON OFF
Proportional OFF ON OFF
Schalter 6: Leisedruck
Bei aktivem Leisedruckmodus (OFF) druckt der Drucker im Vergleich zum
normalen Druckbetrieb mit reduziertem Betriebsgeräusch, jedoch dauert der
Druckvorgang im Leisedruckmodus länger.
Modo di stampa SW1 SW2
LQ ON ON
Draft OFF ON
HS-Draft* ON OFF
* Solo modello LC-4521. Non utilizzato con il modello LC-4511.
Interruttori 3, 4, 5: Passo di stampa
Impostare questi interruttori su ON o su OFF per selezionare la combinazione
corrispondente al passo di stampa che si vuole ottenere.
Passo di stampa SW3 SW4 SW5
10 Zeichen/Zoll ON ON ON
12 Zeichen/Zoll OFF ON ON
15 Zeichen/Zoll ON OFF ON
17 Zeichen/Zoll OFF OFF ON
20 Zeichen/Zoll ON ON OFF
Proporzionale OFF ON OFF
Interruttore 6: Stampa silenziosa
Quando il modo di stampa silenziosa è abilitato (OFF), la stampante stampa con un
livello di rumorosità inferiore rispetto alla stampa normale. Anche se il modo di
stampa silenziosa è meno rumoroso, la stampa impiega molto più tempo rispetto alla
stampa normale.
52
Page 64

BANK D
Switches 1, 2, 3, 4: Page Length
Turn these switches on or off to form the pattern that matches the Page Length
setting you want to use.
GROUPE D
Commutateurs 1, 2, 3, 4: Longueur de page
Activez ou désactivez ces microrupteurs pour régler la longueur de page souhaitée.
Page Length SW1 SW2 SW3 SW4
11″/Letter ON ON ON ON
8
″
″
/A4 ON OFF ON ON
11.7
12
″
8.5″/Letter ON ON OFF ON
14″/Legal OFF ON OFF ON
10.5″/Executive ON OFF OFF ON
7.25″/Executive OFF OFF OFF ON
3.5
″
5.5
″
OFF ON ON ON
OFF OFF ON ON
ON ON ON OFF
OFF ON ON OFF
Switch 5: CR Centering Position
Specifies whether the printer’s CR centering is long (ON) or short (OFF). When the
CR centering position is long (ON), the carriage moves to the center of the platen
before the paper is inserted or ejected. When CR centering is short (OFF), the
carriage moves to the left side of the platen.
In order to prevent paper feeding problems, set the CR centering position to short
(OFF) when narrow (less than 5.6″) paper is used and set it to long (ON) when wider
(more than 5.6″) paper is used.
Longueur de page SW1 SW2 SW3 SW4
11 pouces/lettre ON ON ON ON
8
″
″
/A4 ON OFF ON ON
11.7
12
″
8,5 pouces/lettre ON ON OFF ON
14 pouces/Legal OFF ON OFF ON
10,5 pouces/Executive ON OFF OFF ON
7,25 pouces/Executive OFF OFF OFF ON
3.5
″
5.5
″
OFF ON ON ON
OFF OFF ON ON
ON ON ON OFF
OFF ON ON OFF
Commutateur 5: Position de centrage CR
Spécifie si le centrage CR de l’imprimante est long (ON) ou court (OFF). Lorsque la
position de centrage CR est sur long (ON), le chariot se déplace au centre du
cylindre avant l’insertion ou l’éjection du papier. Lorsque le centrage CR est court
(OFF), le chariot se déplace à gauche du cylindre.
Pour éviter des problèmes d’avance de papier, réglez la position de centrage CR sur
court (OFF) lorsque vous utilisez du papier étroit (moins de 5,6″) ou sur long (ON)
lorsque vous utilisez du papier plus large (plus de 5,6″).
53
Page 65

GRUPPE D
Schalter 1, 2, 3, 4: Seitenlänge
Stellen Sie diese Schalter je nach der gewünschten Seitenlänge auf ON oder OFF.
GRUPPO D
Interruttori 1, 2, 3, 4: Lunghezza pagina
Impostare questi interruttori su ON o su OFF per selezionare la combinazione
corrispondente alla lunghezza pagina stampa che si vuole utilizzare.
Seitenlänge SW1 SW2 SW3 SW4
11″/US-Letter ON ON ON ON
8
″
″
/A4 ON OFF ON ON
11.7
12
″
8,5″/US-Letter ON ON OFF ON
14″/US-Legal OFF ON OFF ON
10,5″/US-Executive ON OFF OFF ON
7,25″/US-Executive OFF OFF OFF ON
3.5
″
5.5
″
OFF ON ON ON
OFF OFF ON ON
ON ON ON OFF
OFF ON ON OFF
Schalter 5: Wagenrücklauf-Zentrierung
Die Einstellung dieses Schalters bestimmt, ob die Wagenrückkehr-Zentrierung lang
(ON) oder kurz (OFF) ist. W enn die Zentrierung lang ist, be wegt sich der Wagen zur
Mitte der Druckwalze, bevor Papier zugeführt oder ausgegeben wird. Wenn die
Zentrierung kurz ist (OFF), fährt der Wagen zur linken Seite der Druckwalze.
Um Probleme mit dem Papiereinzug zu verhindern, die Zentrierstellung auf kurz
(OFF) stellen, wenn schmales Papier (unter 5,6 Zoll) verwendet wird, und auf lang
(ON), wenn breiteres (mehs als 5,6 Zoll) Papier verwendet wird.
Lunghezza pagina SW1 SW2 SW3 SW4
11″/Letter ON ON ON ON
8
″
″
/A4 ON OFF ON ON
11,7
12
″
8,5″/Letter ON ON OFF ON
14″/Legal OFF ON OFF ON
10,5″/Executive ON OFF OFF ON
7,25″/Executive OFF OFF OFF ON
3,5
″
5,5
″
OFF ON ON ON
OFF OFF ON ON
ON ON ON OFF
OFF ON ON OFF
Interruttore 5: Posizione di centratura al ritorno carrello (CR)
Specifica se la posizione di centratura al ritorno carrello della stampante deve essere
lunga (ON) o corta (OFF). Quando la posizione di centratura al ritorno carrello è
lunga (ON), il carrello si sposta al centro del rullo prima dell’inserimento o
dell’espulsione della carta. Quando la posizione di centratura al ritorno carrello è
corta (OFF), il carrello si sposta verso il lato sinistro del rullo.
Per evitare problemi di avanzamento della carta, impostare la centratura al ritorno
carrello sulla posizione corta (OFF) quando si stampa su carta di larghezza inferiore
(minore di 5,6 pollici), e sulla posizione lunga (ON) quando si stampa su carta di
larghezza superiore (maggiore di 5,6 pollici).
54
Page 66

BANK E
Switches 1, 2, 3, 4, 5: Code Page/International Character Set
If your EDS settings specify IBM emulation (Bank A, Switch 1 OFF) with either
character table (Bank A, Switch 2), or Standard emulation (Bank A, Switch 1 ON)
with the graphics character table (Bank A, Switch 2 ON), use the Bank E switches to
select the default character code page you want to use.
GROUPE E
Commutateurs 1,2,3,4,5: Page de code/jeu de caractères international
Si vous avez sélectionné l’émulation IBM (banque A, commutateur 1 sur OFF) et
une table de caractères (banque A, commutateur 2) ou l’émulation standard (banque
A, commutateur 1 sur ON) et la table de caractères graphiques (banque A,
commutateur 2 sur ON), utilisez les commutateurs de la banque E pour sélectionner
la page de code de caractères par défaut à utiliser.
Code Page SW1 SW2 SW3 SW4 SW5
#437 IBM-PC ON ON ON ON ON
#850 Multi-lingual OFF ON ON ON ON
#860 Portuguese ON OFF ON ON ON
#861 Icelandic OFF OFF ON ON ON
#863 Canadian French ON ON OFF ON ON
#865 Nordic OFF ON OFF ON ON
#866 Russian ON OFF OFF ON ON
#3840 IBM-Russian OFF OFF OFF ON ON
#3841 Gost-Russian ON ON ON OFF ON
#3843 Polish OFF ON ON OFF ON
#3844 CS2 ON OFF ON OFF ON
#3845 Hungarian OFF OFF ON OFF ON
#3846 Turkish ON ON OFF OFF ON
#3847 Brazil-ABNT OFF ON OFF OFF ON
#3848 Brazil-ABICOMP ON OFF OFF OFF ON
#852 Latin-2 OFF OFF OFF OFF ON
#1001 Arabic ON ON ON ON OFF
#737 Greek OFF ON ON ON OFF
#851 Greek ON OFF ON ON OFF
#869 Greek OFF OFF ON ON OFF
55
Page de code SW1 SW2 SW3 SW4 SW5
437 IBM-PC ON ON ON ON ON
850 Multilingue OFF ON ON ON ON
860 Portugais ON OFF ON ON ON
861 Islandais OFF OFF ON ON ON
863 Français canadien ON ON OFF ON ON
865 Nordique OFF ON OFF ON ON
866 Russe ON OFF OFF ON ON
3840 Russe IBM OFF OFF OFF ON ON
3841 Russe gothique ON ON ON OFF ON
3843 Polonais OFF ON ON OFF ON
3844 CS2 ON OFF ON OFF ON
3845 Hongrois OFF OFF ON OFF ON
3846 Turc ON ON OFF OFF ON
3847 Brésil - ABNT OFF ON OFF OFF ON
3848 Brésil - ABICOMP ON OFF OFF OFF ON
852 Latin 2 OFF OFF OFF OFF ON
1001 Arabe ON ON ON ON OFF
737 Grec OFF ON ON ON OFF
851 Grec ON OFF ON ON OFF
869 Grec OFF OFF ON ON OFF
Page 67

GRUPPE E
Schalter 1, 2, 3, 4, 5: Codepage/Internationaler Zeichensatz
Wenn Ihre EDS auf IBM-Emulation (Gruppe A, Schalter 1 OFF) und eine der
beiden Zeichentabellen (Gruppe A, Schalter 2) oder auf Standardemulation (Gruppe
A, Schalter 1 ON) und die Grafikzeichentabelle (Gruppe A, Schalter 2 ON) gestellt
sind, wählen Sie die gewünschte Standard-Zeichen-Codepage mit den Schaltern der
Gruppe E.
GRUPPO E
Interruttori 1, 2, 3, 4, 5: Codice pagina/Gruppo caratteri internazionali
Se si è specificata l’emulazione IBM con le regolazioni EDS (Gruppo A, interruttore
1 OFF) con una delle tabelle caratteri (Gruppo A, interruttore 2) o l’emulazione
Standard (Gruppo A, interruttore 1 ON) con la tabella caratteri grafica (Gruppo A,
interruttore 2 ON), usare gli interruttori del gruppo E per selezionare la pagina
codici carattere di default da impiegare.
Code-Page Schalter 1 Sc halter 2 Schalter 3 Schalter 4 Schalter 5
# 437 IBM-PC
# 850 Mehrsprachig
# 860 Portugiesisch
# 861 Isländisch
# 863 Kanadisches
Französisch
# 865 Nordisch
# 866 Russisch
# 3840
IBM-Russisch
# 3841
Gost-Russisch
# 3843 Polnisch
# 3844 CS2
# 3845 Ungarisch
# 3846 Türkisch
# 3847
Brasilien ABNT
# 3848
Brasilien ABICOMP
# 852 Latein 2
#1001 Arabisch
# 737 Griechisch
# 851 Griechisch
# 869 Griechisch
ON ON ON ON ON
OFF ON ON ON ON
ON OFF ON ON ON
OFF OFF ON ON ON
ON ON OFF ON ON
OFF ON OFF ON ON
ON OFF OFF ON ON
OFF OFF OFF ON ON
ON ON ON OFF ON
OFF ON ON OFF ON
ON OFF ON OFF ON
OFF OFF ON OFF ON
ON ON OFF OFF ON
OFF ON OFF OFF ON
ON OFF OFF OFF ON
OFF OFF OFF OFF ON
ON ON ON ON OFF
OFF ON ON ON OFF
ON OFF ON ON OFF
OFF OFF ON ON OFF
Pagina codici
#437 IBM-PC
#850 Multi-Lingual
#860 Portuguese
#861 Icelandic
#863
Canadian French
#865 Nordic
#866 Russian
#3840 IBM-Russian
#3841
Gost-Russian
#3843 Polish
#3844 CS2
#3845 Hungarian
#3846 Turkish
#3847 Brazil-ABNT
#3848
Brazil-ABICOMP
#852 Latin-2
#1001 Arabo
#737 Greco
#851 Greco
#869 Greco
Interruttore 1Interruttore 2Interruttore 3Interruttore 4Interruttore
ON ON ON ON ON
OFF ON ON ON ON
ON OFF ON ON ON
OFF OFF ON ON ON
ON ON OFF ON ON
OFF ON OFF ON ON
ON OFF OFF ON ON
OFF OFF OFF ON ON
ON ON ON OFF ON
OFF ON ON OFF ON
ON OFF ON OFF ON
OFF OFF ON OFF ON
ON ON OFF OFF ON
OFF ON OFF OFF ON
ON OFF OFF OFF ON
OFF OFF OFF OFF ON
5
ON ON ON ON OFF
OFF ON ON ON OFF
ON OFF ON ON OFF
OFF OFF ON ON OFF
56
Page 68

Code Page SW1 SW2 SW3 SW4 SW5
Page de code SW1 SW2 SW3 SW4 SW5
#928 Greek ON ON OFF ON OFF
#2001 Lithuanian-KBL OFF ON OFF ON OFF
#772 Lithuanian ON OFF OFF ON OFF
#774 Lithuanian OFF OFF OFF ON OFF
#3001 Estonian-1 ON ON ON OFF OFF
#3002 Estonian-2 OFF ON ON OFF OFF
#3011 Latvian-1 ON OFF ON OFF OFF
#3012 Latvian-2 OFF OFF ON OFF OFF
#3021 Bulgarian ON ON OFF OFF OFF
#3031 Hebrew OFF ON OFF OFF OFF
#3041 Maltese ON OFF OFF OFF OFF
928 Grec ON ON OFF ON OFF
2001 Lithuanien-KBL OFF ON OFF ON OFF
772 Lithuanien ON OFF OFF ON OFF
774 Lithuanien OFF OFF OFF ON OFF
3001 Estonien-1 ON ON ON OFF OFF
3002 Estonien-2 OFF ON ON OFF OFF
3011 Lettonien-1 ON OFF ON OFF OFF
3012 Lettonien-2 OFF OFF ON OFF OFF
3021 Bulgare ON ON OFF OFF OFF
3031 Hebreux OFF ON OFF OFF OFF
3041 Maltais ON OFF OFF OFF OFF
57
Page 69

Code-Page Schalter 1 Schalter 2 Schalter 3 Schalter 4 Schalter 5
# 928 Griechisch
#2001 Litauisch-KBL
#772 Litauisch
#774 Litauisch
#3001 Estnisch - 1
#3002 Estnisch - 2
#3011 Lettisch - 1
# 3012 Lettisch - 2
# 3021 Bulgarisch
# 3031 Hebräisch
# 3041 Maltesisch
ON ON OFF ON OFF
OFF ON OFF ON OFF
ON OFF OFF ON OFF
OFF OFF OFF ON OFF
ON ON ON OFF OFF
OFF ON ON OFF OFF
ON OFF ON OFF OFF
OFF OFF ON OFF OFF
ON ON OFF OFF OFF
OFF ON OFF OFF OFF
ON OFF OFF OFF OFF
Pagina codici
#928 Greco
#2001
Lituanico-KBL
#772 Lituanico
#774 Lituanico
#3001 Estone-1
#3002 Estone-2
#3011 Lettone-1
#3012 Lettone-2
#3021 Bulgaco
#3031 Ebraico
#3041 Maltese
Interruttore 1Interruttore 2Interruttore 3Interruttore 4Interruttore
5
ON ON OFF ON OFF
OFF ON OFF ON OFF
ON OFF OFF ON OFF
OFF OFF OFF ON OFF
ON ON ON OFF OFF
OFF ON ON OFF OFF
ON OFF ON OFF OFF
OFF OFF ON OFF OFF
ON ON OFF OFF OFF
OFF ON OFF OFF OFF
ON OFF OFF OFF OFF
58
Page 70

A code page is the set of symbols and characters taht your printer can print. Your
printer converts ASCII hexadecimal data according to a code page to print symbols
and characters. By supporting different code pages, the printer can support different
language requirements.
The following table is detailed information about code pages.
Une page de code est un ensemble de symboles et de caractères que votre
imprimante peut imprimer. Pour imprimer les symboles et les caractères, votre
imprimante convertit les données hexadécimales ASCII selon une page de code. Si
l’imprimante dispose de plusieurs pages de code, elle est à même d’imprimer dans
plusieurs langues.
Le tableau suivant vous présente les informations de la page de code.
Code Page Name Country Remarks
#437
#850
#860
#861
#863
#865
#866
#3840
#3841
#3843
#3844
#3845
#3846
#3847
#3848
#852
#1001
#737
#851
#869
IBM PC United Kingdom, France, Germany, Italy,
Multi-Lingual United Kingdom, France, Germany, Italy,
Portuguese Portugal
Icelandic Iceland
Canadian French Canada
Nordic Denmark, Finland, Norway, Sweden Preferred by Microsoft
Russian Russia Preferred by Microsoft
IBM-Russian Russia, Bulgaria
Gost-Russian Russia Gost: government
Polish Poland Also called “Mazowia”
CS2 Czech Republic Also called “Kamenicky”
Hungarian Hungary
Turkish Turkey
Brazil-ABNT
Brazil-ABICOMP
Latin-2 Croatia, Czech Republic, Hungary, Poland,
Arabic Egypt, Saudi Arabia Mainly in Arabic speaking
Greek Greece Almost 80%
Greek Greece
Greek Greece
Austria, Switzerland, United States, Spain
Preferred by Microsoft
Austria, Switzerland, United States, Spain
standard
Preferred by Microsoft
Romania, Serbia, Slovak Republic, Slovenia
countries
Page de code Appellation Pays Remarque
Page de code 437 IBM-PC Royaume-Uni, France, Allemagne, Italie,
Page de code 850 Multilingue Royaume-Uni, France, Allemagne, Italie,
Page de code 860 Portugais Portugal
Page de code 861 Islandais Islande
Page de code 863 Français canadien Canada
Page de code 865 Nordique Danemark, Finlande, Norvège, Suède Préférable pour
Page de code 866 Russe Russie Préférable pour
Page de code 3840 Russe IBM Russie, Bulgarie
Page de code 3841 Russe gothique Russie Norme
Page de code 3843 Polonais Pologne Egalement appelé
Page de code 3844 CS2 Tchèchie Egalement appelé
Page de code 3845 Hongrois Hongrie
Page de code 3846 Turc Turquie
Page de code 3847 Brésil - ABNT
Page de code 3848 Brésil-ABICOMP
Page de code 852 Latin 2 Croatie, Tchèchie, Hongrie, Pologne,
Page de code 1001 Arabe Egypte, Arabie Saoudite Principalement dans
Page de code 737 Grec Grèce Presque 80%
Page de code 851 Grec Grèce
Page de code 869 Grec Grèce
Autriche, Suisse, Etats-Unis, Espagne
Autriche, Suisse, Etats-Unis, Espagne
Roumanie, Serbie, Slovaquie, Slovénie
Préférable pour
Microsoft
Microsoft
Microsoft
gouvernementale
“Mazowia”
“Kamenicky”
Préférable pour
Microsoft
les pays arabophones
59
Page 71

Eine Codepage ist der Satz von Zeichen und Buchstaben, die Ihr Drucker
ausdrucken kann. Ihr Drucker wandelt hexadezimale ASCII-Daten entsprechend der
verwendeten Codepage, in Zeichen und Buchstaben um. Durch Unterstützung
verschiedener Codepages kann der Drucker verschiedene Sprachen unterstützen.
Die folgende Tabelle zeigt, für welche Sprachen die verschiedenen Codepages
geeignet sind.
Una pagina codici è il gruppo di simboli e caratteri che la stampante può stampare.
La stampante converte i dati esadecimali ASCII in base ad una pagina codici per
poter stampare i simboli e i caratteri. Grazie al supporto di pagine codici diverse, la
stampante è in grado di stampare i caratteri speciali delle diverse lingue.
La seguente tabella fornisce informazioni sulle pagine codici.
Codepage Nr. Bezeichnung Land Anmerkung
#437 IBM-PC Großbritannien, Frankreich, Deutschland,
#850 Mehrsprachig Großbritannien, Frankreich, Deutschland,
#860 Portugiesisch Portugal
#861 Isländisch Island
#863 Kanadisches
Französisch
#865 Nordische Länder Dänemark, Finnland, Norwegen, Schweden Von Microsoft bevorzugt
#866 Russisch Rußland Von Microsoft bevorzugt
#3840 IBM-Russisch Rußland, Bulgarien
#3841 Gost-Russisch Rußland Gost-
#3843 Polnisch Polen Auch “Mazowia”
#3844 CS2 Tschechien Auch “Kamenicky”
#3845 Ungarisch Ungarn
#3846 Türkisch Türkei
#3847 Brasilianisch -
ABNT
#3848 Brasilianisch -
ABICOMP
#852 Latein-2 Kroatien, Tschechien, Ungarn, Polen,
#1001 Arabisch Ägypten, Saudi Arabien Hauptsächlich arabisch
#737 Griechisch Griechenland Fast 80%
#851 Griechisch Griechenland
#869 Griechisch Griechenland
Italien, Österreich, Schweiz, USA, Spanien
Italien, Österreich, Schweiz, USA, Spanien
Kanada
Rumänien, Serbien, Slovakische Republik,
Slovenien
Von Microsoft bevorzugt
Regierungsstandard
genannt
genannt
Von Microsoft bevorzugt
sprechende Länder
Pagina codici Nome Paese Note
CP#437 IBM-PC Regno Unito, Francia, Germania, Italia,
CP#850 Multilingue Regno Unito, Francia, Germania, Italia,
CP#860 Portoghese Portogallol
CP#861 Islandese Islanda
CP#863 Franco-canadese Canada
CP#865 Nordica Danimarca, Finlandia, Norvegia, Svezia preferita dalla Microsoft
CP#866 Russa Russia preferita dalla Microsoft
CP#3840 IBM-Russa Russia, Bulgaria
CP#3841 Gost-Russa Russia gost: “governmental
CP#3843 Polacca Polonia detta anche “Mazowia”
CP#3844 CS2 Rep. Ceca detta anche
CP#3845 Ungherese Ungheria
CP#3846 Turca Turchia
CP#3847 Brasiliana-ABNT
CP#3848 Brasiliana-
ABICOMP
CP#852 Latina-2 Croazia, Rep. Ceca, Ungheria, Polonia,
CP#1001 Araba Egitto, Arabia Saudita Prevalentemente nei
CP#737 Greca Grecia quasi 80%
CP#851 Greca Grecia
CP#869 Greca Grecia
Austria, Svizzera, USA, Spagna
Austria, Svizzera, USA, Spagna
Romania, Serbia, Rep. Slovacca, Slovenia
preferita dalla Microsoft
standard” (standard
governativo)
“Kamenicky”
preferita dalla Microsoft
paesi di lingua araba
60
Page 72

Code Page Name Country Remarks
Page de code Appellation Pays Remarque
#928
#2001
#772
#774
#3001
#3002
#3011
#3012
#3021
#3031
#3041
Greek Greece For UNIX
Lithuanian-KBL Lithuania Commonly used for DOS
Lithuanian Lithuania New standard
Lithuanian Lithuania
Estonian-1 Estonia
Estonian-2 Estonia Most often used
Latvian-1 Latvia
Latvian-2 Latvia Government standard
Bulgarian Bulgaria
Hebrew Israel
Maltese Malta
Page de code 928 Grec Grèce Pour Unix
Page de code 2001 Lituanien-KBL Lituanie Généralement utilisé
Page de code 772 Lituanien Lituanie Nouvelle norme
Page de code 774 Lituanien Lituanie
Page de code 3001 Estonien-1 Estonie
Page de code 3002 Estonien-2 Estonie Le plus souvent utilisé
Page de code 3011 Letton 1 Lettonie
Page de code 3012 Letton 2 Lettonie Norme
Page de code 3021 Bulgare Bulgarie
Page de code 3031 Hébreu Israël
Page de code 3041 Maltais Malte
sous DOS
gouvernementale
61
Page 73

Codepage Nr. Bezeichnung Land Anmerkung
#928 Griechisch Griechenland Für Unix
#2001 Litauisch - KBL Litauen Allgemein für DOS
#772 LitauischLitauen Litauen Neuer Standard
#774 LitauischLitauen Litauen
#3001 Estnisch - 1 Estland
#3002 Estnisch - 2 Estland Am meisten benutzt
#3011 Lettisch - 1 Lettland
#3012 Lettisch - 2 Lettland Kommunal benutzter
#3021 Bulgarisch Bulgarien
#3031 Hebräisch Israel
#3041 Maltesisch Malta
benutzt
Standard
Pagina codici Nome Paese Note
CP#928 Greca Grecia per Unix
CP#2001 Lituana-KBL Lituania Usata comunemente
CP#772 Lituana Lituania Nuovo standard
CP#774 Lituana Lituania
CP#3001 Estone-1 Estonia
CP#3002 Estone-2 Estonia Usata più
CP#3011 Lettone-1 Lettonia
CP#3012 Lettone-2 Lettonia Standard governativo
CP#3021 Bulgara Bulgaria
CP#3031 Ebraica Israele
CP#3041 Maltese Malta
per il DOS
frequentemente
62
Page 74

If your EDS settings specify Standard emulation (Bank A, Switch 1 ON) with the
italic character table (Bank A, Switch 2 OFF), use the Bank E switches to select the
international character set you want to use. This setting determines the assignment
of 14 character codes in the Standard Italic character set.
Si vous avez sélectionné l’émulation standard (groupe A, commutateur 1 sur ON) et
le tableau de caractères italiques (groupe A, Commutateur 2 sur OFF), utilisez les
commutateurs du groupe E pour sélectionner le jeu de caractères international à
utiliser. Ce réglage modifie l’assignation de 14 codes de caractères du jeu italiques
standard.
International
Character Set
U.S.A. ON ON ON ON ON
France OFF ON ON ON ON
Germany ON OFF ON ON ON
England OFF OFF ON ON ON
Denmark-1 ON ON OFF ON ON
Sweden OFF ON OFF ON ON
Italy ON OFF OFF ON ON
Spain-1 OFF OFF OFF ON ON
Japan ON ON ON OFF ON
Norway OFF ON ON OFF ON
Denmark-2 ON OFF ON OFF ON
Spain-2 OFF OFF ON OFF ON
Latin America ON ON OFF OFF ON
Korea OFF ON OFF OFF ON
Ireland ON OFF OFF OFF ON
SW1 SW2 SW3 SW4 SW5
Jeu de caractères
international
Etats-Unis ON ON ON ON ON
France OFF ON ON ON ON
Allemagne ON OFF ON ON ON
Angleterre OFF OFF ON ON ON
Danemark-1 ON ON OFF ON ON
Suède OFF ON OFF ON ON
Italie ON OFF OFF ON ON
Espagne-1 OFF OFF OFF ON ON
Japon ON ON ON OFF ON
Norvège OFF ON ON OFF ON
Danemark-2 ON OFF ON OFF ON
Espagne-2 OFF OFF ON OFF ON
Amérique Latine ON ON OFF OFF ON
Corée OFF ON OFF OFF ON
Irlande ON OFF OFF OFF ON
SW1 SW2 SW3 SW4 SW5
Legal OFF OFF OFF OFF ON
63
Legal OFF OFF OFF OFF ON
Page 75

Wenn Ihre EDS auf Standardemulation (Gruppe A, Schalter 1 ON) und die
Kursivschriftzeichentabelle (Gruppe A, Schalter 2 OFF) gestellt sind, wählen Sie
den gewünschten internationalen Zeichensatz mit den Schaltern der Gruppe E. Diese
Einstellung bestimmt die Zuordnung von 14 Zeichencodes im StandardKursivschriftzeichensatz.
Se si è specificata l’emulazione Standard tramite le impostazioni EDS (Gruppo A,
interruttore 1 su ON) con la tabella caratteri corsivi (Gruppo A, interruttore 2 su
OFF), utilizzare gli interruttori del Gruppo E per selezionare il set di caratteri
internazionali che si desidera usare. Questa impostazione stabilisce l’assegnazione
di 14 codici carattere nel set di caratteri corsivi Standard.
Internationaler
Zeichensatz
USA ON ON ON ON ON
Frankreich OFF ON ON ON ON
Deutschland ON OFF ON ON ON
England OFF OFF ON ON ON
Dänemark 1 ON ON OFF ON ON
Schweden OFF ON OFF ON ON
Italien ON OFF OFF ON ON
Spanien 1 OFF OFF OFF ON ON
Japan ON ON ON OFF ON
Norwegen OFF ON ON OFF ON
Dänemark 2 ON OFF ON OFF ON
Spanien 2 OFF OFF ON OFF ON
Lateinamerika ON ON OFF OFF ON
Korea OFF ON OFF OFF ON
Irland ON OFF OFF OFF ON
SW1 SW2 SW3 SW4 SW5
Set di caratteri
internazionali
U.S.A. ON ON ON ON ON
Francia OFF ON ON ON ON
Germany ON OFF ON ON ON
Inghilterra OFF OFF ON ON ON
Danimarca-1 ON ON OFF ON ON
Svezia OFF ON OFF ON ON
Italia ON OFF OFF ON ON
Spagna-1 OFF OFF OFF ON ON
Giappone ON ON ON OFF ON
Norvegia OFF ON ON OFF ON
Danimarca-2 ON OFF ON OFF ON
Spagna-2 OFF OFF ON OFF ON
America Latina ON ON OFF OFF ON
Corea OFF ON OFF OFF ON
Irlanda ON OFF OFF OFF ON
SW1 SW2 SW3 SW4 SW5
Legal OFF OFF OFF OFF ON
Legal OFF OFF OFF OFF ON
64
Page 76

BANK F
Switches 1, 2, 3, 4, 5: LQ Font Selection
Turn these switches on or off to form the pattern that identifies the font you want to
use for LQ printing.
GROUPE F
Commutateurs 1, 2, 3, 4, 5: Sélection de la police d’impression Quasicourrier.
Activez ou désactivez ces commutateurs pour sélectionner la police souhaitée pour
l’impression Quasi-courrier.
Font SW1 SW2 SW3 SW4 SW5
Roman ON ON ON ON ON
Sanserif OFF ON ON ON ON
Courier ON OFF ON ON ON
Prestige OFF OFF ON ON ON
Orator OFF OFF OFF ON ON
Note:
Bank C switches 1 and 2 need to be in the correct positions befor e the abo ve setting
will have any effect.
Police SW1 SW2 SW3 SW4 SW5
Roman ON ON ON ON ON
Sanserif OFF ON ON ON ON
Courier ON OFF ON ON ON
Prestige OFF OFF ON ON ON
Orator OFF OFF OFF ON ON
Remarque:
Les commutateurs 1 et 2 du groupe C doivent être réglés correctement pour que ce
réglage soit opérationnel.
65
Page 77

GRUPPE F
Schalter 1, 2, 3, 4, 5: LQ-Schriftartwahl
Betätigen Sie diese Schalter, um die Standardschriftart für den SchönschriftDruckmodus (LQ) zu wählen.
GRUPPO F
Interruttori 1, 2, 3, 4, 5: Selezione font LQ
Impostare questi interruttori su ON o su OFF per selezionare la combinazione
corrispondente al font che si vuole utilizzare per la stampa in LQ.
Schriftart SW1 SW2 SW3 SW4 SW5
Roman ON ON ON ON ON
Sanserif OFF ON ON ON ON
Courier ON OFF ON ON ON
Prestige OFF OFF ON ON ON
Orator OFF OFF OFF ON ON
Hinweis:
Schalter 1 und 2 in Gruppe C müssen in der richtigen Stellung stehen, bevor diese
Einstellung wirksam ist.
Font SW1 SW2 SW3 SW4 SW5
Roman ON ON ON ON ON
Sanserif OFF ON ON ON ON
Courier ON OFF ON ON ON
Prestige OFF OFF ON ON ON
Orator OFF OFF OFF ON ON
Nota:
Gli interruttori 1 e 2 del Gruppo C devono essere nella posizione corr etta prima che
questa impostazione possa avere effetto.
66
Page 78

Chapter 4: User Setup Utility
Chapitre 4: Utilitaire d’impression
The User Setup Utility is included on the floppy disk that comes with the printer. It
allows you to change the EDS settings of the printer from your computer.
To run the User Setup Utility, you need an IBM-compatible computer running PCDOS or MS-DOS. The computer must be equipped with a 3.5″ floppy drive and a
hard disk drive.
In this chapter you will learn about:
❏ Installing the User Setup Utility
❏ Starting the User Setup Utility
❏ Editing setup data
❏ Loading and saving setup data
❏ Exiting the User Setup Utility and sending the settings to the printer
Important!
See the “readme.txt” file for important information that became available after this
documentation was printed.
All the procedures in this chapter assume that you are using a mouse and that you
are familiar with common mouse operations like click and double-click. If you need
information on mouse operations, see your computer manual. If you want to operate
the User Setup Utility using the keyboard instead of the mouse, follow the
instructions that appear on your computer’s screen.
Installing the User Setup Utility
❏ Insert the disk that contains the User Setup Utility into one of your computer’s
disk drives. This explanation assumes you are using the A: drive, but you could
use any drive. Just remember to change the “A:” drive name specifications in the
following steps to the name of the drive you are using.
❏ Execute the following commands to start installation of the User Setup Utility.
The following commands assume you are starting from drive C:, and the floppy
that contains the User Setup Utility is inserted in drive A:
C:\>A: ↵
A:\>CD UTILITY↵
A:\UTILITY>SETUP↵
Un utilitaire d’impression se trouve sur la disquette fournie avec l’imprimante. Il
permet de modifier les réglages EDS de l’imprimante à partir de l’ordinateur.
Pour pouvoir exploiter cet utilitaire d’impression, vous avez besoin d’un ordinateur
compatible IBM qui fonctionne avec PC-DOS ou MS-DOS. L’ordinateur doit être
équipé d’un lecteur de disquette 3,5 pouces et d’un disque dur.
Ce chapitre contient les paragraphes suivants:
❏ Installation de l’utilitaire d’impression
❏ Exploitation de l’utilitaire d’impression
❏ Configuration des données
❏ Chargement et sauvegarde des données
❏ Sortie de l’utilitaire d’impression et transfert des réglages à l’imprimante
Important!
Veuillez lire le fichier “readme.txt”. Ce fichier vous fournira des informations non
disponibles au moment de l’impression de ce guide d’utilisation.
Dans ce chapitre, il est entendu que vous utilisez une souris et que vous connaissez
les opérations de base de la souris, comme les clics et double-clics. Pour plus de
détails sur l’utilisation de la souris, consultez le mode d’emploi de l’ordinateur. Si
vous souhaitez utiliser l’utilitaire d’impression avec le clavier au lieu de la souris,
suivez les instructions qui apparaissent sur l’écran de l’ordinateur.
Installation de l’utilitaire d’impression
❏ Insérez la disquette qui contient l’utilitaire d’impression dans un des lecteurs de
l’ordinateur. Les instructions suivantes utilisent le lecteur A comme exemple.
Vous pouvez utiliser le lecteur que vous voulez mais n’oubliez pas qu’il est
appelé lecteur A dans les démarches suivantes.
❏ Exécutez les commandes suivantes pour installer l’utilitaire d’impression. Il est
supposé que vous démarrez l’ordinateur sur le lecteur C et que la disquette
contenant l’utilitaire d’impression se trouve dans le lecteur A.
C:\>A: ↵
A:\>CD UTILITY↵
A:\UTILITY>SETUP↵
67
Page 79

Kapitel 4: Drucker-Installationsprogramm
Capitolo 4: User Setup Utility
Das Drucker-Installationsprogramm befindet sich auf der Diskette, die dem Drucker
beiliegt. Es erlaubt es Ihnen, die EDS-Einstellungen des Druckers vom Computer
aus zu steuern.
Zur Verwendung des Drucker-Installationsprogramms benötigen Sie einen IBMkompatiblen Computer, der mit PC-DOS oder MS-DOS läuft. Der Computer muß
über ein 3,5-Zoll-Diskettenlaufwerk und eine Festplatte verfügen.
Dieses Kapitel informiert über:
❏ Installierung des Drucker-Installationsprogramms
❏ Starten des Drucker-Installationsprogramms
❏ Editieren der Setup-Daten
❏ Laden und Speichern der Setup-Daten
❏ Verlassen des Drucker-Installationsprogramms und Übertragung der
Einstelldaten zum Drucker
Wichtig!
Siehe die Datei "README.TXT" bezüglich Informationen, die bei der Druckle gung
dieser Anleitung noch nicht verfügbar waren.
Sämtliche Vorgänge in diesem Kapitel setzen voraus, daß Sie eine Maus verwenden
und mit normalen Maus-Bedienungsabläufen, wie z.B. Klicken und Doppelklicken,
vertraut sind. Falls notwendig, finden Sie Informationen hierzu in der
Bedienungsanleitung Ihres Computers. Wenn Sie das DruckerInstallationsprogramm über die Tastatur und nicht über Maussteuerung bedienen
wollen, folgen Sie den Anweisungen, die auf dem Computerbildschirm erscheinen.
Installierung des Drucker-Installationsprogramms
❏ Schieben Sie die Diskette, die das Drucker-Installationsprogramm enthält, in
eines der Laufwerke Ihres Computers. In dieser Beschreibung wird
angenommen, daß Sie das Laufwerk A: verwenden, obwohl hierzu auch jedes
andere Laufwerk verwendet werden kann. Denken Sie in diesem Fall lediglich
daran, die Laufwerkangabe “A:” dem verwendeten Laufwerk entsprechend zu
ändern.
❏ Geben Sie zur Einleitung der Installierung des Drucker-Installationsprogramm
die folgenden Befehle ein. In dieser Beschreibung wird angenommen, daß Sie
von Laufwerk C: starten und die Diskette, die das DruckerInstallationsprogramm enthält, in Laufwerk A: geschoben haben.
C:\>A: ↵
A:\>CD UTILITY↵
A:\UTILITY>SETUP↵
Questo permette di modifcare le regolazioni EDS della stampante dal computer.
Per usare l’User Setup Utility è necessario un computer compatibile IBM con PC-
DOS o MS-DOS. Il computer deve essere dotato di un drive per floppy disk da 3,5”
e di un disco fisso.
In questo capitolo spieghiamo quanto segue:
❏ Installazione dell’User Setup Utility
❏ Lancio dell’User Setup Utility
❏ Modifica dei dati di impostazione
❏ Caricamento e salvataggio dei dati di impostazione
❏ Uscita dall’User Setup Utility e invio delle regolazioni alla stampante
Importante!
Leggere il file "readme.txt" per ottenere informazioni non disponibili al momento
della stampa del presente documento.
Tutti i procedimenti in questo capitolo presumono che si usi un mouse e che si sia
familiari con le comuni operazioni del mouse come il clic e il doppio clic. Se si ha
bisogno di informazioni sull’uso del mouse, fare riferimento al manuale di
istruzioni del proprio computer. Se si desidera funzionare l’User Setup Utility
usando la tastiera invece del mouse, seguire le istruzioni che appaiono sullo
schermo del computer..
Installazione di User Setup Utility
❏ Inserire il dischetto che contiene User Setup Utility in uno dei disk drive del
computer. Questa spiegazione assume che si usi il drive A:, ma si può usare
qualsiasi drive. Basta ricordarsi di sostituire la specificazione del drive “A:” con
quella del drive impiegato nei vari punti del procedimento.
❏ Eseguire i comandi seguenti per avviare l’installazione di User Setup Utility. I
seguenti comandi suppongono che si parta dal drive C: e che il floppy contenente
User Setup Utility si trovi nel drive A:.
C:\>A: ↵
A:\>CD UTILITY↵
A:\UTILITY>SETUP↵
68
Page 80

Setting for Install
Options Installation
Language:
English
Printer Type:
LC-4511
Install Directory:
c:\star
F1=Install F2=Cancel
❏ Pull down the list of available languages under Language: and double-click the
one you want to use.
❏ Pull down the list of available printers under Printer T ype: and double-click on
the one you want to use. For this printer you should select LC-4511 or LC-4521.
❏ Click the Install Directory: box to change it into an input box.
❏ Input the drive name and directory where you want the User Setup Utility
installed. Make sure to include the full path to the directory.
You can use your computer’s left and right arrow keys, Delete key, and
backspace key to move around the input box and make changes to the te xt inside
it.
❏ Click Install to install the User Setup Utility and start it up.
Langage:
Français
Type d’imprimante:
LC-4511
Répertoire d’Install:
c:\star
F1=Installer F2=Abandonner
❏ Faites apparaître la liste des langues disponible sous Langage: et cliquez deux
fois sur la langue souhaitée.
❏ Faites apparaître la liste des imprimantes disponibles à Type d’imprimante: et
cliquez deux fois sur l’imprimante à utiliser. Dans ce cas de cette imprimante.
Vous devez sélectionner LC-4511 ou LC-4521.
❏ Cliquez sur la case Répertoire d’Install: pour changer de répertoire
d’installation.
❏ Entrez le nom du lecteur et le répertoire dans lequel vous voulez installer
l’utilitaire d’impression. Assurez-zous que le chemin et le répertoire soient
corrects.
Vous pouvez utiliser les touches fléchées gauche et droite, la touche
d’effacement et la touche de recul de l’ordinateur pour déplacer le curseur
dans la case d’entrée et modifier le texte à l’intérieur.
❏ Cliquez sur Install pour installer l’utilitaire d’impression et le lancer.
69
Page 81

Einstellungen
SCELTE INSTALLAZIONE
Sprache:
German
Drucker Typ:
LC-4511
Zielverzeichnis:
c:\star
F1=Install. F2=Abbruch
❏ Rufen Sie die Liste der aufgeführten Sprachen unter “Language” ab, und klicken
Sie die gewünschte Sprache doppelt an.
❏ Rufen Sie die Liste der verfügbaren Drucker unter Drucker T yp: ab, und klick en
Sie den gewünschten Drucker doppelt an. Für diesen Drucker sollten Sie LC4511 oder LC-4521 wählen.
❏ Klicken Sie das “Zielverzeichnis:”-Feld an, um dieses in ein Eingabefeld
umzuwandeln.
❏ Geben Sie den Buchstaben des Laufwerks und das Verzeichnis (Directory), in
das Sie das Drucker-Installationsprogramm installieren möchten, ein.
Sie können die linke und rechte Pfeiltaste, die Delete-Taste und die
Backspace-Taste verwenden, um den Cursor innerhalb des Eingabefelds zu
bewegen und eventuelle Textänderungen im Feld auszuführen.
❏ Klicken Sie “Install” zum Installieren des Drucker-Installationsprogramms an,
und starten Sie das Programm.
Linguaggio:
Italiano
Tipo Stampante:
LC-4511
Poni SET-UP UTILITY in:
c:\star
F1=Esegui F2=Annulla
❏ Tirare giù la lista delle lingue disponibili sotto Language: e fare un doppio clic
sulla lingua desiderata.
❏ Tirare giù la lista delle stampanti disponibili sotto Tipo Stampante: e fare un
doppio clic sulla stampante desiderata. Per installare questa stampante,
selezionare LC-4511 o LC-4521.
❏ Cliccare sul riquadro Poni SET-UP UTILITY in per trasformarlo in un
riquadro di input.
❏ Immettere il nome del drive e la directory dove si desidera installare User Setup
Utility. Assicurarsi di includere l’intero path della directory.
È possibile usare i tasti del cursore sinistro e destro, il tasto Delete e il tasto di
ritorno per spostarsi nel riquadro di input e cambiare il testo al suo interno.
❏ Cliccare Esegui per installare User Setup Utility e lanciarlo.
70
Page 82

Starting up the User Setup Utility
❏ After you install the User Setup Utility, you can start it up any time by moving to
the directory you specified under “Installing the User Setup Utility” on page 67
and inputting the following:
STARSET ↵
Exploitation de l’utilitaire d’impression
❏ Une fois que vous avez installé l’utilitaire d’impression, vous pouvez l’utiliser
quand vous voulez en allant dans le répertoire choisi dans “Installation de
l’utilitaire d’impression” à la page 67 et en entrant la commande suivante:
STARSET ↵
Help
F1
Exit
F2
Emulation
Standard
RAM usage
Input Buffer
Quiet mode
Disabled
File
General
F3
*
*
*
F4
General
Graphic Direction
Bi-direction
CR Centering Position
Long
Font
F5
PaperF6Adjust
*
*
Port
F7
F8
When you start the User Setup Utility, it reads and displays the last settings that
were sent to the printer by the utility.
Note:
The utility does not read the settings fr om the printer. It reads the settings from a file
that was created the last time the utility was run, which are stored on your
computer’s hard disk. If the EDS settings have been changed using the printer’s
control panel, those control panel settings will not be shown by the utility, and they
will be replaced by the current User Setup Utility settings if you specify that current
settings should be sent to the printer (page 75) when you exit the utility.
❏ Now you can use the User Setup Utility to make the setup changes you want.
❏ You can press F1 at any time to access the on-screen help for the setup utility.
Changing the General, Font, Paper and Adjust Settings
The following are basic operations to change settings in the General, Font, Paper and
Adjust windows.
To select a window
❏
Click on the name of the window you want to select (General, Font, Paper,
Adjust, Port) by clicking on its name at the top of your computer’s screen. When
you do, the corresponding window appears on the screen. You can also select a
window by pressing a function key from F4 to F8.
71
AideF1QuitterF2Fichier
Emulation
Standard
Mémoire
Tampon
Mode Silencieux
Désactivé
*
Général
F3
*
*
PolicesF5PapierF6Ajust.
F4
Général
Direction du Graphique
Bi-directionnelle
Position du centrage
Long
Port
F7
*
*
F8
Quand vous lancez l’utilitaire d’impression, il lit et affiche les réglages courants
de l’imprimante.
Remarque:
L’utilitaire ne lit pas les régla g es de l’imprimante. Il lit les réglages mémorisés sur
le disque dur la dernière fois qu’il a été mis en route. Si les réglages EDS ont été
changés sur le panneau de commande de l’imprimante, ils ne seront pas indiqués
par l’utilitaire et ils ser ont r emplacés par les réglag es de l’utilitair e d’impr ession si
vous spécifiez l’envoie des réglages actuels à l’imprimante (page 75) quand vous
sortez de l’utilitaire.
❏ A présent, vous pouvez utiliser l’utilitaire d’impression pour faire les
changements souhaités.
❏ Vous pouvez appuyer sur F1 à tout moment pour afficher sur l’écran le menu
d’aide pour l’utilitaire d’impression.
Changement des réglages de généralités, de la police, du
papier et des paramètres
Effectuez les opérations de base suivantes pour changer les réglages de généralités,
de la police, du papier et des paramètres
Sélection d’une fenêtre
❏
Cliquez sur le nom de la fenêtre que vous voulez sélectionner (Général, Police,
Papier, Ajust., Port) en haut de l’écran de l’ordinateur . La fenêtre correspondante
apparaît sur l’écran. Vous pouvez également sélectionner une fenêtre en
appuyant sur une touche de fonction F4 à F8.
Page 83

Starten des Drucker-Installationsprogramms
❏ Nach der Installierung des Drucker-Installationsprogramms können Sie das
Programm jederzeit starten, indem Sie in das Verzeichnis (Directory) wechseln,
daß Sie unter “Installierung des Drucker-Installationsprogramms” auf Seite 68
angegeben haben, und den folgenden Befehl eingeben:
STARSET ↵
HilfeF1BeendenF2Datei
Emulation
Standard
Speicherbenutzung
Input Buffer
Quiet-Modus
Ausgeschaltet
*
Allgem.
F3
*
*
FontF5PapierF6Justage
F4
Allgem.
Druckrichtung
Bidirektional
Druckkopf Position
Lang
Port
F7
*
*
F8
Lancio di User Setup Utility
❏ Dopo aver installato User Setup Utility è possibile lanciarlo in qualsiasi
momento passando alla directory specificata in “Installazione di User Setup
Utility” a pagina 68 e immettendo quanto segue:
STARSET ↵
AiutoF1Uscita
Emulazione
Standard
Utilizzo RAM
Buffer di Input
Modalita’QUIET
Disabilitato
File
F2
Generale
F3
*
*
*
FONTF5CartaF6TaratureF7Porta
F4
Generale
Direzione Grafica
Bidirezionale
Rientro Verso centro
Lungo
*
*
F8
Das Drucker-Installationsprogramm liest beim Starten die derzeitigen
Druckereinstellungen und zeigt diese an.
Hinweis:
Das Programm liest nic ht die Einstellungen vom Druc k er. Es liest die Einstellungen
vom letzten Einsatz des Programms die auf der Festplatte des Computers
gespeichert sind. Wenn die EDS-Einstellungen über das Bedienfeld des Druckers
geändert wurden, werden diese Bedienfeldeinstellungen nicht vom Programm
gezeigt. Sie werden durch die aktuellen Anwender-Einstellungen ersetzt, wenn Sie
beim Verlassen des Installationsprogramms angeben, daß die aktuellen
Einstellungen zum Drucker geschickt werden sollen (Seite 76).
❏ Sie können jetzt mit Hilfe des Drucker-Installationsprogramms die gewünschten
Einstellungsänderungen vornehmen.
❏ Sie können F1 jederzeit drücken, um die On-screen Hilfefunktion für das
Drucker-Installationsprogramm abzurufen.
Änderung der Einstellungen unter Allgem., Font, Papier, Justage und Port
Nachfolgend beschrieben sind grundlegende Vorgänge zur Änderung der
Einstellungen in den Kästen Allgem. (allgemeine Einstellungen), Font (Schriftart),
Papier (Papier), Justage (Bidirektionaler Druckertest) und Port (Schnittstelle).
Wahl eines Fensters
❏
Wählen Sie eines der Fenster, indem Sie den Namen des gewünschten Fensters
(Allgem., Font, Papier, Justage, Port) am oberen Bildschirmrand anklicken.
Anschließend erscheint das dazugehörige Fenster auf dem Bildschirm. Ebenso
kann ein Fenster auch durch Drücken einer Funktionstaste (F4 bis F8) gewählt
werden.
Quando si lancia User Setup Utility, questo legge e visualizza le regolazioni
attuali della stampante.
Nota:
Il programma non legge le r egolazioni dalla stampante. Legge invece le r egolazioni
dell’ultima volta che il programma è stato usato, che sono memorizzate nel disco
fisso del computer. Se le regolazioni EDS sono state cambiate usando il pannello
comandi della stampante, tali regolazioni non sono visualizzate dal programma e
sono sostituite con le attuali regolazioni di User Setup Utility se si specifica che le
attuali re golazioni devono essere inviate alla stampante (pa gina 76) quando si esce
dal programma.
❏ Ora si può usare User Setup Utility per eseguire le modifiche desiderate
all’impostazione.
❏ Èpossibile premere F1 in qualsiasi momento per accedere all’assistenza sullo
schermo per il programma.
Cambiamento delle impostazioni generali, font, carta e Tarature
Di seguito spieghiamo le operazioni basilari per cambiare le impostazioni delle
finestre Generale, Font, Carta, Tarature e Porta.
Per selezionare una finestra
❏
Cliccare sul nome della finestra che si vuole selezionare (General, Font, Paper,
Adjust, Port) in cima allo schermo del computer. A questo punto la finestra
corrispondente appare sullo schermo. È anche possibile selezionare una finestra
premendo un tasto di funzione da F4 a F8.
72
Page 84

To select a setting box
❏
Click on the box you want to select or move to it by using your keyboard’s Tab
or arrow keys. The currently selected setting box is highlighted on the screen.
To change a setting
❏
After you select a setting box, click on the box or press Enter to pull down a list
of available settings.
❏ Select the setting you want to use in the list by double-clicking on it, or by
moving to it with the arrow keys and pressing Enter.
Note:
An asterisk to the right of a setting indicates that it is the default.
Sélection d’une case de réglage
❏
Cliquez sur la case que vous voulez sélectionner ou positionnez le curseur
dessus à l’aide de la touche de tabulation ou des touches fléchées. La case
sélectionnée apparaît en surbrillance sur l’écran.
Changement d’un réglage
❏
Une fois que vous avez sélectionné une case, cliquez dessus ou appuyez sur la
touche Enter pour faire apparaître les réglages disponibles.
❏ Sélectionnez le réglage souhaité dans la liste en cliquant deux fois dessus ou en
positionnant le curseur dessus avec les touches fléchées, puis en appuyant sur
Enter.
Remarque:
Les réglages par défaut sont indiqués par un astérisque à droite.
The settings in the General, Font, and Paper windows are identical to those in the
EDS Mode. See “EDS Mode Settings” on page 47 for details.
Adjusting the dot alignment
❏ Click on Adjust or press the F7 function key.
Multi-Part Mode
Normal Mode
Normal-Density
0
CRT Graphics Mode I
0
DRAFT Graphics
0
Double-Density
0
CRT Graphics Mode II
0
F9:Test F10:Test All
❏ Use the above window to test and adjust the vertical alignment of the printer in
each printing mode. See “Adjusting the dot alignment” on page 137 for full
details on dot alignment.
Adjust
*
*
*
*
*
*
Triple-Density
0
Quadruple-Density
0
LQ Graphics
0
DRAFT Text
0
LQ-Text
0
*
*
*
*
*
Les réglages des fenêtres Général, Police, Papier sont identiques à ceux du mode
EDS. Pour plus de détails, reportez-vous à “Réglages en mode EDS” à la page
47.
Réglage de l’alignement des points
❏ Cliquez sur Ajust ou appuyez sur la touche de fonction F7.
Mode Multi-copies
Mode Normale
Densité Normale
0
CRT graphiques mode I
0
Graphiques BROUILLON
0
Double-densité
0
CRT graphiques mode II
0
F9:Test F10:Tous Tests
❏ Utilisez la fenêtre illustrée ci-dessus pour tester et régler l’alignement vertical
dans chaque mode d’impression. Voir “Réglage de l’alignement des points” à la
page 137 pour plus de détails sur l’alignement des points.
Ajust.
*
*
*
*
*
*
Triple-densité
0
Quadruple-densité
0
Graphiques LQ
0
Texte BROUILLON
0
Texte LQ
0
*
*
*
*
*
73
Page 85

Wahl eines Feldes
❏
Klicken Sie das gewünschte Feld an, oder führen Sie den Cursor mit der Tab-
Taste oder den Pfeiltasten auf das Feld.
Änderung der Einstellung
❏
Klicken Sie das gewählte Feld an, oder drücken Sie die ENTER-Taste, um eine
Liste der verfügbaren Einstellungen aufzurufen.
❏ Wählen Sie die gewünschte Einstellung auf der Liste, indem Sie die Einstellung
doppelt anklicken, oder den Cursor mit den Pfeiltasten darauf führen und die
ENTER-Taste drücken.
Hinweis:
Ein Sternchen rechts neben einer Einstellung zeigt an, daß es sich bei diesem Wert
um die Standardeinstellung handelt.
Selezione di un riquadro di impostazione
❏
Cliccare sul riquadro che si vuole selezionare o spostarsi ad esso usando i tasti di
tabulazione e del cursore del computer. Il riquadro di impostazione
attualmente selezionato è evidenziato sullo schermo.
Per cambiare un’impostazione
❏
Dopo aver selezionato il riquadro di impostazione, cliccare sul riquadro o
premere Enter per tirare fuori la lista delle regolazioni disponibili.
❏ Selezionare l’impostazione desiderata nella lista con un doppio clic o
spostandosi su di essa con i tasti del cursore e premendo Enter.
Nota:
Un asterisco a destra di un’impostazione indica il default.
Die Einstellungen unter Allgem., Font und Papier sind identisch mit denen im
EDS-Modus. Einzelheiten hierzu enthält der Abschnitt “EDS-ModusEinstellungen” auf Seite 48.
Änderung des Bidirektionalen Druckertests
❏ Klicken Sie “Justage” an, oder drücken Sie die Funktionstaste F7.
*
*
*
*
*
*
Justage
Dreifache Dichte
0
Vierfache Dichte
0
LQ Grafik
0
DRAFT Text
0
LQ-Text
0
*
*
*
*
*
Einstell. Durchschläge
Normal Betrieb
Normale Dichte
0
CRT Grafik Modus I
0
DRAFT Grafik
0
Doppelte Dichte
0
CRT Grafik Modus II
0
F9:Test F10:Test Alles
❏ Testen und stellen Sie die vertikale Justierung des Druckers in jedem
Druckmodus auf dem obigen Schirmbild ein. Einzelheiten hierzu enthält der
Abschnitt “Bidirektionaler Druckertest” auf Seite 138.
Le impostazioni nelle finestre General, Font e Paper sono identiche a quelle nel
modo EDS. Vedere “Regolazioni del modo EDS” a pagina 48 per dettagli.
Regolazione dell’allineamento dei punti
❏ Cliccare su Adjust o premere il tasto di funzione F7.
Modo Multicopia
Modo Normale
60 dpi (F)
0
80 dpi (F)
0
120 dpi (H)
0
120 dpi (F)
0
180 dpi (H)
0
F9:Test F10:Test.Tutti
❏ Usare la finestra mostra sopra per collaudare e regolare l’allineamento verticale
della stampante in ciascun modo di stampa. Vedere “Regolazione
dell’allineamento dei punti” a pagina 138 per dettagli completi sull’allineamento
dei punti.
*
*
*
*
*
*
Tarature
180 dpi (F)
0
240 dpi (H)
0
360 dpi (H)
0
120 dpi(H) Testo DRAFT
0
360 dpi (H) Testo LQ
0
*
*
*
*
*
74
Page 86

Changing the printer port
❏ Click on Port or press the F8 function key.
Changement du port de l’imprimante
❏ Cliquez sur Port ou appuyez sur la touche de fonction F8.
Port
Lpt1:
Com1:
Com2:
❏ Select the port you want to use by double-clicking on it, or by moving to it with
the arrow keys and pressing Enter.
Saving setup data in a configuration file
❏ To sav e setup data in a configuration file so you can recall it later , click on File or
press the F3 function key.
❏ Select Save from the menu that drops down by double-clicking on it, or by
moving the highlighting to it with the arrow keys and pressing Enter.
❏ Input the name that you want to assign to the configuration file and press Enter.
The configuration is automatically stored in the directory you specified under
“Installing the User Setup Utility” on page 67, and assigned the extension “.cfg”.
Important!
Remember that changing User Setup Utility settings on the computer screen does
not directly change them in the printer. To change the printer settings to those
shown on the screen, use the Exit command (page 77).
Port
Lpt1:
Com1:
Com2:
❏ Sélectionnez le port que vous voulez utiliser en cliquant deux fois dessus ou en
positionnant le curseur dessus avec les touches fléchées, puis en appuyant sur
Enter.
Sauvegarde des données dans un fichier de configuration
❏ Pour sauvegarder des données dans un fichier de configuration afin de pouvoir
les rappeler par la suite, cliquez sur Fichier ou appuyez sur la touche de fonction
F3.
❏ Sélectionnez Sauver sur le menu qui apparaît en cliquant deux fois dessus ou en
positionnant le curseur dessus avec les touches fléchées et en appuyant sur
Enter.
❏ Entrez le nom que vous voulez donner au fichier de configuration et appuyez sur
Enter. La configuration est automatiquement mémorisée dans le sommaire que
vous avez désigné à l’étape “Installation de l’utilitaire d’impression” à la page
67 et l’extension “cfg” lui est attribuée.
Important!
Les paramètres modifiés sur l’écran de l’or dinateur avec l’utilitair e d’impr ession ne
sont pas changés dans l’imprimante. Pour transférer les réglages de l’écran à
l’imprimante, utilisez la commande Quitter (page 77).
75
Page 87

Änderung der Schnittstelle
❏ Klicken Sie “Port” an, oder drücken Sie die Funktionstaste F8.
Cambiamento della porta stampante
❏ Cliccare su Port o premere il tasto di funzione F8.
Port
Lpt1:
Com1:
Com2:
❏ Wählen Sie die gewünschte Schnittstelle, indem Sie diese doppelt anklicken,
oder den Cursor mit den Pfeiltasten darauf führen und die ENTER-Taste
drücken.
Speichern der Einstelldaten in einer Konfigurationsdatei
❏ Sichern Sie die Einstelldaten in einer Konfigurationsdatei, so daß die Daten
anschließend jederzeit abrufbar sind. Klicken Sie dazu “Datei” an, oder drücken
Sie die Funktionstaste F3.
❏ Wählen Sie “Sichern” in dem Menü, das erscheint, indem Sie es doppelt
anklicken, oder indem Sie den Cursor mit den Pfeiltasten darauf führen und die
ENTER-Taste drücken.
❏ Geben Sie den Namen ein, mit dem Sie die Konfigurationsdatei benennen
möchten, und drücken Sie die ENTER-Taste. Die Konfigurationsdatei wird
automatisch mit der Erweiterung “.cfg” in dem Verzeichnis gespeichert, das Sie
unter “Installierung des Drucker-Installationsprogramms” auf Seite 68
angegeben haben.
Wichtig!
Beachten Sie, daß eine Änderung der Einstellungen im DruckerInstallationsprogramm auf dem Bildsc hirm k einesfalls einer direkten Änderung der
Einstellungen am Drucker gleichkommt. Eine Änderung der Druckereinstellungen
gemäß der Einstelldaten auf dem Bildschirm muß über den Beenden-Befehl (Seite
78) vorgenommen werden.
Porta
Lpt1:
Com1:
Com2:
❏ Selezionare la porta che si vuole usare con un doppio clic o spostandosi su di
essa con i tasti del cursore e premendo Enter.
Salvataggio dei dati di impostazione in un file di
configurazione
❏ Per salvare i dati di impostazione in un file di configurazione che sia possibile
richiamare in seguito, cliccare su File o premere il tasto di funzione F3.
❏ Dal menu che appare selezionare Salva con un doppio clic o spostando
l’evidenziatura su di esso con i tasti del cursore e premendo Enter.
❏ Immettere il nome che si vuole assegnare al file di configurazione e premere
Enter. La configurazione viene automaticamente memorizzata nella directory
specificata in “Installazione di User Setup Utility” a pagina 68 e riceve
l’estensione “.cfg”.
Importante!
Ricordare che quando si cambiano le impostazioni di User Setup Utility sullo
schermo del computer queste non sono necessariamente cambiate nella stampante.
Per cambiare le regolazioni della stampante in quelle visualizzate sullo schermo
usare il comando Exit (pagina 78).
76
Page 88

Importing setup data from a configuration file
❏ Click on File or press the F3 function key.
❏ Select Load from the menu that drops down by double-clicking on it, or by
moving the highlighting to it with the arrow keys and pressing Enter.
File
C:\STAR\*.cfg
.. <DIR> 1995-06-15
DEFAULT .CFG 1995-06-15
PREVIOUS.CFG 1995-06-22
Load file
Importation de données d’un fichier de configuration
❏ Cliquez sur Fichier ou appuyez sur la touche de fonction F3.
❏ Sélectionnez Charge sur le menu qui apparaît en cliquant deux fois dessus ou en
positionnant le curseur dessus avec les touches fléchées et en appuyant sur
Enter.
Charger fichier
Fichier
C:\STAR\*.cfg
.. <DIR> 1995-06-15
DEFAULT .CFG 1995-06-15
PREVIOUS.CFG 1995-06-22
❏ Select the file that contains the configuration you want to use by double-clicking
on its name, or by moving the highlighting to its name with the arrow keys and
pressing Enter.
Returning to default settings
❏ To make all settings revert to their defaults, perform the procedure under
“Importing setup data from a configuration file” in the previous section and
select the file named “DEFAULT.CFG”.
Exiting the User Setup Utility
To exit the User Setup Utility, pull down the File menu and select Exit.
Exit
Exit without sending current settings.
Exit after sending current settings.
❏ Select the option you want by double-clicking on it, or by moving the
highlighting to it with the arrow keys and pressing Enter.
“Exit after sending current settings” sends all User Setup Utility settings to the
printer, which replaces any settings that may ha ve been made using the printer’s
control panel. “Exit without sending current settings” exits the User Setup
Utility without sending anything to the printer.
Using the Help menu
❏ To get information on how to use the User Setup Utility, click Help or press
function key F1.
77
❏ Sélectionnez le fichier qui contient la configuration souhaitée en cliquant deux
fois sur le nom du fichier ou en positionnant le curseur sur le nom avec les
touches fléchées, puis en appuyant sur la touche Enter.
Retour aux réglages par défaut
❏ Pour ramener tous les réglages aux valeurs par défaut, effectuez les démarches
de “Importation de données d’un fichier de configuration” ci-dessus et
sélectionnez le fichier appelé “DEFAULT.CFG”.
Sortie de l’utilitaire d’impression
Pour sortir de l’utilitaire d’impression, ouvrez le menu Fichier et sélectionnez
Quitter.
Quitter
Quitter sans envoyer les paramètres
Quitter et envoyer les paramètres
❏ Sélectionnez l’option souhaitée en cliquant deux fois dessus ou en positionnant
le curseur dessus à l’aide des touches fléchées et en appuyant ensuite sur Enter.
L’option “Quitter et envoyer les paramètres” vous permet d’envoyer tous les
réglages de l’utilitaire d’impression à l’imprimante. Cette dernière remplacera
lors de l’opération tous les réglages effectués auparavant depuis le panneau de
commande de l’imprimante. L’option “Quitter sans envoyer les paramètres”
vous permet de quitter l’utilitaire d’impression sans envoyer de données à
l’imprimante.
Utilisation du menu d’aide
❏ Pour obtenir des informations sur l’exploitation de l’utilitaire d’impression,
cliquez sur Aide ou appuyez sur la touche de fonction F1.
Page 89

Einlesen von Einstelldaten aus einer Konfigurationsdatei
❏ Klicken Sie “Datei” an, oder drücken Sie die Funktionstaste F3.
❏ Wählen Sie “Laden” in dem Menü, das erscheint, indem Sie es doppelt
anklicken, oder indem Sie den Cursor mit den Pfeiltasten darauf führen und die
ENTER-Taste drücken.
Datei Laden
Datei
C:\STAR\*.cfg
.. <DIR> 1995-06-15
DEFAULT .CFG 1995-06-15
PREVIOUS.CFG 1995-06-22
Importazione di dati di impostazione da un file di
configurazione
❏ Cliccare su File o premere il tasto di funzione F3.
❏ Dal menu che appare selezionare Load con un doppio clic o spostando
l’evidenziatura su di esso con i tasti del cursore e premendo Enter.
Carica File
File
C:\STAR\*.cfg
.. <DIR> 1995-06-15
DEFAULT .CFG 1995-06-15
PREVIOUS.CFG 1995-06-22
❏ Wählen Sie die Datei mit der gewünschte Konfiguration durch doppeltes
Anklicken, oder indem Sie den Cursor mit den Pfeiltasten darauf führen und die
ENTER-Taste drücken.
Rückstellung auf die Standardeinstellungen
❏ Führen Sie den oben unter “Einlesen von Einstelldaten aus einer
Konfigurationsdatei” beschriebenen Vorgang aus, und wählen Sie die Datei
“DEFAULT.CFG”, um sämtliche Einstellungen auf die Standardeinstellungen
zurückzustellen.
Verlassen des Drucker-Installationsprogramms
Rufen Sie zum Verlassen des Drucker-Installationsprogramms das “Datei”-Menü
auf, und wählen Sie “Beenden”.
Beenden
Beenden OHNE Sendung der Einstellung.
Beenden und SENDEN der Einstellung.
❏ Wählen Sie die gewünschte Option, indem Sie sie doppelklicken, oder indem
Sie sie mit den Pfeiltasten markieren und die Enter-Taste drücken.
“Beenden und SENDEN der Einstellung” bewirkt, daß alle Einstellungen des
Drucker-Installationsprogramms zum Drucker geschickt werden und dort alle
vorher vorhandenen Einstellungen, die über die Druckersteuerung eingegeben
wurden, ersetzen. “Beenden OHNE Sendung der Einstellung” bewirkt, daß das
Drucker-Installationsprogramm verlassen wird, ohne etwas an den Drucker zu
schicken.
Verwendung der Hilfe
❏ Klicken Sie “Hilfe” an, oder drücken Sie die Funktionstaste F1, um
Informationen zur Verwendung des Drucker-Installationsprogramms abzurufen.
❏ Selezionare il file che contiene la configurazione desiderata con un doppio clic
sul suo nome o spostando l’evidenziatura su di esso con i tasti del cursore e
premendo Enter.
Ritorno alle impostazioni default
❏ Per riportare tutte le impostazioni ai valori di default, eseguire il procedimento
descritto in “Importazione di dati di impostazione da un file di configurazione”
sopra e selezionare il file “DEFAULT.CFG”.
Uscita da User Setup Utility
Per uscire da User Setup Utility, aprire il menu File e selezionare Uscita.
Uscita
Uscita SENZA invio Settaggio attuale.
Uscita DOPO invio Settaggio attuale.
❏ Selezionare l’opzione desiderata facendo doppio clic su di essa, oppure
evidenziandola con i tasti freccia e premendo Invio.
Selezionando l’opzione “Exit after sending current settings”, tutte le
impostazioni definite nel programma User Setup Utility vengono inviate alla
stampante e sostituiscono quelle eseguite sul pannello comandi della stampante.
Selezionando l’opzione “Exit without sending current settings”, si esce dal
programma User Setup Utility senza inviare nulla alla stampante.
Uso del menu Help
❏ Per ottenere informazioni su come usare User Setup Utility, cliccare Help o
premere il tasto di funzione F1.
78
Page 90

Chapter 5: Using the Printer with Windows 3.1
This chapter contains specific information you need to know when using the printer
with Microsoft Windows 3.1. It also tells you how to install the printer driver on
your computer so that it can control the printer correctly. In this chapter, you will
learn:
❏ How to set up for printing with Microsoft Windows 3.1
❏ How to prepare for printing
❏ How to print a document
❏ How to install TrueType fonts
❏ How to select fonts from within an application
Important!
See the “readme.txt” file for important information that became available after this
documentation was printed.
Setting up for printing with Microsoft Windows 3.1
This printer is designed to work best with computers running Microsoft Windows
3.1.
Before you can use the printer with Windows, you must first use the procedure
outlined below to install the printer driver that is supplied on the 3.5” floppy disk
that comes with the printer. This procedure assumes that you are using a mouse and
that you are familiar with common mouse operations like click and double-click. If
you need information on mouse operations or if you want to install the printer driver
without using a mouse, refer to your Microsoft Windows User’s Guide.
❏ Insert the disk that contains the printer driver into one of your computer’s disk
drives. This explanation assumes you are using a drive named “A:”, but you
could use any drive. Just remember to change the “A:” in the following steps to
the name of the drive you are using.
❏ In the Main group, double-click on the Control Panel icon.
❏ Double-click on the Printers icon in the Control Panel window.
Chapitre 5: Utilisation de l’imprimante sous Windows 3.1
Ce chapitre contient les informations dont vous pourrez avoir besoin pour utiliser
l’imprimante sous Microsoft Windows 3.1. Il explique aussi comment installer le
gestionnaire d’imprimante sur votre ordinateur pour lui permettre de gérer
correctement l’imprimante. Dans ce chapitre, vous allez vous familiariser avec les
aspects suivants :
❏ Configuration de l’impression sous Microsoft Windows 3.1
❏ Préparation à l’impression
❏ Impression d’un document
❏ Installation des polices TrueType
❏ Sélection de polices dans une application
Important!
Veuillez lire le fichier “readme.txt”. Ce fichier vous fournira des informations non
disponibles au moment de l’impression de ce guide d’utilisation.
Configuration de l’impression sous Microsoft Windows 3.1
Cette imprimante est conçue tout spécialement pour fonctionner avec les ordinateurs
qui exploitent Microsoft Windows 3.1.
Av ant de pouv oir imprimer sous W indo ws, v ous de vez ef fectuer la procédure définie
ci-dessous pour installer le gestionnaire d’imprimante qui figure sur la disquette 3,5
pouces fournie avec l’imprimante. Cette procédure suppose que vous utilisez une
souris et que vous connaissez les opérations les plus courantes à la souris comme
cliquer ou faire un double-clic. Pour plus de détails sur les opérations avec souris, ou
pour savoir comment installer le gestionnaire sans utiliser de souris, reportez-vous
au Guide d’utilisation de Microsoft Windows.
❏ Insérez la disquette qui contient le gestionnaire d’imprimante dans un des
lecteurs de disquettes de l’ordinateur. Cette procédure suppose que v ous utilisez
le lecteur «A:», mais vous pouvez naturellement utiliser tout autre lecteur en
remplaçant «A:» par le nom du lecteur dans les instructions suivantes.
❏ Dans le Groupe Principal, cliquez deux fois sur l’icône Panneau de
configuration.
❏ Cliquez deux fois sur l’icône Imprimantes dans la fenêtre Panneau de
configuration.
79
Page 91

Kapitel 5: Einsatz des Druckers unter Windows 3.1
Capitolo 5: Utilizzo della stampante con Windows 3.1
Dieses Kapitel enthält genaue Informationen, die Sie kennen müssen, wenn Sie den
Drucker unter Microsoft Windows 3.1 verwenden. Es sagt Ihnen auch, wie Sie den
Druckertreiber Ihres Computers installieren, damit Sie den Drucker einwandfrei
steuern können. In diesem Kapitel lernen Sie:
❏ Wie Sie die Grundeinstellung (Setup) zum Drucken unter Microsoft Windows
3.1 vornehmen
❏ Wie Sie den Druck vorbereiten
❏ Wie Sie ein Schriftstück drucken
❏ Wie Sie TrueType-Schriftarten installieren
❏ Wie Sie Schriftarten innerhalb einer Anwendung auswählen
Wichtig!
Siehe die Datei "README.TXT" bezüglich Informationen, die bei der Druckle gung
dieser Anleitung noch nicht verfügbar waren.
Grundeinstellung (Setup) zum Drucken unter Microsoft Windows 3.1
Dieser Drucker ist so ausgelegt, daß er am besten mit Programmen arbeitet, die
unter Microsoft Windows 3.1 laufen.
Bevor Sie den Drucker unter Windows einsetzen können, müssen Sie zunächst den
Druckertreiber installieren, der sich auf der mitgelieferten 3.5” Diskette befindet.
Dazu führen Sie nachstehenden Ablauf durch. Dieses Verfahren geht dav on aus, daß
Sie eine Maus verwenden und daß Sie mit der allgemeinen Handhabung der Maus,
z.B. Klick und Doppelklick, vertraut sind. Wenn Sie Informationen über die
Handhabung der Maus benötigen oder wenn Sie den Druckertreiber für den Betrieb
ohne die Maus installieren möchten, schlagen Sie in Ihrem Benutzerhandbuch für
Microsoft Windows nach.
❏ Legen Sie die Diskette mit dem Druckertreiber in das Diskettenlaufwerk Ihres
Computers ein. Diese Anweisung geht davon aus, daß sich die T reiberdiskette in
Laufwerk “ A:” befindet. Sie können aber auch jedes andere Laufwerk benutzen.
In diesem Fall müssen Sie lediglich anstelle von “A:” den Buchstaben des von
Ihnen gewählten Laufwerkes einsetzen.
❏ Klicken Sie in der Hauptgruppe das Systemsteuerung-Symbol doppelt an.
❏ Klicken Sie das Drucker-Symbol im Systemsteuerung-Fenster doppelt an.
Questo capitolo contiene informazioni specifiche su come utilizzare la stampante
con Microsoft Windows 3.1. Il capitolo illustra inoltre la procedura di installazione
del driver della stampante sul vostro computer per permettergli di gestire
correttamente la stampante. In questo capitolo troverete istruzioni relative ai
seguenti argomenti:
❏ Installazione della stampante sotto Microsoft Windows 3.1
❏ Configurazione della stampante
❏ Stampa di un documento
❏ Installazione dei caratteri TrueType
❏ Selezione dei caratteri dall’interno di un’applicazione
Importante!
Leggere il file "readme.txt" per ottenere informazioni non disponibili al momento
della stampa del presente documento.
Installazione della stampante sotto Microsoft Windows 3.1
Questa stampante é ideale per l’uso con computer che utilizzano l’ambiente
Microsoft Windows 3.1.
Per poter utilizzare la stampante con Windows, dovete per prima cosa eseguire la
procedura illustrata di seguito per installare il driver stampante dal dischetto da 3,5”
fornito con la stampante. Per tale procedura si presuppone che utilizziate un mouse e
che abbiate familiarità con le normali operazioni del mouse come fare clic e doppio
clic. Per ulteriori informazioni sull’utilizzo del mouse o se volete installare il driver
della stampante senza utilizzare il mouse, consultate il Manuale dell’utente di
Microsoft Windows.
❏ Inserite il dischetto contenente il driver stampante in una delle unità disco del
vostro computer. Per questa operazione si presume che stiate utilizzando l’unità
A:, ma potete utilizzare qualsiasi altra unità. Ricordate però nelle seguenti
operazioni di sostituire la lettera “A:” con la lettera dell’unità che state
utilizzando.
❏ Nel gruppo Principale, fare un doppio clic sull’icona Pannello di controllo.
❏ Fare un doppio clic sull’icona Stampanti nella finestra Pannello di controllo.
80
Page 92

❏ Click Add and the dialog box will expand to show a List of Printers.
❏ In the List of Printers: box, select Install Unlisted or Updated Printer.
❏ Click Install.
❏ This causes the Install Driver dialog box to appear, which instructs you to insert
the disk that contains the printer driver file.
❏ Click Browse.
❏ In the Directories: list, select WIN 31
❏ Click on the language you want to use and then click OK.
❏ Cliquez sur Ajouter dans la boite de dialogue pour afficher une liste
d’imprimantes.
❏ Sur la Liste des imprimantes, sélectionnez Imprimante non listeé ou mise à
jour.
❏ Cliquez sur Installer.
❏ La case de dialogue Parcourir apparaît et vous demande d’insérer la disquette
qui contient le fichier d’impression.
❏ Cliquez sur Parcourir.
❏ Dans la liste des Répertoires, sélectionnez WIN 31.
❏ Cliquez sur la langue que vous voulez utiliser, puis cliquez sur OK.
❏ In the List of Printers: box of the Add Unlisted or Updated Printer dialog
box, select the Star printer driver and then click OK.
This causes the Printers dialog box to appear. The Star Printer is now listed in
the Installed Printers: list.
81
❏ Dans la boite de dialogue Liste des imprimantes et Imprimante non listée ou
mise à jour, sélectionnez l’imprimante Star, puis cliquez sur OK.
La case de dialogue Imprimantes apparaît. L’imprimante Star est maintenant
intégrée à la liste Imprimantes installeés.
Page 93

❏ Klicken Sie Hinzufügen an, um das Dialogfeld zu erweitern, das anschließend
eine Liste von Druckern (Druckerliste) zeigt.
❏ Wählen Sie im Druckerliste-Feld Nicht aufgeführter oder aktualisierter
Drucker.
❏ Cliccare Aggiungi e il riquadro di dialogo si espande mostrando una lista di
stampanti.
❏ Nel riquadro Elenco stampanti: selezionare non in elenco o Stampante
aggiornata.
❏ Klicken Sie Installieren an.
❏ Dadurch erscheint das Treiber installieren Dialogfenster, in dem Sie die
Diskette mit dem Druckertreiber wählen können.
❏ Klicken Sie Durchsuchen an.
❏ Wählen Sie im Laufwerke-Feld Laufwerk A: oder B:
❏ Klicken Sie das Verzeichnis der gewünschten Sprache, z.B. GER für deutsch,
an.
❏ Wählen Sie im Druckerliste-Feld des Dialogfensters Drucker hinzufügen oder
aktualisierter Drucker den Star-Druckertreiber, und klicken Sie anschließend
OK an.
Hiernach erscheint das Drucker-Dialogfenster. Der Star-Drucker ist jetzt in der
Liste Installierte Drucker eingetragen.
❏ Cliccare Installa.
❏ Questo fa apparire il riquadro di dialogo Sfoglia, che chiede di inserire il
dischetto contenente il file del driver stampante.
❏ Cliccare Sfoglia.
❏ Nella lista Directories: selezionare WIN 31.
❏ Cliccare sulla lingua che si vuole usare e quindi cliccare OK.
❏ Nel riquadro Elenco stampanti: del riquadro di dialogo Aggiurgi non in
elenco o stampante aggiornata selezionare il dri v er stampante Star e cliccare
OK.
Questo fa apparire il riquadro di dialogo Printers. La stampante Star è ora
elencata nella lista Stampanti installate.
82
Page 94

❏ Double click on the name of the printer model you selected above to select it as
the default printer.
❏ Click Close to close the Printers dialog box.
Note:
Windows applications automatically print on the currently selected default printer.
If you want to print on a different printer, you must first select it.
❏ Cliquez deux fois sur le nom du modèle d’imprimante que vous avez installé
pour le sélectionner comme imprimante par défaut.
❏ Cliquez sur Fermer pour sortir de la boite de dialogue Imprimantes.
Remarque:
Les applications Windows impriment automatiquement sur l’imprimante courante
par défaut. Avant de pouvoir utiliser une autre imprimante, vous devez la
sélectionner.
83
Page 95

❏ Klicken Sie den Namen des soeben installierten Druckermodells doppelt an, um
es als Standard-Druckermodell zu übernehmen.
❏ Fare un doppio clic sul nome del modello di stampante appena installato per
selezionarlo come stampante default.
❏ Klicken Sie Schließen an, um das Druckerfenster zu entfernen.
Hinweis:
Windows-Anwendungen drucken automatisch mit dem aktuellen Standarddrucker.
Wenn Sie mit einem anderen Druck er druc k en möc hten, müssen Sie diesen zunäc hst
auswählen.
❏ Cliccare Chiudi per chiudere il riquadro di dialogo Stampanti.
Nota:
Le applicazioni Windows inviano automaticamente le stampe alla stampante
predefinita selezionata in quel momento. Se volete stampare su un’altra stampante,
dovete per prima cosa selezionarla.
84
Page 96

Getting ready to print
Before printing, there are a number of things you must first do to set up the printer.
You must select the printer driver, and the paper source, size, and orientation. Use
the following procedure to make these selections.
Note:
You do not need to perform printer driver and paper selections mentioned above
each time you print, but only if there are any changes to the last selections you made.
Préparation à l’impression
Avant de pouvoir imprimer, vous devez configurer l’imprimante en définissant
certaines informations. Vous devez sélectionner le gestionnaire d’imprimante,
l’alimentation de papier, son format et son orientation. Pour le faire, procédez
comme indiqué ci-dessous.
Remarque:
Vous n’avez pas à effectuer ces procédures à chaque fois que vous avez besoin
d’imprimer, seulement lorsque les sélections effectuées ont été modifiées.
❏ In the Windows Program Manager, open the Main group by clicking on its icon.
❏ Double click on the Control Panel icon.
❏ Double-click on the Printers icon in the Control Panel window.
❏ Double-click on the name of the printer model you selected above to choose it as
the default printer.
❏ Click on Setup to display the window for setting up your printer.
❏ From this window you select buttons that let you control a wide variety of
printer setup parameters. This manual does not include any information about
how to do this because everything you need to know is included in an on-line
manual that tells you how to use all the buttons and menus that appear. To view
the on-line manual, click on the Help button.
❏ After the printer is set up the way you want it, click on OK.
❏ Click on the Close button in the Printers window to save your setup and return
to the Program Manager.
Note:
Depending on the application software you are using , settings similar to those in the
above procedure can be made using the Print Setup command of the File menu
instead of the Control Panel.
❏ Dans le Gestionnaire de programmes de Windows, ouvrez le Groupe principal
en cliquant sur l’icône associée.
❏ Faites un double-clic sur l’icône du Panneau de configuration.
❏ Faites un double-clic sur l’icône Imprimantes dans la fenêtre du Panneau de
configuration.
❏ Faites un double-clic sur le nom du modèle d’imprimante que vous avez
sélectionné ci-dessus pour en faire l’imprimante par défaut.
❏ Cliquez sur Configurer pour afficher la fenêtre de configuration de
l’imprimante.
❏ Dans cette fenêtre, vous pouvez sélectionner des boutons permettant de contrôler
toute une variété de paramètres de configuration de l’imprimante. Ce manuel
n’explique pas comment le faire dans la mesure où tous les détails nécessaires sont
fournis dans l’aide en ligne qui décrit l’utilisation de tous les boutons et menus qui
apparaissent. Pour consulter l’aide en ligne, cliquez sur le bouton Aide.
❏ Une fois l’imprimante configurée, cliquez sur OK.
❏ Cliquez sur le bouton Annuler dans la fenêtre Imprimantes pour sauvegarder
la configuration et revenir au Gestionnaire de programmes.
Remarque:
Selon l’application utilisée, des réglages similaires à ceux indiqués dans la procédure
ci-dessus peuvent être effectués au moyen de la commande Configuration de
l’impression du menu Fichier, au lieu du Panneau de configuration.
85
Page 97

Vorbereitung für den Druck
Bevor Sie mit dem Druckvorgang beginnen, müssen Sie zunächst einige Dinge zur
Grundeinstellung (Setup) Ihres Druckers vornehmen. Sie müssen den
Druckertreiber wählen und die Papierzufuhr sowie die Papiergröße einstellen. Um
diese Wahl vorzunehmen, müssen Sie folgendes ausführen:
Hinweis:
Sie brauchen die Einstellung des Druckertr eibers und die Wahl der Papier einstellungen,
die nachfolgend erwähnt werden, nic ht vor jedem Druckvor gang vorzunehmen, sondern
nur, wenn Sie die zuletzt ausgeführten Einstellungen ändern möchten.
Impostazione della stampante
Prima di stampare un documento, vi sono alcune operazioni da compiere per
configurare la stampante, ossia: specificare il driver della stampante, e inoltre il tipo
di alimentazione della carta, la dimensione e l’orientamento della pagina. Per
specificare queste impostazioni, eseguite la seguente procedura.
Nota:
Non è necessario specificare il driver della stampante e le impostazioni della
pagina ogni volta che volete eseguire una stampa, ma solo se vi sono delle
modifiche da fare alle ultime impostazioni specificate.
❏ Öffnen Sie im Windows Programm-Manager die Hauptgruppe, indem Sie auf
das Symbol klicken.
❏ Doppelklick auf das Symbol Systemsteuerung.
❏ Doppelklick auf das Symbol Drucker im Fenster Systemsteuerung.
❏ Doppelklick auf die Bezeichnung des Druckermodells, das Sie oben gewählt
haben, um dieses als Standarddrucker einzustellen.
❏ Klick auf Einrichten, um das Fenster zur Grundeinstellung Ihres Druckers
anzuzeigen.
❏ In diesem Fenster können Sie Schaltfelder wählen, die Ihnen die Einstellung einer
Vielzahl v on Druck erparametern erlaubt. In diesem Handbuch finden Sie keine
Informationen darüber, wie das zu erfolgen hat, weil alles, was Sie wissen müssen,
in einem Online-Handbuch enthalten ist, das Ihnen Auskunft darüber gibt, wie Sie
die angezeigten Schaltfelder und Menüs verwenden müssen. Um das OnlineHandbuch aufzurufen, klicken Sie auf das Schaltfeld Hilfe.
❏ Nachdem der Setup des Druckers in der von Ihnen gewünschten Weise erfolgt
ist, klicken Sie auf OK.
❏ Klicken Sie auf das Schaltfeld Schließen im Dialogfeld des Druckers, um
Ihren Setup zu speichern und um zum Programm-Manager zurückzukehren
Hinweis:
.
Je nach Anwendungspr o gr amm, das Sie verwenden, können ähnlic he Einstellung en
wie beim oben gezeigten Vorgang vorgenommen werden, wobei der Befehl
Drucker Setup im Dateimenü anstelle der Systemsteuerung verwendet wird.
❏ Dal Program Manager di Windows, aprite il gruppo Principale facendo doppio
clic sulla sua icona.
❏ Fate doppio clic sull’icona del Pannello di controllo.
❏ Fate doppio clic sull’icona Stampanti nella finestra del Pannello di controllo.
❏ Fate doppio clic sul modello della stampante selezionata precedentemente per
specificare che desiderate utilizzarla come stampante predefinita.
❏ Scegliete il pulsante Imposta per visualizzare la finestra di dialogo nella quale
impostare le opzioni di stampa.
❏ In questa finestra di dialogo avete a disposizione dei pulsanti con i quali poter
impostare svariati parametri di configurazione della stampante. Questo manuale
non fornisce alcuna istruzione su come utilizzare il programma di
configurazione, in quanto tutte le informazioni necessarie sono contenute in una
guida in linea che spiega come utilizzare i vari pulsanti e le opzioni contenute
nella finestra. Per visualizzare la guida, scegliete il pulsante Help (Aiuto).
❏ OK.
❏ Scegliete il pulsante Chiudi nella finestra di dialogo delle Stampanti per
salvare la vostra configurazione e tornare al Program Manager.
Nota:
A seconda delle applicazioni che utilizzate, potete impostare opzioni di stampa
simili a quelle appena descritte tramite il comando Imposta Stampante dal
menu File dell’applicazione invece di accedere al Pannello di controllo.
86
Page 98

Printing a document
The following Print window appears when you select the Print command of the
File menu of your Windows application.
Impression d’un document
La fenêtre Imprimer ci-dessous apparaît lorsque vous sélectionner la commande
Imprimer du menu Fichier dans l’application Windows.
Note:
The actual appearance of the Print window may differ somewhat depending on the
application you are using.
Use this window to specify the range of the pages to be printed, the quality of the
printing (in dots per inch), and the number of copies you want to print. Note also that
there are boxes that you can select to specify printing to a file or collating (printing
from back to front).
You can change the printer setup by clicking on the Setup button. When you do, the
following window for setting up your printer appears on the display.
Make changes by clicking on the appropriate radio button or highlighting your
selection on the appropriate pull-down menu.
Remarque:
L’apparence réelle de la fenêtre Imprimer peut être différente de celle illustrée cidessus, selon l’application utilisée.
Cette fenêtre vous permet de spécifier les pages à imprimer, la qualité d’impression
(en points par pouce) et le nombre de copies à imprimer. A noter qu’elle contient
également des zones dans lesquelles vous pouvez spécifier l’impression dans un
fichier ou le triage des copies (imprimées de la dernière page à la première).
Pour modifier la configuration de l’imprimante, cliquez sur le bouton
Configuration. La fenêtre suivante apparaît à l’écran pour vous permettre de
configurer l’imprimante.
Apportez les modifications nécessaires en cliquant sur les icônes appropriées ou en
mettant des options en surbrillance dans le menu déroulant approprié.
87
Page 99

Drucken eines Schriftstücks
Das nachstehende Dialogfeld Drucken erscheint, wenn Sie den Befehl Drucken im
Datei-Menü Ihrer Windows-Anwendung, in diesem F alle Windows Write, benutzen.
Stampa di un documento
Selezionando il comando Stampa dal menu File della vostra applicazione
Windows, apparirà la finestra di dialogo Stampa come quella illustrata sotto.
Hinweis:
Das tatsächliche Aussehen des Dialogfeldes Druc ken, das angezeigt wir d, kann sic h
je nach der von Ihnen verwendeten Anwendung etwas unterschiedlich darstellen.
In diesem Fenster können Sie angeben, welche Papiermaße bedruckt werden sollen,
welche Druckqualität (in Punkten pro Zoll) Sie verwenden möchten und welche
Anzahl Kopien Sie erstellen möchten. Bitte beachten Sie, daß es auch Schaltfelder
gibt, mit denen Sie angeben können, ob Sie in eine Datei oder in sortierter Weise
(Drucken in umgekehrter Reihenfolge von hinten nach vorne) drucken möchten.
Sie können die Druckereinstellung durch Klicken auf das Schaltfeld Einrichten
ändern. In diesem Falle erscheint das nachstehende Dialogfeld zum Einrichten Ihres
Druckers in der Anzeige.
Alle von Ihnen gewünschten Änderungen können Sie durch Klicken auf das
entsprechende Schaltfeld oder durch Markieren Ihrer Wahl an der entsprechenden
Stelle im Bildlaufmenü vornehmen.
Nota:
La finestra di dialogo di Stampa che viene visualizzata può aver e un aspetto diverso
a seconda dell’applicazione che state utilizzando.
In questa finestra di dialogo potete specificare opzioni come l’intervallo delle pagine
da stampare, la qualità della stampa (in punti per pollice, dpi) e il numero di copie
che volete stampare. Osservate che vi sono anche delle caselle di controllo che
potete selezionare per specificare se volete stampare su un file oppure ordinare le
copie (ossia, stampare dall’ultima pagina alla prima).
Potete cambiare le impostazioni della stampante scegliendo il pulsante Imposta
stampante. In questo modo verrà visualizzata la seguente finestra di dialogo
relativa all’impostazione della stampante.
Modificate le opzioni desiderate selezionando il pulsante opzione appropriato o
evidenziando con il mouse un elemento dal relativo elenco a discesa.
88
Page 100

Installing TrueType fonts
The TrueType fonts that are supplied on the 3.5” floppy disk that comes with the
printer can be used only when you are running Windows 3.1 or later. Use the
following procedure to install the fonts.
❏ Launch Windows.
❏ Open the Windows Control Panel.
Installation des polices TrueType
Les polices TrueType fournies sur la disquette 3,5 pouces qui accompagne
l’imprimante ne peuvent être utilisées que sous Windows 3.1 ou une version
supérieur Pour installer les polices, procédez comme indiqué ci-dessous.
❏ Lancez Windows.
❏ Ouvrez le Panneau de configuration sous Windows.
❏ Double-click the Fonts icon and the Fonts dialog box appears.
Click Add and the Add Fonts dialog box appears.
❏ Insert the disk that contains the fonts into one of your computer’s disk drives.
This explanation assumes you are using a drive named “A:”, but you could use
any drive. Just remember to change the “A:” in the following steps to the name
of the drive you are using.
❏ Select the letter that represents the drive where the floppy disk is installed. When
you do, the names of all the fonts on the disk appear in the List of Fonts
window.Select the fonts you want to install by clicking on their names. If you
want to install all of the fonts, click Select All.
89
❏ Cliquez deux fois sur l’icône Polices. La zone de dialogue Polices apparaît,
Cliquez sur Ajouter. La zone de dialogue Ajouter apparaît.
❏ Insérez la disquette contenant les polices dans un des lecteurs de disquettes de
l’ordinateur. Ce manuel suppose que vous utilisez le lecteur «A:», mais vous
pouvez très bien utiliser tout autre lecteur en remplaçant la lettre «A:» par la
lettre du lecteur approprié dans les instructions suivantes.
❏ Sélectionnez la lettre du lecteur qui contient la disquette. Ceci fait, le nom de
toutes les polices figurant sur la disquette s’affiche dans la fenêtre Liste des
polices. Sélectionnez les polices à installer en cliquant sur leur nom. Pour
installer toutes les polices, cliquez sur Toutes.
 Loading...