

Page 1

USERS MANUAL
LC-240C
LC-240
DOT MATRIX PRINTER
IMPRIMANTE MATRICIELLE
PUNKT-MATRIX-DRUCKER
STAMPANTE AD AGHI
HBA-ML 80825300
GUIDE D’UTILISATION
BEDIENUNGSHANDBUCH
MANUALE OPERATIVO
Page 2

VDE Statement
The abo
LC-240C, LC-240, LC24-30, NX-2450, PT
This device carries the VDE RFI protection mark to certify that it meets the radio
interference requirements of the Postal Ordinance No. 243/1991. The additional
marking “Vfg. 243/P” expresses in short form that this is a peripheral device (not
operable alone) which only individually meets the Class B RFI requirements in
accordance with the DIN VDE 0878 part 3/11.89 and the Postal Ordinance 243/
1991.
If this device is operated in conjunction with other devices within a set-up, in order
to take advantage of a “General (Operating) Authorization” in accordance with the
Postal Ordinance 243/1991, the complete set-up must comply with the Class B
limits in accordance with the DIN VDE 0878 part 3/11.89, as well as satisfy the
preconditions in accordance with §2 and the prerequisites in accordance with §3 of
the Postal Ordinance 243/1991.
As a rule, this is only fulfilled when the device is operated in a set-up which has been
type-tested and provided with a VDE RFI protection mark with the additional
marking “Vfg 243”.
Machine Noise Information Ordinance 3. GSGV, January 18, 1991: The sound
pressure level at the operator position is equal or less than 70 dB(A) according to
ISO 7779.
ve statement applies only to printers marketed in Germany.
Trademark acknowledgments
LQ850, LQ860, LQ1050, LQ1060: Seiko Epson Corporation
IBM PC, IBM Proprinter X24E, IBM Proprinter XL24E, IBM Proprinter X24,
IBM Proprinter XL24: International Business Machines Corporation.
TrueType: Apple Computer Inc.
MS-DOS, Microsoft Windows, Windows 3.1: Microsoft Corporation
-10Y, SPC-8K: Star Micronics Co. Ltd.
Notice
• All rights reserved. Reproduction of any part of this manual in any form
whatsoever, without STAR’s express permission, is strictly forbidden.
• The contents of this manual are subject to change without notice.
• All efforts have been made to ensure the accuracy of the contents of this manual
at the time of printing. However, should any errors be found, STAR would
greatly appreciate being informed of them.
• The above notwithstanding, STAR can assume no responsibility for any errors in
this manual.
© Copyright 1994 Star Micronics Co., Ltd
Note concernant les marques déposées
LC-240C, LC-240, LC24-30, NX-2450, PT-10Y, SPC-8K: Star Micronics Co. Ltd.
LQ850, LQ860, LQ1050, LQ1060: Seiko Epson Corporation
IBM PC, IBM Proprinter X24E, IBM Proprinter XL24E, IBM Proprinter X24,
IBM Proprinter XL24: International Business Machines Corporation.
TrueType: Apple Computer Inc.
MS-DOS, Microsoft Windows, Windows 3.1: Microsoft Corporation
Avis
• Tous droits réservés. Il est interdit de reproduire tout ou partie de ce manuel sous
quelque forme que ce soit sans le consentement préalable de STAR.
• Le contenu de ce manuel pourra être modifié sans préavis.
• Tous les efforts nécessaires ont été mis en oeuvre pour garantir l’exactitude de ce
manuel au moment de la mise sous presse. STAR aimerait toutefois être tenu
informé des erreurs éventuellement relevées.
• Nonobstant la clause ci-dessus, STAR décline toute responsabilité pour les
erreurs éventuellement contenues dans ce manuel.
© Copyright 1994 Star Micronics Co., Ltd.
Page 3

Zur Einhaltung der FTZ-Vorschriften ist es notwendig, daß alle Verbindungen zum
Drucker mit abgeschirmten Kabeln ausgeführt sind.
Das Öffnen des Gerätes, sowie das Wechseln des Netzkabels darf nur durch geschultes
Fachpersonal vorgenommen werden.
Maschinenlärminformationsverordnung 3. GSVG, 18.01, 1991: Der arbeitsplatzbezogene Schalldruckpegel beträgt 70 dB (A) oder weniger gemäß ISO 7779.
Die obige Angabe bezieht sich nur auf in Deutschland vertriebene Drucker.
Warenzeichen-Hinweis
LC-240C, LC-240, LC24-30, NX-2450, PT-10Y, SPC-8K: Star Micronics Co. Ltd.
LQ850, LQ860, LQ1050, LQ1060: Seiko Epson Corporation
IBM PC, IBM Proprinter X24E, IBM Proprinter XL24E, IBM Proprinter X24,
IBM Proprinter XL24: International Business Machines Corporation.
TrueType: Apple Computer Inc.
MS-DOS, Microsoft Windows, Windows 3.1: Microsoft Corporation
Hinweis
• Alle Rechte vorbehalten. Reproduktionen dieses Handbuchs sowie
irgendwelcher Teile und Ausschnitte sind ohne ausdrückliche Genehmigung
durch STAR streng untersagt.
• Der Inhalt dieses Handbuchs unterliegt Änderungen ohne vorherige
Ankündigung.
• Es wurden alle denkbaren Bemühungen unternommen, die Genauigkeit des
Inhalts dieses Handbuchs zur Zeit der Drucklegung zu gewährleisten. Sollten Sie
jedoch Fehler feststellen, würde STAR es sehr begrüßen, von Ihnen darüber
informiert zu werden.
• Ungeachtet des vorher Gesagten übernimmt STAR keine Verantwortung für
Fehler in diesem Handbuch.
© Copyright 1994 Star Micronics Co., Ltd.
Dieses Gerät trägt als Hinweis, daß es den Funk-Entstöranforderungen der DBPVerfügung Nr. 243/1991 entspricht, das VDE-Funkschutzzeichen. Der Zusatz
“Vfg. 243/P” soll in Kurzform ausdrücken, daß es sich um ein peripheres (nicht
selbständig betreibbares) Gerät handelt, das nur einzeln den Funk-Entstöranforderungen der Grenzwertklasse B nach DIN VDE 0878 Teil 3/11.89 und der DBPVerfügung 243/1991 entspricht.
Wird das Gerät innerhalb einer Anlage zusammen mit anderen Geräten betrieben,
muß bei Inanspruchnahme der “Allgemeinen (Betriebs-) Genehmigung” nach der
DBP-Verfügung 243/1991 die gesamte Anlage der Grenzwertklasse B nach DIN
VDE 088 Teil 3/11.89 sowie den Voraussetzungen nach §2 und den Auflagen
nach §3 der DBP-Verfügung 243/1991 entsprechen.
Dies ist in der Regel nur dann erfüllt, wenn das Gerät in einer Anlage betrieben
wird, die typgeprüft und mit dem VDE-Funkschutzzeichen mit dem Zusatz “Vig.
243” gekennzeichnet ist.
Riconoscimento di marchio registrato
LC-240C, LC-240, LC24-30, NX-2450, PT-10Y, SPC-8K: Star Micronics Co. Ltd.
LQ850, LQ860, LQ1050, LQ1060: Seiko Epson Corporation
IBM PC, IBM Proprinter X24E, IBM Proprinter XL24E, IBM Proprinter X24,
IBM Proprinter XL24: International Business Machines Corporation.
TrueType: Apple Computer Inc.
MS-DOS, Microsoft Windows, Windows 3.1: Microsoft Corporation
Avvertenze
• Tutti i diritti riservati. La riproduzione di qualsiasi parte di questo manuale in
qualsiasi forma o mezzo, senza il diretto consenso della STAR, è severamente
proibita.
• Le informazioni contenute nel presente manuale sono soggette a modifiche
senza preavviso.
• Malgrado siano state prese tutte le precauzioni per garantire l’accuratezza delle
informazioni contenute nel presente manuale al momento della stampa, la ST AR
sarà ben lieta di ricevere segnalazioni degli eventuali errori riscontrati.
• Nonostante quanto citato sopra, la STAR non si assume nessuna responsabilità
per eventuali errori contenuti nel presente manuale.
© Copyright 1994 Star Micronics Co., Ltd.
Page 4

About this manual
A propos de ce manuel
This manual describes how to set up, use, and care for the Star LC-240C color
printer, and the LC-240 monochrome printer. All of the operations contained in this
manual apply to all of these models, except where specifically noted otherwise.
The following is a list of what you can expect to find in each chapter.
Chapter 1 Choosing a place for your printer, unpacking and setup,
ribbon cassette installation, loading paper, connecting to your
printer
Chapter 2 Installing and starting up, and using User Setup Utility
Chapter 3 How to set up for printing with Microsoft Windows 3.1, how
to prepare for printing, how to print a document, how to
install TrueType fonts, how to select fonts from within an
application
Chapter 4 How to use the control panel
Chapter 5 Selecting the best type of paper, adjusting for paper
thickness, manual sheet feeding, clearing paper jams
Chapter 6 How to set up for printing with MS-DOS, how to select fonts
from within an application
Chapter 7 How to pause printing, paper feed operations, form feeding
Appendix A How to deal with printing problems
Appendix B Specifications
Appendix C Interface information
Appendix D Character sets
Appendix E Printer control codes
Ce manuel décrit la configuration, l’utilisation et l’entretien des imprimantes couleur
Star LC-240C, ainsi que des imprimantes monochrome LC-240. Sauf indication
contraire, toutes les opérations décrites dans ce manuel sont applicables à ces deux
modèles.
Le contenu des différents chapitres est indiqué ci-dessous :
Chapitre 1 Choix d’un emplacement, déballage et configuration de
l’imprimante, installation d’une cassette de ruban,
chargement du papier, connexion de l’imprimante.
Chapitre 2 Installation et démarrage au moyen de l’utilitaire de
configuration.
Chapitre 3 Configuration de l’impression sous Microsoft Windows 3.1,
préparation à l’impression, impression d’un document,
installation de polices TrueType, sélection de polices dans
une application.
Chapitre 4 Utilisation du panneau de commande.
Chapitre 5 Sélection du meilleur type de papier, réglage d’épaisseur du
papier, alimentation manuelle, suppression des bourrages
papier.
Chapitre 6 Configuration de l’impression sous MS-DOS, sélection de
polices dans une application.
Chapitre 7 Interruption provisoire de l’impression, opérations
d’alimentation du papier, alimentation de formulaires.
Annexe A Résolution des problèmes d’impression.
Annexe B Caractéristiques techniques.
Annexe C Informations sur l’interface.
Annexe D Jeux de caractères.
Annexe E Codes de commande d’imprimante.
Page 5

Über dieses Handbuch
Informazioni sul manuale
Dieses Handbuch beschreibt, wie Sie den Star Farbdrucker LC-240C sowie den
Monochrom-Drucker LC-240 einrichten, benutzen und pflegen können. Alle in
diesem Handbuch beschriebenen Vorgänge gelten für beide genannten Modelle
Ausnahmen sind ausdrücklich angemerkt.
Die folgende Liste zeigt Ihnen, was Sie in den einzelnen Kapiteln finden können.
Kapitel 1 Wahl eines Stellplatzes für Ihren Drucker, Auspacken und
Grundeinstellung (Setup), Einsetzen der Farbbandkassette,
Einlegen von Papier, Anschluß Ihres Druckers
Kapitel 2 Aufstellung und Inbetriebnahme einschließlich der
Verwendung des Drucker Setup Programms
Kapitel 3 Wie erfolgt die Grundeinstellung (Setup) zum Druck unter
Microsoft Windows 3.1, wie wird der Druckvorgang
vorbereitet, wie wird ein Schriftstück gedruckt, wie werden
TrueType-Schriftarten installiert, wie erfolgt die Wahl von
Schriftarten innerhalb einer Anwendung
Kapitel 4 Wie benutzt man das Bedienerfeld
Kapitel 5 Wahl der besten Papierart, Einstellung der Papierstärke,
manueller Einzelblatteinzug, Beseitigung eines Papierstaus
Kapitel 6 Wie erfolgt die Grundeinstellung (Setup) zum Drucken unter
MS-DOS, wie wählt man Schriftarten innerhalb einer
Anwendung aus
Questo manuale descrive le procedure di installazione, utilizzo e manutenzione
relative alla stampante a colori Star LC-240C e alla stampante monocromatica
LC-240. Tutte le operazioni contenute in questo manuale si riferiscono ai modelli di
stampante precedentemente indicati, tranne dove specificato altrimenti.
Di seguito viene presentato il contenuto di ciascun capitolo.
Capitolo 1 Scelta del luogo dove installare la stampante, disimballaggio
e installazione, installazione della cartuccia nastro,
inserimento della carta, collegamento della stampante al
computer
Capitolo 2 Installazione, avviamento ed utilizzo del programma User
Setup Utility
Capitolo 3 Installazione della stampante sotto Microsoft Windows 3.1,
configurazione della stampante, stampa di un documento,
installazione dei caratteri TrueType, selezione dei caratteri
dall’interno di un’applicazione
Capitolo 4 Istruzioni sull’utilizzo del pannello di controllo
Capitolo 5 Selezione del tipo di carta più idoneo, regolazione della
distanza di stampa, inserimento manuale dei fogli, rimozione
della carta inceppata
Capitolo 6 Installazione della stampante in ambiente MS-DOS,
selezione dei caratteri dall’interno di una applicazione
Kapitel 7 Wie wird der Druck vorübergehend unterbrochen, wie erfolgt
die Papierzufuhr und die Eingabe von Formularen
Anhang A Wie verhält man sich bei Druckproblemen
Anhang B Technische Daten
Anhang C Informationen über Schnittstellen
Anhang D Zeichensätze
Anhang E Steuercodes des Druckers
Capitolo 7 Esecuzione di una pausa di stampa, avanzamento carta, salto
pagina
Appendice A Ricerca e soluzione dei problemi di stampa
Appendice B Specifiche tecniche
Appendice C Informazioni sull’interfaccia
Appendice D Set di caratteri
Appendice E Codici di controllo della stampante
Page 6

Contents
Chapter 1: Printer Setup
Table des matières
Choosing a place for the printer ................................................................. 1
Unpacking the printer ................................................................................. 3
General guide ............................................................................................. 3
Opening the front cover ..............................................................................5
Removing the print head protector (LC-240C only) .................................. 5
About ribbon cartridges ............................................................................. 5
Installing the ribbon cartridge .................................................................... 7
Installing the paper support ........................................................................9
Connecting to your computer ..................................................................... 9
Connecting to a power outlet ................................................................... 11
Loading paper .......................................................................................... 13
Detaching the automatic sheet feeder ...................................................... 17
Re-installing the automatic sheet feeder .................................................. 19
......................................................................... 1
Chapter 2: User Setup Utility ............................................................. 21
Installing the User Setup Utility ............................................................... 21
Starting up the User Setup Utility ............................................................ 25
Changing User Setup Utility parameter settings ......................................27
Using the General window ....................................................................... 29
Using the Font window ............................................................................ 33
Using the Paper window .......................................................................... 37
Adjusting the printer’s vertical alignment ............................................... 39
Changing the printer port ......................................................................... 43
Saving setup data as a new configuration file ..........................................43
Saving changed setup data in the current configuration file .................... 45
Importing setup data from a configuration file ........................................ 45
Returning to default settings .................................................................... 47
Exiting the User Setup Utility .................................................................. 47
Using the Help window ............................................................................ 49
Chapter 3: Using the Printer with Windows 3.1 ........................ 51
Setting up for printing with Microsoft Windows 3.1 ...............................51
Getting ready to print ............................................................................... 55
Printing a document ................................................................................. 59
Installing TrueType fonts .........................................................................61
Selecting fonts in Windows applications ................................................. 63
Chapitre 1 : Configuration de l’imprimante ................................. 1
Choix d’un emplacement pour l’imprimante ............................................. 1
Déballage de l’imprimante ......................................................................... 4
Guide général ............................................................................................. 4
Ouverture du capot avant ........................................................................... 6
Retrait de la protection de la tête d’impression (LC-240C uniquement) ... 6
A propos des cartouches de ruban .............................................................. 6
Installation d’une cartouche de ruban ........................................................ 8
Installation du support papier ................................................................... 10
Connexion de l’imprimante à l’ordinateur ............................................... 10
Connexion à une prise secteur ................................................................. 12
Chargement du papier .............................................................................. 14
Retrait de l’introducteur feuille à feuille .................................................. 18
Réinstallation de l’introducteur feuille à feuille ....................................... 20
Chapitre 2 : Utilitaire de configuration ......................................... 21
Installation de l’utilitaire de configuration ............................................... 21
Lancement de l’utilitaire de configuration ............................................... 25
Modification des paramètres de l’utilitaire de configuration ................... 27
Utilisation de la fenêtre Générale.............................................................. 29
Utilisation de la fenêtre Police ................................................................. 33
Utilisation de la fenêtre Papier ................................................................. 37
Réglage de l’ajustement vertical de l’imprimante ................................... 39
Changement du port d’imprimante .......................................................... 43
Sauvegarde des données de configuration dans un nouveau
fichier de configuration ...................................................................... 43
Sauvegarde des données de configuration modifiées dans
le fichier courant ............................................................................... 45
Importation des données de configuration à partir d’un
fichier de configuration ...................................................................... 45
Rétablissement des valeurs par défaut ..................................................... 47
Sortie de l’utilitaire de configuration ....................................................... 47
Utilisation de la fenêtre d’aide ................................................................. 49
Chapitre 3 : Utilisation de l’imprimante sous Windows 3.1.. 51
Configuration de l’impression sous Microsoft Windows 3.1 ................... 51
Préparation à l’impression ....................................................................... 55
Impression d’un document ....................................................................... 59
Installation des polices TrueType ............................................................. 61
Sélection des polices dans les applications Windows .............................. 63
Page 7

Inhaltsverzeichnis
Sommario
Kapitel 1: Grudeinstellung (Setup) des Druckers ....................... 2
Wahl eines Stellplatzes für den Drucker.....................................................2
Auspacken des Druckers............................................................................. 4
Allgemeiner Leitfaden ................................................................................ 4
Öffnen der Frontabdeckung ........................................................................ 6
Abnehmen des Druckkopfschutzes (nur beim LC-240C)...........................6
Über die Farbbandkassetten........................................................................ 6
Einsetzen der Farbbandkassette .................................................................. 8
Anbringen des Papierhalters ..................................................................... 10
Anschluß an Ihren Computer.................................................................... 10
Anschluß an eine Netzsteckdose...............................................................12
Einlegen von Papier .................................................................................. 14
Abnehmen der automatischen Papierzufuhr ............................................. 18
Wiedereinsetzen der automatischen Papierzufuhr.................................... 20
Kapitel 2: Drucker Setup Programm............................................... 22
Installieren des Drucker Setup Programms............................................... 22
Starten des Drucker Setup Programms ..................................................... 26
Änderung der Parametereinstellungen des Drucker Setup Programms.... 28
Benutzung des Fensters Allgemein...........................................................30
Benutzung des Fensters Schrift.................................................................34
Benutzung des Fensters Papier ................................................................. 38
Einstellung der Vertikalen Punktausrichtung ........................................... 40
Änderung der Schnittstelle........................................................................44
Speichern der Setup-Daten in einer neuen Konfigurationsdatei.............. 44
Speichern der geänderten Setup-Daten in der aktuellen
Konfigurationsdatei............................................................................ 46
Laden von Drucker Setup-Daten aus einer Konfigurationsdatei .............. 46
Rückkehr zu den Defaulteinstellungen ..................................................... 48
Beenden des Drucker Setup Programms................................................... 48
Benutzung des Fensters Hilfe ................................................................... 50
Kapitel 3: Einsatz des Druckers unter Windows 3.1................. 52
Grundeinstellung (Setup) zum Drucken unter Microsoft Windows 3.1...... 52
Vorbereitung für den Druck...................................................................... 56
Drucken eines Schriftstücks......................................................................60
Installieren von TrueType-Schriftarten..................................................... 62
Wahl von Schriftarten in Windows-Anwendungen.................................. 64
Capitolo 1: Installazione della stampante........................................ 2
Scelta del luogo dove installare la stampante ............................................. 2
Disimballaggio della stampante.................................................................. 4
Panoramica generale della stampante......................................................... 4
Apertura del coperchio frontale .................................................................. 6
Rimozione dell’imballo di protezione della testina di stampa
(solo per il modello LC-240C)............................................................. 6
Due parole sulle cartucce nastro ................................................................. 6
Installazione della cartuccia nastro............................................................. 8
Installazione del supporto appoggia-carta................................................. 10
Collegamento della stampante al computer.............................................. 10
Collegamento alla presa elettrica.............................................................. 12
Inserimento della carta.............................................................................. 14
Smontaggio dell’alimentatore automatico di fogli singoli........................ 18
Reinstallazione dell’alimentatore automatico di fogli singoli .................. 20
Capitolo 2: Il programma User Setup Utility.............................. 22
Installazione del programma User Setup Utility...................................... 22
Avviamento del programma User Setup Utility ...................................... 26
Modifica dei parametri di configurazione del programma
User Setup Utility.............................................................................. 28
Uso della schermata Generale.................................................................. 30
Uso della schermata Carattere.................................................................. 34
Uso della schermata Carta........................................................................ 38
Regolazione dell’allineamento verticale.................................................. 40
Modifica della porta della stampante....................................................... 44
Memorizzazione delle impostazioni in un nuovo file di configurazione ... 44
Memorizzazione delle modifiche alle impostazioni nel file
di configurazione corrente.................................................................. 46
Importazione delle impostazioni da un file di configurazione.................. 46
Ripristino delle impostazioni predefinite.................................................. 48
Uscita dal programma User Setup Utility................................................. 48
Uso della schermata “?” Aiuto.................................................................. 50
Capitolo 3: Utilizzo della stampante con Windows 3.1............ 52
Installazione della stampante sotto Microsoft Windows 3.1 .................... 52
Impostazione della stampante................................................................... 56
Stampa di un documento........................................................................... 60
Installazione dei caratteri TrueType ......................................................... 62
Selezione dei caratteri all’interno delle applicazioni Windows................ 64
Page 8

Chapter 4: Control Panel Operations ............................................. 65
To enter the Sleep Mode .......................................................................... 65
To restore full power from the Sleep Mode ............................................. 65
To switch between the Ready and Not-Ready Modes ............................. 67
To feed single-sheet paper into the printer ............................................... 67
To eject single-sheet paper from the printer ............................................ 67
To advance paper ..................................................................................... 67
Errors ........................................................................................................ 67
Chapitre 4 : Utilisation du panneau de commande................... 66
Passage en mode de veille ........................................................................ 66
Sortie du mode de veille ........................................................................... 66
Passage du mode Ready au mode Not-Ready et vice versa ..................... 67
Alimentation de feuilles individuelles dans l’imprimante ....................... 67
Ejection d’une feuille individuelle de l’imprimante ................................ 67
Comment faire avance le papier ............................................................... 67
Erreurs ...................................................................................................... 67
Chapter 5: Paper Handling ................................................................. 69
Selecting paper types ............................................................................... 69
Adjusting for paper thickness .................................................................. 71
Automatic sheet feeding ........................................................................... 71
Manual sheet feeding ............................................................................... 73
Clearing paper jams ................................................................................. 73
Chapter 6: Using the Printer with MS-DOS................................. 75
Setting up for printing with MS-DOS ......................................................75
Selecting fonts in MS-DOS applications ................................................. 77
Chapter 7: Other Printing Features ................................................ 79
How to pause printing .............................................................................. 79
Line feed .................................................................................................. 79
Form feed ................................................................................................. 79
Appendix A: Troubleshooting ........................................................... 81
Testing the printer .................................................................................... 81
Troubleshooting guide...............................................................................87
Checking system software settings in Windows..................................... 101
Checking system software settings in MS-DOS..................................... 103
Checking the port settings in the User Setup Utility .............................. 103
Appendix B: Specifications ............................................................... 105
Appendix C: Interface Pin Outs ..................................................... 109
Appendix D: Character Sets............................................................. 110
Appendix E: Printer Control Codes.............................................. 113
Chapitre 5 : Manipulation du papier............................................... 69
Sélection du type de papier ...................................................................... 69
Réglage de l’épaisseur du papier ............................................................. 72
Alimentation automatique ........................................................................ 72
Alimentation manuelle ............................................................................. 74
Suppression des bourrages de papier ....................................................... 74
Chapitre 6 : Utilisation de l’imprimante sous MS-DOS.......... 75
Configuration de l’impression sous MS-DOS ......................................... 75
Sélection de polices dans les applications MS-DOS ............................... 77
Chapitre 7 : Autres fonctions d’impression.................................. 79
Pauses en cours d’impression .................................................................. 79
Saut de ligne ............................................................................................. 79
Saut de page ............................................................................................. 79
Annexe A : Dépannage ........................................................................... 81
Comment tester l’imprimante .................................................................. 81
Guide de dépannage.................................................................................. 87
Vérification des paramètres du logiciel système sous Windows.............101
Vérification des paramètres du logiciel système sous MS-DOS............. 103
Vérification des paramètres de port définis dans
l’utilitaire de configuration .............................................................. 103
Annexe B : Caractéristiques techniques....................................... 105
Annexe C : Disposition des broches pour interfaces............... 109
Annexe D : Jeux de caractères.......................................................... 110
Annexe E : Codes de commande d’imprimante........................ 113
Page 9

Kapitel 4: Handhabung des Bedienerfeldes.................................. 66
Drucker in den Sleep-Modus schalten ...................................................... 66
Drucker aus dem Sleep-Modus in den Bereit-Modus schalten.................66
Schaltung zwischen den Betriebsarten Ready (Bereit)
und Not-Ready (Nicht-Bereit)............................................................68
Einzug von Einzelblättern in den Drucker................................................ 68
Auswerfen von Einzelblättern aus dem Drucker ...................................... 68
Papiervorschub..........................................................................................68
Fehler ........................................................................................................ 68
Kapitel 5: Papierhandhabung............................................................. 70
Wahl der Papierart..................................................................................... 70
Einstellung der Papierstärke...................................................................... 72
Automatische Papierzufuhr.......................................................................72
Manueller Papiereinzug ............................................................................ 74
Beseitigung eines Papierstaus................................................................... 74
Kapitel 6: Verwendung des Druckers unter MS-DOS............. 76
Grundeinstellung (Setup) unter MS-DOS.................................................76
Wahl von Schriftarten in MS-DOS-Anwendungen .................................. 78
Kapitel 7: Sonstige Druckerfunktionen........................................... 80
Wie man den Druck unterbricht................................................................80
Zeilenvorschub..........................................................................................80
Blattvorschub ............................................................................................ 80
Anhang A: Fehlerbehebung ................................................................. 82
Testen des Druckers.................................................................................. 82
Anleitung zur Fehlerbehebung..................................................................88
Überprüfen der System-Software-Einstellungen unter Windows........... 102
Überprüfen der Einstellungen der System-Software unter MS-DOS..... 104
Überprüfung der Anschlußeinstellungen im Drucker Setup Programm.... 104
Anhang B: Technische Daten............................................................. 106
Anhang C: Interface-Pin-Belegung.................................................109
Anhang D: Zeichensätze....................................................................... 110
Anhang E: Steuercodes des Druckers............................................ 113
Capitolo 4: Il pannello di controllo e le sue funzioni................. 66
Attivazione del modo “Sleep”................................................................... 66
Disattivazione del modo “Sleep” e ripristino dell’ alimentazione normale.... 66
Passaggio dal modo “Ready” al modo “Not-Ready”................................ 68
Alimentazione di fogli singoli nella stampante......................................... 68
Espulsione di fogli singoli dalla stampante............................................... 68
Avanzamento della carta........................................................................... 68
Segnalazioni d’errore................................................................................ 68
Capitolo 5: Uso della carta.................................................................... 70
Selezione della carta.................................................................................. 70
Regolazione della distanza di stampa ....................................................... 72
Alimentazione automatica dei fogli.......................................................... 72
Alimentazione manuale dei fogli.............................................................. 74
Rimozione della carta inceppata............................................................... 74
Capitolo 6: Utilizzo della stampante in ambiente MS-DOS... 76
Installazione della stampante in ambiente MS-DOS ................................ 76
Selezione dei caratteri all’interno delle applicazioni MS-DOS................ 78
Capitolo 7: Altre funzionalità della stampante............................ 80
Come mettere in pausa la stampante......................................................... 80
Avanzamento linea.................................................................................... 80
Salto pagina............................................................................................... 80
Appendice A: Ricerca e soluzione dei problemi.......................... 82
Esecuzione dei test di stampa.................................................................... 82
Guida alla risoluzione dei problemi.......................................................... 88
Controllo delle impostazioni del software di sistema in Windows......... 102
Controllo delle impostazioni del software di sistema in MS-DOS......... 104
Controllo dell’impostazione della porta nel programma
User Setup Utility............................................................................. 104
Appendice B: Specifiche tecniche................................................... 106
Appendice C: Uscite a terminale interfaccia.............................. 109
Appendice D: Set di caratteri............................................................ 110
Appendice E: Codici di controllo della stampante................... 113
Page 10

1
Chapter 1: Printer Setup
❏
Chapitre 1: Configuration de l’imprimante
This chapter contains important information on setting up your printer. Be sure to
read this chapter carefully before using the printer for the first time. In this chapter
you will learn about:
Choosing a place for the printer
❏ Unpacking and setting up the printer
❏ Installing the ribbon cassette
❏ Loading paper
❏ Connecting to your computer
Choosing a place for the printer
Before actually unpacking the printer, you should take a few minutes to think about
where you plan to use it. Remember the following points when doing this.
✓ Choose a firm, level surface where the printer will not be exposed to vibration.
✓ The power outlet you plan to connect to for power should be nearby and
unobstructed.
✓ Make sure that the printer is close enough to your computer for you to connect
the two with your printer cable.
✓ Allow six inches (15 centimeters) of free space on either side of the printer. If
you are going to use fanfold paper, make sure that there is adequate space for
paper behind the printer.
✓ Make sure that the printer is not exposed to direct sunlight.
✓ Make sure that the printer is well away from heaters.
✓ Make sure that the surrounding area is clean, dry, and free of dust.
✓ Make sure that the printer is connected to a reliable power outlet. It should not
be on the same electric circuit as copiers, refrigerators, or other appliances that
cause power spikes.
✓
Use a power outlet that matches the power rating noted on the label af fixed to the
bottom of your printer.
✓ Make sure that the room where you are using the printer is not too humid.
Ce chapitre contient des informations importantes pour la configuration de
l’imprimante. Il doit être lu attentivement avant d’utiliser l’imprimante pour la
première fois. Ce chapitre est destiné à vous familiariser avec les aspects suivants :
❏ Choix d’un emplacement pour l’imprimante
❏ Déballage et configuration de l’imprimante
❏ Installation d’une cassette de ruban
❏ Chargement du papier
❏ Connexion de l’imprimante à l’ordinateur
Choix d’un emplacement pour l’imprimante
Avant de commencer à déballer l’imprimante, il est préférable de réfléchir quelques
instants à l’endroit où elle va être utilisée. Veuillez tenir compte des points suivants:
✓ Choisissez une surface solide et plate qui n’exposera pas l’imprimante aux
vibrations.
✓ La prise de courant à laquelle l’imprimante va être connectée doit être située à
proximité et être libre de toute obstruction.
✓
Vérifiez que l’imprimante est suffisamment proche de l’ordinateur pour pouvoir
la relier à celui-ci par le câble d’imprimante.
✓ Prévoyez 15 cm de dégagement des deux côtés de l’imprimante. Si vous
envisagez d’utiliser du papier à pliage accordéon, vérifiez qu’il y a assez de
place derrière l’imprimante pour placer le papier.
✓ Vérifiez que l’imprimante n’est pas exposée directement à la lumière du soleil.
✓ Vérifiez que l’imprimante est éloignée des sources de chaleur.
✓ Vérifiez que l’imprimante se trouve dans un environnement propre, sec et non
poussiéreux.
✓
Vérifiez que l’imprimante est connectée à une source d’alimentation stable. Elle
ne doit pas être connectée au même circuit électrique que les photocopieurs,
réfrigérateurs ou autres équipements susceptibles de générer des pointes de
tension.
✓ Utilisez une prise de courant ayant la puissance nominale indiquée sur
l’étiquette collée sur la base de l’imprimante.
✓ Vérifiez que la salle dans laquelle l’imprimante est installée n’est pas trop
humide.
Page 11

Kapitel 1: Grudeinstellung (Setup) des Druckers
Capitolo 1: Installazione della stampante
Dieses Kapitel enthält wichtige Informationen über die Grudeinstellung (Setup)
Ihres Druckers. Lesen Sie dieses Kapitel unter allen Umständen sorgfältig durch,
bevor Sie Ihren Drucker erstmals einsetzen. In diesem Kapitel lernen Sie:
❏ Einen Stellplatz für Ihren Drucker auszusuchen
❏ Ihren Drucker auszupacken und die Grudeinstellung (Setup) vorzunehmen
❏ Die Farbbandkassette einzusetzen
❏ Papier einzulegen
❏ Ihren Drucker anzuschließen
Wahl eines Stellplatzes für den Drucker
Bevor Sie damit beginnen, den Drucker auszupacken, sollten Sie einige Minuten
darüber nachdenken, wo Sie den Drucker einzusetzen beabsichtigen. Beachten Sie
dabei folgende Punkte:
✓
Wählen Sie eine feste, waagerechte Unterlage, damit der Drucker nicht vibrieren
kann.
✓ Die Netzsteckdose, die Sie zum Anschluß verwenden, sollte ganz in der Nähe
des Druckers und unbehindert zugänglich sein.
✓ Stellen Sie sicher, daß der Drucker nah genug am Computer steht, damit Sie
beide mit Ihrem Druckerkabel verbinden können.
✓ Lassen Sie auf allen Seiten des Druckers 15 cm Freiraum. Wenn Sie
Endlospapier verwenden, sorgen Sie auch für genügend Platz hinter dem
Drucker.
✓ Stellen Sie sicher, daß der Drucker keinem direkten Sonnenlicht ausgesetzt ist.
✓ Stellen Sie sicher, daß der Drucker weit genug von Heizungen entfernt steht.
✓ Stellen Sie sicher, daß die Druckerumgebung sauber, trocken und staubfrei ist.
✓
Stellen Sie sicher, daß der Drucker an eine zuverlässig arbeitende Netzsteckdose
angeschlossen wird. Er sollte nicht am gleichen Stromkreis mit Kopiergeräten,
Kühlaggregaten und sonstigen Geräten hängen, die Impulsspitzen verursachen.
✓ Verwenden Sie eine Netzsteckdose, die den Anschlußwerten entspricht, die auf
dem Typenschild auf der Unterseite Ihres Druckers angegeben sind.
✓ Stellen Sie sicher, daß der Raum, in dem Sie Ihren Drucker einsetzen, nicht zu
feucht ist.
Questo capitolo contiene informazioni importanti su come installare la stampante.
Leggete attentamente questo capitolo prima di usare la stampante per la prima volta.
In questo capitolo troverete istruzioni relative ai seguenti argomenti:
❏ scelta del luogo dove installare la stampante
❏ disimballaggio e installazione della stampante
❏ installazione della cartuccia nastro
❏ inserimento della carta
❏ collegamento della stampante al computer
Scelta del luogo dove installare la stampante
Prima di disimballare la stampante, soffermatevi un momento a pensare al luogo in
cui volete utilizzarla, osservando le seguenti indicazioni.
✓ Scegliete una superficie solida e piana dove la stampante non sarà esposta a
vibrazioni.
✓ La presa di alimentazione a cui intendete collegare la stampante dovrà trovarsi
nelle vicinanze e non dovrà essere occupata da altre spine.
✓ La distanza fra la stampante e il computer dovrà essere tale da consentirvi di
collegare le due apparecchiature con il vostro cavo stampante.
✓
Lasciate almeno 15 centimetri di spazio libero su entrambi i lati della stampante.
Se intendete usare carta a modulo continuo, accertatevi che vi sia spazio
sufficiente per la carta dietro la stampante.
✓ Non esponete la stampante alla luce diretta del sole.
✓ Tenete la stampante lontana da fonti di calore.
✓ Scegliete un luogo pulito, asciutto e al riparo dalla polvere.
✓ Collegate la stampante ad una presa di alimentazione con tensione stabile,
possibilmente non sullo stesso circuito di fotocopiatrici, frigoriferi o altre
apparecchiature che potrebbero causare sbalzi di tensione.
✓ Usate una presa di alimentazione di tensione corrispondente a quella indicata
sull’etichetta applicata sul fondo della stampante.
✓ Usate la stampante in un locale non eccessivamente umido.
2
Page 12
Printer
Imprimante
Drucker
Stampante
Ribbon cartridges
Cartouches de ruban
Farbbandkassetten
Cartucce nastro
For Monochrome model
Pour modèle monochrome
Für Monochrom-Modelle
Per il modello monocromatico
Paper support
Support papier
Papierhalter
Supporto appoggia-carta
User’s manual
Guide d’utilisation
Bedienungshandbuch
Manuale utente
3.5” Floppy disk
Disquette 3,5 pouces
3,5” Diskette
Dischetto da 3,5”
For Color printer model
Pour imprimante couleur
Für Farbdrucker
Per il modello di stampante a colori
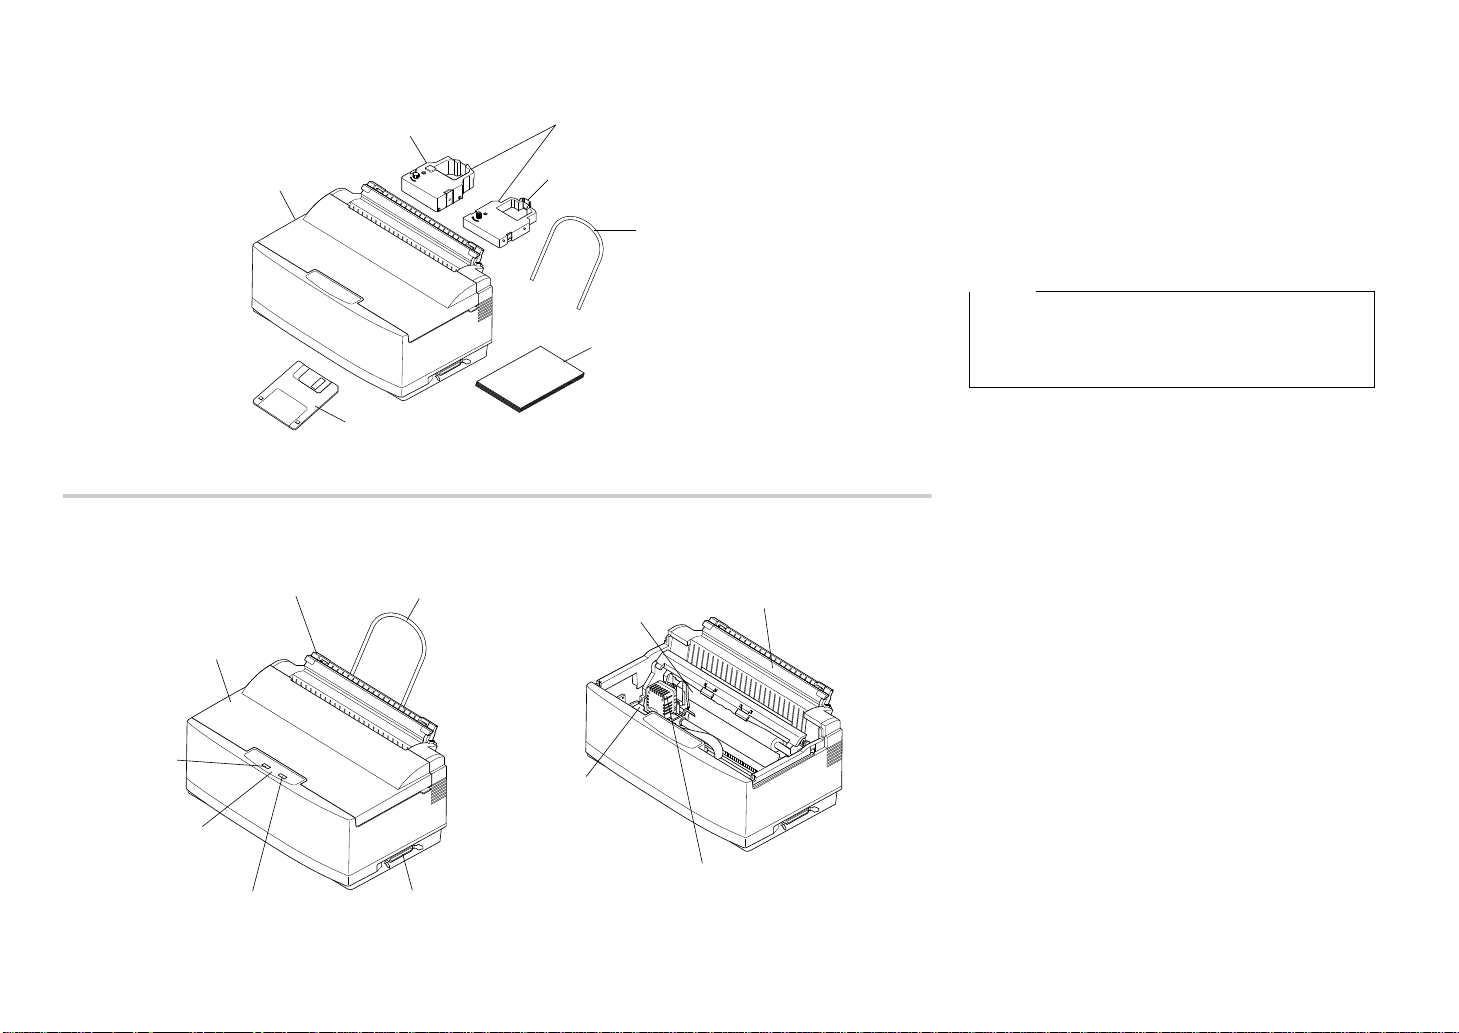
Paper tray cover
Capot de bac papier
Abdeckung des Papierschachts
Coperchio vassoio carta
Platen
Rouleau
Druckwalze
Rullo guida
Print head
Tête d’impression
Druckkopf
Testina di stampa
Cartridge
Cartouche
Kassette
Cartuccia nastro
Control panel
Panneau de commande
Bedienerfeld
Pannello di controllo
Front cover
Capot avant
Frontabdeckung
Coperchio frontale
Automatic sheet feeder
Introducteur feuille à feuille
Automatische Papierzufuhr
Alimentatore automatico di
fogli singoli
Paper support
Support papier
Papierhalter
Supporto
appoggia-carta
Interface connector
Connecteur d’interface
Interface-Anschluß/
Schnittstelle
Connettore d’interfaccia
Paper button
Bouton papier
Papiertaste
Tasto Paper
Power button
Bouton marche-arrêt
Netzschalter
Tasto Power
3
Unpacking the printer
Check to make sure that the carton contains each of
the items shown in the following illustration.
If anything is missing, contact the store where you
bought the printer and ask them to supply the missing
part.
A push tractor unit (PT -10Y) and a Serial-To-Parallel
Interface Converter (SPC-8K) are also available as
options. Consult with your dealer for details on these
options.
Note:
It is a good idea to keep the original box and all the
packing materials just in case you later need to pack
the printer up again and send it somewhere at a later
date.
General guide
The following illustrations show the major
component parts of the your printer.
Page 13

Déballage de l’imprimante
Auspacken des Druckers
Überprüfen und vergewissern Sie sich, daß der
Versandkarton alle in der nachstehenden Abbildung
aufgezeigten Teile enthält.
Wenn etwas fehlt, wenden Sie sich an das Geschäft,
in dem Sie Ihren Drucker gekauft haben und bitten
Sie dieses, die fehlenden Teile zu liefern.
Ein Schubtraktor (PT-10Y) und ein Serieller
Interface-Adapter (SPC-8K) sind wahlweise
ebenfalls verfügbar. Über Einzelheiten zu diesem
Zubehör gibt Ihnen der Händler gerne Auskunft.
Allgemeiner Leitfaden
Die folgenden Abbildungen zeigen die
Hauptbestandteile Ihres Druckers.
Hinweis:
Es ist empfehlenswert, den Originalkarton und das
gesamte Verpackungsmaterial aufzubewahren, um es
später für Lagerung oder Transport verwenden zu
können.
Disimballaggio della stampante
Verificate che la confezione contenga tutte le parti
illustrate nella seguente figura.
Qualora mancasse qualcosa, rivolgetevi al ne goziante
presso cui avete acquistato la stampante e
richiedetegli il componente mancante.
Sono inoltre disponibili accessori come l’unità di
trascinamento (PT-10Y) e il convertitore
d’interfaccia seriale-parallelo (SPC-8K). Richiedete
al vostro rivenditore ulteriori informazioni su questi
accessori.
Panoramica generale della stampante
Le seguenti figure illustrano le parti principali che
compongono la vostra stampante.
Nota:
E’ consigliabile conservare l’imballo originale e
tutti i materiali d’imballaggio nel caso dobbiate
successivamente reimballare la stampante per
trasferirla altrove.
Vérifiez que le carton contient tous les éléments
illustrés ci-dessous :
Si l’un des éléments illustrés manque, adressez-vous
au magasin dans lequel vous avez acheté
l’imprimante et demandez que la pièce manquante
vous soit fournie.
Une unité d’entraînement (PT-10Y) et un
convertisseur d’interface série/parallèle (SPC-8K)
sont également disponibles en option. Pour plus de
détails sur ces options, consultez votre revendeur.
Remarque:
Il est préférable de conserver le carton d’origine et
tous les matériaux d’emballage pour pouvoir
réemballer l’imprimante par la suite et la déplacer
si nécessaire.
Guide général
Les principaux éléments de l’imprimante sont
illustrés aux figures ci-dessous.
4
Page 14

Color ribbon cartridge (accessory)
Cartouche de ruban couleur (accessoire)
Color-Farbbandkassette (Zubehör)
Cartuccia nastro a colori (accessorio)
Monochrome ribbon cartridge
(option for color printer)
Cartouche de ruban monochrome
(option sur imprimante couleur)
Monochrom (einfarbige)-Farbbandkassette
(Option bei Color-Druckern)
Cartuccia nastro nero
(accessorio per stampante a colori)
Monochrome ribbon cartridge
(accessory)
Cartouche de ruban monochrome
(accessoire)
Monochrom (einfarbige) Farbbandkassette (Zubehör)
Cartuccia nastro nero (accessorio)
Print head shield
Protection de tête d’impression
Druckkopfführung
Protezione della testina di stampa
Opening the front cover
❏ Hook your fingers under the two small tabs on
either side of the front cover and pull upwards to
swing the front cover open.
Note:
You can completely remove the front cover from the
printer. However, we recommend that you normally
leave it in place. The cover protects against objects
getting into the printer, and it cuts down on printer
noise.
Removing the print head protector (LC-240C only)
If your printer is a color model, its print head will be
enclosed in a protector that guards against damage
during shipping. Before using the printer, you must
remove the print head protector as shown in the
following illustration.
About ribbon cartridges
The type of ribbon cartridge that comes with your
printer depends on whether it is a color printer or a
monochrome printer. Monochrome printer models
come with a monochrome ribbon cartridge with a
built-in print head shield, while color printer models
come with a color cartridge without a print head
shield (this is because the color printer has its own
print head shield). In addition, monochrome ribbon
cartridges for use on a color printer model are
available as an option.
5
Page 15

Ouverture du capot avant
❏ Placez les doigts sous les deux petits onglets des
deux côtés du panneau avant et soulevez-le pour
l’ouvrir en le faisant pivoter.
Remarque:
Vous pouvez enlever totalement le capot avant de
l’imprimante. Il est cependant recommandé de le
conserver en position. Le capot avant protège
l’imprimante des objets qui risqueraient de s’y
introduire et réduit aussi le bruit lors de
l’impression.
Öffnen der Frontabdeckung
❏ Finger unter die beiden Vorsprünge auf jeder
Seite der Frontabdeckung ansetzen, fest
zugreifen und hochziehen. Die Frontabdeckung
sollte sich öffnen.
Hinweis:
Sie können die Frontabdeckung Ihres Druckers
vollständig abnehmen. Wir empfehlen Ihnen jedoch,
sie im Normalfall an ihrem Platz zu lassen. Die
Abdeckung schützt den Drucker vor eindringenden
Fremdkörpern und vermindert das Geräusch beim
Drucken.
Apertura del coperchio frontale
❏ Aprite il coperchio frontale afferrandolo da
entrambe le linguette laterali e tirandolo verso
l’alto.
Nota:
Il coperchio frontale può essere staccato
completamente dalla stampante. Tuttavia vi
consigliamo di lasciarlo normalmente sulla
stampante, in quanto tale coperchio funge da
protezione contro eventuali oggetti che potrebbero
introdursi nella stampante, oltre a ridurne la
rumorosità.
Retrait de la protection de la tête d’impression (LC-240C uniquement)
Si vous disposez du modèle couleur, la tête
d’impression est recouverte d’une protection destinée
à la protéger contre tout risque d’endommagement
pendant le transport. Avant d’utiliser l’imprimante,
vous devez retirer la protection de la tête
d’impression en procédant comme illustré cidessous.
A propos des cartouches de ruban
Le type de cartouche de ruban fourni avec
l’imprimante dépend du modèle choisi : couleur ou
monochrome. Les imprimantes monochromes sont
fournies avec une cartouche de ruban monochrome
munie d’une protection intégrée de tête d’impression,
tandis que les modèles couleurs sont, eux, livrés avec
une cartouche couleur sans protection de tête
d’impression (parce que l’imprimante couleur
possède sa propre protection de tête d’impression).
En outre, il existe en option des cartouches de ruban
monochromes destinées aux imprimantes couleurs.
Abnehmen des Druckkopfschutzes (nur beim LC-240 C)
Wenn Sie einen Farbdrucker besitzen, befindet sich
der Druckkopf in einem T ransportschutz. Vor Einsatz
des Druckers müssen Sie die Schutzvorrichtung des
Druckkopfs, wie in der nebenstehenden Abbildung
gezeigt, entfernen.
Über die Farbbandkassetten
Die Ausführung der Farbbandkassette, die mit Ihrem
Drucker geliefert wird, richtet sich danach, ob Ihr
Drucker in Farbe oder monochrom druckt.
Monochrom-Drucker werden mit einer einfarbigen
Farbbandkassette geliefert, die eine eingebaute
Druckkopfführung besitzt. Color-Druckermodelle
werden mit einer mehrfarbigen Farbbandkassette
ohne Druckkopfführung geliefert (das liegt daran,
daß Color-Drucker eigene Druckkopfführungen
besitzen). Darüber hinaus gibt es einfarbige Longlife
Farbbandkassetten für den Einsatz in Color-Druckern
als Option.
Rimozione dell’imballo di protezione della testina di stampa (solo per il modello LC-240C)
Se il modello della vostra stampante è a colori, avrete
notato che la sua testina di stampa è avvolta da un
imballo che la protegge dagli urti durante il trasporto.
Prima di utilizzare la stampante dovete rimuovere
l’imballo di protezione come illustrato nella seguente
figura.
Due parole sulle cartucce nastro
Il tipo di cartuccia nastro fornita con la vostra
stampante è diverso in base al modello della
stampante, a colori o monocromatica. Il modello di
stampante monocromatica viene fornito con una
cartuccia di nastro nero dotata di una protezione della
testina di stampa, mentre il modello a colori viene
fornito con una cartuccia a colori priva di questa
protezione (in quanto il modello a colori ha una
testina di stampa dotata di una propria protezione).
Inoltre è disponibile una cartuccia di nastro nero
come accessorio per la stampante a colori.
6
Page 16
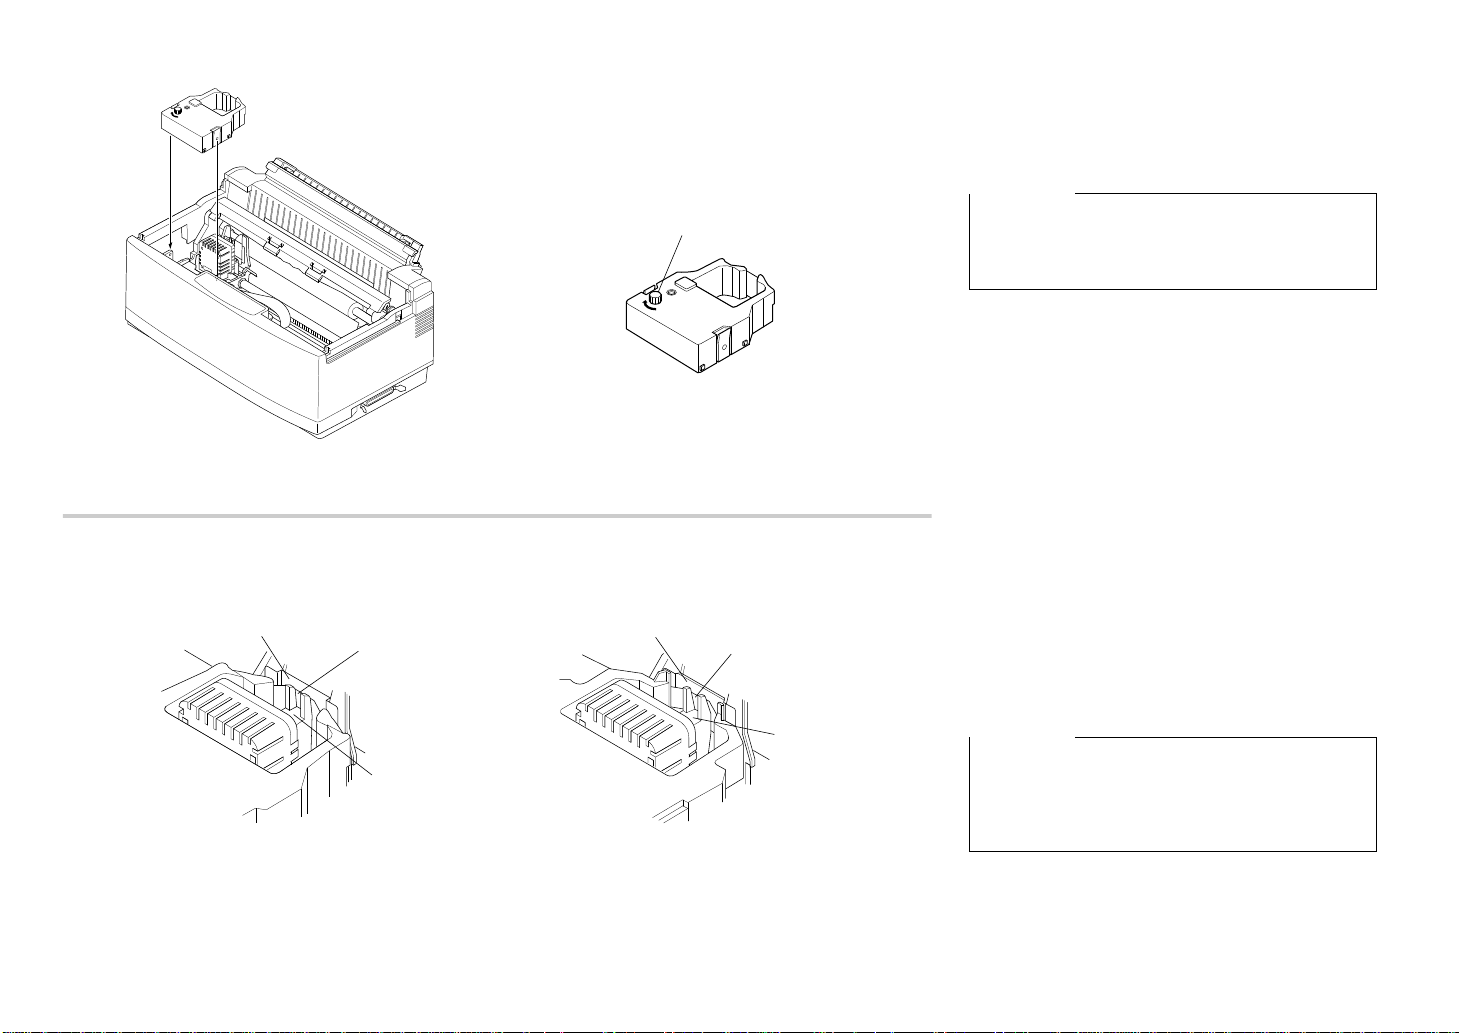
Knob
Bouton
Drehknopf
Manopola
Print head shield
Protection de tête d’impression
Druckkopfführung
Protezione della testina di stampa
Ribbon
Ruban
Farbband
Nastro
Print head
Tête d’impression
Druckkopf
Testina di stampa
Color ribbon cartridge
Cartouche de ruban couleur
Color-Farbbandkassette
Cartuccia nastro a colori
Print head shield
Protection de tête d’impression
Druckkopfführung
Protezione della testina di stampa
Ribbon
Ruban
Farbband
Nastro
Print head
Tête d’impression
Druckkopf
Testina di stampa
Monochrome ribbon cartridge
Cartouche de ruban monochrome
Monochrom (einfarbige)-Farbbandkassette
Cartuccia nastro nero
7
Installing the ribbon cartridge
❏ Rotate the knob on the cartridge clockwise to
take up any slack in the ribbon.
❏ Carefully push the cartridge holder by hand all
the way to the left side as far as it will go.
Important!
Never try to move the print head while the printer is
plugged in. Doing so can damage the printer. If you
have just used the printer, let the print head cool for
a few minutes before you touch it.
❏ Carefully place the cartridge onto the cartridge
holder making sure that the spindle of the holder
fits into the socket on the bottom of the cartridge.
❏ If you have a color printer model, be sure to
carefully position the ribbon between the print
head and the print head shield as shown in the
illustration.
❏ Press down gently but firmly on the cartridge to
make sure that it is securely in place. The
cartridge should move slightly (about 1/10” or
2.5mm) when you press down on it.
❏ Rotate the knob on the cartridge again to take up
any slack.
Important!
If you have a color printer model, be sure to double
check that the ribbon is properly positioned between
the print head and print head shield. If it isn’t, you
may get poor print quality or even end up damaging
the ribbon.
Replace the front cover of the printer . Press do wn
❏
on the raised parts at the back of the cover until it
snaps securely shut.
Page 17

Installation d’une cartouche de ruban
❏ Faites tourner le bouton de la cartouche vers la
droite pour bien tendre le ruban.
❏ Poussez le support de cartouche à fond vers la
gauche sans forcer.
Important!
Ne jamais déplacer la tête d’impression lorsque
l’imprimante est connectée, sous peine de
l’endommager. Si vous venez d’utiliser l’imprimante,
laissez la tête d’impression refroidir pendant
quelques minutes avant de la toucher.
❏
Placez avec précaution la cartouche sur le support
de cartouche en vérifiant que la broche du
support s’insère dans l’orifice au bas de la
cartouche.
Einsetzen der Farbbandkassette
❏
Knopf an der Farbbandkassette im Uhrzeigersinn
drehen, um das Band leicht zu spannen.
❏ Sorgfältig Kassettenhalter von Hand soweit wie
möglich nach links schieben.
Wichtig!
Versuchen Sie niemals, den Druckkopf zu bewegen,
wenn der Drucker ans Netz angeschlossen ist. Dies
kann zu Schäden am Drucker führen. Drucker nach
Gebrauch abkühlen lassen, bevor sie ihn anfassen.
❏ Farbbandkassette vorsichtig auf den
Kassettenhalter legen und vergewissern, daß die
Spindel des Kassettenhalters in der vorgesehenen
Aussparung am Boden der Kassette sitzt.
Installazione della cartuccia nastro
❏
Girate la manopola sulla cartuccia in senso orario
per mettere in tensione il nastro.
❏ Spingete delicatamente con la mano il supporto
portanastro completamente a sinistra finché non
si arresta.
Importante!
Non tentate mai di spostare la testina di stampa
mentre la stampante è collegata, perché ciò può
provocare guasti alla stampante. Se avete appena
utilizzato la stampante, lasciate raffreddare la testina
di stampa per alcuni minuti prima di toccarla.
❏ Applicate accuratamente la cartuccia sul
supporto portanastro, controllando che lo
spinotto del supporto combaci con il foro
praticato sul fondo della cartuccia.
❏ Si vous disposez d’un modèle couleur, veillez à
bien positionner le ruban entre la tête
d’impression et la protection de tête d’impression
comme illustré ci-dessous.
❏ Appuyez doucement mais fermement sur la
cartouche pour la fixer en position. Lorsque vous
appuyez sur la cartouche, elle doit se déplacer
légèrement (de 2,5 mm environ).
❏ Faites tourner à nouveau le bouton de la
cartouche pour tendre le ruban.
Important!
Si vous disposez d’un modèle couleur, revérifiez que
le ruban est correctement positionné entre la tête
d’impression et la protection de tête d’impression. Si
ce n’est pas le cas, la qualité d’impression risque
d’en être affectée et le ruban risque aussi d’être
endommagé.
❏ Remettez le capot avant de l’imprimante en
place. Appuyez sur les éléments soulevés à
l’arrière du capot jusqu’à ce qu’il se ferme
correctement.
Wenn Sie einen Farbdrucker besitzen, achten Sie
❏
verstärkt darauf, daß das Farbband einwandfrei
zwischen Druckkopf und Druckkopfführung
verläuft.
❏ Kassette vorsichtig, aber kräftig nach unten
drücken, um sicherzustellen, daß sie einwandfrei
sitzt. Die Kassette sollte sich etwas bewegen
lassen (etwa 2,5 mm), wenn Sie darauf drücken.
Drehen Sie den Knopf an der Kassette erneut, um
❏
das Farbband leicht zu spannen.
Wichtig!
Wenn Sie einen Color-Drucker besitzen, darauf
achten, daß Sie zweimal überprüfen, ob das
Farbband einwandfrei zwischen Druckkopf und
Druckkopfführung verläuft. Falls nicht, erhalten Sie
schlechte Druckergebnisse oder beschädigen sogar
das Farbband.
❏ Abdeckung des Drucker wieder anbringen.
Drücken Sie die Abdeckung an den erhöhten
Teilen nach unten, bis sie fest einrastet.
❏ Se il modello della vostra stampante è a colori,
assicuratevi di far passare il nastro fra la testina di
stampa e la protezione della testina stessa, come
mostrato nella figura.
❏ Spingete leggermente ma con decisione la
cartuccia, in modo da inserirla nella sua sede.
Spingendo la cartuccia, questa dovrebbe spostarsi
di pochi millimetri (circa 2,5 mm).
❏ Girate nuovamente la manopola sulla cartuccia
per tendere il nastro.
Importante!
Se il modello della vostra stampante è a colori,
controllate attentamente che il nastro sia inserito
correttamente fra la testina di stampa e la relativa
protezione. In caso contrario, la qualità della
stampa risulterà scadente e il nastro potrebbe
persino rompersi.
❏ Rimettete a posto il coperchio frontale,
spingendolo dalle parti sporgenti in fondo al
coperchio fino a richiuderlo con uno scatto.
8
Page 18
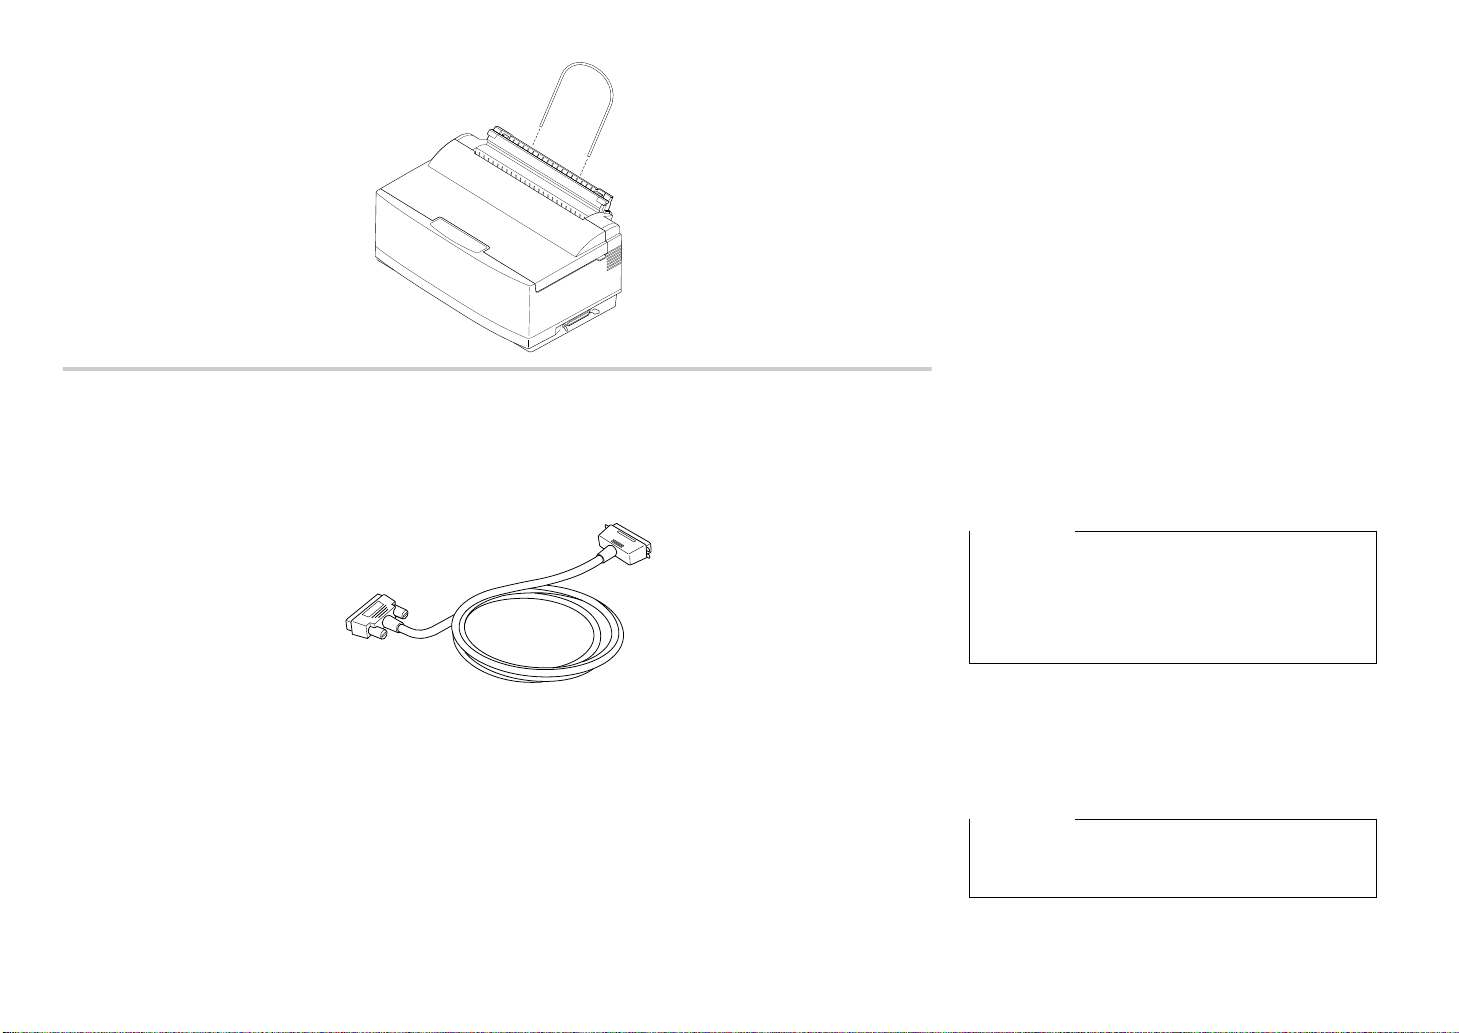
Installing the paper support
❏ Insert the ends of the paper support into the
slots on the printer as shown in the
following illustration.
Connecting to your computer
The computer sends data to the printer through a
cable. This printer does not come with a cable, so you
must purchase one of your own. You will probably
want to use a standard parallel cable for connection,
but note that you can also use an optional Serial-ToParallel Interface Converter (SPC-8K).
Important!
The following instructions apply to the Centronics
parallel cable that is used with an IBM-compatible
personal computer. Note that they do not apply to all
types of computers and cables. If you are unsure
about what type of cable you should use to connect
with your computer, consult with your dealer.
For an IBM-compatible personal computer:
✓ Use a standard 36-pin Centronics parallel cable.
✓ The parallel cable should be no longer than six
feet (two meters). Longer cables can result in
poor transfer of information.
Important!
Make sure that the printer is unplugged from the AC
outlet and that the computer is switched off before
connecting them.
9
Page 19

Installation du support papier
❏ Insérez les extrémités du support papier dans les
fentes prévues à cet effet comme illustré cidessous.
Connexion de l’imprimante à l’ordinateur
L’ordinateur transmet les données à l’imprimante par
l’intermédiaire d’un câble. Ce câble n’est pas fourni
avec l’imprimante. Vous devez vous le procurer
séparément. Vous utiliserez probablement un câble
parallèle standard. A noter toutefois que vous pouvez
aussi utiliser le convertisseur d’interface série/
parallèle (SPC-8K) en option.
Important!
Les instructions suivantes sont applicables au câble
parallèle Centronics généralement utilisé avec un
ordinateur personnel compatible IBM. A noter
qu’elles ne sont pas applicables à tous les types
d’ordinateurs et de câbles. Si vous n’êtes pas sûr du
type de câble à connecter à l’ordinateur, prenez
conseil auprès de votre revendeur.
Pour un ordinateur personnel compatible IBM :
✓ Utilisez un câble parallèle Centronics à 36
broches.
Le câble ne doit pas mesurer plus de deux mètres,
✓
sous peine d’affecter la qualité du transfert
d’informations.
Important!
Vérifiez que l’imprimante est déconnectée de la prise
secteur et que l’ordinateur est hors tension avant
d’effectuer la connexion.
Anbringen des Papierhalters
❏ Die Enden des Papierhalters in die dafür
vorgesehenen Öffnungen des Druckers, wie
nebenstehend abgebildet, einschieben.
Anschluß an Ihren Computer
Der Computer sendet über ein Kabel Daten an den
Drucker. Dieser Drucker wird nicht mit einem Kabel
geliefert. Daher müssen Sie Ihr Kabel käuflich
erwerben. Sie werden wahrscheinlich ein StandardParallelkabel zum Anschluß verwenden wollen.
Beachten Sie aber bitte, daß Sie auch wahlweise
einen Seriellen Interface-Adapter (SPC-8K)
verwenden können.
Wichtig!
Die nachstehenden Anweisungen gelten für das
Centronics-Parallelkabel, das bei IBM-kompatiblen
Personalcomputern verwendet wird. Beachten Sie
bitte, daß sie nicht für alle Arten von Computern und
Kabeln einsetzbar sind. Wenn Sie nicht genau
wissen, welche Art Kabel Sie zum Anschluß Ihres
Computers verwenden müssen, wenden Sie sich an
Ihren Händler.
Bei einem IBM-kompatiblen PC:
✓ Verwenden Sie ein 36-Pin Standard-Centronics-
Parallelkabel.
Das Parallelkabel sollte nicht länger als 2 m sein.
✓
Längere Kabel können zu Störungen bei der
Datenübertragung führen.
Wichtig!
Vergewissern Sie sich, daß der Drucker nicht an die
Netzsteckdose angeschlossen ist und daß der
Computer vor dem Anschließen abgeschaltet ist.
Installazione del supporto appoggiacarta
❏ Inserite le estremità del supporto appoggia-carta
nelle apposite fessure della stampante, come
illustrato nella seguente figura.
Collegamento della stampante al computer
Il computer invia i dati alla stampante attraverso un
cavo. Questa stampante viene fornita senza cavo di
collegamento, per cui dovrete acquistarne uno voi
stessi. Nella maggior parte dei casi, il collegamento
verrà effettuato tramite un cavo parallelo standard,
tuttavia potreste applicare anche il convertitore
d’interfaccia seriale-parallelo opzionale (SPC-8K).
Importante!
Le istruzioni che seguono si riferiscono in
particolare ad un cavo parallelo Centronics
collegato ad un personal computer IBM compatibile;
tali istruzioni non sono valide per tutti i tipi di
computer e di cavi. Se non siete sicuri sul tipo di
cavo da adottare per il collegamento della
stampante al vostro computer, rivolgetevi al vostro
rivenditore per ulteriori chiarimenti.
Per collegare la stampante ad un personal computer
IBM compatibile:
✓ Utilizzate un cavo parallelo Centronics a 36 pin.
✓ Tale cavo non dovrà essere più lungo di due
metri. L’utilizzo di cavi di lunghezza superiore
può compromettere la corretta trasmissione dei
dati.
Importante!
Prima di collegare la stampante al computer,
accertatevi di aver staccato la stampante dalla presa
elettrica e di aver spento il computer.
10
Page 20
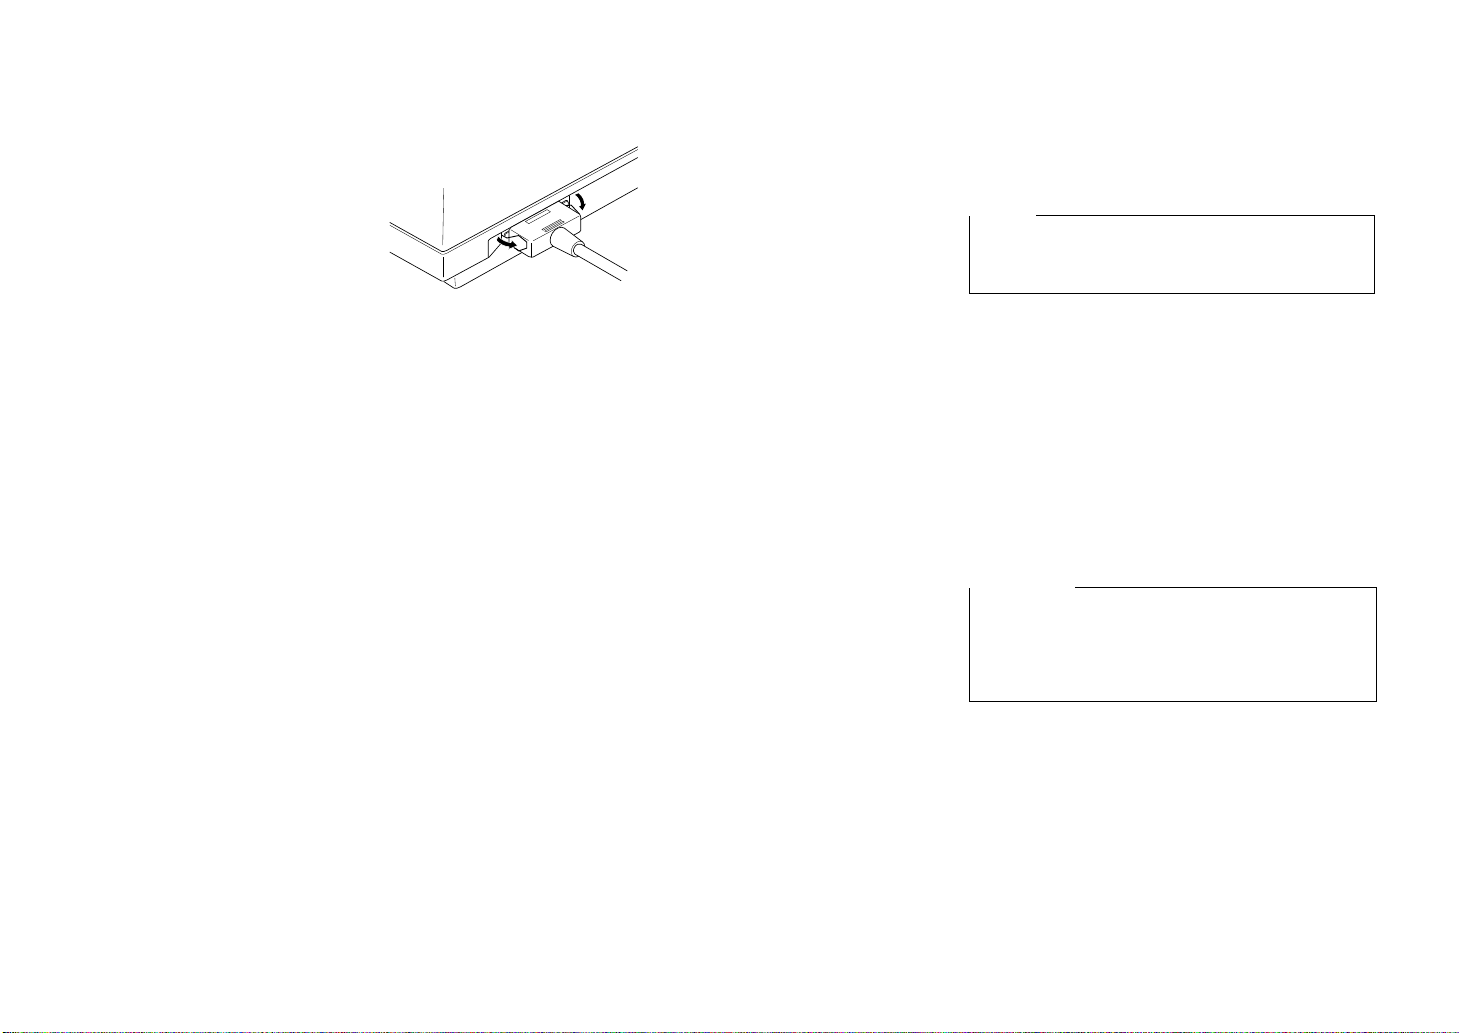
❏
Plug one end of the parallel cable into the parallel
port of your computer. The parallel port should
be labelled “Printer”, “Parallel”, “PRN”, “LPT1”,
or something similar.
❏ Plug the other end of the parallel cable into the
socket on the side of the printer and secure it in
place with the clips.
Note:
Consult with your dealer for details on how to set up
your computer when using the optional SPC-8K
Serial-To-Parallel Interface Converter.
Connecting to a power outlet
❏
Plug the power cord of the printer into a standard
power outlet whose voltage matches the power
rating noted on the label affixed to the bottom of
your printer.
Note that the printer does not have a power switch to
turn power on and off. Instead, its Sleep Mode
automatically reduces power consumption whenever
you leave the printer unattended. For full details
about the Sleep Mode, see “Sleep” on page 33 of this
manual.
Important!
We recommend that you unplug the printer from the
power outlet whenever you do not plan to use it for
long periods. Because of the this, you should locate
the printer so that the power outlet it is plugged into
is nearby and easy to access.
11
Page 21

❏ Branchez une extrémité du câble parallèle sur le
❏ Ein Ende des Parallelkabels an den
Parallelausgang Ihres Computers anschließen.
Der Parallelausgang sollte die Aufschrift
“Drucker”, “Parallel”, “PRN”, “LPT1” oder
ähnliches aufweisen.
❏
Das andere Ende des Parallelkabels in die Buchse
an der Seite des Druckers einstecken und mit den
Klammern sichern.
Anschluß an eine Netzsteckdose
❏ Den Netzstecker des Druckers in eine
Netzsteckdose einstecken, aber darauf achten,
daß sie den Spannungswerten, die auf dem
Typenschild am Boden des Druckers angegeben
sind, entspricht.
Bitte beachten Sie, daß der Drucker keinen
Hauptschalter besitzt, mit dem der Strom ein- und
ausgeschaltet wird. Stattdessen verringert der SleepModus automatisch den Stromverbrauch, sobald der
Drucker nicht in Betrieb ist. Alle Informationen über
den Sleep-Modus finden Sie auf Seite 34 dieses
Handbuchs.
Hinweis:
Lassen Sie sich von Ihrem Händler über Einzelheiten
der Einrichtung Ihres Computers informieren, wenn
Sie den wahlweise erhältlichen Seriellen InterfaceAdapter SPC-8K verwenden möchten.
Wichtig!
Wir empfehlen Ihnen, den Netzstecker aus der
Netzsteckdose herauszuziehen, wenn Sie den
Drucker über einen längeren Zeitraum nicht
einsetzen möchten. Daher sollten Sie den Drucker so
aufstellen, daß die Wandsteckdose sich möglichst
nah am Drucker befindet und leicht zugänglich ist.
❏ Collegate un’estremità del cavo parallelo alla
porta parallela del vostro computer,
contrassegnata di solito “Printer”, “Parallel”,
“PRN”, “LPT1” o diciture simili.
❏ Collegate l’altra estremità del cavo parallelo al
connettore posto sul lato della stampante e
bloccatela con gli appositi fermagli.
Collegamento alla presa elettrica
❏ Inserite il cavo di alimentazione della stampante
in una normale presa elettrica la cui tensione sia
corrispondente al valore indicato sull’etichetta
applicata sul fondo della stampante.
Come avrete notato, questa stampante non dispone di
un interruttore di alimentazione per l’accensione e lo
spegnimento. Al suo posto, la funzione Sleep della
stampante riduce automaticamente il consumo di
energia elettrica ogni volta che la stampante non
viene utilizzata. Per una spiegazione completa del
modo Sleep, leggete la sezione “Modaità sleep” a
pagina 34 del presente manuale.
Nota:
Rivolgetevi al vostro rivenditore per maggiori
dettagli su come impostare il computer per stampar e
tramite il convertitore d’interfaccia seriale-parallelo
opzionale SPC-8K.
Importante!
Vi consigliamo di staccare la stampante dalla presa
elettrica tutte le volte che non la utilizzate per lunghi
periodi. Per questo motivo, cercate di collocare la
stampante in modo tale che la presa elettrica a cui è
collegata sia nelle immediate vicinanze e sia facile
accedervi.
port parallèle de l’ordinateur. Le port parallèle
porte normalement une annotation «Printer»,
«Parallel», «PRN», «LPT1» ou similaire.
❏ Branchez l’autre extrémité du câble parallèle sur
le connecteur situé sur le côté de l’imprimante et
fixez-le en position au moyen des pinces prévues
à cet effet.
Remarque:
Pour plus de détails sur la configuration de
l'ordinateur avec le convertisseur d'interface série/
parallèle optionnel SPC-8K, consultez votre
fournisseur.
Connexion à une prise secteur
❏ Branchez le cordon secteur de l’imprimante sur
une prise secteur standard dont la tension
correspond à la tension nominale indiquée sur
l’étiquette collée sur la base de l’imprimante.
A noter que l’imprimante ne possède pas de bouton
d’alimentation permettant de la mettre sous tension et
hors tension. Au lieu de cela, le mode de veille réduit
automatiquement la consommation d’énergie lorsque
l’imprimante est laissée sans surveillance. Pour plus
de détails sur le mode de veille, reportez-vous à la
section «Mode Veille» à la page 33 de ce manuel.
Important!
Nous vous recommandons de débrancher le cordon
d’alimention de l’imprimante quand vous ne vous en
servez pas pendant une longue période. Grâce à ça,
vous pourrez facilement localiser votre cordon par la
suite et le raccorder plus rapidement sur une prise
plus facile d’accès.
12
Page 22
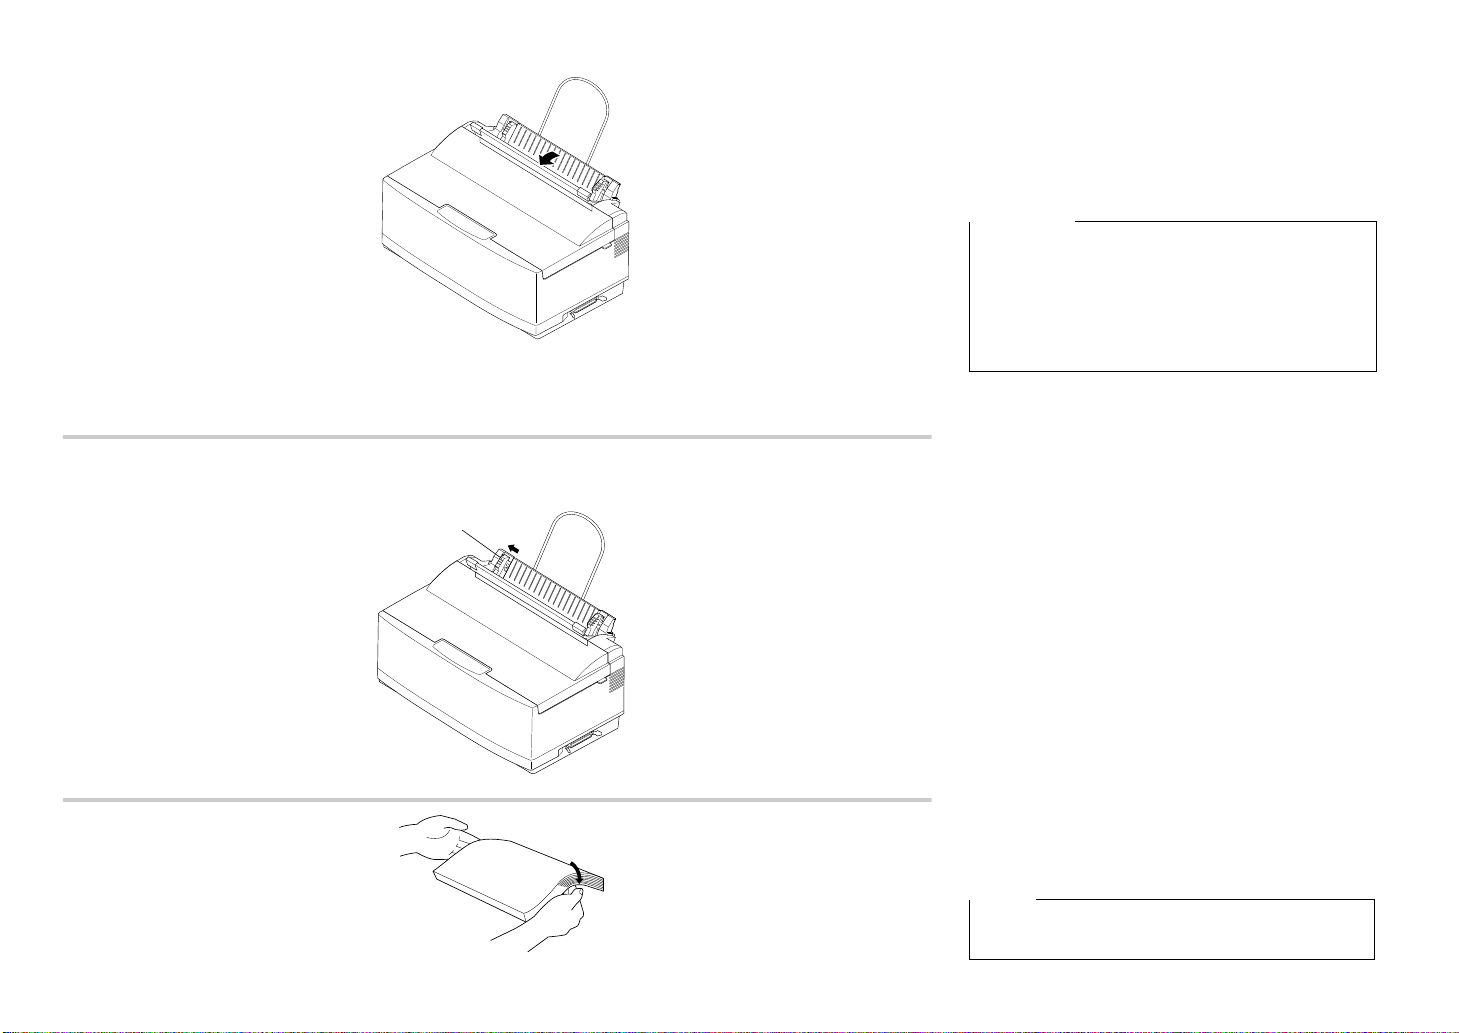
Loading paper
Paper guide
Guide papier
Papierführung
Guida carta
This section tells you how to load single-sheet A4 or
Letter paper into the printer’s built-in automatic sheet
feeder. Note that you can also use fanfold paper and
multi-page form paper. For details on using other
types of paper, see “Paper Handling” on page 69 of
this manual.
Important!
The automatic sheet feeder is designed to easily
detach from the printer when clearing paper jams or
when installing the optional push tractor feeder. If
the automatic sheet feeder accidently becomes
detached, see “Re-installing the automatic sheet
feeder” on page 19 for details on how to re-install it
correctly.
❏ Pull the paper tray cover of the automatic sheet
feeder forward.
❏ Slide the left-hand paper guide all the way to
the left.
13
❏ Pick up the stack of paper with both hands, and
fan through the paper with your thumb. This
prevents paper from sticking together when it is
fed by the automatic feeder.
Note:
The automatic sheet feeder can hold about 55 sheets
of paper at one time.
Page 23

Chargement du papier
Cette section vous explique comment charger des
feuilles de papier individuelles au format A4 ou
Letter dans l’introducteur feuille à feuille. A noter
que vous pouvez également utiliser du papier à pliage
accordéon ou du papier formulaire à plusieurs
feuilles. Pour plus de détails sur l’utilisation d’autres
types de papier, reportez-vous à la section
«Manipulation du papier» à la page 69 de ce manuel.
Important!
L’introducteur feuille à feuille est conçu pour
pouvoir être retiré facilement de l’imprimante lors de
l’élimination des bourrages papier ou de
l’installation de l’unité d’entraînement optionnelle.
Si l’introducteur feuille à feuille se détache par
accident, reportez-vous à la section «Réinstallation
de l’introducteur feuille à feuille» à la page 20 pour
savoir comment le réinstaller correctement.
❏ Tirez le couvercle du bac de papier de
l’introducteur feuille à feuille vers l’avant.
❏ Faites glisser le guide papier à fond vers la
gauche.
Einlegen von Papier
In diesem Abschnitt erfahren Sie, wie Sie
Einzelblätter der Größe A4 oder Papier im LetterFormat in die automatische Papierzufuhr des
Druckers einlegen. Beachten Sie bitte, daß Sie auch
Endlospapier und Formularsätze verwenden können.
Einzelheiten über die Verwendung von anderen
Papierarten finden Sie unter “Papierhandhabung” auf
Seite 70 dieses Handbuchs.
Wichtig!
Die automatische Papierzufuhr läßt sich leicht vom
Drucker abnehmen, wenn ein Papierstau beseitigt
oder der wahlweise zur Verfügung stehende
automatische Schubtraktor installiert werden sollen.
Wenn die automatische Papierzufuhr unbeabsichtigt
versetzt wird, finden Sie in Kapitel “Erneutes
Anbringen der automatischen Papierzufuhr” auf
Seite 20 Einzelheiten über das ordnungsgemäße
Wiederanbringen.
❏
Ziehen Sie die Abdeckung des Papierschachts der
automatischen Papierzufuhr nach vorne.
❏ Schieben Sie die linke Papierführung ganz nach
links.
Inserimento della carta
Questa sezione vi spiega come inserire fogli singoli
di formato A4 o Letter nell’alimentatore automatico
di fogli singoli incorporato nella stampante. Potete
stampare anche su carta a modulo continuo e su
moduli multicopia. Per maggiori dettagli sull’utilizzo
di altri tipi di carta, vedere il capitolo intitolato “Uso
della carta” a pagina 70 del presente manuale.
Importante!
L’alimentatore automatico di fo gli singoli è costruito
in modo tale da staccarsi facilmente dalla stampante
in occasioni in cui si deve rimuovere della carta
inceppata o quando si vuole installare il trattore a
spinta. Nel caso l’alimentatore automatico dovesse
staccarsi accidentalmente dalla stampante, leggete
la sezione “Reinstallazione dell’alimentatore
automatico di fogli singoli” a pagina 20 per le
istruzioni su come reinstallarlo correttamente.
❏ Tirate in avanti il coperchio del vassoio carta
dell’alimentatore automatico di fogli singoli.
❏ Spostate completamente verso sinistra la guida
carta sinistra.
❏ Saisissez la pile de papier à deux mains et
feuilletez-la du pouce pour éviter que les feuilles
ne se collent les unes aux autres au cours de leur
alimentation dans l’introducteur feuille à feuille.
Remarque:
L’introducteur feuille à feuille peut contenir environ
55 feuilles de papier à la fois.
❏ Papierstapel mit beiden Händen fassen und mit
dem Daumen das Papier auffächern. Dies
verhindert das Aneinanderhaften der Blätter beim
automatischen Papiereinzug.
Hinweis:
Die automatische Papierzufuhr kann einen Stapel
von etwa 55 Einzelblättern aufnehmen.
❏ Prendete una risma di carta e, tenendola con
entrambe le mani, smazzatela con il pollice. In
questo modo, eviterete che i fogli aderiscano
l’uno all’altro mentre passano nell’alimentatore
automatico.
Nota:
L’alimentatore automatico di fogli singoli può
contenere circa 55 fogli alla volta.
14
Page 24

❏ Make sure that all four edges of the stack are
Paper guides
Guides papier
Papierführungen
Guide carta
Retaining clip
Pince
Halter
Linguetta di arresto
Paper tray cover
Couvercle du bac de papier
Abdeckung des Papierschachtes
Coperchio del vassoio carta
smooth and even. Tap the edges on the top of a
table or a desk to even them out.
❏ Carefully place the paper into the paper tray
against the right-hand stationary paper guide.
Make sure that the left and right edges of the
paper stack are under the retaining clips inside
the tray.
❏
Slide the left-hand paper guide to the right so that
the stack of paper now sits snugly between the
two guides. The paper should be able to slide
freely into the printer, but it should not be able to
move from side to side.
❏ Push the paper tray cover of the automatic sheet
feeder closed.
15
Page 25

❏ Vérifiez que les bords des feuilles sont
correctement alignés les uns sur les autres et ne
sont pas pliés. Alignez-les en les rangeant sur une
table ou sur un bureau.
❏ Placez soigneusement le papier dans le bac de
papier contre le guide papier stationnaire de
droite. Vérifiez que les bords gauche et droit de la
pile de papier se placent sous les pinces à
l’intérieur du bac.
❏ Vergewissern Sie sich, daß alle vier Kanten des
Stapels glatt und ausgerichtet sind. Die Kanten
zum Ausrichten durch Aufsetzen auf eine
Tischplatte ausrichten.
❏ Sorgfältig das Papier in den Papierschacht
einlegen und es an der feststehenden
Papierführung rechts ausrichten. Sicherstellen,
daß die linke und rechte Kante des Papierstapels
sich unter den Haltern im Papierschacht befinden.
❏ Controllate che i quattro bordi della risma siano
ben lisci ed uniformi. Allineate accuratamente la
risma facendo battere i bordi sulla superficie di
un tavolo o di una scrivania.
❏ Posizionate accuratamente la risma di carta nel
vassoio allineandola contro la carta destra.
Controllate che i bordi sinistro e destro della
risma cadano sotto le linguette di arresto nel
vassoio.
❏
Faites glisser le guide papier gauche vers la droite
de sorte que la pile de papier se trouve maintenue
par les deux guides. Le papier doit pouvoir être
acheminé librement dans l’imprimante, mais ne
doit pas pouvoir se déplacer latéralement.
❏ Refermez le couvercle du bac de papier de
l’introducteur feuille à feuille.
❏ Die linke Papierführung in Richtung auf die
rechte schieben, so daß der Papierstapel sauber
zwischen beiden Papierführungen sitzt. Das
Papier sollte sich unbehindert in den Drucker
einschieben, aber sich nicht seitlich bewegen
lassen.
❏ Die Abdeckung des Papierschachtes der
automatischen Papierzufuhr zudrücken.
❏ Spostate verso destra la guida carta sinistra in
modo che la risma di carta sia ben inserita tra le
due guide carta. I fogli dovranno poter scorrere
liberamente nella stampante, ma non dovranno
potersi spostare lateralmente.
❏ Richiudete il coperchio del vassoio carta
dell’alimentatore automatico di fogli singoli,
spingendolo indietro.
16
Page 26
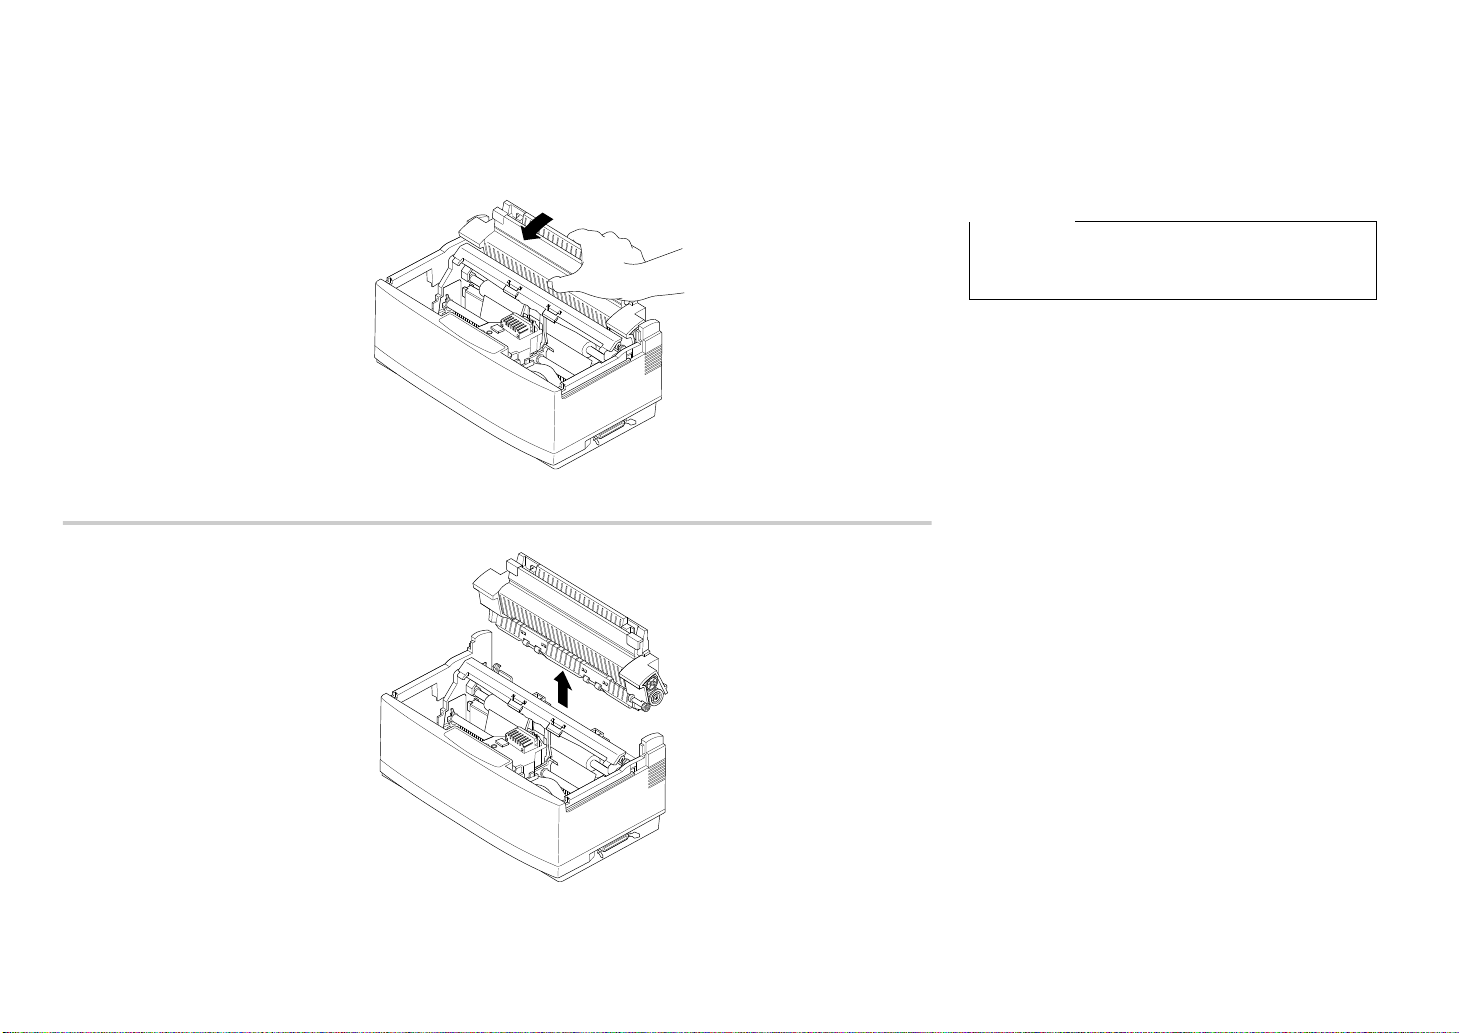
Detaching the automatic sheet feeder
The following procedure describes how to detach the
automatic sheet feeder (to clear a paper jam or to
attach the optional push tractor unit) and how to
reinstall it. Be sure to follow the following
instructions carefully to ensure proper operation of
the printer.
Important!
Always handle the automatic sheet feeder carefully,
and put it somewhere safe whenever it is detached
from the printer.
❏ Open the front cover of the printer.
❏ Grasp the automatic sheet feeder and pull it
gently towards the front of the printer until it
stops.
❏ Lift the automatic sheet feeder straight up.
17
Page 27

Retrait de l’introducteur feuille à feuille
La procédure suivante décrit la façon de retirer
l’introducteur feuille à feuille (pour supprimer un
bourrage papier ou connecter l’unité d’entraînement
optionnelle) et comment le réinstaller par la suite.
Veillez à suivre les instructions suivantes
attentivement pour garantir le bon fonctionnement de
l’imprimante.
Important!
Toujours manipuler l’introducteur feuille à feuille
avec précaution et le ranger dans un endroit sûr
lorsqu’il est enlevé de l’imprimante.
❏ Ouvrez le capot avant de l’imprimante.
❏
Saisissez l’introducteur feuille à feuille et tirez-le
vers l’avant de l’imprimante en procédant avec
précaution jusqu’à ce qu’il se bloque.
Abnehmen der automatischen Papierzufuhr
Das folgende Verfahren beschreibt das Abnehmen
der automatischen Papierzufuhr (zur Beseitigung von
Papierstaus oder zum Anbringen des wahlweise
erhältlichen Schubtraktors) und wie Sie sie wieder
anbringen. Vergewissern Sie sich, daß Sie folgende
Anweisungen sorgfältig befolgen, um einen
einwandfreien Betrieb Ihres Druckers zu
gewährleisten.
Wichtig!
Die automatische Papierzufuhr stets sorgfältig
behandeln und sie an sicherem Ort aufbewahren,
wenn sie nicht am Drucker angebracht ist.
❏ Frontabdeckung des Druckers öffnen.
❏ Automatische Papierzufuhr ergreifen und
vorsichtig, soweit es geht, in Richtung
Vorderseite des Druckers ziehen.
Smontaggio dell’alimentatore automatico di fogli singoli
La seguente procedura illustra come smontare
l’alimentatore automatico di fogli singoli (per
consentire di rimuovere la carta inceppata o per
applicare l’unità di trascinamento opzionale) e come
reinstallarlo. Seguite accuratamente le seguenti
istruzioni per garantire il buon funzionamento della
stampante.
Importante!
Maneggiate sempre con cura l’alimentatore
automatico di fogli singoli e riponetelo in un luogo
sicuro ogni qual volta lo staccate dalla stampante.
❏ Aprite il coperchio frontale della stampante.
❏ Afferrate l’alimentatore automatico e tiratelo
delicatamente in avanti finché non si arresta.
❏ Soulevez l’introducteur feuille à feuille pour le
retirer.
❏ Die automatische Papierzufuhr senkrecht nach
oben herausheben.
❏ Tirate l’alimentatore automatico verso l’alto.
18
Page 28

Re-installing the automatic sheet feeder
❏ Open the front cover of the printer.
❏ Carefully lower the automatic sheet feeder into
the printer, making sure that the two round tabs
on either end of it enter into the corresponding
slots inside the printer. You should have the
automatic sheet feeder angled towards the front
of the printer (at about the same angle that it was
when you pulled the feeder forward while
detaching it).
❏ Lower the automatic feeder all the way down.
When you do, it should naturally slip into place,
with the part that holds the paper angled slightly
towards the back of the printer.
❏ Close the front cover of the printer.
19
Page 29

Réinstallation de l’introducteur feuille à feuille
❏ Ouvrez le capot avant de l’imprimante.
❏ Insérez avec précaution l’introducteur feuille à
feuille dans l’imprimante en vérifiant que les
deux onglets circulaires des deux côtés
s’adaptent dans les fentes correspondantes à
l’intérieur de l’imprimante. L ’introducteur feuille
à feuille doit être incliné vers l’avant de
l’imprimante (au même angle que lorsque vous
l’avez tiré vers l’avant pour le retirer).
Wiedereinsetzen der automatischen Papierzufuhr
❏ Frontabdeckung des Druckers öffnen.
❏ Automatische Papierzufuhr vorsichtig in den
Drucker absenken. Achten Sie darauf, daß die
beiden runden Führungen an jeder Seite in die
beiden Aussparungen im Drucker eingeführt
werden. Die automatische Papierzufuhr sollte
leicht in Richtung der Vorderseite des Druckers
angewinkelt sein (etwa im gleichen Winkel, in
dem Sie die Zuführung beim Abnehmen nach
vorne gezogen haben).
Reinstallazione dell’alimentatore automatico di fogli singoli
❏ Aprite il coperchio frontale della stampante.
❏ Abbassate con cautela l’alimentatore automatico
nella stampante, controllando che le due linguette
arrotondate poste sui due lati entrino nelle
corrispondenti fessure all’interno della
stampante. L’alimentatore automatico dovrà
essere leggermente inclinato verso il davanti della
stampante (alla stessa inclinazione in cui si
trovava quando lo avete tirato in avanti per
smontarlo).
❏ Rabaissez l’introducteur feuille à feuille dans
l’imprimante. Il doit se glisser naturellement en
position avec la partie contenant le papier
légèrement inclinée vers l’arrière de
l’imprimante.
❏ Refermez le capot avant de l’imprimante.
❏ Die automatische Zuführung ganz nach unten
absenken. Dabei sollte sie leicht an ihren Platz
gleiten. Drücken Sie danach gegen die
Abdeckung des Papierschachtes bis die
automatische Zuführung fest einrastet.
❏ Frontabdeckung des Druckers schließen.
❏ Inserite completamente l’alimentatore
automatico, lasciandolo scivolare liberamente
finché non si trova in posizione; il lato che regge
la carta dovrà trovarsi leggermente inclinato
verso il retro della stampante.
❏ Chiudete il coperchio frontale della stampante.
20
Page 30

21
Chapter 2: User Setup Utility
❏
Enter
Chapitre 2: Utilitaire de configuration
In addition to the Windows 3.1 driver, the 3.5” floppy disk that comes with this
printer also contains a User Setup Utility that gives you total control over a v ariety of
printing features and functions. In this chapter you will learn about:
Installing the User Setup Utility
❏ Starting up the User Setup Utility
❏ Editing setup data
❏ Saving and loading setup data
❏ Exiting the User Setup Utility and sending the settings to the printer
Important!
All the procedures in this chapter assume that you are using a mouse and that you
are familiar with common mouse operations like click and double-click. If you need
information on mouse operations, see your computer manual. If you want to operate
the User Setup Utility without using a mouse (using function keys, arrow keys, and
the tab key) refer to the key function explanations at the bottom of each User Setup
Utility screen.
Installing the User Setup Utility
❏ Insert the disk that contains the User Setup Utility into one of your computer’s
disk drives. This explanation assumes you are using the A: drive, but you could
use any drive. Just remember to change the “A:” drive name specifications in the
following steps to the name of the drive you are using.
Important!
Note that you cannot use a mouse to navigate inside the User Setup Utility
installation screens. Instead, you must use the arrow,
Delete keys as noted on the installation screens and in the following
procedures.
, backspace, and
Outre le gestionnaire Windows 3.1, la disquette 3,5 pouces fournie avec
l’imprimante contient un utilitaire de configuration qui permet de contrôler
totalement les différentes fonctions et fonctionnalités d’impression. Ce chapitre est
destiné à vous familiariser avec les aspects suivants :
❏ Installation de l’utilitaire de configuration
❏ Lancement de l’utilitaire de configuration
❏ Modification des données de configuration
❏ Chargement et sauvegarde des données de configuration
❏ Sortie de l’utilitaire de configuration et envoi des paramètres à l’imprimante
Important!
Toutes les procédures décrites dans ce chapitre supposent que vous utilisez une
souris et que vous connaissez les opérations normalement effectuées à la souris
comme cliquer ou faire un double-clic. Pour plus de détails sur les opérations de la
souris, consultez le manuel de votre ordinateur. Si vous préférez ne pas utiliser la
souris dans l’utilitaire de configuration (et utiliser les touches de fonction, les
touches fléchées et la touche de tabulation), reportez-vous aux descriptions des
touches de fonction au bas de chaque écran de l’utilitaire de configuration.
Installation de l’utilitaire de configuration
❏
Insérez la disquette contenant l’utilitaire de configuration dans un des lecteurs de
disquettes de l’ordinateur. Cette description suppose que vous utilisez le lecteur
A:, mais vous pouvez très bien utiliser n’importe quel lecteur. N’oubliez pas de
changer le nom de lecteur «A:» en fonction de l’unité utilisée dans les
instructions suivantes.
Important!
Notez qu’il n’est pas possible d’utiliser la souris pour naviguer à travers les
différents écrans d’installation de l’utilitaire de configuration. Vous devez utiliser
les touches fléchées, Entrée, d’espacement arrière et Suppr comme indiqué sur
les écrans d’installation et dans les procédures suivantes.
Page 31

Kapitel 2: Drucker Setup Programm
Capitolo 2: Il programma User Setup Utility
Zusätzlich zum Treiber für Windows 3.1 enthält die mit dem Drucker gelieferte,
Diskette, ein Drucker Setup Programm. Dieses erlaubt Ihnen die umfassende
Steuerung einer Vielzahl von Druckmöglichkeiten und -funktionen. In diesem
Kapitel lernen Sie:
❏ Das Installieren des Drucker Setup Programms
❏ Die Inbetriebnahme des Drucker Setup Programms
❏ Das Laden und Speichern von Grundeinstellungs-(Setup)Daten
❏ Das Erstellen von Grundeinstellungs-(Setup)Daten
❏ Das Ändern der Einstellungen Ihres Druckers
Wichtig!
Alle in diesem Kapitel beschriebenen Verfahren gehen davon aus, daß Sie eine
Maus verwenden und daß Sie mit der üblichen Handhabung der Maus, wie Klick
und Doppelklick, vertraut sind. Wenn Sie Informationen über die Handhabung der
Maus benötigen, schlagen Sie im Handbuch Ihres Computers nach. Wenn Sie mit
dem Drucker Setup Programm ohne Maus arbeiten möchten (mit Funktionstasten,
Richtungstasten und Tabulatoren) schlagen Sie im Handbuch Ihres Computers
nach.
Installieren des Drucker Setup Programms
❏ Diskette mit dem Drucker Setup Programm in ein Diskettenlaufwerk Ihres
Computers einlegen. Diese Erläuterung geht davon aus, daß Sie das Laufwerk
A: verwenden. Sie können aber grundsätzlich jedes Laufwerk benutzen. Denken
Sie nur daran, die Laufwerkangabe “A:” in den folgenden Schritten zu ändern,
damit die Bezeichnung des Laufwerks, das Sie verwenden, angegeben ist.
Wichtig!
Beachten Sie bitte, daß Sie auf dem Installationsbildschirm des Drucker Setup
Programms nicht mit der Maus arbeiten können. Stattdessen müssen Sie die
Richtungstasten sowie die Tasten Enter, Rückschritt (Backspace), Entfernen
gemäß den Anweisungen auf dem Installationsbildschirm und in den folgenden
Verfahren benutzen.
Oltre al driver per Microsoft Windows 3.1, il dischetto da 3,5” fornito con la
stampante contiene anche un programma di utilità per la configurazione della
stampante (User Setup Utility) con il quale potrete gestire numerose caratteristiche e
funzioni di stampa. In questo capitolo troverete istruzioni su come:
❏ installare il programma User Setup Utility
❏ avviare il programma User Setup Utility
❏ modificare parametri di configurazione
❏ memorizzare e caricare parametri di configurazione
❏ uscire dal programma User Setup Utility e inviare i parametri di configurazione
alla stampante
Importante!
Per tutte le procedure descritte in questo manuale si presuppone che utilizziate un
mouse e che abbiate familiarità con le normali operazioni del mouse come clic e
doppio clic. P er ulteriori informazioni sull’utilizzo del mouse, consultate il manuale
del vostro computer. Per utilizzare il programma di utilità senza mouse (usando i
tasti funzione, i tasti freccia e il tasto TAB), fate riferimento alla spiegazione dei
tasti funzione che si trova in basso ad ogni schermata del programma.
Installazione del programma User Setup Utility
❏ Inserite il dischetto contenente il programma User Setup Utility in una delle
unità disco del vostro computer. Per questa operazione si presume che stiate
utilizzando l’unità A:, ma potete utilizzare qualsiasi altra unità. Ricordate però
di sostituire nelle seguenti operazioni l’identificativo dell’unità “A:” con quello
dell’unità che state utilizzando.
Importante!
Per spostarsi nelle schermate di installazione non è possibile utilizzare il mouse. Al
suo posto usate i tasti freccia, Invio, backspace e Canc, come indicato sulle
schermate di installazione e nelle seguenti procedure.
22
Page 32

❏ Execute the command that installs the User Setup Utility:
A:\>SETUP ↵
❏ Exécutez la commande d’installation de l’utilitaire de configuration :
A:\>SETUP ↵
❏ Select the language you want to use and then press Enter.
The above screen appears in the language that you selected in the previous step.
❏ Input the drive and directory names where you want the User Setup Utility
stored. The following is the default directory name that creates a directory
named “star” on your hard disk (drive C:) to store the User Setup Utility.
C:\star
You can use the left and right arrows, Delete and Back space when making
changes in the box that contains the drive and directory names. If you require
assistance while this screen is shown, press F1 for help.
❏ After you specify drive and directory names, press Enter.
The User Setup Utility program is started up as soon as you press Enter, so you
can use the pull-down menus to make the setup changes you want.
❏ Sélectionnez la langue à utiliser et appuyez sur Entrée.
L’écran ci-dessus apparaît dans la langue que vous avez choisie.
❏ Entrez le nom de l’unité et du répertoire dans lequel l’utilitaire de configuration
doit être installé. La commande suivante utilise le nom de répertoire par défaut
qui crée un répertoire «star» sur le disque dur (unité C:) pour y conserver
l’utilitaire de configuration.
C:\STAR
Vous pouvez utiliser les flèches gauche et droite, ainsi que les touches Suppr et
d’espacement arrière pour modifier le contenu de la zone contenant le nom
de l’unité et celui du répertoire. Lorsque cet écran est affiché, vous pouvez
obtenir plus de détails en appuyant sur la touche F1.
❏ Après avoir spécifié le nom d’unité et de répertoire, appuyez sur Entrée.
L’utilitaire de configuration démarre dès que vous appuyez sur Entrée.
Vous pouvez ensuite utiliser les menus déroulants pour apporter les
modifications nécessaires à la configuration.
23
Page 33

❏ Führen Sie den Befehl aus, mit dem Sie das Drucker Setup Programm
installieren:
A:\>SETUP ↵
❏ Wählen Sie die Sprache, die Sie benutzen möchten und drücken Sie Enter.
Der obige Bildschirm wird in der Sprache angezeigt, die Sie im vorherigen Schritt
gewählt haben.
❏ Geben Sie die Bezeichnung des Laufwerks und des Verzeichnisses ein, in dem
das Drucker Setup Programm gespeichert werden soll. Nachfolgend der Name
des Standardverzeichnisses, das auf Ihrer Festplatte (Laufwerk C:) ein
Verzeichnis mit dem Namen “Star” erstellt, in das das Drucker Setup Programm
gespeichert wird.
C:\star
Mit den Richtungstasten NACH LINKS und NACH RECHTS sowie den Tasten
Entfernen und Rückschritt können Sie Änderungen an dem Feld vornehmen,
in dem die Bezeichnung des Laufwerks und des Verzeichnisses enthalten ist.
Sollten Sie Hilfe benötigen, wenn dieser Bildschirm angezeigt wird, drücken Sie
F1.
❏ Nachdem Sie die Bezeichnungen für das Laufwerk und das Verzeichnis
eingegeben haben, drücken Sie Enter.
Das Drucker Setup Programm wird unmittelbar nach Drücken der
Eingabetaste installiert und gestartet, und Sie können dann in den
Bildlaufmenüs die gewünschten Änderungen der Druckereinrichtung
vornehmen.
❏ Digitate il comando per l’installazione del programma di utilità:
A:\>SETUP ↵
❏ Selezionate la lingua che volete usare e premete Invio.
La videata qui sopra apparirà nella lingua appena scelta.
❏ Digitate l’identificativo dell’unità e il nome della directory in cui volete
installare il programma User Setup Utility. Il seguente esempio mostra la
directory predefinita denominata “star” che viene creata sul vostro disco fisso
(unità C:) per installarvi il programma.
C:\star
Usate i tasti freccia sinistra e freccia destra, Canc e Backspace per modificare
il testo nella casella contenente l’unità e la directory. Per visualizzare una
finestra di aiuto in questa schermata, premete F1.
❏ Dopo aver specificato l’unità e la directory, premete Invio.
Subito dopo aver premuto Invio, viene eseguito il programma User Setup Utility
e potrete utilizzare i suoi menu a discesa per impostare i parametri di
configurazione desiderati.
24
Page 34

Starting up the User Setup Utility
Please check the power and interface cables
and try again
= Retry ESC = Cancel
Printer is not answering !
Veuillez vérifier que l’ imprimante est prête
ainsi que le câble d’ interface, puis relancer
= Relancer ESC = Cancel
L’ imprimante ne répond pas !
❏ To start up the User Setup Utility, move to the directory you specified under
“Installing the User Setup Utility” on page 21. If you want to move to the
directory we named “star” in our example in the previous section, you would
input the following:
C:\>cd star ↵
❏ Next, input the command to launch the User Setup Utility:
STARSET ↵
When you start the User Setup Utility, it reads and displays the printer’s current
settings.
❏ Now you can use the pull-down menus described below to make the setup
changes you want.
If the printer is not connected to your computer or if the power of the printer is
switched off, the following message appears on the display when you start up the
User Setup Utility.
Lancement de l’utilitaire de configuration
❏ Pour lancer l’utilitaire de configuration, sélectionnez le répertoire spécifié à la
section «Installation de l’utilitaire de configuration», page 21. Pour accéder au
répertoire nommé «STAR» à la section précédente par exemple, tapez la
commande suivante :
C:\>cd star ↵
❏ Entrez ensuite la commande suivante pour lancer l’utilitaire de configuration :
STARSET ↵
Lorsque vous lancez l’utilitaire de configuration, celui-ci lit et affiche les v aleurs
du paramétrage courant de l’imprimante.
❏ Vous pouvez ensuite utiliser les menus déroulants décrits ci-dessous pour
apporter les modifications nécessaires à la configuration.
Si l’imprimante n’est pas connectée à l’ordinateur, ou si elle est hors tension, le
message suivant s’affiche à l’écran lorsque vous lancez l’utilitaire de configuration.
Check the connection between the computer and the printer, and check the power.
After correcting the problem, press Enter to continue.
The above message also appears when your computer and printer are connected
through an optional Serial-to-Parallel Interface Converter or when using a non
conforming parallel cable. In such a case, simply press the computer’s ESC key to
clear the message.
25
Vérifiez la connexion entre l’ordinateur et l’imprimante et assurez-vous que
l’imprimante est sous tension. Une fois le problème rectifié, appuyez sur Entrée
pour continuer.
Le message ci-dessus apparaît également lorsque l’ordinateur et l’imprimante sont
connectés par l’intermédiaire d’un convertisseur série/parallèle optionnel, ou si le
câble l’imprimante ue corresponde pas au standard. Dans ce cas, il suffit d’appuyer
sur la touche Echap de l’ordinateur pour annuler le message.
Page 35

Starten des Drucker Setup Programms
❏ Um das Drucker Setup Programm zu starten, gehen Sie in das Verzeichnis, das
Sie unter “Installieren des Drucker Setup Programms” auf Seite 22 angelegt
haben. Wenn Sie in das Verzeichnis gehen möchten, das wir in unserem Beispiel
im vorhergehenden Abschnitt “Star” genannt haben, müssen Sie folgendes
eingeben:
C:\>cd star ↵
❏ Danach geben Sie den Befehl, mit dem Sie das Drucker Setup Programm in
Gang setzen:
STARSET ↵
Wenn Sie das Drucker Setup Programm starten, werden die aktuellen
Einstellungen des Druckers gelesen und angezeigt.
❏ Nun können Sie durch die nachstehend beschriebenen Menüs blättern und die
gewünschten Änderungen der Druckereinrichtung vornehmen.
Wenn der Drucker nicht an Ihren Computer angeschlossen ist oder wenn der
Netzstrom des Druckers ausgeschaltet ist, erscheint folgende Anzeige auf dem
Bildschirm, sobald Sie das Drucker Setup Programm starten.
Überprüfen Sie die Verbindung zwischen Computer und Drucker und überprüfen
Sie den Netzanschluß. Nach Behebung des Problems drücken Sie Enter, um
fortzufahren.
Die obige Meldung erscheint auch, wenn Ihr Computer und Ihr Drucker mittels
eines optionalen Seriellen Interface Adapters miteinander verbunden sind, oder Ihr
Druckerkabel nicht dem Standard entspricht. In einem solchen Falle drücken Sie
einfach die ESC-Taste, um die Meldung zu löschen.
Bitte prüfen Sie die Verbindung
und versuchen es dann noch einmal
= Wiederholen ESC = Abbruch
Drucker antwortet nicht !
Verificare alimentazione, cavo
interfaccia e riprovare
= Invio ESC = Cancella
Stampante non pronta !
Avviamento del programma User Setup Utility
❏
Per far partire il programma User Setup Utility, passate alla directory specificata
nella sezione “Installazione del programma User Setup Utility” a pagina 22. Per
passare alla directory che abbiamo chiamato “star” nel nostro esempio, digitate
il seguente comando:
C:\>cd star ↵
❏ Quindi, digitate il comando per eseguire il programma di utilità:
STARSET ↵
Appena avviato, il programma di utilità legge e visualizza la configurazione
corrente della stampante.
❏ A questo punto potete utilizzare i menu a discesa descritti di seguito per
impostare i parametri di configurazione desiderati.
Se la stampante non è collegata al computer oppure è spenta, subito dopo aver
lanciato il programma di utilità, apparirà il seguente messaggio.
Controllate che la stampante sia collegata al computer e che riceva corrente. Dopo
aver corretto il problema, premete Invio per continuare.
Il precedente messaggio viene visualizzato anche nel caso il computer e la
stampante siano collegati tramite il convertitore d’interfaccia seriale-parallelo
opzionale, oppure se il cauo della stampante non corresponde al standard. In tal
caso, è sufficiente premere il tasto ESC per annullare il messaggio.
26
Page 36

Important!
Your printer cannot read the settings if your computer and printer are connected
through an optional Serial-To-Parallel Interface Converter. In such a case, you can
still use the User Setup Utility to send settings to the printer, but you cannot read the
printer’s current settings.
Important!
L’imprimante ne peut pas lire les valeurs si l’ordinateur et l’imprimante sont
connectés en réseau ou au moyen d’un convertisseur d’interface série/parallèle
optionnel. Dans ce cas, vous pouvez quand même utiliser l’utilitaire de
configuration pour envoyer les valeurs à l’imprimante , mais vous ne pouvez pas lir e
les valeurs courantes de l’imprimante.
Changing User Setup Utility parameter settings
Changing User Setup Utility parameter settings is quite easy, regardless of whether
you are using a mouse or the keyboard. The following are basic operations that you
can use to change parameters in the General, Font, Paper, Adjust., and Port
windows.
To select a window
❏ Highlight the name of the window you want to display by clicking on it in the
menu bar, or by using the left and right arrow keys.
To select a parameter box
❏ Select the parameter box that you want by clicking inside the box with the
mouse or by moving to the box using the keyboard’s Tab key.
Parameters are grouped inside of boxes on the screen. When you first display a
window, the current setting of the parameter in the first (upper left) box in the
window is highlighted to indicate that it is selected. When you select a parameter
box, the parameter’s current selection is highlighted.
About parameter boxes
Note that there are two types of parameter boxes. Some have up and do wn arrows on
the right side, which indicates that there are more than two possible settings for these
particular parameters.
After you select such a box (by clicking inside it with the mouse or by moving to it
by pressing Tab), use the mouse to click on the up and down buttons to scroll
through the available settings. You can also use the up and down arrow keys to scroll
through available settings.
Modification des paramètres de l’utilitaire de configuration
❏ Les paramètres de l’utilitaire de configuration peuvent être modifiés très
facilement avec la souris ou au clavier. Les opérations décrites ci-dessous
constituent les procédures de base que vous pourrez utiliser pour modifier les
paramètres dans les fenêtres Générale, Police, Papier, Réglages et Port.
Sélection d’une fenêtre
❏
Surlignez le nom de la fenêtre à afficher en cliquant sur son nom dans la barre de
menus, ou sélectionnez-la au moyen des flèches droite et gauche.
Sélection d’une zone de paramétrage
❏ Sélectionnez la zone de paramétrage requise en cliquant sur la zone avec la
souris ou en positionnant le curseur dans la zone au moyen de la touche Tab du
clavier.
Les paramètres sont regroupés par zones à l’écran. Lorsque vous affichez une
fenêtre, la valeur courante du paramètre dans la première zone (en haut et à
gauche) de la fenêtre est surlignée pour indiquer qu’elle est sélectionnée.
Lorsque vous sélectionnez une zone de paramétrage, la valeur courante du
paramètre est surlignée.
A propos des zones de paramétrage
Notez qu’il existe deux types de zones de paramétrage. Certaines d’entre elles
s’accompagnent de flèches haute et basse du côté droit. Ces flèches indiquent que le
paramètre peut avoir plus de deux valeurs.
Après avoir sélectionné une de ces zones (en cliquant sur la zone en question a vec la
souris ou en y accédant au moyen de la touche Tab), utilisez la souris pour cliquer
sur les boutons haut et bas afin de faire défiler la liste de valeurs à l’écran Vous
pouvez également utiliser les flèches haute et droite pour examiner les différentes
valeurs possibles.
27
Page 37

Änderung der Parametereinstellungen des Drucker Setup Programms
Es ist ganz einfach, Einstellungen der Parameter des Drucker Setup Programms zu
ändern, gleichgültig ob Sie eine Maus oder die Tastatur benutzen. Die Parameter in
den Fenstern Allgemein, Schrift, Papier, Justage und Port können Sie grundsätzlich
auf folgende Weise ändern.
Ein Fenster wählen
❏ Markieren Sie die Bezeichnung des Fensters, das Sie anzeigen möchten, durch
Anklicken in der Menüleiste oder mit den Richtungstasten NACH LINKS oder
NACH RECHTS.
Ein Parameterfeld wählen
❏ Wählen Sie das gewünschte Parameterfeld durch Anklicken innerhalb des
Feldes mit der Maus oder gehen Sie mit der Tabulatortaste der Tastatur in das
Feld.
Die Parameter sind innerhalb der Felder auf dem Bildschirm gruppiert. Bei der
ersten Bildschirmeinblendung wird die aktuelle Einstellung des Parameters im
ersten Feld (links oben) des Fensters markiert, um anzuzeigen, daß es eingestellt
ist. Wenn Sie ein Parameterfeld wählen, ist die derzeitige Parametereinstellung
markiert.
Über Parameterfelder
Beachten Sie, daß es zwei Arten von Parameterfeldern gibt. In einigen gibt es auf
der rechten Seite nach oben und nach unten gerichtete Pfeile, die anzeigen, daß es
mehr als zwei mögliche Einstellungen für diese Parameter gibt.
Nachdem Sie ein derartiges Feld gewählt haben (durch Anklicken im Feld mit der
Maus oder mit der Tabulatortaste) können Sie durch Klicken mit der Maus auf die
Tasten NACH OBEN oder NACH UNTEN durch die verfügbaren Einstellungen
blättern. Sie können auch auf der T astatur mit den Tasten NACH OBEN oder N ACH
UNTEN durch die verfügbaren Einstellungen blättern.
Wichtig!
Ihr Computer kann die Einstellungen des Druckers nicht auslesen, wenn Ihr
Computer und Ihr Drucker mittels eines optionalen Seriellen Interface-Adapters
miteinander verbunden sind. In diesem Falle können Sie dennoch das Drucker
Setup Programm benutzen, um Einstellungen an den Drucker zu senden, aber Sie
können die aktuellen Einstellungen des Druckers nicht lesen.
Importante!
La stampante non potrà ricevere i dati di configurazione se è collegata al computer
tramite il convertitore d’interfaccia seriale-parallelo opzionale. In tal caso, potrete
comunque utilizzare il programma User Setup Utility per inviare la configurazione
alla stampante, ma il programma non potrà leggere la configurazione corrente.
Modifica dei parametri di configurazione del programma
User Setup Utility
Modificare le impostazioni dei parametri del programma User Setup Utility è molto
semplice, sia che usiate il mouse che la tastiera. Di seguito riportiamo le operazioni
fondamentali da eseguire per modificare i parametri nelle schermate “General”,
“Font”, “Paper”, “Adjust.” e “Port”.
Selezione di una schermata
❏ Evidenziate il nome della videata che volete visualizzare, selezionandola con il
mouse sulla barra del menu o usando i tasti freccia sinistra o freccia destra.
Selezione di un riquadro di parametro
❏ Selezionate il riquadro del parametro desiderato facendo clic al suo interno con
il mouse o spostandovi con il tasto Tab.
I vari parametri sono raggruppati in riquadri sullo schermo. La prima volta che
aprite una schermata, è evidenziata l’impostazione corrente del parametro nel
primo riquadro (in alto a sinistra) della schermata, per indicare che quel riquadro
è selezionato. Selezionando un nuovo riquadro di parametro, verrà sempre
evidenziata la relativa impostazione corrente.
Nota sui riquadri di parametri
Ci sono due tipi di riquadri di parametri. Alcuni mostrano sul lato destro i simboli
delle frecce su e giù, il che sta ad indicare che per quei determinati parametri vi sono
più di due possibili scelte.
Selezionando questo tipo di riquadro (facendo clic al suo interno con il mouse o
spostandovi con il tasto Tab), fate clic con il mouse sui pulsanti su e giù per scorrere
le scelte disponibili. Potete eseguire la stessa operazione usando i tasti freccia su e
freccia giù.
28
Page 38

The other type of parameter box are “toggle” type, which means that you select one
Gener
setting or the other.
L’autre type de zone de paramétrage est de type «bascule» ou, autrement dit, ne
possède que deux valeurs possibles.
Note that with both types of parameter boxes, the currently selected setting is
indicated by a ball inside the parentheses on the left of the setting.
Asterisks to the right of the parameters indicate default settings.
To change a parameter setting
❏
Select the parameter box (by clicking inside it with the mouse or by moving to it
by pressing Tab) that contains the setting you want to change.
❏ Highlight the setting you require by clicking on it with the mouse, or by using
the up and down arrows. Then select that setting by clicking the mouse or by
pressing the space bar.
A setting is selected when there is a ball inside the parentheses on the left of the
setting. Remember that if the parameter box has up and down arrows on the right
side, you may have to scroll through the settings in order to display the one that
you want before you can select it.
Using the General window
While in the User Setup Utility, select
al from the menu bar.
A noter que pour les deux types de zones de paramétrage, la valeur courante
sélectionnée est indiquée par un point entre parenthèses en regard de la valeur.
Les astérisques à droite des paramètres indiquent les valeurs par défaut.
Modification de la valeur d’un paramètre
❏ Sélectionnez la zone paramétrage (en cliquant sur la zone en question ou en y
accédant au moyen de la touche Tab) contenant la valeur à modifier.
❏ Surlignez la valeur requise en cliquant avec la souris ou en utilisant les flèches
haute et basse. Pour sélectionner la valeur surlignée, cliquez à la souris et
appuyez sur la barre d’espacement.
Une valeur est sélectionnée lorsque les parenthèses à gauche contiennent un
point. N’oubliez pas que lorsqu’une zone de paramétrage s’accompagne de
flèches haute et basse à droite, vous pouvez faire défiler les différentes valeurs
possibles afin d’afficher celle que vous recherchez pour la sélectionner.
Utilisation de la fenêtre Générale
Dans l’utilitaire de configuration, sélectionnez l’option GENERAL dans la barre de
menus.
The following describes the various settings that are available for each parameter on
this screen.
29
Les différentes valeurs disponibles pour chaque paramètre affiché sur cet écran sont
décrites dans la suite de ce manuel.
Page 39

Die anderen Parameterfelder bieten Alternativen, d.h. sie können entweder die eine
oder die andere Einstellung wählen.
Bitte beachten Sie, daß innerhalb beider Arten von Parameterfeldern die aktuelle
Einstellung durch einen Punkt innerhalb der Klammern links von der Einstellung
angezeigt wird.
Sternchen rechts von den Parametern zeigen die Standardeinstellungen an.
Ändern einer Parametereinstellung
❏ Wählen Sie das Parameterfeld (durch Anklicken innerhalb des Feldes mit der
Maus oder durch Drücken der Tabulatortaste), in dem sich die Einstellung
befindet, die Sie ändern möchten.
❏ Markieren Sie die gewünschte Einstellung durch Anklicken mit der Maus oder
mit den Tasten NACH OBEN oder NACH UNTEN. Dann wählen Sie diese
Einstellung durch erneutes Anklicken mit der Maus oder durch Drücken der
Leertaste.
Eine Einstellung ist eingeschaltet, wenn sich ein Punkt in den Klammern links
von der Einstellung befindet. Denken Sie daran, wenn ein Parameterfeld auf der
rechten Seite aufwärts und abwärts gerichtete Pfeile aufweist, müssen Sie durch
die Einstellungen blättern, um die von Ihnen gewünschte anzuzeigen, bevor Sie
sie wählen.
Benutzung des Fensters Allgemein
Wenn Sie sich im Drucker Setup Programm befinden, wählen Sie Allgem. in der
Menüleiste.
Im Folgenden sind die verschiedenen Einstellungen beschrieben, die für jeden
Parameter auf dem Bildschirm zur Verfügung stehen.
Gli altri riquadri di parametri sono di tipo “ad interruttore”, il che vuol dire che
potete selezionare solo una delle due impostazioni possibili.
Per entrambi i tipi di riquadro, l’impostazione corrente selezionata è indicata da un
pallino fra le parentesi a sinistra dell’impostazione.
L’asterisco a destra del parametro indica l’impostazione predefinita.
Modifica delle impostazioni di un parametro
❏
Selezionate il riquadro del parametro (facendo clic al suo interno con il mouse o
spostandovi con il tasto Tab) contenente l’impostazione che volete cambiare.
❏ Evidenziate l’impostazione desiderata selezionandola con il mouse o con i tasti
freccia su e freccia giù. Quindi confermate la scelta facendo clic con il mouse o
premendo la barra spaziatrice.
L’impostazione risulta selezionata quando fra le parentesi a sinistra appare un
pallino. Ricordate che se a destra del riquadro del parametro appaiono le frecce
su e giù, in qualche caso dovrete scorrere le varie impostazioni disponibili per
visualizzare quella desiderata, prima di poterla selezionare.
Uso della schermata Generale
Dal programma User Setup Utility, selezionate l’opzione Generale dalla barra del
menu.
Segue una descrizione delle varie impostazioni disponibili per ognuno dei parametri
che appaiono in questa videata.
30
Page 40

Emulation
❏ Select either standard emulation or IBM emulation.
Note that the emulation you choose determines the character set and printer control
commands that are applied for printing. See “Character Sets” on page 110 for the
character sets used by each type of emulation. See “Printer Control Codes” on
page 113 for details on printer control commands.
Unless you specifically need the IBM character set, we recommend that you
normally use Standard emulation. If you select IBM emulation, you will also need to
select an IBM printer driver.
Graphic Direction
❏ Select either unidirectional (Uni-direction) or bidirectional (Bi-direction)
printing for graphics.
Bidirectional printing is faster, while unidirectional printing generally provides
better print quality.
A.E.C.
❏ Switch A.E.C. on (Enabled) or off (Disabled).
The letters A.E.C. stand for Automatic Emulation Change. As its name suggests,
enabling this feature tells the printer to automatically select the proper emulation
mode (standard or IBM) to match the printer driver selected in the application you
are using.
Ink color
❏ Specify use of either a color ink ribbon (Color) or monochrome ink ribbon
(Monochrome).
Always use the correct setting. Selecting Monochrome when using a monochrome
ink ribbon provides longer ribbon life.
Note that this option does not appear or its selection may be disabled if the printer
you are using is not a color printer.
RAM usage
❏
Specify whether RAM should be used as an input buffer or as a download buffer.
Selecting Input Buffer tells the printer to use available RAM to store data it recei ves
from the computer. This speeds up the printing operation, but it also means that
RAM cannot be used to store character patterns used to define down loaded
characters.
Selecting Download tells the printer to use available RAM to store character
patterns you define using the download character control codes (page 113).
31
Emulation
❏ Sélectionnez l’émulation standard ou IBM.
A noter que l’émulation choisie détermine le jeu de caractères et les commandes de
contrôle d’imprimante appliquées à l’impression. Pour déterminer les jeux de
caractères utilisés par chaque type d’émulation, voir «Jeux de caractères» à la page
110. Pour plus de détails sur les commandes de contrôle d’imprimante, voir «Codes
de contrôle d’imprimante» à la page 113.
Il est recommandé d’utiliser l’émulation standard, sauf si vous avez spécifiquement
besoin du jeu de caractères IBM. Si vous sélectionnez l’émulation IBM, vous devez
également sélectionner un gestionnaire d’imprimante IBM.
Impression Graphique
❏ Sélectionnez soit la direction unidirectionnelle (Uni-direction), soit la direction
bidirectionnelle (Bi-direction) pour l’impression des graphiques.
L’impression bidirectionnelle est plus rapide, mais l’impression unidirectionnelle
fournit généralement une meilleure qualité d’impression.
A.E.C.
❏ L’A.E.C. peut être activé ou désactivé.
L’acronyme A.E.C. signifie Automatic Emulation Change ou changement
automatique d’émulation. Comme son nom le suggère, cette fonction, lorsqu’elle est
activée, demande à l’imprimante de sélectionner automatiquement le mode
d’émulation correct (standard ou IBM) selon le gestionnaire d’imprimante
sélectionné dans l’application choisie.
Ruban couleur
❏ Spécifie l’usage d’un ruban de couleur (Couleur) ou monochrome
(Monochrome).
Vous devez toujours utiliser la valeur correcte. En sélectionnant la valeur
Monochrome lorsque vous utilisez un ruban monochrome, vous prolongez la durée
de vie du ruban.
Notez que cette option n’apparaît pas ou qu’elle ne peut pas être sélectionnée si
l’imprimante que vous utilisez n’est pas une imprimante couleur.
Usage de la RAM
❏ Spécifiez si la RAM doit être utilisée comme mémoire tampon d’entrée ou de
téléchargement.
La valeur Tampon Entreé demande à l’imprimante d’utiliser la RAM disponible
pour y sauvegarder les données qu’elle reçoit de l’ordinateur. Cette action accélère
l’impression, mais empêche aussi d’utiliser la RAM pour enregistrer les modèles de
caractères utilisés pour définir les caractères téléchargés.
La valeur Téléchargement demande à l’imprimante d’utiliser toute la RAM
disponible pour enregistrer les modèles de caractères définis au moyen des codes de
commande de caractères de téléchargement (page 113).
Page 41

Emulation
❏ Wählen Sie entweder die Standard-Emulation oder die IBM-Emulation.
Beachten Sie bitte, daß die von Ihnen gewählte Emulation den Zeichensatz und die
Steuerbefehle des Druckers, die beim Druck benutzt werden, festlegt. Im Kapitel
“Zeichensätze” auf Seite 110 finden Sie die Zeichensätze, die von der jeweiligen
Emulation verwendet werden. Unter “Steuercodes des Druckers” auf Seite 113
finden Sie Einzelheiten über die Steuerbefehle des Druckers.
Sofern Sie nicht ausdrücklich die IBM-Emulation benötigen, empfehlen wir, daß Sie
im Normalfall die Standard-Emulation verwenden. Wenn Sie die IBM-Emulation
wählen, müssen Sie auch einen IBM-Druckertreiber wählen.
Druckrichtung
❏ Wählen Sie entweder unidirektional (Grafik wird nur von links nach rechts
gedruckt) oder bidirektional (Grafik wird von links nach rechts und im
Rücklauf von rechts nach links gedruckt) als Druckrichtung.
Bidirektionaler Druck ist schneller, wohingegen unidirektionaler Druck im
allgemeinen bessere Druckergebnisse liefert.
A.E.C.
❏ Schalten Sie A.E.C. ein (Aktiv) oder aus (Inaktiv).
Die Buchstaben A.E.C. stehen für Automatischer Emulations-Wechsel (Automatic
Emulation Change). Wie die Bezeichnung erkennen läßt, erhält beim Einschalten
dieser Funktion der Drucker die Mitteilung, automatisch die geeignete Emulation zu
wählen (Standard oder IBM), damit sie mit dem Druckertreiber für die von Ihnen
benutzte Anwendung übereinstimmt.
Farbband
❏ Geben Sie entweder an, daß Sie ein Color-Farbband (Farbe) oder ein
Monochrom(Monochrom)-Farbband verwenden.
Nehmen Sie immer die richtige Einstellung vor. Wenn Sie monochrom wählen und
ein einfarbiges Farbband verwenden, wird dies eine längere Standzeit haben.
Beachten Sie, daß die Option möglicherweise nicht angezeigt oder die Wahl nicht
eingeschaltet wird, wenn der Drucker, den Sie verwenden, kein Color-Drucker ist.
RAM Speicher
❏ Geben Sie an, ob der Speicher als Input Buffer oder als Download-Speicher für
benutzerdefinierte Zeichen verwendet wird.
Durch Wahl als Input Buffer erhält der Drucker die Mitteilung, den verfügbaren
Speicher zur Speicherung von Daten, die er vom Computer empfängt, zu nutzen.
Dies beschleunigt den Druckvorgang. Es bedeutet aber auch, daß der Speicher nicht
zur Speicherung von selbstdefinierten (Download-) Zeichen verwendet werden
kann.
Wenn Sie Download (benutzerdefinierte Zeichen) wählen, erhält der Drucker die
Mitteilung, den verfügbaren Speicher zur Speicherung von selbstdefinierten Zeichen
zu verwenden, die Sie mit Steuerbefehlen für Downloadzeichen definieren (Seite
113).
Emulazione
❏ Potete scegliere tra emulazione standard ed emulazione IBM.
Ricordate che il tipo di emulazione scelta determina il set di caratteri e i codici di
controllo della stampante che verranno applicati in stampa. Consultate le tabelle
riportate nell’appendice “Set di caratteri” a pagina 110 per conoscere i set di
caratteri utilizzati dai due tipi di emulazione. Per ulteriori dettagli sui codici di
controllo della stampante, vedere l’appendice “Codici di controllo della stampante”
a pagina 113.
Vi consigliamo di utilizzare normalmente l’emulazione Standard, tranne nei casi
particolari in cui dovete stampare con il set di caratteri IBM. Ricordate inoltre che,
selezionando l’emulazione IBM, dovrete anche richiamare un driver di stampante
IBM appropriato.
LQ
❏ Potete scegliere se eseguire la stampa in modalità grafica in modo
monodirezionale (Uni-direzionale) o bidirezionale (Bi-direzionale).
La stampa bidirezionale è più veloce, mentre con la stampa monodirezionale si
ottiene una migliore qualità di stampa.
A.E.C.
❏
Potete scegliere se abilitare (Disattivo) o disabilitare (Attivo) la funzione A.E.C.
A.E.C. è l’acronimo di “Automatic Emulation Change” (Cambio Emulazione
Automatico). Come suggerisce il nome, abilitando questa funzione la stampante
selezionerà automaticamente il tipo di emulazione (standard o IBM) corrispondente
al driver stampante selezionato dall’applicazione in uso.
Nastro colore
❏ Specificate se state utilizzando un nastro a colori (Colore) o un nastro nero
(Monocromatico).
Ricordate di selezionare sempre l’impostazione corretta. Se avete scelto
“Monochrome” e state stampando con un nastro nero, la durata del nastro sarà
maggiore.
Se il modello della vostra stampante non è a colori, questa opzione non apparirà o ne
verrà inibita la selezione.
Utilizzo RAM
❏ Specificate se utilizzare la memoria RAM della stampante come buffer di
ricezione o buffer di download.
Scegliendo Buffer d’ingresso, la stampante utilizzerà la sua RAM disponibile per
memorizzare i dati che riceve dal computer . In questo modo, le operazione di stampa
verranno velocizzate, ma la RAM non potrà essere utilizzata per trasferirvi i motivi
di carattere usati per definire i caratteri di download (trasferibili via software).
Scegliendo Download, la stampante utilizzerà la sua RAM disponibile per
memorizzare i motivi di carattere che definirete tramite i codici di controllo relativi
ai caratteri di download (pagina 113).
32
Page 42

Sleep
❏ Specify how long the printer should wait until entering the Sleep Mode.
The Sleep Mode is entered automatically whenever no printer operation is
performed for the amount of time that you specify here. Note the following
characteristics about the Sleep Mode:
✓ Power consumption is reduced by about 20% of normal.
✓ Any data stored in the printer’s buffer is cleared.
❏ The Sleep Mode is exited when the computer sends data to the printer or when
you press the Power button.
Demo Print
❏ Specify the type of printout to be produced when the demo print operation is
performed.
See “Testing the printer” on page81 for details on the demo print operation.
Default color
❏ Specify the color to use for printing when color is not specified by the
application.
Note that this option does not appear or its selection may be disabled if the printer
you are using is not a color printer.
Using the Font window
❏ While in the User Setup Utility, select Font from the menu bar.
Mode veille
❏ Cette option spécifie le délai que l’imprimante doit attendre avant de passer en
mode de veille.
Le mode veille est activé automatiquement lorsqu’aucune opération n’est effectuée
sur l’imprimante pendant le délai spécifié. Notez les caractéristiques suivantes du
mode de veille :
✓ La consommation d’énergie est réduite de 20% environ par rapport à la
consommation normale.
✓ Les données enregistrées dans la mémoire tampon de l’imprimante sont
effacées.
❏
L’imprimante sort du mode de veille lorsque l’ordinateur lui envoie des données
ou lorsque vous appuyez sur le bouton Power.
Imprime Démo
❏
Cette option spécifie le type d’imprimé à produire en exécutant la démonstration
d’impression.
Pour plus de détails sur la démonstration d’impression, voir «Test d’imprimante» à
la page 81.
Couleur Défaut
❏
Cette option spécifie la couleur à utiliser pour l’impression si l’application ne le
fait pas.
A noter que cette option n’apparaît pas ou qu’elle est désactivée si vous n’utilisez
pas une imprimante couleur.
Utilisation de la fenêtre Police
❏
Dans l’utilitaire de configuration, sélectionnez POLICE dans la barre de menus.
The following describes the various settings that are available for each parameter on
this screen.
33
Les différentes valeurs des paramètres affichés sur cet écran sont décrites dans la
suite de ce manuel.
Page 43

Sleep-Modus
❏ Angabe, wie lange der Drucker warten soll, bis der Sleep-Modus sich
einschaltet.
Die Sleep-Modus wird automatisch eingeschaltet, wenn in dem von Ihnen hier
angegebenen Zeitraum kein Druckvorgang erfolgt. Beachten Sie die folgenden
Merkmale des Sleep-Modus:
✓ Der Stromverbrauch wird um etwa 20% des Normalverbrauchs reduziert.
✓ Alle im Druckerpuffer gespeicherten Daten werden gelöscht.
❏ Der Sleep-Modus wird verlassen, wenn der Computer Daten an den Drucker
sendet oder wenn Sie den Netzschalter drücken
Testausdruck
❏ Geben Sie die Art des Ausdrucks an, die bei Durchführung des Testausdrucks
erstellt werden soll.
Siehe “Testen des Druckers” auf Seite 82. Dort finden Sie Einzelheiten über den
Testausdruck.
Standard Farbe
❏ Geben Sie die zum Drucken verwendete Farbe an, wenn die Farbe nicht durch
die Anwendung angegeben ist.
Bitte beachten, daß diese Option nicht erscheint oder Ihre Auswahl ausgeschaltet ist,
wenn der von Ihnen verwendete Drucker kein Color-Drucker ist.
Benutzung des Fensters Schrift
❏ Wenn Sie sich im Drucker Setup Programm befinden, wählen Schrift aus der
Menüleiste.
Im folgenden werden die verschiedenen Einstellungen beschrieben, die für jeden
Parameter auf diesem Bildschirm verfügbar sind.
Modalità sleep
❏ Specificate il tempo che la stampante dovrà attendere prima di passare al modo
“Sleep”.
La stampante passerà automaticamente al modo “Sleep” una volta trascorso il tempo
specificato senza che abbia eseguito alcuna operazione. Di seguito riportiamo alcune
caratteristiche del modo “Sleep”:
✓ Il consumo di energia elettrica viene ridotto di circa il 20% rispetto al
funzionamento normale.
✓ Tutti i dati contenuti nel buffer della stampante vengono cancellati.
❏ La stampante esce dal modo “Sleep” nel momento in cui il computer invia dei
dati o premendo il tasto Power sul pannello di controllo.
Test della stampante
❏ Potete scegliere il tipo di stampa che la stampante dovrà emettere quando
richiedete il test di stampa.
Vedere la sezione “Esecuzione dei test di stampa” a pagina 82 per maggiori
informazioni sui test di stampa.
Colore standard
❏ Potete scegliere il colore con cui eseguire una stampa quando la vostra
applicazione non consente di eseguire questa scelta.
Se il modello della vostra stampante non è a colori, questa opzione non apparirà o ne
verrà inibita la selezione.
Uso della schermata Carattere
❏ Dal programma User Setup Utility, selezionate l’opzione Carattere dalla barra
del menu.
Segue una descrizione delle varie impostazioni disponibili per ognuno dei parametri
che appaiono in questa videata.
34
Page 44

LQ Font
❏ Select the font that you want to use as the printer’s default letter-quality font.
Police LQ
❏ Sélectionnez la police à utiliser comme police de qualité «courrier» par défaut.
Pitch
❏ Select the print pitch (character spacing) you want to use for printing.
Print mode
❏ Select the print mode you want to use.
Selecting LQ provides letter quality output, while selecting Draft provides draft
quality. Draft quality printing may be less attractive than letter quality, but the
printing operation is faster.
Code page
❏ Select the code page you want to use for printing.
For details on what characters are included in each code page, see “Character Sets”
on page 110 of this manual.
Font lock
❏ Switch the font lock on (Enabled) or off (Disabled).
When font lock is enabled, the printer will not allow the font to be changed by the
software application you are using. When disabled, the application software can
control the fonts used for printing.
Zero style
❏ Select the type of zero you want to use.
Selecting Normal prints zeros without lines running through them, while Slashed
prints zeros with a diagonal slash running through them.
Country
❏ Select the international character set you want to use for printing.
The international character sets you can select in this menu are: U.S.A., France,
Germany, England, Denmark-1, Sweden, Italy, Spain-1, Japan, Norw ay, Denmark-2,
Spain-2, Latin America, Korea, Irish, Legal.
For details on what characters are included in these character sets, see “Character
Sets” on page 110 of this manual.
Char table
❏ Select the character table you want to use for printing.
For details on what characters are included in these character tables, see “Character
Sets” on page 110 of this manual.
Pas
❏ Sélectionnez le pas d’impression (espacement des caractères) que vous voulez
utiliser à l’impression.
Mode imprime
❏ Sélectionnez le mode d’impression à utiliser.
La valeur LQ fournit une sortie de qualité «courrier», alors que la valeur Brouillon
produit un imprimé en mode rapide. L’impression de qualité rapide n’est pas aussi
bonne que l’impression en qualité courrier, mais se fait bien plus rapidement.
Page de codes
❏ Sélectionnez la page de codes à utiliser pour l’impression.
Pour plus de détails sur les caractères inclus dans chaque page de codes, voir «Jeux
de caractères» à la page 110 de ce manuel.
Vérouil Police
❏ Il peut être activé ou désactivé.
Lorsque le verrouillage de police est activé, l’imprimante ne permet pas de modifier
la police dans l’application utilisée. Lorsque le verrouillage de police est désactivé,
le logiciel peut contrôler les polices utilisées à l’impression.
Style du zéro
❏ Sélectionnez le type de zéro à utiliser.
La valeur Normal 0 imprime les zéros sans trait à l’intérieur, alors que la valeur
Barré imprime une diagonale à l’intérieur des zéros.
Pays
❏ Sélectionne le jeu de caractères internationaux utilisée à l’impression.
Les jeux de caractères internationaux dont vous disposez dans ce menu sont : USA,
France, Allemagne, Angleterre, Denemark, Suéde, Italie, Espagne, Japon, Norvége,
Amerique Latíne, Coreé, Irlande, Legal.
Pour plus de détails sur les caractères disponibles dans ces jeux de caractères,
reportez-vous à la section «Jeux de caractères» à la page 110 de ce manuel.
Table Caractè
❏ Sélectionne la table de caractères utilisée à l’impression.
Pour plus de détails sur les caractères disponibles dans ces tables de caractères,
reportez-vous à la section «Jeux de caractères» à la page 110 de ce manuel.
35
Page 45

LQ Schrift (Briefqualität)
❏ Wählt die Schriftart, die Sie als die Standard LQ Schrift des Druckers
verwenden möchten.
Zeichenabstand
❏ Wählt den Zeichenabstand (Zeichenbreite) der Schriftart, die Sie beim Drucken
benutzen möchten.
Druckmodus
❏ Wählt die Druckbetriebsart, die Sie verwenden möchten.
Durch Wahl von LQ erhalten Sie einen Ausdruck in Briefqualität /
Korrespondenzdruck, währen Sie bei Wahl von Draft einen Ausdruck in
Entwurfsqualität erhalten. Das Drucken in Entwurfsqualität kann weniger
ansprechend sein als in Briefqualität, aber der Druckvorgang läuft schneller ab.
Code Page
❏ Wählt die Codeseite, die Sie beim Drucken verwenden möchten.
Einzelheiten darüber, welche Zeichen zu jeder Codeseite gehören, finden Sie auf
Seite 110 dieses Handbuchs unter “Zeichensätze”.
Font lock
❏ Schalten Sie Font lock (Schriftartsperre) ein (Aktiv) oder aus (Inaktiv).
Wenn die Schriftartsperre eingeschaltet ist, erlaubt der Drucker keine Änderung der
Schriftart durch das Anwendungsprogramm, das Sie verwenden. Ist die Sperre
ausgeschaltet, kann das Anwendungsprogramm die zum Drucken benutzten
Schriftarten steuern.
Null
❏ Wählt die Ausführungsart der Null, die Sie drucken möchten.
Wenn Sie Normal wählen, wird die Null ohne eine Querstrich gedruckt, während
bei Wahl von mit Querstrich, die Null mit einem Querstrich versehen wird.
Land
❏ Wählt den internationalen Zeichensatz, den Sie beim Druck verwenden
möchten.
Die internationalen Zeichensätze, die Sie in diesem Menü wählen können, sind:
USA, Frankreich, Deutschland, England, Dänemark-1, Schweden, Italien, Spanien1, Japan, Norwegen, Dänemark-2, Spanien-2, Lateinamerika, Korea, Irland, Legal.
Einzelheiten darüber, welche Zeichen in diesen Zeichensätzen enthalten sind, finden
Sie auf Seite 110 dieses Handbuchs unter “Zeichensätze”.
Zeichensatz
❏ Wählt die für den Druck gewünschte Zeichensatztabelle.
Einzelheiten darüber, welche Zeichen in diesen Zeichensatztabellen enthalten sind,
finden Sie auf Seite 110 dieses Handbuchs unter “Zeichensätze”.
Carattere LQ
❏
Potete scegliere il tipo di carattere (font) che si vuole utilizzare in modalitá letter
quality (qualità lettera) come predefinito.
Passo di stampa
❏
Potete scegliere il passo di stampa (spaziatura dei caratteri) con cui volete stampare.
Modo di stampa
❏ Specificate la qualità di stampa con cui volete stampare.
Scegliendo l’opzione LQ, le stampe verranno eseguite in letter quality, mentre
scegliendo l’opzione Draft, la stampante stamperà in qualità bozza. La stampa in
qualità bozza è probabilmente meno gradevole di quella eseguita in qualità lettera,
ma la stampante sará più veloce.
Code page
❏ Potete scegliere la pagina codici che volete che la stampante utilizzi.
Consultate l’appendice “Set di caratteri” a pagina 110 per conoscere i caratteri che
fanno parte di ogni pagina codici.
Memori il font
❏ Potete scegliere se abilitare (Attivo) o disabilitare (Disattivo) la funzione di
bloccaggio del tipo di carattere.
Abilitando la funzione di bloccaggio carattere, la stampante impedirà al programma
applicativo in uso di cambiare il tipo di carattere. Quando questa funzione è
disabilitata invece, il programma applicativo potrà modificare il tipo di carattere che
verrà stampato.
Scelta dello zero
❏ Potete scegliere il modo in cui far stampare la cifra zero.
Scegliendo Normale, lo zero verrà stampato senza barra, mentre con Barrato, lo
zero verrà stampato con una barra diagonale.
Paese
❏
Potete scegliere il set di caratteri internazionali che volete utilizzare per la stampa.
I set di caratteri internazionali che potete selezionare in questo elenco sono: U.S.A.,
Francia, Germania, Gran Bretagna, Danimarca-1, Svezia, Italia, Spagna-1, Giappone,
Norvegia, Danimarca-2, Spagna-2, America Latina, Corea, Irlanda, Legale.
Consultate l’appendice “Set di caratteri” a pagina 110 per conoscere i caratteri che
fanno parte dei vari set di caratteri.
Set di caratteri
❏
Potete scegliere la tabella dei codici carattere che volete utilizzare per la stampa.
Consultate l’appendice “Set di caratteri” a pagina 110 per conoscere i caratteri che
fanno parte delle tabelle dei codici carattere.
36
Page 46

Using the Paper window
While in the User Setup Utility, select Paper from the menu bar.
Utilisation de la fenêtre Papier
Dans l’utilitaire de configuration, sélectionnez PAPIER dans la barre de menus.
The following describes the various settings that are available for each parameter on
this screen.
Page Length
❏ Specify the length of the paper you are using.
Line Spacing
❏ Select the line spacing you want to use.
Auto LF with CR
❏ Switch auto LF with CR on (Enabled) or off (Disabled).
When auto LF (line feed) with CR (carriage return) is disabled, the computer must
send both a line feed code and a carriage return code at the end of each line. Most
applications do this automatically. When auto LF with CR is enabled, the printer
automatically performs a line feed whenever it receives a carriage return from the
computer.
Note the following check points when trying to figure out which setting to use here:
✓ If you find that your output is double-spaced when it should not be, change this
setting to Disabled.
✓ If you find that lines are printing over each other, change this setting to
Enabled.
Les différentes valeurs des paramètres affichés sur cet écran sont décrites dans la
suite de ce manuel.
Longueur page
❏ Spécifie la longueur du papier utilisé.
Espace Ligne
❏ Sélectionne l’interligne à utiliser.
LF Auto avec CR
❏ Activez ou désactivez le retour automatique à la ligne.
Lorsque cette option est désactivée, l’ordinateur doit envoyer à la fois un code de
saut de ligne et un code de retour-chariot à la fin de chaque ligne. La plupart des
applications se chargent toutefois de le faire automatiquement. Lorsque l’option
Retour auto avec RC est activée, l’imprimante effectue automatiquement un saut de
ligne lorsque l’ordinateur lui envoie un retour-chariot.
A noter que les vérifications suivantes qui doivent être effectuées pour déterminer la
valeur à utiliser :
✓ Si la copie papier est imprimée en double interligne alors qu’elle ne devrait pas
l’être, désactivez ce paramètre en lui donnant la valeur Désactivé.
✓ Si les lignes se superposent à l’impression, activez ce paramètre en lui donnant
la valeur Activé.
37
Page 47

Benutzung des Fensters Papier
Während Sie sich im Drucker Setup Programm befinden, wählen Sie Papier aus der
Menüleiste.
Im Folgenden werden die verschiedenen Einstellungen beschrieben, die für jeden
Parameter auf diesem Bildschirm verfügbar sind.
Seitenlänge
❏ Geben Sie die Länge des Blattes an, das Sie verwenden.
Zeilenabstand
❏ Wählen Sie den Zeilenabstand, den Sie verwenden möchten.
Auto LF mit CR
❏ Schalten Sie Auto LF mit CR ein (Aktiv) oder aus (Inaktiv).
Wenn Auto LF (Zeilenvorschub) mit CR (Druckagenrücklauf) ausgeschaltet ist,
muß der Computer sowohl einen Steuerbefehl für den Zeilen vorschub als auch einen
Steuerbefehl für den Druckwagenrücklauf am Ende jeder Zeile senden. Bei den
meisten Anwendungen erfolgt dies automatisch. Wenn Auto LF mit CR
eingeschaltet ist, führt der Drucker automatisch einen Zeilenvorschub aus, wenn er
vom Computer einen Druckwagenrücklaufbefehl erhält.
Beachten Sie die folgenden Prüfpunkte, wenn Sie versuchen, herauszufinden,
welche Einstellung hier zu verwenden ist:
✓ Wenn Sie feststellen, daß Ihr Computer einen doppelten Zeilenvorschub
ausführt, wo dies nicht erfolgen sollte, ändern Sie die Einstellung in Inaktiv.
✓ Wenn Sie herausfinden, daß Zeilen übereinander gedruckt werden, ändern Sie
diese Einstellung in Aktiv.
Uso della schermata Carta
Dal programma User Setup Utility, selezionate l’opzione Carta dalla barra del
menu.
Segue una descrizione delle varie impostazioni disponibili per ognuno dei parametri
che appaiono in questa videata.
Lunghezza pagina
❏ Specificate la lunghezza della carta che volete utilizzare.
Interlinea
❏ Specificate l’interlinea con cui volete stampare.
Auto LF con CR
❏ Potete scegliere se abilitare (Attivo) o disabilitare (Disattivo) la funzione di
avanzamento linea automatico con ritorno carrello.
Quando la funzione di avanzamento linea (LF) con ritorno carrello (CR) è
disabilitata, il computer dovrà inviare alla stampante un codice di avanzamento
linea e un codice di ritorno carrello al termine di ogni riga. La maggior parte
delle applicazioni invia questi codici automaticamente. Quando questa funzione
è disabilitata, la stampante eseguirà automaticamente un avanzamento linea ogni
volta che riceve un codice di ritorno carrello dal computer.
Per stabilire quale impostazione selezionare qui, controllate le seguenti
condizioni:
✓ Se la stampa viene eseguita con un’interlinea doppia rispetto a come dovrebbe
essere, impostate questo parametro su Disattivo.
✓ Se la righe vengono stampate sovrapposte l’una all’altra, impostate questo
parametro su Attivo.
38
Page 48

Top Margin
❏ Select the spacing from the top of the paper to the first line of printing.
Paper Out
❏ Switch the paper out detect function on (Enabled) or off (Disabled).
When paper out detection is enabled, the printer automatically stops printing
whenever it senses there is no more paper. When disabled, the printer continues
printing as long as there is data. Disabling this function makes it possible to print
right up to the bottom of a page, but it also creates the danger or printing when there
is no paper loaded in the printer, which can damage the print head and platen.
Tear Off
❏ Switch the tear-off function on (Enabled) or off (Disabled).
This function controls a feature of the optional PT-10Y Push Tractor Unit. For
details on this feature, see the Users Manual that comes with the Push Tractor Unit.
Timeout Printing
❏ Switch time-out printing on (Enabled) or off (Disabled).
When time-out printing is enabled and paper is loaded in the Auto Sheet Feeder, the
printer waits for 30 seconds after printing. If no further data is received within 30
seconds, the printer ejects the current page. The page is not ejected automatically
when time-out printing is disabled.
Adjusting the printer’s vertical alignment
❏ While in the User Setup Utility, select Adjust. from the menu bar.
Marge Haute
❏ Sélectionnez l’espace à laisser en haut de chaque feuille avant de commencer à
imprimer.
Détection Fin de Papier
❏ Activez ou désactivez la fonction de détection d’absence de papier.
Lorsque la fonction de détection d’absence de papier est activée, l’imprimante
s’interrompt automatiquement lorsqu’il ne reste plus de papier. Si elle est
désactivée, l’imprimante poursuit l’impression tant qu’il reste des données. En
désactivant cette fonction, vous risquez donc non seulement d’imprimer jusqu’au
bas de la page, mais aussi d’imprimer sans papier dans l’imprimante, ce qui pourrait
endommager la tête et le rouleau d’impression.
Découpe Rapide
❏ Activez ou désactivez la fonction de coupure.
Cette fonction contrôle une caractéristique de l’unité d’entraînement optionnelle PT10Y. Pour plus de détails sur cette caractéristique, reportez-vous au guide
d’utilisation fourni avec l’unité.
Impress. différée
❏ Activez ou désactivez le temporisateur d’impression.
Lorsque l’impression différée est activée et que du papier est chargé dans
l’introducteur feuille à feuille, l’imprimante patiente 30 secondes après
l’impression. Si aucune donnée n’est reçue au bout de 30 secondes, l’imprimante
éjecte la page courante. La page n’est pas éjectée automatiquement lorsque
l’impression différée est désactivée.
Réglage de l’ajustement vertical de l’imprimante
❏
Dans l’utilitaire de configuration, sélectionnez AJUSTE dans la barre de menus.
39
Page 49

Oberer Rand
❏ Wählt den Abstand vom Blattanfang zur ersten Druckzeile.
Papierende
❏ Schaltet die Funktion “Papierende” ein (Aktiv) oder aus (Inaktiv).
Wenn die Funktion, durch die festgestellt wird, daß kein Papier im Drucker
vorhanden ist, eingeschaltet ist, unterbricht der Drucker automatisch den
Druckvorgang, sobald er feststellt, daß kein Papier vorhanden ist. Ist die Funktion
ausgeschaltet, setzt der Drucker den Druckvorgang fort, solange Daten vorliegen.
Das Ausschalten dieser Funktion erlaubt es, bis zum Blattende zu drucken. Es
besteht jedoch auch die Gefahr, daß gedruckt wird, wenn kein Papier in den Drucker
eingelegt ist, was zu Schäden am Druckkopf und der Druckwalze führen kann.
Abreißautomatik
❏ Schalten Sie die Abreißautomatik ein (Aktiv) oder aus (Inaktiv).
Diese Funktion steuert ein technisches Merkmal des wahlweise erhältlichen
Schubtraktors PT-10Y. Einzelheiten über diese Funktion finden Sie im
Bedienungshandbuch, das mit Ihrer Schubtraktorvorrichtung geliefert wird.
Timeout Druck
❏ Schalten Sie den Timeoutdruck ein (Aktiv) oder aus (Inaktiv).
Wenn der Timeoutdruck eingeschaltet und Papier eingezogen ist, wartet der Druck er
30 Sekunden nach Beendigung des Drucks. Werden keine weiteren Daten inerhalb
dieser 30 Sekunden empfangen, wirft der Drucker das derzeit eingezogene Blatt aus.
Das Blatt wird nicht automatisch ausgeworfen, wenn die zeitweilige
Druckunterbrechung ausgeschaltet ist.
Einstellung der Vertikalen Punktausrichtung
❏ Während Sie sich im Drucker Setup Programm befinden, wählen Sie Justage
aus der Menüleiste.
Margine superiore
❏
Specificate lo spazio da lasciare libero tra il bordo superiore del foglio e la prima
riga da stampare.
Fine carta
❏ Potete scegliere se abilitare (Attivo) o disabilitare (Disattivo) la funzione di
rivelazione di fine carta.
Quando la funzione di rivelazione di fine carta è abilitata, la stampante si fermerà
automaticamente ogni volta che percepisce che la carta è terminata. Quando questa
funzione è disabilitata, la stampante continuerà a stampare finché non vi sono dati.
Disabilitando questa funzione, è possibile stampare fino al bordo inferiore della
pagina, tuttavia resta la possibilità che la stampa prosegua anche quando non vi è più
carta nella stampante, danneggiando sia la testina di stampa che il rullo.
Linea di strappo
❏
Potete scegliere se abilitare (Attivo) o disabilitare (Disattivo) la funzione di tear-
off.
Questo parametro gestisce una funzione dell’unità di trascinamento opzionale PT10Y. Per ulteriori informazioni su questa funzione, fate riferimento al Manuale
dell’Utente fornito con l’unità di trascinamento.
Stampa in timeout
❏ Potete scegliere se abilitare (Attivo) o disabilitare (Disattivo) la funzione di
stampa con tempo di attesa.
Quando la funzione di stampa con tempo di attesa è abilitata e nell’alimentatore
automatico di fogli singoli vi è caricata della carta, la stampante attende 30 secondi
dopo il termine della stampa. Se la stampante non riceve altri dati entro 30 secondi,
la pagina corrente viene espulsa. Quando questa funzione è disabilitata, la stampante
non espelle automaticamente la pagina.
Regolazione dell’allineamento verticale
❏ Dal programma User Setup Utility, selezionate l’opzione Regolaz. dalla barra
del menu.
40
Page 50

The above window is used to test and adjust the vertical alignment of the printer in
Double–density –2 :
Double–density –2 :
each printing mode. You may never have to use the procedure described in this
section, but after you have been using your printer for some time you may find that
the dots of some graphics do not align correctly. For example, what should look like:
La fenêtre ci-dessus est utilisée pour tester et ajuster l’alignement vertical de
l’imprimante dans chaque mode d’impression. Vous n’aurez peut-être jamais à
effectuer la procédure décrite dans cette section. Il se peut toutefois qu’au bout
d’une certaine période d’utilisation, les points ne s’alignent pas correctement sur
certains graphiques. Par exemple, au lieu d’obtenir :
may come out looking like one of the following:
or like this:
This is caused when mechanical parts of the printer get out of alignment. This
happens only rarely and you may never experience it at all throughout the life of the
printer. If you do have problems, use the following procedure to correct it.
❏ Select the box for the mode you want to adjust (by clicking inside it with the
mouse or by moving to it by pressing Tab).
❏ Press your computer’s F4 function key to produce a test printing for that mode,
or press function key F5 to produce a test of all the printing modes.
The printer will print something that looks like the following and feed the paper
so you can see the printout clearly.
If you see that your printer requires adjustment, select the box for the mode you
❏
want to adjust (by clicking inside it with the mouse or by moving to it by
pressing Tab).
❏ Next, select a negative value to shift the lower row left, or a positive value to
shift the lines right.The extent of the shift is indicated by the size of the value.
Use the same procedures as you do for other parameters to scroll through the list
❏
of settings and select the one you want (see “Changing User Setup Utility
parameter settings” on page 27).
After you make an adjustment, you can check its affect on printing by printing a
❏
test again.
❏ Repeat the above steps for each mode, if necessary
Vous risquez d’obtenir :
ou
Le problème se produit parce que les pièces mécaniques de l’imprimantes ne sont
plus correctement alignées. Cette situation est toutefois rare et vous risquez de ne
jamais la rencontrer pendant toute la durée utile de votre imprimante. En cas de
problème, procédez comme indiqué ci-dessous pour le corriger :
❏ Sélectionnez la zone correspondant au mode à ajuster (en cliquant sur la zone ou
en y accédant au moyen de la touche Tab).
❏ Appuyez sur la touche de fonction F4 du clavier pour produire le test
d’impression associé ou sur la touche F5 pour produire un test de tous les modes
d’impression.
L’imprimante produit une copie similaire à la suivante et fait avancer le papier
pour vous permettre de voir clairement l’imprimé.
❏ Si vous voyez que votre imprimante a besoin d’être réglée, cliquez sur la zone
correspondant au mode à ajuster (en cliquant sur la zone en question ou en y
accédant avec la touche Tab).
❏ Sélectionnez ensuite une valeur négative pour décaler la ligne inférieure vers la
gauche ou une valeur positive pour décaler les lignes v ers la droite. La portée du
décalage est indiquée par la valeur choisie.
❏ Utilisez la procédure habituelle pour faire défiler la liste de valeurs possibles et
sélectionner la valeur requise (voir «Modification des paramètres de l’utilitaire
de configuration» à la page 27).
❏ Une fois l’ajustement effectué, vous pouvez vérifier le résultat en relançant le
test d’impression.
❏ Répétez la procédure ci-dessus pour chaque mode si nécessaire.
41
Page 51

Das obige Fenster dient zum Testen und Einstellen der vertikalen Ausrichtung des
Druckers in jeder Druckbetriebsart. Vielleicht müssen Sie das in diesem Abschnitt
beschriebene Verfahren niemals anwenden, aber nachdem Sie Ihren Drucker über
einen längeren Zeitraum im Einsatz haben, stellen Sie vielleicht fest, daß die Punkte
einiger Grafiken nicht einwandfrei übereinander liegen. So hat z.B., was aussehen
sollte wie:
folgendes Aussehen:
Dies liegt daran, daß die mechanischen Teile Ihres Druckers nicht mehr einwandfrei
ausgerichtet sind. Das kommt zwar nur selten vor, und es kann sein, daß Sie dies
niemals feststellen müssen, solange Sie mit Ihrem Drucker arbeiten. Wenn das
Problem jedoch auftritt, können Sie den Fehler folgendermaßen beheben.
❏ Wählen Sie das Feld der Betriebsart, die Sie einstellen möchten (durch
Anklicken mit der Maus oder indem Sie die Tabulatortaste drücken).
❏ Drücken Sie die Funktionstaste F4 Ihres Computers, um einen Testausdruck in
dieser Betriebsart vorzunehmen oder drücken Sie die Funktionstaste F5, um
einen Testausdruck für alle Betriebsarten vorzunehmen.
Der Drucker druckt etwas, das folgendermaßen aussieht und schiebt das Blatt
vor, damit Sie das Druckergebnis einwandfrei sehen können.
❏ Wenn Sie feststellen, daß an Ihrem Drucker Änderungen vorgenommen werden
müssen, wählen Sie das Feld der Betriebsart, die Sie einstellen möchten (durch
Anklicken innerhalb des Feldes mit der Maus oder durch Drücken der
Tabulatortaste).
❏ Als nächstes wählen Sie einen negativen Wert, um die untere Reihe nach links
oder einen positiven Wert, um die Linien nach rechts zu verschieben. Der Grad
der Verschiebung richtet sich nach der Größe des Wertes.
❏ Mit dem gleichen Verfahren, das Sie für die anderen Parameter verwenden,
blättern Sie durch die Liste der Einstellungen und wählen die von Ihnen
gewünschte (siehe dazu “Änderung der Parametereinstellungen des Drucker
Setup Programms” auf Seite 28).
❏
Nachdem Sie die Einstellung vorgenommen haben, können Sie die Wirkung auf
das Druckergebnis durch Vornahme eines erneuten Testausdrucks überprüfen.
❏ Wiederholen Sie die oben dargestellten Schritte, falls notwendig, bei jeder
Betriebsart.
Double–density –2 :
Double-density –2 :
In questa schermata è possibile controllare e regolare l’allineamento verticale della
stampante per ognuno dei modi di stampa. Probabilmente non avrete mai bisogno di
eseguire le operazioni descritte in questa sezione, ma dopo aver utilizzato la
stampante per diverso tempo, potreste rilevare che i punti di alcuni grafici non sono
perfettamente allineati. Ad esempio, ciò che dovrebbe essere stampato in questo
modo:
oder sieht so aus:
potrebbe venire stampato in uno dei seguenti modi:
o così:
Ciò è dovuto al fatto che alcune parti meccaniche della stampante si sono via via
disallineate. Ciò accade molto raramente, e potreste non riscontrare mai questo
problema durante tutta la vita della stampante. Tuttavia, se dovesse manifestarsi,
eseguite le seguenti operazioni per risolverlo.
❏ Selezionate il riquadro relativo al modo di stampa in cui volete regolare la
stampante (facendo clic al suo interno con il mouse o spostandovi con il tasto
Tab).
❏ Premete il tasto funzione F4 per ottenere un test di stampa in quella modalità, o
premete il tasto funzione F5 per ottenere un test di stampa in tutte le modalità di
stampa.
La stampante stamperà delle barrette simili all’esempio seguente e farà avanzare
la carta in modo che possiate vedere chiaramente il risultato della stampa.
❏ Se notate che la stampante necessita di regolazione, selezionate il riquadro
relativo al modo di stampa in cui volete regolarla (facendo clic al suo interno con
il mouse o spostandovi con il tasto Tab).
❏ Quindi, selezionate un valore negativo per spostare la riga inferiore a sinistra, o
un valore positivo per spostare la riga a destra. La misura dello spostamento è
indicata dalla grandezza del valore.
❏ Usate lo stesso sistema visto per gli altri parametri per scorrere l’elenco delle
impostazioni possibili e selezionate quella desiderata (vedere la sezione
“Modifica dei parametri di configurazione del programma User Setup Utility” a
pagina 28).
❏ Dopo aver eseguito una regolazione, potete controllarne l’effetto in stampa
richiedendo un altro test di stampa.
❏ Se necessario, ripetete queste operazioni per ogni modalità di stampa.
42
Page 52

Changing the printer port
The following operation is used to supply printer port information to the computer.
❏ While in the User Setup Utility, select Port from the menu bar.
Changement du port d’imprimante
L’opération suivante permet de fournir à l’ordinateur les informations nécessaires
sur le port d’imprimante.
❏ Dans l’utilitaire de configuration, sélectionnez PORT dans la barre de menus.
❏ Select the port name you want to use from the list on the display.
If you are using a parallel cable, you will probably be using LPT1. If you are
using the optional Serial-To-Parallel Interface Converter, you should normally
be using COM1 or COM2.
Saving setup data as a new configuration file
Use the following procedure to save the current User Setup Utility settings as a
configuration file.
❏ While in the User Setup Utility, select the Save item from the menu bar.
43
❏ Sélectionnez le port d’imprimante à utiliser dans la liste affichée.
Si vous utilisez un câble parallèle, le port correct est probablement LPT1. Avec
le convertisseur d’interface série/parallèle optionnel, le port utilisé est
normalement COM1 ou COM2.
Sauvegarde des données de configuration dans un nouveau
fichier de configuration
Utilisez la procédure suivante pour sauvegarder les valeurs de paramétrage de
l’utilitaire de configuration dans un fichier de configuration.
❏ Dans l’utilitaire de configuration, sélectionnez SAUVE dans la barre de menus.
Page 53

Änderung der Schnittstelle
Mit Hilfe des folgenden Verfahrens erhält das Drucker Setup Programm die
notwendigen Informationen über den Druckeranschluß.
❏ Während Sie sich im Drucker Setup Programm befinden, wählen Sie Port aus
der Menüleiste.
❏ Wählen Sie die Bezeichnung des gewünschten Anschlusses aus der Liste der
Anzeige.
Wenn Sie ein Parallelkabel benutzen, werden Sie wahrscheinlich LPT1
verwenden. Wenn Sie den optionalen Seriellen Interface-Adapter einsetzen,
sollten Sie normalerweise COM1 oder COM2 verwenden.
Speichern der Setup-Daten in einer neuen Konfigurationsdatei
Das folgende Verfahren dient zum Speichern der aktuellen Einstellungen des
Drucker Setup Programms in einer neuen Konfigurationsdatei.
❏ Während Sie sich im Drucker Setup Programm befinden, wählen Sie die
Position Speichern aus der Menüleiste.
Modifica della porta della stampante
La seguente funzione serve a configurare la porta del computer a cui è collegata la
stampante.
❏
Dal programma User Setup Utility, selezionate il comando Porta dalla barra del
menu.
❏ Selezionate la porta desiderata scegliendola dall’elenco a video.
Se state utilizzando un cavo parallelo, probabilmente userete la porta LPT1. Se
state utilizzando il convertitore d’interfaccia seriale-parallelo opzionale, dovrete
utilizzare normalmente le porte COM1 o COM2.
Memorizzazione delle impostazioni in un nuovo file di
configurazione
Eseguite la seguente procedura per memorizzare le impostazioni correnti del
programma User Setup Utility in un file di configurazione.
❏ Dal programma User Setup Utility, selezionate il comando Memori. dalla barra
del menu.
44
Page 54

❏ Input the name that you want to assign to the configuration and press Enter.
The displayed configuration is automatically stored in the directory you
specified under “Installing the User Setup Utility” on page 21. It is given the
name you specify above, with the extension “.cfg” added automatically.
Saving changed setup data in the current configuration file
❏ Use the procedure under “Saving setup data as a new configuration file” on
page 43 to load the configuration file that you want to change.
❏ After making the changes that you want, select the Save item from the menu
bar.
❏ Input the same name as the configuration file whose setup data you imported in
the first step of this procedure and press Enter.
The new data is sa ved under the configuration file name you specify, overwriting
the existing file with the same name.
Important!
Remember that changing User Setup Utility settings on the computer screen does
not directly change them in the printer. To change the printer settings to those shown
on the screen, you must specify “Exit and send the settings to the printer” when
exiting the User Setup Utility (page 47).
❏ Entrez le nom à donner au fichier de configuration et appuyez sur Entrée.
La configuration affichée est automatiquement sauvegardée dans le fichier spécifié à
la section «Installation de l’utilitaire de configuration», page 21. Il prend le nom
spécifié ci-dessus, suivi de l’extension «.cfg» qui lui est ajoutée automatiquement.
Sauvegarde des données de configuration modifiées dans
le fichier courant
❏ Utilisez la procédure décrite à la section «Sauvegarde des données de
configuration dans un nouveau fichier de configuration» à page 43 pour charger
le fichier de configuration à modifier.
❏ Une fois que les modifications nécessaires ont été effectuées, sélectionnez
l’option Enregistrer dans la barre de menus.
❏
Entrez le nom du fichier de configuration dont vous avez importé les données au
cours de la première étape de cette procédure et appuyez sur Entrée.
Les données modifiées sont sauvegardées dans le fichier de configuration
spécifié et remplacent celles qu’il contenait précédemment.
Important!
N’oubliez pas qu’en modifiant les valeurs de paramétrage de l’utilitaire de
configuration à l’écran, vous ne les modifiez pas sur l’imprimante. Pour remplacer
les valeurs de paramétrage de l’imprimante par celles affichées à l’écran, vous
devez quitter en sauvegardant les valeurs sur imprimante (voir page 47).
Importing setup data from a configuration file
Use the following procedure to load setup data from a previously saved
configuration file.
❏ While in the User Setup Utility, select the Load item from the menu bar.
45
Importation des données de configuration à partir d’un
fichier de configuration
Utilisez la procédure suivante pour charger les données de configuration
sauvegardées précédemment dans un fichier de configuration.
❏ Dans l’utilitaire de configuration, sélectionnez l’option CHARGE fichier dans
la barre de menus.
Page 55

❏ Geben Sie die Bezeichnung ein, die Sie der Konfiguration zuordnen möchten
und drücken Sie Enter.
Die angezeigte Konfiguration wird automatisch in dem Verzeichnis, das Sie
unter “Installieren des Drucker Setup Programms” auf Seite 22 angegeben
haben, gespeichert. Sie erhält die Bezeichnung, die Sie oben angeben mit der
Erweiterung “.cfg”, die automatisch angefügt wird.
Speichern der geänderten Setup-Daten in der aktuellen
Konfigurationsdatei
❏ Laden Sie die, mit dem unter “Speichern der Setup-Daten in einer neuen
Konfigurationsdatei” auf Seite 44 geschilderten Verfahren erstellte
Konfigurationsdatei, die Sie ändern möchten.
❏ Nachdem Sie die von Ihnen gewünschten Änderungen vorgenommen haben,
wählen Sie die Position Speichern aus der Menüleiste.
❏ Geben Sie die gleiche Bezeichnung der Konfigurationsdatei ein, deren Setup-
Daten Sie im ersten Schritt dieses Verfahrens importiert haben, ein und drücken
Sie Enter.
Die neuen Daten werden unter der Bezeichnung der Konfigurationsdatei, die Sie
angeben, gespeichert und überschreiben die bestehende Datei mit der gleichen
Bezeichnung.
Laden von Drucker Setup-Daten aus einer Konfigurationsdatei
Mit folgendem Verfahren laden Sie Setup-Daten aus der vorher gespeicherten
Konfigurationsdatei.
❏ Während Sie sich im Drucker Setup Programm befinden, wählen Sie die
Position Laden aus der Menüleiste.
Wichtig!
Denken Sie daran, daß eine Änderung der Einstellung en des Drucker-SetupProgramms auf dem Bildschirm nic ht zu einer unmittelbaren Änderung dieser
Einstellungen im Drucker führt. Um die Druckereinstellungen so zu ändern wie sie auf
dem Bildschirm erscheinen, müssen Sie bei Beenden des Druc ker-Setup-Programms
eingeben: “Beenden und die Einstellungen an den Druc ker senden” (Seite 48).
❏ Inserite il nome che volete assegnare alla configurazione eseguita e premete
Invio.
La configurazione a video verrà automaticamente salvata nella directory
specificata in “Installazione del programma User Setup Utility” a pagina 22, in
un file avente il nome specificato precedentemente, a cui verrà aggiunta
automaticamente l’estensione “.cfg”.
Memorizzazione delle modifiche alle impostazioni nel file di
configurazione corrente
❏ Eseguite la procedura illustrata in “Memorizzazione delle impostazioni in un
nuovo file di configurazione” a pagina 44 per caricare il file di configurazione da
modificare.
❏ Una volta eseguite le modifiche desiderate, selezionate il comando Save dalla
barra del menu.
❏
Assegnate al file di configurazione lo stesso nome del file da cui avete caricato le
impostazioni all’inizio di questa procedura e premete Invio.
Le nuove informazioni verranno memorizzate nel file di configurazione
specificato, sovrascrivendo il file esistente avente lo stesso nome.
Importante!
Ricordate che la modifica dei parametri di configurazione del programma User
Setup Utility eseguita a video non altera la configurazione della stampante. Per
configurare la stampante con le impostazioni visualizzate, dovrete specificare
l’opzione “Esci ed invia le impostazioni alla stampante” uscendo dal pr ogramma di
utilità. (pagina 48).
Importazione delle impostazioni da un file di configurazione
Eseguite la seguente procedura per caricare le impostazioni da un file di
configurazione salvato precedentemente.
❏
Dal programma User Setup Utility, selezionate il comando Caricare dalla barra
del menu.
46
Page 56

The currently selected configuration file is the one that is highlighted in the list
that appears on the display.
❏ Click on the up and down arrows of the scroll bar at the right side of the list or
use the keyboard’s up and down arrow keys to move the highlighting up and
down until the name of the configuration file you want to use is selected
(highlighted).
❏ After selecting the configuration file you want, press Enter.
Le fichier de configuration sélectionné est celui qui est mis en évidence dans la
liste affichée à l’écran.
❏
Cliquez sur les flèches haute et droite dans la barre de défilement du côté droit de
la liste ou utilisez les flèches haute et basse du clavier pour positionner la barre
de surlignement sur le fichier de configuration à utiliser.
❏ Une fois le fichier de configuration sélectionné, appuyez sur Entrée.
Returning to default settings
❏ To make all settings revert to their defaults (original settings), select the Load
item from the menu bar, highlight DEFAULT in the list of files, and press Enter.
Exiting the User Setup Utility
❏ While in the User Setup Utility, select the Exit item from the menu bar.
❏
Specify whether or not you want to send the settings to the printer by clicking on
the corresponding item on the screen. Or you can use the up and down arrow
keys to highlight the selection you want and then press Enter to execute.
Rétablissement des valeurs par défaut
❏ Pour rétablir tous les paramètres à leur valeur par défaut (valeur d’origine),
sélectionnez l’option Charger fichier dans la barre de menus, surlignez le nom
DEFAULT dans la liste de fichiers et appuyez sur Entrée.
Sortie de l’utilitaire de configuration
❏ Dans l’utilitaire de configuration, sélectionnez l’option QUIT dans la barre de
menus.
❏ Spécifiez si vous souhaitez ou non envoyer les valeurs de paramétrage à
l’imprimante en cliquant sur l’option correspondante à l’écran. Vous pouvez
également utiliser les flèches haute et basse pour surligner l’option requise et
appuyer sur Entrée pour l’exécuter.
47
Page 57

Die aktuelle Konfigurationsdatei ist in der Liste, die in der Anzeige erscheint,
markiert.
❏ Klicken Sie auf die aufwärts und abwärts gerichteten Pfeile der Bildlaufleiste
rechts von Der Liste oder verwenden Sie die Richtungstasten NO und NU auf
der Tastatur, um die Markierung nach oben oder unten zu bewegen, bis der
Name der Konfigurationsdatei, die Sie verwenden möchten, gewählt (markiert)
ist.
❏ Nach Auswahl der von Ihnen gewünschten Konfigurationsdatei drücken Sie
Enter.
Rückkehr zu den Defaulteinstellungen
❏ Um alle Einstellungen auf ihre Default- (Original-) Einstellungen
zurückzusetzen, wählen Sie die Position Laden aus der Menüleiste, markieren
Sie Default in der Liste der Dateien und drücken Sie Enter.
Beenden des Drucker Setup Programms
❏ Während Sie sich im Drucker Setup Programm befinden, wählen Sie die
Position Beenden aus der Menüleiste.
❏ Geben Sie an, ob Sie die Einstellungen an den Drucker senden möchten, indem
Sie die entsprechende Angabe auf dem Bildschirm anklicken. Sie können auch
die Tasten NACH OBEN und NACH UNTEN verwenden, um die gewünschte
Wahl zu markieren und dann zur Ausführung die Taste Enter drücken.
Il file di configurazione selezionato in quel momento appare evidenziato
nell’elenco visualizzato.
❏ Fate clic sulle frecce su e giù della barra di scorrimento a destra dell’elenco o
usate i tasti freccia su e freccia giù per spostare il cursore in alto e in basso finché
il file di configurazione desiderato non appare selezionato (evidenziato).
❏ Dopo aver selezionato il file di configurazione, premete Invio.
Ripristino delle impostazioni predefinite
❏
Per far tornare tutti i parametri alle impostazioni iniziali, selezionate il comando
Load (Caricare) dalla barra del menu, evidenziate il file DEFAULT nell’elenco
dei file e premete Invio.
Uscita dal programma User Setup Utility
❏
Dal programma User Setup Utility, selezionate il comando Ultimare dalla barra
del menu.
❏ Specificate se volete inviare i parametri di configurazione alla stampante
selezionando con il mouse la relativa opzione visualizzata sullo schermo, oppure
usate i tasti freccia su e freccia giù per evidenziare la scelta desiderata, quindi
premete Invio per confermare la scelta.
48
Page 58

Using the Help window
❏ While in the User Setup Utility, select Help from the menu bar.
Utilisation de la fenêtre d’aide
❏ Dans l’utilitaire de configuration, sélectionnez Aide dans la barre de menus.
❏
Select the item you want help on from the list on the right side of the screen. You
can select an item either by clicking on it with the mouse or by scrolling through
the items with the keyboard’s up down arrow keys.
❏
Sélectionnez l’élément au sujet duquel vous voulez obtenir de l’aide dans la liste
affichée à droite de l’écran. Pour sélectionner un élément, cliquez sur son nom à
la souris ou faites défiler la liste au moyen des flèches haute et basse.
49
Page 59

Benutzung des Fensters Hilfe
❏ Während Sie sich im Drucker Setup Programm befinden, wählen Sie Hilfe aus
der Menüleiste.
❏ Wählen Sie das Thema, über das Sie Hilfe erhalten möchten, aus der Liste auf
der rechten Seite des Bildschirms. Sie können ein Thema entweder durch
Anklicken mit der Maus oder durch Blättern durch die Themen mit Hilfe der
Tasten NACH OBEN und NACH UNTEN auf der Tastatur wählen.
Uso della schermata “?” (Help) Aiuto
❏ Dal programma User Setup Utility, selezionate “?” (Help) dalla barra del menu.
❏
Selezionate l’argomento di cui a vete bisogno di spiegazioni dall’elenco a sinistra
sullo schermo. Potete selezionare un argomento con il mouse o scorrendo
l’elenco con i tasti freccia su e freccia giù.
50
Page 60

51
Chapter 3: Using the Printer with Windows 3.1
❏
Run
File
A:\INSTALL ↵
This chapter contains specific information you need to know when using the printer
with Microsoft Windows 3.1. It also tells you how to install the printer driver on
your computer so that it can control the printer correctly. In this chapter, you will
learn about:
How to set up for printing with Microsoft Windows 3.1
❏ How to prepare for printing
❏ How to print a document
❏ How to install TrueType fonts
❏ How to select fonts from within an application
Setting up for printing with Microsoft Windows 3.1
This printer is designed to work best with computers running Microsoft Windows
3.1. If you are running an earlier version of Windows, we recommend that you
upgrade to 3.1.
Before you can use the printer with Windows, you must first use the procedure
outlined below to install the printer driver that is supplied on the 3.5” floppy disk
that comes with the printer. This procedure assumes that you are using a mouse and
that you are familiar with common mouse operations like click and double-click. If
you need information on mouse operations or if you want to install the printer driver
without using a mouse, refer to your Microsoft Windows User’s Guide.
❏ Insert the disk that contains the printer driver into one of your computer’s disk
drives. This explanation assumes you are using a drive named “A:”, but you
could use any drive. Just remember to change the “A:” in the following steps to
the name of the drive you are using.
❏ In the Windows Program Manager, choose
❏ Type the following line into the command line box:
from the
menu.
Chapitre 3: Utilisation de l’imprimante sous
Windows 3.1
Ce chapitre contient les informations dont vous pourrez avoir besoin pour utiliser
l’imprimante sous Microsoft Windows 3.1. Il explique aussi comment installer le
gestionnaire d’imprimante sur votre ordinateur pour lui permettre de gérer
correctement l’imprimante. Dans ce chapitre, vous allez vous familiariser avec les
aspects suivants :
❏ Configuration de l’impression sous Microsoft Windows 3.1
❏ Préparation à l’impression
❏ Impression d’un document
❏ Installation des polices TrueType
❏ Sélection de polices dans une application
Configuration de l’impression sous Microsoft Windows 3.1
Cette imprimante est conçue tout spécialement pour fonctionner avec les ordinateurs
qui exploitent Microsoft Windows 3.1. Si vous utilisez une version antérieure de
Windows, nous vous recommandons d’effectuer la mise à niveau pour disposer de la
version 3.1.
Avant de pouvoir imprimer sous W indows, vous devez effectuer la procédure définie
ci-dessous pour installer le gestionnaire d’imprimante qui figure sur la disquette 3,5
pouces fournie avec l’imprimante. Cette procédure suppose que vous utilisez une
souris et que vous connaissez les opérations les plus courantes à la souris comme
cliquer ou faire un double-clic. Pour plus de détails sur les opérations avec souris, ou
pour savoir comment installer le gestionnaire sans utiliser de souris, reportez-vous
au Guide d’utilisation de Microsoft Windows.
❏ Insérez la disquette qui contient le gestionnaire d’imprimante dans un des
lecteurs de disquettes de l’ordinateur. Cette procédure suppose que vous utilisez
le lecteur «A:», mais vous pouvez naturellement utiliser tout autre lecteur en
remplaçant «A:» par le nom du lecteur dans les instructions suivantes.
❏ Dans le Gestionnaire de programmes de Windows, ouvrez le menu Fichier et
sélectionnez Exécuter.
❏ Tapez la commande suivante sur la ligne de commande :
A:\INSTALL ↵
Page 61

Kapitel 3: Einsatz des Druckers unter Windows 3.1
Capitolo 3: Utilizzo della stampante con Windows 3.1
Dieses Kapitel enthält genaue Informationen, die Sie kennen müssen, wenn Sie den
Drucker unter Microsoft Windows 3.1 verwenden. Es sagt Ihnen auch, wie Sie den
Druckertreiber Ihres Computers installieren, damit Sie den Drucker einwandfrei
steuern können. In diesem Kapitel lernen Sie:
❏ Wie Sie die Grundeinstellung (Setup) zum Drucken unter Microsoft Windows
3.1 vornehmen
❏ Wie Sie den Druck vorbereiten
❏ Wie Sie ein Schriftstück drucken
❏ Wie Sie TrueType-Schriftarten installieren
❏ Wie Sie Schriftarten innerhalb einer Anwendung auswählen
Grundeinstellung (Setup) zum Drucken unter Microsoft Windows 3.1
Dieser Drucker ist so ausgelegt, daß er am besten mit Programmen arbeitet, die
unter Microsoft Windows 3.1 laufen. Wenn Sie eine frühere Windows-Version
verwenden, empfehlen wir Ihnen, ein Upgrade (Aufrüstung) auf Version 3.1
vorzunehmen.
Bevor Sie den Drucker unter Windows einsetzen können, müssen Sie zunächst den
Druckertreiber installieren, der sich auf der mitgelieferten 3.5” Diskette befindet.
Dazu führen Sie nachstehenden Ablauf durch. Dieses Verfahren geht davon aus, daß
Sie eine Maus verwenden und daß Sie mit der allgemeinen Handhabung der Maus,
z.B. Klick und Doppelklick, vertraut sind. Wenn Sie Informationen über die
Handhabung der Maus benötigen oder wenn Sie den Druckertreiber für den Betrieb
ohne die Maus installieren möchten, schlagen Sie in Ihrem Benutzerhandbuch für
Microsoft Windows nach.
❏ Legen Sie die Diskette mit dem Druckertreiber in das Diskettenlaufwerk Ihres
Computers ein. Diese Anweisung geht davon aus, daß sich die T reiberdiskette in
Laufwerk “A:” befindet. Sie können aber auch jedes andere Laufwerk benutzen.
In diesem Fall müssen Sie lediglich anstelle von “A:” den Buchstaben des von
Ihnen gewählten Laufwerkes einsetzen.
❏ Wählen Sie im Menü Datei des Windows-Programm-Managers das Dialogfeld
“Ausführen”.
❏ Schreiben Sie die folgende Zeile in das für die Befehlszeile vorgesehene Feld:
A:\INSTALL ↵
Questo capitolo contiene informazioni specifiche su come utilizzare la stampante
con Microsoft Windows 3.1. Il capitolo illustra inoltre la procedura di installazione
del driver della stampante sul vostro computer per permettergli di gestire
correttamente la stampante. In questo capitolo troverete istruzioni relative ai
seguenti argomenti:
❏ installazione della stampante sotto Microsoft Windows 3.1
❏ configurazione della stampante
❏ stampa di un documento
❏ installazione dei caratteri TrueType
❏ selezione dei caratteri dall’interno di un’applicazione
Installazione della stampante sotto Microsoft Windows 3.1
Questa stampante é ideale per l’uso con computer che utilizzano l’ambiente
Microsoft Windows 3.1. Se avete una versione precedente di Windows, vi
consigliamo di aggiornarla alla versione 3.1.
Per poter utilizzare la stampante con Windows, dovete per prima cosa eseguire la
procedura illustrata di seguito per installare il driver stampante dal dischetto da 3,5”
fornito con la stampante. Per tale procedura si presuppone che utilizziate un mouse e
che abbiate familiarità con le normali operazioni del mouse come fare clic e doppio
clic. Per ulteriori informazioni sull’utilizzo del mouse o se volete installare il driver
della stampante senza utilizzare il mouse, consultate il Manuale dell’utente di
Microsoft Windows.
❏ Inserite il dischetto contenente il driver stampante in una delle unità disco del
vostro computer. Per questa operazione si presume che stiate utilizzando l’unità
A:, ma potete utilizzare qualsiasi altra unità. Ricordate però nelle seguenti
operazioni di sostituire la lettera “A:” con la lettera dell’unità che state
utilizzando.
❏
Dal Program Manager di Windows, scegliete il comando Esegui dal menu File.
❏ Nella casella della riga di comando, digitate la seguente istruzione:
A:\INSTALL ↵
52
Page 62

You can also accomplish the same result by clicking on Browse… and selecting the
drive where the driver floppy is loaded. Next you should select INSTALL.EXE and
click OK.
❏ Click on the language that you want to use and then click on Install to start the
installation.
Click the name of your printer in the list that appears on the display to highlight
❏
it.
Vous obtenez le même résultat en cliquant sur Parcourir... et en sélectionnant la
lettre du lecteur qui contient la disquette. Vous devez ensuite sélectionner
INSTALL.EXE et cliquez sur OK.
❏ Cliquez sur la langue que vous voulez utiliser, puis sur Install pour lancer
l’installation.
❏ Cliquez sur le nom de l’imprimante dans la liste qui s’affiche à l’écran pour le
mettre en surbrillance.
❏ Click on Install, and the Control Panel window appears.
Double-click on the Printers icon in the Control Panel window.
53
❏ Cliquez sur Install. Le Panneau de configuration apparaît.
Faites un double-clic sur l’icône Imprimantes dans le Panneau de
configuration.
Page 63

Sie erhalten das gleiche Ergebnis, wenn Sie auf das Dialogfeld Durchsuchen...
klicken und das Laufwerk wählen, in dem die Treiberdiskette geladen ist. Danach
sollten Sie den Befehl INSTALL.EXE wählen und auf das Schaltfeld OK klicken.
❏
Klicken Sie auf die Sprache, die Sie verwenden möchten und klicken Sie danach
auf das Schaltfeld Install, um die Installation zu starten.
❏
Klicken Sie auf die Bezeichnung Ihres Druckers in der Liste, die in der Anzeige
erscheint, um sie zu markieren.
❏ Klicken Sie auf das Schaltfeld Installieren. Danach erscheint das Fenster
Systemsteuerung.
Doppelklick auf das Druckersymbol im Fenster Systemsteuerung.
Potete eseguire la stessa operazione utilizzando il pulsante Sfoglia e selezionando
l’unità in cui si trova il dischetto del driver. Poi selezionate INSTALL.EXE e
scegliete OK.
❏ Selezionate la lingua che volete usare e scegliete il pulsante Install per avviare
il programma di installazione.
❏ Selezionate la vostra stampante evidenziandola con il mouse nella lista.
❏ Scegliete il pulsante Install. Dopo qualche minuto apparirà la finestra del
Pannello di controllo.
Fate doppio clic sull’icona Stampanti nella finestra del Pannello di controllo.
54
Page 64

❏ Double click on the name of the printer model you selected above to select it as
the default printer.
❏ Faites un double-clic sur le nom du modèle d’imprimante que vous avez
sélectionné plus haut pour en faire l’imprimante par défaut.
❏ Click on Close to clear the Printers window.
Note:
Windows applications automatically print on the currently selected default printer.
If you want to print on a different printer, you must first select it.
See “Installing TrueType fonts” on page 61 for information of how to install the
TrueType fonts that are supplied on the 3.5” floppy disk that comes with the printer.
Getting ready to print
Before printing, there are a number of things you must first do to set up the printer.
You must select the printer driver, and the paper source, size, and orientation. Use
the following procedure to make these selections.
Note:
You do not need to perform printer driver and paper selections mentioned above
each time you print, but only if there are any changes to the last selections you
made.
❏ In the Windows Program Manager, open the Main group by clicking on its icon.
❏ Double click on the Control Panel icon.
❏ Double-click on the Printers icon in the Control Panel window.
❏ Double-click on the name of the printer model you selected above to select it as
the default printer.
❏ Cliquez sur Fermer pour supprimer la fenêtre Imprimantes.
Remarque:
Les applications Windows impriment automatiquement sur l’imprimante courante
par défaut. Avant de pouvoir utiliser une autre imprimante, vous devez la
sélectionner.
Pour plus de détails sur l’installation des polices TrueType figurant sur la disquette
3,5 pouces fournie avec l’imprimante, reportez-vous à la section «Installation des
polices TrueType», page 61.
Préparation à l’impression
Avant de pouvoir imprimer, vous devez configurer l’imprimante en définissant
certaines informations. Vous devez sélectionner le gestionnaire d’imprimante,
l’alimentation de papier, son format et son orientation. Pour le faire, procédez
comme indiqué ci-dessous.
Remarque:
Vous n’avez pas à effectuer ces procédures à chaque fois que vous avez besoin
d’imprimer, seulement lorsque les sélections effectuées ont été modifiées.
❏ Dans le Gestionnaire de programmes de Windows, ouvrez le Groupe principal
en cliquant sur l’icône associée.
❏ Faites un double-clic sur l’icône du Panneau de configuration.
❏
Faites un double-clic sur l’icône Imprimantes dans la fenêtre du Panneau de
configuration.
❏ Faites un double-clic sur le nom du modèle d’imprimante que vous avez
sélectionné ci-dessus pour en faire l’imprimante par défaut.
55
Page 65

❏ Doppelklick auf die Bezeichnung des Druckermodells, das Sie oben gewählt
haben, um dieses als Standarddrucker einzustellen.
❏ Klick auf Abbrechen, um das Druckerfenster zu verlassen.
Informationen darüber, wie Sie die TrueType-Schriftarten installieren, die auf der
mit dem Drucker gelieferten 3.5” Diskette enthalten sind, finden Sie unter
“Installieren von TrueType-Schriftarten” auf Seite 62.
Vorbereitung für den Druck
Bevor Sie mit dem Druckvorgang beginnen, müssen Sie zunächst einige Dinge zur
Grundeinstellung (Setup) Ihres Druckers vornehmen. Sie müssen den
Druckertreiber wählen und die Papierzufuhr sowie die Papiergröße einstellen. Um
diese Wahl vorzunehmen, müssen Sie folgendes ausführen:
❏ Öffnen Sie im Windows Programm-Manager die Hauptgruppe, indem Sie auf
das Symbol klicken.
❏ Doppelklick auf das Symbol Systemsteuerung.
❏ Doppelklick auf das Symbol Drucker im Fenster Systemsteuerung.
❏ Doppelklick auf die Bezeichnung des Druckermodells, das Sie oben gewählt
haben, um dieses als Standarddrucker einzustellen.
Hinweis:
Windows-Anwendungen drucken automatisch mit dem aktuellen Standarddrucker.
Wenn Sie mit einem anderen Drucker drucken möchten, müssen Sie diesen zunächst
auswählen.
Hinweis:
Sie brauchen die Einstellung des Druckertreibers und die Wahl der
Papiereinstellungen, die oben erwähnt wurden, nicht vor jedem Druckvorgang
vorzunehmen, sondern nur, wenn Sie Änderungen an den zuletzt ausgeführten
Einstellungen vornehmen möchten.
❏
Fate doppio clic sul modello della stampante selezionata precedentemente per
specificare che desiderate utilizzarla come stampante predefinita.
❏ Scegliete il pulsante Annulla per uscire dalla finestra di dialogo delle
Stampanti.
Nota:
Le applicazioni Windows inviano automaticamente le stampe alla stampante
predefinita selezionata in quel momento. Se volete stampare su un’altra stampante,
dovete per prima cosa selezionarla.
Leggete la sezione “Installazione dei caratteri TrueType” a pagina 62 per le
istruzioni sull’installazione dei caratteri TrueType contenuti sul dischetto da 3,5”
fornito con la stampante.
Impostazione della stampante
Prima di stampare un documento, vi sono alcune operazioni da compiere per
configurare la stampante, ossia: specificare il driver della stampante, e inoltre il tipo
di alimentazione della carta, la dimensione e l’orientamento della pagina. Per
specificare queste impostazioni, eseguite la seguente procedura.
Nota:
Non è necessario specificare il driver della stampante e le impostazioni della
pagina ogni volta che volete eseguire una stampa, ma solo se vi sono delle
modifiche da fare alle ultime impostazioni specificate.
❏ Dal Program Manager di Windows, aprite il gruppo Principale facendo doppio
clic sulla sua icona.
❏ Fate doppio clic sull’icona del Pannello di controllo.
❏ Fate doppio clic sull’icona Stampanti nella finestra del Pannello di controllo.
❏ Fate doppio clic sul modello della stampante selezionata precedentemente per
specificare che desiderate utilizzarla come stampante predefinita.
56
Page 66

❏ Click on Setup to display the window for setting up your printer.
❏ From this window you select buttons that let you control a wide variety of
printer setup parameters. This manual does not include any information about
how to do this because everything you need to know is included in an on-line
manual that tells you how to use all the buttons and menus that appear. To view
the on-line manual, click on Help button.
Note:
The Paper Source pull down menu in the above window gives lets you choose
between Auto Sheet Feeder and Manual Feed. If you are using the optional push
tractor unit, you must use the Paper Source menu to specify the push tractor unit
as the paper source. To do this, click on the Options button in the above window to
display the options window. Next, pull down the Feeder menu and select Tractor.
Click on the OK button to complete the operation.
❏ After the printer is setup the way you want it, click on OK.
❏
Click on the Close button in the Printers window to save your setup and return
to the Program Manager.
Note:
Depending on the application software you are using, settings similar to those in the
above procedure can be made using the Print Setup command of the File menu
instead of the Control Panel.
❏ Cliquez sur Configurer pour afficher la fenêtre de configuration de
l’imprimante.
❏ Dans cette fenêtre, vous pouvez sélectionner des boutons permettant de
contrôler toute une variété de paramètres de configuration de l’imprimante. Ce
manuel n’explique pas comment le faire dans la mesure où tous les détails
nécessaires sont fournis dans l’aide en ligne qui décrit l’utilisation de tous les
boutons et menus qui apparaissent. Pour consulter l’aide en ligne, cliquez sur le
bouton Aide.
Remarque:
Le menu déroulant Alimentation dans la fenêtre ci-dessus vous permet de choisir
entre l’alimentation automatiquement ou manuelle. Si vous utilisez l’unité
d’entraînement optionnelle, vous devez utiliser le menu Alimentation pour
spécifier l’unité comme source de papier. Pour ce faire, cliquez sur le bouton
Options dans la fenêtre ci-dessus. La fenêtre des options apparaît. Déroulez le
menu Feeder et sélectionnez Tractor. Cliquez sur le bouton OK pour terminer
l’opération.
❏ Une fois l’imprimante configurée, cliquez sur OK.
❏ Cliquez sur le bouton Annuler dans la fenêtre Imprimantes pour sauvegarder
la configuration et revenir au Gestionnaire de programmes.
Remarque:
Selon l’application utilisée, des réglages similaires à ceux indiqués dans la
procédure ci-dessus peuvent être effectués au moyen de la commande
Configuration de l’impression du menu Fichier, au lieu du Panneau de
configuration.
57
Page 67

❏ Doppelklick auf Einrichten, um das Fenster zur Grundeinstellung Ihres
Druckers anzuzeigen.
❏ In diesem Fenster können Sie Schaltfelder wählen, die Ihnen die Einstellung
einer Vielzahl von Drucker Parametern erlaubt. In diesem Handbuch finden Sie
keine Informationen darüber, wie das zu erfolgen hat, weil alles, w as Sie wissen
müssen, in einem Online-Handbuch enthalten ist, das Ihnen Auskunft darüber
gibt, wie Sie die Schaltfelder und Menüs, die angezeigt werden, verwenden
müssen. Um das Online-Handbuch aufzurufen, klicken Sie auf das Schaltfeld
Hilfe.
❏ Nachdem der Setup des Druckers in der von Ihnen gewünschten Weise erfolgt
ist, klicken Sie auf OK.
❏ Klicken Sie auf das Schaltfeld Schließen im Dialogfeld des Druckers, um
Ihren Setup zu speichern und um zum Programm-Manager zurückzukehren.
Hinweis:
Das Pulldown Menü für Papier im oben gezeigten Dialogfeld ermöglicht Ihnen die
Wahl zwischen automatischer Papierzufuhr und manuellem Einzelblatteinzug. Wenn
Sie den wahlweise erhältlichen Schubtraktor verwenden, müssen Sie im Menü
Papier den Schubtraktor als Papierzufuhr angeben. Dazu klicken Sie auf das
Schaltfeld Optionen im oben gezeigten Dialogfeld, um dieses Feld anzuzeigen.
Danach gehen Sie in das Menü Zuführ und wählen Traktor. Klicken Sie auf das
Schaltfeld OK, um den Vorgang abzuschließen.
Hinweis:
Je nach Anwendungsprogramm, das Sie verwenden, können ähnlic he Einstellungen
wie beim oben gezeigten Vorgang vorgenommen werden, wobei der Befehl
Drucker Setup im Dateimenü anstelle der Systemsteuerung verwendet wird.
❏ Scegliete il pulsante Imposta per visualizzare la finestra di dialogo nella quale
impostare le opzioni di stampa.
❏ In questa finestra di dialogo avete a disposizione dei pulsanti con i quali poter
impostare svariati parametri di configurazione della stampante. Questo manuale
non fornisce alcuna istruzione su come utilizzare il programma di
configurazione, in quanto tutte le informazioni necessarie sono contenute in una
guida in linea che spiega come utilizzare i vari pulsanti e le opzioni contenute
nella finestra. Per visualizzare la guida, scegliete il pulsante Help (Aiuto).
Nota:
L’elenco a discesa Paper Source (Alimentazione Carta) nella finestra raffigurata
sopra vi consente di scegliere il tipo di alimentazione della carta fra Auto Sheet
Feeder e Manual Feed. Se usate l’unità di trascinamento opzionale, dovete
selezionare l’opzione Paper Source (Alimentazione Carta) per specificare che
l’alimentazione della carta dovrà avvenire tramite l’unità di trascinamento. Per
fare ciò, scegliete il pulsante Options (Opzioni) nella finestra raffigurata sopra
per visualizzare la finestra di dialogo delle opzioni, aprite l’elenco a discesa
Feeder (Alimentazione) e selezionate Tractor. Quindi scegliete OK per
confermare la scelta.
❏ Terminata l’impostazione della stampante nel modo desiderato, scegliete OK.
❏ Scegliete il pulsante Chiudi nella finestra di dialogo delle Stampanti per
salvare la vostra configurazione e tornare al Program Manager.
Nota:
A seconda delle applicazioni che utilizzate, potete impostare opzioni di stampa
simili a quelle appena descritte tramite il comando Imposta Stampante dal
menu File dell’applicazione invece di accedere al Pannello di controllo.
58
Page 68

Printing a document
The following Print window appears when you select the Print command of the
File menu of your Windows application.
Impression d’un document
La fenêtre Imprimer ci-dessous apparaît lorsque vous sélectionner la commande
Imprimer du menu Fichier dans l’application Windows.
Note:
The actual appearance of the Print window that appears may differ somewhat
depending on the application you are using.
Use this window to specify the range of the pages to be printed, the quality of the
printing (in dots per inch), and the number of copies you want to print. Note also that
there are boxes that you can select to specify printing to a file or collating (printing
from back to front).
You can change the printer setup by clicking on the Setup button. When you do, the
following window for setting up your printer appears on the display.
Remarque:
L’apparence réelle de la fenêtre Imprimer peut être différente de celle illustrée cidessus, selon l’application utilisée.
Cette fenêtre vous permet de spécifier les pages à imprimer, la qualité d’impression
(en points par pouce) et le nombre de copies à imprimer. A noter qu’elle contient
également des zones dans lesquelles vous pouvez spécifier l’impression dans un
fichier ou le triage des copies (imprimées de la dernière page à la première).
Pour modifier la configuration de l’imprimante, cliquez sur le bouton
Configuration. La fenêtre suivante apparaît à l’écran pour vous permettre de
configurer l’imprimante.
59
Page 69

Drucken eines Schriftstücks
Das nachstehende Dialogfeld Drucken erscheint, wenn Sie den Befehl Drucken im
Dateimenü Ihrer Windows-Anwendung benutzen.
Mit diesem Femster können Sie angeben, welche Papiermaße bedruckt werden
sollen, welche Druckqualität (in Punkten pro Zoll) Sie verwenden möchten und
welche Anzahl Kopien Sie erstellen möchten. Bitte beachten Sie, daß es auch
Schaltfelder gibt, mit denen Sie angeben können, ob Sie aus einer Datei oder in
sortierter Weise (Drucken in umgekehrter Reihenfolge von hinten nach vorne)
drucken möchten.
Sie können den Drucker Setup durch Klicken auf das Schaltfeld Einrichten ändern.
In diesem Falle erscheint das nachstehende Dialogfeld zum Einrichten Ihres
Druckers in der Anzeige.
Hinweis:
Das tatsächliche Aussehen des Dialogfeldes Drucken, das angezeigt wird, kann sich
je nach von Ihnen verwendeter Anwendung etwas unterschiedlich darstellen.
Stampa di un documento
Selezionando il comando Stampa dal menu File della vostra applicazione
Windows, apparirà la finestra di dialogo Stampa come quella illustrata sotto.
Nota:
La finestra di dialogo di Stampa che viene visualizzata può avere un aspetto diverso
a seconda dell’applicazione che state utilizzando.
In questa finestra di dialogo potete specificare opzioni come l’intervallo delle pagine
da stampare, la qualità della stampa (in punti per pollice, dpi) e il numero di copie
che volete stampare. Osservate che vi sono anche delle caselle di controllo che
potete selezionare per specificare se volete stampare su un file oppure ordinare le
copie (ossia, stampare dall’ultima pagina alla prima).
Potete cambiare le impostazioni della stampante scegliendo il pulsante Imposta. In
questo modo verrà visualizzata la seguente finestra di dialogo relativa
all’impostazione della stampante.
60
Page 70

Make any changes that you want by clicking on the appropriate radio button or
highlighting your selection on the appropriate pull-down menu. Clicking on the
Options button displays the following window.
Apportez les modifications nécessaires en cliquant sur les icônes appropriées ou en
mettant des options en surbrillance dans le menu déroulant approprié. En cliquant
sur le bouton Options, vous affichez la fenêtre suivante:
See “Getting ready to print” on page 55 for details on using this window.
Installing TrueType fonts
The TrueType fonts that are supplied on the 3.5” floppy disk that comes with the
printer can be used only when you are running Windows 3.1 or later. Use the
following procedure to install the fonts.
❏ Launch Windows.
❏ Open the Windows Control Panel.
61
Pour plus de détails sur cette fenêtre, reportez-vous à la section «Préparation à
l’impression», page 55.
Installation des polices TrueType
Les polices TrueType fournies sur la disquette 3,5 pouces qui accompagne
l’imprimante ne peuvent être utilisées que sous Windows 3.1 ou une version
supériuer. Pour installer les polices, procédez comme indiqué ci-dessous.
❏ Lancez Windows.
❏ Ouvrez le Panneau de configuration sous Windows.
Page 71

Alle von Ihnen gewünschten Änderungen können Sie durch Klicken auf das
entsprechende Schaltfeld oder durch Markieren Ihrer Wahl an der entsprechenden
Stelle im Bildlaufmenü vornehmen. Klicken auf das Schaltfeld Optionen läßt
folgendes Dialogfeld erscheinen.
Im Abschnitt “Vorbereitung zum Druck” auf Seite 56 finden Sie Einzelheiten über
die Benutzung dieses Fensters.
Installieren von TrueType-Schriftarten
Die TrueType-Schriftarten, die sich auf der mitgelieferten 3,5” Diskette befinden,
können nur verwendet werden, wenn Sie mit Windows 3.1 oder einer späteren
Version arbeiten. Mit dem folgenden Verfahren können Sie die Schriftarten
installieren.
❏ Gehen Sie in das Windows-Programm
❏ Öffnen Sie die Systemsteuerung in Windows.
Modificate le opzioni desiderate selezionando il pulsante opzione appropriato o
evidenziando con il mouse un elemento dal relativo elenco a discesa. Scegliendo il
pulsante Options apparirà la seguente finestra di dialogo.
Leggete la sezione “Impostazione della stampante” a pagina 56 per le informazioni
sull’utilizzo di questa finestra di dialogo.
Installazione dei caratteri TrueType
Potete utilizzare i caratteri TrueType contenuti sul dischetto da 3,5” fornito con la
stampante solo se lavorate con Windows 3.1 o successivo. Per installare i caratteri,
eseguite la seguente procedura.
❏ Fate partire Windows.
❏ Aprite il Pannello di controllo di Windows.
62
Page 72

❏ Double-click the Fonts icon and the Fonts dialog box appears.
Click Add and the Add Fonts dialog box appears.
❏ Cliquez deux fois sur l’icône Polices. La zone de dialogue Polices apparaît,
Cliquez sur Ajouter. La zone de dialogue Ajouter apparaît.
❏ Insert the disk that contains the fonts into one of your computer’s disk drives.
This explanation assumes you are using a drive named “A:”, but you could use
any drive. Just remember to change the “A:” in the following steps to the name
of the drive you are using.
Select the letter that represents the drive where the floppy disk is installed. When
you do, the names of all the fonts on the disk appear in the List of Fonts
window.Select the fonts you want to install by clicking on their names. If you
want to install all of the fonts, click Select All.
❏ Click OK. The Fonts dialog box appears and installation is performed. The
names of the newly installed fonts are automatically added to the Installed
Fonts list.
❏ While in the application program you are using, select Printer Setup from the
application’s File menu, and reselect the printer. After that, the application can
display on-screen text and print text on the printer using the newly installed
fonts.
Selecting fonts in Windows applications
Refer to the manual of the application you are using for details on how to select
fonts within that application.
In addition to the Windows fonts, you can also use the TrueType fonts that come
with this printer.
❏ Insérez la disquette contenant les polices dans un des lecteurs de disquettes de
l’ordinateur. Ce manuel suppose que vous utilisez le lecteur «A:», mais vous
pouvez très bien utiliser tout autre lecteur en remplaçant la lettre «A:» par la
lettre du lecteur approprié dans les instructions suivantes.
Sélectionnez la lettre du lecteur qui contient la disquette. Ceci fait, le nom de
toutes les polices figurant sur la disquette s’affiche dans la fenêtre Liste des
polices. Sélectionnez les polices à installer en cliquant sur leur nom. Pour
installer toutes les polices, cliquez sur Toutes.
❏ Cliquez sur OK. Le dialogue Polices apparaît et l’installation est effectuée
automatiquement. Le nom des nouvelles polices installées est ajouté
automatiquement à la liste Polices installées.
❏
Dans l’application utilisée, sélectionnez Configuration de l’impression dans le
menu Fichier et resélectionnez l’imprimante. Ceci fait, l’application peut
afficher le texte à l’écran et l’imprimer sur l’imprimante en utilisant les
nouvelles polices installées.
Sélection des polices dans les applications Windows
Pour savoir comment sélectionner des polices dans une application, reportez-vous au
manuel de l’application.
Outre les polices Windows, vous pouvez utiliser les polices TrueType fournies avec
l’imprimante.
63
Page 73

❏ Doppelklick auf das Symbol Schriftarten, und das Dialogfeld Schriftarten
wird angezeigt.
Klick auf Hinzufügen und das Dialogfeld Schriftarten Hinzufügen wird
angezeigt.
❏ Legen Sie die Diskette mit den Schriftarten in eines der Diskettenlaufwerke
Ihres Druckers ein. Diese Anweisung geht davon aus, daß sich die
Treiberdiskette im Laufwerk “A:” befindet. Sie können aber auch ein anderes
Laufwerk benutzen. In diesem Falle müssen Sie lediglich anstelle von “A:” den
Buchstaben des von Ihnen gewählten Laufwerks einsetzen.
Wählen Sie den Buchstaben, der das Laufwerk anzeigt, in das die Diskette
eingelegt ist. Dadurch erscheinen die Bezeichnungen aller Schriftarten auf der
Diskette in dem Dialogfeld “Liste der Schriftarten”. Wählen Sie die Schriftart,
die Sie installieren möchten durch Klicken auf die entsprechende Bezeichnung.
Wenn Sie alle Schriftarten installieren möchten, klicken Sie auf Alle Wählen.
❏ Klicken auf das Schaltfeld OK. Das Dialogfeld Schriftarten erscheint und die
Installation ist abgeschlossen. Die Bezeichnungen der neu installierten
Schriftarten werden automatisch der Liste der installierten Schriftarten
hinzugefügt.
❏
Wenn Sie sich im von Ihnen benutzten Anwendungsprogramm befinden, wählen
Sie Druckereinrichtung aus dem Dateimenü der Anwendung und wählen Sie
dort erneut den Drucker. Danach kann die Anwendung Text auf dem Bildschirm
anzeigen, und Sie können den Text auf dem Drucker, der die neu installierten
Schriftarten verwendet, ausdrucken.
Wahl von Schriftarten in Windows-Anwendungen
Schlagen Sie im Handbuch der Anwendungen, die Sie benutzen, nach, um
Einzelheiten über die Wahl von Schriftarten im Rahmen der Anwendung zu
finden.
Zusätzlich zu den Windows-Schriftarten können Sie auch T rueType-Schriftarten
verwenden, die mit diesem Drucker geliefert werden.
❏ Fate doppio clic sull’icona Caratteri per visualizzare la finestra di dialogo
Caratteri.
Scegliete il pulsante Aggiungi per far apparire la finestra di dialogo Aggiungi
caratteri.
❏ Inserite il dischetto contenente i caratteri in una delle unità disco del computer.
Per questa operazione si presume che stiate utilizzando l’unità A:, ma potete
utilizzare qualsiasi altra unità. Ricordate però di sostituire la lettera “A:” con la
lettera dell’unità che state utilizzando.
Selezionate la lettera che identifica l’unità in cui è inserito il dischetto. In questo
modo, nell’elenco Tipi di carattere appariranno i nomi di tutti i caratteri
contenuti nel dischetto. Selezionate i caratteri che volete installare
evidenziandoli con il mouse. Se volete installare in una sola operazione tutti i
caratteri elencati, scegliete il pulsante Seleziona tutto.
❏ Scegliete OK. Riapparirà la finestra di dialogo Caratteri e verrà eseguita la
procedura di installazione. I nuovi caratteri installati verranno automaticamente
aggiunti all’elenco dei Tipi di carattere installati.
❏ Dall’interno della vostra applicazione, selezionate il comando Imposta
stampante dal menu File e riselezionate la stampante. Eseguita questa
operazione, l’applicazione sarà in grado di visualizzare e stampare il testo
utilizzando i nuovi caratteri aggiunti.
Selezione dei caratteri all’interno delle applicazioni Windows
Fate riferimento al manuale della vostra applicazione per informazioni su come
selezionare i caratteri all’interno di quella specifica applicazione.
Oltre ai caratteri standard forniti con Windows, potete utilizzare anche i caratteri
TrueType forniti con la stampante.
64
Page 74

65
Chapter 4: Control Panel
❏
Operations
The control panel gives you push-button control over
the printer’s power and paper feed operations. It also
includes an indicator light that tells you the current
status of the printer at a glance.
Note:
For full details on paper handling, see page 69 of
this manual.
To enter the Sleep Mode
Hold down Power for a few seconds. The printer
beeps when it enters the Sleep Mode.
❏ For details about the Sleep Mode, see page 33 of
this manual.
Important!
We recommend that you unplug the printer from the
power outlet whenever you do not plan to use it for
long periods. Because of the this, you should locate
the printer so that the power outlet it is plugged into
is nearby and easy to access.
To restore full power from the Sleep Mode
❏ Press Power.
Important!
The printer automatically enters the Sleep Mode
when you plug it in to an AC outlet. Be sure to press
Power to power up the printer after plugging it in.
Page 75

Chapitre 4: Utilisation du
Kapitel 4: Handhabung des
Capitolo 4: Il pannello di
panneau de commande
Bedienerfeldes
controllo e le sue funzioni
Le panneau de commande vous permet de mettre
l’imprimante sous tension ou hors tension et de
contrôler l’alimentation du papier. Il est muni d’un
voyant lumineux indiquant immédiatement l’état de
l’imprimante.
Remarque:
Pour plus de détails sur la manipulation du papier,
voir la page 69 de ce manuel.
Passage en mode de veille
❏ Maintenez la touche Power enfoncée pendant
quelques secondes. L’imprimante émet un signal
sonore lorsqu’elle passe en mode de veille.
❏ Pour plus de détails sur le mode de veille,
reportez-vous à la page 33 de ce manuel.
Important!
Il est recommandé de débrancher l’imprimante de la
prise d’alimentation lorsqu’il n’est pas prévu de
l’utiliser pendant des périodes prolongées. Pour
cette raison, vous devez la positionner à proximité
d’une prise de courant, dans un endroit facile
d’accès.
Sortie du mode de veille
❏ Appuyez sur la touche Power.
Important!
L’imprimante passe automatiquement en mode de
veille lorsque vous la branchez sur une prise secteur.
N’oubliez pas d’appuyer sur Power après avoir
branché l’imprimante.
Das Bedienerfeld ermöglicht Ihnen die Steuerung des
Netzanschlusses und der Papierzufuhr des Druckers
mittels Drucktasten. Es enthält auch eine
Leuchtanzeige, die den aktuellen Status des Druckers
mit einem Blick erkennen läßt.
Hinweis:
Einzelheiten über die Papierhandhabung finden Sie
auf Seite 70 dieses Handbuchs.
Drucker in den Sleep-Modus schalten
❏ Power-Taste einige Sekunden lang gedrückt
halten. Der Drucker zeigt durch einen Signalton
an, daß der Sleep-Modus eingeschaltet wurde.
❏ Einzelheiten über den Sleep-Modus finden Sie
auf Seite 34 dieses Handbuchs.
Wichtig!
Wir empfehlen Ihnen, den Netzstecker
herauszuziehen, solange Sie den Drucker über einen
längeren Zeitraum nicht verwenden. Daher sollten
Sie den Drucker in der Nähe einer Netzsteckdose
aufstellen und dafür sorgen, daß sie leicht
zugänglich ist.
Drucker aus dem Sleep-Modus in den Bereit-Modus schalten
❏ Power-Taste drücken.
Wichtig!
Der Drucker schaltet automatisch in den SleepModus, wenn Sie ihn an eine Netzsteckdose
anschließen. Achten Sie daher darauf, die Power-
Taste zu drücken, damit Sie nach dem Einstecken des
Netzteckers für Stromzufuhr sorgen.
Il pannello di controllo vi consente di eseguire con la
semplice pressione di un tasto le operazioni di
accensione e spegnimento della stampante e di
alimentazione della carta. Il pannello dispone inoltre
di un indicatore luminoso che vi segnala
istantaneamente lo stato corrente della stampante.
Nota:
Per informazioni complete sull’uso della carta,
vedere a pagina 70 del presente manuale.
Attivazione del modo “Sleep”
❏ Tenete premuto il tasto Power per alcuni
secondi. La stampante emetterà un segnale
acustico all’attivazione del modo Sleep.
❏ Per maggiori dettagli sul modo Sleep, vedere a
pagina 34 del presente manuale.
Importante!
Vi consigliamo di staccare la stampante dalla presa
elettrica tutte le volte che non la utilizzate per lunghi
periodi. Per questo motivo, cercate di collocare la
stampante in modo tale che la presa elettrica a cui è
collegata sia nelle immediate vicinanze e sia facile
accedervi.
Disattivazione del modo “Sleep” e ripristino dell’ alimentazione normale
❏ Premete il tasto Power.
Importante!
La stampante entra automaticamente in modo Sleep
quando viene collegata ad una presa elettrica a
corrente alternata. Accertatevi di premere il tasto
Power per accendere la stampante dopo aver
inserito la spina di alimentazione.
66
Page 76

To switch between the Ready and Not-Ready Modes
❏ Press Power to switch the computer between being the Ready and Not-Ready
Modes.
❏ When the printer is in the Ready Mode, the READY indicator is lit and the
printer can receive data from the computer. This means that you should make
sure that the printer is in the Ready Mode whenever you are trying to print.
❏ When the printer is in the Not-Ready Mode, the READY indicator flashes
slowly, which means that the printer cannot receive any data.
To feed single-sheet paper into the printer
❏ When there is no paper in the printer, press PAPER to feed paper in.
Press PAPER once to manually feed a sheet of paper (page 71), bypassing the
automatic sheet feeder. To feed paper from the automatic sheet feeder, press
PAPER twice.
To eject single-sheet paper from the printer
❏ When the printer is in Ready Mode (so the READY indicator is lit), press
PAPER once to eject the paper from the printer.
❏
When the printer is in Not-Ready Mode (so the READY indicator is bit lit), hold
down PAPER to eject the paper from the printer.
To advance paper
❏
While there is paper already in the printer, use Power to put the printer into the
Not-Ready Mode (so the READY indicator is flashing slowly).
❏ Press PAPER once to feed the paper one line.
❏ To continuously feed the paper, hold down PAPER.
Errors
❏
Whenever the READY indicator flashes at high speed, it means that an error has
occurred. To clear the error condition, hold down Power for a few seconds to
enter the Sleep Mode. After a few seconds, press Power again so the READY
indicator lights. See “Troubleshooting” on page 81 of this manual for other
information on how to deal with problems. In the case of paper jams, see
“Clearing paper jams” on page 73.
Passage du mode Ready au mode Not-Ready et vice versa
❏ Appuyez sur la touche Power pour faire passer l’ordinateur du mode Ready au
mode Not Ready et vice versa.
❏ Une fois que l’imprimante fonctionne en mode Ready, le voyant READY
s’allume et l’imprimante peut recevoir les données que lui envoie l’ordinateur.
Vous devez donc vérifier que l’imprimante fonctionne en mode Ready avant de
commencer à imprimer.
❏ Lorsque l’imprimante fonctionne en mode Not-Ready, le voyant READY
clignote lentement, indiquant ainsi que l’imprimante n’est pas en mesure de
recevoir des données.
Alimentation de feuilles individuelles dans l’imprimante
❏ S’il ne reste pas de papier dans l’imprimante, appuyez sur la touche PAPER
pour alimenter du papier.
Appuyez une fois sur PAPER pour introduire manuellement une feuille de
papier (page 72) en contournant l’alimentation automatique. Pour alimenter
l’imprimante en papier à partir de l’introducteur feuille à feuille automatique,
appuyez deux fois sur PAPER.
Ejection d’une feuille individuelle de l’imprimante
❏ Lorsque l’imprimante fonctionne en mode Ready (voyant READY allumé),
appuyez une fois sur PAPER pour éjecter le papier de l’imprimante.
❏ Lorsque l ’imprimante fonctionne en mode Not-Ready (voyant READY
clignotant), maintenez la touche PAPER enfoncée pour éjecter le papier de
l’imprimante.
Comment faire avance le papier
❏ Si l’imprimante contient du papier, utilisez la touche Power pour faire passer
l’imprimante en mode Not-Ready (le voyant READY doit clignoter lentement).
❏ Appuyez une fois sur PAPER pour faire avancer le papier d’une ligne.
❏ Pour faire avancer continuellement le papier, maintenez la touche PAPER
enfoncée.
Erreurs
❏ Lorsque le voyant READY clignote rapidement, il indique qu’une erreur s’est
produite. Pour annuler la condition d’erreur, maintenez la touche Power
enfoncée pendant plusieurs secondes pour passer en mode de veille. Au bout de
quelques secondes, appuyez de nouveau sur la touche Power pour rallumer le
voyant READY. Pour plus de détails sur les problèmes possibles, reportez-vous
à la section «Dépannage» à la page 81 de ce manuel. Dans le cas d’un bourrage
de papier, reportez-vous à la section «Elimination d’un bourrage de papier» à la
page 74.
67
Page 77

Schaltung zwischen den Betriebsarten Ready (Bereit) und Not-Ready (Nicht-Bereit)
❏ Drücken Sie die Power-Taste, um den Computer zwischen den Betriebsarten
Ready (ON LINE) und Not-Ready (OFF LINE) hin und herzuschalten.
❏ Wenn sich der Drucker im ON LINE-Betrieb befindet, leuchtet die READY-
Anzeige und der Drucker kann Daten vom Computer empfangen. Vergewissern
Sie sich, daß der Drucker sich ON LINE Befindet, wenn Sie zu drucken
versuchen.
❏ Wenn sich der Drucker im OFF LINE-Betrieb befindet, blinkt die READY-
Anzeige und zeigt an, daß der Drucker keine Daten empfangen kann.
Einzug von Einzelblättern in den Drucker
❏ Wenn sich kein Papier im Drucker befindet, drücken Sie die PAPER-Taste, um
Papier einzulegen.
Drücken Sie die PAPER-Taste einmal, um unter Umgehung der automatischen
Papierzufuhr ein Einzelblatt (Seite 72) in den Drucker einzuziehen. Zum
Papiereinzug mit Hilfe der automatischen Papierzufuhr drücken Sie die
PAPER-Taste zweimal.
Auswerfen von Einzelblättern aus dem Drucker
❏ Wenn sich der Drucker im ON LINE-Betrieb befindet (die READY-Anzeige
leuchtet), drücken Sie die PAPER-Taste einmal, um ein Blatt aus dem Drucker
auszuwerfen.
❏ Wenn sich der Drucker im OFF LINE-Betrieb befindet (die READY-Anzeige
blinkt langsam), die Paper-Taste gedrückt halten, um ein Blatt aus dem Drucker
auszuwerfen.
Papiervorschub
❏ Wenn sich bereits ein Blatt im Drucker befindet, drücken Sie die Power-Taste,
um den Drucker in den OFF LINE-Betrieb zu setzen (READY-Anzeige blinkt
langsam).
❏ Drücken Sie die PAPER-Taste einmal, um einen Blattvorschub um eine Zeile
auszuführen.
❏ Um das Blatt kontinuierlich vorwärtszubewegen, halten Sie die PAPER-Taste
gedrückt.
Fehler
❏ Wenn die READY-Anzeige schnell blinkt, bedeutet dies, daß ein Fehler
aufgetreten ist. Um den fehlerhaften Betriebszustand zu bereinigen, halten Sie
die Power-Taste einige Sekunden lang gedrückt, um in den Sleep-Modus zu
schalten. Nach einigen Sekunden drücken Sie die Power-Taste erneut, so daß
die READY-Anzeige leuchtet. Schlagen Sie auf Seite 82 dieses Handbuches
unter “Fehlerbehebung” nach, um Informationen über die Handhabung des
Problems zu erhalten. Im Falle eines Papierstaus schlagen Sie auf Seite 74 unter
“Beseitigung eines Papierstaus” nach.
Passaggio dal modo “Ready” al modo “Not-Ready”
❏ Premete il tasto Power per far passare la stampante dal modo Ready al modo
Not-Ready.
❏ Quando la stampante è in modo Ready, l’indicatore READY si accende e la
stampante può ricevere i dati dal computer. Ciò vuol dire che do vrete controllare
sempre che la stampante sia in modo Ready ogni volta che vorrete stampare.
❏ Quando la stampante è in modo Not-Ready, l’indicatore READY lampeggia
lentamente, il che indica che la stampante non può ricevere i dati.
Alimentazione di fogli singoli nella stampante
❏ Quando la carta nella stampante è terminata, premete il tasto PAPER per
caricare un altro foglio.
Premete il tasto PAPER una volta per caricare manualmente un singolo foglio
di carta (pagina 72), escludendo così l’alimentatore automatico di fogli singoli.
Per alimentare la carta dall’alimentatore automatico di fogli singoli, premete due
volte il tasto .
Espulsione di fogli singoli dalla stampante
❏
Quando la stampante è in modo Ready (l’indicatore READY è acceso), premete
il tasto PAPER una volta per espellere il foglio dalla stampante.
❏ Quando la stampante è in modo Not-Ready (l’indicatore READY è oscurato),
tenete premuto il tasto PAPER per espellere il foglio dalla stampante.
Avanzamento della carta
❏ Mentre nella stampante si trova già della carta, premete il tasto Power per
portare la stampante in modo Not-Ready (l’indicatore READY lampeggia
lentamente).
❏ Premete il tasto PAPER una volta per far avanzare il foglio di una linea.
❏ Per far avanzare la carta in modo continuo, tenete premuto il tasto PAPER.
Segnalazioni d’errore
❏
Ogni qual volta l’indicatore READY lampeggia velocemente, ciò indica che si è
verificato un errore. Per correggere la condizione di errore, tenete premuto il
tasto Power per alcuni secondi per passare al modo Sleep. Dopo alcuni secondi,
premete di nuovo il tasto Power e l’indicatore READY si accenderà. Consultare
il capitolo “Ricerca e soluzione dei problemi” a pagina 51 del presente manuale
per ulteriori istruzioni su come risolvere eventuali problemi. Se si è verificato un
inceppamento della carta, leggete la sezione “Rimozione della carta inceppata” a
pagina 74.
68
Page 78

69
Chapter 5: Paper Handling
❏
Single-Sheet P
Chapitre 5: Manipulation du papier
Your printer is designed to print on a variety of different paper types. This chapter
tells you everything you need to know about paper, and how to set the printer up for
automatic paper feed and manual paper feed. In this chapter, you will learn about:
Selecting the best type of paper to use
❏ Adjusting for paper thickness
❏ Manual sheet feeding
❏ Clearing paper jams
Selecting paper types
Use the following information when selecting paper.
Width: 7.0″ to 10.5″ / 178 to 267mm
Length: 5.5″ to 14″ / 140 to 356mm
Thickness: 0.00276″ to 0.00472″ / 0.07 to 0.12mm
Weight: 52 to 90 g/m
aper (Manual Sheet Feeding)
2
/ 45 to 77 kg / 14 to 24 lbs
Single-Sheet Paper (Automatic Sheet Feeding)
Width: A4 and Letter
Thickness: 0.00315″ to 0.00472″ / 0.08 to 0.12mm
Weight: 60 to 90 g/m
Input: 55 sheets of 64 g/m
Output: 10 sheets
Note:
You can make certain paper type settings using the User Setup Utility. See
“User Setup Utility” on page 21 of this manual for details.
2
/ 52 to 77 kg / 16 to 24 lbs
2
L’imprimante est conçue pour utiliser différents types de papier . Ce chapitre contient
toutes les informations dont vous pourrez avoir besoin au sujet du papier et explique
comment configurer l’imprimante pour une alimentation automatique ou manuelle
de papier. Il est notamment destiné à vous familiariser avec :
❏ le meilleur type de papier à utiliser
❏ le réglage d’épaisseur du papier
❏ l’alimentation manuelle de papier
❏ la suppression des bourrages de papier
Sélection du type de papier
En choisissant le papier à utiliser, tenez compte des points suivants :
Feuilles individuelles (alimentation manuelle)
Largeur : 178 à 267 mm
Longueur : 140 à 356 mm
Epaisseur : 0,07 à 0,12 mm
Poids : 52 à 90 g/m
2
/45 à 77 kg
Feuilles individuelles (alimentation automatique)
Largeur : A4 et letter
Epaisseur : 0,08 à 0,12 mm
Poids : 60 à 90 g/m
Entrée : 55 feuilles de 64 g/m
Sortie : 10 feuilles
Remarque:
Vous pouvez effectuer certains réglages de papier au moyen de l’utilitaire de
configuration. Pour plus de détails, reportez-vous à la description de l’utilitaire de
configuration à la page 21 de ce manuel.
2
/52 à 77 kg
2
Page 79

Kapitel 5: Papierhandhabung
Capitolo 5: Uso della carta
Ihr Drucker ist so ausgelegt, daß er eine Vielzahl unterschiedlicher Papierarten
bedrucken kann. In diesem Kapitel finden Sie alles, was Sie über Papier wissen
müssen und darüber wie Sie den Drucker auf die automatische Papierzufuhr und die
manuelle Einzelblattzuführung einstellen. In diesem Kapitel lernen Sie:
❏ Die bestgeeignete Papierart zu wählen
❏ Die Papierstärke einzustellen
❏ Papier manuell einzulegen
❏ Papierstaus zu beseitigen
Wahl der Papierart
Bei der Papierwahl beachten Sie die folgende Informationen.
Einzelblätter (Manueller Einzelblatteinzug)
Breite: 178 bis 267 mm
Länge: 140 - 356 mm
Stärke: 0,07 bis 0,12 mm
Gewicht: 52 bis 90 g/m
2
Einzelblätter (Automatische Papierzufuhr)
Breite: A4 und Letter-Format
Stärke: 0,08 bis 0,12 mm
Gewicht: 60 bis 90 g/m
Aufnahme: 55 Blatt bei 64 g/m
Fertigdruckaufnahme: 10 Blätter
Hinweis:
Sie können mit dem Drucker Setup Programm Einstellungen für bestimmte
Papiergrößen vornehmen. Einzelheiten darüber finden Sie auf Seite 22 dieses
Handbuchs “Drucker Setup Programm”.
2
2
Questa stampante è stata studiata per stampare su diversi tipi di carta. Questo
capitolo vi fornirà tutte le informazioni utili sull’argomento carta e su come
configurare la stampante per l’alimentazione automatica e manuale. In questo
capitolo troverete istruzioni su come:
❏ selezionare il tipo di carta più idoneo per la stampa
❏ regolare la distanza di stampa
❏ inserire manualmente i fogli
❏ rimuovere la carta inceppata
Selezione della carta
Seguite le seguenti indicazioni per scegliere il tipo di carta da utilizzare.
Carta a fogli singoli (con alimentazione manuale)
Larghezza: da 178 a 267 mm
Lunghezza: da 140 a 356 mm
Spessore: da 0,07 a 0,12 mm
Peso: da 52 a 90 g/m
2
/ da 45 a 77 kg
Carta a fogli singoli (con alimentazione automatica)
Formato: A4 e Letter
Spessore: da 0,08 a 0,12 mm
Peso: da 60 a 90 g/m
Capacità alimentatore: 55 fogli da 64 g/m
Stampe in uscita: 10 pagine
Nota:
Potete impostare alcune opzioni relative alla carta utilizzando il programma User
Seup Utility. Vedere il capitolo “Il programma User Setup Utility” a pagina 22 del
presente manuale per ulteriori dettagli.
2
/ da 52 a 77 kg
2
70
Page 80

Adjusting for paper thickness
P
Single-sheet
Paper comes in different weights, normally expressed
as gsm (grams per square meter) or lbs (pounds).
Some form paper also has multiple pages that make
them quite thick. Use the following procedure to
change the gap between the print head and the platen
and adjust for paper thickness.
❏
Move the adjustment lever on the right side of the
platen to one of its four settings. The adjustment
lever position that is nearest to the back of the
printer is Position 1 (minimum gap), while the
position at the opposite extreme is Position 4
(maximum gap). Position 2, which is marked
with a dot, is most suitable for single-sheet paper.
The following table provides a general guide for
setting the adjustment lever. Experiment with
different settings until you find the one that gives you
the print quality you want.
71
aper Type
Fanfold 1-ply
Fanfold 2 or
3-ply
Weight Per
Sheet
14 to 24 lbs
(52 to 90 gsm)
14 to 24 lbs
(52 to 90 gsm)
11 to 14 lbs
(40 to 52 gsm)
Thickness
0.07 to
0.12 mm
0.07 to
0.12 mm
0.13 to
0.21 mm
Recommended
Position
2 or 3
3
4
Important!
Continuous use of the wrong adjustment lever setting
can drastically reduce print head life!
Automatic sheet feeding
Your printer comes with a built-in automatic sheet
feeder that can hold up to 55 sheets of paper. See
page 13 of this manual for details on using the auto
sheet feeder.
❏ To feed paper into the printer, press the control
panel’s PAPER button twice.
Page 81

Réglage de l’épaisseur du papier
Einstellung der Papierstärke
Papier wird in verschiedenen Gewichten geliefert,
normalerweise ausgedrückt in g/m2 (Gramm pro
Quadratmeter). Bei Formularen gibt es auch
Mehrfachsätze, die eine erhebliche Stärke aufweisen.
Mit den folgenden Maßnahmen können Sie den
Abstand zwischen Druckkopf und Druckwalze
ändern und auf die jeweilige Papierstärke einstellen.
❏ Stellen Sie den Einstellhebel auf der rechten
Seite der Druckwalze auf eine der Positionen.
Die Hebelstellung, die sich am weitesten hinten
befindet, ist die Stellung 1 (kleinster Abstand),
wohingegen die Stellung auf der
entgegengesetzten Seite, nämlich die Position 4,
den größtmöglichen Abstand darstellt. Position 2,
die durch einen Punkt gekennzeichnet ist, ist die
für Einzelblätter am besten geeignete.
Die folgende Tabelle gibt allgemeine Anhaltspunkte
für die Einstellung des Einstellhebels. Versuchen Sie
verschiedene Stellungen bis Sie herausgefunden
haben, welche die besten Druckergebnisse liefern.
Automatische Papierzufuhr
Ihr Drucker wird mit einer eingebauten
automatischen Papierzufuhr geliefert, die bis zu 55
Einzelblätter aufnehmen kann. Einzelheiten über die
Verwendung der automatischen Papierzufuhr finden
Sie auf Seite 14 dieses Handbuchs.
❏ Um Papier in den Drucker einzuziehen, drücken
Sie die PAPER-Taste des Bedienerfeldes
zweimal.
Papierart
Gewicht
pro Blatt
Stärke
Empfohlene
Stellung
Einzelblatt 52- 90 g/m
2
0,07 - 0,12 mm 2 oder 3
Endlospapier,
1-lagig
52 - 90 g/m
2
0,07 - 0,12 mm 3
Endlospapier,
2-oder 3-lagig
40 - 52 g/m
2
0,13 - 0,21 mm 4
Wichtig!
Dauernde Verwendung der falschen Stellung des
Einstellhebels für Papierstärke kann die Standzeit
des Druckkopfes erheblich verringern!
Regolazione della distanza di stampa
I vari tipi di carta sono caratterizzati da una diversa
grammatura, espressa normalmente in g/mq (grammi
al metro quadro). Alcuni tipi di moduli sono
composti da più pagine che ne fanno aumentare
notevolmente lo spessore. Eseguite la seguente
procedura per cambiare la distanza fra la testina di
stampa e il rullo e regolare la distanza in funzione
dello spessore della carta.
❏
Spostate la leva situata sul lato destro del rullo su
una delle quattro posizioni. La posizione della
leva di regolazione più vicina al lato posteriore
della stampante è la posizione numero 1 (distanza
minima), mentre quella all’estremo opposto è la
posizione numero 4 (distanza massima). La
posizione numero 2, contrassegnata con un
punto, è la più indicata per stampare su fogli
singoli.
La seguente tabella è una guida generale sulle
impostazioni della leva di regolazione. Fate alcune
prove spostandola su posizioni diverse finché non
trovate quella con cui ottenere la qualità di stampa
desiderata.
Alimentazione automatica dei fogli
La vostra stampante è dotata di un alimentatore
automatico incorporato in grado di contenere fino a
55 fogli di carta. A pagina 14 del presente manuale
troverete ulteriori dettagli sull’utilizzo
dell’alimentatore automatico di fogli singoli.
❏ Per alimentare la carta nella stampante, premete
due volte il tasto PAPER.
Tipo di carta Peso per foglio Spessore
Posizione
raccomandata
Foglio singolo da 52 a 90 g/m
2
da 0,07 a 0,12 mm 2 or 3
Modulo continuo
a 1 foglio
da 52 a 90 g/m
2
da 0,07 a 0,12 mm 3
Modulo continuo
a 2 o 3 fogli
da 40 a 52 g/m
2
da 0,13 a 0,21 mm 4
Importante!
L’utilizzo continuo della stampante con la leva di
regolazione impostata su una posizione errata può
ridurre di molto la durata della testina di stampa!
Le papier d’impression est disponible en différentes
épaisseurs qui sont normalement exprimées en gsm
(grammes par mètre carré) ou en kg. Certains
formulaires comportent également plusieurs pages
qui augmentent leur épaisseur. Utilisez la procédure
suivante pour ajuster l’espace entre la tête
d’impression et le rouleau en fonction de l’épaisseur
du papier.
❏ Réglez le levier sur la droite du rouleau pour
choisir une des quatre positions possibles. La
position du levier de réglage la plus proche de
l’arrière de l’imprimante constitue la position 1
(espace minimum), alors que la position à l’autre
extrémité constitue la position 4 (espace
maximum). La position 2, signalée par un point,
est la plus indiquée pour les feuilles de papier
individuelles.
Le tableau suivant vous servira de guide général pour
le réglage du levier. Essayez différents réglages pour
trouver celui qui donne la qualité d’impression
recherchée.
Type de papier
Feuille individuelle 52 à 90 gsm 0,07 à 0,12 mm 2 or 3
Pliage accordéon 1
exemplaire
Pliage accordéon 2
ou 3 exemplaires
Poids par
feuille
52 à 90 gsm 0,07 à 0,12 mm 3
40 à 52 gsm 0,13 à 0,21 mm 4
Epaisseur
Important!
L’utilisation continuelle d’un réglage incorrect du
levier risque de réduire considérablement la durée
utile de la tête d’impression.
Position
recommandée
Alimentation automatique
L’imprimante est fournie avec un introducteur feuille
à feuille intégré qui peut contenir jusqu’à 55 feuilles
de papier. Pour plus de détails sur l’utilisation de
l’introducteur feuille à feuille, reportez-vous à la
page 14 de ce manuel.
❏ Pour alimenter le papier dans l’imprimante,
appuyez deux fois sur la touche PAPER du
panneau de commande.
72
Page 82

Paper release levers
Leviers de dégagement du papier
Papierlösehebel
Leve di rilascio carta
Manual sheet feeding
You can use the following procedure to manually
feed single sheets of paper into the printer, even
while different paper is loaded in the automatic sheet
feeder.
❏ Insert the sheet of paper into the printer, in front
of the paper tray cover.
❏ Press the control panel’s PAPER button once.
Note:
If you are manually inserting letterhead paper, insert
the sheet so that it is face down with the letterhead
portion down.
Clearing paper jams
Use the following procedure to clear paper jams from
the printer.
❏ Unplug the printer from its AC power outlet.
❏ Open the front cover of the printer.
❏ Pull the front of the automatic sheet feeder
forward.
❏ Remove any paper that is still in the feeder.
❏ Carefully try to pull the jammed paper from the
printer.
❏ If the paper is so badly jammed that you cannot
easily pull it out, detach the automatic sheet
feeder from the printer (see “Detaching the
automatic sheet feeder” on page 17).
❏ Lifting up on the two paper release levers on the
back of the printer, pull the jammed paper out.
❏ After you clear the jam, replace the automatic
sheet feeder (see, “Re-installing the automatic
sheet feeder” on page 19).
❏ Reload paper into the automatic feeder.
❏ Close the front cover of the printer.
73
Page 83

Alimentation manuelle
Manueller Papiereinzug
Mit dem folgenden Verfahren können Sie einzelne
Blätter von Hand in den Drucker einziehen, auch,
wenn sich anderes Papier in der automatischen
Papierzufuhr befindet.
❏ Legen Sie das Blatt vor der Abdeckung des
Papierschachtes in den Drucker ein.
❏ Drücken Sie die PAPER-Taste des
Bedienerfeldes einmal.
Beseitigung eines Papierstaus
Einen Papierstau im Drucker können Sie auf
folgende Weise beseitigen.
❏ Netzstecker aus der Wandsteckdose ziehen.
❏ Frontabdeckung des Druckers öffnen.
❏
Vorderseite der automatischen Papierzufuhr nach
vorne ziehen.
❏ Alles Papier, das sich noch in der Zuführung
befindet, herausnehmen.
❏ Vorsichtig das eingeklemmte Papier aus dem
Drucker herausziehen.
❏
Wenn das Papier so stark eingeklemmt ist, daß es
sich nicht leicht herausziehen läßt, nehmen Sie
die automatische Papierzufuhr vom Drucker ab
(Siehe “Abnehmen der automatischen
Papierzufuhr” auf Seite 18).
❏
Aus den zwei Papierlösehebeln auf der Rückseite
des Druckers herausheben und das eingeklemmte
Papier herausziehen.
❏ Nach Beseitigung des Staus die automatische
Papierzufuhr wieder anbringen (Siehe
“Wiedereinsetzen der automatischen
Papierzufuhr” auf Seite 20).
❏ Erneut Papier in die automatische Papierzufuhr
einlegen.
❏ Frontabdeckung des Druckers schließen.
Hinweis:
Wenn Sie Papier mit Briefkopf von Hand einlegen,
achten Sie bitte darauf, daß die Vorderseite mit dem
Briefkopf nach unten zeigt und von Ihnen
abgewendet ist.
Alimentazione manuale dei fogli
Eseguite la seguente procedura per caricare nella
stampante dei fogli singoli anche mentre
nell’alimentatore automatico è inserita carta di tipo
diverso.
❏ Inserite il foglio nella stampante davanti al
coperchio del vassoio carta.
❏
Premete una volta il tasto PAPER sul pannello di
controllo.
Rimozione della carta inceppata
Seguite le seguenti istruzioni per rimuovere dalla
stampante la carta inceppata.
❏ Staccate la stampante dalla presa elettrica.
❏ Aprite il coperchio frontale della stampante.
❏ Tirate in avanti la parte anteriore
dell’alimentatore automatico.
❏ Togliete tutti i fogli rimasti nell’alimentatore.
❏ Cercate di estrarre con cura dalla stampante la
carta inceppata.
❏ Se la carta si è gravemente inceppata e non
riuscite ad estrarla facilmente, smontate
l’alimentatore automatico di fogli singoli dalla
stampante (vedere la sezione “Smontaggio
dell’alimentatore automatico di fogli singoli” a
pagina 18).
❏ Tenendo sollevate le due leve di rilascio carta
situate dietro la stampante, estraete la carta
inceppata.
❏ Una volta rimossa la carta inceppata, rimontate
l’alimentatore automatico di fogli singoli (vedere
la sezione “Reinstallazione dell’alimentatore
automatico di fogli singoli” a pagina 20).
❏ Ricaricate la carta nell’alimentatore automatico.
❏ Chiudete il coperchio frontale della stampante.
Nota:
Se volete stampare su della carta intestata, inserite il
foglio a faccia in giù con il lato intestato rivolto
verso il basso.
Vous pouvez utiliser la procédure suivante pour
introduire manuellement des feuilles de papier dans
l’imprimante, même si du papier différent est chargé
dans l’introducteur feuille à feuille.
❏ Insérez le papier dans l’imprimante, devant le
couvercle du bac de papier.
❏ Appuyez une fois sur la touche PAPER du
panneau de commande.
Remarque:
Si vous insérez manuellement du papier à en-tête,
insérez la feuille face imprimée vers le bas et en-tête
en bas.
Suppression des bourrages de papier
Utilisez la procédure suivante pour éliminer les
bourrages de papier dans l’imprimante :
❏ Débranchez l’imprimante de la prise secteur.
❏ Ouvrez le capot avant de l’imprimante.
❏ Rabaissez l’avant de l’introducteur feuille à
feuille.
❏ Retirez le papier encore dans l’introducteur.
❏ Essayez de sortir le papier coincé dans
l’imprimante en procédant avec précaution.
❏ Si vous ne parvenez pas à retirer le papier,
enlevez l’introducteur feuille à feuille de
l’imprimante (voir «Retrait de l’introducteur
feuille à feuille» à la page 18).
❏ Soulevez les deux leviers de dégagement du
papier à l’arrière de l’imprimante et retirez le
papier coincé.
❏ Une fois que vous avez supprimé le bourrage,
remettez l’introducteur feuille à feuille en place
(voir «Réinstallation de l’introducteur feuille à
feuille» à la page 20).
❏ Rechargez le papier dans l’introducteur feuille à
feuille.
❏ Remettez le capot de l’imprimante en place.
74
Page 84

75
Chapter 6: Using the Printer with MS-DOS
❏
INST
Star LC-240C
Star LC-240
Star LC24-30
Epson LQ-860/1060
Epson LQ-850/1050
Star LC-240C
Star LC-240
Star LC24-30
Epson LQ-860/1060
Epson LQ-850/1050
Chapitre 6: Utilisation de l’imprimante sous MS-DOS
This chapter contains information about how to use the printer with applications
software running under MS-DOS. In this chapter, you will learn about:
How to set up for printing with MS-DOS
❏ How to select fonts from within an application
Setting up for printing with MS-DOS
To print from an application running under MS-DOS, you must first select the
printer from within the application. T ypically, the program will feature an
or SETUP command for selection of printers. Refer to the manual for the
application you are using for details on how to select a printer for it.
Note:
Remember that you must select a printer for each individual application before you
can print from it.
The following procedure describes the basics of selecting a printer.
❏ Start up the application and use the correct procedure for that application to
select a printer. The following is a list of printers that can be used. If your
application lists more than one of these, select the printer that is nearest to the
top of this list. Use User Setup Utility to select Standard emulation (page 31).
ALL
Ce chapitre contient des informations sur l’utilisation de l’imprimante avec des
logiciels tournant sous MS-DOS. Il est destiné à vous familiariser avec:
❏ la configuration d’impression sous MS-DOS
❏ la sélection de polices dans une application
Configuration de l’impression sous MS-DOS
Pour imprimer à partir d’une application tournant sous MS-DOS, vous devez
sélectionner l’imprimante dans l’application utilisée. En général, les logiciels
disposent d’une commande INSTALL ou SETUP permettant de sélectionner les
imprimantes. Pour plus de détails sur la sélection d’imprimante dans l’application
utilisée, reportez-vous à son manuel.
Remarque:
N’oubliez pas que vous devez sélectionner une imprimante dans chaque application
individuelle avant de pouvoir imprimer.
La procédure suivante décrit les opérations de base à effectuer pour sélectionner une
imprimante.
❏ Lancez l’application et utilisez la procédure correcte pour sélectionner une
imprimante dans l’application. Les imprimantes pouvant être utilisées sont
indiquées dans la liste ci-dessous. Si l’application en propose d’autres,
sélectionnez celle qui se situe au début de la liste. Pour sélectionner l’émulation
standard (page 31), utilisez l’utilitaire de configuration.
The shaded printers are not color printers, so you will not be able to print in
color if you select one of them.
Les imprimantes hachurées ne sont pas des imprimantes couleurs. Vous ne
pourrez donc pas imprimer en couleur si vous sélectionnez l’une d’entre elles.
Page 85

Kapitel 6: Verwendung des Druckers unter MS-DOS
Star LC-240C
Star LC-240
Star LC24-30
Epson LQ-860/1060
Epson LQ-850/1050
Star LC-240C
Star LC-240
Star LC24-30
Epson LQ-860/1060
Epson LQ-850/1050
Dieses Kapitel enthält Informationen über den Einsatz des Druckers mit
Anwendungsprogrammen, die unter MS-DOS laufen. In diesem Kapitel lernen Sie:
❏ Wie Sie den Drucker unter MS-DOS einrichten
❏ Wie Sie Schriftarten aus dieser Anwendung wählen
Grundeinrichtung (Setup) unter MS-DOS
Um aus einer Anwendung, die unter MS-DOS läuft, zu drucken, müssen Sie
zunächst den Drucker innerhalb dieser Anwendung auswählen. Üblicherweise
enthält das Programm den Befehl INSTALLIEREN oder EINRICHTEN zur
Auswahl des Druckers. Schlagen Sie im Handbuch der Anwendung, die Sie
benutzen möchten, nach, um Einzelheiten über die Auswahl des Druckers zu finden.
Hinweis:
Denken Sie daran, daß Sie für jede einzelne Anwendung einen Drucker auswählen
müssen, bevor Sie aus dieser Anwendung drucken können.
Das folgende Verfahren beschreibt die grundlegenden Vorgänge bei der Wahl eines
Druckers.
❏ Starten Sie die Anwendung und verwenden Sie das richtige Verfahren für diese
Anwendung, um einen Drucker auszuwählen. Nachfolgend finden Sie eine Liste
von Druckern, die benutzt werden können. Wenn Ihre Anwendung weitere
Drucker auflistet, wählen Sie den Drucker, der am weitesten vorne auf der Liste
steht. Mit dem Drucker Setup Programm können Sie die Standard-Emulation
auswählen (Seite 32).
Capitolo 6: Utilizzo della stampante in ambiente MS-DOS
Questo capitolo vi spiega come utilizzare la stampante con software applicativo
funzionante in ambiente MS-DOS. In questo capitolo troverete istruzioni su come:
❏ installare la stampante in ambiente MS-DOS
❏ selezionare i caratteri dall’interno di una applicazione
Installazione della stampante in ambiente MS-DOS
Per stampare da un’applicazione funzionante sotto MS-DOS, dovrete innanzi tutto
selezionare la stampante all’interno di quell’applicazione. Normalmente il
programma vi metterà a disposizione un comando INSTALL o SETUP con cui
poter installare le stampanti. Fate riferimento al manuale dell’applicazione che state
utilizzando per informazioni su come installare una stampante all’interno di essa.
Nota:
Ricordate che dovrete installare una stampante per ogni singola applicazione prima
di poter stampare da essa.
La seguente procedura illustra le operazioni di base da compiere per selezionare una
stampante.
❏ Avviate la vostra applicazione ed eseguite la relativa procedura per la selezione
della stampante. Di seguito riportiamo un elenco delle stampanti che è possibile
installare. Se la vostra applicazione supporta una o più di queste stampanti,
selezionate quella più vicina alla prima di questo elenco. Eseguite poi il
programma User Setup Utility per impostare l’emulazione Standard (pagina 32).
Die grau unterlegten Drucker sind keine Color-Drucker. Sie können daher nicht
in Farbe drucken, wenn Sie einen von ihnen wählen.
Le stampanti evidenziate dall’ombreggiatura non sono a colori, per cui
selezionando una di queste non potrete eseguire stampe a colori.
76
Page 86

❏ If none of the printers listed above is available in the application, choose one of
Enter
IBM ProPrinter X24E/XL24E
IBM ProPrinter X24/XL24
IBM ProPrinter X24E/XL24E
IBM ProPrinter X24/XL24
the following. Once again, you should choose the one that is nearest to the top in
the following list. Use User Setup Utility to select IBM emulation (page 31).
❏ The above two printers are shaded because they are not color printers. This
means that you will not be able to print in color if your select one of these.
Note:
You cannot print in color unless you select the name of a color printer.
❏ To print, follow the instructions given in the manual of the application you are
using. Typically, you would select the application’s PRINT command, make any
necessary changes in the window that appears (such as the number of copies to
be printed), and then press the
key to start printing.
Selecting fonts in MS-DOS applications
Use the User Setup Utility to select a font when running an application under MSDOS. For details on the fonts that are available and how to select them, see “LQ
Font” on page 35 of this manual.
❏ Si aucune des imprimantes énumérées ci-dessus n’est disponible dans
l’application, choisissez une des suivantes. Là aussi, vous devez sélectionner une
imprimante au début de la liste suivante. Utilisez l’utilitaire de configuration
pour sélectionner l’émulation IBM (page 31).
❏ Les deux imprimantes ci-dessus sont hachurées parce qu’il ne s’agit pas
d’imprimantes couleurs. Vous ne pourrez donc pas imprimer en couleur si vous
choisissez l’une d’entre elles.
Remarque:
L’impression couleur n’est possible que si vous sélectionnez le nom d’une
imprimante couleur.
❏ Pour imprimer, suivez les instructions fournies dans le manuel de l’application
utilisée. En général, vous devez sélectionner la commande IMPRIMER,
apporter les modifications nécessaires dans la fenêtre qui s’affiche (pour choisir
le nombre de copies à imprimer par exemple) et appuyer sur la touche Entrée
pour lancer l’impression.
Sélection de polices dans les applications MS-DOS
Utilisez l’utilitaire de configuration pour sélectionner une police dans une
application tournant sous MS-DOS. Pour plus de détails sur les polices disponibles
et leur sélection, consultez la section «Police LQ» à la page 35 de ce manuel.
77
Page 87

❏
Wenn keiner der in der Liste aufgeführten Drucker in der Anwendung verfügbar
ist, wählen Sie einen der folgenden. Auch hier sollten Sie den Drucker wählen,
der sich am weitesten oben auf der folgenden Liste befindet. Mit dem Drucker
Setup Programm können Sie die IBM-Emulation auswählen (Seite 32).
❏ Die beiden vorerwähnten Drucker sind grau unterlegt, weil sie keine Color-
Drucker sind. Dies bedeutet, daß Sie nicht in Farbe drucken können, wenn Sie
einen von ihnen wählen.
❏ Um drucken zu können, befolgen Sie die Anweisungen, die im Handbuch der
von Ihnen gewählten Anwendung gegeben werden. Üblicherweise wählen Sie
den Befehl Drucken in der Anwendung, nehmen die notwendigen Änderungen
im Dialogfeld, das erscheint, vor (wie Zahl der zu druckenden Exemplare) und
drücken Sie dann die Taste Enter, um den Druckvorgang zu starten.
Wahl von Schriftarten in MS-DOS-Anwendungen
Mit dem Drucker Setup Programm wählen Sie eine Schriftart, wenn Sie eine
Anwendung unter MS-DOS verwenden. Einzelheiten über verfügbare Schriftarten
und darüber, wie sie gewählt werden können, finden Sie unter “Schriftart
Briefqualität (LQ)” auf Seite 36 dieses Handbuchs.
Hinweis:
Sie können nicht in Farbe drucken, wenn Sie keinen Color-Drucker gewählt haben.
IBM ProPrinter X24E/XL24E
IBM ProPrinter X24/XL24
IBM ProPrinter X24E/XL24E
IBM ProPrinter X24/XL24
❏ Se la vostra applicazione non supporta nessuna delle stampanti elencate sopra,
sceglietene una delle due seguenti. Ancora una volta, scegliete quella più vicina
alla prima del seguente elenco. Eseguite poi il programma User Setup Utility per
impostare l’emulazione IBM (pagina 32).
❏ Entrambe queste stampanti sono evidenziate dall’ombreggiatura in quanto non
sono a colori, per cui selezionando una di queste non potrete stampare a colori.
Nota:
Ricordate che per poter stampare a colori dovrete necessariamente selezionare una
delle stampanti a colori indicate.
❏ Per eseguire la stampa, seguite le istruzioni riportate nel manuale
dell’applicazione che state utilizzando. Normalmente, dovrete lanciare il
comando di STAMPA dell’applicazione, specificare alcune opzioni nella
maschera che vi verrà proposta (come ad esempio il numero di copie da
stampare) e premere il tasto di Invio per far partire la stampa.
Selezione dei caratteri all’interno delle applicazioni MS-DOS
Lanciate il programma User Setup Utility per specificare il carattere da utilizzare
quando stampate da un’applicazione MS-DOS. Per maggiori dettagli sui caratteri
disponibili e per istruzioni su come selezionarli, leggete il paragrafo “Caratteri LQ”
a pagina 36 del presente manuale.
78
Page 88

79
Chapter 7: Other Printing Features
❏
P
Chapitre 7: Autres fonctions d’impression
This chapter details other features that you are sure to find helpful, no matter what
kind of document you are printing. They provide you with the versatility to make
your output look exactly as you want it. In this chapter, you will learn about:
How to pause printing
❏ Feeding paper
❏ Form feeding
How to pause printing
❏ To temporarily interrupt printing, press the control panel’s
the printer into the Not-Ready Mode.
❏ To resume printing, press Power again to put the printer back into the Ready
Mode.
ower button to put
Line feed
Use the following procedure to feed paper one line at a time.
❏ Press the control panel’s Power button to put the printer into the Not-Ready
Mode.
❏ Press the control panel’s PAPER button to feed one line.
❏ To print, press Power again to put the printer back into the Ready Mode.
Form feed
The form feed operation feeds paper through the printer so the print head is at the
top of the next page to be printed. Use the following procedure to perform the form
feed operation.
❏ Press the control panel’s Power button to put the printer into the Not-Ready
Mode.
❏ Holding down the control panel’s PAPER button to perform the form feed
operation.
❏ To print, press Power again to put the printer back into the Ready Mode.
Ce chapitre décrit d’autres fonctions qui vous seront utiles, quel que soit le type de
document imprimé. Elles fournissent la polyvalence nécessaire pour obtenir le
résultat recherché. Ce chapitre est destiné à vous familiariser avec:
❏ les pauses d’impression
❏ l’alimentation du papier
❏ les sauts de pages
Pauses en cours d’impression
❏
Pour interrompre provisoirement l’impression, appuyez sur la touche Power du
panneau de commande qui fait passer l’imprimante en mode Not-Ready.
❏ Pour reprendre l’impression par la suite, appuyez de nouveau sur la touche
Power qui rétablit l’imprimante en mode Ready.
Saut de ligne
Utilisez la procédure suivante pour faire avancer le papier ligne par ligne.
❏ Appuyez sur la touche Power du panneau de commande pour faire passer
l’imprimante en mode Not-Ready.
❏ Appuyez sur la touche PAPER du panneau de commande pour faire avancer le
papier d’une ligne.
❏ Pour imprimer, appuyez de nouveau sur la touche Power qui rétablit
l’imprimante en mode Ready.
Saut de page
Cette opération permet de faire avancer le papier de sorte que la tête d’impression
soit située au début de la feuille suivante à imprimer. Utilisez cette procédure pour
effectuer un saut de page.
❏ Appuyez sur la touche Power du panneau de commande pour faire passer
l’imprimante en mode Not-Ready.
❏ Maintenez la touche PAPER enfoncée sur le panneau de commande pour
effectuer le saut de page.
❏ Pour imprimer, appuyez de nouveau sur la touche Power qui rétablit
l’imprimante en mode Ready.
Page 89

Kapitel 7: Sonstige Druckerfunktionen
Capitolo 7: Altre funzionalità della stampante
Dieses Kapitel enthält Einzelheiten über andere Funktionen, die für Sie von Nutzen
sein werden, gleichgültig, welches Schriftstück Sie drucken. Sie bieten Ihnen die
vielfältigen Einstellmöglichkeiten, die Sie benötigen, damit Ihr Ausdruck genau so
aussieht, wie Sie ihn haben möchten. In diesem Kapitel lernen Sie:
❏ Wie Sie den Druck unterbrechen können
❏ Den Einzug von Papier
❏ Den Einzug von Formularen
Wie man den Druck unterbricht
❏ Um den Druckvorgang zeitweilig zu unterbrechen, drücken Sie die Power-
Taste auf dem Bedienerfeld, um den Drucker in den OFF LINE-Betrieb zu
setzen.
❏ Zur Wiederaufnahme des Druckvorgangs drücken Sie die Power-Taste erneut,
um den Drucker in den ON LINE-Betrieb zurückzusetzen.
Zeilenvorschub
Das folgende Verfahren dient zum Papiervorschub um jeweils eine Zeile.
❏ Drücken Sie die Power-Taste auf dem Bedienerfeld, um den Drucker in den
OFF LINE-Betrieb zu setzen.
❏ Drücken Sie die PAPER-Taste des Bedienerfeldes, um den Zeilenvorschub um
eine Zeile vorzunehmen.
❏ Zum Drucken drücken Sie die Power-Taste erneut, um den Drucker in den ON
LINE-Betrieb zurückzusetzen.
Blattvorschub
Beim Blattvorschub wird das Papier durch den Drucker gezogen, so daß sich der
Druckkopf am Anfang der nächsten zu bedruckenden Seite befindet. Mit dem
folgenden Vorgang können Sie den Blattvorschub vornehmen.
❏ Drücken Sie die Power-Taste des Bedienerfeldes, um den Drucker in den OFF
LINE-Betrieb zu versetzen.
❏ Halten Sie die PAPER-Taste des Bedienerfeldes gedrückt, um den
Blattvorschub durchzuführen.
❏ Zum Drucken drücken Sie die Power-Taste erneut, um den Drucker in den ON
LINE-Betrieb zurückzusetzen.
Questo capitolo illustra alcune altre funzionalità che troverete sicuramente utili, a
prescindere dal tipo di documento che volete stampare. Esse aggiungono quel tocco
di versatilità che vi consentirà di ottenere documenti stampati esattamente nel modo
desiderato. In questo capitolo troverete istruzioni su come:
❏ mettere in pausa la stampante
❏ far avanzare la carta
❏ eseguire un salto pagina
Come mettere in pausa la stampante
❏ Per interrompere temporaneamente la stampa, premete il tasto Power sul
pannello di controllo per far passare la stampante al modo Not-Ready.
❏ Per far proseguire la stampa, premete di nuovo il tasto Power per riportare la
stampante in modo Ready.
Avanzamento linea
Eseguite le seguenti operazioni per far avanzare il foglio di una linea per volta.
❏ Premete il tasto Power sul pannello di controllo per far passare la stampante al
modo Not-Ready.
❏ Premete il tasto PAPER sul pannello di controllo per far avanzare il foglio di
una linea.
❏ Per riprendere la stampa, premete di nuovo il tasto Power per riportare la
stampante in modo Ready.
Salto pagina
La funzione di salto pagina fa avanzare il foglio nella stampante in modo che la
testina di stampa venga a trovarsi all’ inizio della pagina successiva da stampare.
Eseguite le seguenti operazioni per far emettere alla stampante un salto pagina.
❏ Premete il tasto Power sul pannello di controllo per far passare la stampante al
modo Not-Ready.
❏ Tenete premuto il tasto PAPER sul pannello di controllo per far eseguire alla
stampante un salto pagina.
❏ Per riprendere la stampa, premete di nuovo il tasto Power per riportare la
stampante in modo Ready.
80
Page 90

81
Appendix A: T
❏
roubleshooting
Appendix A: Dépannage
The appendix tells you what you need to know if you experience problems with your
printer. It tells you how to test the printer, how to check system software settings,
and how to adjust the vertical alignment. In addition, there is information on actions
to take for specific problems, and on the meanings of printer beep tones.
Warning!
The printer uses high voltage. Do not attempt any other repair or maintenance
except as expressly recommended in this appendix. Unauthorized repair and
maintenance not only exposes you to the danger of electrical shock, it also may
damage your printer and void your warranty.
Testing the printer
There are three different tests you can use: a short test, a long test and a hexadecimal
dump. The same operation is used to perform all three tests, and the test print that is
performed is controlled by the setting you make with the User Setup Utility. For
details on selecting the test print type with the User Setup Utility, see “Demo Print”
on page 33.
To perform the demo print selected by the User Setup Utility, hold down the
control panel’s Power button to enter the Sleep Mode.
❏ Holding down the control panel’s PAPER button, press the Power button and
then release both buttons at the same time.
❏ To stop demo printing hold down the Power button to enter the Sleep Mode.
Cette annexe explique la procédure à suivre en cas de problème sur l’imprimante.
Elle vous indique comment tester l’imprimante, vérifier le paramétrage du logiciel
système et vérifier l’ajustement vertical. Elle contient en outre des informations sur
les mesures à prendre en cas de problème spécifique et sur la signification des
différents signaux sonores émis par l’imprimante.
Attention!
L’imprimante utilise une tension élevée. Ne pas essayer d’effectuer de travaux de
réparation ou de maintenance, autres que ceux spécifiés dans cette annexe. Toute
activité de réparation ou de maintenance non autorisée expose non seulement à des
risques d’électrocution, mais risque aussi d’endommager l’imprimante et
d’invalider la garantie.
Comment tester l’imprimante
Vous disposez de trois tests différents : un test court, un test long et un vidage
hexadécimal. La même opération est utilisée pour effectuer les trois tests et le test
d’impression exécuté est déterminé par la valeur choisie dans l’utilitaire de
configuration. Pour plus de détails sur la sélection du type de test d’impression,
reportez vous à la «Imprime Démo», page 33.
❏ Pour effectuer la démo d’impression sélectionnée par l’utilitaire de
configuration, maintenez la touche Power enfoncée sur le panneau de
commande pour accéder au mode de veille.
❏ En maintenant la touche PAPER enfoncée sur le panneau de commande,
appuyez sur la touche Power, puis relâchez simultanément les deux touches.
❏ Pour interrompre la démo d’impression, maintenez la touche Power enfoncée
pour accéder au mode de veille.
Page 91

Anhang A: Fehlerbehebung
Appendice A: Ricerca e soluzione dei problemi
Im Anhang finden Sie alles, was Sie wissen müssen, wenn Sie sich Problemen Ihres
Druckers gegenübersehen. Sie erfahren auch wie Sie den Drucker testen können,
wie Sie die Einstellungen der System-Software überprüfen können und wie Sie die
vertikale Ausrichtung einstellen können. Darüber hinaus gibt es Informationen über
Maßnahmen zur Beseitigung von Einzelproblemen und über die Bedeutung der
Signaltöne des Druckers.
Warnhinweis!
Der Drucker verwendet hohe Spannung. Versuchen Sie nicht, Reparaturen oder
Wartungsmaßnahmen vorzunehmen, wenn Sie nicht in diesem Kapitel ausdrücklich
empfohlen wurden. Unzulässige Reparaturen und Wartungsmaßnahmen setzen Sie
nicht nur der Gefahr eines Stromschlages aus, sondern können auch dazu führen,
daß Ihr Drucker beschädigt und die Garantie ungültig wird.
Testen des Druckers
Es gibt drei verschiedene Druckertests: Kurztest, langer Drucktest und Hexadezimal
Dump (Hexdump). Der tatsächlich durchgeführte Testausdruck wird über die
Einstellungen im Rahmen des Drucker Setup Programms gesteuert. Einzelheiten
über die Wahl der Druckertestart mit dem Drucker Setup Programm, finden Sie auf
Seite 34 unter “Testausdruck”.
❏ Zur Vornahme des über das Drucker Setup Programm gewählten Testausdrucks
halten Sie die Power-Taste des Bedienerfeldes gedrückt, um den Sleep-Modus
einzuleiten.
❏ Halten Sie die PAPER-Taste des Bedienerfeldes gedrückt, drücken Sie die
Power-Taste und lassen Sie dann beide Tasten gleichzeitig los.
❏
Um den Testausdruck zu beenden, halten Sie die Power-Taste gedrückt, um den
Sleep-Modus einzuleiten.
In questa appendice troverete informazioni utili per risolvere eventuali problemi con
la stampante. Vi verrà spiegato come eseguire i test di stampa, come controllare le
impostazioni del software di sistema e come regolare l’allineamento verticale.
Infine, vi verranno date indicazioni sui possibili rimedi per risolvere problemi
specifici e sul significato dei segnali acustici emessi dalla stampante.
Attenzione!
La stampante funziona ad alto voltaggio. Non tentate di effettuare interventi di
riparazione o manutenzione diversi da quelli raccomandati espressamente in questa
appendice. La riparazione e manutenzione non autorizzata non solo può esporvi al
rischio di scosse elettriche, ma può anche danneggiare la stampante e invalidarne
la garanzia.
Esecuzione dei test di stampa
Questa stampante dispone di tre diversi programmi di test: un test versione breve, un
test versione lunga e il test di stampa in modalità dump esadecimale. Queste tre
stampe di test possono essere effettuate mediante la stessa operazione: infatti, la
stampa che la stampante esegue dipende dall’impostazione che avete scelto nel
programma User Setup Utility. Per ulteriori dettagli sulla selezione del tipo di test di
stampa utilizzando il programma User Setup Utility, vedere il paragrafo “Test della
stampante” a pagina 34.
❏ Per eseguire la stampa del test specificata nel programma User Setup Utility,
tenete premuto il tasto Power sul pannello di controllo per attivare il modo
Sleep.
❏ Tenendo premuto il tasto PAPER sul pannello di controllo, premete il tasto
Power e poi rilasciate contemporaneamente i due tasti.
❏
Per interrompere la stampa del test, tenete premuto il tasto Power per riattivare
il modo Sleep.
82
Page 92

Short test
.
*** Ver 1.0 ***
!"#$%&'()*+,-./0123456789:;<=>?@ACBDEFGHIJKLMNOPQRSTUVWXYZ[\]^_`abcdefghijklmno
!"#$%&'()*+,-./0123456789:;<=>?@ACBDEFGHIJKLMNOPQRSTUVWXYZ[\]^_`abcdefghijklmnop
"#$%&'()*+,-./0123456789:;<=>?@ACBDEFGHIJKLMNOPQRSTUVWXYZ[\]^_`abcdefghijklmnopq
#$%&'()*+,-./0123456789:;<=>?@ACBDEFGHIJKLMNOPQRSTUVWXYZ[\]^_`abcdefghijklmnopqr
$%&'()*+,-./0123456789:;<=>?@ACBDEFGHIJKLMNOPQRSTUVWXYZ[\]^_`abcdefghijklmnopqrs
%&'()*+,-./0123456789:;<=>?@ACBDEFGHIJKLMNOPQRSTUVWXYZ[\]^_`abcdefghijklmnopqrst
&'()*+,-./0123456789:;<=>?@ACBDEFGHIJKLMNOPQRSTUVWXYZ[\]^_`abcdefghijklmnopqrstu
The short test prints the version number of the
software contained in the printer’s ROM, followed by
seven lines of text. If you are using a color ribbon,
each line is printed using a different color.
Long test
A long test continually prints the version number of
the software contained in the printer’s ROM,
followed by the current User Setup Utility settings,
and the entire character set in each available font and
pitch setting. This sequence is repeated until you stop
it by holding down the control panel’s Power button.
Since this test can generate many lines of text and
graphics, it is a good idea to perform this test only
when using continuous fanfold paper rather than
single sheets.
Note:
Both the short test and the long test print across the
entire width of the carriage. Make sure that the printer
is loaded with the widest possible paper available in
order to avoid damage to the print head and platen.
Hexadecimal dump
This test prints in hexadecimal format all codes
(character codes and control codes) that are sent to
the printer by the computer. The printer does not
execute any control codes (such as 0A - linefeed), it
just prints them out. The hexadecimal dump is useful
when you are writing programs for printer control.
Use the following procedure to perform a
hexadecimal dump.
❏ Set up the printer for a test print as described
under “Testing the printer” on page81.
83
Page 93

Test court
Kurztest
Der Kurztest druckt die Nummer der
Programmversion, die im ROM des Druckers
enthalten ist, gefolgt von sieben T extzeilen. Wenn Sie
ein Color-Farbband verwenden, wird jede Zeile in
einer unterschiedlichen Farbe gedruckt.
Langer Drucktest
Ein langer Druckertest druckt die Nummer der
Programmversion, die im ROM des Druckers
enthalten ist, gefolgt von den aktuellen Einstellungen
des Drucker Setup Programms und dem gesamten
Zeichensatz in jeder verfügbaren Schriftart und der
jeweiligen Einstellung der Zeichenbreite. Diese
Abfolge wird solange wiederholt, bis Sie den
Vorgang durch Festhalten der Power-Taste auf dem
Bedienerfeld beenden.
Da dieser Test viele Zeilen Text und Grafik erstellen
kann, ist es empfehlenswert, den Test nur
vorzunehmen, wenn Endlospapier und nicht
Einzelblätter eingelegt sind.
Hexadezimal Dump (Hexdump)
Dieser Test druckt im Hexadezimal-Format alle
Steuercodes (Zeichenbefehle und Steuerbefehle), die
vom Computer an den Drucker gesendet werden. Der
Drucker führt keine Steuerbefehle aus (wie z.B. 0A Zeilenvorschub), er druckt sie nur aus. Der He xdump
ist nützlich, wenn Sie Programme zur Steuerung
Ihres Druckers selbst schreiben.
Mit dem folgenden Verfahren können Sie den
Hexadezimal Dump durchführen.
❏ Drucker wie oben unter “Testen des Druckers”
auf Seite 82 beschrieben, für einen Testausdruck
einstellen.
Hinweis:
Sowohl der Kurztest als auch der Langtest nutzt die
gesamte Breite des Druckkopfwagens. Vergewissern
Sie sich, daß im Druc ker das br eitestmögliche Papier
eingelegt ist, um Beschädigungen des Druckkopfes
und der Druckwalze zu vermeiden.
Test versione breve
Il test versione breve stampa il numero della versione
del software contenuto nella ROM della stampante,
seguito da sette righe di testo. Se avete installato un
nastro a colori, ogni riga verrà stampata in un colore
diverso.
Test versione lunga
Il test versione lunga stampa in modo continuo il
numero della versione del software contenuto nella
ROM della stampante, seguito dalle impostazioni
correnti del programma User Setup Utility e infine il
set completo di caratteri per ogni tipo di carattere e
passo di stampa disponibile. Questa sequenza di
stampa viene eseguita ripetutamente finché non viene
interrotta tenendo premuto il tasto Power sul
pannello di controllo.
Poiché questo test produce molte righe di testo e
grafica, è consigliabile eseguire la stampa su modulo
continuo invece che su fogli singoli.
Dump esadecimale
Questo test esegue la stampa in formato esadecimale
di tutti i codici (codici carattere e codici di controllo)
inviati alla stampante dal computer. In questa
modalità, la stampante non esegue nessuna azione
associata ai codici di controllo (come 0A =
avanzamento linea), ma li stampa soltanto. La stampa
in dump esadecimale è utile quando volete scrivere
programmi di controllo della stampante. Eseguite le
seguenti operazioni per ottenere la stampa in dump
esadecimale.
❏
Preparate la stampante per eseguire una stampa di
test, come illustrato nella sezione “Esecuzione
dei test di stampa” a pagina 82.
Nota!
I due tipi di test, versione breve e lunga, stampano
per tutta la larghezza del carrello, per cui
accertatevi di aver caricato nella stampante carta di
larghezza sufficiente per evitare di danneggiare la
testina di stampa e il rullo.
Le test court imprime le numéro de version du
logiciel enregistré dans la mémoire morte de
l’imprimante, suivi de sept lignes de texte. Si vous
utilisez un ruban couleur, chaque ligne est imprimée
dans une couleur différente.
Test long
Le test long imprime continuellement le numéro de
version du logiciel enregistré dans la mémoire morte
de l’imprimante, suivi des valeurs courantes de
l’utilitaire de configuration et de tout le jeu de
caractères dans chaque police et pas disponibles.
Cette séquence est répétée jusqu’à ce que vous
mettiez fin au test en maintenant enfoncée la touche
Power du panneau de commande.
Comme ce test peut générer plusieurs lignes de texte
et graphiques, il est préférable de l’effectuer sur du
papier à pliage accordéon plutôt que sur des feuilles
individuelles.
Remarque:
Le test court et le test long impriment sur toute la
largeur du chariot. Vérifiez que vous avez chargé le
papier le plus large possible pour éviter
d’endommager la tête d’impression et le rouleau.
Vidage hexadécimal
Ce test imprime tous les codes (codes de caractères et
codes de commande) que l’ordinateur envoie à
l’imprimante en notation hexadécimale.
L’imprimante n’exécute pas les codes de commande
(comme 0A - saut de ligne) ; elle se contente de les
imprimer. Le vidage hexadécimal est utile lorsque
vous écrivez des programmes pour le contrôle de
l’imprimante.
Utilisez la procédure suivante pour exécuter un
vidage hexadécimal.
❏ Configurez l’imprimante pour un test
d’impression en procédant comme indiqué à la
section «Test de l’imprimante» à la page 81.
84
Page 94

❏ Begin printing from your computer,
Instead of a normal printout, data will be printed in sixteen columns of
hexadecimal numbers (two groups of eight numbers each). The equivalent
printalble characters (or dots in the case of unprintable codes) are printed to the
right of each row of hexadecimal numbers.
After you start the hexadecimal dump (by using the procedure described above),
you can switch it off (and return the printer to normal operation) by holding
down the control panel’s Power button.
❏ Lancez l’impression sur l’ordinateur.
Au lieu de s’imprimer normalement, les données sont divisées en seize colonnes
de valeurs hexadécimales (deux groupes de huit chiffres chacun). Les caractères
imprimables équivalents (ou les points dans le cas des codes non imprimables)
sont imprimés à droite de chaque ligne de valeurs hexadécimales.
Une fois que le vidage hexadécimal a été lancé (en suivant la procédure décrite
ci-dessus), vous pouvez mettre l’imprimante hors tension (pour rétablir son
fonctionnement normal) en maintenant enfoncée la touche Power du panneau
de commande.
85
Page 95

❏ Den Druck vom Computer aus in Gang setzen.
Anstatt eines normalen Ausdrucks werden die Daten in 16 Spalten von
Hexadezimalzahlen (zwei Gruppen von jeweils acht Zahlen) ausgedruckt. Die
jeweiligen Druckzeichen (oder Punkte im Falle von nichtdruckbaren
Steuerbefehlen) werden rechts von jeder Zeile mit Hexadezimalzahlen gedruckt.
Nachdem Sie den Hexadezimal Dump gestartet haben (mit dem oben
beschriebenen Verfahren), können Sie ihn abschalten (und den Drucker in den
Normalbetrieb zurücksetzen), wenn Sie die Power-Taste auf dem Bedienerfeld
gedrückt halten.
❏ Iniziate a stampare dal vostro computer.
Al posto di essere stampati normalmente, i dati verranno stampati in sedici
colonne di valori esadecimali (due gruppi di otto valori ognuno). A destra di
ogni riga di valori esadecimali verranno stampati i relativi caratteri stampabili
(oppure dei punti al posto dei codici non stampabili).
Dopo aver attivato il dump esadecimale (eseguendo la procedura vista prima),
potete disattivarlo (e ripristinare la stampa normale) tenendo premuto il tasto
Power sul pannello di controllo.
86
Page 96

Troubleshooting guide
The READ
Guide de dépannage
Utilisez le tableau suivant pour déterminer l’origine des problèmes et connaître le
meilleur moyen de les résoudre.
Problème Cause possible Action recommandée
Le voyant READY ne
s’allume pas ou ne clignote
pas.
L’imprimante n’est pas
alimentée.
Vérifiez que le cordon
d’alimentation est
correctement connecté à la
prise de courant.
Vérifiez que la prise de
courant fonctionne
correctement en
débranchant l’imprimante
et en connectant une autre
unité.
L’imprimante émet des
sonorités d’impression
mais n’imprime pas.
L’impression est faible.
Le ruban est coincé,
entortillé ou n’est pas réglé
correctement entre la tête
d’impression et la protection
de tête d’impression.
Vérifiez que la cartouche de
ruban est correctement
installée. V oir «A propos des
cartouches de ruban», page
6.
L’imprimante n’est pas
correctement configurée
pour l’épaisseur du papier
utilisé.
Configurez l’imprimante en
fonction de l’épaisseur du
papier utilisé. Voir
«Réglage de l’épaisseur du
papier», page 72.
Le test d’imprimante
fonctionne, mais
l’imprimante n’imprime pas
les données que lui envoie
l’ordinateur connecté.
L’émulation sélectionnée
est incorrecte.
Vérifiez le mode d’émulation
sélectionné et modifiez-le si
nécessaire. Voir
«Emulation», page 31.
L’imprimante sélectionnée
dans l’application ou le
logiciel système est
incorrecte.
Vérifiez l’imprimante
sélectionnée dans le logiciel
d’application.
Le logiciel système de
l’ordinateur n’est pas
correctement configuré pour
l’imprimante ou pour le type
de câble d’interface utilisé.
Vérifiez la configuration du
logiciel système.
Use the following table to help track down the causes of problems and to determine
the best solution to deal with them.
Problem Possible Cause Recommended Action
not light or flash.
Printer sounds like it is
printing, but it is not.
Printing is weak.
Printer test works, but
printer will not print out data
from the attached computer.
Y indicator does
The printer is not receiving
power.
The ribbon is jammed,
twisted, or not set correctly
between the print head and
the print head shield.
The printer is not set up
correctly for the thickness
of paper you are using.
The wrong emulation is
selected.
Your application program’s
or system software’s printer
selection is wrong.
The computer’s system
software is not set up
properly for the printer or for
the type of interface cable
you are using.
Check whether the power
cord is correctly plugged
into the power outlet.
Check whether the power
outlet is working by
unplugging the printer and
plugging in another device.
Make sure that the ribbon
cartridge is installed
correctly. See “About ribbon
cartridges” on page 5.
Set up the printer for the
paper thickness you are
using. See “Adjusting for
paper thickness” on
page 71.
Check the emulation
selection and change if
necessary. See “Emulation”
on page 31.
Check the printer selection
of your application softw are.
Check the system software
settings.
87
Page 97

Anleitung zur Fehlerbehebung
Die folgende Tabelle dient zur Feststellung der Ursache von Problemen und zur
Ermittlung der besten Maßnahmen zur Behebung des Problems.
Problem Mögliche Ursache Lösung
Die READY-Anzeige leuchtet
oder blinkt nicht.
Der Drucker erhält keinen
Netzstrom.
Prüfen, ob das Netzkabel
ordnungsgemäß in die
Netzsteckdose eingesteckt
ist.
Durch Herausziehen des
Netzsteckers und Anschluß
eines anderen Gerätes
überprüfen, ob die
Stromquelle in Ordnung ist.
Es klingt, als ob der
Druckvorgang läuft, aber der
Drucker druckt nicht.
Druck ist schwach
ausgebildet.
Das Farbband staut, ist
verdreht oder nicht
ordnungsgemäß zwischen
Druckkopf und
Druckkopfführung eingelegt.
Vergewissern, daß die
Farbbandkassette richtig
eingesetzt ist. Siehe dazu
“Über Farbbandkassetten” auf
Seite 6.
Der Drucker ist nicht richtig
auf die verwendete
Papierstärke eingestellt.
Stellen Sie den Drucker auf
die von Ihnen verwendete
Papierstärke ein. Siehe dazu
“Einstellen der Papierstärke”
auf Seite 72.
Druckertest arbeitet, aber
Drucker druckt Daten vom
angeschlossenen Computer
nicht aus.
Die falsche Emulation wurde
gewählt.
Überprüfen Sie die Wahl der
Emulation und ändern Sie
diese, falls notwendig. Siehe
dazu “Emulation” auf Seite
32.
Ihr Anwendungsprogramm
oder die System-Software
Ihres Druckers wurden falsch
gewählt.
Überprüfen Sie die Wahl des
Druckers in Ihrem
Anwendungsprogramm.
Die System-Software des
Computers ist nicht
ordnungsgemäß für den
Drucker oder für die
verwendete Art des
Anschlußkabels eingerichtet.
Einstellungen der SystemSoftware überprüfen.
Guida alla risoluzione dei problemi
Consultate la seguente tabella per individuare più agevolmente le cause degli
inconvenienti e stabilire il rimedio più opportuno da adottare.
Problema Possibile causa Operazione consigliata
L’indicatore READY non è né
acceso né lampeggiante.
La stampante non riceve
corrente.
Controllate che il cavo di
alimentazione sia inserito
correttamente nella presa
elettrica.
Controllate che arrivi
corrente alla presa elettrica
staccando la stampante e
collegandovi un altro
dispositivo elettrico.
La stampante emette un
rumore come se stampasse,
ma non viene eseguita
nessuna stampa.
La stampa è sbiadita.
Il nastro è inceppato,
attorcigliato oppure non è
inserito correttamente fra la
testina di stampa e la
piastrina di protezione.
Accertatevi che la cartuccia
nastro sia installata
correttamente. Vedere la
sezione “Due parole sulle
cartucce nastro” a pagina 6.
La regolazione della distanza
di stampa sulla stampante
non corrisponde al tipo di
carta che state utilizzando.
Regolate la stampante per lo
spessore della carta che state
utilizzando. Vedere la
sezione “Regolazione della
distanza di stampa ” a pagina
72.
Il test della stampante
funziona, ma la stampante
non stampa i dati provenienti
dal computer a cui è
collegata.
E’ stata selezionata
un’emulazione sbagliata.
Controllate l’emulazione
selezionata e, se necessario,
cambiatela. Vedere il
paragrafo “Emulazione” a
pagina 32.
La stampante selezionata
all’interno della vostra
applicazione o del software di
sistema è sbagliata.
Controllate la stampante
selezionata nella vostra
applicazione.
Il software di sistema del
computer non è configurato in
maniera appropriata per la
stampante oppure per il cavo
d’interfaccia utilizzato.
Controllate i parametri di
configurazione del software di
sistema.
88
Page 98

Problem Possible Cause Recommended Action
Problème Cause possible Action recommandée
Le test d’imprimante
fonctionne, mais
l’imprimante refuse
d’imprimer les données
envoyées par l’ordinateur
connecté.
Le câble d’interface n’est
pas bien connecté ou est
endommagé.
Vérifiez que le câble
d’interface de l’imprimante
est correctement connecté.
Si c’est le cas, utilisez un
autre câble.
Les polices sélectionnées
changent sans raison.
L’application utilisée annule
la police sélectionnée dans
l’utilitaire de configuration.
Cette possibilité n’est pas
applicable aux systèmes
tournant sous Windows.
Utilisez l’utilitaire de
configuration pour activer le
verrouillage de police. Voir
«Table caractè» à la page
35.
L’alimentation de papier
n’est pas correcte sur
l’imprimante.
Le couvercle du bac de
papier n’est pas
correctement fermé.
Fermez le couvercle du bac
de papier.
Bourrage de papier. Retirez tout le papier de
l’imprimante et rechargezle.
L’imprimante n’est pas
correctement configurée
pour l’épaisseur du papier
utilisé.
Configurez l’imprimante
pour l’épaisseur de papier
utilisée. Voir «Réglage de
l’épaisseur du papier» à la
page 72.
L’imprimante n’imprime pas
en couleur.
Elle est équipée d’un ruban
monochrome.
Installez un ruban couleur.
Une imprimante ne
supportant pas les couleurs
est sélectionnée dans
Windows ou dans
l’application.
Sélectionner un autre
d’imprimante. Voir
«Configuration de
l’impression sous Microsoft
Windows 3.1» la page 51 ou
«Configuration de
l’impression sous MS-DOS»
à la page 75.
Un ruban monochrome est
spécifié dans l’utilitaire de
configuration.
Utilisez l’utilitaire de
configuration pour
sélectionner le ruban
couleur. Voir «Ruban
couleur» à la page 22.
Printer test works, but
printer will not print out data
from the attached computer.
Font selection changes
unexpectedly.
Printer does not feed paper
properly.
Printer does not print in
color.
The interface cable is
connected incorrectly or
damaged.
Your application software is
overriding the font selected
using the User Setup Utility.
This possibility does not
apply to systems running
Windows.
The paper tray cover is not
closed properly.
Jamming paper. Remove all paper from the
The printer is not set up
correctly for the thickness
of paper being used.
A monochrome ribbon
cartridge is installed.
A printer that does not
support color is selected
either in Windows or the
application program.
A monochrome ink ribbon
is specified by the User
Setup Utility.
Check to make sure that the
printer interface cable is
connected correctly. If it is,
try a different cable.
Use the User Setup Utility to
enable the font lock. See
“Char table” on page 35.
Close the paper tray cover.
printer and then reload it.
Set up the printer for the
paper thickness you are
using. See “Adjusting for
paper thickness” on
page 71.
Install a color ribbon
cartridge.
Select a different printer
driver. See “Setting up for
printing with Microsoft
Windows 3.1” on page 51 or
“Setting up for printing with
MS-DOS” on page 75.
Use the User Setup Utility to
change the ink ribbon
specification to Color. See
“Ink color” on page 31.
89
Page 99

Problem Mögliche Ursache Lösung
Druckertest arbeitet, aber
Drucker druckt Daten vom
angeschlossenen Computer
nicht aus.
Das Anschlußkabel ist falsch
angeschlossen oder
beschädigt.
Vergewissern, daß das
Anschlußkabel des Druckers
richtig angeschlossen ist.
Wenn ja, ein anderes Kabel
ausprobieren.
Unerwartete Änderung der
Schriftart.
Ihr Anwendungsprogramm
setzt die durch das Drucker
Setup Programm gewählte
Schriftart außer Kraft. Diese
Möglichkeit besteht bei
Systemen, die unter Windows
laufen, nicht.
Schalten Sie über das
Drucker Setup Programm die
Schriftartsperre (Font lock)
ein. Siehe Dazu
“Zeichensatz” auf Seite 36.
Papierzufuhr arbeitet nicht
ordnungsgemäß.
Die Abdeckung des
Papierschachtes ist nicht
richtig geschlossen.
Schachtabdeckung
schließen.
Papier staut. Entfernen Sie alles Papier
aus dem Drucker und legen
Sie es erneut ein.
Der Drucker ist nicht
ordnungsgemäß auf die
Stärke des verwendeten
Papiers eingestellt.
Stellen Sie den Drucker auf
die von Ihnen verwendete
Papierstärke ein. Siehe dazu
“Einstellung der
Papierstärke” auf Seite 72.
Drucker druckt nicht in Farbe. Eine Monochrom(einfarbige)-
Farbbandkassette ist
eingelegt.
Setzen Sie eine ColorFarbbandkassette ein.
Ein Drucker, der keinen
Farbdruck unterstützt, wurde
entweder unter Windows oder
im Anwendungsprogramm
gewählt.
Wählen Sie einen anderen
Druckertreiber. Siehe dazu
“Grundeinrichtung (Setup)
zum Drucken unter Microsoft
Windows 3.1” auf Seite 52
oder “Grundeinrichtung zum
Drucken (Setup) unter MSDOS” auf Seite 76.
Ein monochromes
(einfarbiges) Farbband ist im
Drucker Setup Programm
angegeben.
Ändern Sie über das Drucker
Setup Programm die
Farbbandangabe in Color.
Siehe dazu “Farbband” auf
Seite 32.
Problema Possibile causa Operazione consigliata
Il test della stampante
funziona, ma la stampante
non stampa i dati provenienti
dal computer a cui è
collegata.
Il cavo d’interfaccia non è
collegato correttamente o è
danneggiato.
Accertatevi che il cavo
d’interfaccia della stampante
sia collegato correttamente.
In caso affermativo, provate
un altro cavo.
La selezione del tipo di
carattere cambia
inaspettatamente.
Il vostro software applicativo
sta escludendo il tipo di
carattere selezionato tramite il
programma User Setup Utility.
Questa possibilità non si
verifica utilizzando
applicazioni Windows.
Usate il programma User
Setup Utility per abilitare il
bloccaggio del tipo di
carattere. Vedere il paragrafo
“Set di caratteri” a pagina 36.
La stampante non fa
avanzare la carta in maniera
appropriata.
Il coperchio del vassoio carta
non è chiuso in modo
corretto.
Chiudete il coperchio del
vassoio carta.
La carta si inceppa. Togliete tutta la carta dalla
stampante e ricaricatela.
La regolazione della distanza
di stampa eseguita sulla
stampante non corrisponde al
tipo di carta utilizzato.
Regolate la stampante in
base allo spessore della carta
che state utilizzando. Vedere
la sezione “Regolazione della
distanza di stampa” a pagina
72.
La stampante non stampa a
colori.
E’ stata installata una
cartuccia di nastro nero.
Installate una cartuccia di
nastro a colori.
E’ stata selezionata una
stampante che non supporta
il colore in Windows o nel
vostro programma applicativo.
Selezionate un driver
stampante diverso. Vedere le
sezioni “Installazione della
stampante sotto Microsoft
Windows 3.1” a pagina 52 o
“Installazione della stampante
in ambiente MS-DOS” a
pagina 76.
Il parametro specificato nel
programma User Setup Utility
per l’opzione “Ink color” è
“Monochrome”.
Usate il programma User
Setup Utility per cambiare in
“Color” il parametro relativo
all’opzione “Nastro colore”.
Vedere il paragrafo “Nastro
colore” a pagina 32.
90
Page 100

Problem Possible Cause Recommended Action
Problème Cause possible Action recommandée
L’espacement des lignes
est incorrect.
Bourrage de papier. Configurez l’imprimante en
fonction de l’épaisseur du
papier utilisé. Voir
«Réglage de l’épaisseur du
papier» à la page 72.
L’espacement des lignes
sélectionné dans
l’application est incorrect.
Choisissez un espacement
de ligne différent dans
l’application.
L’option Retour auto avec
RC est activée dans
l’utilitaire de configuration.
Utilisez l’utilitaire de
configuration pour
désactiver les sauts de ligne
avec retour-chariot
automatique. Voir «LF Auto
avec CR» à la page 37.
Les lignes se superposent à
l’impression.
L’option Retour auto avec
RC est activée dans
l’utilitaire de configuration.
Utilisez l’utilitaire de
configuration pour
désactiver les sauts de ligne
avec retour-chariot
automatique. Voir «LF Auto
avec CR» à la page 37.
Bourrage de papier. Configurez l’imprimante en
fonction de l’épaisseur du
papier utilisé. Voir
«Réglage de l’épaisseur du
papier» à la page 72.
Le nombre de lignes
imprimées sur la page est
incorrect.
L’option Retour auto avec
RC est activée dans
l’utilitaire de configuration.
Utilisez l’utilitaire de
configuration pour
désactiver les sauts de ligne
avec retour-chariot
automatique. Voir «LF Auto
avec CR» à la page 37.
L’espacement des lignes
sélectionné dans
l’application est incorrect.
Choisissez un espacement
de ligne différent dans
l’application.
Line spacing is incorrect. Jamming paper. Set up the printer for the
paper thickness you are
using. See “Adjusting for
paper thickness” on
page 71.
The line spacing or leading
selected your application
program is wrong.
Auto line feed with carriage
return is enabled by the
User Setup Utility.
Lines print over each other. Auto line feed with carriage
return is disabled by the
User Setup Utility.
Jamming paper. Set up the printer for the
Incorrect number of lines
are printed on the page.
Auto line feed with carriage
return is enabled by the
User Setup Utility.
The line spacing or leading
selected by your application
program is wrong.
Choose a different line
spacing or leading setting
from your application.
Use the User Setup Utility to
disable auto line feed with
carriage return. See “Auto
LF with CR” on page 37.
Use the User Setup Utility to
enable auto line feed with
carriage return. See “Auto
LF with CR” on page 37.
paper thickness you are
using. See “Adjusting for
paper thickness” on
page 71.
Use the User Setup Utility to
disable auto line feed with
carriage return. See “Auto
LF with CR” on page 37.
Choose a different line
spacing or leading setting
from your application.
91
 Loading...