

Page 1

USERS MANUAL
LC-2
DOT MATRIX PRINTER
80820476
0
Page 2
Trademark Acknowledgements
LC-20, NX-1OOO,LC.1O,ND.10/15: StarMicronicsCo., Lid.
IBM PC, PC-AT, PC-XT,
Corp.
Microaoft BASIC, MS-DOS: MicrosoftCorporation
LX.85Q FX86q Fx286e:
NOTICE
● All rights reserved. Reproduction of aoy partof this manual in any form whatsoeverwithout
. %~~~~?~%~~%;~;~~;% ckgewitiattim.
● All effortshavebeenmadeto ensuretheaccuracyof the contentsofthismanrralatthetime of
press,However, shotddanyerrorahe detected,STAR would greatlya~reciate being informed
of them.
● The abovenotwithstanding,STAR cartassumeno responsibilityforanyerrorsinthis manual.
ProprinterIII, ProprhrterII, PC.DOS: InternationalBusinessMachines
seikO @sOn Corp.
. .
@Copyright1990StarMicronicsCo.,Ltd.
Page 3
HOW TO USE THIS MANUAL
Thismanualis organizedintoninechapters.Tolearnhowtomakethebest
useof yourprinteryou areurgedtoreadthroughchapten 1through3.The
remainingchaptersmay be treatedas a referenceguidefor programming
operations,etc. It assumes a degree of knowledgeof the operationof
computexx(forinstance,itassumesyouknowabouthexadecimalnumbers).
Thechaptexxareas follows:
Chapter 1— Settinguptheprinter
Thischapterexplainshowtogettheprinterunpackedandsetup. Readthis
chapterbeforeyoudo anythingelse.
Chapter 2 — Controlpaneloperations
There are a numberof controlson the frontpanel whichperformvarious
functionsrelatedto paperhandling,printmodesandfontselection.
Aftergettingsetup,readthischapterandtryoutthevariousproceduresin
itto findouthowthe printerworks.
Chapter 3 — DIP switchsettings
Thischapterexplainshowto set theDIP switchesto make systemsettings
on the printer.
Chapter 4 — Printercontrolcommands
Thischapterexplainsthe diffe~nt emulationsprovidedbyyourprinter,and
the softwarecommandsusedto drive it. This sectionis of use if you are
writingor modifiing progr~s to take advantageoftheprinter’sfeatures.
Chapter 5 — Downloadcharactem
Thischapterexplainstheproceduresto createyourown characters.
Page 4
Chapter6— MS-DOSand yourprinter
Sincethe PC or PC-AT family of computemrunningunderMS-DOS is
curnmtlythe most popularconfigurationof microcomputer,we have includedafewhintsandtipsto helpyouuseyourprinterwithsuchsystems.
SincevirtuallyallPCsaresoldwithaMicrosoftBASICinterpreter,wehave
also included some hints, and a sample program in this language to
demonstratethecapabilitiesof the printer.
Chapter 7 — Troubleshootingandmaintenance
Thissectiongivesachecklistofpointstocheckifyourprinterisnotworking
in theexpectedway. It alsoincludesdetailsof someroutinemaintenance
operationsyoucancarryoutyourself.Itisno~however,acompleteservice
manual.Callaqualifiedserviceengineerifyouareunsureofyourabilityto
carryout anymaintenanceorservicingoperations.
Chapter 8 — Specifications
Thissectiongivesthe specificationsof yourprinter.
Chapter 9 — Charactersets
Thesechartsgivethedifferentcharactersetsavailable,andthedifferences
betweennationalcharactersets(assetup withtheDIP switches).
Page 5
FEATURES OF THE PRINTER
Thisprinterisaconvenient,monochromeprinterwithoutfiillsbutwithafull
complementof features, making it an excellentpartner for a personal
computer.It supportstheIBM/Epsonprintercommandsandcharactersets,
enablingittoprintjustaboutanythingyourcomputercangenerate,bothtext
and graphics.Someofitsmain featuresarethe following:
. ExtensivesoftwareSupport
Sinceit is compatiblewiththeEpsonandIBMprinters,it workswith any
softwarethat supportsthoseprintem.Thatincludesmostword-processing
andgraphicsprograms,spread-sheets,andintegratedsoftwarepackages.
. Easy”operation
Clearlyunderstandableindicatordisplaysandbeeptonesprovideimmediate feedbackwhen you press the buttonson the controlpanel.The four
buttonscanoperateincombinationstoperforma surprisingvarietyoffunctions,includingmicro-alignment.
. Easycare andmaintenance
The ribbon cartridgecan be replacedin secondsthe print head in a few
minutes.
. Versatilepaperhandling
Singlesheets,fanfoldforms,andmulti-copyforms(upto triple-ply)areall
accepted,andyoucanuse eithertractoror frictionfeed.A specialfeature
enablesyou to keep fanfoldforms parked in readinesswhileprintingon
otherpaper.
● Largevarietyof fontsand sizes
The printerhas one draft font andfourNLQ fonts(Courier,Sanserif,and
Oratorwith small capitalsor lower case), italicsfor all styles,plus con-
densedprint,boldprint,double-sizedprint,andquadruple-sizedprint.
Page 6
TABLE OF CONTENTS
Chapter 1 SETTING UP THE PRINTER
LocatingthePrinter
UnpackingandInspection
Checkthecartoncontents
Partsnameoftheprinter
Setting
Loading Single Sheets
Loading and Parking Fanfold Forms
Adjusting the
Up
Mount the platen knob
Install the ribbon cartridge
Comection
Automatic loading
Manual loading
Loading the paper
Paper parking
Paper unparking
PrintingGap
Chapter 2 CONTROL PANEL OPERATIONS
ButtonsandIndicators
ONLINEbutton
PAPERFEEDbutton
PITCHbutton
FONTbutton
Power-UpFunctions
Shorttestmode
Longtestmode
Stayinpanelpitch
Stayinpanelfont
Stayinpanelpitchandfont
Hexadecimaldump
SwitchCombinationFunctions
Formfeed
PaperParking
Topofform
Forwardmicro-feed
Reversemicro-feed
Clearingthebuffer
1
1
2
2
3
4
4
4
7
8
8
10
11
11
14
14
15
17
17
18
19
19
20
21
21
22
22
22
22
23
25
25
26
26
26
27
27
Page 7
Chapter 3 DIP SWITCH SETTINGS
LocationoftheDIPSwitches
FunctionsoftheDIPSwitches
29
29
30
Chapter 4 PRINTER CONTROL COMMANDS
FontControlCommands
CharacterSetCommands
CharacterSizeandPitchCommands
VerticalPositionCommands
HorizontalPositionCommands
GraphicsCommands
DownloadCharacterCommands
OtherPrinterControlCommands
Chapter 5 DOWNLOAD CHARACTERS
DesigningYourOwnDraftCharacters
Definingtheattributedata
Assigningthechamcterdata
Sampleprogram
DefiningYourOwnNLQCharacters
Chapter 6 MS-DOSANDYOUR PRINTER
InstallingApplicationSoftwarewithYourPrinter
EmbeddingPrinterCommands
ProgrammingthePrinterwithDOSCommands
ProgrammingwithBASIC
Howtheprogramworks
Chapter 7 TROUBLESHOOTING ANDMAINTENANCE
Troubleshooting
Powersupply
Printing
Paperfeeding
Maintenance
ReplacingthePrintHead
33
34
39
41
47
53
58
61
65
69
69
70
72
72
74
77
77
78
80
82
86
89
89
90
90
92
95
95
Page 8
.
Chapter 8 SPECIFICATIONS
Chapter 9 CHARACTER SETS
StandardCharacterSet
InternationalCharacterSets
IBMCharacter
Set #2
IBMCharacterSet#1
IBM Special Character Set
INDEX
COMMANDSUMMARY
99
103
104
106
107
109
110
113
116
Page 9
chapter 1
SETTING UP THE PRINTER
Subjects covered in Chapter 1 include—
●
Locatingtheprinter
●
Unpackingandinspection(namesof parts)
✎
Settingup and connection
✎
Loadingsinglesheets
●
Loadingandparkingfanfoldforms
✘
Adjustingtheprintinggap
LOCATING THE PRINTER
Beforeyoustartunpackingandsettingup yourprinter,makesurethatyou
haveasuitableplaceonwhichtolocateit. By“asuitableplace”,wemean:
.
A firm, levelsurfacewhichisfairlyvibration-free
●
Awayfromexcessiveheat(suchas directsunlight,heaters,etc)
●
Awayfrom excessivehumidity
●
Awayfrom excessivedust
●
Supplyitwith“clean”electricity.Donotconnectittothesamecircuitas
a large,noise-producingappliancesuchas a refrigerator.
●
Make sure the line voltage is the voltage specified on the printer’s
identificationplate.
●
To discomect theprintertheplughasto be disconnectedfromthe wall
socket,whichhas to be locatedcloseto theprinter,andeasyto access.
●
Installthe printerwhere themis sufficientroomfor the paper and any
paperbeingfedin or printedout.
●
Ifyouareconnectingyourprinterwithaparallelcable,makesurethatthe
cableis within2m{6-fi)of theprinter.AnRS-232connectionusingthe
optionalSPC-8Kinterfacecan be madeoverlongerdistances.
Page 10
I
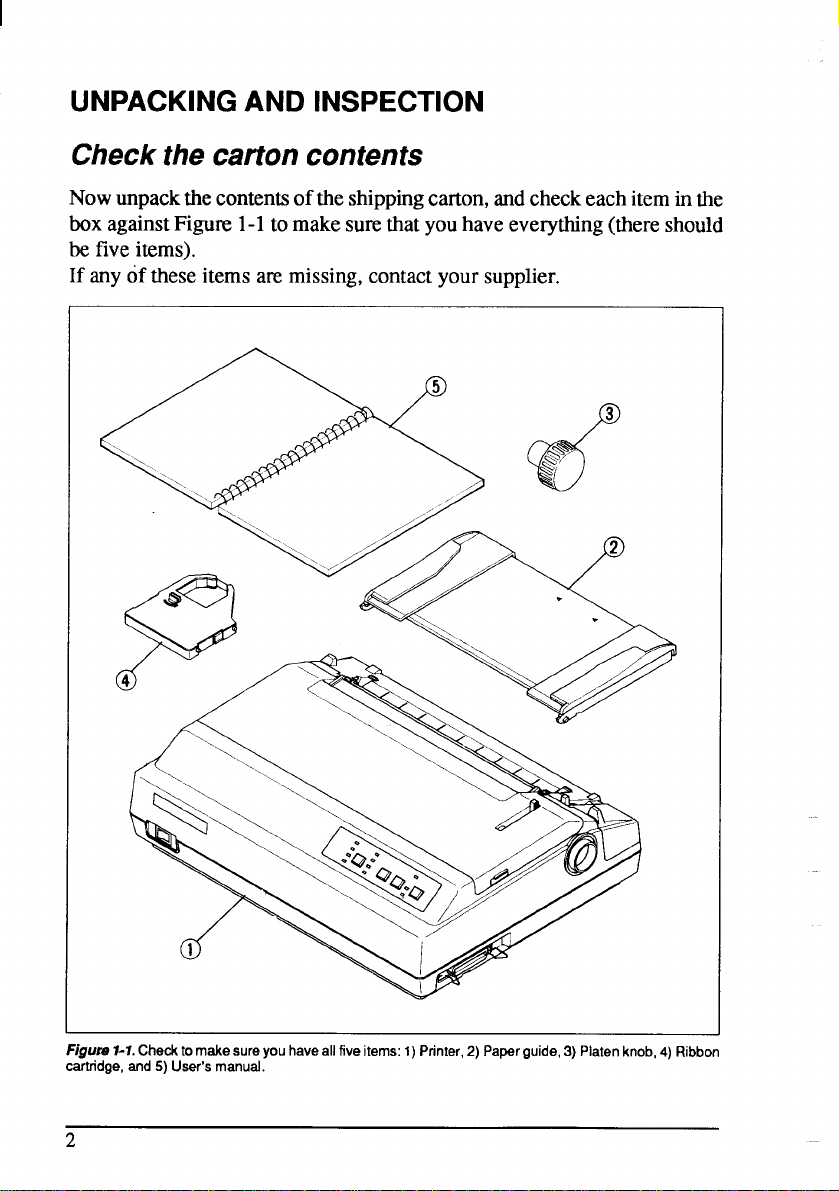
UNPACKINGAND INSPECTION
Checkthecartoncontents
Nowunpackthecontentsoftheshippingcarton,andcheckeachiteminthe
boxagainstFigwe 1-1tomakesurethatyouhaveeverything(thereshould
befiveitems).
If anyof theseitemsaremissing,contactyoursupplier.
Figure 1-1.Checktomake sure you have all five items: 1) Printer, 2) Paper guide, 3) Platen knob, 4) Ribbon
cartridge, and 5) User’s manual.
2
Page 11
The optionalaccessorieswhichyoumayhaveorderedwithyourprinterare:
● Serial-Parallelconverter(SPC-8K)
● Automaticsheetfeeder(SF-1ODR)
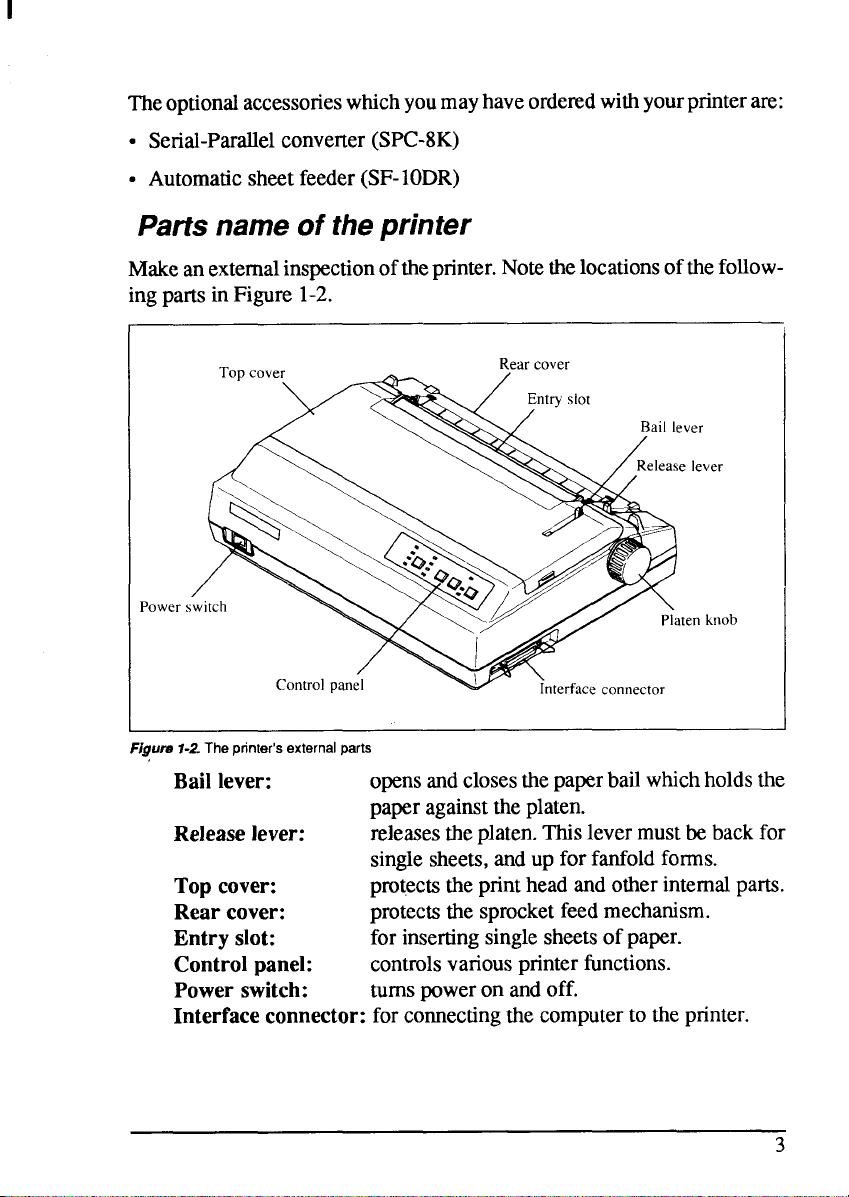
Partsnameof theprinter
Makeanexternalinspectionoftheprinter.Notethelocationsofthefollowingparts in Figure 1-2.
ver
Power
s
Control panil
knob
Figut@1-2 The printer’s external parts
Bail lever:
opensandclosesthepaperbailwhichholdsthe
paperagainsttheplaten.
Releaselever:
releasestheplaten.Thislevermustbe backfor
single sheets,andup forfanfoldforms.
Top cover:
Rear cover:
Entry slot:
protectstheprinthead andotherinternalparts.
protectsthe sprocketfeedmechanism.
for insertingsinglesheetsof paper.
Control panel: controlsvariousprinterfunctions.
Power switch:
turnspoweronandoff.
Interface connector: for connectingthecomputerto the printer.
Page 12
SETIWJGUP
Placethe printerin the desiredlocation,and removeall packingmaterial
from insidethe top cover. This packingmaterialis intendedto prevent
damagetotheprinterwhileintransit.Youwillwanttokeepallthepacking
material,alongwiththeprintercarton,incaseyouhavetomovetheprinter
to anewlocation.
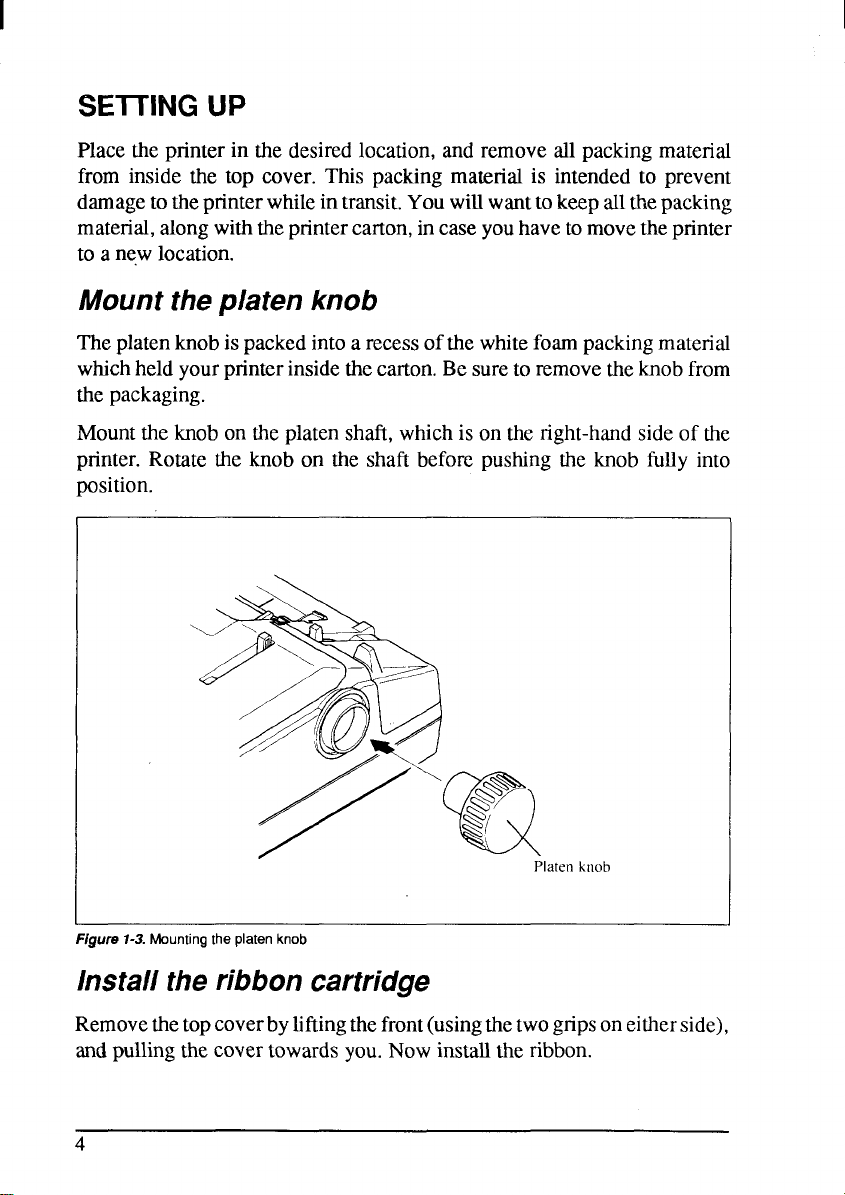
Mounttheplatenknob
Theplatenknobispackedintoa recessofthewhitefoampackingmaterial
whichheldyourprinterinsidethecarton.Be suretoremovetheknobfrom
thepackaging.
Mountthe knobon theplatenshaft,whichis on theright-handsideof the
printer.Rotate the knob on the shaft before pushingthe knob fully into
position.
~
.
Figure 1-3.Mounting the platen knob
Platen knob
lnsta//theribboncartridge
Removethetopcoverbyliftingthefront(usingthetwogripsoneitherside),
andpullingthe covertowardsyou.Nowinstalltheribbon.
4
Page 13
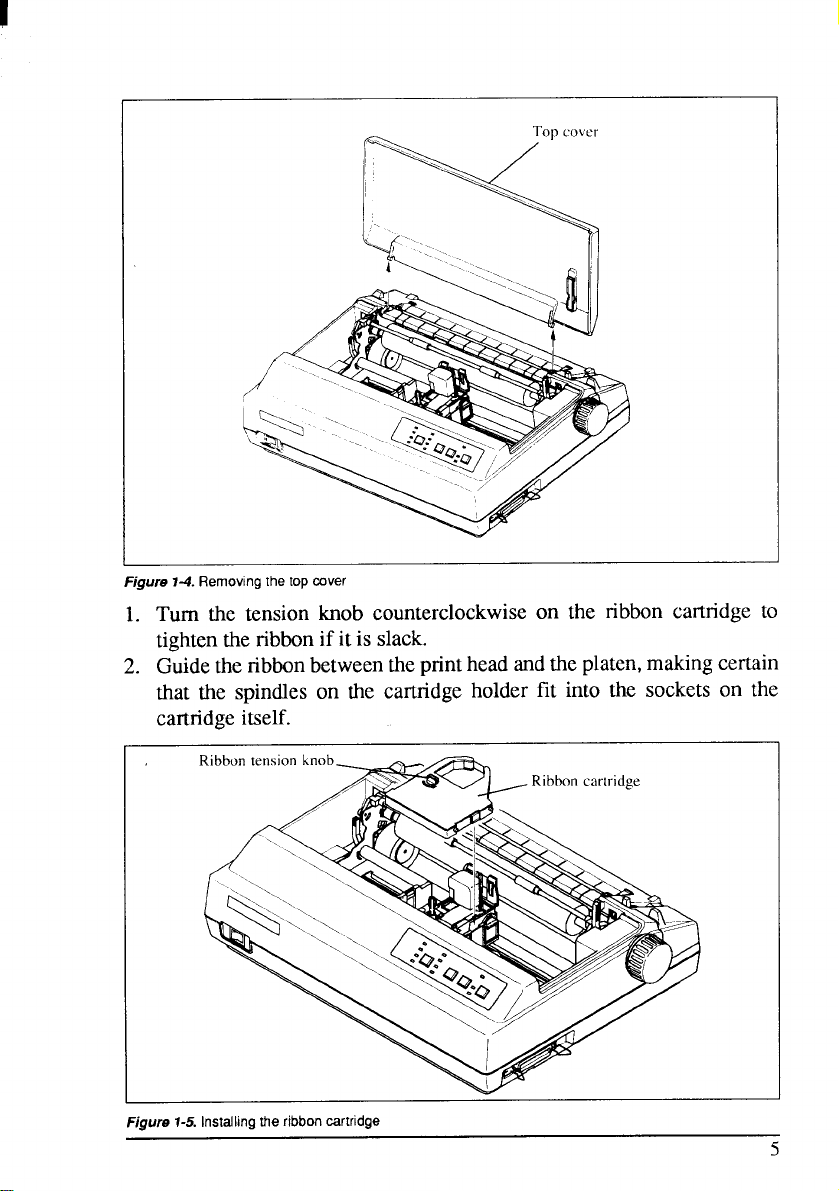
Figure 1-4. Removing the lop cover
1. Turn the tension knob counterclockwiseon the ribbon cartridge to
tightenthe ribbonif it is slack.
2. Guidetheribbonbetweentheprintheadandthe platen,makingcertain
that the spindleson the cartridgeholder fit into the socketson the
cartridgeitself.
Figure 1-5.Installing the ribbon cartridge
Page 14
I
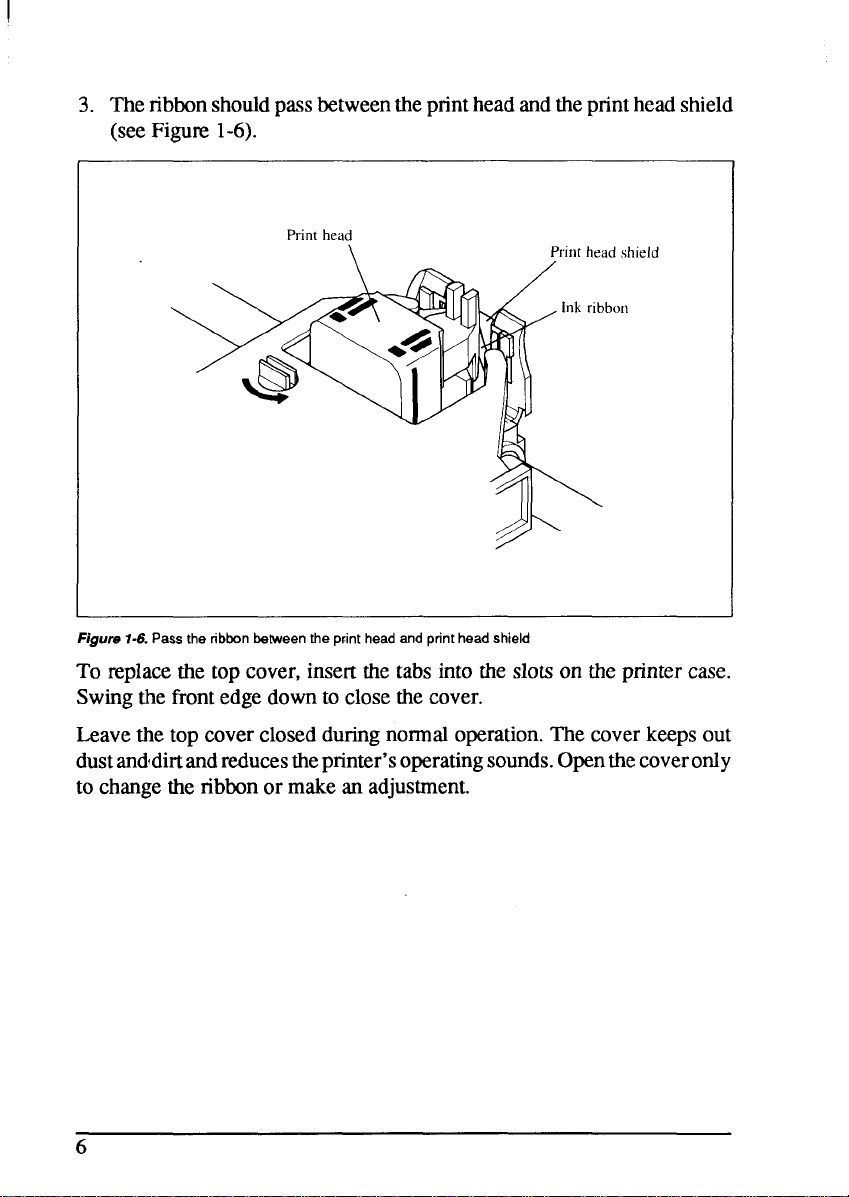
3. Theribbonshouldpassbetweentheprintheadandtheprinthead shield
(seeFigure 1-6).
Print head
I
\
Print head shield
‘ h~,.kribbo.
I
Figure 1-6. Pass the ribbon between the print head and print haad shield
To replacethetopcover,insertthe tabs into the slotson the printercase.
Swingthefrontedgedownto closethecover.
Leavethetop coverclosedduringnormaloperation.Thecoverkeepsout
dustanddirtandreducestheprinter’soperatingsounds.Openthecoveronly
to change the ribbonor makean adjustment.
@J\
IIL
6
Page 15
Connection
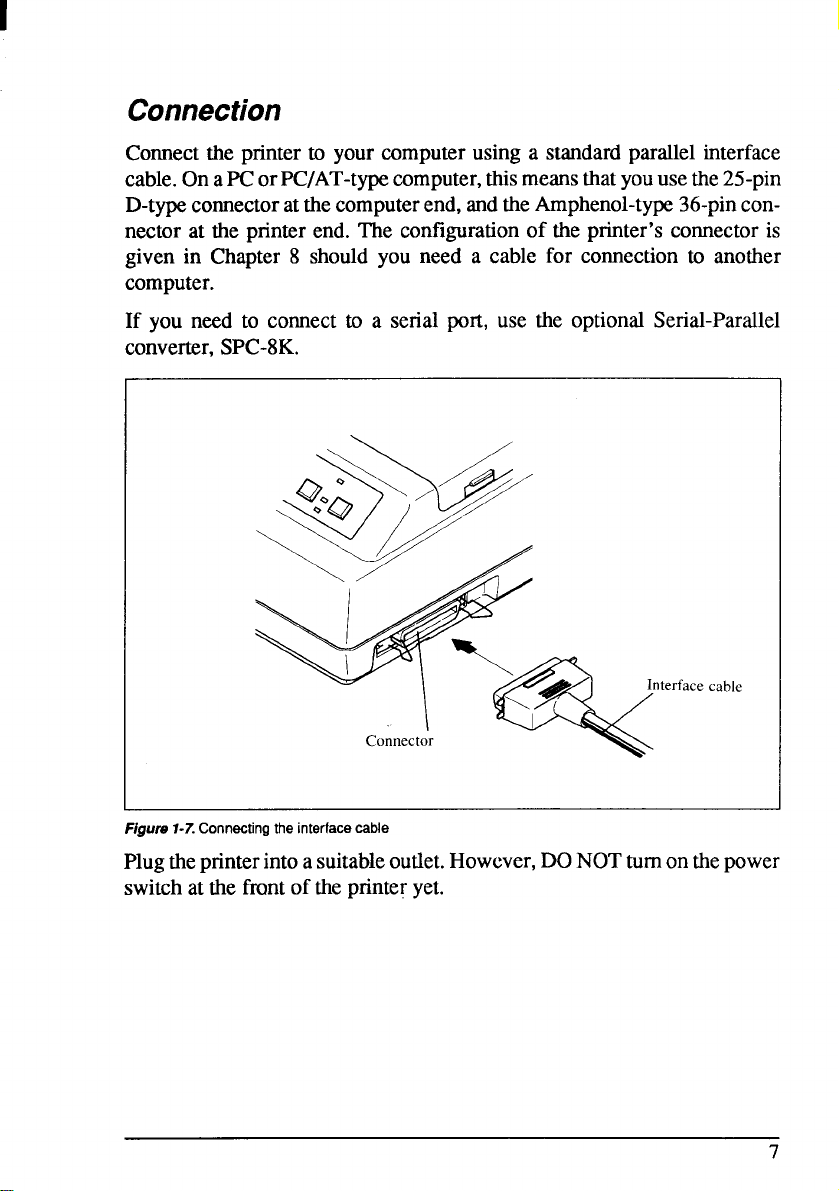
Connecttheprinter to yourcomputerusing a standardparallel interface
cable.OnaPCorPC/AT-typecomputer,thismeansthatyouusethe25-pin
D-typeconnectoratthecomputerend,andtheAmphenol-type36-pinconnector at the printer end. The configurationof the printer’sconnectoris
given in Chapter 8 should you need a cable for connectionto another
computer.
If you need to connectto a serial port, use the optional Serial-Parallel
converter,SPC-8K.
’06’
\!j$”
&
I
,/
Interface
cable
Connector
Figure 1-7.Connecting the interface cable
Plugtheprinterintoasuitableoutlet.However,DONOTturnonthepower
switchatthefrontoftheprinteryet.
*
7
Page 16
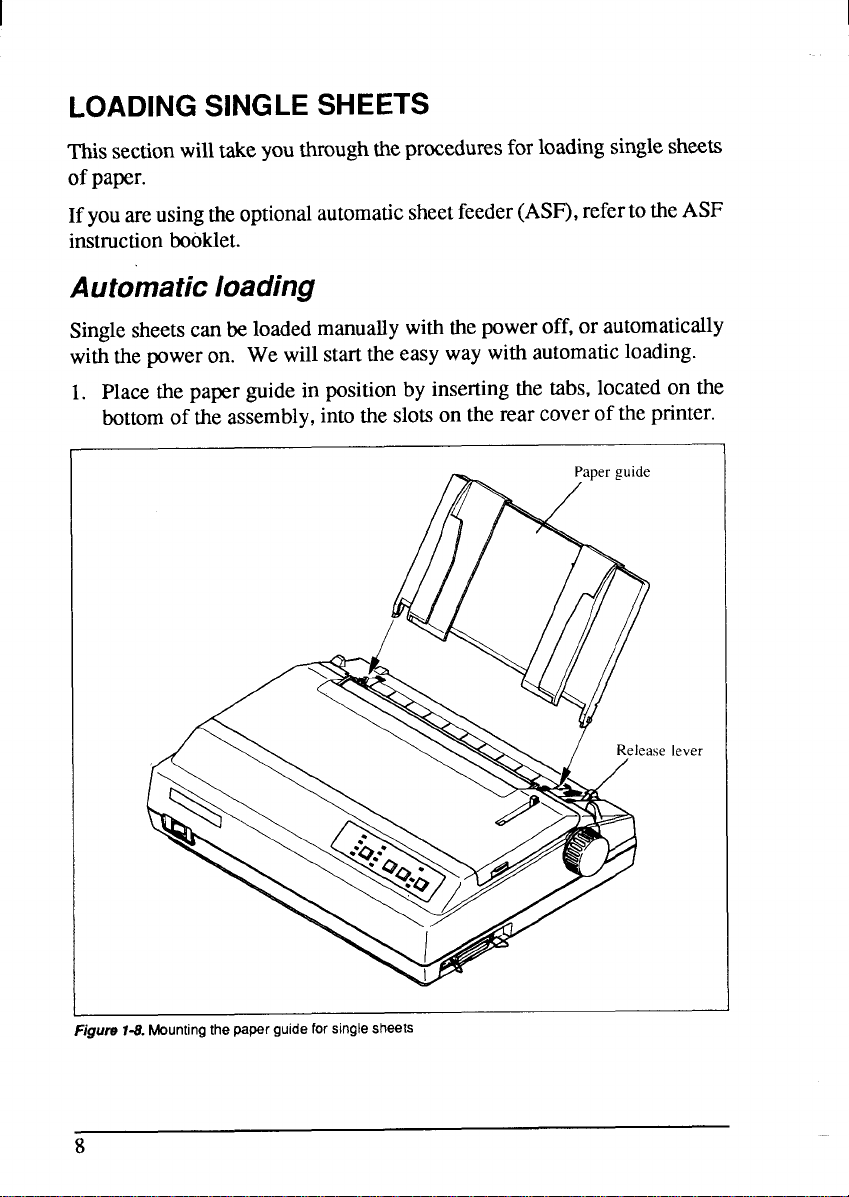
LOADING SINGLE SHEETS
sectionwilltakeyouthroughtheproceduresforloadingsinglesheets
This
ofpaper.
Ifyouareusingtheoptionalautomaticsheetfeeder(AN?),refertotheASF
instructionbooklet.
Automaticloading
Singlesheetscanbeloadedmanuallywiththepoweroff,or automatically
withthepoweron. Wewillstarttheeasy way withautomaticloading.
1. Placethe paperguidein positionby insertingthe tabs, locatedon the
bottomof the assembly,intotheslotsontherearcoverof theprinter.
Figure T-8.Mounting the paper guide for single sheets
8
lever
Page 17
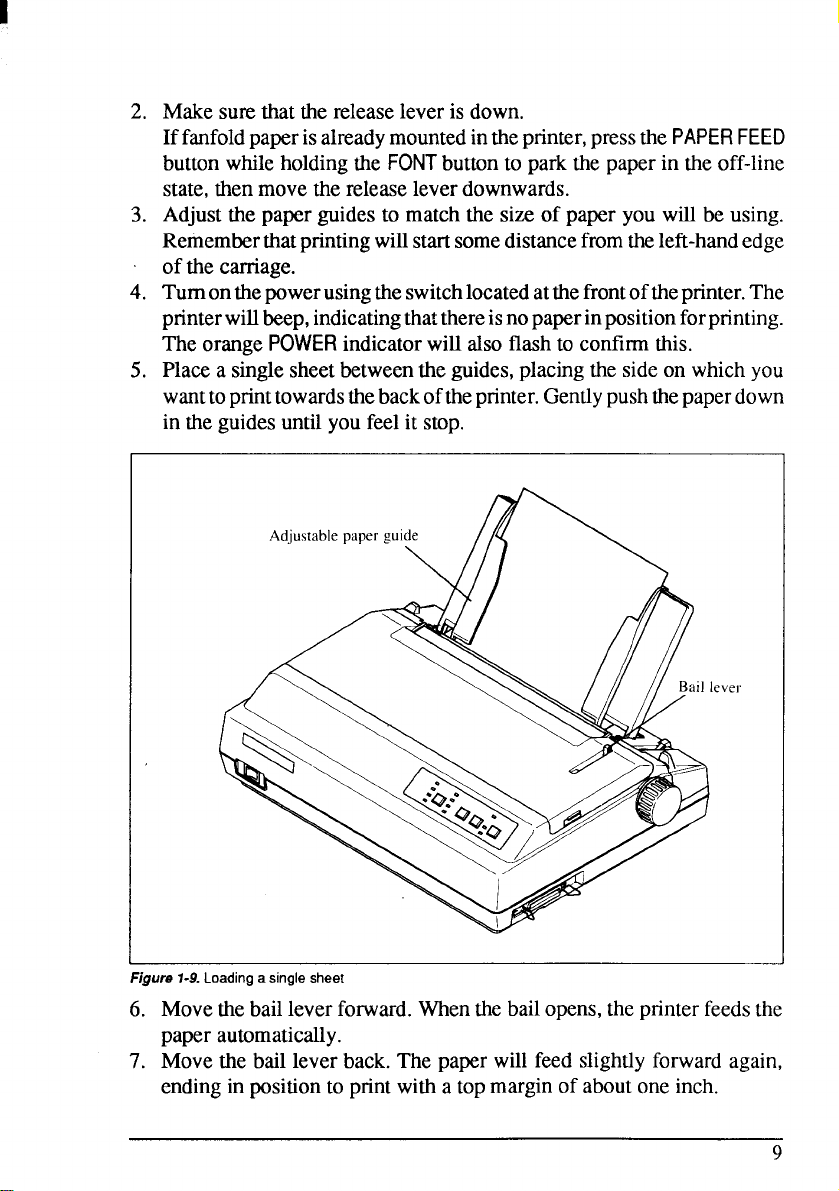
Makesurethatthe releaseleveris down.
2.
Iffanfoldpaperisalreadymountedintheprinter,pressthe
PAPER FEED
buttonwhileholdingthe FONTbuttonto parkthe paperin the off-line
state,thenmovethereleaseleverdownwards.
Adjustthepaperguidesto matchthe size of paperyou will be using.
3.
Rememberthatprintingwillstartsomedistancefromtheleft-handedge
ofthe carriage.
Turnonthepowerusingtheswitchlocatedatthefrontoftheprinter.The
4.
pnnterwillbeep,indicatingthatthereisnopaperinpositionforpnnting.
Theorange
Placea singlesheetbetweentheguides,placingthe sideon whichyou
5.
POWERindicatorwillalsoflashto confirmthis.
wanttoprinttowardsthebackoftheprinter.Gentlypushthepaperdown
in theguidesuntilyoufeelit stop.
I
Figure 7-9. Loading a single sheet
6. Movethebailleverforward.Whenthebailopens,theprinterfeedsthe
paperautomatically.
7. Movethe bail leverback.The paperwill feed slightlyforwardagain,
endinginpositionto printwitha topmarginof aboutoneinch.
9
Page 18
I
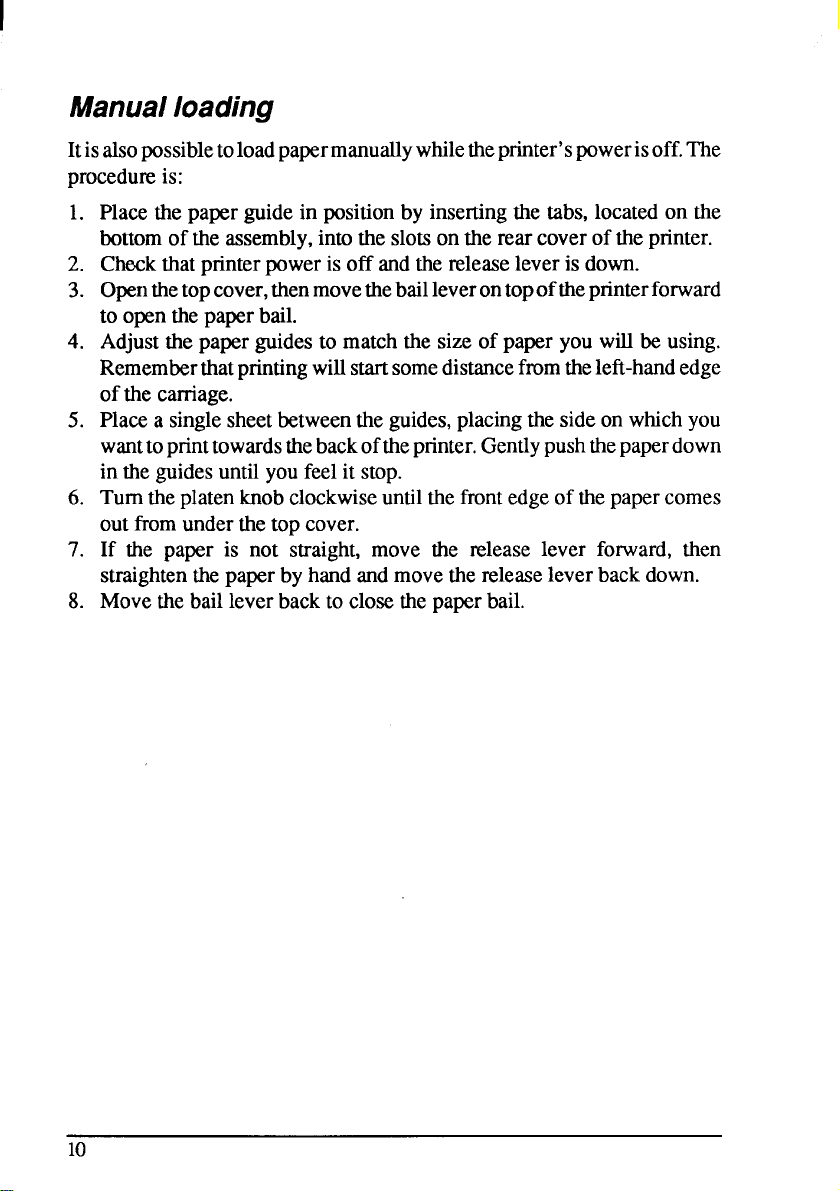
Manualloading
Itisalsopossibletoloadpapermanuallywhiletheprinter’spowerisoff.The
procedureis:
Placethe paper guidein positionby insertingthe tabs, locatedon the
1.
bottomof theassembly,intothe slotsontherearcoverof the printer.
2.
Checkthatprinterpowerisoff andthereleaseleverisdown.
Openthetopcover,thenmovethebailleverontopof theprinterfonvard
3.
to openthepaperbail.
Adjustthepaper guidesto matchthe size of paperyou willbe using.
4.
Rememberthatprintingwillstartsomedistancefromtheleft-handedge
ofthe carriage.
Placea singlesheetbetweentheguides,placingthesideon whichyou
5.
wanttoprinttowardsthebackoftheprinter.Gentlypushthepaperdown
in theguidesuntilyou feelit stop.
Turntheplatenknobclockwiseuntilthefrontedgeofthepapercomes
6.
outfromunderthetopcover.
If the paper is not straight, move the release lever forward, then
7.
straightenthepaperby handandmovethereleaseleverbackdown.
Movethebailleverbackto closethepaperbail.
8.
10
Page 19
LOADING AND PARKING FANFOLD FORMS
Fanfold forms have holes along the sides and perforationsbetween the
sheets.Theyare also calledsprocketforms,punchedforms, or just plain
“computerpaper”.Thisprinteracceptsformsupto 10”wide.Thissection
willtake you throughtheproceduresfor loading,parkingand unparking
fanfoldforms.
Loadingthepaper
Placea stackoffanfoldpaperbehindandatleastonepage-lengthbelow
1.
theprinter.
Turnthe printer’spowerOFF.
2.
Pushthereleaseleverforward.Thishastheeffectofreleasingthepaper
3.
fromtheplatenroller,andengagingthetractorfeed.
Removethepaperguideandputit asideforthe moment.
4.
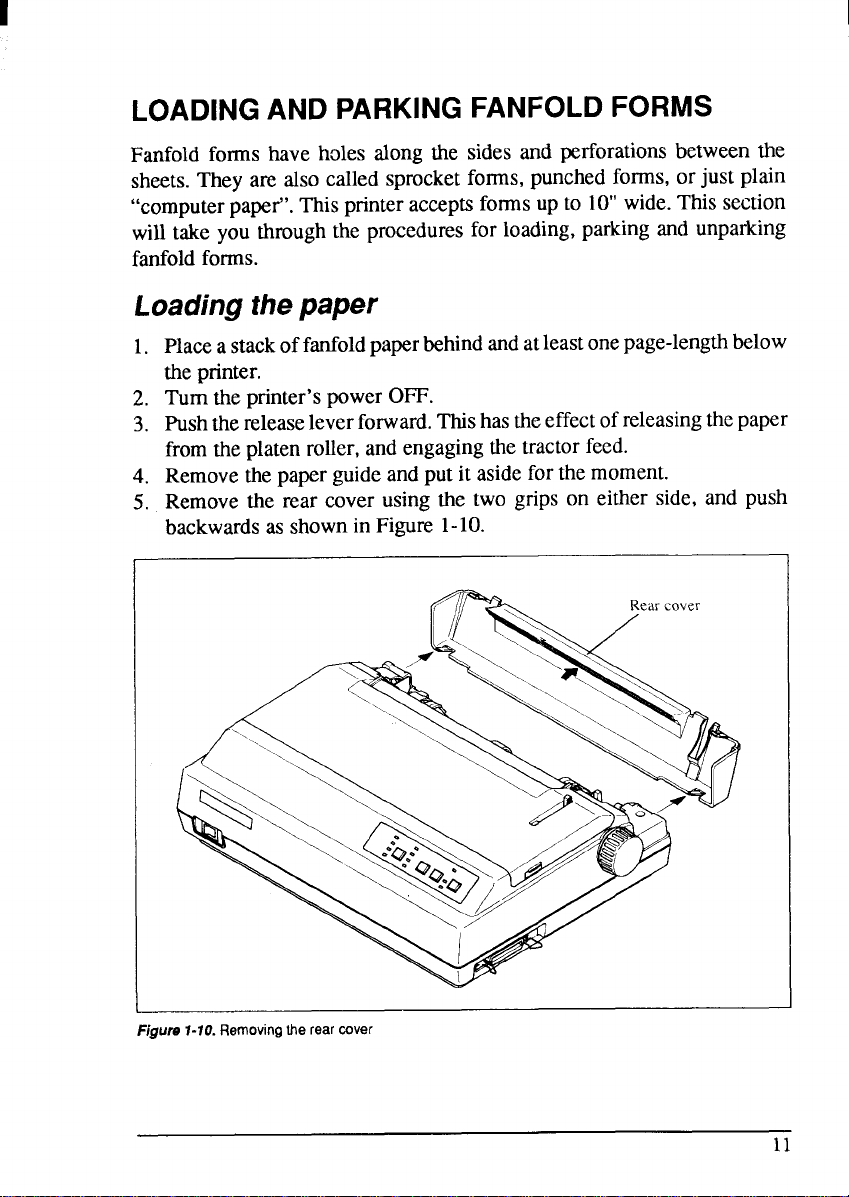
Removethe rear cover using the two grips on either side, and push
5.
backwardsasshowninFigure1-10.
Rear cover
I
Figure 1-10.Removingtherearcover
Page 20
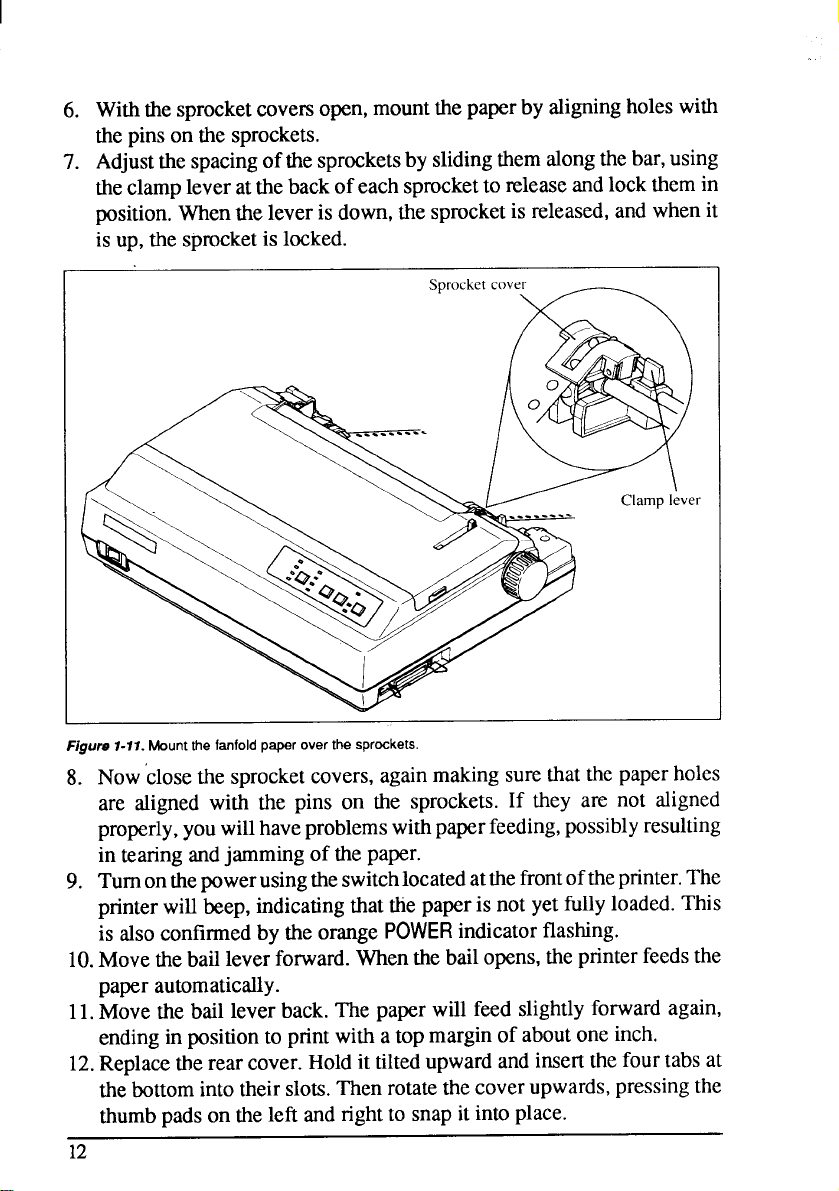
Withthesprocketcoversopen,mountthepaperbyaligningholeswith
6.
thepinson the sprockets.
Adjustthespacingofthesprocketsbyslidingthemalongthebar,using
7.
theclampleveratthebackofeachsprockettoreleaseandlockthemin
position.Whentheleveris down,thesprocketis released,and whenit
is up,the sprocketis locked.
I
Figuru 7-11. Mount the fanfold psper over the sprockets.
Nowclosethe sprocketcovers,againmakingsurethatthepaperholes
8.
are aligned with the pins on the sprockets.If they are not aligned
properly,youwillhaveproblemswithpaperfeeding,possiblyresulting
in tearingandjammingof thepaper.
Turnonthepowerusingtheswitchlocatedatthefrontoftheprinter.The
9.
printerwill‘beep,indicatingthatttiepaperis not yetfullyloaded.This
is alsoconfirmedby the orange
POWERindicatorflashing.
10.Movethebailleverforward.Whenthebailopens,theprinterfeedsthe
paperautomatically.
11.Movethe bail leverback.The paperwill feed slightlyforward again,
endingin positionto printwith a top marginof aboutoneinch.
12.Replacetherearcover.Holdit tiltedupwardandinsertthefourtabsat
thebottomintotheirslots.Thenrotatethe coverupwards,pressingthe
thumbpadsonthe left andrightto snapitintoplace.
12
Page 21
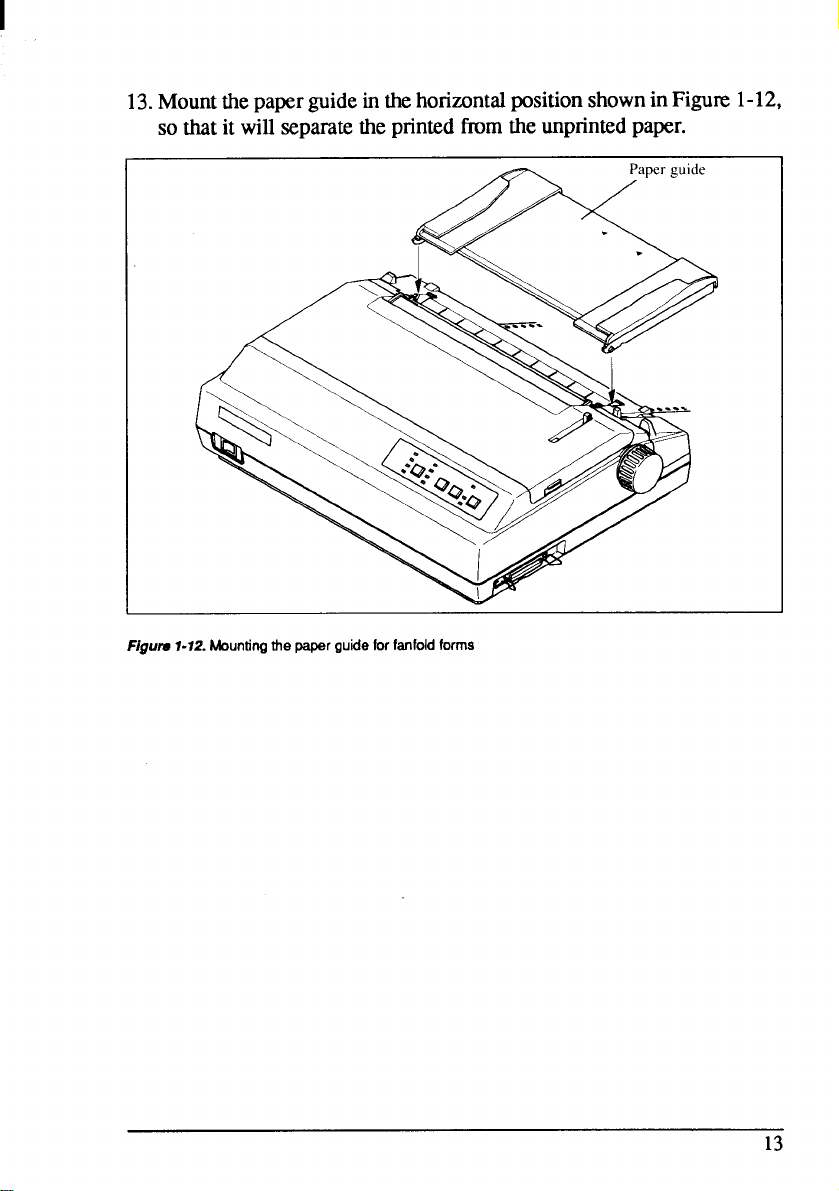
13.Mountthepaperguidein thehorizontalpositionshownin Figure1-12,
so thatit will separatetheprintedfromtheunprintedpaper.
F/gufo 1-12. Mountingthepaperguide for fanfold forms
13
Page 22
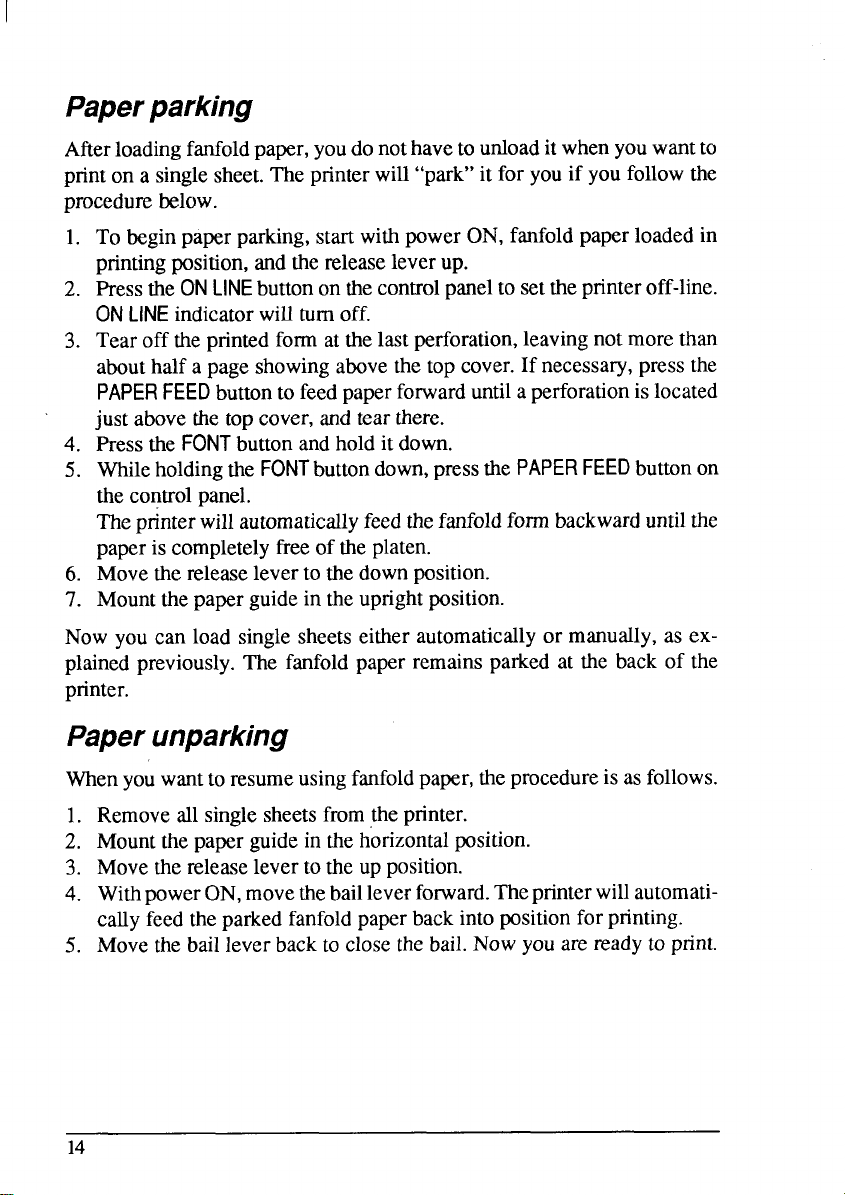
Paperparking
Afterloadingfanfoldpaper,youdo nothavetounloadit whenyouwantto
printon a singlesheet.Theprinterwill“park”it for you if youfollowthe
procedurebelow.
1. To beginpaperparking,startwithpowerON,fanfoldpaperloadedin
printingposition,andthe releaseleverup.
2. Pressthe ON
LINEindicatorwillturnoff.
ON
3. Tear off the printedformatthelast perforation,leavingnotmorethan
abouthalf a pageshowingabovethetopcover.Ifnecessary,pressthe
PAPER FEED buttonto feedpaperforwarduntilaperforationislocated
just above the topcover,andtearthere.
4. Pressthe
5. WhileholdingtheFONTbuttondown,pressthe
thecontrolpanel.
Theprinterwillautomaticallyfeedthefanfoldformbackwarduntilthe
paperiscompletelyfreeof theplaten.
6. Movethereleaseleverto thedownposition.
7. Mountthepaperguidein theuprightposition.
Now you can load singlesheetseither automaticallyor manually,as explainedpreviously.The fanfoldpaper remainsparkedat the back of the
printer.
LINEbuttononthecontrolpaneltosettheprinteroff-line.
FONT buttonandholdit down.
PAPER FEED buttonon
Paperunparking
Whenyouwanttoresumeusingfanfoldpaper,theprocedureisas follows.
1. Removeallsinglesheetsfromtheprinter.
2. Mountthepaperguide in thehorizontalposition.
3. Movethe releaseleverto the up position.
4. WithPowerON,movethebailleverforward.Thepnnterwill automaticallyfeedthe parkedfanfoldpaperbackintopositionfor printing.
5. Move the bailleverbackto closethebail.Nowyouarereadytoprint.
14
Page 23
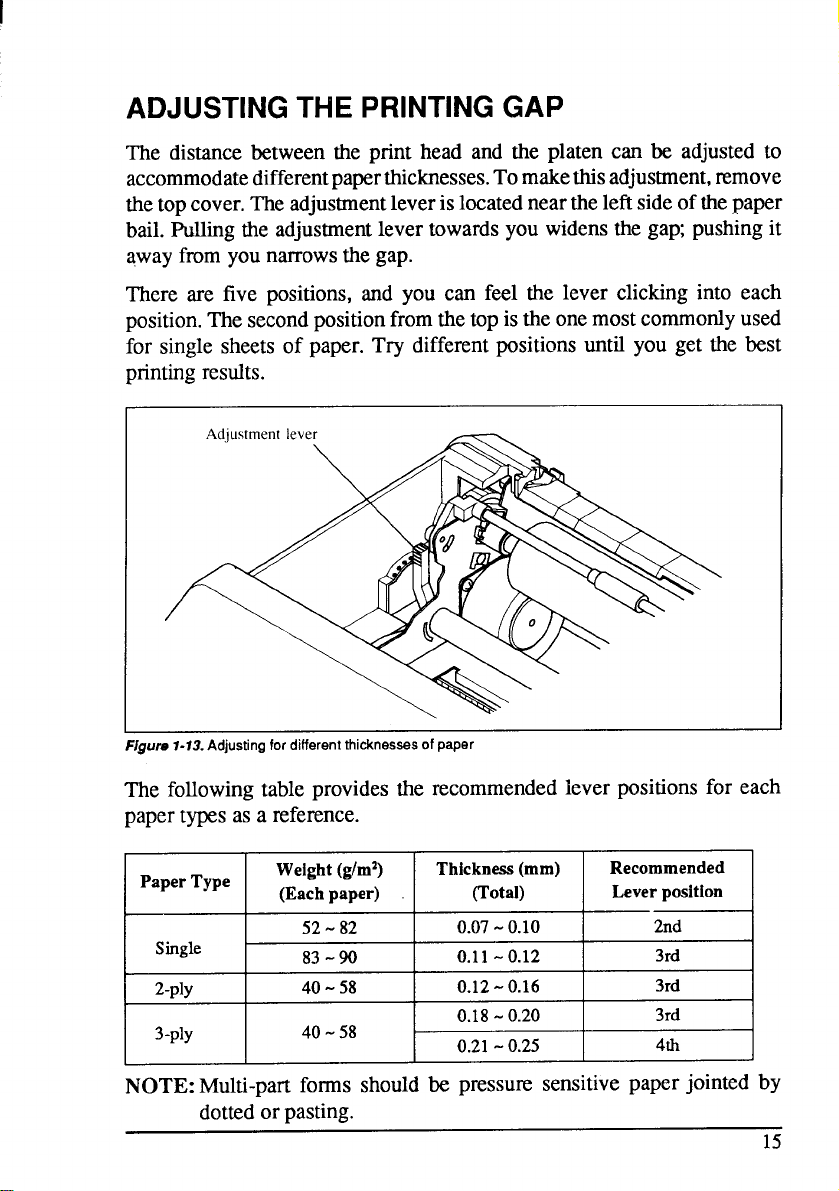
ADJUSTING THE PRINTING GAP
The distancebetween the print head and the platen can be adjustedto
accommodatedifferentpaperthicknesses.Tomakethisadjustment,remove
thetopcover.The adjustmentleverislocatedneartheleftsideofthepaper
bail.Fullingthe adjustmentlevertowardsyouwidensthegap; pushingit
awayfromyounarrowsthe gap.
There are five positions,and you can feel the lever clickinginto each
position.Thesecondpositionfromthetop istheonemostcommonlyused
for single sheets of paper.Try differentpositionsuntil you get the best
printingresults.
FJgure7-73.Adjusting for different thicknesses of paper
The followingtable providesthe recommendedleverpositionsfor each
papertypesas a reference.
PaperType
Single
2-ply
3-ply
Weight(g/mz) Thickness(mm) Recommended
(Eachpaper)
52-82
83-90
40-58
40-58
(Total)
0.07-0.10 2nd
0.11-0.12 3rd
0.12-0.16
0.18-0.20 3rd
0.21-0.25
Leverposition
3rd
4th
NOTE: Multi-partforms should be pressure sensitivepaper jointed by
dottedorpasting.
15
Page 24
16
Page 25
chapter2
CONTROL PANEL OPERATIONS
Thecontrolpanelbuttonscanbepressedindividuallytoperformtheoperationsindicatedbytheirnames.Otherfunctionscanbe achievedbyholding
thesebuttonsdownwhenyouturntheprinter’spoweron,orbypressingthe
controlpanelbuttonsin combination.
Thischapterexplainsallthebuttonandindicatorfunctions.
●
Pauseprinting
●
Feedpaper(fast andslow,forwardand reverse)
✎
Parkfanfoldforms
✎
Setthe top-of-formposition
●
Selectthe printpitch
●
Selectafont
✎
Printtestpatterns
✎
Preventsoftwarefromchangingthepanelpitchandfontselections
✎
Printa hexadecimaldump
●
Cleartheprinter’sbuffer
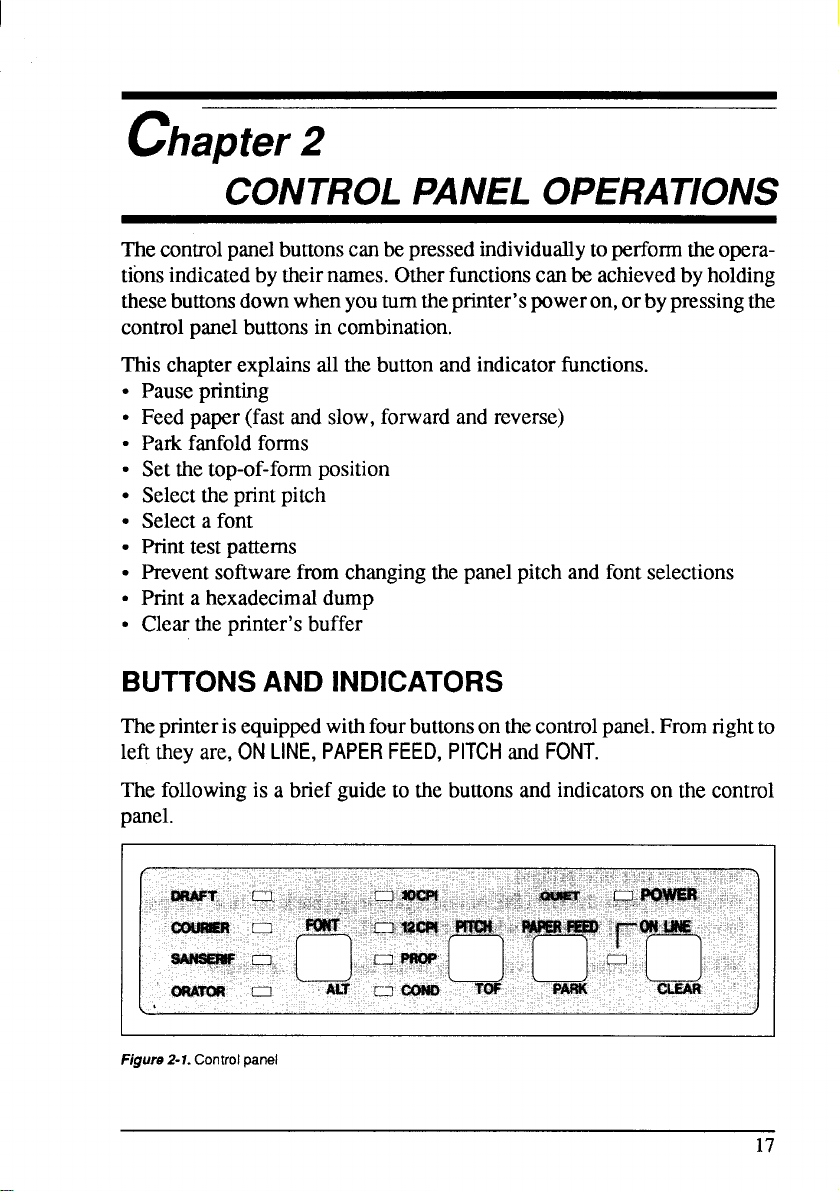
BUTTONS AND INDICATORS
printerisequippedwithfourbuttonsonthecontrolpanel.Fromrightto
The
leftthey are,ON
LINE, PAPER FEED, PITCH and FONT.
followingis a briefguideto thebuttonsand indicatorsonthecontrol
The
panel.
Figure 2-1. Control penel
17
Page 26
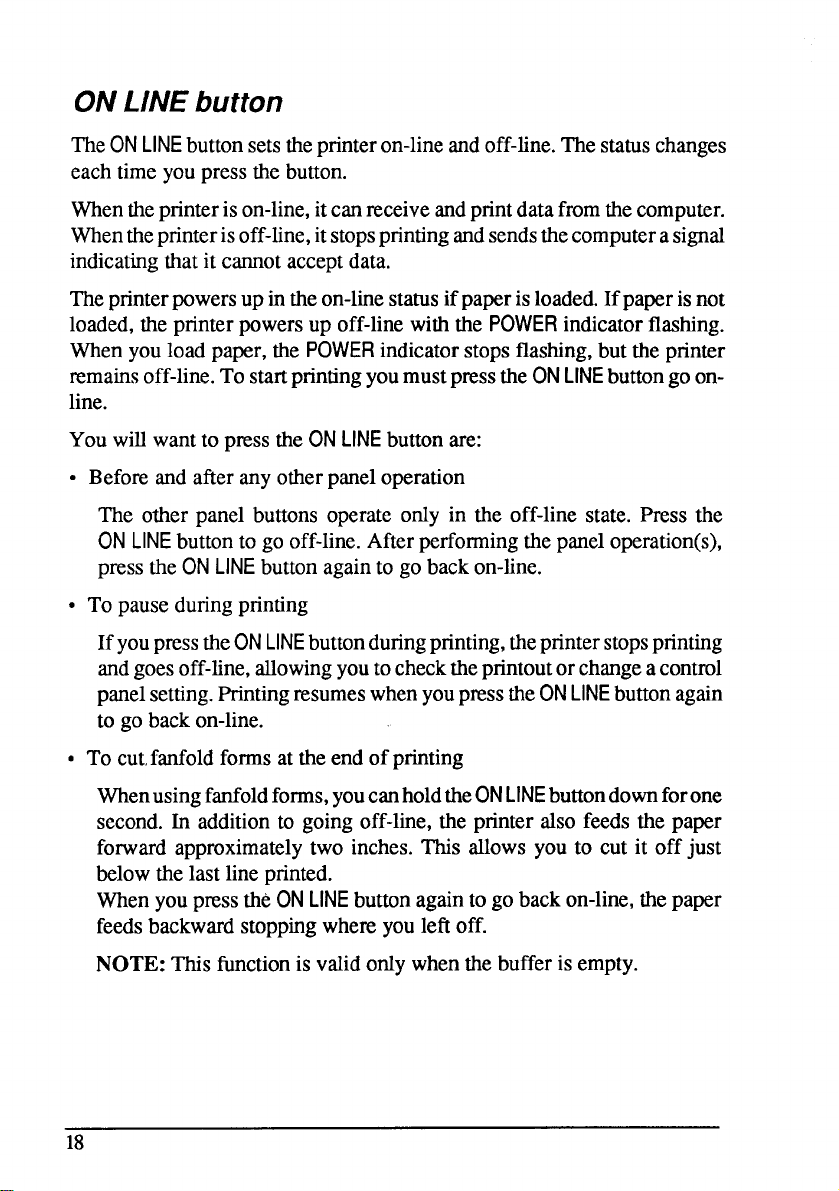
ONL/NEbutton
The ON LINE buttonsetstheprinteron-lineandoff-line.Thestatuschanges
eachtimeyoupressthe button.
Whentheprinterison-line,itcanreceiveandprintdatafromthecomputer.
Whentheprinterisoff-line,itstopsprintingandsendsthecomputerasignal
indicatingthatit cannotacceptdata.
Theprinterpowersup intheon-linestatusifpaperisloaded.Ifpaperisnot
loaded, the printerpowersupoff-linewiththe
Whenyouload paper,the
POWERindicatorstopsflashing,butthe printer
remainsoff-line.TostartprintingyoumustpresstheONLINEbuttongoonline.
POWERindicatorflashing.
Youwill wantto presstheON
● Beforeand afteranyotherpaneloperation
LINEbuttonare:
The other panel buttons operate only in the off-line state. Press the
LINE buttonto go off-line.Afterperformingthepaneloperation(s),
ON
pressthe ON
● To pauseduringprinting
Ifyoupressthe ON
LINE buttonagainto go backon-line.
LINE buttonduringprinting,theprinterstopsprinting
andgoesoff-line,allowingyouto checktheprintoutorchangeacontrol
panelsetting.PrintingresumeswhenyoupresstheON
LINEbuttonagain
to go backon-line.
● To cut,fanfoldformsat the end of printing
Whenusingfanfoldforms,youcanholdtheON
LINE buttondownforone
second.In additionto going off-line,the printeralso feeds the paper
forward approximatelytwo inches.This allows you to cut it off just
belowthelast lineprinted.
WhenyoupresstheONLINEbuttonagainto gobackon-line,thepaper
feedsbackwardstoppingwhereyouleftoff.
NOTE: This functionis validonlywhenthebufferis empty.
18
Page 27
PAPERFEEDbutton
If youpress thisbuttonwhileoff-line,thepaperwillfeedforward.If you
holdthe buttondown,theprinterwillperformconsecutivelinefeeds.
IfyoualsopresstheON
LINEbuttonwhileyouareline-feeding,thepaperwill
feedautomaticallyto thetop of thenextpage.Thisis explainedlater.
If youpressthis buttonwhileon-line,thiswillalternatelyselectandcancel
the Quiet mode. Whenin the Quiet mode, the printer will print slightly
slower,butat a reducednoiselevel.
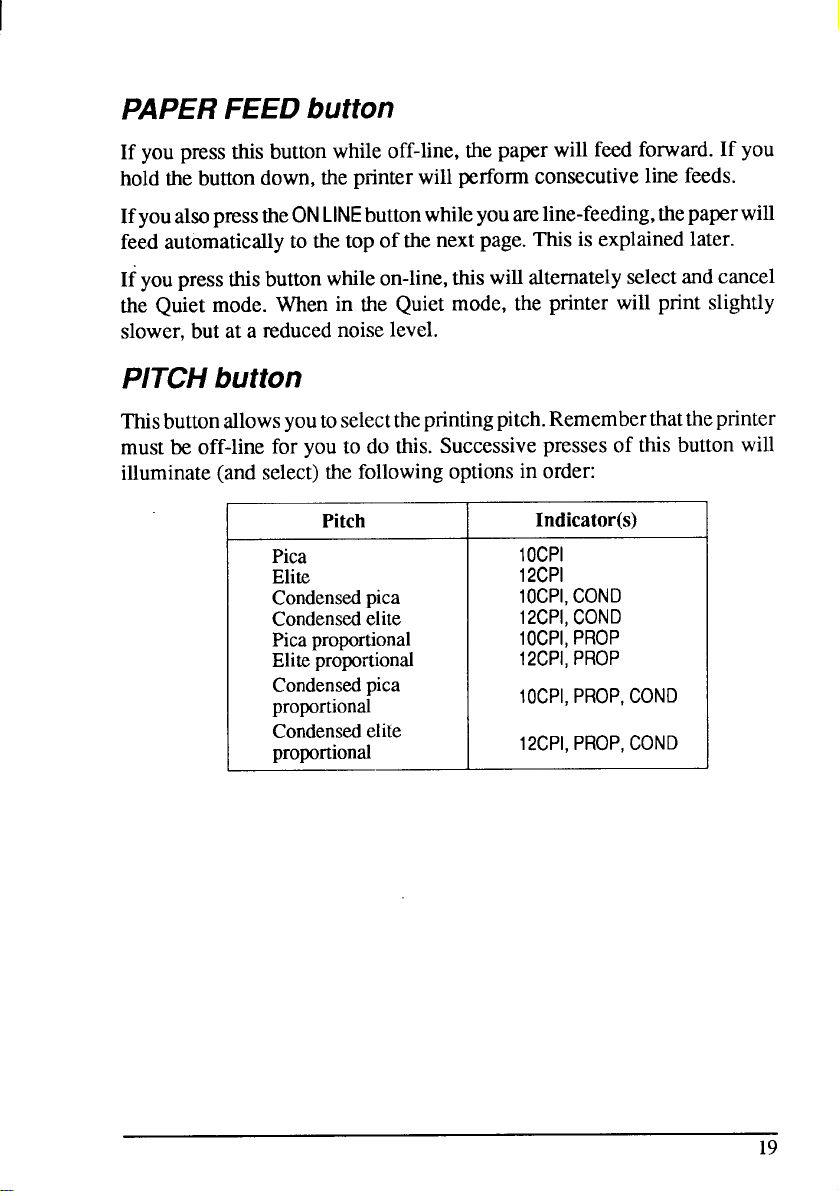
PITCHbutton
Thisbuttonallowsyoutoselecttheprintingpitch.Rememberthattheprinter
mustbe off-linefor you to do this. Successivepressesof this buttonwill
illuminate(andselect)the followingoptionsin order:
Pitch
Pica
Elite
Condensedpica
Condensed elite
Pica proportional
Eliteproportional
Indicator(s)
10CPI
12CPI
10CPI, COND
12CPI, COND
10CPI, PROP
12CPI,
PROP
19
Page 28
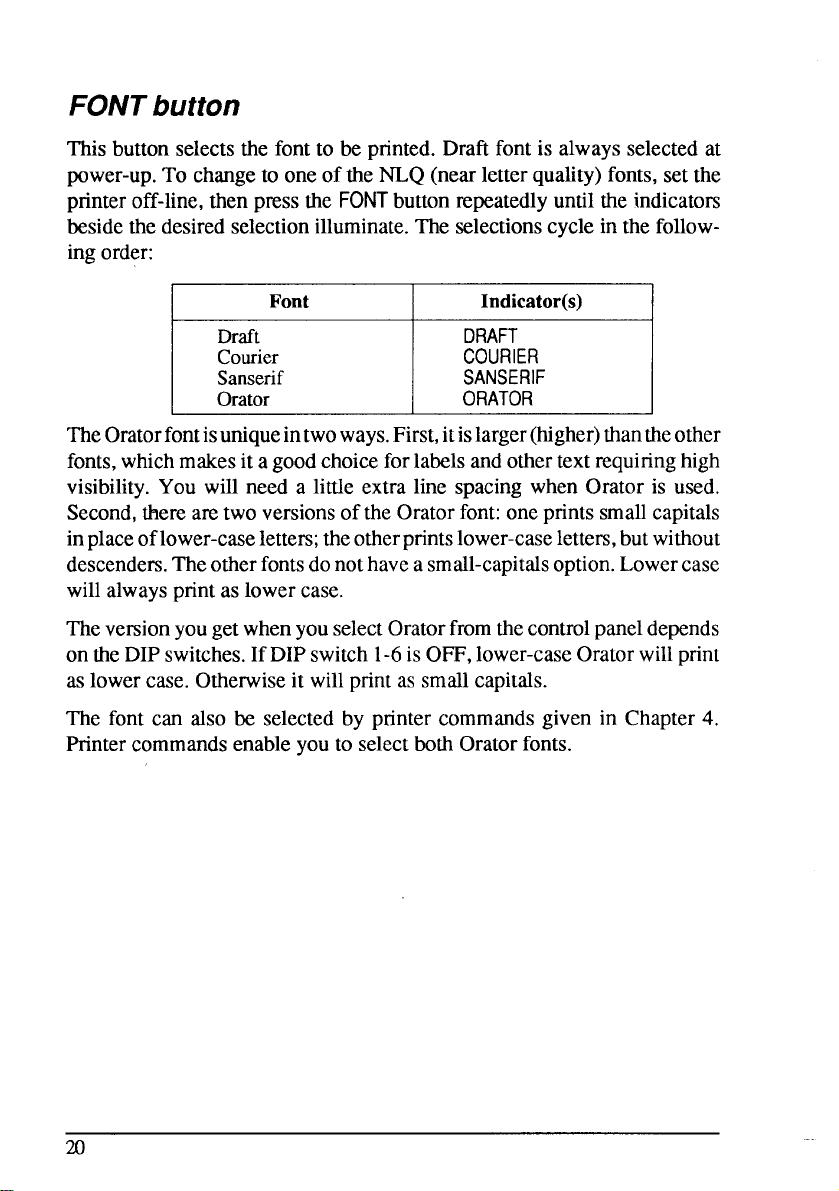
FONTbutton
Thisbuttonselectsthefont to be printed.Draftfont is alwaysselectedat
power-up.To changeto oneof the NLQ (nearletterquality)fonts,set the
printeroff-line,thenpressthe
besidethe desiredselectionilluminate.Theselectionscycleinthe follow-
ingorder:
Font Indicator(s)
FONTbuttonrepeatedlyuntiltheindicators
Draft
Courier
DRAFT
COURIER
Sanserif SANSERIF
Orator
ORATOR
TheOratorfontisuniqueintwoways.First,itislarger(higher)thantheother
fonts,whichmakesitagoodchoiceforlabelsandothertextrequiringhigh
visibility.You will need a little extra line spacingwhen Orator is used.
Second,therearetwoversionsoftheOratorfont:oneprintssmallcapitals
inplaceoflower-caseletters;theotherprintslower-caseletters,butwithout
descenders.Theotherfontsdonothaveasmall-capitalsoption.Lowercase
willalwaysprintaslowercase.
TheversionyougetwhenyouselectOratorfromthecontrolpaneldepends
ontheDIPswitches.IfDIPswitch1-6isOFF,lower-caseOratorwillprint
aslowercase. Otherwiseit willprintas smallcapitals.
The font can also be selectedby printer commandsgiven in Chapter4.
Printercommandsenableyouto selectbothOratorfonts.
20
Page 29
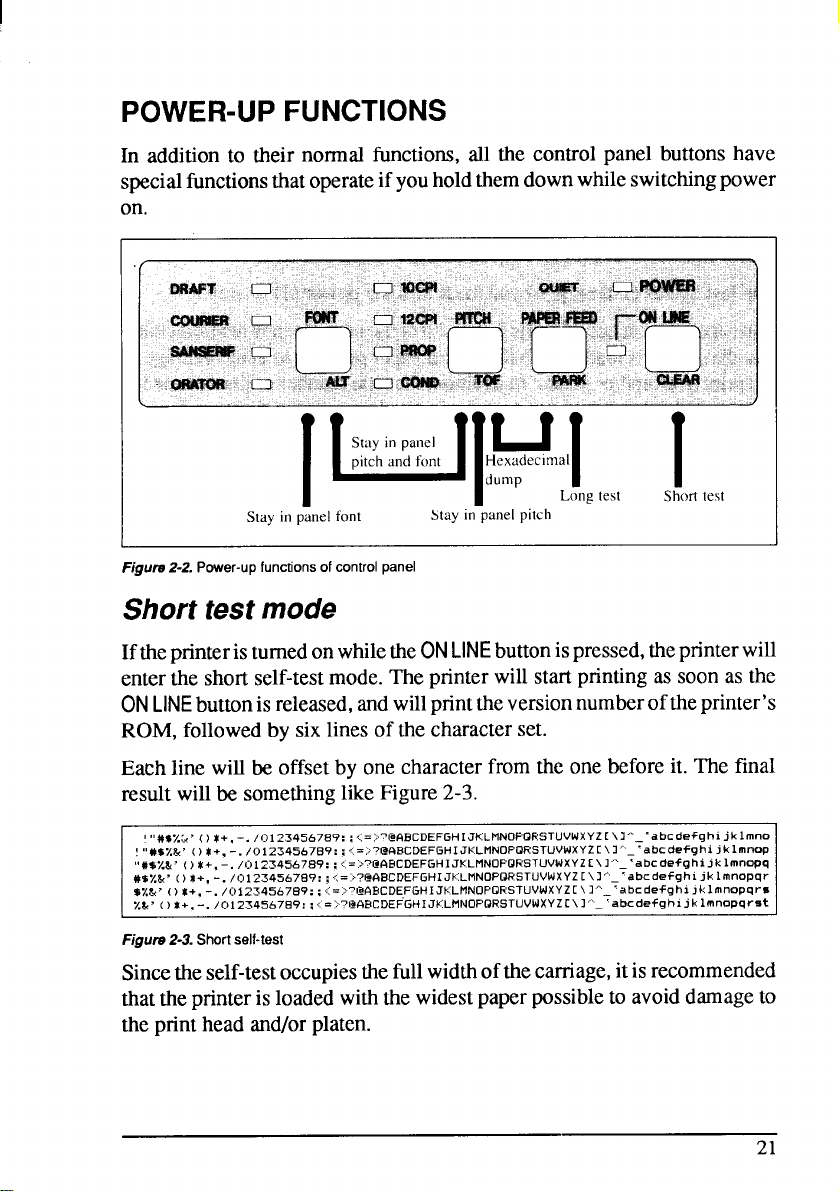
POWER-UP FUNCTIONS
Il:,:;,:a,:,t[lTyj,gJ,,,,,
In additionto their normalfunctions,all the controlpanel buttonshave
specialfunctionsthatoperateifyouholdthemdownwhileswitchingpower
Stay in panel font
Eigum 2-2. Power-up functions of control panel
Stay in panel pitch
Shorttestmode
Ifthe printeristurnedonwhilethe ONLINEbuttonispressed,theprinterwill
entertheshortself-testmode.The printerwillstartprintingassoonas the
LINEbuttonisreleased,andwillprinttheversionnumberoftheprinter’s
ON
ROM,followedby six linesof the characterset.
Eachline willbe offsetby onecharacterfromthe onebeforeit.Thefinal
resultwillbe somethinglikeFigure2-3.
! #’#$%:<’ ( ) *+. -. /01234567!39: : ,::=.,
! ,,~$~~~ ( ) x+, -. /0123456789
C,#$%&’()X+.–.
#$%&’ ( j a+, -. /0123456789:;
$%&’() *+, -.
X&’ ( ) U+. -. /0123456789: : .“-. I-
Figure 2-3. Short self-test
/O1234567S9: : ~.-:. :
/012345678?: ; ::=., _
Sincetheself-testoccupiesthefullwidthofthecarriage,itisrecommended
thattheprinteris loadedwiththe widestpaperpossibletoavoiddamageto
theprinthead and/orplaten.
‘-E!CIBCDEFGHIJKLMNOFIJRSTUVWXYZ[ \1“- ‘abcdefghi jk Imno
: : .:.=:>?QABcDEFGHIJKLMNOFQRSTUVW
- %’ABcDEFGHIJKLMNOF13RSTUVWXYZ t \1’””- ‘abcdefghi Jk lmnoPcl
..=:~?@GBCDEFGHIJ~:LMNoP~sTuvWxYz[ 11“’”-‘abCde@hi jk lmnOPqr
..maABCDEFGHI JKLMNOPQI+STUVWXYZ[\ 1’- ‘a bcdefghi Jklmnopqrs
-.-Ia6BcDEF’6H1 J#:LMNOFQRSTUVWXYZ[\ l”- ‘a bcdefghi J k lmnOPqr-t
xYZ[11“”’-‘abcde+ghi jk lmnOP
Page 30
Longtestmode
IftheprinteristurnedonwhilethePAPERFEEDbuttonispressed,theprinter
willenterthelongself-testmode.Theprinterwillstartprintingassoonas
thePAPERFEEDbuttonisreleased,andwillprinttheversionnumberofthe
printer’sROMandthecurrentsettingsoftheDIPswitches,followedbythe
wholecharactersetprintedineachfontandpitchavailable.
Thetestcyclesendlessly,so youmustturnthe poweroff to stopit.
Sincetheself-testoccupiesthefill widthofthecarnage,itisrecommended
that theprinterisloadedwiththewidestpaperpossibleto avoiddamageto
theprintheadand/orplaten.In addition,thetotalnumberoflinesprintedis
considerable,morethan canbe accommodatedona singlesheet,sofanfold
paperis recommendedforthistest.
Stayinpanelpitch
ByholdingthePITCHbuttondownduringpower-up,theprintpitchcanonly
beselectedfromthecontrolpanel.Thispreventssoftwareinterference.You
willhearan acknowledgingbeepaspowercomeson.
Afterthebeeptone,youcansettheprinteroff-line,selectaprintpitch,then
mtumtoon-lineandstartprinting.Thepitchyouselectedwillnotbe reset
or otherwisechangedby anycommandsyoursoftwaremayissue.
Stayinpanel font
By holdingthe FONTbuttonduringpower-up,fontscan only be selected
fromthe controlpanel.Thispreventssoftwareinterference.Therewillbean
acknowledgingbeep,afterwhichyoucan set the printeroff-line,selecta
font,thenreturntotheon-linestateandstartprinting.Theselectedfontwill
notbe changedby anycommandsyoursoftwaremayissue.
Stayinpanelpitch and font
Ifyouwanttoprotectboththepitchandfontsettingsfromsoftwarechanges,
pressboth the PITCHand
littlelongacknowledgingbeep.
Pressingthesebuttonsduringpower-updoesnotpreventyoufrommaking
anynumberof changeslaterfromthecontrolpanel.
22
FONT buttons duringpower-up.Therewillbe a
Page 31

Hexadecimaldump
This featureis useful for programmed who are debuggingprintingprograms and want to see the actual codes the printer is receiving.(Some
computerschangethe codestheprogrammerintended.)
Inthismode,all datareceivedwill beprintedinahexadecimaldumpformat,
ratherthanthecontrolcodesbeingactedon as commandcodes.
Thismodeis accessedwiththe followingprocedu~:
Whileholdingboth the PAPERFEEDand PITCHbuttonsdown, turn
1.
powerON.Abeeptonewillbeheard.
Startprinting.In place of the usual printoutyou will get a formatted
2.
dumpshowingexactlywhatdatatheprinterreceives.Eachlinepresents
sixteencharactem their hexadecimalcodes to the left and printable
charactersprintedon the right.
At the end of the hexadecimaldump,set the printeroff-line with the
3.
ONLINEbutton.Thisis necessaryto printthelastline.
ThefollowingBASICprogramisa simpletestyoucanruninhexadecimal
mode:
10
FOR 1=0 TO 255
LPRINT
20
30
40
50
NEXT I
LPRINT
END
CHR$(1 ) ;
If your systempasses the codesdirectlyto the printer withoutchanging
them,youwillgeta printoutlikeFigure2-4.
m [:)1(:]203
1[] 11 12 1.3 14 15 16 17
’20 ~~ ~~ p~
31> 31 32 33 34 35 3.5 37
40 41 42 4s 44 45 46 47 48 49 4A 4B 4C 4D 4E 4F
50 51 52 5.3 54 55 36 57
60 01 62 63 64 .55 66 67 68 69 6A 6!3 6C 6D 6E 6F ‘abc de+ghi j k 1mno
70 71 72 73 74 75 76 77
80 .91 S2 S3 84 S5 86 87
90 9 I 72 93 94 95 96 97
M) 01 42 As A4 65 A.5 Q7
EI[:I B 1 E12 B3 E14 B5 Et6 E17
CCI Cl C2 C.3 C4 C5 C6 C.7 C@ C9 CO CB CC CD CE CF
D(I DI D2 D3 D4 D5 D6 D7
E() E 1 E2 E3 E4 E’5 E6 E?
F[l F 1 F2 F3 F4 F5 F6 F7
(:]D (:)(?
Figure 2-4.
04 05 06 07 0!3 09 [:IA Oi3 OC CID OE OF
24 25 26 27
Sample hexadecimal dump
113 19 1A 113 IC ID IE IF
~S 29 ZQ ~B 2C 2D 2E 2F
38 39 30 7B 3C .3D 3E 3F
5S 59 3A 5i3 5C !5D 5E 5F
78 7? 76 7B 7C 7D 7E 7F
8S 89 8.4 8B 8C SD SE SF . . . . . . . . . . . . . . . .
98 99 9A 9S 9C 9D 9E 9F
AS 69 AA (WI AC 6D 9E 6F . . . . . . . . . . . . . . . .
E18 !39 13A !3EI BC EID BE RF . . . . . . . . . . . . . . . .
DE! D9 DA DEI DC DD DE DF
ES E9 EA EH EC ED EE EF
FB F9 FA FEI FC FD FE FF . . . . . . . . . . . . . . . .
. . . . . . . . . . . . . . . .
. . . . . . . . . . . . . . . .
! “#$”/.&’ ( ) *+, -. /
(:11234 !36789 : ; <:=:$?
@9BCDEFGHI JKLMNO
PQRSTUVWXYZ [ \ lo-
pqt. stuvwxyz { : 3-’.
. . . . . . . . . . . . . . . .
. . . . . . . . . . . . . . . .
. . . . . . . . . . . . . . . .
. . . . . . . . . . . . . . . .
. .
23
Page 32

MostBASICS,however,arenotquitethatstraightfonvard.Forexample,the
IBM-PC will giveyou aprintoutsimilarto Figure2-5.
.... . . . ..... . .. .
.... . . .... . . . . ..
! “4+$%!%’( ) x+, -. /
O 123456789: : .::=::.?
@ABCDEFGHIJF::LMNO
PQF:STLIVWXYZ [ \ 1‘“’-
‘ abcde+g h i j l:.1mno
pqh. 5tLlVW>:yZ : : ]+.
.. . . . .... . . . ....
... . . ..... . . . ...
.. . . . .... . . . ....
.. . . . . .... . . .. ..
.. . . . ..... . . ....
... . . . ..... . . ...
.. . . . .... . . . ... .
.... . . ..... . . . ..
“.
Figure2-5. Sample hexadecimal dump with IBM-PC
WhentheIBM-PCBASICinterpretersendshexcodeOD(carriagereturn)
it adds an extra hex OA(linefeed). Hex code 1A (end-of-fde)also gets
specialtreatment:the interpreterdoes not send it at all. This can cause
problemswithgraphicsordownloadcharacterdata.However,youcansolve
thisproblemby changingline20 in theprecedingprogramandaddingthe
codingshownbelow.
Codingfor IBM-PCwithmonochromedisplay:
20 GOSUB 100
100 O==INP(&H3BD) : IF 0<128 THEN 100
110 OUT &H3BC, I
:OUT &H3BE,5
1204 RETURN
Codingfor IBM-PCwithcoloradapter:
20 GOSUB 100
100 O=INP (&H379 )
110 OUT &H378, I
: IF 0<128 THEN 100
:OUT &H37A, 5
120 RETURN
ill
:OUT &H3BE,4
:OUT &H37A, 4
Page 33

SWITCH COMBINATION FUNCTIONS
Severaladditiomdfunctionscanbeachievedbypressingthecontrolpanel
buttonsin combinations.
Reverse mmu-teed
m
I
Figwe2-6. Switch combination functions of control panel
Formfeed
If you areusingsinglesheets,thisoperationejectsthecurrentpage.If you
areusingfanfoldforms,itfeedsto thetop of the nextpage.
1.
PresstheON
Pressthe
2.
formingsuccessiveline feeds.
Whileholdingthe
3.
then releasebothbuttonsat the sametime. The printerwill smoothly
ejectthecurrentpage.
LINE button to settheprinteroff-line.
PAPER FEED buttonandholditdown.Theprinterwillstartper-
PAPERFEEDbuttondown,presstheONLINEbutton,
Page 34

PaperParking
Thisprocedurefeedsthe paperbackward.It parksthefanfoldformat the
backofthe printersothatyoucanswitchtosignal-sheetfeeding(bymoving
the releaseleverto thedownposition).
Beforeparkingfanfoldforms,tearoffallbutthelastpage,leavingless(at
leastthreeinchesless)thana fullpageshowingabovethetopcover.
1. Press theON
LINEbuttonto set theprinteroff-line.
2. Press the FONTbuttonandholdit down.
3. WhileholdingtheFONTbuttondown,pressthePAPERFEEDbutton.The
paperwillbe fedout backward.
Topofform
Whenyoupowerontheprinter,thetop-of-formpositionisautomaticallyset
tothecurrentposition.Ifthisisnotwhereyouwantthetopofthepagetobe,
youcan changethe top-of-formpositionasfollows:
1.
Pressthe ON
Move the paper to the desired top-of-formpmition by pressing the
2.
PAPER FEED button,orbyperformingaforwardorreverse‘micro-feed.
Pressandholdthe
3.
4.
Whileholdingthe
LINEbuttonto set theprinteroff-line.
FONTbutton.
FONTbuttondown, press the PITCHbutton,then
releasebothbuttons at the sametime.Theprinter willbeepto indicate
thatthe top-of-formpositionhasbeenset.
Forwardmicro-feed
Forfinealignment,youcanfeedthepaperforwardinverysmallincrements
as follows:
1. PresstheON
2. Press theON
WhileholdingtheONLINEbuttondown,pressthePAPERFEEDbutton.
3.
LINEbuttonto set theprinteroff-line.
LINE button again and hold it down.
Thepaperwillstartadvancinginaseriesof smallsteps.Whenyouwant
to stop,releasebothbuttons.
26
Page 35

Reversemicro-feed
Youcan also feed the paper in smallincrementsin reverse,to returnto a
higher positiononthesamepage.
NOTE:Withfanfoldforms,donottryto returnto apreviouspage.Theper-
forationmay catchinsidetheprinterandcauseajam.
‘1. PresstheONLINE buttonto set theprinteroff-line.
2. Pressthe ONLINEbuttonagainandhold it down.
3. WhileholdingtheON
LINE buttondown,press the PITCHbutton.The
paperwillstartmovingbackwardsina seriesof smallsteps.Whenyou
wantto stop,releasebothbuttons.
Clearingthebuffer
When DIP switch 1-2 is ON, the printer stores receiveddata in a large
memorybuffer.Thiscreatesaproblemwhenyouwanttoabandonaprinting
job andrestart:the printer maybeholdingmoredatain itsbufferthan ithas
actuallyprinted,andthisunprinteddatamustbeclearedoutbeforerestarting.Turningpoweroffis oneway to clearthe buffer,but there is another
way:
1. Haltthe printingprogramon the computer.If printingstops immediately,thebufferis clearandtherestofthisprocedureisunnecessary.If
printingdoesnot stop,continueas follows:
2. PresstheONLINEbuttontosettheprinteroff-line.Printingwinnowstop,
buttheremaybe dataremainingin thebuffer.
3. Pressandholdthe
4.
Whileholdingthe FONTbuttondown,pressandholdtheON LINEbutton.
Continueholdingthesetwo buttonsdown.In aboutthreesecondsyou
willhear a beeptonesignalingthatthebufferhas beencleared.
5. Releasethesebuttons,makeanynecessarycontrolpanelsettings,then
setthe printerbackon-line.
FONTbutton.
Itisessentialtohalttheprintingprogramonthecomputerbeforeyougooff-
lke. Otherwise,when
you go backon-linethecomputerwillstartsending
dataagainandtheprinterwillcontinueprinting,withmissingdatawherethe
bufferwas cleared.
27
Page 36

z?
Page 37

chapter 3
DIP SWITCH SETTINGS
Thebankof DIP (DualIn-linePackage)switchesinsidetheprinterisused
for variousfunctions.
ThischapterexplainswheretheDIPswitchesare located,andhowto use
them.
LOCATION OF THE DIP SWITCHES
Whenyouremovetheprinter’scoverandlook inside,youwill seeon the
greenboardatthebottomoftheprintertwogroupsof smallwhiteswitches
markedDSW1andDSW2.Thesearetheprinter’sDIPswitches.DSW1has
eightswitches,named1-1to 1-8fromlefttoright.DSW2hasfourswitches
named2-1to 2-4.
mu
DIP Switch I DIP Switch 2
/
/
OFF
e
Figwv S7. DIPswitches
Forallswitches,theONpositionis towardsthebackoftheprinterandthe
OFFpositionistowardsthe front.To set a DIP switch,use a ballpointpen
or othersmallimplementtomovetheswitchto the ON or OFFposition.
Theprinter’spowershouldbeoff whenyousettheDIPswitches.Settings
madewhilepowerisondonottakeeffectuntilpowerisswitchedoff,then
on again,becausetheprinter~ads the DIP switchesonlyatpower-up.
29
Page 38

FUNCTIONS OF THE DIP SWITCHES
Theprinteris factory-setwithallDIPswitchintheONposition.Theseare
thestandardsettings.Bychangingthesettings,youcanaltervariousprinter
fimctionsto match yourrequirements.Thefollowingquestionswillhelp
youchoose the propersettings.
Switch
1-1 Printermode Standard
1-2
1-3 AutoLF
1-4
1-5 Paper-outdetector
1-6
1-7
143
2-1
Function ON OFF
IBM
UsageofRAM
Buffer Download
No Yes
Autosheetfeeder
Oratorlowercase
Pagelength
Characterset
(Standardmode)
Characterset
(IBM
mode)
Inactive Active
Enabled
Smatlcaps Lowercase
Disabled
(seebelow)
‘raphics
‘et #2
Italics
Set
#l
2-2
2-3 Internationalcharacterset
2-4
Switchl-l: DoyouwanttousetheprinterinstandardmodeorIBMmode?
Selectthemodecompatiblewithyourcomputerandsoftware.In standard
mode theprinteroperateslike theEpsonLX-850.In IBMmodeitoperates
likethe IBM PropnnterHI. The ON positionselectsstandardmode.The
OFFpositionselectsIBMmode.
Switch 1-2: Does yoursoftwaredownloadcharacterstothe printer?
InordertodownloadcharactemthisswitchmustbeintheOFFposition.The
printer then uses its RAM memory for storing character patterns and
providesonlyaone-lineprintbuffer.IfyouleavethisswitchON,theprinter
usesitsRAMmemoryasaninputbuffer,allowingthecomputerto senddata
fasterthantheprinterprints.
30
Page 39

Switch 1-3: Do you wantan automaticlinefeed?
If you leave this switch at the ON position, a separate line-feed code is
required from your computer to obtain a line feed.
If you movethis switchto the OFF position,theprinterperformsboth a
carriagereturnandlinefeedeachtimeit receivesa carriage-returncode.
computer systems send a line feed code, or both a carriage return and
Most
line feed, at the end of each line, so this switch should be left ON.
If yougetdoubleline spacingwhenyouexpectsinglespacing,or if lines
overprinteachother,try changingthesettingofthis switch.
Switch1-4: AR you going to use the automatic sheet feeder (ASF)?
In order to use the automaticsheet feeder,movethis switchto the OFF
position.Otherwiseleaveit ON.
Switch 1-5: Doyouwanttheprintertostopprintingattheen dofthepaper,
or to keepprinting?
Leavethis
switch ON except when you needto printto the veryendofthe
paper.WhenthisswitchisOFFtheprinterignoresthepaper-outdetectorand
printsdownto (andbeyond)thebottomedge.
Switch 1-6: WhenyouselecttheOratorfonton thecontrolpanel,doyou
wantlower-caseletterstoprintaslowercase(OFF)eras small
capitals(ON)?
Take yourpick fromthe samplesbelow.Notethat the lower-caseOrator
doesnothavedescendersforthelettersg,j, p, q, and y.
ORATOR PRINTS THIS WAY WITH SWITCH 1-3 ON.
Orator
Switches1-7 and 1-8: Whatisthe pagelengthof yourpaper?
Prints this way with switch 1-3 OFF .
Youcanselectoneoffourpagelengtheswiththesettingsoftheseswitches
as shownbelow.
Page length 1-7
inches ON
11
8inches OFF
1-8
ON A4 size
ON
Page length 1-7 1-8
12inches
ON
OFF
OFF OFF
31
Page 40

Switch 2-1: Theactionof this switchdependson the mode chosenwith
switch 1-1.
If you selected standard mode, do you want italics or graphics
characters?
Setthis switchOFFtoprintitalicsinthestandardcharacterset.Ifyouleave
this switchin the ONposition,in placeof italicsyou will getthe graphic
characte~, internationalcharacters,and mathematicalsymbolsof IBM
characterset#2. See Chapter9, charactercodes 128to 254.
Ifyou selectedIBMmode,doyouwantIBMcharacterset#l or#2?
ONselectscharacterset#2, whichis for computerswithan 8-bitinterface
(themostcommonkind).
OFFselectscharacterset#1, forcomputerswitha 7-bitinterface.
Switches2-2 to 2-4:
Do youwantan internationalcharacterset?
Internationalcharactersetsdifferintheirassignmentof 14charactercodes.
Seethecharactertablesat theback of thismanual.WiththeDIP switches
youcan selectoneof eightcharactersetsas follows:
Country
U.S.A. ON ON
France
Germany
England
2-2 2-3
OFF ON
ON
OFF
OFF OFF
2-4
ON
ON
ON
ON
Country
DenmarkI * ON ON OFF
Sweden OFF ON OFF
Italy ON OFF
SpainI OFF OFF OFF
2-2 2-3 2-4
OFF
* Denmark/Norwaywhenswitch2-1is ON.
32
—
Page 41

chapter 4
PRINTER CONTROL COMMANDS
Theprinterhas two emulationmodes:StandardmodeandIBMmode.
IiIstandardmode,theprinteremulatesthefunctionsoftheEpsonLX-850.
In IBM mode, the printer emulatesthe IBM Propnnter III. Additional
commandcodesareincludedas a supersetof theseemulations.
TheemulationischangedbymeansofDIPswitch1-1.WhenON,theprinter
will be in standard mode, and when OFF, the printer will be in IBM
emulationmode(seeChapter3). It is notpossibletochangetheemulation
modeby meansof softwarecontrolorthefrontcontrolpanel.
Thischapterdescribestheprinter’scontrolcommands.Somecommandsare
commontoboththestandardandIBMmodes.Inthedescriptionsofthecommands,all commandswillbe categorizedby function.The name of each
commandis followedby a tableliketheone below:
Mode ASCII
<ESC> “X” “l” 27120 49
std.
<ESC> “X” <1>
Decimal Hexadecimal
IB 78 31
27120 1
IB 78 01
Mode: Indicatesthemodeinwhichthecommandisrecog-
nized.
Std. Standardmode(DIP switch 1-1on)
IBM IBMmode(DIPswitch 1-1off)
Both BothstandardandIBMmodes
ASCII:
Indicates the ASCII coding of the command.
Controlcharactemareenclosedin pointedbrack-
ets:For example,<1>meanscharactercode 1.
Decimal: Givesthecommandin decimalcharactercodes.
Hexadecimal: Gives the command in hexadecimalcharacter
codes.
Parametersforwhichvaluesmustbesuppliedareindicatedby italicletters
suchas n.
Page 42

FONT CONTROL COMMANDS
Selectdraftqualitycharacters
Mode] ASCII
Both I “(” ‘T’ “F” “)” “)”
std.
IBM
. . . .
<ESC> “X” “O”
.
<o> 27120 0
<ESC>
<ESC> “I” “O” 27 73 48
<ESC> “I” <O>
“x”
“9” I 40407041 41 57 I 282846292939 I
1
Changesfromnearletterqualitytodraftquality.Ignoredifthe FONT
buttonwaspressedduringpower-up.
Selectdraftelite characters
IModeI ASCII
IBM
<ESC> “I” “l”
<ESC> “I”
<1> 27 73 1
I 27 73 49
1 1
Changestodraftqualitycharacterswithelitepitch(12cpi).Ignored
FONTor PITCHbuttonwas pressedduringpower-up.
if the
SelectNLQcharacters
~ModeI ASCII
std.
IBM
<ESC> “X” “l”
<ESC>
“X” <1> 27120 1
<ESC> “I”“2”
<ESC> “I” <2>
<ESC> “I” “3”
<ESC> ‘T” <3>
Decimal
27 ?20 48 16 78 30
27 73 0
Decimal Hexadecimal
Hexadecimal
lB 78 00
16 49 30
16 49 CO
I16 49 31
16 49 01
Decimal
2712049
Hexadecimal
16 78 31
16 78 01
27 73 50
27 73 2
27 73 51
27 73 3
16 49 32
16 49 02
IB 49 33
16 49 03
I
1
34
Changesfromdraftqualityto“nearletterquality.TheinitialNLQ
font is Counerunlessadifferentfonthasbeenselectedbyapreceding command. Ignored if the
FONT button was pressed during
power-up.
Page 43

SelectNLQfont
Mode ASCII
Both
<ESC>
“k” n
Decimal Hexadecimal
27107 n IB 6B n
SelectsanNLQfontaccordingto thevalueof n.In draflmode,this
commandremainsdormantand takes effect later when NLQ is
selected.Ignoredif the
FONTbuttonwaspressedduringpower-up.
n Fontname
O Courier(initialvalue)
1 Sanserif
7 Oratorwithsmallcapitals
8 Oratorwithlowercase
Se!ectCouriercharacters
Mode ASCII
Both “ “ “ “ “F” “)” “)” “o” 4040 70 41 41 48 I 28 28 46 XI ~ 30
((
Decimal
Changesto the CourierNLQfont.Ignoredif the FONTbuttonwas
pressedduringpower-up.
I Hexadecimal
SelectSanserifcharacters
Mode
Both “(” “(” “F’ “)” “)” “l” 4040 70414149 282846 292931
ASCII
Decimal
Hexadecimal
ChangestotheSanserifNLQfont.Ignoredifthe FONTbuttonwas
pressedduringpower-up.
SelectOratorcharacterswithsmallcapitals
Mode
Both “(” “(” “F” “)” “)” “7” 4040 70 41 41 55 28 2846 ~ ~ 37
ASCII
ChangestotheOratorwithsmaIIcaptitalsNLQfont.Ignoredifthe
FONTbutton was pressed during power-up.
Decimal Hexadecimal
35
Page 44

I
SelectOratorcharacters
Mode ASCII Decimal Hexadecimal
Both “ “ “ “ “F’ ‘S“ “ “ “8”
(( ))
withlowercase
40 40 7041 41 56 28 2846 29 29 36
Changesto the Oratorwith lower caseNLQ font. Ignoredif the
FONTbuttonwaspressedduringpower-up.
Selectitalic characters
Mode ASCII Decimal Hexadecimal
Std. <ESC> “4” 27 52 IB 34
Causessubsequentcharactersto be printedin italics.
SelectNLQitalic characters
Mode Ascli
IBM <ESC> “I” <VT>
Causes subsequentcharactersto be printed in italics with NLQ
charactem.Ignoredif the
Up.
FONTbuttonwaspressedduringpower-
Decimal Hexadecimal
27 73 11
IB 49 OB
Selectuprightcharacters
Mode ASCII
std. <ESC> “5”
Stopsitalic printing andcausessubsequentcharactersto beprinted
upright.
Emphasizedprinting
Mode
Both <ESC> “E”
36
ASCII
Causessubsequentdraft charactersto be emphasizedby adding
extrathicknessto verticalstrokes.
Decimal Hexadecimal
27 53
Decimal
27 69
IB 35
Hexadecimal
IB 45
Page 45

Cancelemphasjzedprjntjng
Mode ASCII
Borh
<ESC> “F’ 27 70
Decimal Hexadecimal
CanWlsemphasizedprinting.
Double-strikeprinting
Mode ASCII
Both -@3C> “G”
Causessubsequentcharacterstobe printedin double-strikemode
withaslightverticalpapermotioninbetween,causingathickening
of horizontalstrokes.
Forboldprint,useofdouble-strikeis~commendedinNLQmode,
and combined use of emphasizedand double-strikeis recommendedin draftmode.
Double-strikecannotbeused with superscriptsor subscripts.
Decimal Hexadecimal
27 71
Canceldouble-strikeprinting
Mode
Both @SC> “H”
ASCII Decimal
27 72
Cancels
double-strikeprinting.
IB 46
IB 47
Hexadecimal
IB 48
Startunderlining
Mode
Both
ASCII
<ESC>“-” “l”
<ESC> “-”
<1> 27 45 1
Causessubsequentcharactemtobeunderlined.IBMblockgraphics
charactemand spaces skipped by horizontaltabulation are not
underlined.
Decimal Hexadecimal
27 4s 49
IB 2D 31
IB 2D 01
Page 46

Stopunderlining
Mode
Both
ASCII Decimal Hexadecimal
<ESC> “-” “O”
<ESC> “-” <o> 27 45 0
Stopsunderlining.
Startoverlining
Mode
IBM
ASCII
<p.c> ,,-.. ‘.~?>
<ESC> “–“ <1>
Causessubsequentcharactersto be overlined.Spacesskippedby
horizontaltabulationarenot overlined.
Stopoverlining
Mode
LBM
ASCII
<~sc> ,,– .! “0..
<ESC> “ - “ <O> 27 95 0
Stopsoverlining.
Superscript
27 45 48 IB 2D 30
IB 2D 02
Decimal Hexadecimal
27 95 49
27 95 1
Decimal Hexadecimal
?7 95 4a
IB 5F 31
IB 5F 01
IB 5F 30
IB 5F W
Mode ASCII
Both
<ESC> “S” “O”
<ESC> “S”<O>
Causessubsequentcharactemtobeprintedassuperscripts.Doesnot
changethe characterpitch.
Subscript
Mode
Both
ASCII
<ESC> “S” “l”
<ESC> “s” <1>
Causessubsequentcharactersto be printedassubscripts.Doesnot
changethe characterpitch.
Decimal
27 33 4a
27 83 0
Decimal
27 B3 49
27 S3 1
Hexadecimal
IB 53 30
IB 53 00
Hexadecimal
IB 53 31
IB 53 01
Page 47

Cancelsuperscriptorsubscript
Mode ASCII Decimal
Both ! CEsc> ‘“r”
27 64
Stops printing superscriptsor subscriptsand Eturns to normal
printing.
CHARACTER SETCOMMANDS
Selectstandardcharacterset
Mode ASCII Decimal
Both -
CEsc> “t” “o”
CEsc> “t” <o>
27116 4S
27116 0
Selectsthe standardcharacterset.This is the power-updefaultin
Standardmodeif DIP switch2-1is OFF.
SelectIBMcharacterset
Mode
Both
ASCII Decimal
<ESC> “t” “l”
<ESC>
“t”<1>
27116 49 IB 74 31
27116 1 IB 74 01
Selectsan IBM character set. This is the power-up default in IBM
mode.
Hexadecimal
iB 54
Hexadecimal
IB 74 30
IB 74 00
Hexadecimal
Selectcharacterset#1
Mode ASCII Decimal
Both
<ESC>
“7” 27 65
Selectscharacterset#1.
Selectcharacterset#2
Mode ASCII Decimal
Both
<ESC>
Selectscharacterset#2.
“6” 27 54
Hexadecimal
IB 37
Hexadecimal
IB 36
Page 48

I
Select
Mode ASCII
std.
internationalcharacterset
Decimal Hexadecimal
&SC>
“R” n
27 02 n
Selectsan internationalcharacterset accordingtothevalueof n.
n Characterset
O U.S.A
1 France
2 Germany
3 England
4 DenmarkI
5 Sweden
6 Italy
n Characterset
7 SpainI
8 Japan
9 Norway
10 DenmarkII
11 SpainII
12 LatinAmerica
13 Denmark/Norway
Thefirsteight of thesecharactersets(fromU.S.A.toSpainI) can
be selectedaspower-updefaultsby DIP switches2-2 to 2-4.
Enableprintingof all charactercodes
Mode ASCII
IBM <ESC> ‘Y”
EnablesprintingofallcharactersintheIBMcharacterset,including
thoseassignedto charactercodeswhichare normallyconsidered
controlcodes.Thiscommandremainsineffectforthenextnl +n2
x256 characters,wherenl andti arenumbersbetweenOand255.
Duringthisintervalnocontrolfimctionsareexecuted.Ifacodewith
no assignedcharacteris received,theprinterprintsa space.
nl d
Decimal Hexadecimal
27 92nl n2
IB 52 n
IB SC nl n2
Enable printing of all character codes on next
character
Mode ASCII
IBM
CEsc> “ ‘ “
This commandoperateslike<ESG ‘1”exceptthat it remainsin
effectfor onlyone character.
40
Decimal Hexadecimal
27 94 IB 5E
Page 49

I
Selectslashzero
Mode
std.
ASCII Decimal
<ESC> “ - “ “l” 27126 49 IB 7E 31
<ESC> “ - “ <1> 27126 1
Hexadecimal
IB 7E 01
Causessubsequentzero charactersto be overprintedwith a slash
(0
Selectnormalzero
Mode ASCII Decimal
std.
<ESC> “ - “ “O” 27126 48 IB 7E 30
<ESC> “ - “ <O> 27126 0 IB 7E 00
Causes subsequentzero charactersto be printed normally (0),
withouta slash.
CHARACTER SIZE AND PITCH COMMANDS
Hexadecimal
Picapitch
Mode ASCII Decimal Hexadecimal
std. <ESC> “P”
IBM <DC2> 18
27 80 IB 60
12
Changesfromelitetopicapitch(10cpi)orfromcondensedeliteto
condensedpica(17 cpi). Ignoredif the
duringpower-up.
Elitepitch
Mode ASCII
std. <ESC> “M”
IBM
<ESC> “:” 27 58
Changesfrompicato elitepitch(12cpi)or fromcondensedpicato
condensedelite(20 cpi). Ignoredif the
duringpower-up.
PITCHbuttonwas pressed
Decimal Hexadecimal
27 77
PITCHbuttonwaspressed
16 4D
IB 3A
41
Page 50

Condensedprinting
Mode
Both
ASCII
<Sb
<ESC> <Sb 27 15 IB OF
Decimal
15 OF
Hexadecimal
Changesfrom pica to condensedpica (17 cpi) or from elite to
condensedelite(20cpi).Ignoredif the
PITCHbuttonwas pressed
duringpower-up.
Cancelcondensedprinting
Mode
Both <DC2> 18
ASCII Decimal
In Standardmode,changesfromcondensedpicato normalpicaor
fromcondensedelitetonormalelite.InIBMmode,alwayschanges
to normal pica. Ignoredif the
power-up.
PITCHbutton was pressed during
Hexadecimal
12
Expanded printing
Mode ASCII Decimal Hexadecimal
Both
<ESC> “W” “l”
<ESC> “W” <1>
27 87 49
27 87 1
Causessubsequentcharacterstobe expandedto doublewidth.
IB 57 31
IB 57 01
Cancelexpandedprinting
Mode
Both -
42
ASCII Decimal Hexadecimal
<ESC> “W” “O”
<ESC> “W” <O>
Stopsexpandedprintingand returnstonormalwidth.
27 87 48
27 87 0
IB 57 30
IB 57 00
Page 51

Expanded printingforone /ine
r
Mode
Both
ASCII Decimal Hexadecimal
<so> 14
<ESC> <SO> 27 14
Causessubsequentcharactersinthecurrentlineto beexpandedto
doublewidth.Charactemreturntonormalwidthafterthenextline
feed(<LF>).The<DC4>,cVT>, d%-, andcESC> “W”Ocom-
mandsalsocancelexpandedprinting.
Cancelone-lineexpandedprinting
OE
IB OE
IMode ]
Both I
ASCII Decimal Hexadecimal
1
<X4> 20
Stopsone-lineexpandedprintingsetwithcSO> or <ESC>-+0>.
Doesnotcancel<ESC>‘W” 1.
Selectproportionalspacing
Mode ASCII
std.
IBM
<ESC> “p” “l” 27112 49
<ESC> “p” <1>
<ESC> “P” <1> 27 H) 1
Causessubsequentcharacterstobeproportionallyspaced.Ignored
PITCHbutton was pressedduringpower-up.
if the
Selectfixedspacing
Mode
Std.
IBM
ASCII Decimal
<ESC> “p” “O” 27112 48
<ESC> “p” <o> 27112 0
<ESC> “P”
<0> 27 80 0
Causessubsequentcharactersto be printedwith fixed character
spacing.Ignoredifthe
PITCHbuttonwaspressedduringpower-up.
14
Decimal Hexadecimal
16 70 31
27112 1
IB 70 01
16 .50 01
Hexadecimal
16 70 30
IB 70 00
IB 50 00
43
Page 52

I
Selectmasterprintmode
Mode ASCII Decimal Hexadecimal
std. <ESC> “!” n 27 33 n IB 21 n
Selectsa combinedprintmode accordingto the value of n. The
valueofnisthesumofthevaluesgivenbelowforthedesiredchar-
acteristics.
Examples:n= 1 giveselite;n = 9 (1 +8) givesemphasizedelite;n
=
137(1+ 8 + 128) givesunderlinedemphasizedelite.
Function
Underline
Italic
Expanded
Double strike 16
Emphasized
Condensed[*]
Proportional[*] 2
Elite [*]
[*I Ignoredifthe
PITCHbutton was pressedduringpower-up.
n value
128
64
32
8
4
1
Increasecharacterspacing
Mode ASCII Decimal Hexadecimal
std. <ESC> <SP> n 27 32 n IB 2U n
Increasesthespacebetweencharactersby rz/240inches,wherenis
a numberfromOto 127.Usedin microjustification.
Selectdoubleor quadruplesize
Mode ASCII Decimal Hexadecimal
std.
<ESC> “h” n 27 104 n IB 6$ n
Selectsthe size of subsequentcharactersas shownbelow.Extrahighcharactersalignalongthecap-lineof normalcharacters,with
the baselinetemporarilymovingdown.Line spacingistemporarily
doubledwhenn = 1 andquadrupledwhenn =2.
Page 53

n Effect
O Normalsize
1 Double-high,double-wide
2 Quadruple-high,quadruple-wide
Selectcharactersize
Mode
Both “ “ “ “ “S” “ “ “)” n
ASCII
((
)
Decimal
40 40 E3 41 41
Selectsacombinationofcharacterheightandwidthaccordingtothe
valueof n, as below.Doesnotmovethebase line.
n Characterwidth
O Singlewidth
1 Double width Single height
2 Singlewidth
3 Doublewidth
Double-heightcharactemarealwaysprintedat nearletterquality.
Doubleheightprintingtemporarilycancelsthesuper/subscriptand
condensedprinting modes, but these modes resume when the
printerreturnsto normalheight.
Printdouble-heightcharacters
Mode
sid.
ASCII
<ESC> “W” “l”
<ESC>
“W” <1>
Printssubsequentcharactersat doubleheightwithoutmovingthe
base line, and withoutchanging the line spacing. Temporarily
cancelssuper/subscriptand condensedprintingmodes.
Decimal
27119 49
27119 1
Hexadecimal
n
28 28 53 29 29 n
Characterheight
Single height
Double height
Doubleheight
Hexadecimal
IB 77 31
IB 77 01
Page 54

Returntonormalheight
Mode ASCII Decimal Hexadecimal
std.
<ESC> “W” “O” 27119 48
<ESC>
“W” <O> 27119 0
IB 77 w
16 77 00
Terminatesdouble-heightprintingandpxintssubsequentcharactem
atnormalheight.Resumessuper/subscriptandcondensedprinting
if thesemodeswerein effectbeforedoubleheightwas selected.
Selectcharacterheight,width,andline spacing
Mode ASCII Decimal
IBM
cESC> “[” “@” <4> <()>
CO> CO>
n m OOnm OOW nm
27 91 64 4 0 16 56 40 04 W
Selectsacombinationofcharacterheight,width,andlinespacing
accordingtothevalueofn andm,asbelow.Doesnotmovethebase
line.
—
Linespacing
n
Unchanged
o
1
Unchanged
2
Unchanged
16
Single
17
Single
Single
;;
Double
33
Double
Double
34
—
m
1
Singlewidth(sameas~SC> “W”O)
2
Doublewidth(sameas<ESG “W” 1)
—
Characterwidth
Characterheight
Unchanged
Single height
Doubleheight
Unchanged
Singleheight
Doubleheight
Unchanged
Singleheight
Doubleheight
Double-heightcharactemarealwaysprintedat near letterquality.
Doubleheightprintingtemporarilyc&cels thesuper/subscript~d
condensedprinting modes, but these modes resume when the
printerreturnsto normalheight.
Hexadecimal
46
Page 55

..,,
VERTICAL POSITION COMMANDS
Setline spacingto 1/8inch
Mode ASCII
Both <ESC> “0”
Decimal
27 48
Setsthedistancethepaperadvancesor revemesinsubsequentline
feedsto 1/8inch.
Setline spacingto 7Y72inch
Mode
Both <ESC> “l”
ASCII
Setsthedistancethepaperadvancesor reversesin subsequentline
feedsto7f72inch.
Decimal
27 49
Setline spacingto 1/6inch
Mode ASCII
std. dzsc> “2”
Setsthedistancethepaperadvancesorreversesin subsequentline
feedsto 1/6inch.
Decimal
27 WI
Setlinespacingto~/216inch
Mode ASCII
Both cESC> “3” n
Decimal Hexadecimal
27 51 n
Hexadecimal
IB 30
Hexadecimal
IB 31
Hexadecimal
IB 32
IB 33 n
Setsthedistancethepaperadvancesorreversesin subsequentline
feeds to n/216 inch, where n is betweenOand 255. If n= O,in
Standardmodetheline-feeddistanceis set to O,butin IBMmode
thiscommandis ignored.
Page 56

I
Setlinespacington/72inch
Mode ASCII Decimal Hexadecimal
Both
<ESC> “A” n 27 65 n
In Standardmode,setsthedistancethepaperadvancesor reverses
insubsequentlinefeedston/72inch,wherenisbetweenOand255.
.If n =0,the linespacingis setto O.
In IBMmodethiscommanddoesthesameexceptthat(1)thenew
line spacing does not take effect until the next <ESC> “2”
command,and(2) if n = O,thecESC>“A”commandis ignored.
Execute<ESC>“A”
Mode ASCII Decimal Hexadecimal
IBM <ESC> “2”
Sets the line spacingto the value defined by the last preceding
cESC>“A”command.Setstheline spacingto 1/6inchif themis
no precedingcESC>“A”command.
27 50
16 41 n
IB 32
Linefeed
‘Mode ASCII
Both <LF>
10 OA
Printsthecurrentlineandfeedsthepaperto thenextline.Seethe
precedingcommandsfortheline spacing.
Reverselinefeed
Mode ASCII
std. <ESC> <LF> 27 10
IBM
48
<ESC> “ “ 27 93
1
Printsthecurrentlineandfeedsthepaperinthereversedirectionto
the preceding line. See the preceding commands for the line
spacing.Ignoredwhenfrictionfeed is used.
Decimal Hexadecimal
Decimal Hexadecimal
IB OA
IB 5D
Page 57

Performonen/216-imh linefeed
Mode ASCII
Both ] <!3SC>“J”n
Decimal Hexadecimal
27 74 n
IB 4A n
Feedsthepaperoncebyn/216inches,wherenisbetween1and255.
Doesnotmovetheprintpositionrightorleftinthe standardmode.
Doesnot changetheline-spacingsetting.
Performonen/216-inchreverseline feed
Mode ASCII
std.
<ESC> “j” n
Feedsthe paperoncebyn/216inchesinthereversedirection,where
nisbetween-land255.Doesnotmovethepnntpositionrightorleft.
Doesnotchangethe line-spacingsetting.
Decimal Hexadecimal
27106 n
IB 6A n
Feedpapern lines
Mode ASCII
std.
<ESC> “f” “l” n 27102 49 n
<ESC>
Feedsthepapernlinesfromthecurrentline,wheren is betweenO
and 127.
“f” <1> n
Decimal
27102 1 n
Hexadecimal
IB 66 31 n
IB 66 01 n
Settopofpage at currentposition
Mode ASCII
IBM <ESC> “4”
Setsthecurrentpositionasthetop-of-pageposition.Notethatthis
can alsobe donefromthe controlpanel.
Decimal Hexadecimal
27 52
IB 34
49
Page 58

I
Setpage lengthton lines
Mode ASCII
Both <ESC>
“C”
n
Decimal Hexadecimal
27 67 n IB 43 n
Setsthepagelengthto n linesin thecurrentlinespacing,wheren
isbetween1and127inStandardmodeorbetween1and255inIBM
mode.Changingthe line spacinglaterdoesnot alter the physical
pagelength.The currentlinebecomesthetopof the page.
Setpage lengthton inches
Mode ASCII Decimal Hexadecimal
Both
cESC> “C” cO> n
27 67 0 n
IB 43 00 n
Sets the page lengthto n inches,wheren is between 1 and 32 in
Standardmodeorbetween1and64inIBMmode.Thecurrentline
becomesthetop of thepage.
Setbottommargin
Mode ASCII
Both
<ESC>
Setsthe bottommarginto n lines,wherenisbetween1and 127in
Standardmode or between 1 and255 in IBMmode. The bottom
marginis resetwhenyouchangethepagelength.
“N” n
Decimal
27 78 n
Hexadecimal
IB 4E n
Cancelbottommargin
Mode ASCII Decimal
Both
<ESC> “O”
Cancelsthebottommargin.
27 79 IB 4F
Hexadecimal
Page 59

I
Formfeed
Mode
Both
ASCII
<FF>
Decimal Hexadecimal
12
Feedsthe papertothetopof thenextpageaccordingtothecurrent
pagelength,andmovestheprintpositiontotheleftmargin.When
the automaticsheetfeeder (ASF) is selected(DIP switch 14 is
OFF),thiscommandejectsthecurrentpage.
Returnto topof currentpage
Mode
std.
ASCII Decimal
<ESC> <FF>
27 12 IB OC
Feedsthe paperbackwardto the top of the currentpage. Ignored
whenfrictionfeedis used.
Disablepaper-outdetector
Mode
Both
ASCII Decimal
<ESC> “8” 27 5S IB 38
Causesthe printerto disregardthe signal sent by the paper-out
detector,enablingprintingtothebottomofthepaper.Overridesthe
settingof DIP switch 1-5.
Oc
Hexadecimal
Hexadecimal
Enablepaper-outdetector
Mode ASCII Decimal
Both
<ESC>
Causesthe printer to stop printingbefore the end of the paper.
Overridesthesettingof DIP switch 1-5.
“9” 27 57 IB 39
Hexadecimal
51
Page 60

Set verticaltabstops
Mode ASCII Decimal Hexadecimal
Both
<ESC> “II” nl n2 ... <0> 2766
d n2 ... 0
IB 42 nl d ...00
Cancelsall currmt verticaltabstopsandsetsnewverticaltab stops
atlinesnl, n2,etc., whered, w2,etc.arenumbersbetween1and
255.A maximumof 16verticaltabstopscanbe set.Thetab stops
must be specifiedin ascendingorder any violationof ascending
orderterminatesthetabstoplist.Standardterminationisbythecb
controlcode.Theverticaltabstopsaresetintermsofthecurrentline
spacinganddonotmoveif thelinespacingischangedlater.
Set verticaltabstopseveryn lines
Mode
std.
ASCII Decimal Hexadecimal
<ESC> “e” 4’1” n
<“ESC> “e” <1> n
27101 49
27101 1 n IB 65 01 n
Cancelsall currentverticaltabstopsandsetsnewtabstopseveryn
lines.wheren is between2 and 127.
Set verticaltabstopsin channel
Mode
std.
ASCII Decimal Hexadecimal
<ESC> “b” nO nl 27 96 nO nl IB 62 nO nl
n2 ...
<o> n2... 0
CancelsallcurrentverticaItab stopsin channelnO,(whereM is
betweenOand7) andsetsnewverticaltabstopsinthischannel.(A
channelis a set of verticaltab stops selectedby the <ESC> “~’
command.)Seed3SC> “B”forparametemnl, n2, ... <0>.
Selectvertica/tabchannel
Mode ASCII
std.
<ESC> “r’ nO 27 47 nil
Selectsa set of verticaltab stopsdesignatedby a channelnumber
(n(l)fromOto7.Thetabstopsineachchannelaresetby<ESC>’’b”.
Decimal Hexadecimal
n
IB 65 31 n
d ... 00
IB 2F nO
Page 61

I
Verticaltab
Mode ASCII
Both
<VT>
Decimal
11
Feedsthe paper to the next verticaltab stop and movesthe print
positiontotheleftmargin.Performsalinefeedifnoverticaltabsaxe
set,asatpower-up.Feedstothetopofthenextpageifverticaltabs
aresetbutthecurrentlineis at or belowthelast verticaltab stop.
HORIZONTAL POSITION COMMANDS
Setleftmargin
Mode ASCII
std.
<ESC> “l” n
Setstheleftmarginatcolumnn(wherenis betweenOand255)in
the current characterpitch (pica pitch if proportionalspacingis
selected).Theleft margindoes not move if the characterpitch is
changedlater.Theleftmarginmustbeatleasttwo columnsto the
leftof the rightmarginandwithinthelimitsbelow:
Pica
Elite
Condensedpica
Condensedelite
Expandedpica
Expandedelite
Expandedcondensedpica
Expandedcondensedelite
Decimal
27108 n
Hexadecimal
OB
Hexadecimal
IB 6C n
53
Page 62

Setrightmargin
Mode
std.
ASCII Decimal
<ESC> “Q” n 27 81 n
Setstherightmarginatcolumnninthecurrentcharacterpitch(pica
pitch if proportionalspacing is currently selected). Column n
‘becomesthe lastcharacterpositioninthe line.Thenghtmargindoes
notmove if the characterpitchis changedlater.The rightmargin
mustbe withinthe limitsMow:
Pica
Elite
Condensedpica
Condensedelite
Expandedpica
Expandedelite 3 s n548
Expandedcondensedpica
Expandedcondensedelite
Setleftand rightmargins
Mode
IBM
ASCII Decimal
<ESC> “X” nl d 27 38 nl d
Setstheleftmarginatcolumnnl andtherightmarginatcolumnn2.
See the precedingcommandsfor margin restrictionsand other
notes.
Hexadecimal
IB 51 n
4< n <80
5 s n <96
7< n <137
8< n <160
2< n <40
4< n <68
4< n <80
Hexadecimal
IB M nl n2
Carriagereturn
Mode ASCII
Both
54
<CR>
Prints the current
margin.If DIP switch 1-3is OFF, alsoperformsaline feed.
Decimal
13 OD
Hexadecimal
lineandreturnsthenextprintpositionto theleft
Page 63

Setautomaticlinefeed
Mode ASCII Decimal Hexadecimal
IBM
CEsc>“’5” cl> 27 63 1
IB 36 01
Causesthe printerto performbotha carriage~tum and line feed
eachtime it receivesa <CR>code.This commandtakes priority
overDIP switch 1-3.
Cancelautomaticlinefeed
Mode ASCII Decimal Hexadecimal
IBM <ESC> “5” cO> 27 53 0
IB 35 00
Causestheprintertoperformonlyacarriagereturnwhenitreceives
a <C- code.ThiscommandtakespriorityoverDIP switch 1-3.
Backspace
Mode ASCII Decimal
Both CBs> 8 06
Hexadecimal
Movestheprintpositionone cohunn to theletl. Ignorediftheprint
position is at the left margin. This command can be used to
overstrikeor combinecharacters.
Leftjustify
Mode
std.
ASCII
<ESC> “a” “O” 27 97 46
<ESC>
“a” <0>
Alignssubsequenttext withtheleft margin,leavingtherightmargin
ragged.
Decimal Hexadecimal
61 30
IB
27 97 0
IB 61 CO
Centertext
Mode ASCII Decimal Hexadecimal
61 31
std.
<ESC> “a” “1” 27 97 49
dzsc>
“a” cl> 27 97 1
Centerssubsequenttextbetweenthe left and rightmargins.
IB
IB 61 01
55
Page 64

Rightjustify
Mode
std.
ASCII Decimal Hexadecimal
cESC> “a” “2” 27 97 50 IB 61 32
<ESC>
“a” <2>
27 97 2
IB 61 02
Alignssubsequenttextwiththenghtmargin,leavingtheleftmargin
‘ragged.
Sethorizontaltabstops
Mode
Both
ASCII
cESC> “D” nl n2 ... d>
Cancelsallcurnmthorizontaltab stops and setsnew tab stops at
columnsnl, ti, etc.inthecurrentcharacterpitch(picapitchifproportional spacing is currently selected), where nl, n2, etc. are
numbensbetween1 and255.Themaximumnumberofhorizontal
tabstopsallowedis32inStandardmodeand64inIBMmode.The
tab stopsmust be specifiedin ascendingorder;any violationof
ascendingorderterminatesthetabstoplist.Standardterminationis
bythecO>controlcode.Toclearalltabstops,specify<ESC>“D”
<o>.
Decimal Hexadecimal
27 66 nl n2 ... 0
IB 44 nl n2 ... 00
Sethorizontaltabstopseveryn columns
Mode
std.
ASCII
<ESC> “e” “O” n 27101 46 n
cESC> “e” <O> n 27101 0
Cancelsall currenthorizontaltabstopsandsetsnewtabstopsevery
n columns,wheren isbetween1 and 127.
Resetall tabstops
Mode ASCII
IBM <ESC> “R”
Resetsthehorizontaltabstopstotheirpower-upvaluesin whicha
tab stopis set every8columnstartingatcolumn9. Also clearsall
verticaltabstops.
56
Decimal
Decimal
27 82
n
Hexadecimal
IB 65 30 n
IB 65 00 n
Hexadecimal
IB 52
Page 65

Horizontaltab
Mode ASCII Decimal
Both <H-f> 9
Movestheprintpositionto thenexthorizontaltabstop.Ignoredif
thereisnonexthorizontaltabstopinthecurrentline.Notethatwhen
underliningis selected,spacesskippedbyhorizontaltabulationare
notunderlined.
Relativehorizontaltab
Mode ASCII
std. cESC> ‘A” nl n2
Movestheprintpositionrightorleftaspecifieddistance(maximum
8inches).Ignorediftheresultingpositionisbeyondtherightorleft
margin.Theformulasforthedistanceanddirectionareasfollows:
If n2isbetweenOand63,theprintheadmovesrightby (nl + n2x
256)/120inches.
Ifyouwanttomovethe printheadtotheleft,nl andn2areobtained
by subtractingthevaluefrom 65536,and dividingthe resultinto
highandlowbytes.
Decimal Hexadecimal
27 92 nl d IB 5C nl n2
Absolutehorizontaltabin inches
Hexadecimal
09
Mode
std.
ASCII
cESC> 4’$” nl n2
Decimal
27 36 nl n2 IB 24 nl n2
Setsthenextprintpositionto(nl +n2x 256)/60inchesfromtheleft
marginon the currentline.Ignoredif this positionis beyondthe
rightmargin.Themaximumpositionis 8 inches.
Absolutehorizontaltabin columns
Mode ASCII Decimal
std.
<ESC> “f’ “O” n 27102 48 n
cESC> “f’ cO> n 27102 0 n
Movesthe nextprint positionto column n fmm the left margin,
wheren is betweenOand 127.
Hexadecimal
Hexadecimal
IB 66 30 n
IB M 00 n
57
Page 66

GRAPHICS COMMANDS
Printnormal-density8-bitgraphics
Mode
Both
ASCII Decimal Hexadecimal
cESC> “K” nl d
ml m2 . ..
Prints
bit-imagegraphics at 60 dots per inch horizontally.The
27 75 nl n2 IB 4B n] d
ml d .. .
ml d ...
graphicimageis8dotshighandnl +n2x256dotswide.Maximum
widthis 8 inches(480dots).ml, m2,...arethedotdata,eacha 1bytevaluefromOto255representing8verticaldots,withthemost
significantbitat thetop andtheleastsignificantbit atthe bottom.
Thenumberof databytesmustbenl + ti x 256.Dotsbeyondthe
rightmarginareignored.Attheendofbit-imageprintingtheprinter
returnsautomaticallyto charactermode.
Printdouble-density8-bitgraphics
Mode
Both
ASCII
<ESC> “L” nl n2
ml m2 ...
Decimal Hexadecimal
27 76 nl d IB 4C nl n2
ml m2 ...
ml d ...
Printsbit-imagegraphicsat 120dotsperinchhorizontally(maximum960dotswide).See<ESC>“K”for otherinformation.
Printdouble-density,double-speed8-bitgraphics
Mode
Both
ASCII
CESC> “Y” nl d
ml m2 ... ml d ... ml ?n2 . ..
Decimal Hexadecimal
27 B9 n] d IB 59 nl n2
Printsbit-imagegraphicsat 120dotsper inchhorizontally(maximum960 dots wide),skippingeveryseconddotin the horizontal
direction.See<ESC>“K”for otherinformation.
Page 67

Printquadruple-density8-bitgraphics
Mode ASCII Decimal Hexadecimal
Both
<ESC> “Z” nl n2
ml d ...
27 90 nl d
ml m2 ... ml m2 ...
IB 5A nl W?
Printsbit-imagegraphicsat 240dots per inchhorizontally(maximum 1920dotswide),skippingeveryseconddotin thehorizontal
direction.See<ESC>“K” forotherinformation.
Selectgraphicsmode
Mode ASCII Decimal Hexadecimal
std.
<ESC> “*” nO nl 27 42 d d IB 2A nO nl
n2 ml m2 ... n2
ml d ...
d ml m2 ...
Selectsoneof eightgraphicsmodesdependingonthevalueof nO
and prints bit-imagegraphicsin this mode. See <ES~ “K”
informationon nl, ti, ml, rn2,...
MI Graphicsmode
O Normal-density (60dotsper inch)
1 Double-density (120dotsperinch)
2 Double-density,double-speed (120dotsper inch)
3 Quadruple-density
(240dotsper inch)
4 CRTgraphics,modeI (80dotsperinch)
5 Plottergraphics (72 dotsper inch)
6 CRTgraphics,modeII (90 dotsper inch)
7 Double-densityplottergraphics(144dotsperinch)
for
Convertgraphicsdensity
IMode ] ASCII Decimal
IStd. I <ESC> “?” n m
ConvertsgraphicsdefinedbysubsequentcESC>“K”,<ESb “L”,
<ESC>”Y”or<ESC>“Z”commandstoadensitymodedefinedby
<ESC>“*”.n is “K”,“L“,“Y” or “Z”,indicatingthemodeto be
converted.misacodefrom<0>to<7>indicatingoneofthemodes
of <ESb “*”.
I 27 M n m I
Hexadecimal
IB 3F n m
59
Page 68

Print9-pingraphics
Mode ASCII Decimal Hexadecimal
std.
<ESC> “” “ nO nl
d ml d ... n2 ml d . .. n2 ml d ...
27 94 nO nl
Selectsoneof eightgraphicsmodesdependingonthe valueof M
and prints 9-pin bit-imagegraphicsin this mode. The graphics
imageis 9 dotshighandnl +n2x 256dotswide.Maximumwidth
is8inches.Dotsbeyondtherightmarginareignored.ml, m2,...are
bytepairsrepresenting9verticaldotseach.Intheleftmostposition,
themostsignificantbitofml isthetopdot;theleastsignificantbit
ofml istheseconddotfromthebottom;themostsignificantbitof
m2isthebottomdot;andtheotherbitsofm2areignored.Otherbyte
pairsaresimilar.Thenumberof databytesmustbe2 x (nl + n2 x
256).Attheendofbit-imageprintingtheprinterreturnsautomaticallyto charactermode.
rd Graphicsmode
O Normal-density (60 dotsper inch)
1 Double-density (120dotsperinch)
2 Double-density,double-speed (120dotsper inch)
3 Quadruple-density
4 CRTgraphics,modeI
(240dotsper inch)
(80dotsper inch)
5 Plottergraphics (72dotsper inch)
6 CRTgraphics,modeII (90dotsper inch)
7 Double-densityplottergraphics(144dotsper inch)
IB 5E nO
nl
60
Page 69

DOWNLOAD CHARACTER COMMANDS
Definedraftdownloadcharacters
Mode ASCII
cESC> “&” <O> n]
. std.
Definesoneormorenewdraftcharactersandstoresthemin RAM
forlateruse.DIPswitch1-2mustbeOFF;otherwiseRAMisused
as an inputbuffer,not for downloadingcharacters,andthis commandis ignored.Draftmodemustbeselectedbeforethiscommand
is executed.
nl is the charactercodeof thefirst characterdefinedand n2 is the
charactercodeof thelastcharacterdefined.nl mustbe equaltoor
lessthann2.Useofcharactercodes32(space)and127(deletecode)
shouldbe avoidedif possible.
Eachcharacters definedbyanattributebyte(mO)and11databytes
(ml, nd, .... .roll).
Themostsignificantbit of the attributebyteis 1if thecharacteris
an ascender(positionedentirelyabovethe baseline)orOif it is a
descender(descendingbelowthebaseline).Theattributebytealso
indicatestheamountofwhitespacetotheleftofthecharacter(Oto
7 dots,specifiedbybits4 to 6),andthewidthofthecharactercell,
includingthisspace(4 to 15dots,specifiedbybitsOto 3).Theleft
spaceandcellwidthattributesareusedonlyinproportionalspacing.
Eachdatabyte indicateseightverticaldots,withthe MSBbeingthe
topdotandtheLSBthebottomdot.Thesecorrespondtopins 1to
8or2 to 9 of theprinthead,dependingon whetherthecharacteris
an ascenderor descender.
For furtherdetails,pleasereferto the Chapter5.
d mO ml m2
d ... mll
Decimal
27 30 0 d
n2 mO
ml d d mO ml m2
d ... mll d ... mll
Hexadecimal
IB 26 W nl
61
Page 70

DefineNLQdownloadcharacters
IMode/
std. d rno ml m2
ASCII Decimal
cESC> “&” <O> nl 27 36 0 nl IB 26 LII nl
d d ml d
d ...
m46
nd ... m46
Hexadecimal
I
d mo ml d
ti ... m46
.DefinesoneormorenewNLQcharactemandstorestheminRAM
for later use. DIP switch 1-2must be OFF. NLQ mode must be
selectedbeforethiscommandis executed.Theparametersarethe
sameasforthedraftdownloadcharactercommandexceptthatthe
attributebytespecifiesrightspaceinsteadofcharacterwidthandthe
dotdensityis doubledin eachdirection,soeachcharacterconsists
of 16dotsverticallyand23dotshorizontallyandrequires46 data
bytes.Dotsdefinedbyml tom23areprintedonthefirstpassof the
head.Dotsdefinedby m24to m46areprintedon the secondpass,
thepaperbeingscrolledup half a dotbetweenthetwopasses.For
furtherdetails,pleaserefertothe Chapter5.
Definedraftdownloadcharacters
Mode ASCII Decimal Hexadecimal
27 61 nl n2 20 IB 3D nl n2 14
aO al a2 ml
d ... mll d .. . mll
aO al d ml
IBM
<ESC> “=” nl n2
aO al a2 ml
<DC4>
d ... mll
DefinesoneormorenewdraftcharactersandstorestheminRAM
forlateruse.Draftmodemustbe selectedbeforethiscommandis
executed.nl andn2givethenumberofdatabytesthatwillfollow.
dOisthecharactercodeofthefirstcharacterdefined.al anda2are
attributesbytes.ml tomll arethecharacterdata,andarethesame
as in <ESC> “&”. The attributebyte al indicateswhetherthe
characteris an ascender(notusingthe lowestof the ninevertical
dots)or a descender(notusingthehighestdot)andwhetherit has
a downwardextensionto 12dots.
62
Theattributebytea2 givesproportional-spacinginformation.Bit7
is ignored.Bits4 to 6 specifythe offsetto the firstbyteprinted(O
to7),enablingleadingspacesinthecharactertobe ignored.BitsO
to 3 specifythe widthofthecharactercell(maximum11dots).The
characterwillbefollowedbyamandatoryblankdotcolumnwhich
is notincludedin thiswidth.
Charactersdefinedbythiscommandcanbeselectedby-d3Sb “I”
4 or <ESC>
“I” 5.ThiscommandisignoredwhenDIP switch1-2
is ON.
Page 71

DefineNLQdownloadcharacters
Mode ASCII Decimal Hexadecimal
IB 3D nl n2 15
aO al d ml
m2 m46
IBM
<ESC> “=” nl n2 dJAU
al d ml
aO
d ... m46
27 61 n] n2 21
aO al d ml
d ... m46
Definesone ormorenewNLQcharactersandstorestheminRAM
for later use. DIP switch 1-2 must be OFF.NLQ modemust be
selectedbeforethiscommandisexecuted.Theparametemarethe
sameasforthedraftcharactercommandexceptthatthedotdensity
is doubledin eachdirection,so eachcharacterconsistsof 16dots
verticallyand23 dotshorizontallyandrequires46 databytes.
CopycharactersetfromROMintoRAM
Mode
sid. <ESC> “:” <O> n <o>
ASCII Decimal Hexadecimal
27 56 0 n O
Copiesthe selectedcharacterset with n, as shownbelow, to the
correspondingdownloadcharacter RAM area, overwritingany
downloaddataalreadypresent.IgnoredwhenDIPswitch1-2isON.
n Characterset
O Courier
1 Sanserif
7 Oratorwithsmallcapitals
8 Oratorwithlowercase
Selectdownloadcharacterset
Mode
std.
ASCII Decimal Hexadecimal
<ESC> “Yo” “l” 27 37 49
<ESC> “%” <1> 27 37 1
Selectsthedownloadcharacterset.IgnoredwhenDIPswitch1-2is
ON.
IB 3A 00 n 00
IB 25 31
IB 25 01
63
Page 72

Selectdraftdownloadcharacterset
Mode ASCII Decimal Hexadecimal
IBM
<ESC> “I” “4” 27 73 52
<ESC>
“I” <4> 27 73 4 IB 49 04
IB 49 34
Selectsthedownloadcharactersetanddraftquality.Ignoredifthe
FONTbuttonwaspressedduringpower-upor if DIP switch 1-2is
‘
ON.
Selectdraftelite downloadcharacterset
Mode
IBM
ASCII
<ESC>
<ESC>
“I” “5” 27 73 53 IB 49 35
“I” <5> 27 73 5
Decimal Hexadecimal
IB 49 05
Selectsthe downloadcharacterset,draftquality,andelitepitch(12
cpi).Ignoredifthe
FONTbuttonwaspressedduringpower-uporif
DIPswitch1-2is ON.
SelectNLQdownloadcharacterset
Mode ASCII Decimal Hexadecimal
IBM
<ESC> “1” “6” 27 73 54
<ESC> “I”
<6> 27 73 6
IB 49 36
IB 49 06
Selectsthedownloadcharactersetandnearletterquality.Ignored
FONTbuttonwaspressedduringpower-uporifDIPswitch1-
ifthe
2 is ON.
SelectROMcharacterset
Jode I ASCII Decimal Hexadecimal
std.
<ESC> “%” “O” 27 37 48
<ESC> Vo” <O> 27 37 0
Stopsusingthe downloadcharacterset and returnsto the built-in
ROMcharacterset.IgnoredwhenDIPswitch1-2is ON.
IB 25 30
IB 25 00
64
Page 73

OTHER PRINTER CONTROL COMMANDS
SetMSBto 1
Mode ASCII Decimal Hexadecimal
std. <ESC> “>” 27 62
IB 3E
Setsthemostsignificantbit of eachsubsequentbytereceivedto 1,
allowinguserswitha7-bitinterfacetoaccesscharacterswithASCII
codesgreaterthan 127.
SetMSBto O
Mode
ASCII Decimal Hexadecimal
std. <ESC> “=” 27 61
Sets the
mostsignificantbitof eachsubsequentbytereceivedto O.
AcceptMSBas is
Mode
std.
ASCII Decimal Hexadecimal
<ESC> “#” 27 35
Cancelstheprecedingcommandsandacceptsthemostsignificant
bitas it is sentto the printer.
Deletelast charactersent
Mode
std. <DEb
ASCII Decimal Hexadecimal
127
Deletesthe last characterreceived.Ignoredif the last character
receivedhas alreadybeenprinted,orif the lastcharacterreceived
wasallor part of a command.
Cancellastline
Mode ASCII Decimal
Both
<CAN> 24 18
IB 3D
IB 23
7F
Hexadecimal
Deletesthelastlinecurrentlypresentin theprintbuffer.
65
Page 74

Quietprint
Mode
Std.
ASCII
<ESC>
<ESC> “s” <1> 27115 1
“S” “l” 27115 49
Decimal Hexadecimal
IB 73 31
IB 73 01
Selectsthequietprintmode,inwhichtheprinterprintseachlinein
two passestoreducethe soundofprinting.Youcanalsosetthequiet
modewiththe controlpanelbutton.
Cancelquietprint
Mode ASCII Decimal Hexadecimal
Std.
<ESC>
<ESC> “s”
“S” “O”
<o> 27115 0
27115 48 IB 73 30
IB 73 00
Cancelsthequiet printmode,andresumesnormalprinting.
Youcan alsocancelthequietmodewiththecontrolpanelbutton.
Setprinteroff-line
Mode
ASCII Decimal
std. <DC3>
IBM
<ESC> “Q”
Sets the printer off-line. The printer disregardsall subsequent
charactersandcommandsexcept<DC1>,whichreturnsittotheonlinestate.Theprinter’sON
<3>
19
27 81 3
LINEindicatordoesnotgo off.
Hexadecimal
13
IB 51 03
Setprinteron-line
Mode ASCII Decimal Hexadecimal
Both
66
<Del> 17 11
Returnstheprinterto the on-linestate,allowingit to receiveand
processallsubsequentcharactersandcommands.Thiscommandis
ignorediftheprinterwassetoff-linebypressingtheON
LINEbutton
on thecontrolpanel.
Page 75

Bell
Mode ASCII
Both -+lEb 7
Decimal Hexadecimal
Soundsabriefbeeptonefromtheprinter’sbeeper.
Bidirectionalprinting
IModel ASCII
Both
<ESC> “U” “O”
<ESC> “U” <O> 27 85 0
Causessubsequentprintingto be donein the normalbidirectional
mode,whichis fasterthanunidirectionalprinting.
I Decimal
27 85 48 IB 55 30
Unidirectiona/printing
Mode ASCII
Both
<ESC> “U” “l”
<ESC> “u” cl>
Causessubsequentprintingto be doneunidirectionally,ensuring
maximumverticalalignmentprecision.
Decimal Hexadecimal
27 85 49 IB 55 31
27 85 1 18 55 01
One-1ineunidirectionalprinting
07
\ Hexadecimal I
16 55 00
Mode ASCII
Std. <ESC> “<”
Immediatelyreturnstheprintheadtotheleftmargin,thenprintsthe
remainder of the line fromleft to right. Normal bidirectional
printingresumeson thenextline.
Manualfeed
Mode ASCII
Both ,,(,, ,,(,,
<ESC>
Selectsmanual sheet feedingeven when the optional automatic
sheetfeeder is mounted.Ignoredif DIP switch 1-4 is ON (ASF
inactive).
<EM> <O>
“o” “ “ “ “
))
Decimal Hexadecimal
27 60
Decimal
27 25 0
40 40 48 41 41 28 28 30 29 29
IB 3C
Hexadecimal
IB 19 00
Page 76

I
Autofeed
‘Mode ASCII
Both ,,(,, ,,(,,
<ESC> <EM> <4>
“4” “ “ “ “
))
Decimal
27 25 4
40 40 52 41 41 28 28 34 29 29
Selectstheautomaticsheetfeeder.IgnoredifDIPswitch1-4is ON
(ASFinactive).
Ejectpaper fromASF
Mode ASCII
Both ,,(,, ,,(,,
<ESC> <EM> “R”
Ejects the current page. Ignored if DIP switch 1-4is ON (ASF
inactive).
“R” “ “ “ “
))
Decimal
27 25 82 IB 19 52
40 40 82 41 41
Setprint startpositiononASF
Mode ASCII
Both ,,(,, ,,(,,
<ESC> <EM> ‘T” n
Skipsn/6inchesatthe topofthe page,wherenisbetween1and 15.
IgnoredifDIP switch 1-4is ON(ASFinactive).
“T” “ “ “ “ n
))
Decimal Hexadecimal
27 25 84 n
40 40 84 41 41 n 28 28 54 28 29 n
Hexadecimal
IB 19 04
Hexadecimal
28 28 52 29 28
IB 19 54 n
Resetprinter
Mode ASCII Decimal Hexadecimal
Both <ESC> ‘&I@” 27 64 IB 40
Reinitializestheprinter.Clearstheprintbufferandreturnssettings
totheirpower-upvalues.Doesnot cleartheinputbufferorchange
ASF selections.
68
Page 77

chapter 5
DOWNLOAD CHARACTERS
Withthisprinteryoucancreatenewcharactersandsymbols,downloadtheir
dotdata,andhave themprintedinplaceofselectedcharactersintheregular
characterset.Charactersthatcanbegeneratedinthiswayrangefromsimple
but useful symbols like the check mark through complex Chinese or
Japanesecharacters.
Regular characters are permanentlystored in the printer’s ROM, but
charactersyoudesignaredownloadedandstoredin RAMfor use.
DESIGNING YOUR OWN DRAFT CHARACTERS
Designingandprintingyour own charactershas two requirements:first,
designingtheshapeofthecharacter,calculatingthedatanecessarytomake
the shape,and sendingthatdatato the printer,and secondly,sendingthe
commandtoprintthedownloadedcharactersinsteadoftheregularcharacters. There are a numberof designconstraintsfor downloaddraft quality
characters:
● Thematrixor grid on whichyoudesignthecharactersis sixboxeswide
by nineboxeshigh.
● HorizontaUy,dotsmaybecenteredinabox, ormaystraddlealine,making
theactualcharactergrid 11dotswideby9 dotshigh.Vertically,dotscan
onlybe centeredin a box.SeeFigure5-1.
I
Figure5-1.Dotscanbe insideboxesorstraddletheverticallinesof thegrid
69
Page 78

I
●
Theminimumwidthof a characteris fivedots.
●
Theuser-definedcharactersmayuseeightdotsvertically.
w
Dotscannotoverlap—thatis, youmaynothavea dotinsideaboxnext
to onethat is on a line.
●
Youmay defineanypositionin the ASCIItable.
PhotocopythegridinFigure5-2tohelpdesignyournewcharacters.Wewill
usea tiny-rep=sentationof a car-shapedsymbolforour example.
ml m3 ti m7 m9 mll
m2 m4 m6 m8 m10
]~g
64
32
16
8
4
2
1
ASCII Code:
Descender:
Left space:
Last column:
mO= Descender x 128
+ (Left x 16)
+ Last
[
Flgutw5-2 Usethisgrid(oronesimilartoit)todefineyourowndraftcharacters
Definingtheattributedata
Beforeyoustartthedefinition,youwillneedtodecideexactlywherein the
mgularASCIIsetyouwanttoplaceyourcharacters.Atlerdownloading,you
access your new characterby sending the code for the character you
replaced.
70
Page 79

ml m3 nd m7 m9 mll
nl~ “,4 m6 n,8 ~,]()
128
64
32
16
8
4
2
1
124 66 64 76 16 0
0 4 36 2 12
FigureS3.Addthevalues of the dote in each column and write the sum of each column atthebottom
ASCII Code:
Descender: 7
Left space: O
column: ?Z
Last
Descender x ]28
m(l =
(bft X 16)
+
+ Last
Next you must choosewhetherto make the car symbolan ascenderor a
descender.Thisdetermineshowthecharacteris seatedonthe line:
Ascender: Cl:;:::
Descender: ~.u~i’:
Wedecidedthatourcarsymbolwillnotbe a“descender”,soafigure“l” is
writtennexttoDescenderonthegrid.Ifyourcharacterisadescender,write
a “O”nextto Descender.
Next, you must specify the left space and the last print column of the
character.
Beingableto specifythe widthof the characterallowsyouto specifythe
precisearea insidethe grid that the characterwill occupy,so that narrow
charactemwilllook attractivenextto wideones.
AcceptablevaluesfortheleftspaceareOto7, andthelastprintcolumnare
from4 to 11.
Ourcharacterwilloccupyfromcolumn1tocolumn11,sotheleflspaceis
Oandthe characterwidthdatais 11.
Page 80

Assigningthecharacterdata
Now,wecalculatetheverticalnumericalvaluesofthecolumnsofdots,and
enterthemunderneaththegrid.Forexample,lookingatFigure5-3,wesee
thatintheleft-mostcolumntherearefivedots,andtheyaresittinginthe“64”
box,“32’’box,“16”twx,“8”box,and“4”box.Thusitsverticalvalueis124.
In the nextcolumn,thereis no dotstraddlingtheverticalline;itsvalueis
nxorded as O.
Youwillseethelettersml,nd, m3,etc.,areaboveyourvalues.Whenyou
definethecharacter,youwillsubstituteyourvalueforeachoftheseletters.
Samp/eprogram
To demonstratehow to use the downloadcharacters,let’s use the “car”
characterandsomeotheruser-definedcharacterstoprintasmallgraph.This
programwilldojust that:
LPRINT CHR$(27) ; “A” ; CHR$(O) ;
200
LPRIN”r CHR$(60) ; CHR$(62 ) ;
210
FOR N=60 TO 62
220
FOR M=O TO 11
230
READ MM
240
LPRINT CHR$(MM);
250
NEXT M
260
NEXT N
270
LPRINT
280
290
;:); 139, 2, 5,
300
DATA 139, 124,
310
DATA 36, 16,
320
DATA 139, 46, 16, 2, 60, 0
330
DATA 48,
340
LPRINT CHR$(27) ; ‘(
350
360
LPRINT CHR$(27 ) j “h” jCHR$(1 ) ;
LPRINT “
370
LPRINT CHR$(27 ) j “h” 1CHR$(OJ ;
380
LPRINT CHR$(27) : “%”; CHR$( 1 ) ;
390
LPRINT “AUTOS“ ; CHR$(9 ) j
400
FOR I=. 4 TO 9.3 STEP .4
410
LPRINT CHR$(61) ;
420
430
NEXT I
LPRINT
440
0,241, 8, 5, 2, 0
0, 48,
U. S . EXPORTS”
8, 241, 0
0, 66,
2, 16, 12, ()
D:4JCHR$( 11 ) ;CHR$(O) ;
4, 64
0, 48, 0
72
Page 81

450 L,PRINT “CHEMICALS”;CHR$ (9) ;
460 FOR 1=.4 TO 5.7 STEP .4
470 LPRINT CHR$(60) ;
480 NEXT 1
490 LPRINT
500 LPRINT “GUNS”;CHR$ (9) ;
510 FOR 1=.4 TO 1.4 STEP .4
520 LPRINT CHR$(62);
530 NEX’1”I
540 LPRINT
550 LPRINT CHR$(9) ;“+––”;
560 SCALE$=’’––+––”
570 FOR 1=2 TO 8 STEP 2
580 LPRINT SCALE$;
590 NEXT I
600 LPRINT “--+”
610 LPRINI” CHR$(9); ” “;
620 FOR 1=2 TO B STEp 2
630 LPRINT “ “;1;
640 NEXT I
650 LPRINI” CHR$(27) ;”%’’;CHR$(O)
660 LPRINT CHR$(27) ;“S’’;CHR$(O) ;
670 LPRINT CHR$(9); ’’MILLIONS OF DOLLARS”
680 LPRINT CHR$(27); ”T”
690 LPRINT CHR$(27) ;“@”
LLlEL
+--- ..-.” -t . ---+.. . . -,+----,-- --+’ ---- .....+
EX’
73
Page 82

I
DEFINING YOUR OWN NLQ CHARACTERS
Asyou probablynoticed,NLQcharactersareprintedby twopassesofthe
printhead.Halfofthecharacters printedonthefirstpass,andtheremainder
onthe secondpass.Thepaperis rolleduphalfadotheightinbetweenpasses
toletthe printheadprintdotsonthe secondpassthatoverlaptheprevious
dots,b onlerto fillin thespacesandproducedenserchamctem.Additionally,theprint head speedis halved,andthe dotsareprintedat doublethe
densityofdraftcharacters.Forthisreason,NLQcharactemcancontainup
to 23 dotsin the horizontaldirection.
Fundamentally,theprocesstodefineandprintdownloadedNLQcharacter
is the sameas fordraftcharacters,exceptthatyoumust supplyaboutfour
timesasmuchcharacterdata,andyoumustdesignthecharacterwiththetwo
passes of the print head in mind. There are small differenceswith the
standardmodein the way the attributeinformationis processedalso.
In the draftqualitymodetheattributebytecarriesthe descenderdata,and
specifiestheleft spaceandthecharacterwidth.In theNLQmode,the first
bit also carries the descenderdata, and the next three bits describethe
character’sleft space as with the draft charactem,but the last four bits
describetherightspace.Appropriateallocationofdatain thesesevenbits
lets you place the character where you like within the grid, with the
restrictionthatthecharactermustbe at least9 dotswide.
Usethe gridinFigure5-4to helpplotthedata.Duetothetwo-passprocess,
NLQcharacterscancontainupto 16dotsvertically.mltom23arethedata
forthe f~st pass,and m24to m46arethedataforthesecondpass.
Tomakethecharacterdataeasiertocalculate,putthefirstpassdotsinside
theboxesonthegridwhenyouaredesigningyourcharacters,andthesecond
passdots on thelines.Rememberthatadjacentdotsmaynotoverlaponthe
samepass;inotherwords,ifonedotis inabox,itsadjacentdotonthesame
passmaynotbeonaline.Therefore,tomakesmoothcharactm, putthedots
neededto overlapanyspacesinacharacterintheappropriateplacesin the
secondpass grid.
Ifweplotourcar-shapedsymbolforNLQ,thegriddatawilllooklikeFigure
5-5.
Thedefiningprocessisthesameasfordraftcharacters,exceptthatyoumust
selectNLQmode,and you mustdefine46 data. If youwish to printyour
NLQ characterswiththe regularcharacterset, the remarksregardingthe
74
Page 83

simultaneoususeof ~gular anddownloadcharactersinthedraftcharacter
sectionapplyequallyto NLQ characters.
(1s1) ml
rr124.
,.
..m23
..m46
(2nd)
]~8
128
64
32
16
64
32
8
4
~
16
8
4
Code:
ASCII
Descender:
Left space:
Right space:
mO= Descender x 128
+ (Lef{
+ Right
~
1
lst:
1
2nd:
I
I
Figure5-4.Usethis grid (or one similar to it) to define your own NLO characters
( lst) m] ...,
..m23
(2nd)
128
128
64
3?
16
8
4
2
64
ASCI1Code:
32
Descender: 1
16
Left space: O
8
Right space: O
mO= Descender x 128
4
+ (Lef[ x 16)
2
1
~St: 14 38 70 70 126 0 0 0
?6 1 1 0
2nd: 28 M 74 M 124 0 64 32 76 0 0 0
32 64 0 0 0
070382.?6 6 6
12 12 74 74 74 72
9980
1
igure 5-5.Add the values of the dots in the boxes first, and then add the value on the lines
X 16)
I
75
Page 84

MEMO
76
Page 85

chapter 6
MS-DOS AND YOUR PRINTER
WhenusingyourprinterwithanIBMPC,PC-XT,orPC-ATorcompatible,
youwillprobablybeusingPC-DOSorMS-DOSas anoperatingsystem.A
numberofsoftwaretricksmaybe usefulhere.Thischapterisnot,however,
asubstitutefortheoperatingsystemmanualssuppliedwithyourcomputer.
To learnhowto printfiles,etc.it is best to readthe relevantpartsofthese
manuals.
INSTALLING APPLICATION SOFTWARE WITH
YOUR PRINTER
Wheninstallingapplicationsoftware,youmayfindthatyourprinteris not
specificallymentionedin the lists of printersgivenfor installation.However, this should pose no problem. Read this section, and guidelines
providedwithyoursoftwa~ on printerinstallation.
If youhaveyourprintersetup instandardmode,thenchooseanEpsonLX-
850as yourprinterto be selected.
Ifthisisnotmentioned,chooseoneofthefollowing(inorderofpreference):
StarNX-1000/LC-10,StarND-10/15,EpsonFX86e,EpsonFX286e.
If you have yourprintersetup withthe DIP switchesto emulatean IBM
ProprinterIII, simplychoosethisfromthelist of printersavailablein the
applicationsoftwarelist.
If the IBMProprinterIII is notmentioned,usePmprinterII or Pmprinter.
Ifyoursoftwaxepackagedoesnotmentionprintersbyname,butasksinstead
whatfeaturesyourprinteris capableof, the most commonquestionsare:
“Canyourprinterperforma backspace?”and“Canit do a hardwareform
feed?”.You shouldanswer“Yes”to boththesequestions.
Other softwarepackagesmay well allowyou to installspecificfeatures.
Spreadsheetprogramswilloftenaskforthemaximumnumberofcolumns
to be printed.This is givenbelow.
77
Page 86

CPI
Pica 10
Elite 12
Condensedpica
Condensedelite
Proportional
Sometimesthe software installation will ask you for an initialization
sequenceto returntothedefaultsettings.Thecommandforyourprinteris
<ESC>@.
MakesurethattheDIPswitchesaresetforthecorrectpnnteremulation,and
thatyouhave selectedtheappropriatecharactersetusingtheDIPswitches.
Ifyouareindoubtaboutthecofilgrationof yourapplicationsoftware,seek
expertadvice.Yoursoftwaresupplierwillprobablybeyourmostqualified
reference.
17.1 137
20 160
Numberofcolumns
80
96
Variable
EMBEDDING PRINTER COMMANDS
Many word-processorsand other softwarelack commandsfor changing
font,or printingdouble-sizecharactem.Yourprinterthereforehas commandsthatcanbeembeddedindocumentstocontrolthesefunctionswithout
softwarehelp.Thecommandsconsistofacapitalletterenclosedindouble
parentheses,followedbya digit:
Font:
Size:
If you want to print a title in double-sizeOratorwith smallcapitals,then
changeto regular-sizefontsforothertext,youcan usethesecommandsas
follows:
((F))O
((F))l
((F))7
((F))8
((F))9
((s))0 Standardsize
((s))1
((s))2
((s))3
Courier
Sanserif
Oratorwithsmallcapitals
Oratorwithlowercase
Draft
Double width
Doubleheight
Doublewidthandheight
Page 87

Fileas seenon computerscreen:
((F))7 ((S))3
Printer commands
(( F))CI (( S))0
Font commands (( F))lcan be (( F))7embeddecl
((Fl)8anywhere ((F) )9in a document.
Printout:
PRINTER COMMANDS
Whenyouusethesecommandsthereare severalpointsto note:
● The font ((F)) commandis ignoredif the FONTbuttonwas held down
whenpowerwas switchedon.
● A lineconsistingof commandsaloneprintsas a blankline.
● Thesoftwarewillnot knowthatthesearecommands,soyoucannottrust
yoursoftwaretogiveyouthecorrectlinewidth.Theprintedlinemaybe
considerablyshorterthanthelineon thescreen;theextraspacebeingthe
spacethatwasoccupiedby thecommands.
Onewaytohandlethe lastproblemistoprepareyour documentwithoutthe
commands,theninsertthemasa finalstep,withthemarginsreleased.The
find,replace,andcopyfunctionsofword-processingsoftwarecanbehelpful
here.
Ifyoudonotusethesecommandsorthepanelcontrols,theprinterwillprint
standard-size,draft characters.
The printersupportsvariouscommandsin additionto the above,such as
quadruple-sizeprinting.Mostoftheseothercommandsconsistoftheescape
codefollowedby one or morelettersor numbers.
If your softwareenablesyoutoplacetheescapecodeinyourfiles,orif you
areabletodefinethisasauseroptionduringinstallation,youcanalsoembed
theseescapesequences.
Page 88

PROGRAMMING THE PRINTER WITH DOS
COMMANDS
If your systemincludesthe file PRINT.COMyoucan use the main DOS
printingcommand.SimplytypethewordPRINTfollowedby thenameof
the file you want to print. To print a fde named README.DOC,for
example,type:
A>PRINT README .DOC
The computermay respond with the followingmessage,asking which
printertouse:
Name of 1ist device [PRN] :
If yourcomputerisconnectedtoonlyoneprinter,pressRETURNto select
the default choice (HUN).Printing will begin and the A> prompt will
reappear.You can executeothercommandsor programswhilethe fde is
beingprinted.
A single PRINTcommandcanprinttwoor morefiles.Listthe filenames
consecutivelyon the sameline,or use wild-cardcharactem(* and?).Each
filewillbe printedstartingon anewpage.ThePRINTcommandalsohas
controloptions.For example,youcan terminatea printingjob in progress
withthen option.(Theprintermaynotstopprintingimmediatelyasthere
maybeconsiderabledatastoredaheadinitsbuffer.)Forthen option,type:
A )F’RINT/’”lY
Seeyour,DOSmanualforfurtherinformationaboutthePRINTcommand.
If yoursystemdoesnotincludePRINT.COM,youcanprintfilesby using
thePRNdevicenameinCOPYorTYPEcommandssuchasthefollowing:
COPYandTYPEdonotpermityouto executeothercommandswhilethe
fileis printing.
Ifyouwantaparticularfont,orprintpitch,youcanmakethesesettingsfrom
thecontrolpanelbeforeyoustartprinting.See Chapter2.
80
Page 89

I youprintfromtheDOScommandlevelveryoften,itwillbeadvantageous
tocreateaprintersetupfde.Theninsteadofsettingfontetc.manuallyeach
time, you can compIetethe setup with a single command from your
computer.Forexample,youcancreateafilecontainingprintercommands
to selectnearletterquality,and selectelitepitchwith the Standardmode.
Youcan find the commandsin Chapter4. Wesuggestthefollowing:
~Nearletterquality
● Elitepitch
<ESC> “l”
<ESC> “!”
<1>
<ESC>“!”<1>is a powerfulcommandthat,in additionto selectingelite
pitch,cancelsunwantedfeaturessuch as underliningwhichmightbe left
from previous commands.The angle brackets around the cl> indicate
charactercode 1,whichis a controlcode,notthe printabledigit“l”.
Youmay wantto placeadditionalcommandsin this file, such as left and
rightmargins,line spacingandbottommargincommands.Oryoumaywant
to createa varietyof setupfdes with a differentset of commandsin each.
To avoidexcesslinefeeds,youshouIdpIacethe commandsononelinein
thesetupfile.Youmayormaynotbeabletogenerateasetupfilewithwordprocessingsoftware;it dependson whetheryour softwarelets you enter
controlcodes.If yoursystemincIudesthefileEDLIN.COM,however,you
caneasilycreatea setupfile withthe DOSline editor.
An appropriatenameforthissetupfilewouldbeNLQELITE.DAT.Touse
the DOSlineeditor,typethe commandEDLINNLQELITE.DAT,thentype
theunderlinedpactsofthe followingdisplay.PressRETURNattheendof
eachline.Don’ttypethesymbol“A”.ThissymbolmeanstoholdtheCTRL
keydownwhilepressingthenextkey:forexample,‘V meanstotypeCTRL-
V. whichindicatestheendof the input.
A)EDLIN NLQELITE .DAT
..._————.———....-..—..—.,-
New f i le
“’v[:“VA
—......—..——_.—
‘V indicatesthatthe
*.X1X1
*“C
—
followingcharacteris a controlcode.‘V[ entersthe
<ESC>code.<ESb has charactercode27, and “[” is the 27thcharacter
fromAinASCIIsequence.Similarly,‘VAentersthecontrolcode<1>.See
yourDOSmanualif youneedfurtherinformationaboutEDLIN.
81
Page 90

Youcannowsetup theprinterby sendingitthefileNLQELITE.DAT.To
avoidumecessaryloggingofcommands,switchhard-copyoutputoff (by
pressingClllL-PRTSCifhardcopyis on).ToprintthefileREADME.DOC
in NLQelitetype,givethe followingtwo commands:
A?COPY NLC?ELITE. PAT PRN
A)PRINT README .DOC
Forgreaterconvenienceyoucanmakeabatchfdethatwillsetup theprinter
andprintany specifiedfilewitha singlecommand.To createsucha batch
filewiththenameNLQPRINT.BAT,typeinthefirstfourlinesshownnext.
‘Z meansto presstheCTRLandZkeyssimultaneously.Tousethis fileto
printREADME.DOC,typethefifthline.
A ?c@Pj’CON NI.QFT!INT.BAT
COPY NLQELITE . DAT PRN
PRINT %1
.-
L
A’?NLQpRINT RE7iDME. DOc
The firstline aboveis a copycommandfromthe CONsolescreento a file
namedNLQPRINT.BAT.Thenexttwolinesarethecontentsofthisfile.The
%1is a dummyparameter:whateverfilenameyoutypeafterNLQPRINT
willbe substitutedfor 701andprinted.
PROGRAMMING WITH BASIC
As an exampleofprogrammingtheprinteronMicrosoftBASIC,wehave
listed the program for the IBM-PC.This program runs in the printer’s
Standardmode,andthe dowrdoadablecondition(DIPswitch 1-1ON and
DIP switch 1-2OFF).
1000 ‘
1010 E$=CHR$(27) ‘Escape cqde
1020 D$-E$+’’XO”
1030
1040C$=@+’’kO’’+N$
1050S$=E$+’’kl’’+N$
106001$-E$+’’k7’’+N$
107002$=E$+’’k8’’+N$
1080H$=CHR$(9)
1090P$=E$+”P”
1100‘ Startprinting
1110WIDTH“1.Fll:“,255
82
Set control cedes
N$=E$+’’x1°
‘Draft quality
‘Nearletterquality
‘Couriercharacters
‘Sarserifcharacters
‘Oratorwithsmal1 capital
‘Oratorwithlowercase
‘Horizontaltab
‘Picapitch
Page 91

1120LPRINTE$;’’D’’;CHR$(3);CHR$(13);CY+R$(O)‘Set~
1130LPRINTC$;“Fontsare:”
1140LPRINTH$;D$;“Draftcharacters,“
1150LPRI~ H$;C$;“Couriercharacters,”
1160LPRINTH$;S$;‘%nserifcharacters,”
1170LPRINTH$;O1$;“Oratorwithsmal1 capitals,or ‘(
1180LPRINTH$;02$;“
1190LPRINTE$;“4”;
withlowercasecharacters,
‘Selectitalics
1200LPRINTH$;02$;“and“;01$;‘(italics“;S$;“for“;
1’210I.F’RINTC$;“all“;E$;“fonts.”
1220LPRINTE$;“5”
‘Cancelitalics
1230LPRINTC$;“Printpitchesare:”
1240LPRINI’H$;P$;“Picapitch,“
1250LPRINTH$;E$;
“M”;“Elitepitch,”
1260I#RI~ H$;CHR$(15);‘Cordensedpitch
1270LPRXNTP$;“Condensedpicapitch,“
1280LPRINTH$;E$;“M”;
1290LPRI~ P$;
1300LPRINTCHR$(18)
1310LPRINTH$;E$;
“Cordemedelitepitch,”:
‘Picapitch
‘Cancelcordemedprint
‘Selectproportionalspacing
1320LPRINI’“andproportionalspacirg,”
1330LPRI~ E.$;
‘ proportiomlspacirg
1340LPRIW H$;E$;“W1’’;’’Expanded,“;F$;“WO”;
1350LPRI~ IZ$;“w1”;‘Touble-height,“;E$;“wO”
1360IFRINTH$;E$;“h”;GIR$(l);“Ibubl=ized,”
1370LPRItWH$;E$;“h”;CHR$(2);“Quad*ized.”;
1380LPRI~ E$;“h’’;CHR$(O)
1390LPRI~ :LPRINT:IYRINT
1400LPRI~ ~; “Q”;CTIR$(47)‘Setrightumqin
1410LX’RINTC$;“Varimslineamicharacterspacings:”
1420IPRI~ E$;“al”
‘Centertext
1430KM? 1=1‘ID7
1440LPRINTE$;“A”;CHR$(I); ‘Set1inespacing
1450LPRIM E$;“ “;CHR$(I); ‘Increasecharacterspace
14$0~~~ “THE
S C
1470NEXTI
la FCR I-7ITI1 SIW –1
1490LPRINTF.$;“A”;CHR$(I);
1500LPRINTE$;“ “;cHR$(I);
1510LPRI!W“lHESPACIN3SARE CHAN’3ED”
1520NEXTI
1530LPRI~ E$;“aO” ‘Lef,tjustify
1540LpRIm ~; “3”;CHR$(36); ‘Set1/6”1inespacing
1550LPRINTF$;“ “;CHR$(0);
‘Normalcharacterspace
1560LPRINT:LPRINT
1570LPRIW C$;“Otherfeatures:”
1580LPRINTH$;E$;“E”;“I@hasized”;E$;“F”;”,“;
1590LPRINTE$;“G”;‘Tkmble-trike”;E$;“H”;”,“;
1600LPRINTE$;“-l”;‘Thxierlining”;E$;“4”; “, “;
1610LPRINT
16~0~1~ H$;FJ$;“SO”;“
SUPERSCRIPT”;E$;“T”;“ and “;
1630LPRI~ E$;“S1”;“5WESCR1PT”;E$;“T”
1640Gmu8 2110
,
83
Page 92

1650 LPRI~ H$;C$;“Ibtnloadcharacters:“;
1660LPRI~ D$;E$;“%1”; ‘Selectdownloadcharacter
1670l?3R1=1TO 5
1680LPRINTCHR$(60); ‘Printdownlmd character
1690NEXTI
1700LPRINTE$;“%0”; ‘Selectnormalcharacter
1710GCEuB2200
1720LPRIm C$;E$;“%1”:
‘Selectdownloadcharacter
1730FQR 1=1‘lU5
1740LPRINTCHR$(60); Printdownloadcharacter
1750NEXTI
1760LPRINTE$;“%0”
‘Selectnomal character
1770LPRI~ H$;C$;“Variousdot graphicdensities:“
DIM 1.030$(4)
1780
1790 RE31?3RE2390
1800 FUR ROW=l TO 4
FORCOL=lTO 65
1810
1820REAOIX
1830- (ROW)‘D30$(ROW)+CHR$(t13)
1840NEXTCOL
1850NEXT~
1860LPRINrm; “A’’;CHR$(8):
‘Set8/72”linespscing
1870FORROW=lTO 4
1880LPRINTH$;“ “:
1890RX?E=JOTO 4
IF 1940
1900
LPRI~ E$;
1910
LPRI~ CHR$(65);CHR$(0);KG0$(173W);
1920
LPRI~ “ “;
1930
NEXTB
1940
LPRI~
1950
mm
1960
LPRINT
1970
m mw==lm 4
1980
LPRIm I-l$;“ “:
1990
FcRB-5m 7
2000
LPRINTES:
2010
LPRI~
2020
L “
2030
NEXTB
2040
LPRI~
2050
“*’’;CHR.$(B);
“*’’;CHR$(B);
C ; ; ;
‘Select
‘
S dotgraphicsmode
dotgraphicsmode
2060
EN!mm; “@”
2070
m
2080
‘Initializeprinter
2090
‘ ~INES
2100
‘Definedraftdownloadcharacter
2110
LPRIm D$;E$;“&”;CHR$(0);CHR$(60);CHR$(60);
2120
2130
RE510RE2300
FORM=O~ 11
2140
READMt4
2150
LPRINTCHR$(MM);
2160
NIXTM
2170
84
Page 93

2180
2190
‘DefineNLQdownloadcharacter
2200
LPRINTC$;E$;“&’’;CHR$(O);CHR$(60);CHR$(60);
2210
RHmRE 2330
2220
RX M=OTO 46
2230
FmDMM
2240
LPRI~ CHR$(MM);
2250
NEXTM
2260
2270
2280
‘DATA
2290
‘Draftdownload
2300
DATA139,124,0,
2310
characterdata
4, 64,36, 16, 2, 16,12, 0
66,
2320
2330
‘NI.Qdownloadcharacterdata
DATA128,14,16,38> 1, 70, 1, 70, 0,126s O, 0
2M0
DATA 70, 0, 38, 0, 22> 9, 6. 9, 6, 8> 6, 0
2350
DATA 28,32. 14,64,14. 0, 14, 0>124, 0, 0, 12
2360
DATA 64, 12,32,14,16,14, 0, 14, 0, 12, 0
2370
2380
‘Lbtgraphicsdata
2390
DATA O, 0, 0, 0, 1, 3, 7, 7, 7, 15/14,14
2400
DATA 14,14,14, 7, 7, 3, 3, 15,15,15> 0, 0
2410
DATA O, 0, 6, 7, 7. 7, 7. 7. 7. 7, 7. 6
2420
DATA 6. 0. 0, 7. 7, 7. 7. 7, 7. 7. 7s 7
2430
DATA 7, 7. 0, 0, 7. 7> 7, 7. 7, 7. 7. 7
2440
DATA 7, 7, 0, 0, 0
2450
DATA 0,
2460
DATA 7, 7, 3, 3,
2470
DATA O, 0, 0,
2480
DATA O, 0, 1,
2490
DATA O, 0, 0, 1,
2500
DATA O. 0, 0, 0, 0
2510
DATA
2520
2530
::~~~24>224.224.240,255r255t255,255,255,127,0, 0
2540
DATA 15,63,252,240,192,
2550
DATA
2560
DATA 0, 0, 0, 0, 0
2570
DATA 0,248,248,240,224,224,112.112,56,56,56,56
2580
DATA 56,120,120>240,X0,224,224,192,128,0, 0, 0
2590
DATA 0. 0, 0> 0, 0,
2600
DATA 192. 0, 0, 0, 0.
2610
DATA192, 0. 0, 0, 0, 0, 0, 0> 0, Or o> 0
2620
DATA O. 0, 0, 0, 0
2630
0, 60,255,255,255,255,255,143,15, 7, 7
3,131,193,241,240,240,0, 0
0,224,255,255>255,255,255,31, 0
3, 31,255,255,255,255,255,255>1
7, 31,255,252,240,192,128,O
o, 31,31. 3,129,128,192,192,192,192,192,224
0, 0, 0, 0,
0,192,255,255,255,255,255,15
0,240,255,255,255,255,255
7, 15,127,252,240,192,0, 0, 0, 0. 0, 0
0,128,248,248,248,248,240
0,240,248,248,248,248,240
85
Page 94

p w
Thisprogrambeginsbyassigninganumberofprintercommandsto BASIC
stringvariables(lines1000to 1090).Youcanfindmostofthesecommands
nearthe beginningof chapter4.
TheWIDTH“LPT1 :“255statementinline1110meansintlnitelinewidth.
It preventstheIBM-PCfrominsertingunwantedcarriagereturnsandline
feedsin graphicsdata.
Actualprintingbeginsin line 1120.Usingthepreassignedcommands,the
programprintssamplesof its differentfonts,includinga line showingall
stylesin italics,followedbysamplesoftheprintpitches,thensomedouble
andquadruple-sizedprinting.
Next comes the centralattractionof the program:a line of text printed
fourteentimesinexpandingandcontractingloopstogiveabarreleffect.The
workisdonebyfourprintercommands:acommandsettingtherightmargin
(line14@);acenteringcommand(line1420);a commandto varythe line
spacing(lines 1440and 1490);and a commandto micro-adjustthespace
betweencharactm (lines1450and 15W).
Nexttheprogramreturnstonormalspacingandgivesademonstrationofthe
printer’swc)rd-processingabilities:boldprinting,underlining,subscripts,
etc.
Therowof automobilesin thenextprintedlineiscreatedby dGwrdoading
twonew characterpatterns,whichareprintedinplaceofthecharacter“<”
(character60).Detailscanbe fwnd in Chapter5.
The finalpart of theprogramusesdotgraphicsto print some“SW”IGgm
withvariousdensities.Thedotpatternofthelogowasoriginallylaidouton
graphpaper,thenconvertedtothe datainlines2400to 2630withthehelp
of a calculator.Eachnumber~presents eightverticaIdots.(See“Graphics
cGmmands”in Chapter4 for details.)
Thepatternisprintedinfourrows,eachrowiseightdotshigh and65dots
wide.Lines1800to 1850readthedotdataintoastringarrayvariablenamed
LOGO$.Line1860setstheline spacingtG8/72inchsothatthe rows will
connectvertically.Theloopinlines 1870tG1960dGestheprintinginfour
passesof theprinthead.
86
Page 95

Fonts are:
;,l!...,.:<..,.;.
Courier characters,
SanSet -if characters,
ORATOR
(::/”’”1;::,/’”!(:{l.:::”!”:.(::!’”+:,
w l c c
a ITALICS fof-all ~’~:~:”;fc:.
Print pitches are:
Pica pitch,
Elite pitch,
Condensedpicap]tch,
Condensedel]tepltch,
and proportional spacing,
O
Expdncled..
Double-height,
Ihub 1e–s ized,
Q i .
Various 1i ne and charac<er spacings :
Other features :
Emphasized,
SUPER=CR1~~ and ~uB~C=l r_.*
Down1oacl characters :
Various dot graphic dens it ies :
Doubl e-strike, —-....—
;:,~:ii~:~:$~
~nder 1i n i nq,
Page 96

$8
Page 97

c 7
TROUBLESHOOTING
AND MAINTENANCE
Thefollowingsectionontroubleshootingandmaintenanceisintendedonly
as a brief guide. Rememberthat your printer is a highly sophisticated
electronicdevice,whichalsocontainshighvoltageinside.Forthatreason,
onlycarryoutthoseoperationsthatate describedin this chapter.
CAUTION: Anyattempttocarryoutoperationsotherthanthosedescribed
heremayresultinelectricshockand/ordamagetotheprinter.
Whencarryingoutanyrepairsormaintenance,alwaysfollow
the instructionscarefidly.
TROUBLESHOOTING
Yourprinteris a reliablepieceof precisionmachinery,which shouldnot
causeyouanytrouble,providedthatitisusedandtreatedsensibly.However,
if youdoexperienceaminorproblem,thefewtipsbelowshouldhelpyou
avoidhavingtomakeanunnecessaryservicecall.Thefollowingtablegives
youideason whereto look in thissectionif youexperienceproblems:
Region of fault Description
Power supply Power is not
Printing Theprinterdoesnotprin~orstopsprinting
Theprintisfaintoruneven
Dotsare
Whileusing application software, fonts orcharactm cannotbeprinted
The printout is not what is expected when running a program
Paper feeding Single sheets do not feed properly (without
Continuous pap& does not feed properly with the tractor feed
The ASF is not operating or is not feeding paper properly
Paper park(switching between continuous paper and cut she&a) is not
working properly
Text is being printed all on one line, or with extra blank lines
Page length and margin settings are not what is expected.
Remember-itisbetternotto attemptoperationsor~pairs aboveyourlevel
of competence.Otherwise,yourun the riskof damagingtheprinter.
beingsuppliedtotheprinter
missing in charactm or graphics
ASF)
89
Page 98

P s
If the POWER indicatordoesnotilluminate,checkthefollowing:
Check
1
Is the power cable properly
plugged into the eledrical
1
(
outlet?.
1
Is power being supplied to
1
the outlet?
1
Is theprintervoltage correct?
Possible remedy
Turn off the printer, make certain that the power cable
is securely connected, andthen tumtheprinterback on.
Turn off the printer and unplug it- TV out another
appliance oftheoutletto determin
supplied to that outlet.
Check thebottom panel ofyourprinterto verify that the
outletvoltage corresponds tothevokagerequiredby the
printer. If theydonotmatch, DONOTW tooperate the
printer. Contact your supplier.
eifelectricity is being
P
If yourprinterdoesnotprint,or suddenlystopsprinting,checkthefollowing:
Check
Is the interface cable con-
nected securely?
Is the O indicator illu-
minated? line.
Is the indicator
flashing?
Is the paper caught up internally?
Is the ribbon caught up Turnoff thepower, remove thenbbon, retension
around the print head? replace it. This problem occurs most frequently with a
Is the software you are using Check the installation settings inyour softwar% andreproperly installed for your install if necessary.
printer?
Can the printer perform self-
test operations? one of the buttons to perform a self-test. If these do not
Possible remedy
Check both ends of the cable - printer and computer to
make sure that the connector is firmly in position.
Ifit isno~ press the ON
If it is, the paper has run out. Load more paper.
Turn off the power, remove thejmedpaper, replace,
tumonthe@nter, andcontinueprinting. hIalcesurethat
the leading edge of the paper is smooth and uncreased.
LINEbuttontoset the printer on-
it,and
worn ribbom so you may need to replace the ribbon.
Turn the printer off, and turn it on again, holding down
work, contact your dealer.
9
Page 99

If theprintis faint,or uneven,checkthe following:
Check
Is the ribbon properly in-
stalled?
Is the ribbon worn out? The ribbon has a long tife, but will eventually need re-
Possible remedy
Check and reinstall ifnecessaxy.
placing. Fit a new ribbon cartridge if necessary.
If dotsare missingintheprinting,checkthe following:
I Check
Are dots missing at random
in the printing?
Isa line of dots missing con-
sistentlythroughoutthe”
ptiting?
I Possible remedv
The ribbon has become slack causing it to get caught
up. Stop printing, remove the ribbon cartridge, reten-
sion and replace it.
The print head is darnaged. Stop printing, and contact
your supplier for a new print head
If your applicationsoftwarecannotprint the fontsor charactersselected,
checkthefollowing:
Check
Is your application software
properly installed?
Are fonts not being selected
properly?
Are characters other than
those expected being
primed?
Possible remedv
Check the software installation, andre-install the soft-
ware if necessary.
Check the software installatio~ and insert the commands necessary for font changes into the software.
Eitheryou areusing the wrong International Character
Set (reset with DIP switches or software commands),
or you have the wrong character set selected (for
example if characters other than IBM block graphic
characters are being printed). Correct this with DIP
switches or the appropriate software sequences.
If the printout is not whatis expected:
1 Check I Possible remedv
Is the printer installed correctly?
I
Your software may think that it is driving a different
emulation to the one actually set. Check the DIP switch
settings to make sure you have the right emulation.
Usethe Hex Dumpmode to analyze the output from the
computer to the printer. This witt enable you to determine that the right escape sequences, etc are being
mmsmitted.
91
Page 100

P f
If cut sheetpaper (withoutthe ASF) is not feedingsmoothly,checkthe
following:
Check Possible remedy
Is the papa release leva
pushedback(toti ~ posi-
tion)?
Is the paper guide in plwe
and Veltical?
Are the left and right guidea If the left and right guides are too close together, the
too close together?
Is the ASF selected with the If it is, then deselect it.
DIP switch settings?
Are you hying to feed paper
using the front panel buttons
while the ON
LINEindicator
i illuminsled?
Is the DS- too thick?
. .
Iffanfold(continuous)paperisnotbeingfedcorrectlyusingthetractorfeed,
checkthefollowing:
Set the release lever to the * position.
The paper guide should be in place vertically for cut
sheets to feed smoothly.
p~willnot feed smoothly. Move them a little further
apart to allow the paper to feed freely.
You can only feed paper in this way wh~ the printer is
off-line. Set the printer off-line and then feed paper.
There are limits to the thickness ofpaper thatcsnbe fed
I
in this way. Try with thinner pa&r. -
Check
Is the paper release lever
pushed to the ~ position?
Is the paper guide in the ver-
tied position?
Are the holes on each side of
thepaper aligned withregard
to each other in the sprock-
e~?
Arethesprockets tooclosea
too far apart?
Are the sprockets locked in
position and the covers
closed?
Is the paper feeding freely
into the printer?
92
Possible remedy
Make sure the release lever is pushed to the ~ posi-
tion
When using the &actorfd thepaper guide should be
horizontal.
Ifthetwosidesof thepaperare out of alignmen~realign
them so that the sprocket holes match up.
Misalignment of the sprockets, making the paper too
loose or too tight+will prevent a smooth paper feed.
Correct this if necessary.
The paper should not be too far horn the printer (less
than 1 meter/3 feet), and there should be no cables or
other obstacles obstructing its path. The paper should
also be feeding straight into the printer, and an angled
feed may cause jams and blockages.
 Loading...