Application of IBM/Epson printer commands and character sets is Supported
Accepts: single sheets, fanfolds, multi-interface copy forms (thick to a maximum of three)
Available feed types: Tractor or friction feed.
Compatible with almost all word-processing, graphics, and spreadsheet software
Easy to understand indicator lights with audible beeping sounds as feedback
Simple Replacement of Ribbon cartridge within seconds
Modes of Printing: Draft style and four NLQ styles( Courier, Sans serif, Orator Small cap’s or Low case)
Available font styles include italicized, condensed print, bold printer, double-sized printer and quadruple-sized printer
Appropriate functions like paper handling and font selection have been given five buttons on the control panel
Printer functions are user-customizable via DIP switch settings.
Has automatic or manual paper loading
Has Paper parking and un-parking features
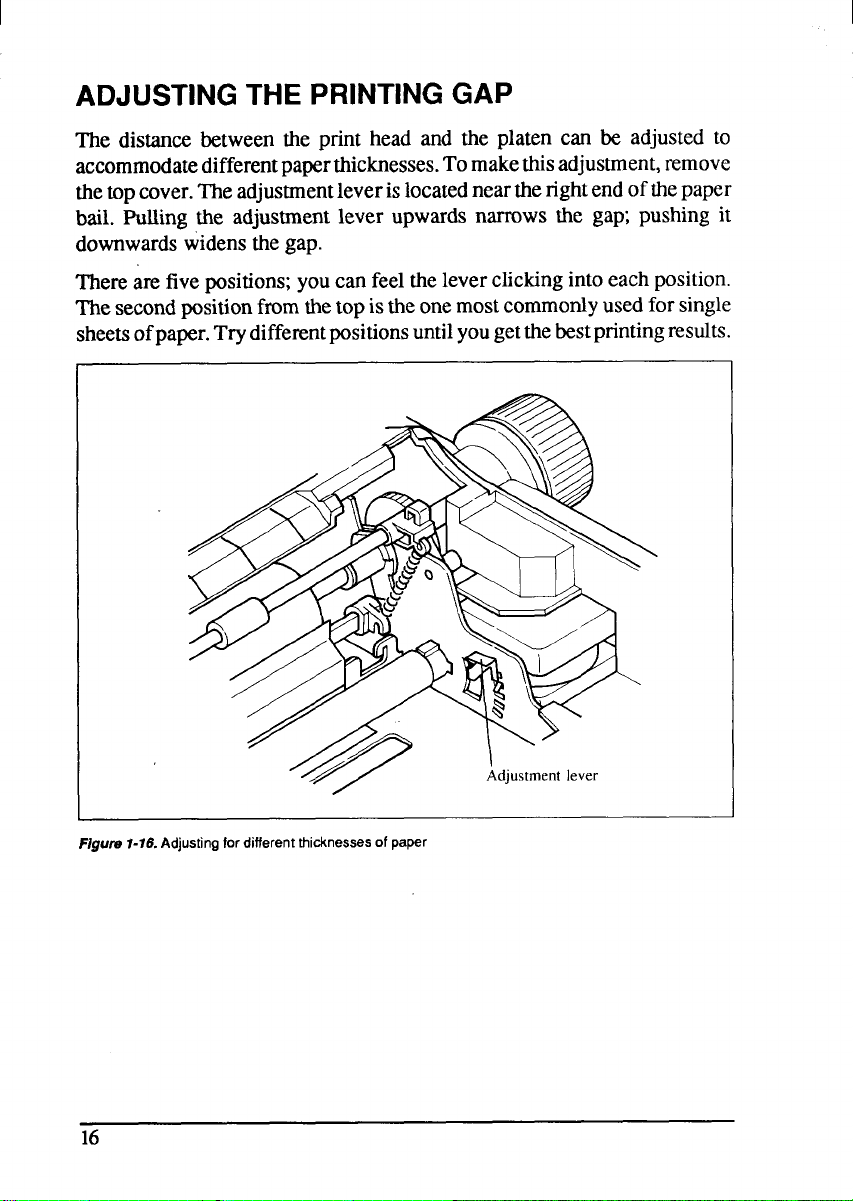
Printing gap is adjustable to suit different thickness papers
Self test includes: short test and long test and a print area
Frequently Asked Questions
Q: Which type of paper do you recommend for this printer?
A: The printer readily accommodates single, folds, multi-copy sheets and feeds them using either tractor or friction.
Q: In what manner must I change the ribbon cartridge?
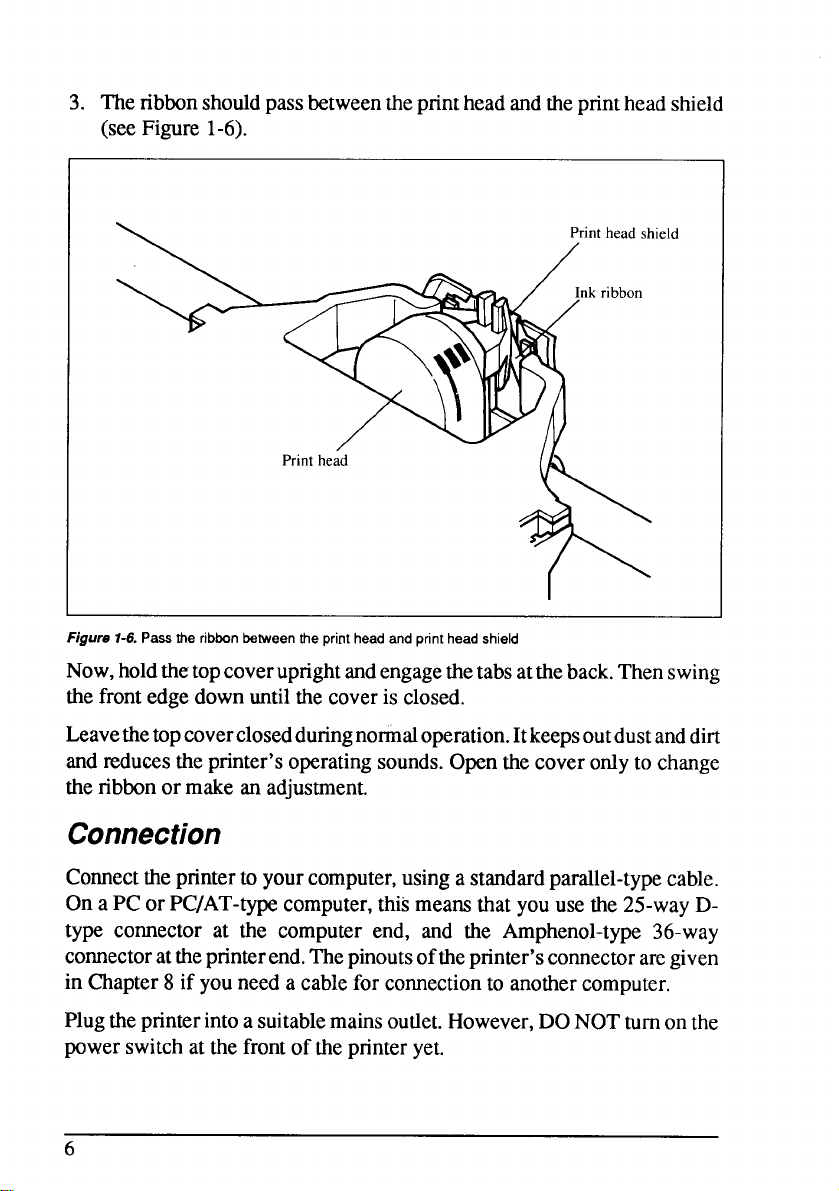
A: A ribbon cartridge is attached to a device that can be secured and changed in a matter of minutes ensuring that the ribbon sits neatly in between the print head and print head shield after which the cartridge can be changed after removing the tops cover.
Q: Which of the print quality settings are of utmost importance?
A: The printer includes a draft and several NLQ, which contains Courier, Sanserif, Orator (with an option for upper case only or lower case only).
Q: Explain the process through which I can add paper to the printer manually?
A: You can load the paper manually by opening the top lid, adjusting the paper guides, placing the sheet between the guides and twisting the platen knob to draw the paper in.
Q: Do it yourself test which the printer can complete is possible right?
A: Yes, to begin the short and long self test you have to as usual switch the printer on while holding a button that is specifically assigned for this task.
Q: So what changes can I make when I have a thicker paper?
A: The printing gap can be arranged by the adjustment lever which is on the right side of the paper bail near its end.
User Manual
Page 1
MULTI-FONT
8082
0390
USERS MANU AL
Page 2
MULTI-FONT
LC-15
USERS MANUAL
NOTINTENDEDFORSALE
Page 3
Trademark Acknowledgements
LC-15, ND-10/15, NR-10/15: Star Micronics Co., Ltd.
IBM PC,PC-AT, PC-XT, Proprinter XL, Proprinter II, PC-DOS: International Business Machines
Corp.
Microsoft BASIC, MS-DOS: Microsoft Corporation
FX-1050, EX-1000, FX86e, FX286e: Seiko Epson Corp
NOTICE
● All rights reserved. Reproduction of any part of this manual in any form whatsoever without
STAR’s express permission is forbidden.
● The contents of this manual are subject to change without notice.
● All efforts have been made to ensure the accuracy of the contents of this manual at the time of
press. However, should any errors be detected, STAR would greatly appreciate being informed
of them.
● The above notwithstanding, STAR can assume no responsibility for any errors in this manual.
O Copyright1989StarMicronicsCo.,Ltd.
Page 4
I
HOW TO USE THIS MANUAL
Thismanualis organizedintoninechapters.Tolearnhowtomake thebest
useof yourprinteryouareurgedto readthroughchapters1through3.The
remainingchaptersmay be treatedas a ~fenmce guidefor programming
operations,etc. It assumesa degreeof acknowledgeoff the operationof
computm (forinstance,itassumesyouknowabouthexadecimalnumbers).
Thechaptersareas follows:
Chapter 6— MS-DOSandyourprinter
Sincethe PC or PC-AT family of computersrunningunder MS-DOSis
currentlythe mostpopularconflgmationof microcomputer,we have includeda fewhintsandtipstohelpyouuseyourprinterwithsuchsystems.
Sincevirtuallyall PCsaresoldwithaMicrosoftBASICinterpreter,wehave
also included some hints, and a sample program in this language to
betweennationalcharactersets (asset up withthe DIP switches).
Page 6
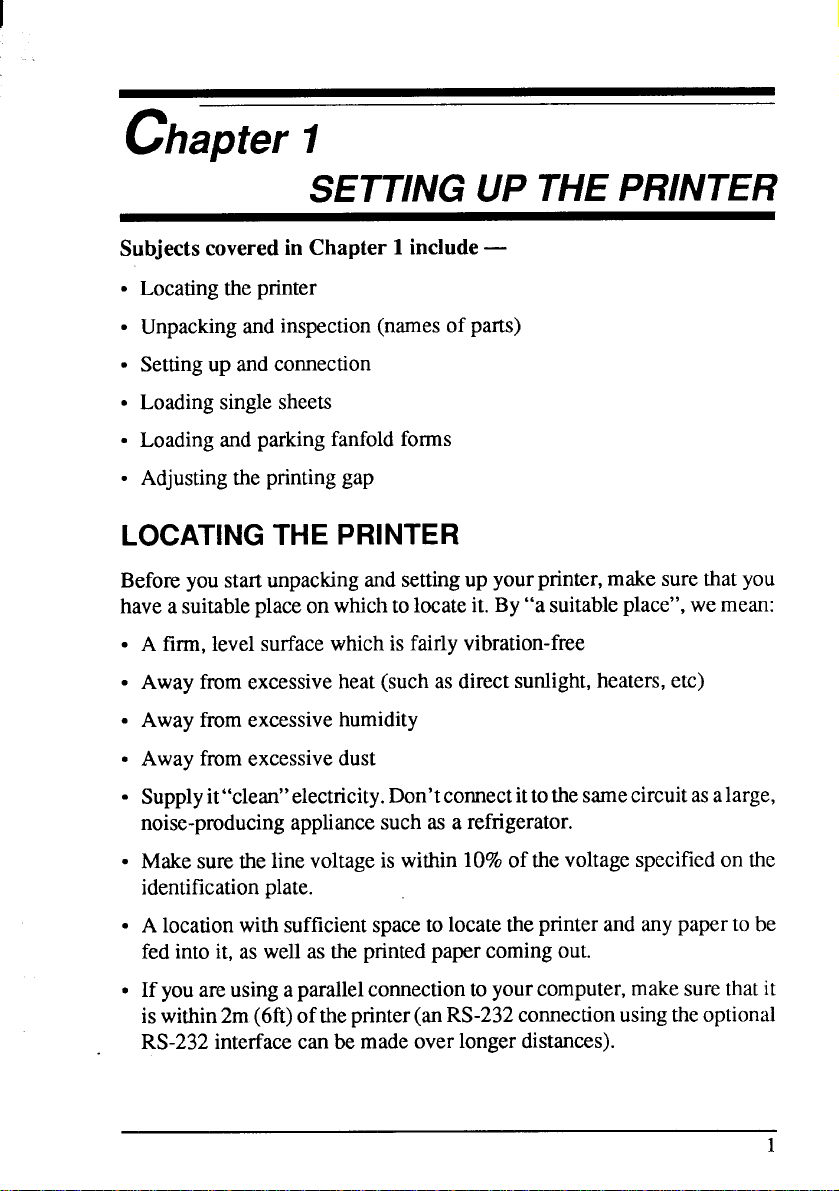
FEATURES OF THE PRINTER
Thisprinterisaconvenient,monochromeprinterwithoutfrillsbutwithafull
complementof features, making it an excellentpartner for a personal
computer.It supportstheIBM/Epsonprintercommandsandcharactersets,
enablingittoprintjustaboutanythingyourcomputercangenerate,bothtext
Clearlyunderstandableindicatordisplaysandbeeptonesprovideimmediate feedbackwhen you press the buttonson the controlpanel.The five
buttonscan operate in combinationsto perform a surprisingvariety of
functions,includingmicro-alignment.
. Easycareandmaintenance
The ribboncartridgecan be replacedin secondsthe print head in a few
minutes.
Supplyit“clean”electricity.Don’tconnectit tothesamecircuitasalarge,
noise-producingappliancesuchas a refrigerator.
●
Makesurethelinevoltageis within10%ofthevoltagespecifiedon the
identificationplate.
.
A locationwithsufficientspacetolocatetheprinterandanypaperto be
fedintoit, as wellasthe printedpapercomingout.
●
If youareusingaparallelconnectionto yourcomputer,makesurethat
iswithin2m(6ft)oftheprinter(anRS-232comectionusingtheoptional
RS-232interfacecanbe madeoverlongerdistances).
—
it
1
Page 11
UNPACKINGAND INSPECTION
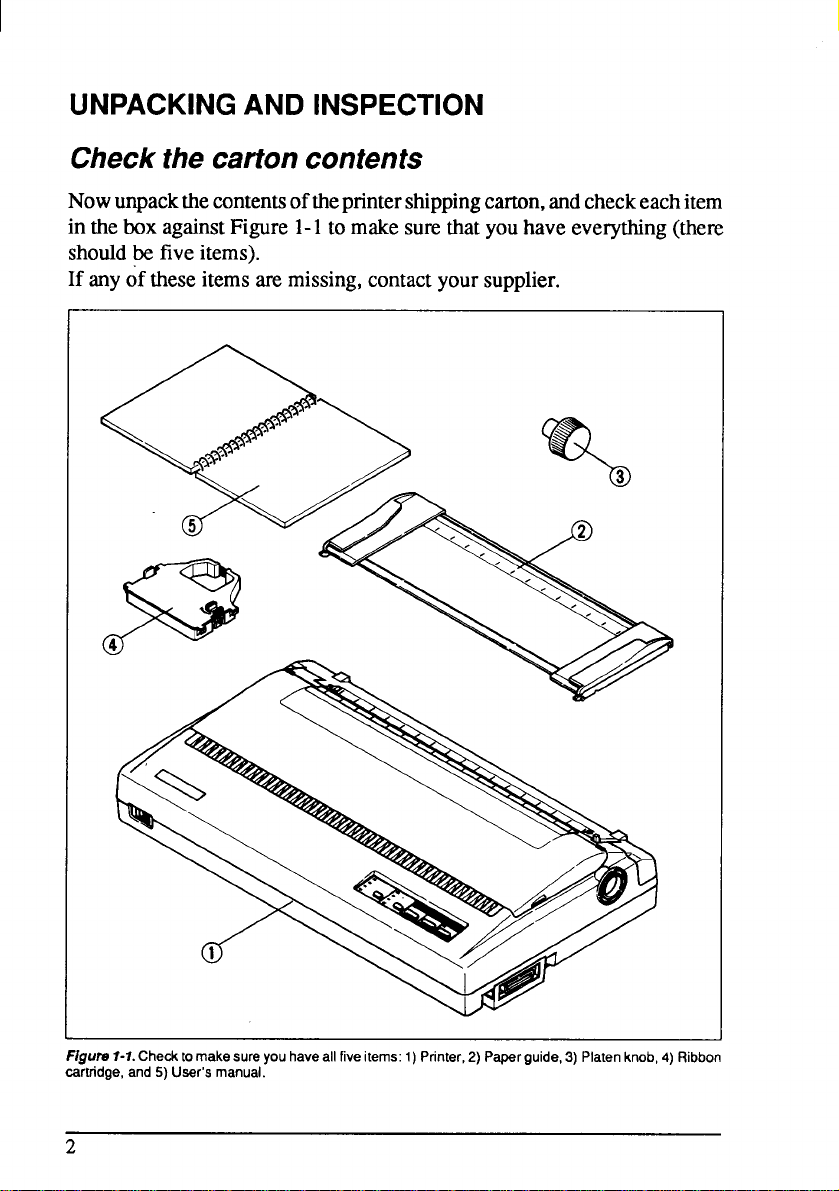
Checkthecartoncontents
Nowunpackthe contentsoftheprintershippingcarton,andcheckeachitem
in thebox againstFigure1-1to makesurethatyouhave everything(there
shouldbe five items).
If anyof theseitemsare missing,contactyoursupplier.
Figuru I-I. Check tomake sure you have all five items: 1) Printer, 2) Peperguide, 3) Platen knob, 4) Ribbon
cartridge, and 5) Uaer’s manual.
2
Page 12
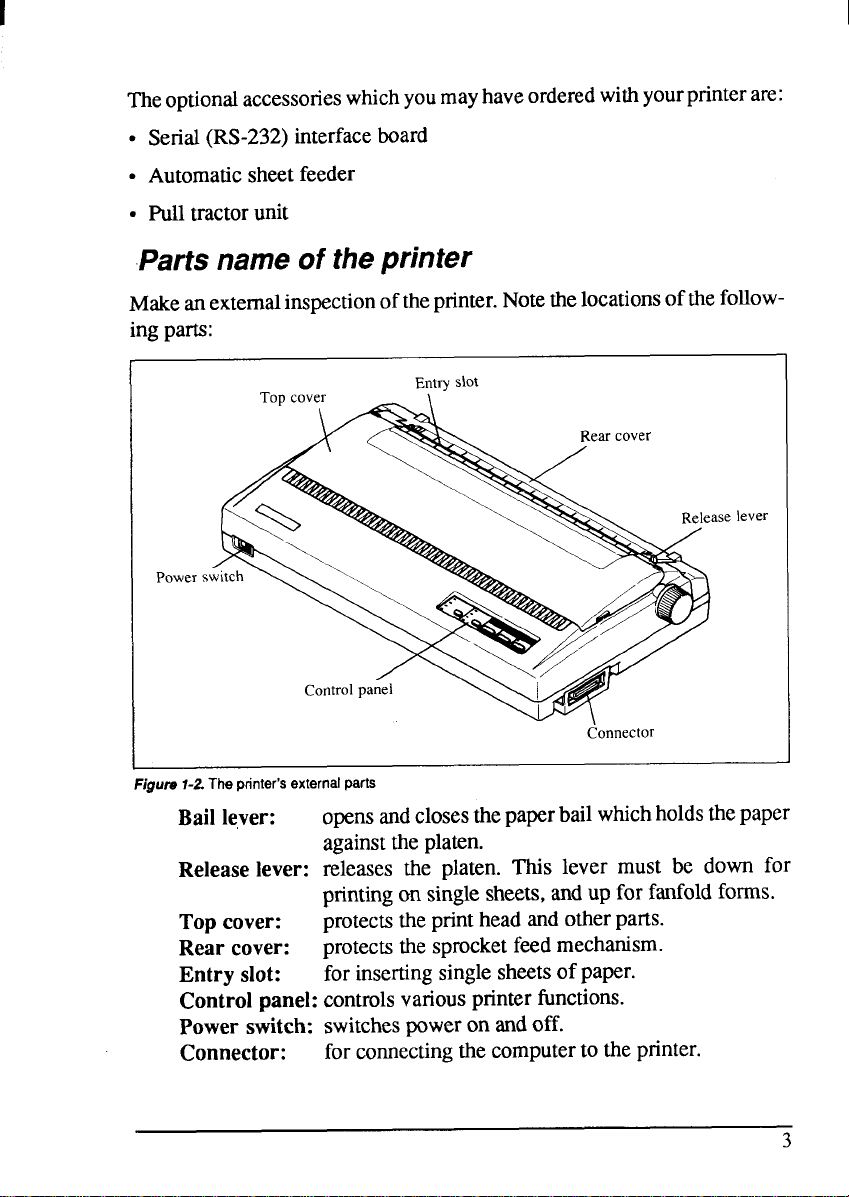
The optionalaccessorieswhichyoumayhaveorderedwithyourprinter are:
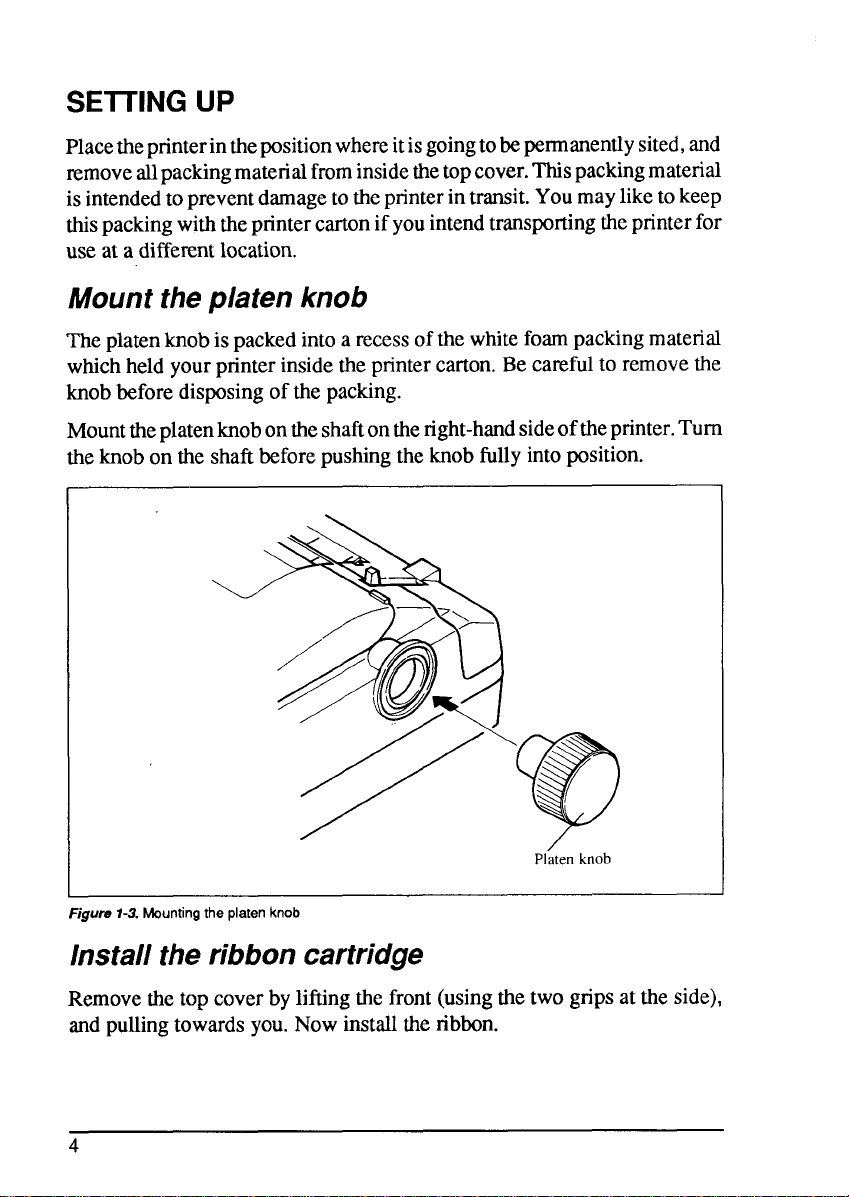
isintendedtopreventdarnagetotheprinterintransit.Youmayliketokeep
this packingwiththe printercartonifyouintendtransportingtheprinterfor
use at a differentlocation.
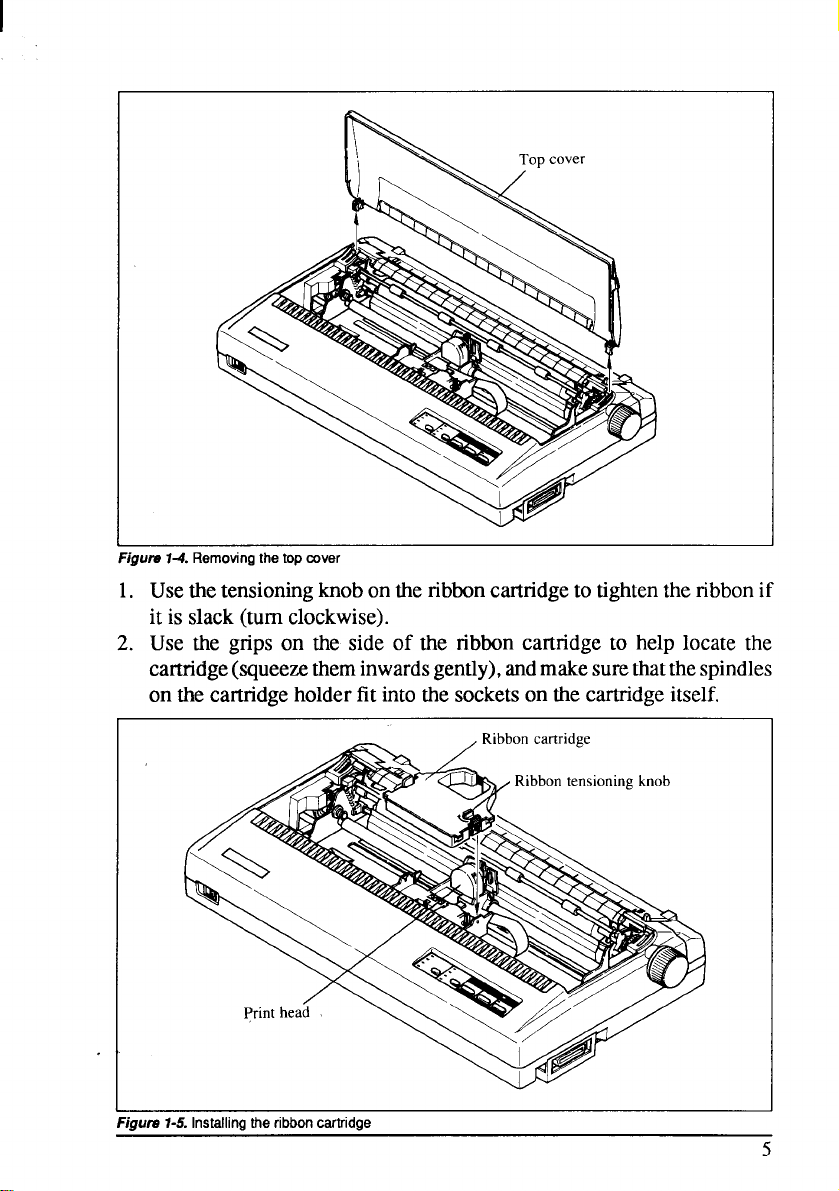
1. Usethetensioningknobontheribboncartridgeto tightenthe ribbon if
it is slack(turnclockwise).
2. Use the grips on the side of the ribbon cartridgeto help locate the
cartridge(squeezetheminwardsgently),andmakesurethatthespindles
on thecartridgeholderfit intothe socketson thecartridgeitself.
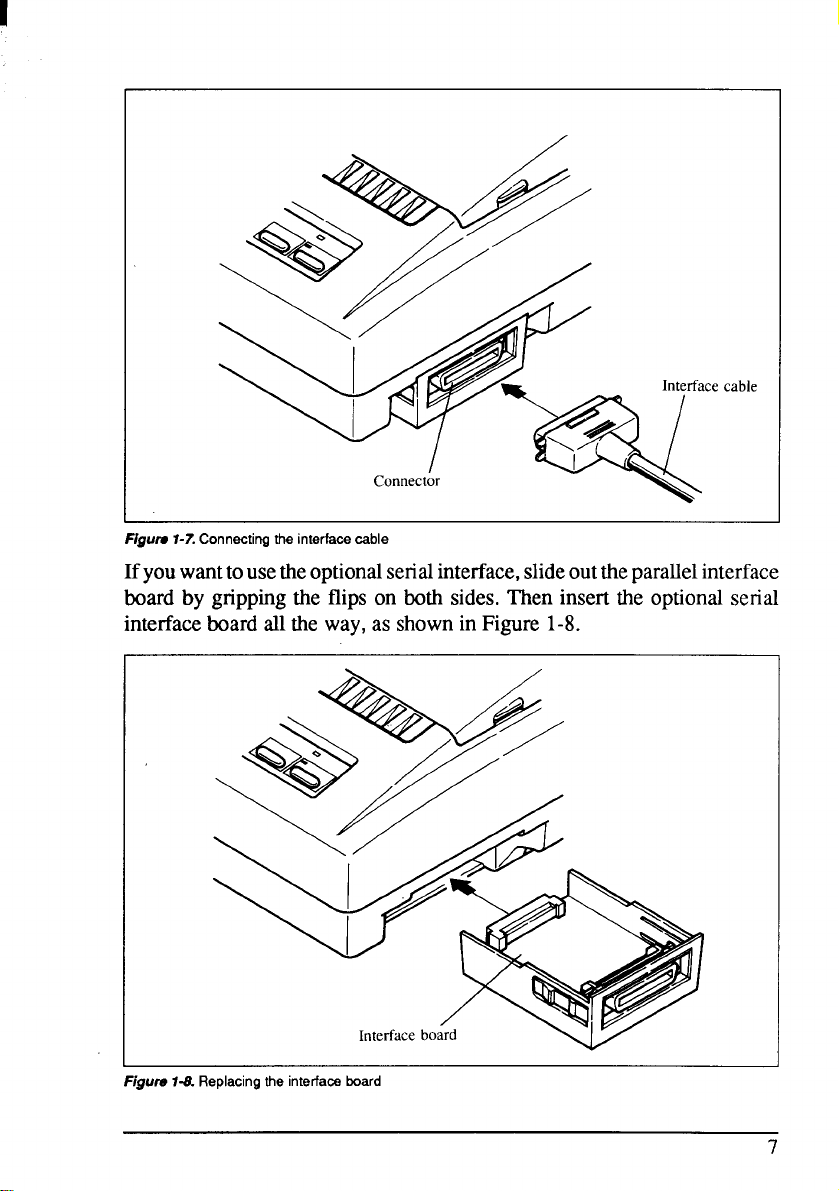
Connecttheprinter to yourcomputer,usinga standardparallel-typecable.
On aPCorPC/AT-typecomputer,thismeansthatyouusethe 25-wayDtype connector at the computer end, and the Amphenol-type36-way
connectoratthepnnterend.Thepinoutsoftheprinter’sconnectoraregiven
in Chapter8 if youneeda cableforconnectionto anothercomputer.
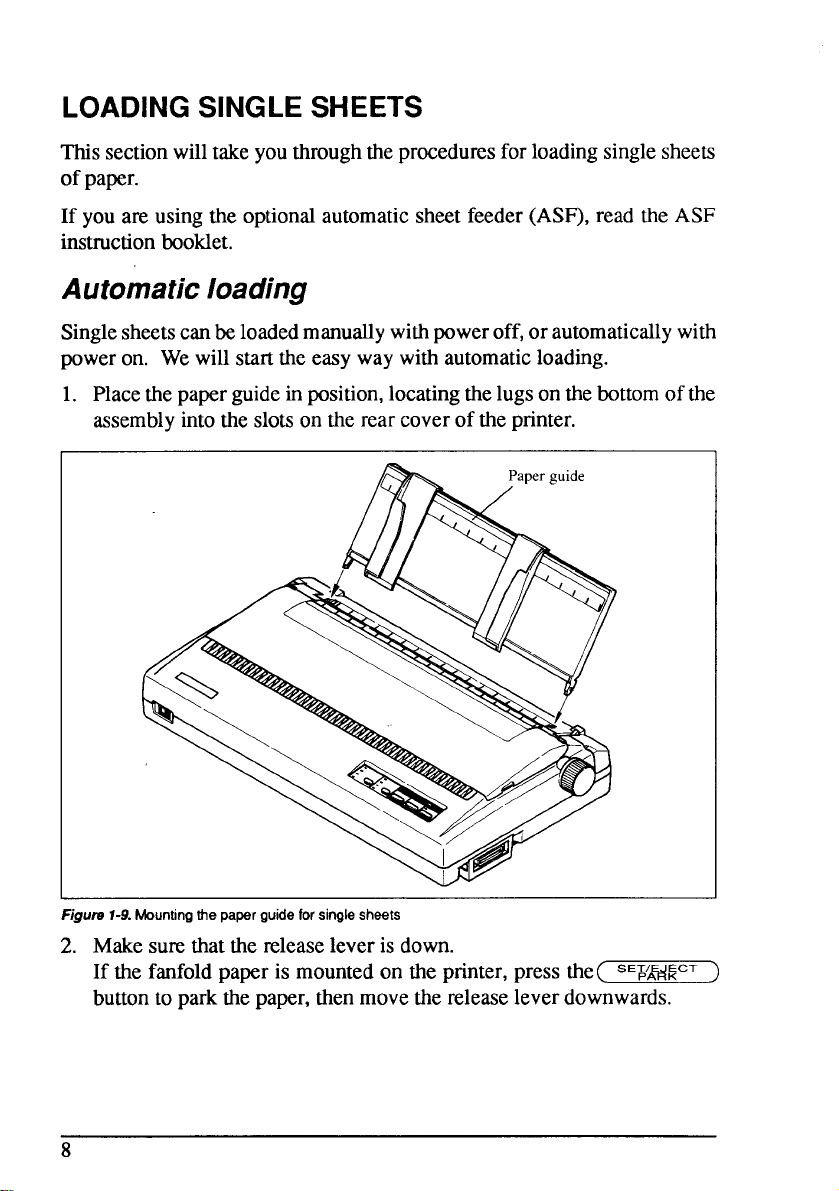
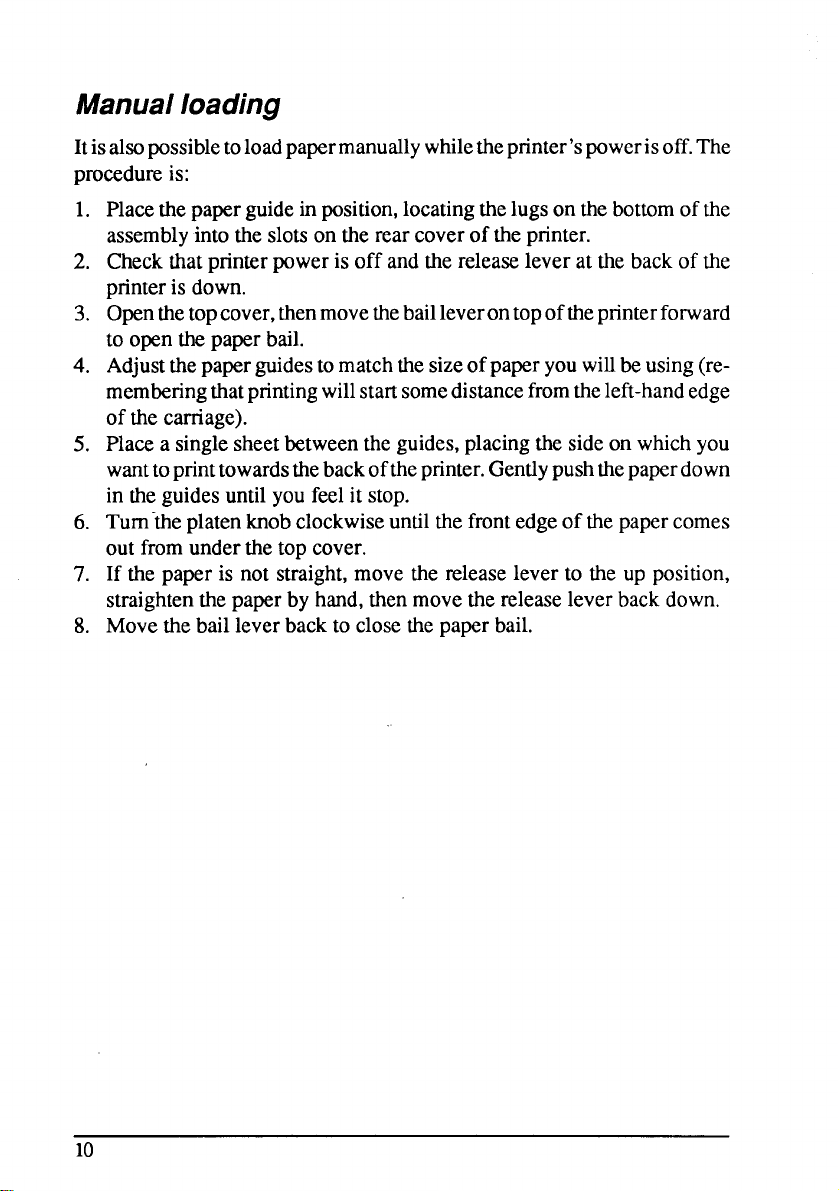
1. Placethepaperguideinposition,locatingthelugs on thebottomofthe
assemblyintotheslotsonthe rearcoverofthe printer.
Figurs 1-9. Mounting the paper guide for single sheets
2. Makesurethatthereleaseleveris down.
If the fanfoldpaperis mountedon the printer,pressthe( “ERKCTj
buttonto parkthepaper,thenmovethereleaseleverdownwards.
Placea single sheetbetweenthe guides,placingthe sideon whichyou
wanttoprinttowardsthebackoftheprinter.Gentlypushthepaperdown
in theguidesuntilyoufeelit stop.
to openthe paperbail.
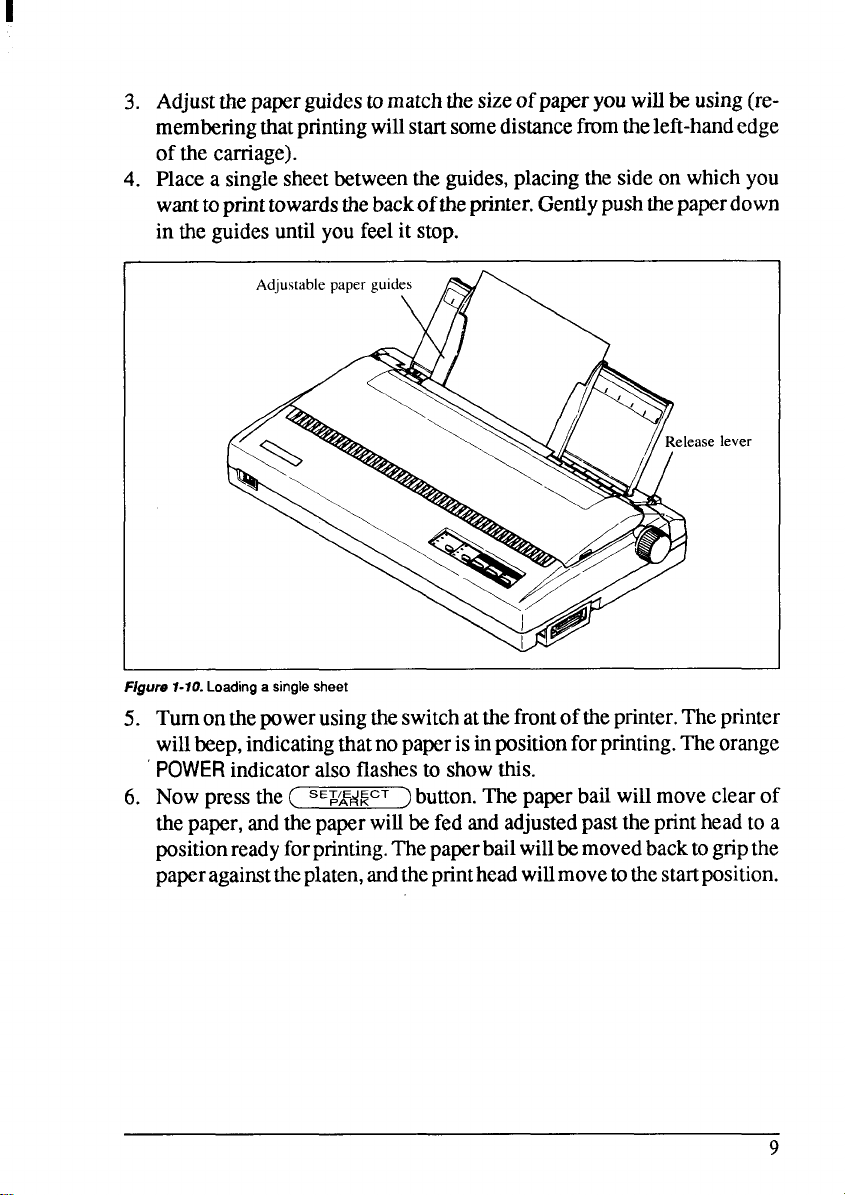
Adjustthepaperguidestomatchthesizeof paperyouwillbeusing(re-
4.
memberingthatprintingwillstartsomedistancefromtheleft-handedge
of the carriage).
Placea singlesheetbetweentheguides,placingthe sideon whichyou
5.
wanttoprinttowardsthebackoftheprinter.Gentlypushthepaperdown
in theguidesuntilyoufeel it stop.
Turn-theplatenknob clockwiseuntilthefrontedgeof thepapercomes
6.
outfromunderthetop cover.
If the paper is not straight,move the releaselever to the up position,
7.
straightenthepaperby hand,thenmovethereleaseleverbackdown.
Move the bailleverbackto closethepaper bail.
8.
10
Page 20
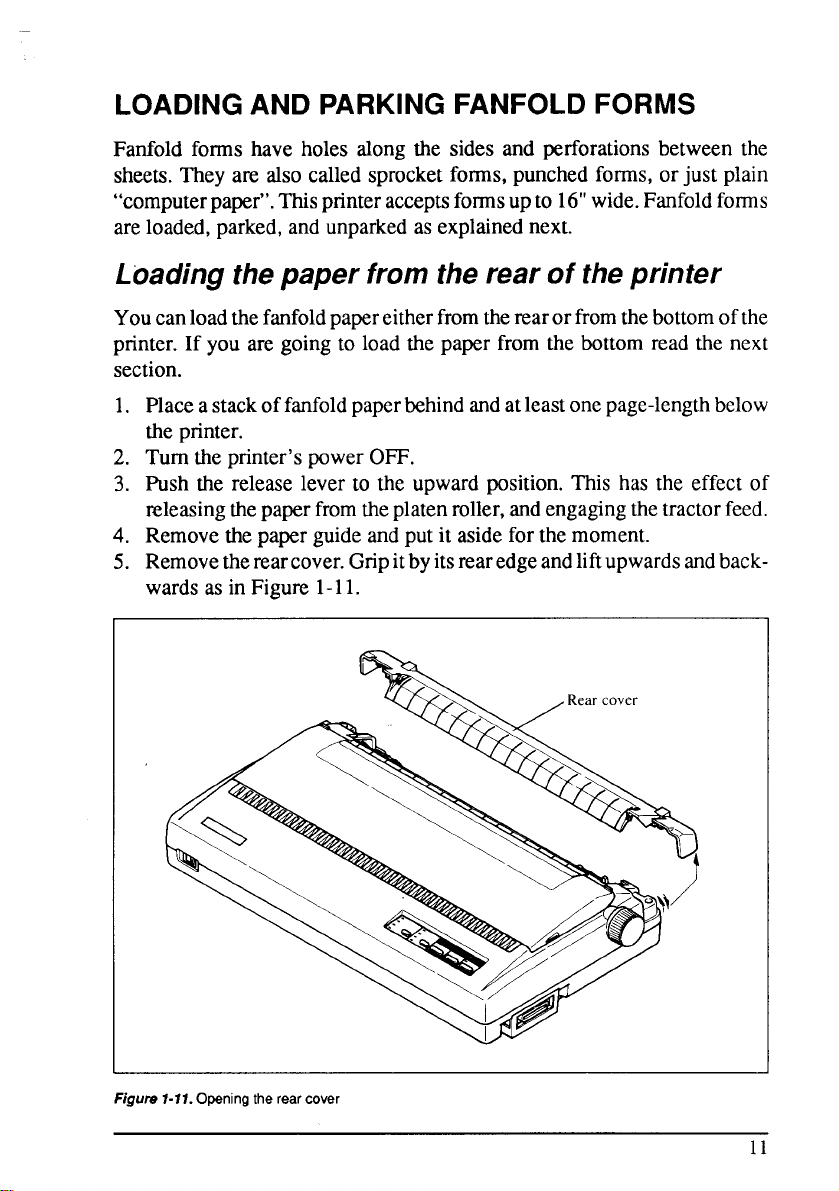
LOADING AND PARKING FANFOLD FORMS
Fanfold forms have holes alongthe sides and perforationsbetween the
sheets.Theyare also calledsprocketforms,punchedforms,or just plain
“computerpaper”.Thisprinteracceptsformsupto 16”wide.Fanfoldforms
areloaded,parked,andunparkedasexplainednext.
Loadingthepaperfromtherear of theprinter
Youcanloadthefanfoldpapereitherfromtherearorfromthebottomofthe
printer.If you are goingto load the paper from the bottomread the next
section.
1. Place astackoffanfoldpaperbehindandatleastonepage-lengthbelow
theprinter.
2. Turn theprinter’spowerOFF.
3. Pmshthe releaselever to the upward position.This has the effect of
~leasingthe paperfromtheplatenroller,andengagingthetractorfeed.
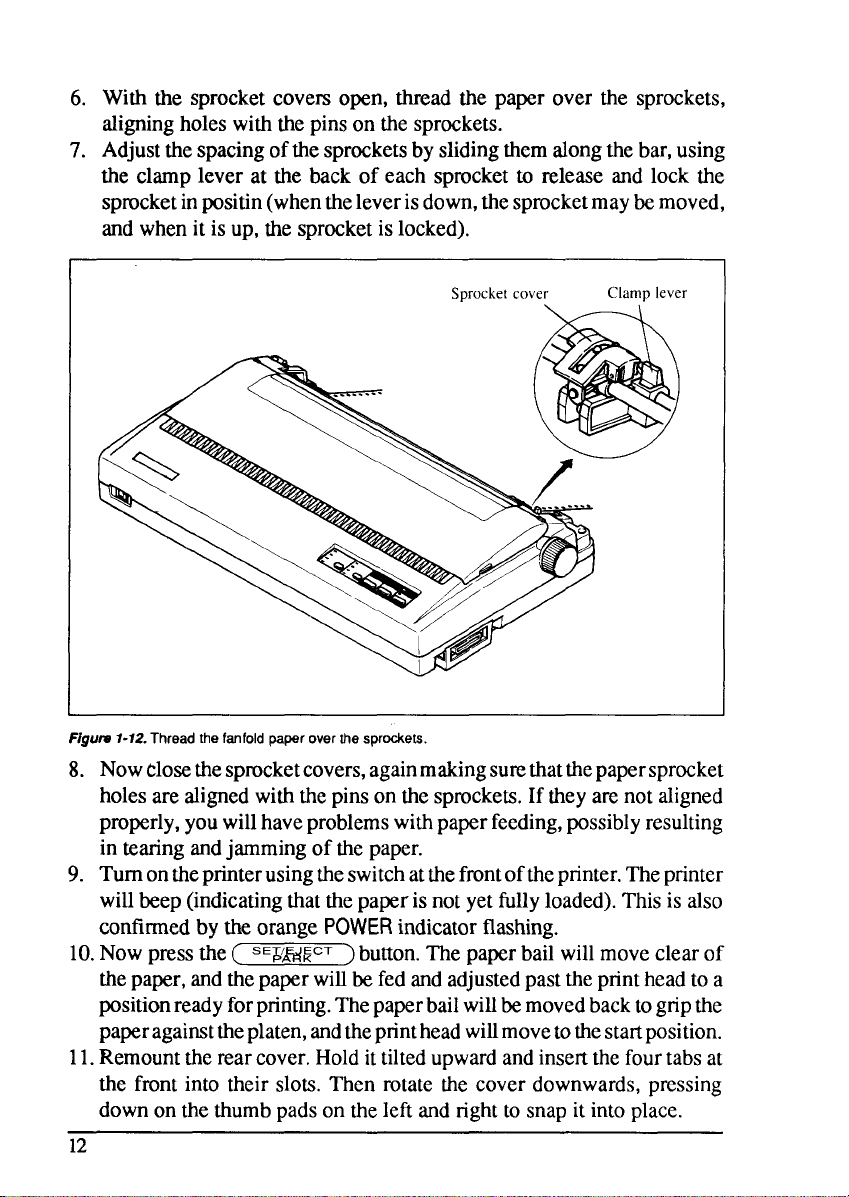
the clamplever at the back of each sprocketto release and lock the
sprocketinpositin(whentheleverisdown,thesprocketmaybemoved,
andwhenit isup,the sprocketis locked).
Smocket cover
F/gun?1-12. Thread the fenfold paper over the sprockets.
holesarealignedwiththepinsonthesprockets.Iftheyarenot aligned
properly,youwillhaveproblemswithpaperfeeding,possiblyresulting
in tearingandjammingof the paper.
Turnontheprinterusingtheswitchatthefrontoftheprinter.Theprinter
9.
willbeep(indicatingthatthepaperisnotyetfilly loaded).Thisis also
confirmedby theorange
10.Nowpressthe(
‘EER-ECT) button.Thepaperbailwillmoveclearof
POWER indicatorflashing.
thepaper,andthepaperwillbefedandadjustedpasttheprintheadto a
positionready forprinting.Thepaperbailwillbemovedbacktogripthe
paperagainsttheplaten,andtheprintheadwillmovetothestartposition.
11.Remounttherearcover.Holdittilted upwardandinsertthefourtabsat
the front into their slots.Then rotate the cover downwards,pressing
downonthethumbpadson theleft andrighttosnapit intoplace.
12
Page 22
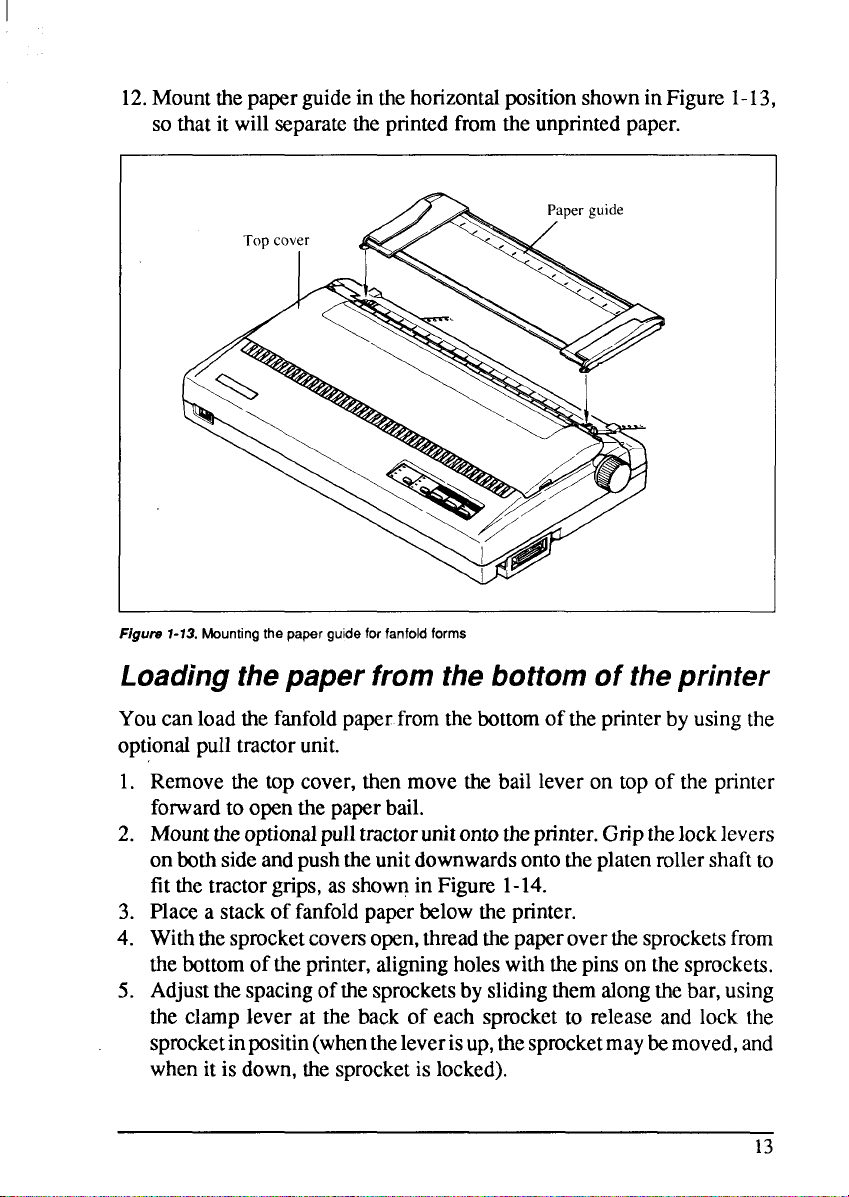
12.Mountthepaperguideinthehorizontalpositionshownin Figure1-13,
sothatit will separatetheprintedfromtheunprintedpaper.
Figurs 1-13. Mounting the paper guide for fanfold forms
Removethe top cover,thenmovethe bail lever on top of the printer
forwardtoopenthepaperbail.
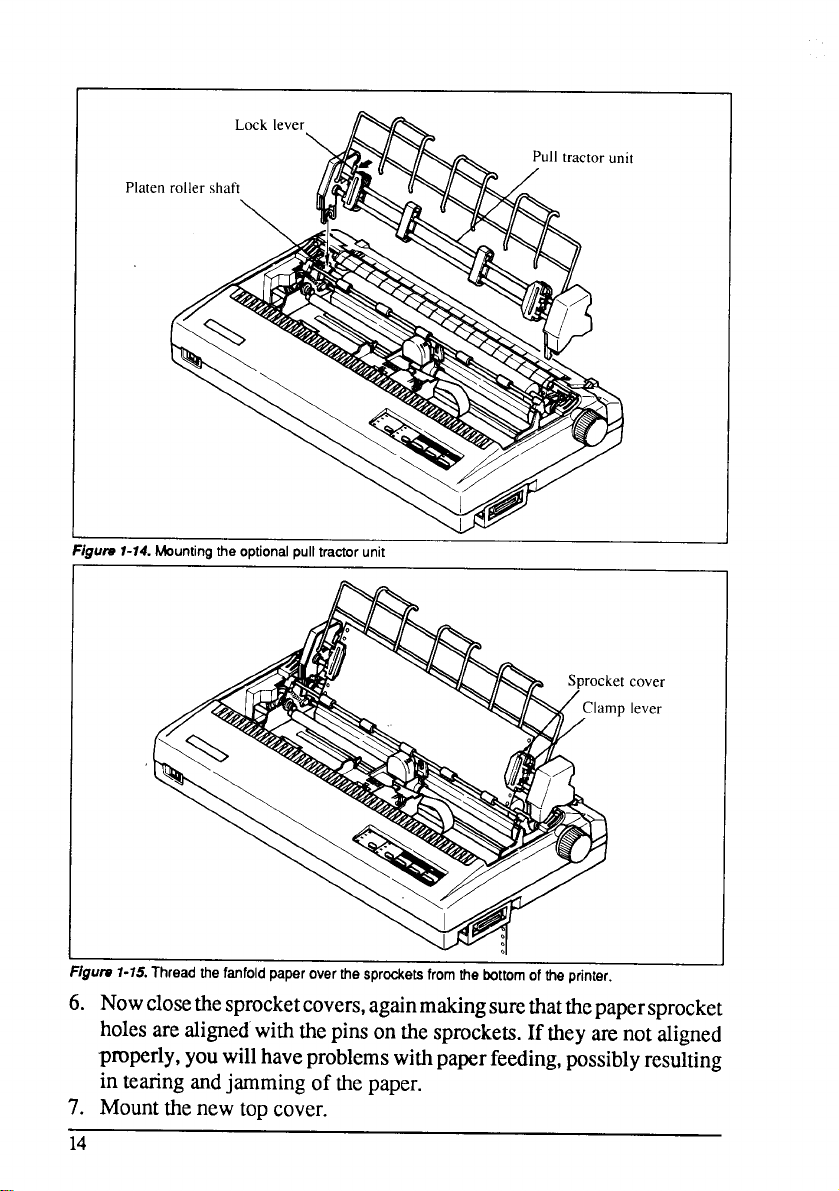
Mounttheoptionalpulltractorunitonto theprinter.Gripthe locklevers
5.
the clamplever at the back of each sprocketto release and lock the
sprocketinpositin(whentheleverisup,thesprocketmaybemoved,and
whenit is down,thesprocketislocked).
13
Page 23
Platen
~utw1-14.Mountingthe optionalpulltractor unit
it
cover
lever
Figure 7-15. Thread the fanfold paper over the sprockets from the bottom of tie printer.
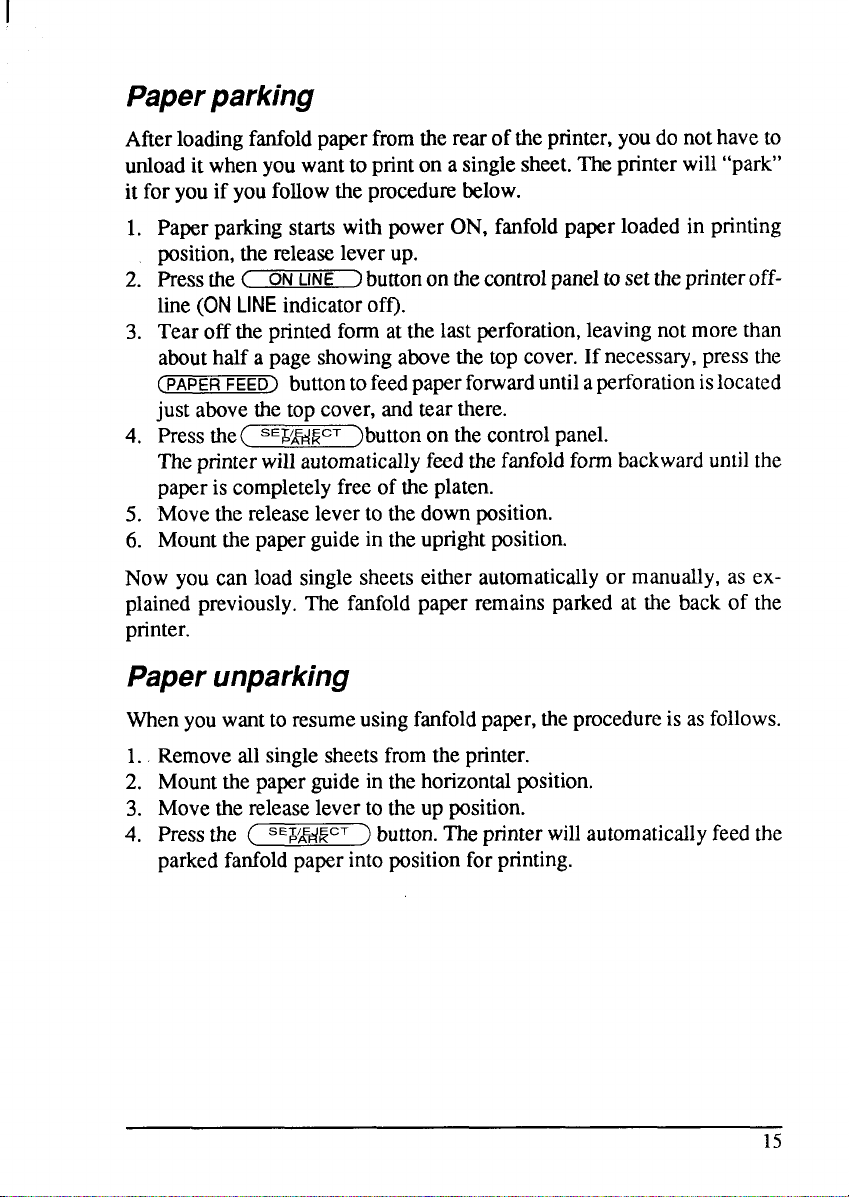
Afterloadingfanfoldpaperfromtherearof theprinter,youdonothaveto
unloadit whenyouwanttoprinton a singlesheet.Theprinterwill“park”
it for youif youfollowtheprocedurebelow.
abouthalf a page showingabovethetop cover.If necessary,pressthe
(PAPERFEED)buttontofeedpaperfonvarduntilaperforationislocated
just abovethetop cover,andtearthere.
4. Pressthe( ‘W&4RcT)
Theprinterwillautomaticallyfeedthefanfoldformbackwarduntilthe
paperis completelyfree of theplaten.
5. “Movethe releaseleverto thedownposition.
6. Mountthepaperguidein theuprightposition.
Now you can load singlesheetseitherautomaticallyor manually,as ex-
plainedpreviously.The fanfoldpaperremainsparked at the back of the
printer.
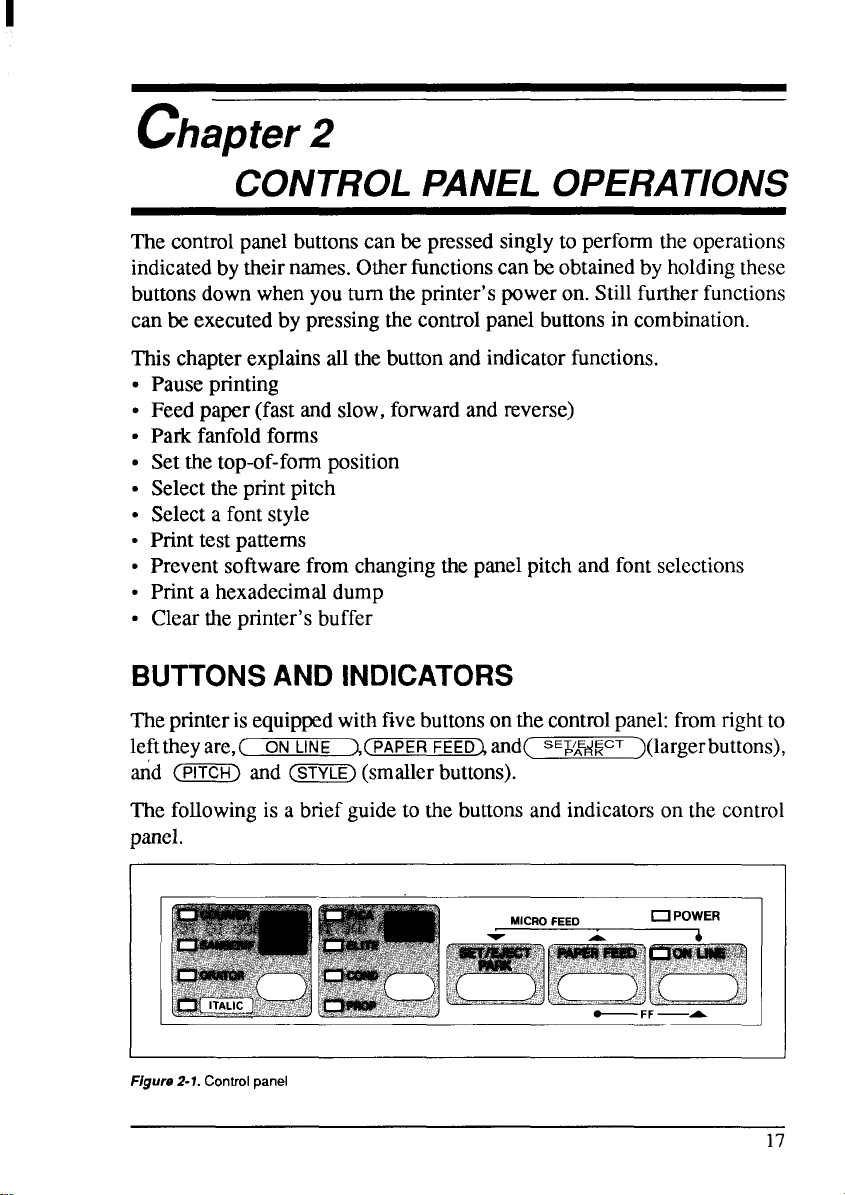
The followingis a briefguideto the buttonsandindicatorsonthe control
panel.
Figure 2-1. Control panel
17
Page 27
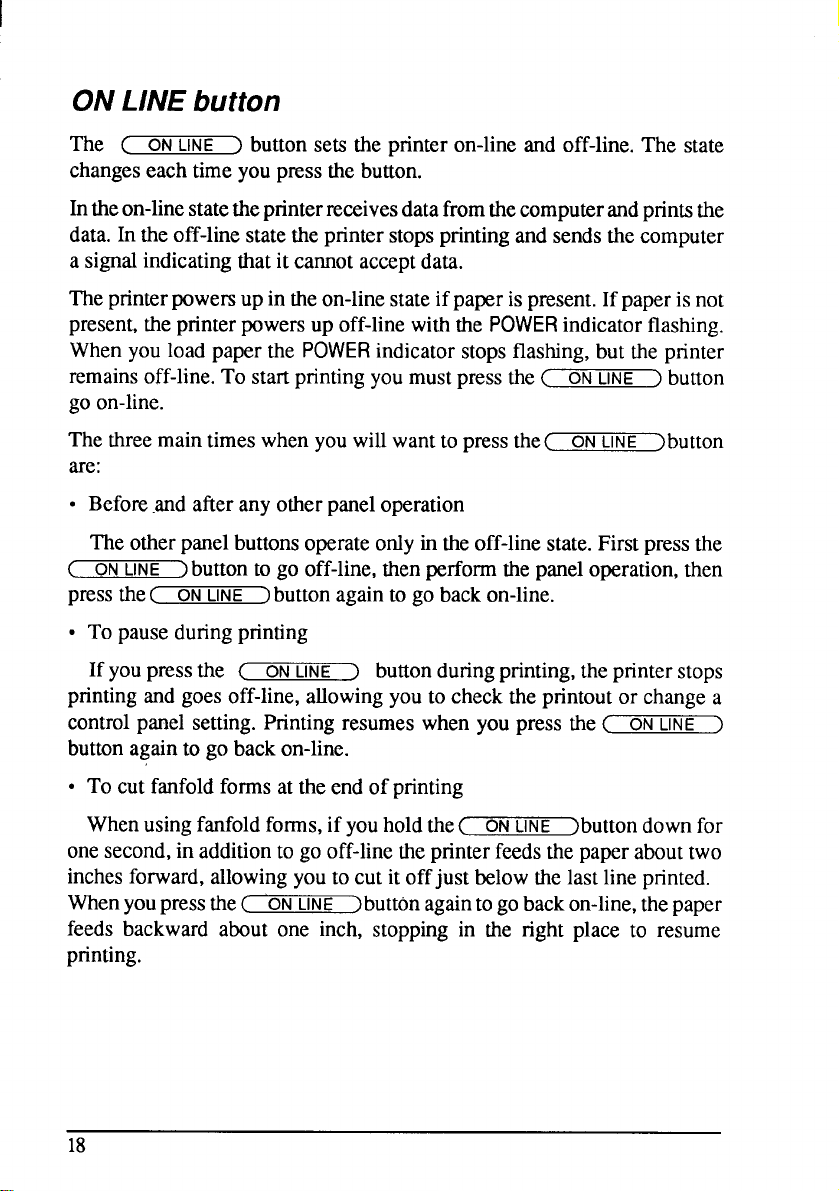
ONLINE button
(
ON LINE
buttonsets the printeron-lineand off-line.The state
)
The
changeseachtimeyoupressthebutton.
Intheon-linestatetheprinterreceivesdatafromthecomputerandprintsthe
data.Intheoff-linestatetheprinterstopsprintingand sendsthecomputer
a signal indicatingthatit cannotacceptdata.
Theprinterpowersup in theon-linestateifpaperis present.If paperisnot
present,theprinterpowersup off-linewiththe
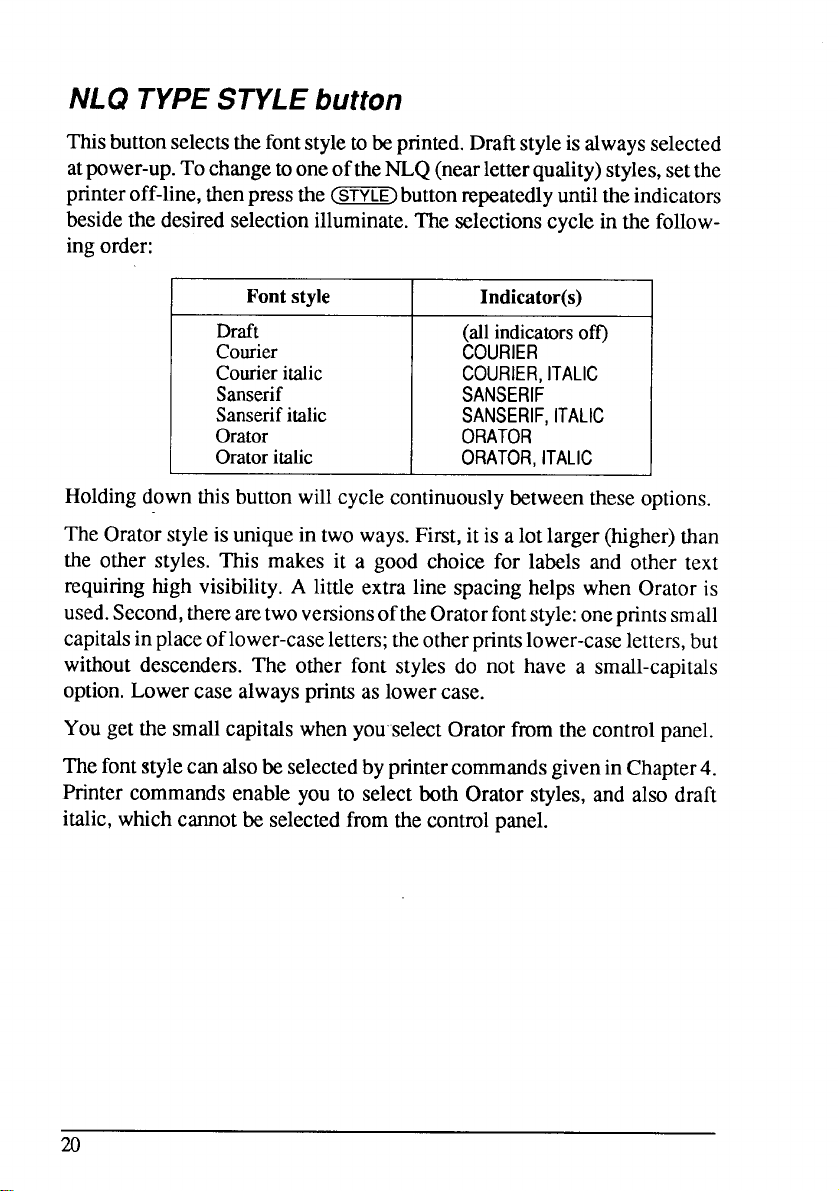
Holdingdownthisbuttonwillcyclecontinuouslybetweentheseoptions.
TheOratorstyleis uniquein twoways.First,it is a lotlarger(higher)than
the other styles. This makes it a good choice for labels and other text
requiringhigh visibility.A little extraline spacinghelps when Oratoris
used.Second,therearetwoversionsoftheOratorfontstyle:oneprintssmall
capitalsinplaceoflower-caseletters;theotherprintslower-caseletters,but
withoutdescenders.The other font styles do not have a small-capitals
option.Lowercasealwaysprintsas lowercase.
Yougetthe smallcapitalswhenyou selectOratorfmm the controlpanel.
ThefontstylecanalsobeselectedbyprintercommandsgiveninChapter4.
Printercommandsenableyouto selectboth Oratorstyles,and also draft
italic,whichcannotbe selectedfromthecontrolpanel.
20
Page 30
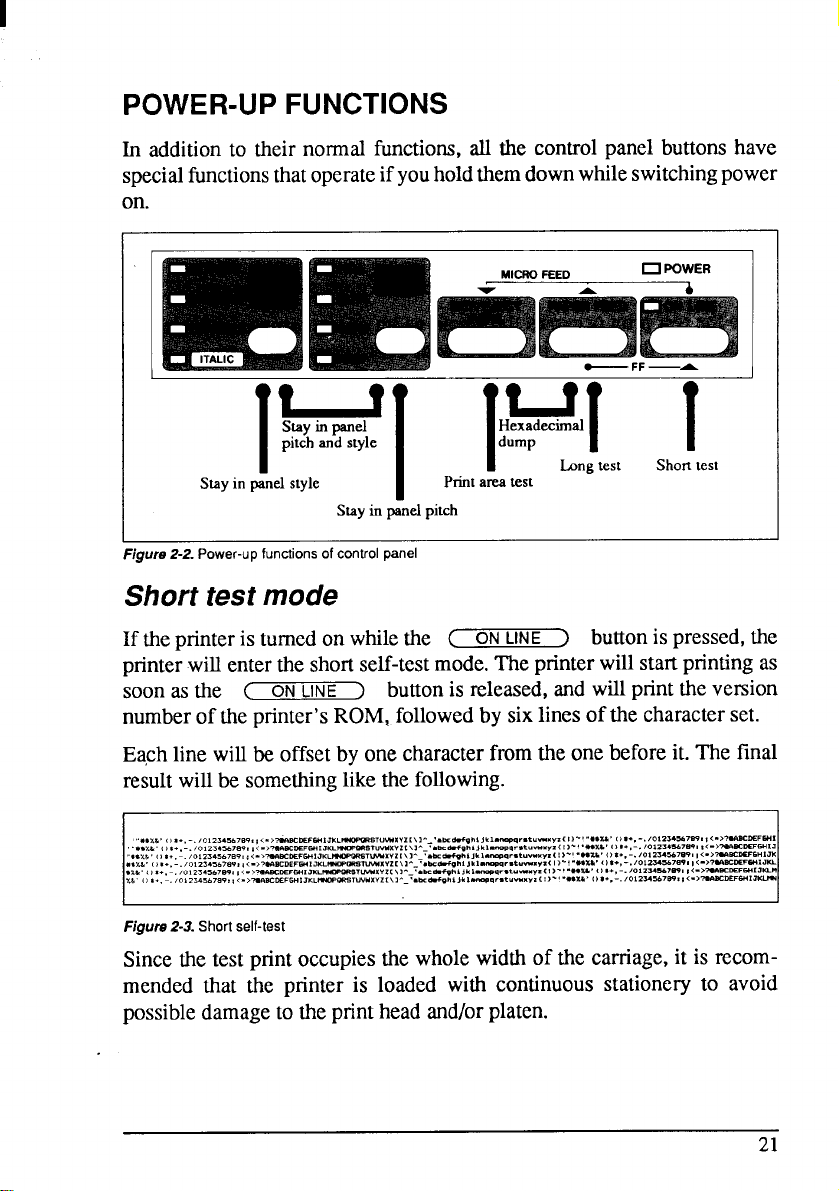
POWER-UP FUNCTIONS
,hlte,
In additionto their normalfunctions,all the controlpanel buttonshave
specialfunctionsthatoperateifyouholdthemdownwhileswitchingpower
on.
MICROFEED
-
A&
‘,byinJu[p?+f,
Printarea test
Stay in P&l pitch
rgure2-2. Power-up functions of control panel
OPOwER
—FF —A
Shorttestmode
ON
If theprinteris turnedonwhilethe
printerwillentertheshortself-testmode.The printerwillstartprintingas
LINE
soonas the
numberof the printer’sROM,followedby sixlinesofthecharacterset.
Eachline willbe offsetby onecharacterfromtheonebeforeit. The final
resultwillbe somethinglikethefollowing.
ON
(
button is released,and willprintthe version
)
LINE
(
button is pressed,the
)
Figure 2-3. Short self-test
Sincethetestprintoccupiesthe wholewidthof the carriage,it is recommended that the printer is loaded with continuousstationeryto avoid
possibledamageto theprinthead and/orplaten.
21
Page 31
Long test mode
If the printeris turnedon whilethe (PAPER FEED) buttonis pressed,the
printerwillenterthelong self-testmode.Theprinterwillstartprintingas
soon as the
numberof theprinter’sROM,followedby thewholecharactersetprinted
in eachfont stylesandpitchavailable.
oflinesprintedisconsiderable,morethancanbeaccommodatedon a single
sheet,sofanfoldpaperis certainlysuggestedforthistest.
CPAPER FEED) buttonis released,and will printthe version
Printarea testmode
Ifyouwanttoknowhowmanylinesonyourpapercanbeprinted,tryto run
thispnntarea test.Byholdingthe~ ‘%FWCT]buttondowndunng powerup,theprinterwillentertheprintareatestmode.Theprinterwillprintthe
firstlinemessage,thenprintsthelastlinemessageonyour singlesheetafter
feedingthepapertothebottomof the paper.
If youhaveloadedthefanfoldpaper,the printershowsonlythe firstline.
Stayinpanelpitch
By holdingthe @iTCR)button down during power-up,you can prevent
softwareinterferencewiththeprintpitchselectedfromthe controlpanel.
Youwillhearan acknowledgingbeep aspowercomeson.
acknowledgingbeep,after whichyou can set the printeroff-line,selecta
fontstyle,thenreturntotheon-linestateandstartprinting.Theselectedfont
stylewillnotbechangedby anycommandssentby software.
Stayinpanelpitchandstyle
If you wantto protectboththepitchandfont stylesettingsfrom software
changes,pressthe@iTiX!landGF7iT3buttonsduringpower-up.Therewill
2. Start printing.In placeof the usualprintoutyou will get a formatted
dumpshowingexactlywhat datathe printerreceives.Eachlinepresents
sixteencharactem,their hexadecimalcodes to the left and printable
character printedon the right.
3. At the end of the hexadecimaldump,set theprinteroff-linewiththe
ON LINE )button. Thisis necessaryto printthelastline.
(
(PAPER FEED) and( ‘EJ!MCT>buttonsdown,turn
23
Page 33
ThefollowingBASICprogramis a simpletestyoucanruninhexadecimal
mode:
10 FOR 1=0 TO 255
20 LPRINTCHR$(11 J
30 NEXT I
40 LPRINT
50 END
If your systempassesthe codes directlyto the printer withoutchanging
them,youwillgeta printoutlikeFigure2-4.
DE! D9 DA DB DC DD DE DF. . . . . . . . . . . . . . . .
FE F9 FA FE FC FD FE FF. . . . . . . . . . . . . . . .
I“#*z&’()*+,-./
01234567B9:;<=>?
‘abcdefghijklmno
. . . . . . . . . . . . . . . .
. .
Figure 2-5. Sample hexadecimal dumpwithlBM-PC
24
Page 34
I
WhentheIBM-PCBASICinterpretersendshexcodeOD(carnagereturn)
it adds an extra hex OA(line feed). Hex code 1A (end-of-fde)also gets
specialtreatment:the interpreterdoes not send it at all. This can cause
problemsthatgenerategraphicsordownloadcharacterdata,but thereis a
solution.Try changingline 20 in the precedingprogramand addingthe
codingshownbelow.
Whenyouturnon printerpower,thetop-of-formpositionis automatically
setto thecurrentposition.Ifthisisnotwhereyouwantthetopofthepage
to be, youcan changethetop-of-formpositionas follows.
LINE
1. Pressthe(
ON
buttonto setthe printeroff-line.
)
2.. Move the paper to the desired top-of-formpositionby pressingthe
Thebankof DIP(DualIn-linePackage)switchesinsidetheprinterisused
for variousfunctions.
ThischapterexplainswheretheDIP switchesam located,andhowto use
them.
LOCATION OF THE DIP SWITCHES
Whenyouremovetheprinter’scoverandlookinside,youwillseeon the
greenboardatthe bottom of theprintertwogroupsofsmallwhiteswitches
markedDSW1andDSW2.Thesearetheprinter’sDIPswitches.DSW1has
eightswitches,named1-1 to 1-8fromlefttoright.DSW2hasfourswitches
named2-1to 2-4.
Figure 3-1.DIP switches
For allswitches,theONpositionistowardsthebackoftheprinterandthe
OFFpositionistowardstheIlont.Toseta DIP switch,use aballpointpen
orothersmallimplementtomovetheswitchto the ON or OFFposition.
Theprinter’spowershouldbeoffwhenyousettheDIPswitches.Settings
madewhilepowerisondonottakeeffectuntilpowerisswitchedoff,then
on again,becausetheprinterreadsthe DIP switchesonlyat power-up.
29
Page 39
FUNCTIONS OF THE DIP SWITCHES
The printerisdeliveredwithallDIPswitchsettotheONposition.Theseare
thestandardsettings.Bychangingthesettings,youcanalter variousprinter
functionsto match yourrequirements.The followingquestionswill help
Switch 1-3: Whichtype of printingarea formatdo you want to use for
single sheets?
Thisprintercanusetwotypesofpnnting areaformatforsinglesheets. By
puttingtheswitchON(“Atype”),thetopofthefirstlineofprintingwillstart
to oneinchfromthetopofthepaper,andtheprintedareawiIIendtoprint
oneinchfromthebottomofthepaper.
To use the automaticsheetfeeder,move this switchto the OFF position.
Otherwiseleaveit ON.
Switch 1-5: Doyouwantthepnnterto stoppnntingattheendofthe paper,
or to keepprinting?
LeavethisswitchONexceptwhenyouneedto printverycloseto the end
of the paper. Whenthis switch is OFF the printer ignoresthe paper-out
detectorandprintsdownto (andbeyond)thebottomedge.
Switch 1-6: DoyouwanttousetheprinterinstandardmodeorIBMmode?
Selectthemodecompatiblewithyour computerandsoftware.In standard
Theprinterhas twoemulationmodes:Standardmodeand IBMmode.
Instandardmode,theprinteremulatesthefunctionsoftheEpsonFX-1050.
In IBM mode, the printer emulatesthe IBM ProprinterXL. Additional
commandcodesareincludedas a supersetof theseemulations.
The emulations changedbymeansofDIPswitch1-6.WhenON,theprinter
will be in standardmode, and when OFF, the printer will be in IBM
emulationmode(seeChapter3).Itisnotpossibletochange theemulation
modeby meansof softwarecontrolor the frontcontrolpanel.
Thischapterdescribestheprinter’scontrolcommands.Somecommandsare
commontoboththestandardandIBMmodes.Inthedescriptionsofthecommands,allcommandswillbegivenbyfunction.Thenameofeachcommand
is followedby a tableliketheonebelow:
Mode
Both
ASCIIDecimal
<ESC>
<ESC> “X”<1>
Mode:
“X”“l”
27120 49
271201
Indicatesthemodeinwhichthecommandisrecog-
Hexadecimal
IB 78 31
IB 78 01
nized.
Std. Standardmode(DIP switch1-6on)
IBM IBMmode(DIPswitch1-6off)
Both BothstandardandIBMmodes
ASCII:
Indicates the ASCII coding of the command.
Controlcharactersareenclosedinpointedbrackets:For example,<O>means character codeO.
Decimal:
Hexadecimal:
Givesthecommandin decimalcharactercodes.
Gives the command in hexadecimalcharacter
codes.
Parametersforwhichvaluesmustbesuppliedareindicatedby italicletters
suchas n.
33
Page 43
Many commandshave alternativeforms. Some commandsuse cESC>
(charactercode27)inStandardmodeandcFS>(charactercode28) in IBM
mode. Other commandshaveparametersthat can be specifiedas either
charactercodes or digit characters,like the parameter 1 in the sample
commandabove.
FONT CONTROL COMMANDS
Selectdraftqualitycharacters
ModeASCIIDecimalHexadecimal
,,,,,, ,,
((
Both<ESC>
<ESC>
IBM
<ESC>“1” “O”
<ESC>
“F” “ ““ ““9”
))
“X”“O”
<o>271200
“x”
“I” <O>27 73 0
40 40 70 41 41 57 28 28 46 29 29 39
27120 46
1
27 73 48
IB 78 30
1
IB 78 00
IB 49 30
IB 49 00
Changesfrom near letter qualityto draft quality.Ignoredif the
_buttonwaspressedduringpower-up.
Selectdraftelitecharacters
Mode ]ASCII
~M I <E!
SC>
[1
I <ESC> “I”
Changestodraftqualitycharacterswithelitepitch(12cpi).Ignored
if the
“I” “l”27 73 49
<1>
(~E)Or(FiiTii)buttonwaspressedduringpower-up.
Decimal
I 27 731I IB 49 01
Hexadecimal
IB 49 31
SelectNLQcharacters
ModeASCIIDecimalHexadecimal
Boh
<ESC>
<ESC>
“X”“l”
“X” <1>
27120 49
271201
IB 78 31
IB 78 01
I
34
Changesfromdraftqualityto nearletterquality.The initialNLQ
typestyleisCourierunlessa differentstylehasbeenselectedby a
precedingcommand. Ignored if the(js~)button was pressed
Causessubsequentdraft charactemto be emphasizedby adding
extrathicknesstoverticalstrokes.
Decimal
4040 7341 41 48
Hexadecimal
28 2849 29 2930
27 53IB 35
28 53IC 35
DecimalHexadecimal
IB 45
Page 46
Cancelemphasizedprinting
ModeASCII
Both
<ESC> “F”
Decimal
27 70IB 46
Cancelsemphasizedprinting.
Double-strikeprinting
ModeASCIIDecimal
Both
“ ,,,, “
((“B”“)”“)”
<ESC> “G”
“l”40 40 66 41 41 49
27 71
Causessubsequentcharactersto be printedin double-strikemode
withaslightverticalpapermotioninbetween,causingathickening
of horizontalstrokes.
Forboldprint,useofdouble-strikeis recommendedinNLQmode,
and combined use of emphasized and double-strike
mended in draft mode.
Double-strike cannot be used whh superscripts or subscripts.
Canceldouble-strikeprinting
IMode IASCII
Both
“ ‘.“ “
((“B” “)”“)”“0”
<ESC> “H”27 72
I Decimal
4040
M 41 41 48
Hexadecimal
Hexadecimal
28 28 42 29 29 31
IB 47
is recom-
IHexadecimal\
28 28 42 29 29 30
IB 48
Cancelsdouble-strikeprinting.
Startunderlining
Mode
Both
ASCIIDecimal
,, t,,, ,,
((“-”“)”“)”“1”
<ESC> “-” “l”27 45 49
<ESC> “-” <1>27 451
Causessubsequentcharactemtobeunderlined.IBMblockgraphics
charactemand spaces skippedby horizontaltabulation are not
underlined.
40 40 45 41 41 49
Hexadecimal
28 28 2D 29 29 31
IB 2D 31
IB 2D 01
37
Page 47
stop
underlining
‘ModeASCIIDecimal
,, ,,‘, 4.
((“-”“Y’“Y’
Both<ESC>“-” “O”27 45 48
<ESC> “-” <O>27 450
“o”4040 45 41 41 4828 2820 29 29 30
“Stopsunderlining.
Startoverlining
IMode \ASCII
<Es~> .,–‘, t!~..
Both
<ESC> “ - “ <1>
Causessubsequentcharactersto be overlined. Spacesskippedby
horizontaltabulationarenotoverlined.
Increasesthespacebetweencharactemby n/240inches,wherenis
a numberfromOto 127.Usedin microjustification.
Selectdoubleorquadruplesize
ModeASCII
Decimal
Both <ESC>“h” n27 104 n
Selectsthesizeof subsequentcharactersas shownbelow.Extrahighcharactersalignalongthecap-lineofnormalcharacters,with
thebaselinetemporarilymovingdown.Linespacingistemporarily
doubledwhen n = 1,5 or 6 and quadrupledwhenn = 2. To print
correctlywhenn = 3,4,5 or 6, setthelinespacingto 24/216(1P)
44
Hexadecimal
16 68 n
Page 54
of an inch with cESC> “3” <24>,and print the same characters
twice,upperhalf on oneline,lowerhalfon thenext.For accurate
alignment of the two halves, select unidirectionalprintingwith
<ESC>“U” <1>.
Double-heightcharactersarealwaysprinted at near letterquality.
Doubleheightprintingtemporarilycancelsthesuper/subscriptand
condensedprinting modes, but these modes resume when the
printerreturnsto normalheight.
Printdouble-heightcharacters
ModeASCIIDecimal
Both .
<ESC>
<ESC>
“W” “l”
“W” <1>
Printssubsequentcharactersat double heightwithoutmovingthe
base line, and withoutchangingthe line spacing.Temporarily
cancelssuper/subscriptandcondensedprintingmodes.
Double-heightcharactemare alwaysprintedat nearletterquality.
Doubleheightprintingtemporarilycancelsthesuper/subscript~d
condensedprinting modes, but these modes resume when the
printerreturnsto normalheight.
Setsthedistancethepaperadvancesorreversesin subsequentline
feeds to n/216inch, where n is betweenOand 255. If n= O,in
Standardmodetheline-feeddistanceis settoO,butin IBMmode
thiscommandisignored.
47
Page 57
Setlinespacington/72inch
Mode
Both<ESC>
ASCIIDecimalHexadecimal
“A” n27 65 nIB 41
In Standardmode,setsthedistancethepaperadvancesor reverses
insubsequentlinefeedstonf72inch,wherenisbetweenOand85.
~If n =0,the linespacingis set to O.
In IBMmodethiscommanddoesthesameexceptthat(1)thenew
line spacing does not take effect until the next <ESC> “2”
command,and(2) if n = O,the<ESC>“A”commandis ignored.
Execute<ESC>“A”
ModeASCII
IBM<ESC> “2”
Sets the line spacingto the value defined by the last preceding
<ESC>“A”command.Setsthelinespacingto 1/6inchif thereis
no precedingcESC>“A”command.
Linefeed
IModelASCII
BothI <LF>10
Printsthe currentlineand feedsthe paperto thenextline. If DIP
switch 1-2 is ON, also moves the next print positionto the left
Feedsthepaperoncebyn/216inches,wherenisbetween1and255.
DoesnotmovetheprintpositionrightorleftwhenDIPswitch1-2
is OFF.Doesnotchangethe line-spacingsetting.
Performonen1216-inchreverseline feed
ModeASCIIDecimal
Both
<ESC> “j”
n27106 n
Feedsthepaperoncebyn/216inchesinthereversedirection,where
nisbetween1and255.Doesnotmovetheprintpositionrightorleft
when DIP switch 1-2 is OFF. Does not changethe line-spacing
setting.
Hexadecimal
IB 6A n
Feedpapern lines
ModeASCII
Both.
<ESC>“f’
<ESC>“f’ <1> n
Feedsthepapernlinesfromthecurrentline,wherenis betweenO
and 127,
Setsthepagelengthto n linesin thecurrentlinespacing,wheren
isbetween1and127inStandardmode orbetween1and255inIBM
mode.Changingthe line spacing later doesnot alterthephysical
pagelength.Thecurrentlinebecomesthetop of thepage.
Setpage lengthton inches
Mode
Both <ESC>“C” <O>n27 670 nIB 43 00 n
ASCIIDecimalHexadecimal
Setsthepagelengthto n inches,wheren is between 1 and 22 in
Standardmodeorbetween1and127inIBMmode.Thecurrentline
becomesthetop of thepage.
Settopmargin
ModeASCIIDecimalHexadecimal
Both
<ESC> “c” n27 99 nIB 63 n
Setsthe topmargintonlines,wherenisbetween1and255.Printing
begins on the nth lineon thepage.Thepower-updefaultis n = 1,
givingno top margin.
Setbottommargin
IModeIASCIIDecimalHexadecimal
IBoth] <ESC> “N” n] 27 78 n
Setsthebottommarginton lines,wheren is between1and 127in
Standardmode or between 1 and 255 in IBMmode.The bottom
marginis resetwhenyouchangethe pagelength.
50
! IB 4E nI
I
Page 60
Canceltopand bottommargins
ModeASCII
Both
<ESC>“O”
DecimalHexadecimal
27 79
Cancelsboththetop marginandthebottommargin.
Formfeed
ModeASCII
Both<FF>
Feedsthe papertothetopofthe nextpageaccordingtothe current
pagelength,andmovestheprintpositiontotheleft margin.When
the automaticsheetfeeder (ASF) is selected(DIP switch 1-4 is
OFF),thiscommandejectsthecurrentpage.
Decimal
12Oc
Returntotopof currentpage
Mode
ASCII
Both <ESC><FF>
Feedsthepaperbackwardto the top of the currentpage.Ignored
whenfrictionfeedisused.
Decimal
27
Disablepaper-outdetector
12
IB 4F
Hexadecimal
Hexadecimal
IB OC
Mode
Bah
ASCII
<ESC> “8”
Causesthe printer to disregardthe signalsent by the paper-out
detector,enablingprintingtothebottomofthepaper.Overridesthe
settingof DIPswitch 1-5.
Enablepaper-outdetector
ModeASCII
Both
<ESC>
Causesthe printer to stop printingbefore the end of the paper.
Feedsthepaperto the next verticaltab stop and movestheprint
positiontotheleftmargin.Performsalinefeedifnoverticaltabsare
set,asatpower-up.Feedstothetopofthenextpageifverticaltabs
aresetbutthecurrentlineis at or belowthelast verticaltab stop.
HORIZONTAL POSITION COMMANDS
Setleftmargin
ModeASCII
BothI <EsC> “l” n
Setstheleftmarginatcolumnn (wherenisbetweenOand255)in
the currentcharacterpitch(picapitch if proportionalspacingis
selected).The left margindoesnot moveif the characterpitch is
changedlater.Theleftmarginmustbeat leasttwocolumnstothe
leftof therightmarginandwithinthe limitsbelow:
Cancelsallcurrenthorizontaltab stopsand sets new tab stops at
columnsnl, n2,etc.inthecurrentcharacterpitch(picapitchifproportionalspacingis currently selected), where nl, n2, etc. are
numbersbetween1and255.Themaximumnumberofhorizontal
tabstopsallowedis32inStandardmodeand28in IBMmode.The
tab stops must be specifiedin ascendingordec any violationof
13.6inches).Ignoredif theresultingpositionisbeyondtherightor
left margin. The formulasfor the distanceand direction are as
follows:
If n2isbetweenOand63,theprintheadmovesrightby(nl + @ x
256)/120inches.
If n2isbetween64and 127,theprint headmovesleftby(nl + [rz264]x 256)/120inches.
DecimalHexadecimal
27 92 ni d
28 92 nl d
Absolutehorizontaltabin inches
16 5C td d
IC 5C nl n2
Mode
ASCII
Both cESC>“$” nld
DecimalHexadecimal
27 36 nl d
Setsthe nextprintpositionto (nl +rd x 256)/60 inchesfromtheleft
marginon the currentline.Ignoredif this positionis beyondthe
rightmargin.Themaximumpositionis 13.6inches.
Absolutehorizontaltabin columns
ModeASCII
Both
cESC>“f’ “O” n
<ESC>“f’ <O>n27102 0 n
Movesthe next print positionto columnn from the left margin,
wheren is betweenOand 127.
DecimalHexadecimal
27102 48 n
IB 24 nl n2
IB 66 30 n
IB 66 00 n
57
Page 67
GRAPHICS COMMANDS
Printnormal-density8-bitgraphics
ModelASCIII DecimalIHexadecimal I
Both
cESC>“K”
nln2
mld.. .mld...mld. ..
27 75 nl d
I
IB 4B nl d
I
Prints bit-imagegraphicsat 60 dots per inch horizontally.The
l-byte valuefrom Oto 255 representing8 verticaldots, withthe
most significantbit at the top and the least significantbit at the
bottom.The numberof databytesmust be nZ+ n2 x 256.Dots
beyond the right margin are ignored.At the end of bit-image
printingthe printerreturnsautomaticallyto charactermode.
Printdouble-density8-bitgraphics
IModelASCIIIDecimalIHexadecimal I
Both
<ESC> “L”nln227 76 nl d
mlm2...
mlm2 . ..
Printsbit-imagegraphicsat 120dotsperinchhorizontally(maximum 1632dotswide).SeecESC>“K” for otherinformation.
ConvertsgraphicsdefinedbysubsequentcESC>“K”,<ESC>“L”,
<ESC>“Y”or<ESC>“Z”commandstoadensitymodedefinedby
cESC> “*”.n is “K”,”
converted.misacodefrom<0>to<7>indicatingoneofthemodes
of <ESG “*”.
dots wide.Maximumwidthis 13.6inches.Dotsbeyondthe right
marginareignored.ml, m2,...
arebytepairsrepresenting9vertical
dotseach.In theleftmostposition,themostsignificantbitof ml isthetopdot;theleastsignificantbitofml istheseconddotfromthe
bottom;themostsignificantbitofm2isthebottom dot;andtheother
bitsofm2areignored.Otherbytepairsaresimilar.Thenumberof
data bytesmust be 2 x (nl + n2 x 256).At the end of bit-image
printingthe printerreturnsautomaticallyto charactermode.
DOWNLOAD CHARACTER COMMANDS
CopystandardcharactersfromROMintoRAM
ModeASCIIDecimal
std.<ESC>“:”
IBM
<FS> “:” <o> <o> <o>
<o> <o> <o>
27 58 000 IB 3A 03 00 00
28 58 000 IC 3A 03 W 00
Copies all the standard charactersto the correspondingdownload
characterRAMarea,overwritinganydownloaddataalreadypresent.IgnoredwhenDIP switch2-1is ON.
Hexadecimal
Definedraftdownloadcharacters
ModeASCIIDecimal
cESC> “&” <O> nl27 3S O nl
Bothn2mO mlm2
d... mlld... mll
Definesoneormorenewdraftcharactersandstoresthemin RAM
forlateruse.DIPswitch2-1mustbeOFF;otherwiseRAMisused
as an inputbuffer,not for downloadingcharacters,andthiscommandisignored.Draftmodemustbeselectedbeforethis command
is executed.
60
dmO ml dd dml d
Hexadecimal
IB 26 W nl
d... mll
Page 70
nl is the charactercode of thefirstcharacterdefinedandn2is the
charactercode ofthelastcharacterdefined.nl andn2mustbothbe
between32and 127or bothbe between 160and255.n] must be
equalto orlessthann2.Useofcharactercodes32(space)and127
(deletecode)shouldbe avoidedif possible.
an ascender(positionedentirelyabovethe baseline)orOif it is a
descender(descendingbelowthebaseline).Theattributebytealso
indicatestheamountofwhitespace to theleftofthecharacter(O to
7 dots,specifiedbybits4to 6),and the widthofthecharactercell,
includingthisspace(4to 15dots, specifiedbybits Oto 3).Theleft
spaceandcellwidthattributesareusedonlyinproportionalspacing.
Eachdatabyteindicateseightverticaldots,withtheMSBbeing the
topdotandtheLSBthebottomdot.Thesecorrespondto pins 1to
8or2 to 9 of theprinthead,dependingon whetherthecharacteris
an ascenderor descender.
For furtherdetails,pleasereferto the Chapter5.
DefineNLQdownloadcharacters
Mode
Both
ASCIIDecimalHexadecimal
<ESC>“&”<O>nl27 3S O dIB 26 W d
MO ml@
d
m3...
M46
dmO ml d
m3 ... m46
d dml d
d... m46
DefinesoneormorenewNLQcharactersandstorestheminRAM
for later use. DIP switch 2-1 must be OFF. NLQ mode must be
selectedbeforethiscommandisexecuted.Theparameter arethe
sameasfor thedraftdownloadcharactercommandexceptthat the
attributebytespecifiesrightspaceinsteadofcharacterwidthandthe
dotdensityis doubledineachdirection,so eachcharacterconsists
of 16dotsverticallyand23 dotshorizontallyandrequire 46data
bytes.Dotsdefinedbyml tom23areprintedonthefirstpassof the
head.Dotsdefinedby m24to m46areprintedon the secondpass,
thepaperbeingscrolleduphalfa dotbetweenthetwopasses.For
furtherdetails,pleasereferto theChapter5.
Cancelstheprecedingcommandsandacceptsthemostsignificant
bit asit is sentto theprinter.
Deletelast charactersent
ModeASCIIDecimal
Std.
<DEb1277F
Deletesthe last characterreceived.Ignoredif the last character
receivedhas alreadybeenprinted,or if thelast characterreceived
wasall or partof a command.
Selectstheimmediateprint mode,in whichtheprinterprints each
characterassoonas received.Ateverypausein theincomingdata
streamthe printerscrollsthepaperup about2 inchesso that the
curmt linecan be seen.Whenthe next characteris receivedthe
paperis scrolledbackdownandprintingcontinues.Thiscommand
is ignoredwhenfrictionfeedis used.
Sets the printer off-line. The printer disregards all subsequent
charactersandcommandsexcept<DC1>,whichreturnsittotheonlinestate.The printer’sON
LINE indicatordoesnotgooff.
Setprinteron-line
IModelASCII
IBothI
<DCl>
Returnstheprinterto the on-linestate,allowingit to receiveand
processall subsequentcharactemandcommands.Thiscommandis
i~ored iftheprinterwassetoff-linebypressingthe( ON
button on the control panel.
IDecimalIHexadecimalI
1711
LINE
1
Bell
Mode
BothcBEb
66
ASCIIDecimalHexadecimal
Soundsa briefbeeptonefromtheprinter’sbeeper.
7
07
Page 76
Bidirectionalprinting
Mode
Both
ASCII
<ESC> “U” “O”
<ESC> “U” <O>
DecimalHexadecimal
27 85 48IB 55 30
27 85 0
Causessubsequentprintingto be donein thenormalbidirectional
mode,whichis fasterthanunidirectionalprinting.
Unidirectionalprinting
Mode
Both
ASCIIDecimalHexadecimal
<ESC> “U” “l”
<ESC>
“u” <1>
27 85 49IB 55 31
27 85 1IB 55 01
Causessubsequentprintingto be doneunidirectionally,ensuring
maximumverticalalignmentprecision.
One-lineunidirectionalprinting
Mode
Both
ASCII
<ESC> “<”
Immediatelyreturnstheprintheadtothe leftmargin,thenprintsthe
remainder of the line from left to right. Normal bidirectional
printingresumeson the nextline.
DecimalHexadecimal
27 60IB 3C
IB 55 (KI
Manualfeed
Mode
Both
ASCIIDecimalHexadecimal
<ESC><EM><O>27 25 0IB 19 N
“ $’“ “
((
Selectsmanual sheet feedingeven when the optionalautomatic
sheetfeederis mounted.Ignoredif DIP switch 1-4 is ON (ASF
inactive).
“o”“y’ “)”
40
40 48 41 41 28 28 30 29 29
67
Page 77
I
Autofeed
ModeASCII
Both,,(,,‘,(,,,’4,,,,),,,,),,
<ESC> <EM> <4>
DecimalHexadecimal
27 25 4IB 19 04
40 40 52 4141 28 28 34 29 29
Selectstheautomaticsheetfeeder.Ignoredif DIPswitch1-4is ON
,(ASFinactive).
Ejectpaper fromASF
IModelASCII
Borh,,(,,,,(,,
<ESC><EM>“R”
Ejects the currentpage. Ignoredif DIP switch 1-4 is ON (ASF
inactive).
“R”“ ““ “
))
I DecimalIHexadecimal I
27 25 82
40 40 82 4141 28 28 52 29 29
Setprint startpositiononASF
ModeASCIIDecimal
Both,,(,,,,(,,
<ESC> cEM> “T” n
Skipsn/6inchesatthetopofthepage,wherenisequaltoorgreater
than 1.Ignoredif DIPswitch1-4is ON (ASFinactive).
PhotocopythegridinFigure5-2tohelpdesignyournewcharacters.Wewill
use a tinyrepresentationofacar-shapedsymbolforour example.
rnl m3 m5 rrr7 m9 ml I
m2 m4 m6 m8 m10
128
64
32
16
8
4
2
ASCII Code:
Descender:
Left space:
Last column:
mO = Descender x 128
+ (Left x 16)
+ Last
1
Figure S2 Usethis grid (or one similar to it) todefine your own draft characters
Definingtheattributedata
Beforeyoustartthedefinition,youwillneedtodecideexactlywherein the
regularASCIIset youwanttoplaceyourcharacters.Afterdownloading,you
access your new characterby sending the code for the character you
replaced.
70
Page 80
mlndm5m7m9mll
m2 m4 m6 m~ ml(l
128
64
32
16
8
4
2
I
124 66 64 76 76 0
0436 272
Figure 5-3.Add the values of the dots in eacAcolumn and write the sum of eaeh column at the bottom
ASCII Code:
Descender: ?
Left space: O
Last column: 17
mO = Descender x 128
+ (Left x 16)
+ Last
Next you must choosewhetherto makethe car symbolan ascenderor a
descender.Thisdetermineshowthecharacteris seatedonthe line:
Ascender:
!j;I>~Ii’Descender:CI~,,l:~:
Wedecidedthatourcarsymbolwillnotbea“descender”,soafigure“l” is
writtennexttoDescenderonthegrid.Ifyour characterisadescender,write
a “O”nextto Descender.
Next, you must specifythe left space and the last print column of the
character.
Beingableto specifythewidthof the characterallowsyouto specifythe
precisearea insidethegridthat the characterwill occupy,so that narrow
charactemwilllook attractivenextto wideones.
Acceptablevaluesfortheleftspace areOto 7,andthelastprintcolumnare
from4 to 11.
Ourcharacterwilloccupyfromcolumn1to column11,so theleft spaceis
Oandthe characterwidthdatais 11.
71
Page 81
Assigningthecharacterdata
Now,wecalculatetheverticalnumericalvaluesof thecolumnsofdots,and
enterthemunderneaththegrid.Forexample,lookingatFigwe 5-3,wesee
thatintheleft-mostcolumntherearefivedots,andtheyare sittinginthe“64”
box,“32’’box,“16”box,“8”box,and “4”box.Thusitsverticalvalueis 124.
In the nextcolumn,thereis no dot straddlingtheverticalline; its valueis
recordedas O.
To demonstratehow to use the downloadcharacters,let’s use the “car”
characterand someotheruser-definedcharacterstoprintasmallgraph.This
programwilldojust that:
FOR 1=.4TO 8.7STEP.4
LPRINT CHR$(60) ;
NEXT I
LPRINT
LPRINT“GUNS’’;CHR$(9);
FOR 1=.4TO 1.4STEP.4
LPRINT CHR$(62);
NEXT I
LPRINT
LPRINT CHR$(9);’’+–-”;
SCALE$=’’–-+–-”
FOR 1=2 TO 8 STEP 2
LPRINTSCALE$;
NEXT I
LpRINTII––+11
LPRINT CHR$(9);”“;
FOR 1=2 TO 8 STEP 2
LPRINT“
“;1;
NEXT I
LPRINT CHR$(27);“%’’;CHR$(O)
LPRINT CHR$(27);’’S’’;CHR$(O);
LPRINTCHR$(9);
“MILLIONS OF DOLLARS”
LPRINT CHR$(27);”T”
END
Page 83
DEFINING YOUR OWN NLQ CHARACTERS
As youprobablynoticed,NLQcharactersareprintedby two passesofthe
printhead.Halfofthecharacterisprintedonthefirstpass,andtheremainder
onthe secondpass.Thepaperisrolleduphalfadot heightinbetweenpasses
to lettheprintheadprintdotsonthe secondpassthatoverlaptheprevious
dots,inorderto fill inthespacesandproducedensercharacters.Additionally,the printhead speedis halved,andthedots areprintedatdoublethe
densityof draftcharacters.Forthisreason,NLQcharacterscancontainup
to 23 dotsinthehorizontaldirection.
Fundamentally,theprocessto defineandprintdownloadedNLQcharacter
is the sameas for draftcharacters,exceptthatyoumust supplyaboutfour
timesasmuchcharacterdata,andyoumustdesignthecharacterwiththetwo
passesof theprintheadinmind.Thereamsmalldifferencesin thewaythe
attributeinformationis processedalso.
In the draftqualitymodethe attributebytecarriesthe descenderdata,and
specifiesthe left spaceandthecharacterwidth.IntheNLQmode,the first
bit also carries the descenderdata, and the next three bits describe the
character’sleft space as with the draft characters,but the last four bits
describetherightspace.Appropriateallocationofdatain thesesevenbits
lets you place the character where you like within the grid, with the
restrictionthatthecharactermustbe at least9 dotswide.
To makethecharacterdataeasierto calculate,putthefirstpassdotsinside
theboxesonthegridwhenyouaredesigningyourcharacters,andthesecond
passdots on thelines.Rememberthatadjacentdotsmaynotoverlapon the
samepass;inotherwords,ifonedotisinabox,itsadjacentdot on thesame
passmaynotbeonaline.Therefore,tomakesmoothcharacters,putthedots
neededto overlapanyspacesin a characterintheappropriateplacesinthe
To learnhowto printffles,etc.it is bestto readthe relevantpartsof these
manuals.
INSTALLING APPLICATION SOFTWARE WITH
YOUR PRINTER
Wheninstallingapplicationsoftware,youmayfindthatyourprinterisnot
specificallymentionedin the lists of pnntemgiven for installation.However, this should pose no problem. Read this section, and guidelines
providedwithyoursoftwareon printerinstallation.
Ifyouhave yourprintersetup in standardmode,thenchooseanEpsonFX-
1050or EX-1OOOas yourprintertobe selected.
If neitherofthesea~ mentioned,choose one of thefollowing(inorderof
preference):StarNR-10/15,StarND-10/15,EpsonFX86e,EpsonFX286e.
If youhaveyourprintersetup withthe DIP switchesto emulatean IBM
applicationsoftwarelist.
If theIBMProprinterXLis notmentioned,useProprinterII orPropnnter.
Ifyoursoftwarepackagedoesnotmentionpnntembyname,butasksinstead
whatfeaturesyour printeris capableof,the mostcommonquestionsare:
“Canyourprinterperformabackspace?”and“Canit do a hardwareform
feed?”.Youshouldanswer“Yes”toboth thesequestions.
Othersoftwarepackagesmay well allow you to install specificfeatures.
Spreadsheetprogramswilloftenaskforthemaximumnumberof columns
to be printed.Thisisgivenbelow.
If you wantto printa title in double-sizeOratorwith smallcapitals,then
changetoregular-sizeCourierforsometextthatincludesitalics,youcanuse
thesecommandsasfollows:
Fileas seenon computerscreen:
( (F) ) 2( (S) ) 3
PrinterCommands
( (F) ) O ( (S) ) O
Typestyle,size,boldprint,and
( ( I ) ) 11ta 1i c( (I ) ) Ocorrunandscanbeembedded
(( I))lanYwhem((l)}Olna document.
The boldcommand((B))1givesdouble-strikeprinting.Indraftmodeyou
may preferto use emphasizedprinting,whichrequiresa softwarecommandor escapesequence.
✎
A lineconsistingof commandsaloneprintsasa blankline.
●
Softwaredoes not know that these commandsare commands,so you
cannottrustyoursoftwaretogiveyouthecorrectlinewidth.Theprinted
linemaybe considerablyshorterthanthelineonthescreen;themissing
Theprintersupportsvariouscommandsin additionto the above,such as
quadruple-sizeprinting.
Most of theseothercommandsconsistof theescapecodefollowedbyone
or morelettersornumbers.
Ifyoursoftwareenablesyoutoplace theescapecodeinyour files,orif you
wereable to definethis as a user optionduringinstallation,you can also
embedthese escapesequences.
PROGRAMMING THE PRINTER WITH DOS
COMMANDS
If yoursystemincludesthe file PRINT.COMyou can use the main DOS
printingcommand.SimplytypethewordPRINTfollowedbythe nameof
the file you want to print. To print a file named README.DOC,for
example,type:
k )PRINT
The computermay
printertouse:
Name of
If your computerisconnectedtoonlyone printer,pressRETURNtoselect
the default choice (PRN). Printing will begin and the A> prompt will
reappear.You can executeothercommandsor programswhilethe file is
beingprinted.
A single PRINTcommandcanprinttwoor morefiles.Listthe filenames
consecutivelyonthe sameline,or usewild-cardcharactem(* and?). Each
filewillbe printedstartingon anewpage.ThePRINTcommandalsohas
controloptions.For example,youcan terminateaprintingjob in progress
withthen option. (Theprintermay notstopprintingimmediatelyitmay
haveconsiderabledatastoredaheadinits buffer.)Forthe/T option,type:
A)PRINT/T
SeeyourDOSmanualforfurtherinformationaboutthePRINTcommand.
If yoursystemdoesnotincludePRINT.COM,youcanprintfilesby using
thePRNdevicenamein COPYorTYPEcommandssuchasthefollowing:
IfyouprintfromtheDOScommandlevelveryoften,itwillbeadvantageous
tocreateaprintersetupfile.Theninsteadof settingfontstyleetc.manually
each time,you can completethe setupwitha singlecommandfromyour
computer.Forexample,you can createafile containingprintercommands
toselectnearletterquality,andselectelitepitch.Youcanfindthecommands
in Chapter4. Wesuggestthefollowing:
● Nearletterquality
● Elitepitch
<ESC>
<ESC>.<1>
“X”“l”
66199
<ESC>“!”cl> is a powerfidcommandthat,in additionto selectingelite
pitch,cancelsunwantedfeaturessuch as underliningwhichmightbe left
from previous commands.The angle brackets around the cl> indicate
charactercode 1,whichis a controlcode,nottheprintabledigit” l“.
Youmay wantto placeadditionalcommandsin thisfile,suchasleft and
rightmargins,line spacingandbottommargincommands.Oryoumaywant
to createa varietyof setupfileswitha differentsetof commandsin each.
To avoidexcesslinefeeds,youshouldplacethecommandsononelinein
thesetupfile.Youmayormaynotbeabletogenerateasetupfilewithwordprocessingsoftware;it dependson whetheryour softwarelets you enter
AZ me~st. pIWStheCTRLandZkeyssimultaneously.TO usethisfiletO
printREADME.DOC,typethe fifthline.
A)COPY CON NLQPRINT . BAT
COPY NLQELITE . DAT PRN
PRINT %1
“z
A>NLQELITE README.DOC
Thefirstaboveline is a copycommandfromthe CONsolescreento a file
namedNLQPRINT.BAT.Thenexttwolinesarethecontentsofthisfile.The
%1is a dummyparameter:whateverfilenameyoutypeafterNLQPRINT
willbe substitutedfor%1 andprinted.
PROGRAMMING WITH BASIC
As an exampleof programmingtheprinter on Microsoft BASIC,wehave
listed the program for the IBM-PC.~isprogram runs in the printer’s
‘Set right margin
1410 LPRINT C$;UVarious line and character spacings:”
1420 LPRINT E$; ’’al”~
‘Centertext
1430 FOR 1=1 TO 7
1440 LPRINT E$; ’’A’’;CHR$(I);
1450 LPRINT E$;” “;CHR$(I);
‘Set line spacing
‘Increase character space
1460 LPRINT “THE SPACINGS ARE CHANGED”
1470 NEXT I
1480 FOR 1=7 TO 1 STEP –1
149o LPRINT E$;’’A’’;CHR$(I);
1500 LPRINT E$;” “;CHR$(I);
1510 LPRINT “THE SPACINGS,ARE CHANGED”
1520 NEXT I
1530 LPRINT E$;’’aO”
‘Left justify
1540 LPRINT E$;’’3’’;CHR$(36);‘Set 1/6” line sPacin9
1550 LPRINT E$;” “;CHR$(0);
TheWIDTH“LPT1:”255statementinline1110meansinfhite linewidth.
It preventsthe IBM-PCfrominsertingunwantedcarriagereturnsand line
feedsin graphicsdata.
Actualprintingbeginsinline 1120.Usingthepreassignedcommands,the
programprintssamplesofitsdifferentfontstyles,includingalineshowing
all stylesin italics,followedby samplesof the print pitches,then some
double and quadruple-sizedprinting.
Next comesthe centralattractionof the program:a line of text printed
fourteentimesinexpandingandcontractingloopstogiveabarreleffect.The
workisdonebyfourprintercommands:acommandsettingtherightmargin
(line1400);acenteringcommand(line1420);acommandto varythe line
spacing(lines 1440and 1490);and a commandto micro-adjustthe space
betweencharacters(lines 1450and 1500).
The finalpartof theprogramusesdotgraphicsto printsome“SW”logos
withvariousdensities.Thedotpatternofthelogowasoriginallylaidouton
graphpaper,thenconvertedtothedatainlines2370to 2600withthehelp
of acalculator.Eachnumberrepresentseightverticaldots.(See“Graphics
commands”in Chapter4 for details.)
Thepatternisprintedinfour rows,eacheightdotshighand65 dotswide.
Lines 1800to 1850read the dot data into a string array variablenamed
LOGO$.Line 1860setsthelinespacingto 8f12inchso thatthe rowswill
connectvertically.Theloop in lines 1870to 1960doestheprintingin four
passesoftheprinthead.
86
Page 96
Type sty 1es are :
,..
:,i:.~;:,,;::~. (::.i;;,,...(;,;.::.:,,..,~,.::?
Couriercharacters,
Sa nse r if char-acte rs ?
ORATORWITHSMALLCAP ITAI.S,OR
...+
wi t h1 @wercasecharacters,
and-rTA[.T[;S
PrintP itchesare :
Pi cci pi
t.ch( 1Cl CF’1) ,
Condensedp]cap]tch(17CPII,
propor-tionil spacing forall pitches,
Variouslineandcharacterspcicinqs:
Fat- a II v;:~..,:F .,.
El it-e pitch[12 CPI) ,
Condensedelitepitch(20CPII,
CIttierfeatures:
87
Page 97
I
ModificationsforIBMmode
Thisprogramcan alsobe run in IBMmode (DIPswitch 1-6OFF’)if you
changeafewofthelinesasshownbelowto allowfordifferenceinsomeof
the commands.Youwillgetacylinderinsteadofabarreleffect,becuasethe
IBM mode does not have any commandto micro-adjustthe character
spacing.
Yourprinteris a reliablepieceof precisionmachinery,whichshouldnot
causeyouanytrouble,provideditisusedandtreatedsensibly.However,the
few elementarytipsbelowshouldavoidyouhavingto makeunnecessary
servicecalls.The followingtablegivesyouideason whereto lookin this
sectionif youexperiencefaults:
Regionoffault
Powersupply
Printing
Paperfeeding
Remember-itisbetternottoattemptoperationsorrepairsaboveyourlevel
of competence.Otherwise,youruntherisk of damagingtheprinter.
The
Paper park (switching between continuous paper and cut sheets) is not
working properly
Text is being printed all on one line, or with extra blank lines
Page length and margin settings are not what is expected.
missing incharactersorgraphics
expected when ruining a program
ASF)
feed
ASFisnotoperatingor is not feeding paper properly
89
Page 99
I
Powersupply
If the POWER indicatordoesnotilluminate,checkthe following:
Check
Is the power cable properly
plugged into the electrical
outtet?
Is power being supplied to
the outtet?
Is theprintervoltage correct?
Possible remedv
Turnoffthe@nter,ensure the power cable is securely
connected, and then turn the printer back on.
Turn off the printer, unplug it, and try with another
appliance to determine if electricity is being supplied to
that outlet.
Check the bottom panelof your printer toensurethat the
outletvoltagecorresponds tothevoltagerequiredby the
printer. If theydonot match, DONOT try to operate the
minter. Contact vour surmlier.
Printing
If yourprinterdoesnotprint,orsuddenlystopsprinting,checkthefollowing:
Check
Is the interface cable con-Check both ends of the cable - printer and computer to
nected securely?
Is the ON
minated?
Is the
flashing?
Is the paper caught up internally?
Is the ribbon caught up
around the print head?
Is the software you are using
properly installed for your
printer?
Can the printer perform self-
test operations?
LINEindicator itlu-
POWER indicator
Possible remedy
make sure that the connector is firmly in position.
IfitisnoCpress the~
on-line.
If it is, the paper has run cut. Load more paper.
Turn off thepower, remove thej
tumontheprinter, andcontinueprinting. Make sure that
the leading edge of the paper is smooth and uncreased.
Turn off the power, remove the ribbon, retensionit, and
replace it. This problem occurs most frequently with a
worn ribbow so you may need to replace the ribbon.
Check the installation settings in your software, andreinstall if necessary.
Tum the printer off, and turn it on again, holding down
one of tie buttons to perform a self-test. If these donot
work, contact your dealer.
ONLINE >buttontosettheprinter
ammedpaper, replace,
I
90
Page 100
If theprintis faint,oruneven,checkthefollowing:
CheckPossible remedy
Istheribbonproperlyin-
Checkandreinstallifnecessary.
Is the ribbon worn out?The ribbon has a long life, but eventually will need
1-”-
replacing. Fit a new riblxm cartridge if necessary.
Are dots missing at random
in the printing?up. Stop printing, remove the ribbon cartridge, reten-
Is a line of dots missing con-The print head is damaged. Stop printing, and contact
sistentlythroughouttheyour supplier for anew print head.
printing?
The ribbon has become slack causing it to get caught
sion and replace it.
If your applicationsoftwarecannot print the fontsor charactersselected,
checkthefollowing:
CheckPossible remedy
Is your application softwareCheck the software installation, andre-install the soft-
properly installed?
Are fonts not being selwted
properly?martds necessary for font changes into the software.
Are characters other than
thoseexpectedbeingSet (reset with DIP switches or software axnrnands),
printed?or you have the wrong character set selected (for
ware if necessary.
Check the software installation+ and insert the com-
Either you we usingthe WrongInternational Character
example if characters other than IBM block graphic
characters are being printed). Correct this with DIP
switches or the appropriate softwue sequences.
I
If the printoutis not whatis expected:
Check
Is the printer installed cor-
rectly?
Is the printer not printing
anything that youare expect-
~g?
Possible remedy
Your software may think that it is driving a different
emulation to theone actually set. Check the DIP switch
settings to make sure you have the right emulation.
Use the Hex Dumpmode toanalyze the output from the
computer to the printer. This will enable you to determine that the right escape sequences, etc are being
transmitted.
91
Loading...
+ hidden pages
You need points to download manuals.
1 point = 1 manual.
You can buy points or you can get point for every manual you upload.


 Loading...