

Page 1

SERIAL INTERFACE UNIT
МОДУЛЬ ПОСЛЕДОВАТЕЛЬНОГО
ИНТЕРФЕЙСА
IS-NP192
USER’S MANUAL
РУКОВОДСТВО ПОЛЬЗОВАТЕЛЯ
PBA10 SIF 80825940
Page 2

Notice
• All rights reserved. Reproduction of any part of this manual in any
form whatsoever, without STAR’s express permission is forbidden.
• The contents of this manual are subject to change without notice.
• All efforts have been made to ensure the accuracy of the contents of
this manual at the time of going to press. However, should any errors
be detected, STAR would greatly appreciate being informed of them.
• The above notwithstanding, STAR can assume no responsibility for
any errors in this manual.
© Copyright 1997 Star Micronics Co., LTD.
Предупреждение
• Все права сохранены. Воспроизведение любой части данного
руководства в любой форме без прямо выраженного разрешения
STAR запрещено.
• Содержание данного руководства может быть изменено без
уведомления.
• Предприняты все меры для обеспечения точности содержания
данного руководства в момент его выхода в печать. Тем не менее,
в случае обнаружения ошибок STAR будет чрезвычайно
благодарна за информацию о них.
• Несмотря на вышесказанное, STAR не может принять на себя
ответственность за любые ошибки в данном руководстве.
© Copyright 1997 Star Micronics Co., LTD.
Page 3

CONTENTS
Chapter 1: Serial Interface Unit .............................................................. 2
Unpacking .......................................................................................... 2
Chapter 2: Installation .............................................................................. 2
Installing the serial interface unit ....................................................... 3
Connecting a serial cable.................................................................... 4
Setting the printer’s Electronic DIP switches (EDS).......................... 5
EDS-2 Settings ................................................................................... 5
Chapter 3: Software Settings.................................................................... 7
Setting up a serial connection on an MS-DOS computer................... 7
Chapter 4: Technical Specifications (Input)............................................ 8
Connector Signals and Functions ....................................................... 8
English
Page 4
Serial Interface Unit
This serial interface unit makes it possible for your printer to communicate
with your computer using serial data. This manual describes the operational
procedures for using the serial interface unit.
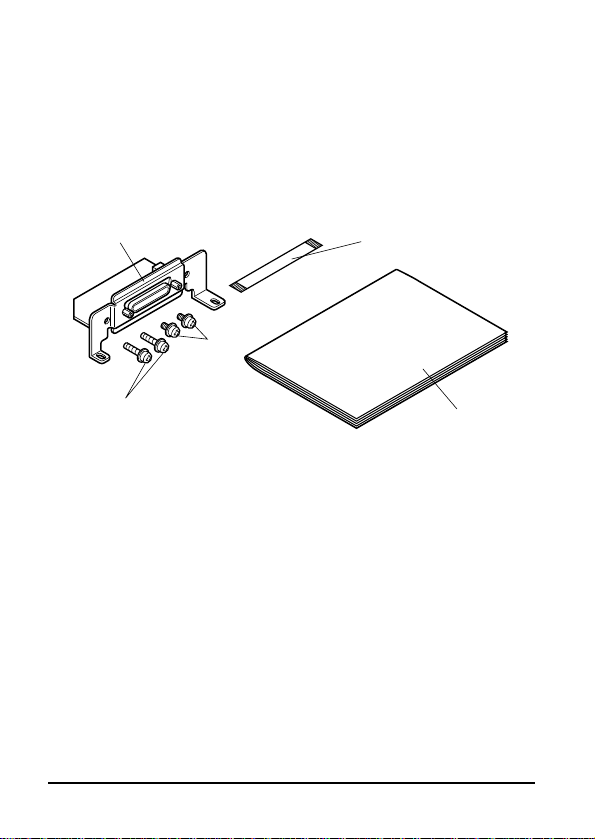
Unpacking
• After removing the contents from the packaging, check to make sure
you have all seven items. If anything is missing, contact your dealer.
Serial Interfase Unit
Small
Screws
Harness
Large Screws
User's Manual
In addition to the interface unit, you will also need a proper serial cable. Consult dealer where you bought your printer if you are unsure about the type of
serial cable you need for your system.
Installation
This section explains how to install the serial interface unit into the printer
and connect your printer to your computer. It also includes information on
DIP switch settings you should make to match the interface to your computer .
2
Page 5
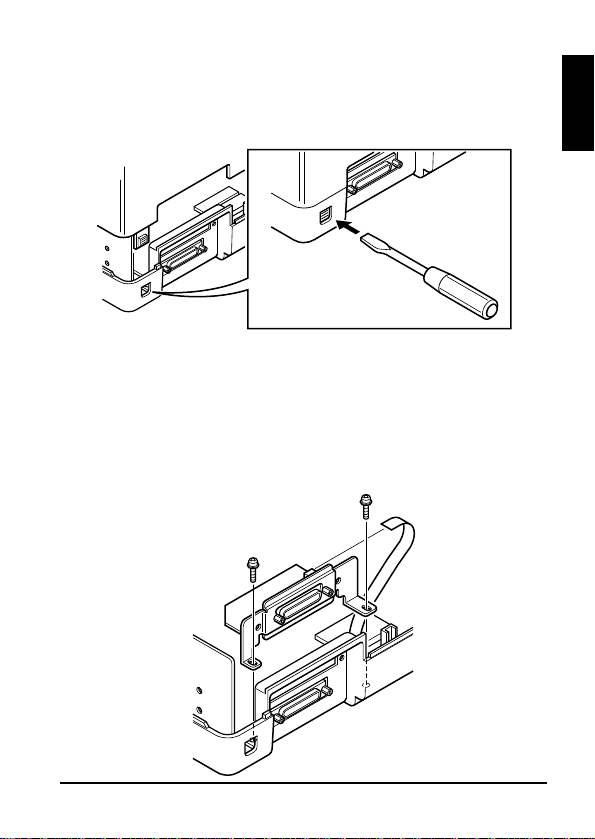
Installing the serial interface unit
• First remove the printer cover by pushing in the tabs located on both
sides of the lower rear of the printer with a screwdriver as illustrated
below.
• Set the DIP switches on the serial interface unit to the settings that you
want. See “Setting the serial interface unit’s DIP switches” on page5
for details on how to do this.
• Connect the ribbon cable to the top terminal inside the printer, and
carefully slide the serial interface unit into the printer.
After sliding the interface unit in as far as it will go, secure it in place
with the two large screws that come with it.
English
3
Page 6
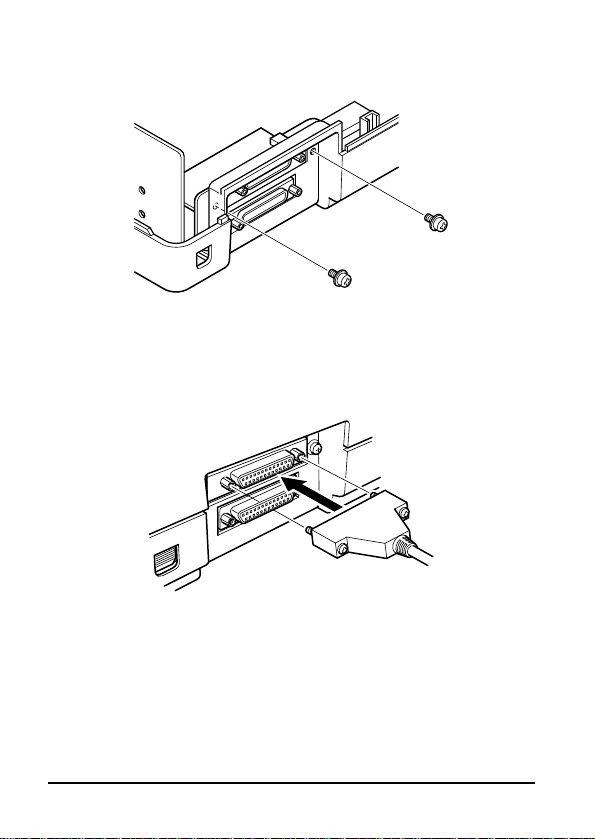
And secure interface unit in place with the two small screws.
Finally , install the printer cover.
Connecting a serial cable
• Unplug the printer from its AC power outlet.
Plug one end of a serial cable into the printer’s serial port and secure it
in place with the two screws on the cable.
• Plug the other end of the serial cable into one of your computer’s serial
ports. Serial ports are usually marked COM1, COM 2, etc. If your computer has only one serial port, it will be marked COM1.
4
Page 7

NOTE:
The printer is equipped with a serial interface for connecting the optional serial interface unit.
This makes it possible to connect two separate computers for serial
data communication.
Setting the printer’s Electronic DIP switches (EDS)
You should set the printer ’s Electronic DIP switches so they match the settings you make on your computer. For instructions on setting (switching) the
electronic DIP switches, refer to “Using the EDS Mode” in the printer’s User’s Manual. The following tables shows the parameter that each DIP switch
controls.
EDS-2 Settings
The following details all of the settings you can make for EDS-2. For
communications protocol settings (Banks A and B), the matching settings you have to make in your MS-DOS AUTOEXEC.BAT file.
BANK A
Switch 1: Data Length
Specifies the number of bits that the computer transmits as one byte.
This setting is normally 8.
Data Length SW1 DOS Setting
8 bits ON 8
7 bits OFF 7
English
5
Page 8

Switch 2: Parity Check
This switch specifies whether or not a parity check should be performed
on the data.
Parity Check SW2 DOS Setting
Disabled ON Disabled
Enabled OFF Enabled
Switch 3: Parity
This switch specifies the parity as non, odd, or even.
Parity SW3 DOS Setting
Odd ON O
Even OFF E
Switch 4: Protocol
Protocol, which is sometimes referred to as “handshaking,” is the communications convention that is used to allow the printer and computer
to regulated the flow of data. DTR is the most commonly used protocol.
Protocol SW4 DOS Setting
DTR ON DTR
XON/XOFF OFF XON/XOFF
Switches 5, 6: Not used
BANK B
Switch 1, 2, 3: Baud Rate
The baud rate is the speed, in bits per second, that the printer sends
data to the computer. The common setting is 9600 or 19200.
6
Page 9

Baud Rate SW1 SW2 SW3 DOS Setting
300 OFF OFF OFF 300
600 ON OFF OFF 600
1200 OFF ON OFF 1200
2400 ON ON OFF 2400
4800 OFF OFF ON 4800
9600 ON OFF ON 9600
19200 OFF ON ON 19200
9600 ON ON ON 9600
Switches 4, 5, 6: Not used
Software Settings
This section describes how to set up the software of your computer for printing over a serial interface connection. Setups are described for MS-DOS.
Setting up a serial connection on an MS-DOS computer
Remember that the settings you make on your computer must match those
you have made using the printer’s Electronic DIP switches.
•
Modify your AUTOEXEC.BAT file so that it includes the following line:
MODE LPT1:=COMn
This line tells the computer to send printer output to the COMn serial
port. The letter n stands for the number 1, 2, etc. You should input
COM1, COM2, etc. to identify the serial port to which the serial cable
from the serial interface unit is connected.
• Also add the following line to your AUTOEXEC.BAT file:
MODE COMn:baud, parity, data length, stopbits, p
This line sets up the COMn port according to the parameters you input for
baud, parity, data length, and stopbits. To set up COM2 for 9600 bps,
no parity, data length of 8 bits and 1 stop bit, you should input the following:
MODE COM2:9600,N,8,1,p
The letter “p” at the end of the line tells the computer that the printer will
continually try to re-send data whenever an error occurs. If you need further
information about the MODE command, see your MS-DOS User’s Guide.
English
7
Page 10

Technical Specifications (Input)
Interface: RS-232C-level
Synchronization: Asynchronous
Baud rate: 300, 600, 1200, 2400, 4800, 9600, 19200 BPS
(selectable)
Word length
Start bit:2 1
Data bits: 7 or 8 (selectable)
Parity bit: Odd, even, none (selectable)
Stop bits: More than one bit
Signal polarity
Mark: Logical 1 (–3V to –15V)
Space: Logical 0 (+3V to +15V)
Handshaking: DTR, XON/XOFF
Connector Signals and Functions
Pin No. Signal Name Direction Function
1 F - GND — Printer chassis ground
2 TXD OUT Data from printer
3 RXD IN Data to printer
4 RTS OUT Always SPACE
5 CTS — Not checked by printer
6 NC Not used
7 S - GND — Signal ground
8 - 10 NC Not used
11 RCH OUT Same signal as pin 20
12 - 19 NC Not used
20 DTR OUT SP ACE when printer ready to receive
21 - 25 NC Not used
8
Page 11

СОДЕРЖАНИЕ
Глава 1: Модуль последовательного интерфейса ................................ 10
Распаковка........................................................................................... 10
Глава 2: Инсталляция ............................................................................... 10
Инсталляция модуля последовательного интерфейса ................ 11
Подсоединение последовательного кабеля ................................... 12
Установка электронных ДИП-переключателей
принтера (EDS) .................................................................................. 13
Выставки режима EDS-2 ................................................................... 13
Глава 3: Выставки программного обеспечения ................................... 15
Установка последовательного соединения на MS-DOS
компьютере ......................................................................................... 15
Глава 4: Технические условия (Вход)...................................................... 16
Сигналы и функции соединителя ................................................... 16
Русский
Page 12

Модуль последовательного интерфейса
Данный модуль последовательного интерфейса позволит Вашему
принтеру взаимодействовать с Вашим компьютером с использованием
последовательных данных. Данное руководство описывает процедуры
эксплуатации этого модуля последовательного интерфейса.
Распаковка
• После того, как Вы достанете содержимое из упаковки, пожалуйста
проверьте на личие всех семи де талей. Если каких-либо деталей не
хватает, свяжитесь с Вашим дилером.
Последовательный интерфейс
Малые
винты
Жгут
Большие винты
Руководство
пользователя
В дополнение к интерфейсному модулю Вам также потребуется
соответствующий последовательный кабель. Если Вы сомневаетесь,
какой тип кабеля необходим для использования с Вашей системой,
проконсультируйтесь у продавца Вашего принтера.
Инсталляция
Данный раздел ознакомит Вас с процедурами инсталляции модуля
последовательного интерфейса в принтер и подсоединения Вашего
принтера к компьютеру. Здесь также содержится информация о
выставках ДИП-переключателей, которые необходимо установить с тем,
чтобы они соответствовали интерфейсу Вашего компьютера.
10
Page 13

Инсталляция модуля последовательного интерфейса
• Прежде всего снимите крышку принтера; для этого нажмите
отверткой на ушки, расположенные с обеих сторон нижней задней
части принтера, как показано на нижеприведенном рисунке.
• Утановите ДИП-переключатели на модуле последовательного
интерфейса на требуемые установки. См. подробности этой
операции в разделе “Установка элек тронных ДИП-переключателей
модуля последовательного интерфейса” на стр. 5.
•
Подсоедините ленточный кабель к верхнему терминалу внутри принтера
и осторожно вставьте последовательный интерфейс в принтер.
После того, как Вы вставите модуль интерфейса до упора,
закрепите его с помощью входящих в комплект больших винтов.
Русский
11
Page 14

Затем закрепите модуль инт ерфейса в этом положении с помощью
двух малых винтов.
И наконец установите на место крышку принтера.
Подсоединение последовательного кабеля
• Отсоедините принтер от розетки сети переменного тока.
Вставьте один конец последовательного кабеля в
последовательный порт принтера и закрепите его в этом
положении с помощью двух винтов, имеющихся на разъеме
кабеля.
• Вставьте другой конец последовательного кабеля в один из
последовательных портов Вашего компьютера. Последовательные
порты обычно имеют маркировку СОМ1, СОМ2 и т.д. Если на
Вашем компьютере имеется только один последовательный порт,
он будет иметь маркировку СОМ1.
12
Page 15

ПРИМЕЧАНИЕ:
Принтер имеет последовательный интерфейс для подсоединения
опционального модуля последовательного интерфейса.
Это позволяет подключиться к двум разным компьютерам с
целью передачи последовательных данных.
Установка электронных ДИП-переключателей принтера (EDS)
Вам следует установить электронные ДИП-переключатели принтера
таким образом, чтобы они соответствовали установкам Вашего
компьютера. Подробное описание процедуры установки
(переключения) электронных ДИП-переключателей содержится в
разделе “Использование режима EDS” в руководстве по эксплуатации
принтера. Нижеприведенные таблицы показывают параметры,
контролируемые каждым ДИП-переключателем.
Выставки режима EDS-2
Ниже описаны детали всех выставок, которые Вы можете
запрограммировать в режиме EDS-2. Для выставок протокола
связи (банки А и В) следует использовать те же параметры, что и
в Вашем файле AUTOEXEC.BAT MS-DOS.
БАНК А
Переключатель 1: Длина данных
Задает число битов, передаваемых компьютером как один байт.
Обычно это число равно 8.
Длина данных SW1 Выставка DOS
8 битов ON 8
7 битов OFF 7
Русский
13
Page 16

Переключатель 2: Проверка четности
Этот переключатель показывает, проводится или нет проверка
четности данных.
Проверка четности SW2 Выставка DOS
Запрещена ON Запрещена
Разрешена OFF Разрешена
Переключатель 3: Четность
Этот переключатель задает вид четности данных.
Четность SW3 Выставка DOS
Четный ON О
Нечетный OFF Е
Переключатель 4: Протокол
Протокол, который иногда называют “рукопожатием” — это
соглашение, использующееся для взаимной регулировки данных
принтером и компьютером. Чаще всего используется протокол
DTR.
Протокол SW4 Выставка DOS
DTR ON DTR
XON/XOFF OFF XON/XOFF
Переключатели 5,6: Не используются
БАНК В
Переключатели 1, 2, 3: Скорость в бодах
Скорость в бодах — это скорость в битах в секунду, с которой
принтер передает данные на компьютер. Общепринятой
скоростью является 9600 или 19200.
14
Page 17

Скорость в бодах SW1 SW2 SW3 Выставка DOS
300 OFF OFF OFF 300
600 ON OFF OFF 600
1200 OFF ON OFF 1200
2400 ON ON OFF 2400
4800 OFF OFF ON 4800
9600 ON OFF ON 9600
19200 OFF ON ON 19200
9600 ON ON ON 9600
Переключатели 4, 5, 6: Не используются
Выставки программного обеспечения
Данный раздел описывает процесс конфигурации программного
обеспечения Вашего компьютера для печати с использованием
последовательного интерфейсного соединения. Установки даются для
MS-DOS.
Установка последовательного соединения на MS-DOS компьютере
Помните, что уст ановки на Вашем компьютере должны соответствовать выставкам,
установленным Вами с помощью элект ронных ДИП-переключателей на принтере.
• Измените файл AUTOEXEC.BAT таким образом, чтобы он включал в себя
следующую строчку: MODE LPT1=COMn
Эта строчка приказывает Вашему компьютеру посылать выходные данные
для принтера на последовательный порт COMn. Буква n обозначает 1, 2 и
т.д. Вам необходимо ввести COM1, COM2 и т.д. для того, чтобы
идентифицировать последовательный порт, к которому подсоединен
последовательный кабель от модуля последовательного интерфейса.
• Также добавьте следующую строчку к Вашему файлу AUTOEXEC.BAT:
MODE COMn: baud, parity, data length, spopbits, p
Данная строчка программирует порт COMn в соответствии с параметрами,
вводимыми Вами в отношении скорости в бодах, четнос ти, длины данных
и стопбитов. Для программирования COM2 в параметрах 9600 битов в
секунду, отсутствия четности, длины данных в 8 битов и стопбита 1, Вам
следует ввести следующее: MODE COM2: 9600, N, 8, 1, p
Буква “р” в конце строчки соо бщает Вашему компьютеру, что принтер будет
беспрерывно пытаться еще раз передать данные в случае ошибки. Если Вам
нужна дополнительная информация о команде MODE, обратитесь к
Руководству пользователя MS-DOS.
Русский
15
Page 18

Технические условия (Вход)
Интерфейс: RS-232C-level
Синхронизация: Асинхронная
Скорость в бодах: 300, 600, 1200, 2400, 4800, 9600, 19200 битов
в секунду (с возможностью выбора)
Длина слова 1
Стартбит: 2
Биты данных: 7 или 8 (с возможностью выбора)
Бит четности: Четный, нечетный, никакой
(с возможностью выбора)
Стопбиты: Больше, чем 1 бит
Полярность сигнала
Метка: Логическая 1(-3V до -15V)
Пробел: Логический 0 (+3V до +15V)
Рукопожатие: DTR, XON/XOFF
Сигналы и функции соединителя
№ Контакта
Название сигнала
1 F-GND — Заземление шасси принтера
2 TXD ВЫХОД Данные из принтера
3 RXD ВХОД Данные на принтер
4 RTS ВЫХОД Всегда ПРОБЕЛ
5 CTS — Не проверяется принтером
6 NC Не используется
7 S-GND — Заземление сигнала
8-10 NC Не используются
11 RCH ВЫХОД Сигнал идентичный контакту 20
12-19 NC Не используются
20 DTR ВЫХОД
21-25 NC Не используются
Направление
Функция
ПРОБЕЛ когда принтер готов к приему
16
Page 19

Page 20

STAR MICRONICS ASIA LTD.
Rm 1802-6, 18/F., Tower 2, Enterprise Square
9 Sheung Yuet Road, Kowloon Bay
Hong Kong
Tel: 852-2796-2727
Fax: 852-2799-9344
KEI • INTERNATIONAL CORPORATION
Matsuya Bldg. 4F
3-2-12 Nihonbashi Ningyocho, Chuo-ku,
Tokyo 103, Japan
Tel: 81-3-3249-1531 Fax: 81-3-3249-1532
Telex: 27324 KEIKO
 Loading...