

Specifications and Main Features
- Printing Modes: Draft and NLQ Letter Quality.
- Font selections: Built in Printer offers many typefaces.
- Printer Attachments: The printer graphics supported by either Epson or IBM Proprinter.
- Paper Management:
- Supported by Cut-sheet or tractor with Optional Automatic Sheet Feeder and Fan fold paper.
- For loading cut-sheet paper, a paper-park facility to avoid the unloading of fanfold paper.
- Programmable Options: Allow advanced setting to be adjusted directly from front panel.
- Color Printing: Works with certain accessories to print in color.
Frequently Asked Questions
- Q: What are the modes available on the printer?
A: There are two modes of printing available on the Printer which are known as Draft and Letter Quali zation mode.
- Q: Can your printers print color documents?
A: Advanced features such as optional color facilities may be procured to printer to allow it to work in color mode.
- Q: Do you have the capability to print on different kinds of papers?
A: A cut-sheets or a tractor feed paper can be employed to print and an Automatic Sheet Feeder helps improve the printing experience by being an optional addition.
- Q: You think I will face issues regarding the type of printer?
A: There is a printer that can be used with either an Epson printer or an IBM Graphics Printer that will also include Suits formats.
- Q: And what does this Memory Switch do exactly?
A: The memory setting provides the operator with direct programming options in the form of panels that controls the entire machines functionalities.
User Manual
Page 1
MULTI-FONT
MULTI-FONT
8082
0415
USERS MANU AL
Page 2
Sdf Declaration
Radio intcrfcrcnceregardingthis equipmenthas bear eliminatedaccordingto Vfg 1046/1984 arnouncedby the DBP.
DBP hasbeeninfosmedof theintroductionofhis specialquipment andhas beengrantedtherightso
ex-e the whole series.
Itis the user’sresponsibilityto seethathis own assembledsystemisin mmr&nee withthetechnical
regulationsunderVfg 104( Y1984.
ToconformtoFTZ-regulationsitis ncccssarytomakeailcmmectionstothepMkr withshieldedcable.
Theequipmentmayonly be openedby qualif]edservicerepresentatives,
Theobovcstafensanfapplies only foprinters mrkted in WestGermany,
Trademark Acknowlcdgcmcnta
FR-10, FR-15, ND-10/15, NR-10/15: StarMicrcnicsCo., Ud.
IBM PC, PC-AT, PC-XT, Proprinter, Proprhster II, PC.DOS: InternationalBusinessMachines
Corp.
MicroaofIBASIC, MS-DOS: MicrosoftCorporatiar
EX-800, EX-1OOO,EX-~ FX-286+XSeiko EpsonCap.
WordStar: MicsQPmfntemationalCorporation
NOTICE
●
All rightsreserved.Reproductionof anypartof this manualin any formwharmeverwithout
●
‘llrecontems of Mmanualaresubjcztto changewilhoutnotice
‘TAR’sexpss117
●
Aif effortshavebeen madeto ensurethe accumc of thecontentsof tis manualatthetime of
of them.
●
The aboven~witistanding, STAR canassumeno rcspcmsibiiityforanyerrorsin thismanual.
mrissionis forbidden.
fpress.IIowever,shouldany errorsbe &tected,S AR worddgreatlyappreciatebeing informed
(3Copyright1989Sbr MicronicsCo.,Ltd.
Page 3
CONGRATULATIONS
Thankyouforbuyingthisprinter.Thisprinterisprovidedwiththefollowing featunx:
●
2 printmodes- DraftandNearLetterQuality
●
Manydiffenmttypefacesbuiltintotheprinter
i
Epsonor IBMPmprintercompatibilityincludinggraphics
●
Comprehensivepaper-handlingfacilities(cut-sheetor tractorasstandard,withoptionalAutomaticSheetFeeder)
●
Paper-parkfacility for loading cut-sheet paper without having to
unloadfanfoldpaper
●
MemorySwitchfacility,enablingcomprehensiveprogrammingfrom
thefrontpanel
.
Optionalcolorfacilities
I
ORGANIZATIONOFTHISMANUAL
Thismanualis dividedinto9 chaptm. Usechapters1through3 asa“User
Guide”,givingyouinformationonhowto setupandstartyourprinter.The
remainingchaptersmay be treatedas a referenceguideforprogramming
operations,etc. It assumes a degree of knowledgeoff the operationof
computers(forinstance,itassumesyouknowabouthexadecimalnumbers).
Thechaptersam as follows:
Chapter 1- Introduction
Readthissectionfirst,as itexplainshowtounpackandinstallyourprinter.
Chapter 2- Front panel controls
Theream a numberof controlson the frontpanelwhichperformvarious
functionsrelatedto paperhandling,printmodesand font selection.This
sectionshowsyouhowto usethefrontpanelcontrols.
Chapter 3- Settingup the Memory Switches
Your printerhas a MemorySwitch function,which allowsyou to make
certain system settings fmm the front panel. This section explains the
operationof theseMemorySwithes.
Page 4
Chapter 4- Emulations and escapecodes
Thischapterexplainsthedifferentemulationsprovidedbyyourprinter,and
the softwarecommandsused to drive it. This sectionis of use if you zue
writingor modifyingprogramstotakeadvantageof theprinter’sfeatwvs.
Chapter 5- DIP Switches
Thissectionexplainshowto settheDIPswitchestomakesystemsettings
on the printer.
Chapter 6- MS-DOSand your printer
Sincethe PC or PC-ATfamilyof computers
runningunderMS-DOSis
currentlythe most popularccmflgurationof microcomputer,wehave includeda fewhintsandtips to helpyouuseyourprinterwithsuchsystems.
SincevirtuallyallPCsaresoldwithaMicrosoftBASICinteqmxer,wehave
also included some hints, and a sample program in this languageto
demonstratethecapabilitiesoftheprinter.
Chapter 7- Troubleshooting and maintenance
Thissectiongiveachecklistofpointstocheckifyourprinterisnotworking
in theexpectedway. It alsoincludesdetailsof someroutinemaintenance
operationsyou cancarryoutyourself.Itisno~however,acompleteservice
manual.Callaqualifiedserviceengineerifyouareumnueofyourabilityto
carryoutanymaintenanceor servicingoperations.
Chapter 8- Specifications
This sectiongivesthe specificationsof yourprinter.
Chapter 9- Character sets
Thesechartsgivethe diffenmtcharactersetsavailable,andthedifferences
between‘nationalcharactersets (as set up withtheDIP switches).
Page 5
TABLEOFCONTENTS
Chapter 1 INTRODUCTION
LOCATINGTHEPRINTER
UNPACKING,SEITING UP ANDCONNECTION....................1
Setting
up.................... ............ .................. ... ................................3
.. ............ ............................... ... ..........
Comection.. ............ ..................... ........................... ... ... ............. ..5
LOADINGPAPER.......................................... ........... .......... ......... .
Cut-sheetpaper.................... ............. ... ... ............. ..................... ...7
Fanfoldpaper(continuous)stationery.........................................8
Oncethepaperhasbeenloaded
Chapter 2 FRONT PANEL CONTROLS
CONTROLSANDINDICATORS.................... ............. ... ...........11
Controls..... ........ ......... ........ ......... .................................... ..........11
Indicators...................................................... ........... ........ ..........11
PITCHSETTING.......................................... ......... .......... ........... ..12
PitchPanelLock........ ......... ......... .......... ........ ............................12
FONTSETTING ........ ......... ........ .......... ......... ...............................13
Font PanelLock...................... ........ ........... .......... ......... .......... ...13
QUIETMODE... .................................. ........... ........ .......... ........... .13
PAPERHANDLING......................................... ........ ...................14
Formfeed
Paperparking..... ........ ......... ........ ......... .......... ......... ...................14
Shorttear-offfunction....................................... .......... ........... ...15
MicroFeed........ ....... .......... ....... .......... ........... ........ ....................16
BUFFERCLEAR/RESET............... ......... .......... .......... ......... .......16
TESTANDMAINTENANCESETTINGS................. ........ ........16
..... ........ ................................... .......... .......... ......... ......14
.. ............................................. .
1
1
7
10
11
Chapter 3 SETTING UP THE MEMORY SWITCHES
MENUOPTIONS.................... ............ ............. ... .... .....................
CommandMenu.................................. ......................................19
Fontmenu...................................................................... ......... ...
Print Menu............................................................ .......... .......... .20
PaperMenu... .......... ......... ........ ..................................................20
FormsMenu.... .......................................... .................................21
Factorysettings................ ................................. .........................22
Chapter 4 EMULATIONS ANDESCAPE CODES
EMULATIONS........ ......... ........ ......... .......... .......... .......... ......... ....
NUMERICALREPRESENTATION...........................................23
COMMANDCODESANDESCAPESEQUENCES..................24
Fontstyle and characterset controlcodes.................................26
Font pitchcontrolcodes.......... ........ ........... ........ ........... ............30
Specialprintmodecontrolcodes
Linespacecontrolcodes........................... ....................,............36
..... .......... ...............................
17
19
19
23
23
32
Page 6
Formfeedcontrolcodes..... ........ ......... ........ ..............................39
Marginsand verticaltabsettingcontrolcodes......................,...41
Horizontalprintpositioncontrolcodes.....................................44
Downloadedcharactercontrolcodes. ......... ........ ......... ......... .....48
Graphics
Miscellaneouscodes..... ........ ......... ....... .....................................55
ASCIIcommandsequences............... ......... ...............................63
..... ............................... ........ ........ .................................52
Chapter 5 DIP SWITCHES
67
Chapter 6 TROUBLESHOOTING AND MAINTENANCE 69
TROUBLESHOOTING..... ........ ......... ........ ......... .........................69
Powersupply....................................... ......................................70
Printing...... ......... ........ ....... ......... ................................. ........ ......70
Paperfeeding..... ........ ....... ......... ................................ ......... .......72
MAINTENANCE........................... ......... ................................ .....75
ADJUSTINGTHEPRINTINGGAP ...... ......... ......... ........ ......... ..75
RIBBONREPLACEMENT............ ................................ ..............76
REPLACINGTHEPRINTHEAD............................. ........ ..........78
FRONTPANELDIAGNOSTICAND
TESTMODES........ ....... ......... ........ ................................. ........ .....80
Shorttestmode... ......................................... ..............................80
Longtestmode
Texttestmode
Hexadecimaldumpmode...... ......... ......... ........ ......... .................83
Bidirectionaltest/adjustmentmode
........................... ......... ...... .......... ......... ......... ....81
..... ....... ................................ ......... ........ ......... .....82
..... ........ ..............................84
Chapter 7 MS-DOSANDYOURPRINTER 87
INSTALLINGAPPLICATIONSOFI’WARE
WITHYOURPRINTER........ ......... ........ ....... .......... ......... ......... ..87
GRAPHICSHARDCOPY............................ ...............................89
SE’ITINGUPTHEPRINTERFROMTHEDOSPROMPT......89
PROGRAMMINGUSINGBASIC......... ................................. ....90
Sampleprogram............... ..........................................................90
Howtheprogramworks............................................................93
Patchesnecessaryto usethe BASICinterpreter........................96
Chapter 8 SPECIFICATIONS
Chapter 9 CHARACTER SETS
STANDARDCHARACTERSET#1.. .......... ....... ......................102
STANDARDCHARACTERSET#2........ ......... ........ ................104
IBMCHARACTERSET#2 ................ .......................................105
IMBCHARACTERSET#l ..................................... ......... .........107
ADDITIONALCHARACTERSET......................... ..................108
INTERNATIONALCHARACTERSETS...... ......... ......... ........ .109
INDEX
97
101
111
Page 7
I
chapter 1
INTRODUCTION
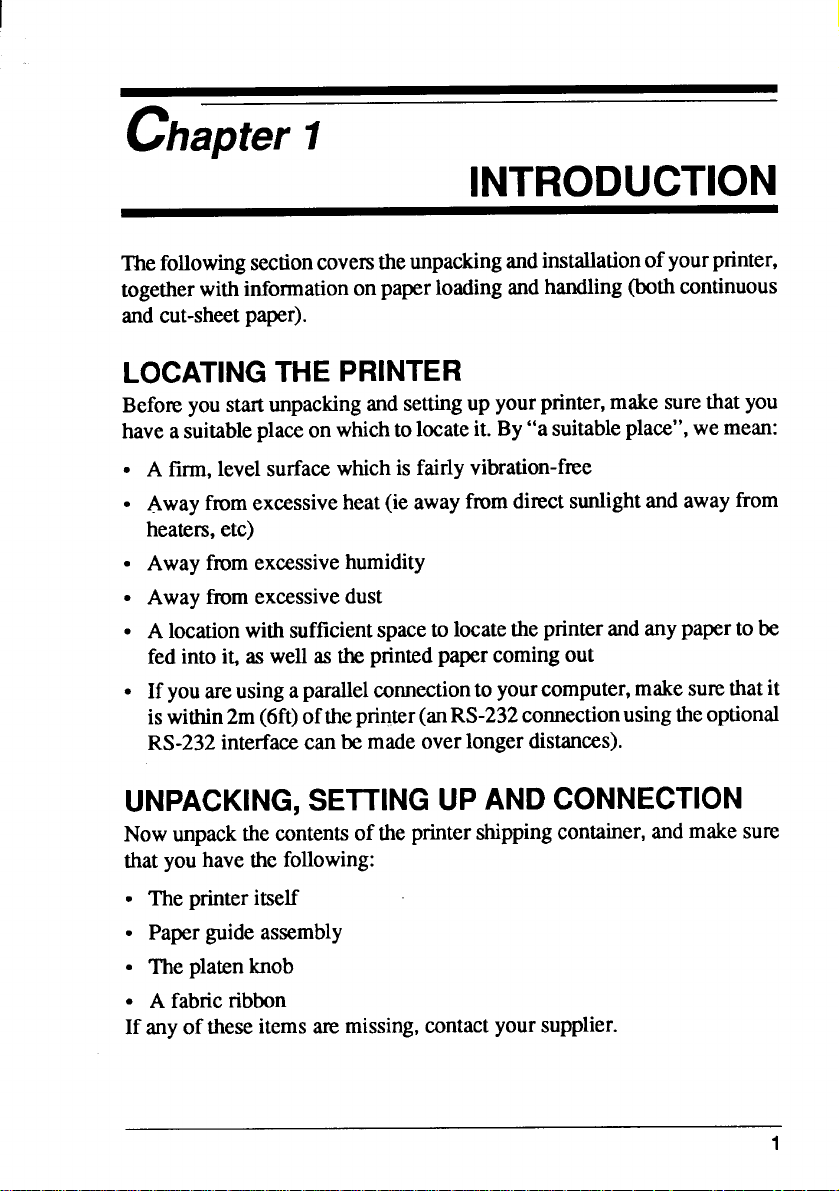
Thefollowingsectioncovemtheunpackingandinstallationofyourprinter,
togetherwithinformationonpaperloadingandhandling(bothcontinuous
andcut-sheetpaper).
LOCATINGTHE PRINTER
Beforeyoustartunpackingandsetting up yourprinter,makesurethatyou
havea suitableplaceon whichtolocateit. By“asuitableplace”,wemean:
●
A firm,levelsurfacewhichis fairlyvibration-free
●
Awayfromexcessiveheat(ie awayfromdirectsunlightandawayfrom
heaters,etc)
●
Awayfmmexcessivehumidity
●
Awayfromexcessivedust
●
A locationwithsufficientspaceto locatethe printerandanypaperto be
fedintoit, as well as theprintedpapercomingout
●
Ifyouareusinga parallelconnectionto yourcomputer,makesurethatit
iswithin2m(6ft)ofthe printer(anRS-232connectionusingtheoptional
RS-232interfacecanbe madeoverlongerdistances).
UNPACKING,SE’l_HNGUPANDCONNECTION
Nowunpackthecontentsof theprintershippingcontainer,andmakesure
thatyouhavethefollowing:
● The printeritself
● Paperguideassembly
s Theplatenknob
. A fabricribbon
If anyoftheseitemsm missing,cmtact yoursupplier.
1
Page 8
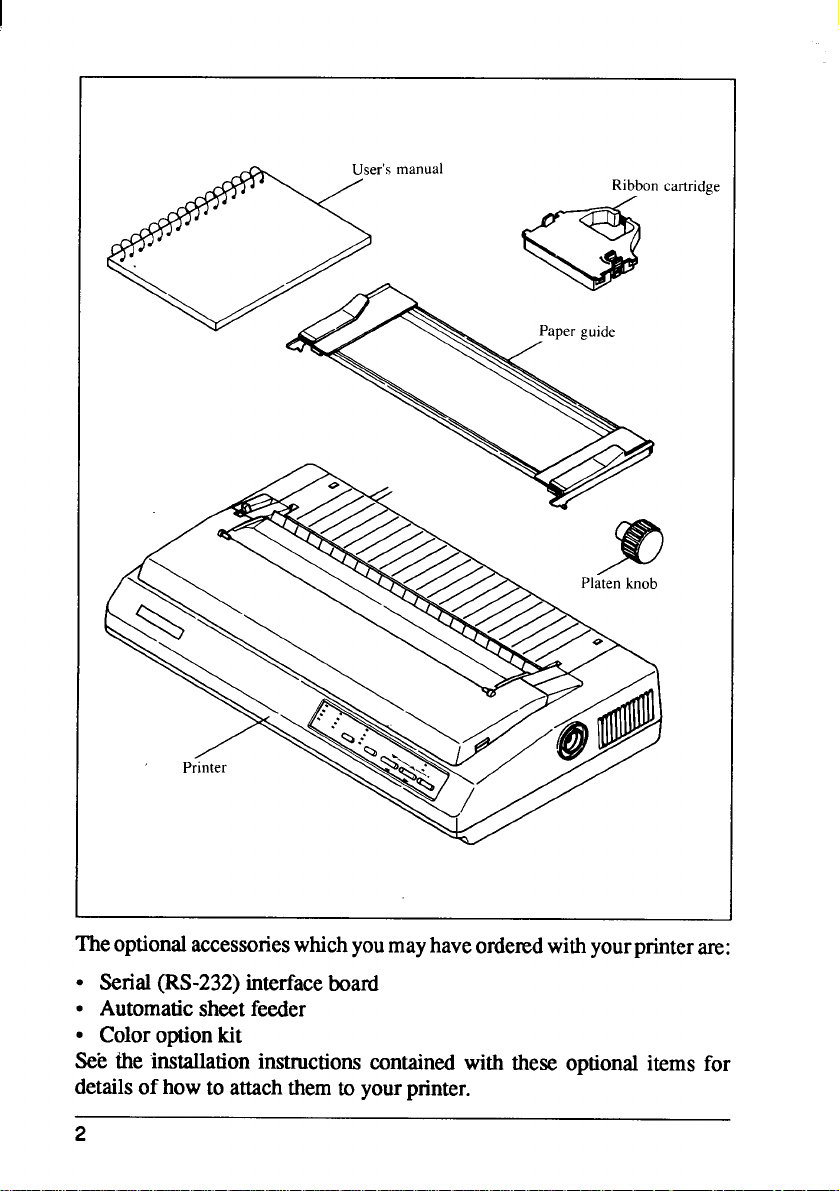
The optionalaccessorieswhichyoumayhaveorderedwithyourprinterare:
● Serial(IN-232) interfaceboard
● Automaticsheetfeeder
● Coloroptionkit
See the installationinstructionscontainedwith these optionalitems for
detailsof howto attachthemtoyourprinter.
2
Page 9
Settingup
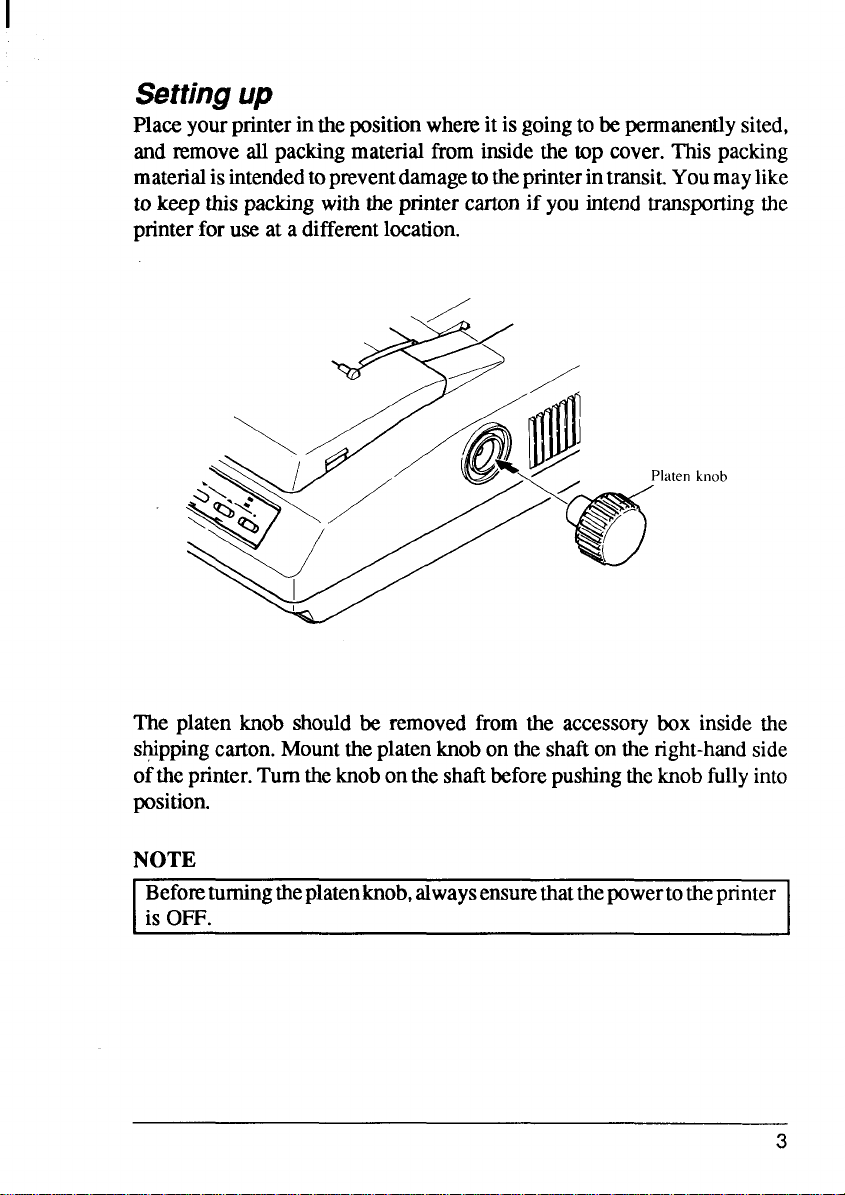
Placeyourprinterinthepositionwhereitisgoingto be permanentlysited,
and removeallpackingmaterialfrominsidethe top cover.This packing
materialisintendedtopnwentdamagetotheprinterintransit.Youmaylike
to keep thispackingwiththeprintercartonif youintendtranspofiingthe
printerfor use at a differentlocation.
The platen knob should be removedfrom the accessorybox inside the
s~pping carton.Mounttheplatenknobontheshaftontheright-handside
ofthe printer.Turnthe knobontheshaftbeforepushingtheknobfullyinto
position.
NOTE
I Beforeturningtheplatenknob,alwaysensurethatthepowertotheprinter ~
is OFF.
3
I
Page 10
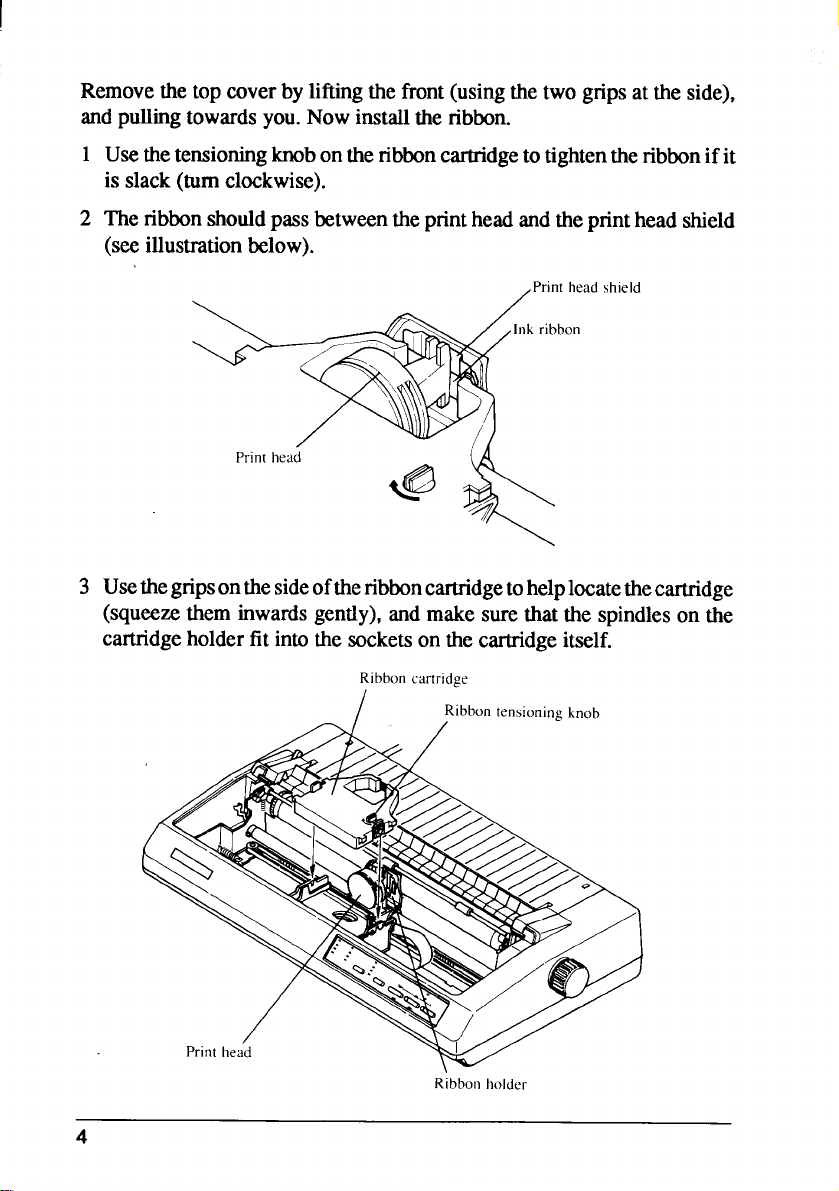
Removethetopcoverbyliftingthefront(usingthetwogripsat the side),
andpullingtowardsyou.Nowinstalltheribbon.
1
Usethetensioningknobontheribboncartridgetotightentheribbonifit
is slack(turnclockwise).
23Theribbonshouldpassbetweentheprintheadandtheprintheadshield
(seeillustrationbelow).
,Print headshield
bon
Usethe gnpson thesideoftheribboncartridgetohelplocatethecartridge
(squeezetheminwardsgently),and make surethatthe spindleson the
cartridgeholderfit intothesocketsonthecartridgeitself.
Ribboncartridge
Ribbon holder
Page 11
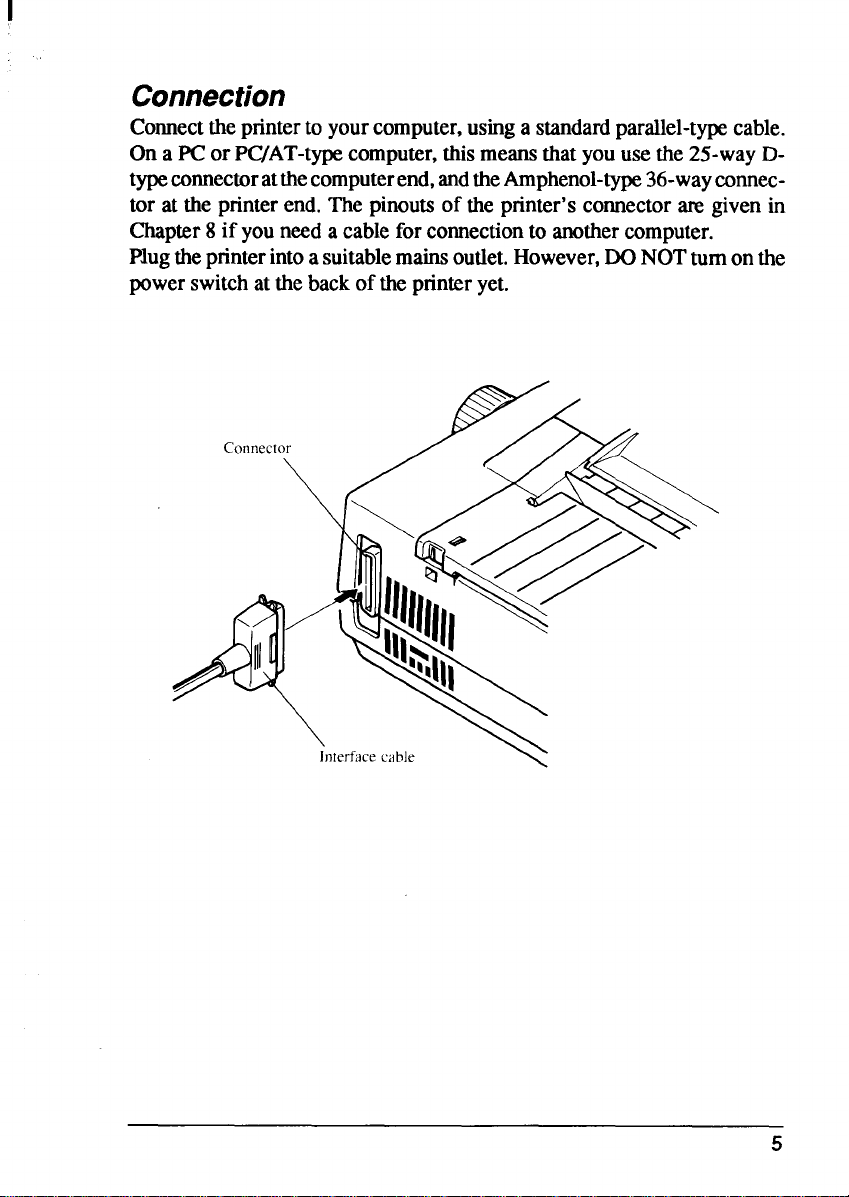
Connection
Comect theprinterto yourcomputer,usinga standardparallel-typecable.
On a PC or PC/AT-typecomputer,thismeansthat youusethe25-wayDtypeconnectoratthecomputerend,andtheAmphenol-type36-wayconnector at the printerend.Thepinoutsof the printer’scomector m givenin
Chapter8 if you needa cableforconnectionto another computer.
Plugtheprinterintoa suitablemainsoutlet.However,DONOTturnonthe
powerswitchatthebackof theprinteryet.
5
Page 12
I
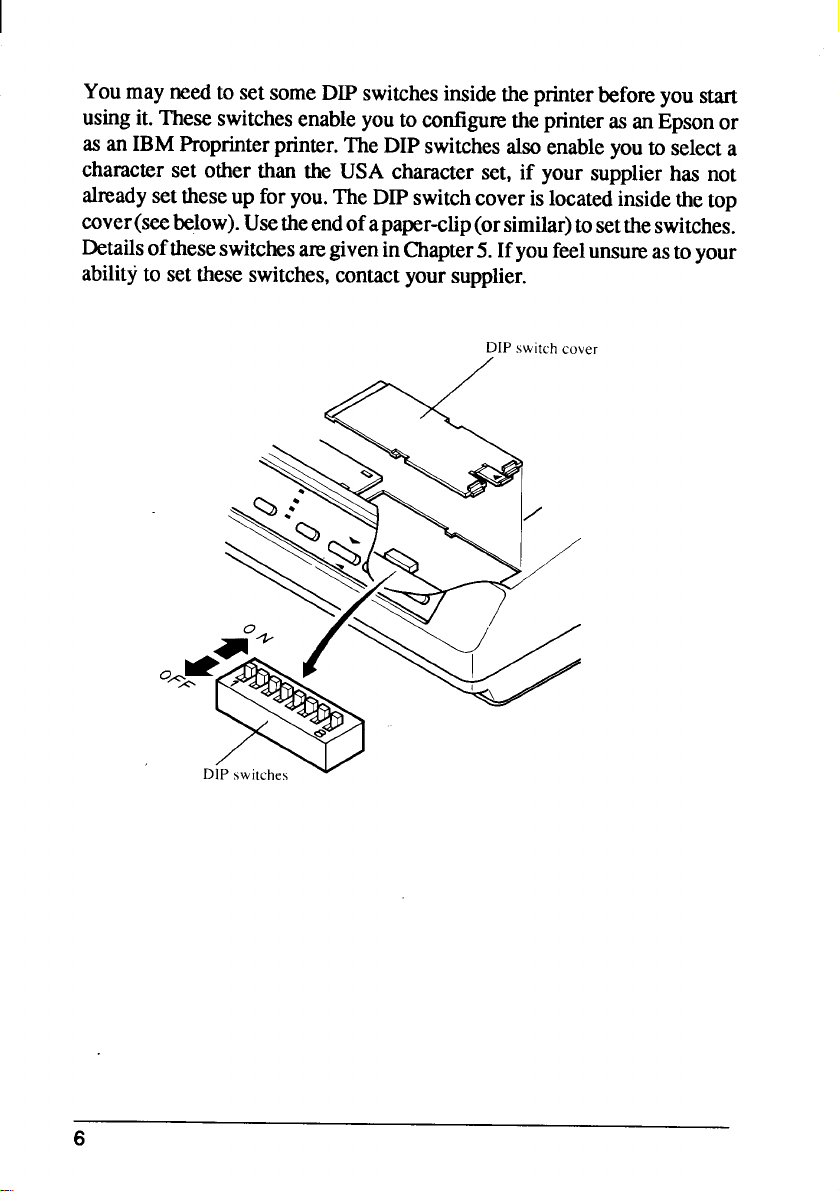
You mayneedto setsomeDIP switchesinsidetheprinterbeforeyou start
usingit. TheseswitchesenableyoutoconfigwetheprinterasanEpsonor
asanIBMProprinterprinter.TheDIPswitchesalsoenableyouto selecta
characterset other than the USA characterset, if your supplierhas not
alreadysettheseup foryou.TheDIPswitchcoverislocatedinsidethetop
cover(seebelow).Usetheendofapaper-clip(orsimilar)tosettheswitches.
Detailsoftheseswitchesaregiven inChapter5.Ifyoufeelunsureastoyour
abilityto settheseswitches,contact yoursupplier.
DIP switch covel
/
6
Page 13
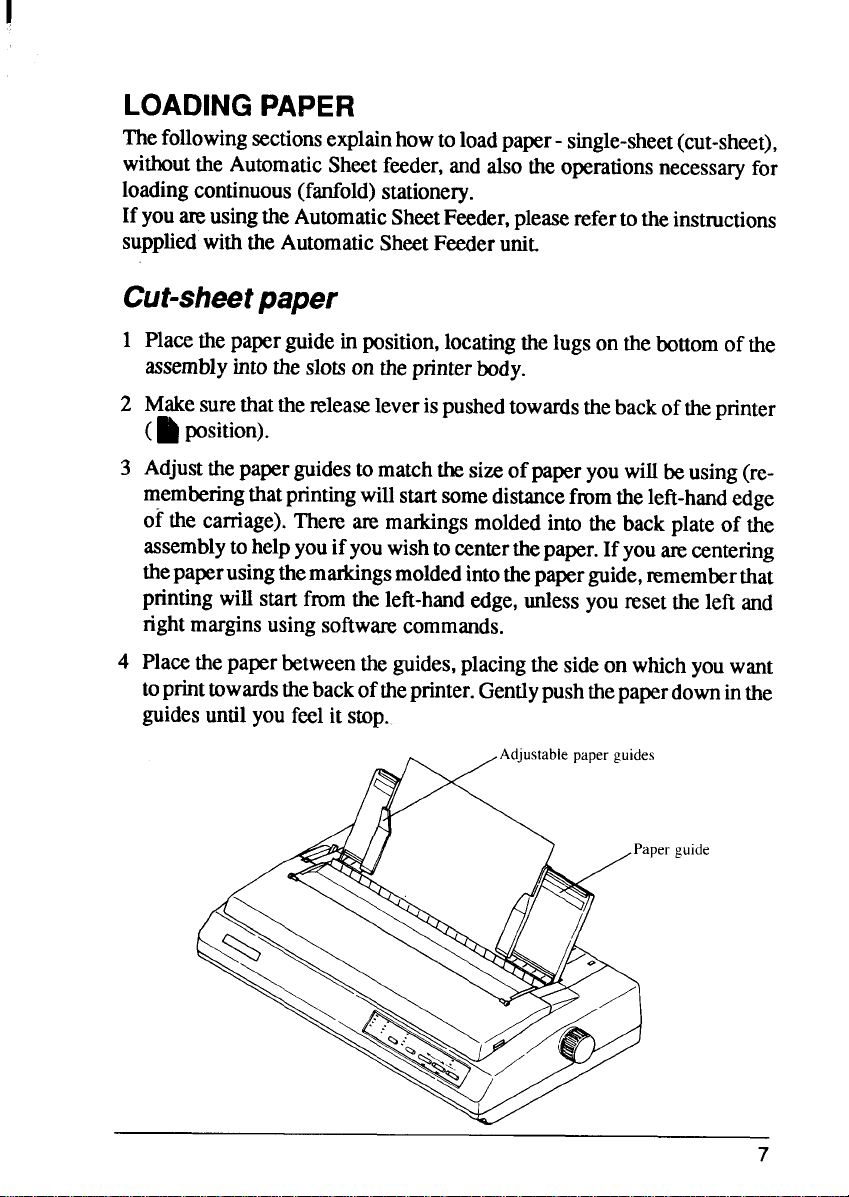
LOADINGPAPER
followingsectionsexplainhowto loadpaper- single-sheet(cut-sheet),
The
withoutthe AutomaticSheetfeeder,and alsotheoperationsnecessaryfor
loadingcontinuous(fanfold)stationery.
Ifyoutm usingtheAutomaticSheetFeeder,pleaserefertotheinstructions
suppliedwiththeAutomaticSheetFeederunit.
Cut-sheetpaper
1
Placethepaperguidein position,locatingthelugsonthebottomofthe
assemblyintotheslotsontheprinterbody.
2
Makesurethatthereleaseleverispushedtowardsthebackoftheprinter
(~ position).
Adjustthepaperguidesto matchthesizeof paperyouwillbeusing(re-
3
memberingthat printingwillstartsomedistancefmmtheleft-handedge
of the carnage).Therearemarkingsmoldedinto the backplateof the
assemblytohelpyouifyouwishto centerthepaper.Ifyouarecentering
thepaperusingthemarkingsmoldedintothepaper guide,rememberthat
printingwillstartfromtheleft-handedge,unlessyouresettheleft and
rightmarginsusingsoftwmvcommands.
4
Placethepaperbetweentheguides,placingthesideon whichyouwant
toprint towardsthebackoftheprinter.Gentlypushthepaperdowninthe
guidesuntilyoufeelit stop.
s
per guide
7
Page 14
Turnonthepowerusingtheswitchatthebackof theprinter.Theprinter
5
wilibeep,indicatingthatno paperisinpositionforprinting.Theorange
PAPERindicatoralsoshowsthis.
Nowpmssthe (SE’’WT’PARK:button.ThepaperbailWillmoveclearofthepaper,
6
andhe paperwillbefed andadjust&1past the printheadto a position
readyforprinting.The paperbailwillbemovedbackto grip the paper
againsttheplaten,and theprintheadwillmovetothestartposition.
Theactualverticalpositionofthe paperafterauto-loadingisdeterminedby
theMemorySwitchsetting(seeChapter3).
The verticalpositionof the paper can be finely adjustedby meansof the
microfeedfunction(seeChapter2).
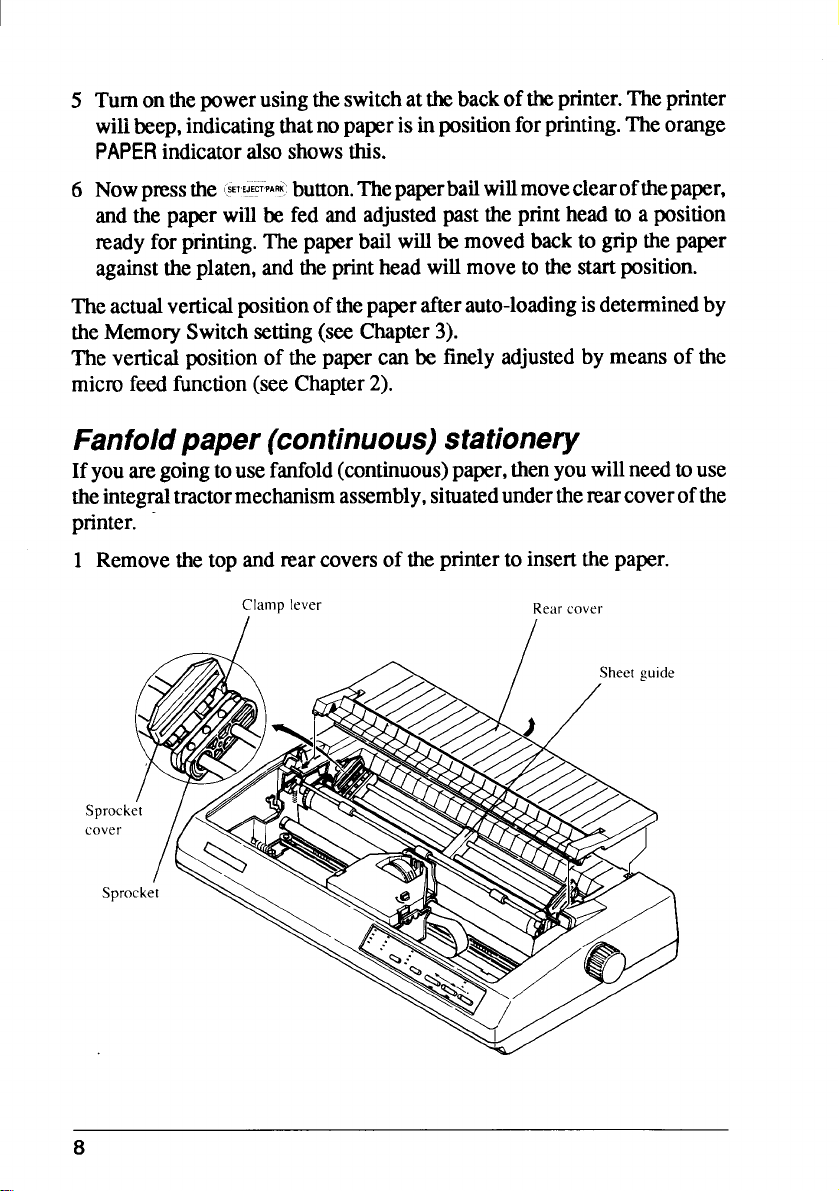
Fanfoldpaper (continuous)stationery
Ifyouaregoingtousefanfold(continuous)paper,thenyouwillneedtouse
theintegraltractormechanismassembly,situatedundertherearcoverofthe
printer.
1 Removethetopandrearcoversof theprinterto insertthe paper.
Clamp lever
Rear cover
8
Page 15
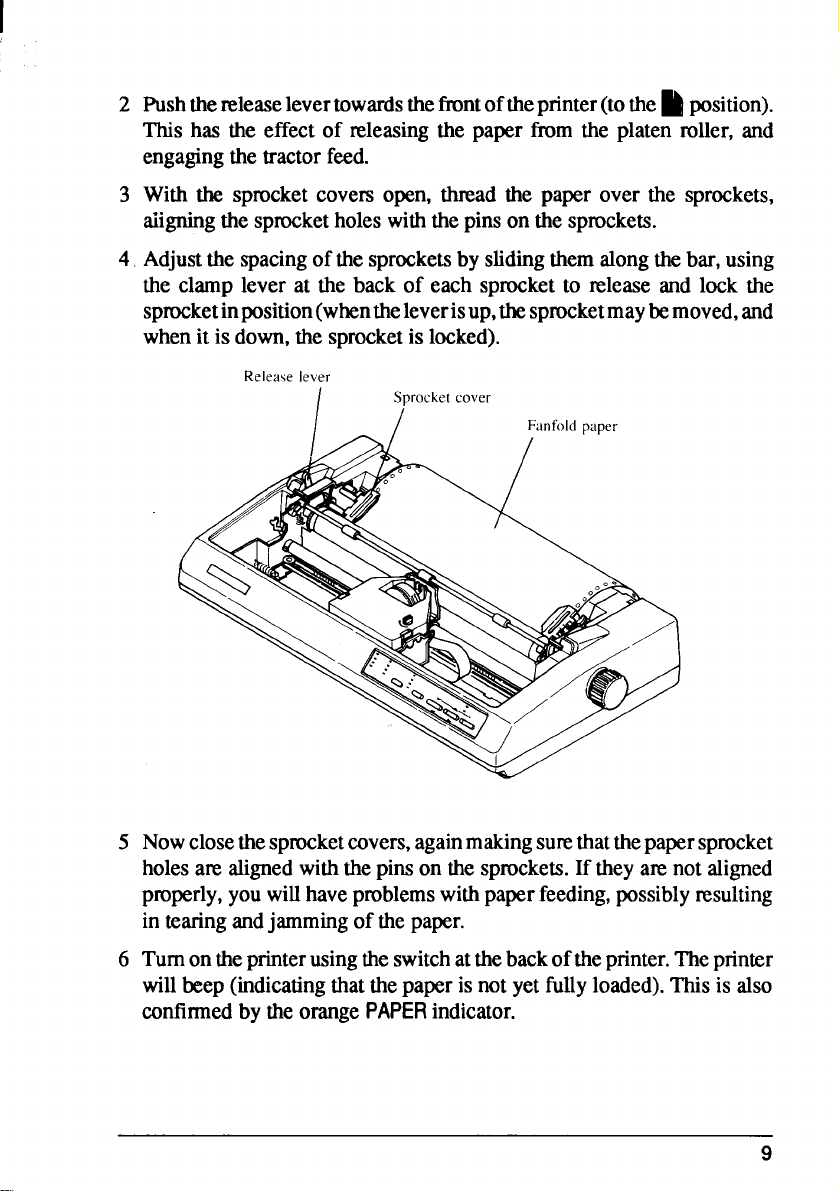
2 Pushthereleaselevertowardsthe frontoftheprinter(tothe~ position).
This has the effect of releasingthe paper from the platen roller, and
engagingthetractorfeed.
3 With the sprocketcovers open, tluvad the paper over the sprockets,
aiigningthesprocketholeswiththepinsonthesprockets.
4 Adjustthe spacingofthesprocketsby slidingthemalongthebar,using
the clamp lever at the back of each sprocketto release and lock the
sprocketimposition(whentheleverisup,thesprocketmaybemoved,and
whenitisdown,the sprocketis locked).
Release lever
/
Sprocket cover
5 Nowclosethespmcketcovers,againmakingsurethatthepapersprocket
holesarealignedwiththepinson the sprockets.If theyarenotaligned
properly,youwillhaveproblemswithpaperfeeding,possiblyresulting
in tearingandjammingof thepaper.
6 Tumonthe printerusingtheswitchattheback oftheprinter.Theprinter
willbeep(indicatingthat the paperisnotyetfullyloaded).This is also
confirmedbytheorange
PAPERindicator.
9
Page 16
I
7 Nowpnxthe @&@button.Thepaperbailwillmoveclearof thepaper,
andthepaperwillbe fed and adjustedpast the printheadto a position
~ady for printing.The paperbailwillbemovedbackto grip thepaper
againsttheplaten,andtheprinthead willmoveto the startposition.As
whenloadingcut-sheetpaper,theMemorySwitchsettingwilldetermine
the initialpositionof the paper after auto-feeding,and the micm feed
functionmaybeusedto adjustthe paperposition.
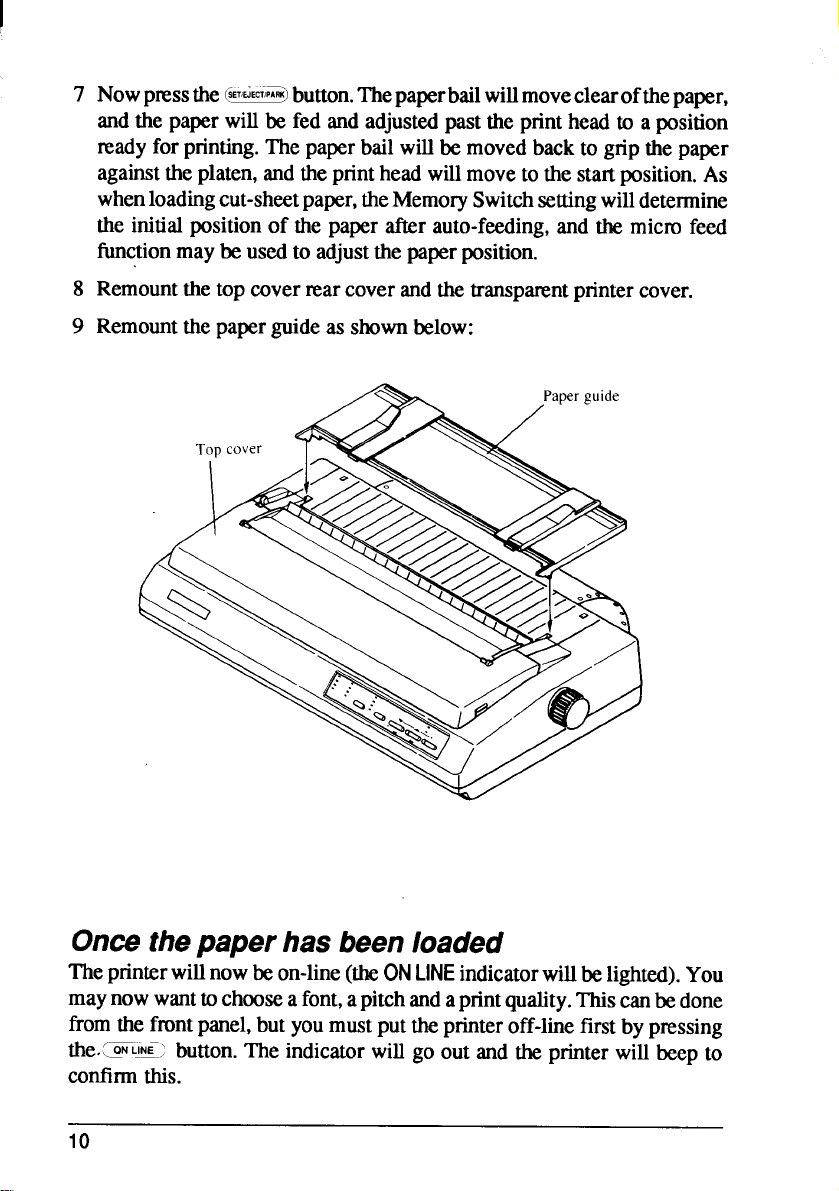
8 Remountthetop coverrearcoverandthetransparentprintercover.
9 Remountthepaperguideas shownbelow:
Oncethepaper has beenloaded
Theprinterwillnowbeon-line(theONLINEindicatorwillbelighted).You
maynowwanttochoosea font,apitchand aprintquality.This canbedone
fromthefrontpanel,butyoumustputtheprinteroff-linefirst by pressing
the.[=~~~-;button. The indicatorwill go out and the printerwillbeepto
confirmthis.
10
Page 17
chapter2
FRONTPANELCONTROLS
The followingsectiondescribesthe frontpanelcontrolsand indicatorson
yourprinter,togetherwithadescriptionofthefunctionsperformedbythem.
CONTROLSANDINDICATORS
The followingis a brief guideto the controlsand indicatomon the front
panel.
Controls
I m CO”mm m W-LIGHT
9 LETTER-Q _ SCRIPT
9 SANSERIF = CINEMA FONT
M INTERNAL = DRAFl
m WcFl _ POWER
m Izcm
= ‘mp PITCH
-“NDn u a– fi
MICRO FEED
\
5ETIWECTiT.ARU PAPER FEm
= PAPER
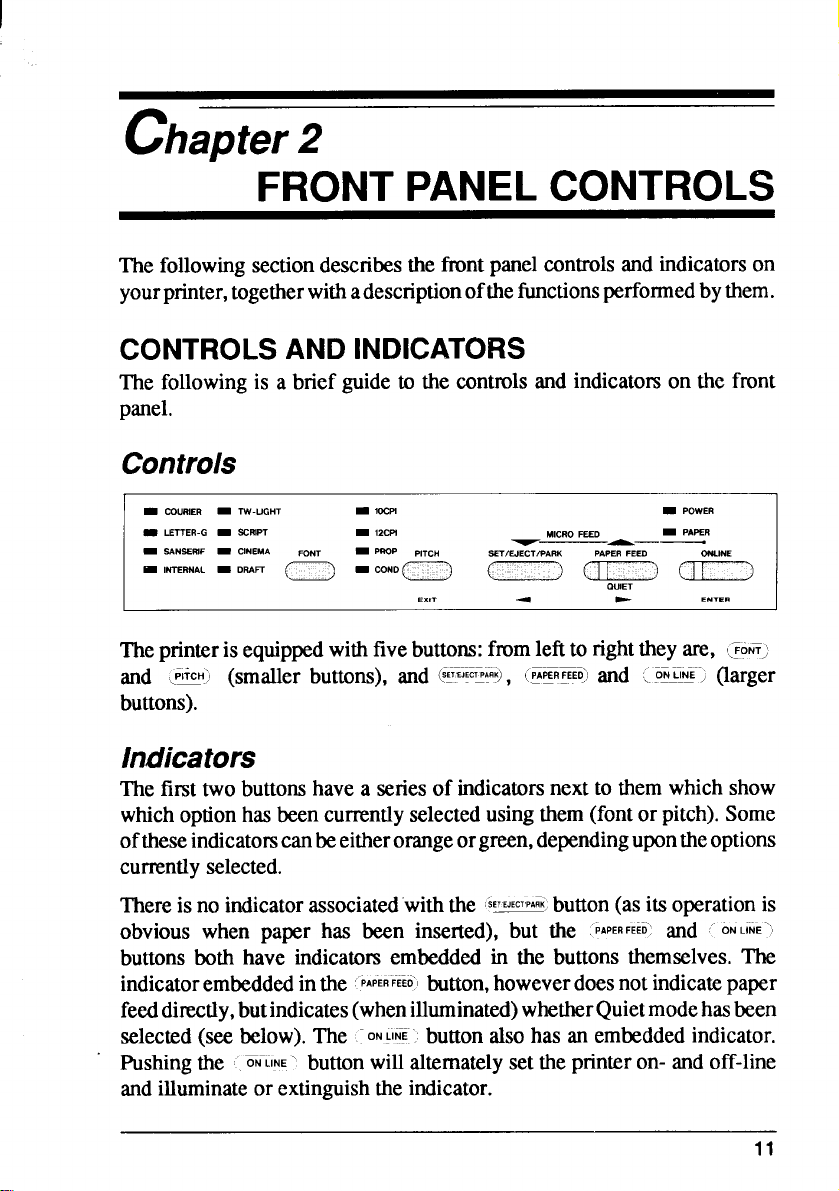
Theprinterisequippedwithfivebuttons:fmmleftto right theyare, LFONT;
and .@!I (smaller buttons), and @E@,
buttons).
(PA~R~EEtj and (, ONPUI~”> (larger
Indicators
The firsttwobuttonshavea seriesof indicatorsnextto them whichshow
whichoption has beencurrentlyselectedusingthem(fontor pitch).Some
oftheseindicatomcanbeeitherorangeorgreen,dependingupontheoptions
cunently selected.
Thereis no indicatorassociatec’withthe
SETEJECTPA~K;
obvious when paper has been inserted), but the
buttonsboth have indicatmxembeddedin the buttons themselves.The
indicatorembeddedinthe
PAPERFEEO’Ibutton,howeverdoesnotindicatepaper
feeddirectly,butindicates(whenilluminated)whetherQuietmodehasbeen
selected(see below).The .Pushingthe
~-LINE”’ buttonwillalternatelysetthe printeron- andoff-line
ONWE’. buttonalsohas an embeddedindicator.
andilluminateor extinguishtheindicator.
button (as its operationis
PAPERFEED’and ‘“ONLINE””
I
11
Page 18
Inadditiontotheseindicators,the~ m twoothers,POWERandPAPER.The
POWER
the
indicatorwillilluminatewhenpowerissuppliedtotheprinter,and
PAPERindicatorwillilluminatewhennopaperhasbeeninserted.
PITCHSEITING
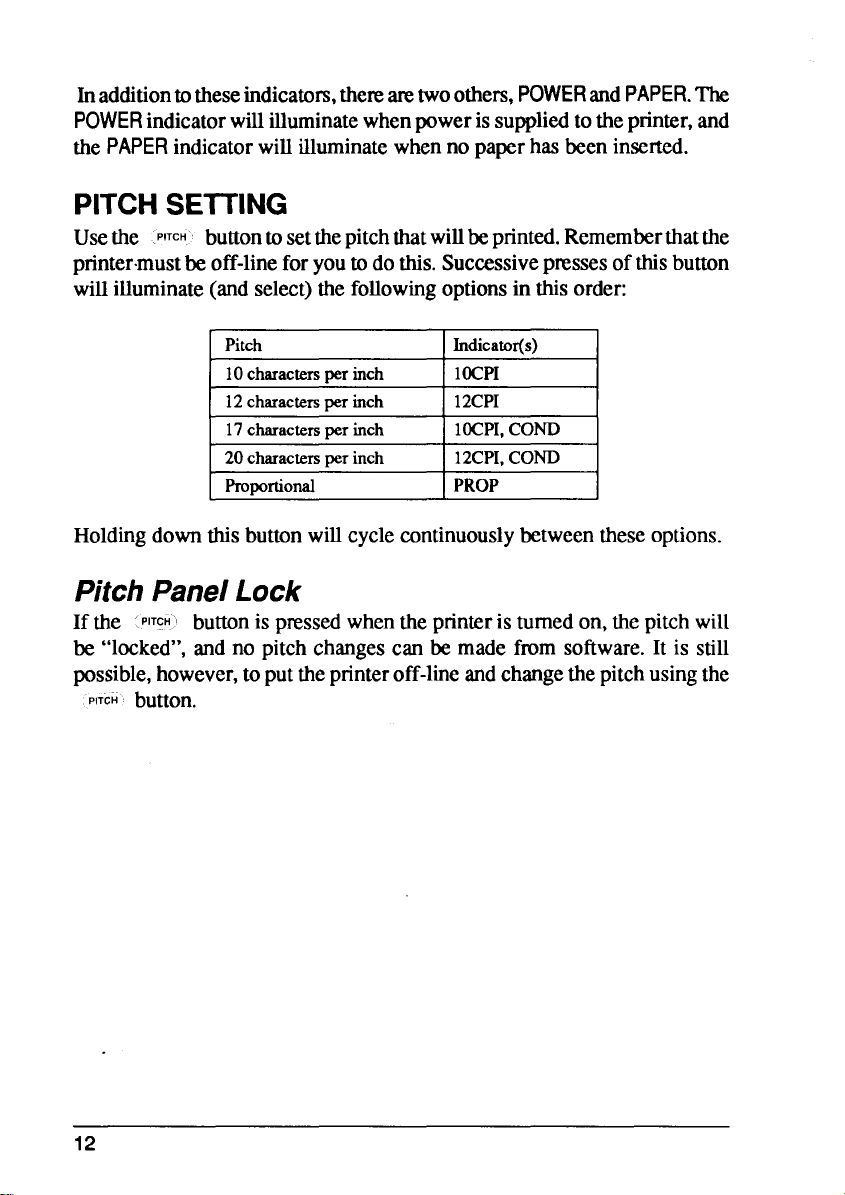
Usethe PITCH’ buttontosetthepitchthatwillbe printed.Rememberthatthe
printer.mustbeoff-lineforyoutodothis.Successivepnxses ofthisbutton
willilluminate(andselect) the followingoptionsin thisorder:
( Pitch IIndicator(s)
10charactersperinch
12charactersper inch 12CPI
17charactersper inch 10CPI,COND
20charactersuer inch ] 12CPI.COND 1
Proportional I PROP
1
IOCPI
Holdingdownthisbuttonwillcyclecontinuouslybetweentheseoptions.
PitchPanelLock
If the PITCH’ buttonis pressedwhentheprinteris turnedon, thepitchwill
be “locked”,and no pitchchangescan be made from software.It is still
pssible, however,toputtheprinteroff-lineandchangethepitchusingthe
PITCH button.
12
Page 19
I
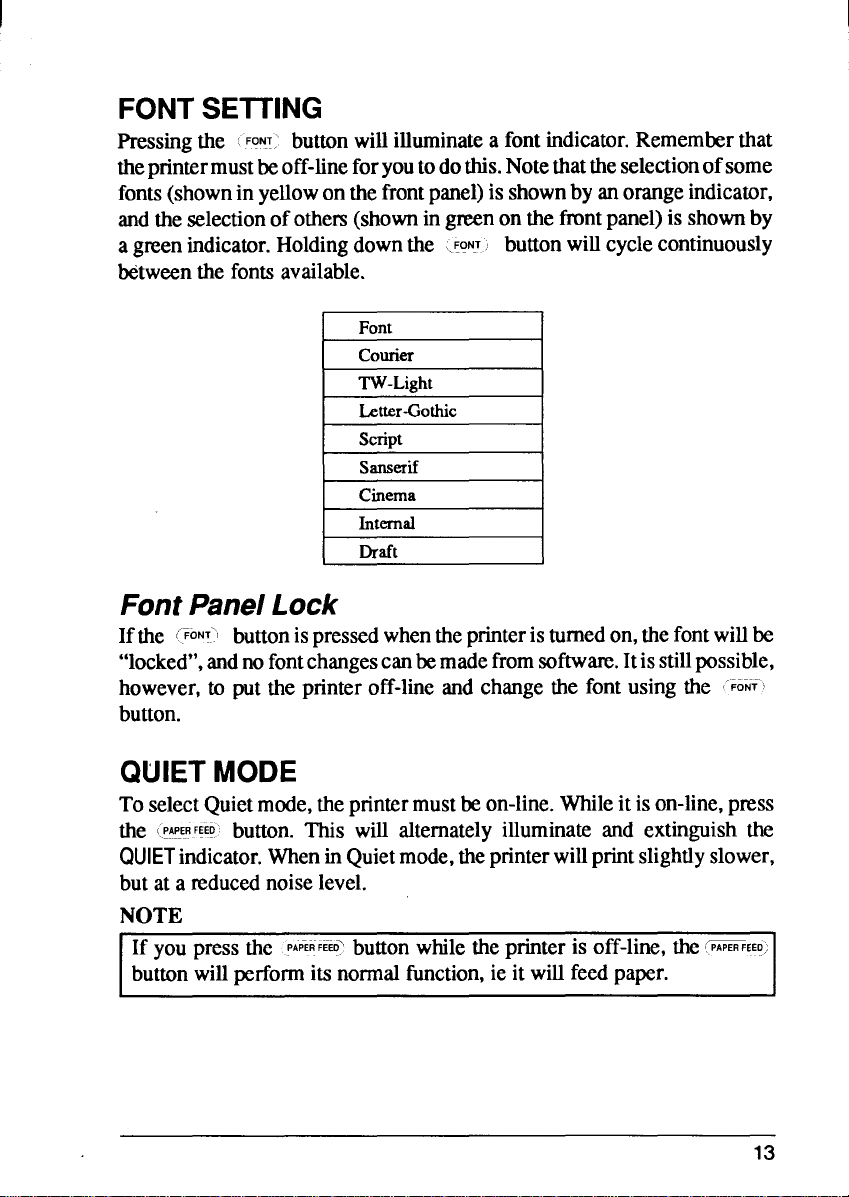
FONTSEITING
hXSiIlg the ~‘oNT:
the printermustbeoff-lineforyoutodothis.Notethattheselectionofsome
fonts(showninyellowonthefrontpanel)is shownby anorangeindicator,
andthe selectionofothers(shownin greenon the frontpanel)is shownby
agreenindicator.Holdingdownthe
Mtweenthe fontsavailable.
button willilluminatea fontindicator.Rememberthat
(FONT~ button will cycle continuously
I Font
I courier
I
!kliDt
sanserif
Cinema
I Internal
Draft
I
I
I
I
FontPanelLock
lfthe .TONTI buttonimpressedwhentheprinteristurnedon,thefontwillbe
“locked”,andnofontchangescanbemadefromsoftware.Itisstillpossible,
however,to putthe printeroff-line and changethe font using the ‘~ONf’
button.
QUIETMODE
To selectQuietmode,theprintermustbeon-line.Whileitison-line,press
I.PAPE!FEEDbutton. This will alternatelyilluminateand extinguishthe
the
QUIETindicator.Whenin Quietmode,theprinterwillprintslightlyslower,
butat a reducednoiselevel.
NOTE
If you press the
button willperformitsnormal function,ie it willfeedpaper.
PAPERFEEO?
buttonwhile the printeris off-line,the-EEZ
13
Page 20
I
PAPERHANDLING
The followingsectionsdescribethe waysin whichyoucancontrolpaper
feeding,etcbymeansof thefrontpanelcontrols:
Formfeed
formfeedcanbe achievedfromthe frontpanelin the followingway:
A
Put the printer off-line, by pressing the
1
indicatoris extinguished.
Pressthe
2
Pressthe =‘ button momentarily.
3
The paper willthenmoveforwardto the top of the nextsheet(fanfold
4
paper),or ejectacutsheet.
Settheprinteron-lineagain(..
5
.!APEBFEEDbutton,andkeepit depnxsed.
ONLINE.button)to resumeprinting.
ON.LINE button, so that the
Paperparking
Paperparkingisusefulif youareusingfanfoldpaper,andyouwanttoprint
adocumenton oneortwosheetsof cut-sheetpaper.Theprinter“parks”the
fanfoldpapersafelyout of the way,so that youdo notneedto unloadthe
paper before inserting cut-sheet paper, then, when you have finished
printingon cut-sheetpaper, movesthe fanfoldpaper back to its original
positionso thatyoucan restat printing.
To use this facility,followthe instructionsbelow:
1
Puttheprinteroff-line@ess the :-OWW‘button,sothattheindicatorgoes
out).
Pressthe
2
paperpath.
{ET:::CT:PARK’button,so that the fanfoldpaperis movedoutof the
Nowmovethe teleaseleverto therearoftheprinter(~ position)toselect
3
cut-sheetpaper(disengagingthe fanfoldsprockets).
NOTE
Ifyoudonotmovethereleaseleveratthisstage,theprinterwillwarnyou
at‘thenextstepbyemittinga continuousseriesof &ps.
14
I
Page 21
4
Insertthecutsheetpaperin thepaperguides
Pressthe
5
6fi~~ECTPAR~buttoninorderto feedthecutsheettothestartingprint
position.Theprinterwillautomaticallygo on-line.
Printasnormalonthecutsheet(s),andwhenyouhaveftished printing,
6
puttheprinteroff-line(byp~ssing the .
If the softwarehasnotdonethisfor you,ejectthe paperbypressingthe
7
ONLNE.;buttonagtin).
@IS!:@button.
Movethe releaselever to the frontof the paper (~position) to select
8
fanfoldpaper(engagingthefanfoldsprockets).
Nowfeedthefanfoldpaperto the printpositionbypressingthe
9
{EKJECTP(R]
button.Thepaperwillmoveto itsformerprintposition,and theprinter
willautomaticallygoon-line.
Youarenowreadyto startprintingon fanfoldpaperagain.
Shorttear-offfunction
Theshort-tear-offfunction is handy when using fanfold paper. It ejects the
papersothatthe perforation isjust abovethetransparentcover, allowing you
tear it off
feedafteryouhavetomoffthepaper,the~by startingprintingatthetopof
thenextform.Thisfeatureis especiallyusefulif you areusingpre-printed
stationery(suchas invoices,etc),whichwillnotbe printedalltogether.
withouthavingto openuptheprinter.It thenreversesthe paper
Tousetheshorttear-offfunction,pressthe{
ON”LINEIbutton whentheprinter
ison-line,andholditdownforafewseconds.Whenyoureleasethebutton,
thepnnterwillgooff-line,andthepaperwillmoveupafewinches,allowing
youtotearofftheform.
To ~tum the paperto itspreviousposition,pressthe
ONLINE buttononce
again.Whenyou ~lease the button,the printer will return to its on-line
status,andthepaperwillbefedbackwards,withtheprintheadalignedwith
thetopofthenextform.
15
Page 22
MicroFeed
The Micro Feed facilityis usefulif youwishto alignthe paperexactly.It
feedsthepaperforwardsor backwardsin l/216th inchincrements.
To use thisfeatwe,puttheprinteroff-line(usingthe (- button).
Thenpress the @@> button,and eitherthe
(PAP-O) button (to feed the
paperforwatis), or the @W@ button(to feedthepaperbackwards).
Holdingdownthesebuttonscontinuouslywillcontinueto feedthepaperfor-
wardsor backwardsinsmallincrements.
BUFFERCLEAR/RESET
It is possibleto clearthebufferoftheprinteror to mtumittoitspower-on
statusby usingthefrontpanelbuttonswithouthavingto turnthe poweroff
andon.Todothis,put theprinteroff-line(pressthe[ON
L~.1 button),andthen
pressthe :-0N~i~~7buttonagain.Beforereleasingthe (“~~ button,hold
downthe
holdingit down(beforereleasingthe C
“F!NT button.Releasingthe (:0~~1buttonwithintwosecondsof
ON.LNSIbutton)willclearthedatain
thebuffer.Releasingthebuttonaftertwoseconds(again,beforereleasing
the @~-’ button)willresettheprinterback to thesettingsatpower-on.
TESTANDMAINTENANCESETTINGS
printerisequippedwithanumberoffunctionstoassisttestingandmain-
The
tenance.Since it isanticipatedthattheywillnotbeusedveryoften,theyare
notdescribedhem,butin Chapter6.
However,briefly,theyare:
● Atexttestprintmode
● A shorttestprintmode
● A longtestprintmode
. A hexadecimaldumpmode
● Abidirectionalprinttest
16
Page 23
chapter 3
SETTINGUP
THE MEMORYSWITCHES
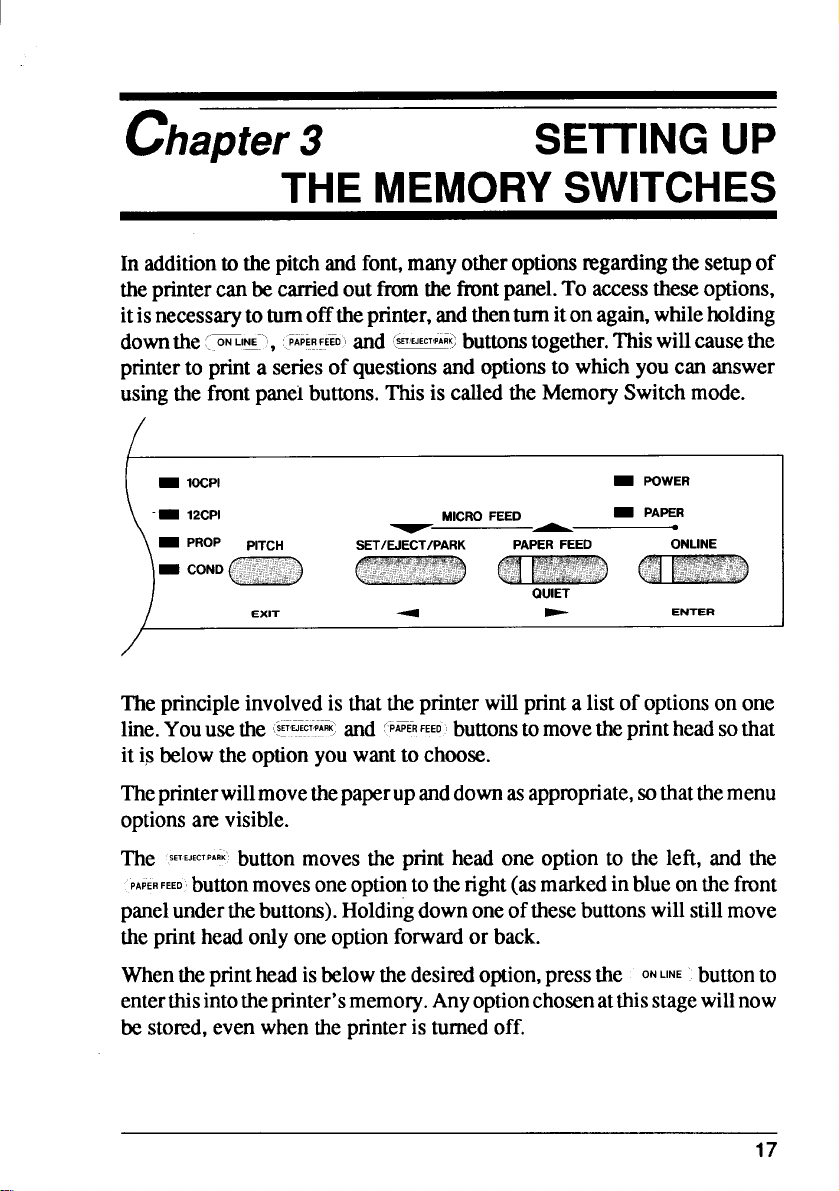
In additiontothepitchandfont,manyotheroptionsregardingthesetupof
theprintercanbecarriedoutfromthefrontpanel.To accesstheseoptions,
itisnecessarytoturnofftheprinter,and thenturnitonagain,whileholding
downthe
printerto printa seriesof questionsandoptionsto whichyoucan answer
usingthe frontpaneibuttons.Thisis calledthe MemorySwitchmode.
[~IE’1, .WR.FEED’Iand 4*S buttonstogether.Thiswillcausethe
-- 12CPI
- PROP
- COND ,.,:,:;;..;;:”::
)
Theprincipleinvolvedis thattheprinterwillprinta listof optionson one
line.Youusethe
PITCH
Q ---
EXIT d -
,.—.———..——,
SET:WPARK and ‘P~ERFEEObuttonstomovetheprintheadsothat
SET/EJECT/PARK PAPERFEED
.,..,,,
MICROFEED
~—
QUIET
- PAPER
ONLINE
ENTER
it is belowthe optionyouwantto choose.
Theprinterwillmovethepaperupanddownasappropriate,sothatthemenu
optionsa~ visible.
The SETEJECTPAriK’buttonmovesthe print head one optionto the left, and the
PAPERFEED button moves one optiontotheright(asmarkedinblueonthefront
panelunderthebuttons).Holdingdownone ofthesebuttonswillstillmove
theprintheadonlyone optionforwardor back.
Whentheprintheadisbelowthedesiredoption,pressthe
ONLINE buttonto
enterthisintotheprinter’smemory.Anyoptionchosenatthisstagewillnow
be stored,evenwhenthe printeris turnedoff.
17
Page 24

Whenyoupressthe { ON- buttonto enteranoption,a“*”(asterisk)will
beprintedto confirmthattheoptionhasbeenchosen.
Themenusare organizedin a hieramhical(tm-structumd) fashion.Some
menusdo not chooseoptionsdirectly,but instead,move down to other
menus. To move up throughthe menu structure towards the “root” or
“trunk”,use the ~
PITCH’ button as an ““EXIT
button (a.. marked in blue
underneaththe button).
Thestructwe
of the menusis shownbelow.:
Mainmenu
,
Printcurrentsettings
Usefactorysettings
,
1-[
,
Commandmenu Fontmenu Printmenu Papermenu
1000-
Theoptionswithineachmenuare givenbelow.
Asmentionedabove,whenyoupressthe
(“-EX-”’I buttonfromanysub-menu
orfromanoptionwithinamenu,youwillreturntothemenulevelabovethe
currentone.If youpressthe ‘
willprint
“***E~***” ~d exitto
EXIT-’ buttonfromthemainmenu,theprinter
beingon-line,withthe settingschosen
inMemorySwitchmodebeingnow setin the printer.
18
Page 25
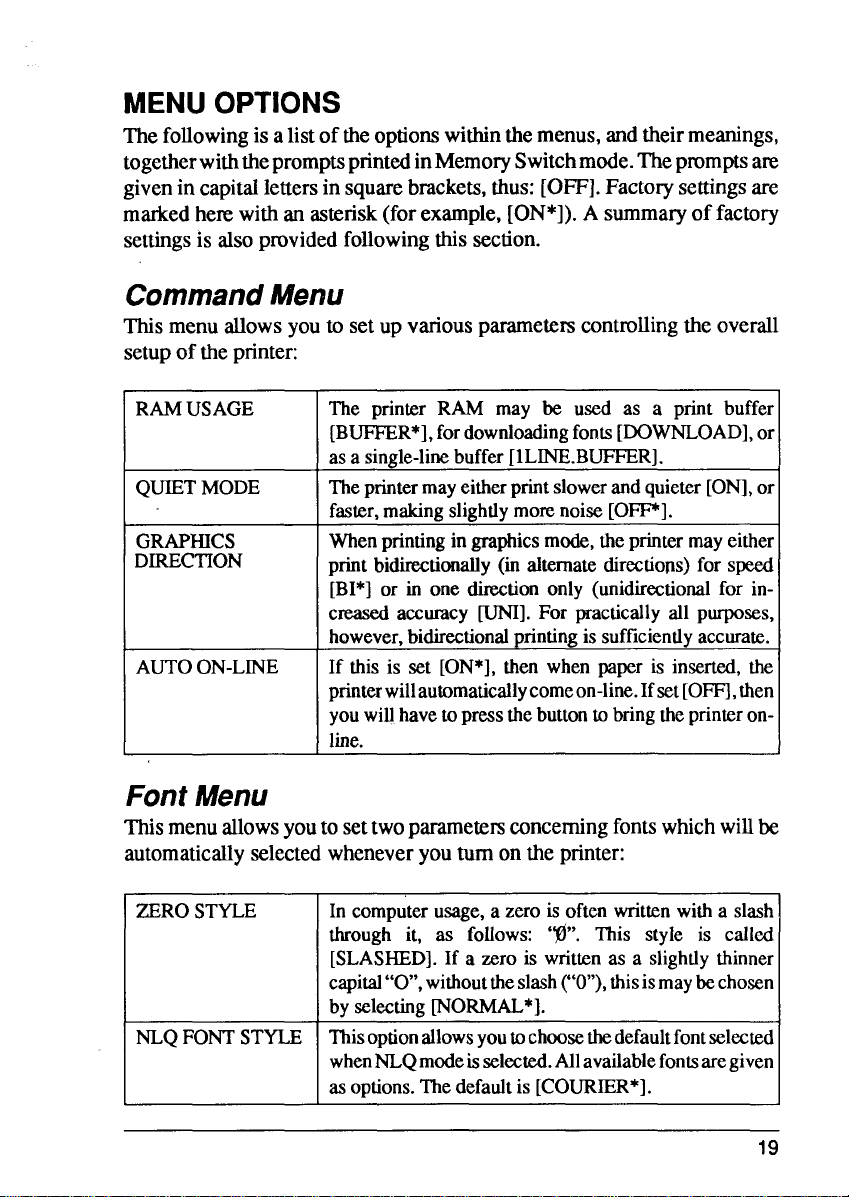
MENUOPTIONS
followingis alistoftheoptionswithinthemenus,andtheirmeanings,
The
togetherwiththepromptsprintedinMemorySwitchmode.Thepromptsare
givenin capitallettersin squarebrackets,thus:[OFF].Factorysettingsare
markedhemwithan asterisk(forexample,[ON*]).A summaryof factory
settingsis alsoprovidedfollowingthissection.
CommandMenu
Thismenuallowsyouto setup variousparameterscontrollingthe overall
setupof the printer:
RAMUSAGE
QUIETMODE
GRAPHICS
DIRECTION
AUTOON-LINE
The printer RAM may be used as a print buffer
[BUFFER*],fordownloadingfonts[DOWNLOAD],or
asasingle-linebuffer[lLINE.BUFFER].
Theprintermayeitherprintslowerandquieter[ON],or
faster,makingslightlymorenoiseIOFP].
Whenprintingingraphicsmode,theprintermayeither
printbidirectionally(in alternatedirections)for speed
IBI*]or in one directiononly (unidirectiomlfor increasedaccuracyCUNI].For practicallyall purposes,
however,bidirectionalprintingissufficientlyaccurate.
If this is set [ON*],then when paper is inserted,the
printerwillautomaticallycomeon-line.Ifset[OFFI,then
youwillhave to press thebuttonto
bringtheprinteron-
line.
FontMenu
Thismenuallowsyouto settwoparametm concerningfonts whichwillbe
automaticallyselectedwheneveryouturn on the printer:
ZEROSTYLE
NLQFONTSTYLE Thisoptionallowsyoutochoosethedefaultfontselected
In computerusage,a zero is often writ?enwitha slash
through it, as follows: ‘@”. This style is called
[SLASHED]. If
capital“O”,withouttheslash(“O”),thisismaybechosen
a zero is writtenas a slightlythinner
byselectirwrNOW*I.
whenNLQmodeisselected.Allavailablefontsaregiven
asoptions.Thedefault is [COURIER*].
19
Page 26
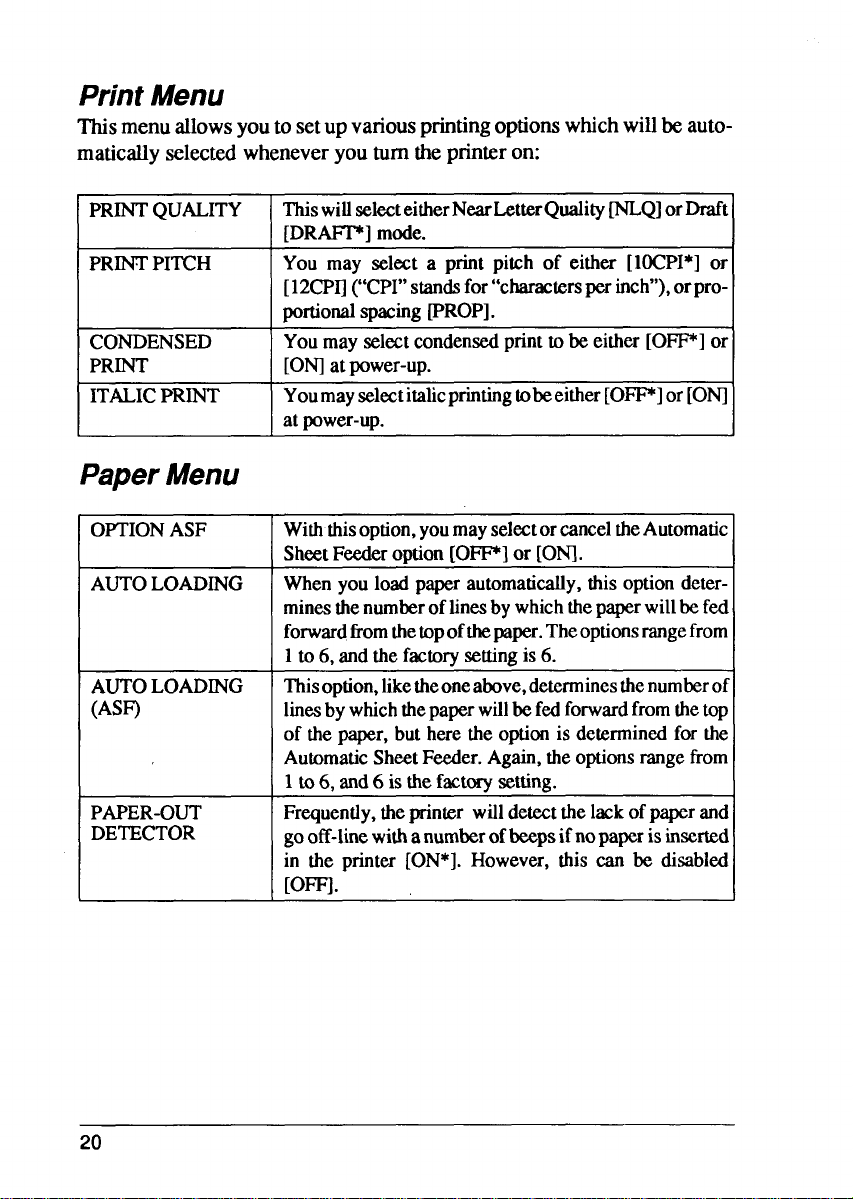
PrintMenu
Thismenuallowsyouto setup variousprintingoptionswhichwillbeautomaticallyselectee-wheneveryouturntheprinteron:
PRINT QUALITY
PRINTPITCH
CONDENSED
PRINT
ITALICPRINT
OPTIONASF
AUTOLOADING
k
AUTOLOADING
(ASF)
r
PAPER-OUT
DETECTOR
ThiswillselecteitherNearLetterQualityWQ] orDraft
[DRAFF] mode.
You may select a print pitch of either [1OCPI*]or
[12CPIl(c’CPI”standsfor “charactersperinch”),orpro-
portionalspacingPROP].
Youmayselectcondensedprintto be eitherIOIP] or
IONlatpower-up.
YoumayselectitalicprintingtobeeitherIOW] or[ONI
atpower-up.
Withthisoption,you mayselectorcanceltheAutomatic
SheetFeederoption[OFF] or [ONI.
Whenyouloadpaperautomatically,thisoptiondeterminesthenumberoftinesbywhichthepaperwill befed
forwardffomthetopofthepaper.Theoptionsrangefrom
1to 6, andthefactorysettingis6.
l%isoption,liketheoneabove,determinesthenumberoi
linesbywhichthepaperwillbefedforwardfromthetop
of thepaper,butheretheoptionis determinedfor the
AutomaticSheetFeder. Again,theoptionsrangefrom
1to6, and6 isthefactorysetting.
Frequently,theprinter willdetectthelackofpaperand
gooff-linewithanumberofbeepsifnopapcrisinserted
in the printer [ON*]. However, this can lx disabled
[Ore.
20
Page 27
I
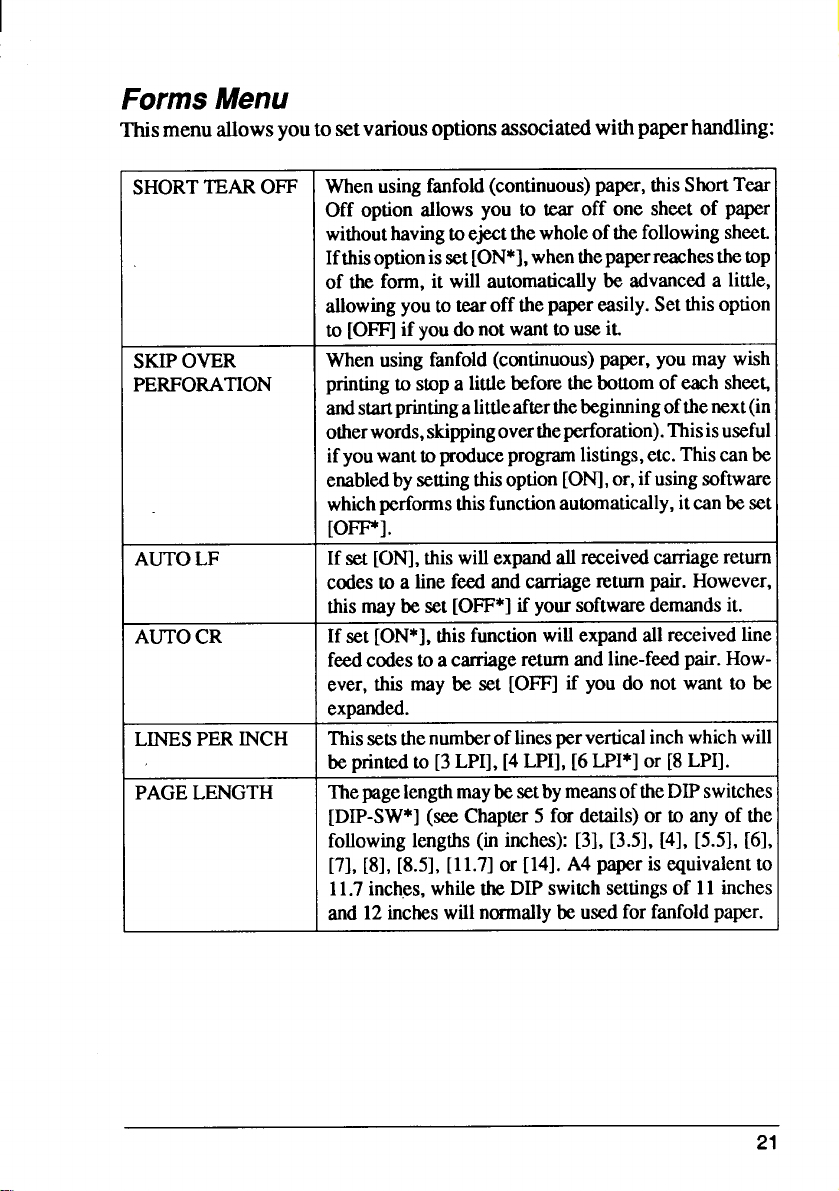
FormsMenu
menuallowsyoutosetvariousoptionsassociatedwithpaperhandling:
This
SHORTTEAROFF
SKIPOVER
PERFORATION
I
I AUTOLF
AUTOCR
LINESPER INCH
PAGELENGTH
Whenusingfanfold
Off option allowsyou to tear off one sheet of paper
withouthavingtoejectthewholeofthefollowingsheet.
Ifthisoptionis set[ON*],whenthepaperreachesthetop
of the form,it will automaticallybe advanceda little,
allowingyouto tearoff thepapereasily.Setthis option
to IOFFIif Youdonotwantto useit.
Whenusingfanfold(continuous)paper,you may wish
printingto stopa littlebeforethebottomofeachshee~
andstartprintingaLittleafterthebegimingofthenext(in
otherwords,skippingoverrheperforation).Thisisuseful
ifyouwanttoproduceprogramlistings,etc.Thiscanbe
enabledbysettingthisoption[ONI,or,ifusingsoftware
whichperformsthisfunctionautomatically,itcanbe set
[OFF].
Ifsel[ONI,this willexpandallreceivedcarriagereturn
codesto a linefeedandcarriagereturnpair.However,
thismaybe set
If set [ON*],thisfunctionwillexpandallreceivedline
feedcodes to a carriagereturnandline-feedpair.However,this may be set [OFF]if you do not want to be
expanded.
Thissets thenumberoflinesper verticalinchwhichwill
beprintedto [3LPI],[4LPI],[6LPI*]or [8LPI].
ThepagelengthmaybesetbymeansoftheDIPswitches
[DIP-SW*](seeChapter5 for details)or to anyof the
followinglengths(in inches):
[7],[8],[8.5],[11.7]
11.7inches,whiletheDIPswitchsettingsof 11inches
(continuous) paper, this ShortTear
[OFF*Iifyoursoftwaredemandsit.
[31,[3.51,[41,[5.51,[61,
or [14].A4 paperisequivalentto
and12incheswillnormallybeusedforfanfoldpaper.
21
Page 28
I
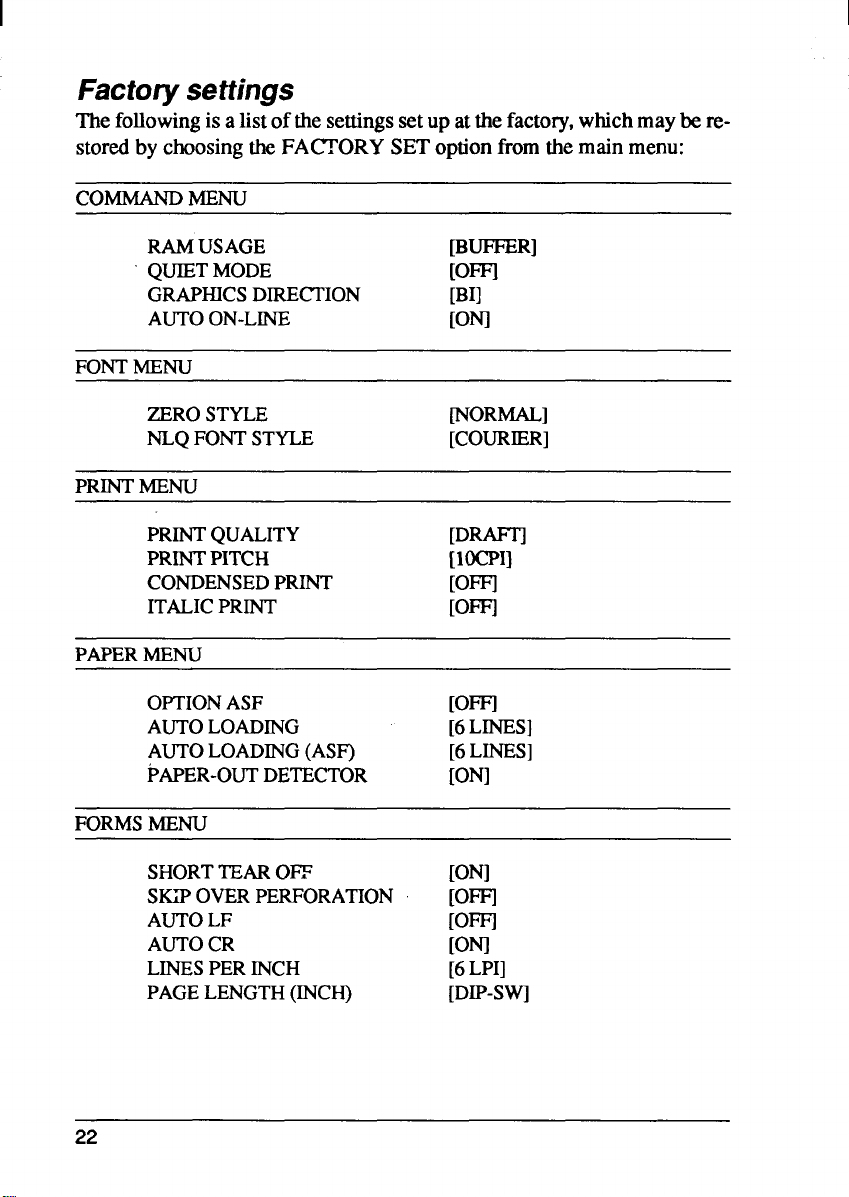
Factorysettings
Thefollowingis a listofthesettingssetup atthefactory,whichmaybe re-
storedby choosingtheFACTORYSEToptionfromthemain menu:
COMMANDMENU
RAMUSAGE [BUFFER]
QUIETMODE
GRAPHICSDIRECTION
AUTOON-LINE
FONTMENU
IOm
IBI]
[ONI
ZEROSTYLE
NLQFONTSTYLE
PRINT MENU
PRINTQUALITY [DRAFT’1
PRINTPITCH [1OCPI]
CONDENSEDPRINT
ITALICPRINT
PAPER MENU
OPTIONASF
AUTOLOADING
AUTOLOADING(ASF)
PAPER-OUTDETECTOR
FORMSMENU
SHORTTEAROFF [ONI
SKIPOVERPERFORATION
AUTOLF
AUTOCR
LINESPERINCH
PAGELENGTH(INCH)
NORMAL]
[COURIER]
[OFFI
[OFFI
IOm
[6LINES]
[6LINES]
[ONI
IOm
IOm
[ONI
[6LPI]
IDIP-SWl
22
Page 29
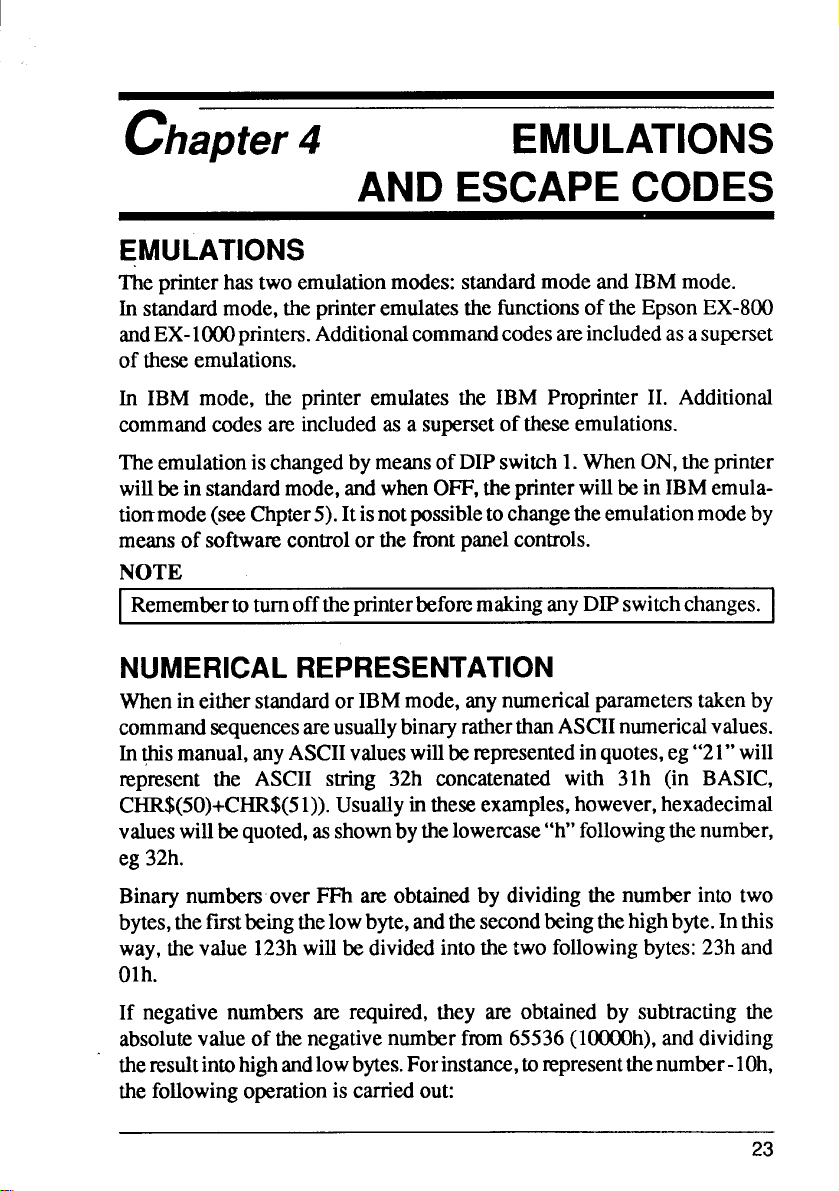
chapter 4
EMULATIONS
AND ESCAPECODES
EMULATIONS
The printer has two emulation modes: standard mode and IBM mode.
In standard mode, the printer emulates the fhnctions of the Epson EX-800
andEX-lOOOpnnters.Additional command codes areincluded as asupset
of these emulations.
In IBM mode, the printer emulates the IBM Proprinter II. Additional
command codes are included as a superset of these emulations.
TheemulationischangedbymeansofDIPswitch1.WhenON,theprinter
willbeinstandardmode,andwhenOFF,theprinterwillbeinIBMemulationmode(seeChpter5).Itisnotpossibletochangetheemulationmodeby
meansof softwarecontrolor thefrontpanelcontrols.
NOTE
RemembertoturnofftheprinterbeforemakinganyDIPswitchchanges.
NUMERICALREPRESENTATION
Whenin either standard or IBM mode, any numerical parametem taken by
command sequences are usually binary
In@ismanual,any ASCIIvalueswillberepresentedinquotes,eg“21”will
represent the ASCII string 32h concatenated with 31h (in BASIC,
CHR$(50)+CHR$(51)).Usuallyintheseexamples,however,hexadecimal
valueswillbequoted,asshownbythelowercase“h”followingthenumber,
eg 32h.
ratherthanASCIInumericalvalues.
Binarynumbersover FFh areobtainedby dividingthe numberinto two
bytes,thefirstbeingthe lowbyte,andthesecondbeingthehighbyte.Inthis
way,thevalue 123hwillbedividedintothe two followingbytes:23hand
Olh.
If negativenumbersare required,they are obtained by subtractingthe
absolutevalueof thenegativenumber from65536(10000h),anddividing
theresultintohighandlowbytes.Forinstance,torepresentthenumber-l Oh,
thefollowingoperationis carriedout:
23
Page 30
1000Oh- IOh= FFFOh
andthe nxdt is dividedintothetwobytesof F7)handFFh,
If“non-printable” codes are given, ie those codes fmm OOhthrough IFh and
71%,these codes will be enclosed in angle brackets, for example cDC1>.
The name in the angle brackets is that assigned to the code in the ASCII convention. The name of the character should not be used, the binary value
should”beinput. In the same way, it should be noted that the angle brackets
are not to be input - they are merely there as delimitem in the printed text.
Of course, in a program, a meaningful variable name can be given to these
charactem, for instance (the following example is written in BASIC):
10
ESC$=CHR$(27) :BS$=CHR$(8)
20 LPRINT ESC$;BS$;
COMMANDCODESANDESCAPESEQUENCES
SomecommandcodesarecommontoboththestandardandIBMmodes.In
thedescriptionsof thecommandcodes,allcommandcodeswillbegiven,
togetherwithanoteofthemodestowhicheachcommandcodeisapplicable.
Mostof the
mode and the IBM emulation mode. If a command is common to both
modes, the descriptive heading is followed by “Both”. If the command is
specific to one mode, then either “Standard” or “IBM” will follow the
descriptive heading. Occasionally, there am two identical commands to
perform the same function. In these cases, the relevant sign follows the
escape sequence.
following command codes are available in both the standard
Whenparametemare given,theaccompanyingtextdescribeswhetherthe
parameteris an ASCIIcharacteror a binaryvalue.
In the following descriptions, first the function of the command sequence is
given. This is followed by the emulation for which this command is
appropriate (“Standard”, “Both” or “IBM”).
24
Page 31

Followingthe heading,the full formof the commandis given,usingthe
ASCIInamesforcontrolcodes,eg<ESC>(theanglebracketsoneitherside
ofthename arenotpartofthename,beingsimplydelimitem,andshouldnot
beentered).Variableparametersrueindicatedbya letter(usually“n”),and
an optional number, enclosed in angle brackets (eg cnO>). Where an
indefinitenumberof pararnetemareto be supplied,thecos areseparated
by an ellipsis(“...
“).Thesequenceisthengivenusinghexadecimalcodes
(twohexadecimaldigitsfollowedbyalowercase“h”),withvariablesagain
representedby lettersenclosedin anglebrackets.The decimalequivalent
followsthehexadecimal.Thefollowingis an example:
Examplecommand Both
<ESC>
IBh
I 27
Note that the above command sequence is for example purposes only - it
does not have any real function.
cBS>
08h
8
<?0
<0
<0
(codes)
(hexadecimal)
(decimal) \
25
Page 32

Fontstyleandcharacterset controlcodes
Selectitaliccharacters
<ESC> 4
Standard
hz- 34h i
27
<FS> 4
I ICh
I 28 52
The sequence above selects italic character printing.
Deselectitalicprinting
<ESC>
IBh
27 53
<FS>
ICh
I 28
The sequence above deselects italic printing.
52
34h
5 Standard
35h
5
35h
53
IBM
IBM
I
I
I
I
\ select printmode
<ESC>,
IBh
27 120
This command selects the print mode for subsequent printing, where <n> may be a
binaryvalueofOOhorOl h,oreither of the,ASCHcharacters “O”or”l” (30h or 3lh).
If -a> is equal to OOhor “O”,then Draft mode will be selected, and if equal to Olh
or “l“, then NLQ mode will be selected. All other parameters are invalid. This
command will also be ignored if Font Panel Lock has been selected.
26
x
78h
-3P
<n>
<n>
Both I
Page 33

I Selectfont
<ESC>
IBh
27 107
ThecommandaboveselectsatypefaeeforsubsequentNLQprinting,where<n>is
abinaryvalue in therangeofOOhto07h.The followingtableshowstheeffectof
differentvaluesof thisparameter:
k
6Bh
<0
<0
<n
Both
I
Binary
Value
OOh I Courier
I
I Olh I Sanserif
I 02h I Letter-Gothic I 06h I TW.Li~ht I
Anyotherparametersare invalidandwill be ignored.Thiscommandwillalsobe
ignoredifFontPanelLockhasbeenselected.
Selectedfont
Selectcharactertable
<ESC>
IBh
Theeommandabovewillselectthecharaetertabletobeusedinsubsequentprinting,
where<n>canbeabinaryorASCIIvaluefromOOhthrough02hor”O”through“2”.
Thefollowingtableshowstheeffectof this parameter:
Value of cO I Description
I
OOhor “O”
Olh or
02h or “2” Moves character set downloaded in OOhto 7Fh area to
t
74h
116
I Selects standard character table
“i” I Selects IBM character table
80h to FFh area
<*
<0
<0
Binary
Vatue
Selectedfont
I 04h I Script
I 05h ] OCR-B
I 07h I Cinema
1
I
I
I
Both
I
Anyothervaluesareinvalidandwillbe ignored,
27
Page 34

I
I Selectprimarycharacterset
Both
IBh 37h
27
55
Thecommandaboveselectstheprimarycharacterset.
Thereye noparameters.The areafrom80hto9Fh isusedforcontrolcodes.
[ Seiectsecondarycharacterset
IBh
27 54
36h
Both
Thecommandabove selectsthesecondarycharacterset.
Therearenoparameters.Theareafrom80hto9Fhisusedforprintablecharacters.
Selectinternationalcharacterset
<Esc>
IBh
R
52h
27 82
<FS> R <m
ICh 52h
28 82
<m
<0
<0
<*
<0
Standard
IBM
Thecommandaboveselectsaninternationalcharacterset,where<n> is a binary
valueintherangeOOhthroughOEh.Thecharactersetselectedisdependentonthe
valueof cn>, asshowninthetablebelow:
Value of ~ Intemationat character set
OOh USA 08h Japan
Olh France
02h
03h England
04h Denmark I
05h Sweden ODh Denmark/Norway
06h Italy
07h Spain I
Germany
Value of ac= International character set
09h
Norway
oAh Denmark II
OBh
OCh
OEh Irish
Spain II
Latin America
28
Page 35

Anyothervaluesof <n> are invalidand willbe ignored.The specialcharacters
affectingeachsymbolsetaregiveninChapter9.
\ Printcontinuouslyfromthe AHCharactersChart
IBh 5Ch
I ‘27 92 ah
Thecommandaboveallowsa seriesof specialcharactersto be printedfrom the
controlcodearea(OOhthruIFh),wherethe twoparametersgivethetotalnumberof
charactersto be printed(lowbytefiist).On receiptof thiscommand,anycodes
receivedintherangeOOhthroughIFh willnotbeinterpretedas controlcodes,but
willprintthecharacterscorrespondingto thosecodes.This willcontinueforthe
numberofcharactersdesignatedby <n@ and<nI>.
C/lb al>
d>
IBM I
I Printasinale characterfromthe All CharacterChart IBM \
<ES(7>
IBh
27 94
ThecommandaboveprintsasinglecharacterffomtheAllCharactersChart.There
arenoparameters.Ifthenextcharactertoreprintedhasacodebetw=n OOhandIFh,
itwillnot be treatedasa controlcode,andthecharactercorrespondingto this code
willbeprinted.
\ Select/cancelundefinedcontrolcodearea
<ESC>
IBh
I 27 73
A
5Eh
I
49h
Standard
<*
<0
<m
I
1
1
I
Thiscommandselectstheprintablecodeareaexpansion,wherea> maybea binary
valueofOOhorOlh,oreitheroftheASCIIcharacters“O”or”l” (30hor3lh). If<n>
isequaltoOOhor”O”,thentheundefinedcontrolcodearearemainsasnon-printable
codes.If cn> isequl to Olh or“l”, thoseareashiftstotheprintablecharacters.
29
Page 36

Fontpitch
controlcodes
Set picapitchprinting Standard
<ESC>
IBh
I 27
The commandabove sets all subsequentprintingto pica pitch. There are no
parameters.ThiscommandwillbeignoredifPitchPanelLockhasbeenselected.It
maybe candled bya cESC>M(elitepitchset)command.
P
50h
80
I
Set picapitchprinting
IBM
I<Dc2>
12h
18
The commandabovesetstheprintpitch to pica. There are no parameters.This
commandisignoredifPitchPanelLockmodehasbeenselected.
Setelite pitchprinting
<Esc>
IBh 4Dh
I 27 77
The commandabove sets all subsequentprintingto elite pitch. There are no
parameters.ThiscommandwillbeignoredifPitchPanelLockhasbeenselected.
may be cancelledby a <ESC> P (standardmode)or a <DC2> (lBM mode)
command.
M
Seteiite pitchprinting IBM
<Esc>
IBh
27 58
3Ah
Both
1
I
I
It
The commandabovesets theprintpitchto elite. Thereare no parameters.This
commandisignoredifPitchPanelLockmodehasbeenselected.
30
Page 37

Setcondensedprintmode
<ESC>
IBh
27 15
<S1>
oFh
Eitherof the two commandsabovewill set condensedprintmode.Thereare no
parameters.Subsequentprintingwill take place at approximately1.7timesthe
numberofcharacters/inchthan waspreviouslythe case.Thisiscancelledonreceipt
ofacDC2>command.ThiscommandwillbeignoredifPitchPanelLockmodehas
beenselected.
<S1>
Om
Both
I
I
I Cancelcondensedprintmode
i
12h
18
Thecommandabovecancelsthecondensedprintmode.Therearenopammeters.On
receiptofthiscommand,all subsequentprintingwillbe doneat thepitchselected
priortoa cESC>
PitchLockmodehasbeenselected.
<S1>or<S1>command.Thiscommandwillbe ignoredifPanel
Select/cancelproportionalprinting
CEsc>
IBh 70h
27
Thesequenceaboveselectsorcancelsproportionalprinting,whereen> isabinary
orASCIIvaluefmmOOhthroughOlhor“O”through“l”. If<n>–+tlhor“O”,then
proportionalprintingisdeselected(cancelld), andifa>=olh or“l”, then
tional printing is selected. This command
hasbeenselected.
P
112
<w
<?0
</0
willbeignoredifPanel PitchLockmode
Standard
Both
propor-
31
Page 38

I
Setor cancelpicaproportionalpitch
<ESC>
IBh
27
Thecommandabovesetsor cancelspicaproportionalpitchprinting,wherecn> is
abinaryvalueofeitherOOhorOlh.Ifcn>issetto Olh,thenpicaproportionalprinting
isenabled,andifQ> is settoOOh,thenpicaproportionalprintingisdisabled.Any
othervaluesof<m withthiscommandwillsetpicapitch,andthepMter willattempt
toprint<n>.IfPanelPitchLockmodehasbeenselected,thenthiscommandwillbe
ignored.
P <m
50h
80
<m
<0
iBM
Specialprint modecontrol”codes
Seiectkancei expandedprinting
<ESC>
IBh
27 87 <?D
Thecommandaboveselectsorcancelsexpandedprinting,where<n>isa binaryor
ASCIIvaluefromOOhthroughOlh or “O”through“l”. If cn>=OOhor “O”,then
expandedprintingis deselected(canceled),andif cn>=olh or“l”, thenexpanded
printingisselectedforallprintingsubsequenttothereceiptof thiscommand.
w
57h
<0
<0
Both
Seiectone-iineexpandedprinting
<ESC>
IBh
27 14
<so>
OEh
14
I
Eitherof the commandsabovewillselectone-lineexpandedprint.Thereare no
parameters.Expandedprintingwillbeperformedsubsequentto thereceiptofthis
commanduntilanyofthe followingcommandsisreceived:<DC4>,.&E-, &! SC>
<B, cVT>, =&I+,<ESC>cFI%=or&! SC>W.
32
<so>
OEh
Both
Page 39

Cancelone-lineexpandedprint
I<DC4>
14h
I
20
The commandabovecancelsthe one-lineexpandedprint modesetby cSO> or
cESC> <SO>. There are no parameters
Both
I
I
I
I
I SelectMasterprint mode
1cESC>
l13h 21h
27
Thecommandaboveselectsa “Masterprint”mode,
composedof theadditionof the following bit settings:
Bit Value Value
01 Olh
73=
1 2 02h
2
3 8 08h
4 16 IOh
m=
33
(dec) (hex)
4 04h
<0
<m
<0
Function Effect when Effect when
Pitch [ 12cvi I
Proportionalprinting
Condensed printing
Emphasized tnintimzI set cancel
where <n> is a binary value
bit=l
set
set cancel
Both
bit=O
IOcui
csi-kcei
Et=E=
61
I
I 7 I 128 I 80h
Hence, if condensed italic underlined print is required at 12cpi, the values of bits 2,
6,7 and Omust be added together.Tl& comesto(indecim~)4+64+128+1= 197,
or (in hexadecimal)04h+40h+80h+Olh=C5h.Themastermodeishencea useful
wayofselectinga numberofprintparameterssimultaneously.
64 I 40h
I
33
Page 40

I
I Selectprintmode
<ESC> I
IBh
27 73
The commandabove selectsthe print mode (resident/downloadedfont, pitch),
wherecn> is a binaryvalue.Theprintmodeselectedbydifferentvaluesof-> is
shown‘inthetable below:
49h
I + I Printmode
I o I Draft
I 1 I Dniftwith elite pitch
I 2 I sanserif
3 Courier
4 Draft download
\
5 Draft download with elite pitch
6
7 Courier
Thiscommandisignoredif Panel Lockmodehasbeenselected.
<0
<Lb
<0
I
I
I
I
NLQ download
I Selectemphasizedprintmode
<ESC> E
IBh
I
27
45h
69
IBM
Both
1
I
Thecommandaboveselectstheemphasizedprintmode.Therearenoparameters.
All charactersprintedsubsequentto receiptof this commandwillbe printed in
emphasizedmode.Thiscommandisvalidonlyin draftmode.
Cancelemphasizedprintmode
<ESC> F
IBh
I 27
Thecommandabovecancelstheemphasizedprint mode.Therearenoparameters.
Allcharactersprintedsubsequenttoreceiptofthiscommandwillbeprintedinnonemphasizedmode(canceling theeffectof the@SC> E command).
34
46h
70
Both
i
I
Page 41

Selectdouble-strikeprinting
<ESC>
IBh 47h
27 71
Thecommandabovewillselectthedouble-strikeprint mode.‘Ilere arenoparameters.Anycharactersprintedsubsequenttothereceiptofthiscommandwillreprinted
indouble-strikemode.
G- ‘
I
Canceldouble-strikeprinting
<ESC>
IBh
H
48h
Both
27 72
The commandabove will cancel the double-srnkeprint mode. There are no
parameters.AnychamcterspMted subsequenttothereceiptof thiscommandwill
beprintedin non-double-strikeprintmode(canceling theeffectof the cESC> G
command).
Select/cancelunderline
<ESC>
I IBh 2Dh
27
45
<m
<m
<m
Both
The commandabovewill selector cancelunderlining,where<n> is a binaryor
ASCIIvaluewhichmaytakethevaluesOOhthroughOlhor “O”through“l”. If the
value is OOhor“O”,thenunderliningwillbecancelled.If cn>=olh or“l”, thenall
printablecharactersincludingspaces(butexcludinghorizontaltabsandIBMblock
graphiccharacters)willbe underlined.
Select/canceloverline
<ESC>
<?0
Both
IBh 5Fh <*
27 95
<m
I
I
I
Thecommandabovewillselectorcancdoverlining,where<n>isabinaryorASCII
. valuewhichmaytakethevaluesOOhthroughOlhor“O”through“l”.
isOOhor’’O”,then overlining will becancelled. If-a>=Olh or’’l”, then all printable
characters including spaces (but excluding horizontal
tabs)willbeoverlined.
If the value
35
Page 42

Selectsuperscriptkubscript
<ESC>
IBh 53h
Thecommandabovewillselecteithersuperscriptor subscriptprinting,where<O
isabinaryorASCII valuewhichmaytakethevaluesOOhthroughOlhor”o”through
“l”. If&e valueisWhor“O”,superscriptprintingwillbeselected,andif c~=olh
or“l”, thensubscriptprintingwillbe selected.
s
<0
<m
Both
Cancelsuperscripthubscript
i <ESC> T
I 27
Thecommandabovewillcancelsuperscriptorsubscriptprinting(ifeitherhasbeen
selected).Therearenoparameters.Ifeithersuperseriptorsubscriptprintinghasbeen
selected,then printingsubsequenttoreceiptof thiscommandwillbeinthenormal
position.
84
Both
Linespacecontrolcodes
] Linefeed
<LF>
OAh
I 10
Thecommandaboveadvancesthepaperoneline.Therearenoparameters.IfAuto
CRhas beenselectcxl,a carriagereturnwillalsobegeneratedonreceipt of a Line
Feedcharacter.1/6inchlinespacingwillautomaticallybe selectedatpower-on.
I Reverselinefeed Both
1<ESC> <Lfi
1
I
I
I
1
I
10 I
The commandabove will reverse line-feedthe paper one line. There are PO
parameters.1/6inchlinespacingisautomaticallyselectedatpower-on.
36
Page 43

Set linespacingto 1/8 inch
<ESC>
IBh
27 48
Therearenoparameters.Thecommandabovesetslinespacingto 1/8inch,where
“O”is theASCIIvalue“O”.
o
30h
Both
Set iinespacingto 7/72 inch
<ESC>
IBh
27 49
Therearenoparameters.Thecommandabovesetslinespacingto7/72inch,where
“l” istheASCIIvalue“l”.
1
31h
Set iinespacingto 1/6 inch
<ESC>
IBh
27
Therearenoparameters.Thecommandabovesetslinespacingto 1/6 inch,where
“2”istheASCIIvalue“2”.
2
32h
50
Set iinespacingto n/216inch
<ESC>
IBh
27
Thecommandaboveallowsprecisecontroloflinespacing,whereco isa binary
value.Uponreceiptofthiscommand,thelinespacingwillbesetto <n>/216inch.
3
33h
51
<m
<0
<m
Both
Standard
Both
37
Page 44

Set linespacingto n/72inch
<E!W>
IBh 41h
A
I 27 65
Thecommandabovesets thelinespacinginincrementsof 1/72 inch,where<O is
abinaryv~ue. on receiptofthis command,line spacingwillbeset to<0f72 inch.
<*
<m
<*
Standard
I
Definelinespacing(1/72inchincrements)
<ESC>
IBh 41h
27
Thecommandabovedefineslinespacingin 1/72inchincrements,wherecn> isan
optionalbinaryvalueifitknot txqualtozero,~> definesthelinespacingwhichwill
beimplementedafterancESC>2commandhas beenreceived.If<P = O,thenthe
currentvalueoflinespacingsetby a previouscESbA commandwillremainin
force.
A
65
<m
<m
<0
IBM
Execute<ESC>Adefinition IBM
<ESC>
IBh
27
Thecommandaboveexecutesthelinespacingpreviouslydefinedbythe43SC>A
command.Therearenoparameters.Ifan&SC>A sequencehasnotpreviouslybeen
entered,then linespacingwillbesetatl/6thinch.Ifan<ES~A sequencehasbeen
receivedpriortothiscommand,thenanysubsequentlinefeedswillmovethepaper
bythe amount specifiedbythe
2
32h
50
cESC>A command.
I One-timelinefeed (in 1/216inchincrements) Both I
<ESC>
IBh
J
4Ah
74
<m
<m
<m
I
I
Thecommandabovecausesaprecisepaperfeed,whereen> isa binaryvalue.On
receiptofthiscommand,thepaperwillbefedforwardby~>/216inch. Nocarriage
returnwilltakeplace,andthe currentlinespacingvaluewillbe unaffected.
38
Page 45

Reverseone-timelinefeed (in 1/216inchIncrements)
Both
IBh
27 106
Thecommandabovecausesa precisereversepaper fmxl,where<n> is a binary
value.Onreceiptofthiscommand,thepaperwillbefedbackwardsby<n>/216inch.
Nocarriagereturnwilltakeplace,andthecurrentlinespacingvaluewillbe unaffected.
6Ah
<*
<m
Setverticsiprintposition(in iines) Both
<ESC>
IBh
I 27 102
Thecommandabovesetsthenextverticalprintposition,wherecn>isabinaryvalue
specifyingthenumberoflines(atcurrentlinepitchsetting)downfromthecurrent
positionatwhichprintingwillnexttakeplace.In thecommandthebinarycharacter
Olhcanbe substitutedfortheASCIIcharacter“l”.
f
66h 31h
1
49
<m
<*
<m
Formfeedcontrolcodes
Formfeed Both
<m
OCh
I
Thecommandabovewillcauseaformfeed.Therearenoparameters.Onreceiptof
thiscommand,theprinterwillprintalldatastoredintheprintbuffer,andwillmove
to the topofthenextpage(asdeterminedby the formlengthsetby@! SC>C or
<ESC>C<NUb. A
ASFhasbeenselected,thiscommandfunctionsasa pageejectcommand.
carriagereturn(totheleftmargin)willalsotakeplace. If the
39
Page 46

I Reversefeedto top ofform
[“<ESC>
<FF>
Both
IBh OCh
27
12
The commandabovereversesthe paper to the top of the form. There are no
parameters.Onreceiptofthiscommand,thepaperwillbefedbackwardstothetop
ofthe currentpage.A carriagereturn(totheleftmargin)willalsotakeplace.This
commandisinvalidif theASFhasbeenselected.
I
Set pagelength(in inches)
<ESC>
c
IBh 43h
27 67 0
<Nub <0
OOh
<m
<0
Both
Thecommandabovesetsthepagelengthin inches,where<n> is a binaryvalue
(ls~><22 instandardmode,lS<n>S127inIBMmode)repmenting thenewpage
lengthininches.Thebottommarginis reset,andthecurrentlineafterexecutionof
this commandis madethe newtopofform.
Set pageiength(in iines)
<ES(2>
IBh
I 27
c
43h
67
<m
<0
<*
Both
The commandabovesetsthepagelengthin lines,wherecn> is a binary value
(ISCn>S127in standardmode,lgQ>s255 inIBMmode).Thenewpagelengthis
set accordingto the currentlinespacingvalue. Subsequentchangesof the line
spacingvaluewillnotaffectthepagelength.Thebottommarginis reset,and the
currentlineafter executionofthiscommandismadethenewtopofform.Thiscommandisinvalidifthelinespacingis setto,O.
I
40
Page 47

I Set top-of-form
<ESC>
IBh
I
! 27
Thecommandabovesetsthetopof-formPositionatthecurrentpaperposition.There
arenoparameters.Onreceiptofthiscommand,thetop-of-formpositionwillbeset
tothecurrentpaperposition.
4
34h
52
IBM
Marginsand verticaltabsettingcontrolcodes
I Moveto nextverticaitab position Both
<V’b
t
OBh
11
Thecommandabovemovesthepapertothenext verticaltabposition.Thereareno
parameters.Onreceiptof thiscommand,the printerprintsdatastored in theprint
buffer,andthe papermovestothenextverticaltabpositionor(ifrhereareno more
verticaltabpositionsonthepage),tothetopofthe nextpage.IfnoverticaltabpositionshavebeensetwiththecESG B commandoriftheyhavebeencleared,the
papermovesforwardbyoneline.
I
I Set verticaitab positions
<ESC>
IBh 42h
27
The commandabovesetsverticaltabpositions,wherethevaluesrepresentedby
cnb to-ad> arebinaryvaluesgivingtheveficaltabpositionsinlinesfromthetop
of thepage.Thevaluesgivenmustkin ascendingorder.Iftheyareno~thesequence
willbeterminated.Thesequencemustendwitha-WUL>(ASCIIOOh).Ifnovalues
aregivenbetweenthecESC>Bandthe@JUL>,thenallverticaltabpositionspreviouslysetwillbecleared.Printingwillstartonthe(cm+lth) lineinstandardmode,
andthe(cn>th)lineinIBMmode.
B cn~ ... <nl>
<nl>
cnl>
66
<n@ ...
Q@ ...
Both
<NuL>
OOh
00
41
Page 48

I Selectverticalform unit(VFU)channel
<ESC>
IBh 2Fh
27
I
47
cm>
a>
cm>
Both
Thecommandaboveselectsa VFUwithinwhichallsubsequent<VT>commands
willbeexecuted,wherem isabinaryvaluefromOto7. Differentsetsofvertical
tabscanbestoredindifferentchannels‘usingthe<ESC>bcommand,andselected
usingthiscommand.
[ SetVFUverticaltabs Both
<ESC>
b
IBh 62h
27
98 -an>
ThecommandabovesetsverticaltabsinsideaVFW,wherem istheVFUchannel
(0S-<7) (accessedby the <ESG / C- command),and subsequentabsolute
values(inlines)ofverticaltabs(accessedby thecVb command)arerepresented
by <n@ to <nZ>.Thesevaluesmustbe giveninascendingorder,otherwisethe
commandwillbe terminated.Thesequencemustend witha @JUL>(oOh).If no
verticaltab valuesaregivenbetweenthechannelnumberandthe @JUb, thenall
previousverticaltabpositionssetforthatchannelwillbe cleami.
<m>
cm>
<n(b ...
cd>
<n@ ... d>
O@ ...
al>
<NuL>
OOh
o
1
I Set reiativeverticaltab positions
L
<ESC>
IBh 65h
27 101
e 1
31h
49
<*
<m
<*
Both
Thecommandabovewillsetrelativeverticaltabpositions,where<n> isa binary
value givingthedistance in linesbetweenverticaltabssetby thiscommand.The
verticaltabssetbythiscommandaresubsequentlyaccessedbythecV’b command.
Allverticaltabspreviouslysetarecleared.InsteadoftheASCII“l”, thebinaryOlh
charactercanbe used.
42
Page 49

Settop margin
<ESC>
IBh 63h
27 99
Thecommandaboveset.sthetopmargin,whereaisabinary valuewhichspecifies
the”heightofthetopmargintothefmt printedlineinlines(atthecurrentlinepitch
setting).Printingwill starton the(*>+lth) lineon thepage.Subsequentchanges
tothelinepitchsettingwillnot affectthisvalue.
c
<*
<0
<m
Both
Set bottommargin
<ESC>
IBh 4Eh
27
Thecommandabovesetsthebottommargin,wherea> isabinaryvaluespecifying
thebottommargindeprhinlinesatthecurrentlinepitchsetting.Ifthepagelength
is reset (with the cESCX or <ESC>C<NUL>commands),the effect of this
commandwillbelost.Subsequentchangestothelinepitchsetting,however,willnot
affectthelengthsetby thiscommand.
N
78
<n
<n
<0
Canceltopand bottommargins
<ESC>
IBh 4Fh
27
I
Thecommandabove cancelsthesettingsfortopandbottommargins.Thereareno
parameters.
o
79
Set leftand rightmargins
<ESC>
I IBh
I 27 88
x
58h
<* <0
<?0
<0
<n
Both
Both
Both
I
I
Thecommandabovesets theleftandrightmargins,wherethe two valuesrepresentedby the<n>sare binarynumbersusedfor settingthe leftandrightmargins
respectively.Marginsare setatthe currenthorizontalpitch.
43
Page 50

I Set left margin
I<ESC>
Thecommandabovesetstheleftmargin,where“l” isalowercase“L”(not“one”),
and<o is a binaryvalueusedtosettheleftmargin.Themarginis definedinterms
of thenumberofcharacterpositionsatcurrentpitch.Ifproportionalspacinghasbeen
selected,then thecharacterwidthfor picapitchis used.Theleftmarginmaynotbe
closerthan two print positionsto the right margin,otherwisethis commandis
ignored.
1
I
I Set right margin
I <ESC>
I IBh
I 27
ICh
28
Thecommandabovesetstherightmargin,wherecn> isabinaryvalueusedtoset
the rightmarginincharacterspacesatthecurrentpitch.Ifproportionalspacinghas
beenselected,thenthecharacterwidthforpicapitchisused.
Q
51h
81
Q
51h
81
<m
<m IBM I
<m
<0
Standard I
Horizontalprintpositioncontrolcodes
[ Carriagereturn
I <CR>
I 13
Thecommandaboveperformsa
beginningoftheprintline.IfAUTOLFhasbeensetupwiththeMemorySwitches,
a linefeedwillbe performedaswill(atthecurrentlinespacing).
carriagerehun.Theprintheadwillreturnto the
Both
I
I
I
I
I
I
44
Page 51

Set/cancelautomaticlinefeed
<ESC>
IRh 35h <m
27 53
l%ecommandabovesetsorcancelsautomaticlinefeed,wherec- isabinaryvalue
ofeitherOOhorOlh.If<m=Olh,thenwhenevertheprinterreceivesa<CR>(ODh),
alinefeedwillautomaticallybeaddedbytheprinter.Ifcn>=OOh,thenthisfunction
willbecancelled.
5
<m
<n
IBM
I Moveto nexthorizontaltab
<I-In
I
09h
I
9
Thecommandabovemovestheprintheadtothenexthorizontaltabsetting.There
arenoparameters.Iftherearenohorizontaltabssetonthelinefollowingthecurrent
printposition,thiscommandis ignored.If underliningis on, then skippedprint
positionsarenotunderlined.
I Set/clearhorizontaltabs
<ESC>
IBh 44h cn(b
27
Thecommandabovesetshorizontaltabs,where-a@ andal> arebinaryvalues
representingthenewtabpositions.Ifnovaluesaregiven,alltab stopsarecleared.
Thedefaulttabsettingiseveryeightcharacters.Tabsaresetat thecurrentcharacter
pitch. If proportionalspacing has been selected, then pica pitch is used for
determiningthepositionsofthetabs.InStandardmode,oncethetabshavebeenset,
thepositionofthe tabswill remainthesameifthecharacterpitchischanged.In the
IBMmode,the tab settingswillchangerelativeto thenewcharacterpitchif the
characterpitchis changed.
D *b
67
*b
...
...
...
al>
<n]>
all>
Both
Both
<NuL>
OOh
o
I
45
Page 52

I
Restoretabs to defaultsettings
<ESC>
IBh
27
Thecommandaboverestoresalltabs(verticalandhorizontal)to defaultsettings.
Thereare no parametm. On receiptof thiscommand,allverticaltabsettingswill
becleared,andallhorizontaltabswillbereset to everyeighthposition,startingat
column9.
R
52h
82
Set relativehorizontaltab positions
<ESC>
IBh
I 27 101
The command above sets horizontaltabs, where -> is a binary value. On
receiptof this command,allhorizontaltabswillbe cleared,andnewonesinserted
every<n> characters.Thesehorizontaltabscan be accessedwithan c- corn.
mand.
e
65h 30h
o
48
<*
<m
‘cm
Set horizontalprintposition
<ESC>
IBh
27
f
66h 30h
102
o
48
<0
<n
<*
IBM
Both
Both
1
I
Thecommandabovesetsthenexthorizontalprintposition,where-> isabinary
value.Thenexthorizontalprintingwilltakeplacecn> characterspaces(atcurrent
print pitch)fromthecurrenthorizontalprintposition.
46
Page 53

I Setjustificationmode
L
<Esc>
IBh
I 27 97
a
61h
<?0
<w
<m
Both
The commandabove will set thejustifkation mode in whichthe printerprints
receiveddata,where-> isabinaryorASCIIvalueintherangeOOh(or’’O”)through
02h(or“2”).Themeaningsof thesevaluesare shownin thetablebelow:
I
Value
Meaning
Thedefault(whentheprinterisf~stturnedon) isleftjustifkation.
Producecharacterspace
<ESC>
IBh 20h
I 27 32
<s>
<?0
<*
<0
Standard
Thecommandabove producesa spacecharacter,where cSI% istheASCIIspace
character(20h),anda> isabinaryvaluefromOthrough127givingthe spacewidth
indots.Whenindraftmode,thedot spacingis1/120inch,andwheninNLQ,thedot
spacingis 1/240inch.If in superscriptor subscriptprinting,thedotspacingisthe
sameas above,butifinexpandedmode,theresolutionis halfthe above.
Selectnexthorizontalprintposition(by dot) Both
<ESC>
$
IBh 24h Cnb al>
27
36
<nib
*b
Cnl>
al>
I
Thecommandabovewill startsubsequentprintingat a horizontalpositiondeter-
minedly dot spacing,where~ andd> aretwobinarynumbers(lowbytefirst)
specifyingthenumberof dots(at 1/60 inchspacing)by whichtheprinthead will
movetothe rightfromtheleftmargin.IfthesubsequentpMt positionisbeyondthe
right margin,thenprintingwillstartattheleft margin.
47
Page 54

I
I Moveprinthead
<ESC> \
Cnb
IBh 5Ch Cnb
27 92 Cnb
<FS> \ d>
ICh
/ 28
5Ch
92 Cn(b
Thecommandabovemovestheprintheadrelativetothelastprintposition,where
o~ andcnl> aretwobinarynumbers(lowbytefwst)specifyingtheamount(in
inches)by whichtheprintheadwillmove fromthelastprintposition.Thenumber
representedbytheparameterssignifiesmove~entinl/120thsinch.Apositivevalue
willmovetheprintheadtotherighgandanegativevaluewillmoveittotheleft.See
“NumericalRepresentation”forderailsofhownegativevaluesarerepresentedin
thisway.
ad> Standard
al>
d>
IBM
-all>
ad>
Downloaded charactercontrolcodes
CopystandardROM font intoRAM
<ESC> <NLJb <*
IBh
27
3Ah
58
OOh
0
<*
<?0
<FS> <NUb <0
ICh
3Ah
28 58 0
OOh
<0
<m
Thecommandabovecopiesthecharactersfromtheselcctcdcharactersetwitha>,
asshownbelow,into thedownloadRAMarea.<NUb is theASCIIcharacterOOh.
Thiscommandis only valid if “DOWNWARD”has been selectedin theRAM
USAGEmenuoftheMemorySwitch(seeChaptcr3fordetails).Allcharactersfrom
20htoFFharecopied.Regardlessofthecharacterse~thecharacters80hto9Fhare
copied.However,theblockcharactersofthe IBMcharacterset(BOhthroughDFh,
F4handF5h)arecopiedasspacecharacters.
e~Standard
OOh
o
<NuL>
OOh
o
IBM
I
I
48
Binary
Value
OOh Courier
Olh
02h
03h
Selected
Sanserif
Letter-Gothic
orator
font
Binary
Value
04h
05h
~h
07h Cinema
Selected font
Script
OCR-B
‘lW-Light
Page 55

I
Definedraft downloadcharacter(s) Both
<ESC> & <NUb <cl> <C2> C*
IBh
27 61 0 <d>
I
Thecommandaboveenablesthedefinitionof“soft’’charactersto be downloaded.
Thiscommandis only valid if “DOWNLOAD”has been selectedin the RAM
USAGEmenuoftheMemorySwitch(seeChapter3fordetails),andthedraftmode
hasbeenselectedbefore thiscommandisexecuted.
Thefollowingrulesareobsexved.<cl> andec2> arebinaryvalueswhichdetermine
thecharacterrangewhichwill be replacedby downloadeddata.For instance,if
<cZ>=20handcc2>.30h, allcharactersfrom20hthrough30hwillbeoverwriuen
bythedownloadeddata.Ifadownloadedcharacterisstoredinthearea80hthrough
9Fh, it can only be printedin the characterset #2 mode.It is possibleto store
downloadedcharactersin the part of rhe characterset reserved for
graphics(BOhrhroughDFh,F4handF5h),butthesecharacterscanonlybeprinted
whenthestandardcharactersethasbeenselected.
Eachcharacterisdefiiedby anattributebyte(cn>)and11databytes(dl> ...<A>).
Theattributebyte,en>,indicateswhetherthecharacterisanaseender(notusingthe
lowestof thenineverticaldots)or a descender(notusingthehighestdot).Italso
indicatestheamountofwhitespacetotheleftofthechamcter(Oto 7 dots),andthe
widthofthecharactercell,includingthisspace(4to 15dots).Theleftspaceandcell
widthattributesareusedonlyin proportionalspacing.
3Dh OOh
<cl>
<C2> <?0
<C2> <m’
cdl> ...
‘4> ...
4> ... cdn> I
~n>
ain>
IBM block
Eachdatabyteindicateseightverticaldots,withtheMSBbeingthetopdotandthe
LSB thebottomdot.Thesecorrespondtopins 1 to 8 or 2 to 9 of theprinthead,
deWndingonwhetherthecharacterisanascenderordescender.
49
Page 56

Definedraft downloadcharacter(s)
<ESC> =
al> 4> <DC4> cm> d> cd> cdl> ... 411>
IBM
I IBh 3Dh cd> 4> 14h cm> cal> cd> ail> ... 42>1
27 61 al> 42> 20 -> al> cd> 41> ... 411>
Thecommandaboveenablesthedefinitionof “soft”charactersto bedownloaded.
Thiscommandis only valid if “DOWNLOAD”hasbeen selectedin the RAM
USAGEmenuoftheMemorySwitch(seeChapter3fordetails),andthedraftmode
hasbeenselectedbefore thiscommandisexecuted.
The followingrulesare observed.cnl> and d> give the numberof bytes of
characterdata that will follow.cm is the charactercode of the frostcharacter
defined.al> andCU2>areattributesbytes.’<all>tocdll> are thecharacterdata,
andare thesameasincESC>“&”. Theatrnbutebyted> indicateswhetherthe
characters anascender(notusingthelowestofthenineverticddots)ora descender
(notusingthehighestdot)andwhetherithasa downwardextensionto 12dots.
Theatrnbutebyted?> givesproportional-spacinginformation.Bit7 is ignored.
Bits4to6 specifytheoffsettothefwstbyteprinted(Oto7),enablingleadingspaces
inthecharactertobeignored.BitsOto3specifythewidthofthecharactercell(maximum 11dots).The characterwillbe followedby a mandato~ blankdotcolumn
whichis notincludedin thiswidth.
Charactersdefinedby thiscommandcanbeselectedby cESb % 1,cESC> 14,
cESC>15,orcESC>16.
DefineNLQdownloadcharacter(s) Both
<ESC>
Cal> d>
&
I IBh 26h
ICal>
27
d>
38
Cal> cd>
<NUb
<*
OOh
<*
0
<m
<cl>
...
ccl>
...
ccl> <C2>
...
Thecommandaboveenablesthedefinitionof “soft”characterstobedownloaded.
Thefollowingrulesareobserved.<cl> andec2>arebinaryvalueswhichdetermine
thecharacterrangewhichwillbe replacedby downloadeddata.For instance,if
ccZ>=20handec2>=30h,allcharactersfrom20hthrough30hwillbeoverwritten
bythedownloadeddata.Ifa downloadedcharacterisstoredinthearea80hthrough
9Eh,it can onlybe printedin the characterset #2 mode.It is possibleto store
downloadedcharactersin the part of the characterset reservedfor IBM block
50
<C2>
‘C*
<C2>
<0
<0
cab
cab
-b
Page 57

graphics(130hthroughDFh,F4handF5h),butthesecharacterscanonlybeprinted
whenthestandardcharactersethasbeenselected.
a~, <al> andca2> areattributebytes, settingthestartingdotcolumn,printable
width(in dots),andendingdotcolumnrespectively.
Theverticaldefinitionofthecharactersis 18dots.Eachbytethereforerepresentsa
third of the verticaldefinition.If co bytes am requiredfor a character,the
arrangementofthesebytesisasfollows(wherethebytenumbersarerepresentedby
decimalnumbers,startingatO),andthctotalwidthofthecharacterhasbeendefined
bytheparametercal>:
Bit
1St
Byte
??nd
B}’le
6
“1-i
5
4
3
2
1
0
B
3rd
Byte
51
Page 58

Selectdownload/standardcharacterset Both
<ESC>
IBh 25h
27
Thecommandaboveselectseitherthestandardordownloadedcharacterse~where
cn>isabinatyvalue(OOhorOlh)oranASCIIvalue(“O”or’’l”).Ifcn> equalsOOh
or“O”,thestandardcharactersetisselected.Thisis thedefaultvalueat power-on.
IfOlhor“l” hasbeenselected,thenthedownloadedcharactersetisselected.
%
37
<m
<*
<0
Graphics
Thefollowingcommandsrelatetothegraphicalcapabilitiesoftheprintex(bitimage
mode).Allbit-imageprintingis carriedoutasrastergraphics(iedatais acceptedin
blocks,andthenprintedas adjacentlinesofgraphicsonedotwide).
I
Select-bitimagemode
<ESC>
...
IBh
... dt>
27 42
...
I
Thecommandaboveselectsoneof thegraphicmodesavailableontheprinterand
printsgraphicdata,where-is abinaryvaluerepresentingthegraphicsmode(see
tablebelow),and<nb andcnl>arebinary values(lowbytefirst)givingthenumber
of graphicdatabytesfollowing(as representedby dO> ... <tin>).The actual
numberofdatabytes variesaccordingtothegraphicmodechosen.Thenumberof
databytes is equalto thenumberof graphiccolumnstQbeprinted.
[Graphicprintmodes]
CfrD
* Adjacentdotsarenotprintablein thismode.
Mode
0 Single
1 Double
2 High-speeddouble* 120
3 Quadruple
*
CA>
2Ah
dn>
m> -b
cm> -07
m> -aO> CnI>
DPI
60
120
240
urc-
Mode DPI
4
CRTI 80
5 Plotter 72
6 CRTH
7
Doubleplotter 144
<nl>
otl>
Both
Cdb
db
-do>
90
I
52
Page 59

~elationship ofbitnumbertodotposition]
Whentheprinterisprintingbit-image&ta, therelationshipof dotsto pinsusedis
asfollows:
Pin number
;
3
4
5
6
7
8
9
Qzl
Select8-dotnormaldensity
<ESC>
IBh
27 75
K Cnb
4Bh
*b
Cnb
Bi[
number
7
6
5
4
3
2
1
0
Both
-all> db ... cdn>
d>
Cnl>
Ufb ...
Cdb ...
cdn>
cdn>
Thecommandaboveselects8dot normaldensitybit-imageprinting,where<n@
andcnl> are binaryvalues(lowbytefrost)representingthe numberofdatabytes
followingthecommand.The databytes are representedby d(b ... dn>. This
commandhasthesameeffectas <ESG * O.
[ Select8-dot doubl-density
<ESC> L Cnb al> db ...
IBh
L
27 76 ab
4Ch Cnb d> d-b ...
d> Cd_b ...
Both
cdn>
dn>
cdn>
Thecommandaboveselects8-dotdouble-densitybit-imageprinting,wherecnb
and<nl> arebinaryvalues(lowbytefwst)representingthenumberofdatabytes
followingthecommand.The databytesare representedby cdtb ... ==zfn>.This
commandhasthesameeffectas <ESG * 1.
53
1
1
Page 60

I Select8-dotdouble-speeddouble-density
<Esc>
I IBh 59h cnb
27 89 Cnb
l%ecommandaboveseleas 8-dotdouble-speed,double-densitybit-imageprinting,
wherec@- andcnl> arebinaryvalues(lowbytef~st)representingthenumberof
databytesfollowingthecommand.Thedatabytesarerepresentedbycdb... <d-.
Thiscommandhasthesameeffectas cESC> * 2.
Y
2
all>
Cnl>
Qll>
Clib ...
db ...
d(b ...
Both
C&>
cdn>
cdn>
Set 8-dot quadruple-density Both
<ESC>
I IBh 5Ah cn~
I 27 90 ~(b
Thecommandaboveselects8-dotquadruple-densitybit-imageprinting,where
cn~ and”cnl>arebinaryvalues(lowbytefrost)representingthenumberofdata
bytesfollowingthecommand.Thedatabytesarerepresentedby cd~ ... cdn>.
ThiscommandhasthesameeffectascESC> * 3.
z
Cn(b Qll> Qo ... cdn>
<nl>
Cnl>
<d& ...
Qi(b ...
-ain>
cdn> I
i
I
I
[ Redefinebit-imagemode
<ESC>
I
IBh
27
Thecommandaboveredefinesabit-imagemodeto anothermode, wherecm@ is
themodeto be redefined.ThismaytaketheASCIIvalues“K”, “L”,“Y”or“Z”.
cml> isa binaryvaluerepresentingthemodetowhichcmb isredefined,beinga
value used after the cESC> * command(Othrough 7). If any of the modes
representedby<m@ are subsequentlyselected,bit-imageprintingwillnowtake
placein themodeas definedbyml>.
?
3Fh Cml>
63 Cml>
cd>
Select9-dotgraphics
<ESC> A
IBh 5Eh cm>
I 27 94 un> Q(b =W> cd(h ... -dn> I
Thecommandaboveselectsthe9dot bitimagemode,wherecm isa binaryvalue
representingthe graphicsmode(seetablebelow),and cnb and cnl> arebinary
54
a> UIO>
<n(b
Cnl> cdlb ... .ain>
all> db ... cdn>
Both
Standard
1
Page 61

values (low byte f~st) giving the numberof graphicsdata bytes following(as
representedby ~ ...
-do). The numberof data byte is twicethenumberof
graphicscolumnstobeprinted.
Miscellaneouscodes
The followingcommandsdo not relate specificallyto graphics,but have more
generalapplications:
I Set MSBto 1
<ESC>
IBh 3Eh
-27 62
Thecommandabovesets theMSBto 1.Therearenoparameters.Onreceiptofthis
command,themostsignificantbit(MSB)ofsubsequentdatawillalwaysbesetto
1.
Set MSBto O
<ESC>
IBh 3Dh
r
, 27 61
<FS>
ICh
t
>
=
=
3Dh
Standard
IBM
>
Thecommandabovesetsthe MSBtoO. Therearenoparameters.Onreceiptofthis
command, themostsignificantbit (MSB)of subsequentdatawillalwaysbe set
too.
55
Page 62

I CancelMSBcontrol
IcESC>
IBh
27 35
ThecommandabovecancelssoftwarecontroloftheMSB.Therearenoparameters.
Onreceiptof this command,softwarecontrolofthemostsignificantbit(MSB)by
the<ESC>>,<ESC>=(standard)ordYi>=(IBM)commands,willbecancelled.
#
23h
Both I
I
I Selectzerostvle
1
<ESC>
IBh 7Eh
27 126 <w
Thecommandaboveselectsthestyleinwhichzeroeswillsubsequentlybeprinted,
where<n>iseitherabinaryvalueofOOhorOlhor anASCIIvalueof“O”or “l”. If
o> is OOhor“O”,rhen“normal”(non-slashed)zeroeswillbeprinted,butifitis Olh
or“l”, thenthe“computer-style”(slashed)zerostylewillbeprinted(thisoverrides
theMemorySwitchsetting,inChapter3).
<0
<?0
Both
Backspace Both
cBS>
The commandabove moves the print head back one position.There are no
parameters.This commandmoves the print head back one position(at current
spacing)to theleft.Ifproportionalspacinghasbeenselected,theprintheadwill
movebackbya distanceequal tothewidthof thelastcharacterprinted.Itdoesnot
deletethelast character.
( Cancellastcharacter Standard
!<DEL> I
7Fh
127
I
I
I
Thecommandabovedeletesthelastcharactertransmittedtotheprinter.Thereare
noparameters.Thiscodeis effectivelya destructivebackspace.
56
Page 63

[ Cancellast line
Both
<CAN>
18h
24
Thecommandabovedeletesthelastlinetransmittedtotheprinter. Thereareno
parameters.Thelastlinetransmittedtotheprinterwillbeerasedfromtheprinter’s
buffer.
1
I
Set printeroff-line
<DC3>
Standard
I 13h
I 19
Thecommandabovesetstheprinteroff-line.Thereare noparameters.Thiscom-
mandisnotequivalenttopressingthe .
printerison-line,as afterthecDC3>commandhasbeenreceived,theprinterwill
ignoreanydatatransmittedto i~exceptforthe cDC1>command(below).
Set printeron line
<Del>
llh
Thecommandabovesetstheprinteron-lineaftera<DC3>command(above).There
arenoparameters.
Deselectprinter(1O“carriagemodelonly) IBM
<ESC>
IBh
27
Q
51h
81
<ETX>
ONLINE buttonon thefrontpanelwhenthe
Both
03h
3
I
I
Thecommandabovedeselectsthe printer.Therearenoparameters.Thiscommand
willdeselecttheprinter,forcingittodisregardalldataandcommandcodesuntila
<DCl> (1Ih) commandisreceivedtoputtheprinterbackon-line.Thiscommand
appliesonlytothemodelofprinterequippedwitha 10”carriage.
57
Page 64

Deselectprinter(15” carriagemodelonly)
<ESC>
IBh
27
Thecommandabovedeselectsthe pMter. There arenoparameters.Thiscommand
willdeselecttheprinter,forcingittodisregardalldataandcommandcodesuntila
cDCI> (1lh) commandisreceivedtoputthe printerbackon-line.Thiscommand
appliesonlyto themodelofprinterequippedwitha 15”carriage.
Q
51h
81
<SYN>
16h
22
IBM
I Soundbuzzer
<BEb
07h
7
Thecommandabovesoundstheprinter’sbuzzer.Therearenoparameters.
Both
I Disablepaper-outdetection Both
<ESC>
IBh
27
The command above disablesthe printer’spaper-outdetection.There are no
parameters.ThisoverndesthesettingmadebytheMemorySwitchSettings(Chapter
3).
8
38h
56
Enablepaper-outdetection Both
<ESC>
IBh
27
The commandabove enables the printer’spaper-outdetection.There am no
parameters.ThisoverridesthesettingmadebytheMemorySwitchsettings(Chapter
3).
9
39h
57
I
58
Page 65

I Enable/disablebidirectionalprinting
i cESC> u
Both
I
I 27 85
Thecommandaboveenablesordisablesbidirectionalprinting,wherea> isabinary
valueofeitherOOhorOlh oranASCIIvalueofeither”O”or’’l”.If<n>is settoOOh
or “O”,thenbidirectionalprintingwillbe performed,andif it is Olhor “l”, then
unidirectionalprintingwillbeperformedsubsequenttothereceiptofthiscommand.
If the Memory Switch setting has been made for bidirectionalprinting, this
commandwillbe ignored.
] Enableunidirectionalprintingfor one lineonly
I<ES
-c>
IBh 3Ch
<
<m
Both I
I 27 60
Thecommandaboveenablesunidirectionalprintingforonelineonly.Thereareno
parameters.Printingwill be performedfromleft-to-rightforthecurrentlineonly.
Definemacroinstruction
<ESC>
IBh 2Bh
27
Thecommandabovecancelsanyexistingmacroinstructionandreplacesitwiththe
definedinstruction.Thedefinedmacro instructionconsistsof the charactersbetweenthe’’+’’andcRS>.‘fhesecanbeanyprintablecharactersorcontrolcharacters
exceptcRS>, uptoa maximumof 16characters.
43
+
cdl> ...
Cdl> ...
41> ...
.dn>
cdn>
-ah> 30
<RS>
IEh
Both
I
I
I Execute macroinstruction
<ESC>
IBh 2Bh
27 43
Thecommandaboveexecutesapreviouslydefinedmacroinstruction.
+
<NUb
OOh
0
Both I
59
1
I
Page 66

I
Enable/disablelargecharacterprinting
<ESC> h
IBh 68h
1
I 27
Thecommandaboveenlargeswholeor partofcharacters,orcancelssuchenlargemen~where<n> isa binaryvalueof OOhthrough06h or an ASCIIvalueof “O”
through“6”.
<n>
104
Effect
<m
<m
<m
Both
1
I
Olh,“l” Double-high,double-wide
02h,“2” Quadruple-high,quadruple-wide
03h, “3” Double-high,double-wide(Lowerhalfonly)
04h, “4” Double-high,double-wide(Upperhalfonly)
05h,“5”
1
06h,“6”
Itisthe user’sresponsibilitytoalterthe Iinepitchsothatitisinaccordancewiththe
newcharacterheigh~andtoproducea linefeedat thenewpitchin orderto leave
sufficientspaceforthenewcharacters.Iftherearedifferentsizesofprintonthesame
line,the printingwillbealignedalongthetopofthecharacters.Anypreviouscommandsforenlargement(verticalorhorizontal)ofcharacterswillbecancelledbythis
command.
Quadruple-high,quadruple-wide(Lowerhalfonly)
Quadruple-high,quadruple-wide(Upperhalfonly)
I
I Enabie/disabiedoubie-heightmode
<ESC>
IBh 77h
I 27
The commandaboveenablesor disablesdouble-heightprinting,whereco is a
binaryvalueofeitherOOhorOlh oranASCIIvalueofeither“O”or’’l”. If<n>isset
toOOhor“O”, thendouble-heightprintingiscancelled.If <n>isset toOlhor “l”,
thendouble-heightprintingisenabled.Thecharacterwidthis unaffected.It isthe
user’sresponsibilitytoalterthe linepitchso thatitisinaccordancewith thenew
characterheight,and to producea line feed at the new pitch in order to leave
sufficientspaceforthenewcharacters.Iftherearedifferentsizesofprintonthesame
line,theprintingwillbe alignedalongthebottomof thenormal-sizedcharacters.
Anypreviouscommandsforverticalenlargementofcharacterswillbecancelledby
this commrmd.
60
w
119
<*
<0
<ID
Both
I
I
1
Page 67

Selectcharacterheight,width,linespacing
<ESC> [
IBh 5Bh
@
40h -b cd> OOh OOh crt2> cn.3>
27 91 64 -b 4>
C?lLb <d> <NUb CNUb Cn2> 4>
0 0 C?L?> Cn.b
Both
Thecommandaboveis usedto controlcharacterheighgwidthand line spacing,
wherecnb andcnl> (lowbytefnt) ate usedtosupplythenumberofsubsequent
databytes (1 or2).Theeffectof thetwodatabytes(d> and<rd>) isdetermined
asfollows:
d>
1
2 Double-heightcharacters
16 Sinzle line feed
17 ]Single line f~ single-heightcharacters
18 Single line fed double-heightcharacters
32
33 ]Doublelinef~single-heightcharacters I
34
AnY othervaluesINo effect
Cn3>
1
2 IDouble-widthcharacters
AnyothervaluesINo effect
ISingle-heightcharacters
I
]Doublelinefeed
IDoubleline fed double-heightcharactersI
\Single-widthcharacters
1
I
I
I
I
I
Anysuperscript/subscriptorcondensedmodeprintsettingspreviouslyselectedwill
be cancelled,butif double-heightprintingis cancelled,the printerwillreturnto
superscriptlsubscriptorcondensedmodeprinting,ifthesewereselectedpreviously.
Anypreviouscommandsforverticalcharacterenlargementarecancelledby this
command.Ifdouble-heightandnormal-sizedcharactersareprintedinthesameline,
thentheprintingwillbe alignedalongthebottomofrhenormal-sizedcharacters.
61
Page 68

Set/cancelimmediatemode
<ESC>
IBh
I 27
Thecommandaboveselectsorcancelsthe“immediate”printmode,wherecn> is
abinmyvalueofeitherOOhorOlhoranASCIIvalueofeither“O”or“l”. If<n>is
settoOOhor“O”,thenimmediateprintingiscancelled.If~ isset toOlhor“l”,
thenimmediateprintingisenabled.Inimmediateprintmode,eachcharacterissent
straighttotheprintheadas itisreceivedfromthehostcomputer(unbuffered),and
thepapermovesup so thatitispossibleto read whatisonthepaper,similar to a
typewriter.
i
69h
105
<*
<m
<*
Both ]
I
I
~Reset
I<ESC>
IBh 40h
27 64
Thecommandaboveresetstheprinter.Themarenoparameters.Onreceiptofthis
command,thebufferiscleared,andallsettings(withthefollowingexceptions)are
restoredtotheirpower-upvalues.
● ASFsettingsmadewiththecESC>EM command
“ Panelmodesettings
@
ASF(AutomaticSheetFeeder)control
<ESC> <ENb <m
IBh 19h
27
25 <*
<#
Both
Both
1
I
62
Page 69

Thecommandabovecontrolstheoperationof theASF,wherecEIkb istheASCII
code19h,and<O maytakethebinaryvaluesOOhor04hor theASCIIvalues“R”
or“T”.Theeffectof tkesevaluesissummarizedbelow:
Value Effect
OOh Select manualmode
I 04h I Selectautomode
“R”
“T”
r
Thesecommandswillbe ignoredif theASFhasnotbeenselected.
Ejectpaper
Set top printposition. This parametermustbe
followed by anotherbinaryvalue (>1) signifying the distance (in 1/6 inch units) at which
printingshouldstartbelow thetopof thepaper.
ASCIIcommandsequences
Themrnmandabovesequencesarenotprecededbya cESG orcFS>character,but
insteadamprecededbydoubleparentheses,thus’’((”.Theyapplyequallytoboththe
standardandtheIBMemulationmodes.Theyaregivenbelow:
I Selectfont
( (
28h 28h
I 40
Thecommandaboveselectsafon~wherecn> is artASCII valuewhichmaytake
thefollowingvalues:
40 70
C?P Effect
4’..
0 Courier
t “1”
I Sanserif I “6”
44 . .
2 Letter-Gothic
“ ..
3 orator
I “4” I Script I
F
46h 29h 29h
,, ?.
“7”
,, ..
) )
41 41
5
TW-Light
Cinema
Draft
9
+
Both
<*
<m
<?0
63
I
Page 70

Select/cancelitalicmint Both
28h 28h 49h 29h 29h <#
40
Thecommandaboveselectsorcancelsitalicprinting,where cn> isanASCIIvalue
whichmaybeeither“l” or“O”.Anyothervalueswillbeignored.If->= “l” then
italicprintingisenabled,andifcm = “O”, thenitalicprintingiscancelled.
40 73 41 41 <0
Select/cancelboldprint Both
(
28h 28h 42h 29h
40 40
Thecommandaboveselectsorcancelsboldprinting,wheree~ isanASCIIvalue
whichmaybeeither”l” or’’O”.Anyothervalueswillbeignored.If<~ =“l” then
boldp;nting isenabled,andifm> =
(
B
66
“O”,thenboldprintingiscancelled.
)
41 41 <*
)
29h
<m
<m
I Selecticancelunderline Both
(
I
28h
40 40 45
(- ) )
28h 2Dh 29h 29h <0
41 41 <m
<*
Thecommandaboveselectsorcancelsunderlining,whereen> isanASCIIvalue
whichmaybe either“l” or“O”.AnyothervalueswillbeignoredIf~>=”1” then
underliningis enabled,andif en>=’’O”,thenunderliningiscancelled.
I Sekcffcancel expandedprint
( (- -s
28h
40
Thecommandaboveselectsorcancelsexpandedprinting,where<n isanASCII
value from“O”through“3”.Theeffectof cn> is givenin thetablebelow:
64
28h
40
53h
83
) )
29h 29h
41
41
Both 1
<*
<m
<m
Page 71

“l” I Double I Normal
“2” I Normal ] Double
“3” I Double ] Double
I Selectcolorprinting(withcoloroptiononly) Both
t (
(
28h 28h 43h
40 40
c
67
) )
29h
41
29h <*
41 <*
Thecommandaboveselectsthecolorto beprintedwhenthecoloroptionisfitted,
wherea> is artASCIIvaluefrom“O”through“6”.Thecolorselectedby <n> is
shownin thetablebelow:
- Color
,’ !!
o
Black
‘, ,?
1 Red
‘, ..
2 Blue
Violet
“3”
“4” Yellow
Orange
“5”
., .,
Green
6
<)0
ControlASF
( (
28h
40
28h
40 <m
<?0
<0
)
29h
41 41
29h
)
1
1
ThecommandabovecontrolstheASF(AutomaticShmtFeeder),where<n>isan
ASCIIparameterwhichcantakethevalues O
“ “,’’4’’,’’R’’or’’T”.Thiscommandhas
exactlythesamefunctionastheESC<Ehb command.
65
Page 72

66
Page 73

chapter 5
DIPSWITCHES
ThebankofDIPswitchesinsidetheprinter(seeillustrationbelow)is used
forvariousfunctions.AllswitchesaresetONwhentheprinterleavesthe
factory.
-“”’’’’’”’’”
Accesstheswitchesbyremovingthetopcover,andthenslidingtheblack
switchcoverto the left and thenpullingup, usingthe tab at the right, as
shownin the illustrationabove.
Thefunctionsoftheswitchesareshownin thetablebelow:
Switch
1,2 Emulationandchancter set
3 Pagelength 11inches 12 inches
4-7 Internationalcharacterset See tablebelow
8 Not used LeaveON
NOTE
AnychangestotheDIPswitchsettingsmustbe madewiththe power
to the printerturnedOFF.
Function
ON I OFF
See tablebelow
Page 74

Switches1and2 areused to determinethe emulationmode (standardor
IBM)of theprinter,and alsoto determinethecharactersetto be used.
Switch
11 /2
I ON I ON I Standard
ON
OFF
i OFF I OFF I IBM
I Emulation I CharacterSet I
1
STDf
OFF Standard IBM#2
ON IBM
I
IBM#2
IBM#l
/1 I
I
Switches4 through7 are usedto selecttheInternationalcharacterset, as
shownin the tablebelow:
Switch
4
ON ON
OFF ON
ON OFF
OFF OFF
ON ON OFF
OFF ON OFF
ON OFF OFF
OFF
ON ON
OFF ON
ON
OFF
ON ON OFF OFF LatinAmerica
OFF ON OFF OFF Denmark/Norway
ON
OFF OFF OFF OFF Not uaed
5
OFF
OFF
OFF
OFF
6
ON
ON
ON
ON
OFF
ON
ON OFF
ON OFF DenmarkII
ON OFF spain II
OFF OFF Irish
7
ON
ON
ON
ON
ON
ON
ON
ON
OFF Japan
InternationalCharacterSet
USA
France
Germany
England
DenmarkI
Sweden
Italy
SpainI
Norway
68
Page 75

&ipter6 TROUBLESHOOTING
ANDMAINTENANCE
Thefollowingsectionontroubleshootingandmaintenanceisintendedonly
Mabriefguideto thesefunctions.Rememberthatyourprinteris a highly
sophisticatedelectronicdevice,whichalsocontainshigh voltagesinside.
Forthat~ason, onlycarryoutthoseoperationsdescribedin thissection.
CAUTION
Anyattempttocarryoutoperationsotherthanthosedescribedheremayresultin
electric
maintenance,alwaysfollowtheinstructionscarefully.
TROUBLESHOOTING
Yourprinteris a tdiable pieceof precisionmachinery,whichshouldnot
causeyouanytmttble,provideditisusedandtreatedsensibly.However,the
few elementarytipsbelowshouldavoidyou havingto make unnecessary
servicecalls.Thefollowingtablegivesyouideasonwhereto lookinthis
sectionif youexperiencefaults:
shockand/ordamageto theprinter.Whencarryingoutanyrepairsor
Regionoffault
Power supply
Printing
Paper feeding
Description
Poweris notbeing suppliedto theprinter
Theprinterdoes notpringorstopsprinting
Themintis faintoruneven
Dots aremissing incharactersorgraphics
Whileusingapplicationsoftwsre,fontsorcharacterscannotbeprinted
Theprintoutis not whatis expected whenrunningaprogram
Single sheets donotfeed properly(withoutASF)
ContinuousDauerdoes notfeed moxrly with thetractorfeed
The ASFisnotoperatingorisnotfeedingpaperproperly
Psperpsrk(switchingbetweencontinuouspaperandcutsheets) is not
workingproperly
Theshorttear-offfimctiondoes not work
Text is beingprintedallonone line, or withextrablanktines
Pagelengthandmarginsettings arenot whatis expected.
Remember-itisbetternotto attemptoperationsorrepairsaboveyourlevel
of competence.Otherwise,yourunthe risk of damagingtheprinter.
69
I
Page 76

Powersupply
If the POWERindicatordoesnotilluminate, checkthe following:
Check Possibleremedy
Is the power cable properly
plugged into the electrical cormec@ andthenturntheprinterbackon.
outlet?
Is power being supplied to Turnoff the printer,unplug i~ and try with another
theoutlet? appliancetodetermineifelectricityis being suppliedto
Istheprintervoltagecorrect?
Turnoff theprinter,ensurethepowercableis securely
thatoutlet.
Checkthebottompartelofyourprintertoensurethatthe
outletvokagecorrespondstothevoltagerequiredbythe
printer.If theydonotmatch,DONOTtrytooperatethe
printer.contact yoursupplier.
Printjng
If yourprinterdoesnotprint,or suddenlystopsprinting,checkthefollowing:
Check
Is the interface cable con- Checkbothends of thecable - printerandcomputerto
nectedsecurely? make surethatthe comector is ftiy in position.
Is theON
minated?
LINEindicatorillu-
Possibleremedv 1
Eit is n@ press the ONLINE
line.
bUttOn to 5(3 theprinteron-
Is the PAPERindicatoritlu- If it is, thepaperhas nm out.Loadmorepaper.
minated?
Is thepapercaughtup inter- Turnoffthepower,removethejammedpaper,replace,
nally?
Is the ribbon caught up Turnoff thepower,removethenbbon,retensionit,and
aroundtheprinthead? replaceit-This problemoccursmostfrequentlywitha
Isthesoftwareyou areusing
properly installed for your installifnec+xsary.
Orinter?
Cantheprinterperformself- Turntheprinteroff, andturniton again,holdingdown
testoperations? oneof thebuttonstoperformaself-test. If thesedo not
tumontheprinter,andcondnueprindng.Makesurethat
theleadingedge of thepaperis smoothandm-creased.
wornribbon.so voumayneed toreplacetheribbon.
Checktheinstallationsettingsinyoursoftware,andre-
work,contactyourdealer.
70
Page 77

If the printisfaint,or uneven,checkthefollowing:
Check Possibleremedy
Is the ribbon properly in- Checkandreinstallif necessary.
Stalted?
Is theribbonwornout?
The ribbonhas a long life, but eventually will need
replacing.Fitanew ribboncartridgeif necessary.
If dots aremissingin theprinting,checkthe following:
Check
Are dots missing at random
in theprinting?
Isa lineofdotsmissingconsistently throughout the
printing?
Possibleremedy
Theribbonhasbecome slack causing it to get caught
up. Stopprinting,remove the ribboncartridge,retension andreplaceit.
Theprintheadis damaged.Stopprinting,and contact
yoursupplierfor anewprinthead.
If your applicationsoftwarecannotprintthe fontsor charactemselected,
checkthe following:
Check Possible remedy
Is yourapplicationsoftware
pr@rly ‘titalled?
Are fontsnotbeingselected Check the software installation andinsert the com-
I properly?
Are characters other than
those
printed?
expected being
Checkthesoftwareinstallation+andre-installthesoftwareif necessq.
I mandsnece.ssaryforfontchanges intothesoftware.
Eitheryou areusingthewrong InternationalCharacter
Set (resetwithDIP switches orsoftwarecommands),
or you have the wrong characterset selected (for
example if charactersother thanIBM block graphic
charactersare being printed). Correctthis with DIP
switches ortheappropriatesoftwaresequences.
If the printoutis not whatis expected:
I Check
Is the printer installed correctly?
Is the printer not printing
anythingthatyouareexpect-
ing?
I Possibleremedv
Yoursoftwaremay thinkthatit is drivinga different
emulationtotheone actuallvset.ChecktheDIPswitch
settingstomakesureyou havetherightemulation.
Use theHexDunmmodeto analvzetheouhmtfromthe
computerto thep%nter.This will enable you to determine that the right escape sequences, etc are being
transmitted.
.
71
Page 78

Paperfeeding
If cut sheetpaper (withoutthe ASF) is not feedingsmoothly,check the
following:
Check Possibleremedy
Is the paper release lever Set therelease lever to the ~ psition. -
pushedback (to the ~ position)? .
Is the paper guide in place The paperguide should be in place vertically for cut
andvertical? sheets to feedsmoothly.
Aretheleft andrightguides If theleft andrightguides aretoo close together,the
tooclose together? paperwill not feed smoothly.Move themalittle further
apt to Now thepapertofeed freely.
Is the ASF selected withthe If it is, thendeselect it.
MemorySwitch settings?
Areyoutryingto feed paper Youcanonlyfeedpaperin thiswaywhen theprinteris
usingthefrontpanelbuttons off-line. Set theprinteroff-line and thenfeedpaper.
while the ON
is illuminated?
Is thepapertoo thick? Therearelimitstothethicknessof paperthatcanbe fed
Iffanfold(continuous)paperisnotbeingfedcorrectlyusingthetractorfeed,
checkthe following:
Check Possibleremedy
Is the paperlever pushed to Makesurethereleaseleveris pushedtothe B position.
the ~ position?
Is thepaperguideinthever- Whenusingthe tractorf~ thepaperguideshouldbe
ticalposition? horizontal.
Aretheholes oneachside of
thepaperalignedwithregard themso thatthesprocketholes matchup.
to each otherin the sprock-
e~?
Arethesprocketstoocloseor
toofarapart?
Are the sprocketslocked in Correctthis if necessary.
position and the covers
closed?
Is the paper feeding freely
intotheprinter?
LINEindicator
inthisway. Trywiththinnerpaper.
Ifthetwosidesof thepaperareoutof alignmen~realign
Misalignmentof the sprockets,makingthepaper too
loose ortootigh~ will preventasmoothpaperfeed.
The papershouldnotbe too fm fromtheprinter(less
than1meter/3 feet), andthereshouldbeno cables or
otherobstacles obstructingits path.The papershould
alsobe feedingstraightinto theprinter,andan angled
feed maycausejamsandblockages.
72
Page 79

Check
Areyou hying to feed paper
usingthefrontpanelbuttons
while the ON
is illuminated?
ISthe paper
LINEindicator
toothick?
Youcanonlyfeedpaperinthisway whentheprinteris
off-line. Set the@nter off-line andthenfeed paper.
Therearelimitstothethicknessofpaperthatcanbe fed
inthisway(one topcopyandthreeNCRcopies). Try
withthinnerpaper.
If the ASF is not operatingor is not feedingpaper carectly, check the
following:
Check
Has the ASF option been
selected using the Memory
Switchfunctions?
Is thereleaseleversettothe
~ position?
Is the ASF correctly
mounted?
Is papercaughtup near the
orinthead?
Aretheleft andrightguides
tooclose together?
Istheretoomuchpaperinthe
paperfeedhopperorstacker?
Wasthepaperfannedbefore
beingfedintothe ASF?
Haa the paperbeen used alreadyoris it creased?
Areyou b-yingtofeedpaper
usingthefrontpanelbuttons
while the ON
is illuminated?
ts thepapertoo thickortoo
~?
LINEindicator
Possibleremedy
Select this option
The release lever should be set to the single-sheet
position.
MakesurethattheASFimproperlyseatedontheprintcr.
Stopprinting,removethejsrnmedsheet(you mayhave
toremovethe ASFforthis), andcontinue.
If the left and right guides are too close together,the
paperwillnotfeedsmoothly.Move themalittlefurther
aW to Mow thepaperto feed freely.
TheASF’Spaperfeed hopperandstackercanhold 120
sheetseach.Makesurethatthereis no morepaperthan
thisineitherthehopperorstacker.
If this is not done,paperjams mayoccur.Remove the
stackof paperfromtheASF andfanitbeforereinsertilw.
Only new, uncreaaedpapershould be used with the
ASF.
Youcanonly feedpaperin thiswaywhentheprinteris
off-line. Set theprinteroff-line and thenfeedpaper.
Therearelimitsto thethicknessofpaperthatcanbefed
in thisway. Try withdifferentpaper.
73
Page 80

Ifthepaperparkfacilitydoesnotappeartobeworkingcorrectly,checkthe
following:
Check
Is the paperrelease lever in
the ~ position?
Has the fanfold paperbeen
WWIY puked?
Possibleremedy
Thepaperrelease lever must be set to the ~ position
afterthe fanfoldpaperhasbeenparked.
Makestrrethatthe
fanfoldpaperhasbeen parked.
PAPERindicatorcomes on afterthe
Iftheshorttear-offfunctiondoesnotappeartobeworkingproperly,check:
Check
Has printing ended in the EithersendacFF>orenough <LF>ccmunandstoeject
middleof apage? thepage.
If text is being printed all on one line, or with extra blank lines, check the
Possibleremedy
following:
ICheck ] Possibleremedv
Is the text all on the same
tine?
Is text being printed with
extrablanklines?
Ifthepagelengthandmarginsarenotwhatisexpected,checkthefollowing:
Carriage returns are not being expanded to
-&R>+cLF>pairs. ChecktheMemorySwitchSetting
andcorrect.
Two line feeds arebeing printed.Eithermakeyour
softwareprintjust a carriagereturnor (if this is not
possible),settheAUTOLFtoOFFusingtheMemory
Switchmenus.
Check
Is the printing starting too
highortoolow onthepage?
Does the printer’s page
lengthnotmatchthephysical
pagelength?
Is the Skip-overperforation
facilitynotworking?
74
Possibleremedy
Use theMicroFeed facilitytoadjusttheprintposition
relativetothewwze.
Use theMemorySwitchsettings, ortheDIP switch to
set up the correctpage lengti or use software cOm-
mandsto do it.
Makesure@isis set withtheMemorySwitchmenus.If
theskipoccursin thewrong place, makesurethepage
length is properly se~ and that the top of the print
position is abouttwo lines down from the top of the
uaver.
Page 81

I
MAINTENANCE
Essentially,yourprinterisarobustpieceofequipment,butshouldbetreated
withamodicumofcaminorderto avoidmalfimctions.Forexample:
● Keepyourprinterin a’’comfortable”environment.Roughlyspeaking,if
youamcomfortable,thenthe environmentissuitableforyourprinter,too
,(seeChapter1).
s Do not subjectthe printerto physicalshocksor excessivevibration.
c Avoidover-dustyenvironments.Dustistheenemyof allprecisionme-
chanicaldevices.Ifyouhaveto usetheprinterin suchan situation,you
might like to considerthe use of an acoustichood, whose primary
functionistoreducetheprinter’snoise,butcanalsoactasabarneragainst
dus~Consultyoursupplierfordetailsof a suitablemodel.
s To cleantheexteriorof theprinter,usea barelydampcloth(useeither
waterwithalittledetergentor alittlealcohol),butdonotallowanyliquid
to fallinsidetheprinter.
● Theinteriorofthepnntermay becleanedwithasmallvacuumcleaneror
a compressed-airaerosol(soldforthispurpose).Whenperformingthis
operation,be sure not to bend or damage any cable connectionsor
electroniccomponents.
ADJUSTINGTHEPRINTINGGAP
distance between the print head and the platen can be adjusted to
The
accommodate different paper thicknesses. To make this adjustment, remove
the top cover. The adjustment lever is located near the left end of the paper
bail. Fulling the adjustment lever towards you widens the gap; pushing it
away from you narrows the gap.
Thereare fourpositions;youcanfeeltheleverclickingintoeachposition.
Thefirstposition(narrowestgap)istheonemostcommonlyusedforsingle
sheetsofpaper.Trydifferentpositionsuntilyougetthebestprintingnxmlts.
75
Page 82

RIBBONREPLACEMENT
The ribbonsused by your printer MEendless-loopribbonsin which the
ribbonis recycled.Whentheprintqualitybecomestoofaint,youwillneed
toreplacetheribbon.Useonlyribbonsnxommendedforusewiththeprinter
(yoursupplierwillbe abletoadviseyou).
1 To removetheoldribbonfmmtheprinter,firstturnoffthepower.
2 Removethetopcover,andholdtheribbonbythetwolugsoneach side.
Pushin thetwolugsslightly,andpullupwardsto removetheribbon.
Rihhon car[ridgc
/ Rihh,,~ni,,i,:~nb
76
Ribbon holder
Page 83

I
3 Takethenewribbonandtensionitbyturningtheknobonthe topofthe
ribboncartridgeclockwise.
4 Nowinsertthenbboncartridgeintotheholdergrippingitbythelugs, and
turning the knob slightlyckwkwiseif necessary.Make sum that the
ribbongoesbetweentheprintheadandtheplatenguard(seeillustration
below).
,Print headshield
5 Nowreplacethetopcoverand turnontheprinter. Youarenowreadyto
startnxsing the printer.
77
Page 84

REPLACINGTHEPRINTHEAD
Thisisnotajobwhichyouwillneed to dovery often.The printheadhasbeen
designedtogivealife of about200milliondots. In normal everyday use, this
will mean years of life. However, ifthe print quality is faint, even after you
have changed the ribbon, the print head will
Onlyuse a replacementprintheadasrecommendedby yoursupplier.
Turn OFFthe printer,andremovethepowercable.
1
2 Iftheprinterhas beeninoperationimmediatelybeforethisoperation,the
printhead willbehot.
NOTE
Allowtime for the print head to cool before attempting to work on it.
3 Openthetop cover.
4 Remove the ribbon cartridge (as described above)
5 Using a Phillips-typescrewdriver,carefully unscrew the two bolts
securingthe printhead to the printheadassembly(see the illustration
below).
6 Pulltheprintheadfirmlyupwards,releasingthepnntheadcard edgecon-
nectorsfromthe connectormountedon thechassis.
needreplacement.
I
7 Removethe retainingscrewsandwashersfromtheprintheadassembly.
Putthemon one side.
8 Take,thenewprinthead, and locateit in position,makingsurethatthe
cardedgeconnectionsfitsecurelyintothechassisconnector.
78
Page 85

Print headbolts
~
Print head
NOTE
DONOTapplyexeessiveforce,as thismayresultin damageto theprinthead.
9 Fastendownthenewprint headusing thenminingwashers andscrews.
@not applyexcessiveforcewhentighteningthescrews,asthismaystrip
thet.lmad,butensu~ thatthe printheadis firmlysecured.
10 Replaee the ribboncaruidge:
1112Replacethetop cover.
Re-insertthe powercableandre-applypower.Yourprintermaynowbe
used.Youmayliketo checktheprintqualityusingoneof thetestprint
pmeedums
(SW below).
79
Page 86

FRONTPANELDIAGNOSTICANDTEST MODES
Theprinterisequippedwithanumberofdifferentmodesfordiagnosisand
testing.These am accessedfromthe frontpanelby holdingdown a front
panelbutton(or combinationof buttons)whileturningon thepowertothe
printer.
The test and diagnostic modes available are listed below
● A text test print mode
c A short test print mode
“ A long test print mode
● A hexadecimal dump mode
● A bidirectional print test
Shorttestmode
Iftheprinteristumed onwhilethe ~~~ buttonispressed,thepnnterwill
enterthe shortself-testmode.Theprinterwill startprintingassoonas the
@ElilEliECbuttonisreleased,andwill printthevemionnurnberoftheprinter’s
ROM,eg “***Ver 1.0***”,followedby sevenlinesof thecharacterset.
Eachlinewillbe offsetby onecharacterfromtheonebeforeit. If thecolor
optionhas been installed,each line will be in a differentcolor.The final
(blackandwhite)resultwillbe somethinglikethefollowing:
[Standardmode]
KBMmode]
Sincethe test
mended that the printer is loaded with continuous stationery to avoid
possible damage to the print head and/or platen.
print occupies the whole width of the carriage, it is recom-
Page 87

L testmode
Ifth[PAPERR”EDb t
e t l s m T p w s p a s a t
PAPERFEED button is released, and will printthevemionnumberof theprinter’S
ROM, eg “*** Ver 1.0***”, followed by the whole character set printed in
each typeface and pitch available.
Since the test print occupies the whole width of the carriage, it is recommended that the printer is loaded with continuous stationery to avoid
possibledarnageto theprinthead and/orplaten. In addition,thetotalnumber
oflinesprinted isconsiderable, more than can be accommodated on a single
sheet, so fanfold paper is certainly suggested for this test.
The printout below shows a short sample of the mults of this test:
—.x)-,“s. /oD<->
dm.%41y~~.
( c )
-W. -em-.ll,!l, ”l - ! ] , ,4567ss: =>
mrt,-.~,y~pCU.rJ .=. .
—.w
--,~
—.llnL, tl -.—+/0!211--—-
_tNU._.11Wtit~ ~Wi.
!,,“()*
23’->-1 - I :1l
lnn-t-w’mm F—*=—
[\lk —“
,!,, -,..,”..
—-- - - U >--m
,Ja... p..
81
Page 88

Texttestmode
t m t p w p t M S m a o
In
T m i a b t o t p a t s t a h
d t @ b
T r p w b s t t e b
Xlt HEtlORY SWITCH TREE $Xx
MAIN HEN1
FRINT CURRENT SET
INSTOLL MENU
‘f4cTORY SET
COHt4AND MENU
FONT MENU
PRINT HENU
PAPER MENU
FORHS MENU —
RAM USAGE
QUIET fiOOE
GRAPHICS OIRECTION :
NITO ON-LINE
ZERO STYLE
1
NLQ-FONT
PRINT QUALITY :
FRINT PITCH
CONDENSED FT(INT :
ITALIC F,RINT
OPTION ASF
AUTO L0401NG
AUTO LOtiDING ($ISF) :
PAPER-OUT DETECTOR :
SHOh’T TEAR OFF :
SKIP OVER PERFORATION : OFF / ON
AUTO LF
NJTO CR
LINES PER INCN
PAGE LENGTH (INCH)
: OFF / ON
: OFF/ ON
: 3LPI / 4LF1 / 6LPI / SLPI
a DIP-SW /5/S.5/4/5.5
EWFFER / DOWNLOAD / IL INEEWFFER
OFF / ON
SIX / UNI
OFF / ON
NORMAL / SLASHED
COURIER / SANSERIF
LETTER-G / ORATOR
SCRIFT / OCR-C!
TW-LIGHT / CINEMA
NLO / OF(AFT
1 / I / PROP
OFF / ON
OFF / ON
OFF / ON
1 ,~,~,~,~,~ (6LP1)
1 / 2/ 3/ 4 / 5/ 6 (6LFI)
OFF /ON
OFF /.ON
6/ 7/s/s.5/ 11.7/ 14
8
Page 89

Hexadecimaldumpmode
I t m a r d w b p i ah d f
r t t c c b a o a c c
T m i a b t o t p w s
h d (
“
necessary to turn off the printer completely.
tie printoutwillbesimilartothatproduced by aMS-DOS DEBUG Display
command, ie the hexadecimal values of the bytes received will be given in
rows of 16, divided into two blocks of eight. “Unprintable” charactem, ie
control codes from OOhthrough IFh and 7Fh t.hugh FFh, are represented
by peliOdS.
The following (BASIC) program will produce the result below it:
10 FOR 1=0 TO 255
20 LPRINT CHR$ ( I ) ;
30 NEXT I
40 LPRINT
50 END
After the program has been run, the printer’s buffer should be flushed by
pressing the -OWN. button.
tixiFEED’ k t mode, it is
OS tj9 fjAIJB fic ~D {jE ,:)F
18 19 1A IB IC ID IE IF
28 29 2(3 2EI 2C ~D 2E ~F
38 39 3A 3B 3C 3D 3E 3F
48 49 4A 4J3 4C 4D 4E 4F
58 5? 59 513 SC SD 5E 5F
68 69 6A 6B 6C 6D 6E 6F
78 79 7A 7B 7C 7D 7E 7F
S8 B9 8Q EI13 EC ED BE SF
98 99 9A 9E+ 9C 9D 9E 9F
AS C)9 M AH AC (2D AE AF
!38 69 W 13B EC BD BE BF
C8 C9 CA CB CC CD CE CF
DE D9 DA DB DC DD DE DF
ES E9 EA EB EC ED EE EF
FE F9 FCI FF4 FC FD FE FF
....... . ..... ...
....... . ...... . .
1
,
01234567 89: ; <=)?
WBCDEFG
POllSTUVW XYZ [\ ]’”’-
‘ abcde+g h i
pqt. stuvw Xyz { ;1 *LI
. . . . . . . . . . . . . . . .
. . . . . . . . . . . . . . . .
. . . . . . . . . . . . . . . .
. . . . . . . . . . . . . . . .
...... . . ....... .
...... . . . ...... .
........ . . ......
....... . . . . . ....
..
( ) x+,-./
J
j k 1mno
T m i u w i a d s t e t
t c a c a b ~ b t p a t
w a a r
8
Page 90

BidirectionaltestYadjustmentm
T m i u t a t a o t p h o s
bip A ap o s m y p m w
i o o a o l a r p p s i m
o i g p T m w t b u v r
1
T t p o a t t i o a w h d t
S“a
fo
T p w f t p f a b d t
2
opa y t v t p f o a
T v l a i f c o t l t t a b
3
b p o o p o t p h a t m o ap i
t o d
.-oNE!!:.’ b T p w s l t
DOT AD JL15T11ENT P1OI)E A X ~
#iX
4
T a t p u t
T @Eb w m t m l t t l ( s b t
5
n b t s o t l T I
?Ea .EERFEE! buttons.
PAPERFEEDb w p t
o f
W t t v l a a w e o t f o
6
col t bia t i c
T c t m f w t b a i p
7
p t f b T w c b ’
“NLQ-A”, “NLQ-B”, “NLQ-C”, “GRAPHICS-A”and “GRAPHICS-B”.
“DRAFT-B”,
—
8
Page 91

8
(
I
:SEW+
ON LINE ‘:—
[-ON LINE “ 4
tw,n -13
N-D-A
N
I
I
I
O LINE _
:PkPER FEED’ 4
N C
tJL.13--i;
9 T e f t m p t PITCH’ b
I
I
1,
I
I
1
I
!
I
I
I
I
i
I
I
I
!
I
I
I
I
I
!
I
j
8
Page 92

8
Page 93

c 7
su
MS-DOS AND
YOUR PRINTER
W u y p w a I P P o P o c
y w p b u P o M a a o s A
n o s t m u h T s i n h
a
T l h t p f e i i b t m t r p o t
m
I A S W
Y P
W i a s y m f t y p i n
spm i t l o p g f i H
e t s p n p R t s a t g
p w y s o p i
I y h y p s u i s m t c a E
E o E 1 a y p t b s
I n o t a m c o o t f ( o o
prS N 1 S N E F E F
f t o s m s w y c
I y h y p s w t D s t e a I
PrI s c t f t l o p a i t
aps l
I t I P I i n m u P
You may be a t c y a s t i s o
t c c s t y p ( i c f
w a n a t y u t s e F i
i y m i W y m w t u t ‘ ‘ * a
A c t c
WordStar installation program. Read the section on escape sequences for
details of how to change fonts (for example).
diffenmt typefaces. This can all be done with the
8
Page 94

I
I y wod n a y t c f i m a a
p i p I a “ c i y t f a t p
w y w t c f W t d i p p w
t p a t p Y c t p t p o a c
f w t f p b T p t p o a a
m p
I y s p d n m p b n b a i
w f y p i c o t m c q a
“ y p p a b a “ i d a h f
f Y s a “ t b t q
O s p m w a y t i s f
Spp w o a f t m n o c
t b p T i g b
N o c . C 1 m
P
E
C p
C e
PrV V
S t s i w a y f a i
s t r t p t t d s ( b t
M S T c f y p i < @( 4
M S t t D s a s f t r p e a
t y h s t a c s u t D s
I y a i a d a t c o y a s
s e a Y s s w p b y m
con
1 8 1
1 9 1
1
2
1 2
1 2
1 m
Page 95

G H C
O a PCc
~ a ( k o t c t t o a p o a
t s T p ag s y w h t r t p
G . S y M m f f d
Coe o t o t t s t t p c b t
o a o b u o t ( @ k c
r u M y c u t
S T P F T D
P
P command can be used to transmit control codes and escape
T
sequences 120ma file to the printer inorder to setup various parameters. For
instance, if you want to set up NLQ printing, the command is <ESG x 1
(lBh 78h 31h).
A file must therefore be created using these tie charactem. Though the
MS-DOS line editor EDLIN can be used, there is a small difficulty in
inputting the <ESO character. This is achieved with the following sequence:
mm
and then the ASCII “xl” can be input. The file is then saved, and output to
t p T s c t b s l t f
A E N . D
N F
*
I
O c i y h at e o w w a y t
i c s a t < c t i p p t
u E F f d o h t u E c y o
s m
8
Page 96

T resulting f s b s t t p u t C c
e
A N . D P
prior to printing document files. Of course, this command can also be
included in a batch file.
P U B
A d e a v o B i u s w P
com W t B c a s t t p
u t L c a c c a d u t
C f
Sampleprogram
The following lines of BASIC give examples of how the printer may be
driven from within your own programs:
1000 ‘ Set control codes
1010 E$=CHR$(
1020
D$=E$+”XO“ ‘Draft quality
1030 L$=E$+’’x1° ‘Letter quality
1040 F$=E$+”k” ‘Select font
1050 C$=F$+CHR$(O)+L$ ‘Select Courier
1060 H$=CHR$(9) ‘Horizonta1 tab
1070 P$=E$+”P” ‘Pica pitch
1080 ‘ Start printing
1090 WIDTH “LPT1:“,255
1100 LPRINT E$;“D”;CHR$(3);C~$ (27);CHR$(O);
1110 LPRINT C$;“Font settings:“
1120 LPRINT H$;D$;“Draftcharacters,”;L$;
1130 LPRINT H$;F$;CHR$(0);“Couriercharacters,“
1140 LPRINT H$;F$;CHR$(l);’’Sanserifcharacters,”;
1150 LPRINT H$;F$;CHR$(2);“Letter-Gothic,“
1160 LPRINT H$;F$;CHR$(3);“Oratorcharacters,“;
1170 LPRINT H$;F$;CHR$(4);“Scriptcharacters,“
1180 LPRINT H$;F$;CHR$(5);“OCR-B characters,“ ;
1190 LPRINT H$;F$;CHR$(6);“TW-Lightcharacters,“
1200 LPRINT H$;F$;CHR$(7);“Cinemacharacters”
1210 ‘
1220 LPRINT
1230 LPRINT C$;“Printpitches are:”
1240 LPRINT H$;P$;’’Picapitch (10 CPI),”;
1250 LPRINT H$;E$;’’M’’Eliteitepitch (12 CPI),”
1260 LPRINT H$;P$;
1270 LPRINT CHR$(15);
1280 LPRINT “Condensedpica pitch (17 CPI),”;
1290 LPRINT H$;E$;’’M’’Condensedsedelite pitch (20 CPI),”;
1300 LPRINT CHR$(18) ‘Cancelcondensedprint
27) ‘ Escape code
‘Selectcondensedprint
I
9
Page 97

1310 LPRINT H$;E$;“pi”;
‘Selectproportionalspacing
1320 LPRINT P$;’’Proportionalspacing,”;
1330 LPRINT
1340 LPRINT
1350 LPRINT H$;E$; ’’Wl’’Doubleble width,’’ ;E$;’’WO” ;
1360 LPRINT H$;E$; ”wl’’; ”Double-height ,“;E$;’’wO”
1370 LPRINT H$;E$; ’’h’’;CHR$(l) ;“Double-sized,”
1380 LPRINT H$;E$; ’’h’’;CHR$(2J ;“Quad-sized.”;
1390 LPRINT E$;’’h’’;CHR$(O)
1400 LPRINT :LPRINT
1410 ‘
1420 LPRINT E$;”Q’’;CHR$(47) ‘Set right margin
1430 LPRINT C$;’’Various line and character spacings:”
1440 LPRINT E$;’’al”
1450 FOR 1=1 TO 10
1460 LPRINT E$;’’A’’;CHR$(I); ‘Set line spacing
1470 LPRINT E$;” “;CHR$(I); ‘Increase character space
1480 LPRINT “THE SPACINGS ARE CHANGED”
1490 NEXT I
1500 FOR 1=10 TO 1 STEP -1
1510 LPRINT E$;”li’’;CHR$(I); ‘Set line spacing
1520 LPRINT E$;” “;CHR$(I); ‘Increase character space
1539 LPRINT “THE SPACINGS ARE CHANGED”
1540 NEXT I
1550 LPRINT E$;’’aO”
1560 LPRINT E$;’’3’’;CHR$(36); ‘Set 1/6” line spacing
1570 LPRINT E$;” “;CHR$(0);
1580 LPRINT :LPRINT E$;’’Q’’;CHR$(8O)
1590 ‘
1600 LPRINT C$;’’Other features:”
1610 LPRINT H$;E$; ’’4’’ Italics”cs” ;E$;’’5” ;”, “;
1620 LPRINT E$; ’’E’’Emphasizedz;E$’;E$ ;“F’’;”, “;
1630 LPRINT E$; ’’G’’Doublebstrike”ke” ;E$;’’H’’;”, “
1640 LPRINT H$;E$; ’’-;’’ ;’’Underlining” ;E$;’’-;”,;”, “;
1650 LPRINT E$; ’’-;’’ ;’’Overlining” ;E$;”-O’’ ;”, “;
1660 LPRINT E$; ’’SO’’ SUPER”;E$;E$;“T’’;” and “;
1670 LPRINT E$; ’’S1’’SUBSCRIPT”PT”;E$;’’T’’ ;”, “
1680 LPRINT H$;C$;’’Download characters: “;
1690
GOSUB 3020
1700 LPRINT E$;’’%l”;
E$;’’PO”
‘Cancel proportional spacing
‘Center text
‘Left justify
‘Normal character space
‘Selectdownload character
1710 FOR 1=1 TO 5
1720 LPRINT CHR$(60);
1730 NEXT I
L E$;II%OII: ‘ n c
1740
‘Printdownload character
1750 GOSUB 3130
1760 LPRINT E$;’’%l”;
‘Selectdownloadcharacter
1770 FOR 1=1 TO 5
1780 LPRINT CHR$(60);
‘Printdownload character
1790 NEXT I
1800 LPRINT E$;’’%O”
‘Selectnormal character
1810 ‘
1820 LPRINT H$;C$;’’Dotgraphics:”
1830 DIM LOGO$(4)
1840 RESTORE 4170
1850 FOR ROW=l TO 4
1860 FOR COL=l TO 65
91
Page 98

READ GD
1870
LoGO$(ROW)=LOGO$(ROW)+CHR$(GD)
1880
NEXT COL
1890
NEXT ROW
1900
LPRINT E$ ; “A” ;CHR$(8) ;
1910
FOR ROW=l TO 4
1920
LPRINT “ “;
1930
FOR B=O TO 6
1940
IF B=2 THEN 2000
1950
IF B=5 THEN 2000
1960
LPRINT E$;’’*’’;CHR$(B) ;
1970
LPRINT CHR$(65);CHR$(0) ;LOGO$(ROW);
1980
LPRINT “ “;
1990
NEXT B
2000
LPRINT
2010
NEXT ROW
2020
LPRINT E5;”@”
2030
END
2040
‘Set 8/72” line spacing
‘Select normal density
‘Initialize printer
3000
‘ SUBROUTINES
3010
‘ Define Draft download character
3020
LPRINT E$;’’xO’’;E$;”:U
3030
LPRINT E$;’’&’’;CHR$(O);CHR$(60);CHR$(60);
3040
RESTORE 4020
3050
READ LS :LPRINTCHR$(LS);
3060
FOR M=l TO 11
3070
READ MM
3080
LPRINT CHR$(MM);
3090
NEXT M
3100
RETURN
3110
;CHR$(0);CHR$(O);CHR$(0);
3120
‘ Define NLQ download character
3130
LPRINT C$;
3140
LPRINT E$;’’&’’;CHR$(O);CHR$(60):CHR$(60);
3150
RESTORE 4060
3160
READ LS :LPRINTCHR$(LS);
3170
READ CW :LPRINTCHR$(CW);
3180
Rl?ADRS :LPRINT CHR$(RS);
3190
FOR M=l TO CW*3
3200
READ MM
3210
LPRINT CHR$(NM);
3220
NEXT M
3230
RETURN
3240
4000
‘ DATA
4010
‘ Draft download characterdata
4020
DATA 139
4030
4040
DATA 124,
0, 66,
4, 64, 36, 16, 2, 16, 12, 0
4050
‘ NLQ download characerdata
4060
DATA O, 23, 0
4070
DATA
4080
DATA 16, 2,
4090
DATA 32,124, 0, 0, 0.
4100
DATA O, 0>
4110
DATA 16, 0, 0,
4120
1,248, 0, 6, 0, 0.
0, 32,124, 0> 0, 2, 0
0, 63,248, 0
0, 32, 0, 0,
8,120, 0, 4, 0, 0
8.124, 0
0,120, 0
9
Page 99

4130 DATA
anu
be
4140 DATA
4150 DATA
4160 ‘
4170 ‘ Dot graphics
4180
‘ ROW i
4190 DATA 0, 0. 0, 0. 1. 3> 7. 7,
4200 DATA 14. 14, 14, 14, 14. 7, 7, 3,
4210 DATA 15, 15, 0, 0. 0. 0, 6. 7. 7, 7
4220 DATA 7. 7. 7, 7. 7, 6. 6. 0. 0, 7
4230 DATA 7. 7, 7. 7. 7, 7, 7, 7. 7. 7
4240 DATA O. 0. 7, 7. 7, 7. 7, 7, 7. 7
4250 DATA 7. 7. 0. 0. 0
4260 ‘ ROW 2
4270 DATA O.
4280 DATA 7. 7. 7. 7. 3, 3,
4290 DATA 240,240. 0. 0s O, 0, 0>
4300 DATA 255>255,255.255,31. 0> 0. 0, 1> 3
4310 DATA 31,255,255,255,255.255,255, 1, 0. 0
4320 DATA 0, 1>
433o DATA 0, 0. 0. 0, 0
4340 ‘ ROW 3
4350 DATA
4360 DATA 192,224.224.224.224,240,255.255,255.255
4370 DATA 255,127> 0, 0, 0. 0> 0> 0>
4380 DATA 255,255,255,255,255>15, 15> 63.252n240
4390 DATA 192,
4400 DATA 127.252,240,192> 0> 0. 0> 0, 0> 0
4410 DATA 0, 0, 0, 0> 0
4420 ‘ ROW 4
4430 DATA
4440 DATA 56, 56, 56,120.120,240,240>224>224,192
445o DATA 128> 0, 0> 0> 0> 0, 0. 0. 0, 0
4460 DATA 128,248,248>248,248,240,192, 0, 0, 0
4470 DATA 0,
4480 DATA 0, 0, 0> 0, 0> 0, 0. 0, 0. 0
449o DATA 0, 0, 0, 0, 0
2,124, 0,
0,130, 0,
0,120, 0, 0, 0, 0
0. 60,255,255,255>255.255,143,15
o, 31, 31,
0,240,255,255,255,255,255,
0,248,248,240,224,224.112,112>56, 56
0,240,248,248,248,248,240,192. 0
1,130, 0,
0,124, 0,
data
7, 31,255,252,240,192.128,O
3,129,128,192,192,192,192
0,124, 0
0,128, 0
7, 15
3, 15
3,131,193,241
0,224,255
0,192
7, 15
T r h m h
Howtheprogramworks
This
s va1 1 Yo
neo
TheW10
I p t I i u c r a
fee
A p
p p s o d f s f b o
t p p t s d a q p
1 U p t
9
Page 100

I
N c t c a o t p al o t p t
t i e a c l t g ab e T w
i d b f p c ac s t r m (
1 ac c ( 1 a v t l s
( 1 a 1 a a c t m t s b
c ( 1 a 1
N t p r t n s a g ad o t
p woa i p b p u
i sue
The K)Wo c s i t next printed line is created by downloading
two new character patterns, which are printed in place of the character “<”
(character 60).
The final part of the program uses dot graphics to print an “SW” logo. The
dotpattern of the logo was originally laid outongraph paper, then converted
to the data in lines 4180 to 4490 with the help of a calculator. Each number
represents eight vertical dots. (See “Graphics commands” in Chapter 4 for
details.)
The pattern is printed in four rows, each eight dots high and 65 dots wide.
Lines 1830 to 1900 read the dot data into a string array variable named
LOGC)$. Line 1910 sets the line spacing to 8172inch SOthat the rOwSwill
connect vertically. The loop in lines 1920to 2020 does the printing in four
passes of the print head.
This program can also be run in IBM mode if you change a few of the lines
asshownbelow to allow for differences in someof the commands. You will
getacylinderinsteadof abarreleffect, bccuase the IBM
m d n h
a c t mit c s
Mof I m
1070 P$=CHR$(18) ‘Pica pitch
1250 LPRINT H$ ;E$;“:“;“Elite pitch (12 CPI),“
1290 ‘ LPRINT H$ ;E$;“M”;“Condensede1ite pitch (20 CPI),“;
1420 LPRINT CHR$(28);“Q”;CHR$(47)
1460 LPRINT E$;“A”;CHR$(I);E$;“2”; ‘Set 1ine spacing
1470 ‘ LPRINT E$;“ “;CHR$(I);
1510 LPRINT E$;“A”;CHR$(I);E$;“2”; ‘Set 1ine spacing
1520 ‘ LPRINT E$ ;“ “;CHR$(I);
1570 ‘ LPRINT E$ ;“ “;CHR$(O);
1580 LPRINT :LPRINT CHR$(28);“Q”;CHR$(80)
1610 LPRINT H$;CHR$(28);“4”;“Italics”;CHR$(28);“5”;“, “;
1910 LPRINT E$;“A”;CHR$(8);E$;“2”;
3030 LPRINT E$;
3150 LPRINT CHR$(28);“&”;CHR$(O);CHR$(60);CHR$(60);
“ ; CHR$(28);“:“;CHR$(O);CHR$(O);CHR$(O);
‘Increasecharacterspace
‘Increasecharacterspace
‘Normal characterspace
94
‘Set right margin
‘Set 8/72”
1ine spacing
 Loading...