Q1: Which papers are compatible for use with the Star LaserPrinter 8III?
A1: The following paper sizes are accepted by the printer: A4, legal (LGL), letter (LTR), B5 and executive sizes within the range of 16 to 36 lb (60 to 135 g/m²).
Q2: Is it possible to attach serial and parallel cables to the printer simultaneously?
A2: Both a parallel and a serial cable may be connected however only one can be in use at any one moment.
Q3: How much RAM does the printer ship with and can one increase the RAM capacity?
A3: With a maximum of 1 MB the printer ships with 1 MB of RAM which can only be expanded if One purchases a RAM expansion board, however in doing so one can expect an increase in RAM by up to 4 MB.
Q4: What do the indicators in the LED lights suggest in regards to the functions of a printer?
A4: The indicators are used to display and communicate various statuses of the printer to the user. The following are the statuses the indicators are used to denote: READY status (flashing while warming up and unchanged when ready), ON LINE (light when printer is ready), PRINT (light when printer is printing), ALARM (light when an error is detected), and DATA (light when info for printing is received).
Q5: What are the requisite steps involved in printing a test page from the printer?
A5: Press and hold the [TEST] button until the message “HOLD FOR TEST” appears, and after that, release the button to print the required status sheet.
Q6: What should I do if the ALARM light remains in power on state?
A6: The ALARM lamp indicates an error condition that will require the operator’s intervention, for example, when the paper cassette is either empty or has been removed.
Q7: What are the steps involved in installing the toner cartridge?
A7: Once the printer has been prepared for installation, toner cartridge contained in a sealed box should be taken out, rocked back and forth to loosen the toner, and lastly inserted into the printer as per the guidelines given in the manual.
User Manual
Page 1
---
Operations Manual
Page 2
Safety Notices
This rinteriscertifiedasaClass 1 laserproductundertheU.S.Departmentof HealthandHumanServices
(DHl?S) Radiation Performance Standard according to the Radiation Control for Health and Safety Act
of 1968. This means that the printer does not produce hazardous laser radiation.
Since radiation emitted inside the printer is completely confined within protective housings and external
covers, the laser beam cannot escape from the machine during any phase of user operation.
The Center for Devices and Radiological Health (CDRH) of the U.S.Food and Drug Administration
implemented regulations for laser products on August 2,1976. These regulations apply to laser products
marketed in the United Stales. The label on the printer indicates compliance with the CDRH regulations
and must be attached to laser products marketed in the United States.
Caution-use of controls or adjustments or performance of procedures other than those specified herein
may result in hazardous radiation exposure.
Federal Communications Commission
Radio Frequency Interference Statement
This equi
to Part 1 P
interference in a residential installation. This equipment generates, uses and can radiate radio frequency
energy and. if not installed and used in accordance with the instructions, may cause harmful interference
to radio communications. However, there is no guarantee that interference will not occur in a particular
installation. If this equipment does cause harmful interference to radio or television reception, which can
bedeterminedbytumingtheequipmentoffandon,~euserisencouraged to trytocorrecttheinterference
by one or more of the following measures:
For compliance with the Federal Noise Interference Standard, this equipment requires a shielded cable.
Tk above statemenls apply only to printers markled in lk U.S.A.
ment has been tested and found to comply with the limits for a Class B digital device, pursuant
of FCC Rules. These limits are designed to provide reasonable protection against harmful
* Reorient or reloate the receiving antenna.
* Increase the separation between the equipment and receiver.
l Connect the equipment into an outlet on a circuit different from that to which the receiver is
connected.
* Consult the dealer or an experienced radioKV technician for help.
Self Declaration
Radio interference regarding this equipment has been eliminated according to Vfg 1056/1984 announced
by the DBP.
DBP has been informed of the introduction of this special equipment and has been granted the right to
examine the whole series.
It is the user’s res nsibility to see that his own assembled system is in accordance with the technical
regulations under fg 1046/1984.
To conform to FlZ-regulations it is necessary to make all connections to the printer with shielded cable.
The equipment may only be opened by qualified service representatives.
Tk above s~a~emenl applies only IO prinlers ma&led in West Germany.
T
-
-
-
-
Page 3
: >__..
. .
. .
.
The Canadian Department of Communlations
Radio Interference Regulations
Statement of
atatus does not exceed the Class B limits for radio noise emissions from digital apparatus
msdi@T!
set out m the adto Interference Regulations of the Canadian Department of Communications.
Le p&sent appareil num&ique n emetpas de bruits radio6.lectriques depassant les limiters applicables aux
appamils numeri ues de la classe B prescrites dans le Rkgk.rnent sur le brouillage radio&ctrique tdicd
par le Mini&e. 1 es Communications du Canada.
Tk above statement applies only toprinters marketed in Canada.
Trademark Acknowledgements
LaserPrinter 8111: Star Micro&s Co., Ltd.
Intellifont, CC Times: Agfa Corporation (AGFA Canpugraphic Division)
Ventura Publisher: Xerox Corporation
EX-800: Seiko Epson Corporation
HP LaserJet III: Hewlett Packard Company
IBM PC/XT, IBM Proprinter: International Business Machines Corporation
Lotus l-2-3: Lotus Development Corporation
Microsoft Word, Microsoft Windows: Microsoft Corporation
PageMaker: Aldus Corporation
WordPerfect: WordPerfect, Inc.
NOTICE
l All rights reserved. Reproduction of any part of this manual in any form whatsoever without
STAR’s express permission is forbidden.
l The contents of this manual are subject to change without notice.
- Alleffotts havebeenmadetoensuretheaccuracyofthecontenuofthismanualatthetimeofpress.
However, should any errors be detected, STAR would greatly appreciate being informed of them.
l The above notwithstanding, STAR can assume no responsibility for any errors in this manual.
Congratulations on purchasing a Star LaserPrinter 8111. You will be delighted with both the quality of the printed images and the ease of operation.
With your computer and this printer, you can create professional-looking
documents.
This Operations Manual is one of two that explore the entire range of printing
possibilities of the Star LaserPrinter 8111. This manual is for beginners and
for those who plan to concentrate on the basics. Advanced users and those
interested in programming should refer to the Applications Manual.
Chapter 2 begins with an overview of the manual and of the Star Laser
printer. This chapter explains how to unpack your new printer and prepare
it for initial operation. Chapter 3 explains how to operate the printer’s front
operating panel and display screen.
Some people like to skip the preliminary explanations and begin using the
printer immediately. Chapter4 provides the information for such a fast start.
If you begin with Chapter 4, at some later time you should read the rest of the
book, in sequence, for a more complete picture of your printer and its
operations.
Chapter 5 explains how to set up a page, while Chapter 6 describes the type
characteristics and printer operations that will enable you to give your
printed pages that professional look.
The Star LaserPrinter 8111 emulates the operation of three widely-used
printers:
l HP LaserJet III, a laser printer
. Epson EX-800, a dot-matrix printer
l IBM Proprinter, a dot-matrix printer
1
Page 8
With this capability, the Star LaserPrinter 8111 will operate with a wide range
of applications programs on the market, both old and new. Chapter 7
provides the information that will allow you to use your printer with four
popular applications programs: Lotus I-2-3, WordPerfect, Microsoft Word,
and Microsoft Windows.
Chapter 8 and 9 describe the maintenance and troubleshooting operations to
keep your Star LaserPrinter 8111 working in “perfect” condition.
LASER PRINTING
Before you begin learning about your new Star LaserPrinter 8111, you may
find it helpful to know something about laser printing itself.
A laser is actually a beam oflight ofjust one wavelength (Laser is an acronym
for Light Amplification by Stimulated Emission of Radiation). Such a beam
of light, described as “highly coherent,“can be focused very sharply. Lasers,
generated by gases, liquids or semiconductors, are widely used in applications ranging from surgery to the visual arts.
Laser printing is a process that uses a laser beam - in this case, generated
by a semiconductor- to activate portions of an electrically charged surface.
These activated parts represent the words, numbers, or graphics being sent
from the computer for printing. Other parts of the printer transfer this image
to paper, then clean the surface and prepare it to receive more information to
be printed.
In other words, this process is a type of laser-activated temporary engraving.
In the Star LaserPrinter 8111, two interconnected units produce the complete
printing process: the toner cartridge and the printer body.
The toner cartridge contains the drum, which is the rotating surface. In the
darkness of the toner cartridge, the drum holds a negative charge placed on
it by the primary corona wire in the printer. Shutters on the bottom ofthe toner
cartridge assure that no unwanted light penetrates its interior.
2
Page 9
I -
L...
._.
1
1
When text or graphics are sent by the computer to the printer, a laser beam
is generated by a semiconductor laser diode. This beam is focused by special
BO-ITOM VIEW
scanning mirrors that turn the light beam into a tool that “writes” or “paints”
on the surface of the drum. The areas of the drum touched by the laser beam
lose their negative charge and contain a reverse image of the information sent
from the computer. As the drum rotates, it passes a developer unit that is also
rotating, but in the opposite direction. The surface of the developer unit is
covered with toner (“ink”) which has a negative charge. The neutralized
portions of the drum, containing the information to be printed, pick up
negatively charged toner from the developer unit.
At,this point, paper fed from the paper cassette moves through the transfer
unit, from which it receives a positive charge. As the drum rotates, the
negatively charged particles of toner are attracted to the positively charged
surface of the paper.
A combination of heat and pressure fuse the image to the paper. The paper
is then ejected from the printer.
Finally, acleaning mechanism in the toner cartridge cleans excess toner from
the drum, and a special light beam neutralizes its entire surface. Then the
entire process can begin again.
3
Page 10
THE STAR LASERPRINTER 8lll-
AN INTRODUCTION
You will meet each portion of your Star LaserPrinter 8111 as you read this
manual, but a brief introduction is in order here. The following figures show
the printer from the front and the rear.
-
-
-
-
@ Upper Cover Release Botton @ Font Cartridge Slots
/
I
I
/
i
1
@ Carrying Grip Plate
@ Hole for Test Print Button
@ Control Panel
8 Paper Cassette
0 Paper Set Guides for Manual Feed-
0 Parallel Interface Connector
@ Serial Interface Connector
Youcanejectpaperfaceup whenthepapertray is foldedout as shownbelow.
@ Power Cord Connector
8 Power Switch
8 Faceup Print Delivery Tray
(folded up)
5
Page 12
NOTES
-
-
6
Page 13
The fact that you’re now reading this manual shows that you’ve got at least
as far as opening the carton containing your new Star LaserPrinter 8111. This
chapter will help you do unpack the printer, set it up, and get it running.
First, though, you should make some preparations. You may already have
decided on the printer’s new location. Whether you have or have not, run
through this checklist of requirements:
l environmental control -The printer and toner cartridge should never
be exposed to strong sunshine or other direct heat sources. It should also
be located away from air conditioning ducts, dust andfumes. Excessive
moisture should be avoided, such as humidity in excess of 80% or less
than 20%. If it is comfortable for you, then it will be comfortable for your
printer.
l a large, strong table or stand
-The printer weighs 45 lbs (20 kg), and
must be firmly supported. Also, the printer will need more room than it
takes up in the shipping carton, because the paper cartridge will extend
forward from the front, and an auxiliary paper tray will unfold from the
rear; so plan for a space at least 3 x 4 ft. (lm2). Because the top of the
printer must open, be sure there is at least 24 in. of headroom above the
table/stand.
--
-.
-.
l a three-pronged outlet -
(1 Sm) from the printer (the length of the power cord), preferably one
shielded from power fluctuations. In any case, no motor-driven appliance should be connected to the same outlet, to avoid interference with
the printer’s operations.
The outlet should be no more than 5 feet
. access to the computer/workstation/network - If you will be using
a serial connection, the printer should be a maximum of 50 feet (Urn)
away, with a parallel connection, no more. than 6 feet (2m) .
l a fresh toner cartridge (product #EP-S).
L
L
7
Page 14
l paper-A package of 16 - 20 lb (60 -1 35g/m2) photocopier paper is best
to start with; however, the printercanuse thickerpaper, as well as special
media, such as envelopes, mailing labels, and transparent sheets.
l someone to help you lift the printer from the carton to its new
location.
UNPACKING
The shipping carton contains two layers of material. On top is a Styrofoam
tray containing the paper cassette, power cord, ground wire, and the users’
manuals.
Printer
Power cord
Remove the tray with its contents and set it aside-NOT on the table where
the printer will go. On the bottom, you will see the printer in a plastic bag,
resting in its own Styrofoam nest.
Summon your lifting partner and prepare to remove the printer. Since it is
tightly cradled in the shipping carton, it may be necessary to tip the carton
slightly to get a firm grip. Lifting handles are located half-way back on each
underside of the printer, but they will be difficult to use, because of the
plastic bag. Lift the printer from the Styrofoam and place it on the table or
stand, plastic bag and all. Now slide the bag off by slightly lifting the printer
gently.
To stabilize the printer during shipment, it contains several kinds of
protective material. The front of the printer has three slots, one about 9 in.
8
-
-
Page 15
wide and two narrower slots below it. The wide slot is packed with a paper
package of silica gel (to absorb moisture during shipping) and a brick of
Styrofoam. Remove both of these and save them for use if you must move
or ship the printer over long distances.
There are also packing materials inside the printer. Near the right front of
the printer’s top you will see a postage-stamp sized, rectangular button.
Page 16
Place your finger on the arrow and slide the button forward, then press down
on it. The top of the printer will pop open slightly, just like the hood of an
automobile. The top has two open positions, one at about 45 degrees and the
other fully open. Lift the top to its fully open position, so you can see the
interior of the printer.
You must remove several pieces of packing material. The largest, a large
wedge of Styrofoam, is at the center front of the interior. Lift this out and
save it for future repacking.
-
L
Toward the back of the interior you will see a green lid with a warning label
in red lettering. On the left and right sides of this area are orange stabilizers.
Each stabilizer bears a tag with black lettering, telling you (in several
languages) to remove them. Grasp one of these and pull it down, then
forward in the direction of the arrows on the tag. Remove the second one
the same way. Save the stabilizers for future repacking.
10
-
-
Page 17
Spacer
After you remove all the packaging material, leave the printer top open, so
that you can insert the toner cartridge, which contains the “ink” that will print
your documents.
11
Page 18
INSERTING THE TONER CARTRIDGE
The toner cartridge comes in a separate sealed carton. Open this and remove
a foil package, contained within Styrofoam. Also packed is a small plastic
bag containing cleaning material, some of which you will install inside the
printer, and an installation sheet.
-
-
After separating the two packages from the Styrofoam, pick up the smaller
one and open it. In this package is a green and black 8-inch long rod and a
cotton swab. The rod is a fixing roller cleaner, with cleaning pad attached
to one end. Open the green lid to the upper fixing assembly and insert the
cleaning pad end of the roller cleaner into the slot. Slide the cleaning pad
back and forth several times.
12
-
-
Page 19
i
i
L.
,
L
i
L
Remove the cleaner from the slot. Peel off the cleaning pad and discard it.
i
13
Page 20
Now grasp the fixing roller cleaner by the two prongs in the center and
install it in the slot you have just cleaned.
Finally, close the green lid. It will not close tightly, but don’t force it down,
Now it is time to install the toner cartridge. Pick up the sealed package that
contains it. You will see the letters EP-S stamped on one end. This is at the
bottom of the cartridge, so turn it over, and snip open the foil. Be careful to
grasp the cartridge only at the instruction panel and the other long end, not
in the middle. This is to prevent disruption of its moving parts.
Holding the cartridge with two hands, rock it back and forth 5 or 6 times,
as shown below, so that it moves through about 90 degrees.
14
-
-
-
Page 21
Now lower the printer lid to its halfway position and insert the cartridge in
the direction of the arrows on its instruction panel. Push gently but firmly,
until it is seated at the back of its container.
.
As you look at the left front side of the toner cartridge, you will see a small
plastic tab with a circle on it.
15
Page 22
pull down on this tab and wiggle it up and down a few times, until it snaps
off. Attached to the tab is a long strip of plastic that must be completely
removed. Hold the tab and pull it straight out, applying firm, even pressure.
Keep pulling until the end of the long plastic strip emerges from the
cartridge.
The final step is to close the printer top, pushing down gently until it latches.
Page 23
PAPER TYPES AND PAPER LOADING
You may load paper into the printer automatically or manually. Either way
you will need the cassette, which is in the Styrofoam tray that you set aside
after first opening the printer packing case. The paper cassette comes in two
parts, the paper tray and the cover.
The paper tray contains two pieces of packing material. Remove and
discard them.
Automatic Paper Feed
For automatic paper feed, paper must be placed within the paper cassette.
Each size of paper requires a different paper cassette. The Star LaserPrinter
8111 uses cassettes for five paper sizes:
LTR (letter)
LGL (legal)
A4 (standard metric) 210 x 297 mm
B5 (metric)
Executive
S1lr x 11 in.
81n x 14 in.
l82x257mm
71fl x 10IR in.
17
Page 24
The cassette packed with your printer is for 81n x 11 in. paper or for A4
paper. Consult your Star LaserPrinter 8111 dealer about additional cassettes
for different sized paper.
Your Star LaserPrinter 8111 can print on automatically-fed paper whose
weight is between 16 and 36 lb. It should be between 3.7 and 7.5 mils in
thickness, with a moisture content of 4-6% by weight. Its smoothness
should be 100-300 Sheffield, with a minimum pH of 5.5, and an ash content
of not more than 10%. It must be able to withstand heat of 200°C for 0.1
second. It should be long grain paper, with cut edges showing no visible
fray. There should be no curl toward the printing side. It should be packaged
in reams in moisture-proof polylaminate. Avoid coated and extremely
smooth papers, and those that are wrinkled or contain staples. Do not use
carbonless paper or multipart forms. The type of paper used for photocopying and the newer paper designed specifically for laser printers are
suitable, including Canon NP, Xerox 4024, Gilbert Neu-Tech and Neenah
NP. However, Star Micronics does not recommend any particular brand,
since it has no control over the content and quality. Selecting suitable paper
is your responsibility.
Envelopes, mailing labels, and transparencies require manual feed. Among
the suitable brands of labels are Avery Lasergraphic and HP LaserJet series.
Be sure to select labels that cover the entire backing sheet during printing.
For transparencies, a satisfactory brand is that with the Hewlett Packard
trade name. When printing envelopes and transparencies, use the rear
output tray. Paper over 20 lb. in weight may be fed manually.
-
You may place up to 200 sheets of paper in the paper cassette. Do not
overload the cassette, and do not fan the paper before inserting it in the
cassette. Placing the cassette in front of you so that the paper size is facing
you, slide the paper in so that it comes to rest against the notch with three
arrows on it and beneath the adjacent lip.
18
Page 25
Now press down on each comer of the paper stack, to make sure it is seated
flat on the bottom of the cassette.
19
Page 26
Finally replace the cover, so that the beveled edge is at the front of the tray
and the notched edge points to the rear.
The cassette must be inserted in the large slot at the front of the printer.
Holding the cassette so that the front is near you, guide it into the slot and
push back until it cannot go any further. A portion of the cassette will
protrude from the front of the slot.
-
-.
20
-
-
Page 27
Manual Paper Feed
Manual feeding of paper into the printer is accomplished from an adjustable
slot on the cassette cover.
The Star LaserPrinter 8111 can print on paper or other media sized from 3.9
x 7.5 in. (100 x 190 mm) to 8.5 x 14 in. (216 x 356 mm).
For manual feeding, you must first adjust the slot for the width of the paper.
Manual feeding also requires changing the printer’s operating instructions
by programming at the front panel. This will be explained in the chapter
“Quick Start With the Star LaserPrinter 8111: A tutorial.”
Note that gauges for the five standard paper sizes are printed on the cover
below the left-hand slot guide. If you plan to handfeed paper of one of these
sizes, adjust the guides accordingly. For envelopes, labels, transparencies,
or paper other than 8’” x 11 inch paper, place a sample sheet on the feed slot
and adjust the guides until they hold the sheet snugly.
OPTIONAL RAM EXPANSION BOARD
The optional expansion board provides up to 4 megabytes of additional
RAM (as 1-, 2- or 4-megabyte cartridges), and permits full page bit-map
mode operation. To tell whether a board is displayed in your printer, watch
the printer display screen during power-up. If no board has been installed,
the display will read:
Memory Test 1 MB
21
Page 28
If a memory board has been already installed, the display will give the total
amount of memory available (for example):
Memory Test 5 MB
The board is easily installed in a slot located at the left rear of the printer
frame. The only tool required is a Phillips screwdriver.
Before beginning the installation, turn off the printer and unplug it. The
plate covering the slot is secured by one screw. Remove the screw and lift
the cover plate out. Notice the lip on the left side of the cover plate. The
interior of the slot contains a pin hole receptacle.
The RAM expansion board has two plastic insertion tabs at one end, with
a pin connector underneath. Hold the card by the two tabs so that the
memory chips face upward. Insert the opposite end into the slot, pressing
firmly with your thumbs against the plastic tabs, until the pins are completely seated in the pin hole receptacle. During insertion, do not wiggle the
board back and forth, as this may damage the pins.
22
-
-
-
Page 29
Whik Tabs
When the board is completely seated, it will be entirely inside the slot.
Finally, replace the coverplate. Fit the lip behind the printer frame at the left
end of the slot. Then visually line up the hole in the cover with that in the
frame. Hold the right edge of the cover plate away from the printer frame
and reinsert the screw. Slide the cover back into position until the screw
enters the hole in the frame. Tighten the screw with the screwdriver.
If you want to remove the expansion board, unscrew the slot’s cover plate.
Grasp the plastic tabs with two hands and pull evenly on them until the
board comes unplugged. Do not wiggle the board back and forth as you pull,
to avoid damaging the pins.
23
Page 30
POWER SUPPLY
All connections for the Star Laser-Printer 8111 are located on the rear panel.
These include a receptacle for the power cord, as well as parallel and serial
connectors.
The Star LaserPrinter 8III’s three-pin power cord comes packed on the top
tray, along with the paper cassette. Attach this cord to the receptacle at the
left side of the rear panel, aligning the cord pins with the holes before
inserting. Make sure that the printer is turned 08 Then plug the now-at-
tached cord into a wall socket, or into a surge-protected power strip.
The printer’s on-off power switch is located just above the power cord
receptacle. The power switch is marked with two international symbols: I
for on and 0 for off. To turn the printer on, press the end of the switch
marked with I. To turn it off, press 0.
Be sure the switch is at the OFF position before plugging in the power
cord.
24
-
-
-
_-
Page 31
I
f
!’
i.
: . . .._
CONNECTING TO A COMPUTER
The Star LaserPrinter 8111 comes equipped with both a parallel and a serial
connector to receive data from a computer. Selection of either a parallel or
a serial connection is accomplished from the control panel (see the chapter
on Initial Operation).
Both a parallel and a serial cable can be attached to the printer at the same
time, but only one can be active. Before attaching any cable, be sure the
power supply is off on both the printer and any computer to which the cable
is attached.
Parallel
When you face the front of the printer, the parallel connector is on the rear
left. This is a standard 36 pin Centronics connection. To attach a cable to
the parallel connector, match the wedge shape of the cable end to the shape
of the connector, and insert the cable firmly. Secure it with the lock clips.
25
Page 32
The functions of the parallel interface pins are given in the Appendix. Your
Star LaserPrinter 8111 is pm-set at the factory to use a parallel connector to
the computer. You may change the settings from the front panel as
explained in the chapter “Quick Start with the Star LaserPrinter 8111: A
Tutorial.”
Serial - M-232
The serial connector, to the left of the parallel connector, can be used for a
standard RS-232 configuration. It is a standard 25 pin DB connector. To
attach a serial cable to the printer, match the wedge shape of the cable end
to that of the printer’s connector and insert firmly. Then use a screwdriver
to secu,re it v&h the two screws on the cable end.
26
I
I
-
-
Page 33
Many applications programs provide a special menu that makes it easy for
you to use a serial printer with them. If you wish to make the connection
between your IBM compatible computer and the Star LaserPrinter 8111
through DOS, you must enter TWO commands at the prompt.
: --
-.
In the first command, for example, if you want to set the options at 2400
baud, no parity, 8 data bits, 2 stop bits, and pause for a full buffer, enter
MODE COM1:24,N,8,2,P<ENTER>
Then
MODE LPTl:=COMl:<ENTER>
To include these commands in an AUTOEXEC.BAT tile, type
Then press <FUNCTION KEY 6> and <ENTER>.
For more information on this, consult the manual supplied with your
computer.
The functions of the serial interface pins are given in the Appendix.
Your Star LaserPrinter 8111 is set at the factory as a parallel printer, unless
you instruct it differently. This is done from the front panel, and will be
explained in the chapter “Quick Start with the Star LaserPrinter 8111: A
Tutorial.”
^.
27
Page 34
NOTES
28
-
Page 35
FRONT PANEL
The front panel of the Star LaserPrinter 8111 is a combination control board
and interactive message center. The panel consists of:
l a 1 line, 16 character LCD display screen
l 5 LED lights
l 6 touch-sensitive buttons
The touch-sensitive buttons permit you to send instructions to the printer.
In turn, the printer uses the display screen and the light indicators to convey
information to you.
The screen display is the primary way the printer communicates with the
operator. It informs the operator about the machine’s state, the printer’s
status, and alarm conditions that require some action by the operator. The
LEDs provide an “at a glance” summary of the printer’s status.
This information may be about the printer’s operating status - the screen
may say TONER LOW, or a light may indicate “data to be printed”. The
screen also informs you of the next option for setting your printing
instructions and confirms that you have made a selection, such as selecting
the RS-232 interface.
-
29
Page 36
The printer operates in two main modes when the printer is off line:
1. Front panel Mode (grey buttons) - performs functions labeled on the
button.
2. Program Mode (yellow buttons) - press the [PROGRAM] button to enter
menu selections.
The meaning and use of the panel buttons depends on the mode in which the
printer is operating.
Powering Up
Your first interaction with the panel will come when you turn on the power.
Now is the time to begin using the printer and operating its front panel. First
turn on the power, pressing the I position on the switch, located at the rear
of the printer. (The 0 position turns the power ofi)
As soon as you press the I end of the power switch on the rear of the printer,
all lights on the panel will come on.
The printer will begin its internal diagnostics and warming up, displaying
a series of messages on the screen.
The first message is
LaserPrinter 8111
followed immediately by a flashing message
Memory Test 1 MB
meaning that the Star LaserPrinter 8111 is putting itself through a test series
of its engine and all its circuits and functions. It an optional RAM board has
been installed, the message will display
Memory Test 2 MB
30
Page 37
(for example). The actual value will depend on the size of the RAM board
installed (1,2 or 4 megabytes).
When the tests have been completed satisfactorily, the screen will display
the phrase
NV RAM LOAD DONE
This means that the printer is activating various formatting values that it
will use in printing information. (You can reprogram these from the front
panel, if you desire.) When this is completed the screen will display
PRINTER WARMUP
and the two lights at the left side of the panel - the READY light, which
flashes, and the ONLINE light, which will show steadily. The others will
btZO_ff.
Finally the screen will say
PRINTER READY
The READY light and the ON LINE light will be continuously lit; the others
will remain off. This means you can instruct your computer to send it
information that it will print.
If at any point during the test period the printer detects a problem, one of a
variety of messages will flash on the screen.
:
I
,.
The chapter on “Troubleshooting” explains the meaning of these messages
and suggests ways for you to respond to them.
31
Page 38
The Buttons
--.
This section explains the various meanings and uses of the buttons,
including their light indicators, where present. Keep in mind that the
buttons’ functions depend on the mode the printer is in: the Front Panel
Mode, using the grey buttons to perform the labelled functions, and the
Program Mode, using the yellow buttons to enter menu selections after
pressing the [PROGRAM] button.
For the Program Mode, you will use the buttons to move in four directions
through the hierarchy of selections. You [ENTER] or [EXIT] a Level to select
the [PREVIOUS] or [NEXT] Item within a Group. For example, Baud Rate is
the first Item in Level 3 within the Interface Group:
Level Number: 1
2 3
4
(Item 1)
(Item 2)
Interface
Parallel
Serial
Baud Rate
Parity
The following diagram should help you as you program:
[PREVIOUS]
[EXIT]
[NEXT]
[ON LINE]
[ENTER]
With this button you control whether the printer is on line or
ON LINE
off line. On line means that the printer is able to receive
information from the computer and to print it. All other
cl
buttons are inactive when the printer is on line. Off line means
that the printer is unable to receive information and print, but can be
programmed; in other words by entering the Program Mode.
-
-
-
When the printer is on line, the light is on.
When the printer is off line, the light is of.
32
-
Page 39
e
/.
_.
---
[PRINT]
When the printer is off line, the operator uses this buttton to
PRINT
El
[ERROR SKIP/NEXT]
print whatever is in the printer’s memory. When printing is in
operation, the light is on.
This button has no function when the printer is in the Program
mode.
-.
I-.
When the printer is on line, this key is called [ERROR SKIP].
Any time the printer stops because of an internal error condition, the operator has two choices. You may press this key to
override the error or you may correct the error. If the error is
minor, printing may continue. If the error is major, pressing the key will
result in confirmation by the printer that the error is continuing. When this
happens, consult the display screen for further information.
When the printer is in the Program mode, this key is called [NEXT]. During
programming, pressing this key displays the various items under a category
for the operator to select next in the sequence.
This key has two functions when the printer is off line.
l If the operator is holding the button as [TEST], it acts as a
form feed command, telling the printer to print whatever
information is in memory. It then tells the printer to
,,compose a sample print. This is a summary of the printer’s present
settings. The [TEST] button will:
1. Print whatever is in memory
2. display
3. display
HOLD FOR TEST
STATUS SHEET
If you release the button, the sheet will begin printing.
4. display
Therefore, there are two tests under a category for the operator to
select from.
.
In the Program Mode, pressing the button as [PREVIOUS] presents the
available items in reverse sequence.
TEST PRINT MODE
33
Page 40
[RESET/ENTER]
When the printer is off line, holding [RESET] tells the printer
to discard any information that has not yet been printed and to
restart the printer by loading Initial RAM settings into Current
RAM (the memory of the printer is always working from). The
f
1
i
1
i
t
1
action will be confirmed by the message REINITIALIZE on the display screen.
Before this takes effect, any printing already in process will be completed.
When the printer is in the Program mode, [ENTER] has two functions. First,
it displays items in the next higher level. Second, if there is no higher level,
it selects the value with an @.
[PROGRAM/EXIT]
To start using the Program mode, you must first set the printer
off line, that is, press the [ON LINE] button so that the ON LINE
light is ofJ: Then press [PROGRAM]. The printer will then display on the screen PROGRAM MODE. The first of the available
programming choices for the operator to make.
Within a programming sequence, pressing [EXIT] takes the programming
Menu to the next higher level. If the sequence is already at the highest level,
pressing [EXIT] causes the control panel to leave the Program mode and
display PRINTER READY.
Light Indicators
When the printer is first turned on, all LED indicators will go on. Then
ALARM, DATA, and PRINT will then go of, to be activated only to indicate specific functions or the printer’s status. For instance, if the paper
cassette is empty or removed, ALARM sounds, the ALARM light stays lit,
and READY blinks.
l The READY light -This light will blink when the printer is warming
up. It will be on steadily when the printer is on line and ready to receive
information from the computer. If the printer is operational, the READY
light will also be on continuously when the printer is off line.
l The ON LINE light -This light will be on when the printer is on line.
When the operator takes the printer off line, or when an error condition
occurs, the printer automatically goes off line and the light goes ofi
34
--
-
-
Page 41
: -.
The PRINT light - This light will be on when information is being
printed. Otherwise it will be o&
The ALARM light -This light will not be lit unless there is an error that
requires action by the operator, such as the paper cassette needing to be
-.
refilled. When the light goes on, the printer’s alarm beeper will sound for
5 seconds.
The DATA light -This light will be on whenever the printer’s memory
contains information to be printed. This is to notify the operator that
-
resetting the printer or turning it ofs will result in data loss.
L
i -
t -i
. -_.
If the printer is in the process of composing a page or printing, this light
will be on continuously.
If the printer is waiting for more information, the light will blink.
The light will be 08 when the printer prints all the information it has
received.
Hex Dump
The Star La&Printer 8111 can also operate in hexadecimal mode. This
means that it will print information sent to it in its equivalent hexadecimal
notation (in base 16 numbers). This mode is useful in correcting commu-
nication incompatibilities between some computers and the Star
LaserPrinter 8111, that can result in incorrect text or formatting. For
information on performing a Hex Dump, see the Chapter “Troubleshooting.”
SELF TEST
The Star LaserPrinter 8111’s test print provides a complete summary of what
it is currently capable of doing for you. It shows the quality of the printing
of text. It summarizes the printer’s configuration, including amount of
memory and which fonts are installed or available. It explains how the
printed page will look at the current settings. This includes paper size, page
orientation, and whether the text is centered on the page or offset for left and
right pages. It tells whether the parallel or serial interface is active, and what
the settings are for serial communication, should it become active.
: -_
35
Page 42
There are three stages to the self test.
1. Hold [TEST] until the screen displays
HOLD FOR TEST
then
STATUS SHEET
Releasing the button will print the 4 page status sheet.
2. Hold nESTI until the screen displays
HOLD FOR TEST
then
STATUS SHEET
then
TEST PRINT MODE
When you release the button, the printer will produce a multipage
“barber pole”.
3. Pressing the test button on the right side of the printer with a pointed
object causes the printer to print a sheet of vertical lines.
Printing the Status Sheets
Now use the front panel to print a sfarlc~ sheet, which is a sample printout
of the Star LaserPrinter 8111’s available type fonts and information about its
settings.
Press the [ON LINE] button so that the light goes ofs.
Now press and hold the button labeled [TEST/PREVIOUS].
The display screen will read
STATUS SHEET
Release the button. The DATA light will go olt, and in a few seconds the
sample prints will start being ejected from the printer. The DATA light will
then go out.
36
-
-
Page 43
Status Sheet Description
You can tell several things about the printer’s settings by just looking at the
print, without reading any of it. First (and obviously) the printer is
operating. Second, the page is printed in the portrait orientation. That is,
the printing runs on the page the way portraits are usually painted, higher
than they are wide. When the printed area is wider than it is high, the
orientation is referred to as landscape. If the printer is set for landscape
orientation, the sample is printed that way.
First Two Pages: The first part of the four status sheet pages is divided into
three sections. The top section summarizes your printer’s basic configuration, identifying the version of its operating system and specifying the
amount of total RAM (memory) and the amount of RAM available for your
use. If your printer has an optional RAM expansion board, its memory size
will also be listed here.
The middle portion of the page summarizes the type fonts available and
gives samples of each. First it lists the fonts that come with the printer,
giving the name of the typeface, such as
Courier
its width (pitch)
10.0
-
*_
height (point)
12.0
and darkness as printed (weight)
Medium
After identifying the font, for instance
8U
it gives a sample of its upper and lower case letters, symbols, and numbers
ABCDabcdA%$-123[iZ6ti8ZiiW~jj
If you have installed optional font cartridges, the same information will be
. given for each one.
37
Page 44
The bottom part of the page lists any errors that were found during the
powering up and test procedure.
Page Three: The third page of the status report provides information on the
options for formatting and printer operation that are currently active, in the
order you are most likely to need the information. You can change any of
these by programming from the front panel.
Four sets of selected (or default) options are listed:
Current - the settings to which the printer will respond when it
receives a command.
Initial -the settings that were selected when the printer was first turned
on.
Power-up - the settings that are stored in NV RAM (see Glossary).
Factory set - the settings originally selected at the factory as default
values (ROM).
The COMMAND GROUP includes these functions:
Emulation -the printer whose functions the Star LaserPrinter 8111 is set
to emulate.
Number of Copies - the number of copies of each page to be printed.
Macro Overlay - whether special instructions are preprogrammed.
FF on Rotate - whether the printer will issue a form feed command if
the orientation (portrait or landscape) of the printing is switched within
a page.
Hex Dump - whether the text will be printed in ASCII symbols or in
hexadecimal.
LCD Intensity - the brightness of the panel display.
Bell - wheher the printer’s beeper will sound if you need to take action
during printing, such as a pause to change fonts.
Warning Alarm - whether there will be an audible warning in case of
a printer malfunction.
38
-
-
-
Page 45
-_
-
The functions of the LAYOUT GROUP are:
Orientation - portrait or landscape.
Margin settings - left, right, and top in relation to the available page
area, and page (text) length in number of lines.
VMI and HMI - Vertical Motion Index, Horizontal Motion Index.
VMI refers to the smallest increment that can be made in the vertical or
y axis. Line spacing is a multiple of VMI. HMI refers to the smallest
increment that can be made in the horizontal or x axis. Dot spacing is a
multiple of HMI.
Vertical and Horizontal Offset - text/graphic position is oriented
away from the center of the printed page, for special layouts, such as left
and right pages of a book or magazine.
The PAPER FEED GROUP includes:
Feeder - whether the paper will be fed from the cassette or manually.
Paper size - the dimensions of the paper cassette now in use.
Automatic parameters- whether there is an automatic carriage return
(CR) at a paragraph break, an automatic line feed (LF) at the end of each
line, a form feed (FF) after each page, and an auto wrap feature.
The INTERFACE GROUP functions include:
Interface type - parallel or serial
What the communication settings would be if serial communication
were activated, including baud rate (rate of data transmission), data bits
(number of information bits per byte), parity (error checking mode), and
communication protocol.
Page Four: The fourth page of the status report presents information about
the fonts available for each of .the three printer emulations, HP LaserJet
III(primary and secondary fonts), IBM Proprinter, and Epson EX-800. HP
emulation displays a symbol set. Epson, and IBM Proprinter emulations
display character sets. These include the selection of letters, numbers, and
symbols, such as
Roman-8
39
Page 46
It specifies the typeface, such as
Courier
and tells whether the letters in the font are proportional (vary in width from
one letter to another, such as a narrow i or a wide w) or whether all letters
are the same width. It also tells how many characters to the horizontal inch
(pitch), font height (point), whether it will print in italics or upright
(sometimes called roman), how dark the printing is (stroke weight - light,
medium, or bold).
PROGRAMMING FROM THE FRONT PANEL
As the status report indicates, the various functions that you can select from
the font panel are arranged in an outline form, or a hierarchy. This means
there am main groups and several levels within each one.
Remember: you [ENTER] or [EXIT] a Level to select the [PREVIOUS] or
[NEXT] Item within a Group.
[PREVIOUS]
WTI
[ENTER]
+
[NEXT]
To get into the Program Mode, you must perform two actions:
l Press [ON LINE] until the light goes OJ, then
. Press [PROGRAM]
The screen wiIl respond by displaying the phrase
PROGRAM MODE
The order of the main categories within Program Mode is:
CHARACTER
LAYOUT
PAPER FEED
COMMAND
40
-
-
-
Page 47
INTERFACE
SET INIT. VALUES
SET POWER-UP
LOAD FACTORY SET
You move from one item to the next in this level by pressing [NEXT].
Pressing [ENTER] displays the next item of the next higher level. If no such
item exists, [ENTER] displays the value that is to be selected with @ added.
[ON LINE] ends the program mode. Pressing [PREVIOUS] returns the display
to the last item at the same level you are currently in. Pressing [EXIT]
displays the last item at the next lower level.
Here’s how this works in real life, using a portion of the COMMAND group
hierarchy. Set the printer off line and press [PROGRAM] so the display reads
PROGRAM MODE
Press [NEXT] until the display reads
COMMAND
Then press [ENTER] until the display reads
EMULATION
Pressing [ENTER] will display one of the following:
HP LaserJet III
IBM Proprinter
EPSON EX-800
LincPage
Cartridge 1
Cartridge 2
Pressing [NEXT] continuously will list all the available emulations.
Suppose you want to select Epson EX-800 as the emulation.
41
Page 48
First get into the Program Mode,
l Press [ON LINE], so the light is ofi
l Press [PROGRAM], after which the screen displays
PROGRAM MODE
l Now press [NEXT]. The screen responds with
CHARACTER
l Pressing [NEXT] three times displays, in order,
LAYOUT
PAPER FEED
COMMAND
l Now press [ENTER]. The screen responds with
EMULATION
l Pressing [ENTER] here displays
HP LaserJet III
as the default emulation. You want to stay in this level of the hierarchy, so
this time
-
l Press [NEXT], giving you
IBM Proprinter
l Pressing [NEXT] again displays
EPSON EX-800
which is the emulation you want. To select it,
l Press [ENTER]. which displays
EPSON EX-800@
l To leave this level, press [EXIT], which displays
EMULATION
This time when you press [ENTER], the screen will display as the default
EPSON EX-800@
42
-
_-
-
-
Page 49
&
::
; :
To summarize:
PROGRAM MODE [NEXT]
CHARACTER [NEXT]
LAYOUT [NEXT]
PAPER FEED [NEXT]
COMMAND [ENTER]
EMULATION [ENTER]
HP LaserJet III [NEXT]
IBM Proprinter [NEXT]
EPSON EX-800 [ENTER,EXITl
The entire hierarchy is shown on the next page. Chapter4, “Quick Start with
the Star LaserPrinter 8111: A Tutorial”presents programming sequences for
selecting serial and parallel interfaces, saving settings, returning to factory
settings, activating manual paper feed, printing in landscape orientation,
changing the character set, and changing fonts during printing. Chapter 6,
“Printing,” shows the default settings for each of the three emulations.
For more on programming, please see the Applications Manual.
43
Page 50
-
z:fiR LASERPRINTER Level 2
YHARACTER- (Refer to next page)
LAYOUT-
/
PAPER FEED
l
COMMAND-
INTERFACE
-0RIENTATION~Portrait
MARGIN DEFAULT MARGIN’
VMI~~tA,N,UAL’~OOl - 255 (008’)
HMILAUTO
OFFSET~;‘Ft~;~tTAL
FEEDER1Cas,S,5,ea:e;8ed
SIZE----- Paper: A4’
F
AUTO PARAMETERSTEmuI. Mlt On’
NUMBER OF COPIES~ONE’
MACRO OVERLAY-Disable’
FF ON ROTATE-Yes’
PRINT MODE
Epson Std USA
Epson Std France
Epson Std German
Epson Std UK
Epson Std Dnmkl
Epson$td Swedn
Epson Std Italy
Epson Std Spain 1
Epson Std Japan
Epson Std Norway
Epson Std DnmkZ
Epson Std +ain 2
yrlpyca
IBM DN
PROP. SPACE EN= Prop Disabled
ITALIC/GRAPHICS~ Italic Fnable’
BOLDFACE7 E+J;z g
CODE 126-159~ Print On
Level 4
IBM PC Set
-IBM DN Set
IBM PC-650
ECMA94
-Ventura Math
-Ventura lntl
-Ventura US
-Windows
- PS Text
- PS Math
-DeskTop
- yidgpt Pub1
-Pi Font
-US ASCII
I “a/
%h R a’
-:&zY”
- IS0 25: French
- IS0 69: French
-HP German
- IS0 21: German
- IS0 11: Swedish
- IS0 10: Swedish
IS0 15: Italian
IS0 60: Norwegian
IS0 61: Norwegian
HP Spanish
IS0 17: Spanish
IS0 85: Spanish
- IS0 16: Portugese
- IS0 64: Portugese
IS0 57: Chinese
Speclfy Font
Prop Enabled
Graphics Enable
Print Off
Level 5
SPAClNG~bIIspp$~
PITCH
7
POINT SIZE
STYLE - /J$$:“,“”
STRoKE wEIGHTp!%$J y:;
TYPEFACE
Level 6
10 PI’
12 CPI
16.66 CPI
6.5 CPI
6.1 CPI
12 Pomt’
14 Point
16 Point
16 Point
24 Point
:ri ~:k:
60 Point
72 Point
6 Point
7 Point
6.5 Point
I
10 Point
pJ$
Tms Romn
g?$;
Prestige
Caslon
Orator
CG Times
Univers
‘pi”,“, Printal
Elite
45
Page 52
/VOTES
-
-
-
Page 53
This chapter is designed for dual use, since most computer users fall into
one of two categories. Some peopIe like to read the documentation through
from beginning to end. Others like to plunge right into the hands-on mode,
using documentation as a quick reference, at most.
This chapter is for both groups. It can be read in sequence with the rest of
the book, or it can be used as a stand-alone aid.
PRELIMINARIES
You Star LaserPrinter 8111 comes in three basic parts:
l the printer body
l the paper cassette
l the toner cartridge
When you place your printer for use with your computer, be sure that:
l it sits on a strong, stable table
l there is circulation on all sides, including the bottom
l there is sufficient room for the paper cassette, which protrudes
from the front, and for the pullout paper tray for face-up paper
ejection, located at the rear of the printer.
The printer is heavy, so use the grip handles located halfway back on either
side. Don’t try to lift it by yourself - have someone help you.
Be sum to remove all the packing material before you use the printer.
If you am just setting up your Star LaserPrinter 8111, and have not read the
material in Chapter 2, please take the time to mad the section on installing
the toner cartridge. It is very vital that you handle and install this component
precisely, because it contains important laser printing devices, as well as the
toner (“ink”) that actually prints on the paper.
47
Page 54
Ordinary office-weight paper of standard sizes can be fed automatically
into the printer from the paper cassette. A different cassette is required for
each size. For heavier-than-normal paper, envelopes, mailing labels, and
transparencies, use the manual feed slot, located on the top of the paper
cassette’s cover.
The printer’s on-off switch is located at the rear.
THE FRONT PANEL
The front panel of the printer provides information about the printer’s
internal and operating status. It also allows you to program it for your (and
your computer’s) specific needs. The Star LaserPrinter 8111 works in two
basic modes when the printer is off line:
Front panel mode-using the grey buttons
Program mode-using the yellow buttons
The buttons have different functions in each mode:
BUlTON
[ON LINE]
[PRINTI
ERROR SKIP/NEXT]
RESTiPREVIOUS]
[RESET/ENTER]
[PROGRAM/EXIT] Enter ~ogram mode
FRONT PANEL MODE PROGRAM MODE
(GREY BUTTONS) (YELLOW BUTTONS)
When light is on printer can
print. When light is off all gramMode(retums to Printer
other buttons are enabled
Print information in memory
Continue printing or display
error code rent level of menu selections
Initiate tests Display previous item within
Discard information
Fastexit(te.rmination)ofPro-
Ready)
No function
Display next item within cur-
current level of menu selec-
tiOllS
Display next level withincurrent item of menu selection.
When in last level of current
item, executes function
Display previous level within
current item of menu selection
--
_
-
-
48
Page 55
[PREVIOUS]
[EXIT] -4~ [ENTER]
t
[NEXT]
Remember: you [ENTER] or [EXIT] aLEVELto select the [PREVIOUS]
or [NEXT] ITEM within a GROUP.
The front panel also has some lights. When lit they mean:
READY - the printer is ready for printing or for programming
ALARM - and error condition exists and the printer is off line
DATA - information received, not yet printed
ON LINE - the printer is ready for printing
PRINT - the printer is printing information
BASIC OPERATIONS
Ther are four basic operations performed from the panel:
l On Line and Off Line
- The printer can receive information from
the computer and print it only when it is on line. When the printer is
on line, the light on the [ON LINE] button will be lit. For all other
functions, the printer must be off line. This is accomplished by
pressing the [ON LINE] button until its light is our.
l Form feed - The printer may have unprinted information in its
memory. This is indicated by the lighted DATA light. To clear it from
the printer, take the printer off line. Then press [PRINT]. When all the
remaining information is printed, the paper will be ejected and the
DATA light will go our.
l Error Skip - In case of an error, the printer will go off line and stop
printing. If the error is minor, it is possible to continue printing. To do
this, press [ERROR SKIP], then [ON LINE] until its light is on. If
the error was minor, printing will resume. If the error was more
serious, the panel will provide information on how to handle it.
49
Page 56
l Reset -To clear the printer memory and restore settings to emulation
defaults, press [RESET].
Before you begin printing, at any time, but especially when you are new to
the process, it is a good idea to run a test or sample print. To do this, take
the printer off line. Then press and hold [TEST] until the display reads
Status Sheet. The printer will provide a series of 4 sheets showing.
l its configuration
l the quality of its text printing, and
l a summary of its settings - current, initial, power-up and factory
preset.
CONNECTING THE PRINTER TO THE COMPUTER
The Star LaserPrinter 8111 comes equipped with both a standard parallel
interface and an RS-232 serial interface. Both can be connected simultaneously, though only one can be active at any one time.
The printer comes from the factory pre-set with the IBM parallel interface
active. You can confirm this by looking at the Interface Group portion of
the sample print.
This means that the IBM parallel interface is active. If the serial port were
active, that line would state SERIAL.
50
-
-.
Page 57
c
L
If you are going to use an IBM parallel interface, you don’t need to make
any changes. If you want to use an RS-232 interface, you must perform a
programming sequence. Programming will involve pressing various panel
keys and following the information provided on the display screen. The
front panel indicates the selected function with the @ symbol following the
function displayed.
Note: Changing the interface type requires two steps after front panel
programming.
1. Save the new interface setting in NV RAM by pressing
[PROGRAM]
then pressing
[NEXT]
until the screen displays
SET POWER-UP
Press
[ENTER]
to store the new selections
2. Turn the printer’s power off, then on again to activate the new
interface.
Selecting the Serial Interface
Note that when you have completed the selection sequence, the settings
must be stored in NV RAM (see Saving Settings), then activated by turning
the printer’s power off, then on again.
l Take the printer off line by pressing the [ON LINE] button until the
button’s light is 08
l Then press [PROGRAM].
l Press [NEXT] until the display screen reads
INTERFACE
l Press [ENTER]. Now the screen will read
PARALLEL IBM
51
Page 58
. Now press [NEXT] two times. The screen will change to
SERIAL
l With the display reading SERIAL, this time press [ENTER]. The
screen will show
BAUD RATE
l Pressing [ENTER] now displays
9600 baud
l Press [NEXT] to display a series of options, from 300 to 19200. Keep
pressing until the one you want appears on the screen.
l Pressing [ENTER] now displays
9600 baud @
l Then press [EXIT] displays BAUD RATE. Pressing [NEXT] displays
these options:
DATA BIT
PARITY
STOP BIT
PROTOCOL
The settings from the factory for these options are:
8 bit
no parity
1 stop bit
XON/XOFF
Whenever you want to change any of the serial parameters, follow the same
sequence as for selecting the baud rate. For example, to change the data bit,
at SERIAL press [ENTER] then [NEXT] until DATA BIT is displayed on the
screen. Pressing [ENTER] will display the first option, and [NEXT] will
give the rest of them. Press [ENTER] when your choice appears on the
screen. Finally, press [ON LINE], which readies the Star LaserPrinter 8111
for printing.
52
-_
-
Page 59
!!
g.
i’ .
1..
L I
-
If your applications program requires a DTR handshake (“hardware” rather
than XON/XOFP “software”), set it from the SERIAL menu by
l Pressing [ENTER] then [NEXT] until you see
PROTOCOL
l Pressing [ENTER] displays
XON/XOFF
l Pressing [NEXT] displays DTR. Press [ENTER] to execute.
The next step is to activate your choice to the printer.
l Press [EXIT] 3 times to display
INTERFACE
l Press [NEXT] 2 times to display
SET POWER-UP
l Press [ENTER] to store the current settings into NV RAM. Turn
power off, then on to activate.
-
-
..,-
l
Press [ON LINE], which allows the Star LaserPrinter 8111 to begin
printing through the serial interface.
Activating the Parallel Interface
To return to a parallel interface, do this:
l ,,
Take the printer off line by pressing the [ON LINE] button until the
button’s light is off
l Thenpress [PROGRAMI.
. Press [NEXT] until the screen displays
INTERFACE
l Press [ENTER], which displays
SERIAL
l Press [NEXT] which gives
PARALLEL IBM
53
Page 60
l Press [ENTER] to select parallel.
. Press [EXIT] once to display
INTERFACE
l Press [NEXT] 2 times to display
SET POWER-UP
l Press [ENTER] to store the current settings into NV RAM. Turn the
power off, then on to activate.
l Pressing [ON LINE] will allow the Star LaserPrinter 8111 to begin
printing through the parallel interface.
Saving the Setting
The new setting will remain in the printer’s RAM memory until it is turned
off. To understand why, you should realize that there are four different types
of settings stored in the printer’s memories.
l The FACTORY SETTINGS, which are those put into the printer’s
unchangable ROM memory at the factory.
l The POWER-UP SETTINGS, which the user can create, then store in a
permanent memory called NV RAM, even when the power is turned off
at the end of the session in which they are created. These settings will
then override the Factory Settings, being activated when the printer is
turned off, then on again.
l The INITIAL SETTINGS, which the user can create and use as long as
the printer is not turned off. These are stored in temporary or volatile
RAM memory. They override the Power-up Settings.
l The CURRENT SETTINGS, which are those stored in temporary RAM
memory. These may be issued by software commands that override all
other settings.
To make the setting permanent, you must save it in NV RAM! Perform this
programming sequence, after taking the printer off line.
l Press [PROGRAM].
l .Press [NEXT] until the screen displays
SET POWER-UP
54
Page 61
l Press [ENTER], after which the screen will display
NV RAM LOAD DONE
l Finally, press [ON LINE]. Your new settings are now saved, and you
can continue with other printing, if desired.
Returning to Factory Settings
If for some reason you want to start from the beginning, with the original
factory settings, follow this procedure:
l In the Program mode, press [NEXT] until the screen reads
LOAD FACTORY SET
l Press [ENTER]. The screen will display briefly
LOAD FROM ROM OK
then
REINITIALIZE
The factory settings are now restored, and you can go on line for other
activities.
_“.^
-..
MANUAL FEED
As the status sheet shows, the Star LaserPrinter 8111 come set for
automatic paper feed from the cassette. To change this setting from
the front panel, put the printer off line, and press [PROGRAM].
l Press [NEXT] until the screen displays:
PAPER FEED
l Press [ENTER], and the screen will now display:
FEEDER
. Press [ENTER], which will display
Cassette
l Press [NEXT] to display
Manual
55
Page 62
l Pressing [ENTER] confirms the change.
l Finally, press the [ON LINE] button to make the Star LaserPrinter
8111 ready for printing.
The Star LaserPrinter 8111 is now ready to receive sheets fed through the slot
on top of the paper cassette’s cover.
Before you start printing, adjust the slot to fit your material. Below the slot
are settings for various standard sized papers. If you are going to use one of
these, simply adjust the slot accordingly. If you are planning to use sheets
of other sizes, place a sample in the slot, and adjust the slot until it holds the
sheet securely without bending it.
Note that it is better to do this before you actually start printing, than to trust
to luck during the process.
If during either manual or automatic feed, you get a paper jam, refer to the
chapter on “Troubleshooting,” for ways to clear the machine.
PAPER SIZE
As the status sheet shows, the Star LaserPrinter 8111 comes set to use letter
size paper. If you want to use other size of paper or envelopes, you must first
instruct the printer. After going off line and pressing [PROGRAM]:
.
-
. Press [NEXT] until the screen reads
PAPER FEED
l Press”[ENTER], which will display
FEEDER
l Pressing [NEXT] displays
SIZE
l Press [ENTER], which will display
Paper : Letter
56
Page 63
l Pressing [NEXT] repeatedly will list the other choices,
l Press [ENTER] when the required paper/envelope size is displayed on
: lntntnl C5
: Letter
the screen.
l Finally, press [ON LINE], which readies the Star LaserPrinter 8111 for
printing.
Before you start printing, refill the cassette with the appropriate paper.
PRINTING IN LANDSCAPE ORIENTATION
If you want to change from portrait to landscape orientation for your
printed page, follow this procedure, after going off line and pressing
[PROGRAM]:
l Press [NEXT] until you get
LAYOUT
l Press [ENTER], which will display
- ORIENTATION
l Press [ENTER] for
Portrait
l Pressing [NEXT] gives
Landscape
l Pressing [ENTER] selects Landscape.
Page 64
CHANGING CHARACTER SET
If you want to use a character set other than that provided at the factory,
follow this procedure:
l After going off line and pressing [PROGRAM]
l Press [NEXT] until you see
CHARACTER
l Press [ENTER], which displays
FONT
(preceded by primary or secondary, if the printer is in the HP LaserJet
III emulation)
l Press [ENTER], which gives
CHARACTER or SYMBOL SET
depending on the emulation.
l Pressing [ENTER] again presents the various options.
9 Press [NEXT] until you see the desired one.
l Then press [ENTER].
l Press [ON LINE].
CHANGING FONT ATTRIBUTES
Attributes are those characteristics of a type font that make it distinct from
all others. These include spacing of characters, either proportional or
monospaced (uniform); pitch, measured in characters per inch; height or
point size; style, either upright (roman) or italic; stroke weight, bold,
medium, or light; and typeface. Typefaces available with the Star
LaserPrinter 8111 include Courier, Helvet, Tms Romn, Gothic, Script,
Prestige, Caslon, Orator, Line printer, Pica, and Elite. All these attributes
can be selected from the front panel with the printer in Program Mode.
58
Page 65
l To change font attributes, take the printer off line and press
[PROGRAM], to enter Program Mode. Then press [NEXT], so
that the display reads
CHARACTER
l Press [ENTER], so the display shows
FONT
l Pressing [ENTER] again, displays
SET
-_
l Press [NEXT] to display
-.
FONT AIlRIBUTES
and [ENTER] for
_-
l To change any of the attributes, press [NEXT], so the screen reads
Standard Default
Specify Font
Now you can select individual atributes.
l Pressing [ENTER] will display
SPACING
l And pressing [NEXT] repeatedly will list the remaining attributes,
e...
I-
PITCH
POINT SIZE
STYLE
L.-
STROKE WEIGHT
TYPEFACE
If you want to change any of attribute, when its name appears on the screen,
press [ENTER], then [NEXT] for the choices available. For example, if
you want to change point size, when that attribute appears on the screen,
pressing [ENTER] will list
6 point
59
Page 66
and pressing [NEXT] several times will list the other choices,
7 point
8.5 point
10 point
12 point
14 point
16 point
18 point
24 point
36 point
When the size you want appears on the screen, pressing [ENTER] will
select it.
If you want to change the pitch, use the same procedure to select among 6.5,
8.1,10,12, or 16.66 characters per inch. For stroke weight, your options are
for bold (+l through +7), medium (0). and light (-1 through -7). In each
case, select your choice by pressing [ENTER].
If you am in Epson emulation, you may also select other parameters by
pressing [PREVIOUS] until the screen displays
CHARACTER
l Now press [ENTER], then [NEXT] so the screen reads
SETUP PARAMS
The choices here are
Proportional spacing on or off
Enabling italics or graphics
Enabling boldface
l Again, when the parameter you want to change appears on the screen,
press [ENTER], then [NEXT] to see yourchoices. When you seethe one
you want, press [ENTER] to select it.
60
Page 67
PROGRAMMING ON YOUR OWN
i -
f i
-.
I.
Now that you have successfully programmed some basic information into
your Star LaserPrinter 8111, you may want to continue on your own. The
choices you can make are arranged in a hierarchy. They represent the
options common to all the emulations available with the printer, and include
a selection of the specific emulation:
HP LaserJet III
Epson EX-800
IBM Proprinter
To customize your printing beyond that will require programming from the
computer. For that, refer to the Applications Manual.
There are several settings that cannot be changed, regardless of emulation.
They are:
Form size
paper size, depending on orientation.
Top of form - always defaults to the top of the sheet. However, you
can select the top margin of the printed page.
Perforation skip Special word processing features - of other printers is ignored.
Text/graphics mode - defaults to text mode.
-which will always default to the maximum value for the
always defaults to 0 lines.
Slashed zero
On-line - The printer is always on line after being turned on or
powered up.
The highest rank in the hierarchy available for programming through the
printer’s front panel is as follows:
PROGRAM MODE
* CHARACTER
* LAYOUT
* PAPERFEED
* COMMAND
* INTERFACE
- the style of the zero depends on the selected font.
61
Page 68
SET INIT. VALUES
SET POWER-UP
LOAD FACTORY SET
The functions marked with an asterisk ate summarized on the status sheet.
Always start your programming by going offline (press [ON LINE] so that
its light goes off). Then press [PROGRAM].
As you have already found, you move from one to the next item in the same
level by pressing [NEXT]. [PREVIOUS] returns the display to the last
item at the current level. [EXIT] displays the last item at the next higher
level. [ENTER] displays the first item of the next lower level. If no such
item exists, [ENTER] displays the value that is to be selected with@ added.
[EXIT] or [ON LINE] ends the program mode.
The complete hierarchy is shown next page.
Movement within the LaserPrinter 8111 hierarchy is shown below:
[PREVIOUS]
-
62
[EXIT]
[ENTER]
-+
$
[NEXT]
Page 69
_.
. .
‘-
I_.
-.
L
L..
1 .
STAR LASERPRINTER 8111 FRONT PANEL HIERARCHY
Level 1 Level 2 Level 3 Level 4 Level 5
IARACTER- (Refer to next page)
YOUT----rORlENTATlON L~;Po&w
MARGlN~~~;\JLL$$RGIN’ LEFT MARGIN-OOO’- 132
7 TOP RIGHT MARGIN-000 MARGIN-000’ - - 112 132 (003
VMI~~;$~AL’~OOl - 255 (006*)
HMI~$ij’
OFFSETLV;;;;;{$AL
PER FEED-
lMMAND
‘ERFACE T PARALLEL IBM’
FEEOERLCa;FF;ed
-SIZE , Paper: A4
AUTO PARAMETERSTEmuI. Dfk On’
NUMBER OF COPIES~ONE’
MACRO OVERLAYiDisable*
FF ON ROTATE-Yes’
PRINT MODE LPartial Page’
As the sample print shows, your Star LaserPrinter 8111 can fill a sheet ofpaper
with text and/or graphics to within 3/16 - l/2 in (8 - 12mm) of the margins.
Some of the choices am made for you by the printer. But most of them are
under your control, either from the front panel of the printer, or through your
computer and the application software you are using on it.
Some of the choices may be limited. Printer emulation and the page
orientation are examples. Your application software may not support an
available command, or it may not permit a change in page orientation
Whether you are printing business letters, charts or other graphics, or
brochures and newsletters, you should keep these choices and their limitations in mind.
What follows is a list of the elements that go into a printed page. They may
be selected through the front panel of the Star LaserPrinter 8111 or through
your application software.
.
Page 72
Format:
Orientation
Form size
Text length
Margins
Line spacing
;
Text:
Character set/symbol set
Typeface
Character spacing
Pitch
Point size
Style
Stroke weight
If you am a beginner, you may want to limit the amount of computer
programming you do for page set-up. Remember: you can print a very nicelooking page with very little manipulation, by relying on the default settings
in your printer and application program. By using the programming available
from the front panel of the printer, you have a wide variety of options.
The next chapter outlines your choices, both for Star LaserPrinter 8111
programming and for making choices from the computer.
66
Page 73
FONTS
The style of printing that appears in your finished work consists of five
elements:
l the symbol/character set -
the letters, numbers, and symbols avail-
able for use
. the fonts present in the Star LaserPrinter 8III - some fonts come
as standard equipment, while others are available in cartridges that are
installed in the font slots of the printer, you may also purchase fonts on
a disk and load them down (downloading) from the computer to the Star
LaserPrinter 8111’s RAM (for mom information consult a software
dealer)
l font attributes - consisting of character spacing, pitch, point size,
style, stroke weight, and typeface
l the printer you select to emulate - the Star LaserPrinter 8111 can
emulate three widely available printers, the Hewlett Packard LaserJet
III (a laser printer), Epson EX-800, orlBM Proprinter (both dot-matrix
printers).
l the capabilities of your applications software.
The Star LaserPrinter 8111 comes equipped with four families of fonts. Any
one of them can be selected from the front panel for use as the base font in
any emulation.
Many of the available fonts can be selected from the front panel. The ultimate
in printing flexibility is provided by programming with the command sets.
For more on this, see the chapter “Interfacing With Applications Programs”
and the Applications Manual.
For each of the three printers that the Star LaserPrinter 8111 emulates, there
are default print styles that it will use if you do not make other choices. In the
material that follows, the default values will first be presented together, for
your convenience. Then the entire range of choices for each attribute without
an optional Font Cartridge will be presented: the default values will be
marked with an *.
66
-
-
-
-
Page 75
HEWLElT PACKARD LASERJET III
Default Values, primary and secondary fonts:
Symbol set:
Spacing:
Pitch:
Point size:
Style:
Stroke Weight:
Typeface:
Roman-8
Monospaced
1Ocpi
12 point
Upright
Medium 0
Courier
A vailable Values, primary and secondary fonts:
Symbol set:
US ASCII
HP Legal
IS0 IRV
JIS ASCII
IS0 UK
IS0 25: French
IS0 69: French
HP German
IS0 21: German
IS0 11: Swedish
IS0 10: Swedish
IS0 15: Italian
IS0 16: Portuguese
IS0 84 :Portuguese
IS0 57: Chinese
Roman-g*
IBM PC Set
69
Page 76
Spacing:
Pitch:
Point size:
Style:
Stroke Weight:
Std Typeface:
IBM DN Set
IBM PC-850
ECMA94
Proportional
Monospaced*
10 cpi*
12 cpi
16.66 cpi
8.5 point
10 point
12 point*
Upright*
Italics
-7 to -1 Light
Medium 0*
+l to +7 Bold
Line Printer
Courier*
70
-
Page 77
EPSON EX-800
Default Values:
Character set:
Spacing:
Pitch:
Point size:
Style:
Stroke Weight:
Typeface:
Proportional Spacing:
Italic:
Bold:
A vailable Values:
Character set:
Proportional spacing:
Epson Std USA
Monospaced
10 cpi
12 point
Upright
Medium 0
Courier
Disabled
Enabled
Off
Epson Std USA*
Epson Std France
Epson Std Germany
Epson Std UK
Epson Std Denmark 1
Epson Std Sweden
Epson Std Italy
Epson Std Spain 1
Epson Std Japan
Epson Std Norway
Epson Std Denmark 2
Epson Std Spain 2
Epson Std Latin America
IBM PC
IBM DN
Disabled*
Enabled*
71
Page 78
Italic/Graphics:
Boldface:
IBM PROPRINTER
Default Values:
Character set:
Spacing:
Pitch:
Point size:
Style:
Stroke Weight:
Typeface:
A vailable Values:
Character set:
Italic Enable*
Graphics Enable
Offr
On
IBM GP Set 2
Monospaced
10 cpi
12 point
Upright
Medium 0
Courier
IBM GP Set 1
IBM GP Set 2*
IBM PC
IBM DN
ECMA94
72
-
-
-
-
Page 79
1
‘, _
L
INSTALLING OPTIONAL FONT CARTRIDGES
.
You may install two optional font cartridges in the slots beneath the paper
cassette, at the front of the Star LaserPrinter 8111 (referred to as slot #l and
slot #2). If the power is off, simply hold one of the cartridges at its label end,
label facing up, and insert it into the slot, pushing it as far back as it will go.
Part of the label end will protrude from the printer’s frame.
If you want to change a cartridge while the power is on, do this:
l Make sure the printer is off line. If necessary, press the [ON LINE]
button until the light is ufi
: . .._
) -
l Be sum the DATA light is ofl If the light is on, this means the printer
contains material in its memory that has not yet been printed. Press the
[PRINT] button,toprintthismaterial. Whenprintingofallthematerial
in memory is completed, the DATA light will go ofl
l Make the desired cartridge changes.
l Press [ON LINE], so that the light is on, and continue your printing as
desired.
Note: If you attempt to change a cartridge while the printer in on line, the
printer will go off line. The screen will display the message CHECK
CARTRIDGE and the slot number. Replace the cartridge and press
[ERROR SKIP], then [ON LINE], whichmay allow youto continue.
If this doesn’t work, turn the power off, then on again. For mote on this
subject, see “Font/Emulation Cartridge Problems” in the chapter
“Troubleshooting.”
73
Page 80
ADJUSTING PRINT QUALITY
At some time you may find that the quality of the printing is not what you
want. You may run test prints and then make the printing lighter or darker,
as desired.
Begin by running an engine test print, which consists of a pattern of vertical
lines. To do this, make sure there is paper in the paper cassette and turn the
printer on, if necessary. Now look on the right hand side of the printer about
halfway back. You will see a small hole.
-
Take a &nted pencil and gently press it into the hole. The alarm will sound
and the screen will display
ENGINE TEST.
Examine the printed sheet that comes from the printer to determine whether
the density of the print is satisfactory, and the density is uniform throughout
the printed page.
If you want to adjust the print density, follow this procedure:
l Open the printer.
: At the left front you will see a green knurled dial, marked with the odd
numbers from 1 through 9.
74
-
-
Page 81
.
To make the printing lighter, turn the dial clockwise to a higher number.
.
To make the printing darker; turn the dial counterclockwise to a lower
number.
For more on improving the quality of your prints, see “Streaky Prints” in the
chapter “Troubleshooting.”
75
Page 82
NOTES
Page 83
i.
I
‘.
t L_
k_
-
: -_
i I
. .._
-.
--.
-_
-.
.
If this were the best of all possible computer worlds, every software
application would run automatically on the Star LaserPrinter 8111 or any
other printer. The fact is that software applications-word processing,
spreadsheets, databases, or others-are designed to work with a specific
printer or a limited group of printers.
Some very popular software applications were written before laser printers
became common, and require a dot-matrix or daisy-wheel printer. Some
software is linked to a particular brand of computer and printer. And some
can be used on only one brand of laser printer.
As you have read, some of the commands needed for printing am resident in
the Star LaserPrinter 8111. Some can be programmed from the front panel.
And some must be issued by the computer, from within a program. Some
applications programs allow the user to specify a printer or printers, either by
name or by type. Once the selection is made, it becomes part of the program
file. As a result, printing usually requires nothing mom than issuing a one or
two keystroke command.
ln this chapter you will learn how to specify the Star LaserPrinter 8111 for
thme popular applications programs for IBM-compatible computers: Lotus
l-2-3, WordPerfect, Microsoft Word, and Microsoft Windows. The Star
LaserPrinter 8111 will print graphics as well as words and numbers, emulating
Hewlett Packard graphics, all densities of the Epson dot matrix printers, and
the IBM Proprinter semigraphics. It can also be used with the two popular
desktop publishing programs, Aldus PageMaker, and Xerox Ventura Publisher, which uses the GEM desktop environment. Both are compatible with
the HPLaserJet III. For further information consult the Applications Manual.
Before you begin printing, be sure your Star LaserPrinter 8111 is correctly
configured for your computer by having either the parallel or serial interface
selected and the correct cabling. Prior to printing, make sure that you have
’ selected the same emulation from the front panel as the one you specified in
the application.
77
Page 84
LOTUS 1-2-3
Original Version:
The original version of Lotus l-2-3 is perhaps the most widely used
applications program. It also predates the popularity of laser printers.
However, Lotus l-2-3 can readily be used with dot-matrix printers. This
makes it easy to use with the Star LaserPrinter 8111, because it emulates two
dot-matrix printers, the Epson EX-800 and the IBM Proprinter.
There are two ways to make Lotus compatible with a printer:
l permanently, in a startup configuration file through the /Worksheet
Menu, and
l temporarily, through the Print/Printer Menu.
The more straightforward of the two choices is to make the choice pennanent
and automatic upon startup. Doing this saves the printer setup in the file
223.CNI on the Lotus system disk. Here is how to do this:
At the opening screen and Menu, select Worksheet by typing
/W
ln the next Menu, select Global by typing
G
and then, at the Global Menu, select Default by typing
.D
ln the Default Menu, type
P
for Printer. Now you are ready to make some selections about the configuration of your Star LaserPrinter 8111..
The first of these is telling Lotus l-2-3 whether your printer will use a parallel
or serial interface.
For parallel, type
1
78
.~
-
-
Page 85
For serial, type
2
You will now see a series of options. If you have a parallel interface, make
these selections next:
l Automatic line feed-type
_-
A_
_.-
N
for No. If you look at your sample print under Paper Feed Group, you
will see that the matching command is ofl
. Pitch-If you am using a standard font, you do not need to make a
selection here.
Now you are through with the parallel configuration. To save these new
values, in the Default Menu type
U
for Update. Finally, type
Q
for Quit, and Lotus l-2-3 is ready to use with the Star LaserPrinter 8111.
For a serial interface, type 2 to select it. Choices following this are:
l Data transmission rate - type
6
-...
-
for 9600 baud.
l Automatic line feed - type
N
for No. If you look at your sample print under Paper Feed Group, you will
see that the matching command is ofi
l Pitch-If you are using a standard font, you do not need to make a
selection here.
-
79
Page 86
Now you are through with the serial configuration. To save these new values,
in the Default Menu type
U
for Update. Finally, type
Q
for Quit, and Lotus l-2-3 is ready to use with the Star LaserPrinter 8111.
If you are interested in customizing your Lotus files’ comnmnication with
the Star LaserPrinter 8111, you should consult the section in the Lotus l-2-3
manual entitled “Printer Control Codes.”
With the Star LaserPrinter 8111, you canuse Lotus 1-2-3’s PrintGraph feature
to reproduce charts and graphs, in the Epson emulation. To do this you must
select options that configure PrintGraph for this emulation.
If you are in Lotus, save your worksheet with File and Save,
/FS
and your graph with Graph and Save,
/GS
Access PrintGraph and insert the PrintGraph program disk in Drive A and the
font disk in Drive B. From the menu make these selections:
Configurable Device-Epson FX-80 (either single, double, or quad den-
sity-the Star LaserPrinter 8111 supports them all), using the arrow keys to
position the pointer, and
<Enter>
Page-type width and length values for the size of paper; this should match
the printer paper cassette used in the printer
Interface-if your printer will use a parallel connection, highlight
1
and
<Enter>
With a serial connection, select a baud rate of 9600, which is rate choice
number 8.
80
Page 87
To make these changes permanent, save them by typing
/S
and choosing
Replace
Now select
Quit
to return to the main PrintGraph menu. PrintGraph is now ready to use with
the Star LaserPrinter 8111.
Lotus I-2-3 Release 2
In this newer version of Lotus l-2-3, all equipment selections are saved in a
single driver file, called 123.SET. Select your printer from the Install program, through the option called
-..
Change Selected Equipment.
On this Menu, select
L....
---
and press <ENTER>. From the list of printers, choose
Text Printer
HP LaserJet II
-..
and then select
_.
Save Changes
to record your choice.
From the main Lotus Menu, you can specify your default printer by selecting
/Worksheet Global Default Printer Name
You can also use the Star LaserPrinter 8111’s Epson EX-800 and IBM
Proprinter emulations, following the same routine from the Lotus Menus.
For graphics, place the PrintGraph disk in drive A. Select
PrintGraph
from the Lotus l-2-3 menu. Or from DOS, type
xvaph
81
Page 88
and
<Enter>.
Put the configuration menu on the screen by selecting
Settings
To specify the printer connection, either parallel or serial, select
Hardware
and
Interface
For printer type, from the Hardware menu, choose
Printer
and designate
HP LaserJet II.
From the configuration menu you can also choose fonts, paper size (be sure
to select the same size paper cassette for the printer), and actions such as
whether the printer should pause or eject the paper after each graph is printed.
When you have finished, make your selections permanent by choosing
Save
from the configuration menu. When you quit PrintGraph, you are ready to
use your Star LaserPrinter 8111.
WORDPERFECT
WordPerfect must be installed before you can select a printer. Once this is
done, display the Printer Control Menu by pressing
[SHIFT] and Function Key 7
From the list of options that appears on the screen, type the number
4
for Printer Control. Of the three options that now appear, choose Select
Printers by typing
3
82
.-
-
-
Page 89
1
From the list of defined printers, select either HPLaserJet III, Epson EX-800,
or IBM Proprinter, and call it Printer No.1.
Now you must specify the interface connection. If you are using a parallel
interface, for LPT 1, type
0
For a serial interface, for COMl type
4
You must now specify the serial parameters, including baud rate, parity, stop
bits, and character length. Be sure that you specify the same values in
WordPerfect as you do for the Star LaserPrinter 8111. Consult the sample print
under Interface Group for the printer’s default values. To save your
WordPerfect selections, EXIT the program.
MICROSOFT WORD 4.0
_
: . .
In Microsoft Word, you can make your printer selections through the Print
Menu. At the text screen, press [ESC]. Then select PRINTER by typing
P
In the resulting Menu, select OPTIONS by typing
0
A list of available printers appears at the top of the screen. Each of these
printers is the subject of a Printer Description (PRD) File, which is found on
the Printer Disk or the Utilities Disk.
Depending on which release of Microsoft Word you have, you can select the
HP LaserJet III. You should copy the PRD file for the printer you want to use
to the main Word disk, or to a hard disk. Once you do this, the printer will
appear in the Menu for selection at time of printing.
For the HP LaserJet III, you need three PRD fdes:
l HPLASLAN.PRD-for all landscape fonts in cartridges, including
Courier 12, LetterGothic 12, Lineprinter 8.5, Prestige 7 and 10, and
Times Roman 10.
l HPDWNSFP.PRD-for all portrait fonts available in downloadable
fonts.
83
Page 90
l HPDOWNSFL.PRD-for all landscape fonts available in download-
able fonts.
For the Epson, copy these files:
l EPSONFXQ.PRD-which uses graphics mode during justification.
l EPSONFX.PRD-which uses full width spaces for justification, and
is faster than the method used in EPSONPXQ.PRD.
For IBM Proprinter emulation, copy:
9 IBMPRO.PRD
MICROSOFT WINDOWS
Microsoft Windows is a program that coordinates the use of various
programs that might not otherwise be compatible on the screen. Windows
can be configured for your printer, but you should also be aware that any
applications program that you use may have its own printer requirements,
which must be taken into consideration.
To choose a printer for Windows, at the initial Menu select
CONTROL PANEL.
From the resulting Menu, select the
INSTALLATION
Menu, then
‘ADD A PRINTER.
The screen will display a box that reads:
Add printer
Insert the disk with the printer file
you wish to add into drive A, or choose
an alternative drive/directory:
A:\
OK
CANCEL
84
-.
--
-
Page 91
Insert the Utilities disk in drive A and press
OK
Now the screen displays this box:
Available Printers
Printer File:
Epson FX-80
NEC 3550
HP LaserJet
HP LaserJet Plus
HP 7470A
Add Cancel
Highlight HP LaserJet Plus or Epson and select
ADD
Another box appears in response:
Copy associated printer file HPLASERP.DRV
to drive/directory:
C:\Windows (if you have a hard disk)
Yes No Cancel
selecting YES confirms your printer choice and returns you to the
CONTROL PANEL Menu.
If you am just starting with Windows, you should select SETUP from the
CONTROL PANEL Menu. This will present a Menu with three options.
You should first select PRINTER and from the list choose the printer
you wish to use.
Next, from SETUP select CONNECTIONS. This will let you designate
the parallel or serial port for the printer, clicking OK to confinn it.
If you am using a serial printer, go to SETUP once again, and select
COMMUNICATIONS
85
Page 92
After you indicate the active port you have already chosen, Windows
will present a series of settings options. Type in the desired baud rate
and “push the button” for your selection of word (bit) length, parity,
stop bits, handshake, and port.
Select HARDWARE handshake and 1 stop bit.
Be sure that the other selections match the printer settings shown under
Interface Group on the Star LaserPrinter 8111’s sample print.
88
-
-
Page 93
The Star LaserPrinter 8111 is a sophisticated piece of equipment, but its
routine maintenance is simple, and requires only a soft cloth, a cotton swab,
and mild detergent.
Portions of the interior of the printer require periodic cleaning. This should
occur at the time you change the toner cartridge. But they should be a part of
routine maintenance, as well.
To prevent paper dust from interfering with the operation of the printer, each
day you should wipe three interior areas with a moistened soft cloth:
paper feed guide area; use caution, since this area may be hot
l
Page 94
9 transfer guide
l transfer paper guide
Each day you should also gently clean off the transfer corona wires, using a
cotton swab.
-
-
-
Page 95
I
f . . .
.
L”.
. .
L...
“.
i..
Periodically you should use the wire brush contained within the printer to
clean the groove near the transfer corona wires. Be careful not to damage the
wires.
Page 96
Finally, you can clean the exterior of the printer with a mild detergent and a
soft cloth. Before you begin, unplug the printer, and remove the paper
cassette and any font cartridges.
-
90
Page 97
I
: ‘:
T
.,‘.
--.
An important key to reliable operation of your Star LaserPrinter 8111 is
knowing how to respond when trouble occurs. Some problem conditions
can be handled on the spot by the printer operator. Others require servicing
by trained personnel. This chapter will explain when to do what. It will also
help you deal with the paper jamming and other operational problems.
ERROR MESSAGES DISPLAYED ON THE
SCREEN
The front panel screen may display a variety of messages during the course
of operation of the Star LaserPrinter 8111. You are already familiar with the
display sequence during power-up, and when programming the printer.
Some messages provide information about the paper supply in the cassette
or the condition of the toner cartridge. Others have to do with fonts or
emulations.
Another way of considering errors is that some of them result from failures
in hardware or software. Other errors are functional, meaning that either the
printer operator or the host computer has commanded the controller to
perform an operation that is beyond its designed capabilities.
If the printer malfunctions for some reason, warning messages will appear
on the screen, recommending what action you should take. The most
serious are messages that tell you to call for repair service. Some messages
concern less serious conditions that can be handled by the printer operator.
Information messages relate a communication problem with the host
computer, but do not affect the printer’s operation. These messages are
summarized here.
91
Page 98
SERVICE CALL MESSAGES
Engine service call messages
Engine service call messages are related to the interface with tbe.engine.
They can result from either a communication failure, or a halt in the
engine’s ready level.
1 MESSAGE 1 MEANING 1 RESULT
CALLSERVICE
improper communication
processing stops; alarm beeps;
press DZRROR SKIP] to reset
engine and recheck
CALLSERVICE
t-
CALL SERVICE 03 scanner motor malfunc- processing stops; alarm beeps;
laser synchronization processing stops; alann beeps;
problem
press [ERROR SKIP] to reset
engine and recheck
tion
press [ERROR SKIP] to reSet
engine and recheck
communication processing stops; alann beeps;
press [ERROR SKIF’] to reset
engine and recheck
Controller error messages result from failure in either hardware or software.
Some controller error messages occur during startup tests. The messages
mean that the controller is malfunctioning, but is still able to display the
error m,assage. Certain conditions can also be detected during controller
reset, on insertion of a cartridge, and at other times after the completion of
power-up initialization. An error stops the test sequence, the unit goes off
line, and the alarm sounds. The controller will attempt to recover, if
possible. If the problem is not found during initialization, but nxurs during
operation, most likely the fault is in the hardware.
-
-
-
92
Page 99
MESSAGE
MEANING RESULT
CALL SERVICE 05 CRC error in controller program halts; fatal
main ROM program
CALL SERVICE 06 CRC error in resident program halts; fatal
font ROM
CALL SERVICE 07 read/write test error in program halts; fatal
on-board RAM
CALL SERVICE 08 read/write test error in program halts; fatal
expansion RAM (if
present)
CARTRIDGE 1 BAD CRCerrorinCartridge 1 sequence stops; alarm beeps;
(if present)
shut off power and fuc prob
lem; or depress [ERROR
SKIP] to continue, in which
case Cartridge 1 is ignored
CARTRIDGE 2 BAD CRCerror inCartridge sequence stops; alarm beeps;
(if present)
shut off power and fuc problem; or depress [ERROR
SKIP] to continue, in which
case Cartridge 2 is ignored
CALL SERVICE 10 CRC error in NV RAM sequence stops; alarm beeps;
shut off power and fm prob
lem; or depress [ERROR
SKIP] to continue, in which
case program uses factory settings as power-up settings
NO FONT PRESENT no font present
program halts; fatal
FATAL RAM ER- RAM error on main program or expansion board
ROR board
halts; fatal
PROGRAM ERROR ROM error on main program halts; fatal
board
TIMER ERROR counter-timer error program halts; fatal
93
Page 100
OPERATOR CALL MESSAGES
Whenever the semen displays operator call messages, the printer goes off
line and the alarm sounds. The problem is one that the operator should be
able to resolve. After making any corrections, the message will be turned
off and printing will continue.
Engine Problems
These are mechanical problems that prevent the engine from being ready to
print.
-- -;
MESSAGE 1 MEANING 1 ACTION 1
REFILL CASSETTE
SET EPS CART.
PAPER JAMMING paper is jammed within follow printer procedure on
out of paper
no toner cartridge
printing stops; refill according
to procedure in Chapter 2.
insert or reposition toner cartridee
page 106.
--
CLOSE COVER I printer cover is open I close cover
FontI Emulation Cartridge Problems
The font and emulation cartridges plug into the printer. They canbe inserted
or withdrawn at any time, even while the printer is in operation. If someone
does this while the printer is online, the printer will immediately go off line,
and the screen will display an operator call message. After resolving the
problem, you should press [ERROR SKIP], which con@ures the unit. If
you want to continue printing, press [ON LINE].
If a cartridge is removed while it is being accessed, the screen will display
a message, if possible. After resolving the problem, the operator must
reinitialize the printer by turning the power off and then on again.
94
I
Loading...
+ hidden pages
You need points to download manuals.
1 point = 1 manual.
You can buy points or you can get point for every manual you upload.


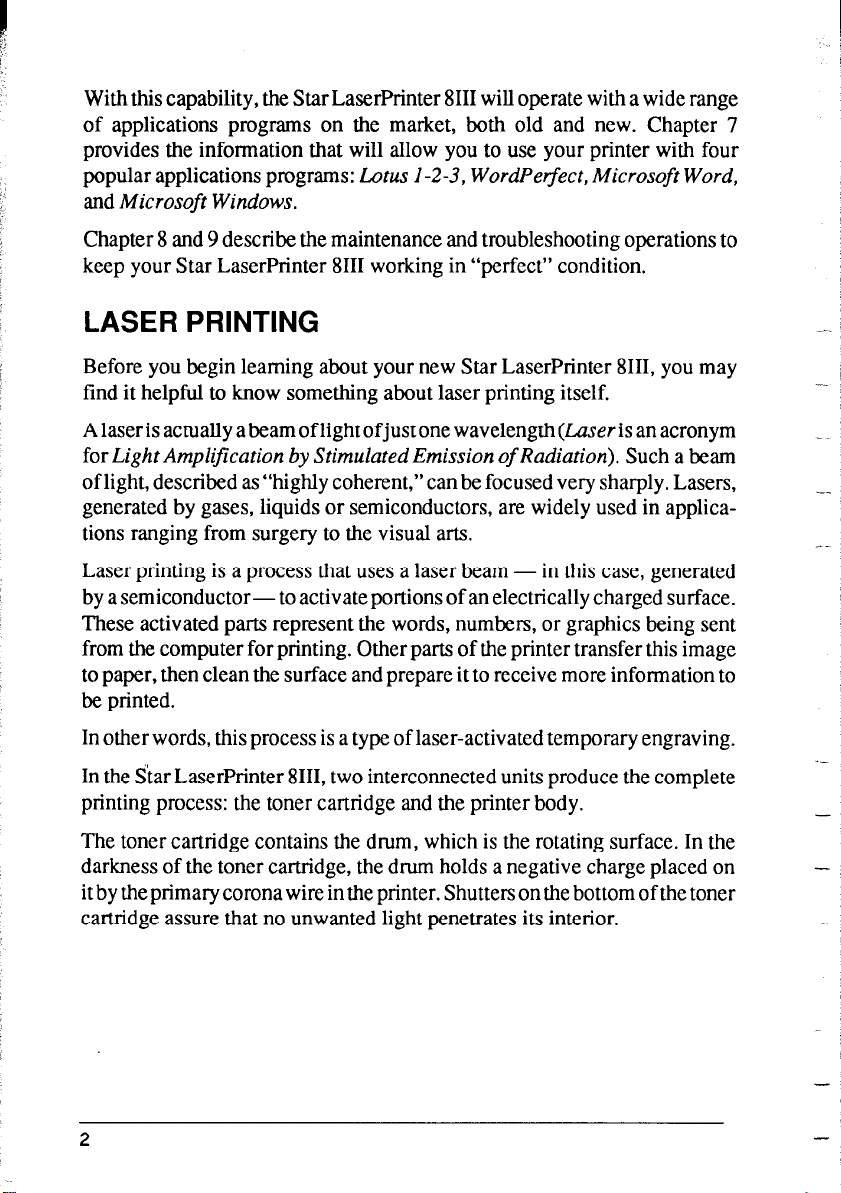
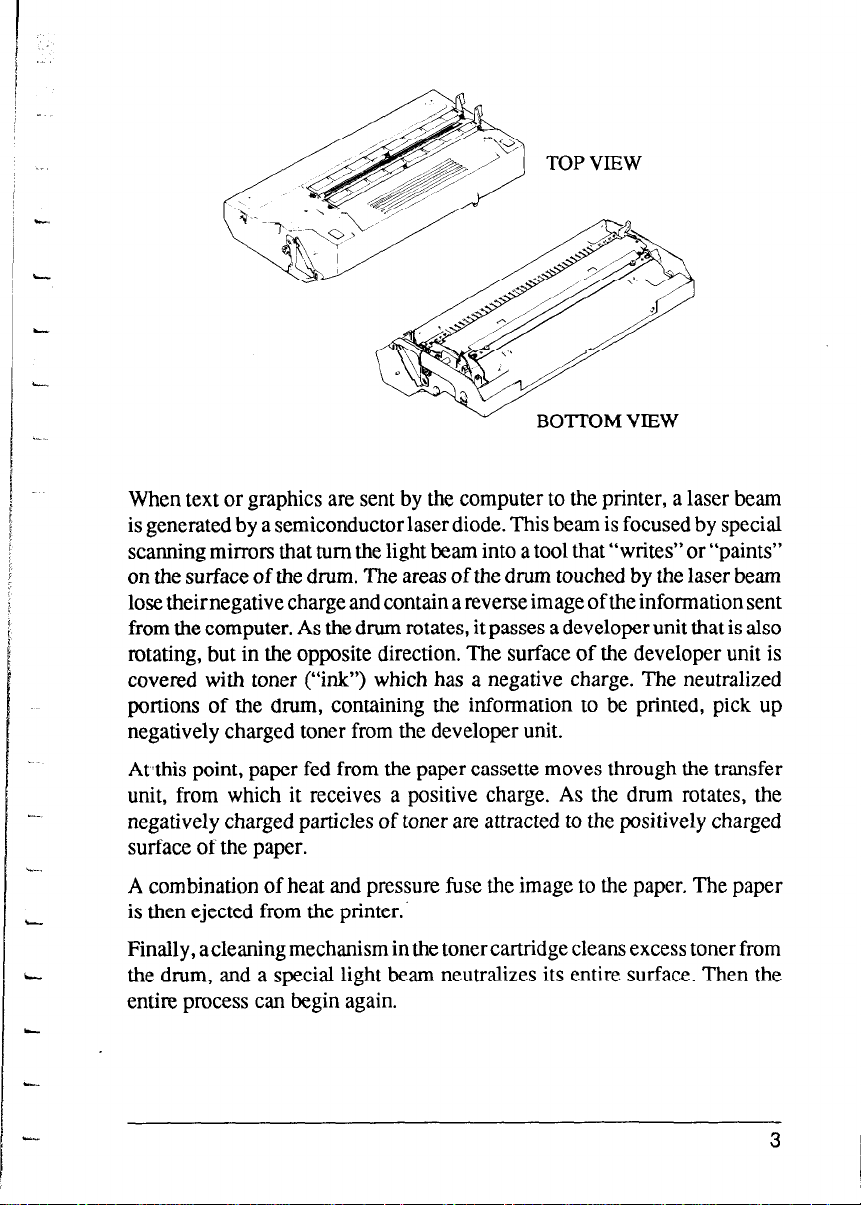
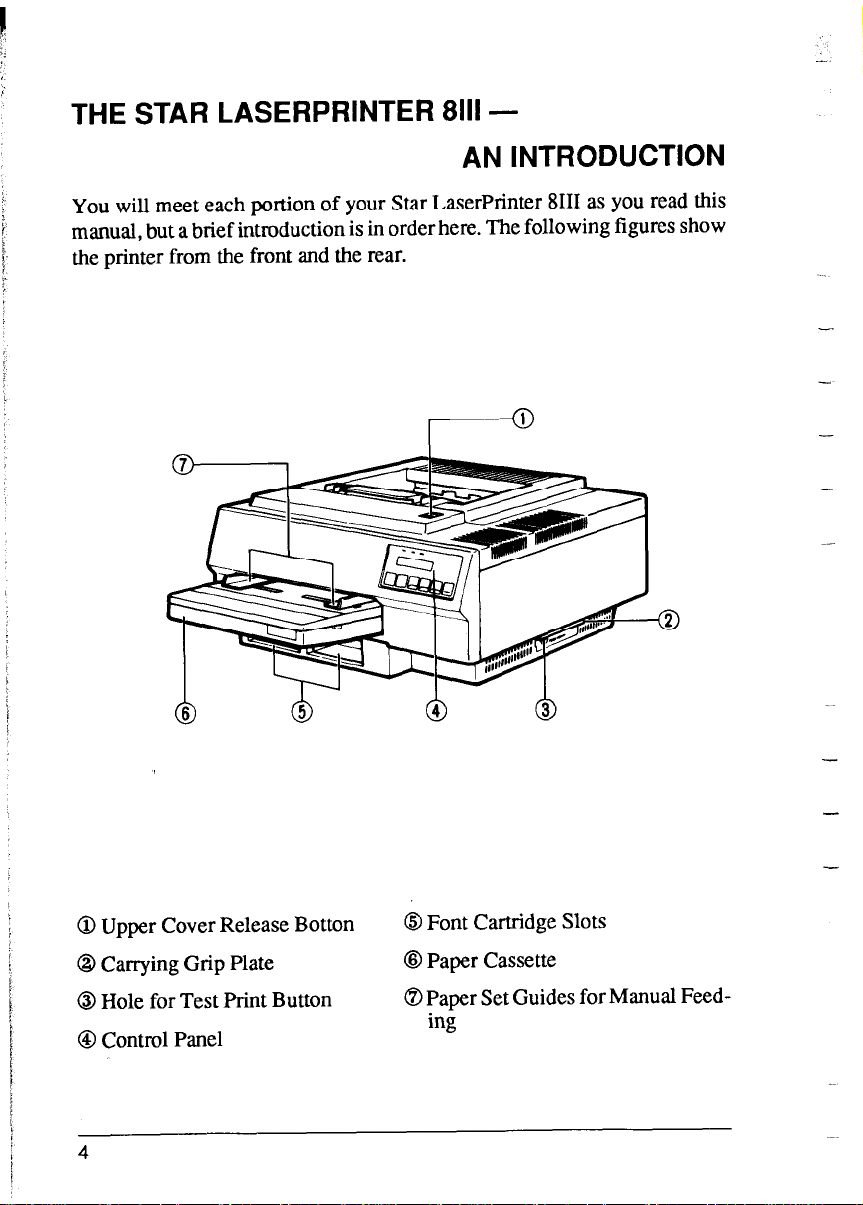
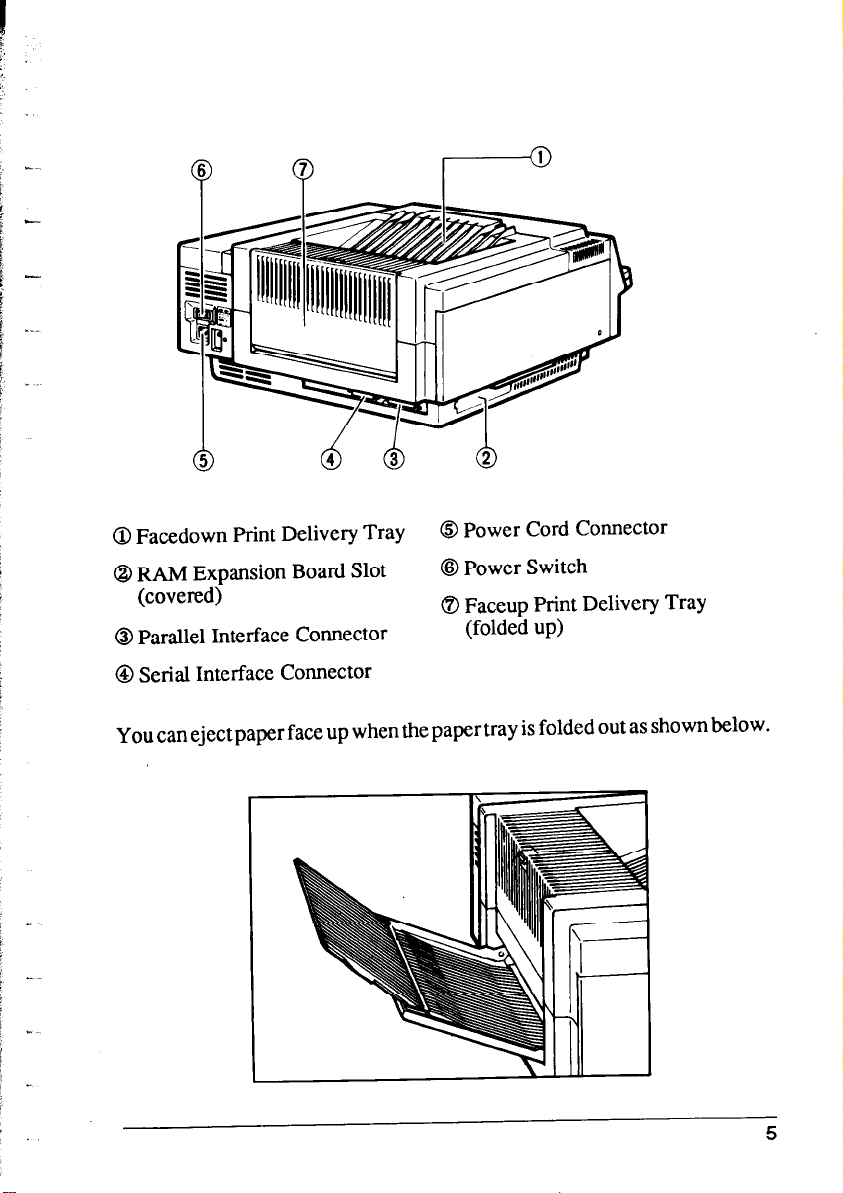

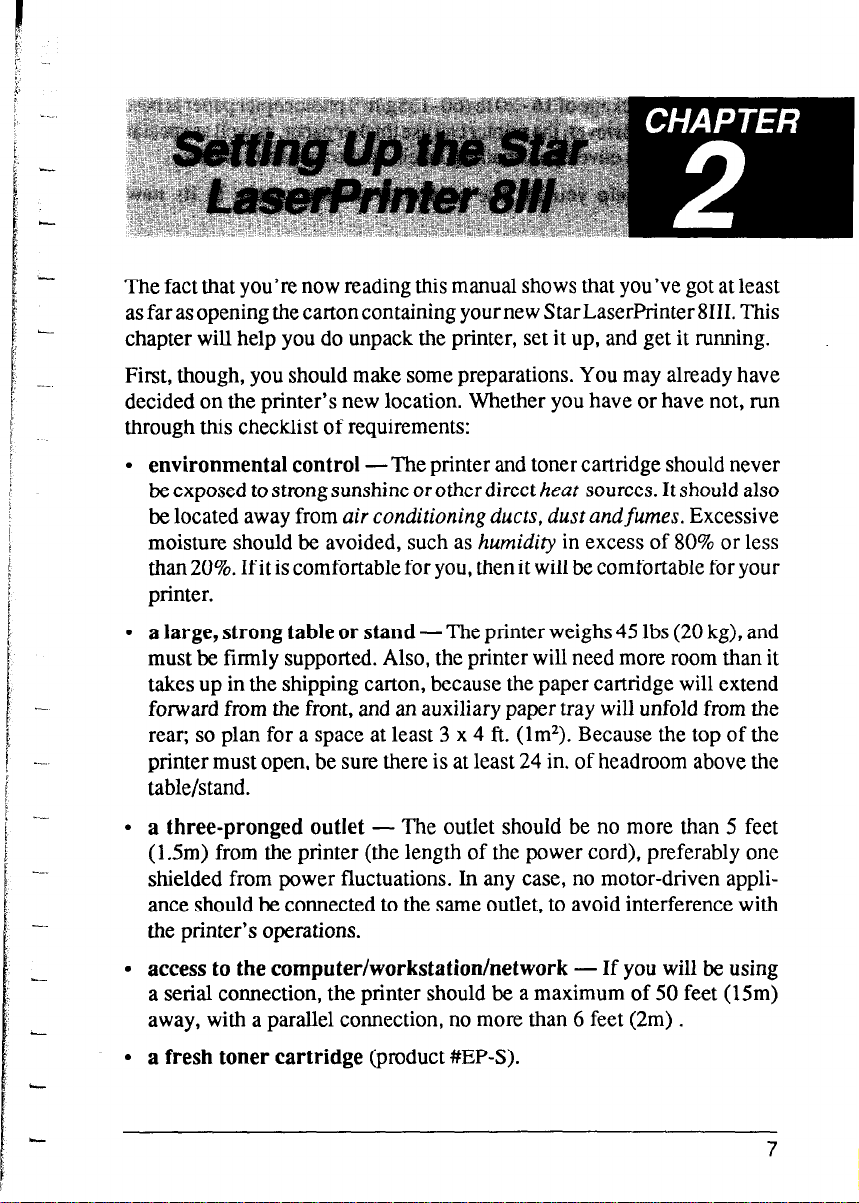

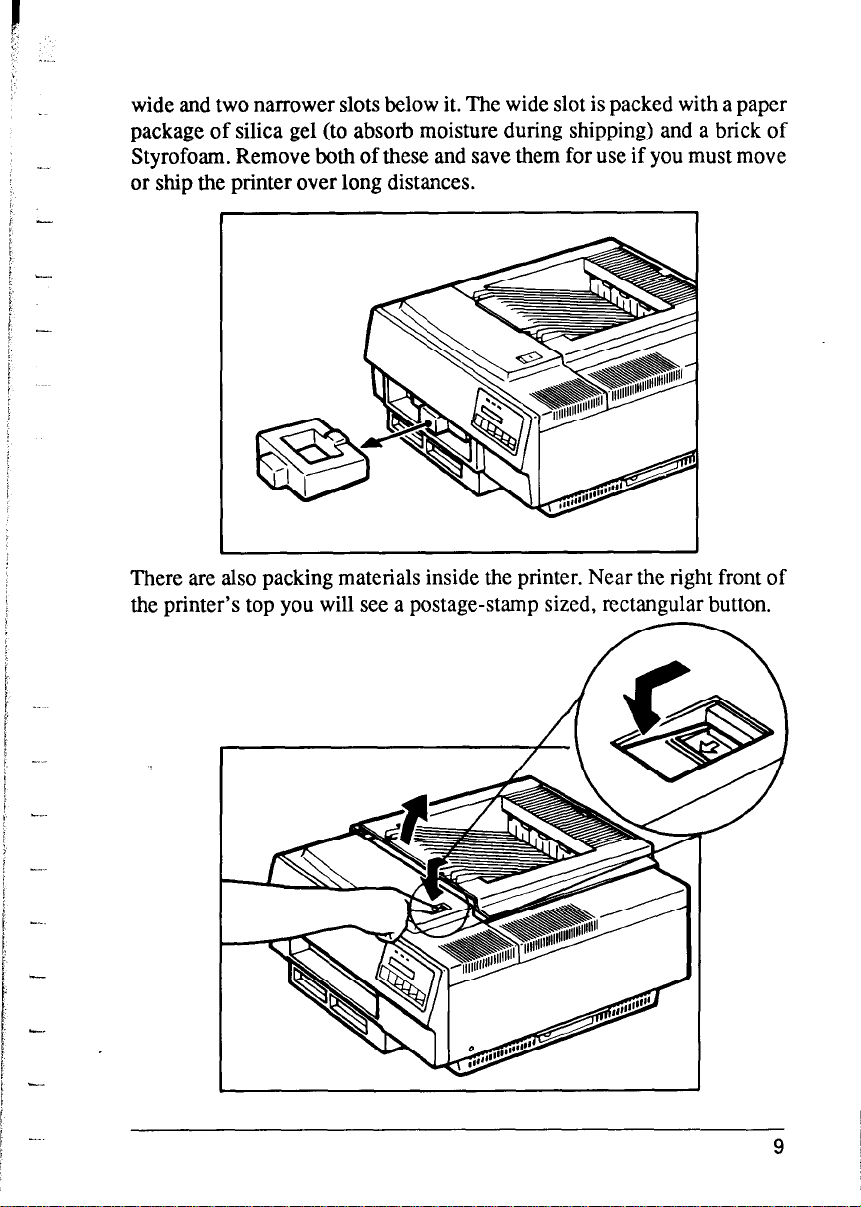
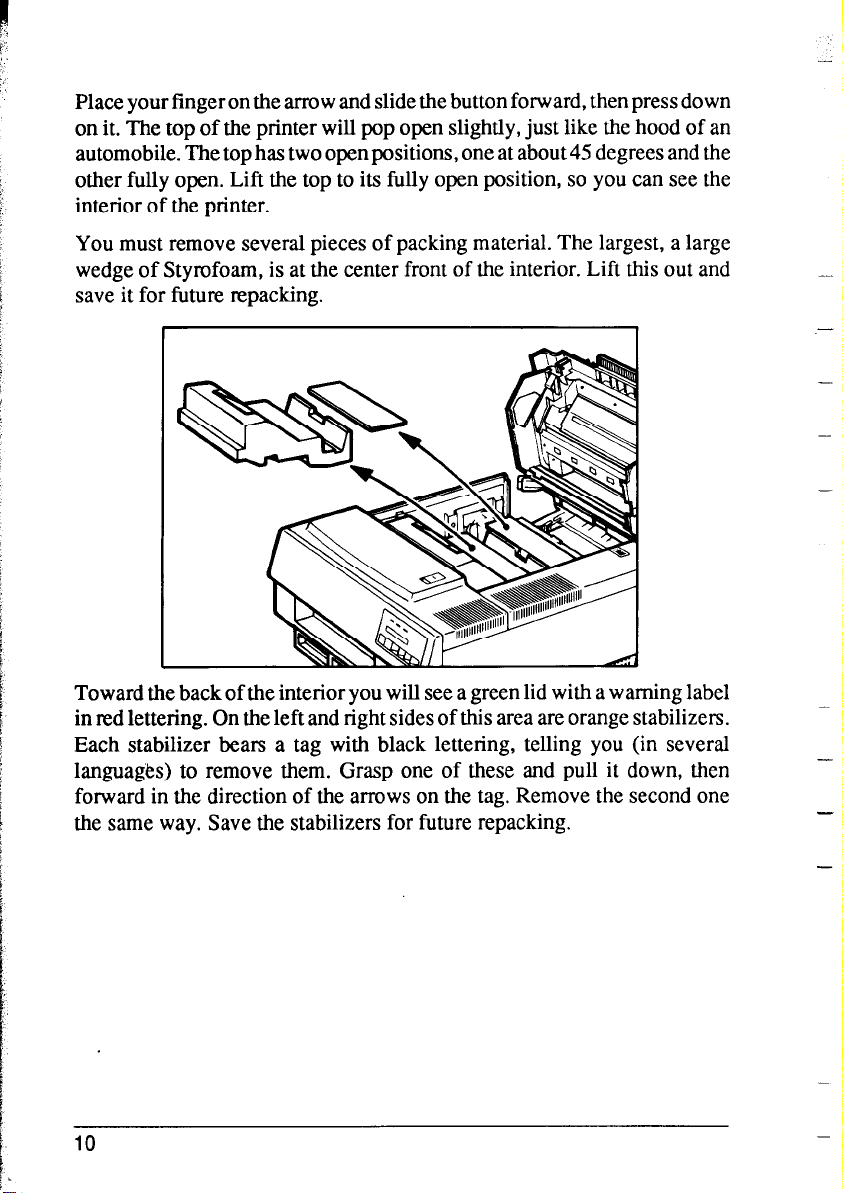
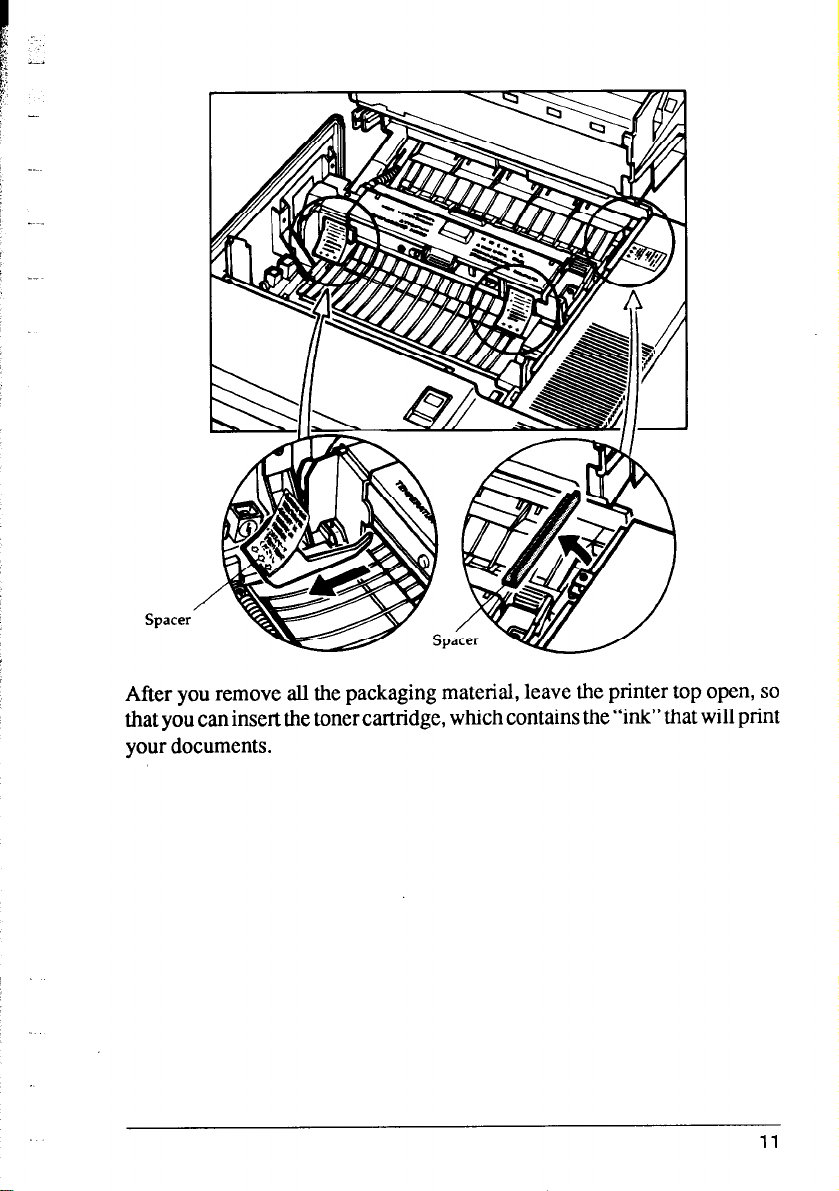
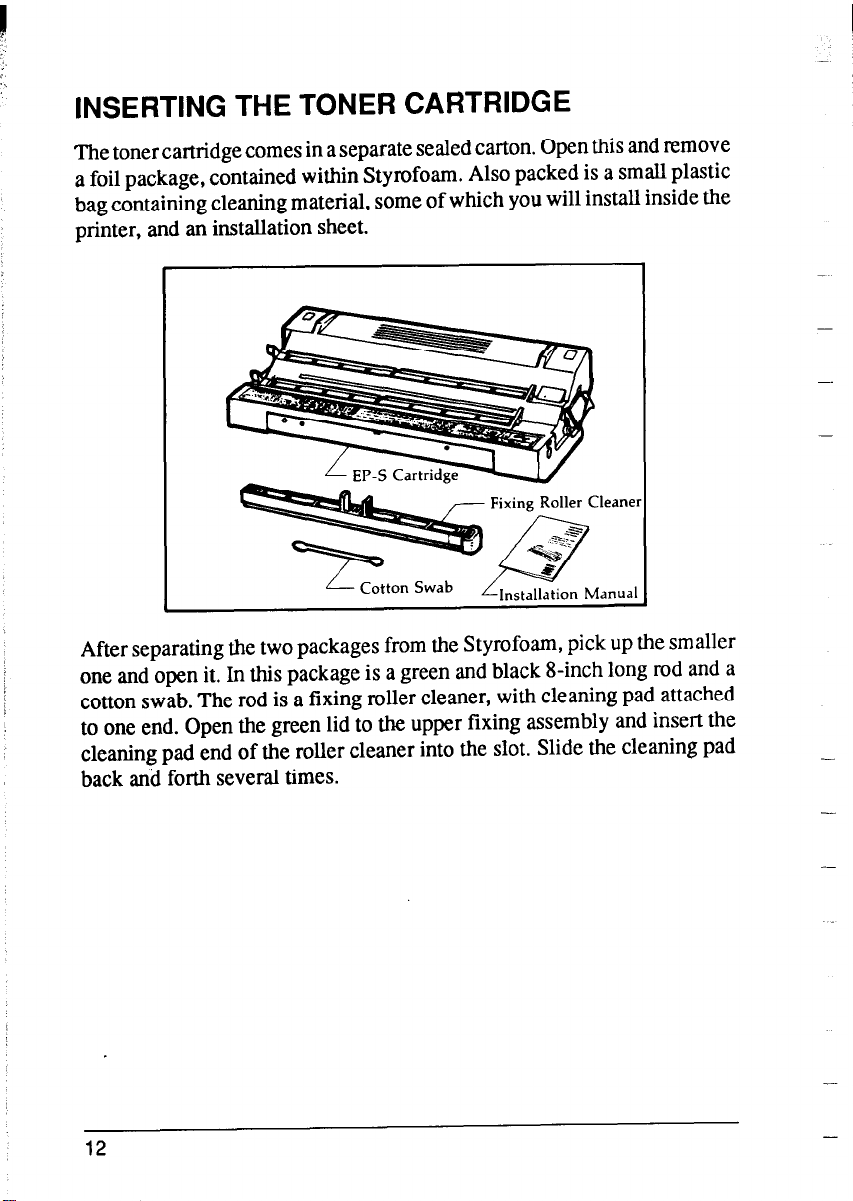
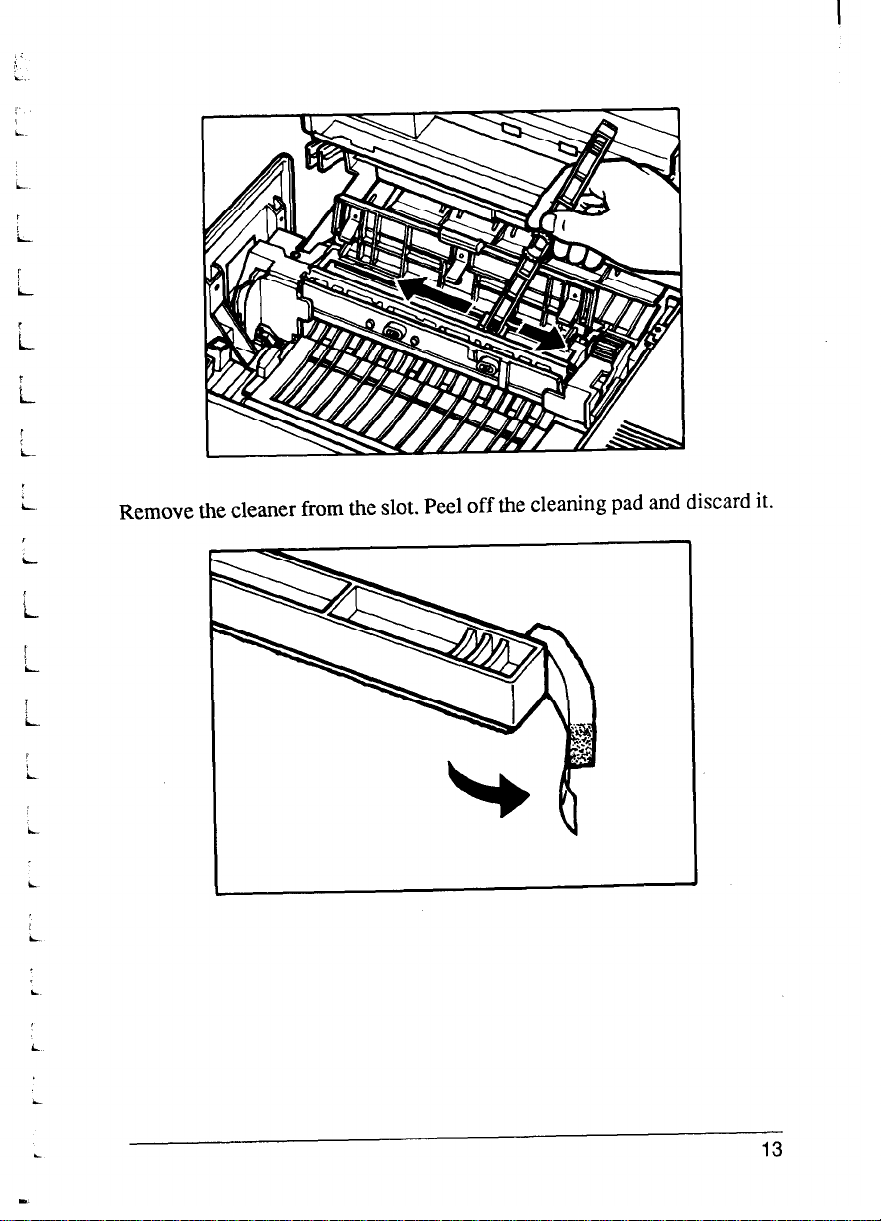
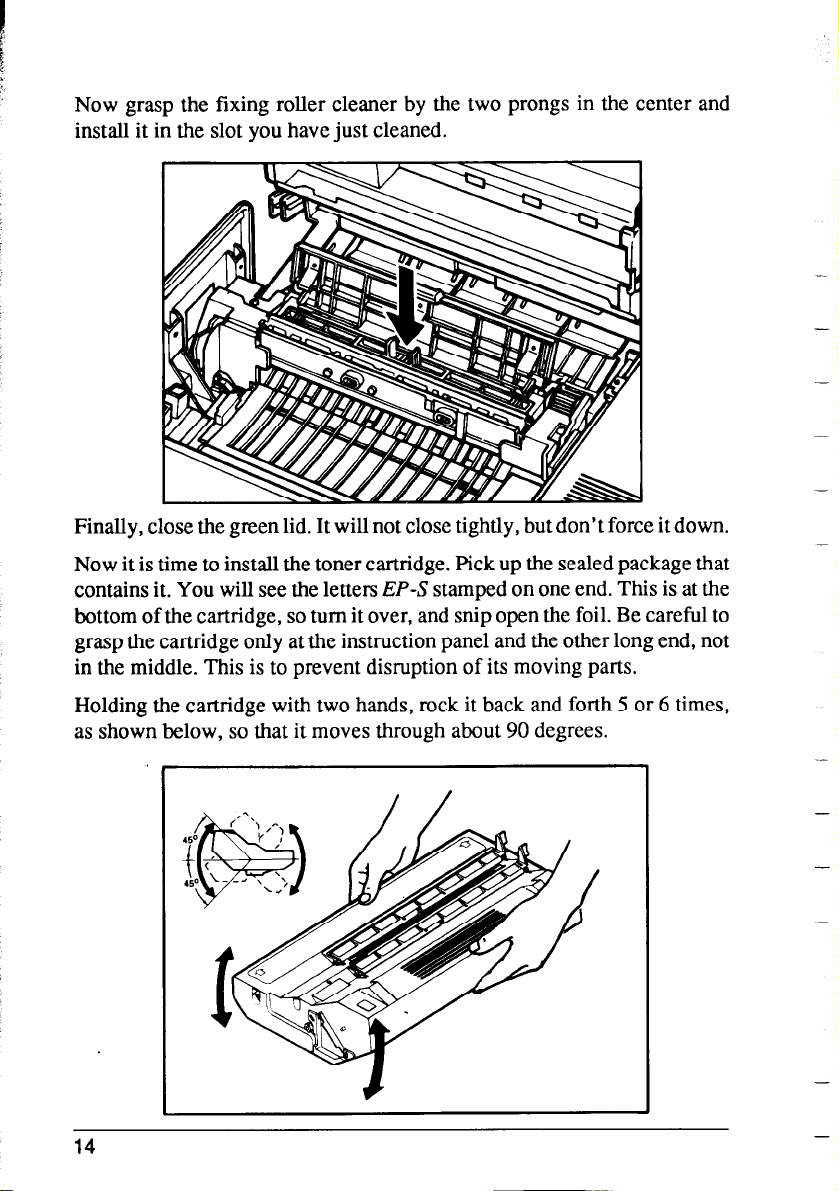
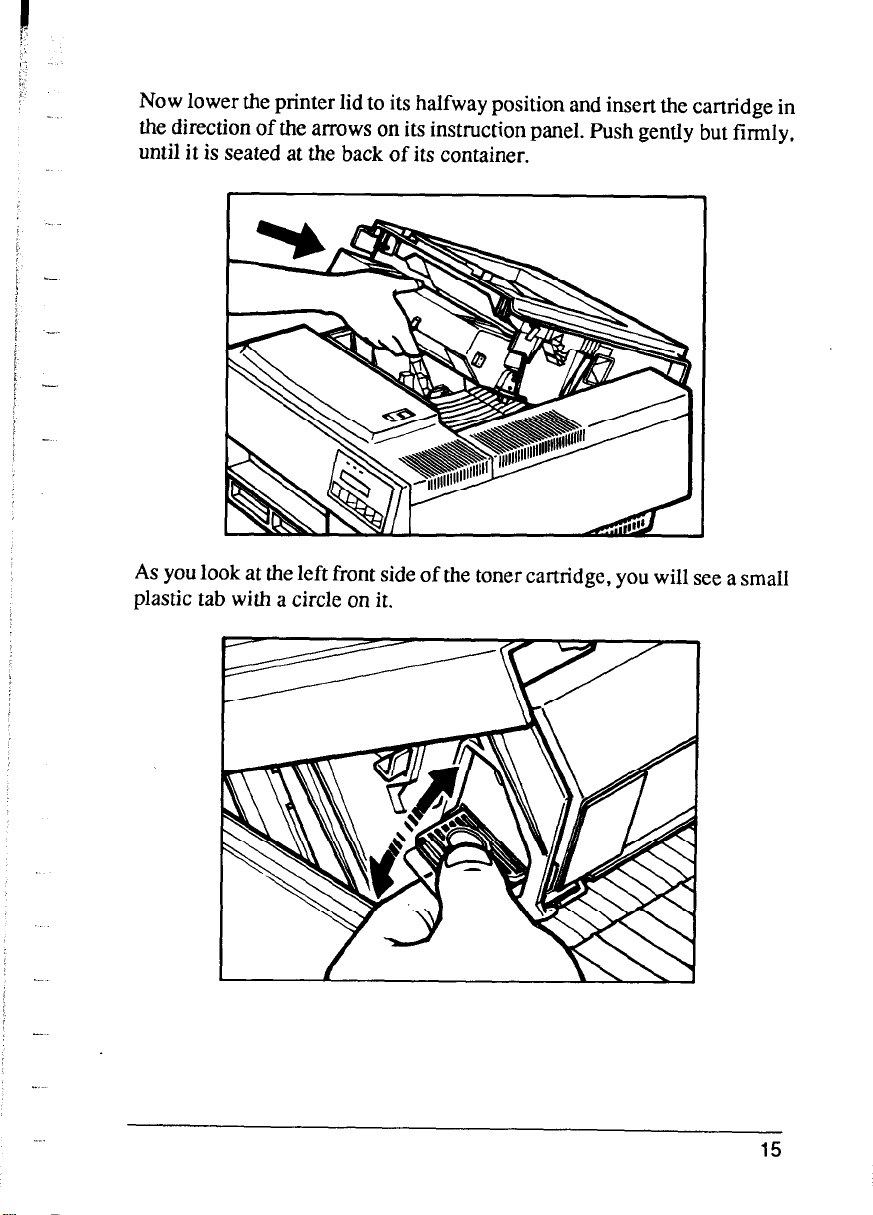

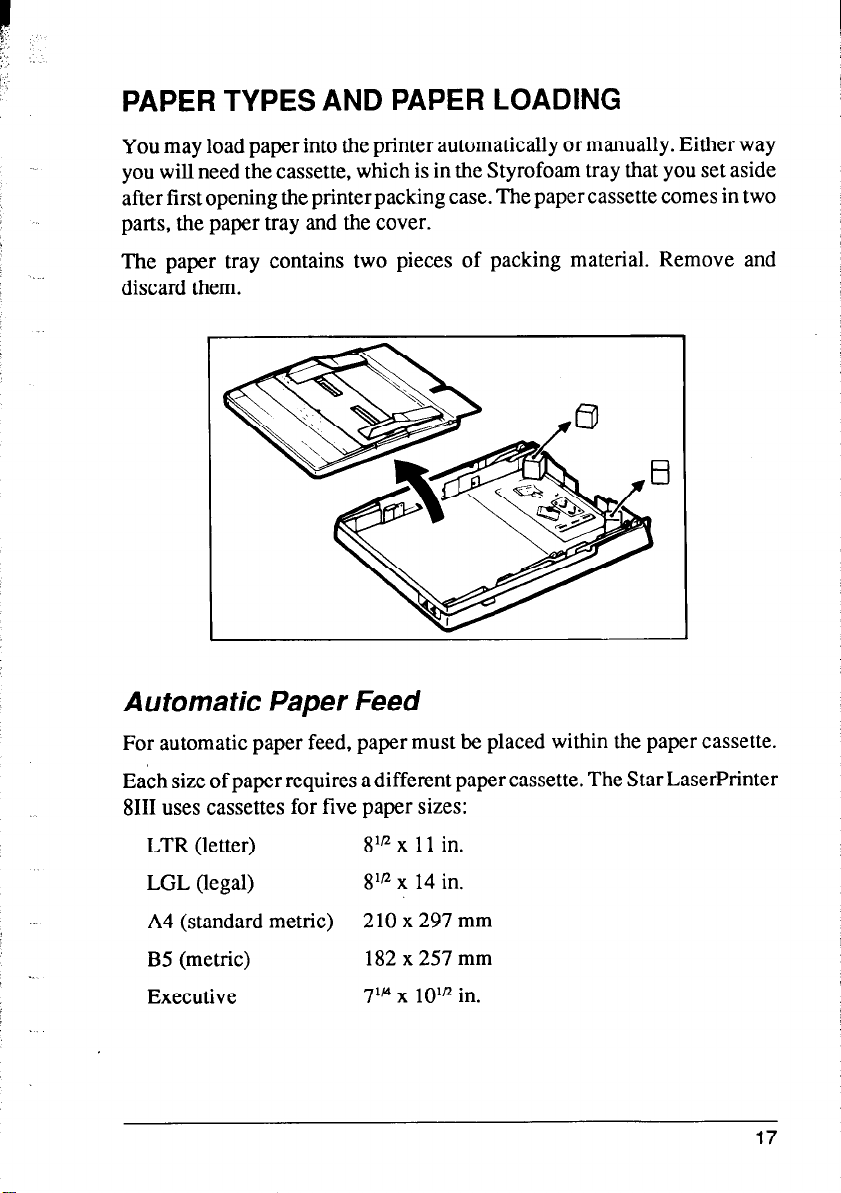
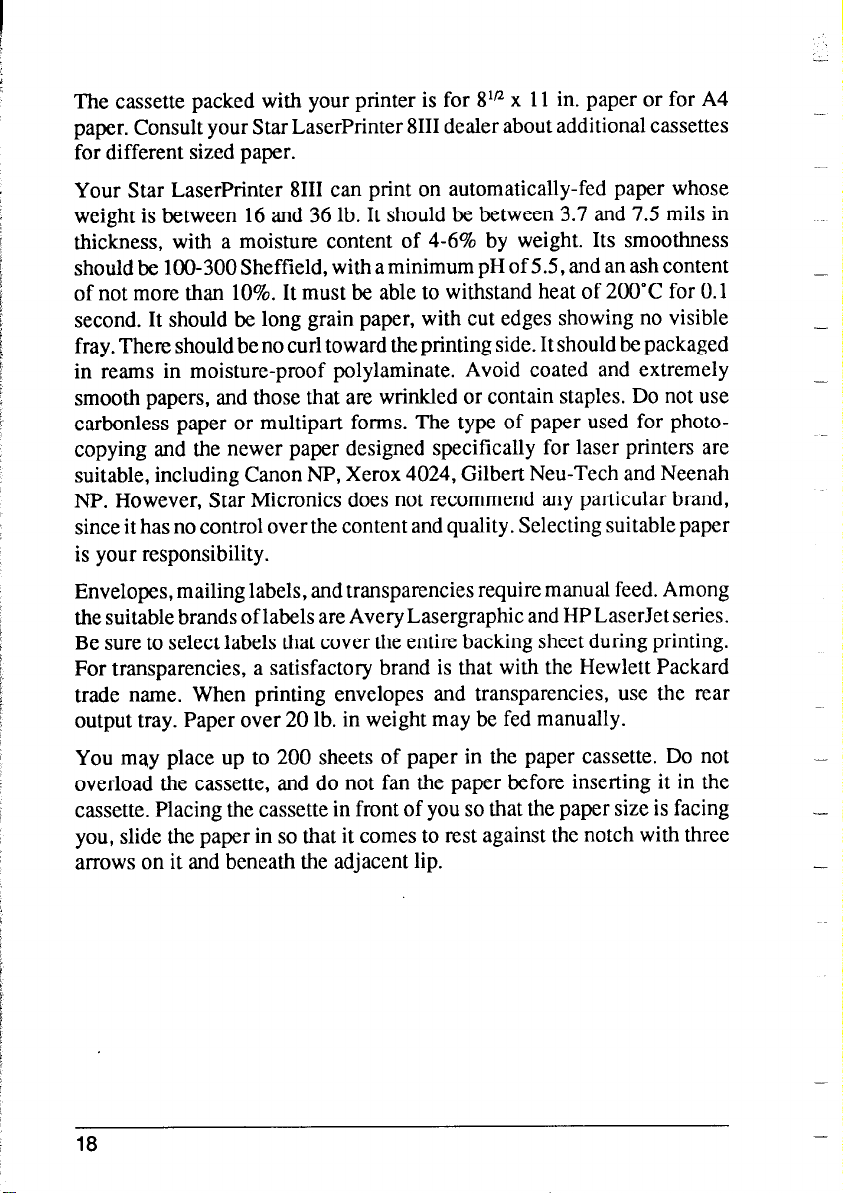
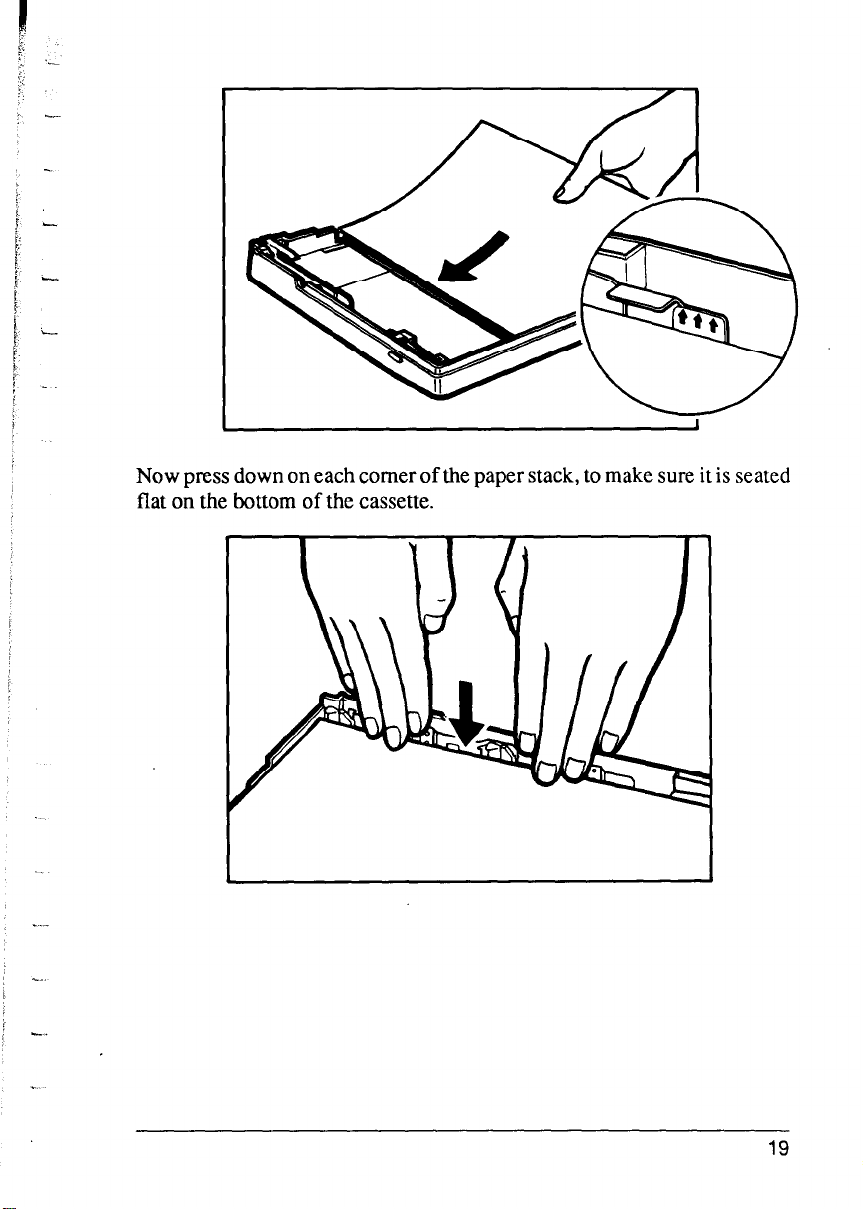
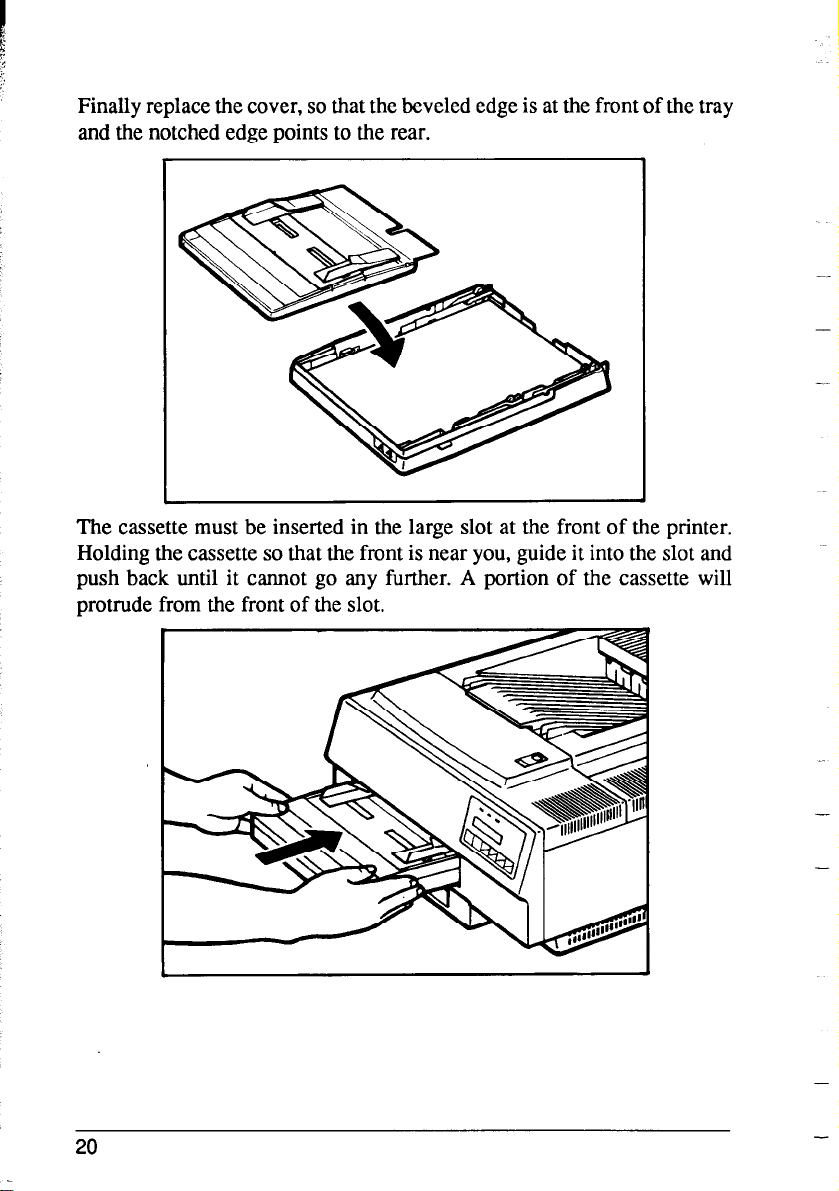
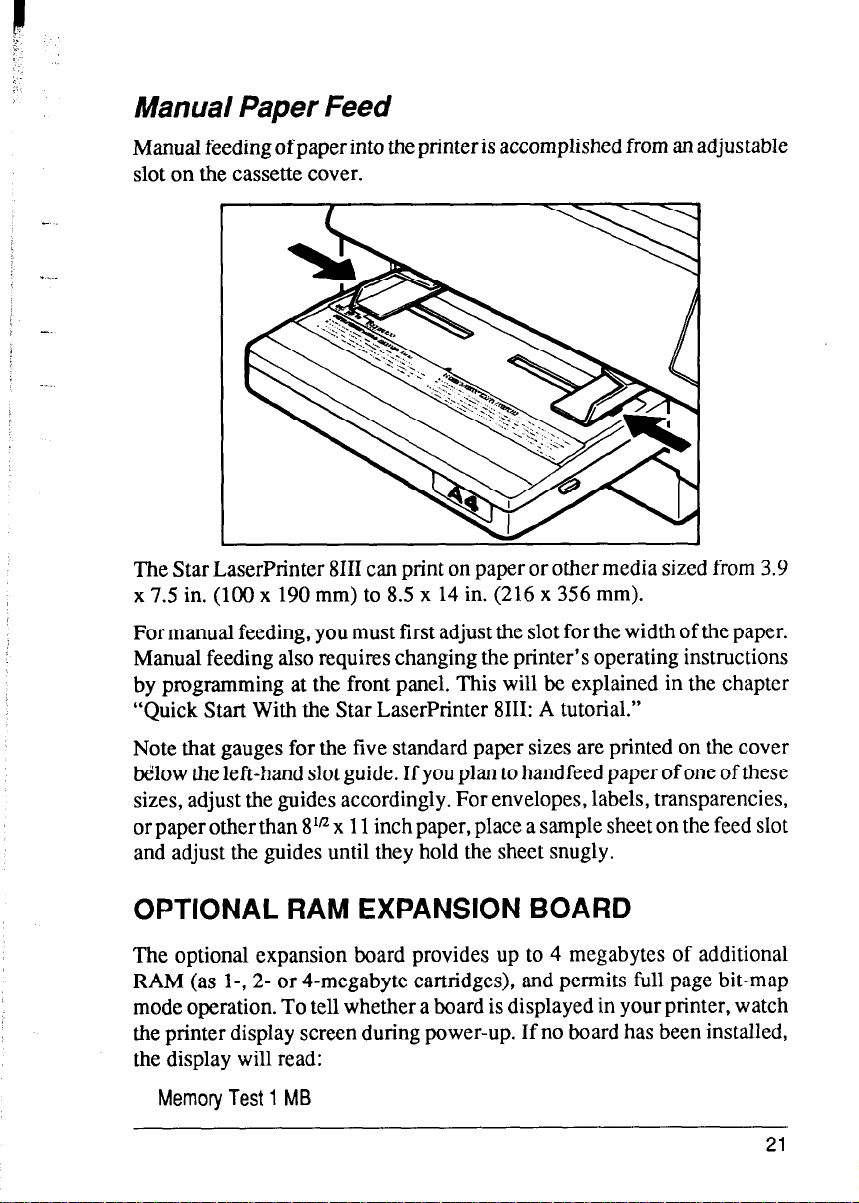
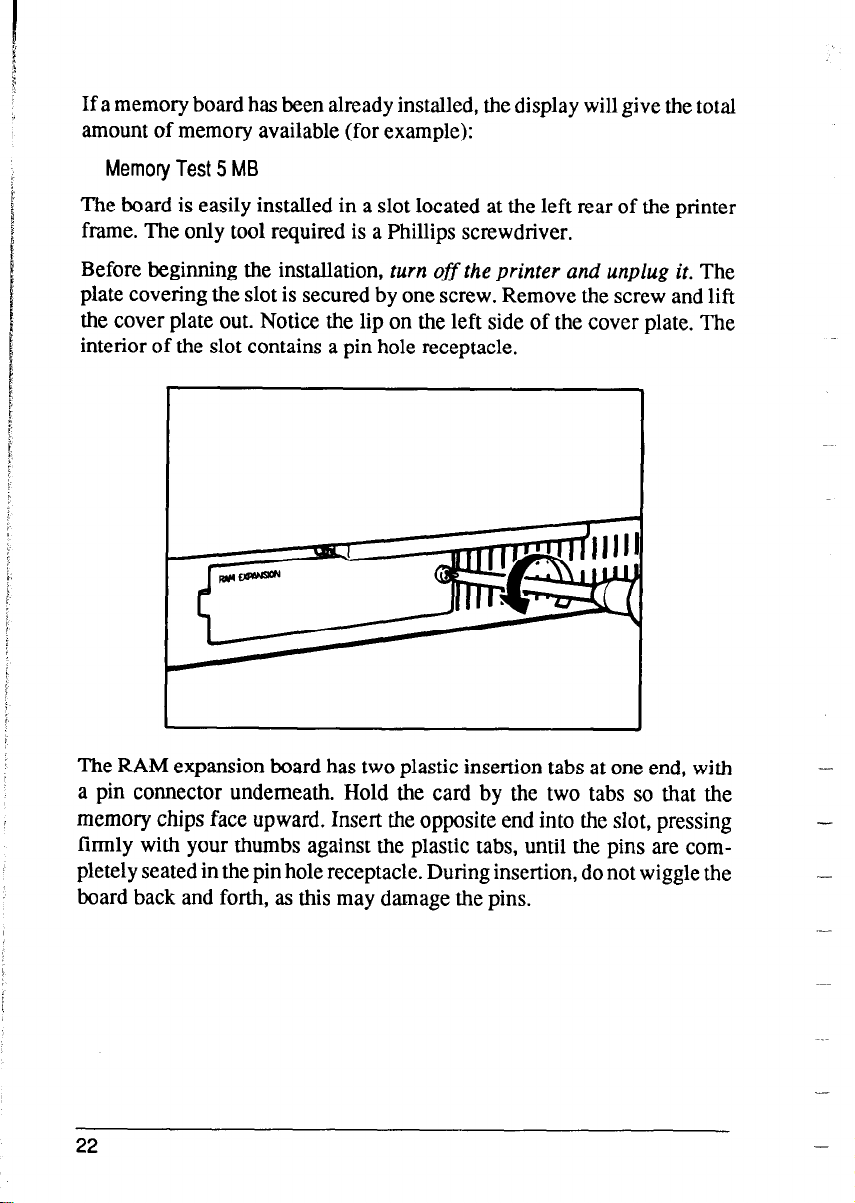
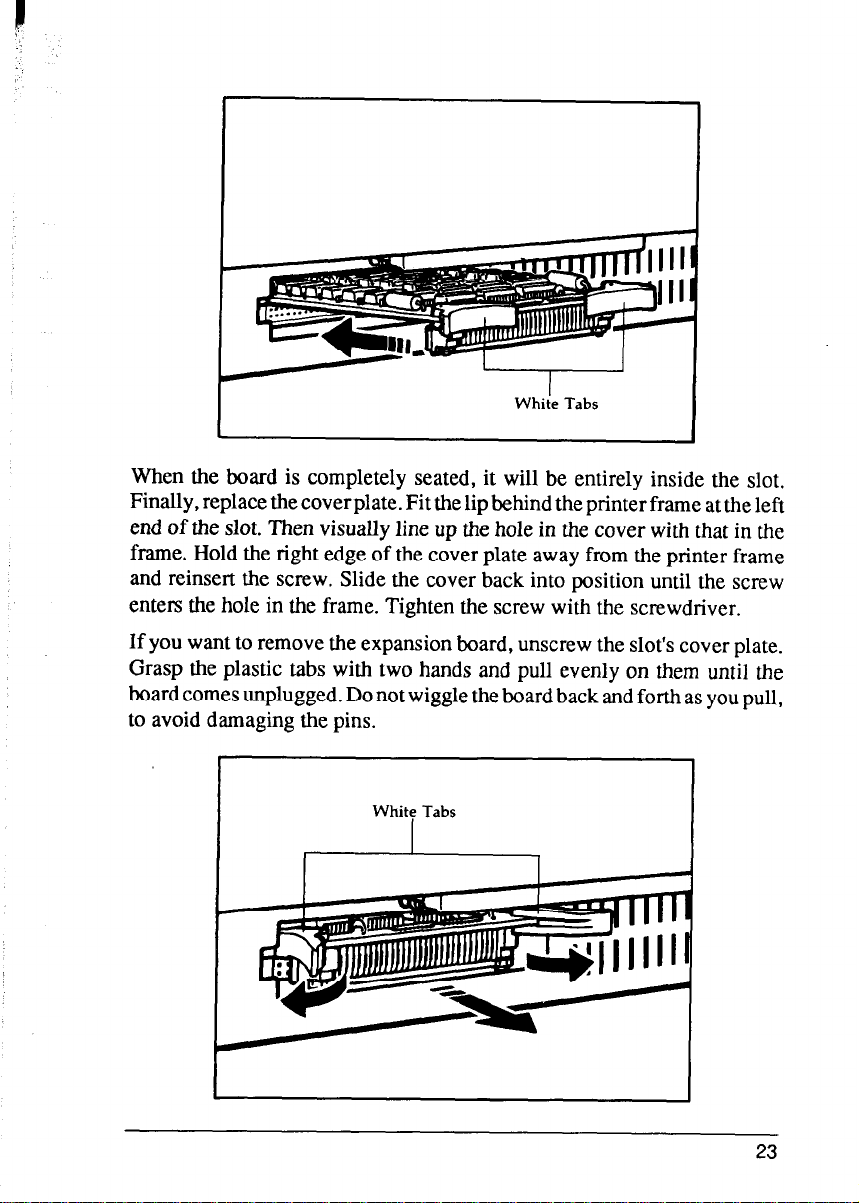
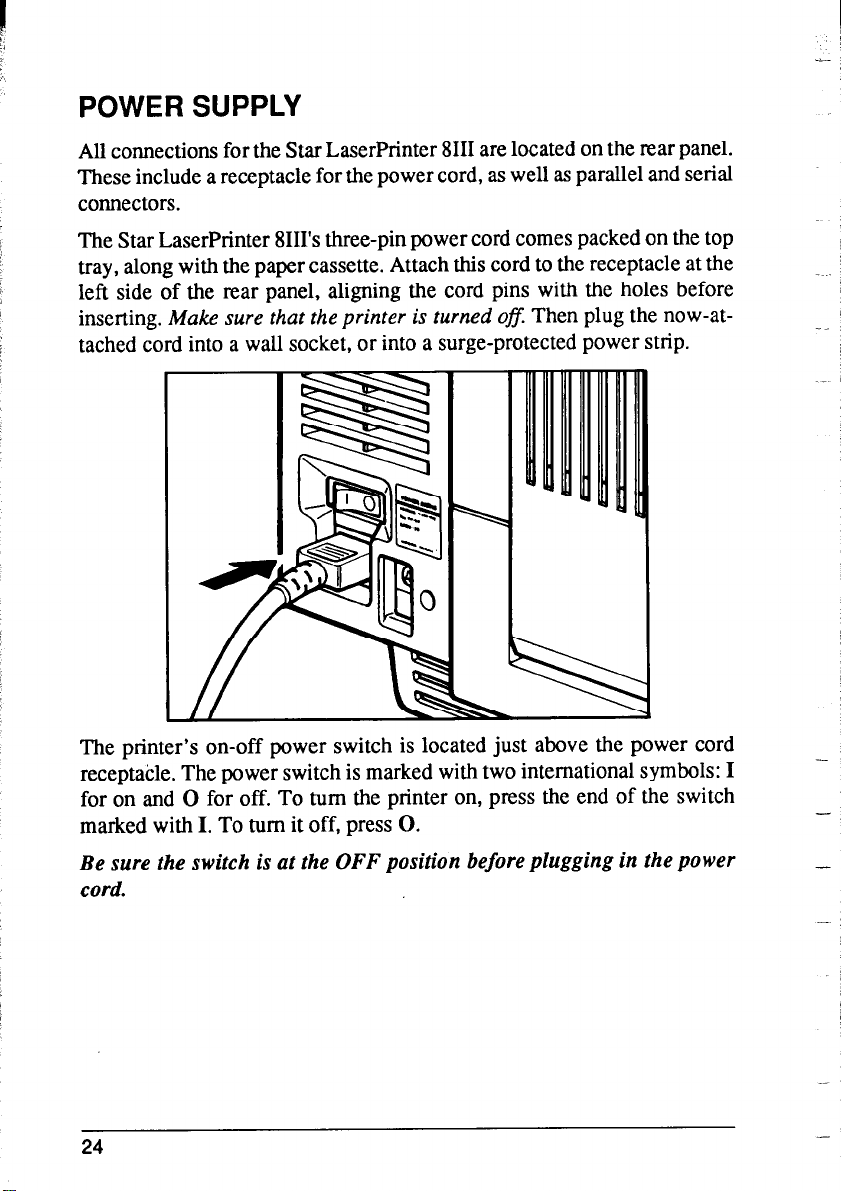


 Loading...