

Page 1

The Windows™ Laser Printer-Designed for Speed
WinType 4000
Users Manual
80825851
Page 2

Safety Notice
This printer is certified as a Class 1 laser product under the U.S. Department of Health and Human Services
(DHHS) Radiation Performance Standard according to the Radiation Control for Health and Safety Act of
1968. This means that the printer does not emit hazardous laser radiation.
Since radiation emitted inside the printer is completely confined within protective housings and external cov-
ers, the laser beam cannot escape from the machine during any phase of user operation.
The Center for Devices and Radiological Health (CDRH) of the U.S. Food and Drug Administration imple-
mented regulations for laser products on August 1, 1976. These regulations apply to laser products marketed in
the United States. The label on the printer indicates compliance with the CDRH regulations and must be
attached to laser products marketed in the United States.
Caution-use of controls or adjustments or performance of procedures other than those specified herein may
result in hazardous radiation exposure.
Federal Communications Commission
Radio Frequency Interference Statement
This equipment has been tested and found to comply with the limits for a Class B digital device, pursuant to
Part 15 of FCC rules. These limits are designed to provide reasonable protection against harmful interference
in a residential installation. This equipment generates, uses and can radiate radio frequency energy and, if not
installed and used in accordance with the instructions, may cause harmful interference to radio communications. However, there is no guarantee that interference will not occur in a particular installation. If this equipment does cause harmful interference to radio or television reception, which can be determined by turning the
equipment off and on, the user is encouraged to try to correct the interference by one or more of the following
measures.
• Reorient or relocate the receiving antenna.
• Increase the separation between the equipment and receiver.
• Connect the equipment into an outlet on a circuit different from that to which the receiver is connected.
• Consult the dealer or an experienced radio/TV technician for help.
Unauthorized modifications of this product by the user will void his authority to operate the equipment unless
expressly approved by the party responsible for compliance.
For compliance with the Federal Noise Interference Standard, this equipment requires a shielded cable.
The above statement applies only to printers marketed in the U.S.A.
Statement of
The Canadian Department of Communications
Radio Interference Regulations
This digital device does not exceed the Class B limits for radio noise emissions from digital apparatus set out
in the Radio Interference Regulations of the Canadian Department of Communications.
Le présent appareil numérique n'emen pas de bruits radioélectriques dépassant les limits applicable aux appareils
numériques de la classe B prescrites dan le Règlement sur le brouillage radioélectrique édicté par le minisère
des Communications du Canada.
The above statement applies only to printers marketed in Canada.
Tämä Kirjoitin LUOKAN 1 LASERLAITE.
Safety Notices for Finland
VAROITUS! Laitteen käyttäminen muulla kuin tässä käyttöohjeessa mainitulla tavalla saattaa altistaa käyttäjän
turvallallisuusluokan 1 ylittävälle näkymättömälle lasersäteilylle.
DENNA SKRIVARE ÄR EN KLASS 1 LASERAPPARAT.
VARNING! Om apparaten används på annat sätt än i denna bruksanvisning specificerats, kan användaren
utsättas för osynlig laserstrålning, som överskrider gränsen för laseklass 1.
The above statement applies only to printers marketed in Finland.
Page 3

Bescheinigung des Importeurs
Hiermit wird bescheinigt, daß der
COMPUTER DRUCKER LX04GDI
in Übereinstimmung mit den Bestimmungen der
VDE 0878 3/22.89, EN 55022: 1987, BMPT Vfg. 243/1991 und 46/1992
funk-entstört ist.
Dem Zentralamt für Zulassungen im Femmeldewesen wurde das Inverkehrbringen dieses Gerätes angezeigt
und die Berechtigung zur Überprüfung der Serie auf die Einhaltung der Bestimmungen eingeräumt.
Star Micronics Deutschland, GmbH
Westerbachstraße 59, D-60489
Frankfurt, Germany
The above statements apply only to printers marketed in Germany.
T rademark Acknowledgments
HPLaserJet IIP, PCL4: Hewlett Packard Company
PostScript, Adobe Type Manager: Adobe Systems, Inc.
LaserWriter NTX, TrueType: Apple Computer, Inc.
Intellifont: Agfa Corporation
Windows 3.1, MS-DOS: Microsoft Corporation
Xerox 4024: Xerox Corporation
EET: Destiny Technology
Notice
• All rights reserved. Reproduction of any part of this manual in any form whatsoever without STAR's
express permission is forbidden.
• The contents of this manual are subject to change without notice.
All efforts have been made to ensure the accuracy of the contents of this manual at the time of press.
However, should any errors be detected, STAR would greatly appreciate being informed of them.
• The above notwithstanding, STAR can assume no responsibility for any errors in this manual.
©Copyright 1994 Star Micronics Co., Ltd.
©Copyright, WinRefs 1993-1994, Destiny Technology Corp. Ver. 1.0
©Copyright, WinStyler™ 1992-1994, Destiny Technology Corp. Ver. 1.00
©Copyright, DT1R™ 1992-1994, Destiny Technology Corp. Ver. 1.0
©Copyright, LaserAct® 1990-1994, Destiny Technology Corp. Ver. 4.5
©Copyright, PageStyler® 1989-1994, Destiny Technology Corp. Ver. 1.0
©Copyright, 1992, Microsoft Corporation
i
Page 4

Contents
A word about the printer v
How to use this manual vii
Features of the printer vii
Introduction v
System requirements v
Printer components viii
Chapter 1 Setting up your printer 1
Unpacking and checking the package contents 1
Package contents 1
Placing the printer 1
Installing the toner cartridge 2
Setting up the upper paper tray 4
Setting up the output tray 5
Connecting the printer to the computer 5
Connecting the power cord 6
Turning the printer ON 6
Turning the printer OFF 6
Relocating the printer 7
Chapter 2 Selecting print media 11
Recommended print media 11
Printing media to avoid 12
Loading plain paper, OHP (overhead projection) film and label sheets 12
Loading envelopes 15
Chapter 3 Installing the printer driver and TrueType fonts 17
System requirements 17
Printer command languages 18
Installing the printer driver and TrueType fonts 20
Removing the printer driver software 24
Chapter 4 Printing with WinType 4000 25
Windows Direct (GDI) mode 25
PostScript mode 25
PCL mode 25
Features of the printer driver software 26
ii
Page 5

Printing with the Windows Direct (GDI) mode 26
Manual duplex printing 29
Duplex printing errors 30
Using fonts in the Windows Direct (GDI) mode 30
Eliminating screen fonts from your application 31
Printing with the PostScript mode 32
Printing from a Windows application 32
Fonts in PostScript Mode 33
Printing DOS applications in PostScript mode under Windows 35
• DOS Prompt Method 35
• .PIF File Method 35
Printing with the PCL mode 36
Printing in PCL mode from a Windows application 36
Printing DOS applications in PCL mode under Windows 37
Fonts in PCL Mode 39
Recovering from an error message in PCL or PostScript modes when
running a DOS application from within Windows 40
Saving download fonts and macros in the PCL mode 41
Chapter 5 The Star WinType Print Manager 43
Enabling the WinType Print Manager 43
Viewing and accessing the WinType Print Manager 45
Options: 46
Size 48
Queue information 49
Display of information 49
Changing priority in the queue 50
Status Bar 50
Progress Bar 50
Pause 50
Resume 50
Add 51
Delete 51
Printing to a file in the Windows Direct (GDI) and PCL modes 51
iii
Page 6

Printing to an Encapsulated PostScript file in the PostScript mode 54
Quitting the Star WinType Print Manager 55
Exiting before a print job has been completed 55
Chapter 6 Star WinType Printer Status Display 57
Selecting the Printer Status Display - Windows Direct (GDI) mode 57
Selecting the Printer Status Display - PCL and PostScript modes 59
Accessing and viewing the Star WinType 4000 Printer Status Display 60
Options: 61
Help: 62
Power Off or Cable Problem 63
Pause 64
Resume 64
Delete 64
Chapter 7 Maintenance & troubleshooting 65
Maintaining your printer 65
Handling of the toner cartridge 65
Cleaning your printer 66
Cleaning the output port window 66
Clearing paper jams 67
T roubleshooting: Solving print quality problems 70
Other mechanical problems 74
The front door will not shut 74
The Error LED indicator is lit and the printer will not print 74
Chapter 8 Reference information 75
Specifications 75
Character tables for PCL mode 79
Glossary 82
Index 86
iv
Page 7

Introduction
Thank you for purchasing the Star W inType 4000 Laser Printer. This Users Manual has
been organized into eight chapters, a glossary and an index to help you learn the pr oper
operation and care of your printer. The first six chapters explain the basic care and
handling of this printer and the operation of the printer driver software. The r emaining
chapters are intended as a reference guide for troubleshooting any printing problems
you may encounter.
A word about the printer
The Star WinType 4000 is a new laser printer that has been developed specifically for
users of Windows™ version 3.1. This printer is provided with the WinType software
and does not require special add-in cards or cartridges. The W inType 4000 differs from
other printers in that it is directly driven by the computer's CPU; hence it has faster
response and better status information. In addition, by expanding the memory of your
computer, or by upgrading to a more powerful PC, the performance of your printer will
also improve.
This printer supports three printing modes: Windows Direct (GDI), PostScript and PCL.
The Windows Direct (GDI) mode of fers the full performance of the total printing system
while PCL mode offers compatibility with HP LaserJet IIP software drivers. PostScript
mode lets you print graphics intensive files with ease.
Your computer and the WinType 4000 communicate bi-directionally to exchange information on the operating status of the printer. Your computer will display status information such as paper out, or paper jams via Print Status Window. The WinType 4000
printer driver eliminates the need for a complex printer control panel.
System requirements
To operate this printer you need an IBM compatible PC with at least a 386SX 16-MHz
CPU. The PC must be running DOS 3.3 or later and W indows 3.1 in Enhanced Mode. A
Microsoft-compatible mouse is highly recommended. The printer requires at least 4
megabytes (MB) of PC memory (RAM) which is also the minimum amount of memory
recommended by Microsoft Corporation for use with Windows version 3.1.
This printer driver software requires approximately 1.4 megabytes of disk space on your
system's hard drive. Up to approximately 8.5 megabytes of disk space is required for
permanent virtual memory under Windows. If you have more than 4 megabytes of RAM,
you won't need the entire 8.5 MB of virtual memory, which is described later in Chapter 3.
This printer requires a total of 12.5 megabytes of disk space, which is divided between
your computer's RAM memory (which needs to be at least 4 MB) and Windows virtual
memory. If your system has 4 MB of RAM, then you must allocate at least 8.5 MB of
virtual memory in Windows. If you have 5 MB of RAM, then you need at least 7.5 MB
of virtual memory, etc.
A standard PC parallel printer port is required to connect the printer using a standard
Centronics parallel cable.
v
Page 8

This users manual
Chapter 1 Setting up your printer
This chapter explains the basic procedures for unpacking, placing and connecting your
printer.
Chapter 2 Selecting print media
This chapter provides information on the proper print media to use with this printer. It
also includes instructions on loading paper.
Chapter 3 Installing the printer driver software and
TrueType fonts
This chapter details the procedures used to install the WinType printer driver software
and TrueType fonts. You must install the printer driver software to be able to print with
this printer.
Chapter 4 Printing
This chapter will take you through each of the three printing modes and explain the
meaning and usage of each mode.
Chapter 5 Print manager
This chapter will tell you about this useful feature which allows you to control the printing of your documents.
Chapter 6 Print status window
This chapter explains the usage of the print status window which provides you with
helpful information on the printer's operation.
Chapter 7 Maintenance & troubleshooting
This chapter explains the proper procedures for routine maintenance and care of your
printer and a quick reference to help you solve any problems which may occur.
Chapter 8 Reference information
This chapter lists the printer's specifications. It also contains PCL4 character tables.
Glossary
This provides you with definitions of commonly used terms.
Index
This lists, in alphabetical order, terms which appear in this manual.
vi
Page 9

How to use this manual
Each chapter provides you with simple explanations of the printer's operation. We have
included illustrations of the printer and screens wherever necessary and where space
allowed. You should be able to operate this printer by carefully following each of the
steps provided.
Features of the printer
This printer is capable of many useful and high quality printing functions ranging from
printing on plain copier paper to OHP (overhead projection) film and label sheet printing.
The main features of the printer include:
• Ultra fast, Windows Direct (GDI) printing
• True WYSIWYG performance in Windows
• PostScript compatibility for both Windows and MS-DOS applications running under
Windows
• PCL 4 compatibility for both Windows and MS-DOS applications running under
Windows
• High speed bidirectional interface for easy to understand feedback on the computer
screen about the printer's operation
• 35 TrueType fonts for Windows 3.1 applications and 14 bitmapped fonts for DOS
applications and fully compatible with 13 PostScript Type 1 fonts
• Edge Enhancement Technology (EET) for 600 dpi class output
• Energy Star compliant - Sleep Mode
• Toner Save Mode - Increases toner yield up to twice the normal consumption levels
• Manual Duplexing for double-sided printing
• Single unit EP toner cartridge with high definition toner.
• Compact size - Small footprint
vii
Page 10
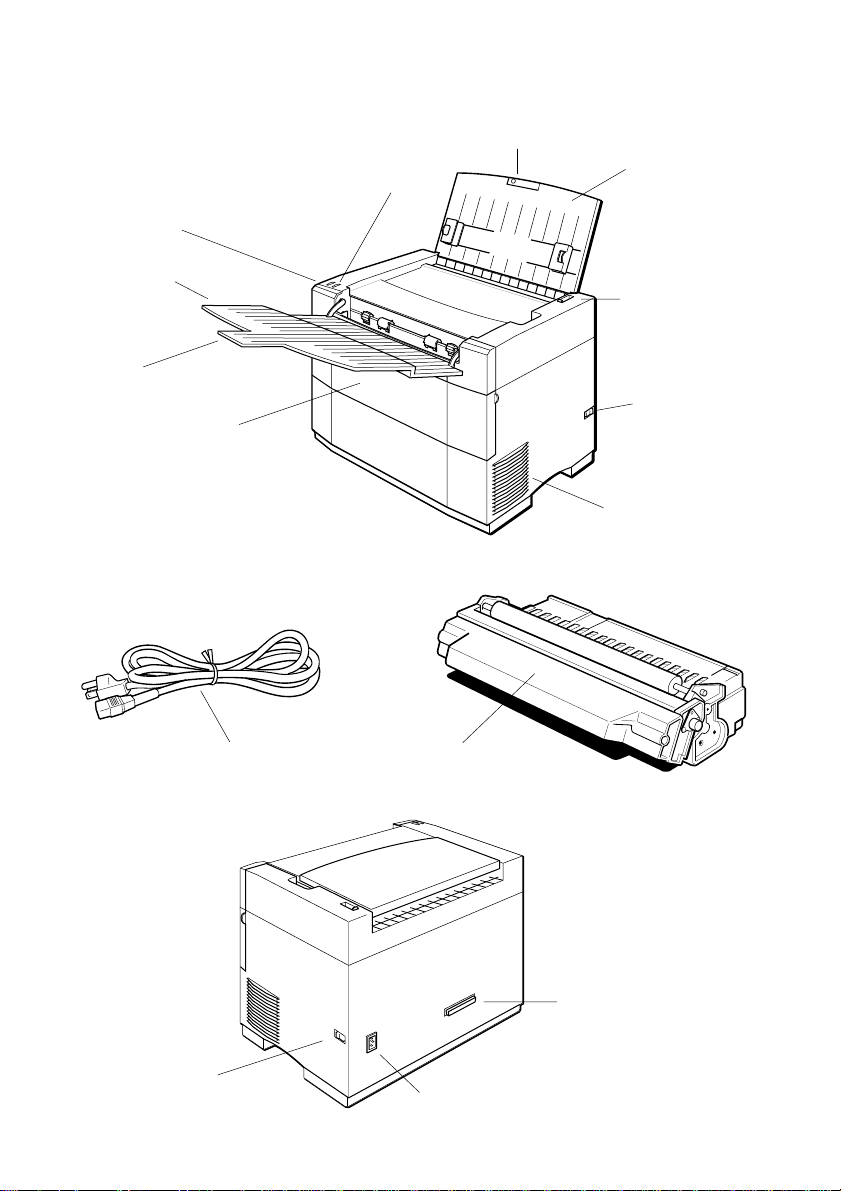
Printer components
Ready LED lamp
(Green)
Extension bar and paper
support extender
Error LED lamp
(Orange)
Upper paper
tray
Output tray
Output
paper
extender
Front cover
Power cord
Paper release
lever
Power
switch
Ventilation fan
outlet
High definition EP
toner cartridge
Power Switch
viii
Parallel port
Power cord socket
Page 11
Chapter 1 Setting up your printer
Y our printer is a r eliable and quality pr ecisioned instrument. It is every owner's r esponsibility to make sure that their equipment is properly placed and sensibly used. If the
following conditions are met, you can expect your printer to perform at its finest and to
last a long time.
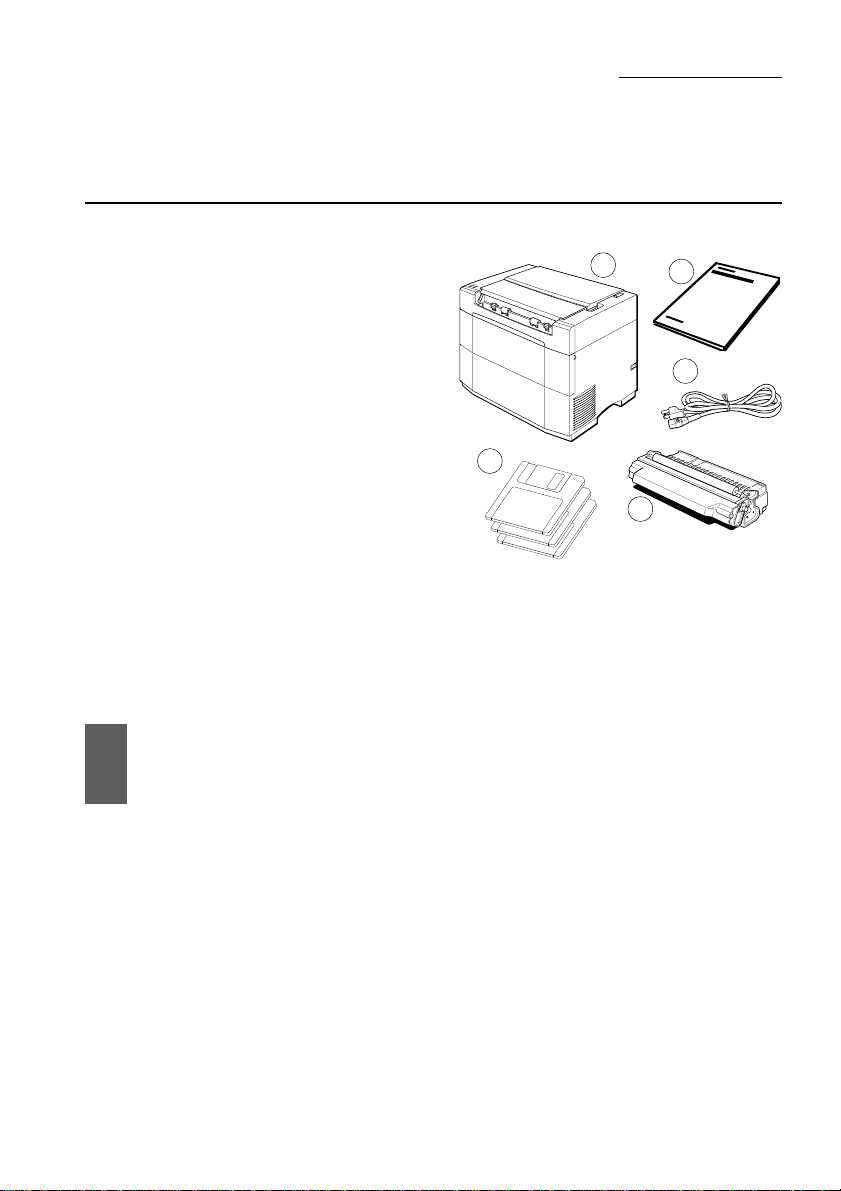
Unpacking and checking the package contents
When you open the box, you will find the
items in the list below included. Remove all
of the packing materials. Check to make sure,
when removing the contents of the carton, that
each item has been included. There should
be a total of five items. If you are missing
any of them, contact your dealer immediately.
1
2
3
Package contents
1 WinType 4000 laser printer
2 This Users Manual
3 Power cable
4 Printer driver and font software (3 disks)
5 Starter high definition EP toner cartridge
W e strongly recommend that you save the box
and all of the packing materials for this printer.
They will protect the printer should you ever
need to transport it to a new location.
Caution: Always remove the EP toner cartridge prior to transporting this
printer. Failure to do so may result in permanent damage to your
printer and may void your warranty.
4
5
Placing the printer
If you take good care of your printer, you can expect it to perform at its finest and to last
for a very long time. You can do that by first setting your printer in an area which meets
the following requirements.
• A firm, level surface which is free from vibration.
• An area free from excessive heat such as direct sunlight or heaters.
• A dust free environment.
• A steady power supply. Do not connect it to an outlet which uses the same circuit as
a refrigerator or an air conditioner.
• Use only the line voltage specified on the identification plate.
1
Page 12
• The printer should be positioned relatively close to the computer. The maximum
recommended length of the parallel interface cable (not supplied) is 2 meters or 6
feet.
• The printer should be placed so that there is a minimum of 50mm (2 in.) clearance on all sides to prevent blockage of its ventilation fan outlets.
Installing the toner cartridge
After selecting a suitable place for your printer, you can begin preparing it for printing.
Always follow these easy steps to install the EP (electrophotographic) toner cartridge.
The toner cartridge contains toner (a dry ink substance) and an EP (electrophotographic)
drum that transfers the toner to the paper.
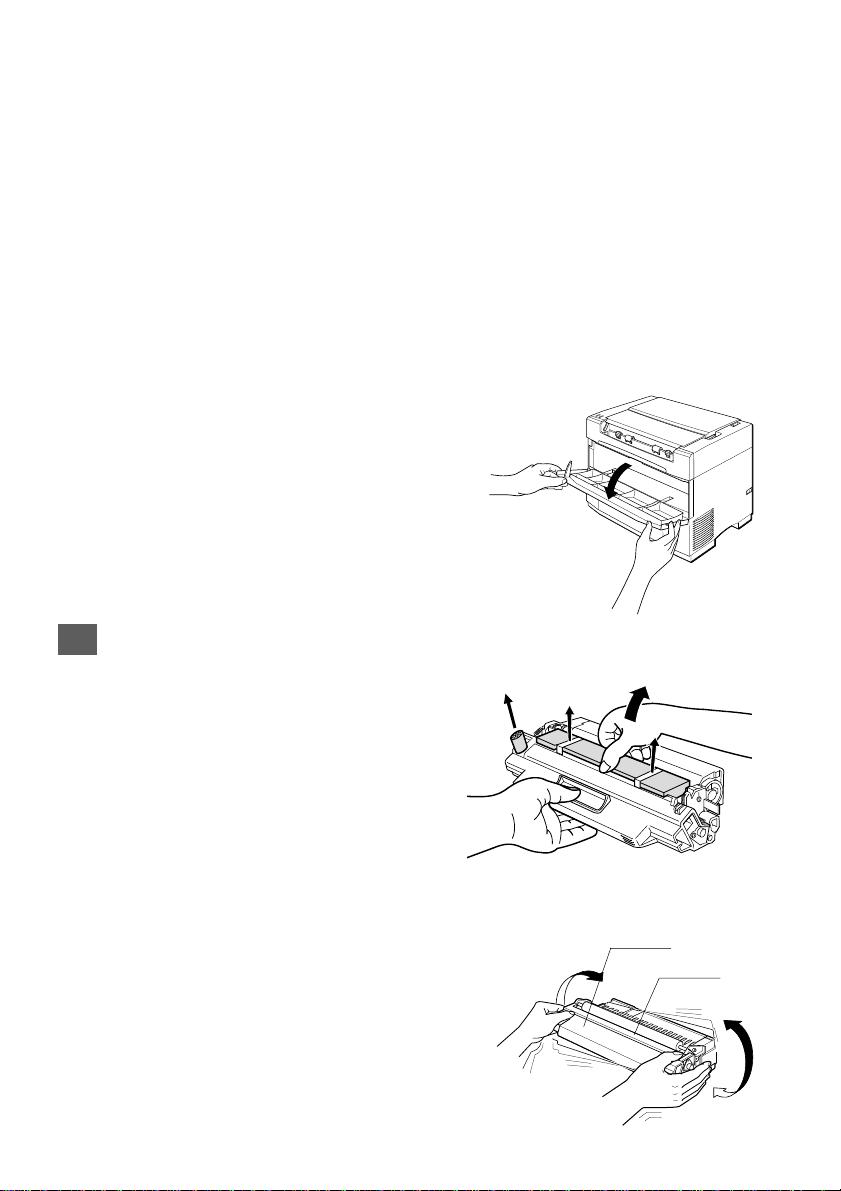
Steps:
1. Face the front of the printer and
gently open the front cover of the
printer using both hands.
Caution: Never lean on or rest heavy objects on the open cover of the printer.
2. After unpacking the toner cartridge,
turn it ov er and remove the two strips of
tape and the protective shim.
Next, gently remove the cardboard pad.
3. Turn the toner cartridge rightside-up and
gently rock it back and forth seven or eight
times to free the toner.
2
Drum
Roller
Page 13
Caution: Be careful when holding the cartridge not to touch the roller, drum or
top of the cartridge.
Note: Save the toner cartridge package in case you need to store the
cartridge after removing it. Do not expose the toner cartridge to
direct sunlight or strong room lighting.
Complete the installation process for the toner cartridge as quickly as
possible to avoid damage to the cartridge.
Always use these steps when you install a toner cartridge.
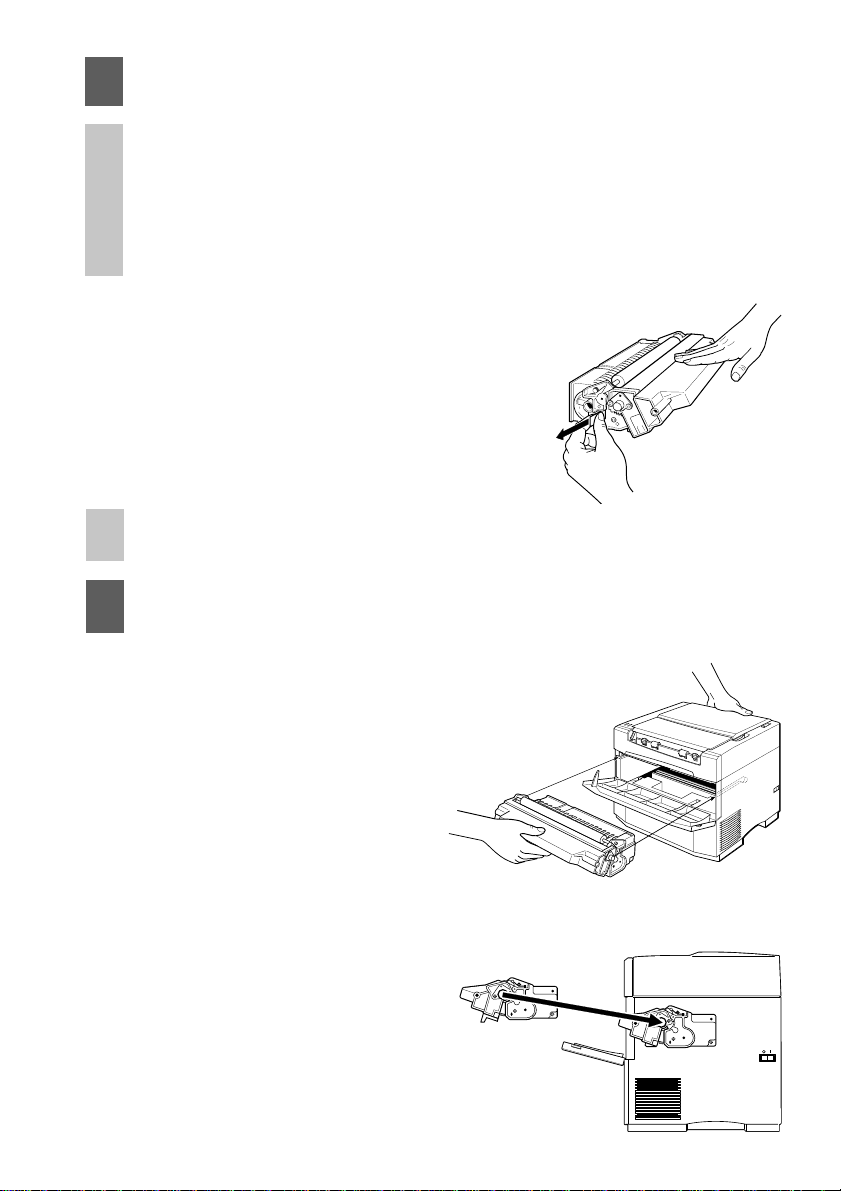
4. Lay the cartridge on a flat surface and
press down with one hand. Grasp the
end tab of the sealing tape and pull the
tape straight out horizontally from the
cartridge.
Note: Pull gently outward from the cartridge because pulling up on the tape
may break it.
Caution: Make certain that the cartridge is flat to prevent damage to the
cartridge roller or the drum.
5. Grasp the toner cartridge by its
molded center grip and insert the
cartridge into the front of the
printer. Make certain that the
locking knobs on either side of the
cartridge rest on the guides inside
the printer.
6. While keeping the cartridge level, slide
the cartridge into the printer until it
stops well inside the body of the
printer.
3
Page 14
7. Press the toner cartridge firmly into the
printer until it locks into position.
8. Close the front cover by pressing at the
top corners. The door will lock closed.
Caution: If you experience a paper jam, never pull the paper out of the toner
cartridge in the reverse direction of the paper feed mechanism. See
page 67 for details on clearing paper jams.
Note: Always use these steps when you install a toner cartridge.
Setting up the upper paper tray
Your printer is equipped with a convenient fold-out upper paper tray on the top of the
printer body. You can stack up to 100 sheets of 20 lb. paper for continuous multiple page
document printing.
Steps:
1. Lift the upper paper tray into the upright
position.
2. Lift up on the extension bar until it reaches
the desired height.
3. Rotate the paper support extender to its
open position.
4. Slide the paper guides to the furthest
outside positions.
1
3
2
4
Paper
guides
4
Page 15
Setting up the output tray
When you print documents, this tray will keep your work in order.
Steps:
1. Lift the output tray to its open position.
2. Slide the output paper extender to its
open position.
Output paper
extender
Note: You do not need to open the output tray when printing only one sheet.
The output tray will support up to 50 sheets of 20 lb. paper.
Caution: Never lean or rest heavy objects on the open output tray.
Output tray
Connecting the printer to the computer
Follow these steps to connect the printer to a computer with a high quality 36 pin shielded
Centronics parallel interface cable (not supplied).
Steps:
1. Plug one end of the parallel cable into one
of the interface ports on the computer.
2. Plug the other end of the interface cable
into the printer's interface port which is
located on the back of the printer.
3. Securely fit the prongs on either side of
the printer's port into the clips on both sides
of the printer cable.
Interface Port
Note: To ensure proper operation, you must use a high quality Centronics-
compatible shielded parallel interface cable. This cable should not be
longer than 2 meters or 6 feet.
5
Page 16
Connecting the power cord
Steps:
1. Make sure that the power switch, located
on the side of the printer, is in the OFF
[ ] position.
2. Securely plug the power cord into the
socket located on the rear of the printer.
3. Plug the other end of the power cord into
a grounded wall outlet.
Turning the printer ON
Step:
1. After plugging in the printer's power
cord, press the power switch, located on
the side of the printer, to the ON [ ]
position. The Ready LED lamp will
flash while the printer is warming up.
When the printer is ready to print, it will
remain lit.
Turning the printer OFF
Step:
1. Pressing the power switch, located on
the side of the printer, to the OFF [ ]
position will turn the printer OFF.
Note: If you are not going to use the printer for an extended period, remove
all print media from the upper paper and output trays and close them.
Caution: Never turn the printer OFF while a print job is being processed. If
you turn the power OFF accidentally during printing, remove all print
media from the upper paper tray. Clear any paper jams that may be
inside the printer (see page 67). Then turn the power ON again.
6
Page 17
Relocating the printer
Caution: Always follow these steps when moving the printer. You must always
remove the toner cartridge when moving the printer. Failure to do so
may cause permanent damage to the printer.
Steps:
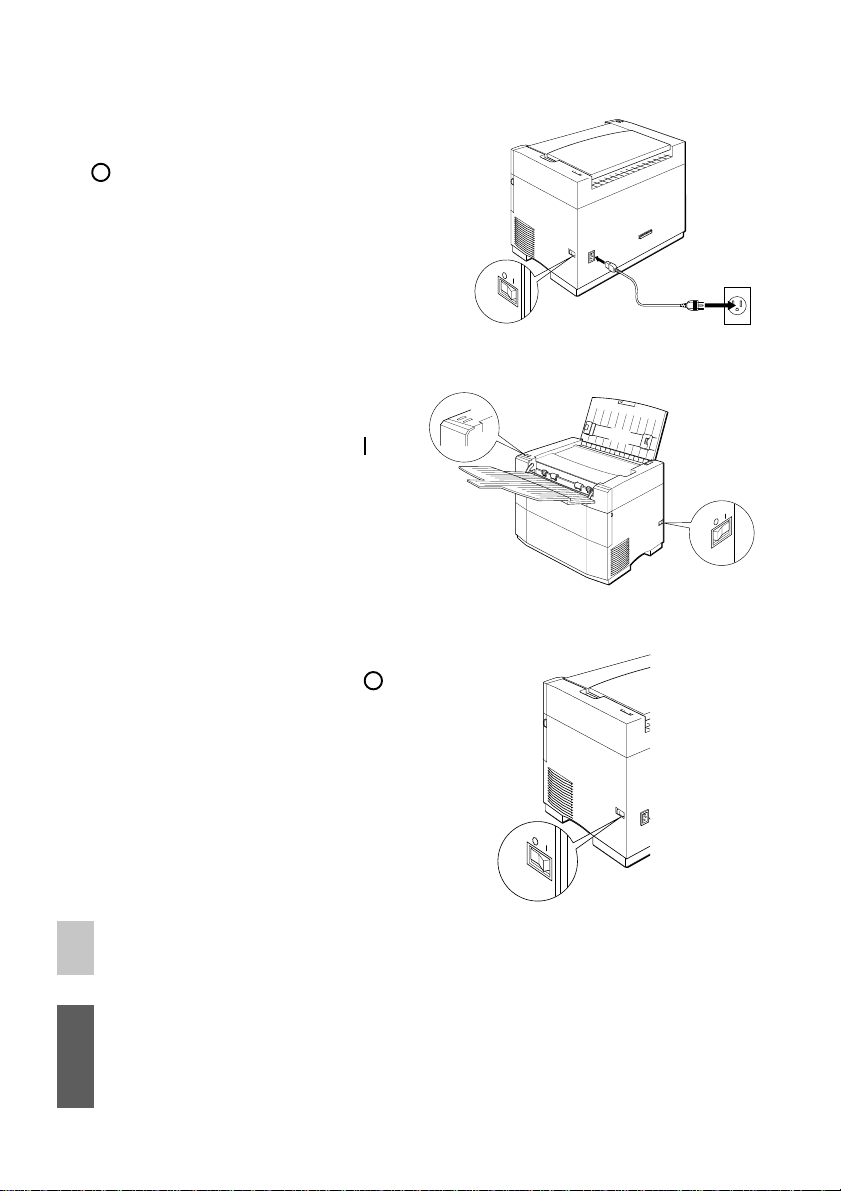
1. Make sure that the power switch, located
on the side of the printer, is in the OFF
[ ] position.
2. Disconnect the power cord from the wall
outlet and the printer socket at the back
of the printer. In addition, you should
disconnect the parallel cable connecting
your printer to your computer.
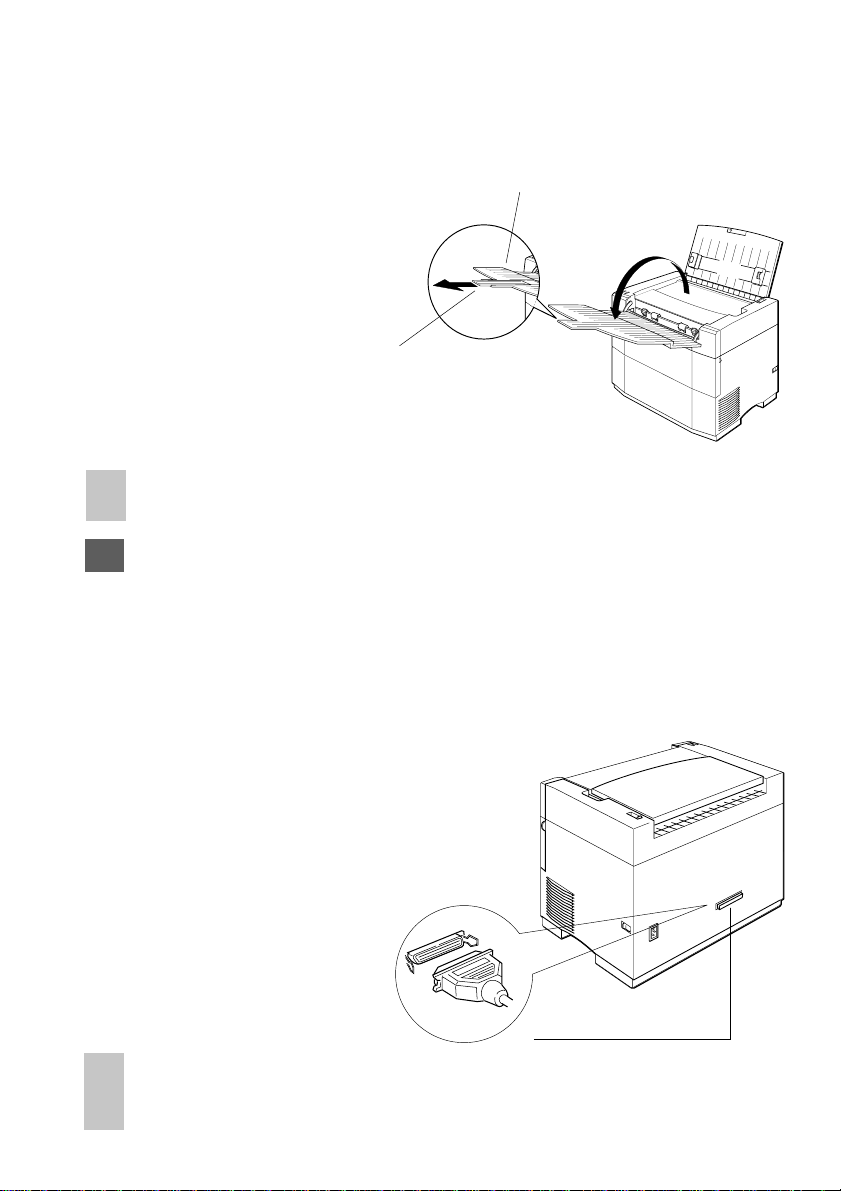
3. Remove any printed material from the
output tray.
4. Move the paper release lever to the
release position (toward the front of the
printer) and remove any paper from the
upper paper tray.
5. Retract and close the output tray and
retract and close the upper paper tray.
To close the trays, follow the steps
shown in the illustration at the right.
1. Push in the output paper
extender.
2. Fold up the output paper tray.
3. Close the paper support extenders.
4. Fold down the upper paper tray.
4
2
1
3
7
Page 18
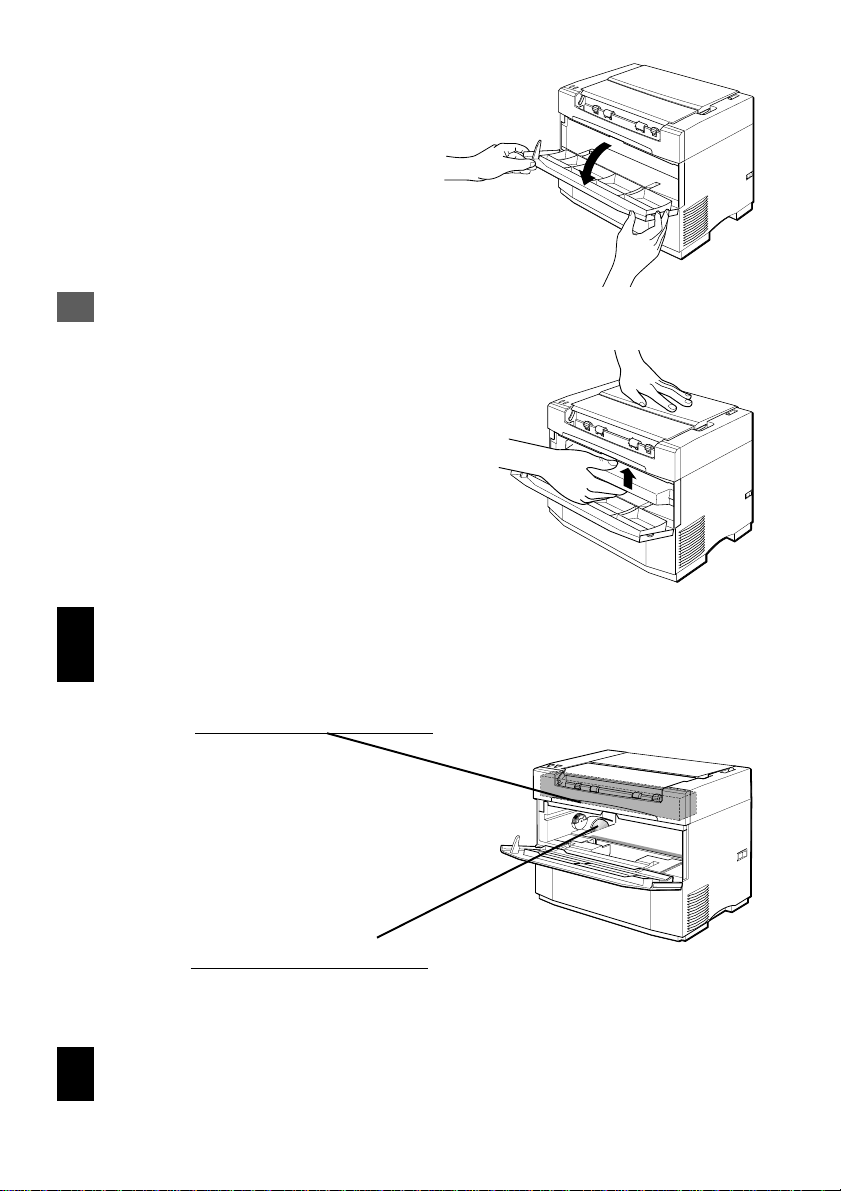
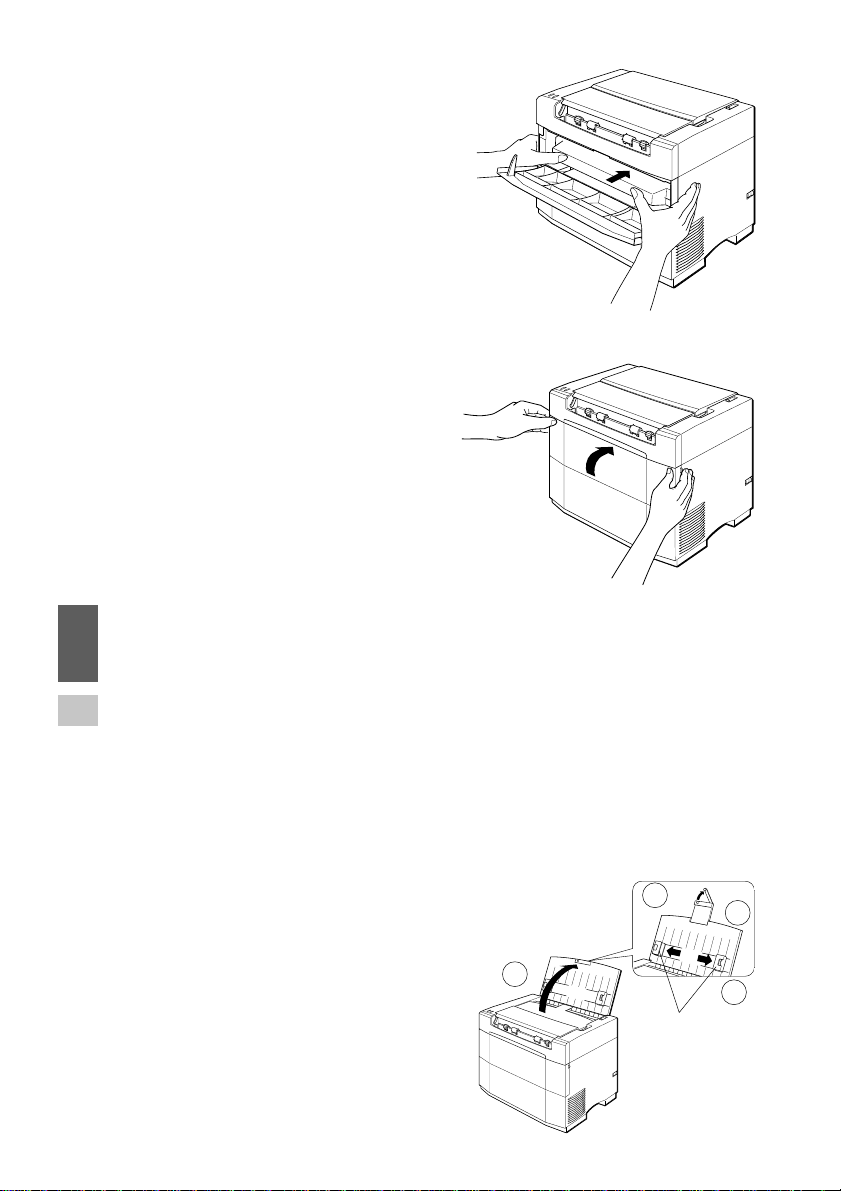
6. Face the front of the printer and open the
front cover.
Caution: Never lean or rest heavy objects on the open door.
7. Gently rest one hand on the top of the printer
and grasp the toner cartridge by its molded
center grip with the other hand and pull
upward until the cartridge unlocks and
releases.
Warning: The fuser area is located in the upper front part of the printer and it is
extremely hot. Be especially careful not to touch any part of the fuser
area to prevent burns.
The fuser area is extremely
hot. Do not touch this area.
The drive motor is
extremely hot. Do not touch.
Warning: The drive motor becomes very hot after extended periods of printing.
Be careful not to touch any metal part of the drive motor.
8
Page 19
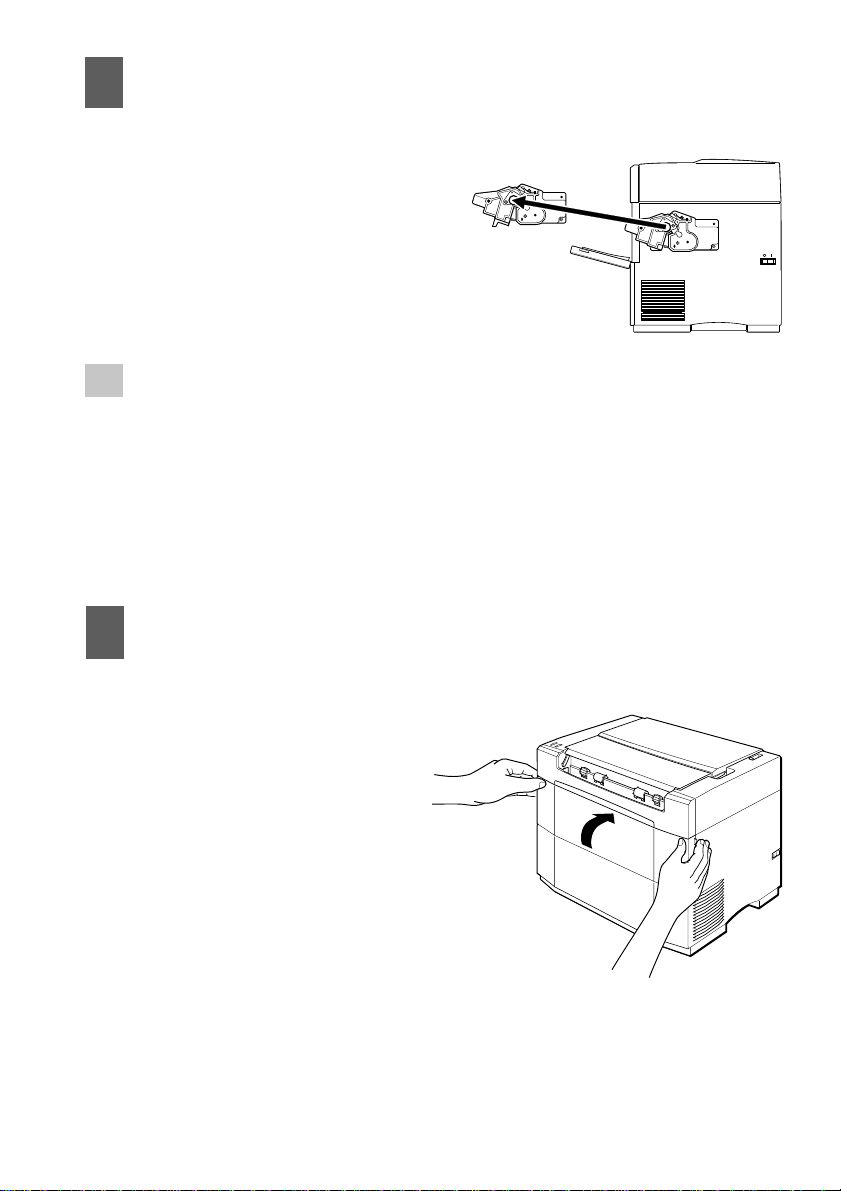
Caution: Do not press too hard on the top of the printer because this could
damage the cover or trays.
8. Rotate the toner cartridge slightly down-
ward until it is level. Slide it out from
the printer.
Note: The toner cartridge will not slide smoothly unless it is level.
9. Put the toner cartridge in its original
package (aluminum bag) or wrap it in
thick cloth to protect it from damage.
Caution: To prevent spilling the toner, do not shake the toner cartridge.
Do not expose the cartridge to direct sunlight or strong room light.
10.Close the front cover by pressing on the
top corners with your hands. The door
will lock closed.
9
Page 20
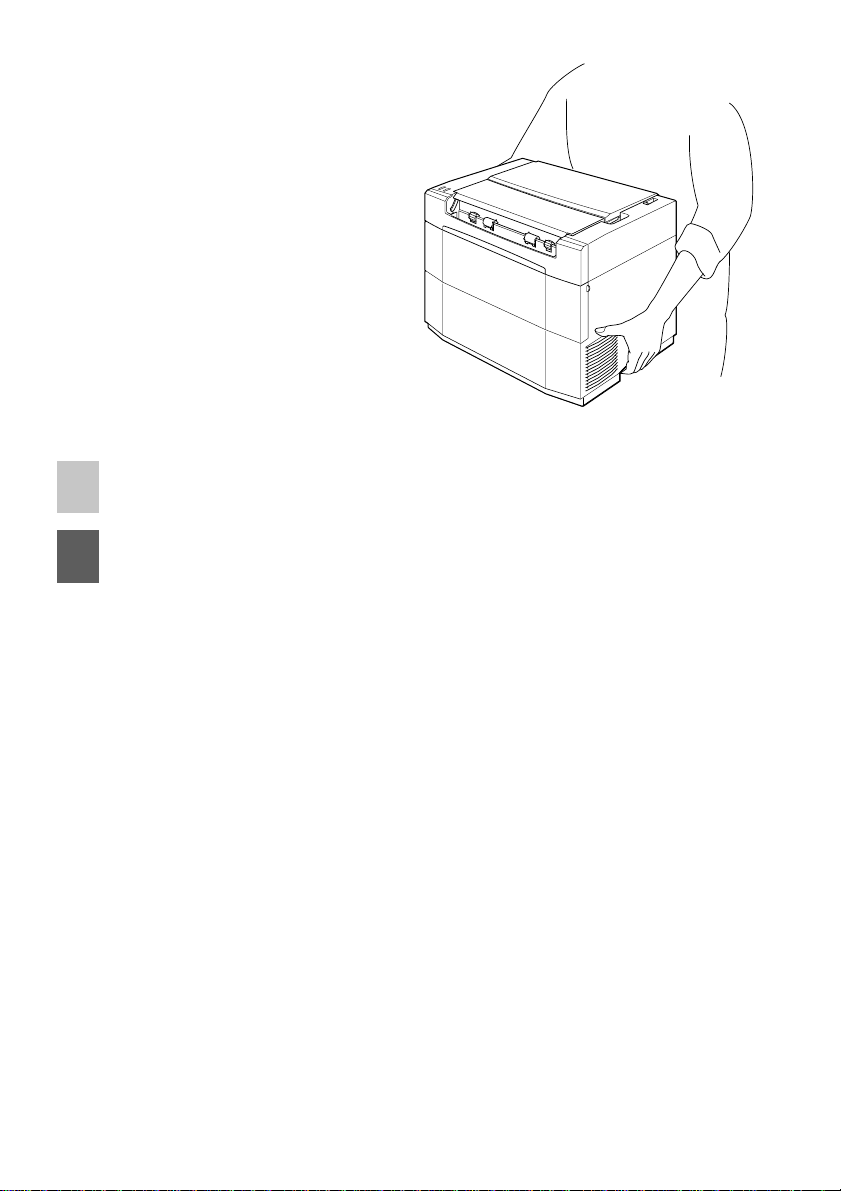
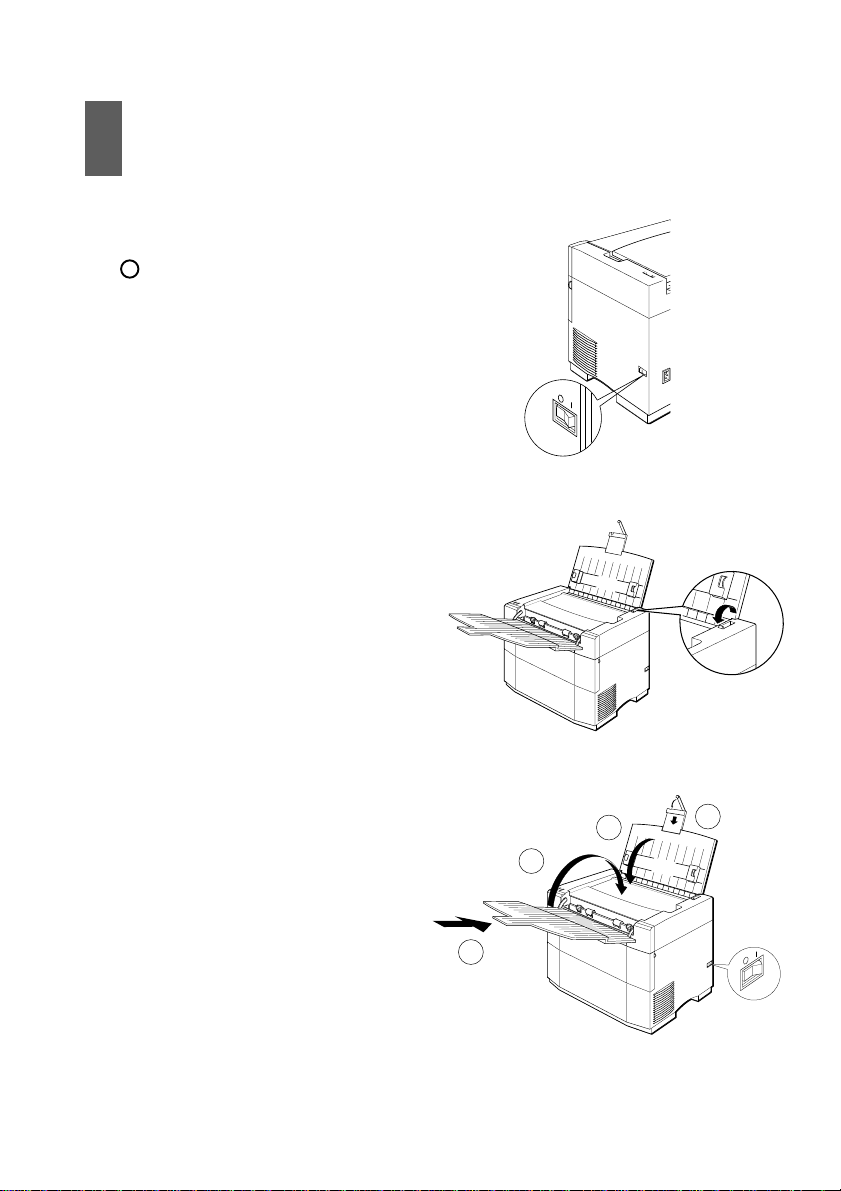
11.Face the back of the printer, tilt the
printer toward you and grasp it by the
bottom grips on both sides of the body.
Carry the printer to the new location.
Note: Without paper and the toner cartridge, the printer weighs approxi-
mately 6.5 kg. (14.3 lbs.).
Caution: Be sure to locate your printer according to the guidelines explained
on page 1, "Placing the printer."
10
Page 21
Chapter 2 Selecting print media
Your printer can handle a wide variety of print media including plain paper sizes from
Legal and Executive to B5. It can also print on OHP (overhead projection) film, label
sheets and envelopes. However, to get the best results in printing quality and printer
performance, you should select only the types described here.
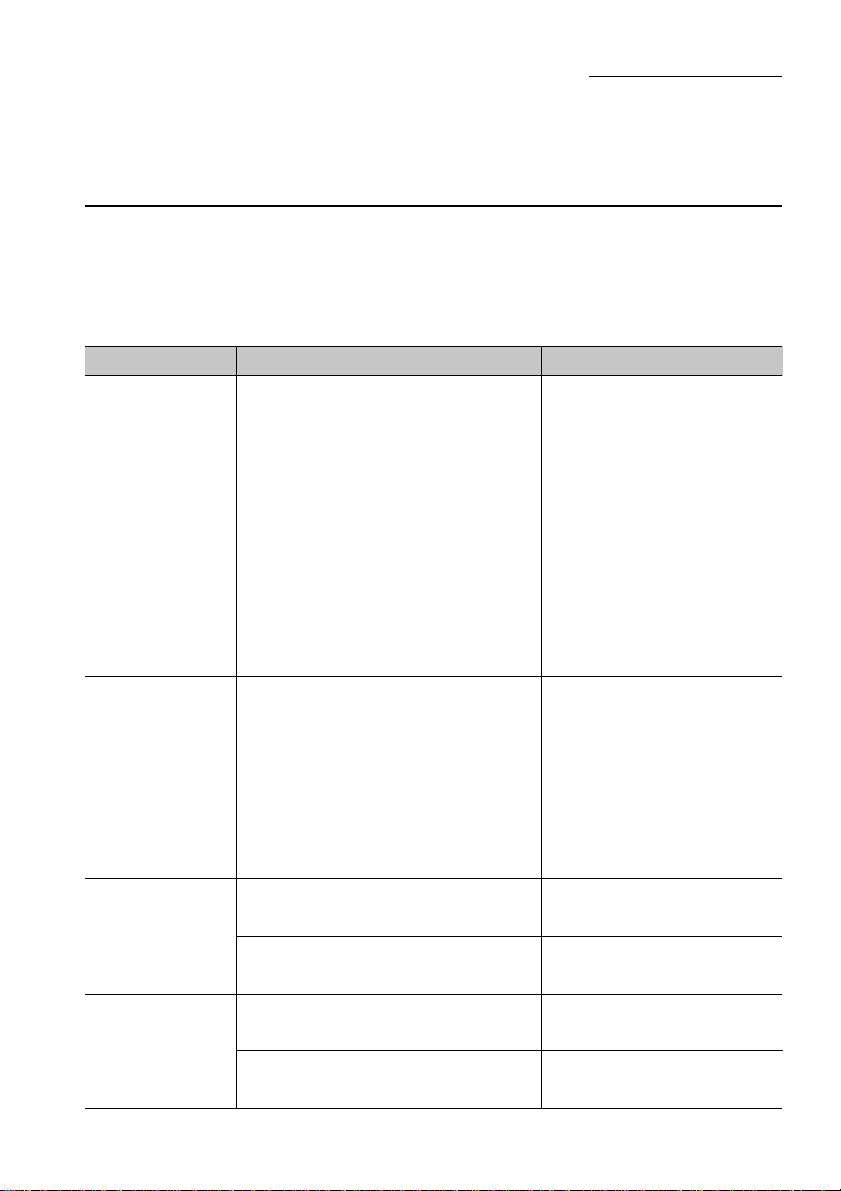
Recommended print media
We recommend that you use only high quality paper designed for laser printers or other
electrophotographic devices with this printer. Please refer to the following list to determine the types and size of paper you can use.
Type Size Weight/Recommended
Plain paper A4 (8.27" X 11.69") 60g/m2 to 135 g/m
(210mm X 297mm) (16 lb. to 36 lb.)
Letter (8 1/2" X 11")
(216mm X 279mm)
B5 (7.17" X 10.12")
(182mm X 257mm)
Executive (7 1/4" X 10 1/2") XEROX 4024
(184mm X 267mm)
Legal (8 1/2" X 14")
(216mm X 356mm)
A5 (5.83" X 8.27")
(148mm X 210mm)
Envelope Com-10 (4 1/8" X 9 1/2") 60 g/m2 to 135 g/m
(105mm X 241mm) (16 lb. to 36 lb.)
MONARCH (3 7/8" X 7 1/2")
(98.5mm X 199mm)
DL (4.33" X 8.66")
(110mm X 220mm)
C5 (6.38" X 9.02")
(162mm X 229mm)
2
2
Label A4 (8.27" X 11.69") XEROX, P/N 3R97408
sheets (210mm X 297mm)
Letter (8 1/2" X 11") XEROX, P/N 3R4469
(216mm X 280mm)
OHP Film A4 (8.27" X 11.69") XEROX, P/N 3R91330
(Overhead (210mm X 297mm)
Projection) Letter (8 1/2" X 11") XEROX, P/N 3R2780
(216m X 280mm)
11
Page 22
Printing media to avoid
This laser printer is a sophisticated printing tool and should be used with care. As with
any precisioned instrument, there are proper and improper methods of use. The following table lists the printing media you should avoid when using with this printer.
• Excessively thick or thin media
• Media which has been already laser printed or photocopied
• Wrinkled, curled, torn or bent media
• Punched or perforated media
• Moist or damp media
• Sticky media or media which has adhesive
• Thermal paper
• Coated media
• Carbon paper
• Media unable to withstand temperatures of 150°C. (302°F)
• Stapled or clipped media
• Media which is not recommended for laser printers or electrophotographic devices
• Labels with exposed backing
Acceptable Not Acceptable
In order to maintain high quality printing, we recommend that all printing media is stored
until needed. The following are the guidelines for storing your materials.
• Store print media on a flat surface so that it does not bend or curl
• Wrap all unused printing media securely
• Do not unwrap media until ready to use
• Do not expose media to direct sunlight or high humidity for long periods
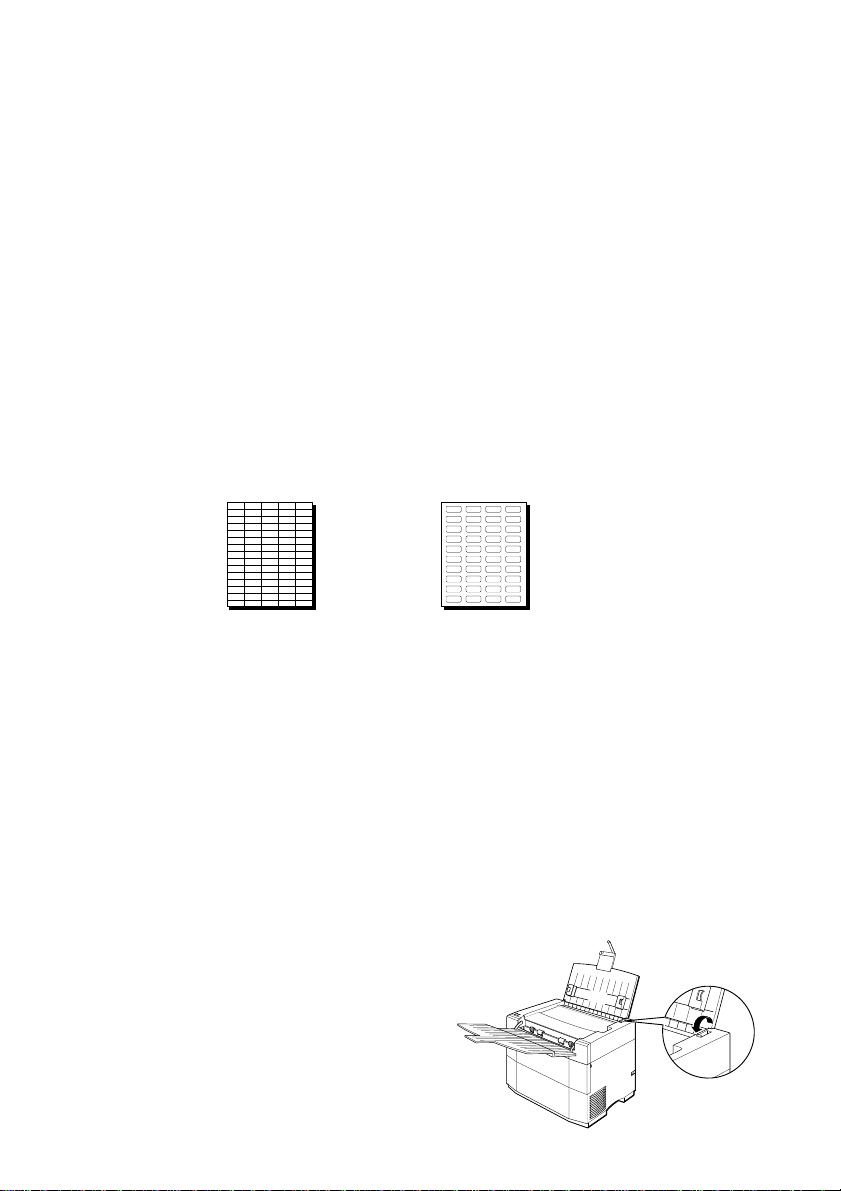
Loading plain paper, OHP (overhead projection) film and label sheets
You can load up to 100 sheets of plain paper (20 lbs.) or 30 sheets of OHP (overhead
projection) film or 30 label sheets in the upper paper tray.
Steps:
1. Move the paper release lever to the front
of the printer.
2. Remove any paper that is in the upper
paper tray.
12
Page 23

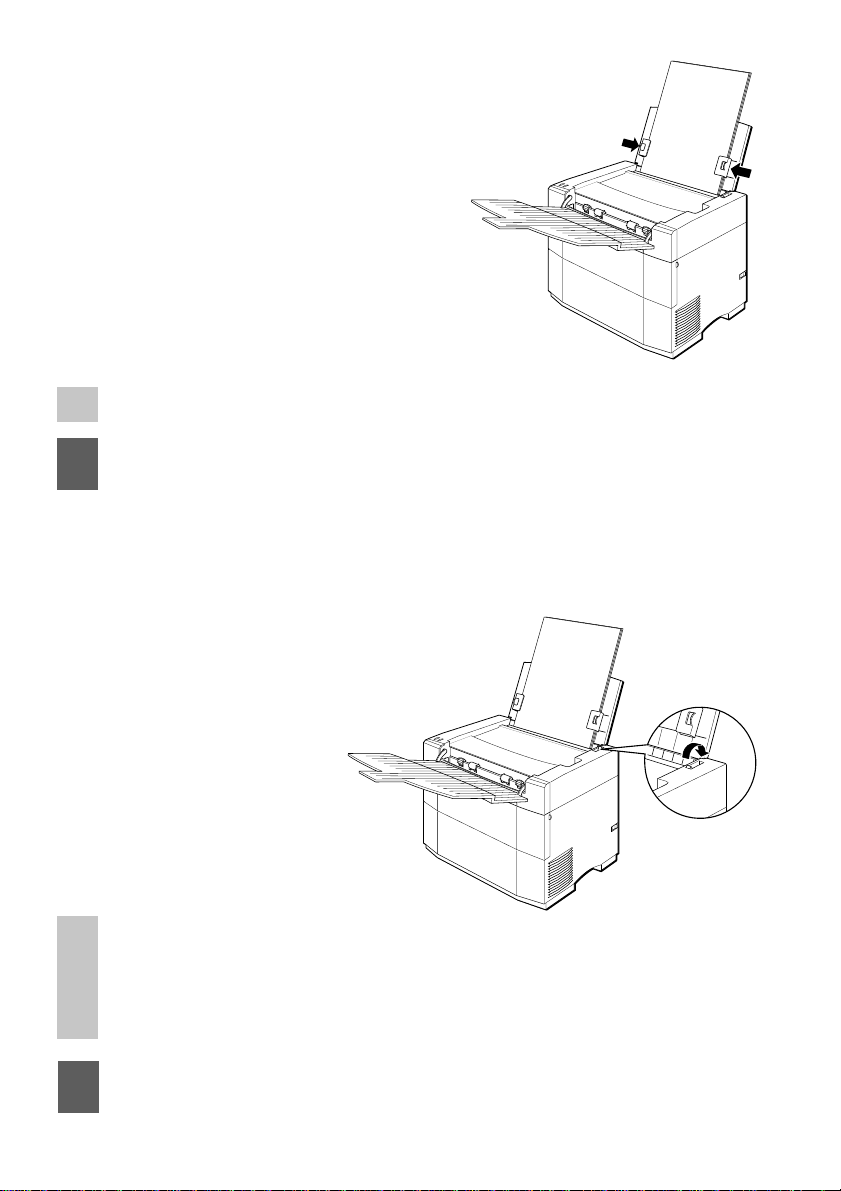
3. Adjust the paper guides so that they are
slightly wider than the medium on which
to be printed.
4. Fan a stack of print media. This will help
prevent paper jams.
5. Load the print media into the upper paper
tray with the surface that you want to print
on facing the rear of the printer.
Caution: Only use the paper, labels or OHP film recommended for laser
printers to avoid paper jams or quality problems.
Do not load more paper, labels or OHP film than the recommended
amount because this will cause paper jams.
13
Page 24
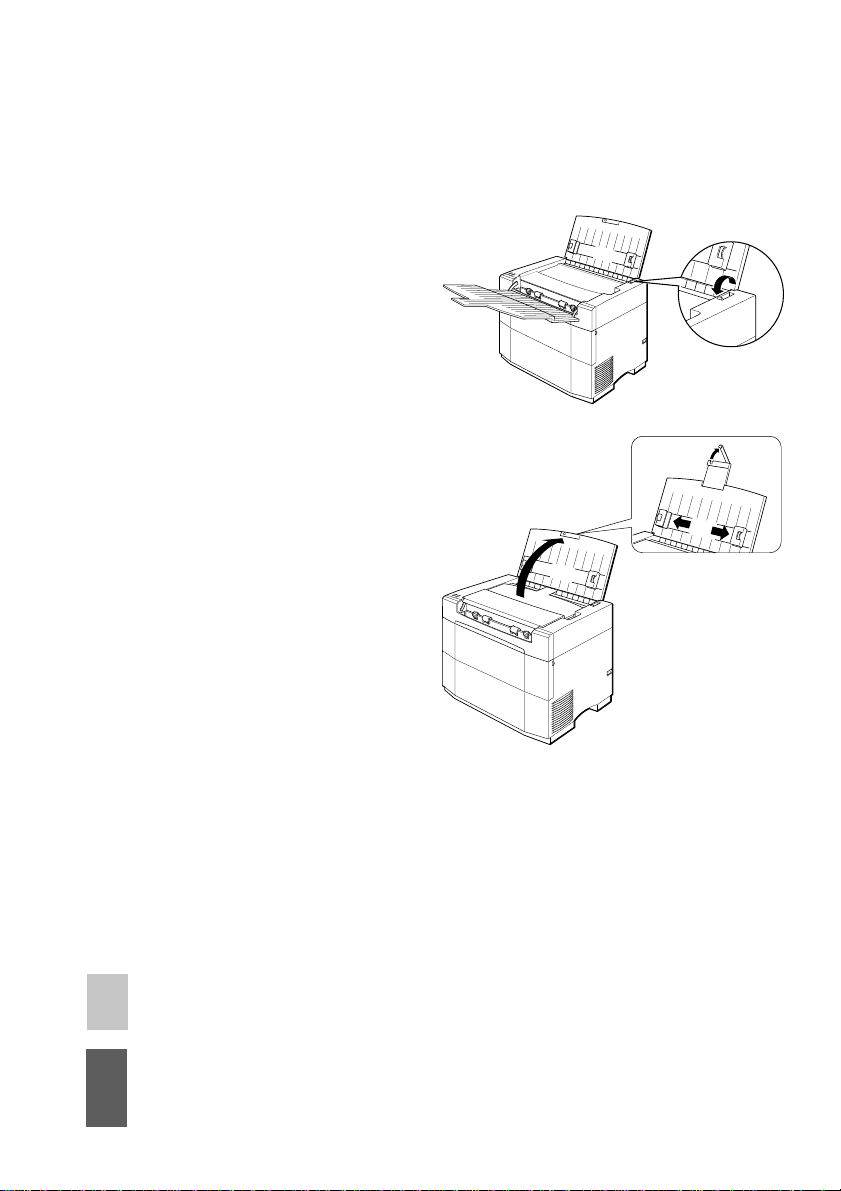
6. Adjust the paper guides to the width of
the stack.
Note: Do not crush the stack with the paper guides.
Caution: The paper should fit completely within the channels of the paper
guides.
7. Move the paper release lever to the back
of the printer.
Note: Moving the paper release lever will press the paper against the upper
paper tray. When loading a new stack of paper, remove the finished
documents from the output tray. Never add more paper to a partially
finished stack. Wait until the entire stack has been printed and then
load another stack.
Caution: Always make sure that the paper release lever is moved to the back
of the printer when printing. If it is not, a print error will occur.
14
Page 25
Loading envelopes
You can load up to 10 envelopes in the upper paper tray. Just as with plain paper printing, always put your media with the side to be printed on facing the rear of the printer in
the upper paper tray.
Steps:
1. Move the paper release lever to the front
of the printer.
2. Remove any paper that is in the upper
paper tray.
3. Adjust the paper guides so that they are
slightly wider than the medium you are
going to be printing on.
4. Fan the envelopes before loading them into
the upper paper tray. This will help
prevent jams.
5. Load the stack face down in portrait
orientation as illustrated on the next page.
Note: When printing envelopes, always be sure that the envelope flaps are
facing away from the paper tray.
Caution: Never print on the backs of envelopes. Never overload the upper
paper tray. The stack of envelopes should fit loosely into the channel
formed by the paper guides.
15
Page 26
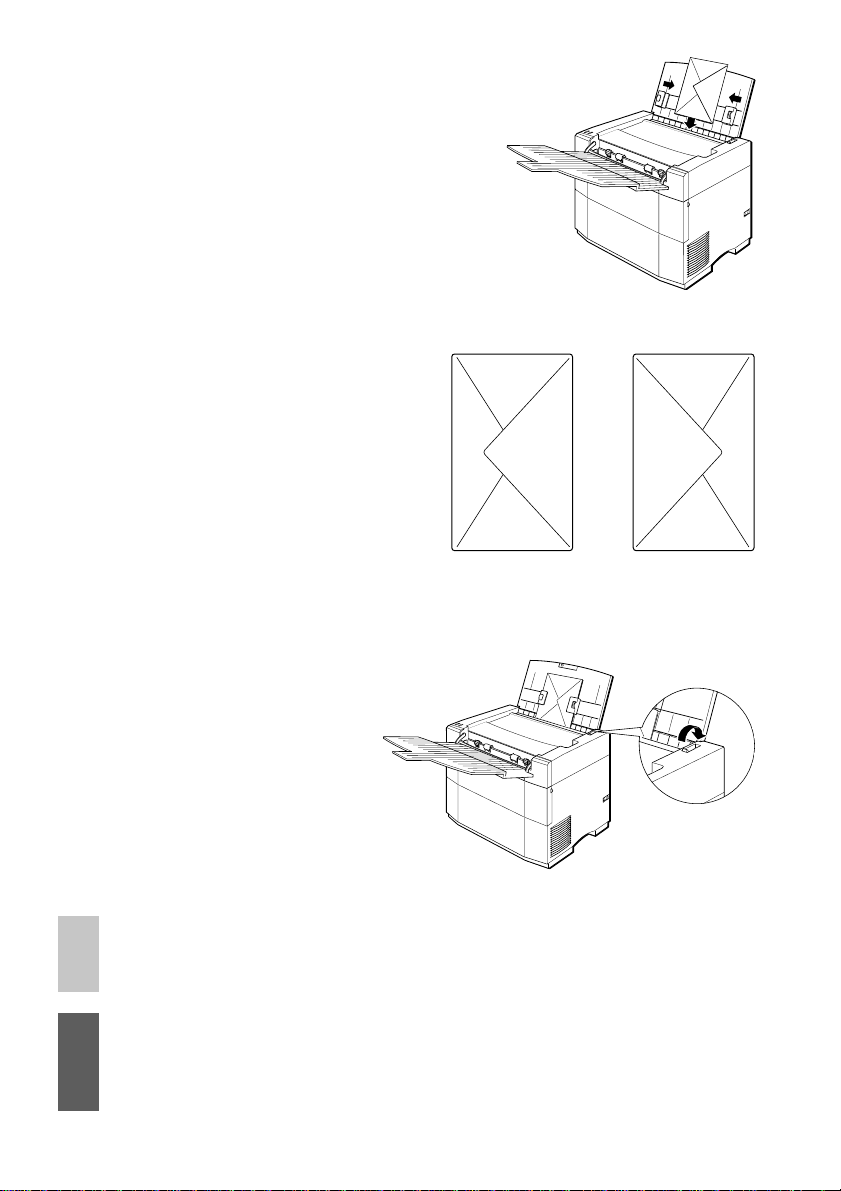
6. Adjust the paper guides to the width of
the stack.
Envelopes must be inserted into the upper
paper tray in the orientation as shown in
the illustration at the right.
YES
7. Move the paper release lever to the
back of the printer.
Note: Never add more media to a partially finished stack. Wait until the
stack in the upper paper tray has been finished before loading
another stack.
Caution: Only use envelopes recommended for laser printers to avoid paper
jams or quality problems.
Do not load more envelopes than the recommended amount because
this will cause paper jams.
16
NO
Page 27

Chapter 3 Installing the printer driver and TrueType fonts
This printer comes with a printer driver and 35 TrueType fonts which are designed especially for Windows version 3.1 applications printing. It does not require any special
add-in cards, cartridges or cables. It also differs from other printers in that it uses the
computer's CPU to directly print your documents. When you upgrade to a mor e power ful computer, your printer performance is also improved. To operate the printer, however, you must follow these steps to install the printer driver software.
System requirements
T o run this printer driver you need an IBM compatible PC with at least a 386SX 16-MHz
CPU. Some older 386 computers cannot run in Windows Enhanced Mode, which means
that this software will not work properly on those systems. You can verify this, if you
have Windows installed on your computer, by typing WIN/3 at the MS-DOS prompt. If
your computer cannot run Windows in Enhanced Mode, the system will tell you. This
printer will not run on 286 based PCs and other earlier systems.
This printer requires at least 4 megabytes (MB) of PC memory (RAM) which is also the
minimum amount of memory recommended by Microsoft Corporation for use with Windows version 3.1. By adding more memory to your computer, both your PC and printer's
performance will increase.
This system software requires approximately 1.4 megabytes of disk space on your system's
hard drive. An additional 1.85 megabytes is needed to install all of the 35 TrueType
fonts. Up to approximately 8.5 megabytes of disk space is required for permanent virtual memory under Windows. If you have more than 4 megabytes of RAM, you won't
need the entire 8.5 megabytes of virtual memory, which is described later in this Chapter .
The total memory, PC RAM plus virtual memory, should add up to at least 12.5 megabytes,
which is divided between your computer's RAM memory (which needs to be at least 4
MB) and Windows virtual memory. If your system has 4 MB of RAM, then you must
allocate at least 8.5 MB of virtual memory in Windows. If you have 5 MB of RAM, then
you need at least 7.5 MB of virtual memory, etc.
A math co-processor is not necessary, however, having one will increase the speed of
PostScript emulation printing.
A Microsoft-compatible mouse is also highly recommended. This manual assumes that
you are using a mouse. If you are not using a mouse, please refer to your Windows 3.1
Users Guide for information on using the keyboard in place of a mouse.
A standard PC parallel printer port is required to connect the printer using a high quality
Centronics parallel cable.
Note: It is important that you use a properly manufactured cable. Using a
poor quality cable may affect the output of this printer.
17
Page 28

Printer command languages
This printer can receive data and interpret command languages through two standard
command interpreters and also by directly using your computer's processing power. Those
languages are 1) PostScript; 2) PCL and 3) Windows Direct.
It is strongly recommended that you use permanent virtual memory, rather than tempo-
rary. This can be changed through the Control Panel by following the steps below.
If you have not already designated the amount of virtual memory needed to run this
printer with the current amount of RAM on your computer, or if you wish to convert to
permanent virtual memory, do it now by using the Control Panel. These instructions
assume that your system has a minimum of 4 MB of RAM and is running Windows 3.1
in Enhanced mode.
Steps:
1. Switch to the Program Manager.
2. Double-click on the Main group icon
in the Program Manager.
3. Double-click on the Control Panel icon
in the Main group.
4. Double-click on the 386 Enhanced
icon.
5. Click on the Virtual Memory button.
6. If the type is Temporary or None, click
on the Change button.
7. Select Permanent from the Type menu
under New Settings. (An X should
appear in this box.)
18
Page 29

8. If required, increase the size of the virtual
memory by typing in the amount of
virtual memory you require in New Size,
according to the following chart.
PC RAM Size Virtual Memory Requirements
4 MB 8500K
5 MB 7500K
6 MB 6500K
7 MB 5500K
8 MB 4500K
9 MB 3500K
10 MB 2500K
11 MB 1500K
12 MB 500K
13 MB or more None required
If the New Size shown in the Virtual
Memory dialog box is less than the
amount you need, you will need to correct
the situation before proceeding by freeing
up additional hard disk space on your computer.
9. Click OK to save your changes. You must
click Restart Windows to implement
these changes.
10.Click Yes to implement the changes,
otherwise, click No.
Note: You cannot allocate more virtual memory than Recommended Size
as displayed in the New Settings window.
If Windows won't let you allocate the required amount of disk space, check to make sure
that you have enough room on your hard disk drive. If you have enough free disk space
and Windows won't let you create large enough permanent virtual memory, you may
need to run a disk defragmentation utility, such as MS-DOS 6.0's Defrag Utility, to clean
up your hard disk drive before changing your virtual memory to permanent. In the
meantime, you can use temporary virtual memory instead of permanent.
Note: If you are using a disk compression utility such as Microsoft's
Doublespace or Stac Electronics' Stacker (versions below 4.0),
permanent virtual memory must be located on the uncompressed
drive (typically the D drive).
Note: If you need more information on Windows' virtual memory, refer to the
Microsoft Windows 3.1 Users Guide.
19
Page 30
Installing the printer driver and TrueType fonts
If at any time during installation of the printer driver you need help, press <F1> or
choose <Help> on the Setup screen.
Note: Remember that you need at least 1.4 megabytes of hard disk space
to install this printer driver and 1.85 megabytes of hard disk space to
install the 35 TrueType fonts.
Always make a backup copy of each disk in the software package
and store the original disks in a safe place. Use the backup copies to
install the software.
Steps:
1. Insert disk #1 into the <A> drive. (Use the
<B> drive depending on your computer.)
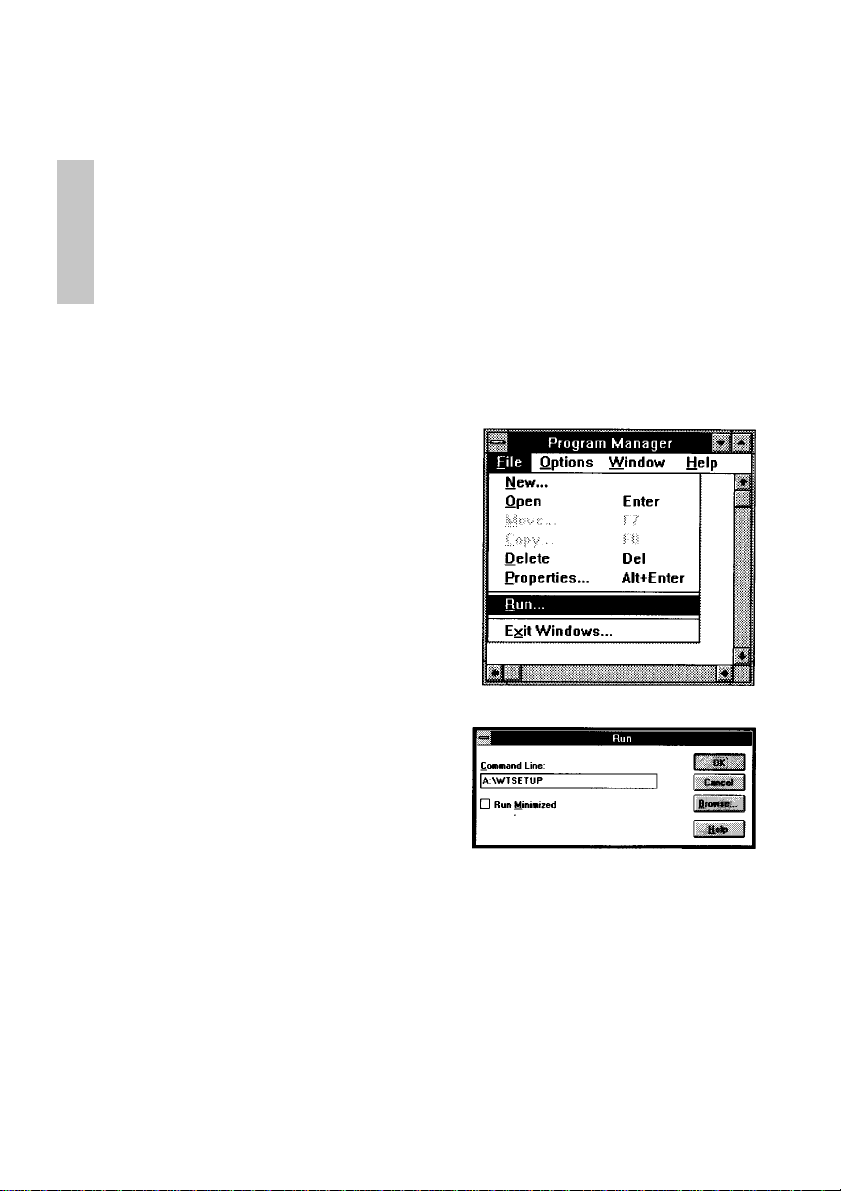
2. In the Windows Program Manager,
choose Run from the file menu.
3. In the Command Line box, type
"A:\WTSETUP" and press <Return>, if
A: is the letter of the drive containing the
software program. Y ou can also select this
by clicking on the Browse... and selecting
the drive in which the software program
floppy is located. Select WTSETUP .EXE
and press OK.
4. You will see the blue colored WinType
Setup screen. Click the mouse anywhere
on the screen or press any key to continue.
20
Page 31

5. You will see the Parallel Port Selection
screen. You must tell the Setup program
which of the parallel ports you will be using. The choices are LPT1, LPT2 or
LPT3. The Setup program only shows
those ports which are available on your
system. The default port is LPT1.
6. Click on Connect or press <Return> to
continue.
This will display the Directory
Setup screen.
Note: After installing the printer driver, you can select a different port by
using the WinT ype Print Manager.
Note: If you select another drive on which to install the printer driver, it must
have at least 1.4 MB of free hard disk space for the system files and
1.85 MB for all 35 TrueType fonts.
7. The Setup program will create and set
up the directory , "C:\WINTYPE", as the
default installation directory. You
can change the default directory and/or
drive now by specifying a new name.
Click OK if you are satisfied with the
name or click Cancel to ignore the change.
Note: If you changed the directory name, it is helpful to write the new
directory name somewhere in this manual. You should keep it handy,
in case you should ever want to remove this printer driver software.
21
Page 32

8. As the Setup program copies the software program to the specified directory,
it will prompt you to insert the additional disk as needed.
Note: As the installation is being carried out, the install program will display
messages and will show you the progress of the installation.
Note: The Setup program will modify the Windows initialization files so that
the printer driver will run properly when you start Windows.
9. When the program installation is complete,
you will see a message that tells you that
the WinType Setup program will install
the 35 TrueType fonts. If you click OK,
the install program will prompt you to insert disk #3. Clicking Cancel will ignore
the font installation and prompt you to restart Windows.
The Setup program also creates the
WinType Tools group. This group
contains icons for the WinT ype programs,
including the Star WinType Print Man-
ager, the Star WinType TEST, the Star
WinT ype Help and the Star WinT ype Uninstall program. When the printer is ac-
tive, you will be able to run these programs
by double-clicking on their icons.
10.When the TrueType fonts have been installed, the Setup program will display a
message telling you that setup was
successful and to restart in order to activate the WinType printer.
Choose "Restart Windows" to restart or
choose Exit to quit the Setup program.
Note: You must restart Windows before you can operate this printer.
22
Page 33

11.When Windows is restarted, the Star
WinType TEST Utility will check to
make sure that all of the print modes work
correctly. The test utility will print
several pages during the test, including
a configuration page containing information about your system and printer.
Caution: Make sure that the printer is turned on and that there is enough paper
in the paper tray to perform this test.
Note: It is a good idea to save a copy of the most recent configuration page
with this manual because it may be useful if you ever have to call
Customer Service.
12.If the installation is completed success-
fully, WinType device names will appear
in the Printers window of your Control
Panel.
23
Page 34

Removing the printer driver software
If you should ever need to remove the printer driver software from your system, use the
Un-install icon in the WinType Tools Group.
Steps:
1. From Program Manager, double-click
on the Star WinType Tools Group.
2. Double-click on the Star WinType
Un-install icon.
3. Click on Yes to remove all Star WinType
printer drivers and restore your Windows
initialization files. Otherwise click on No.
4. Exit Windows
5. Restart Windows
24
Page 35

Chapter 4 Printing with WinType 4000
The WinType 4000 printer driver has three print modes from which you can choose.
They are the Windows Direct (GDI), PostScript and PCL modes. These three printing
modes can be easily selected to meet your specific printing requirements. This chapter
explains these different print modes and how you can select and use them.
Windows Direct (GDI) mode
The Windows Direct (GDI) mode uses the processing power of your computer to print in
the Windows operating environment. It provides fast WYSIWYG (What You See Is
What You Get) printing output which is twice as fast as standard printers under most
Windows applications.
Windows Direct (GDI) mode takes advantage of Windows own internal design to produce documents faster than most conventional printers. Other printers require Windows
to translate a document into a special printer language, such as PCL on LaserJet printers.
Windows Direct (GDI) mode reduces printing time by eliminating this translation step
before starting to print. This mode also includes some additional useful features, such as
duplex printing.
Windows Direct (GDI) mode works well for most software packages. However , certain
applications and certain graphics files will look more polished when printed using a
more sophisticated printer language, like PostScript. Also, W indows Direct (GDI) mode
uses Windows functionality which is not available when running non-W indows applications. For these reasons, the WinType 4000 includes PostScript and PCL emulation
modes. We'll explain how to select these modes later.
PostScript mode
PostScript mode printing gives you the ability to print high quality and sophisticated
documents in Windows and DOS applications within the Windows environment.
PostScript mode is good for printing files with sophisticated embedded graphic images.
Because Windows may not always display graphic intensive files accurately , try printing
those files with the PostScript mode. The WinType software supports additional
PostScript-compatible Type1 software fonts such as Adobe's Type Manager (ATM).
PCL mode
The printer duplicates the functionality of Hewlett-Packard LaserJet IIP with some minor exceptions. PCL emulation gives you the ability to print from a DOS application
running within Windows and from the MS-DOS command line within Windows.
25
Page 36

Features of the printer driver software
This printer driver software includes the following capabilities.
• Printing from any Windows 3.1 application.
• Printing DOS applications through Windows
• Printing from DOS command line within Windows
• Print manager (print spooler)
• On-line help files
• Printer and printing status information
Printing with the Windows Direct (GDI) mode
GDI mode works best for very fast printing in Windows applications. Use the following
steps to select the Windows Direct mode.
Steps:
1. Switch to the Program Manager.
2. Open the Main group by double-clicking
on its icon.
3. Double-click on the Control Panel
icon in the Main window.
4. Double-click on the Printers icon in the
Control Panel window.
5. Double-click on the Star WinType 4000
GDI on WTGDI. This will select the GDI
mode as your default printer.
Note: Most popular Windows applications also have shortcuts to the printer
setup screen which allows you to make changes without having to go
through the Control Panel.
26
Page 37

6. Click on the Setup button.
You will see a window which
looks like the one on the right.
In the Setup dialog box, you can
set the Paper Size, the number of
Copies (from 1 to 99) and the
Orientation of the paper. A com-
plete listing of the types of paper
and other media types is in Chapter 2.
Note: The Setup screen in GDI mode lets you select the following items:
• Paper size
• Number of printed sets (1 — 99)
• Portrait or landscape style printing
Caution: Remember that this printer can hold up to 100 sheets in the paper
tray. Overloading the paper tray will cause the paper to jam.
You must never select any port other than WTGDI in the Connect box
of the Printers menu. If you want to change the port from LPT1 to
LPT2 or LPT 3, use the Star WinType Print Manager to make these
changes.
7. Clicking on the Options button will call
up the Options dialog box, shown at right,
which is where you can make the following selections.
• Clicking on the Use WinType Print
Manager will cause the printer driver to
always display the WinType Print
Manager. The WinT ype Print Manager
is explained in Chapter 5.
• If you have Use WinT ype Print Manager
selected, you can also click on Reverse
Printing Order which will print your
document from the highest page number
to the lowest page number.
• If you have Use WinT ype Print Manager
selected, you can also select Manual
Duplexing.
Note: This printer will print faster if the WinT ype Print Manager is turned OFF.
Note: Printing Status Options are only available when the Use WinType
Print Manager is not selected in this dialog box. However, you can
enable and set up the Printing Status Options from within the
WinType Print Manager. See Chapter 5 for details.
27
Page 38

• Clicking the Display Status While Print-
ing box, described in Chapter 6 Print
Status Window, will cause the Print Sta-
tus Window to appear whenever you print,
as shown in the illustration at the right.
The print status window includes an animated illustration of this printer to show
you the progress of your printing job or to
inform you of any errors.
• Clicking the Beep on Printer Error box
will cause the system to beep when an error occurs.
• Clicking the Beep when Print Job is
Complete box, will cause the system to
beep to inform you that a print job is finished.
• Clicking Manual Duplexing under Du-
plex Printing will allow you to print ei-
ther the Book Style or the Report Style.
Both styles are explained on the next page.
• Clicking Print Instruction Page will
cause the printer to output the instructions
for the Duplexing style you have selected.
These easy to understand instructions are
printed before the first page of your print
job to help you follow the job through
easily.
8. Click the OK button if you are satisfied
with the changes you have made. Y ou will
return to the Setup window.
Click the Cancel button to exit the
window and ignore any settings you have
made.
9. Click OK to exit the Setup window and
to save your changes.
10.Click on Close to exit the Printers menu
and to save your printer selection.
11.Click on Settings and select Exit to exit
the Control Panel window
28
Page 39

Manual duplex printing
Manual duplex printing, which is a feature of the Windows Direct (GDI) mode, allows
you to print on both sides of the page. Two duplexing styles are available - Book Style
and Report Style. Book Style printing prints your document so that if you opened it in
the same way as you opened this manual, for example, the even and odd numbered pages
would face each other on the left and right, respectively. In Report Style , the printer will
output the even numbered pages upside down so that if you opened the document in the
same way as a report that has been bound at the top, the even and odd numbered pages
would face the same way and will border on the top and bottom of the pages. You can
perform manual duplex printing by clicking on the style you want and following the
steps explained below.
Note: Manual duplex printing is available only when the Star WinType Print
Manager is clicked ON.
Steps:
1. Open the Options screen in the WinType
4000 GDI printer setup by following steps
1-6 on pages 26-27.
2. Click on Use WinType Print Manager.
3. Click on Manual Duplex Printing.
4. Click on the duplexing style you prefer
- Book Style - bound on the side or
- Report Style - bound at the top.
5. If the Print Instruction Page is not
checked, click this box.
6. After selecting the style that you want to
print, start your print job in the usual manner. The printer will print every odd-numbered page of your document, starting
from page 1.
Caution: If you are going to print multiple copies of your manually duplexed
documents, ALWAYS input the number of copies you want to print in
the Copies box in the
number of copies into the Copies box of the Print Command dialog
box.
printer driver dialog box. Do not input the
29
Page 40

7. Pick up your printed papers, straighten
them and reinsert them face up into the upper
paper tray.
Note: Some printed sheets may become curled. Curled sheets may cause
paper jams. Always straighten the sheets before reinserting them
into the upper paper tray.
Duplex printing errors
If an error occurs during Duplex Printing, please use the following procedures to recover.
• If an error (e.g. paper jam) occurs while you are printing the front side of the page the odd numbered pages - clear the error as instructed in the Print Status Window.
Click the Resume button to continue the current duplex printing job as usual.
• If an error occurs while printing the back side of the page - the even numbered pages
- clear the error as instructed in the Print Status Window. If the page being printed
when the error occurs is damaged, insert a new piece of paper into the printer after
removing the damaged one. Click the Resume button to continue printing. After
all pages are finished printing, reinsert that new piece of paper and reprint the corresponding odd numbered page on the opposite side.
Using fonts in the Windows Direct (GDI) mode
The usefulness of the WinType 4000's "What You See Is What You Get" method is apparent when you use fonts. In Windows, any font you can see on the screen will work
with this printer. This includes TrueType, 35 of which have been bundled with this
printer driver, Adobe Type Manager (Type 1) and Intellifont for Windows font formats.
TrueType fonts are usually the most efficient, since they are already built into Windows
3.1. In most cases, there is negligible performance difference between TrueType and
other kinds of fonts such as Type 1 and Intellifont.
One advantage of the Windows Direct (GDI) mode becomes clear as you work with
documents using many different types of fonts. A standard printer language, such as
PostScript, must get the font information each time it processes a new font in a document. Therefore, a document using a large number of different fonts can take a noticeably long time to print. In Windows Direct (GDI) mode, font information is processed at
the time that the document is retrieved and displayed on your screen. For that reason,
Windows printing requires only a small amount of time for processing. In the end you
are able to get fast text printing regardless of the number of fonts you employed.
30
Page 41

Note: Windows includes some special built-in fonts that were not meant for
printing, including Helv and Tms RMn. These fonts were designed
for screen display so their resolution is coarser than the fonts
normally used for printing. We recommend that you should not select
these fonts when you create your document. If you only need
TrueType fonts, which are usually identified with a TT symbol on your
font list, you can eliminate them from appearing in your application
using the procedure below.
These screen fonts will remain on your hard disk for needs that may
arise in the future.
Eliminating screen fonts from your application
Steps:
1. Switch to the Program Manager.
2. Open the Main group in the Program
Manager by double-clicking on its icon.
3. Double-click on the Control Panel icon.
4. Double-click on the Fonts icon.
5. Click the TrueType button.
6. Select Show Only TrueType Fonts in
Application, and click OK to exit this
window.
7. Click Close to exit the Fonts window.
8. Select Exit from the Settings menu to
exit the Control Panel window.
31
Page 42

Note: The WinType printer driver installation routing automatically tells
Windows to display only TrueType fonts. If you would like to display
other font formats as well, use the above procedure but remove the X
from the Show Only TrueType Fonts in Applications by clicking on
the box.
Printing with the PostScript mode
PostScript mode is used to print graphics intensive files made using Windows applications or DOS applications through Windows. PostScript printing uses the power of your
PC to "draw" an exact replication of your document in a PostScript format before sending it to be printed. Although printing with the PostScript mode is slower than the other
modes, the output is of the highest quality . Use the following steps to setup your printer
to print with the PostScript mode.
Printing from a Windows application
Note: While the WinType 4000 can print Windows applications in PostScript
or PCL modes, we recommend printing Windows applications via
Windows Direct GDI mode. This mode ensures the best and most
efficient printing.
Steps:
1. Switch to the Program Manager.
You will see a group titled Main.
2. Double-click on the Main group icon to
open this window.
3. Double-click on the Control Panel
icon in the Main window.
4. Double-click on the Printers icon in the
Control Panel window.
5. Double-click on the Star WinType
4000 PostScript on WTPS.
32
Page 43

6. Click on the Setup button.
You will see a window which looks like
the one on the right.
In the Setup window , you can change the
Paper Size, Orientation and make any
further adjustments you need through the
Options button. For additional information on these features and advanced options click on the Help button.
7. Click OK to exit the Setup window and
to save your changes.
8. Click on Close to exit the Printers Menu
and to save your printer selection.
9. Click on Settings and select Exit to exit
the Control Panel window.
Note: If you have a file saved in PostScript language format (.EPS files) you
can print from the MS-DOS command line from within Windows. At
the command line prompt, type:
COPY/B <filename.ext> TO LPT1
where <filename.ext> is the name of your PostScript-formatted file.
If you have your printer configured to print to a different parallel port,
give its name instead of LPT1.
Fonts in PostScript Mode
The PostScript mode supports all TrueType fonts, Type 1 fonts (ATM) and Intellifonts
for Windows. The WinType 4000's PostScript mode also emulates the original 13 resident PostScript printer fonts by substituting these fonts as TrueType fonts. The substitutions are as follows.
Original PostScript Font Name TrueType Substitute
Helvetica Arial
Helvetica Bold Arial Bold
Helvetica Oblique Arial Italic
Helvetica BoldOblique Arial BoldItalic
Courier CourierNew
Courier Bold CourierNew Bold
Courier Oblique CourierNew Italic
Courier BoldOblique CourierNew BoldItalic
Times Roman TimesNewRoman
Times Roman Bold TimesNewRoman Bold
Times Roman Oblique TimesNewRoman Italic
Times Roman BoldOblique TimesNewRomanBoldItalic
Symbol Symbol
33
Page 44

In order to expand font support to emulate the full 35 original PostScript printer fonts,
you will need to purchase Microsoft's Font Pack 1. Font Pack 1 is sold and supported by
Microsoft Corporation.
If you decide to purchase Font Pack 1, the WinType 4000's PostScript mode will emulate
these 35 PostScript printer fonts by substituting these fonts as TrueType fonts. See the
list below.
Original PostScript Font Name TrueType Substitute
Courier CourierNew
Courier Bold CourierNew Bold
Courier Oblique CourierNew Italic
Courier BoldOblique Courier BoldItalic
Times Roman TimesNewRoman
Times Roman Bold TimesNewRoman Bold
Times Roman Oblique TimesNewRoman Italic
Times Roman BoldOblique TimesNewRoman BoldItalic
Helvetica Arial
Helvetica Bold Arial Bold
Helvetica Oblique Arial Italic
Helvetica BoldOblique Arial BoldItalic
Symbol Symbol
Palatino Roman BookAntiqua
Palatino Bold BookAntiqua Bold
Palatino BoldItalic BookAntiqua BoldItalic
Palatino Italic BookAntiqua Italic
Helvetica Narrow ArialNarrow
Helvetica Narrow Bold ArialNarrow Bold
Helvetica Narrow Oblique ArialNarrow Italic
Helvetica Narrow BoldOblique ArialNarrow BoldItalic
Bookman Light BookmanOldStyle
Bookman Demi BookmanOldStyle Bold
Bookman DemiItalic BookmanOldStyle BoldItalic
Bookman LightItalic BookmanOldStyle Italic
AvanteGarde Book CenturyGothic
AvanteGarde Demi CenturyGothic Bold
AvanteGarde DemiOblique CenturyGothic BoldItalic
AvanteGarde BookOblique CenturyGothic Italic
NewCenturySchlbk Roman CenturySchoolbook
NewCenturySchlbk Bold CenturySchoolbook Bold
NewCenturySchlbk BoldItalic CenturySchoolbook BoldItalic
NewCenturySchlbk Italic CenturySchoolbook Italic
ZapfChancery MediumItalic MonotypeCorsiva
ZapfDingbats MonotypeSorts
34
Page 45

Printing DOS applications in PostScript mode under Windows
To print your DOS applications while running under Windows, please follow the steps
explained below.
Steps:
1. Select and setup the Star WinType
PostScript driver by following steps 1-9
explained on pages 32 - 33.
2. Launch your DOS application by using
one of the following methods.
• DOS Prompt Method
1. Double-click on the MS-DOS prompt icon
from the Main Group in the Windows
Program Manager.
2. Begin the DOS application as normal according to your application's user manual.
3. Follow the instructions for setting up
your default printer.
4. Select either PostScript® printer or Apple
LaserWriter Plus in your DOS application.
Refer to your DOS application's Users
Manual for details on selecting a printer.
5. Select the command to print.
• .PIF File Method
1. Double-click on your .PIF DOS application icon. This icon was either created by
you or supplied to you by your application program.
2. Follow steps 2-5 from the DOS prompt
method described above.
Note: When you are finished with your DOS application, you must type Exit
at the command line prompt (eg. C:>) to return to Windows.
35
Page 46

Printing with the PCL mode
As mentioned before, the PCL emulation gives you the ability to print from a DOS
application running under Windows, and from the MS-DOS command line from within
Windows. While this is similar to the PostScript mode, it is, however, slightly more
complex. You can select PCL from many W indows applications use the following steps
in the Control Panel in Windows to select the PCL mode.
Printing in PCL mode from a Windows application
Note: While the WinType 4000 can print Windows applications in PCL
mode, we recommend printing Windows applications via Windows
Direct (GDI) mode. This mode ensures the best and most efficient
printing.
Steps:
1. Switch to the Program Manager.
You will see a group titled Main.
2. Double-click on the Main group icon to
open this window.
3. Double-click on the Control Panel
icon in the Main window.
4. Double-click on the Printers icon in the
Control Panel window.
5. Double-click on the Star WinType
4000 PCL on WTPCL. This will
select the PCL mode as your
default printer.
36
Page 47

6. Click on the Setup button. You will see a
window which looks like the one on the
right. In the Setup window, you can
change the resolution, paper size,
memory, orientation, number of copies
and make any further adjustments you
need through the Options button. For
additional information on these features
and advanced options, click on the Help
button.
7. Click OK to exit the Setup window and
to save your changes.
8. Click on Close to exit the Printers menu
and to save your printer selection.
9. Click on Settings and select Exit to exit
the Control Panel window.
10.Once you have selected this mode, and
made any setting changes. You can print
from your Windows application just as you
would to any other printer.
Printing DOS applications in PCL mode under Windows
Steps:
1. If your default printer is already setup for
either WinType 4000 GDI on WTGDI
or WinType 4000 PCL on WTPCL,
move to Step 3.
2. Follow steps 1-10 on pages 36 - 37 (PCL
mode setup) or steps 1-10 on pages 26 28 (Windows Direct (GDI) mode).
3. Launch your DOS application by using
one of the following methods.
• DOS Prompt Method
1. Double-click on the MS-DOS Prompt
icon from the Main group in the Windows
Program Manager.
2. Begin the DOS application as normal
according to your application's user
manual.
37
Page 48

3. Follow the instructions for setting up your
default printer.
4. Select the HP LaserJet IIP driver in your
DOS application. Refer to your DOS
application's Users Manual for details on
selecting a printer.
5. Select the command to print.
• .PIF File Method
1. Double-click on your .PIF DOS application icon. This icon was either created by
you or supplied to you by your application program.
2. Follow steps 2 - 5 from the DOS prompt
method described above.
Note: When you are finished with your DOS application, you must type Exit
at the command line prompt (eg. C>) to return to Windows.
Note: The WinType 4000 is a Windows printer. The Window's Direct (GDI)
mode is based on Windows 3.1 and will not work with MS-DOS.
However, the WinType 4000 will work in PCL mode if you launch an
MS-DOS application from within Windows.
The WinType 4000 will not run properly if you exit Windows
completely.
38
Page 49

Fonts in PCL Mode
PCL mode supports several resident fonts which correspond to the internal fonts of the
HP LaserJet IIP. They are:
Courier: 10 point; 12 pitch; Regular, Bold and Italic.
Courier: 12 point; 10 pitch; Regular, Bold and Italic.
Line Printer, 8.5 pint, 16.66 pitch Regular
You can select these resident fonts in this printer driver in PCL mode. The steps are
outlined below.
Steps:
1. Switch to the Program Manager. You
will see a group titled Main.
2. Double-click on the Main group icon to
open this window.
3. Double-click on the Control Panel.
4. Double-click on the Fonts icon.
5. Click on the TrueType button.
6. Disable the Show Only TrueType Fonts
in Applications by clicking the check-box.
The X should not appear in this box.
7. Click OK to close the TrueType window.
8. Click on the Control-Menu box in the
upper left hand corner of the Fonts win-
dow. Select Close to close the Fonts win-
dow.
9. Click on Settings and select Exit to exit
the Control Panel window.
10.Select the resident fonts through your ap-
plication as you would with any other kind
of font.
Note: When a font has not been selected, Courier 12 point regular is the
default setting.
39
Page 50

Recovering from an error message in PCL or PostScript modes when running a DOS application from within Windows
If you are running a DOS application when a printer error or status message occurs, (eg.,
W arming up, Paper Out, Paper Jam, etc.) the Star W inT ype Printer Status Display will
automatically appear on your screen. Since this advanced messaging feature is a Windows utility, your DOS application will be temporarily suspended and your computer
screen will display your Windows 3.1 desktop.
Once you correct the printer problem by following the screen messages, the WinType
4000 will complete the print job but you will remain in the Windows desktop display.
You can easily return to your DOS application by following one of the methods explained below .
Keyboard Method
Steps:
1. While holding down the ALT key on your
computer keyboard, press the TAB key
until you see the illustration at the right.
2. Release both the ALT and TAB keys to
return to your DOS application.
Mouse Method
Steps:
1. At the bottom of your screen, there will
be an MS-DOS prompt icon which looks
like the illustration at the right.
2. Double-click on the MS-DOS prompt icon
to return to your DOS application.
Note: The minimized MS-DOS Prompt icon may not be visible on your
screen if your are displaying any open windows as full screens. To
make this icon visible, you must reduce the size of all open full screen
windows (eg. Program Manager). Please refer to your Microsoft
Windows 3.1 Users Guide for an explanation on changing the size of
a window.
40
Page 51

Saving download fonts and macros in the PCL mode
By default, when your application prints using the PCL mode, the PCL emulation interpreter will start up, print your document and then automatically shut itself off. This
means that the PCL interpreter will not take up memory on your computer except when
needed.
However, when the PCL interpreter turns itself off, all of the fonts and macros that you
have downloaded will be lost. This is the same for a conventional printer when turned
off. You can save these fonts by using the Print Manager to keep the PCL interpreter
active. Just use the following steps.
Steps:
1. Select the Star WinType PCL printer as
described on page 36.
2. Double-click on the Print Manager icon
in the WinT ype Tools group in the Pro-
gram Manager window.
3. You can Minimize the Star WinType
Print Manager to an icon if you like by
clicking on the button in the upper right
hand corner of the title bar.
4. Download macros or soft fonts in advance,
using the download utility provided by
your application's font program.
5. Start or return to your application and print
your document.
Saving your fonts and macros will help decrease processing time because the PCL emulation interpreter has already been loaded. However, if your switch from PCL to another
mode, downloaded information will be lost, just as is if you were changing languages in
a conventional printer.
41
Page 52

42
Page 53

Chapter 5 The Star WinType Print Manager
The Star WinType Print Manager helps you manage the output flow and the operation of
your printer. You can see all the files waiting to be printed and you can change their
order. You can also see how much of the current print job has already been processed.
You can control the priority setting for printing relative to other applications running at
the same time. Also, with the WinType Print Manager , you can print double-sided (manually duplexed) pages in the Windows Direct (GDI) mode. When minimized, the print
manager appears as an icon at the bottom of your screen. In this chapter, we'll explain
the various facets of this program.
Enabling the WinType Print Manager
If you plan to print in the Windows Direct (GDI) mode (Star WinType 4000 GDI on
WTGDI) and use the Star WinType Print Manager, you must first enable this Print
Manager. Use the following steps to enable the WinType Print Manager.
Steps:
1. Switch to the Program Manager.
2. Open the Main group by double-clicking
on its icon.
3. Double-click on the Control Panel
icon in the Main window.
4. Double-click on the Printers icon in
the Control Panel window.
5. Double-click on the Star WinType
4000 GDI on WTGDI. This will
select the GDI mode as your default
printer.
43
Page 54

6. Click on the Setup button.
7. Click on the Options button.
8. If the Use WinType Print
Manager has not been selected, click on
the check-box to put an X in it.
9. Click OK to exit the Options window
and to save your changes.
10.Click OK to exit the Setup window and to
save your changes.
11.Click on Close to exit the Printers
window and to save your printer selection.
12.Click on Settings and select Exit to exit
the Control Panel window.
44
Page 55

Viewing and accessing the WinType Print Manager
There are two methods to access the Star WinType Print Manager. You can use either
method.
Method One
1. Open the Star WinType Tools Group in
the Program Manager by double-
clicking on the icon.
2. Double-click on the Star WinType
Print Manager icon
Method Two
1. If the Star WinType Print Manager is
already opened but minimized (eg. after
starting a print job), double-click on the
minimized icon.
2. After printing is completed, you can close
the Star WinType Print Manager by
clicking on the Control-Menu box on the
upper left hand corner of the title bar.
45
Page 56

Options:
1. Priority
Windows lets you run several applications at the same time. This helps productivity, but
it also means that you are sharing your computer's power among several different activities.
These priority settings let you control the priority order of the printing jobs relative to
other applications which may be running at the same time.
The Options menu lets you choose between High, Medium and Low priority processing when you print. When you select High priority, the output is faster but it will slow
down your system. Conversely, when you select Low, your other applications will run
faster, but your document will take longer to print. A check mark ( ) indicates the cur rent setting. You can change the priority by clicking on the desired selection. Medium
priority is the default setting.
2. Beeps
If you check Beep When Print Job is Complete, your system will beep when the printing job is done. If you check Beep on Printer Error, your system will beep when a
problem occurs with the printer. A check mark ( ) indicates that the feature is turned on.
The default setting for the beep features are as follows.
Beep When Job is Complete (Off)
Beep on Printer Error (On)
46
Page 57

3. Display Print Status
This item, when clicked, will pop up the Print Status Window when you print. If this
is not selected, the Print Status Window will only be displayed when an error occurs.
A check mark ( ) indicates that this feature is on. The default setting is off.
4. Smoothing On
This option smooths text and graphic edges to give you 600 dpi class resolution. A check
mark ( ) indicates that the smoothing feature is on. Click on it to change the setting.
Smoothing On is also referred to as Edge Enhancement Technology (EET). The default
setting is on.
5. Toner Saving Mode
This printer has a built-in feature that extends toner life. This feature is called Toner
Saving Mode. For print jobs that require the best resolution, choose Toner Save Off.
This is the default setting. For draft documents, choose Toner Save On and select the
setting that best suits your needs.
If you choose Toner Save On, you must also click on one of the settings (Dark, Me-
dium or Light). Dark uses more toner, but produces higher quality print. Light uses the
least amount of toner, but produces lower quality print. Using less toner to print your
documents will allow you to print more documents per toner cartridge.
6. Power Saving Mode
This printer has a built-in power saving mode. After idling for 15 minutes (default), the
printer will reduce its power consumption by shifting into a power saving mode. You
can select either "Power Saving Mode On" or "Power Saving Mode Off." If you
choose the latter, your printer will remain active and will consume more power.
When you select "Power Saving Mode On," you can select an interval from 1 to 15
minutes. After the specified time of idling, the printer will automatically enter the power
saving mode and the left panel power lamp will blink slowly. The printer will "wake-up"
as soon as you send a print job to the printer.
7. Time Format
Y ou can choose the way time is displayed with this option. There are two selections: 12
hour or 24 hour formats. 12 hour format displays time like 2:15 P.M. as: 02:15 PM and
24 hour would display that time as 14:15. A check mark ( ) indicates which format is
being used. The default setting is the 12 hour format.
8. Connect Port
This port option lets you select a different parallel port for your printer. Your computer
may not have all of these ports, but LPT1, LPT2, LPT3 are the selections available.
The steps for operation are below.
Steps:
1. Click on Connect Port.
2. Click on either LPT1, LPT2 or LPT3.
If LPT2 or LPT3 do not exist on your PC, these ports choices will be displayed in
gray and you will not be able to select them.
3. To save your setting, click on Restart Windows. Otherwise, click Cancel.
47
Page 58

Size This menu lets you change the size of the display window for the Star WinType Print Manager.
1. Normal will display information on your screen including Job Name, Printer
language format, Print Job Size (in bytes) and the time of day the job was created.
2. Minimum will take up less space on you screen, but limits the information to Job
Name and Format.
Help
1. Contents
This gives you a list of subjects available in the help menu.
2. Search for Help On...
This will open up a window allowing you to get helpful information on other printer
features.
3. How to Use Help
This is a standard Windows Help guide to instruct users how to access the help menu.
4. About
The About option provides you with the information about the version of printer driver
software version you are currently using.
48
Page 59

Queue information
This part of the Star WinType Print Manager screen shows the print jobs in the queue
waiting to be printed. The following describes each element of this program.
Job Name
This shows the name of the application used to create the document and the file name.
Format
This will show one of the three print modes: Windows Direct (GDI), PostScript or PCL
(Printer Command Language)
Size
This shows the print job size in bytes.
Time
This is the time of the day the print job was created.
Display of information
On a color monitor, the current job being printed will be displayed in dark blue. A job
that you have selected with your mouse will appear against a light blue background.
On a monochrome monitor, the current job will be highlighted. A paused or a selected
job will also appear highlighted, but somewhat darker gray than the current job.
49
Page 60

Changing priority in the queue
The Star WinT ype Print Manager will send the first job in the queue to the printer first.
If you have a mouse, you can change the order of print jobs that remain in line by following a "drag-and-drop" procedure.
Steps:
1. Open the Star WinType Print Manager
by following the Steps on pages 43 - 44.
2. Move the mouse to the entry that you
want to reorder.
3. While pressing down on the left mouse
button, move your mouse and drag the
item to the new location in the queue.
When you select an item with your
mouse, you will see that it is highlighted
to let you know that it is selected.
4. Release the mouse button at the new
location for the print job. The job will
be displayed at the new position.
Status Bar
Progress Bar
Status Bar
This shows whether the printer is printing or is ready to print. When printing, the status
bar shows the page number currently being printed.
Progress Bar
The progress bar shows what percentage of your print job has been processed by the
printer driver software on your computer. The print job will begin to print once the job
has been processed.
Pause
This button lets you temporarily stop the current job. Once stopped, you can use the
Resume button to continue printing, or you can cancel the print job by clicking on the
Delete button.
Resume
This will allow you to continue printing the job that was paused.
50
Page 61

Add
Add lets you include another print job at the end of the queue. The job selected must be
stored on your hard disk to be displayed. The following section explains how to save
documents you have created for printing with the Star WinType Print Manager.
Delete
If you want to cancel a print job, you can do so with this button. You can select any print
job in the queue by clicking and highlighting the job with your mouse. Then click on
Delete to eliminate it from the queue. To delete the job, click OK. Otherwise, click
Cancel.
Printing to a file in the Windows Direct (GDI) and PCL modes
Y ou can create print job files for specific printing formats regardless of the default printer
setting and add them to the Star WinType Print Manager queue by following the steps
below.
Note: The example steps below use the Write software application in Windows.
Some applications don't necessarily include all of these steps.
Steps:
1. After you have created a document, you
can save the file in the normal way you
would for any application.
2. Click on the Print command from the file
menu of your application.
3. Click on the Setup button.
Double-click either the Star
WinType GDI on WTGDI or
Star WinType 4000 PCL on
WTPCL.
4. Click on the Print to File checkbox in the
bottom left hand side of the Print dialog
box.
5. Click OK to save your changes.
51
Page 62

6. A dialog box like the one at right will appear on your display . T ype the Output File
Name for the document which you want
to print from the Star WinType Print
Manager.
Give your file a name no longer than 8
characters.
If you selected the Star WinType
4000 GDI on WTGDI, your file
name must end with .GDI.
If you selected the Star WinType
4000 PCL on WTPCL, your file
name must end with .PCL.
7. Click OK to save your file.
8. Close your application.
9. Access the Star WinType Print
Manager as described on pages 43 - 44.
10.Click on the Pause button.
11.Click on the Add button.
12.Click on the File format Drop Down List
Box and select the format with which you
just printed to file (GDI or PCL). You will
find a list containing all of the files you
have created with that specific printing
format.
52
Page 63

13. Click on the file that you want to print from
the File Name: list and click OK.
14.Y our selection will appear in the queue of
the Star W inType Print Manager.
15.You can continue this process until you
have finished adding to the list all of the
files that you want to print.
16.Click the Resume button in the Star
WinType Print Manager and all of the
files you have selected will be printed.
53
Page 64

Printing to an Encapsulated PostScript file in the PostScript mode
The steps for printing to file with the PostScript mode are basically the same as the
Windows Direct (GDI mode). There are, however, some minor differences in the way
you create an Encapsulated PostScript file for use with the Star WinType Print Man-
ager. The following steps use "Write" as an example.
Steps:
1. After you have created a document, you
can save your document in the normal way
you would for any application.
2. Click on the Print command from the file
menu of your application.
3. Click on the Setup button.
4. Click on the Star WinType 4000
PostScript on WTPS to select the
PostScript mode.
5. Click on the Setup button in the Print
Setup Screen.
6. Click on the Options button
7. Click on Encapsulated PostScript File
in the Print To section of the Options
dialog box.
8. Give your file a name (no longer than 8
characters) followed by ".PS"
9. Follow Steps 8 – 16 on pages 52 - 53.
54
Page 65

10.Click OK to exit the Options window and
to save your changes.
11.Click OK to exit the Star WinT ype 4000
PostScript Setup window and to save
your printer changes.
12.Click OK to exit the Print Setup window.
13.Click OK to exit the Print window and to
save your .PS file to your hard disk.
14.Follow Steps 8 – 16 on pages 52 - 53.
Note: The steps explained above may vary in some applications.
The steps for Printing to an Encapsulated PostScript file in the
PostScript mode when using Paintbrush, for example, are slightly
different.
First click on Print Setup in the File menu to select the PostScript
mode. Then click on the Options button. After doing that you can
follow from Step 5.
Quitting the Star WinType Print Manager
Double-click on the Control-Menu box to quit the Star WinType Print Manager. An-
other way to do this is to press Alt and F4. Quitting Windows will also close the print
manager.
Exiting before a print job has been completed If you try to exit the print manager before you have completed the print jobs, the Star WinT ype Print Manager will display a message asking if you want to save the remain-
ing print jobs.
If you select "YES," the print jobs will be saved and you can exit. When you start up the
print manager the next time, you can resume printing the unfinished documents.
If you select "NO," all print jobs in the queue will be lost and you will exit. This has no
effect on the file where the print jobs were created.
Selecting "Cancel" will cancel the exiting command and you will remain in the WinType
Print Manager window.
55
Page 66

56
Page 67

Chapter 6 Star WinType Printer Status Display
The Star WinType Printer Status Display graphically displays the status of your Star
WinType 4000 printer. It will let you know when something is printing and alert you to
any errors that may occur when printing. It will display a warning or err or message and
graphically point to the problem ar ea on the printer and give you instructions on how to
fix the problem. In all thr ee printing modes, you can choose whether or not to display the
Print Status window when printing.
Caution: The WinType Printer Status Display is designed for Windows
applications only. Turn this feature off when printing from a DOS
application in PCL or PostScript modes.
Selecting the Printer Status Display - Windows Direct (GDI) mode
T o setup the WinT ype Printer Status Display in the W indows Direct (GDI) mode when
the WinType Print Manager is Off, follow the Steps below.
Steps:
1. Switch to the Program Manager.
2. Open the Main group by double-
clicking on its icon.
3 Double-click on the Control
Panel icon in the Main group.
4. Double-click on the Printers icon
in the Control Panel window.
5. Double-click on Star WinType
4000 GDI on WTGDI.
6. Click on the Setup button.
57
Page 68

7. Click on the Options button.
The Options button will take you to
the Options window where you can
select the Printing Status Options
described below.
As mentioned in Chapter 4, clicking
the box marked Display Status While
Printing will cause the printer to pop
up the print status window whenever
you print in the Windows Direct (GDI)
mode. However, you cannot select
this option if you have checked Use
WinT ype Print Manager.
If you don't click this box, you only see
this box when the printer encounters an
error or during printer warm up
and needs to inform you of a warning.
For example, when the printer has run out
of paper you will receive a message that
tells you to add paper.
If you put a check in the box marked
Beep When Print Job is Complete, you
will hear a beep whenever the printer has
finished a print job which you have sent.
If you leave this box blank, the printer
will beep only when an error occurs.
8. Click OK to exit the Options window and
to save your changes.
9. Click OK to exit the Setup window.
10.Click on Close to exit the Printers
window and to save your printer selection.
11.Click on Settings in the Control Panel
menu and select Exit to exit the Control
Panel window.
58
Page 69

Selecting the Printer Status Display - PCL and PostScript modes
To setup the Star WinType 4000 Printer Status Display in the PCL and PostScript
modes, and in the Windows Direct (GDI) mode when the WinType Print Manager is
on, follow the Steps below.
Steps:
1. Open the Star WinT ype T ools group from
the Program Manager by double-clicking on the Star WinType Tools group
window.
2. Double-click on the Star WinType
Print Manager icon.
3. Click on the Options menu in the
Star WinType Print Manager.
4. Click on Display Print Status with
your mouse.
This will cause the Star WinType
Printer Status Display to be
displayed whenever you print,
either directly from an application
or when you print using the Star
WinT ype Print Manager.
Caution: Do not select Display Print Status if you are printing from a DOS
application in either PCL or PostScript modes.
5. You can also select from the Star
WinType Print Manager whether to
Beep When Print Job is Complete,
or to Beep on Printer Error by clicking
on these selections with your mouse.
6. T o exit the WinType Print Manager and
save your settings, click on the ControlMenu box in the upper left hand corner of
the window.
7. Click on Close.
59
Page 70

Accessing and viewing the Star WinType 4000 Printer Status Display
Steps:
1. Open the Star WinT ype T ools group from
the Program Manager by double-clicking on the Star WinType Tools group
icon.
2. Double-click on the Star
WinType Print Manager
icon.
3. Select Display Print Status
from the Options menu by
clicking on it.
A check ( ) will appear when
the feature is turned on.
4. Reduce the size of the Star
WinType Print Manager
screen by clicking Minimum
in the Size menu.
60
Page 71

5. The Star WinType Printer
Status Display screen will appear.
To view the WinType Printer Status
Display at full size, click anywhere on the
Printer Status Display Screen.
6. To exit the WinType Printer Status
Display and to save your settings, click
on the Control-Menu box in the upper left
hand corner of the Star WinType Print
Manager window.
7. Click on Close.
The following pages describe the various features of the Star WinType 4000 Printer
Status Display.
Please refer to the above illustration of the Star WinType 4000 Printer Status Display
while we explain the features.
Options:
Animate Icon (Animate window)
This setting allows you to display an animated icon of your printer. This icon appears in
the print status window and will provide you with real-time animation of the printer's
status. If Animate Icon is checked, the printer icon will show paper being printed.
Note: The Animate Icon feature uses additional system memory . If your
system is low on free memory, this feature should be turned off.
61
Page 72

Help:
1. Contents
This gives a table of contents on the available subjects in the Help menu.
2. Search for Help On...
With this option, you can open a window which allows you to get information on this
printer's features.
3. How to Use Help
This is a standard Windows Help guide to instruct users on how to access the Help menu.
4. About
This will give you information about the printer software version you are currently using.
Job
This displays the name of the application, file name and page number of the job currently
being printed.
Picture of your printer (Status Display Message Window)
This displays a picture of your printer. If a problem should occur, an arrow will point to
the problem area and provides step-by step instructions to solve the problem.
Status Display Messages
This window will show an error or status message. It will also tell you what to do for
each error or warning message. Some of the possible messages include the following
items.
Cover Open
Your printer's cover is open. Firmly close the printer's cover.
Duplex Printing
Duplex (double-sided) printing mode is enabled and the printer has finished printing on
one side of your documents. In this case, follow the directions on the Print Instruction
page to print on the other side. (See Chapter 4 Printing with the WinType 4000 for an
explanation on duplex printing.)
Warming Up
W ait until the printer has finished warming up. The printer will begin to print automatically.
Paper Out
The printer has run out of paper. Add more paper to the upper paper tray. Click the
RESUME button to start again.
Paper Jam
Paper has jammed inside the printer, making it impossible to continue printing. Open the
printer's cover and remove the toner cartridge. Pull the jammed paper toward the front of
the printer. Reinstall the toner cartridge and close the cover. For detailed information on
clearing paper jams, refer to pages 67 - 69 in this manual.
62
Page 73

This printer will start automatically once the jam has been cleared. In most cases, the
printer will continue printing the rest of your document.
Power Off or Cable Problem
The printer driver software cannot access the printer. This error could be caused by one
of the following.
1. The printer is Off
2. The printer's parallel
cable is not plugged in
properly.
3. A problem exists within
the cable connection or the
parallel cable is not good.
You need to verify if the printer is turned ON and that the left printer status lamp (Green
LED) is lit or flashing. Check that the parallel cable is properly connected to the printer
and the computer.
Printing
This message indicates that the printer is currently printing your document.
NV-RAM Error
This message indicates a possible problem with the printer's Nonvolatile RAM settings.
Turn the printer off, then on again. If the problem does not clear, reinstall the WinT ype
driver. If after reinstalling the W inType driver, the problem persists, contact your dealer
or Customer Support.
Fuser Abnormality
This message indicates a possible problem with the printer's fuser assembly. Turn the
printer off, then on again. If the problem persists, contact your dealer or Customer Support.
Scanner Abnormality
This message indicates a possible problem with the printer's scanner assembly. T urn the
printer off, then on again. If you see this message persistently, then something is wrong
with the printer's engine. Call your dealer or Customer Support.
EP (Toner) cartridge missing
This message indicates that the toner cartridge has not been installed or is not installed
properly. Open the printer's front cover, install or reinstall the toner cartridge and close
the cover.
63
Page 74

Pause
This button lets you pause the print job. You can pause printing, for example, to delete
the print job from the print manager. If this selection is displayed in gray, the option is
not currently available.
Resume
The Resume button lets you continue the print job you have just paused or to begin
again after recovering from an error. If this selection is displayed in gray, the option is
not currently available.
Delete
This button will delete the current print job. You must always pause the print job before
you delete it. You can also delete a stopped print job. For example, you can delete a job
that has stopped when the printer ran out of paper. If this selection is displayed in gray,
the option is not currently available.
64
Page 75

Chapter 7 Maintenance & troubleshooting
Your printer is a reliable, precisioned instrument. It was built with care and should, if
used with care, perform at its finest and serve you well for a long time. However, like any
piece of equipment, there may be times when it may not perform as you had expected. In
this chapter, we would like to provide you with simple guidelines on the proper maintenance and troubleshooting that will keep your printer in fine working condition.
Maintaining your printer
Because the toner cartridge is the most important part of your printer, its maintenance
should begin with the proper handling of the toner cartridge. The toner cartridge contains a photosensitive drum and toner. Damage to the cartridge will affect print quality,
so observe the following guidelines when handling.
Handling of the toner cartridge
• Do not expose the toner cartridge to direct sunlight or strong room light.
• When removed from the printer, always keep the toner cartridge in its original
packaging or wrapped in a thick cloth to protect it from light.
• When moving the toner cartridge from a cold environment to a warmer one, let
it adjust to the new temperature for at least one hour before installation.
• Do not stand the toner cartridge on end or with its label facing downward.
• Never disassemble the toner cartridge.
• If toner gets on your hands or clothing, wash it off immediately.
• Do not unpack the toner cartridge until you are ready to install it. If it is already
unpacked, keep it in its original aluminum wrapping.
• Store the toner cartridge in a stable environment. (See Chapter 8 Reference
information)
• Never store the toner cartridge on end or upside down; in direct sunlight or strong
room light; near cathode ray tube (CRT) displays or floppy diskettes or within
the reach of children.
• Always replace the toner cartridge following the procedures described on pages
2 — 4.
Note: The toner cartridge has a shelf life of approximately 2 years from the
time of manufacturing.
Toner cartridges for the Star WinType 4000 can print more than 4,000
pages of A4 size or Letter size pages with 5% covering with the
Toner Save feature off. Printing large quantities of graphic intense
documents will shorten the toner cartridge's life span.
65
Page 76

Cleaning your printer
This printer has been designed to be maintenance-free. For that reason, only a minimum
of cleaning is needed. Other than maintaining the outer appearance of the printer, you
may need to clean the output port window, which is explained below. T o clean the outer
surface of the printer, use a dry soft cloth to wipe off any dirt or stains.
If the printer's surface becomes very dirty, wipe it with a cloth moistened in a dilute mild
soap. Wipe the printer dry with a dry, soft cloth.
Caution: Never use solvents, such as benzine, or cleaners to clean any part of
the printer.
Cleaning the output port window
You may need to clean the laser output port window if you encounter any print quality
problems like faded print or missing characters. If you do, follow the steps below.
Steps:
1. Turn the printer power switch to the OFF
position [ ] and close both the upper
tray and output tray.
2. Disconnect the power cord from the wall
outlet and from the printer socket in the
back of the printer.
3. Remove the toner cartridge.
(Reverse the steps on pages 2 – 4)
Note: Always place the toner cartridge in its original, aluminized packaging
or wrap it securely in a thick cloth to prevent exposure to light.
66
Page 77

Warning: The fuser area, located in
the upper front part of the
printer, is extremely hot.
Be especially careful not to
touch any part of the fuser.
Warning: The drive motor becomes
very hot after extended
periods of printing.
Be careful not to touch any
metal part of the drive motor.
The fuser and drive motor are extremely hot. Do not touch this area.
4. Wipe the laser output port window with a
dry, soft, lint-free cloth.
Orange label
The window is located in front of the long
orange label in the center of the toner
cartridge compartment.
Laser output port window
Note: Do not use tissue paper to wipe the laser output port window as this
may leave paper fibers on the window.
5. Reinstall the toner cartridge. (Follow the
Steps described on pages 2—4.)
Clearing paper jams
This printer's feeding mechanism is designed to be jam-free. However, you should observe the following steps should a paper jam occur and the Error LED is lit.
Caution:
Steps:
1. Remove all printed material from the out-
put and paper trays and close them.
Never pull paper out of the toner cartridge in the reverse direction of the
paper feed mechanism because this can damage the photosensitive drum.
67
Page 78

2. Face the front of the printer and flip open
the front door using both hands.
3. Gently rest one hand on the top of the
printer, grasp the toner cartridge by its
molded center grip with the other hand and
pull upward until the cartridge unlocks and
releases.
Warning: The fuser is located in the upper front part of the printer and it is
extremely hot. Be especially careful not to touch any part of the fuser
area.
Warning: The drive motor becomes very hot after extended periods of printing.
Do not touch the driver motor; note the warning label located on the
back of the drive motor
Caution: Do not press too hard on the top of the printer because this may
damage the cover or trays.
4. Rotate the toner cartridge slightly
downward until it is level. Slide it out of
the printer.
Jammed paper
68
Page 79

Note: The toner cartridge will not slide smoothly unless it is level.
Paper may be caught in the toner cartridge feeding mechanism
making it difficult to remove the cartridge. Pull firmly to draw the
paper out with the cartridge.
5. If the jammed paper comes out with the
toner cartridge, draw the paper out of the
cartridge in the normal feeding direction.
Caution: Never pull paper out of the toner cartridge in the reverse feeding
direction of the paper feeding mechanism because this can damage
the photosensitive drum.
6. If the paper does not come out with the
toner cartridge, look inside the printer. If
you can see the jammed paper inside the
printer, draw the paper out through the
front of the printer.
Warning: The fuser is located in the upper front part of the printer and it is
extremely hot. Be especially careful not to touch any par of the fuser
area when pulling out the jammed paper.
7. If the jammed paper is not visible inside
the printer, the jam is in the feeder section. Move the paper release lever to the
release position. Remove the stack from
the feeder and pull out the jammed sheets.
8. Reload the stack of paper into the upper
paper tray (See pages 12 – 14).
9. Move the paper release lever toward the
rear of the printer.
10.After clearing the jam, reinstall the toner
cartridge and close the front door.
(See the explanation on pages 2 — 4.)
Note: Use the above procedures for other print media jams.
8
9
69
Page 80

Troubleshooting: Solving print quality problems
Below is a list some of the problems that you may encounter with this printer. Ordinarily, you can easily remedy the situation yourself. However, if the problem persists,
call your authorized Star Micronics service center or our customer service department
for assistance. The addresses and telephone numbers where you can contact these people
are listed in the back of this manual.
Symptom Possible Cause Action
The print media is moist Remove the moist media
Printer
The laser output port window Clean the output port
is dirty. window. Refer to
Faded print
and load new, dry media.
Refer to "Loading paper"
pages 12 — 14
"Cleaning the output port
window" pages 66 — 67.
Printer
Black dots
Printer
Vertical black streaks
The toner cartridge is low on
toner Refer to "Installing the
The toner cartridge is damaged.
The print media is outside Use recommended print
the recommended media.
specifications. Refer to "Selecting print
The toner cartridge is damaged.
The toner cartridge is damaged.
The laser output port is dirty. Clean the output port
Replace the toner cartridge.
toner cartridge" pages 2
— 4.
Replace the toner cartridge.
Refer to "Installing the
toner cartridge" pages 2
— 4.
media" page 11.
Replace the toner cartridge.
Refer to "Installing the
toner cartridge" pages 2
— 4.
Replace the toner cartridge.
Refer to "Installing the
toner cartridge" pages 2
— 4.
window. Refer to pages
66 – 67.
70
Page 81

Symptom Possible Cause Action
The paper path is dirty. Print out several blank
Printer
Repetitive defects
Printer
The toner cartridge is damaged.
The print media is outside Use recommended print
the recommended media.
specifications. Refer to "Selecting print
The laser output port window Clean the output port
is dirty. window. Refer to
sheets.
Replace the toner cartridge.
Refer to "Installing the
toner cartridge" pages 2
— 4.
media" page 11.
"Cleaning the output port
window" pages 66— 67.
Character voids
Printer
Toner smears
when rubbed
Black page
The toner cartridge is damaged.
The print media is moist Remove the moist media
The print media is outside Use recommended print
the recommended media.
specifications. Refer to "Selecting print
The toner cartridge is damaged.
Replace the toner cartridge.
Refer to "Installing the
toner cartridge" pages 2
— 4.
and load new, dry media.
Refer to "Loading paper"
pages 12 — 14
media" page 11.
Replace the toner cartridge.
Refer to "Installing the
toner cartridge" pages 2
— 4.
71
Page 82

Symptom Possible Cause Action
Blank page
The toner cartridge's sealing
tape is not pulled out. and pull out the sealing
The printer fed two or more Fan the print media
sheets at a time. before loading. Refer to
A jam error occurred Check for a paper jam.
(If the Error LED indicator Refer to "Clearing paper
is lit.) jams" pages 67 — 68.
The toner cartridge is out of
toner Refer to "Installing the
The toner cartridge is damaged.
Replace the toner cartridge
tape. Then reinstall the
cartridge.
Refer to "Installing the
toner cartridge" pages 2
— 4.
"Loading paper" pages 12
– 14.
Make sure that the paper
release lever is in the
locked position before
printing.
Replace the toner cartridge.
toner cartridge" pages 2
— 4.
Replace the toner cartridge.
Refer to "Installing the
toner cartridge" pages 2
— 4.
Printer
Printer
Printer
Printer
Partial deletions
72
The print media is moist. Remove the most media
and load new, dry media.
Refer to "Loading paper"
pages 12 — 14.
The print media is outside Use recommended print
the recommended media.
specifications. Refer to "Selecting print
media" page 11.
The toner cartridge is damaged.
Replace the toner cartridge.
Refer to "Installing the
toner cartridge" pages 2
— 4.
Page 83

Symptom Possible Cause Action
The print media is outside Use recommended print
Printer
Wrinkled or blurred
the recommended media.
specifications. Refer to "Selecting print
media" page 11.
The print media is moist. Remove the most media
and load new, dry media.
Refer to "Loading paper"
pages 12 — 14.
Printer
Printer
Printer
Printer
Vertical deletions
The toner cartridge is low on
Replace the toner cartridge.
toner Refer to "Installing the
toner cartridge" pages 2
— 4.
The toner cartridge is damaged.
Replace the toner cartridge.
Refer to "Installing the
toner cartridge" pages 2
— 4.
The laser output port is dirty. Clean the output port
window. Refer to pages
66 – 67.
73
Page 84

Other mechanical problems
This is to provide you with a list of other possible problems and their easy remedy.
The front door will not shut
Remove and reinstall the toner cartridge. Refer to "Installing the toner cartridge" on
pages 2 — 4.
The Error LED indicator is lit and the printer will not print
• Make sure that the front door is properly shut.
• Remove and reinstall the toner cartridge. Refer to "Installing the toner cartridge"
on pages 2 — 4.
• Check for a paper jam. Refer to "Clearing paper jams" on pages 67 — 68.
• If the Error LED indicator remains lit, move the paper release lever to the release
position (toward the front of the printer), remove all print media from the feeder
tray and then turn the power OFF and ON again. If, after performing all of these
procedures, the Error LED indicator still remains lit, contact an authorized Star
Micronics service center.
74
Page 85

Chapter 8 Reference information
Specifications
Engine
Printing process Electrophotographic
Resolution 300 X 300 dpi (Smoothing off)
600 dpi class (Smoothing on)
Exposure Semiconductor laser beam scanning
Fixing Thermal fusing by heated rollers
Printing speed
Warm-up time 45 seconds or less after power on at 22°C (72°F)
(115 volts or 220 volts)
Time for first print 20.5 seconds for Letter paper
21.1 seconds for A4 paper
Continuous printing Min. 4 pages per minute for Letter or A 4 size paper
speed
Printable area Guaranteed printing requires a margin of 4 mm from edge
of the paper.
Paper feed
Input tray Capacity: 100 sheets of standard paper or 30 overhead
(OHP) transparencies or 30 label sheets or 10
envelopes
Paper weight:60 g/m2 (16 lb.) • 135 g/m2 (36 lb.)
Output tray Face down
Capacity: Approximately 50 sheets of standard paper
Printing materials
Standard paper XEROX 4024 DP 20 lb 8.5" X 11" cut sheet paper (US)
Special printing OHP film: 8.5" X 11" XEROX, PN 3R2780 (US)
materials A4 XEROX, PN 3R91330 (Europe)
Label: 8.5" X 11" XEROX, PN 3R4469 (US)
A4 XEROX, PN 3R97408 (Europe)
Envelope: Com-10 Monroe Brand
Monarch Monroe Brand
Toner cartridge The toner cartridge consists of the OPC drum, the
developing roller and blades, primary charge roller,
the drum cleaner and high definition black toner.
Toner save mode Off/Dark/Medium/Light
Mode Yield
Off Approx. 4000 pages
Dark Approx. 5000 pages
Medium Approx. 5700 pages
Light Approx. 8000 pages
75
Page 86

Mean printing life Starter cartridge: 4000 sheets given a 5% coverage life
Replacement cartridge: 4000 sheets given a 5% coverage
life
Power specifications
Input line voltage/ For US Voltage Frequency
frequency Min.: 90V 47Hz
Normal: 100/120V 50/60Hz
Max.: 132V 63Hz
For Europe and Asia/Pacific
Voltage Frequency
Min.: 198V 47Hz
Normal: 220/240V 50/60Hz
Max.: 264V 63Hz
Power consumption Maximum power consumption at warming-up and
printing is as follows
100/120V Less than 400W (less than 3A)
220/240V Less than 400W (less than 2A)
Environmental
specifications Energy Star Compliant
Temperature, humidity Print engine with toner cartridge:
and altitude Operating: 5 – 35°C (41 – 95°F) at 15 – 85% RH
(no condensation)
Non-operating: 20 – 40°C (60 – 104°F) at 5 – 95% RH
(no condensation)
0 – 2,500 meters (0 – 8,200 feet)
Print engine without toner cartridge
Non-operating: 20 – 40°C (60 – 104°F) at 5 – 95% RH
(no condensation)
0 – 15,000 meters (0 – 49,200 feet)
Acoustic noise Printing: 48 dB (A) or less
Warm up: 38 dB (A) or less
In accordance with ISO 7779
Dust emission Less than 0.1mg/m
concentration: Measured in accordance with Mass Measurements
Method
3
76
Page 87

Reliability specifications
MPBF Recommended usage: Average 2,000 pages per month
Maximum 10,000 in any one month
MPBF: 60,000 pages
MTTR Within 30 minutes
Jam radio 1/1000 using recommended paper
1/100 using special printing materials
Double feed ratio 1/1000 using recommended paper
1/100 using special printing materials
Life 100,000 pages or 5 years
Dimensions 330mm X 235mm X 265mm
(13.0 in. X 9.25 in. X 10.4 in.)
Weight 6.5 kg. (14.3 lbs.) without toner cartridge
7.5 kg. (16.5 lbs.) with toner cartridge
Controller
I/F High speed bi-directional parallel interface
Panel 2 LED lamps (Ready and Error)
Software
Windows Direct Provides fast, WYSIWYG output for Windows
(GDI) mode applications
PCL mode Provides compatibility with the popular printer languages
used in the LaserJet IIP. Both Windows
applications and DOS applications running under
Windows can use PCL emulation mode for printing.
PostScript mode Provides compatibility with the sophisticated PostScript
language. Both Windows applications and DOS
applications running under Windows can use PostScript
emulation mode for printing.
Paper size
Paper size in GDI mode A4, Letter, Legal, A5, Executive, B5, Com 10, C5, DL,
Monarch
Paper size in A4, Letter, Legal, Executive, Com 10, C5, DL,
PCL4 emulation Monarch
Paper size in PostScript A4, Letter, Legal, A5, Executive, B5, Com 10, C5, DL,
emulation mode Monarch
77
Page 88

Fonts 13 Original Windows 3.1 TrueType Fonts
Arial Arial Bold
Arial Italic Arial Bold Italic
Courier New Courier New Bold
Courier New Italic Courier New Bold Italic
Times New Roman Times New Roman Bold
Times New Roman Italic Times New Roman Bold Italic
Σψµβολ
Additional TrueType 35 TrueType Fonts (on diskette)
fonts
(Symbol)
13 Original PostScript PostScript Mode
Fonts Substituted Original PostScript Font TrueType Substitute
as TrueType Fonts Helvetica Arial
Helvetica Bold Arial Bold
Helvetica Oblique Arial Italic
Helvetica BoldOblique Arial BoldItalic
Courier CourierNew
Courier Bold CourierNew Bold
Courier Oblique CourierNew Italic
Courier BoldOblique CourierNew BoldItalic
Times Roman TimesNewRoman
Times Roman Bold TimesNewRoman Bold
Times Roman Oblique TimesNewRoman Italic
Times Roman BoldOblique TimesNewRomanBoldItalic
Symbol Symbol
PCL Mode Courier, 10 point, 12 pitch, regular, Bold and Italic
14 Bitmapped Fonts Courier, 12 point, 10 pitch, regular, Bold and Italic
Line Printer, 8.5 point, 16.66 pitch, Regular
78
Page 89

Character tables for PCL mode
This section provides charts for the character sets used with fonts in LaserJet IIP PCL
emulation.
Includes ASCII and Roman Extension Symbol Set
ECMA-94 Latin 1 Symbol Set
79
Page 90

PC-8 Symbol Set
PC-8 D/N (Danish/Norwegian) Symbol Set
80
Page 91

PC-850 Symbol Set
ISO Substitution Table
* Not recommended for future use.
81
Page 92

Glossary
T o further aid you in the understanding of the printer and computer peripherals, we have
created this glossary of terms. Some of the terms listed in this glossary appear in this
User's Manual, while others are commonly used computer terminology.
A
Animate
This refers to a printer icon used when the
Printer Status Display is an active window. If Animate is selected, the Printer
Status Display will show paper feeding
into and out of the printer.
Application
A program that you use to perform a specific task on your computer. These include
programs for word-processing or graphics
creation.
ATM fonts
An abbreviation for Adobe T ype Manager.
This font system was developed by Adobe
Systems.
Attribute
The characteristics of a font. It includes
orientation, symbol set, spacing, pitch, point
size, style, stroke and typeface.
B
Backup
To make a copy of the original floppy diskette or a file on the hard disk. Making a
backup of your disks or files ensures that
you won't lose data if the originals are lost
or damaged.
Bit
Binary digit. This is the smallest unit of
information that a computer can hold. The
value of a bit (which is either 1 or 0) represents a two-way choice (on or off, true or
false, black or white).
Bitmap
A set of bits that represent a graphic image.
Bitmapped character
A character in a font that's rendered as a
bitmap and drawn as a pixel pattern on the
screen. See also font and pixel.
Bitmapped font
A font in a single point size made up of
bitmapped characters. Some fonts stored
in the computer system are bitmapped fonts.
Buffer
A "holding area" in the memory where information can be stored by one program or
device and then read by another. For example, some printers have built-in memory
to store text that comes from the computer
faster than it can printed. This memory,
which frees the computer for other work
while the printer is printing is called a
printer buffer.
Button
An image on your screen which resembles
a push-button. You can click to designate,
confirm or cancel an action.
Byte
A series of 8 bits that represent one character.
C
Cancel button
A button that appears in most dialog boxes
which you can use to cancel any command
or option you may have chosen.
Central processing unit (CPU)
The brain of the computer. It is the microprocessor which performs the actual computations.
Centronics parallel port
A standard wiring configuration for paral-
82
Page 93

lel data transmission. Centronics is often
used as a synonym for the parallel standard
developed by Centronics Inc.
Character set
The complete set of characters available in
a font.
Checkbox
A small box associated with an option in a
dialog box or window. You can click on
the checkbox to turn the option on or off.
An option is on when there is an X in the
checkbox.
Click
To position the pointer arrow on an object
on your display and to press the left button
of your mouse.
Command
An instruction that causes the computer to
perform some action.
Configuration
(1) Your computer set up. (2) Your hardware: the computer, displays, keyboard and
peripheral devices.
CPI
An abbreviation for Characters Per Inch.
D
Data bits
The number of bits in a transmitted byte
that actually contains data.
Default
A preset value or setting on your computer
which you can change.
Dialog box
A box which contains a message or instructions for you to follow or a box containing
options from which you can select.
Document
Whatever you created on your computer
using an application program.
Double-click
To position your pointer arrow on an object, such as an icon, and to press the left
mouse button twice in quick succession
without moving your mouse.
Drag and drop
To position your pointer arrow on an object and press and hold the left mouse button, moving the mouse and releasing the
button.
Duplex Printing
Printing on both sides of the page.
E
EEPROM
Electronically Erasable Programmable
Read Only Memory. It has an internal
switch to permit the user to erase the contents and write new contents into it by
means of electrical signals.
EET
An abbreviation for Edge Enhancement
Technology. It is a smoothing technique
developed by Destiny Technology.
EPS
An abbreviation of Encapsulated
PostScript.
Engine
This is the mechanical printer developer
and laser portion of the printer.
EP Cartridge (electrophotographic
cartridge)
A type of process cartridge which contains
the photosensitive drum and toner. Also
called a toner cartridge.
Emulation
One printer's imitation of the functions of
another printer.
Expansion RAM board
An available option that is easily attached
to the computer to increase memory.
83
Page 94

F
File
A named, ordered collection of information stored on your hard disk or floppy disk.
File menu
A menu that lists commands that af fect your
documents. File menus typically contain
commands such as Save, Print and Quit.
Floppy disk
A disk made of flexible plastic which stores
information from your computer. Floppy
disks come in two types: 3.5" and 5.25."
Font
A set of letters, numbers or symbols of the
same typeface design.
G
GDI
An abbreviation for Graphics Device Interface.
H
Handshaking
In data communications, the automatic acknowledgment by the receiving device of
information that has been sent to it, either
by signals and the interface ("hard") or by
software controls ("soft").
Hex dump
Conversion by the printer of ASCII symbols into their hexadecimal (base 16)
equivalent. This is useful for programmers
or other users who want to troubleshoot the
communications between the computer and
the printer.
I
Icon
A small pictorial representation of an item
on your computer's desktop in Windows.
Interface
A hardware plug that allows cable connections of two devices. For example, a cable
from a computer parallel port to a printer's
parallel port.
L
Landscape
Printing on paper across its wider dimensions, such as a spreadsheet that is 11 inches
wide and 8.5 inches high; landscape pictures are usually wider than they are tall.
M
Megabyte
1024 kilobytes, or 1,048,576 bytes. Also
represented as MB.
Memory
Part of the computer system that can store
information and retrieve it later.
Menu
A list of items either in the group windows
or in your applications from which you can
select. These are selected by clicking on
them with your mouse button.
Mouse
A device that controls the pointer arrow on
your display in Windows.
Mouse button
The button on the top of the mouse which
you press to make selections or do some
action on your screen.
MS-DOS
Microsoft Disk Operating System.
O
Output
Information which is transferred from your
computer to an external device such as your
screen, a disk, printer or modem.
P
Parallel
A communications interface that sends or
receives 8 bits of information plus control
signals at a time.
84
Page 95

Parity
A bit in a serial information that allows a
computer and printer to automatically check
for errors in transmission.
PCL
An abbreviation for Printer Command Language.
Point
This is the typical unit of measurement for
height of a font. One point equals 1/72nd
inch.
Portrait
Printing on paper across the narrower dimensions, such as a letter on paper which
is 8.5 inches wide and 11 inches high; portrait pictures are usually taller than they are
wide.
PostScript
PostScript is a printer page description language developed by Adobe Systems to communicate between software applications
and printers, independent of the printer's
resolution.
Q
Queue
A list of jobs to be printed.
on a character-by character basis ensuring
high speed and print quality. In virtually
limitless sizes, these fonts can be scaled
from 3 points to 999.75 points in quarterpoint increments.
Serial
A communications interface that sends or
receives 1 bit of information at a time at a
specified baud rate.
System fonts
These are fonts that are installed and used
by Windows during a normal installation.
T
Title bar
The bar at the top of your window that
shows the name of the current window.
TrueType font
A type of scalable font supplied with the
Star WinType 4000 printer and used in
Windows to create WYSIWYG (What You
See Is What You Get) output. This font
system was developed by Apple Computer .
V
Virtual memory
A method by which Windows substitutes
hard disk space in place of RAM.
R
RAM
Random Access Memory. This is memory
that can be used to store information temporarily such as text or printing configurations. RAM-stored information is erased
when the power is turned off.
ROM
Read Only Memory. This is memory which
can be stored permanently whether the
power to the computer is on or off.
S
Scalable fonts
These are fonts created within the printer
W
Window
An area of your display which shows information on your desktop. You can create
and view documents through windows.
Windows
A graphical user interface software program
developed by Microsoft Corporation for use
on MS-DOS computers.
WYSIWYG
An abbreviation for What You See Is What
You Get.
85
Page 96

Index
Symbols
.PIF File Method 35, 38
386 Enhanced 18
Duplex printing 62
Duplex printing errors 30
A
About 48, 62
Add 51
Animate Icon 61
B
Backup copy 20
Beep on Printer Error 28
Beep When Print Job is Complete 58
Book Style 29
C
Cable problem 63
CANCEL 55
Centronics parallel 5
Centronics parallel cable 12, 17
Changing priority in the queue 50
Character tables for PCL mode 79
Cleaning the output port window 66
Cleaning your printer 66
Clearing paper jams 67
Color monitor 49
Configuration 23
Connect Port 47
Connecting the power cord 6
Connecting the printer
to the computer 5
Contents 48, 62
Control Panel 18, 23, 32, 36, 57
Copies 27
Cover Open 62
D
DELETE 50
Directory 21
Display of information 49
Display print status 47
Display Status While Printing 58
DOS 26
DOS command line 26
DOS Prompt Method 35, 37
E
Eliminating screen fonts
from your application 31
Enhanced Mode 17
EP (electrophotographic) cartridge 2
EP (Toner) cartridge missing 63
Error LED 67, 74
Errors when printing 57
Exiting before a print
job has been completed 55
F
Features of the printer
driver software 26
Fonts in PCL Mode 39
Fonts in PostScript Mode 33
Fonts in the Windows
Direct (GDI) mode 30
Format 49
Front cover 2
Front cover will not shut 74
Fuser 69
Fuser Abnormality 63
Fuser area 67
G
GDI 25
Glossary 83
Guidelines for storing 12
H
Handling of the toner cartridge 65
Help 48
Hewlett-Packard LaserJet IIP 25, 39
High 46
How to Use Help 48, 62
I
IBM compatible PC 12, 17
Installing the printer driver 17
Installing the printer driver software 20
86
Page 97

Installing the toner cartridge 2
Intellifont 30
Interface cable 5
Interface port 5
J
Job Name 49
Job Name & Page No. 62
L
Labels 12
Landscape 27
Loading OHP (overhead
projection) film label sheet 15
Loading paper 12
Locking knobs 3
Low 46
LPT1 47
LPT2 21, 47
LPT3 21, 47
M
Main 26, 32, 36, 43, 57
Maintaining your printer 65
Maintenance & troubleshooting 65
Manual duplex printing 29
Medium 46
Memory 12, 17
Minimum 48
Monochrome monitor 49
MS-DOS command 25
N
Normal 48
NV-RAM Error 63
O
Options 27, 45, 61
Options button 58
Orientation 27
Other mechanical problems 74
Output port window 67
output tray 5
P
Package contents 1
Paper guides 13, 14, 15
Paper Jam 62
Paper jams 27, 30
Paper out 62
Paper release lever 7, 12, 14, 15, 16
Paper size 27
Parallel interface cable 2
Parallel Port 21
Parallel port 21
Pause 50, 64
PCL 18, 25
PCL emulation 25
PCL mode 25
Permanent virtual memory 18
Picture of your printer 62
Placing the printer 1
Portrait 27
PostScript 18, 25
PostScript language format 33
PostScript mode 25, 32
See also PCL mode:
Power cable 1
Power cord 66
Power Off 63
Power Saving Mode 47
Print Instruction Page 28
Print Manager 21
Print manager 26, 43, 50
Print status menu 57
Print Status Window 47
Printer command languages 18
Printer driver 17
Printer driver software 1
Printer error
See Printer Error: Beeps
Printers icon 26, 32, 36, 43, 57
Printers window 23
Printing DOS applications
in PCL mode under Window 37
Printing DOS applications in
PostScript mode under Windows 35
Printing from a DOS application
within Windows 37
Printing from a Windows application 32
Printing in PCL mode from
a Windows application 36
Printing media to avoid 12
Printing status information 26
Printing status options 58
Printing to a file in the Windows
87
Page 98

Direct (GDI) and PCL modes 51
Printing to an Encapsulated PostScript
file in the PostScrip mode 54
Printing with the PCL mode 36
Printing with the Windows Direct
(GDI) mode 26
Printing with the WinType 4000 25
Priority 46
Program Manager 20, 24, 26,
32, 36, 43, 57
Progress Bar 50
Q
Quality printing 12
Queue information 49
Quitting the print manager 55
R
RAM 12, 17
Recommended print media 11
Recovering from an error message in
PCL or PostScript modes 40
Reference information 75
Relocating the printer 7
Removing the printer
driver software 24
Report Style 29
Restart Windows 22
Resume 50, 62, 64
Run 20
S
Saving download fonts and
macros in the PCL mode 41
Scanner Abnormality 63
Search for Help On... 48, 62
Selecting print media 11
Selecting the Printer Status Display PCL and PostScript modes 59
Selecting the Printer Status Display Windows Direct (GDI) mode 57
Setting up the output tray 5
Setting up the upper paper tray 4
Setting up your printer 1
Setup 20, 21, 22, 27
Setup button 57
Size 48, 49
Smoothing On 47
88
Solving print quality problems 70
Specifications 75
Star Micronics Bulletin
Board Service 90
Status Bar 50
Status Display Messages 62
System requirements 12, 17
T
Temporary 18
Time 49
Time Format 47
Toner cartridge 1, 65, 66, 68, 69
Toner save mode 66
Toner Saving Mode 47
Total memory 17
Troubleshooting 70
TrueType 30
TrueType fonts 78
Turning the printer OFF 6
Turning the printer ON 6
Type 1 30
U
Unpacking and checking
the package contents 1
upper paper tray 4
Use WinType Print Manager 27
Using fonts in the GDI mode 30
V
Virtual Memory 18
W
Warming Up 62
What You See Is What You Get 30
Windows 17, 22
Windows application 26
Windows Direct (GDI) mode 25
WinType Delete 24
WinType GDI 26
WinType PostScript on WSPS 32
WinType PostScript on WTPS 36
WinType Print Manager 22
WinType Printer Status Display 57
WinType TEST 22
WinType TEST Utility 23
WinType Tool 22
Page 99

Customer service information
In the event that you are experiencing some technical difficulty with your Star printer,
please refer to Chapter 7 Maintenance & troubleshooting. That chapter provides you
with easy methods to diagnose and resolve problems which you may encounter.
For further technical support, you should first contact your Authorized Star Dealer. If
you require additional support, Star Micronics offers a wide variety of technical support
services. Please use the phone numbers listed below based on the country which your
Star printer was purchased.
Star Micronics Technical Hotline:
Hong Kong: 852-795-2335
Australia: 61-2-748-4300
New Zealand: 64-9-570-1470
Star Micronics Bulletin Board Service:
Requires a computer modem
United Kingdom: 44-494-461395
France: 33-1-305807
Germany: 49-69-780929
Netherlands: 31-73-424485
Australia and New Zealand: 61-2-748-2960
Customer response
Star Micronics Co., Ltd., invites your suggestions and comments on your printer and this
Users Manual. Please address your correspondence to: Attn: Product Manager
Worldwide Headquarters U.K. Market
STAR MICRONICS CO., LTD. STAR MICRONICS UK., LTD.
536 Nanatsushinya, Shimizu Star House
Shizuoka, 424 Japan Peregrine Business Park
Gomm Road, High Wycombe
Bucks. HP13 7DL, U.K.
Australian Markets New Zealand Market
STAR MICRONICS PTY, LTD. STAR MICRONICS (N.Z.) LTD.
Unit A/107-115 Asquith Street 64 Lunn Ave., Mount Wellington
Silverwater, NSW 2141 P.O. Box 6255, Wellesly St.
Australia Auckland, New Zealand
European Market Asian Market
ST AR MICRONICS DEUTSCHLAND GMBH STAR MICRONICS ASIA LTD.
Westerbachstraße 59 18/F Tower 2, Enterprise Square
D-60489 Frankfurt 9 Sheung Yuet Road, Kowloon Bay,
F.R. of Germany HONG KONG
89
Page 100

PRINTED IN JAPAN
 Loading...