

Page 1

Automatic Sheet Feeder
USERS MANUAL
Page 2

TABLE OF CONTENTS
CHAPTER 1 INSTALLATION
Unpacking
Mounting the Automatic Sheet Feeder
CHAPTER 2 OPERATION
Loading the Paper
Operation of Control Codes
CHAPTER 3 MAINTENANCE
Maintenance
Malfunctions
CHAPTER 4 SPECIFICATIONS
Dimensions and Weight
Paper Type and Dimensions
Printing Area
Hopper Capacity
Stacker Capacity
Reliability
Ambient Conditions
1
5
8
10
NOTICE
l All rights reserved. Reproduction of any part of this manual in any form whatsoever without
STAR’s express permission is forbidden.
0 The contents of this manual are subject to change without notice.
0 All efforts have been made to ensure the accuracy of the contents of this manual at the
time of press. However, should any errors be detected, STAR would greatly appreciate
being informed of them.
0 The above notwithstanding, STAR can assume no responsibility for any errors in%&
manual.
. @ Copyright 1988 Star Micronics Co., Ltd.
Page 3
Chapter 1
INSTALLATION
UNPACKING
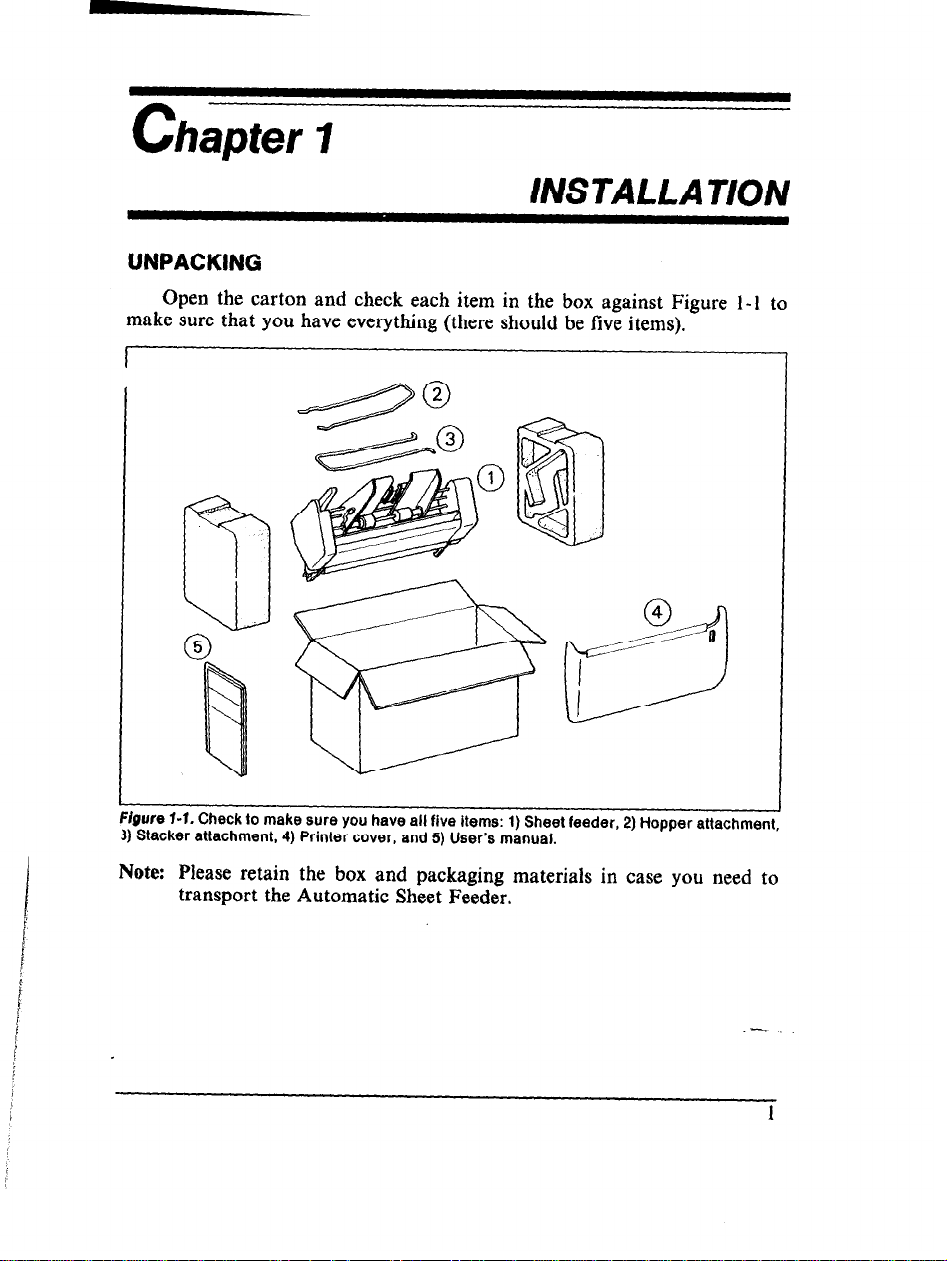
Open the carton and check each item in the box against Figure l-l to
make sure that you have everything (there should be Sve items). -
I
FfOure I-1. Check to make sure You have all five items: 1) Sheet feeder, 2) Hopper attachment,
3) Stacker attachment, 4) Printer cover, and 5) User’s manual.
Note: Please retain the box and packaging materials in case you need to
transport the Automatic Sheet Feeder.
Page 4
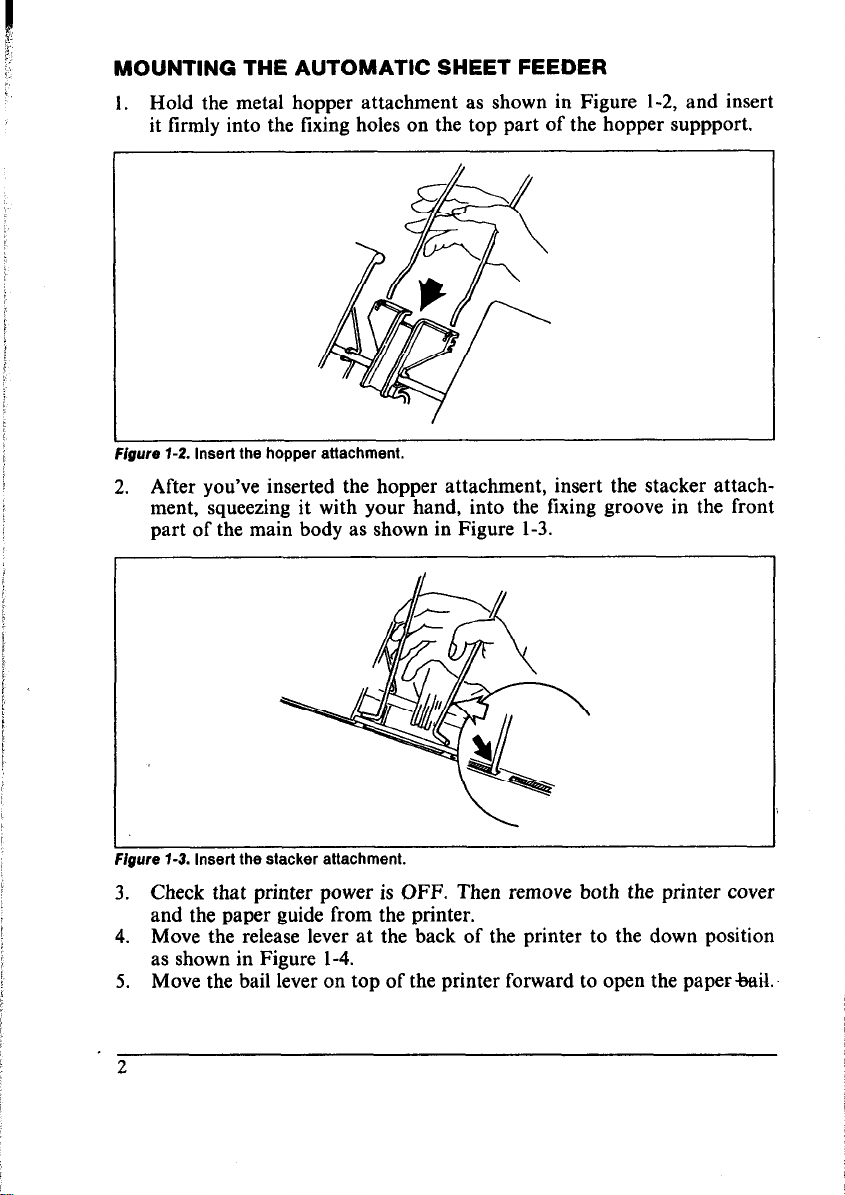
MOUNTING THE AUTOMATIC SHEET FEEDER
1. Hold the metal hopper attachment as shown in Figure l-2, and insert
it firmly into the tixihg holes on the top part of the hopper suppport.
-. _ - . . . . . . .
wgure i-2. Insert me nopper anacnmem.
2. After you’ve inserted the hopper attachment, insert the stacker attachment, squeezing it with your hand, into the fixing groove in the front
part of the main body as shown in Figure l-3.
Figure 1-3. Insert the stacker attachment.
3. Check that printer power is OFF. Then remove both the printer cover
and the paper guide from the printer.
4. Move the release lever at the back of the printer to the down position
as shown in Figure l-4.
5. Move the bail lever on top of the printer forward to open the paperbail-
2
Page 5
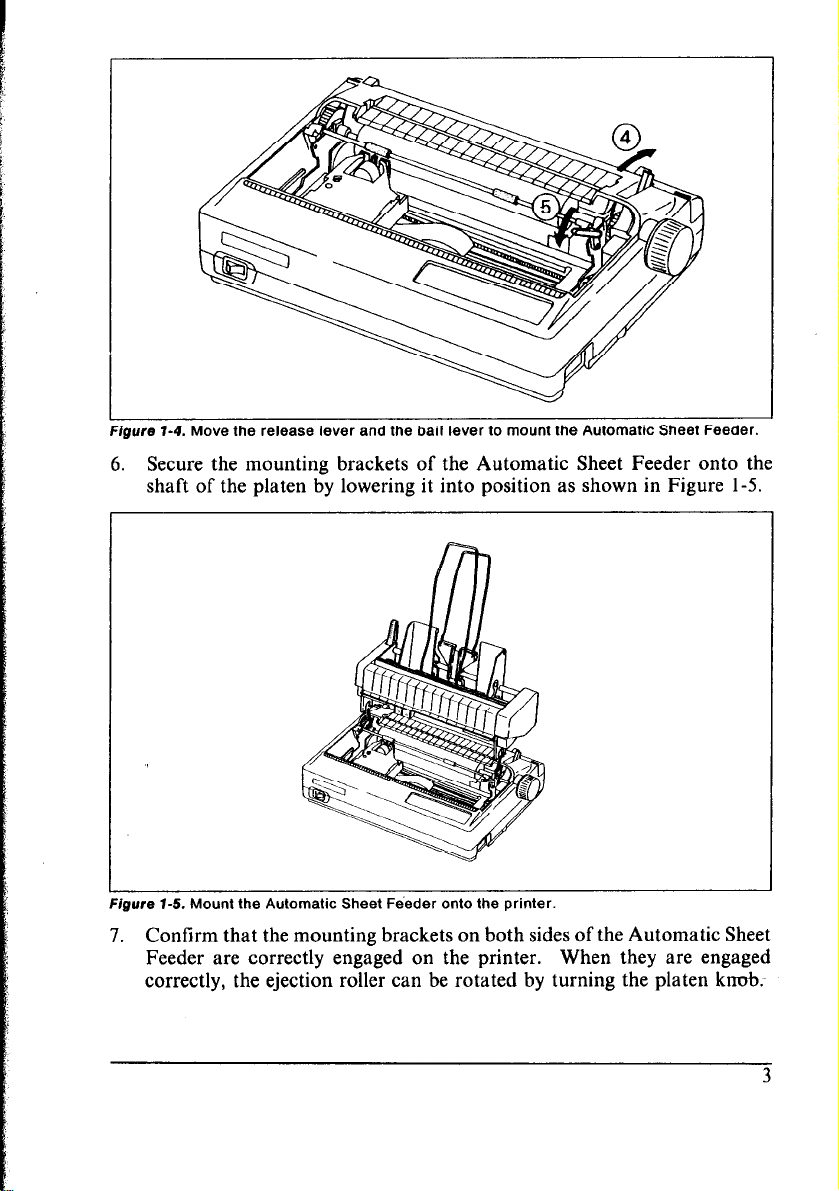
igure 1-4. Move the release lever and the bail lever to mount the Automatic Sheet Feeder.
6. Secure the mounting brackets of the Automatic Sheet Feeder onto the
shaft of the platen by lowering it into position as shown in Figure l-5.
igure 1-5. Mount the Automatic Sheet Feeder onto the printer.
7. Confirm that the mounting brackets on both sides of the Automatic Sheet
Feeder are correctly engaged on the printer. When they are engaged
correctly, the ejection roller can be rotated by turning the platen knob.
Page 6

ection roller
I
Figure 1-B. Confirm that the Automatic Sheet Feeder is set correctly.
8. Install the printer cover provided with the Automatic Sheet Feeder.
Notes: 1. Please keep the original printer cover in a safe place.
2. To remove the Automatic Sheet Feeder, carry out the above installation procedures in reverse.
4
Page 7

hapter 2
C
OPERATION
LOADING THE PAPER
Pull the paper loading lever forward to bring the pressure plate back into
1.
position with a clicking sound as shown in Figure 2-l.
I
Figure 2-1. Pull the paper loading lever forward.
Align the left paper guide position with the triangle seal on the side of
2.
the stacker.
Fan the paper before loading as shown in Figure 2-2, and line up the
?.
edges of the paper evenly.
Page 8

Figure 2-2. Fan the paper before loading.
4. Load the paper, aligning it with the left side hopper, then sliding the right
hopper into position. Do not set it too tightly, so as to allow the paper
to be transported smoothly between the hoppers.
5. After loading the paper into the hopper, press the paper loading lever
backward. The paper will be set into position between the hoppers and
the hopper roller.
Figure 2-3. After loading the paper, press the paper loading lever backward.
Note: When you are not going to use the printer again for some time, or
at the end of the day’s operation, be sure to remove any paper in the
printer. Paper left in the printer may become deformed by the platen.
-
6
Page 9

OPERATION OF CONTROL CODES
When the paper-out detector is enabled by setting the DIP switch, the
following control codes will be changed as shown below:
< FF > (Form Feed)
1.
This command sets the paper into the printer. It ejects any paper set in
the printer when the Automatic Sheet Feeder is empty.
< LF > (Line Feed)
2.
If a line feed operation results in going over the page length, the next
sheet of paper is fed in to the printer.
< VT > (Vertical Tab)
3.
This command functions as a line feed operation.
4. Vertical tab position setting command
This command is ignored.
5. Page length setting command
The page length setting is ignored, and is set to the paper size in actual
use.
When the paper-out detector is disabled by setting the DIP switch, the
control codes will be function normally.
Page 10

hapter 3
C
MAINTENANCE
MAINTENANCE
The Automatic Sheet Feeder is designed to withstand long use with high
reliability. We ask users to regularly remove any dirt or dust from the Au-
tomatic Sheet Feeder, first removing it from the printer. The platen of the
printer mechanism and roller in particular should be kept clean.
MALFUNCTIONS
Malfunctions may be resolved by simple inspection, so please check the
following items:
Automatic Sheet
Feeder does not
Paper does not feed
into printer
I
More than 2 sheets
transported
Cause
* Not in Automatic
Sheet Feeder mode
* Paper stacked
incorrectly
* Platen & feeder not
operating together
* Out of paper
. Paper jammed
* Paper loading lever
forward
* Paper not fanned
properly
* Incorrect paper
specifications
Remedy
. Set DIP switch
correctly
- Set paper correctly
- Check Automatic Sheet
Feeder mounting
* Load paper
* Remove jammed paper
* Press paper loading
lever backward
* Load paper after
fanning well
* Use paper suitable to
Automatic Sheet Feeder
specilications
8
Page 11

Symptom
Paper is crooked
Cause
* Poor paper l Use new paper
Remedy
0 Too much horizontal * Check position of the
movement of paper so paper guide
that guide rollers of
the Automatic Sheet
Feeder do not take up
the paper correctly.
Malfunction of
paper ejection
* Full stacker (the - Empty stacker
part which stores the
printed paper)
- Paper does not match
Automatic Sheet
* Use paper suitable to
Automatic Sheet Feeder
Feeder specifications. specifications.
If the Automatic Sheet Feeder still does not operate correctly after car-
rying out these simple checks, consult your dealer.
--
Page 12

Chapter 4
w Dimensions and weight
Width
Depth
Height
Weight:
n Paper type and dimensions
Type
Width
Length
Weight
Storage
H Printing area
Paper width
18
12mm (7.15”) N 216mm (8.5”
Smm -
and ovel
I
r
f
Printing Width
2
SPECIFICA TIONS
340 mm (13.4 inches)
250 mm ( 9.8 inches)
320 mm (12.6 inches)
1.2 kg (2.65 pounds)
Fine quality paper (slick paper)
182mm(7.15inches) - 216mm(8.5inches)
203 mm (8.0 inches)
60 g/m2
18 -
- 90 g/m2
22 “C, 40 - 60 %
I
Smm
md over
Top of page
Grst printing line
- 356 mm (14.0 inches)
Paper length
I
I
Printing
length
.ast printing line
Bottom of paper
203mm (g”)
?
356mm (14”)
.-
Page 13

n Hopper capacity
Max. 50 sheets (with 64 g/m2)
H Stacker capacity
n Reliability
n Ambient conditions
Temperature
Operation
Storage
Humidity
Operation
Storage
Max. 50 sheets (with 64 g/m2)
100,000 cycles
(MCBF; Mean Cycle Before Failure)
+5 - +40 “C
-30 -
30
20
+70 “C
N 80 % (no condensation)
N 95 % (no condensation)
--
11
Page 14

12
-
Page 15

Consumer Response
Star Micronics Co., Ltd. invites your suggestions and comments on your
printer and this manual. Please address your correspondence to:
Worldwide Headquarters:
STAR MICRONICS CO., LTD.
194 Nakayoshida
Shizuoka, JAPAN 422-91
Attn: Product Manager
American Market:
STAR MICRONICS AMERICA INC.
Pan Am Bldg., Suite 3510
200 Park Avenue
New York, NY 10166
Attn: Product Manager
European Market:
STAR MICRONICS DEUTSCHLAND GMBH
Mergenthalerallee 1-3.
D-6236 Eschborn/Ts., WEST GERMANY
Attn: Product Manager
U.K Market:
STAR MICRONICS U.K., LTD.
Craven House
40 Uxbridge Road
Ealing, London, W5 2BS, U.K.
Attn: Product Manager
French Market:
STAR MICRONICS FRANCE S.A.R.L.
25, rue Michael Faraday
78 180 Montigny-le-Bretonneux
Attn: Product Manager
Asian Market:
STAR MICRONICS (S.E.A.) LTD.
Room 2409-10 Sincere Building;
173 Des Voeux Road Central, HONG KONG
Attn: Product Manager
Page 16

-.
Printed in Japan, 80820936
 Loading...