

Star Manufacturing F24 Installation Manual

90 INDUSTRIAL PARK ROAD, SACO, ME/U.S.A. 04072
(207) 282-1589 800-225-3958 FAX (207) 282-6283
OPERATORS MANUAL
HOLMAN CHEESE MELTERS
MODELS F24, F36, F40 & F24W, F36W, F40W
(For Service Information Call: 800-225-3958)
TABLE OF CONTENTS
UNCRATING AND INSPECTION PAGE 1
ASSEMBLY & INSTALLATION PAGE 1, 2
ELECTRICAL INSTALLATION PAGE 3
OVEN OPERATION PAGE 3
CLEANING (DAILY) PAGE 3
TROUBLE SHOOTING GUIDE PAGE 4 & 5
MAINTENANCE PROCEDURES PAGE 5, 6
PARTS LIST PAGE 7
DRAWINGS
HEATER TUBE INSTALLATION PAGE 2
LEFT SIDE EXPLODED VIEW PAGE 6
WIRING DIAGRAMS
F24(W), F36(W), F40(W) PAGE 8
F\MICHAEL\MANUALS\VAMANUAL\F36MAN.DOC
HGO111 REV. 4/24/97 MJC
PAGE 1
OPERATORS MANUAL
HOLMAN CHEESE MELTERS
MODELS F24, F36, F40 & F24W, F36W, F40W
UNCRATING AND INSPECTION
Unpack unit and components from container. Remove all visible packing
material and inspect unit for damage. If damage is discovered, file a claim
immediately with the carrier that handled the shipment.
ASSEMBLY AND INSTALLATION
A. Counter Mounting (models F24, F36, F40):
If the unit is to be installed on a counter, attach legs as shown below.
Anti-skid pads are available at no charge and may be adhered to the foot
section of each leg to prevent sliding. Call 1-800-225-3958 for details.
(Caution: Use of these pads is not approved by the National Sanitation
Foundation).
LEGS SCREW INTO LEG HOLES
AT BOTTOM OF UNIT.
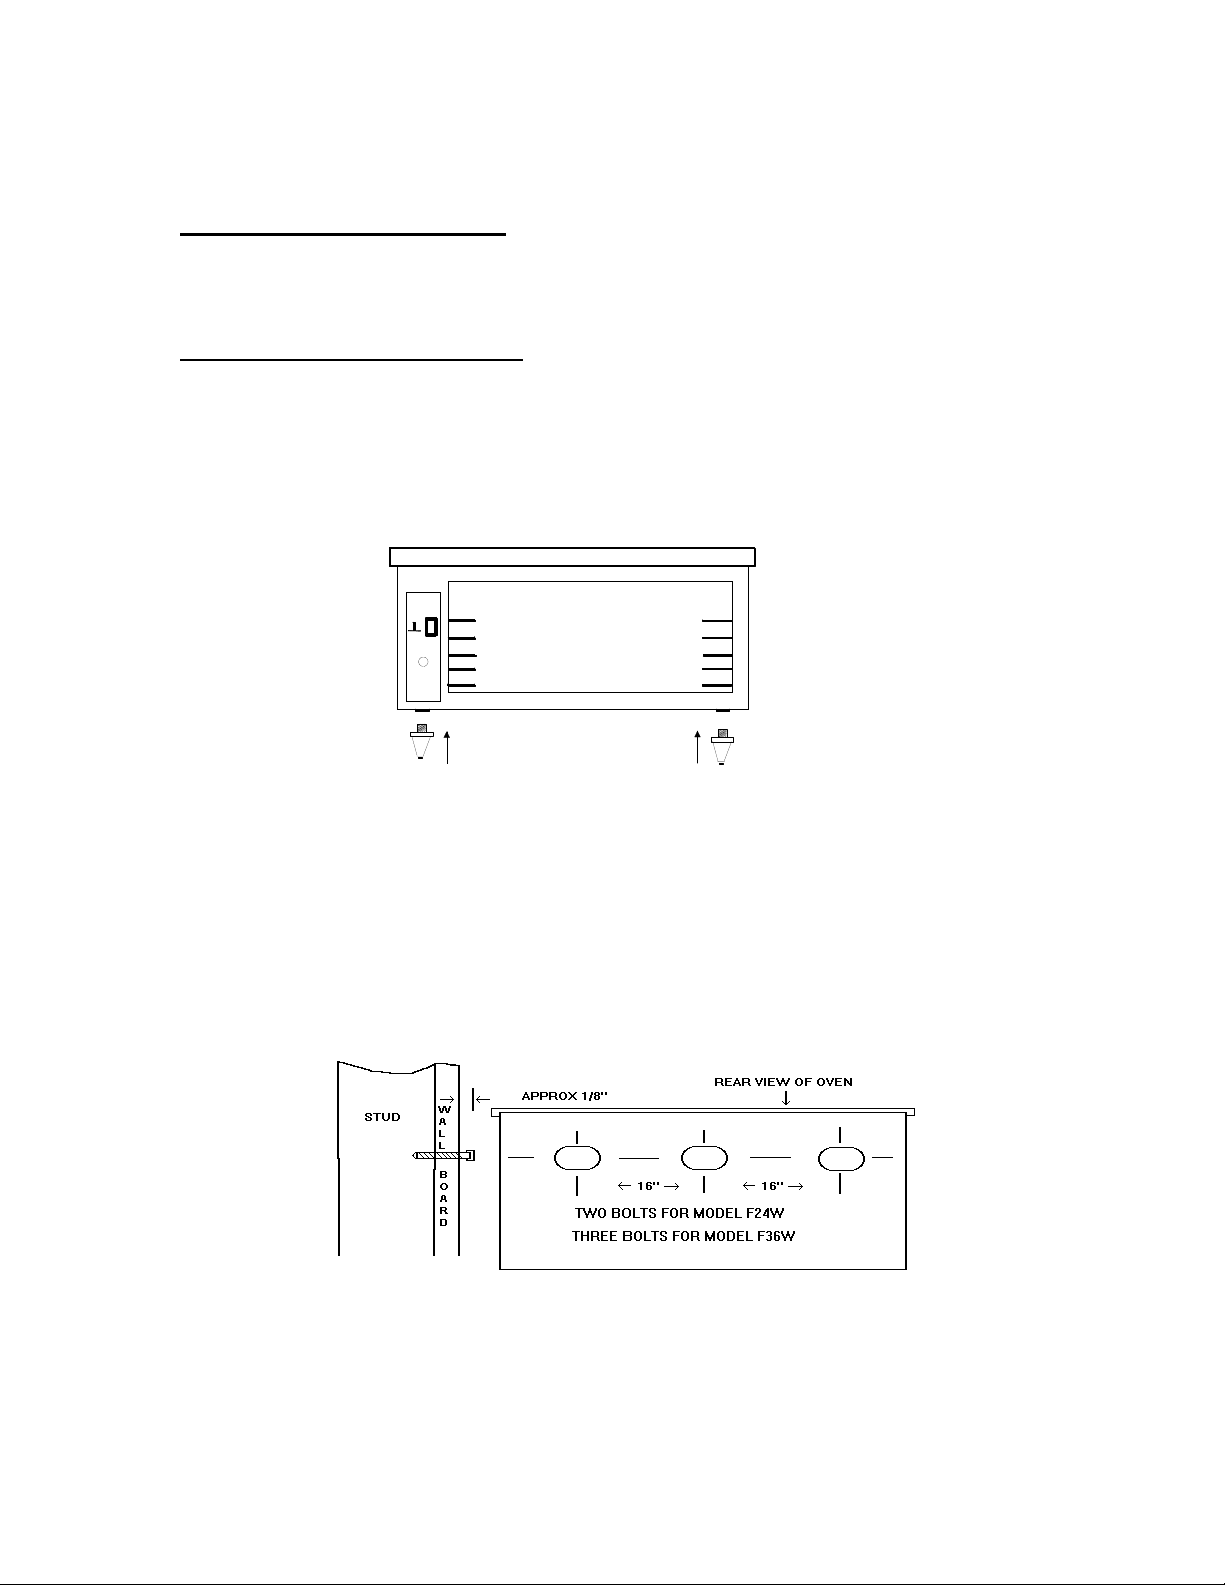
B. Wall Mounting (models F24W, F36W, F40W):
Mounting bolts (2 1/2" lag bolts) have been supplied with your Cheese
Melter. At the back of the Cheese Melter there are either two (F24) or three
(F36) 5/8" holes which are plugged with nickel platted Button Plugs. These
holes are on 16" centers and large enough so that the head of the Lag Bolt
will slip inside the hole.
Screw the Lag Bolt into wall studs on 16" centers and level. Screw heads
should be 1/8" away from the wall as shown below.
Using a flat tipped screw driver, the Button Plugs can be removed from the
holes at the top rear of the unit. Unit may now be hung from wall by inserting
the bolt heads into the mounting holes in the unit.
ASSEMBLY AND INSTALLATION CONTINUED ON PAGE 2
REVISED 3/30/00 MJC

PAGE 2
OPERATORS MANUAL
HOLMAN CHEESE MELTERS
MODELS F24, F36, F40 & F24W, F36W, F40W
ASSEMBLY AND INSTALLATION CON'T.
C. Heater Tubes:
Models F24, F36, F40 and F24W, F36W, F40W use quartz sheathed Heater
Tubes which are held in position by spring loaded Sockets which push on
the end of the Heater Tubes. To install or remove a Heater Tube, grasp the
end of the Heater Tube (NEVER THE MIDDLE), push one end of the Heater
Tube into one of the spring loaded Sockets and insert or remove the other
end of the Heater Tube into or out of the remaining Socket as shown below.
HEATER ELEMENT SOCKET END, MODEL F24 & F36
HEATER TUBE SOCKETS; METAL CONTACTS IN SOCKET
FACE SHOULD ALIGN WITH METAL FLANGE AT EACH
END OF HEATER TUBE
HEATER SOCKET
WALL OF UNIT
:
The F24, F36, F40 and F24W, F36W, F40W heater tubes are clear quartz
(like glass) and quite fragile. When removing them from the cardboard tubes
it is very important that no bending pressures be applied or they will
immediately snap in the middle.
(EXTREME CAUTION SHOULD BE EXERCISED)
TUBES ARE VERY FRAGILE
REVISED 11/28/95 MJC

OPERATORS MANUAL
HOLMAN CHEESE MELTERS
MODELS F24, F36, F40 & F24W, F36W, F40W
ELECTRICAL INSTALLATION
WARNING:
NEVER PLUG A 208 VOLT UNIT INTO 240 VOLTS OR A 240
VOLT UNIT INTO 208 VOLTS. CHECK WITH POWER COMPANY TO
DETERMINE ACTUAL VOLTAGE AT THE JOB SITE BEFORE INSTALLING
UNIT.
WARNING:
BE ABSOLUTELY SURE THE GROUND CONNECTION FOR THE
RECEPTACLE IS PROPERLY WIRED. NEVER CONNECT UNIT TO POWER
WITHOUT PROPER GROUND CONNECTIONS. IMPROPER GROUND
CONNECTION MAY RESULT IN SEVERE INJURY OR FATALITY.
Models F24, F36 and F40 are furnished with a 4 foot cord and standard NEMA 630 Plug for plug in installation in a grounded 208 or 240 Volt outlet. Models
F24W, F36W and F40W are furnished with a 1 1/2 foot cord and NEMA 6-30
Plug. Your HOLMAN oven should be the only appliance connected to the
electrical line and should have its own fuse or breaker in the electrical box.
OVEN OPERATION
A. Pre-heat:
Put Power Saver Switch into the ON position and set front and rear heat
controls to desired settings. Fan Motor will now run and Pilot Light turns on.
Allow approximately five minutes for warm up time.
B. Power Saver:
Put power Switch into the off position. Pilot light is on and fan continues to run.
Front two elements will now turn off while rear two elements continue to run.
Unit is now in 1/2 power.
C. Cooking:
There are six shelf positions in your Holman Cheese Melter (2 in model F40)
with temperatures that range from approximately 300 deg. (F) in the lowest
position to approximately 600 deg. (F) in the highest position. Some
experimentation between heat control settings and shelf position may be
necessary to achieve desired cooking results.
CLEANING (DAILY)
A. Turn Power Saver to the OFF possition. When oven has cooled;
1. Remove shelf or rack. Clean with hot soapy water.
2. Wipe interior and exterior surfaces with a damp cloth.
REVISED 11/27/95 MJC
PAGE 3
 Loading...