

Page 1

10 SUNNEN DRIVE P.O. BOX 430129 ST. LOUIS, MISSOURI 63143
(314) 781-2777 y (800) 807-9054 y FAX (800) 264-6666
UNCRATING AND INSPECTION PAGE 2
ASSEMBLY AND INSTALLATION PAGE 2
ELECTRICAL INSTALLATION PAGE 3
COOKING PROCEDURES PAGE 4
CLEANING PROCEDURES PAGE 4
TROUBLESHOOTING GUIDE PAGE 5
PARTS LIST PAGE 6
TOAST CHUTE PAGE 2
ADJ. HEAT SHIELD, FRONT VIEW PAGE 2
POWER SAVER SWITCH PAGE 3
CRUMB TRAYS PAGE 4
HIGH LIMIT RESET SWITCH PAGE 4
WIRING DIAGRAMS PAGE 7, 8
2M-HG0219 Rev. C 10/1/07
Conveyor Toasters & Ovens Cheese Melters Broilers Pretzel Bakers
OPERATOR’S MANUAL
HOLMAN CONVEYOR TOASTERS
MODELS DT14-PS AND DT14-TH
FOR SERVICE INFORMATION
U.S. AND CANADA CALL: TOLL FREE 1-800-807-9054
24 HOURS/DAY 7 DAYS/WEEK
TABLE OF CONTENTS
ILLUSTRATIONS AND WIRING DIAGRAMS
Electric Cooking Equipment for the Food Service Industry
Page 2

HOLMAN CONVEYOR TOASTERS
ϑ
ϑ
ϑ
ϑ
ϑ
ϑ
MODELS DT14-PS AND DT14-TH
PAGE 2
UNCRATING AND INSPECTION
Unpack unit and components from shipping container. Remove all visible packing material and inspect unit for
damage. If damage is discovered, contact the carrier that handled the shipment and file a shipping damage
claim immediately.
ASSEMBLY AND INSTALATION
Model DT14-PS/TH is shipped fully assembled and ready to plug into a 50A, 250VAC Twist Lok receptable
such as a Hubbell part number CS8269. Removal or replacement of the power cord and plug will VOID the
warranty. Consult with a licensed electrician prior to installation. For assistance, call the Holman Factory
Service Team at 1-800-807-9054.
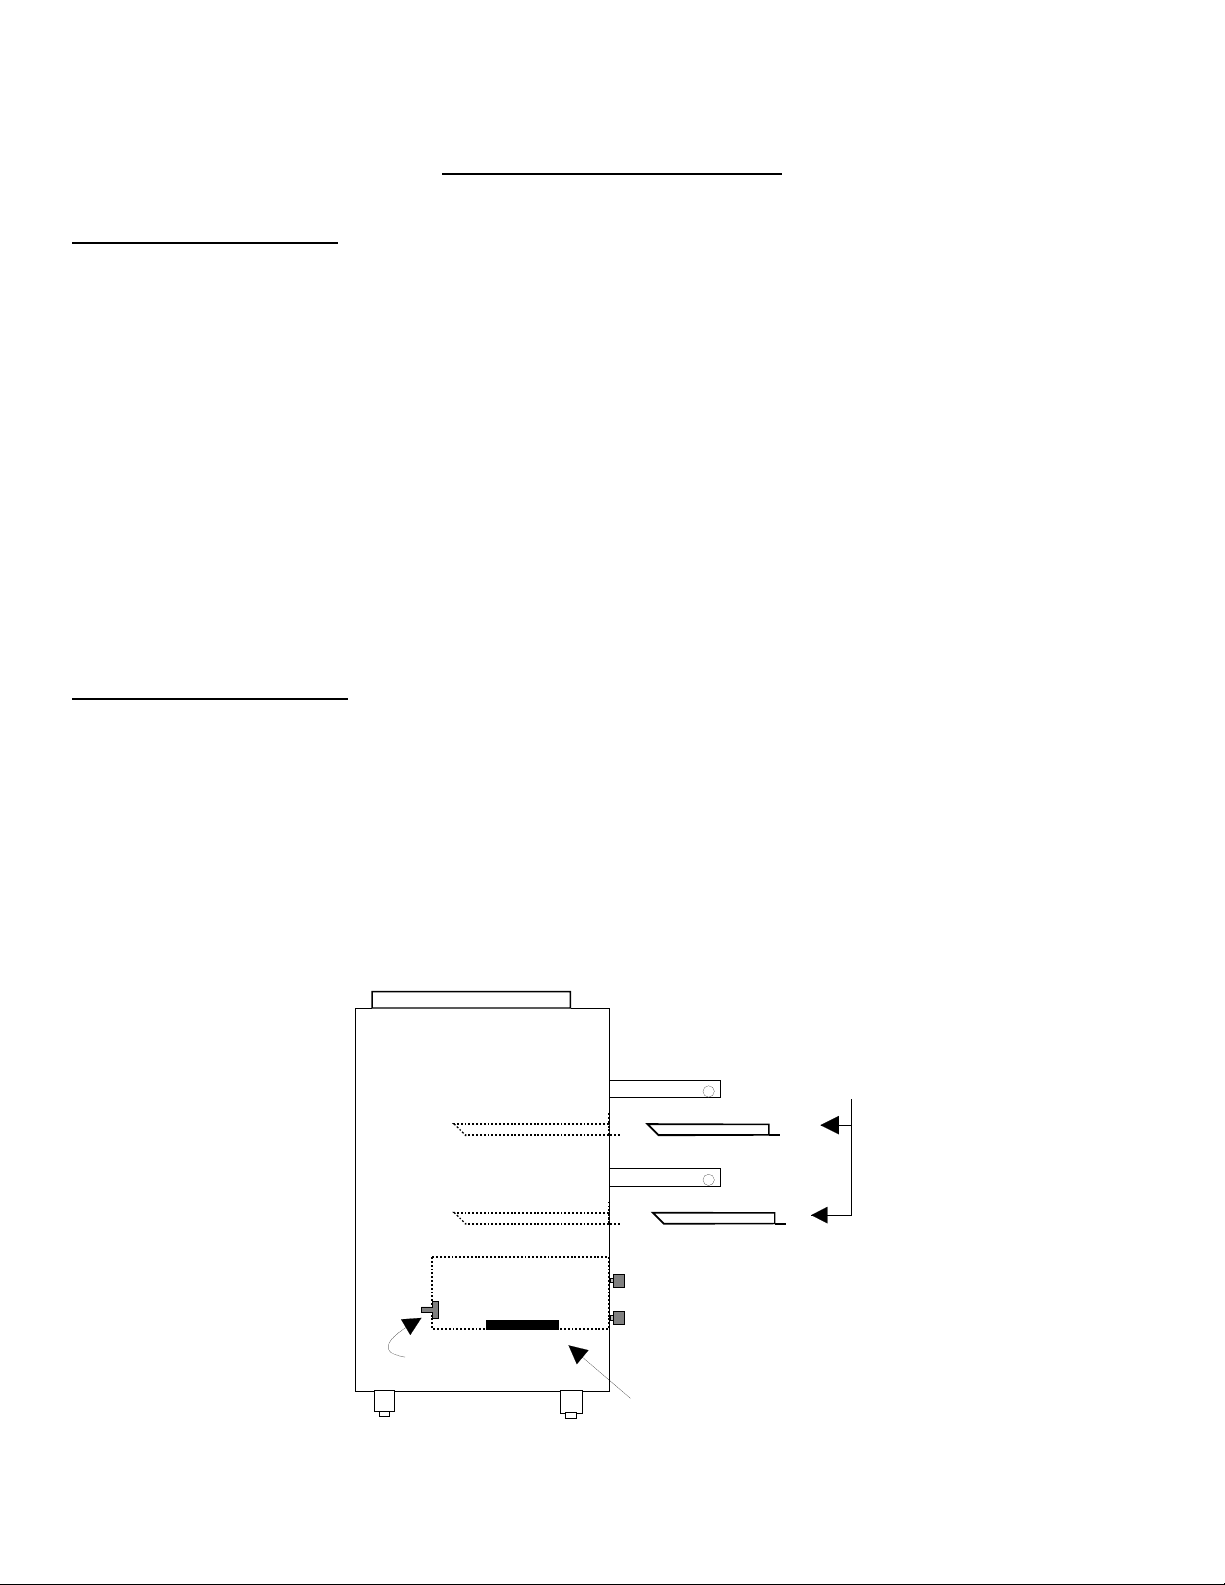
The toast chute may be installed for either front of rear product discharge as shown below.
The DT14-PS/TH is equipped with an adjustable front heat shutter. This shutter may be adjusted from an
opening clearance of 1½” up to 3”. To adjust shutter, loosen the single Phillips screw on the front of the top
cover, slide the shutter up or down to the desired height and tighten the Phillips screw. The screw for the lower
chamber is located above the conveyor belt on the front of the toaster and can be adjusted in the same
manner.
ADJUSTABLE HEAT SHUTTER
ϑΙϑϑϑΟΙΟ
ϑΙϑϑϑΟΙΟ
ϑΙϑϑϑΟΙΟ
ϑΙϑϑϑΟΙΟ
ϑΙϑϑϑΟΙΟ
ϑΙϑϑϑΟΙΟ
HOLMAN
ΙϑϑϑΟΙΟ
ΙϑϑϑΟΙΟ
ΙϑϑϑΟΙΟ
ΙϑϑϑΟΙΟ
ΙϑϑϑΟΙΟ
ΙϑϑϑΟΙΟ
FRONT VIEW OF TOASTER
Page 3
OPERATOR’S MANUAL
HOLMAN CONVEYOR TOASTERS
MODELS DT14-PS AND DT14-TH
PAGE 3
ELECTRICAL INSTALLATION
WARNING
MAKE SURE ALL INPUT POWER IS OFF OR THAT THE UNIT IS DISCONNECTED FROM THE POWER
SUPPLY BEFORE INSTALLING OR REMOVING ANY PART.
WARNING
BEFORE INSTALLING UNIT (S), CHECK WITH LOCAL POWER COMPANY TO DETERMINE ACTUAL
VOLTAGE AT THE JOB SITE. NEVER PLUG a 208-VOLT UNIT INTO 240 VOLTS OR A 240-VOLT UNIT
INTO 208 VOLTS.
WARNING
BE SURE THE GROUND CONNECTION FOR THE RECEPTICAL IS PROPERLY WIRED. NEVER
CONNECT UNIT TO POWER WITHOUT PROPER GROUND CONNECTIONS. IMPROPER GROUND MAY
RESULT IN SEVERE INJURY OR FATALITY.
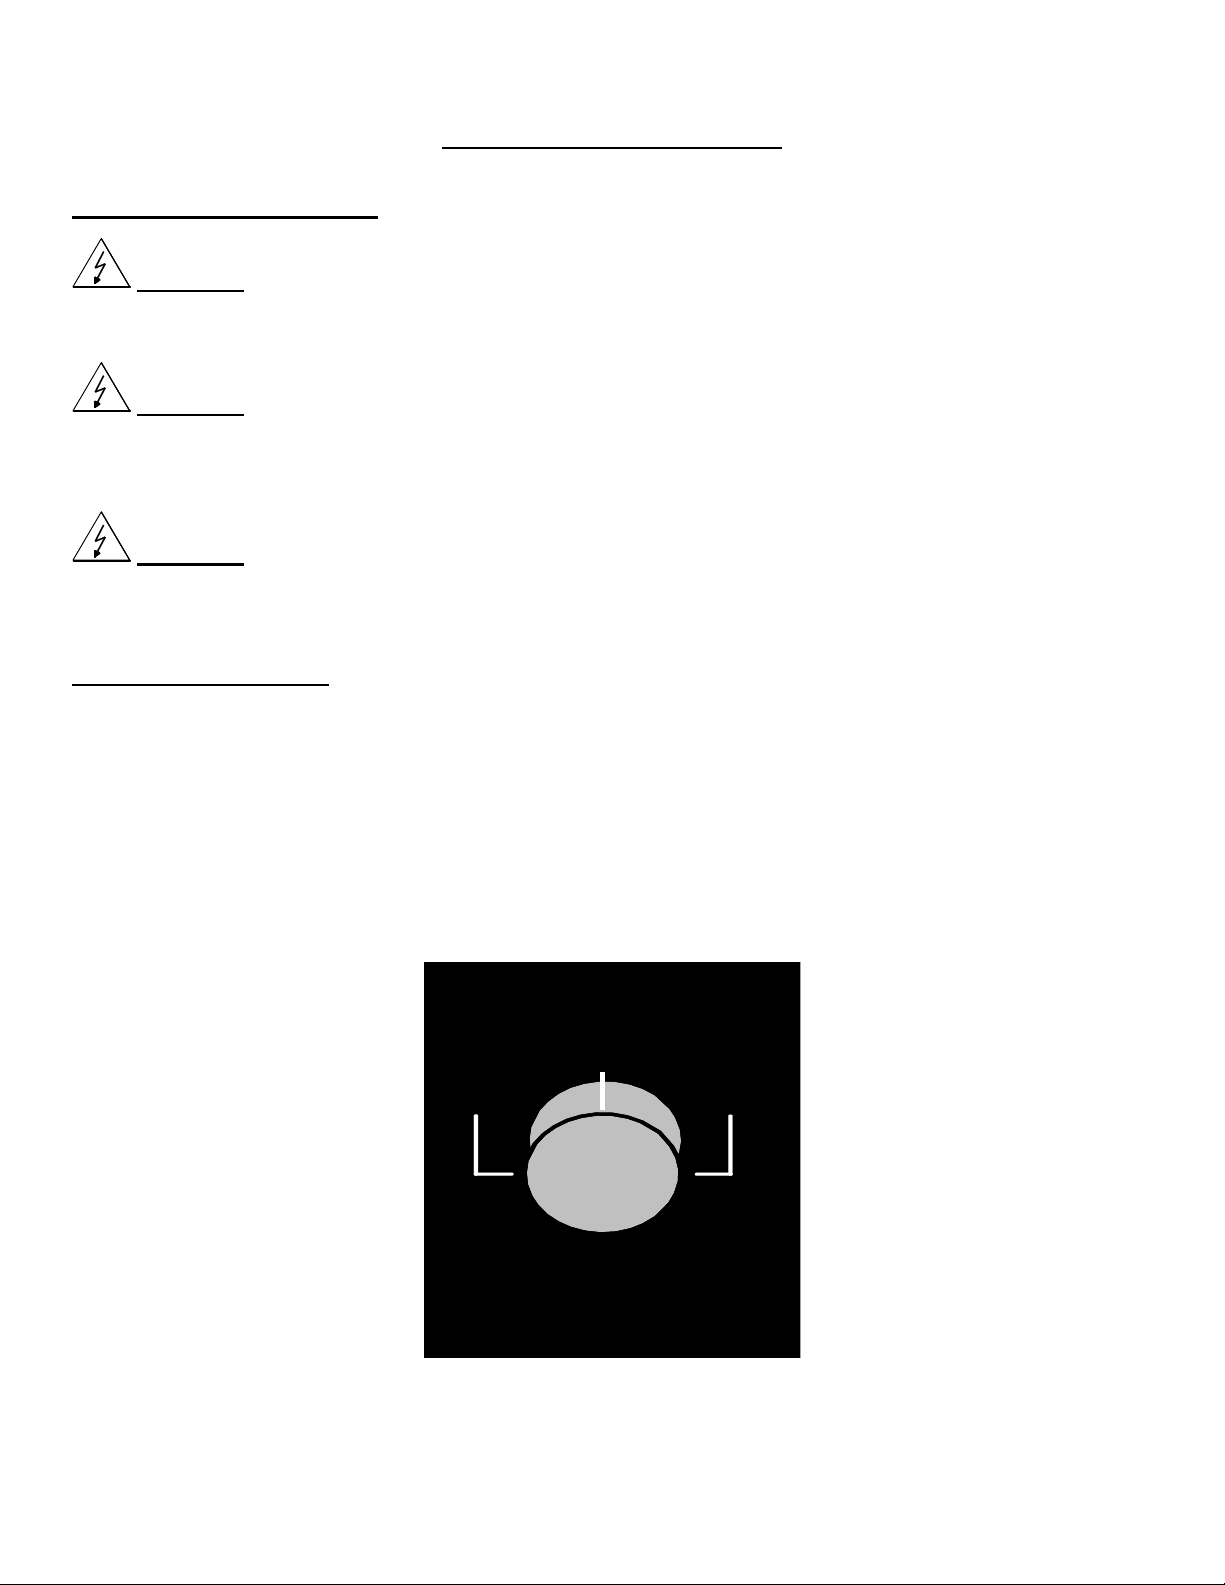
POWER SAVER SWITCH
Your Holman toaster is equipped with 2 rotary power saver switches.
FULL POWER-
OFF-ROTARY-
When in this position your unit is at Full Power and ready to use. Adjust the Conveyor
Belt Speed Control to your desired settings.
Two off positions are provided so that a single rotation in either direction will result in
the unit being turned OFF.
The standby position reduces the power to the unit to ¼, and therefore saves 75% of
STANDBY-
the energy consumption. In this position your unit will stay warm and reduce the
reheat time when switched to Full Power to 20 to 30 seconds.
STANDBY FULL HEAT
POWER/STANDBY
OFF
OFF
PATENTED
Page 4
OPERATOR’S MANUAL
HOLMAN CONVEYOR TOASTERS
MODELS DT14-PS AND DT14-TH
PAGE 4
COOKING PROCEDURES
A. BREAD TOASTING, TOP CONVEYOR ONLY.
1) Turn the Power Saver Switch for the top toasting chamber to FULL POWER.
2) Allow warm up time of 5 to 10 minutes. Test with product.
• If product is too light, turn conveyor speed control counterclockwise to a slower speed.
• If product is too dark, turn conveyor speed control clockwise to a faster speed.
B. BAGEL TOASTING (one-sided toasting).
1) Use the lower conveyor. Turn the power saver switch to FULL POWER. Set conveyor speed control
to 50. Follow the same instructions as above.
2) Test using a half of a bagel with the cut side up.
• If the bagel half is too light, turn the speed control counterclockwise to a slower speed.
• If the bagel half is too dark, turn conveyor speed control clockwise to a faster speed.
CLEANING PROCEDURES
A. CLEANING (DAILY)
1) Clean air intake on bottom of unit.
2) For lightly soiled conveyor belts, turn conveyor speed control to fastest setting and wipe with a
damp cloth. For heavily soiled conveyors, turn conveyor speed control to fastest setting and wipe
with a light abrasive pad.
3) Turn main power switch to the OFF position.
4) After the unit cools, remove interior crumb tray (as shown below) and clean. Slide crumb tray back
into position.
5) Wipe exterior surface of unit.
CRUMB TRAYS
RESET / HIGH LIMIT
COOLING FAN
DO NOT OPERATE UNIT WITHOUT CRUMB TRAY IN PLACE AS THIS CAUSES OVERHEATING IN THE
CONTROL BOX.
Page 5

OPERATOR’S MANUAL
HOLMAN CONVEYOR TOASTERS
MODELS DT14-PS AND DT14-TH
PAGE 5
NOTE: Lubrication of a drive chain with a graphite-based lubricant is required as periodic
maintenance. Call the Holman Cooking Equipment Factory Service Team at 1-800-807-9045 for details.
TROUBLESHOOTING GUIDE
A. UNIT WILL NOT HEAT, CONVEYOR BELT WILL NOT MOVE.
1) Make sure air intake on bottom of unit is clean.
2) Be sure the main circuit breaker is switched to the ON position.
3) Check to see if the toaster is plugged in and all controls are turned to theON position.
B. UNIT HAS HEAT ONLY ON ONE SIDE, CONVEYOR BELT TURNS PROPERLY.
1) Call the Holman Cooking Equipment Factory Service Team at 1-800-807-9054 as heating
element may need replacing.
C. CONVEYOR BELT DOES NOT TURN, UNIT HEATS PROPERLY.
To check for mechanical binding:
1) DISCONNECT UNIT FROM POWER SOURCE.
2) When conveyor belt has cooled, move the conveyor belt by hand to check for mechanical binding. If
conveyor moves freely, call the Holman Cooking Equipment Factory Service Team
at 1-800-807-9054 .
3) Remove the crumb tray(s) and check for obstructions in the conveyor belt.
4) If no obstructions are found, remove the three screws holding side panel in place (facing front of
unit, remove the left side panel to access the lower conveyor drive system and the right side panel
to access the upper conveyor drive system).
5) Check drive chain to make sure it is not jammed on the drive sprocket on the motor or the driven
sprocket on the drive shaft.
6) If the drive chain is not jammed and there are no obstructions to the conveyor belt, call the Holman
Cooking Equipment Factory Service Team at 1-800-807-9054 as the speed control or drive
motor may need servicing.
Page 6

Visit our Website at: www.star-mfg.com Email: service@star-mfg.com
This unit has been tested for proper operation before leaving our plant to insure delivery of your unit in perfect condition. However, there are instances in
which the unit may be damaged in transit. In the event you discover any type of damage to your product upon receipt, you must immediately contact the
transportation company who delivered the item to you and initiate your claim with same. If this procedure is not followed, it may affect the warranty status of
the unit.
All workmanship and material in Star products have a one (1) year limited warranty on parts & labor in the United States and Canada. Such warranty is limited
to the original purchaser only and shall be effective from the date the equipment is placed in service. Star's obligation under this warranty is limited to the repair
of defects without charge, by the factory authorized service agency or one of its sub-agencies. Models that are considered portable (see below) should be taken
to the closest Star service agency, transportation prepaid.
THOROUGHLY INSPECT YOUR UNIT ON ARRIVAL
LIMITED EQUIPMENT WARRANTY
> Star will not assume any responsibility for loss of revenue.
> On all shipments outside the United States and Canada, see International Warranty.
* The warranty period for the JetStar six (6) ounce & Super JetStar eight (8) ounce series popcorn machines is two (2) years.
* The warranty period for the Chrome-Max Griddles is fi ve (5) years on the griddle surface. See detailed warranty provided with unit.
* The warranty period for Tefl on/Dura-Tec coatings is one year under normal use and reasonable care. This warranty does not apply if damage occurs to
Tefl on/Dura-Tec coatings from improper cleaning, maintenance, use of metallic utensils, or abrasive cleaners, abrasive pads, product identifi ers and
point-of-sale attachments, or any other non-food object tha comes in continuous contact with the roller coating. This warranty does not apply to the
“non-stick” properties of such materials.
> This warranty does not apply to "Special Products" but to regular catalog items only. Star's warranty on "Special Products" is six (6) months on parts
and ninety (90) days on labor.
> This warranty does not apply to any item that is disassembled or tampered with for any purpose other than repair by a Star Authorized Service Center or
the Service Center's sub-agency.
> This warranty does not apply if damage occurs from improper installation, misuse, wrong voltage, wrong gas or operated contrary to the Installation and
Operating instructions.
> This warranty is not valid on Conveyor Ovens unless a "start-up/check-out" has been performed by a Factory Authorized Technician.
Parts that are sold to repair out of warranty equipment are warranted for ninety (90) days. The part only is warranted. Labor to replace the part is chargeable to
the customer.
1. Travel time and mileage rendered beyond the 50 mile radius limit
2. Mileage and travel time on portable equipment (see below)
3. Labor to replace such items that can be replaced easily during a daily cleaning
routine, ie; removable kettles on fryers, knobs, grease drawers on griddles, etc.
4. Installation of equipment
5. Damages due to improper installation
6. Damages from abuse or misuse
7. Operated contrary to the Operating and Installation Instructions
8. Cleaning of equipment
9. Seasoning of griddle plates
Star will not honor service bills that include travel time and mileage charges for servicing any products considered "Portable" including items listed below.
These products should be taken to the Service Agency for repair:
* The Model 510FD Fryer.
* The Model 526TOA Toaster Oven.
* The Model J4R, 4 oz. Popcorn Machine.
* The Model 518CMA & 526CMA Cheese Melter.
* The Model 12MC & 15MC & 18MCP Hot Food Merchandisers.
* The Model 12NCPW & 15NCPW Nacho Chip/Popcorn Warmer.
* All Hot Dog Equipment except Roller Grills & Drawer Bun Warmers.
* All Nacho Cheese Warmers except Model 11WLA Series Nacho Cheese Warmer.
* All Condiment Dispensers except the Model HPD & SPD Series Dispenser.
* All Specialty Food Warmers except Model 130R, 11RW Series, and 11WSA Series.
* All QCS/RCS Series Toasters except Model QCS3 & RCS3 Series.
SERVICES NOT COVERED BY WARRANTY
PARTS WARRANTY
10. Voltage conversions
11. Gas conversions
12. Pilot light adjustment
13. Miscellaneous adjustments
14. Thermostat calibration and by-pass adjustment
15. Resetting of circuit breakers or safety controls or reset buttons
16. Replacement of bulbs
17. Replacement of fuses
18. Repair of damage created during transit, delivery, &
installation OR created by acts of God
PORTABLE EQUIPMENT
ALL:
* Pop-Up Toasters
* Butter Dispensers
* Pretzel Merchandisers
(Model 16PD-A Only)
* Pastry Display Cabinets
* Nacho Chip Merchandisers
* Accessories of any kind
* Sneeze Guards
* Pizza Ovens
(Model PO12 Only)
* Heat Lamps
* Pumps-Manual
The foregoing warranty is in lieu of any and all other warranties expressed or implied and constitutes the entire warranty.
FOR ASSISTANCE
Should you need any assistance regarding the Operation or Maintenance of any Star equipment; write, phone, fax or email our Service Department.
In all correspondence mention the Model number and the Serial number of your unit, and the voltage or type of gas you are using.
Part# 2M-4497-2 12/06 RMS
Page 7

OPERATOR’S MANUAL
HOLMAN CONVEYOR TOASTERS
MODELS DT14-PS AND DT14-TH
PARTS LIST
PART NO.
HM-100805 TOP COVER 1 HM-100316 CONTROL BOX COVER 1
HEATER TUBES – SEE HEATER TUBE PART LIST 2R-200562 FAN GRILL 1
HM-401543 RETAINER, HEATER TUBES 4 2A-202905 IDLER SHAFT 2
HM-160004 CONVEYOR BELT 2 HM-100543 CRUMB TRAY 2
HM-100999 BACK PANEL 1 HM-400899 HEAT SHUTTER 1
HMDT0002 SIDE PANEL, RIGHT 1 HM-401089 GUARD, EXTENSION 2
HMDT0001 SIDE PANEL, LEFT 1 HM-401022 TOAST CHUTE 1
DRIVE CHAIN (13½”)
ZZ-150022
2P-150033 DRIVE CHAIN (23½”) UPPER 1 2R-200703 KNOB, SPEED CONTROL 2
2P-200645 SPROCKET, DRIVE MOTOR 2 2P-200700 BEARING, EXTENSION 4
2P-200643 SPROCKET, DRIVE SHAFT 2 2R-200709 LEG, 1” 4
2A-202902 DRIVE SHAFT ASSEMBLY 2 2E-200566
HA-112261 REAR BEARING 4 2E-200551 POWER SAVER SWITCH 2
2U-200509 DRIVE MOTOR, (LOWER) 1 2R-200703 KNOB, POWER SAVER 2
2U-200504 DRIVE MOTOR, (UPPER) 1 2E-200574 FAN SWITCH 1
2U-200577 FAN MOTOR 1 2E-Z10865 PLUG/CORDSET 50A
2E-Z5680 Fuse, 5A - Class G 4 2E-Z5681 Fuseholder 2
LOWER 1 SP-118042 SPEED CONTROL 2
DESCRIPTION QTY.
Fuses Added October 2007
PART NO.
DESCRIPTION QTY.
HIGH LIMIT REST
SWITCH 1
HEATER TUBE PART LIST
PART NO. DESCRIPTION QTY.
HM-198038
HM-198039
HM-198069
HM-198070
HEATER TUBE QUARTZ, UPPER CHAMBER, 208V
HEATER TUBE QUARTZ, LOWER CHAMBER, 208V
HEATER TUBE QUARTZ, UPPER CHAMBER, 240V
HEATER TUBE QUARTZ, LOWER CHAMBER, 240V
PAGE 6
1
6
4
6
4
Page 8

WIRING DIAGRAM DT14-PS
TOP
POWER
SAVER
2
1
4
3
TOP
DRIVE
MOTOR
RESET
L1
L2
GRND
OPERATOR’S MANUAL
HOLMAN CONVEYOR TOASTERS
MODELS DT14-PS AND DT14-TH
UPPER DECK-TOP HEAT
UPPER DECK
LOWER DECK
2
1
4
3
LOWER
POWER
SAVER
-LOWER HEAT
-TOP HEAT
TOP SPEED
CONTROL
FAN SWITCH
LOWER SPEED
CONTROL
LOWER
MOTOR
PAGE 7
DRIVE
RESET
FAN CORD
PLUG
Page 9

WIRING DIAGRAM DT14-TH
OPERATOR’S MANUAL
HOLMAN CONVEYOR TOASTERS
MODELS DT14-PS AND DT14-TH
PAGE 8
*Includes Attached Cordset
Page 10

135614
UPPER DECK TOP HEAT
135616
TOP
POWER
SAVER
WHT
BLU
ORG
YEL
BLK
WHT
TOP
DRIVE
MOTOR
2
1
3
4
WHT
135613
WHT
BLK
BLK
BLK
ORG
ORG
BLU
PUR
RESET
WHT
BLK
BLK
135615
L1
BLK
L2
WHT
GRN
UPPER DECK BOT. HEAT
LOWER DECK TOP HEAT
2
1
3
4
WHT
LOWER
POWER
SAVER
FAN SWI TC H
BLK
WHT
BLK
TOP SPEED
CONTROL
WHT
BLK
WHT
135612
LOWER
SPEED
CONTROL
BLK
WHT
BLK
YEL
BLK
BLK
LOWER
DRIVE
MOTOR
BLK
WHT
RESET
PUR
RED
BLK
FAN CORD
PLUG
CORDSET PN 2E-Z10865
GRND
THIS DRAWING CONTAINS INFORMATION CONFIDENTIAL TO STAR MFG. INT'L. INC.
NO REPRODUCTION OR DISCLOSURE OF ITS CONTENTS IS PERMITTED.
MODEL:
DT14TH w/FUSES
STAR MANUFACTURING INTERNATIONAL INC.
SK2301 Rev - 8-3-2007
Page 11

Page 12

STAR MANUFACTURING
10 Sunnen Drive, St. Louis, MO 63143 U.S.A.
(800) 807-9054 (314) 781-2777
Parts & Service (800) 807-9054
www.star-mfg.com
 Loading...