

LP Phono CD Recorder
Installation and User’s Manual
Item Number: 62904150
SKU# 01366
* Important Notice: Please read this manual carefully
All brand names and trademarks are the property of their respective owners

Contents
Overview.............................................................................................................................................3
Quick Start Guide........................................................................................................ ....................3-4
Music System Controls Identification ........................................................................................5-10
Operating Instructions...............................................................................................................11-18
Using the Remote Control .........................................................................................................19-22
Recording CDs............................................................................................................................23-29
Specifications ..................................................................................................................................30
Troubleshooting...............................................................................................................................31
Records, Stylus, CD’s ..................................................................... .... .... .... ....... .... .... ........ ........32-34
Important Safety Instructions/Precautions....................... ..................................................... 35--36
Customer Service........................................................................ ....................................................37
Warranty ....................................................... ................................................ ....................................38
2
Overview
• This All-in-One Music System enables you to enjoy your favorite albums and cassettes and record
them onto CD’s.
• This unique music system offers you the options of playing music from various sources such as Vinyl
Records, CD’s, AM/FM Radio and Cassette Tapes.
• The CD recording system allows you to record from various music sources giving you the options of
recording your favorite records, cassettes and audio pr ograms from auxiliary sources that can be
connected to the CD recorder via stereo input cables.
• A full function remote control let’s you control the unit from the comfort of your easy chair.
Quick Start Guide
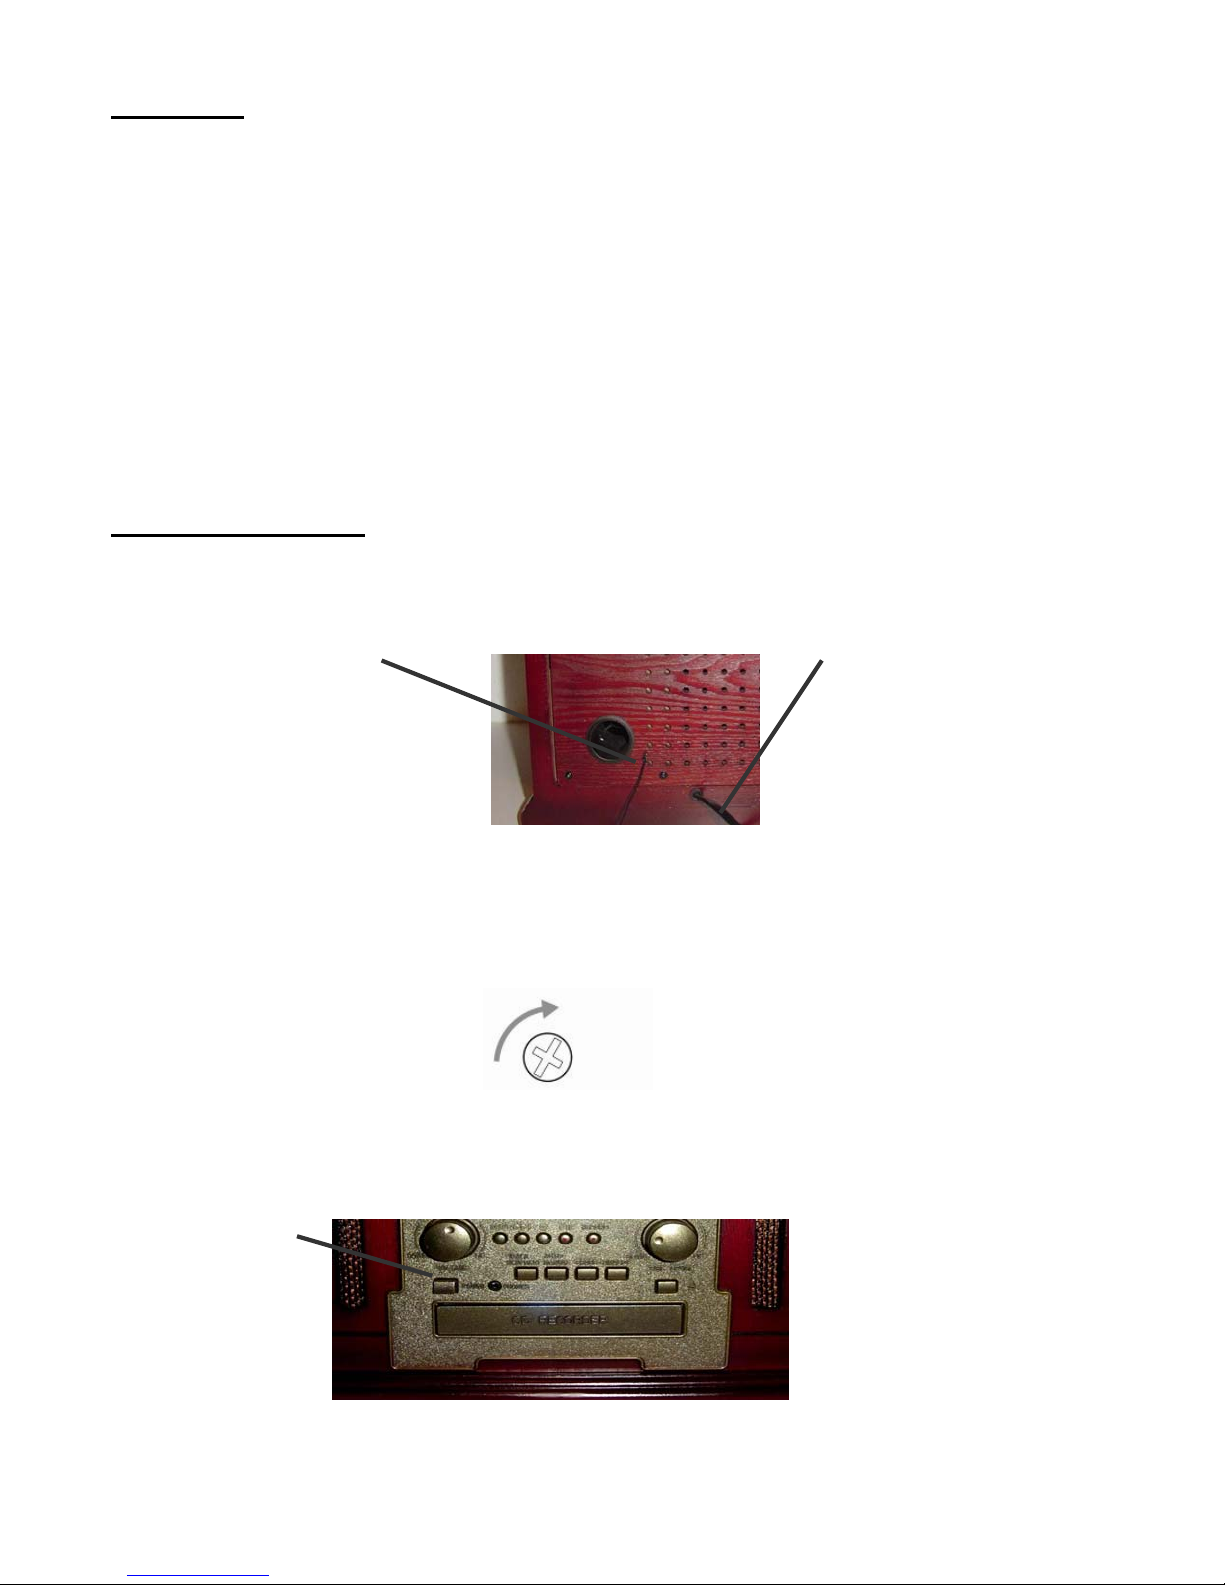
1. Unwrap the FM antenna wire located in the back of the unit and extend the cable for best reception.
Locate the power cord and plug the unit into a standard AC power outlet.
FM Antenna Power Cord
2. Open the lid to the turntable. Loosen the shock absorbing tension screw at the top of the turntable to
allow for the turntable suspension to absorb any shock. Remove the tie wrap holding the tone arm
secure. Remove the cover over the stylus needle. Set the turntable to the correct speed for the record
you will be playing.
3. Press the Power button located on the front of the unit to turn the unit On.
Power Button
3
Quick Start Guide
5. Press the selector buttons located on the bottom of the front panel to choose to listen to Phono, CD,
Cassette Tape, AM / FM Radio and AUX.
AUX PHONO FM-AM CD TAPE
To record from a Phono Record or Cassette please read the following steps:
1. Insert a blank CD into the CD tray.
2. On the Dis play you sh ould see the "NO TOC CD-R (or CD-RW)" indicator go on.
3. Place a Record on the turntable and place the needle on the Record, or insert the Cassette into the
tape deck. (Note: make sure the record speed selector is set to the proper RPM).
4. Press the PHONO or TAPE button depending upon the music source.
5. Press the RECORD button on the unit (you'll now see REC on the Display).
(Note: If you wish to adjust the track increment manual, you may now press the TRACK INCREMENT
button, otherwise you’ll see the AUTO TRACK indicator on the display. This will change the tracks
automatically for you.)
6. Press the PLAY/PAUSE button (the remote control is recommended), you should now see the Play
symbol (triangle shape) underneath REC on the Display.
(Note: If you wish to pause the recording to record the other side of the Phono record or Cassette, press
the PLAY/PAUSE button during the recording, and you will see the “II” symbol underneath the “REC”
indicator on the display. (Then repeat Step 6 to continue the recording).
7. Press the STOP button when you are done recording.
8. Press the FINALIZE button to Finalize the CD. (Note: The Busy message should appear on the
screen after you press FINALIZE, if you do not see the “FIn-d” message on the screen, please open and
close the CD tray.)
9. Once the message is no longer on the screen then press the Play/Pause button.
10. Once the "NO TOC CD-R (or CD-RW)" indicator turns off, the CD is now finalized.
At this point you may now play the CD on any CD player.
4
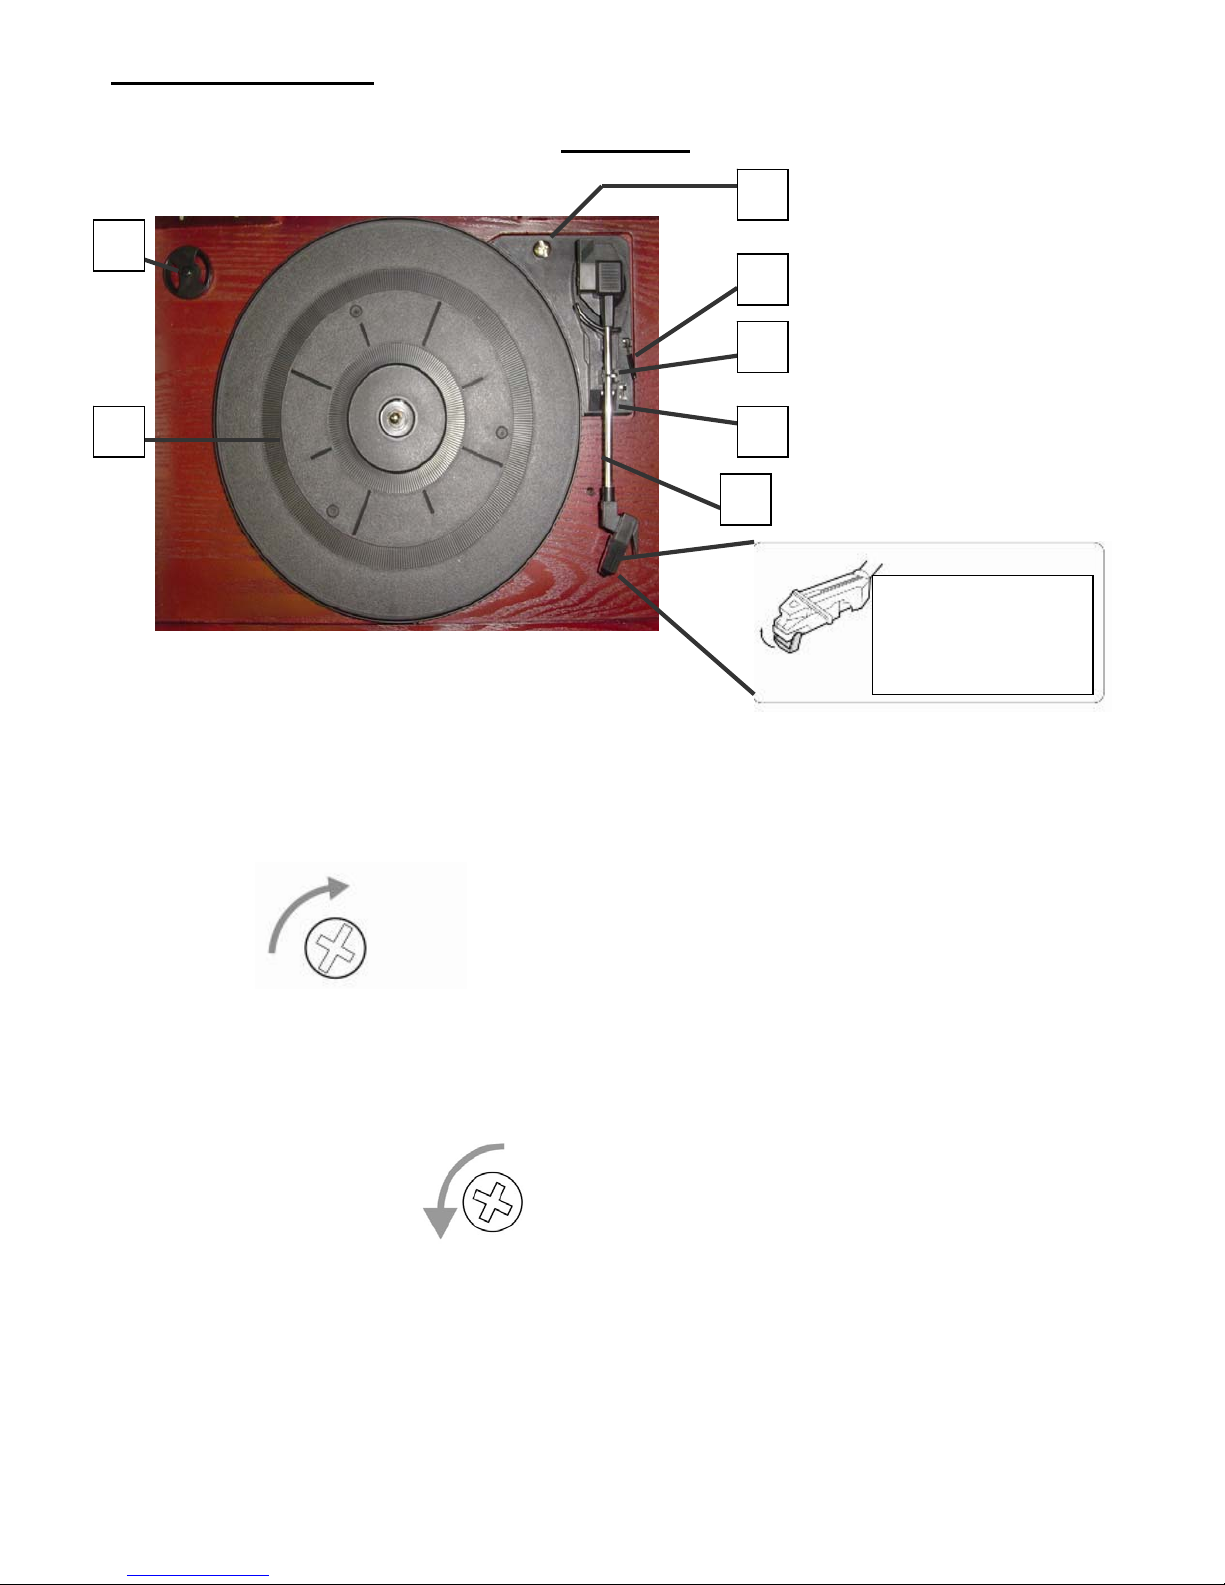
Turntable Diagram
2
1
1) Tu rnt ab le Platt er.
2) 45 RPM adaptor.
3) Shock absorbing tension screw.
Top View
3
4
5
6
7
Before use, slide off
the stylus protector
(white colored plastic
When you transport the unit, turn the screw clockwise to secure the turntable.
Before use, completely loosen the screw by turning it counterclockwise with a coin or screwdriver. The
platter will now absorb vibration and allow the tone arm and rec ord to play correctly.
4) Cue-lever -> Use this lever to lift the tone arm.
5) Tone arm Support and clamp.
6) Speed selector.
7) Tone arm.
5
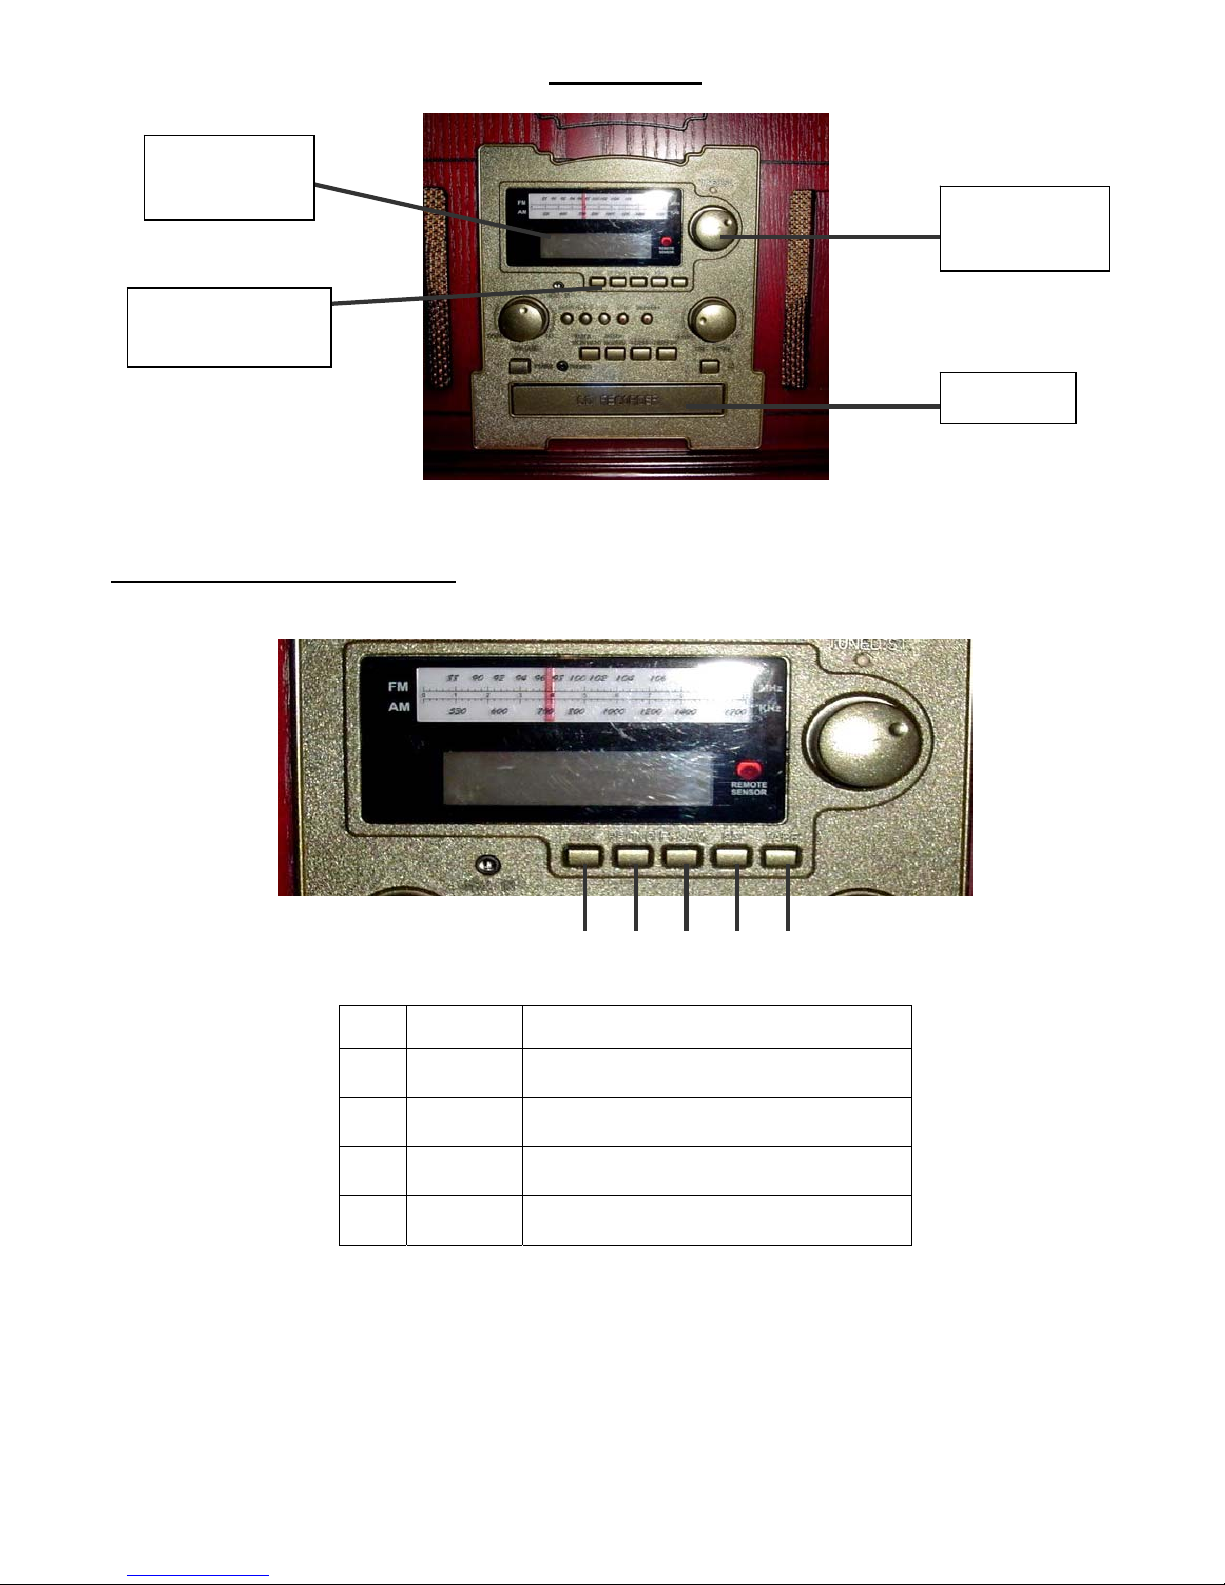
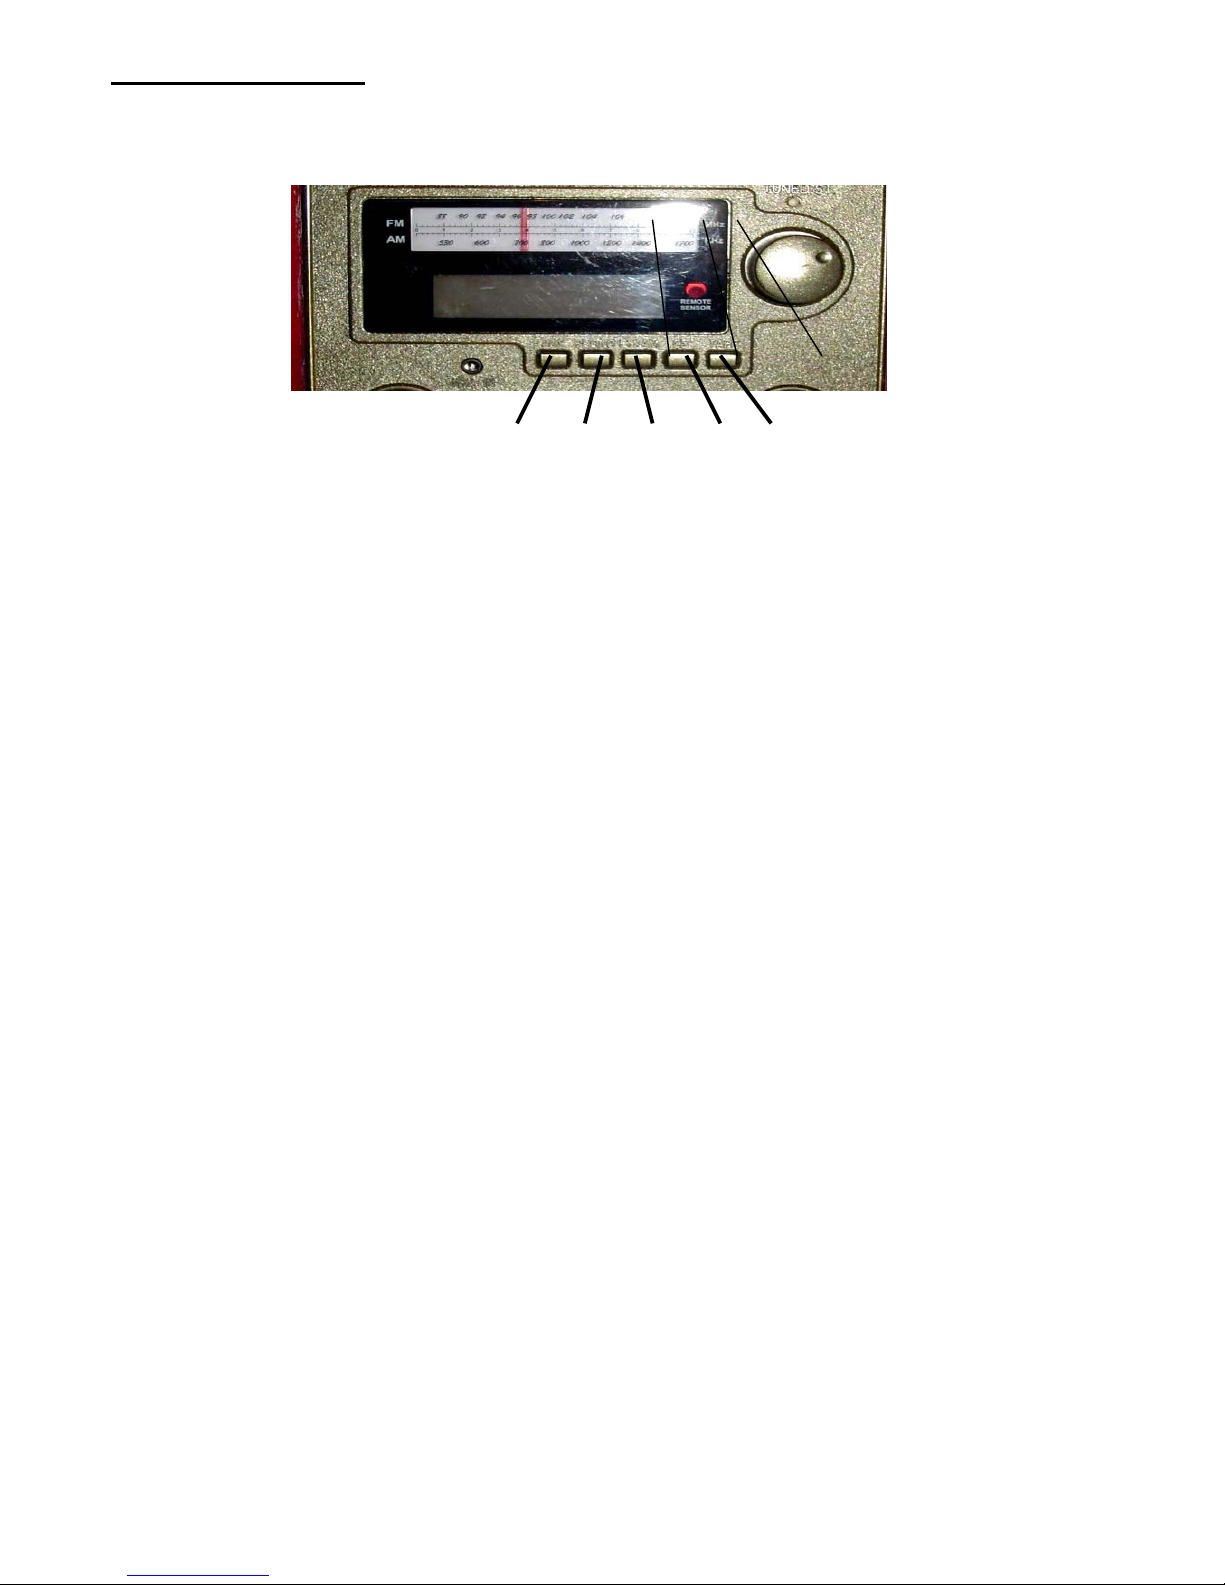
LED CD Track
Indicator
Music Source
Selection Buttons
Music Source Selection Buttons
your music source will play from.
Front View
AM / FM
Radio Dial
CD Drawer
---Push one of the five selection buttons in order to determine where
1 2 3 4 5
1 AUX Set the Music Source to AUX Inputs.
2 PHONO Set the Music Source to PHONO.
3 FM-AM Set the Music Source to FM/AM Radio.
4 CD Set the Music Source to CD.
5 TAPE Set the Music Source to TAPE.
6
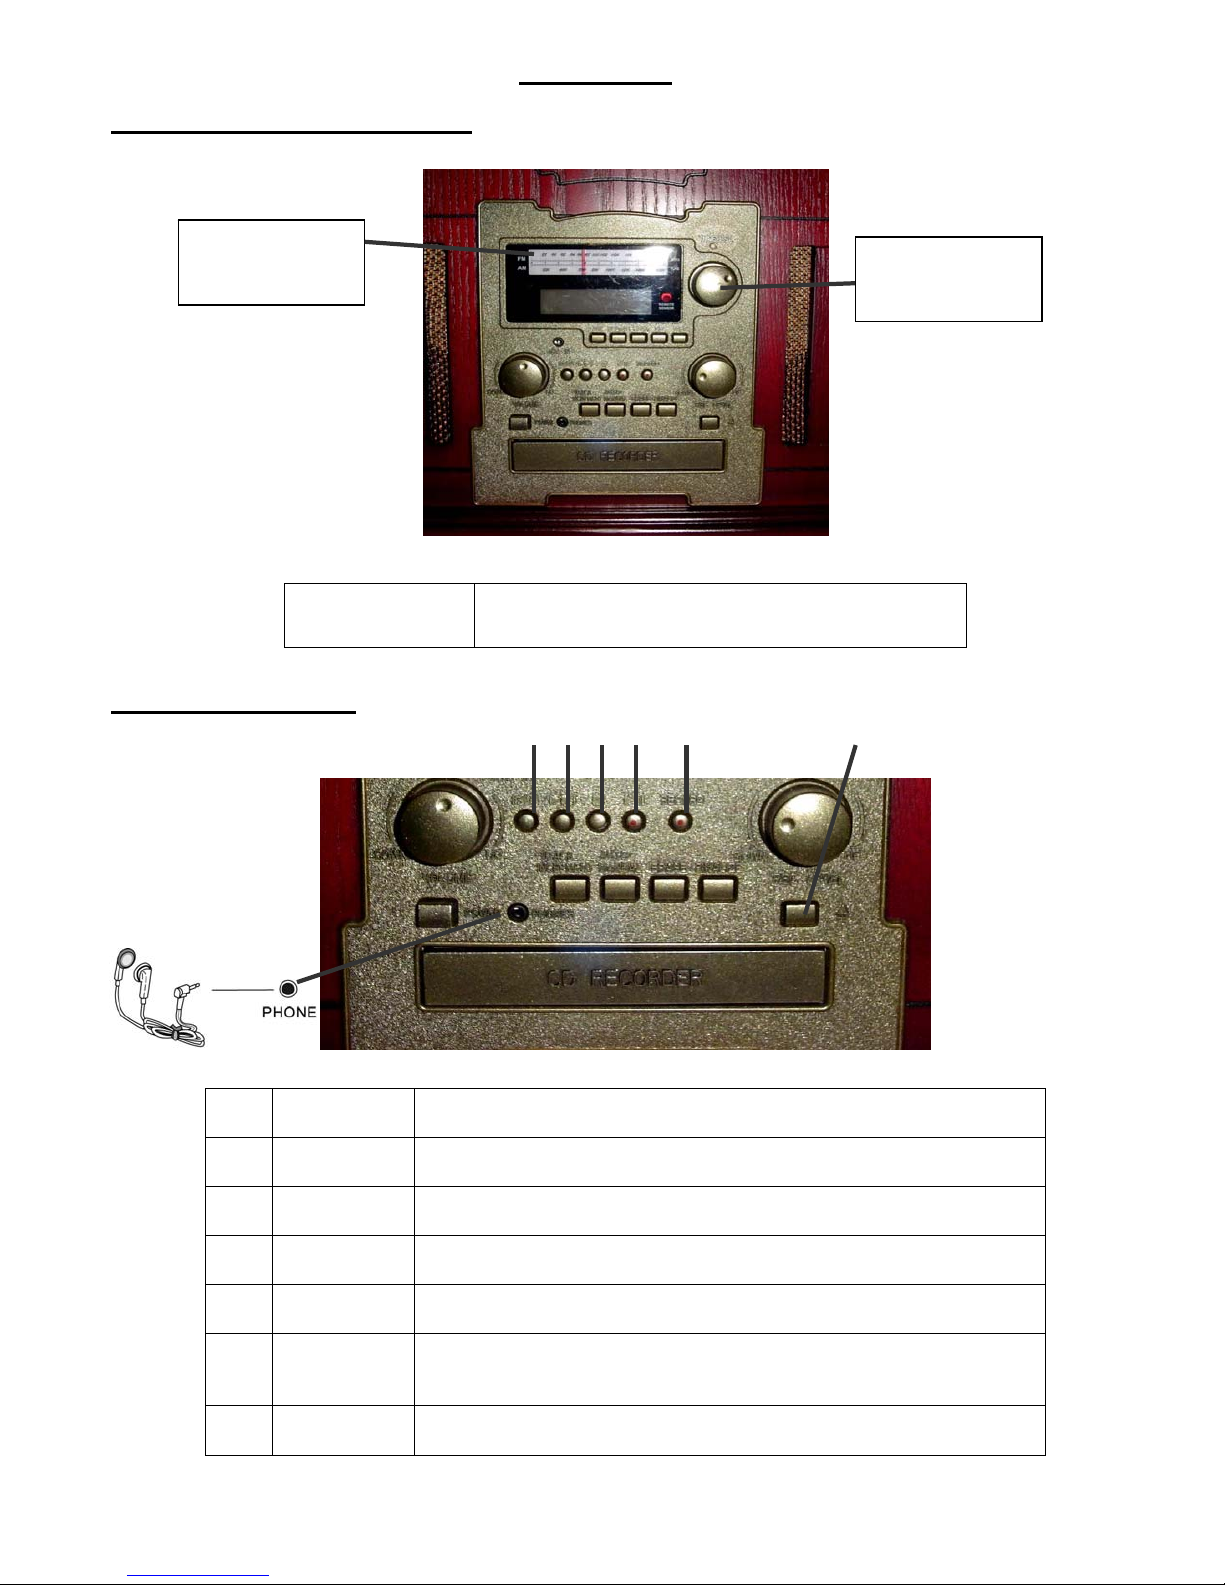
FM-AM Radio Control Button
Front View
AM / FM
Radio Dial
Radio Tuning
CD Control Buttons
Knob
Radio Tuning
Knob
Rotate this knob to select the AM or FM radio station
you choose to listen to.
1 2 3 4 5 6
1
2
3 STOP Stops the CD mechanism from playing.
4
5 RECORD Press this button to activate the Recording function.
6
7 EARPHONE
FAST
REVERSE
FAST
FORWARD
PLAY /
PAUSE
OPEN /
CLOSE
By pressing this button the CD player will go back and play the
previous song or track.
By pressing this button the CD player will advance to the next song or
track on the CD.
Press this button to play the CD in the drawer. Press this button a
second time to pause the CD.
Opens the CD drawer to allow you to insert or remove a CD. Insert
your CD with the label facing up into the drawer. Press the button
again to close the CD drawer.
You may use this jack to plug in earbuds or headphones to listen to
your music privately. (External speakers will turn off.)
7
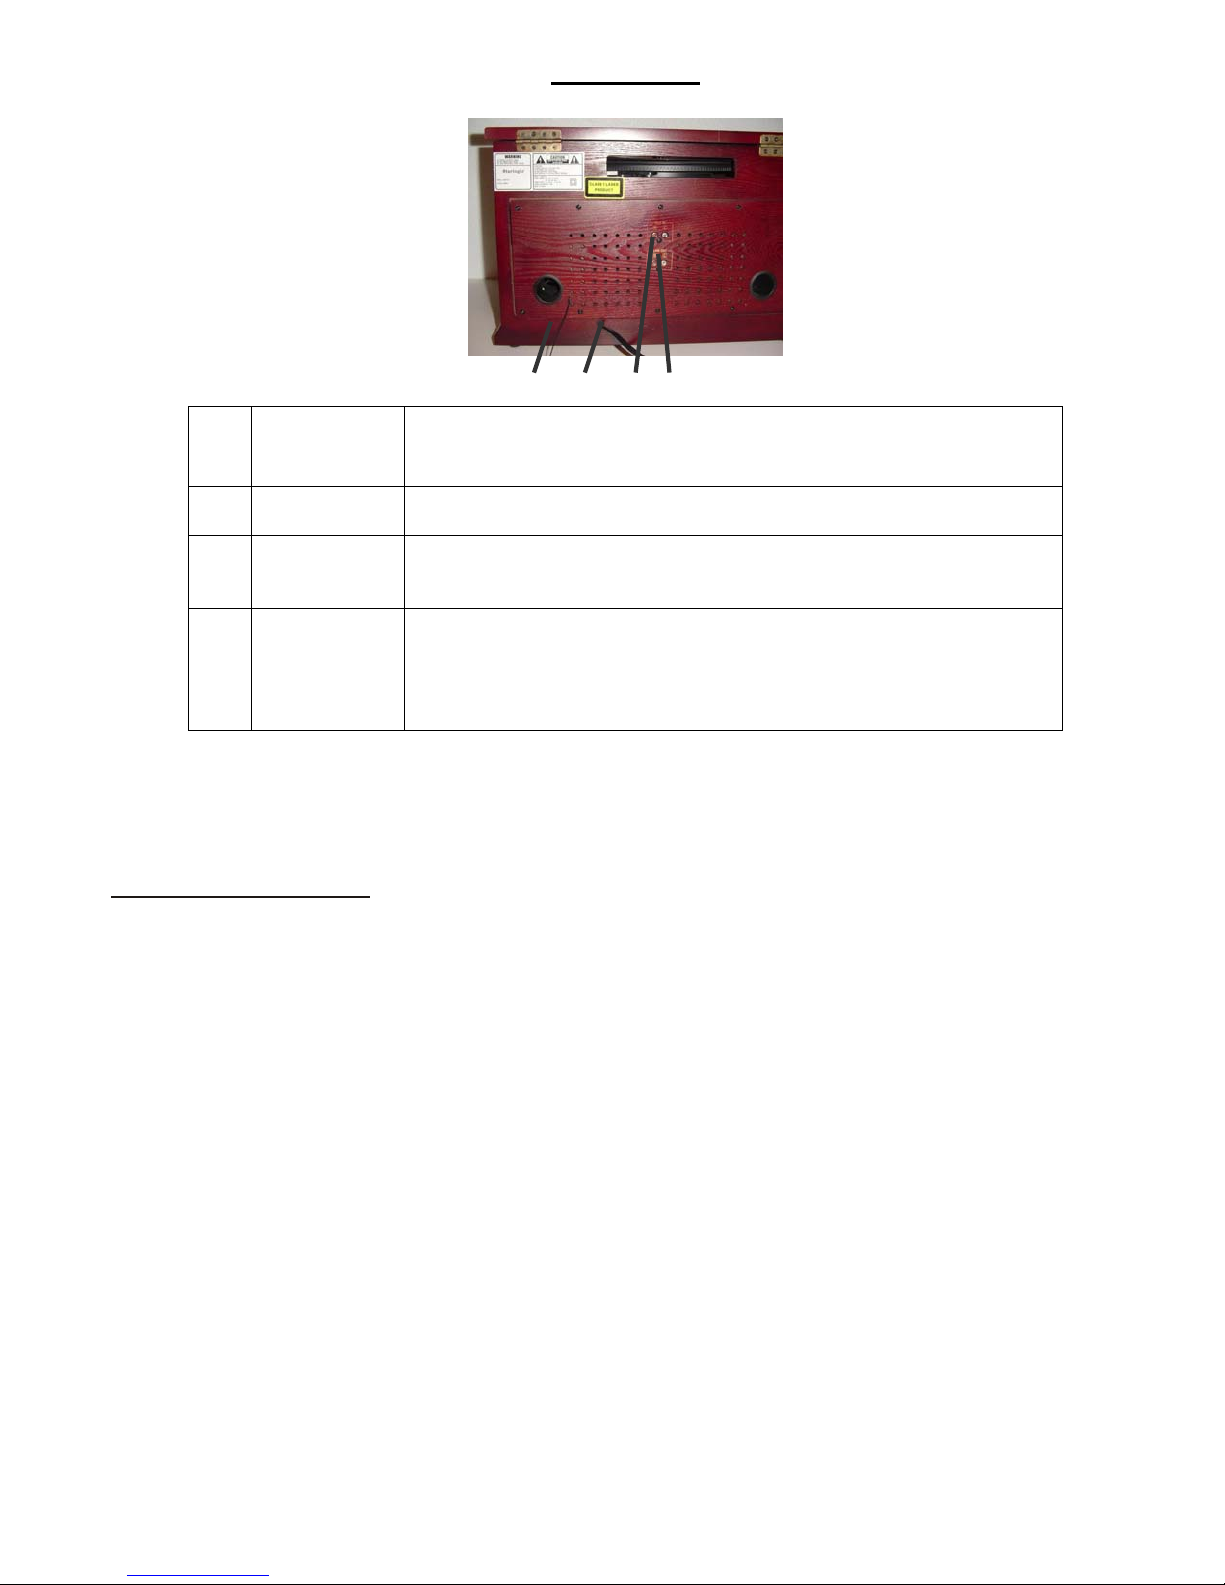
Back View
1 2 3 4
FM Antenna
1
AC Power Cord Plug the power cord into an AC wall socket.
2
AUX In Jacks
3
4
Line Out
While in FM mode, tune in an FM station and extend the antenna lead
to find the best position for the reception. This antenna may need to be
repositioned if you move your unit to a new location.
You can connect a CD player, cassette tape deck, etc. to this unit.
Connect the component with RCA Type cables. Make sure to connect
the white and red color jacks accordingly.
You can connect the sound output of your Phono CD Recorder to the
auxiliary input of your home entertainment receiver or other music
systems.
AUX Input Operation
An external (auxiliary) audio source (i.e. personal CD player / MP3 player / Cassette Deck) can be
connected to this unit and enjoyed through the speakers on this system and recorded to a CD.
- Plug the stere o cables (included) into the AUX IN socket on the back of the unit.
- Plug the other end of the cable into the headphone or Line Out socket of the external source.
- Once the aux cables are plugged in, it will override all oth er functions. You should remove the auxiliary
cable to resume normal operation of the unit.
- You may use the Aux Input located at the front of the unit to connect small hand held audio devices
such as MP3 or CD player via a phono jack cable connection (cable included).
8
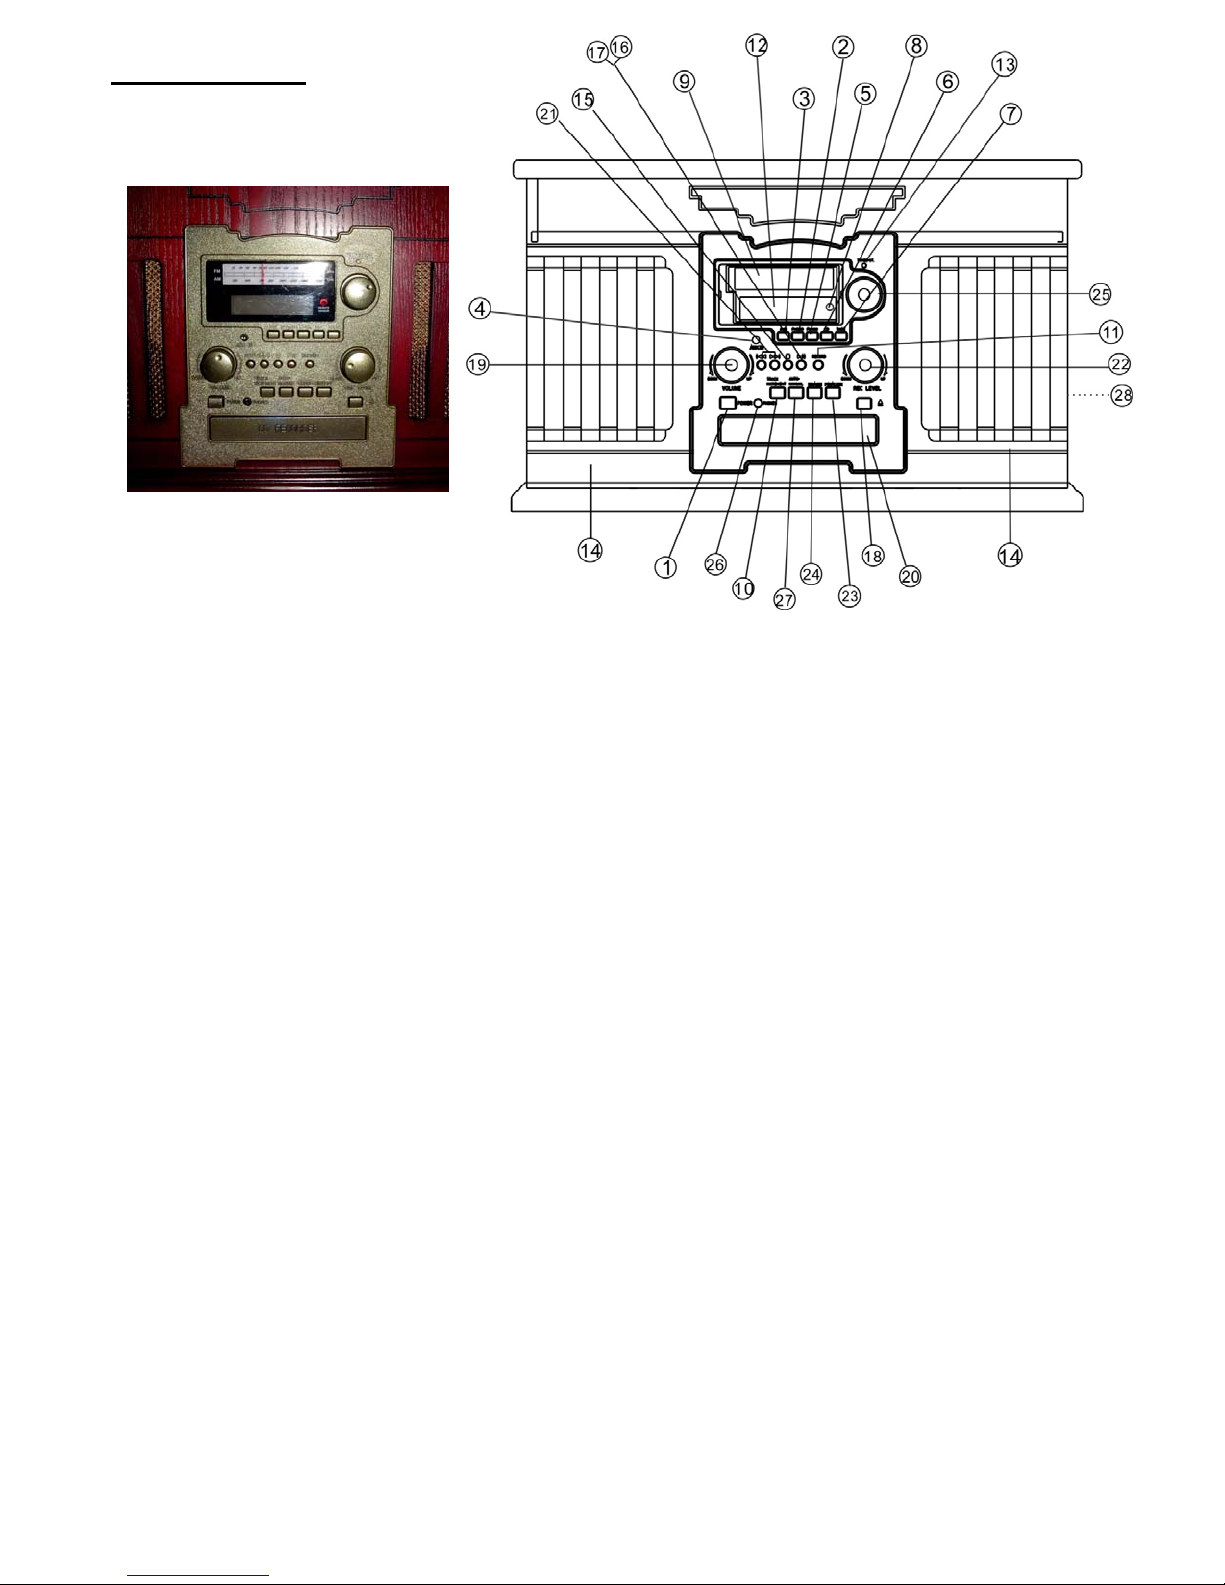
Control Panel
1. POWER
2. PHONO
3. AUX
4. AUX IN Jack
5. FM/AM
6. CD
7. TAPE
8. REMOTE SENSOR
9. AM/FM RADIO DIAL
10. TRACK INCREMENT
11. RECORD
12. LED DISPLAY
13. RADIO TUNING STEREO INDICATOR
14. SPEAKERS (STEREO)
15. STOP PLAYBACK/RECORD
16. PLAY
17. PAUSE
18. OPEN/CLOSE CD TRAY
19. VOLUME
20. DISC TRAY
21. MUSIC SKIP
22. RECORD LEVEL
23. FINALIZE/UNFINALIZE
24. ERASE
25. RADIO STATION TUNING
26. HEADPHONE OUT JACK
27. MANUAL / AUTO REC
28. CASSETTE EJECT
9
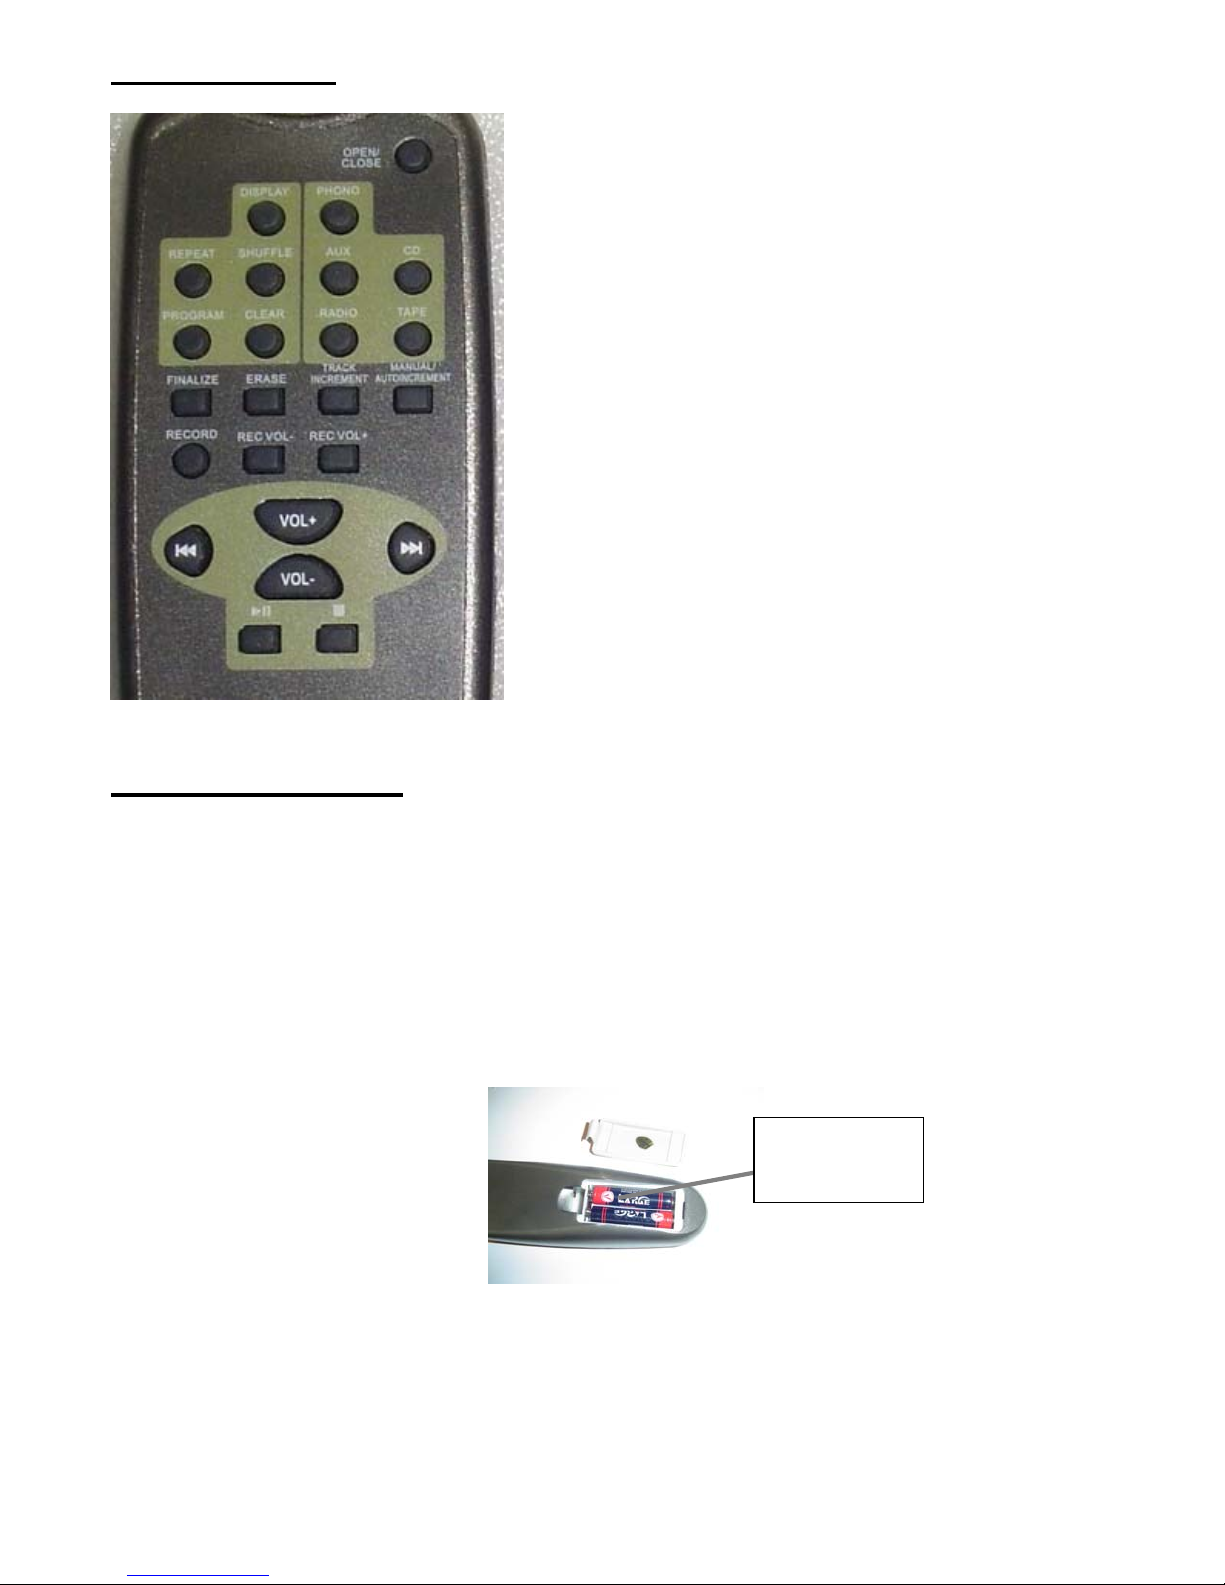
Remote Control
1. OPEN / CLOSE TRAY
2. DISPLAY
3. PHONO
4. REPEAT
5. SHUFFLE
6. AUX
7. CD
8. PROGRAM
9. CLEAR
10. RADIO
11. TAPE
12. FINALIZE
13. ERASE
14. TRACK INCREMENT
15. MANUAL / AUTO INCREMENT
16. RECORD
17. REC VOL -
18. REC VOL +
19. PREVIOUS
20. VOL +
21. VOL -
22. NEXT
23. PLAY / PAUSE
24. STOP
Remote Control Unit
When operating the remote control unit, point it towards the front panel of the unit.
Remote control operat ion may be interrupted if there are any obstacles between the un it and the
remote control.
If the remote control unit is operated near other appliances which generate infrared rays, or if other
remote control devices using infrared rays are used near the unit, it may oper ate incorrectly.
Battery Installation
Battery
Compartment
1. Remove the battery compartment cover.
2. Insert two “AAA” batteries. Make sure that the batteries are inserted with their positive “+” and “-”
poles positioned correctly.
3. Close the cover.
10
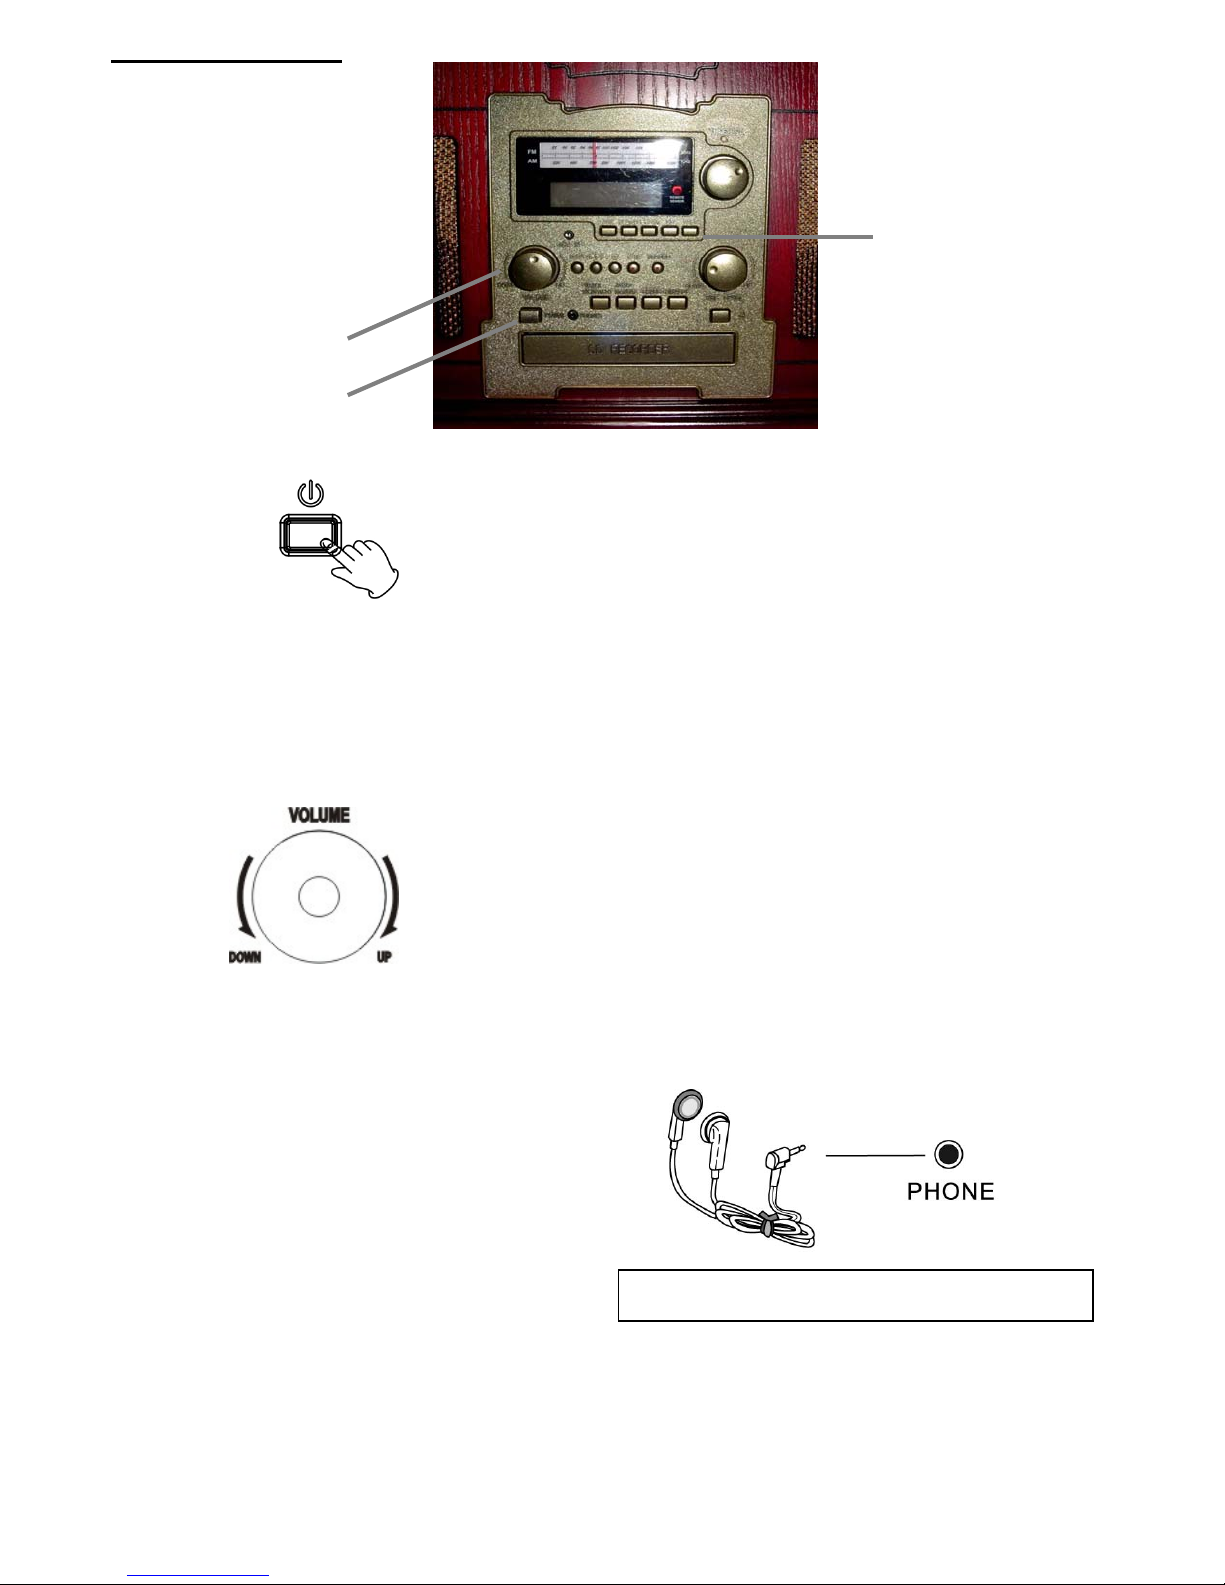
Basic Operation
2
3
1
1. Press the POWER switch to turn the unit on.
2. Select the music source by pressing the corresponding button.
AUX PHONO FM-AM CD TAPE
3. Rotate the VOLUME knob clockwise or counterclockwise to turn the radio on and adjust to desired
sound level.
Listening through Earphones / Headphones (not included).
Plug earphones into the phones out jack.
The Sound to external speakers is shut off.
11
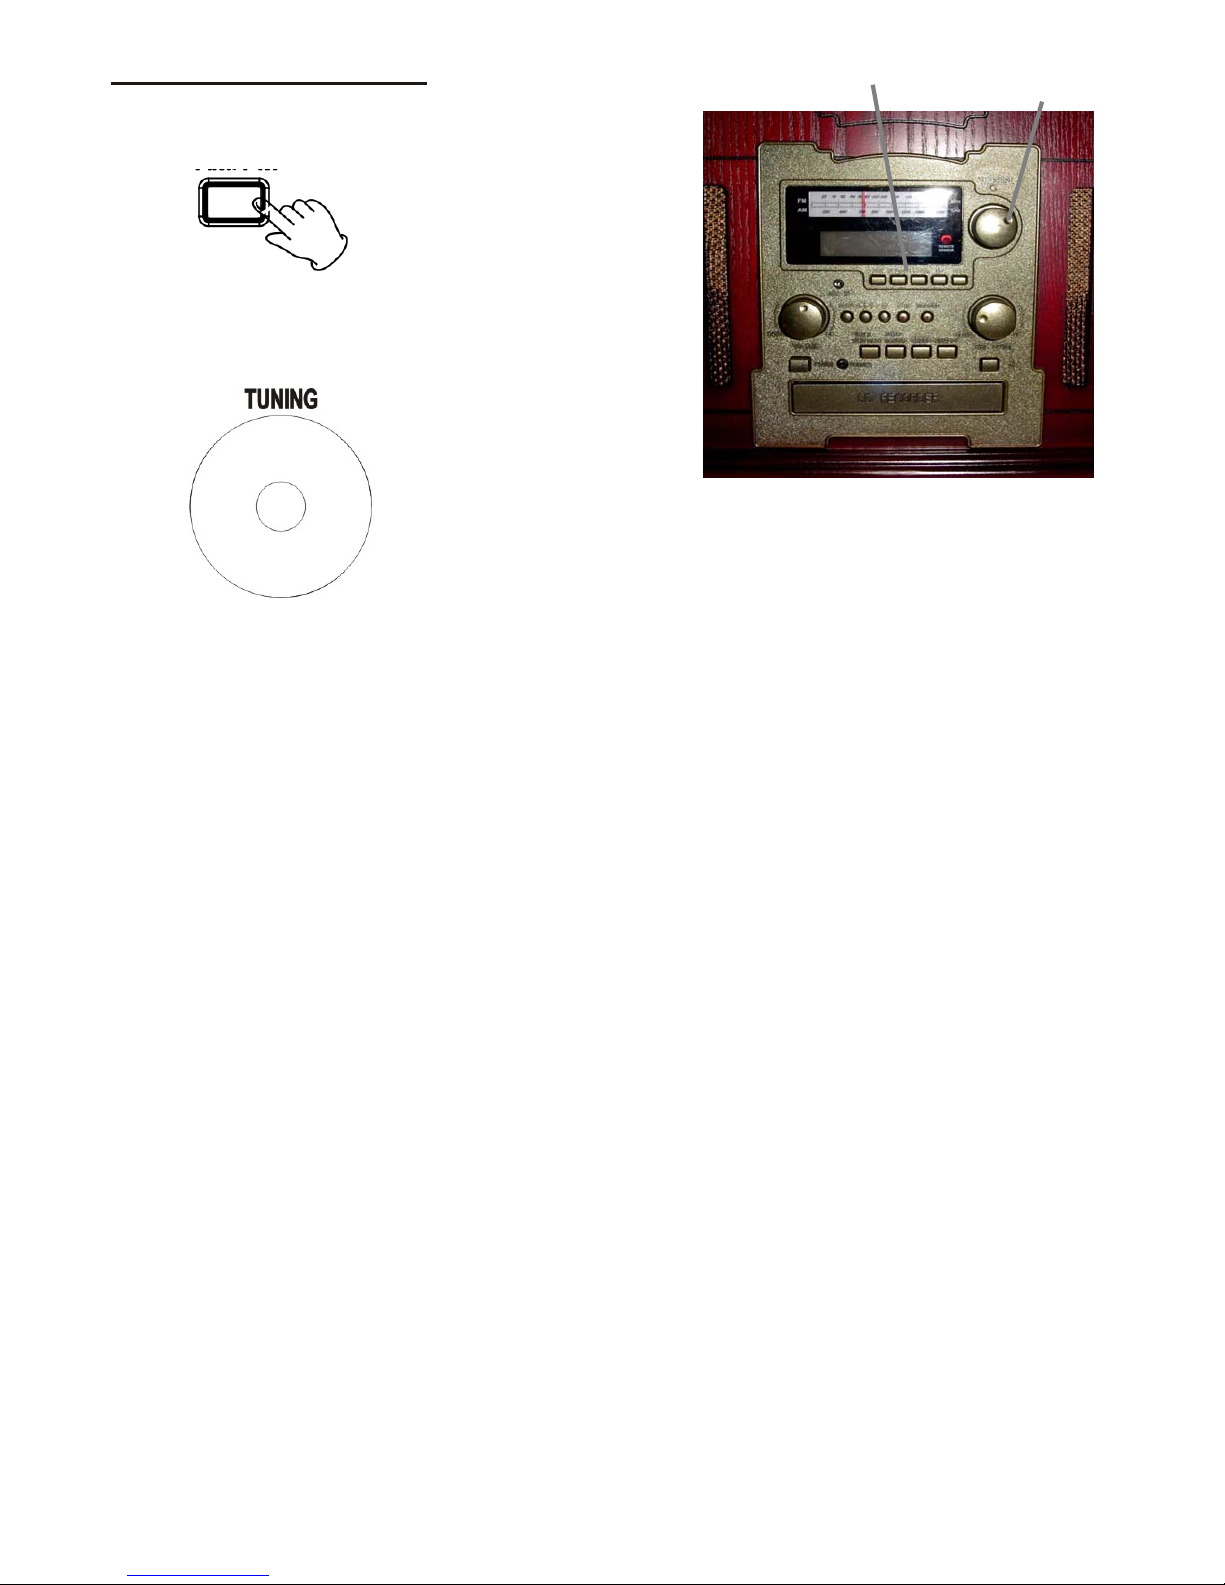
Listening to the Radio
1. Select FM or AM using the FM-AM button.
1
2
2. Tune to the desired frequency.
If the reception is poor AM broadcast:
Reposition the unit to find the best position for AM stations.
FM broadcast:
Extend and move around the FM antenna so that you can receive the station clearly.
FM-AM
12

Listening to a Record
1. Press the PHONO button to select PHONO.
2. Gently o pen the dust cover and secure the lid by
extending the support.
3. Put the record on the turntable.
When playing a 45 RPM record, use the included adaptor.
4. Select the speed.
1
5. Gently push the clamp to the right to release the tone arm.
6. Raise the cue lever to lift the tone arm off the tone arm support.
Clamp
13

Listening to a Record (Continue)
7. Move the tone arm gently to the edge of the record (or the starting point of a track).
The platter will begin to spin.
8. Gently lower the tone arm by slowly releasing the cue lever.
You can lower the tone arm manually if the cue lever has not been raised.
Playing records with the dust cover down will prevent dust from setting on the turntable.
When the playback has been finished, the tone arm automatically returns t o the tone arm holder a nd the
turntable rotation stops.
To stop playback manually, slightly lift the tone arm using the cue lever and return it to the tone arm
holder.
14

Listening to a Cassette Tape
1. Select TAPE using the TAPE button.
2. Insert the cassette into the tape deck. (Note: The Cassette will automatically start playing. Tape will
play from right to left.)
1
3. Press and release the Fast Forward / Eject button half way to Fast Forward the cassette.
Note: To stop the Fast Forward function, press and release the Fast Forward / Eject button gently.
4. To eject the cassette, press the Fast Forward / Eject button all the way.
Note: If you wish to stop the cassette, you’ll have to eject the cassette.
15

Listening to a CD
1. Press the CD button.
“--- BUSY CD” will appear in the Display.
When no disc is set in the tray, “NO DISC” will appear on the display.
2. Press the OPEN/CLOSE button to insert a CD.
1
3 & 4
5
2
3. Place a disc in the tray with the printed label face up.
Never place more than one disc on the tray.
The disc must be placed in the center of the disc tray. If the disc is not correctly loaded, it may not be
possible to open the tray again once it has closed, so you should ensure the disc is always centered
on the tray.
Do not force the tray by hand during opening and closing operations.
4. Press the OPEN/CLOSE button
to close the tray.
It takes a few seconds for the unit to load the disc. No buttons will work during the loading process.
Wait until the total number of the tracks and the total play time of the disc are displayed on the LCD
Display.
The disc type indicator shows the type of disc curre ntly loaded.
5. Press the PLAY/PAUSE button (
) to start playback.
16

Listening to a CD (Continue)
NEXT PREVIOUS
STOP
To suspend playback temporarily (pause mode).
1. Press the PAUSE button (
) during playback. Playback stops at the current position.
To resume playback, press the PLAY/PAUSE button (
To stop playback.
2. Press the STOP button (
) to stop playback.
To skip to the next or a previous track, press the correct buttons.
3. During playback, you may repeatedly press the PREVIOUS or NEXT button (
desired track is found. The selected track will play from the beginning.
In the stop mode, press the PREVIOUS or NEXT button (
listen to is found, and press the PLAY button (
) to start playback from the selected track.
When the (
) button is pressed during playback, the track being played will be played from the
beginning. To return to the beginning of the previous track, press the (
During playback, hold down the PREVIOUS or NEXT button (
want to listen to is found.
PLAY / PAUSE
).
or ) repeatedly until the track you want to
) button twice.
or ) and release it when the part you
or ) until the
17

Understanding the LED Display
Each time the DISPLAY button is pressed, the display changes as follows:
Display
18

Using your Remote Control
Repeat Playback
Each time the REPEA T button is pressed, the repeat mode is changed as follows:
Repeat
REPEA T ALL (Repeat ALL the Tracks)
Press the REPEAT button once during playback.
All the tracks of the disc will be played repeatedly.
REPEAT 1(Repeat one track)
Press the REPEAT button twice during playback.
The track being played will be played repeatedly. If you press the MUSIC SKIP button and
select another track, the track you select will be played repeatedly.
It is also possible to select a track to be repeated in the stop mode. Press the REPEAT
button twice and then select the track number by pressing the MUSIC SKIP button. Press
the PLAY button to start playback.
If one of the following buttons is pressed, repeat mode will be cancelled:
OPEN/CLOSE, RADIO, PHONO, AUX, TAPE.
Repeat playback works with finalized discs only.
19

Using your Remote Control (Continue)
Shuffle Playback
The CD tracks can be played randomly . Press the SHUFFLE button during playback. (In the stop mode,
press the SHUFFLE button and the PLAY button).
When the SHUFFLE playback of all the tracks has been finished, the unit stops and the shuffle
playback mode is cancelled.
If you press the (
played. If you press the (
track cannot be replayed during shuffle playback.
Shuffle playback will not work during programmed playback.
If one of the following buttons is pressed, shuffle mode will be cancelled:
SHUFFLE in the stop mode, OPEN/CLOSE, RADIO, PHONO, AUX, TAPE.
Shuffle playback works with finalized disc only.
Shuffle
) button during shuffle playback, next track will be randomly selected and
) button, the currently played track will be played from the beginning. A
20

Using your Remote Control (Continue)
Programmed Playback
Up to 32 tracks can be programmed in the desired order.
Insert a disc and select “CD” before beginning programming.
Shuffle playback does not work during programmed playback.
Programmed playback works with finalized discs only.
1 Press the PROGRAM button in the stop mode.
“PROGRAM” indicator blinks, and “P-01” appears on the display.
2 Press the PREVIOUS or NEXT button ( or ) to select a track.
or
3 Press the PROGRAM button.
The track is programmed, and “P-02” is display.
Repeat step 2 an d 3 t o program more tracks.
You can program up to 32 tracks.
To cancel the program mode, press the STOP button (
4 When the selection of track numbers has been finished, press the PLAY button ( ) to start
program playback.
21
Program
).

Using your Remote Control (Continue)
Programmed Playback (Continue)
To check the programmed order
In the stop mode, press the PREVIOUS / NEXT button repeatedly to show the track numbers that have
been stored in memory.
To add a track to the end of the program.
In the stop mode, press the PROGRAM button.
Select a track number by pressing the PREVIOUS / NEXT button, and then pr ess the PROGRAM button.
The track is added to the end of the program.
To delete the last track from the program.
In the stop mode, press the CLEAR button to delete the last track from the program.
To clear the program
If one of the following buttons is pressed, the programmed contents will be cleared:
OPEN/CLOSE, RADIO, PHONO, AUX, TAPE or STOP when in the stop mode.
Clear
or
22

Recording CD-R and CD-R W Operation Steps
Select Recording Source
Select Auto/Manual Track
Increment Mode; Set Auto Track
Increment Sensitivity
Please refer to the detailed operation instructions that follow.
For CD-R or CD-RW discs, if they are recorded and finalized, the disc can be played by ordinary CD
players. If it is recorded but not finalized, the disc will not be playable by ordinary CD players.
*It is suggested to use the
Manual Track mode for
creating a CD with tracks as
on the album.
23

Recording a CD-R and CD-RW Disc
Audio from a Phono Record, Cassette Tape or Auxiliary device can be recorded on the CD recorder.
1. Insert a blank Audio CD-R or CD-RW disc into the CD tray .
Press the OPEN/CLOSE button (
printed label side up, then press the OPEN/CLOSE button (
disc tray.
4
7
2
5
1
), place a disc on the disc tray with the
) to close the
6
8
2. On the Display you should see the “NO TOC CD-R (or CD-RW)” indicator will ap pe ar on the screen.
*Note: Make sure the “NO TOC CD-R (or CD-RW)” indicator lights on the display, or the RECORD
function will not work.
NO TOC Indicator
3. A) When recording from a Phono record, place the Phono Record on the turntable and place the
needle / stylus on the Record. (Note: make sure the speed selector is set to the proper RPM according
to the Record’s RPM).
Press the PHONO button to select the Phono record as your music source.
24

Recording a CD-R or CD-RW Disc (Continue)
B) When recording from a Cassette tape, load the Cassette tape into the unit (located on side of the unit)
Playback will automatically begin. (You may press the Fast Forward / Eject button halfway to Fast
Forward the Tape. Press and release the button gently and playback will resume. Press the button all
the way to end playback and eject the Tape.)
Press the TAPE button to select the Cassette Tape as your music source.
C) When recording from an external source, connect the Auxiliary device using the AUX IN jacks located
on the front and back of the unit.
Press the AUX button to select the Auxiliary device as your music source.
AUX IN Jacks
4. To initiate the recording, press the Record button on the unit or on the remote control.
The “REC” indicator will appear on the display, right below the “NO TOC CD-R (or CD-RW)” indicator.
REC
Indicator
5. If you wish to adjust the track increment manually, you may now press the TRACK INCREMENT
button. You will see the AUTO TRACK indicator will no longer be visible in the display.
25

Recording a CD-R or CD-RW Disc (Continue)
If necessary, adjust the recording level using the REC LEVEL knob, the display will show from 00 - 79.
Play the source to be recorded and adjust the recording level so that the highest level reached on the
meter does not exceed the “OVER” indicator on the peak level meter.
A. Manual Track Division.
Y ou can divide your recording into separate CD tracks if you wish. This will allow each song to have it’s
own sequential track number . To perform this step, use the Track Increment button.
While recording the record or cassette, as it approaches the end of a song, listen for the silence
between songs. At this point press the Track Increment button. The recording will advance to the next
track number.
B. Automatic Track Division
If you cannot attend the recording as it plays through the album, you may choose the Auto Track mode.
Press the Auto/Manu al button until Auto Track appears in the display.
The recorder will now divide the songs automatically into separate tracks, when the sound level has
dropped below the -20dB / -30dB / -40dB sound levels for more than 2 seconds as shown on the level
meter in the display.
*Note: A word of caution, when
using the Automatic Track
Division. If within a song there
is a silence detected for 2
seconds, the recorder will
detect this as a new song and
therefore create a new track.*
6. Press the PLAY / PAUSE (
) button on the remote control (recommended) to start the recording
process.
Recording Level
Indicator
*Note: When recording from a Phono Record or a Cassette Tape, if you wish to pause the recording to
record the other side of the album or tape, press the Play / Pause button to Pause the recording.
Once you see the pause “II” symbol underneath the “REC” indicator on the display, flip the album or eject
the tape and flip the tape. Press the PLAY / PAUSE button again to resume the recording.
26

Recording a CD-R or CD-RW Disc (Continue)
7. Once you are finish with the recording, press the STOP button to stop the recording.
8. T o finalize the CD, press the FINALIZE button on the unit. (Note: Once you press the F INALIZE bu tton,
the “BUSY” message should appear on the display and the “FIn-d” message will appear on the display.)
9. Press the PLAY / PAUSE (
) button on the remote control (recommended) to start the finalization
process.
10. Once the “NO TOC CD-R (or CD-RW)” indicator goes off, the CD is finalized.
NO TOC CD-R
Indicator
11. You may now play the CD on any CD player and enjoy your music.
27

Finalizing
This section deals with the steps taken after recording.
Once finalized, CD-R discs are truly final. No more tracks can be recorded on them. By contrast,
CD-RW disc can be “un-finalized”, and if there is space, further material can be recorded on them.
In order for a disc to become a standard CD, it must have a Table of Contents (TOC) written to it.
This process is known as finalizing.
2
1
1 Press the FINALIZE button while in the stop mode.
“FIn—d” message will appear on the display.
To cancel the finalizing process, press the STOP button (
).
2 Press the PLAY ( ) button to start finalizing.
The display will show "--- BUSY" during finalization, wait until the “BUSY” message disappears to
complete the finalization.
The finalization time is subject to the contents of record, it may take several minutes in some cases.
When the operat ion has finished, the NO T O C in dicator turns off and the display returns to the
track / time display.
During finalization, no other functions will w ork during this important step.
*Note: Never turn the power off nor unplug the power cord.
Although finalized CD-R discs may be played on ordinary CD players, remember that finalized CD-RW
discs may not play on ordinary CD players.
28

Erase or UnFinalize a CD-RW
It is possible to er ase the last recorded track, it is also possib l e to erase a whole di s c .
Erase procedures are possible only on an UNFINALIZED CD-R W disc. If a CD-RW disc has been
finalized, unfinalize it prior to erasure.
1 Press the CD button to select “CD”.
2 Load a recorded CD-RW.
3 Press the ERASE button in the stop mode.
(1). Wait until “BUSY” message disa ppears on the display.
(2). Press the (
(3). Repeating press the Erase button to continue to the next track.
“Er” and the last track number will appear in the display when the disc hasn't been finalized. Each time
the ERASE button is pressed, the display changes as follows:
) button to begin erasing the last track.
“Er” and the number of the last track recorded on the disc. Select this to erase the last track on the
disc. Note: This will not appear when only one track is recorded on the disc.
Select erase all to delete all of the tracks.
To cancel the erasing or un-finalizing process, press the STOP button
4 (1).Press and hold the “Erase” button till the display shows “Erase All”.
(2). Press play (
) button to begin the erasing procedure.
(3). The Display will show 0000000 to confirm the disc is clear.
The remaining time for the operation appears in the display. When the operation has been
finished, the display returns to the track/time display.
During the erasing / unfinalization function, no other functions will work.
*Note: Never turn the power off nor unplug the pow er c ord during this process.
This operation cannot be reversed. If you are going to erase a track or tracks, make sure that they are
recordings that you really want to erase.
Copies of CD-RW discs from other units can't be erased one by one in this unit, but can be erased
completely.
29

Specifications
Amplifier section
Output Power……………………………....5 W + 5W
Frequency Response………………….….60 to 20, 000 Hz
Tuner section
FM Section
Frequency Range…………………………88 to 108 MHz
AM Section
Frequency Range……………………..…..530 to 1710 KHz
CD PLAYER section
Frequency Response…………………….60 to 20, 000 Hz +/-4 dB
Signal-to-Noise Ratio……………….……55 dB (IEC-A)
Cassette Deck section
Track System…………………………...….4 Track, 2 channel stereo
Tape Speed………………………………...4.8 cm/sec
Wow and Flutter………………………..….0.4% (WRMS)
Frequency Response……………..……...125 to 6300 Hz +/-6 dB
Record Player section
Motor……………………………………....DC servo motor
Drive System………………………..…….Belt Drive
Speeds……………………………….……33-1/3 rpm, 45 rpm and 78 rpm
Wow &Flutter………………………...……Less than 0.35% (WTD)
S/N Ratio…………………………….…….More than 50 dB
Cartridge Type…………………………….Ceramic Stereo Cartridge
Stylus………………………………………402-M208-165
SPEAKER SYSTEM section
Type…………………………………….….1-way
Impedance………………………………..8 ohms
Input Power……………………………….Max. 10W
GENERAL
Power Requirements……………….……AC 120 V~ 60 Hz
Power Consumption…………………….60 W
Standard Accessories……………...……Operating Instruction Booklet; 45 rpm Adapter
Remote Control, Aux In/Out Cable
30

Troubleshooting Guide
Problem Cause Solution
Power does not come
on.
No sound comes out
of the speakers.
The Sound is noisy. The unit is too close to a TV set or another
CD Stops immediately
after starting.
No sound comes out
of the speakers.
Specific CD is noisy or
playback stops or
skips.
The cassette deck
door cannot open.
No sound from tape. The tape heads are dirty. Clean the tape heads.
Cannot record. The write-protect tabs on the cassette have
Cannot listen to any
station, or signal
appears weak.
The sound is
distorted.
Unit is unplugged. Connect the unit to the AC power
The volume is turned down (to MIN.)
The input selector does not match the play
back source.
similar appliance which is causing
interference.
The CD is inserted upside down.
The CD is dusty or dirty.
The CD player is paused. Press the PLAY/PAUSE button to
The CD is scratched, damaged or warped,
or the disc is very dirty.
The cassette tape is not inserted properly. Insert the cassette tape correctly.
been broken off.
The tape heads are dirty.
You are trying to record on metal (Type IV)
tape.
The station is not tuned-in properly.
A TV set is being used nearby and is
interfering with the radio reception.
The antenna is not oriented properly. Re-orient the antenna until reception
Music System
supply.
Adjust the volume.
Re-select the desired input source.
Turn Off the TV or other appliance
and relocate the unit.
The CD Player
Insert the CD with the printed side
facing up.
Clean the CD before inserting to the
unit.
play the CD.
The CD should be changed.
Carefully clean the CD.
Tape Deck
Tape over the holes with cellophane
tape.
Clean the tape heads.
Use a normal (Type I) tape.
Radio Tuner
Properly tune-in the desired station.
Turn-off the interfering TV set.
improves.
31

Handling Records
Do not touch the record’s grooves. Only handl e records by the edges or the label with cl ean hands. Otherwise, di rty
hands can leave a residue on the record surface that will gradually deteriorate the quality of your record.
Using a soft anti -static cloth to gently wipe the record surface when the record has become dirty.
Keep records in their album covers when not in use.
Store records upright on their edges. The level store would make it become curved.
Avoid placing records in direct sunlight or close to a source of heat such as radiators, stoves. Also avoid locations
subject to vibration and excessive dust, heat, col d or moisture.
How to Replace the Stylus
The stylus should last about 50 hours of playin g time under n ormal use. H owever, it is recommenced that the stylus be
replaced as soon as you notice a change in sound quality . Prolonged use of a worn-out stylus may damage the record.
The higher speeds of 78 RPM records will tend to wear out the stylus faster.
Caution:
Do not remove or bend the stylus.
Do not touch the needle, which may injure your hand.
Turn off the unit’s power before you replace the stylus.
Keep out of the reach of children.
Avoid direct sunlight or placing records close to a source of heat.
Removing old stylus
1. Set a small tool edge at the tip of the stylus and push down in the direction “A”.
2. Remove the stylus by pulling it forward and down.
Installing a new stylus
1. Hold the tip of the stylus and insert the leading edge by pushing in the direction “B”.
2. Push up in direction “C” until it locks at the tip.
32

About CD-R and CD-RW discs
CD-R discs can be recorded once only. Once they have been used for recording, they cannot be erased or re-recor ded.
However, if space is available on the disc (and the disc has not been Finalized), additional material can be recorded.
By contrast, a CD-RW disc can be used in much the same way as a CD-R disc, but the last track or tracks recorded can
be erased, and the space on the disc can be re-used for other recordings.
However, you should note that an audio CD created using a CD-RW disc may not play back satisfactorily on other audio
CD-players such as the CD player on your automobile.
CD-R, by contrast, can be played on the majority of audio CD players
.
Discs
Please use CD, CD-R and CD-RW discs bearing the “DIGITAL AUDIO” mark.
In this manual, although we refer to “CD-R” and “CD-RW” disc, we always mean “CD-R Digital Audio” and “CD-RW
Digital Audio”, even when this is not explicitly stated.
“CD-R” and “CD-R W” discs designed for com puter systems and prop erly recorded by a comp uter are playable, but
this unit cannot record, finalize or erase them.
Depending on the quality of the disc and the condition of the recording, some CD-R/CD-RW disc may not be
playable.
Always place the disc on the disc tray with the label side facing up (compact discs can be played or recorded only
on one side)
To move a disc from its storage case, pre ss down on the cen ter of the case an d lift the disc out, holding it carefully
by the edges.
If the disc(s) become dirty, wipe the surface from the center hole outward towards the outer edge with a soft, dry
cloth.
33

Discs (Continued)
Never use such chemicals as record spray, antistatic sprays or fluid, benzine or thinner to clean the discs. Such
chemicals will do irreparable damage to the disc’s plastic surface.
Discs should be returned to their cases after use to avoid dust and scratches that could cause the la ser pick u p to
“skip”.
Do not expose discs to direct sunlight or high humidity and temperature for extend periods. L ong exposur e to high
temperatures will warp the disc.
Printable CD-R and CD-RW discs are not recommended, as the label side might be sticky and damage the unit.
Use a soft oil-based felt-tipped pen to write the i nfo rmation on the label side. Never use a ball- poi nt or hard-tipped
pen, as this may cause damage to the recorded side.
Do not use CDs with an irregular shape(octagonal, heart shaped, business card size, etc).CDs of this sort can
damage the unit:
If you have any doubts of using CD-R/CD-RW disc, rea d the pr ecautions suppli ed with the d isc, or co nt act the disc
manufacture directly.
34

Precautions
Safety Information
CAUTION:
In order to shut off the power to this product completely , unplug the power cord from the wall outlet. Be sure to
unplug the unit if you do not intend to use it for an extended period of time such as a vacation.
Do not remove the protective housing.
Use of controls and adjustments or performance of procedures other than those specified herein may result in
hazardous exposure.
If this product develops trouble, contact our service center, and do not use the product in a defective state.
Safety Precautions
WARNING:
To reduce the risk of fire or electric shock, do not expose this appliance to rain or moisture.
CAUTION:
Use of controls or adjustments or performance of procedures other than those specified may result in hazardous
exposure.
CAUTION
RISK OF ELECTRIC SHOCK- DOES NOT OPEN!
To reduce the risk of electric shock, do not remove cover or back.
No user serviceable parts inside. Refer servicing to qualified service personnel.
The light flash with arrowhead symbol, within an equilateral triangle, is intended to alert user to the
presence of un-insulated “dangerous voltage” within the product’s enclosure that may be of sufficient
magnitude to constitute risk of electric shock to persons.
The exclamation point within an equilateral triangle is intended to alert user to the presence of important
operating and maintenance (servicing) instructions in the literature accompanying the appliance.
CAUTION:
For compact disc units only: invisible laser radiation when open and interlock failed or defeated. Avoid
direct exposure to laser beam.
1. Choose unit installation location carefully. Avoid placing it in direct sunlight or close to a source of heat.
Also avoid locations subject to vibrations and excessive dust, cold or moisture.
2. Do not open the cabinet as this might result in damage to the circuitry or electrical shock, if a foreign object
should get into the set, contact your dealer.
3. Be sure not to handle discs with dirty fingers. Never insert a disc that has a crack on the surface.
4. When removing the power plug from the wall outlet, always pull directly on the plug, never pull the cord.
5. To keep the CD laser pickup clean, do not touch it, and do not forget to close the disc tray.
6. Do not attempt to clean the unit with chemical solvents as this might damage the finish. Use a clean, dry
cloth.
7. In order to shut off the power to this product comple tely , unplug the power cord from the wall outlet. Be sure
to unplug the unit if you do not intend to use it for an extended period of time.
8. Keep this manual in a safe place for future reference.
35

FCC Norm
FCC
This equipment has been tested and complies with limits for Class B digital devices purs uant to Part 15
of Federal Communications Commission (FCC) rules.
FCC Compliance Statement
These limits are designed to provide reasonable protection against frequency interference in residential
installations. This equipment generates, and radiates radi o frequency energy , and if not installed properly
or used in accordance with the instructions, may cause harmful interference to radio communication.
However, there is no guarantee that interference will not occur in television reception, which can be
determined by turning the equipment on and off. Interference may be corrected by one or more of the
following measures:
Reorient or relocate the receiving antenna
Increase the separation between the equipment and the receiver
Plug the equipment into an outlet on a circuit different from that to which the re ceiv er i s
connected.
CAUTION!
The Federal Communications Commission warns the user that changes or modifications to the unit not
expressly approved by the party responsible for complianc e could void the user’s authority to operate the
equipment.
36

Customer Service
This product is backed by the exclusive firstSTREET Guarantee. Try this product for 90 days. If for any
reason you are not completely satisfied with your purchase, simply return the product within 90 days
for a full refund of your purchase price, less shipping and handling or a merchandise credit to
firstSTREET.
To find out more information about the firstSTREET 90-day home trial, or for answers to any of your
questions you may contact the firstSTREET customer service department Monday through Friday
from 9AM to 8PM (Eastern Time) at (800) 958-8324.
*******************************************************************************************
For technical support and answers to questions regarding the operation and installation of this
Starlogic item you may contact the manufacturer’s technical support team by calling the toll free
number below to obtain help. A customer service representative will assist you.
Please have the following information available when you call the servic e center:
Your Name and Address
Date of Purchase
Model Number
Serial Number
Store Name and Address
Type of problem with the unit
To contact technical support, please call 1Email Support: techsupport@fourstari.com
508-435-4830 or 1-800-639-3803.
37

Manufacturer’s Warranty
90 Day Limited Warranty
This product is warranted to be free from defects in material and workmanship for a period of 90 days.
Warranty obligations are limited to replacement or repair of defective parts and components, at the
option of the manufacturer. The warranty of this product is null and void if the product is subjected to
negligence, abuse, modification, misuse, accident or if the customer uses the product for a function it
was not intended for.
This warranty is only valid for the original purchaser of this product and will not be honored if the product
is resold. This warranty gives you specific legal rights, and you may also have other rights which vary
from state to s t a t e.
The manufacturer will not be liable for incidental or consequential damages caused by the use of this
product. The manufacture will not be liable for any costs such as lost profits or revenues, cost of
temporary replacements, loss of data, loss of equipment or use of equipment or any claims by third
parties.
In order to contact the manufacturer’s technical support department, please call
1-
508-435-4830 or 1-800-639-3803.
E-mail Support: techsupport@fourstari.com
38
 Loading...