

StarLogic 62904150, 01366 Installation And User Manual
LP Phono CD Recorder
Installation and User’s Manual
Item Number: 62904150
SKU# 01366
* Important Notice: Please read this manual carefully
All brand names and trademarks are the property of their respective owners

Contents
Overview.............................................................................................................................................3
Quick Start Guide........................................................................................................ ....................3-4
Music System Controls Identification ........................................................................................5-10
Operating Instructions...............................................................................................................11-18
Using the Remote Control .........................................................................................................19-22
Recording CDs............................................................................................................................23-29
Specifications ..................................................................................................................................30
Troubleshooting...............................................................................................................................31
Records, Stylus, CD’s ..................................................................... .... .... .... ....... .... .... ........ ........32-34
Important Safety Instructions/Precautions....................... ..................................................... 35--36
Customer Service........................................................................ ....................................................37
Warranty ....................................................... ................................................ ....................................38
2
Overview
• This All-in-One Music System enables you to enjoy your favorite albums and cassettes and record
them onto CD’s.
• This unique music system offers you the options of playing music from various sources such as Vinyl
Records, CD’s, AM/FM Radio and Cassette Tapes.
• The CD recording system allows you to record from various music sources giving you the options of
recording your favorite records, cassettes and audio pr ograms from auxiliary sources that can be
connected to the CD recorder via stereo input cables.
• A full function remote control let’s you control the unit from the comfort of your easy chair.
Quick Start Guide
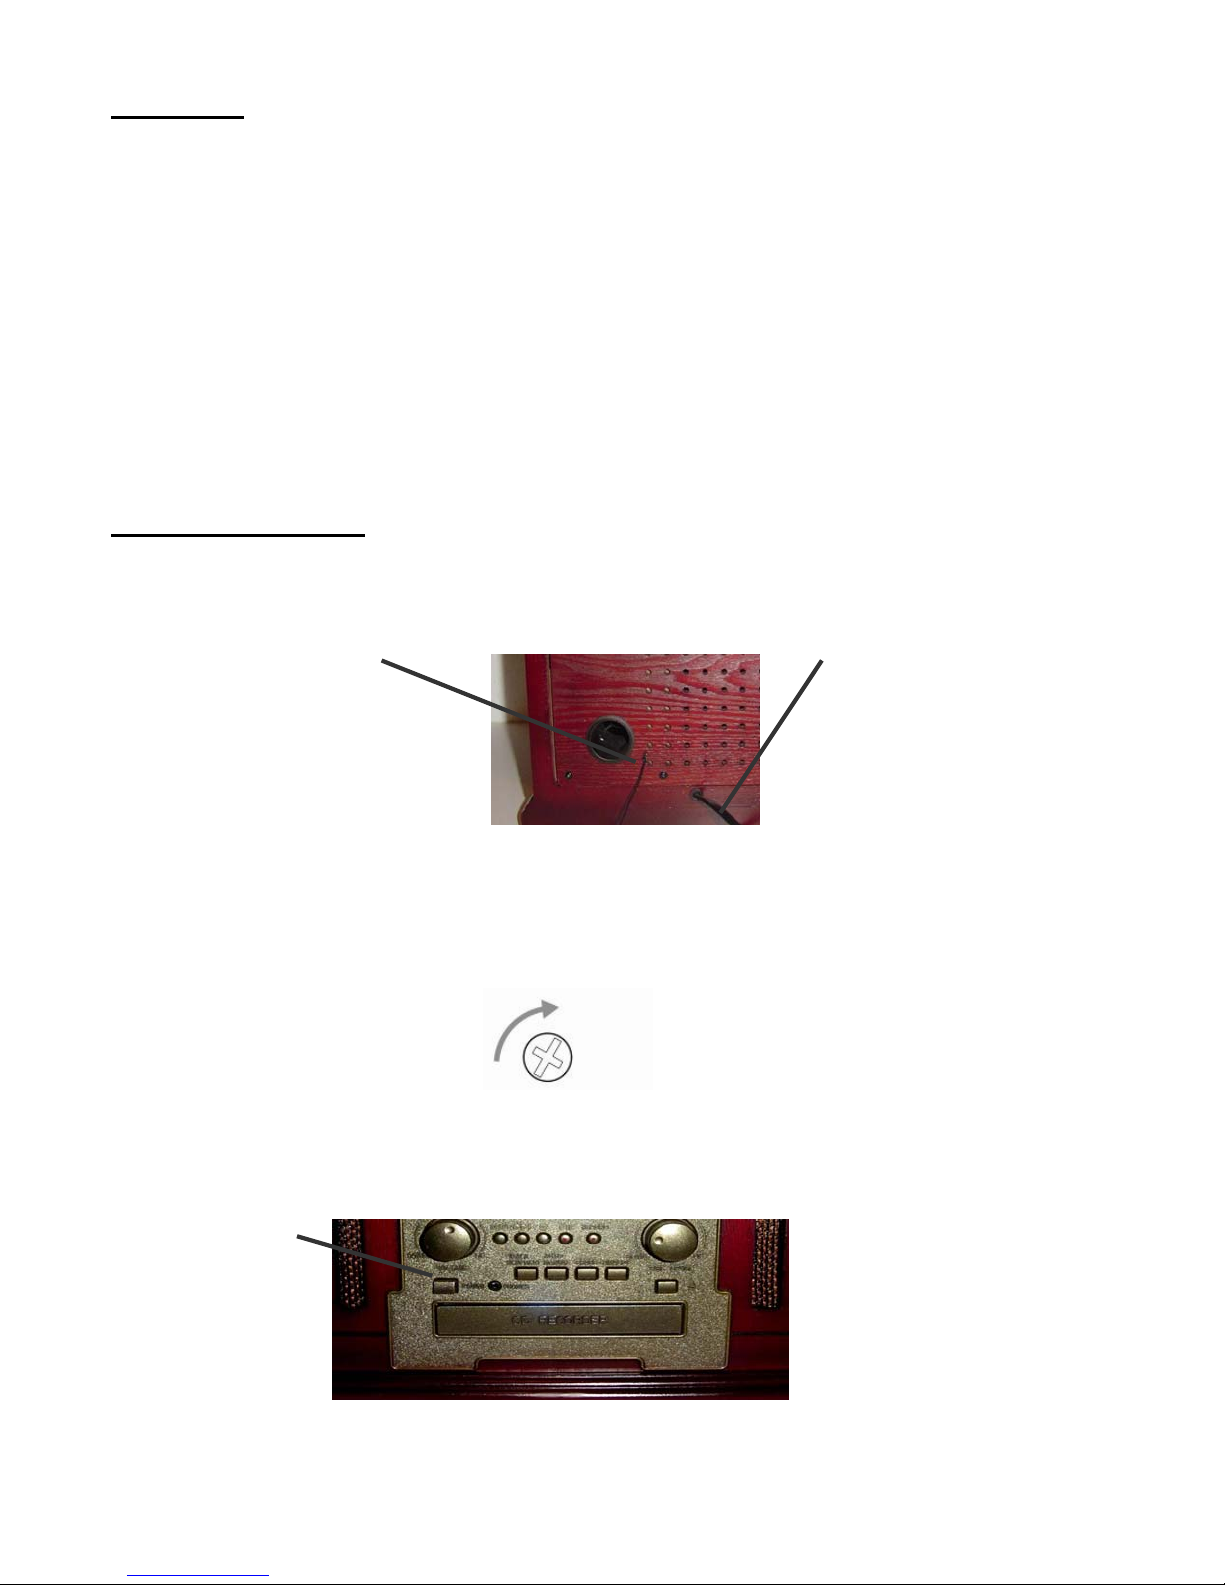
1. Unwrap the FM antenna wire located in the back of the unit and extend the cable for best reception.
Locate the power cord and plug the unit into a standard AC power outlet.
FM Antenna Power Cord
2. Open the lid to the turntable. Loosen the shock absorbing tension screw at the top of the turntable to
allow for the turntable suspension to absorb any shock. Remove the tie wrap holding the tone arm
secure. Remove the cover over the stylus needle. Set the turntable to the correct speed for the record
you will be playing.
3. Press the Power button located on the front of the unit to turn the unit On.
Power Button
3
Quick Start Guide
5. Press the selector buttons located on the bottom of the front panel to choose to listen to Phono, CD,
Cassette Tape, AM / FM Radio and AUX.
AUX PHONO FM-AM CD TAPE
To record from a Phono Record or Cassette please read the following steps:
1. Insert a blank CD into the CD tray.
2. On the Dis play you sh ould see the "NO TOC CD-R (or CD-RW)" indicator go on.
3. Place a Record on the turntable and place the needle on the Record, or insert the Cassette into the
tape deck. (Note: make sure the record speed selector is set to the proper RPM).
4. Press the PHONO or TAPE button depending upon the music source.
5. Press the RECORD button on the unit (you'll now see REC on the Display).
(Note: If you wish to adjust the track increment manual, you may now press the TRACK INCREMENT
button, otherwise you’ll see the AUTO TRACK indicator on the display. This will change the tracks
automatically for you.)
6. Press the PLAY/PAUSE button (the remote control is recommended), you should now see the Play
symbol (triangle shape) underneath REC on the Display.
(Note: If you wish to pause the recording to record the other side of the Phono record or Cassette, press
the PLAY/PAUSE button during the recording, and you will see the “II” symbol underneath the “REC”
indicator on the display. (Then repeat Step 6 to continue the recording).
7. Press the STOP button when you are done recording.
8. Press the FINALIZE button to Finalize the CD. (Note: The Busy message should appear on the
screen after you press FINALIZE, if you do not see the “FIn-d” message on the screen, please open and
close the CD tray.)
9. Once the message is no longer on the screen then press the Play/Pause button.
10. Once the "NO TOC CD-R (or CD-RW)" indicator turns off, the CD is now finalized.
At this point you may now play the CD on any CD player.
4
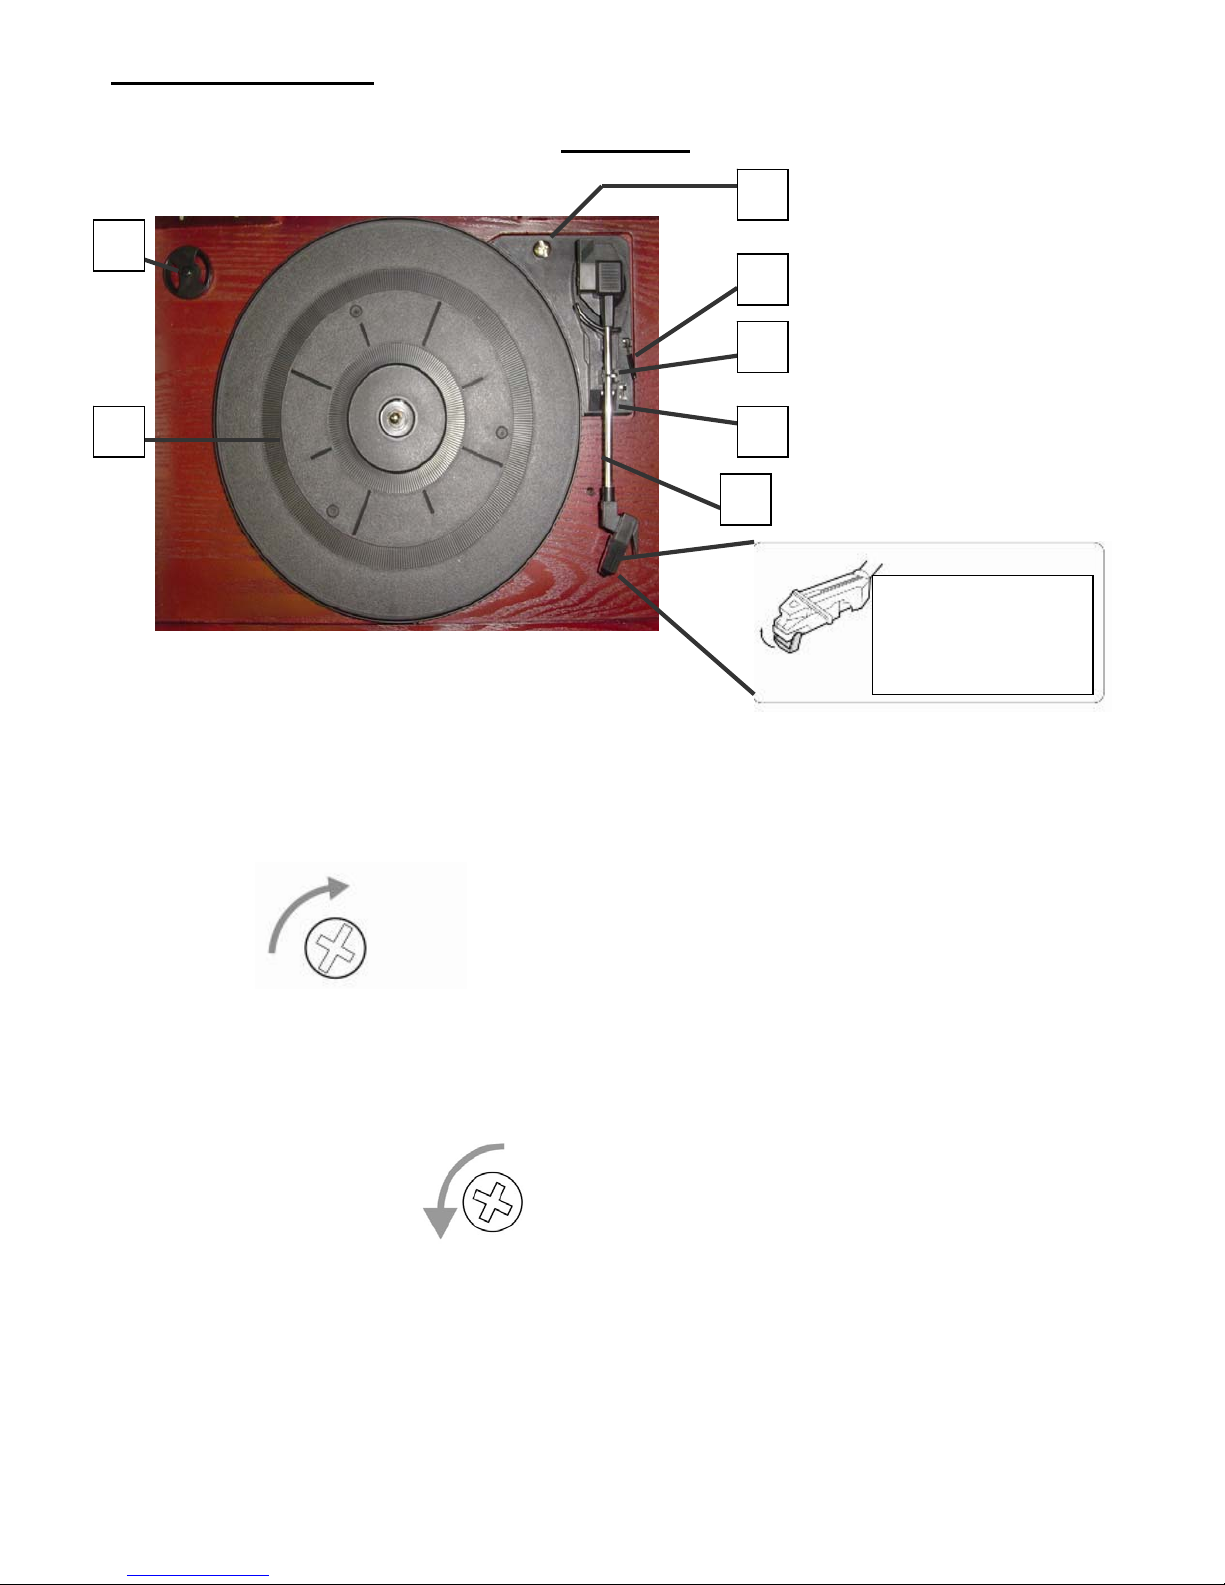
Turntable Diagram
2
1
1) Tu rnt ab le Platt er.
2) 45 RPM adaptor.
3) Shock absorbing tension screw.
Top View
3
4
5
6
7
Before use, slide off
the stylus protector
(white colored plastic
When you transport the unit, turn the screw clockwise to secure the turntable.
Before use, completely loosen the screw by turning it counterclockwise with a coin or screwdriver. The
platter will now absorb vibration and allow the tone arm and rec ord to play correctly.
4) Cue-lever -> Use this lever to lift the tone arm.
5) Tone arm Support and clamp.
6) Speed selector.
7) Tone arm.
5
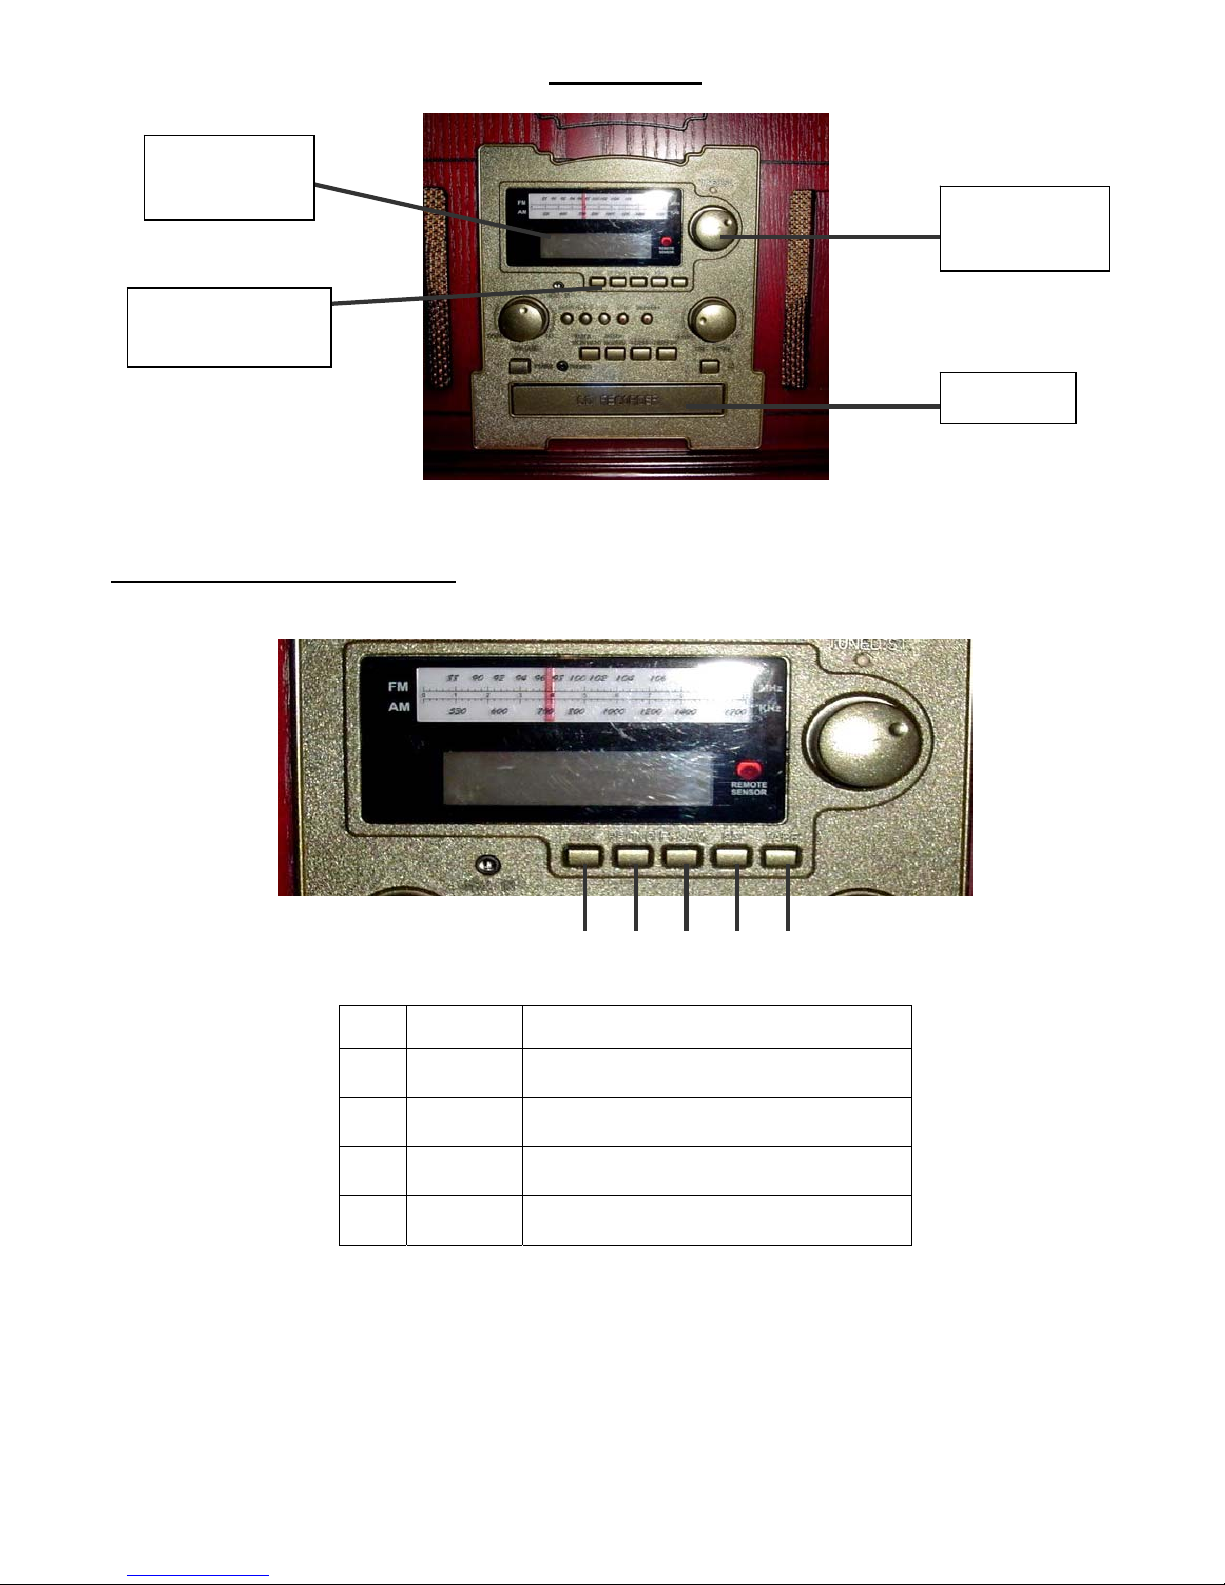
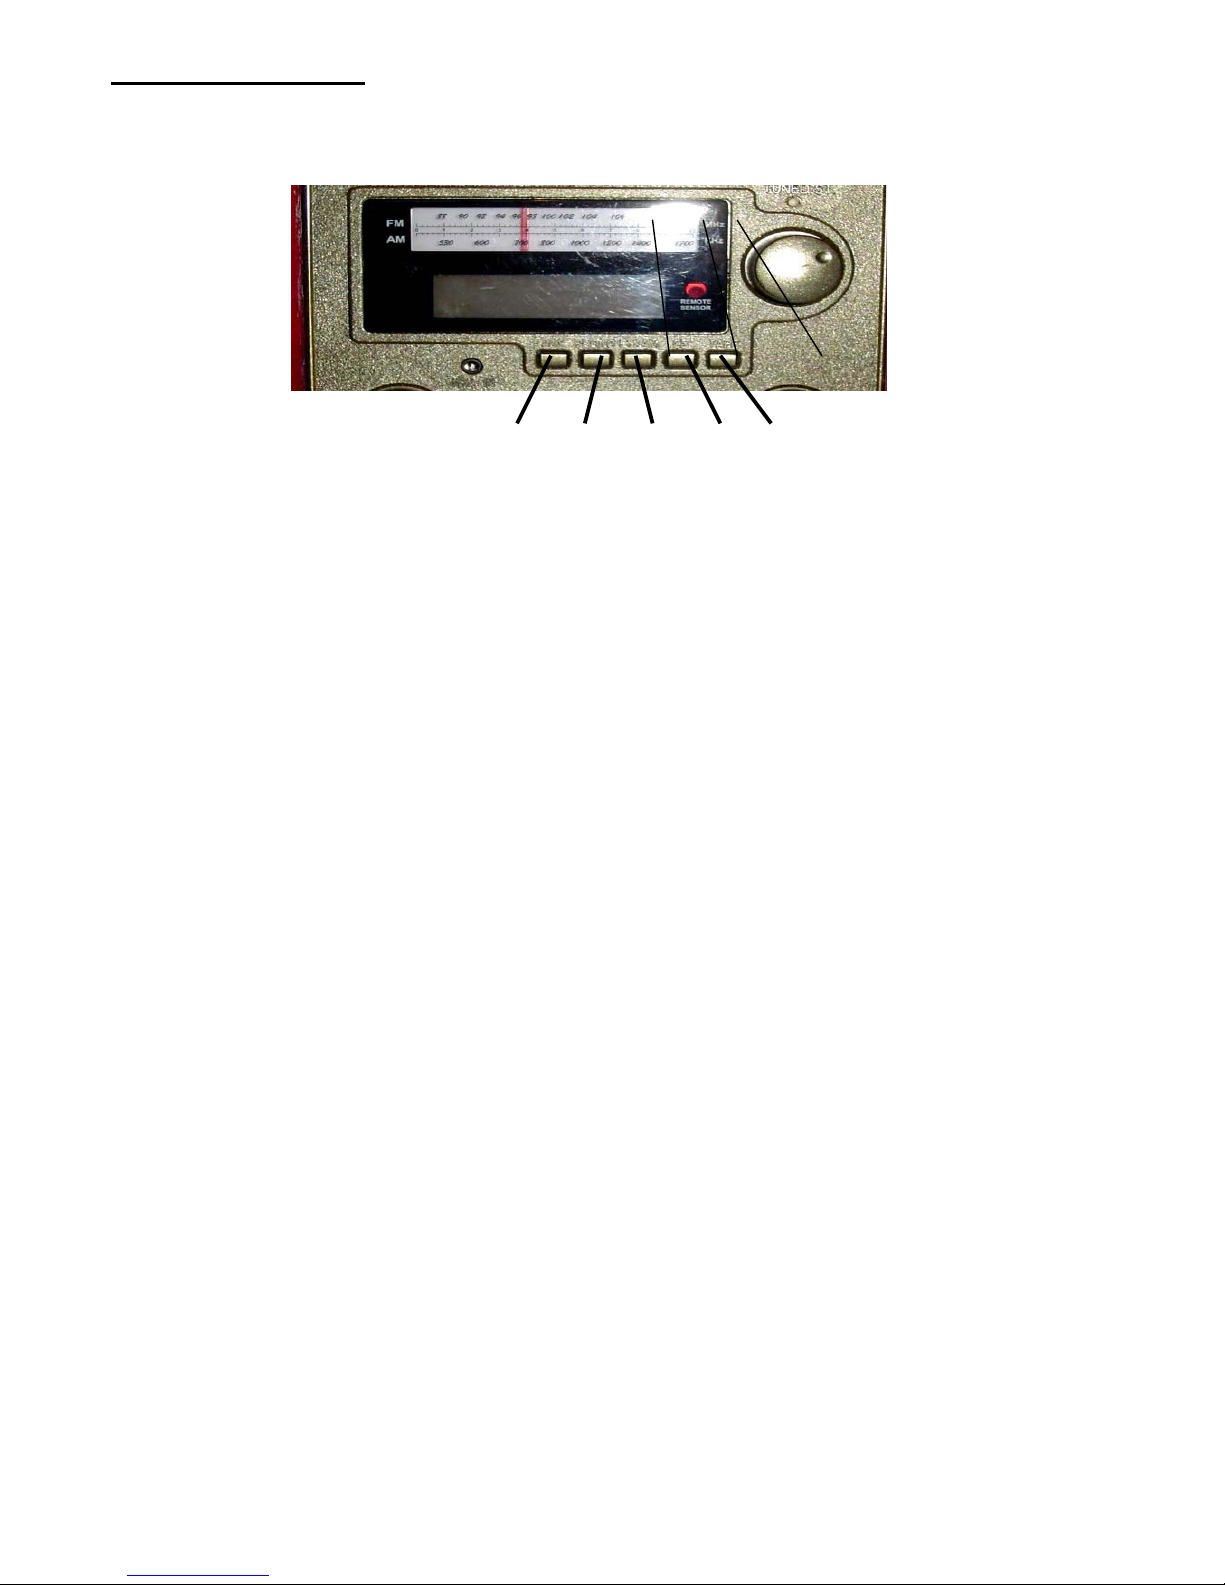
LED CD Track
Indicator
Music Source
Selection Buttons
Music Source Selection Buttons
your music source will play from.
Front View
AM / FM
Radio Dial
CD Drawer
---Push one of the five selection buttons in order to determine where
1 2 3 4 5
1 AUX Set the Music Source to AUX Inputs.
2 PHONO Set the Music Source to PHONO.
3 FM-AM Set the Music Source to FM/AM Radio.
4 CD Set the Music Source to CD.
5 TAPE Set the Music Source to TAPE.
6
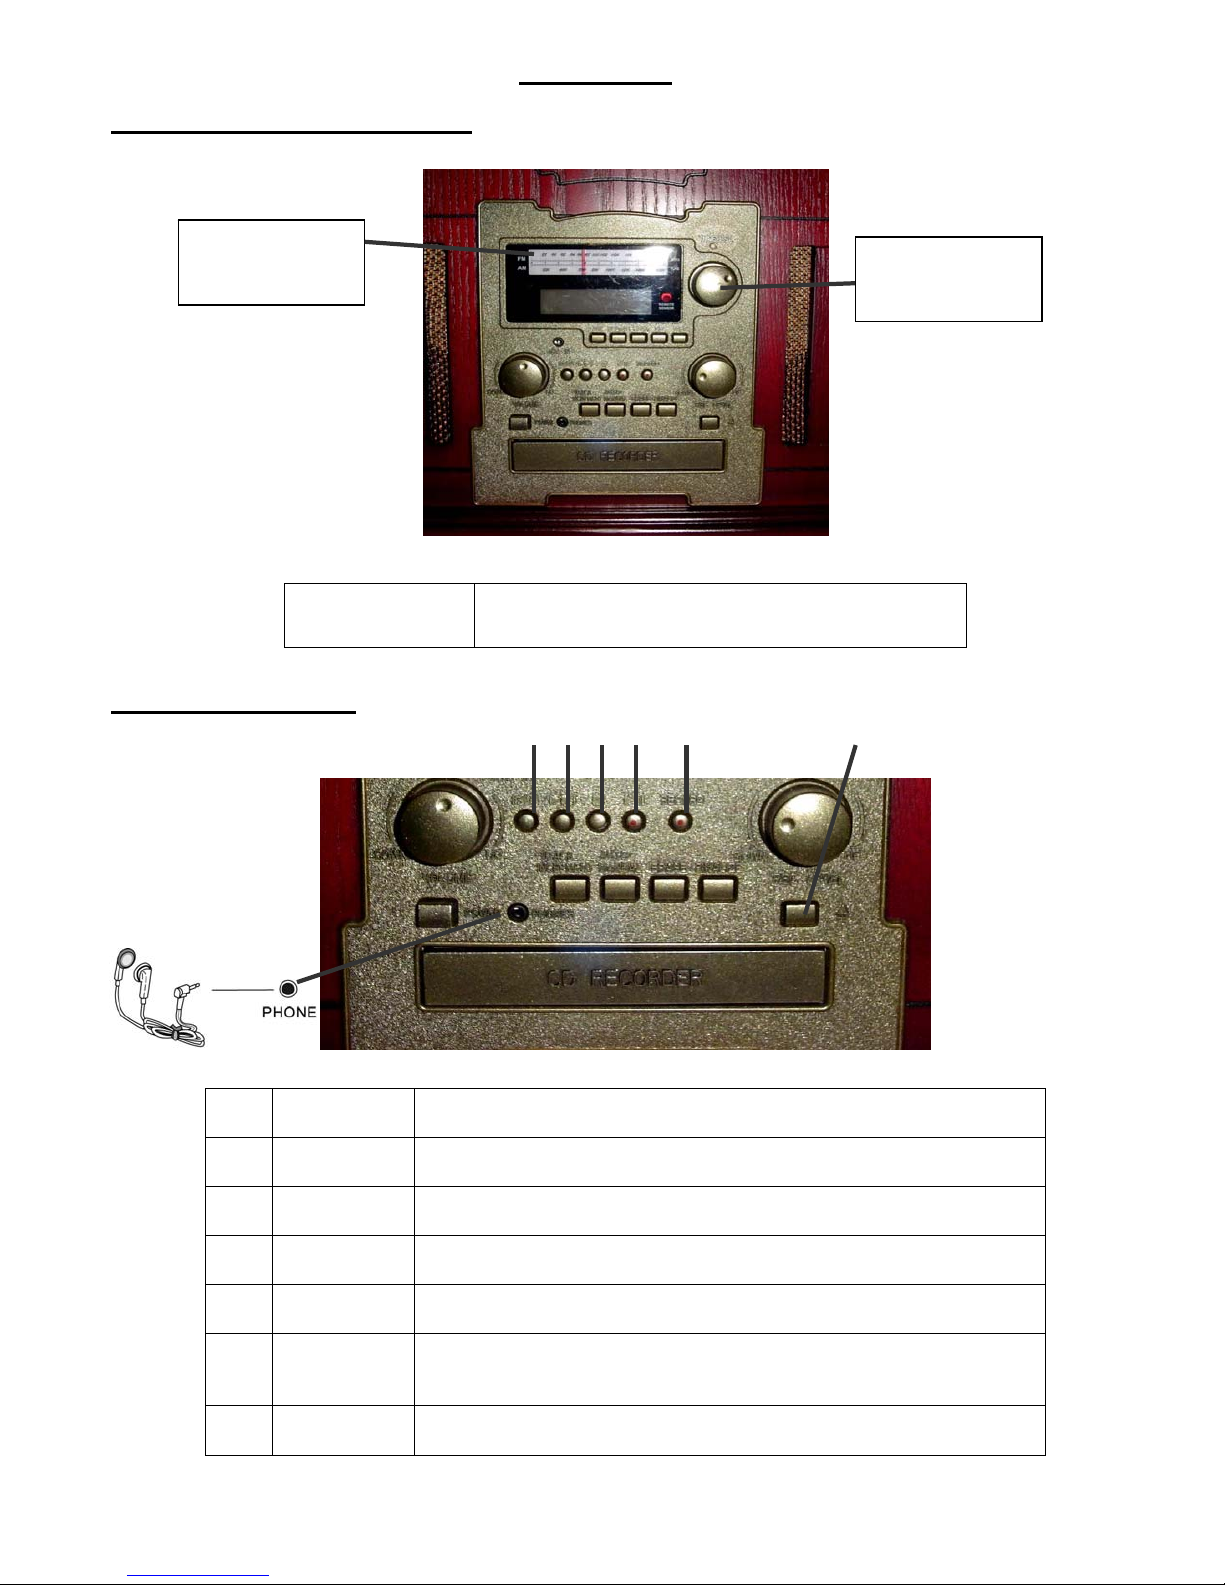
FM-AM Radio Control Button
Front View
AM / FM
Radio Dial
Radio Tuning
CD Control Buttons
Knob
Radio Tuning
Knob
Rotate this knob to select the AM or FM radio station
you choose to listen to.
1 2 3 4 5 6
1
2
3 STOP Stops the CD mechanism from playing.
4
5 RECORD Press this button to activate the Recording function.
6
7 EARPHONE
FAST
REVERSE
FAST
FORWARD
PLAY /
PAUSE
OPEN /
CLOSE
By pressing this button the CD player will go back and play the
previous song or track.
By pressing this button the CD player will advance to the next song or
track on the CD.
Press this button to play the CD in the drawer. Press this button a
second time to pause the CD.
Opens the CD drawer to allow you to insert or remove a CD. Insert
your CD with the label facing up into the drawer. Press the button
again to close the CD drawer.
You may use this jack to plug in earbuds or headphones to listen to
your music privately. (External speakers will turn off.)
7
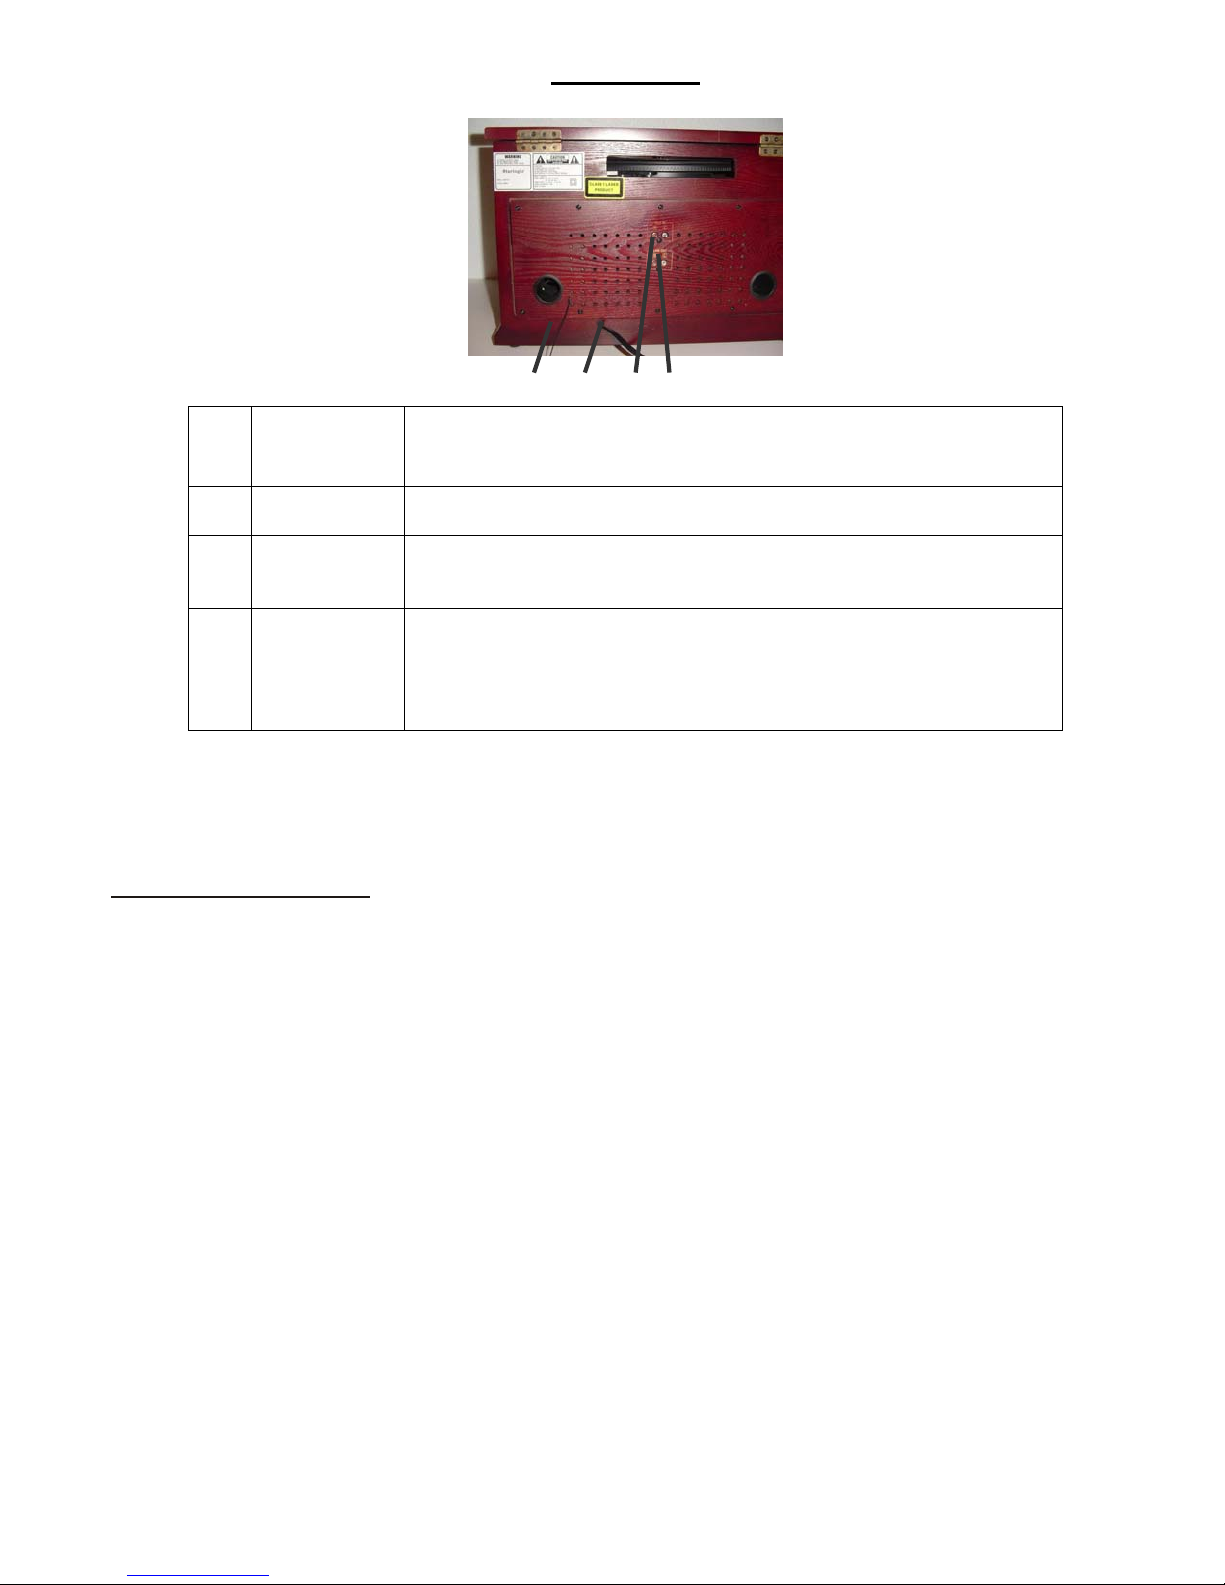
Back View
1 2 3 4
FM Antenna
1
AC Power Cord Plug the power cord into an AC wall socket.
2
AUX In Jacks
3
4
Line Out
While in FM mode, tune in an FM station and extend the antenna lead
to find the best position for the reception. This antenna may need to be
repositioned if you move your unit to a new location.
You can connect a CD player, cassette tape deck, etc. to this unit.
Connect the component with RCA Type cables. Make sure to connect
the white and red color jacks accordingly.
You can connect the sound output of your Phono CD Recorder to the
auxiliary input of your home entertainment receiver or other music
systems.
AUX Input Operation
An external (auxiliary) audio source (i.e. personal CD player / MP3 player / Cassette Deck) can be
connected to this unit and enjoyed through the speakers on this system and recorded to a CD.
- Plug the stere o cables (included) into the AUX IN socket on the back of the unit.
- Plug the other end of the cable into the headphone or Line Out socket of the external source.
- Once the aux cables are plugged in, it will override all oth er functions. You should remove the auxiliary
cable to resume normal operation of the unit.
- You may use the Aux Input located at the front of the unit to connect small hand held audio devices
such as MP3 or CD player via a phono jack cable connection (cable included).
8
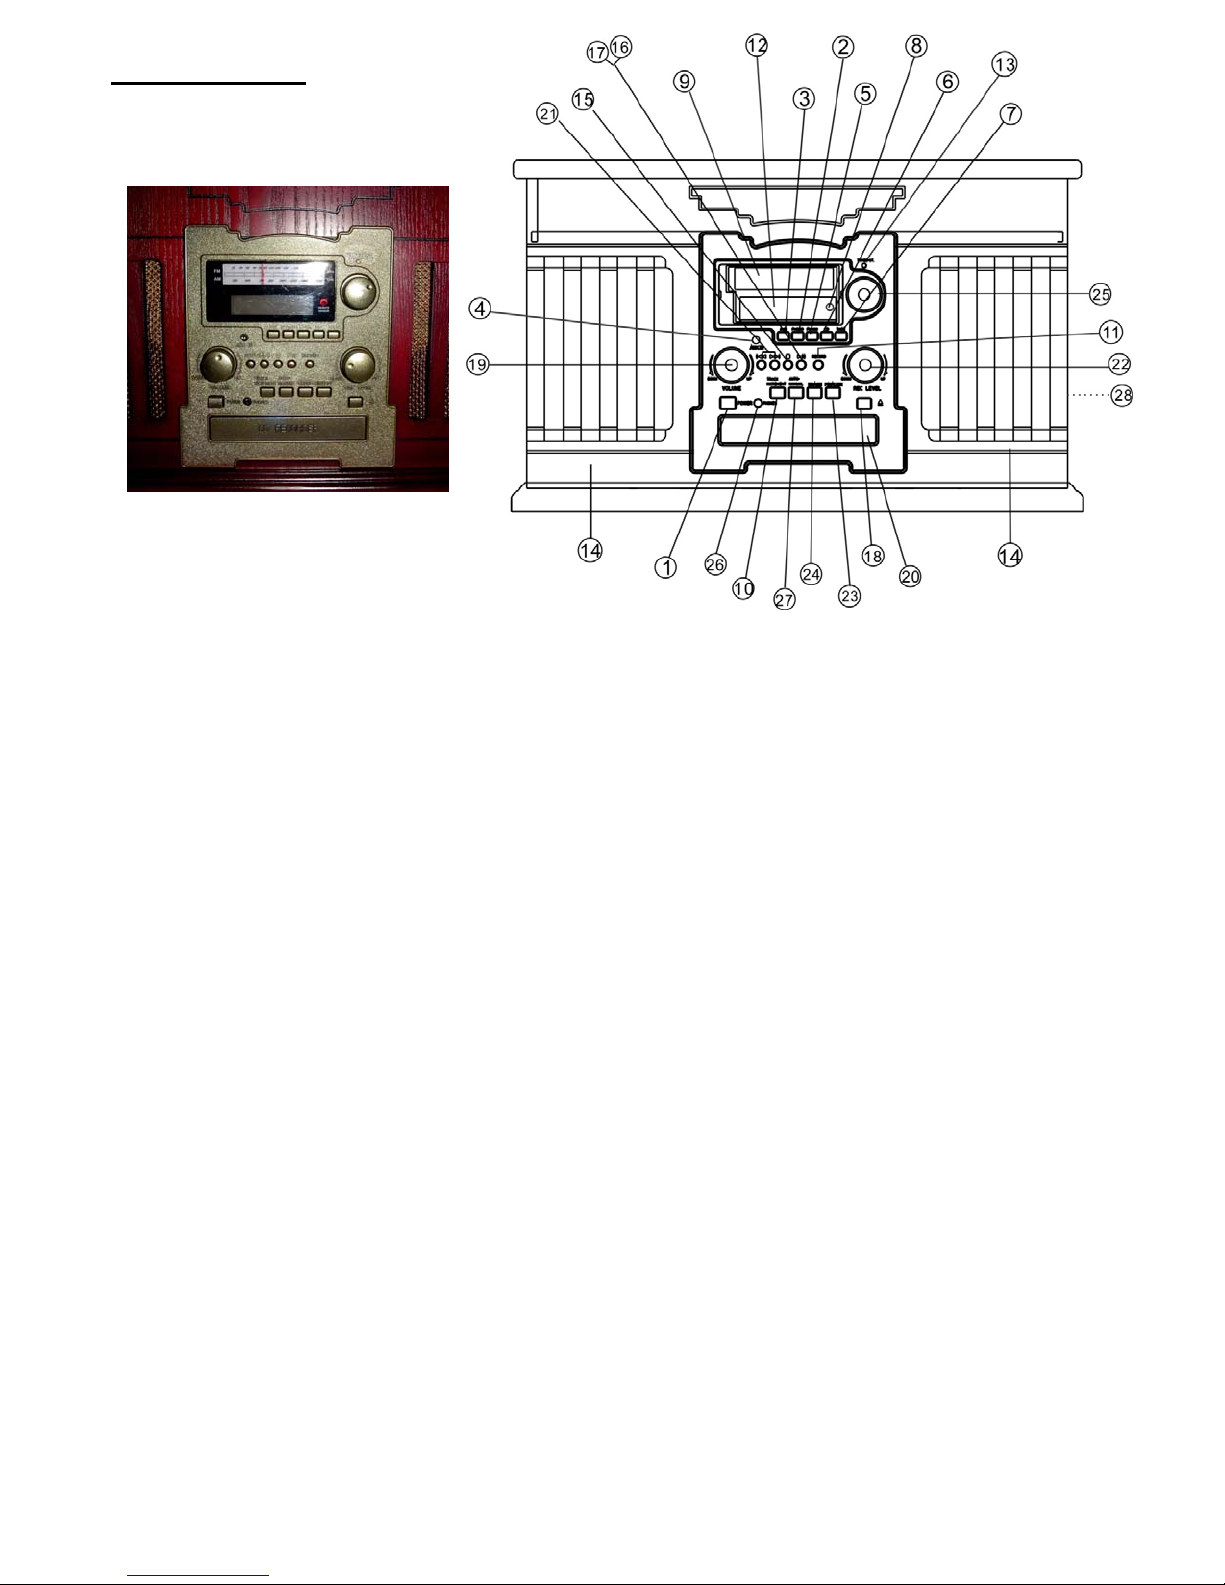
Control Panel
1. POWER
2. PHONO
3. AUX
4. AUX IN Jack
5. FM/AM
6. CD
7. TAPE
8. REMOTE SENSOR
9. AM/FM RADIO DIAL
10. TRACK INCREMENT
11. RECORD
12. LED DISPLAY
13. RADIO TUNING STEREO INDICATOR
14. SPEAKERS (STEREO)
15. STOP PLAYBACK/RECORD
16. PLAY
17. PAUSE
18. OPEN/CLOSE CD TRAY
19. VOLUME
20. DISC TRAY
21. MUSIC SKIP
22. RECORD LEVEL
23. FINALIZE/UNFINALIZE
24. ERASE
25. RADIO STATION TUNING
26. HEADPHONE OUT JACK
27. MANUAL / AUTO REC
28. CASSETTE EJECT
9
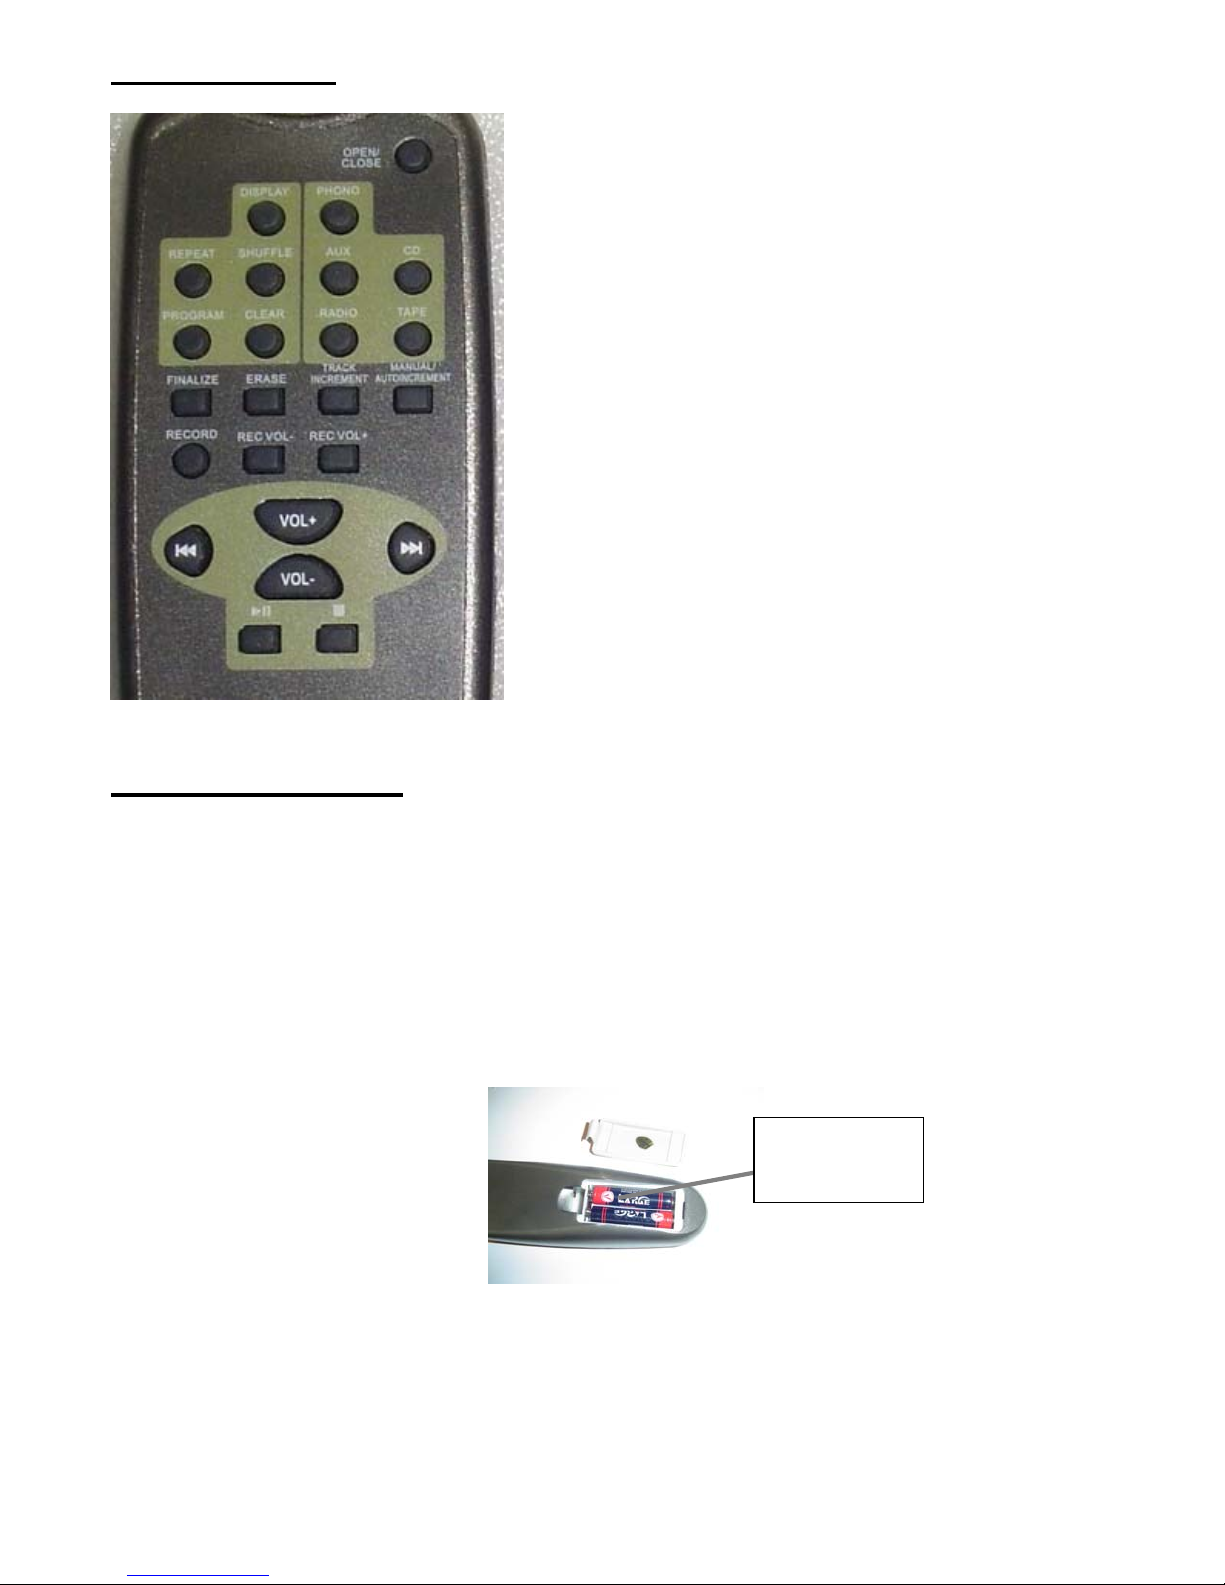
Remote Control
1. OPEN / CLOSE TRAY
2. DISPLAY
3. PHONO
4. REPEAT
5. SHUFFLE
6. AUX
7. CD
8. PROGRAM
9. CLEAR
10. RADIO
11. TAPE
12. FINALIZE
13. ERASE
14. TRACK INCREMENT
15. MANUAL / AUTO INCREMENT
16. RECORD
17. REC VOL -
18. REC VOL +
19. PREVIOUS
20. VOL +
21. VOL -
22. NEXT
23. PLAY / PAUSE
24. STOP
Remote Control Unit
When operating the remote control unit, point it towards the front panel of the unit.
Remote control operat ion may be interrupted if there are any obstacles between the un it and the
remote control.
If the remote control unit is operated near other appliances which generate infrared rays, or if other
remote control devices using infrared rays are used near the unit, it may oper ate incorrectly.
Battery Installation
Battery
Compartment
1. Remove the battery compartment cover.
2. Insert two “AAA” batteries. Make sure that the batteries are inserted with their positive “+” and “-”
poles positioned correctly.
3. Close the cover.
10
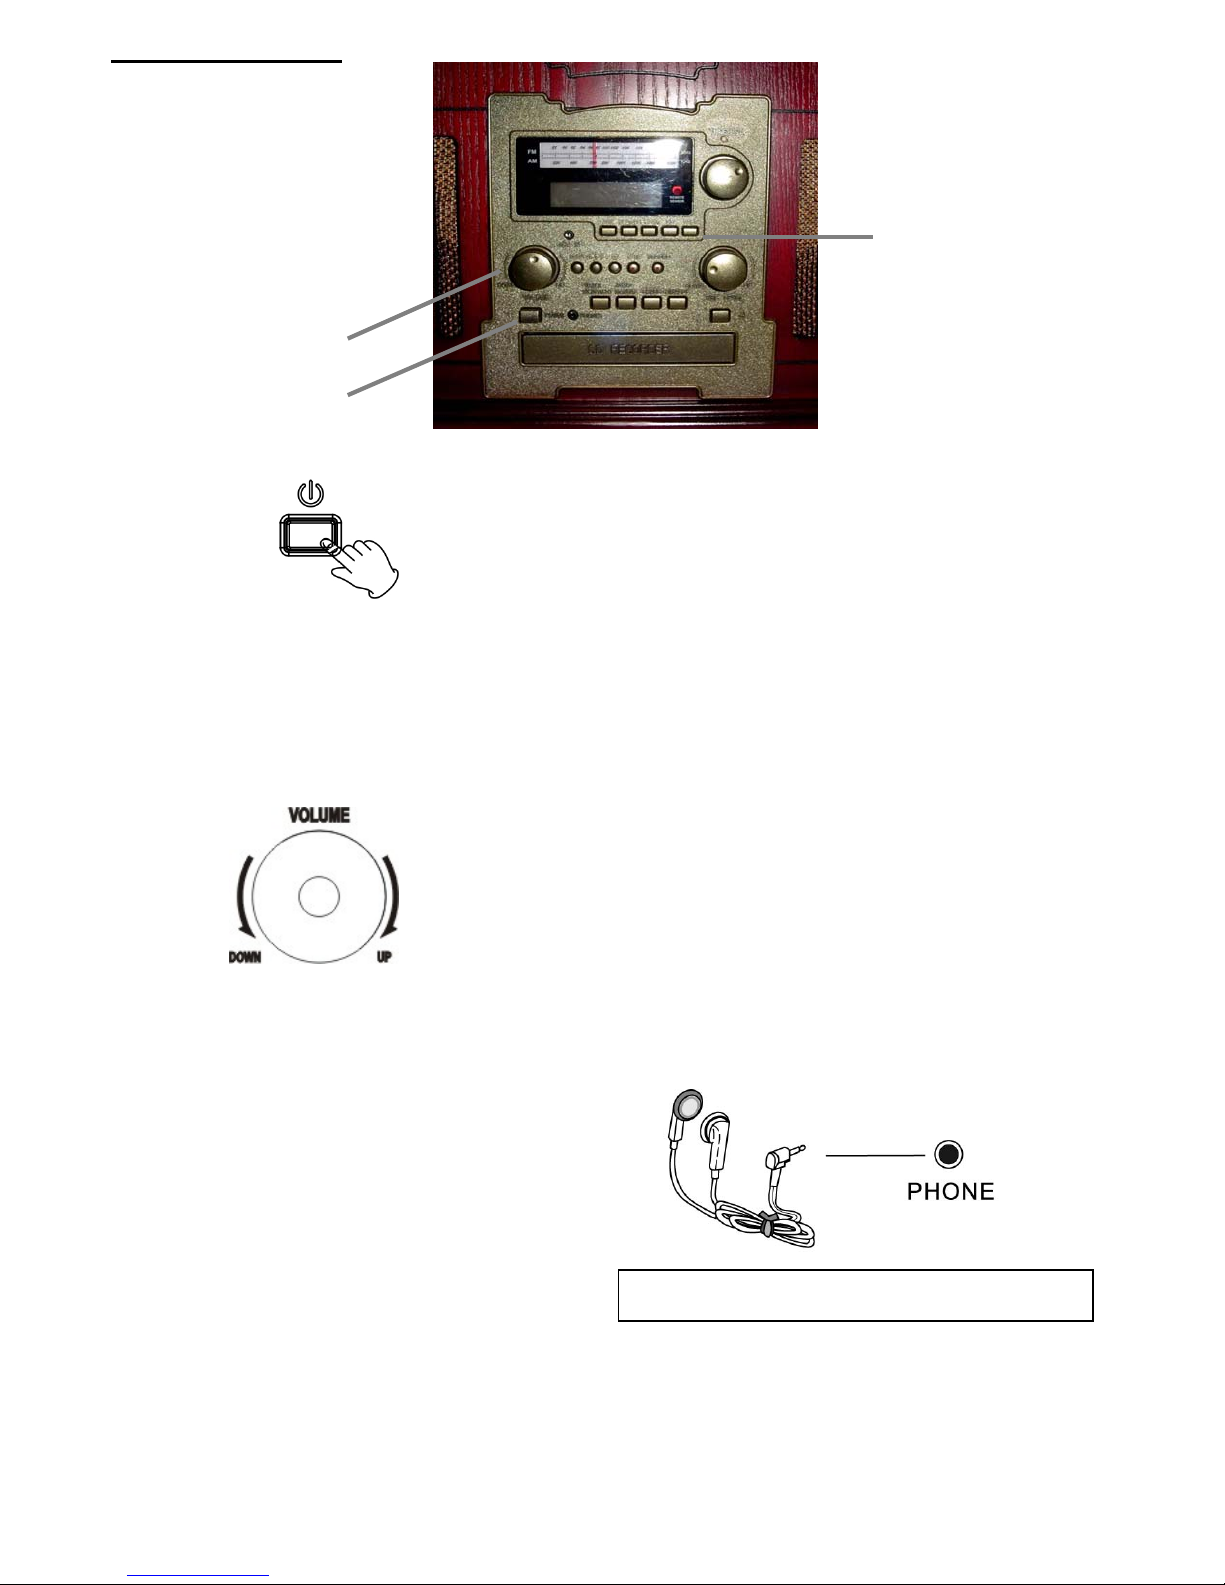
Basic Operation
2
3
1
1. Press the POWER switch to turn the unit on.
2. Select the music source by pressing the corresponding button.
AUX PHONO FM-AM CD TAPE
3. Rotate the VOLUME knob clockwise or counterclockwise to turn the radio on and adjust to desired
sound level.
Listening through Earphones / Headphones (not included).
Plug earphones into the phones out jack.
The Sound to external speakers is shut off.
11
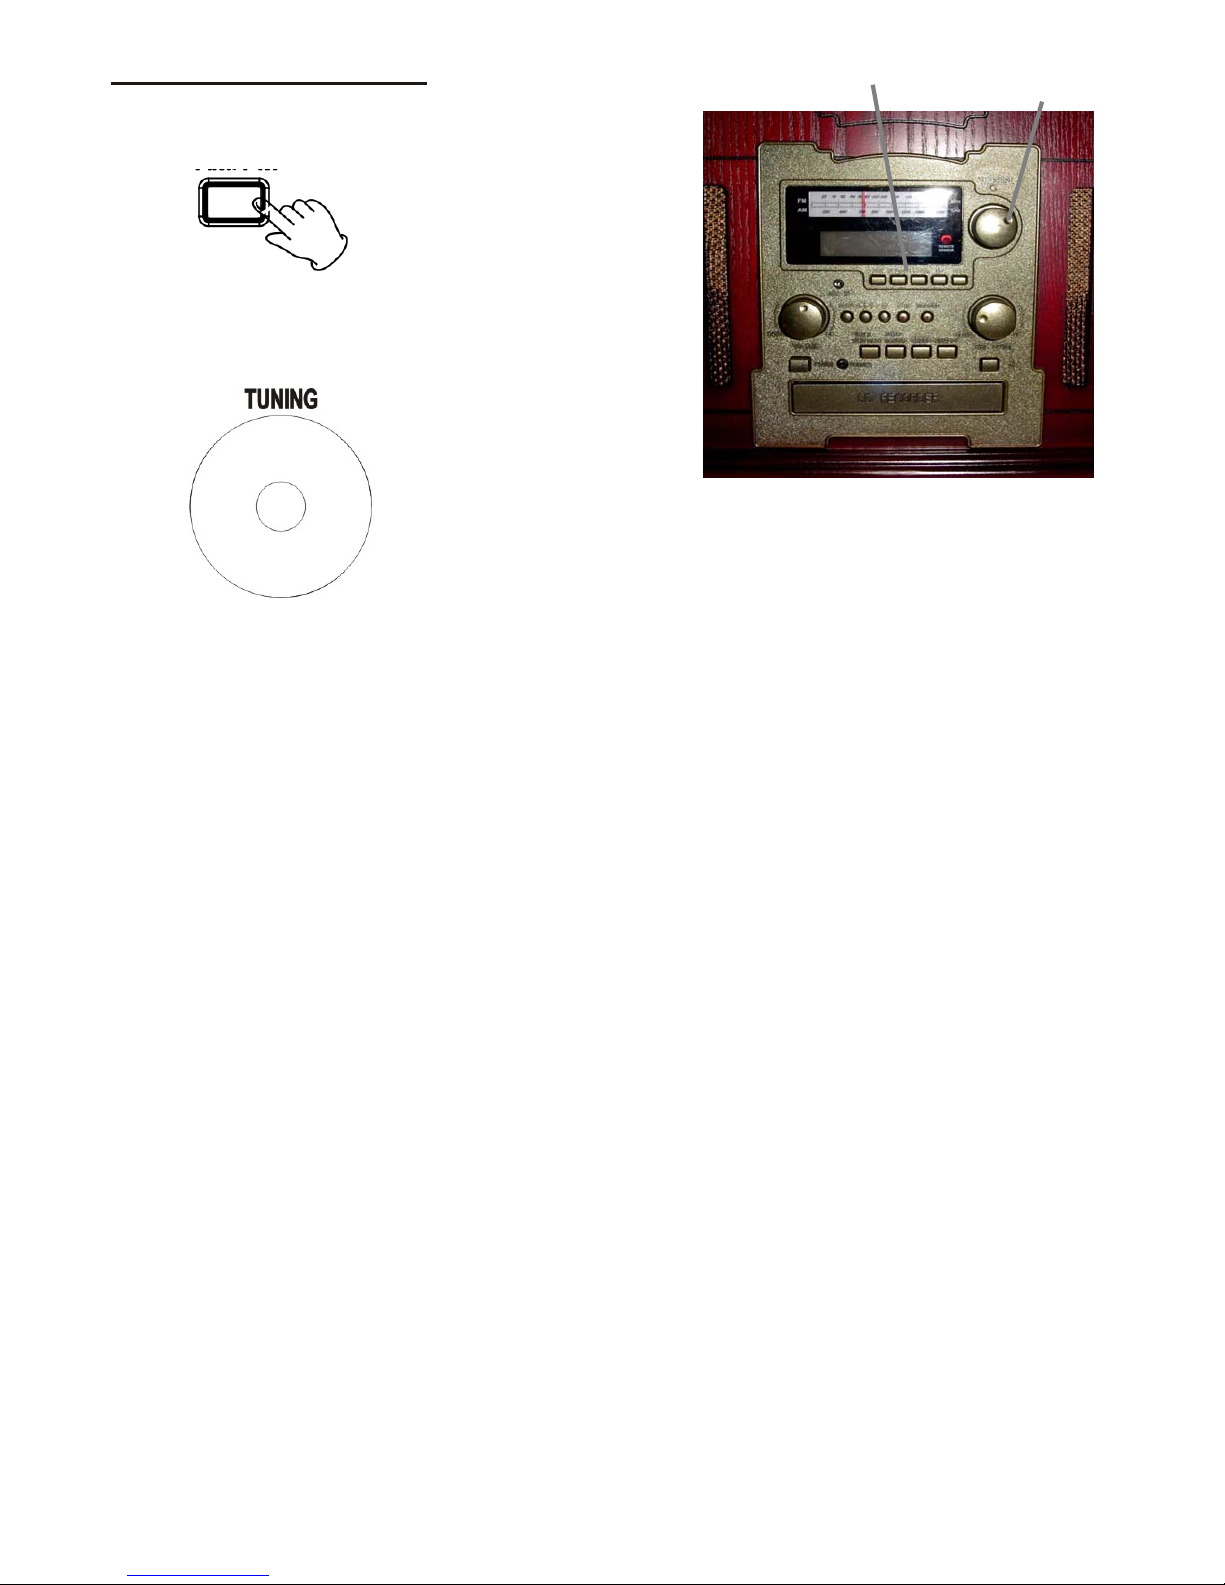
Listening to the Radio
1. Select FM or AM using the FM-AM button.
1
2
2. Tune to the desired frequency.
If the reception is poor AM broadcast:
Reposition the unit to find the best position for AM stations.
FM broadcast:
Extend and move around the FM antenna so that you can receive the station clearly.
FM-AM
12
 Loading...