

Page 1

ROS
Operator Manual
Page 2

2 ROS - Operator Manual 170719
We have checked that the contents of this document correspond to the model described. There
may be discrepancies nevertheless, and no guarantee can be given that they are completely
identical. The information contained in this document is reviewed regularly and any necessary
changes will be included in the next edition. We welcome suggestions for improvement.
Specifications and document subject to change without prior notice.
Information supplied in this manual is copyright. No part of this work may be reproduced or
copied in any form or by any means, electronic or mechanical without the express permission of
the author / publisher.
Service 0800 782 754
Parts 09 829 0930
Manufactured in New Zealand by Washtech Ltd.
414 Rosebank Road, Avondale, Auckland 1026.
PO BOX 90548, Auckland
CONTENTS
Safety Instructions.......................................................................................................................................................3
Installation Checklist.................................................................................................................................................. 4
Installation Diagram.................................................................................................................................................... 4
Installation Instructions............................................................................................................................................. 5
Polish Free Chemical................................................................................................................................................... 6
Polish Free Calibration.................................................................................................................................................7
RO Operation................................................................................................................................................................. 8
Optimizing Polish Free Results................................................................................................................................ 8
Maintenance.................................................................................................................................................................. 9
RO Layout Diagram.....................................................................................................................................................10
RO Schematic................................................................................................................................................................11
WARNING
Before installation and commissioning, you must read the safety instructions and warnings
carefully and all the warning labels attached to the equipment.
IMPORTANT
Polish free results are achieved through a combination of the equipment, chemicals and
processes. Failure to implement all the recommended steps might lead to inferior results.
IMPORTANT
Failure to comply (even partially) with the instructions given in this manual will invalidate
the product warranty and relieves the manufacturer of any responsibility
IMPORTANT
The alteration of machine operation, design or the replacement of parts not approved by
the manufacturer may void warranties and approvals.
IMPORTANT
This machine is intended for commercial use only.
WARNING
Before installation and commissioning, you must read the safety instructions
and warnings carefully and all the warning labels attached to the equipment.
IMPORTANT
Failure to comply (even partially) with the instructions given in this manual
will invalidate the product warranty and relieves the manufacturer of any
responsibility.
IMPORTANT
The alteration of machine operation, design or the replacement of parts not
!
!
!
WARNING
Before installation and commissioning, you must read the safety instructions
and warnings carefully and all the warning labels attached to the equipment.
!
WARNING
Before installation and commissioning, you must read the safety instructions
and warnings carefully and all the warning labels attached to the equipment.
IMPORTANT
Failure to comply (even partially) with the instructions given in this manual
will invalidate the product warranty and relieves the manufacturer of any
responsibility.
IMPORTANT
The alteration of machine operation, design or the replacement of parts not
!
!
!
WARNING
Before installation and commissioning, you must read the safety instructions
and warnings carefully and all the warning labels attached to the equipment.
IMPORTANT
Failure to comply (even partially) with the instructions given in this manual
will invalidate the product warranty and relieves the manufacturer of any
responsibility.
IMPORTANT
The alteration of machine operation, design or the replacement of parts not
!
!
!
Page 3

3 ROS - Operator Manual 170719
Safety Instructions
WARNING
Before installation and commissioning, you must read the safety instructions
and warnings carefully and all the warning labels attached to the equipment.
!
WARNING
Equipment contains dangerous voltages and can be hazardous if installed or operated
incorrectly. Non-compliance with warnings or failure to follow the instructions
contained in this manual can result in loss of life, severe personal injury or serious
damage to property.
Installation
• Use qualified, skilled personnel
• Follow installation instructions
• Connect to correct voltage and supply current
• Provide fully accessible electrical Isolation Switch & water supply valves
Training and Supervision
• Read and understand the Operating instructions and train all staff
• This appliance must not be operated by children or infirm persons
• Machine panels must only be removed by suitably qualified and trained personnel
– internal hazards include live electrics and very hot surfaces
• This appliance is not intended for use as a stepladder
Cartridge Replacement
• Turn off power and unplug machine from mains before replacing water filtration
cartridge
Chemicals
• Commercial dishwashing detergents are hazardous – handle with care
• Read and follow the safety information found on the labels of detergent
containers and Material Safety Data Sheets
• Use protective eye-wear and clothing if decanting containers
Cleaning
• Do not hose down the machine or splash water over the exterior
Improper Use
• This unit is only intended to supply treated water to a commercial glasswashing
machine and should not be used for any other purpose
Water Leaks
• If the unit develops a leak disconnect the power by pulling the plug out of the wall
socket, then turn off the water supply and contact your service agent
Service/repair
• Under no circumstances the user should attempt to carry out repairs
• All service/repair work must be carried out by qualified personnel only
Power Cord Replacement
• If the supply cord is damaged, it must be replaced by the manufacturer or its
service agent or a similar qualified person in order to avoid a hazard
Page 4
4 ROS - Operator Manual 170719
Unpack
• Unpack the machine, check for damage and complete delivery.
Positioning
• Place machine on sound waterproof self draining floor, fit feet and adjust feet to level
Water
• Flush supply lines before connection
• Connect hose supplied to adjacent accessible isolator valve - 20 mm 3/4 female
• Flow rate required - 1 litres per minute
• Pressure required - 200-350 kPa - fit limiter above this pressure
• Back Flow - Combination Dual Check Valve and Pressure Limiting Valve
Power
• 0.3A 240V 50Hz via switched outlet adjacent to the unit, which is supplied with cord set
including 10A plug.
Waste
• Connect drain pump hose supplied to upstand or sink waste connection
Troubleshooting Installation
• If machine doesn’t fill after switching on power, check & ensure that hot water supply tap is
open, water supply pressure is not below specification
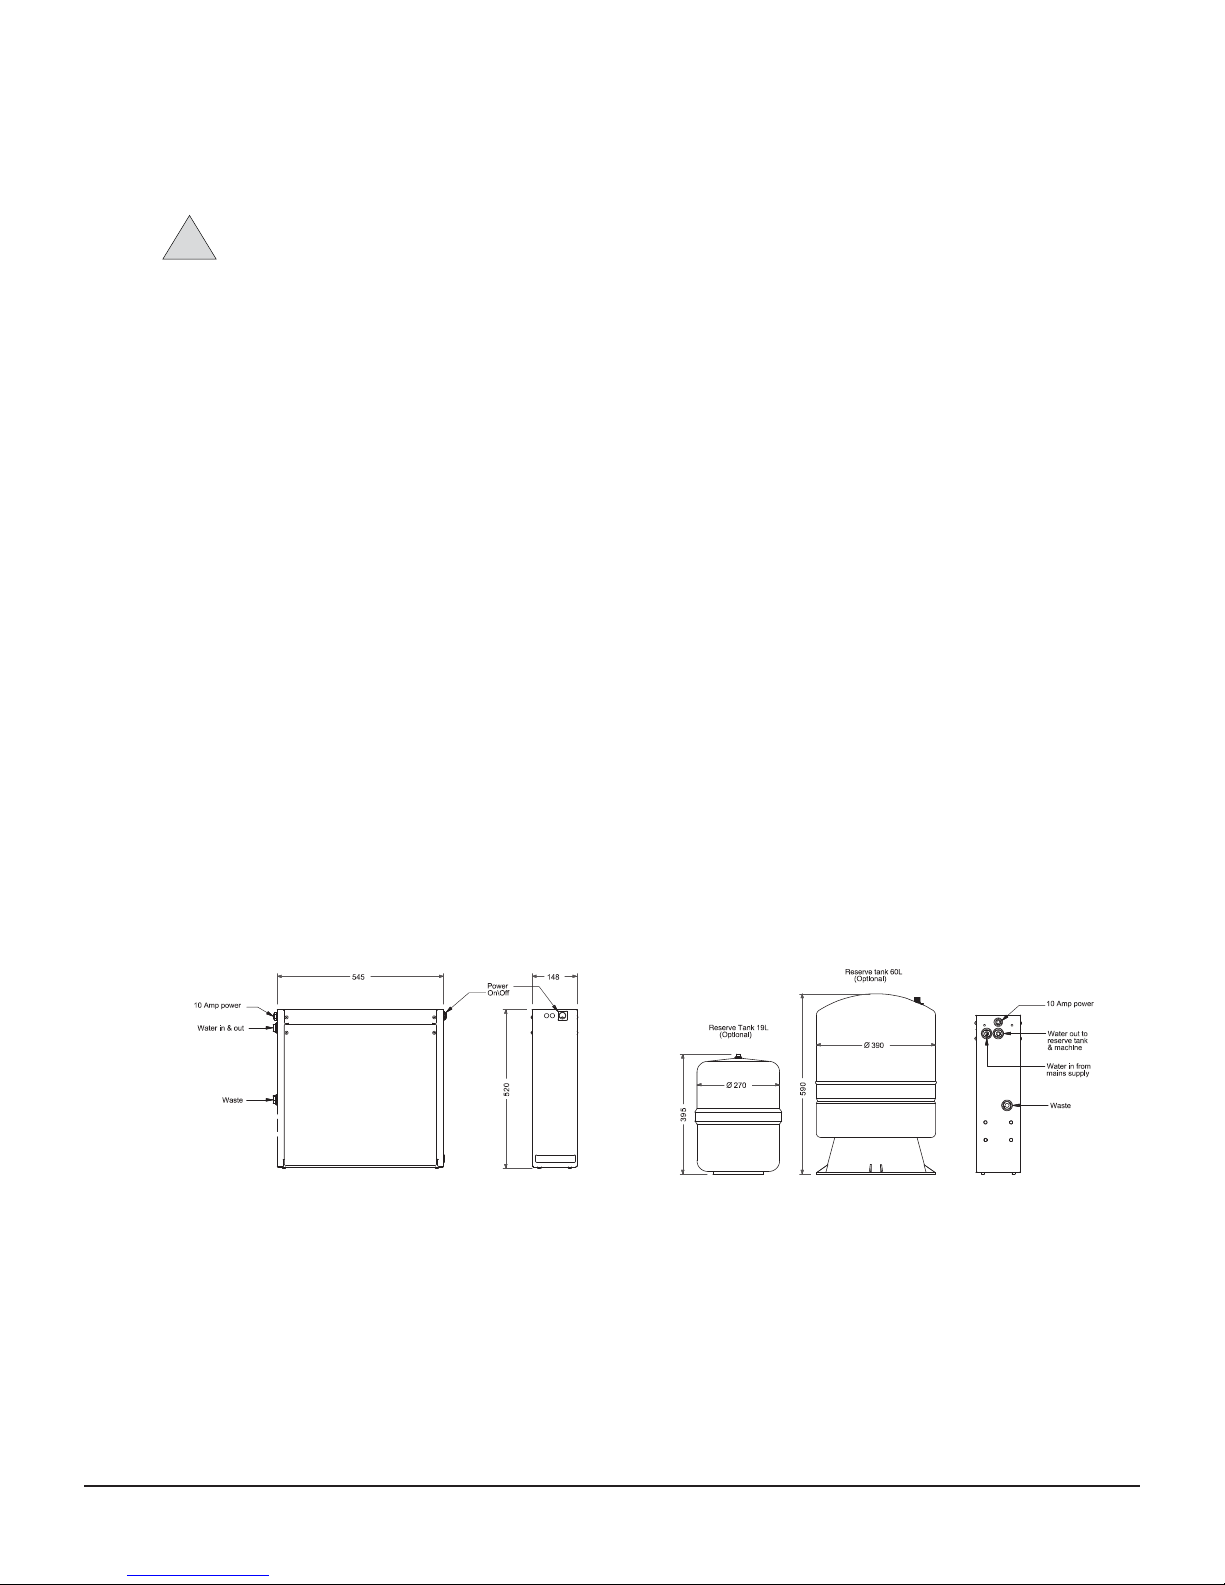
Installation Checklist
WARNING
Installer must be suitably qualified and ensure compliance with all codes and standards
including AS/NZS3500.1.
WARNING
Before installation and commissioning, you must read the safety instructions
and warnings carefully and all the warning labels attached to the equipment.
!
A Cold (only) connection Quick fit connect
water pressure 350Kpa
flow 20L/min
B Waste connection Quick fit connect
C Electrical Single phase 240V 50HZ 0.3amp
10amp plugset supplied
Installation Diagram
RO INST 12-014-17 3 B
Page 5

5 ROS - Operator Manual 170719
Fit the tubes supplied, to the solenoid valve of the glasswasher, an isolating valve on the
water main and an appropriate drain point.
Remove the shipping tubes from the tube fittings at the rear of the filtration unit.
Cut the tubes supplied to length and insert them into their labelled points at the rear of
the unit, and open the isolating valve.
Installation Instructions
IMPORTANT
The hoses supplied with this unit must be used for the purposes indicated on the label.
WARNING
Before installation and commissioning, you must read the safety instructions
and warnings carefully and all the warning labels attached to the equipment.
IMPORTANT
Failure to comply (even partially) with the instructions given in this manual
will invalidate the product warranty and relieves the manufacturer of any
responsibility.
IMPORTANT
The alteration of machine operation, design or the replacement of parts not
!
!
!
THE HOSES SUPPLIED WITH THIS UNIT MUST BE USED FOR THE
PURPOSES INDICATED ON THE LABELS.
Fit the tubes supplied to the solenoid valve of the glasswasher, an isolating valve on the
water main and an appropriate drain point.
Remove the shipping tubes from the tube fittings at the rear of the filtration unit.
Cut the tubes supplied to length and insert them into their labelled points at the rear of
the unit, and open the isolating valve.
See below for a guide to fitting and removing tubes.
Plug the power lead for the unit into a power point and switch on.
The pump in the unit will now run to build up pressure in the storage tank. By placing a
hand on the unit vibrations will be detected indicating the operation of the pump.
When the pressure builds up to 350Kpa the pump will cut out and the unit is now ready
for the
dishwasher to be switched on and filled.
The pump in the unit will now cycle on and off to keep up the pressure in the storage
tank.
The high pressure switch controls the pump so that the pressure in the tank can not
exceed 350Kpa.
The low pressure switch will cut the pump off in the event of loss of water at the inlet to
the unit..
Cut the tube
square and remove burrs and
sharp edges
Push the tube into the
fitting to the tube stop
Pull on the tube to
check that is secured.
To disconnect, push the
collet square against the
fitting. With the collet
held in this position the
tube can be removed.
MACHINE
RO Operation
To operate an ROS unit
• Plug the power lead for the unit into a power point and switch on the machine.
• The POWER light will glow red. The pump in the unit will now run to build up pressure in
the storage tank. By placing a hand on the unit vibrations will be detected indicating the
operation of the pump.
• When the pressure builds up to 350Kpa the pump will cut out and the unit is now ready
for the dishwasher to be switched on and filled.
• The OPERATION light will glow green. The pump in the unit will now cycle on and off to
keep up the pressure in the storage tank.
• The high pressure switch controls the pump so that the pressure in the tank can not
exceed 350Kpa.
• The low pressure switch will cut the pump off in the event of loss of water at the inlet
to the unit..
NOTE: The Operating light will not turn on if:
• The water supply to the ROS unit has been turned off
• If there is any obstruction to the water supply to the ROS unit
• The external tank is full
POWER
POWER
OPERATION
Page 6

6 ROS - Operator Manual 170719
Polish Free Chemicals
WARNING
If you use different chemicals, you will have to carefully recalibrate the chemical
injection levels to compensate for the different formulations and concentrations.
Without recalibration polish free results will be negatively impacted.
WARNING
Before installation and commissioning, you must read the safety instructions
and warnings carefully and all the warning labels attached to the equipment.
IMPORTANT
Failure to comply (even partially) with the instructions given in this manual
will invalidate the product warranty and relieves the manufacturer of any
responsibility.
IMPORTANT
The alteration of machine operation, design or the replacement of parts not
!
!
!
NOTE
Polish free results are dependant on using the right concentrations of the right
chemicals. An RO system is inclusive of your glasswasher, RO unit, chemicals,
operating procedures and drying area. If one of these components is altered without
recalibration of the system, inferior polish free results can be expected.
WARNING
Before installation and commissioning, you must read the safety instructions
and warnings carefully and all the warning labels attached to the equipment.
IMPORTANT
Failure to comply (even partially) with the instructions given in this manual
will invalidate the product warranty and relieves the manufacturer of any
responsibility.
IMPORTANT
The alteration of machine operation, design or the replacement of parts not
!
!
!
Starline has worked with Kemsol to develop the following chemicals to be used with a Starline
Glasswasher and Starline Reverse Osmosis system.
Ultimate
Automatic liquid detergent for commercial dish
and glasswash machines, designed for reverse
osmosis automatic glass and ware machine
units. Safe when used as directed on all
commercially automatically washed items.
Not recommended for aluminum or sensitive
metal-constructed kitchen items.
Features & Benefits
• Delivers exceptional results
• Ideal for use with any machine type
• Fitted with the Kemlock closed loop system
• Septic tank safe, when used as directed
Optimum
A drying aid concentrate specifically designed
for reverse osmosis automatic glass and ware
machine units. Significantly reduces or eliminates the requirement for post-clean
drying and polishing of glass and dishware,
leaving rinsed surfaces dry and spotlessly
streak-free.
Features & Benefits
• Leaves surfaces dry and spotlessly
streak-free
• Ideal for use with any machine type
• Fitted with the Kemlock closed loop system
• Septic tank safe, when used as directed
Automatic liquid detergent for commercial dish and
glasswash machines, designed for reverse osmosis
automatic glass and ware machine units. May also be
used with other machine types where operators
demand high performance detergent delivering
exceptional results. Safe when used as directed on all
commercially automatically washed items.
Not recommended for aluminium or sensitive
metal-constructed kitchen items. Septic tank safe,
when used as directed.
MPI APPROVED C31 (All Animal Product Except Dairy)
Engineered for Reverse Osmosis Systems
Features & Benefits
• Delivers exceptional results
• Ideal for use with any machine type
• Fitted with the Kemlock closed loop system
• Septic tank safe, when used as directed
AUTO DISHWASH DETERGENT
ultimate
®
A drying aid concentrate specifically designed for
reverse osmosis automatic glass and ware machine
units. May also be used with other machine types where
operators demand high-performance rinse aid delivering
exceptional results. Significantly reduces or eliminates
the requirement for post-clean drying and polishing of
glass and dishware, leaving rinsed surfaces dry and
spotlessly streak-free.
Septic tank safe, when used as directed.
®
Features & Benefits
• Leaves surfaces dry and spotlessly streak-free
• Ideal for use with any machine type
• Fitted with the Kemlock closed loop system
• Septic tank safe, when used as directed
SPOT-FREE RINSE ADDITIVE
optimum
MPI APPROVED C31 (All Animal Product Except Dairy)
Engineered for Reverse Osmosis Systems
CHEMICAL
Page 7

7 ROS - Operator Manual 170719
NOTE
To ensure best product performance it is strongly recommended that you use a
professional machine servicing agent, to set chemical dosage rates. Settings will
depend on machine type and operation. Product should be dosed specific to machine
manufacturer or distributor recommendations.
WARNING
Before installation and commissioning, you must read the safety instructions
and warnings carefully and all the warning labels attached to the equipment.
IMPORTANT
Failure to comply (even partially) with the instructions given in this manual
will invalidate the product warranty and relieves the manufacturer of any
responsibility.
IMPORTANT
The alteration of machine operation, design or the replacement of parts not
!
!
!
Polish Free Calibration
NOTE
To achieve optimal polish free results, Washtech have designed Starline glasswashers
to be run on Kemsol Ultimate and Optimum detergent and rinse fluid.
WARNING
Before installation and commissioning, you must read the safety instructions
and warnings carefully and all the warning labels attached to the equipment.
IMPORTANT
Failure to comply (even partially) with the instructions given in this manual
will invalidate the product warranty and relieves the manufacturer of any
responsibility.
IMPORTANT
The alteration of machine operation, design or the replacement of parts not
!
!
!
START
UP
POWER
DOWN
User Settings on your Starline Glasswasher
• Press the UP and DOWN key simultaneously for a few seconds
• Navigate through settings by pressing the POWER key
• Parameter values can be changed using the UP or DOWN keys
• Press START key to save changes and exit menu.
Choose your machine from the list below & adjust the following settings accordingly:
Machine Model F-Detergent Time W-Detergent Time Rinse Aid
GM 23 6 30
GL 10 14 30
UD 15 10 30
UL 13 10 30
Technical Settings on your Starline Glasswasher
• Press the UP, DOWN and START key simultaneously for a few seconds
• Navigate through settings by pressing the POWER key
• Parameter values can be changed using the UP or DOWN keys
• Press START key to save changes and exit menu.
For all machines adjust: FILL TIMEOUT to 20 minutes.
CALIBRATION
NOTE
If you are washing plates and cutlery in the same machine speak to Washtech as the
settings may need to be increased to accommodate the extra soiling.
WARNING
Before installation and commissioning, you must read the safety instructions
and warnings carefully and all the warning labels attached to the equipment.
IMPORTANT
Failure to comply (even partially) with the instructions given in this manual
will invalidate the product warranty and relieves the manufacturer of any
responsibility.
IMPORTANT
The alteration of machine operation, design or the replacement of parts not
!
!
!
To calibrate your Starline Glasswasher for polish free washing with Kemsol Ultimate and
Optimum, the following steps are to be followed.
Page 8

8 ROS - Operator Manual 170719
Optimizing Polish Free Results
APPROPRIATE RACKS
ADEQUATE DRYING TIME
Owner’s Manual
Glasses must be given the appropriate space
and time to dry. If space and time is an issue we
recommend using a drying table.
Drying tables facilitate fast drying and cooling of
glasses following the washing process.
Features & Benefits
• Drying tables reduce the drying time
• Drying tables speed up the turnaround time
of glasses whilst delivering them in perfect
condition for dispense
• The use of wet, warm glasses will impair the
presentation of the glass.
ATE LI ER R AOS
The rack design ensures water circulates efficiently over and
around the items in the rack, significantly improving washing
results. The sides are high enough to keep all items safely inside
the rack during the wash cycle.
External dimensions: 500 x 500 x 174 mm
Internal dimensions: 460 x 460 x 150 mm
Stacked height of 2 R500s: 305 mm
3
1
2
Base rack R500
1
3
2
4
5
Thanks to a range of optional and movable inserts, you can
rearrange the internal configuration of the rack as often as you
wish to meet your various warewashing needs, making this the
ideal unit for pubs, bars, cafes and restaurants.
Glasrelax GR500
The Glasrelax insert is designed to safely hold glasses in an inclined
position. This helps to reduce breakages, and also improves water
flow. Up to 5 Glasr
elax inserts can be placed in the rack.
Cutlery holder CBS
With pyramid-shaped base to improve water flow.
External dimensions: 105 x 105 x 140 mm
Plate insert PI 400
This insert for washing plates can hold 9 plates, each measuring up
to 240 mm.
Plate rack P 18 – 12
The plate rack P 18 – 12, external dimensions 500 x 500 x 100 mm
is the ideal addition if plates are to be washed. It holds 18 flat or
12 deep
plates.
Drip tray AWAT 500
The perfect drip tray for use on the counter.
2
3
4
5
Accessory
You can use up to 4 Glasrelax inserts for larger glasses
and up to 5 Glasrelax inserts for smaller glasses.
With four inserts (advised for larger glasses):
Row 1 can be used to hold tulip-shaped glasses up to 111 mm diameter.
Rows 2 – 4 can be positioned to allow for glasses measuring up
to 95 mm diameter.
With five inserts:
Row 1 can be used to hold tulip-shaped glasses up to 97 mm
diameter.
Rows 2 – 5 can
be positioned to allow for glasses measuring up
to 75 mm diameter.
6
7
Glasrelax GR500 suggestions for positioning the inserts
1
4 x GR500
6
5 x GR500
7
for 9 glasses
compartment
size
150 x 150 mm
for 16 glasses
compartment
size
113 x 113 mm
for 20 glasses
compartment
size
99 x 99 mm
20
for 25 glasses
compartment
size
90 x 90 mm
for 36 glasses
compartment
size
74 x 74 mm
for 44 glasses
compartment
size
67 x 67 mm
44
for 49 glasses
compartment
size
63 x 63 mm
for 20 glasses
compartment
size
113 x 90 mm
for 35 glasses
compartment
size
90 x 63 mm
5 x 7
Rack System 500
NEW
NEW
Concaved bases of glassware allow chemical saturated water to pool and not drain off of the
glasses while in the machine. Once removed from the machine, if the water is allowed to run
down the side of the glassware and dry, this can stain the glasses.
We recommend using Tilt racks with our RO systems. Tilt racks enhance the cleaning result by
allowing all water to drain off the glassware.
CLEAN MACHINE
Carry out proper shut down and cleaning procedures
every night to ensure optimum performance of your
Starline glasswasher.
If arm (6) jets and filters (1, 2 & 3) are not adequately
cleaned blockages can form, impeding water flow. This
will result in a reduction in spray area, which will effect the
amount of water and chemical dispersed over each glass.
Cleaning instructions are provided with each Starline
glasswasher. If you however require copies of these
instructions please contact your local Starline dealer.
Talk to a Starline dealer about tilt rack and drying tables.
2
1
3
4
6
6
5
Page 9

9 ROS - Operator Manual 170719
This filtration unit uses one sediment filter cartridge, one carbon filter cartridge, and two
reverse osmosis membrane cartridges.
It is recommended that the sediment cartridge be checked every 3 months and that spare
cartridges are kept available for prompt replacement when showing signs of wear. The lifetime
of the cartridge will vary according to the quality of the water source and the number of cycles
performed per day. Replacing the cheaper sediment and carbon filters more frequently will
help protect and extend the life of the more expensive RO membranes.
If the cartridges are not regularly replaced they will become blocked and the water flow will
diminish to the extant that it will effect the efficient operation of the glasswasher.
If the cartridges become blocked up and there are no spare cartridges available, the bypass
valves on the unit may be operated and the glasswasher will run on untreated water until new
cartridges are fitted.
Maintenance
WARNING
Turn off power and unplug machine from mains power supply before replacing water
filtration carridges
WARNING
Before installation and commissioning, you must read the safety instructions
and warnings carefully and all the warning labels attached to the equipment.
!
WARNING
To prevent flooding turn the valve of the storage tank off before removing/replacing
the cartridges
WARNING
Before installation and commissioning, you must read the safety instructions
and warnings carefully and all the warning labels attached to the equipment.
IMPORTANT
Failure to comply (even partially) with the instructions given in this manual
will invalidate the product warranty and relieves the manufacturer of any
responsibility.
IMPORTANT
The alteration of machine operation, design or the replacement of parts not
!
!
!
CARTRIDGE REPLACEMENT
Page 10

10 ROS - Operator Manual 170719
RO Layout Diagram
RO 0002 12/01/16 3 D
Page 11

11 ROS - Operator Manual 170719
RO Schematic
180100 07/02/13 1 A
Page 12

Information supplied in this manual is copyright.
No part of this work may be reproduced or copied
in any form or by any means, electronic or
mechanical without the express permission of the
author/publisher
Manufactured in New Zealand by Washtech Ltd.
414 Rosebank Road
Avondale
Auckland 1026
New Zealand
PO Box 90548, Auckland
24HR Service 0800 Starline
Tel 09 829 0930
Fax 09 829 0935
E-mail info@washtech.co.nz
web www.starline.co.nz
ISO9001
All Washtech products are designed and
manufactured by Washtech using the
internationally recognised ISO9001 quality
management system, covering design,
manufacture and final inspection, ensuring
consistent high quality at all times.
In line with policy to continually develop and
improve its products, Washtech Ltd reserves the
right to change specifications and design without
prior notice.
The Spirit of Excellence
an Ali Group Company
 Loading...