

Page 1
RDEB2013MM.02
STARLINE ROLDECK
ROLDECK CONTROL MANUAL RDEB 2013
HANDLEIDING ROLDECKBESTURING RDEB 2013
Copyright Starline Pools & Equipment the Netherlands.
All rights reserved. Nothing from this publication may be copied, stored in an automated database or made
public in any shape or form whether electronically, mechanically, through photocopying, recording or in any
other way without prior written permission from Starline Pools & Equipment.
Copyright Starline Pools & Equipment The Netherlands.
Alle rechten voorbehouden. Niets uit deze opgave mag worden verveelvoudigd, opgeslagen in een
geautomatiseerd gegevensbestand of openbaar gemaakt, in enige vorm of op enige wijze, hetzij elektronisch,
mechanisch, door fotokopieën, opnamen, of op enige andere manier, zonder voorafgaande schriftelijke
toestemming van Starline Pools & Equipment.
NL
GB
NL
GB
Page 2

RDEB2013MM.02 2
CONTENTS / INHOUDSOPGAVE
1 INTRODUCTION TO THE STARLINE ROLDECK CONTROL RD 2013 3
INTRODUCTIE VAN DE STARLINE ROLDECKBESTURING RD 2013 4
2/3 INSTALLATION INSTRUCTIONS / SAFETY INSTRUCTIONS 5
INSTALLATIE VOORSCHRIFTEN / VEILIGHEIDS INSTRUKTIES 6
4 OVERVIEW CONTROL / OVERZICHT BESTURING 7
5 OPERATING THE KEY SWITCH / BEDIENING VAN DE SLEUTELSCHAKELAAR 8
6 OPENING & CLOSING OF THE CONTROL HOUSING 9
OPENEN & SLUITEN VAN DE BESTURINGSKAST
7 OVERVIEW ROLDECK CONTROL / OVERZICHT BESTURINGSKAST 10
8 OVERVIEW LED’S AND MALFUNCTION MESSAGES 12
OVERZICHT LED’S EN STORINGSMELDINGEN
9 ELECTRICAL CONNECTIONS / ELECTRISCH AANSLUITEN 14
9.1 OVERVIEW OF CABLING IN COMBINATION W ITH GLAND NUTS / OVERZICHT 14
VAN BEKABELING IN CO MBINATIE MET W ARTELS
9.2 CONNECTING 230V SUPPLY VOLTAGE / AANSLUITEN VAN 230V VOEDINGSSPANNING 15
9.3 CONNECTING STANDARD ROLDECK MOTOR (RDEM) / AANSLUITEN VAN STANDAARD 16
ROLDECKMOTOR (RDEM)
9.4 CONNECTING THE ROLDECK IN-ROLLER MOTOR (RDIM) / AANSLUITEN VAN DE 17
ROLDECK BUISMOTOR (RDIM)
9.5 CONNECTING THE ROLDECK S-SWITCH CONTROL PANEL / AANSLUITEN VAN ROLDECK 19
S-SWITCH BEDIENINGSPANEEL
9.6 CONNECTING THE CHILDPROOF SAFETY LOCK TO ROLDECK CONTROL / AANSLUITEN 21
VAN KINDERVEILIGHEIDSSLOT OP ROLDECKBESTURING
9.7 CONNECTING THE LEVEL CONTROLLER TO ROLDECK CONTROL / AANSLUITEN VAN 22
NIVEAUREGELING OP ROLDECKBESTURING
9.8 CONNECTING JETSTREAM TO ROLDECK CONTROL (FLUVO) / AANSLUITEN VAN 23
JETSTREAM OP ROLDECKBESTURING (FLUVO)
9.9 CONNECTING JETSTREAM TO ROLDECK CONTROL (FITSTAR) / AANSLUITEN VAN 24
JETSTREAM OP ROLDECKBESTURING (FITSTAR)
9.10 CONNECTING FILTER PUMP TO ROLDECK CONTROL / AANSLUITEN VAN FILTERPOMP 25
OP ROLDECKBESTURING
9.11 1- BUTTON OPERATION / 1- KNOP BEDIENING 26
9.12 GARDENLICHTS / TUINVERLICHTING 27
9.13 POOL LIGHTS / ONDERWATERVERLICHTING 28
9.14 CONNECTING THE ROLDECK OPERATING KEY-SWITCH / AANSLUITEN VAN ROLDECK 29
BEDIENING-SLEUTELSCHAKELAAR
9.15 CONNECTING THE TEMPERATURE FEELING (OPTION) / AANSLUITEN VAN 31
TEMPERATUUR VOELING (OPTIE)
10 POGRAMMING THE ROLDECK CONTROL / PROGRAMMEREN VAN DE ROLDECK 32
BESTURING
10.1 WITHOUT AUTOMATICAL BOTTOM LID / ZONDER BEWEEGBARE BODEMKLEP 32
10.2 WITH AUTOMATICAL BOTTOM LID / MET BEWEEGBARE BODEMKLEP 36
10.3 MANUAL ROLDECK CONTROL / HANDMATIGE ROLDECK BEDIENING 42
11 S-SWITCH CONTROL PANEL / S-SWITCH BEDIENINGSPANEEL 44
11.1 FUNCTIONS S-SWITCH CONTROL PANEL / FUNCTIES OP S-SW ITCH BEDIENINGSPANEEL 44
11.2 PROGRAMMING THE S-SWITCH / PROGRAMMEREN VAN DE S-SWITCH 45
11.3 FINE TUNING THE S-SWITCH / FIJNINSTELLEN VAN DE S-SW ITCH 47
11.4 MENU NAVIGATION S-Switch / MENU NAVIGATIE S-Switch 50
11.4.1 Time / Tijd 50
11.4.2 Water temperature / Water temperatuur 51
11.4.3 Remote control / Afstandsbediening 51
11.4.4 General information / Algemene informatie 53
11.5 OPENING AND CLOSING ROLDECK / OPENEN EN SLUITEN RO LDECK 54
11.6 LED POOL LIGHT, JETSTREAM & GARDEN LIGHT / ZWEMBAD LED VERLICHTING, 55
JETSTREAM & TUINVERLICHTING
11.7 SPECIAL REPORTS / BIJZONDERE MELDINGEN 56
13 ROLDECK CONTROL IN CONNECTION WITH AUTOMATICAL BOTTOM LID / 58
ROLDECKBESTURING icm BEWEEGBARE BODEMKLEP
14 CLOSING SPEED / SLUITSNELHEID 61
15 HIGH POWER BRAKE MODULE (RDBS 2013) optional / HIGH POWER REMMODULE 61
(RDBS 2013) OPTIE
16 TECHNICAL SPECIFICATIONS / TECHNISCHE GEGEVENS 62
17 COPYRIGHTS 63
Page 3

RDEB2013MM.02 3
1. INTRODUCTION TO THE STARLINE ROLDECK CONTROL RDEB 2013
The control is modular and can therefore be extended with the addition of separate modules if required.
The control is designed according to the “plug and play” principle. This means there is an automatic motorrecognition between, for example, a standard motor and a pipe motor.
The control automatically selects the best control program according to the selected motor.
For the in-roller motor this means that when the Roldeck is opening, the rotational speed is automatically
limited to guarantee smooth running.
The control also recognises “plug-in modules” and activates these automatically.
The RD 2013 comes with a soft start and a soft stop.
The RD 2013 also has 4 outlets for the jetstream, filter pump, Garden lights and poollights respectively.
• If the jetstream pump is in operation and the command “Roldeck close” is given, regardless of which
control is used, the jetstream pump will be switched off immediately and the Roldeck will close after a delay
of 30 seconds. The jetstream pump can only be switched on again when the Roldeck is completely open.
• If the Roldeck runs in front of the injectors, for example when opening and closing, this can seriously
disrupt the functioning of the Roldeck.
During the opening or closing of the Roldeck, the control, in combination with the Starline pool control,
offers the possibility of switching off the filter pump first and activating the Roldeck after a delay of 30
seconds. As soon as the Roldeck reaches its end position (open or closed), the filter pump switches on
again automatically.
In addition the standard control has connections for the childproof safety lock, pressure measurement (only
in connection with the in-roller motor) 1 button operation.
The control is also equipped with a comprehensive error-code-diagnosis-system with which malfunctions
can be easily identified.
If the supply voltage fails all settings will remain stored in the processor, no matter how long the power
failure lasts.
Standard functions on the RD 2013
• Roldeck control in combination with electronic soft start and stop
• Childproof safety lock connection
• Garden lights
• Poollights
• If desired, delayed switching on and off of filter pump
• If desired, delayed switching on and off of jetstream
• Temperature measure
• Connection Starline electronic water-level regulator EELS 2006
The following modules can be added to the RD 2013.
• Remote control. (RDRC 2013)
• Automatic bottom flap control (RDAP 2013) (formerly RDAP 2006)
• Electronic Brake System (RDBS 2013) brake module for in-roller motor 500 Nm
These functions are added in the form of electronic plug-in modules, which are attached to the mother print
via a connector interface.
Existing accessories, such as “remote control extension set” and the “dealer remote control”, can also be
used on the RD 2013.
GB
Page 4

RDEB2013MM.02 4
1. INTRODUCTIE VAN DE STARLINE ROLDECKBESTURING RD 2013
De besturing is uitgevoerd volgens het principe “plug en play”. Dit houdt in dat er een automatische motorherkenning plaats vindt tussen bijvoorbeeld een standaard motor en een buismotor.
Aan de hand van de gekozen motor kiest de besturing automatisch het beste besturingsprogramma.
Voor de buismotor houdt dit in dat bij het sluiten van het Roldeck het toerental automatisch wordt afgeremd
zodat een constante loop gegarandeerd wordt.
Tevens herkent de besturing de “steekmodules” en activeert deze automatisch.
De RD 2013 is voorzien van een soft start en soft stop.
De RD 2013 is uitgerust met 4 uitgangen voor respectievelijk de jetstream, filterpomp, tuinverlichting en
onderwaterverlichting.
• Indien de jetstreampomp in bedrijf is en het commando “Roldeck sluiten” wordt gegeven, ongeacht met
welke bediening, wordt de jetstreampomp direct uitgeschakeld en na een vertraging van 30 seconden sluit
het Roldeck. De jetstreampomp kan pas weer worden ingeschakeld als het Roldeck geheel geopend is.
• Wanneer het Roldeck bij openen en sluiten bijvoorbeeld voor de inspuiters loopt kan dit het
functioneren van het Roldeck ernstig verstoren.
De besturing biedt de mogelijkheid om in combinatie met de Starline Poolcontrol bij het openen of sluiten
van het Roldeck eerst de filterpomp uit te schakelen en na een vertraging van 30 seconden het Roldeck te
activeren. Zodra het Roldeck in zijn eindpositie is (open of dicht) schakelt automatisch de filterpomp weer
in bedrijf.
Daarnaast is de besturing standaard voorzien van aansluitingen voor het kinderveiligheidsslot,
temperatuurvoeling, drukmeting (alleen i.c.m. buismotor) 1 knop bediening.
Tevens is de besturing uitgerust met een uitgebreid foutcode-diagnose-systeem waardoor storingen
makkelijker herkenbaar zijn.
Indien de voedingsspanning uitvalt blijven alle instellingen opgeslagen in de processor, ongeacht de duur
van de spanningsonderbreking.
Standaard functies op de RD 2013
• Roldeckbesturing in combinatie met elektronische soft start en stop
• Kinderveiligheidsslot aansluiting
• Tuinverlichting
• Onderwaterverlichting
• Indien gewenst, vertraagd in- en uitschakelen filterpomp
• Indien gewenst, vertraagd in- en uitschakelen jetstream
• Temperatuur voeling
• Aansluiting Starline elektronische waterniveauregelaar EELS 2006
De RD 2013 kan met de volgende modules worden uitgebreid.
• Afstandsbediening. (RDRC 2013)
• Automatische bodemklep besturing (RDAP 2013) (voorheen RDAP 2006)
• Electronic Brake System (RDBS 2013) remmodule voor buismotor 500 Nm
Deze functies, worden toegevoegd in de vorm van elektronische steekmodules, die d.m.v. een
connectorverbinding op de moederprint van de besturing bevestigd worden.
Huidige accessoires zoals “afstandsbediening verlengset” alsmede de “dealer remote control” kunnen ook
toegepast worden op de RD 2013.
NL
Page 5
RDEB2013MM.02 5
2. INSTALLATION INSTRUCTIONS
• Install the Starline Roldeck control RD 2013, protected from moisture in accordance with its
protection class, in a well-ventilated (technical) space.
• Mount the RD 2013 on a flat wall, using the attachment holes meant for this purpose.
These holes are on the bottom left and bottom right and in the centre top. Leave a minimum of 5
cm space around the RD 2013.
• Do not install the RD 2013 above chemicals or in a space where chemicals are stored.
This can seriously damage PC board and components, and as a result of this the guarantee will
lapse.
• Electrical connection and adjustment and servicing work may only be carried out by a certified
electro technician!
• The connection diagram and the prevailing safety regulations must be taken into account.
It is preferable for the 230 Volt connection of the RD 2013 to be connected over the Starline Pool
control. If this is not possible, the RD 2013 can be connected directly to the 230V mains voltage
which has an earth leakage circuit breaker with a IFN value of ≤ 30mA.
PLEASE NOTE:
• Before the housing is opened the equipment must be switched off*.
3. SAFETY INSTRUCTIONS
PLEASE NOTE:
• The Roldeck must not be (partially) closed or opened if there are people in the
swimming pool.
• Always switch the key switch to “0” when the Roldeck is open and there are people
in the swimming pool
• Switch the key switch to “0” and remove the key when the Roldeck is not in use.
• Have the Roldeck installation inspected once a year by your installer.
• You should report any malfunctions in the Roldeck to your installer.
Important:
Read the installation instructions en safety instructions before installing and operating
the roldeck control.
GB
Page 6

RDEB2013MM.02 6
2. INSTALLATIE VOORSCHRIFTEN
• Plaats de Starline Roldeckbesturing RD 2013, volgens zijn beschermingsklasse beschut tegen
vochtigheid, in een geventileerde (technische)ruimte.
• Monteer de RD 2013 tegen een vlakke muur, gebruik hiervoor de desbetreffende montagegaten.
Deze gaten bevinden zich links- en rechtsonder en in het midden boven. Houd rondom de RD
2013 minimaal 5 cm vrije ruimte.
• Plaats de RD 2013 niet boven chemicaliën of in een ruimte waar chemicaliën worden opgeslagen.
Dit kan ernstige beschadigingen aan printplaat en componenten veroorzaken en op grond daarvan
zal de garantie dan ook vervallen.
• Elektrische aansluiting en servicewerkzaamheden aan de besturing mogen alleen door een
gecertificeerde elektrotechnicus worden uitgevoerd!
• Het aansluitschema en de op dat moment geldende veiligheidsvoorschriften dienen in acht te
worden genomen.
• De 230 Volt aansluiting van de RD 2013 wordt bij voorkeur over de Starline Poolcontrol
aangesloten. Indien dit niet mogelijk is wordt de RD 2013 rechtstreeks op de netspanning 230V.
aangesloten welke voorzien is van een aardlekschakelaar met een I
FN
waarde ≤ 30mA .
3. VEILIGHEIDS INSTRUKTIES
LET OP:
• Het is niet toegestaan het Roldeck (gedeeltelijk) te sluiten of te openen wanneer er
zich personen in het zwembad bevinden.
• Schakel de sleutelschakelaar altijd op “0” als het Roldeck geopend is en er zich
personen in zwembad bevinden.
• Schakel de sleutelschakelaar op “0” en verwijder de sleutel als het Roldeck niet gebruikt wordt.
• Laat de Roldeckinstallatie 1x per jaar door uw installateur controleren.
•
Eventuele storingen aan het Roldeck dient u te melden aan uw installateur.
LET OP:
• Vóór het openen van de behuizing dient het apparaat spanningsvrij te worden
gemaakt.
Belangrijk:
Lees eerst de installatievoorschriften en veiligheidsinstrukties alvorens de
roldeckbesturing te monteren en in bedrijf te stellen.
NL
Page 7

RDEB2013MM.02 7
2
3
4
5
1
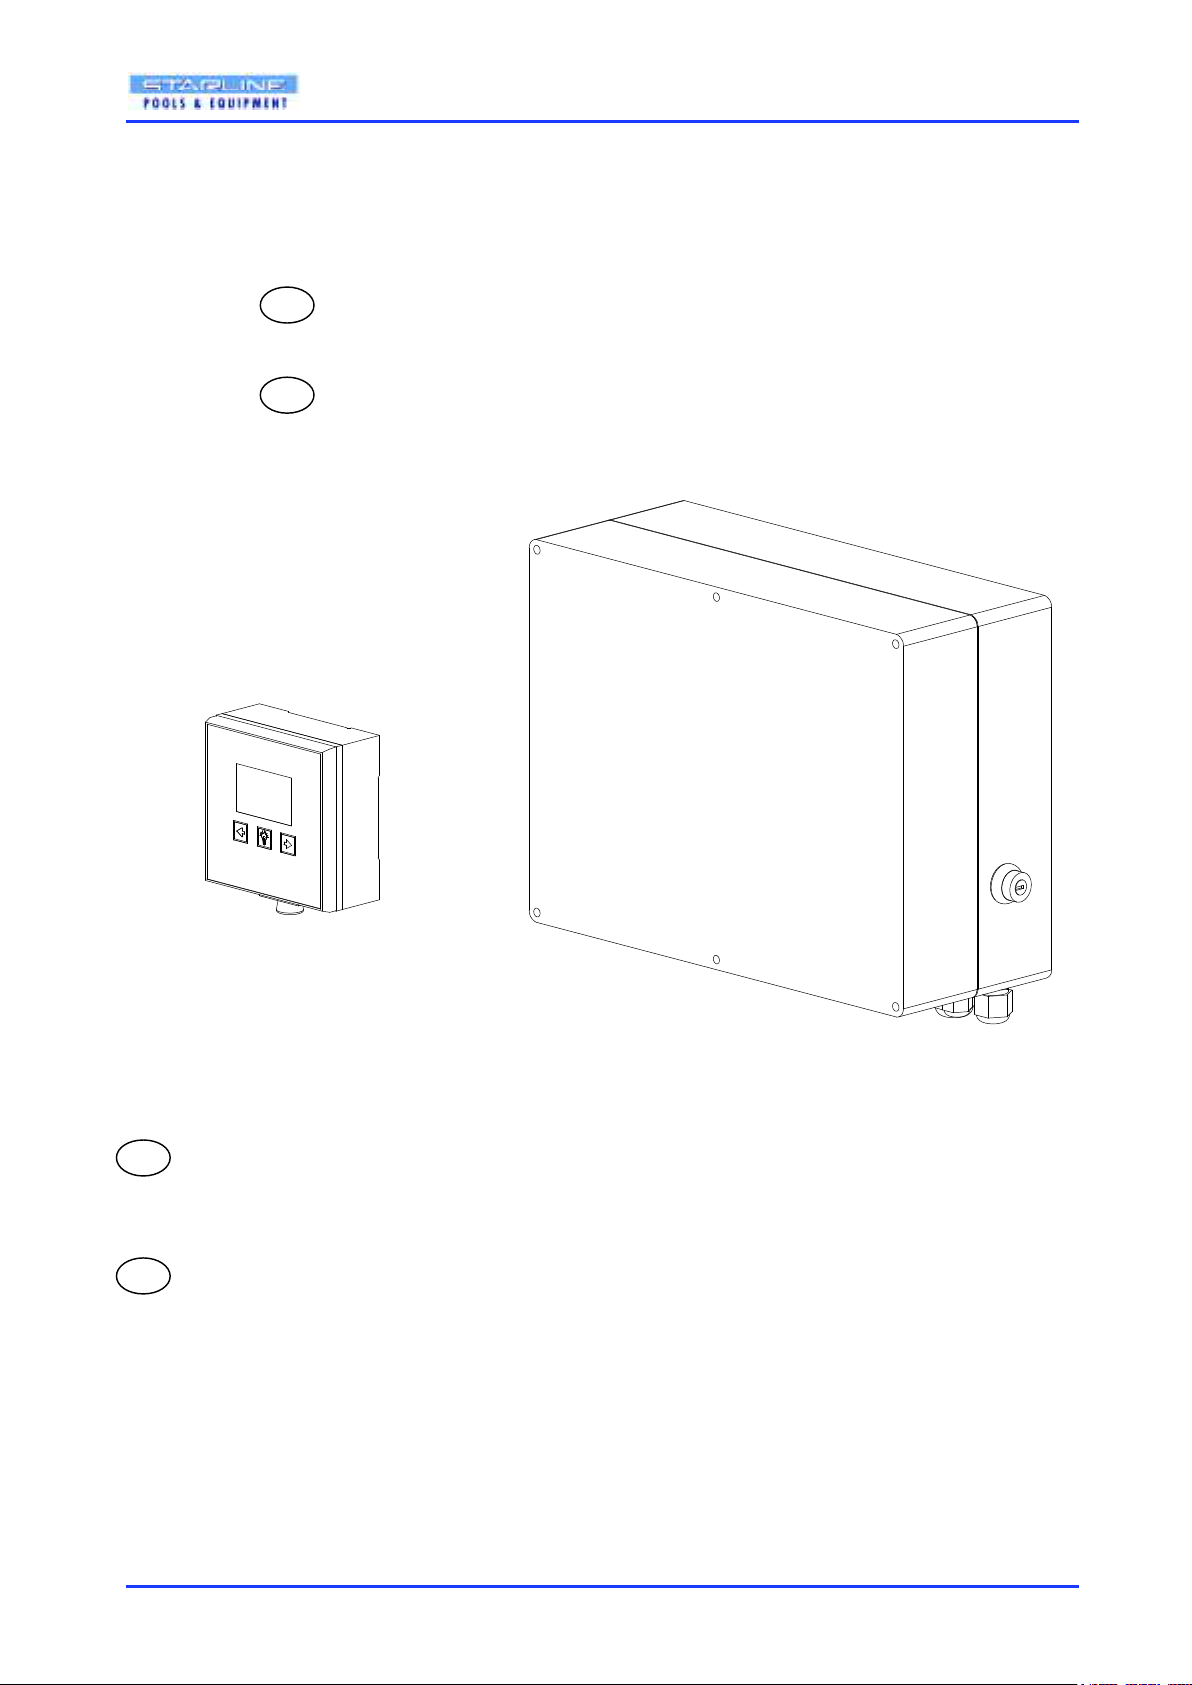
4. OVERVIEW CONTROL / OVERZICHT BESTURING
GB
NL
1 Roldeck control RD 2013 Roldeck Besturingskast RD 2013
2 On / off switch Aan/uit schakelaar
3 Key switch Sleutelschakelaar / Noodstop
4 S-Switch control panel S-Switch bedieningspaneel
5 Remote control Afstandsbediening
Page 8

RDEB2013MM.02 8
5. OPERATING THE KEY SWITCH / BEDIENING VAN DE SLEUTELSCHAKELAAR
PLEASE NOTE:
To operate the Roldeck the key switch must be in
position 1.
If the key switch is in position 0 it works as
emergency stop and the Roldeck is not operable.
(childproof safety)
LET OP:
Om het Roldeck te kunnen bedienen moet de
sleutelschakelaar in stand 1 staan.
Als de sleutelschakelaar in stand 0 staat werkt
deze als noodstop en is het Roldeck niet
bedienbaar. (kinderveiligheid)
Page 9

RDEB2013MM.02 9
ABC
D
EFG
H
J
L
M
O
P
K
I
288.0000
Prog
Mode
Waterlevel
Close
Stop
Open
Pulse
1 2 3 4 5 6 7
S400
REL303
V501 V500
RV400
S404
REL503
REL502 REL501 REL500
REL400REL302REL301
R528
R227
R118
REL300
RV212
RV210
RV207
RV206
RV205
RV201
RV200
LED206
LED205
LED204
LED203
LED202
LED201
LED200
R244
R243
R204
R203
R202
R201
R200
Switch
Waterlevel
Switch
Tipp
L 1 2 3 4 5 6 7
Panel - Unit
Safety
Lock
Roldeck S ensor-Roldeck S switch
M-BUS Temp.
+ - + 24V -
+ A B - P 1a 2a 3a 4a A B X Y
J201
J500
X200 J104 J103 J102
J502
3,15A/T
L1
N
230 V AC
Filtration
Pump
13 12 11
J401
N L 1 Ls
bl.br. sw.
Power Switch
12V 12V
max. 6A / 72W
AC out
Garden
Light
333143 41
Jet
RC
2321
Jet
Enable
max. 230V/5A
J400 X300 X301
X302 J402X303
8 9 10 11 12
1314 1516
J200
6. OPENING & CLOSING OF THE CONTROL HOUSING
OPENEN & SLUITEN VAN DE BESTURINGSKAST
OPENING OF THE CONTROL HOUSING
OPENEN VAN DE BESTURINGSKAST
PLEASE NOTE:
Before the housing is opened the equipment must be switched
off*.
Remove the 6 screws from the cover of the housing.
Remove the cover of the control housing.
LET OP:
Vóór het openen van de behuizing dient het apparaat
spanningsvrij te worden gemaakt.
Demonteer de 6 schroeven in de deksel van de besturingskast.
Neem de deksel van de besturingskast weg.
CLOSING
OF THE CONTROL HOUSING
SLUITEN
VAN DE BESTURINGSKAST
Put the cover back on the housing and tighten the screws
crosswise.
NOTE:
Make sure that the cover on the housing is completely closed,
otherwise condensation may occur inside the housing.
Plaats het deksel terug op de behuizing en draai de schroeven
kruislings vast.
LET OP:
Zorg dat het deksel geheel sluit op de behuizing omdat anders
condens in de behuizing kan ontstaan.
OFF!
UIT!
1. 2.
3.
Page 10

RDEB2013MM.02 10
Prog
Mode
Waterlevel
Close
Stop
Open
Pulse
1 2 3 4 5 6 7
S400
REL303
V501 V500
RV400
S404
REL503 REL502
REL501 REL500
REL400REL302REL301
R528
R227
R118
REL300
RV212
RV210
RV207
RV206
RV205
RV201
RV200
LED206
LED205
LED204
LED203
LED202
LED201
LED200
R244
R243
R204
R203
R202
R201
R200
Switch
Waterlevel
Switch
Tipp
L 1 2 3 4 5 6 7
Panel - Unit
Safety
Lock
Roldeck
Sensor-Roldeck S switch
M-BUS Temp.
+ - + 24V -
+ A B - P 1a 2a 3a 4a A B X Y
J201
J500
X200 J104 J103 J10 2
J502
3,15A/T
L1 N
230 V AC
Filtration
Pump
13 1 2 11
J401
N L1 Ls
bl. br. sw.
Power Switch
12V 12V
max. 6A / 72W
AC out
Garden
Light
33 3143 41
Jet
RC
23 21
Jet
Enable
max. 230V/5A
J400 X300 X301
X302 J402X303
8 9 10 11 1 2
13 14 15 1 6
J200
J202
Closing
Speed
- +
6
8
9
10
8 9 10 11 12
13 14 15 16
J200
J502
4
7
11
12
J202
3
1
Panel - Unit
14
2
5
13
Closing
Speed
- +
Prog
Mode
Waterlevel
Close
Stop
Open
Pulse
1 2 3 4 5 6 7
R528
RV212
RV210
RV207
RV206
RV205
RV201
RV200
LED206
LED205
LED204
LED203
LED202
LED201
LED200
R244
R243
R204
R203
R202
R201
R200
7. OVERVIEW ROLDECK CONTROL / OVERZICHT BESTURINGSKAST
Functions DIP-switch “S1” / Functies Dip switch “S1”
Switch /
Schakelaar
Function
Functie
ON
OFF
1 Activates childproof safety lock Kinderveiligheidsslot activeren ON
AAN
OFF
UIT
2 30 Second engagement delay Roldeck in
connection with filter pump and/or jetstream
pump
30 Seconden inschakelvertraging Roldeck
i.c.m. filterpomp en/of jetstreampomp
ON
AAN
OFF
UIT
3 Roldeck opens /closes when the open
/close button is pressed.
Switches off at pre-programmed end
position
Roldeck opent / sluit als de open / close
knop wordt ingedrukt.
Schakelt uit op voorgeprogrammeerde
eindafstelling
ON
AAN
OFF
UIT
4 Activates module “moveable bottom flap” Activeren van module “beweegbare
bodemklep”
ON
AAN
OFF
UIT
1 Fuse primary 230V / 3.15 A T Zekering primair 230V / 3.15 A /T
2 LED 01 t/m 07 LED 01 t/m 07
3 LED 08 t/m 12 LED 08 t/m 12
4 LED 13 t/m 16 LED 13 t/m 16
5 Jumper connector (for installation) Jumper aansluiting ( voor programmeren)
6 Program buttons Programmeer toetsen
7 Display Display
8 Chopper module Rem module
9 Adjust “close” speed Instellen “close” snelheid
10 DIP Switch S1 DIP Switch S1
11 Socket for program plug Connector tbv programmeerstekker
12 Automatic lid module Automatische klep module
13 LED A & B Motor sensor signal LED A & B Motor sensor signaal
14 Fuse 12V LED Zekering 12V LED lampen
Page 11

RDEB2013MM.02 11
Display
Buismotor
Externe motor
Display
Display
Display
Display
Display
or / of
External motor
In-roller motor
Rotation direction (open / close) / Draairichting ( sluiten / openen)
Roldeck sluiten: randje knippert bij lopen motor
Roldeck openen: randje knippert bij lopen motor
Roldeck gesloten: randje brandt, motor op eindpunt.
Roldeck open: randje brandt, motor op eindpunt.
Endposition Roldeck / Eindstand Roldeck
Roldeck partly open / Roldeck deels open
Roldeck partly open: edge lights
or / of
Closing Roldeck: edge flashes when running motor.
Roldeck deels open: randje brandt
Roldeck open: edge lights, motor on endposition.
Roldeck closed: edge lights, motor on endposition.
Opening Roldeck: edge flashes when running motor.
LED display
Page 12

RDEB2013MM.02 12
8 9 10 11 12
13 14 15 16
J200
1 2 3 4 5 6 7
8. OVERVIEW LED’S AND MALFUNCTION MESSAGES
OVERZICHT LED’S EN STORINGSMELDINGEN
Below describes the functions of the LED’s
Hieronder worden de functies van de LED’s weergegeven
LED Description Omschrijving
1 Signal open Signaal open
2 Keyswitch Sleutelschakelaar
3
4 Signal Tipp Signaal knop
5 Signaal Level switch Signaal niveauregelaar
6 Signaal Program Signaal Programma
7 Signaal Mode Signaal Mode
8 See 10 (Auto lid) Zie 10 (Auto klep)
9 See 11 (Auto lid) Zie 11 (Auto klep)
10 Close
• flashing when closing the Roldeck.
• lights when the Roldeck is closed.
Sluiten
• knipperen bij het sluiten van het Roldeck .
• branden als Roldeck gesloten is.
11 Open
• flashing when opening the Roldeck.
• lights when the Roldeck is opened.
Openen
• knipperen bij het openen van het Roldeck .
• branden als Roldeck open is.
12 Operation
• lights when control is in operation
• flashes at power failure detection.
In bedrijf
• brandt als besturing in bedrijf is
• knippert bij detectie stroomuitval.
13 Error
• lights at an error in the display occur.
• flashes at fault F04, F11 and F12 in the
display.
Storing
• brandt bij een fout in het display.
• knippert bij fout F04, F11 en F 12 in het display.
14 Program available
• lights when the control is completely set.
Programma aanwezig
• brandt als de besturing volledig is ingesteld.
10-11-15 Flashes > no program Knippert > geen programma
11-15 Program open Programma open
10 -15 Program close Programma dicht
15 No program
• lights when the Roldeck is active.
• flashes when the Roldeck must be set.
Geen programma
• brandt als het Roldeck actief is.
• knippert als het Roldeck moet worden ingesteld.
16 Auto lid actif
• lights when the moveable bottom flap is
active.
• flashes when the moveable bottom flap
must be set.
Autoklep actief
• brandt als de bodemklep actief is.
• knippert als de bodemklep moet worden
ingesteld.
16 Auto
• flashes at the start of the factory setting (for
5 sec.) Or in the emergency mode (for 3
sec.)
Auto
• knippert bij aanvang van de fabrieksinstelling
(voor 5 sec.) of in de nood modus (voor 3 sec.)
The emergency mode is enabled when LED’s "OPEN, CLOSE, AUTO and ROLDECK or BOTTEM LID are flashing.
De nood modus is ingeschakeld als LED’s “OPEN, CLOSE, AUTO en ROLDECK of KLEP” knipperen.
Page 13

RDEB2013MM.02 13
LED error & display error / LED storing & foutmelding op display
LED
Error
Description
Omschrijving
LED13 Motor not receiving 24V. voltage.
• Wrongly connected.
• Power cable is broken.
• Drive motor not running/blocked. Check whether the
wind-up axle is jammed or whether the Roldeck
itself is trapped in the recess.
Motor krijgt geen 24V.
• Verkeerd aangesloten.
• Voedingskabel onderbroken
• Aandrijfmotor draait niet / geblokkeerd. Controleer of de
opwikkelas vast zit of dat het Roldeck zich in de nis
heeft verklemt.
LED13
F11
Drive motor runs for 1 second and then stops.
• Sensor is connected incorrectly. Check connections.
• Sensor cable broken
• Sensor defect.
Aandrijfmotor draait 1 sec en stopt dan.
• Sensor verkeerd aangesloten. Controleer aansluitingen.
• Sensorkabel onderbroken
• Sensor defect
LED13
F03
Only with programmed control.
• Motor has been changed over or reconnected and is
running in opposite direction.
• Check direction of rotation and change the 24V + and
- over if necessary
•
Re-program control
Motor draait na programmeren in de verkeerde richting
• Motor is verwisseld of opnieuw aangesloten en draait in
tegengestelde richting.
• Controleer draairichting en verwissel indien nodig de
24V + en -.
• Besturing opnieuw programmeren
LED13
F04
Short circuit in feeder cable or drive motor. Kortsluiting in kabel of elektromotor
LED13
F05
Maximum power (9.5 A) has exceeded 9.5 A for longer
than 5 seconds continuously.
• Motor is not running smoothly enough.
• Motor is too light in connection with Roldeck
dimensions and overall depth.
• Moisture in electromotor.
Maximale stroom (9,5 A) meer dan 5 sec. onafgebroken
hoger geweest dan 9.5 A
• Motor draait te zwaar.
• Te lichte motor i.c.m. Roldeck-afmetingen of
inbouwdiepte.
• Vocht in electromotor
LED13
Q13
Maximum running time exceeded.
Roldeck 15 minutes.
• Motor running too slowly; check rotational speed of
drive motor.
• Motor slips over drive shaft; cotter or drive bolt
missing
•
Moveable bottom flap 2 min.
• Motor slips over drive shaft, cotter or drive bolt
missing.
Maximale draaitijd aandrijfmotor overschreden.
Roldeck 15 minuten.
• Motor draait te langzaam; controleer toerental van
aandrijfmotor.
• Motor slipt over aandrijfas; spie of aandrijfbout
ontbreekt
Beweegbare bodemklep 2 min.
• Motor slipt over aandrijfas, spie of aandrijfbout
ontbreekt.
LED13
Q14
Standard braking capacity inadequate, upward pressure
of slats too high.
• Install High Power Brake module
(RDBS 2013).
Standaard remvermogen onvoldoende, opwaartse kracht
van lamellen te groot.
• High Power Remmodule (RDBS 2013) plaatsen.
Temperature electronics in control too high. After cooling
down control switches back on automatically.
Temperatuur elektronica in besturing te hoog. Na afkoeling,
schakelt automatisch weer aan.
LED13
F11
Temperature High power brake module too high. After
cooling down control switches back on automatically.
Temperatuur High power remmodule te hoog. Na afkoeling,
schakelt automatisch weer aan.
Display error’s / Display foutmeldingen
Display
Error
Description Omschrijving
F01
• No sensor signal by start motor • Geen sensorsignaal bij start motor
F02
• No sensor signal during running for ≤ 1 second • Geen sensorsignaal tijdens bedrijf motor
F03
• Wrong direction of rotation (50 pulses in the wrong
direction)
• Foute draairichting (50 pulsen in verkeerde richting)
F04
• Short-circuit (motor current> 30A) • Kortsluiting (motorstroom> 30A)
F05
• Too much current (motor current for 10 s> 9.5 A) • Te veel stroom (motorstroom voor 10 s> 9,5 A)
F06
• Runtime error (Roldeck> 900s, bottom lid > 120s) • Runtime error (Roldeck > 900s, klep> 120s)
F07
• Overvoltage (motor voltage for 5s> 45V) • Overspanning (motorspanning voor 5s> 45V)
F09
• Overtemperature chopper module (temp> 100 ° C) • Te hoge temperatuur chopper-module (temp> 100 ° C)
F11
• Sensor error (both sensors are different) • Sensor fout (beide sensoren zijn verschillend)
F12
• Absolute overvoltage (motor voltage> 60V) • Absolute overspanning (motorspanning> 60V)
F21
• Water Level Sensor Input Open (RD Model: SK) • Ingang W aterniveau sensor open (Model RD: SK)
F22
• Key switch off “0” • Sleutelschakelaar op “0”
F31
• Under pressure Roldeck driver, low pressure in inroller motor Roldeck
• Onder druk Roldeckaandrijving, te lage druk in
buismotor Roldeck
F32
• Under pressure liddriver, low pressure in in-roller
motor of moveable bottom flap
• Onder druk klepaandrijving, te lage druk in buismotor
automatische klep
For error F04, F11 and F12: switch control off / Bij foutmelding F04, F11 en F12: besturing uitschakelen
Page 14

RDEB2013MM.02 14
Switch
Waterlevel
Switch
Tipp
L 1 2 3 4 5 6 7
Panel - Unit
Safety
Lock
Roldeck Sensor-Roldeck S s witch
M-BUS Temp.
+ - + 24V -
+ A B - P 1a 2a 3a 4a A B X Y
J201
J500
X200 J104 J103 J102
3,15A/T
L1 N
230 V AC
Filtration
Pump
13 12 11
12V 12V
max. 6A / 72W
AC out
Garden
Light
33 3143 41
Jet
RC
23 21
Jet
Enable
max. 230V/5A
J400
X300 X301
X302 J402X303
A
B
C
D
E
F
G H
J
L
M
O
P
K
I
9. ELECTRICAL CONNECTIONS / ELECTRISCH AANSLUITEN
9.1 OVERVIEW OF CABLING IN COMBINATION WITH GLAND NUTS / OVERZICHT VAN
BEKABELING IN COMBINATIE MET WARTELS
Cable specifications / Kabelspecificatie.
Description: Shows what the cable is used for.
mm²: Is the core diameter of the connection cable.
Max. Ø cable mm: The max. total diameter of the connection cable that is fed through gland nut.
Omschrijving: Geeft de vermelding weer waarvoor de kabel gebruikt wordt.
mm²: Kerndiameter van de aansluitkabel.
Max. Ø kabel mm: De max. totale diameter van aansluitkabel welke door wartel gevoerd wordt.
Gland nut
Wartel
Description Omschrijving mm² Max. Ø kabel
mm
A Power supply 230V. Voeding 230V. 1.5 8
B Filter pump Filterpomp . 1.5 13
C Jetstream pump Jetstreampomp 1.5 13
D Garden lights Tuinverlichting 1.5 13
E Pool lights 1 Onderwaterverlichting 1 1.5 13
F Keyswitch or Tipp (1-button operation) Sleutelschakelaar of 1- knop bediening 0.75 13
G Pool lights 2 Onderwaterverlichting 2 1.5 13
H Waterlevel switch Waterniveauregelaar 0.75 8
I Panel sensor or Childproof safety lock Panel sensor of Kinderveiligheidsslot 1.5 13
J Panel (Drive motor automatic flap ) Aandrijfmotor automatische klep * 8
K Roldeckmotor 24V Roldeckmotor 24V * 13
L Sensor Roldeck motor Sensor Roldeckmotor 1.5 13
M S-Switch control panel S-Switch bedieningspaneel 0.75
O M-Bus, system communication M-Bus, Systeem communicatie 0.75 8
P Tempature feeling (optional) Temperatuur voeling (optioneel) 0.75 8
*
see table below / zie onderstaande tabel
Distance / Afstand cable diameter / kabeldiameter
Motor 24V Sensor
< - 15mtr. 2½ mm² 1½ mm²
16 – 25mtr. 4 mm² 1½ mm²
26 – 40mtr. 6 mm² 1½ mm²
NL
GB
Page 15

RDEB2013MM.02 15
Switch
Waterlevel
Switch
Tipp
L 1 2 3 4 5 6 7
Panel - Unit
Safety
Lock
Roldeck Sensor-Roldeck S switch
M-BUS Temp.
+ - + 24V -
+ A B - P 1a 2a 3 a 4a A B X Y
J201
J500
X200 J104 J103 J102
3,15A/T
L1
N
230 V AC
Filtration
Pump
13 12 11
12V 12V
max. 6A / 72W
AC out
Garden
Light
33 3143 4 1
Jet
RC
23 21
Jet
Enable
max. 230V/5A
J400 X300
X301
X302 J402X303
A
B
C
D
E
F
G H
J
L
M
O
P
K
I
9.2 CONNECTING 230V SUPPLY VOLTAGE / AANSLUITEN VAN 230V VOEDINGSSPANNING
Connecting 230 Volt “ N – L1- ” Aansluiting 230 Volt “ N – L1- ”
It is preferable for the Roldeck control to be connected directly
to the Starline Pool control, to the connections “230V OUT”
(see Pool control instruction manual)
If this is not possible the RD 2013 can be connected via a plug
to the 230V mains voltage which has an earth leakage circuit
breaker with a IFN value of ≤ 30mA.
Tighten the gland nut so that the cable is held firmly.
De Roldeckbesturing wordt bij voorkeur direct aangesloten op
de Starline Poolcontrol, op de aansluitingen “230 V OUT” (zie
handleiding Poolcontrol)
Wanneer dit niet mogelijk is wordt de RD 2013 door middel van
een stekker op de netspanning 230V. aangesloten welke
voorzien is van een aardlekschakelaar met een I
FN
waarde ≤
30mA .
Draai de wartels aan zodat de kabels vast zitten.
 Loading...