

Page 1

GTm Family
GTm 5250 • GTm 5140
User Guide
27 September 2017
Page 2

Contents
Introducing the GTm Family 3
Introducing the touchscreen controller 3
Out-of-hours power saving for touchscreen controllers 4
The home screen 5
Near end camera control 5
Status indicators 5
Making a call 7
Dialing addresses that include letters and symbols 7
Redialing a recent call 7
Clearing recent calls 7
Searching in the company directory 8
Using in-call features 9
Adding more people to your video call 9
Changing what you see in a video call 10
Changing what they see in a video call 11
Layouts for dual screen room systems 12
Joining a conference 13
Joining a scheduled conference 13
Joining an ad hoc conference 14
Contacts 15
About contacts 15
About personal contacts 15
Creating favorites 15
Deleting favorites 16
Presence and other speed dial icons 16
Connecting a laptop 17
On the GTm 5250 17
On the GTm 5140 19
Customizing your touchscreen controller 21
Changing the screen brightness 21
Sorting your company directory 21
Sorting your contacts 21
Legal information 22
Third party software acknowledgments 22
Disclaimers and notices 22
GTm Family, 27 September 2017 Page 2 of 22
Page 3

Introducing the GTm Family
Introducing the GTm Family
The StarLeaf GTm family consists of the GTm 5250 and the GTm 5140 Huddle. These
meeting room endpoints connect to Skype for Business and Lync servers as an easy-to-use
video meeting room system. You will have either a one or two screen system.
GTm 5250 GTm 5140 Huddle
Introducing the touchscreen controller
Every GTm system comes with a touchscreen controller: the StarLeaf Touch 2035. You use
the touchscreen controller as the means for making and controlling video calls with GTm.
Through the touchscreen controller, you can access the directory and contacts, and join
conferences.
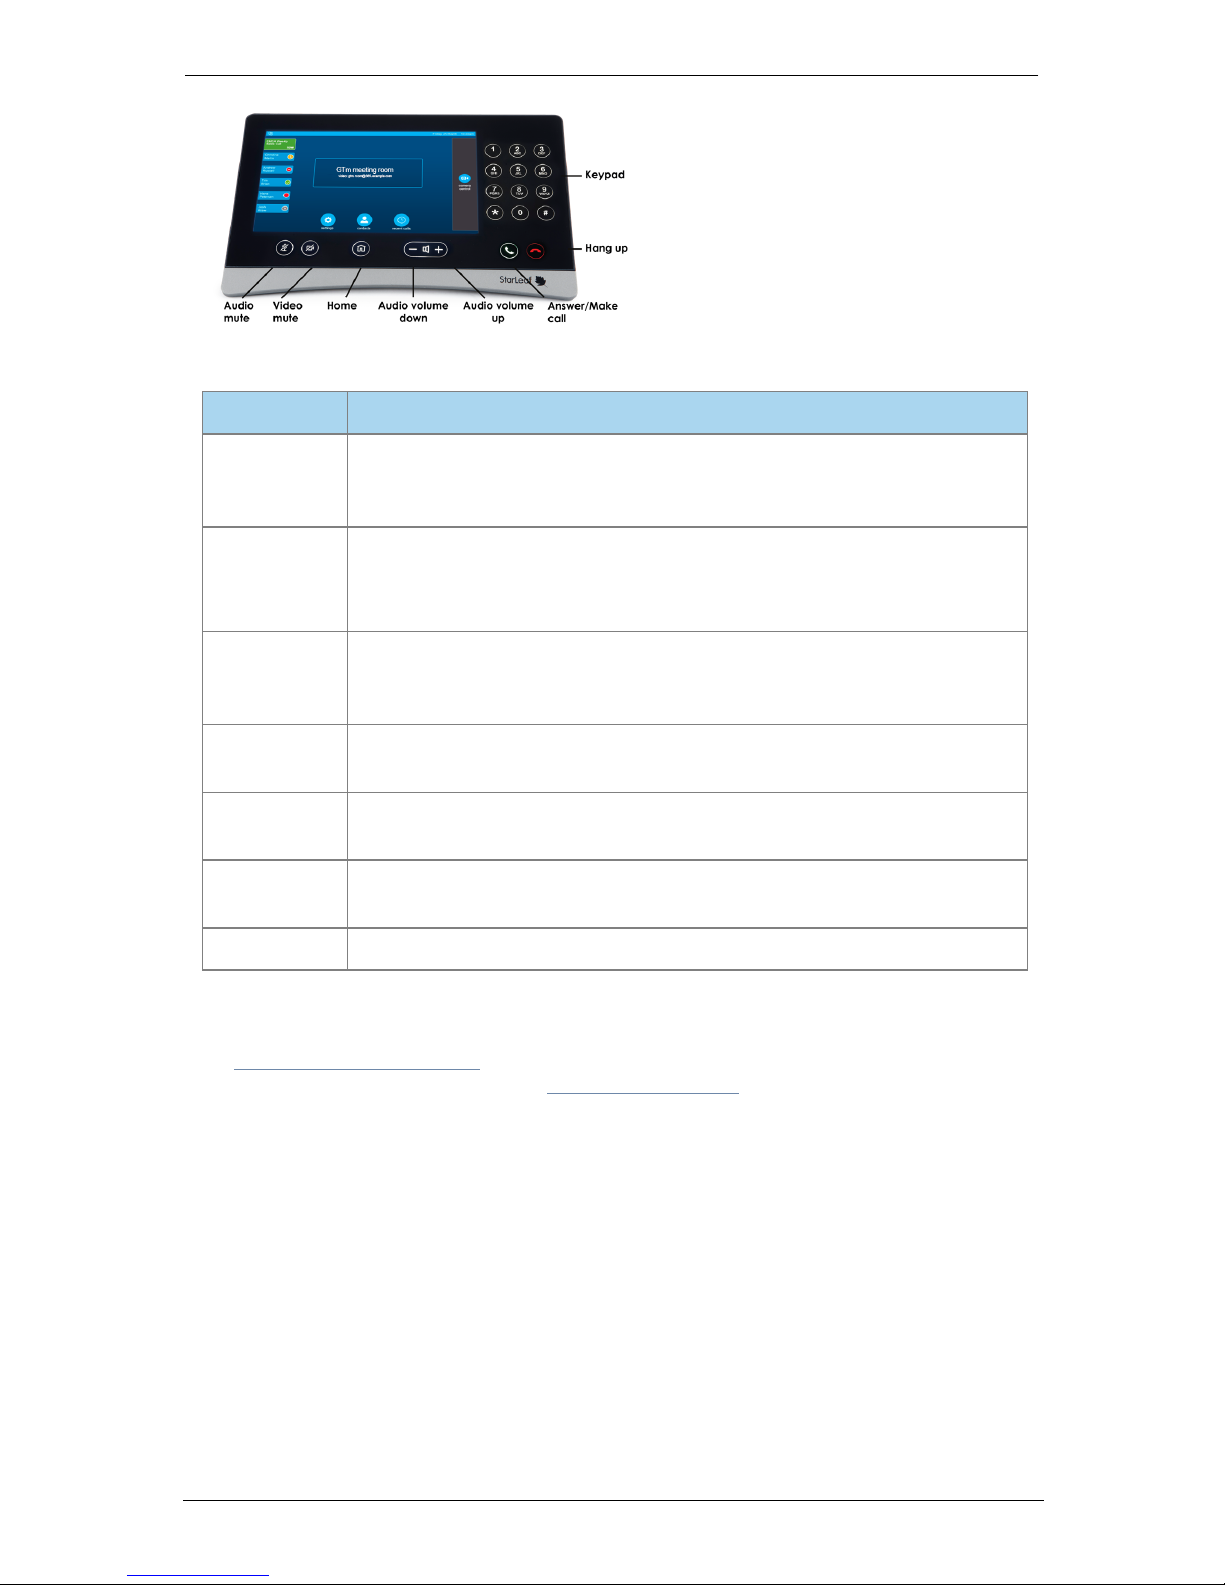
The StarLeaf Touch 2035
The figure below shows the features on the front of the StarLeaf Touch 2035.
GTm Family, 27 September 2017 Page 3 of 22
Page 4
Introducing the GTm Family
Table 1: Front panel features and controls
Button Description
Audio mute Toggle the microphone on and off. The button lights when the
microphone is off. When you are in a call and your audio mute is on,
nobody in the call can hear what you are saying
Video mute
Toggle the camera on and off. The button lights when the camera is off.
When you are in a video call and the video mute is on, nobody in the
call can see you
Home Press to display the home screen of the touchscreen controller from any
screen in the interface. Double-press to access the touchscreen
controller’s settings
Audio
volume down
Press during a call to decrease audio volume or, if you are not in a call,
press to decrease the loudness of the ringer
Audio
volume up
Press during a call to increase audio volume or, if you are not in a call,
press to increase the loudness of the ringer
Answer/Make
call
Press to answer an incoming call. At other times, press to access the dial
screen and the directory
Hang up Press to end the current call
For more information about audio, refer to:
n Connecting a laptop (p17)
n the StarLeaf Knowledge Center at support.starleaf.com
Out-of-hours power saving for touchscreen
controllers
The backlight on a touchscreen controller dims between the hours of 7pm and 7am in the
endpoint's local timezone. When a touchscreen controller is dimmed, it shows a screen
saver displaying the time. Touching the dimmed screen causes the backlight to light
again. A touchscreen does not dim for one hour after the last time it was touched.
Power saving is automatically enabled for all touchscreen controllers. There is no
configuration.
GTm Family, 27 September 2017 Page 4 of 22
Page 5
The home screen
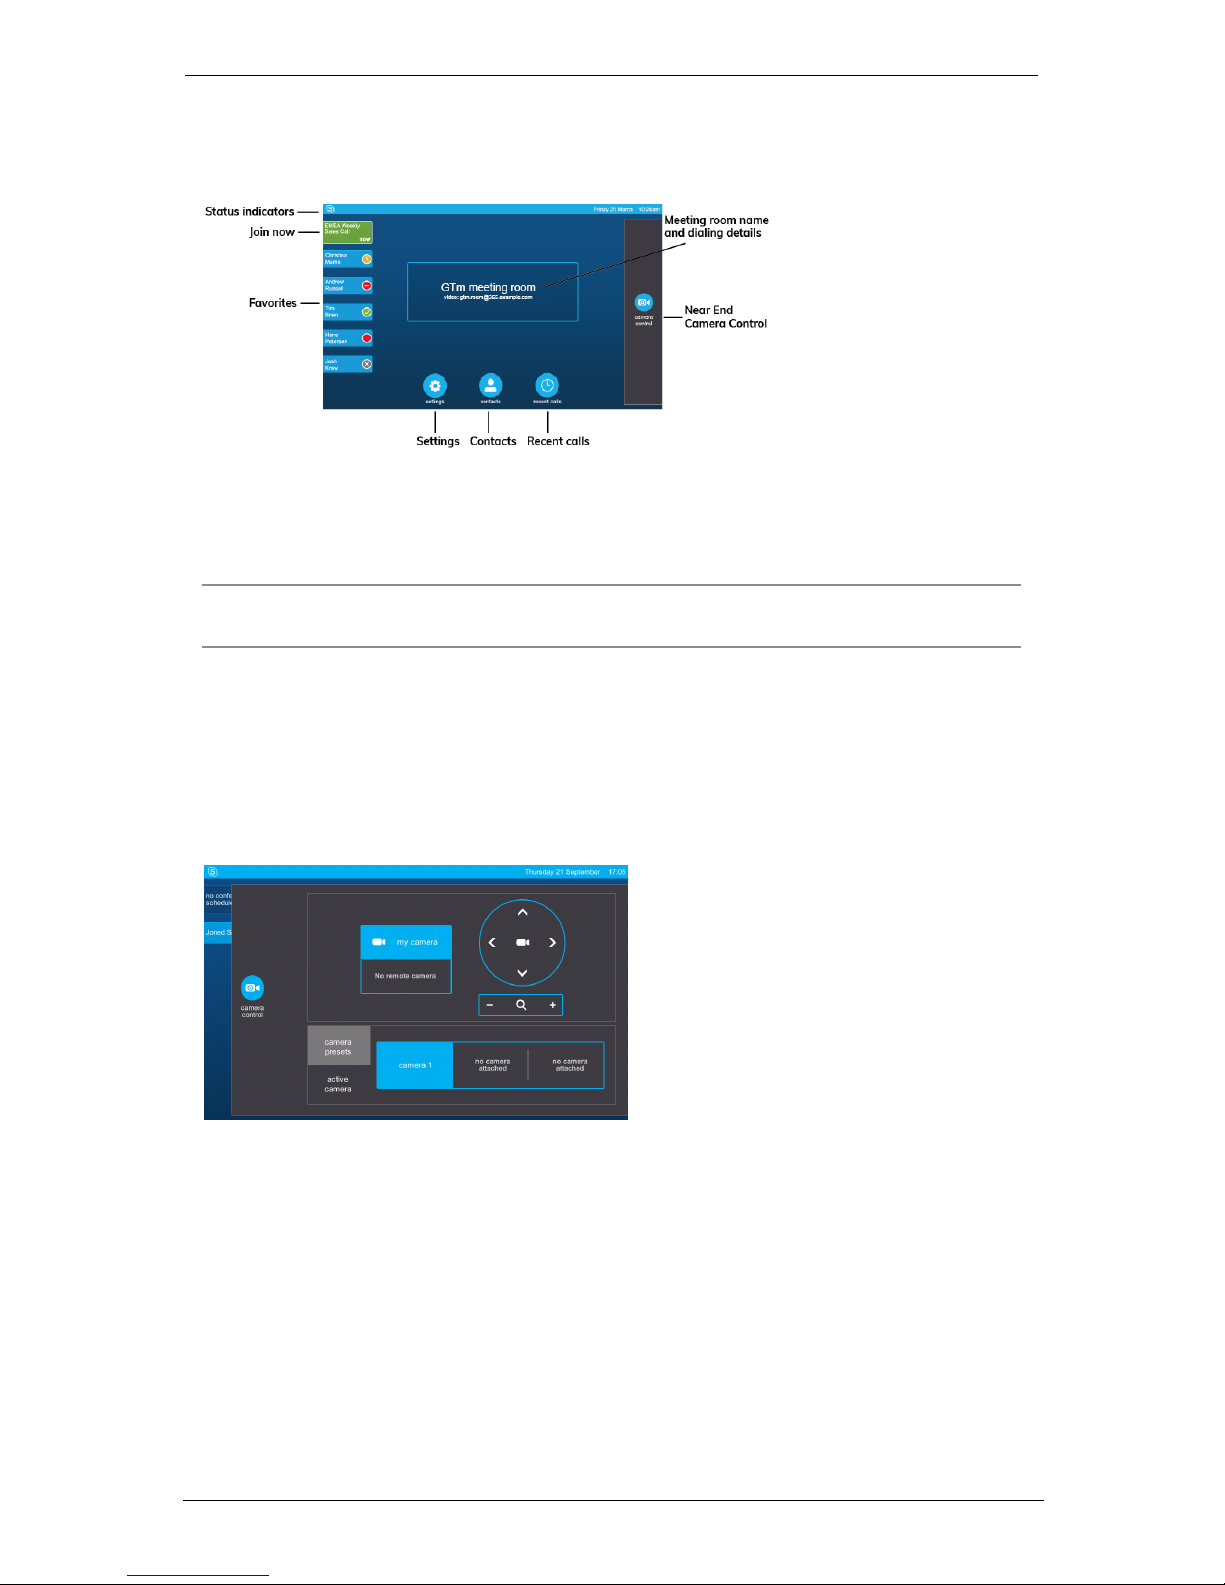
The home screen
This is the home screen of the touchscreen controller:
To display the home screen of the touchscreen controller from any of its other screens,
press the Home button. In the picture above, this system is assigned to Meeting Room.
To access the settings, double-press the Home button.
Note: The system name is assigned by logging into the GTm's Skype for Business account
using a Skype for Business client.
Near end camera control
The Camera Control tab on the home screen provides you with controls for the GTm
camera.
The near-end camera control allows you to pan, tilt, and zoom your camera. This control is
available both before you make a call and while you're in a call.
Status indicators
The status indicators in the top-left corner show you which displays and cameras are
detected, and what state they are in. Descriptions of what each of the icons mean can
be found in the table below.
GTm Family, 27 September 2017 Page 5 of 22
Page 6
The home screen
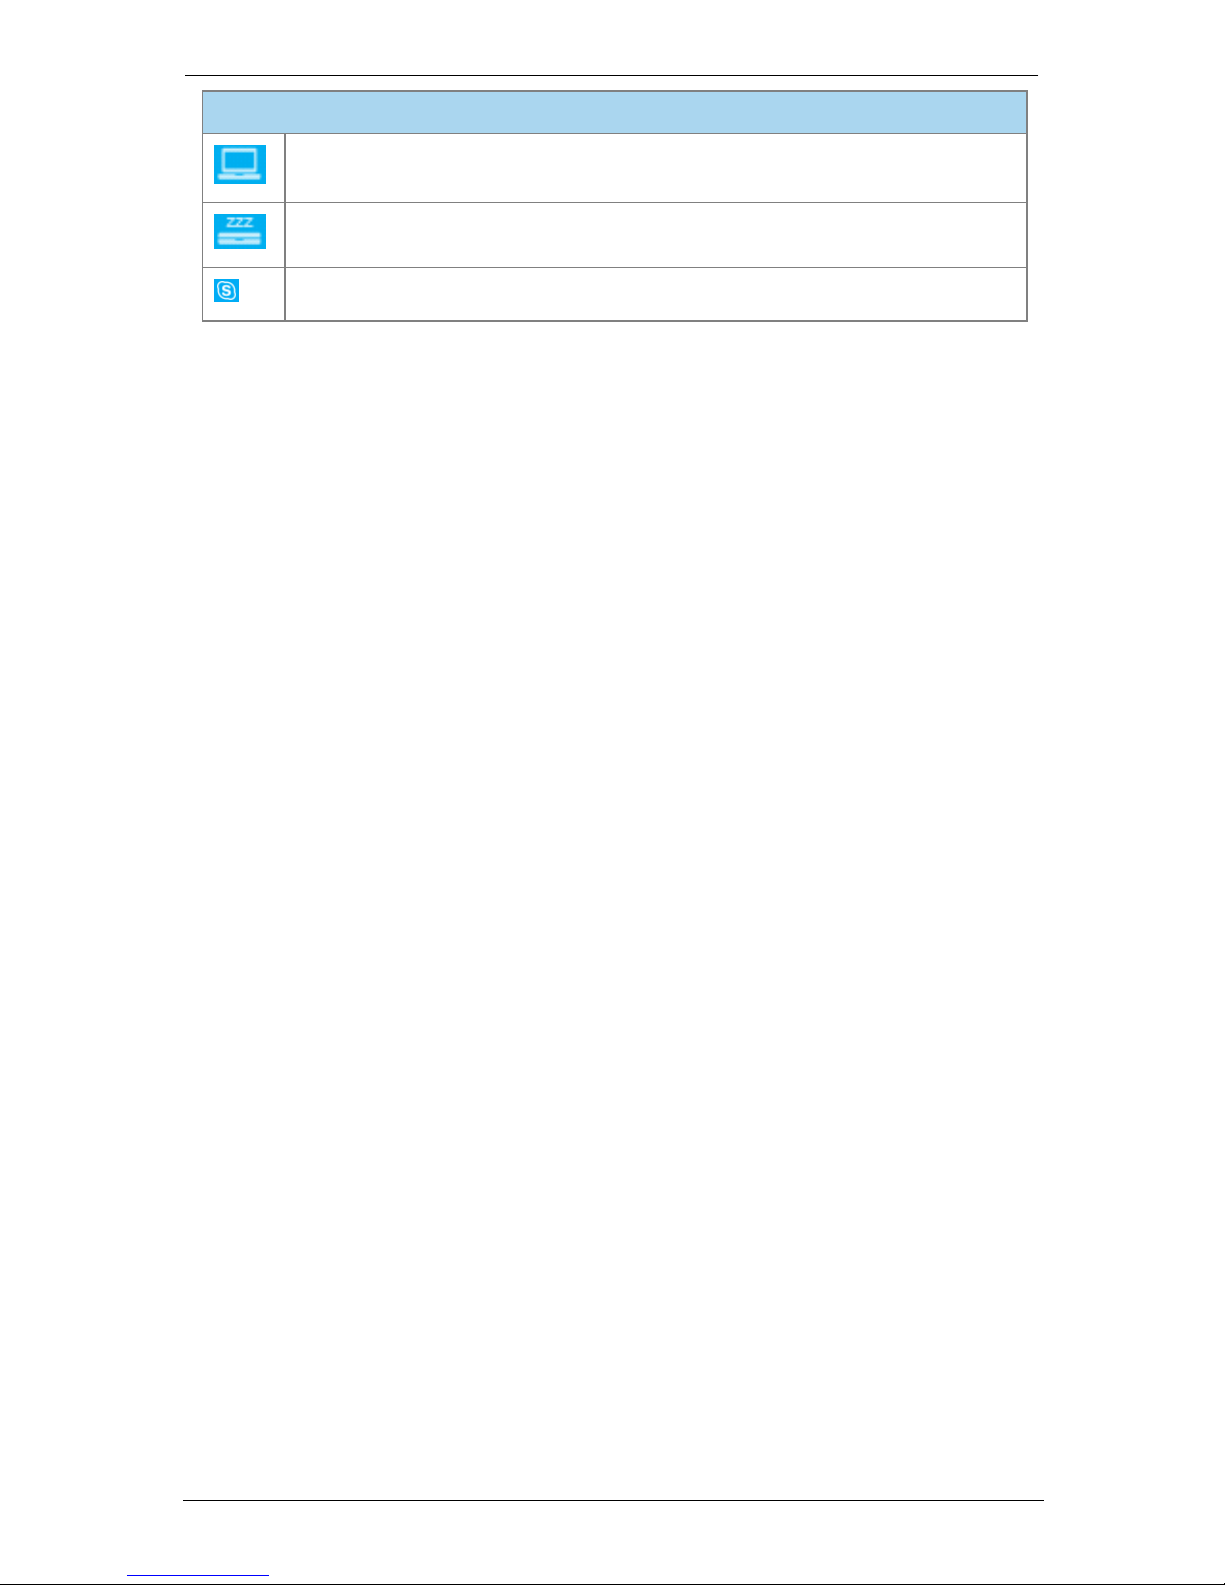
Status indicators
A PC has been detected
The detected PC is asleep. This is applicable to the GTm 5250 only
A connection to the Lync server has been made
GTm Family, 27 September 2017 Page 6 of 22
Page 7
Making a call
Making a call
On the touchscreen controller, you can make a call in a number of different ways:
n
You can dial a number: Simply dial the number
n
You can call one of your favorites: Press the speed dial for the favorite that you want to
call, or go to home screen > contacts > favorites
n
You can return a call: Go to home screen > recent calls and select the call you want to
return
n
You can call someone in the company's directory: Go to home screen > contacts >
company directory and choose someone to call
n
You can call someone from your own personal contact list: Go to home screen >
contacts > personal contacts
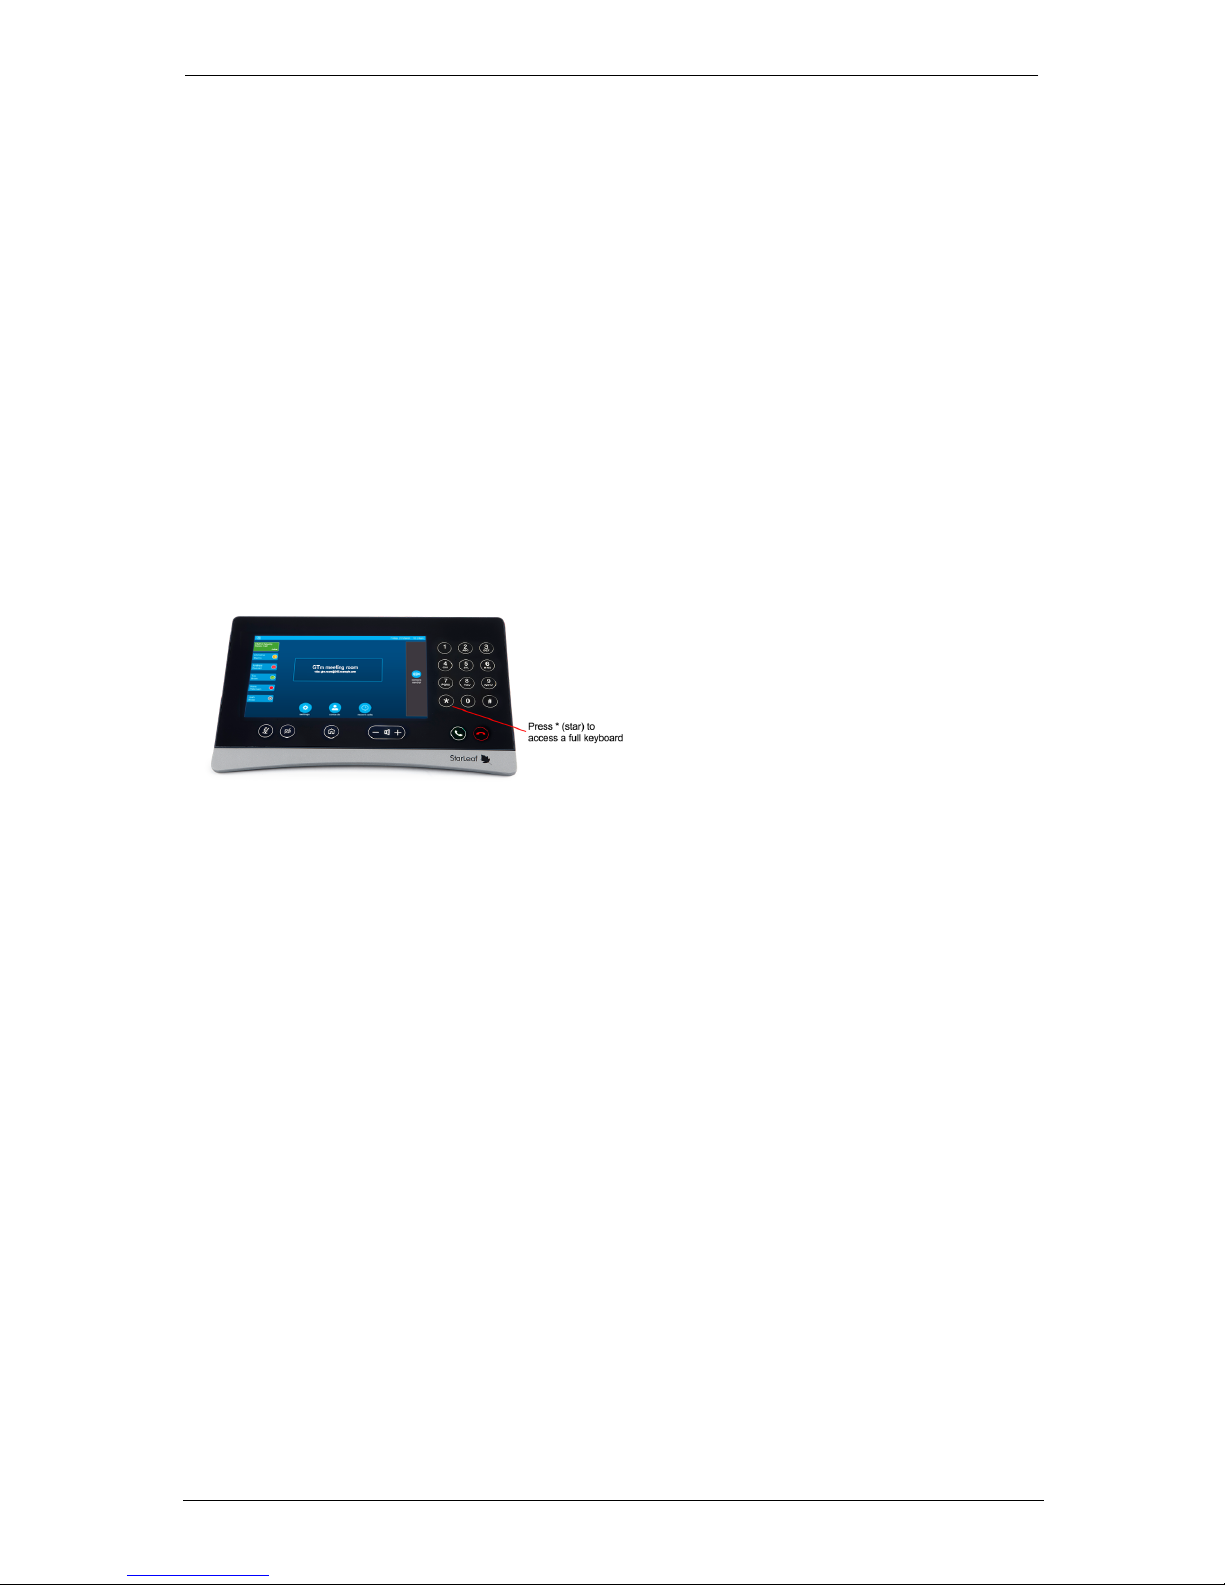
Dialing addresses that include letters and symbols
You might need to dial someone who has a video address that includes letters or numbers
and symbols (known as a URI). If you need to do this, press * on the touchscreen (press the
star key).
You can also press any number on the keypad. As soon as you press a button, the
keyboard displays on the home screen.
Redialing a recent call
To redial a call that you received recently:
1.
Go to home screen > recent calls. The screen displays the recent calls' list.
2. Select the name of the person whom you want to call.
Clearing recent calls
To clear your recent call list:
1.
Select home screen > recent calls. The screen displays the recent calls' list.
2.
Click clear, then confirm clear all to empty the recent calls' list.
GTm Family, 27 September 2017 Page 7 of 22
Page 8

Making a call
Searching in the company directory
Some companies have a lot of entries in the directory. In this case, you might find it easier
to use the search facility. To do so:
1.
Go to contacts > company directory.
2. Use the keyboard to type the name of the person you want to find.
Note: As soon as you start typing, the search starts looking. You might only need to type
the first letter of someone's name to find them.
GTm Family, 27 September 2017 Page 8 of 22
Page 9
Using in-call features
Using in-call features
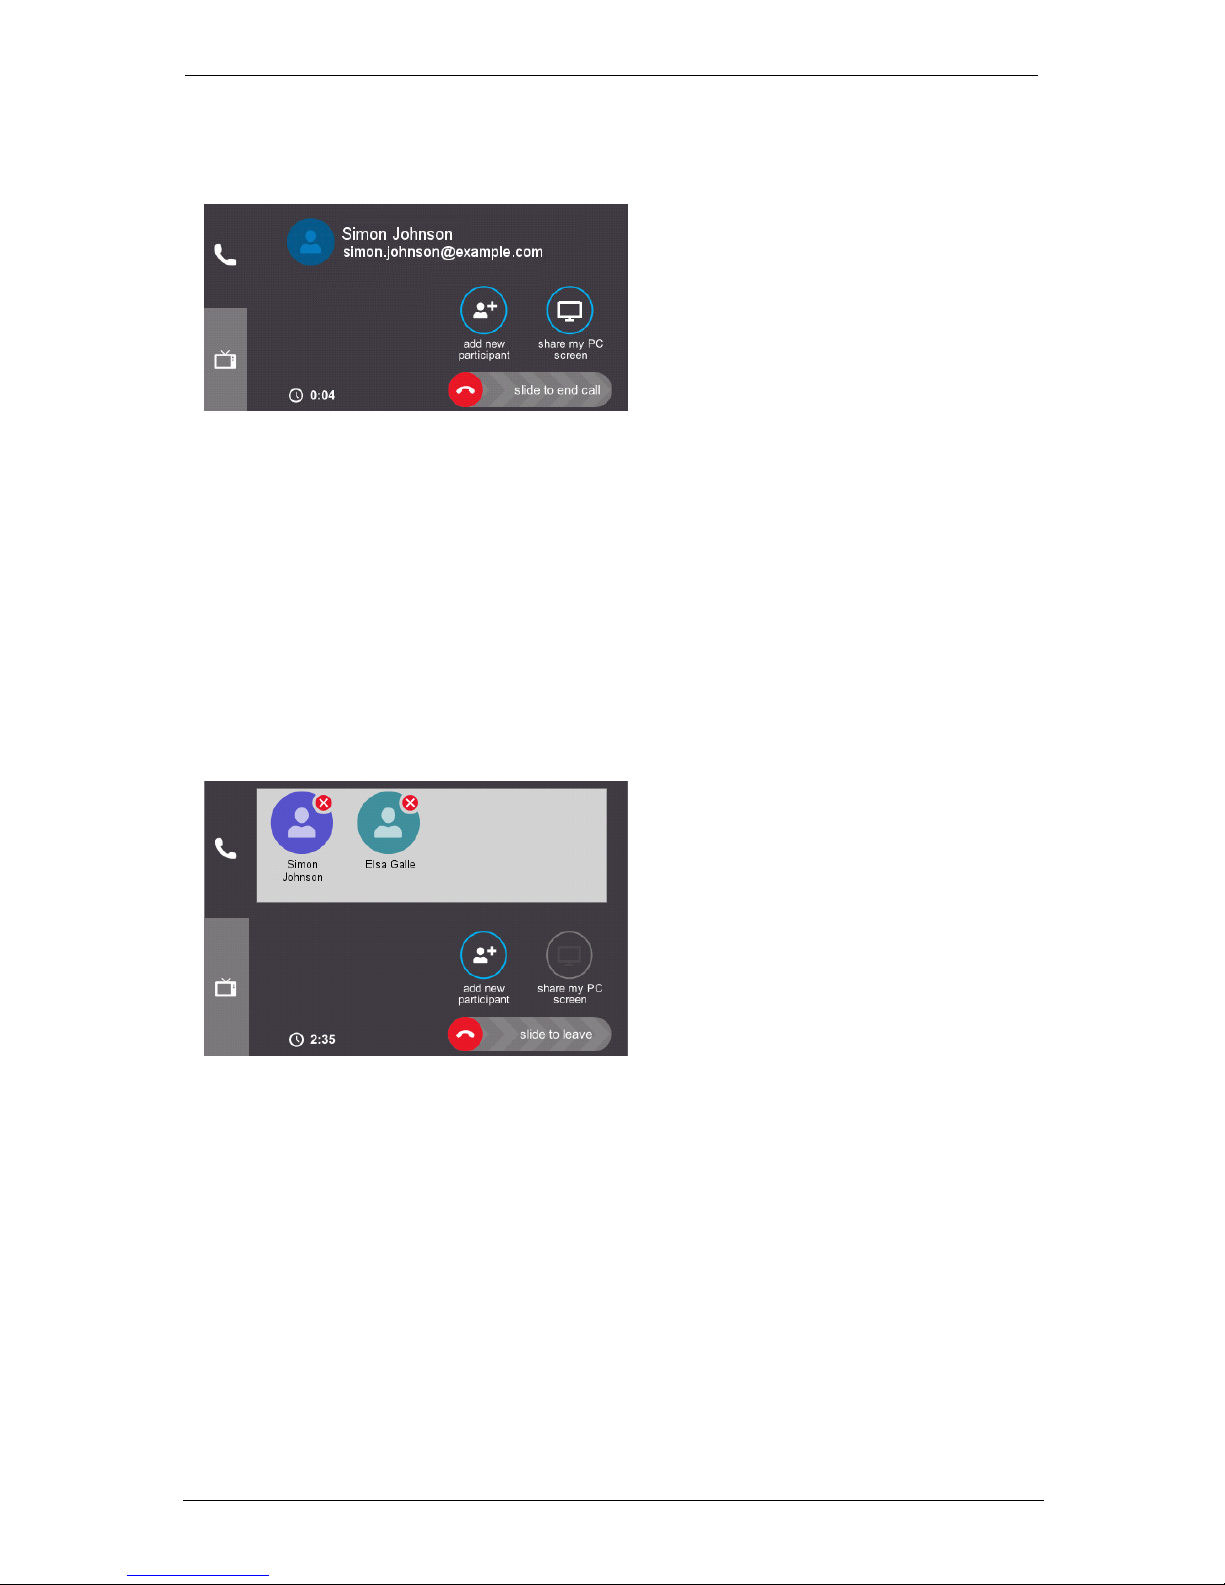
If you are in a video call, you see a panel similar to the one shown below:
n
add new participant: escalates the call to an ad hoc conference by adding another
participant to the call
n
share my PC screen: if there is a laptop or other digital source connected to the GTm,
you can share that to the other person (or people) in your video call
n
Display tab: provides you with options for the screen layout. Note that this tab also
provides a button to switch self view on and off
Adding more people to your video call
When you are in a call, add additional participants to the call, escalating it to an ad hoc
conference. Adding another participant dials them in the same way as with direct calls
and they can choose whether or not to accept the call. If they accept, they are added
directly to the conference. A list of conference participants are shown in the in-call panel.
You can individually remove participants in a conference by clicking the x on their profile
picture. Confirmation options appear to ensure that you want to remove them before
doing so.
GTm Family, 27 September 2017 Page 9 of 22
Page 10

Using in-call features
When you want to leave the conference, push the slide to leave button to the right. This
does not terminate the conference, and if other participants choose to remain on the
call, they can. Only when everyone has left the call is the conference terminated.
Changing what you see in a video call
Press the Display tab to change what you can see in a video call. The Display tab looks like
this:
The Display tab gives you these options:
n
video: select to view the other people in your video call. This is the default setting for a
video call until someone shares a PC screen and then you see the shared PC screen, in
which case, you may prefer to press this button to return to the video view
n
my PC: press to view a connected PC or other connected digital source. Remember
that other people in the video call may still be able to see you
n
shared PC: press to view a PC screen that someone else in the video call is sharing with
you. If there is no shared PC, the button reads no shared PC. If the shared PC goes to
sleep while connected, the button reads attached PC is asleep
n
self-view: use the self-view slider to either see yourself or not. Self view allows you to see
the view of you that other people see when you are in a video call. Switching it off does
not prevent them from seeing you. To prevent people from seeing you in a video call,
press the Video mute button on the touchscreen controller
n
PiP: The PiP is the Picture-in-Picture view. Use the PiP control on the Display tab to move
the PiP around the screen. In one screen systems, if shared PC is present in a call, but the
main screen view is video, the PiP is not hideable; when in a call and viewing local or
shared content, you can hide the video PiP
Note: Screen layout behavior differs according to whether you have one or two screens
attached. For more information, refer to Layouts for dual screen room systems (p12)
below.
GTm Family, 27 September 2017 Page 10 of 22
Page 11

Using in-call features
Changing what they see in a video call
Camera presets
Room systems can have up to five camera presets that allow you to adjust the camera
focus of your video. For example, you can set a camera to point towards one part of the
room and zoom in, when selected. To select a camera preset, open the Camera Control
tab and press the star button for the camera preset that you want. The video adjusts
automatically to the preset configuration. You can swap between presets at any time.
The camera presets must be predefined in Maestro. For more information on setting
camera presets, refer to the topic Meeting room management.
Active cameras
Note: The use of multiple cameras is limited to the GTm 5250 only.
You can have up to three cameras connected to the GTm 5250 but only one camera can
be active at a time. These three cameras can utilize the camera presets described
above to determine not only which camera is in use, but also what the cameras focus on
in the meeting room.
When multiple cameras are connected to the codec, the active camera is selected in
the Camera Control tab on the touchscreen controller.
GTm Family, 27 September 2017 Page 11 of 22
Page 12

Using in-call features
Selecting any of the other cameras in the Camera Control tab makes the one you've
selected the active camera and, if done while in a call, the video immediately switches
to that camera and the configured preset view.
Layouts for dual screen room systems
Room systems with two screens attached (screen 1 and screen 2 connected to HDMI
ports 1 and 2 on the rear of the codec), show the full-screen self view under the following
circumstances:
n in a call, with self view enabled, and no computer connected, screen 1 shows self view
n off hook, but not in a call, and no computer connected, screen 1 shows self view
n off hook, but not in a call, with a computer connected, screen 2 shows self view
The table below shows what is displayed and when in a dual-screen room system with a
PC connected.
Room
system state
Screen 1 Screen 2
Not in a call Local PC or Leaf icon Leaf icon or if there is a meeting
scheduled for today, the meeting room
main screen
In a call Local PC or self view or Leaf
icon
Remote video
Receiving
content
Shared PC Remote video
Sharing
content
Local PC Remote video
GTm Family, 27 September 2017 Page 12 of 22
Page 13

Joining a conference
Joining a conference
There are two ways to join a conference call: join an ad hoc conference or join a
scheduled conference.
Joining a scheduled conference
If you are invited to a conference that is scheduled on the GTm, the details of that
conference are listed on the GTm touchscreen controller. The details are shown on the
Join Now button on the day of the scheduled conference. The behavior of the Join Now
button varies depending on the details of the conference:
n
If there are no scheduled conferences for the day, the Join Now button displays no
conferences scheduled today
n If there is a scheduled conference for the day, the Join Now button displays the name
of the next conference and the time it starts
n If you receive invitations to two overlapping conferences, the details of the first
conference due to start display on the Join Now button. When the first conference has
ended, the details of the second conference display. To join the second conference at
any time, dial the unique seven-digit direct number
n When the conference is due to take place in ten minutes or less, the Join Now button is
lit green and, instead of the time, displays how many minutes until the conference is
due to start
n When the conference starts, the Join Now button flashes. Anytime after the Join Now
button lights green, you can click the button to join the conference
If a previously scheduled conference is deleted, the conference details are removed
from the conference button.
Join Now behavior
The default message when there are no
conferences scheduled.
The message displayed when a conference
has been scheduled for that day.
The message displayed when a
scheduled conference is due to start.
The message displayed when a scheduled
conference has started.
GTm Family, 27 September 2017 Page 13 of 22
Page 14

Joining a conference
Joining an ad hoc conference
When someone adds you to a call, this is known as an ad hoc conference; the call
behaves in the same way as a direct call. You receive a notification on your home screen
with the details of the person who is trying to contact you. To accept the call, select
answer call, and you are added directly to the conference.
If you do not want to join the conference, ignore or reject the call.
GTm Family, 27 September 2017 Page 14 of 22
Page 15

Contacts
Contacts
About contacts
Contacts are the people you want to call. Their contact details are available either
because they are in the company directory or because you have added them as
personal contacts.
Favorites are the contacts that you call most often. You decide who are your favorites.
Favorites appear on your home screen as speed dials. You can see the 'presence' of your
favorites (described below in Presence and other speed dial icons (p16)).
To access contacts, go to home screen > contacts.
About personal contacts
In addition to the global directory (to which everyone in your company has access), you
can add personal contacts. To do so, you need to log in to the GTm's Skype for
Business/Lync account on a PC. There you can set up favorites and these appear as
personal contacts on the GTm.
Creating favorites
To create a favorite contact:
1.
Click on home screen > contacts and click on someone in your personal contacts tab
or company directory tab.
2.
Click the add to favorites button in the lower-left corner of the contact window.
When you have added the contact as a favorite, the add to favorites button no longer
appears. Click on the favorites tab to see the new contact alongside all those you've
already added. Each favorite appears as a speed dial on your home screen, up to
thirteen contacts.
GTm Family, 27 September 2017 Page 15 of 22
Page 16

Contacts
Deleting favorites
To delete a favorite:
1.
Go to home screen > contacts > favorites > edit.
2.
Select the icon next to the favorite and select delete.
Presence and other speed dial icons
Speed dials are displayed on the home screen with icons:
Presence and speed dial icons
This favorite is available
This favorite is in a call or busy at the moment
This favorite is marked as do not disturb
This favorite has their status set to: Be right back, Off work, or Away
This favorite has been disconnected or is currently not signed in to Lync/Skype for
Business
Contacts not in your organization or using other systems have the following icon:
This is a guest user
GTm Family, 27 September 2017 Page 16 of 22
Page 17

Connecting a laptop
Connecting a laptop
There are two models of GTm: GTm 5250 and GTm 5140. How users connect a laptop
differs depending on which model you have. Each is described below.
On the GTm 5250
When you are in a video call you can share your laptop's display with the other people in
the call, for example if you want to share what you are working on. To do so, your laptop
must be connected to the GTm. Usually, your IT administrator will have left a cable in the
meeting room to which you can connect your laptop. If this is not the case, you need to
consult your IT administrator, or refer to the GTm installation information, which is available
from the Knowledge Center. The GTm system includes a number of adaptors to suit
different PC video outputs (HDMI, VGA, DVI-D).
Additionally, you can connect an HDMI source to Computer In 1 on the rear of the codec.
This can be useful where you have a permanent digital source that you want to connect
to the GTm, for example an Apple TVor whiteboard.
When you are in a meeting, you can select to share content using the touchscreen
controller. If more than one source is connected, the GTm displays content from the
most-recently connected source.
Sharing the display
To share your laptop's display:
1. Ensure you have connected your laptop to the GTm codec using the supplied cable.
2. Make a video call.
3.
On the touchscreen controller, press share my PC screen:
Note: If you only have one screen, the main view is the PC display and the view of the
other participants is in PiP view in the corner of the screen
4. To change the view you see, use the display tab on the touchscreen controller:
GTm Family, 27 September 2017 Page 17 of 22
Page 18

Connecting a laptop
The display tab is described in greater detail in Using in-call features (p9).
GTm Family, 27 September 2017 Page 18 of 22
Page 19

Connecting a laptop
Sharing the audio
You can also share the audio from your laptop. To do so, connect the audio-out from your
laptop to the audio-in 3.5 mm connector on the rear of the room system. For further
information about this, refer to the GTm installation information, which is available from
the Knowledge Center.
On the GTm 5140
There are three scenarios for sharing content from a laptop:
n Using a sharing device attached to the laptop to share content and audio
n Using Skype for Business to present content from your laptop to the GTm room
n Using Skype for Business to present content from your laptop to a scheduled
conference
Each of the above scenarios is described below.
Note: You may also find that you are initially presenting content from your laptop to a
room but need to present to a larger group after you've begun. In this case, you need to
schedule a conference and follow the steps listed in Presenting to a scheduled
conference without a sharing device (p20).
Presenting using a sharing device
You can use a sharing device to share content and audio from a laptop. Simply pair the
device with the GTm 5140, plugging it into your laptop, and following the instructions
given for the device.
If you do not have a sharing device, you can share your screen using Skype for Business.
Presenting to a room without a sharing device
You can share content from your laptop through Skype for Business by calling from the
laptop. To do this:
1. Start a point to point Skype for Business call between the laptop and the GTm.
2.
Click Present at the bottom of the conversation window.
You can choose to either Present Desktop or Present Programs, depending on whether
you want to share your entire screen or a specific window.
Note: For more information on presenting in Skype for Business, refer to the Skype for
Business support page.
The laptop can share on-screen content but not audio. StarLeaf recommends that you do
not share audio-dependent content.
GTm Family, 27 September 2017 Page 19 of 22
Page 20

Connecting a laptop
Presenting to a scheduled conference without a
sharing device
You can share content during a scheduled conference by calling in from your laptop
using Skype for Business. To do this:
1. Accept the scheduled conference invite.
2.
When you're ready to share content with the conference, click Present at the bottom
of the conversation window.
You can choose to either Present Desktop or Present Programs, depending on whether
you want to share your entire screen or a specific window.
Note: For more information on presenting in Skype for Business, refer to the Skype for
Business support page.
If you are in the same room as the GTm, StarLeaf recommends that you mute the volume
and microphone on your laptop while you present in order to prevent any feedback
distortion. The laptop can share on-screen content but not audio. StarLeaf recommends
that you do not share audio-dependent content.
GTm Family, 27 September 2017 Page 20 of 22
Page 21

Customizing your touchscreen controller
Customizing your touchscreen controller
There are some customizable options. To access settings from any screen, double press
the Home button or, on the home screen, press settings.
Note: The settings described below may require a PIN if the touchscreen controller has
been locked against editing.
Changing the screen brightness
You can adjust the screen brightness of the touchscreen controller when it is in use. This
setting does not control the brightness of the screen while dimmed. To adjust the
brightness:
1.
Go to settings > general.
2.
Drag the screen brightness slider to the left to lower the brightness, or to the right to
raise the brightness.
Sorting your company directory
Your company directory appears in alphabetical order. You can choose whether you see
it sorted by first name or by second name. To select a new sorting order:
1.
Go to settings > contacts.
2.
Select company directory > sort order and choose the sort order that you require.
Sorting your contacts
Your contacts appear in alphabetical order. You can choose whether you see them
sorted by first name or by second name. To select a new sorting order:
1.
Go to settings > contacts.
2.
Select personal contacts > sort order and choose the sort order that you require.
GTm Family, 27 September 2017 Page 21 of 22
Page 22

Customizing your touchscreen controller
Legal information
Third party software acknowledgments
Acknowledgments of third-party software are available at:
www.starleaf.com/support/legal
Disclaimers and notices
Copyright © StarLeaf 2017. All rights reserved.
This guide may not be copied, photocopied, translated, reproduced, or converted into
any electronic or machine-readable form in whole or in part without prior written
approval of StarLeaf Limited.
StarLeaf Limited reserves the right to revise this documentation and to make changes in
content from time to time without obligation on the part of StarLeaf Limited to provide
notification of such revision or change.
StarLeaf Limited provides this documentation without warranty, term, or condition of any
kind, either implied or expressed, including, but not limited to, the implied warranties,
terms or conditions of merchantability, satisfactory quality, and fitness for a particular
purpose. StarLeaf Limited may make improvements or changes to the product(s) and/or
the program(s) described in this documentation at any time. All other product and
company names herein may be trademarks of their respective owners.
GTm Family, 27 September 2017 Page 22 of 22
 Loading...