

Page 1
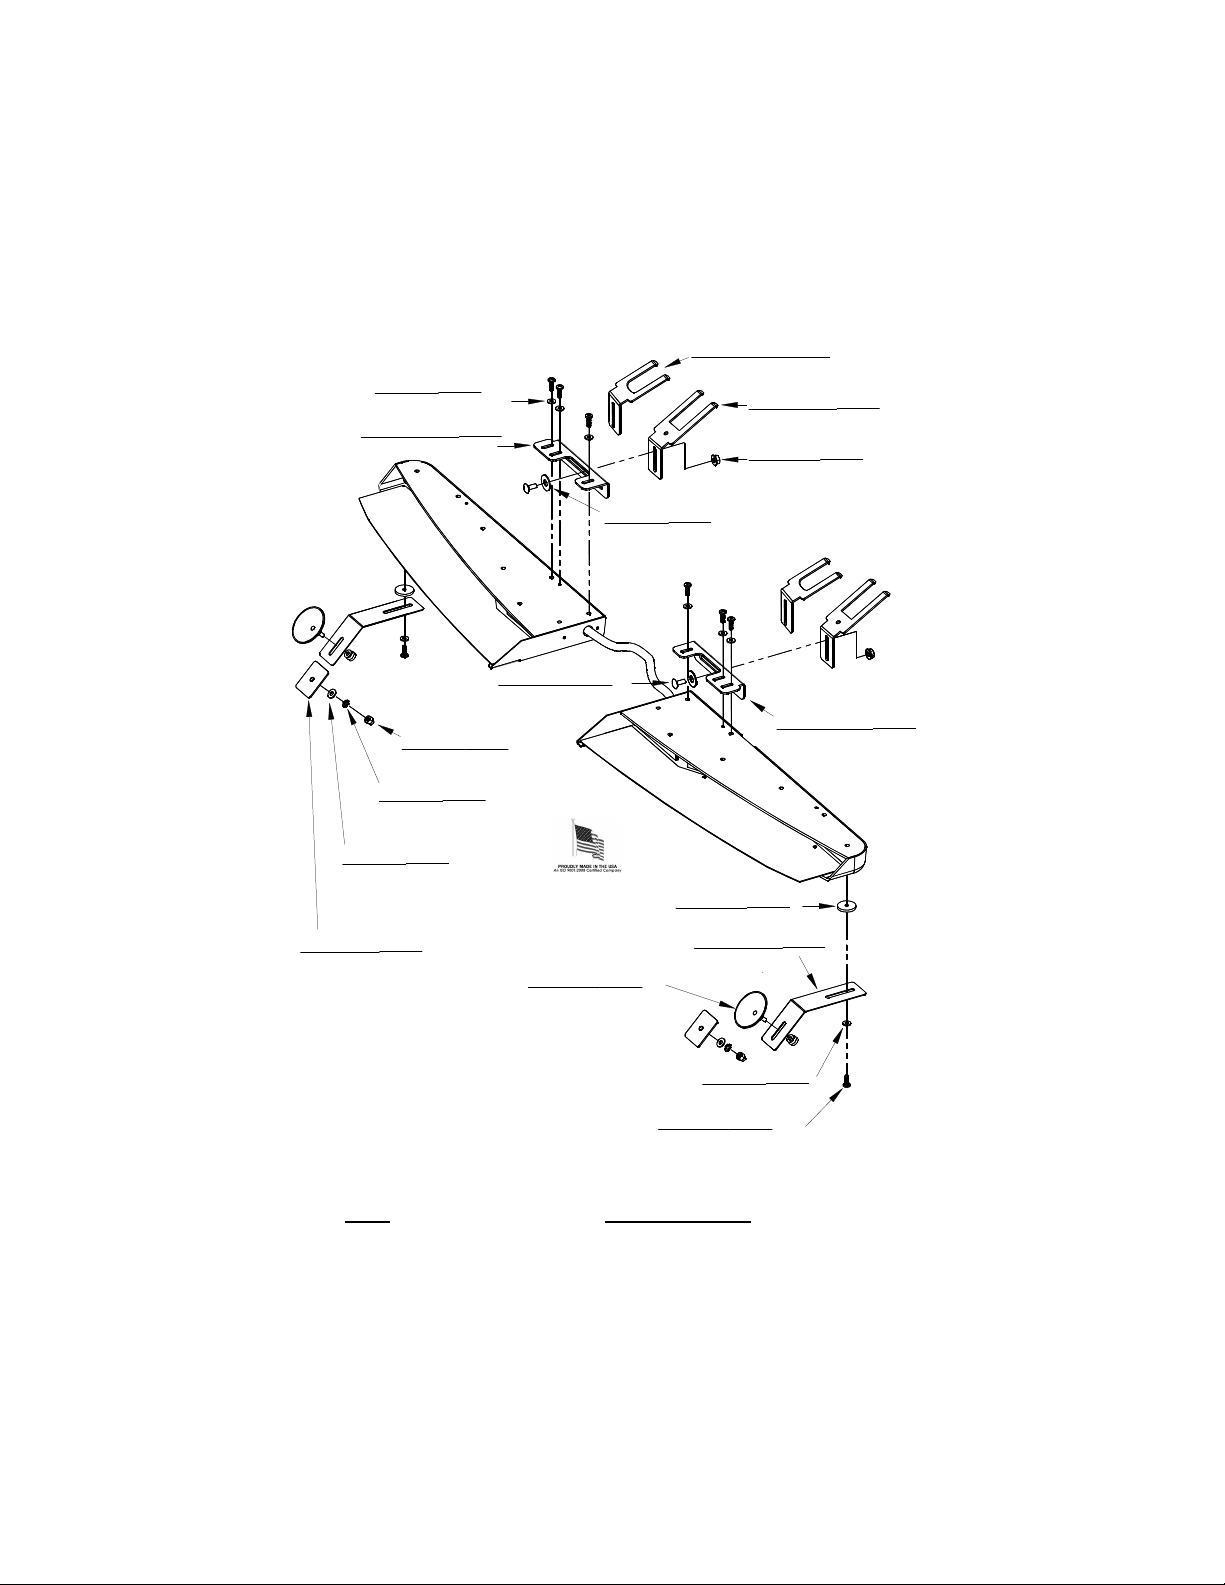
274-ULB10-U1 and 274-ULB21-U1
Universal Mounting Kit for the Half and Split Phantom
P30073-4
#8 Black Flat Washer
P30150-266RP
Right Attaching Bracket
P30073-1
18-8 S/S Flat Washer
S30150-268
Windshield Mounting Bracket
(QTY=6)
P30093-4
8-32 Acorn Nut
P30073-3
#8 Tooth Washer
(QTY=2)
(QTY=2)
(QTY=2)
(QTY=1)
P30054-27
#10-32 1/2" Carriage Bolt
(QTY=2)
ULB21 PICTURED
DL15-CUP
Suction Cup w/Hardware
P30076-8
1/4" Black Washer
(QTY=2)
(QTY=2)
OR
P300150-189P
Small Forked Visor Clip
P300150-79P
Forked Visor Clip Bracket
P30094-10
#10-32 Black Serrated Hex Nut
(QTY=2)
P30089-24
Rubber Washer
(QTY=2)
P30150-267P
Suction Cup
Mounting Bracket
(QTY=2)
(QTY=2)
(QTY=2)
OR
P30150-266LP
Left Attaching Bracket
(QTY=2)
(QTY=1)
• The quantities listed above are for the
274-ULB21-U1. The 274-ULB10-U1 will
have half the quantities shown.
• Two different sets of forked brackets are
provided. Use the pair of forks that will require
P30073-4
#8 Black Flat Washer
P30052-41
#6 x 5/8 Black Phillips Head Screw
(QTY=2)
(QTY=2)
the least amount of adjusting when aligning
the light with the window.
• You MUST use a pair of forked brackets, in conjunction with the suction cups or the
window adhesive mounting pads.
• Determine if you can install the Forked Brackets using your visor clips or if you will be
installing them without the use of visor clips.
PLIT512 REV. - 3/17/14
Page 2
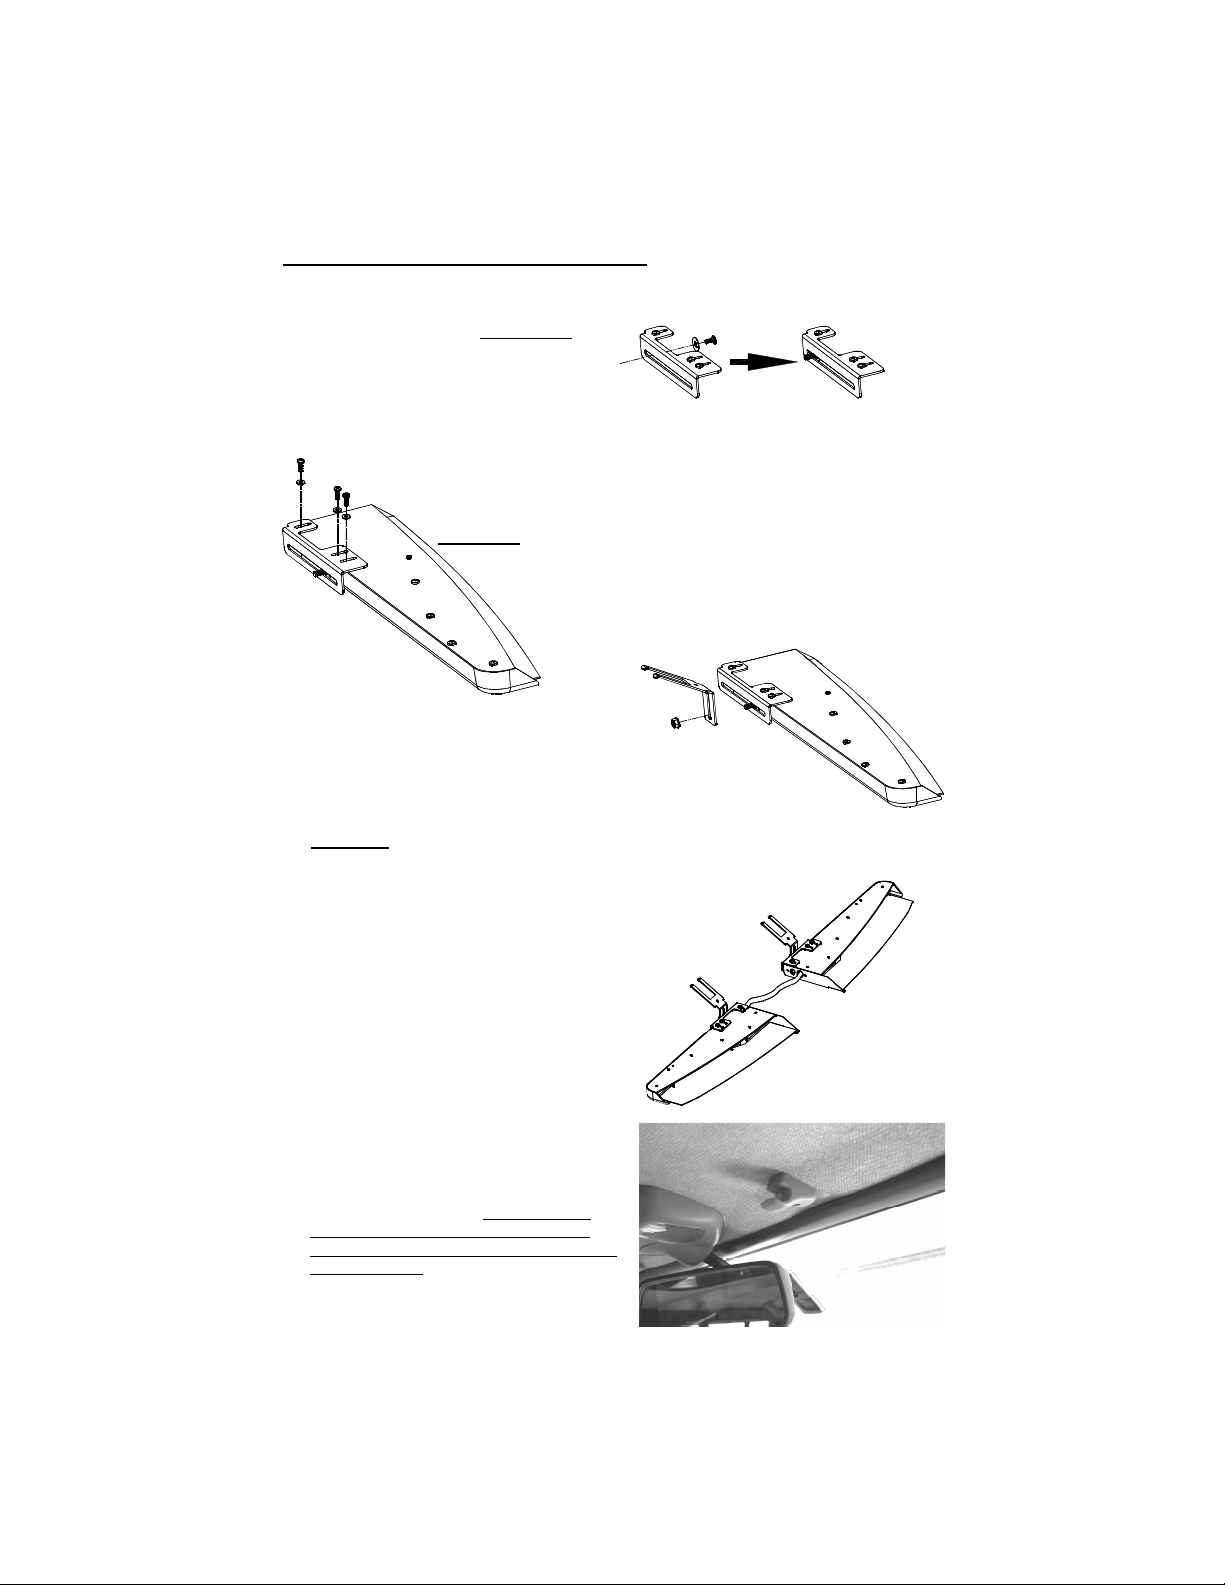
Forked Bracket Installation With Visor Clip
1. Insert one of the carriage bolts through one of the washers. Please note that washer is
used as a spacer on the square neck of the carriage bolt. Slide the bolt and washer
through the back of the right bracket.
For the 274-ULB21-U1, be sure to select
the correct bracket. The flange with a
single slot should be located towards the
center of the light.
2. Remove three of the #8 x 1/2" self-tapping Phillips pan head screws
from the left side of the light. Using the #8 washers enclosed and
assemble as shown to the left.
CAUTION: Take extreme caution not to over tighten the screws!!!
3. Install one of the forked “L” brackets onto the attaching bracket,
using the carriage bolt, a washer, and a serrated nut. Leave the nut
slightly loose to allow for minor adjustments during the remainder of the
installation.
CAUTION: Take extreme caution not to over tighten the screws!!!
Over tightening of the screws can strip the holes.
4. For the 274-ULB21-U1, repeat steps 1-3 for the right
attaching bracket .
5. Locate the two visor clips on the vehicle.
The style may vary from vehicle to vehicle.
Some styles use only one screw each, while
others may have more. Verify that both
visor clips are a minimum of 3” from the
center of the window, and a maximum of 8”
from the center.
-2-
ULB21 PICTURED
Page 3

6. Loosen (or remove if necessary) both visor
7. Check to see that the bottom of the light is
level front-to-back. If it is not level, remove
the light from the visor clips and carefully
bend the forked brackets as necessary.
Reinstall the light and check again for
levelness. Repeat this process until the
light is level.
clips for the 274-ULB21-U1 or the passenger
side visor clip for the 274-ULB10-U1. They
should be loose enough that one of the forked
brackets can easily slide under each clip, then
tighten the clip such that it securely holds
each bracket in place.
Bend here if
necessary
Forked Bracket Installation Without Visor Clips
Some vehicles may not have visor clips appropriate for
the previously described installation, or your application
may completely lack any visor clips. An alternate mounting
screw hole is provided in the bracket for these situations. This
hole can be used with an appropriate user supplied screw or
other suitable fastener.
Alternate
Mounting
Hole
1. Locate the roof brace under the headliner of the vehicle or other suitable mounting
surface.
2. Pick an area to mount the brackets (one on each side) that is a minimum of 3” from the
center of your window and a maximum of 8”.
3. Determine an appropriate size screw that it is capable of supporting the weight of the light
and will penetrate the mounting surface securely mounting the brackets.
4. Carefully drill any necessary pilot holes in your roof brace. CAUTION: Take care that
you do not penetrate the roof of the vehicle.
5. Install the screws through each bracket.
6. Check to see that the bottom of the light is level front-to-back. If it is not level, remove the
light from the visor clips and carefully bend the forked brackets as necessary. Reinstall
the light and check again for levelness. Repeat this process until the light is level.
-3-
Page 4

Suction Cups or Window Adhesive Mounting (MANDATORY)
You MUST use either the suction cups or the window adhesive mounts in addition to the
forked brackets.
1. Use the #6-5/8” black screw to attach the angled bracket to the holes in the end of the
light, as pictured below. Use the rubber washer between the bracket and the light
housing. Repeat for the other half if installing the 274-ULB21-U1.
CAUTION: Take extreme caution not to over tighten the
screws!!! Over tightening of the screws can
strip the holes and result in a faulty mount.
Bracket used with
either mount
2. Use the appropriate hardware (as shown above and on page 1) to attach either the
Adhesive Pads or the Suction Cups, depending upon your application.
If using the window adhesive, carefully follow the directions on the packaging.
The manufacturer assumes no responsibility for the secure
mounting of this light. It is the responsibility of the installer
and/or owner to ensure the lightbar is mounted securely.
Check your light every time you enter the vehicle to ensure
that it is mounted securely.
These mounting instructions describe the standard, most common way to mount this light.
This method may or may not apply to your vehicle. Because vehicles can vary widely in
their design, it may be necessary to configure the brackets differently than described.
Some applications may require you to design your own custom brackets. The installer
assumes all responsibility for the integrity of the installation.
-4-
 Loading...