

StarDot NetCam SC User Manual

NetCam SC
H.264 Me g a p i x e l Hy b r i d ip Ca M e r a
User’s Manual
www.stardot.com


NetCam SC H.264 Megapixel Camera
Table of Contents
Chapter 1 Conguration....................................................................5
1.1 Before You Start .................................................................5
1.2 What’s Included and What’s Required ...............................5
1.3 Parts of NetCam SC ..........................................................6
1.4 Connecting NetCam SC to a Network ...............................7
1.5 An Overview of Network Connectivity ................................7
Chapter 2 Installation ........................................................................ 9
2.1 Installing NetCam SC .........................................................9
2.2 Outdoor Environment .......................................................10
Chapter 3 Accessing NetCam SC .................................................. 11
3.1 Viewing NetCam SC’s Images ......................................... 11
3.2 NetCamSC’sCongurationMenus ................................. 12
3.3 Image Properties ..............................................................13
3.4 Overlay Properties ...........................................................23
3.5 FTP Properties .................................................................27
3.6 Date/Time Properties ....................................................... 32
3.7 Network Properties ..........................................................35
3.8 Dial-Out Properties ..........................................................38
3.9 Security Properties ...........................................................41
3.10 Advanced Menus ............................................................. 42
3.11 Miscellaneous ..................................................................43
3.12 ManualCong .................................................................. 43
3.13 PTZ .................................................................................. 43
3.14 Dynamic DNS...................................................................44
3.15 Trigger Properties ............................................................ 45
Technical Support .............................................................................50
Specications .................................................................................... 52

NetCam SC H.264 Megapixel Camera

NetCam SC H.264 Megapixel Camera Page 5
Chapter 1 Conguration
Congratulations on your purchase of a StarDot NetCam SC H.264 Megapixel
Hybrid IP Camera with integrated web server. The NetCam SC combines the best
of the analog CCTV world (auto iris, mechanical day/night IR lter*, video out,
24VAC/12VC power inputs) with the best of the digital IP camera world (up to
5 megapixel, Power over Ethernet, integrated video motion detection).
With proper usage, the NetCam SC will provide many years of quality video.
We recommend that you read this manual carefully to completely understand
the camera’s capabilities. Throughout this manual, your NetCam SC Megapixel
Hybrid IP Camera will also be referred to as simply NetCam SC.
* Mechanical Day/night IR lter available only on IR models.
1.1 Before You Start
This manual guides you through the basic setup procedure for the
NetCam SC and provides a detailed resource of the camera’s advanced
options and capabilities.
1.2 What’s Included and What’s Required
The basic package includes:
NetCam SC, lens, StarDot Tools CD and Manual.•
Since the NetCam SC is a PoE device (Power over Ethernet), it is
assumed that most users will provide their own CAT 5 or CAT 6 cable,
as well as a PoE switch or power injector. StarDot optionally offers a
wall mount, a power supply, a combination network/power cable and
a null serial conguration cable. In order to use the NetCam SC, you
will need the following:
Page 6 NetCam SC H.264 Megapixel Camera
• Power source (PoE, 12VDC or 24VAC)
• A computer – for conguring NetCam SC and for viewing video
Note: A computer is not necessary to operate NetCam, only to congure it.
• Network connectivity (LAN, cable modem, DSL, T-1, Dial-Up
Internet Account, Satellite Modem, etc.)
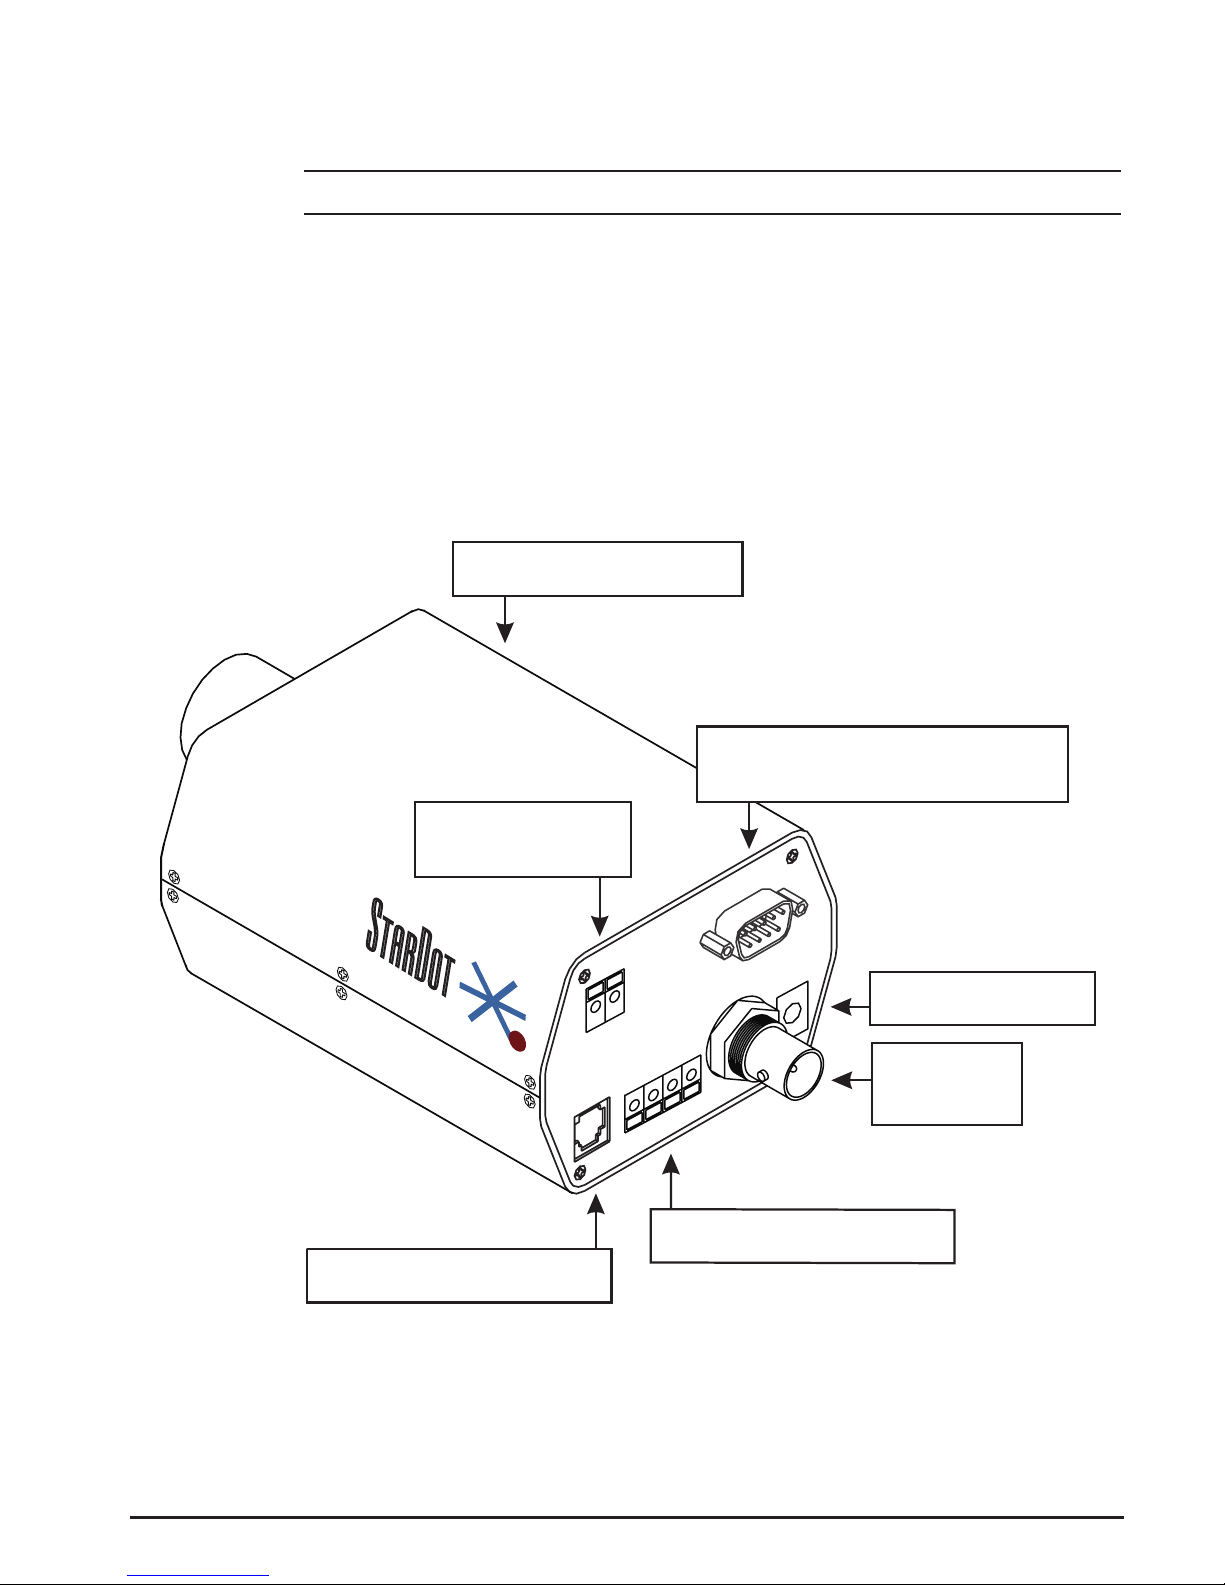
1.3 Parts of NetCam SC
StarDot
Technologies
24VAC
Useful for legacy CCTV
Power Infrastructure
S1 (Aux)
RS-232 Port, Optional Serial Configuration
Auxilliary Device Control
NET (PoE) 802.3af
100Mbit Power over Ethernet Port
PWR (DCPower Jack)
10-20VDC
(500mA @ 12VDC)
I/O (Input/Output)
Alarm Trigger Input / Relay Output
NET (PoE)
S1 (AUX)
24VAC
I/O
1 2 3 4
VIDEO
12VDC
VIDEO OUT
Analog Video
(NTSC or PAL)
Auto Iris Jack (not shown)
For connecting DC auto iris lens

NetCam SC H.264 Megapixel Camera Page 7
1.4 Connecting NetCam SC to a Network
The StarDot Tools software can be used to nd the camera’s IP
address or to congure the camera with the Setup Wizard (optional).
Install the StarDot Tools software by inserting the CD-ROM and
running setup.exe (it should run automatically).
Connect NetCam SC into a PoE switch or injector with a
standard CAT 5 network cable or with a StarDot Combo
Ethernet/Power Cable.
If your network has a router or server that automatically assigns
IP addresses (DHCP), StarDot Tools will nd the camera’s IP
address and display it in the software. To access NetCam SC,
simply double-click its IP address. If the IP address is displayed,
skip to Chapter 3.
If no DHCP server is present, the NetCam SC will auto assign
itself a “zeroconf” IP address, which will always start with
169.254. You can temporarily assign your computer a similar
address and use StarDot Tools to nd the camera’s IP address
and assign it a new permanent IP address. To do so, give your
PC the IP address 169.254.100.100 with a subnet of 255.255.0.0.
1.5 An Overview of Network Connectivity
A LAN or network connection is the simplest configuration
for NetCam SC. NetCam SC simply needs an IP address (and other
networking parameters) to make the live images and conguration
menus accessible from any web browser on the network. There are
two ways NetCam SC can be assigned an IP address: automatically
or manually.

Page 8 NetCam SC H.264 Megapixel Camera
Automatic IP Assignment (DHCP)
NetCam SC is shipped in an automatic IP assignment mode called
DHCP (Dynamic Host Conguration Protocol). If your network has a
DHCP server (in most cases, a router), it will automatically assign the
necessary network parameters to NetCam SC. Before you can access
the camera, you will need to know which IP address was assigned. Use
the StarDot Tools software to nd the camera’s IP address.
Automatic IP Assignment (zeroconf)
If no DHCP server is present, the NetCam SC will automatically
assign itself a “zeroconf” IP address, which will always start with
169.254. You can temporarily assign your computer a similar address
and use StarDot Tools to nd the camera’s IP address and assign it
a new permanent IP address. To do so, give your PC the IP address
169.254.100.100 with a subnet of 255.255.0.0. Use the StarDot Tools
software to nd the camera’s IP address.
Manual IP Assignment
If you want to assign the camera a permanent IP address, you will
need the following information:
• IP Address (example: 192.168.1.5)
• Subnet Mask (example: 255.255.255.0)
• Gateway (example: 192.168.1.1)
• DNS Servers (obtain from ISP)
If you are installing the camera on a company network, you will probably
want to get this information from the system administrator.
If NetCam SC is connected to a network with a DHCP server and
your computer is not running Windows, you can log into your router (or
whatever is acting as your DHCP server) and view the DHCP clients
table. NetCam SC will have a MAC address starting with 00:30:F4.
Take note of the IP address and enter it in your web browser. Click on
the conguration link, visit the network tab and assign the camera a
manual IP address (outside of the router’s DHCP range).

NetCam SC H.264 Megapixel Camera Page 9
Chapter 2 Installation
Before installing the camera in its nal location, it is important to
congure and test it rst (see Chapter 1).
2.1 Installing NetCam SC
Measure the distance from the camera to the nearest Ethernet
hub or switch. This distance should not exceed 330 feet. If you wish
to extend the distance further than 330 feet, you can add an Ethernet
hub or switch.
There are three ways to power NetCam SC. This allows you go
install the camera in virtually any existing infrastructure. NOTE: Only
use one method to power the camera . Do not plug two or more
power sources into the camera simultaneously.
Power over Ethernet (PoE)
Run standard CAT 5 or better Ethernet cable from a PoE hub/
switch (or PoE power injector) into the NET jack on the back of
NetCam SC. NetCam SC will run off the PoE power running in the
CAT 5 cable. No other power source is required.
Separate Ethernet and Power
If you decide not to use PoE, you can connect one end of a CAT
5 or better Ethernet cable into a hub/switch and the other end into the
NET jack on the back of NetCam SC. Plug a 12VDC 1A power supply
into the back of NetCam SC (or you may use a 24VAC power supply
and connect it to the input marked 24VAC).
StarDot’s Power/Network Cable
If you choose not to power NetCam SC via PoE and you still want the
take advantage of a single cable run, StarDot provides Power/Network
cable that allows you to run both power and data in the same cable. Visit
http://www.stardot.com for more information.

Page 10 NetCam SC H.264 Megapixel Camera
2.2 Outdoor Environment
To mount NetCam SC outdoors, it must rst be encased in an outdoor
enclosure (different models are available from StarDot Technologies,
see http://www.stardot.com). Install the camera in an outdoor enclosure
and adjust the internal mount so the lens is up against the enclosure
window. This helps to reduce glare and interior reections.
Determine where NetCam SC will be pointing and where you’d
like to mount it. The outdoor enclosure can be mounted on a horizontal
or vertical surface. When aiming the camera, factors such as sun travel
and amount of visible sky can vastly affect the quality of the image.
NetCam SC H.264 Megapixel Camera Page 11
Chapter 3 Accessing NetCam SC
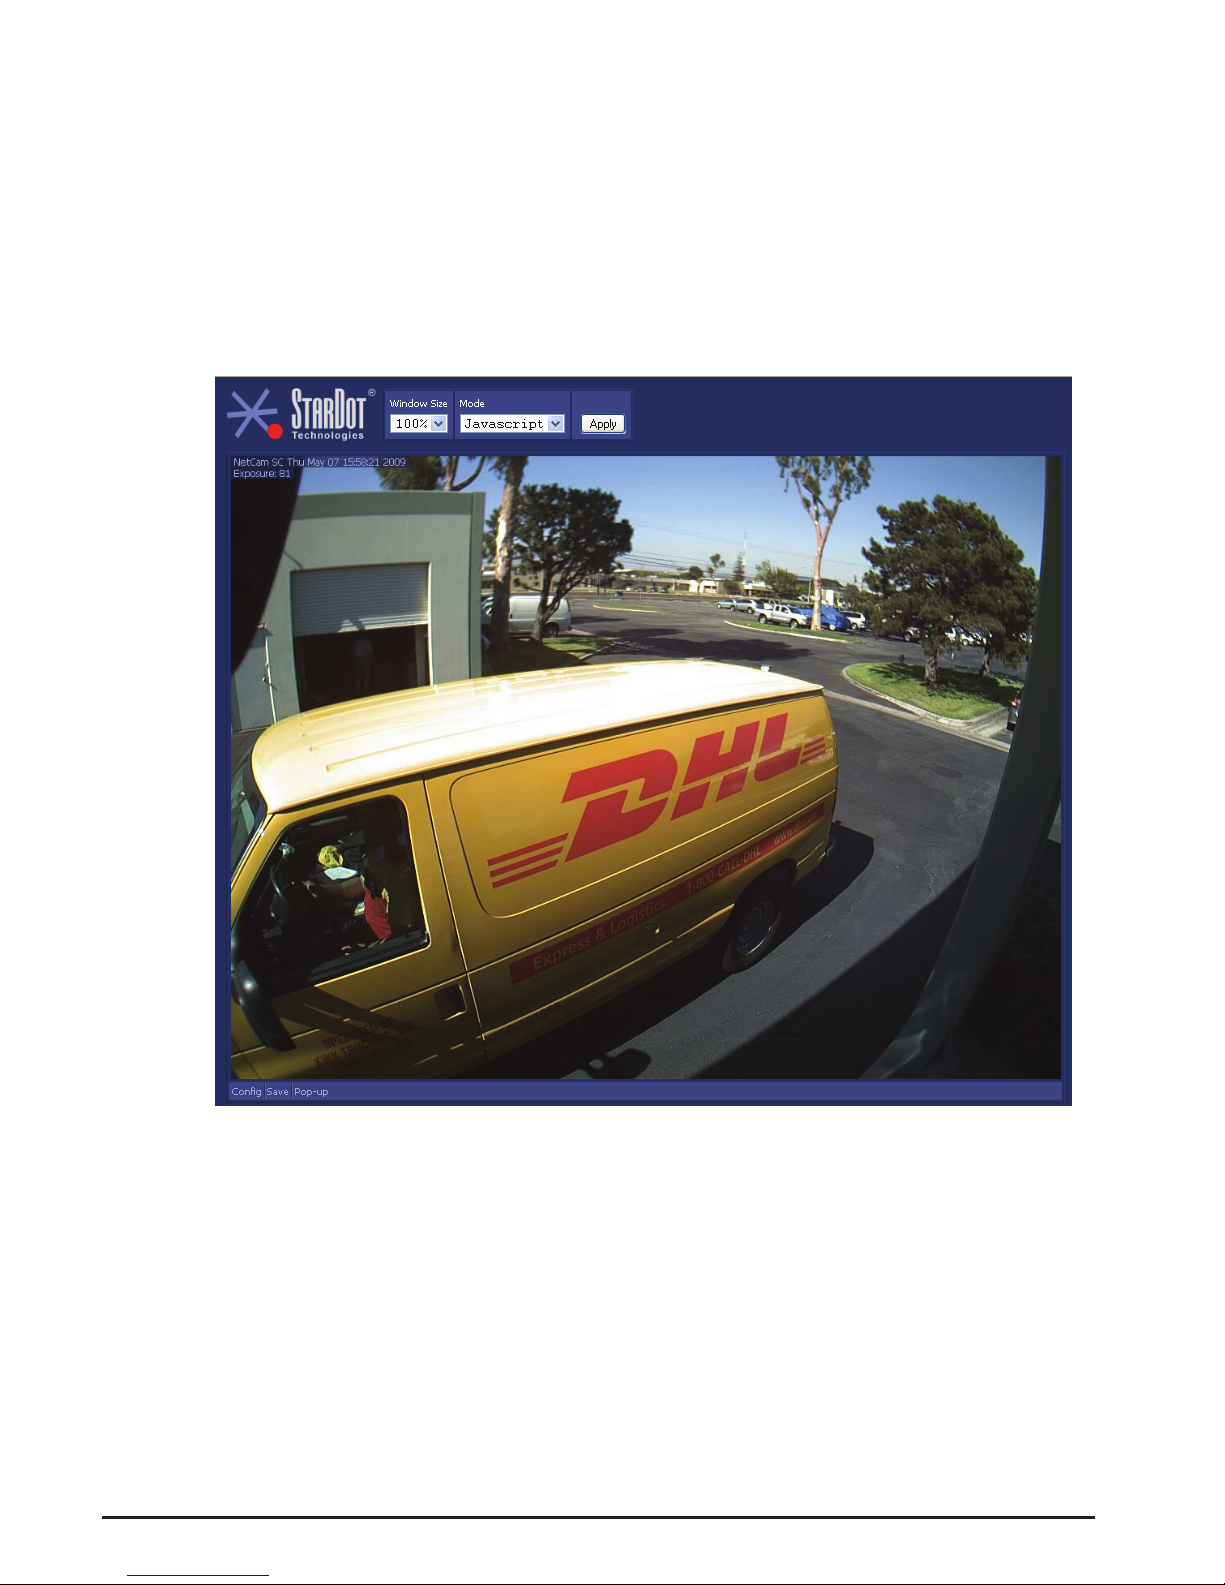
3.1 Viewing NetCam SC’s Images
Any Java or Javascript-enabled browser can be used to view the
live images. Type NetCam SC’s IP address in your browser’s address
bar (example: http://192.168.1.5), or use StarDot Tools to Find the
camera’s IP address.
Window Size
For most viewing, the window size should be set to 100%, which
is a pixel to pixel match of the image resolution. If you select 50%, the
width and height will be resized by the browser to 50% of the actual
image resolution. If you select 200%, the width and height will be
resized by the browser to 200% of the actual image resolution. This
does not affect the actual image resolution which is set on the image
conguration menu (Section 3.3).

Page 12 NetCam SC H.264 Megapixel Camera
Mode
This determines which method is used to watch the live video:
Javascript - the default viewing mode, works on nearly all
browsers, including iPhone. For higher speeds, use Java or
ActiveX
Pull - Java applet “pulls” the live images via web port (usually80)
Push - Java applet receives motion JPEG stream via port 8001
ActiveX - receives motion JPEG stream via port 8001
.NET - receives motion JPEG stream via web port (usually 80)
3.2 NetCam SC’s Conguration Menus
Virtually any web browser can be used to access NetCam SC’s
conguration menus. To access these menus, type NetCam SC’s IP address
in your browser’s address bar (example: http://192.168.1.5).
This will bring up the live image page. Click on the Cong link. You will
be prompted for a User Name and Password. Use admin for both.
Tip: We highly recommend that you change the default password. To do so,
see the section on Security Properties in this chapter.
NetCam SC H.264 Megapixel Camera Page 13
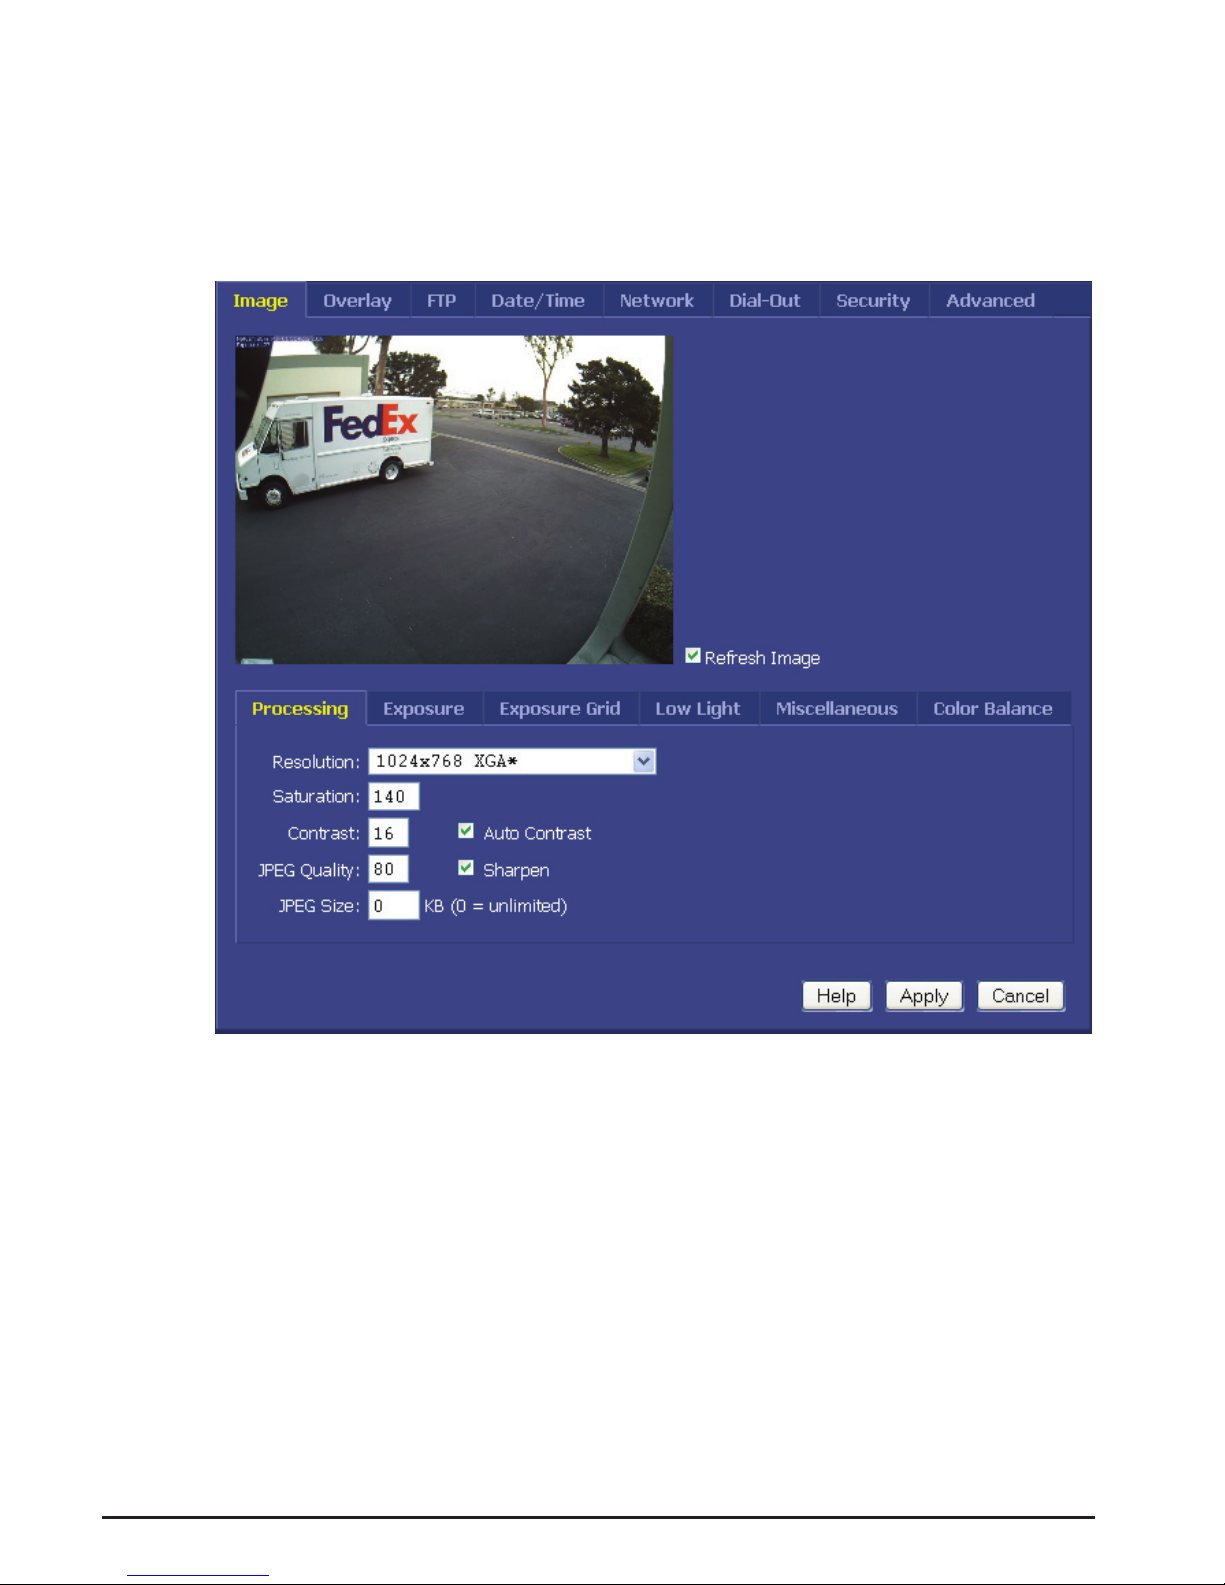
3.3 Image Properties
All image-related conguration options are located on the Image
Properties page. After making changes, click the Apply button to
save new settings in the camera.

Page 14 NetCam SC H.264 Megapixel Camera
PROCESSING
Resolution
Resolution is the dimensional size of the NetCam SC image,
measured in pixels, horizontal by vertical. The higher the resolution,
the larger the picture appears in your browser, and the longer it takes to
download. Some resolutions, such as portrait and HD, crop the image.
The resolution marked with an asterisk (*) denotes the default quarter
resolution image.
Tip: As with most digital cameras, NetCam SC achieves the highest quality
and clearest images at quarter resolution. This is due to the way color is
calculated with digital image sensors. The largest “high quality” image on
the NetCam SC 5MP is 1296x960.
Saturation
This represents the amount of color in the image. The higher the
number, the more saturated the color.
Contrast
This represents the amount of haze subtraction. The higher the
value, the more haze is subtracted and the image results in higher
contrast. Using the Auto Contrast function is recommended over
setting the contrast manually.
Auto Contrast
Haze subtraction is automatically determined by the camera.
Enabling Auto Contrast is recommended.
JPEG Quality
The JPEG Quality is a balance between lossy image compression
and image quality. The higher the number, the less compression
artifacts in the image, but the bigger the le size. A value higher
than 80 is not recommended, as it greatly increases the le size
with very little noticeable difference in image quality. Note: H.264
quality can be set via NVR software (through the NetCam API).

NetCam SC H.264 Megapixel Camera Page 15
Sharpen
When enabled, sharpening is performed on the video. For the best
image quality, Sharpen should be enabled.
JPEG Size
Limits the each JPEG frame to a specic size (in KB). This is useful
for limiting bandwidth and increasing frame rate.
EXPOSURE
Auto vs. Manual
Unless you have a controlled (xed) lighting condition, you will
almost always want to leave Auto Exposure enabled.
Auto Exposure
Enabling Auto Exposure causes NetCam SC to automatically
adjust the image exposure based on the overall brightness of the
image. The following functions are only implemented when Auto
Exposure is enabled.
• Brightness - The higher the number, the brighter the picture.
This is the target for the auto exposure code.
• Sync - Fluorescent lighting refreshes at 60 Hz or 50 Hz,
depending on what country you live in. This may interfere with
the camera’s exposure. Set the sync to the appropriate value
for your area (example: U.S. is 60 Hz). If you are pointing the
camera outdoors or do not use uorescent lighting, turn this
option off.

Page 16 NetCam SC H.264 Megapixel Camera
Manual Exposure
Enabling Manual Exposure causes the camera to expose images at
the value placed in the Exposure eld. Keep in mind that using manual
exposure is not advised for outdoor imaging, since the light conditions
are constantly changing. You may opt to use manual exposure indoors
if your lighting conditions do not change. Here are some sample values
and their fractional and decimal equivalents:
48 = 1/1000 second (0.001)
96 = 1/500 second (0.002)
248 = 1/200 second (0.005)
480 = 1/100 second (0.01)
800 = 1/60 second (0.01666)
960 = 1/50 second (0.020)
1600 = 1/30 second (0.0333)
3200 = 1/15 second (0.0666)*
6000 = 1/8 second (0.125)*
12000 = 1/4 second (0.25)*
24000 = 1/2 second (0.5)*
32767 = 0.68 seconds (maximum exposure)*
* may introduce pixel noise
NetCam SC H.264 Megapixel Camera Page 17
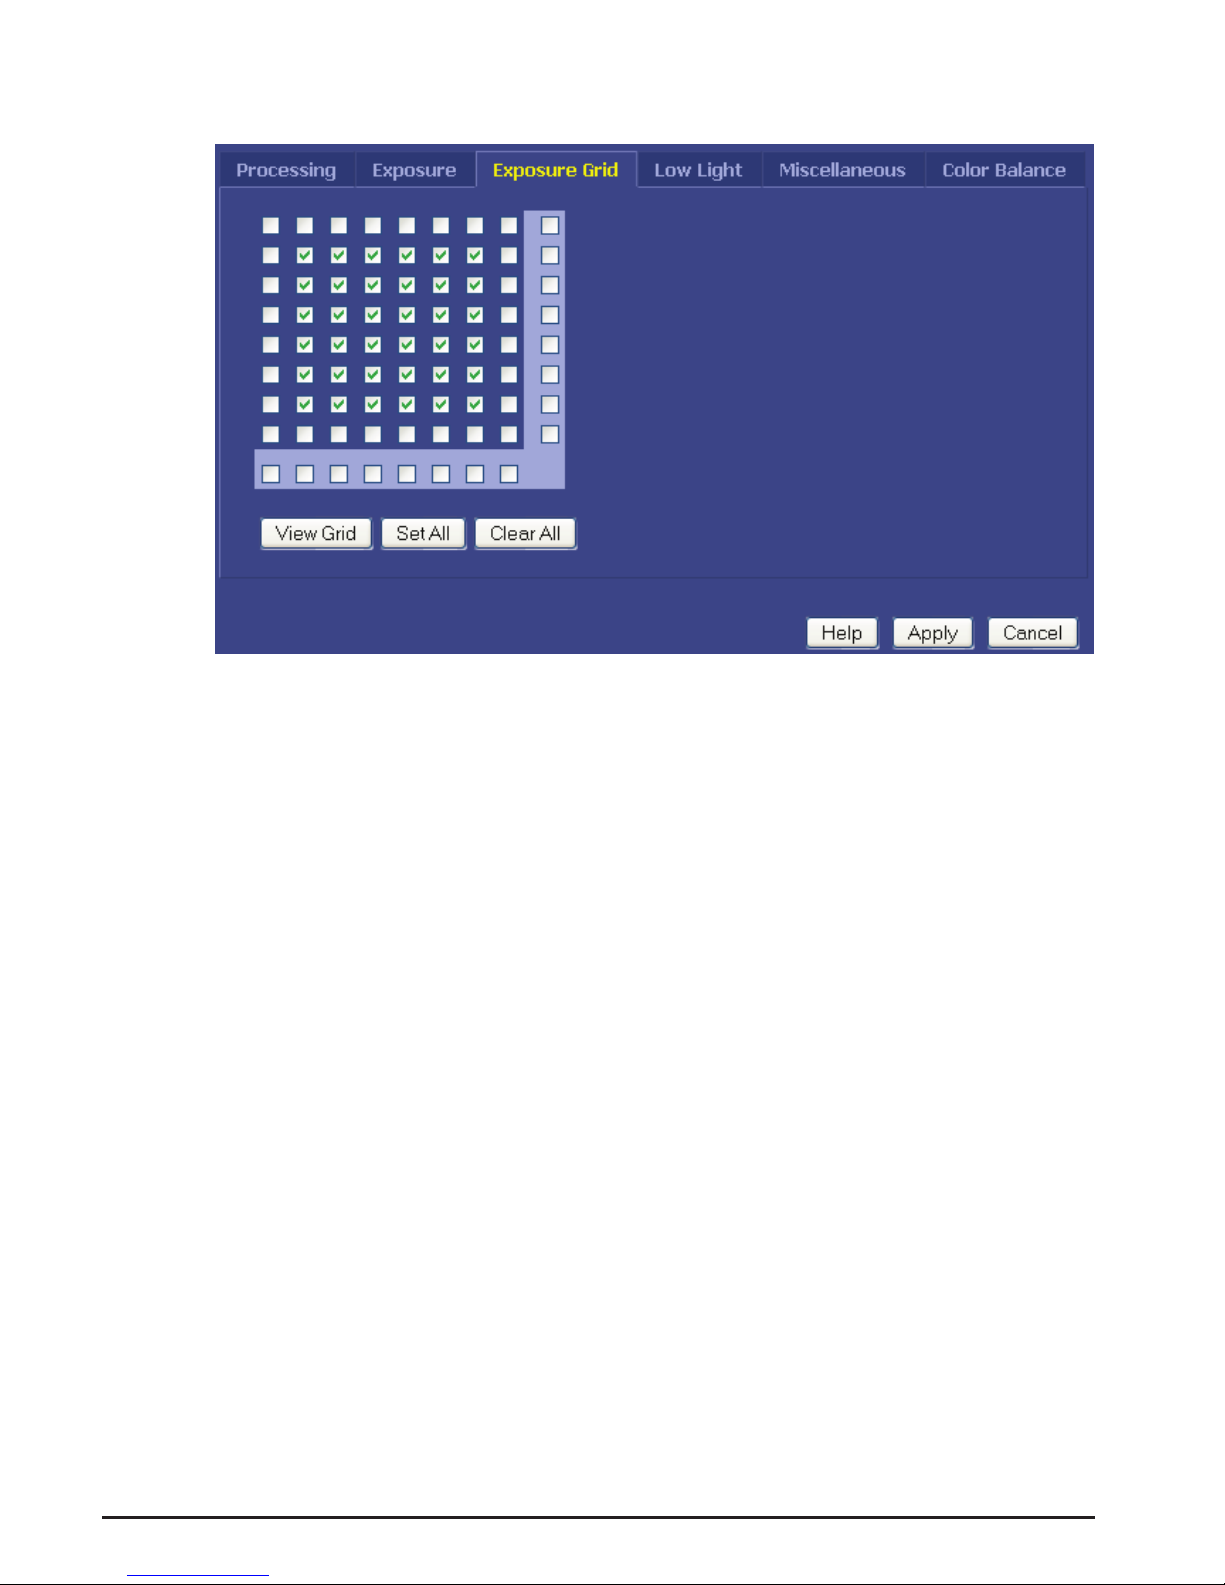
EXPOSURE GRID
When Auto Exposure is enabled, NetCam SC adjusts the
exposure of the image based on the average brightness of the pixels
located in the selected regions in the Exposure Grid. If you want the
camera to determine the exposure based on only the sky, you would
select the squares that apply to the sky (click the View Grid button to
see the grid over the image). Conversely, if you’d like the exposure
to be determined by the foreground, select only those squares. This is
comparable to the spot exposure on a traditional camera.
 Loading...