

Page 1

USERS MANUAL
ZA-
200
MULTI-FONT
ZA-
250
MULTI-FONT
ZR
80825018
Page 2
ZA-200
ZA-250
USERSMANUAL
NOTINTENDEDFORSALE
Page 3
VDE Statement
This device carries the VDE RFI protection mark to certify that it meets the radio interference
requirements of the Postal Ordinance No. 243/1991. The additional marking “Vfg. 243/P” expresses in
short form that this is a peripheral device (not operable alone) which only individually meets the Class
B RFI requirements in accordancewith the DIN VDE 0878 part 3/11.89andthe PostaIOrdinance 243/
1991,
If this device is operated in conjunction with otherdevices within a set-up, in orderto take advantageof
a“General(Operating)Authorization” inaccordancewith thePostal Ordinance 243/1991, the complete
set-up mustcomply with the Class B limits in accordance with the DIN VDE 0878 part 3/11.89,as well
as satisfy the preconditions in accordance with $2 and the prerequisites in accordance with $3 of the
Postal Ordinance 243/1991.
As a rule, this is only fulfilled when the device is operated in a set-up which has been type-tested and
provided with a VDE RFI protection mark with the additional marking “Vfg 243”.
Machine Noise Information Ordinance 3. GSGV, January 18, 1991: The sound pressure level at the
operator position is equal or less than 70 dB(A) according to 1S0 7779.
The above statement applies only to printers marketed in Germany.
Trademark Acknowledgements
ZA-200/250,FR-10/15, LC-200 Color, LC-10 Color, LZ9~X9CL, IS-8XL, IP-128XL, SF-1ODMIU
15DMII, SF-1ORMIV15RMII,PT-10XM/15XM: StarMlcronics Co., Ltd.
IBM-PC, PS/2, PC-AT, Proprfnter, PC-DOS: International Business Machines Corp.
MS-DOS, Microsoft BASIC: Microsoft Corporation
EX-8OW1OOO,FX-850/1050: Seiko Epson Corp.
NOTICE
● All rights reserved. Reproduction of any part of this manual in any form whatsoever without
STAR’s express permission is forbidden.
● The contents of this manual are subject to change without notice.
● Alleffortshaveheen made toensurethe accuracyofthecontents ofthis manualatthetimeofpress.
However, shouldanyerrorsbedetected, STAR would greatly appreciate beinginformedofthem.
● The above notwithstanding, STAR can assume no responsibility for any errors in this manual.
@Copyright1991StarMicronicsCo.,Ltd.
Page 4
I
HOWTO USETHISMANUAL
Thismanualisorganizedintoelevenchapters.Toleamhowtomakethebest
useof yourprinteryouareurgedto readthroughchapters2through6.The
remainingchaptemmay be treatedas a ~ference guidefor programming
operations,etc. It assumesa degnx of acknowledgeof the opemtionof
computers(forinstance,itassumesyouknowabouthexadecimalnumbers).
Thechaptersareas follows:
Chapter1— Introduction
Thischapterindicatesthesomefeatwesoftheprinter,thenamesandthose
functionsoftheprintercomponents,andtheactualexample of fontstyle.
Chapter2— Settingup theprinter
Thischapterexplainshowto gettheprinterunpackedandsetup. Readthis
chapterbefo~ youdo anythingelse.
Chapter3— Optionalaccessories
Thischapterexplainstheoptional
accessorieswithyourprinter,andhowto
installthem.
Chapter4— Paperinstallationanduse
‘l%ischapterdescribesinstructionsforprintingsuchasselectingpapertypes,
adjustingthepfiting gap,andinstallingpaper.
Chapter5— Controlpaneloperations
T&e are a numberof controlson the frontpanelwhichperformvarious
iimctionsrelatedto paperhandling,printmodesand fontselection.
Aftergettingsetup, nxulthis chapterandtryout thepmcedumsinitto find
outhowtheprinterwoiics.
Page 5
Chapter6— SettingtheMemorySwitches
This chapterexplains how to set the MemorySwitchesto make system
settingsontheprinter.
Chapter7
—Printercontrolcommands
Thischapterexplainsthedifferentemulationsprovidedbyyourprinter,and
the softwarecommandsusedto driveit. This sectionis of use if you are
writingor modifyingprogramstotakeadvantageof theptiter’s featunx.
Chapter8— Downloadcharacters
Thischapter explainsthepmcedunxtocmte yourowncharactem.
Chapter9— MS-DOSandyourprinter
Sincethe PS/2 or PC-ATfamilyof computemrunningunderMS-DOSis
cwmmtlythemostpopUIarmnfigurationofmic-mPuter. wehaveincluded
a fewhintsandtipsto helpyouuseyourprinterwithsuchsystems.
SincevirtuaUyallPCsm sold withaMicmoft BASICinteqxW.er,wehave
alsoincludedsomehints,andasamplepmgraminthislanguagetodemonstmte
thecapabilitiesof theprinter.
Chapter10- Troubleshootingandmaintenance
Thissectiongivesachecklistofpointstocheckifyourprinteris notwodcing
in the expectedway.It alsoincludesdetailsof someroutinemaintenance
operationsyoucancany outyourself.Itisno~however,acompleteservice
manual.Callaqualifiedserviceengineerifyoum
unsweof yourabilityto
cany outanymaintenanceor servicingoperations.
Chapter11— Reference
Thissectiongivessomereferencesofyourprinter,suchasspecificationsof
yourprinter,thepinoutof interfaceconnector,thecharactertables.
Thecharactertablechartsgivethe diffenmtcharactersetsavailable.
Page 6
I
TABLE OF CONTENTS
Chapter 1INTRODUCTION
Featuresoftheprinter
Printercomponents
Fontstyleexample
Chapter2 SETTING UP THE PRINTER
Locatingtheprinter
Unpackingandinspection
Settingup
Mountingtheplatenknob
Installtheribboncartridge
Connectingtheinterfaeecable
Chapter3 OPTIONALACCESSORIES
AutomaticSheetFeeder
Single-BinAutomaticSheetFeeder
Dual-Bin
AutomatiC SheetFeeder
PullTractorUnit
InterfaceCartridges
DIPswitchfunctionsontheSerialInterfaeeCartridge
Chapter4 PAPERINSTALLATIONANDUSE
Selectionofpaper
Adjustingtheprintinggap
Loadingfanfoldforms
Loadingthepapertlomtherearoftheprinter(Pushfeed)
Loadingthepaperhornthebottomoftheprinter
LoadingthepaperwithPush/Pullfeed
Papxparking
Paperunparking
Loadingsinglesheets
Loadingthepaperwithoutoptionalaece+wories
LoadingthepaperwithoptionalAutomaticSheetFeeder
1
1
2
4
5
5
6
8
8
9
10
13
13
13
18
20
22
23
25
25
26
27
28
30
31
34
35
36
36
38
Page 7
Chapter5 CONTROLPANELOPERATIONS
Buttonsandindiators
ONLINEbutton
PAPERFEEDbutton
SET/EJECT/PARKbutton
PrKH butten
MODEbutton
FONTbutton
Power-upfunctions
Shorttestmode
Longtestmode
Printareatestmale
Pitchlak mode
Fontlockmode
PitchamiFontlockmode
Hexadecimaldump
Switchcombinationfimdons
Formfeed
Topofform
Fonvsrdmicro-feed
Revememicro-feed
ChsngingtheSutoIoadingVshle
clearingtheIxIffer/Allreset
selectingtheprintC&r
SelectingtheASFbinnumber
Storemacrodefinition
Chapter6 SETTINGTHEMEMORYSWITCHES
Menuoptions
Printcurrentsettings
InstaUionmenu
Factmysettings
Dotwijustmexitmode
41
41
42
42
43
43
44
44
45
45
46
47
47
47
47
48
50
50
50
51
51
51
52
52
53
54
55
57
57
58
62
63
Page 8
Chapter7 PRINTERCONTROLCOMMANDS
Fontcontrolcommands
charactersetcommands
Charactersizeandpitchcommands
Verticalpositioncommands
Horizontalpositioncommands
Graphicscommands
Downloadcharactercommands
Colorselectioncommands
Otherprintercommands
Chapter8 DOWNLOADCHARACTERS
Definingyourowndraftcharacters
Definingtheattributedata
Assigningthecharacterdata
Sampleprogram
DefiningyourownNLQ characters
AssigningthecharacterdatawiththeStandard
mode
higning the character data with the
IBMmode
Chapter9 MS-DOSANDYOURPRINTER
Installingapplicationsoftwarewithyourprinter
Embeddingprintercommands
ProgrammingthepMtcxwithDOScommands
ProgrammingwithBASIC
Chapter10 TROUBLESHOOTINGANDMAINTENANCE
Troubleshooting
Powersupply
Printing
Paperfeeding
Maintenance
Replacingtheprinthead
65
66
71
74
79
85
90
93
98
99
103
103
104
105
106
108
108
112
117
117
118
120
123
129
129
130
130
132
135
135
Page 9
Chapter11REFERENCE
specifications
PinOut
ofinterface~tor
Parallelinterface
serialintexke
Charwtersets
standardclumwta Saw
Intematkd
Cbaractasets
IBM
CtiiUiW* set #2
km set
#l
IBMqecid CiMtWkX *
INDEX
COMMANDSUMMARY
137
137
141
141
142
143
144
146
147
154
155
157
161
Page 10
I
chapter 1
INTRODUCTION
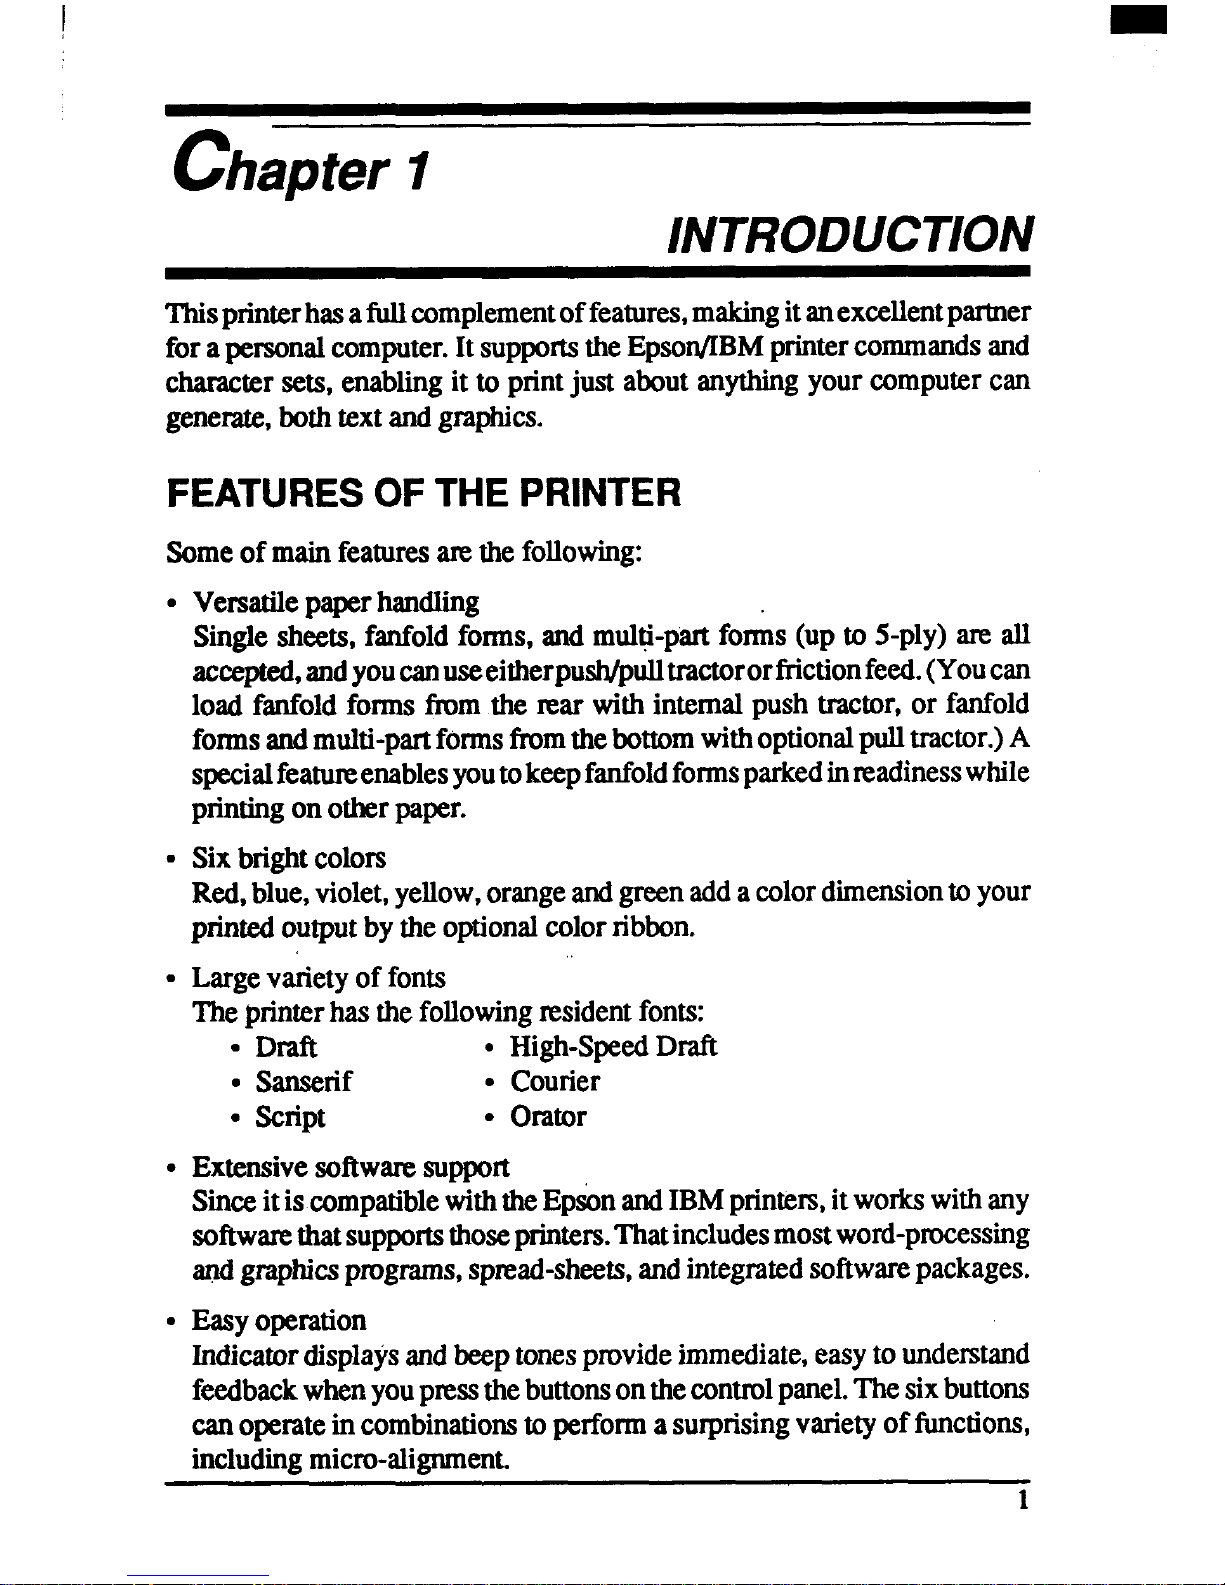
Thisprinterhasafidlcomplementoffeatures,makingitanexcellentptier
fora personalcomputer.Itsuppo~ theEpson/IBMprintercommmds~d
charactersets, enablingit to printjust aboutanythingyourcomputercan
generate,bothtextandgraphics.
FEATURESOFTHEPRINTER
Someof mainfeaturesmethefollowing:
● Versatilepaperhandling
Singlesheets,fanfoldforms,and multi-partfor& (upto 5-ply)are all
accepted,andyoucanuseeitherpush/pti tractororfiictionfeed.(Youcan
load fanfoldforms fmm the mar withinternalpush tractor,or fanfold
formsandmuhi-pmtformsftomthebottomwithoptionalpulltractor.)A
specialfeatureenablesyoutokeepfanfoldformsparkedinmadinesswhile
printingon otherpaper.
● Sixbrightcolors
Red,blue,violet,yellow,orangeandgreenadda color dimensiontoyour
printedoutputby theoptionalcolor ribbon.
“ Largevarietyof fonts
Theprinterhas thefollowingresidentfonts:
● Draft c High-SpeedDraft
● Sanserif ● Courier
● script
. Orator
● Extensivesoftwaresupport
Sinceitis compatiblewiththeEpsonandIBMprinters,itworkswithany
softwarethatsupportsthoseprinters.Thatincludesmostword-processing
andgraphicsprograms,spmd-sheets, andintegratedsoftwarepackages.
● Easyoperation
Indicatordisplaysandbeeptonesprovideimmediate,easytounderstand
feedbackwhenyoupressthebuttonsonthecontrolpanel.Thesixbuttons
canoperateincombinationstoperformasurprisingvarietyof functions,
includingmicro-alignment.
1
Page 11

I
●
Easycareandmaintenance
The ribboncatidge canbe replacedin secondsthe printheadin a few
minutes.
PRINTERCOMPONENTS
Togetacquaintedwiththeprinter’scomponentsandcapabilities,mfertothe
informationon thefollowingpages.
Release lever
Adjustment lever
\
Tractor -
Paper guide
[or
lever
lever
knob
Control panel
Tear assist
2
Page 12
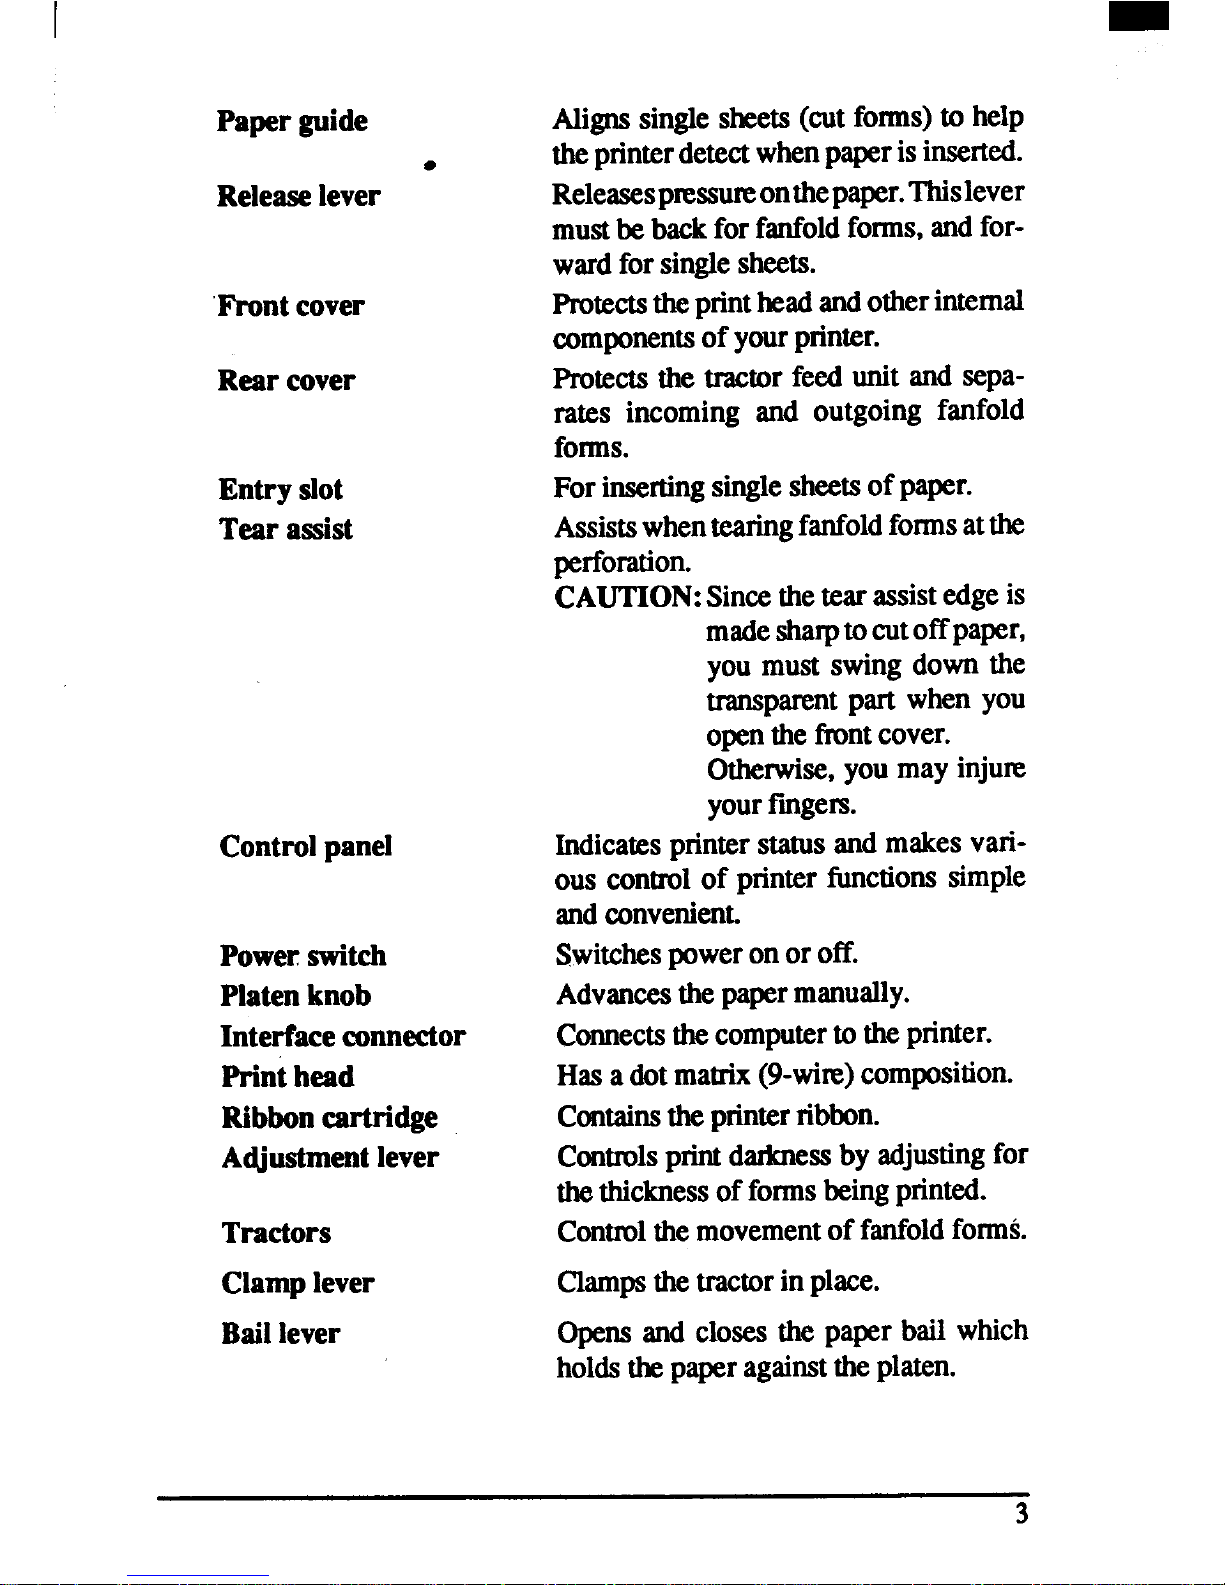
Paper guide
●
Releaselever
‘Frontcover
Rear cover
Entry slot
Tear assist
Control panel
Power switch
Platen knob
Interface connector
Print head
Ribbon cartridge
Adjustment lever
Tractors
Clamp lever
Baillever
Alignssinglesheets(cutforms)to help
theprinterdetectwhenpaperisinsexted.
Releasespressweonthepaper.Thislever
mustbe backfor fanfoldfoxms,andforwardforsingle sheets.
Protectstheprintheadandotherinternal
componentsof yourprinter.
Protectsthe tractorfeed unit and separates incoming and outgoing fanfold
forms.
Forinsertingsinglesheets of paper.
Assistswhentearingfanfoldformsatthe
perforation.
CAUTION:Sincethetearassist edgeis
madesharptocutoffpaper,
you must swing down the
transparent part when you
openthe frontcover.
Otherwise,you may injure
yourfmgem.
Indicatesprinterstatusand makesvarious controlof printer fimctionssimple
andconvenient.
Switchespoweronoroff.
Advancesthepapermanually.
Connectsthecomputertotheprinter.
Hasa dotmatrix(9-win3)composition.
Containstheprinterribbon.
Controlsprintdadmessby adjustingfor
thethicknessof formsbeingprinted.
Controlthemovementoffanfoldforms.
Clampsthetractorinplace.
Opensand closes the paper bail which
holdsthepaperagainsttheplaten.
Page 13
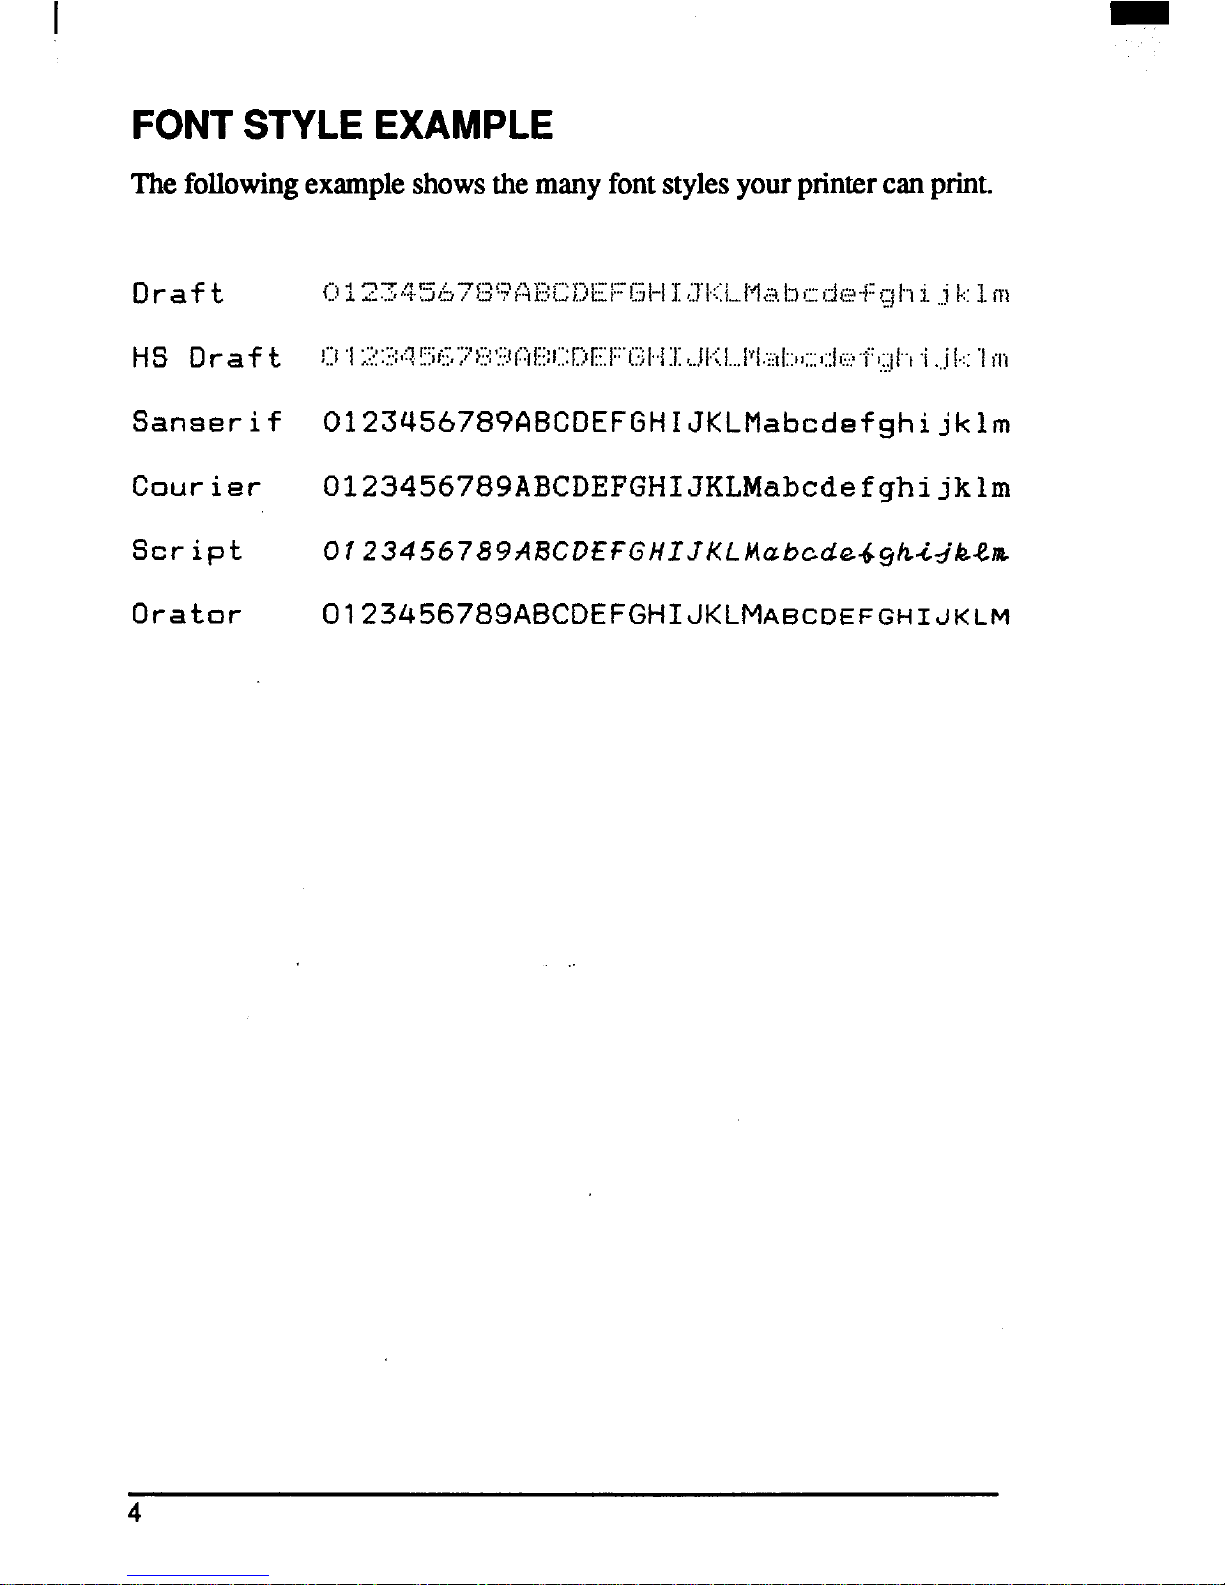
FONTSTYLEEXAMPLE
The
followingexampleshowsthemanyfontstylesyourprintercanprint.
4
Page 14
chapter2
SEWING UP THEPRINTER
Locatingtheprinter
Unpackingthecartonbox
Mountingtheplatenknob
Installingtheribboncamidge
Connectingtheprinterto yourcomputer
Thischapterdescribesthefollowingproceduresto setup yournewprinter.
Ifyouhaveoptionalaccessories,mfertochapter3 aftersettingupthe printer.
●
●
●
●
LOCATINGTHE PRINTER
Beforeyoustartunpackingandsettingup yourprinter,makesumthatyou
havea suitableplaceon which to locate it. By“asuitableplace”,wemean:
●
●
●
●
●
●
●
A firm,level surfacewhichis fairlyvibration-free
Awayfromexcessiveheat(such as directsunligh~heaters,etc)
Awayfromexcessivehumidity
Awayfmmexcessivedust
Supplyitwith“clean”electricity.Donotconnectittothesamecircuitas
alarge,noise-producingappliancesuchas a refrigerator.
Make sure the line voltage is the voltage specifiedon the printer’s
identiilcationplate.
To disconnecttheprinter,theplughastobedisconnectedfromthe wall
socket,whichhas to belocatedcloseto theprinter,andeasyto access.
Installtheprinterwhemthereissufficientmomforthepaperandanypaper
beingfed in or printedout.
If you ate connectingyourprinterwith a Centmnicspamllelinterface,
makesumthatthecableiswithin2m(6ft)oftheprinter.AnRS-232serial
connectionusingtheoptionalIS-8XLinterfacecartridgecanbemadeover
longerdistances.
Page 15
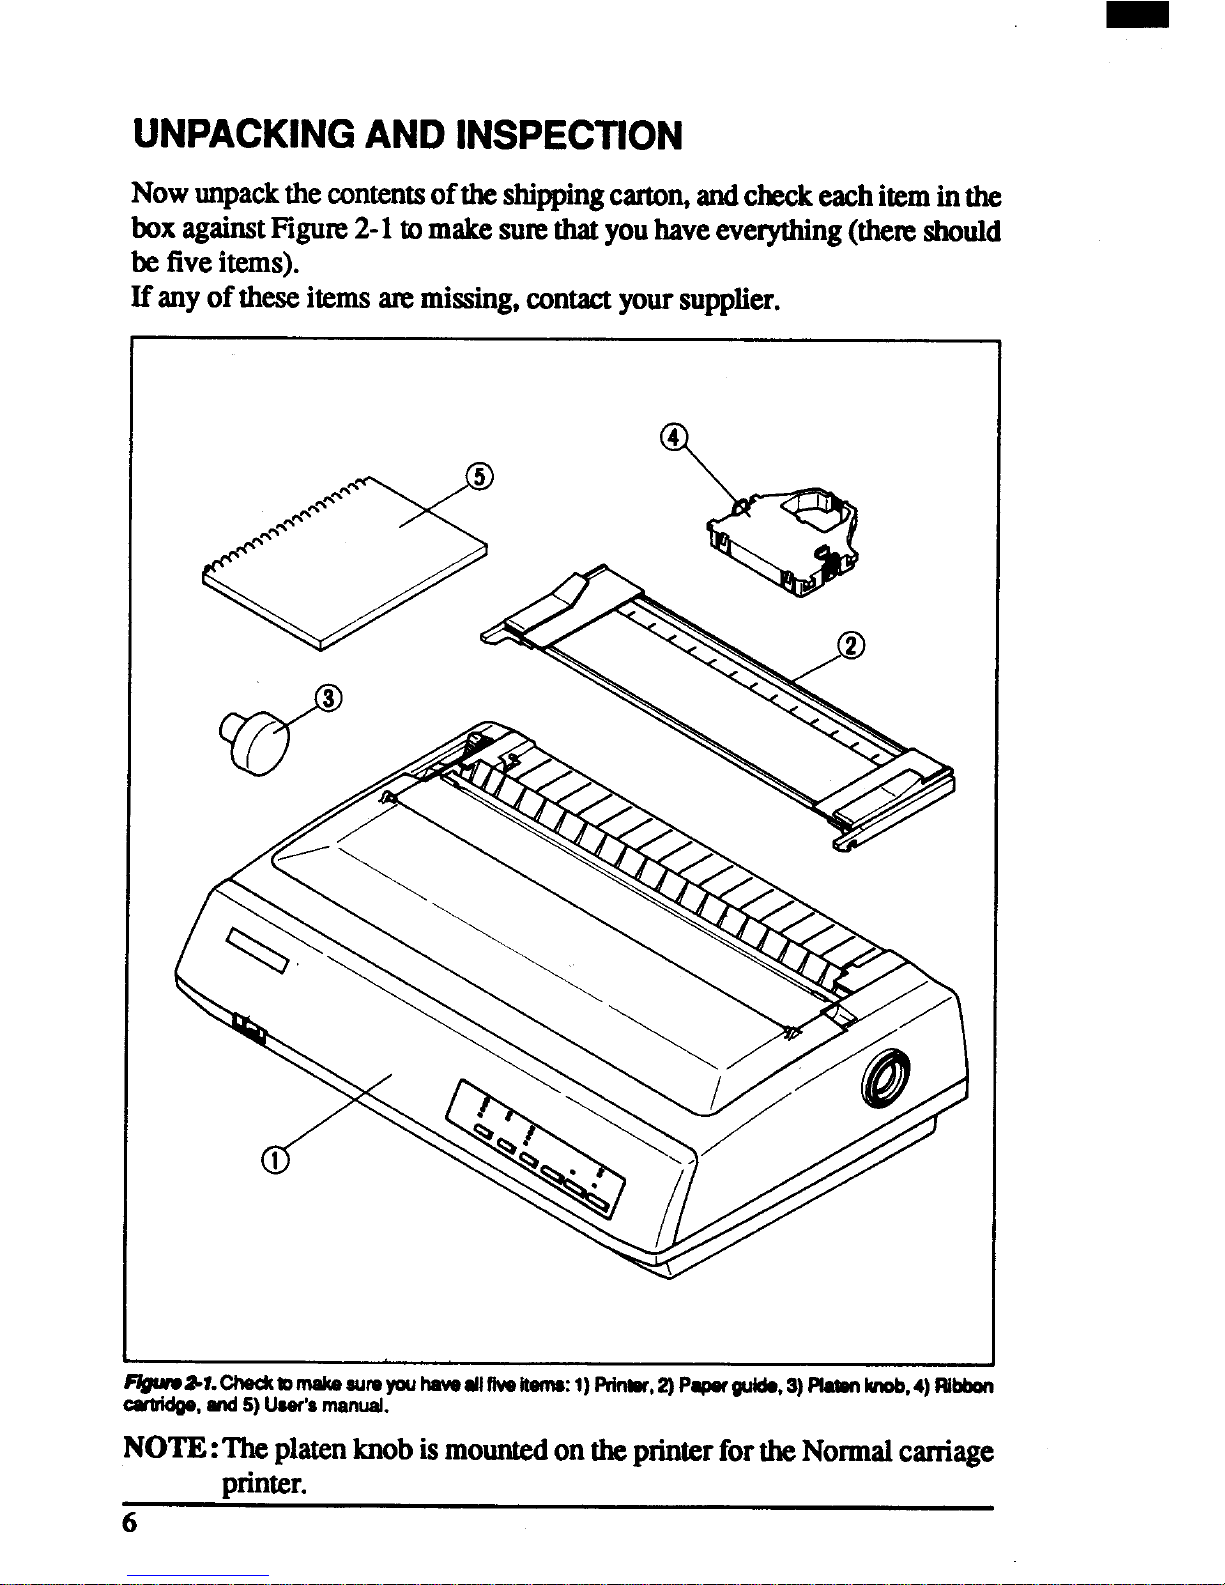
UNPACKINGANDINSPECTION
Nowunpackthecontentsoftheshippingcarton,andcheckeachiteminthe
boxagainstFigwe2-1tomakesumthatyouhaveeverything(the~ should
be fiveitems).
If anyof theseitemsammissing,contactyoursupplier.
F@We?l.Chedtbmake aumyouhavedltiveitenw:1)Pdntw,2) Papof3uido,3)Plat9nknob,4)Ribbon
cwW3e, d 5)user’sInanlld.
NOTE:The platen knobismountedontheprinterfortheNormalcarriage
Drinter.
Page 16
Theoptionalaccessorieswhichyoumayhaveorde~d withyourprinteranx
● Colorribboncartridge(X9CL)
● Serialinterfacecartridge(IS-8XL)
s Bufferedparallelinterfacecartridge(IP-128XL)
● Automaticsheetfeeder(SF-10DMII/15DMII,SF-1ORIVW15RMII)
● Pulltractorunit(PT-1OXIW5XM)
For detailsof theoptionalaccessories,referto Chapter3.
7
Page 17
SEIllNG UP
Placethe printerin the desiredlocation, and removeallpackingmaterial
ilom insidethe printercover.Thispackingmaterialis intended&prevent
damagetotheprinterwhileintransit.Youwillwanttokeepallthepacking
material,along withtheprintercarton,in caseyouhavetomovetheprinter
to a newlocatiom
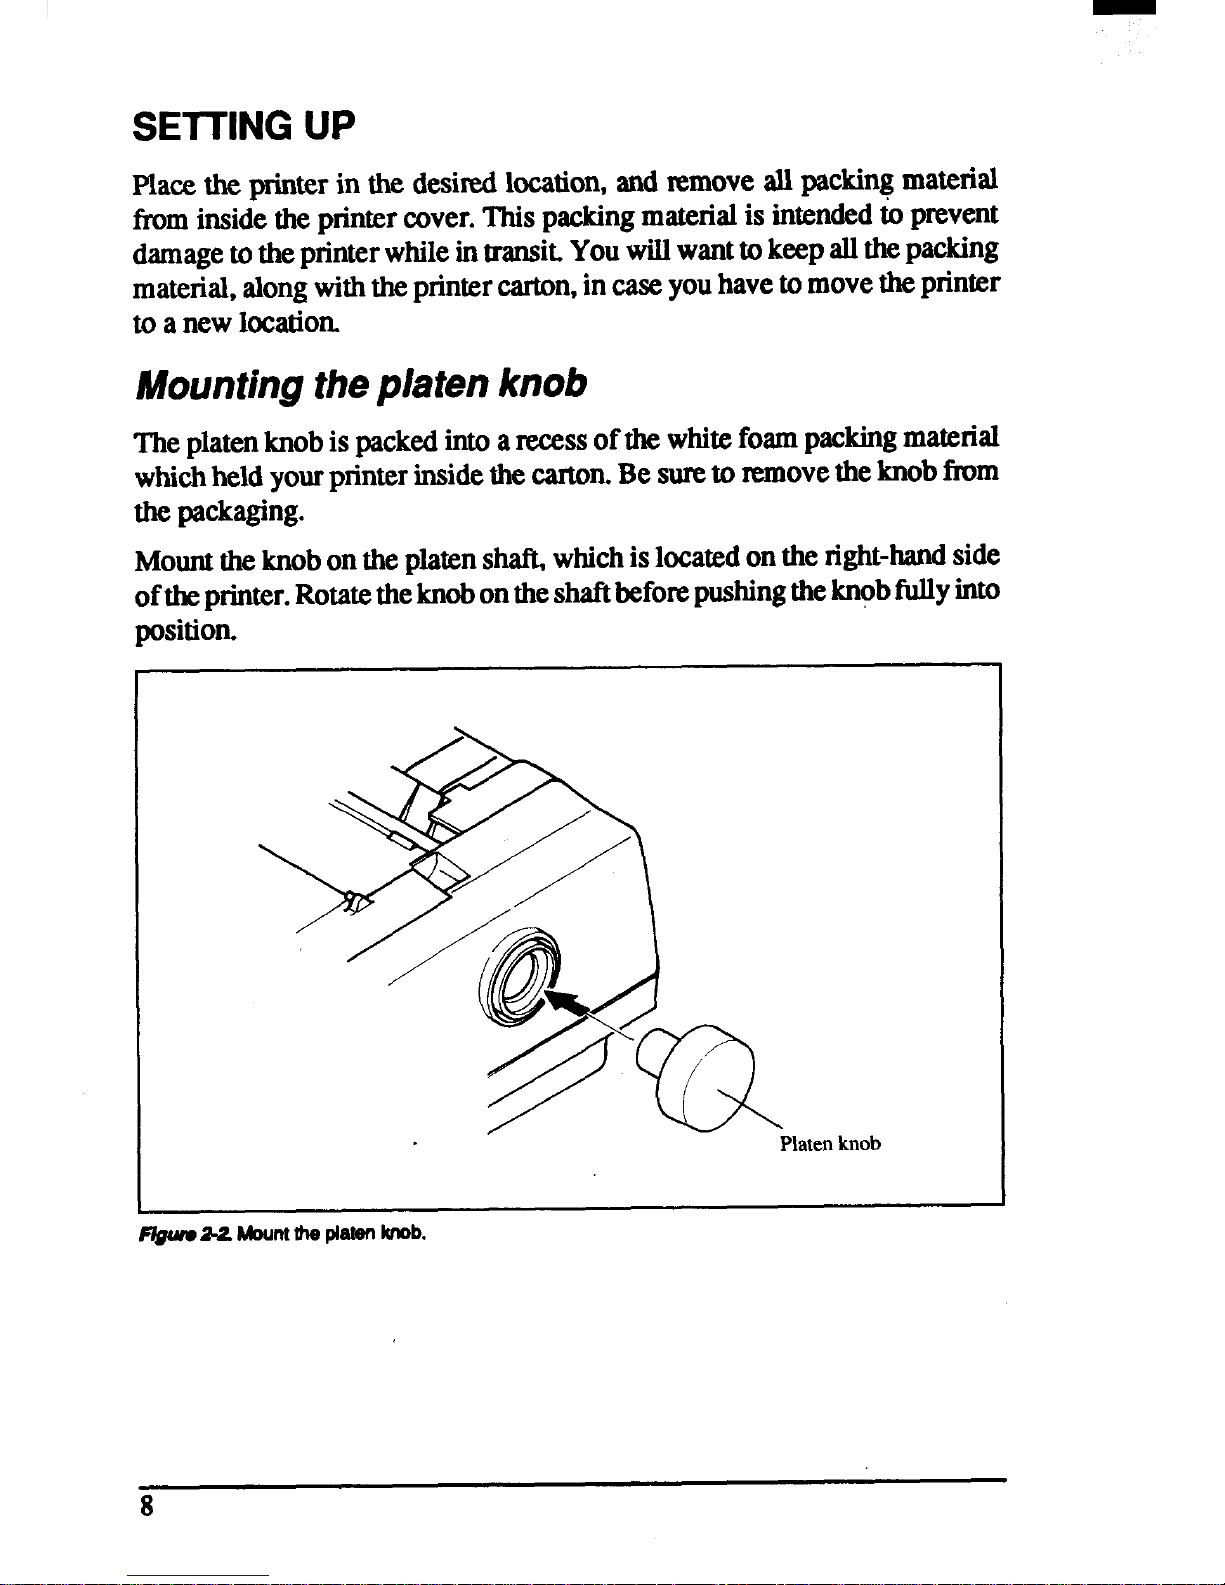
Mounting thep~atenknob
Theplatenknobis packedintoarecessofthewhitefoampackingmaterial
whichheldyourprinterinsidethecarton.Besureto xemovetheknobfrom
thepackaging.
Mounttheknobonthe
platen shaft whichisl~@d ontie right-~ side
oftheprinter.Rotatethe knobontheshaftbeforepushingtheknobfullyinto
position.
knob
F@m%2Mountthe platenknob.
8
Page 18
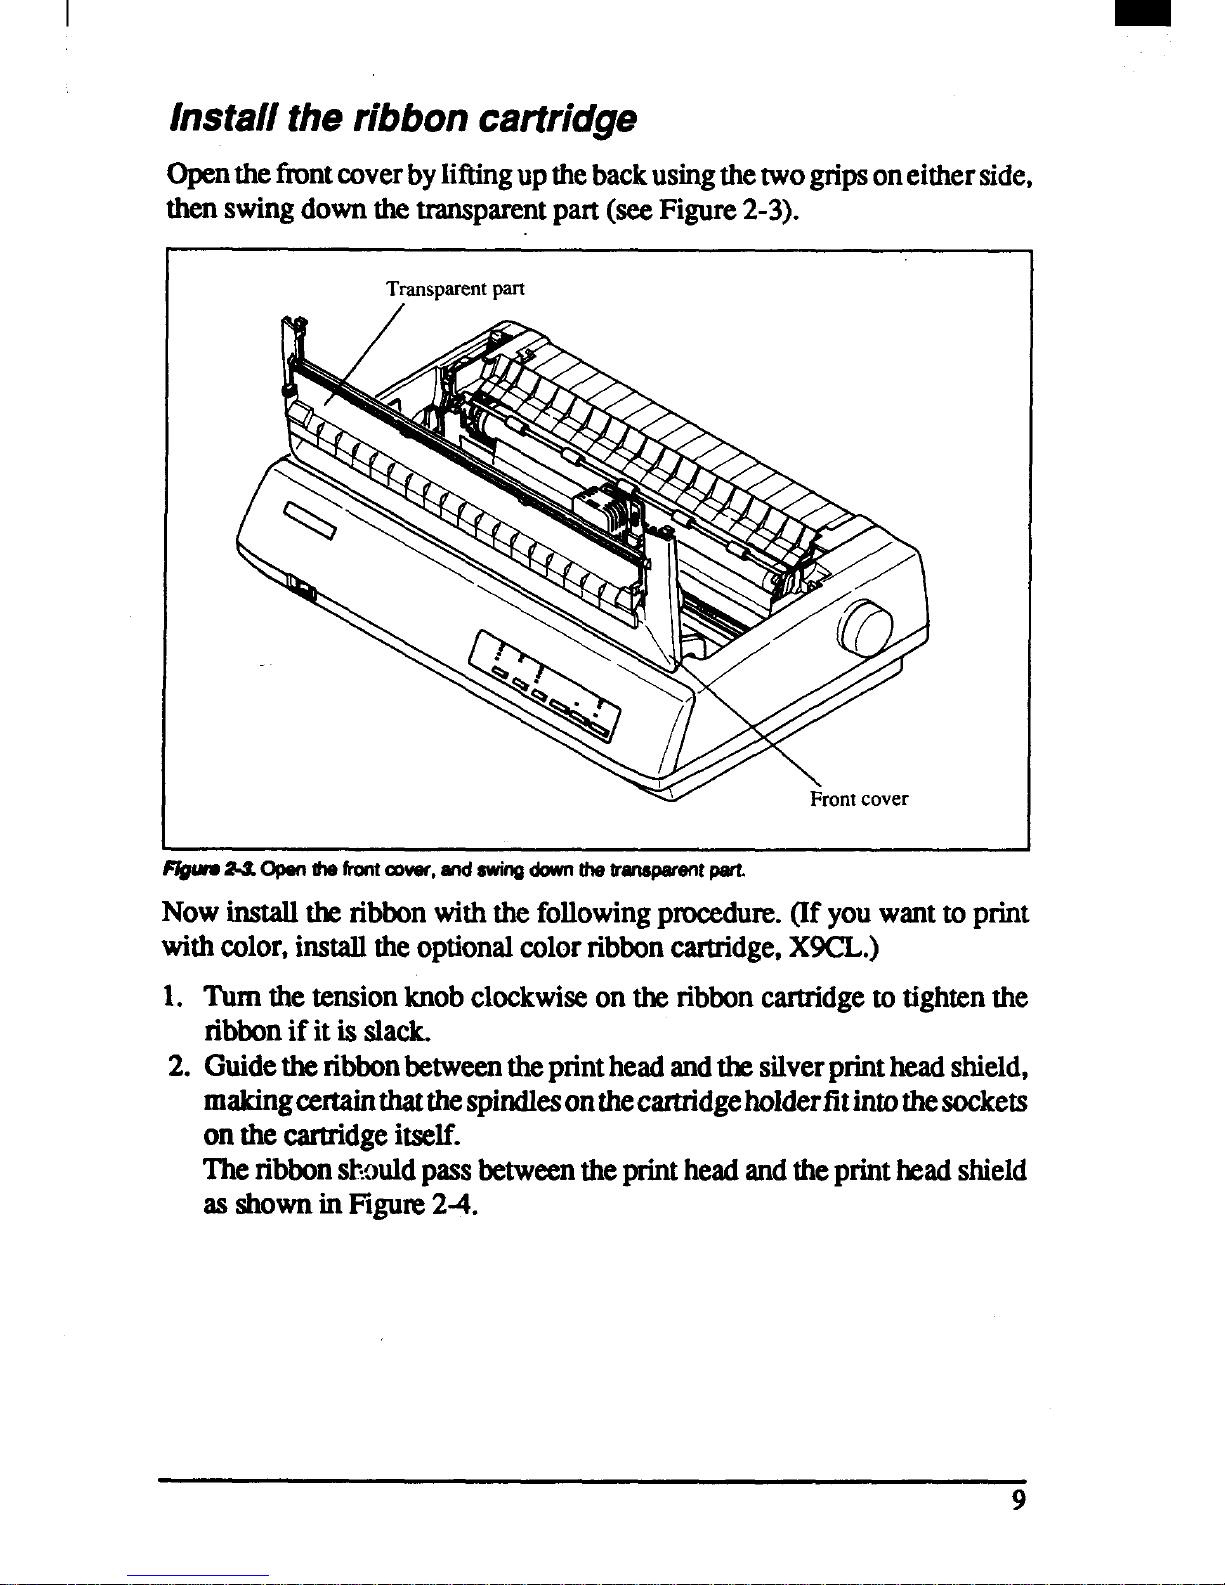
Installtheribboncartridge
openthefiuntcover byliftingupthe backusingthetwo gripsoneitherside,
thenswingdownthetransparentpart(seeFigure2-3).
Transparent part
/
f@wMOIMM dw
fmtcover,andswho downthetronqwenrpsm
Nowinstall& ribbonwiththe followingprocedure.(Ifyouwantto print
withcolor,installtheoptionalcolorribboncartridge,X9CL.)
1.
2.
Turnthe tensionknobclockwiseonthe ribboncartridgeto tighten the
ribbonif it is slack.
Guidetheribbonbetweentheprintheadandti silverprintheadshield,
makingcertainthatthespindlesonthecartridgeholderfitintothesoclcets
onthe cartridgeitself.
Theribbonslwuldpassbetweentheprintheadandtheprint&ad shield
as shownin FQuE 2-4.
9
Page 19
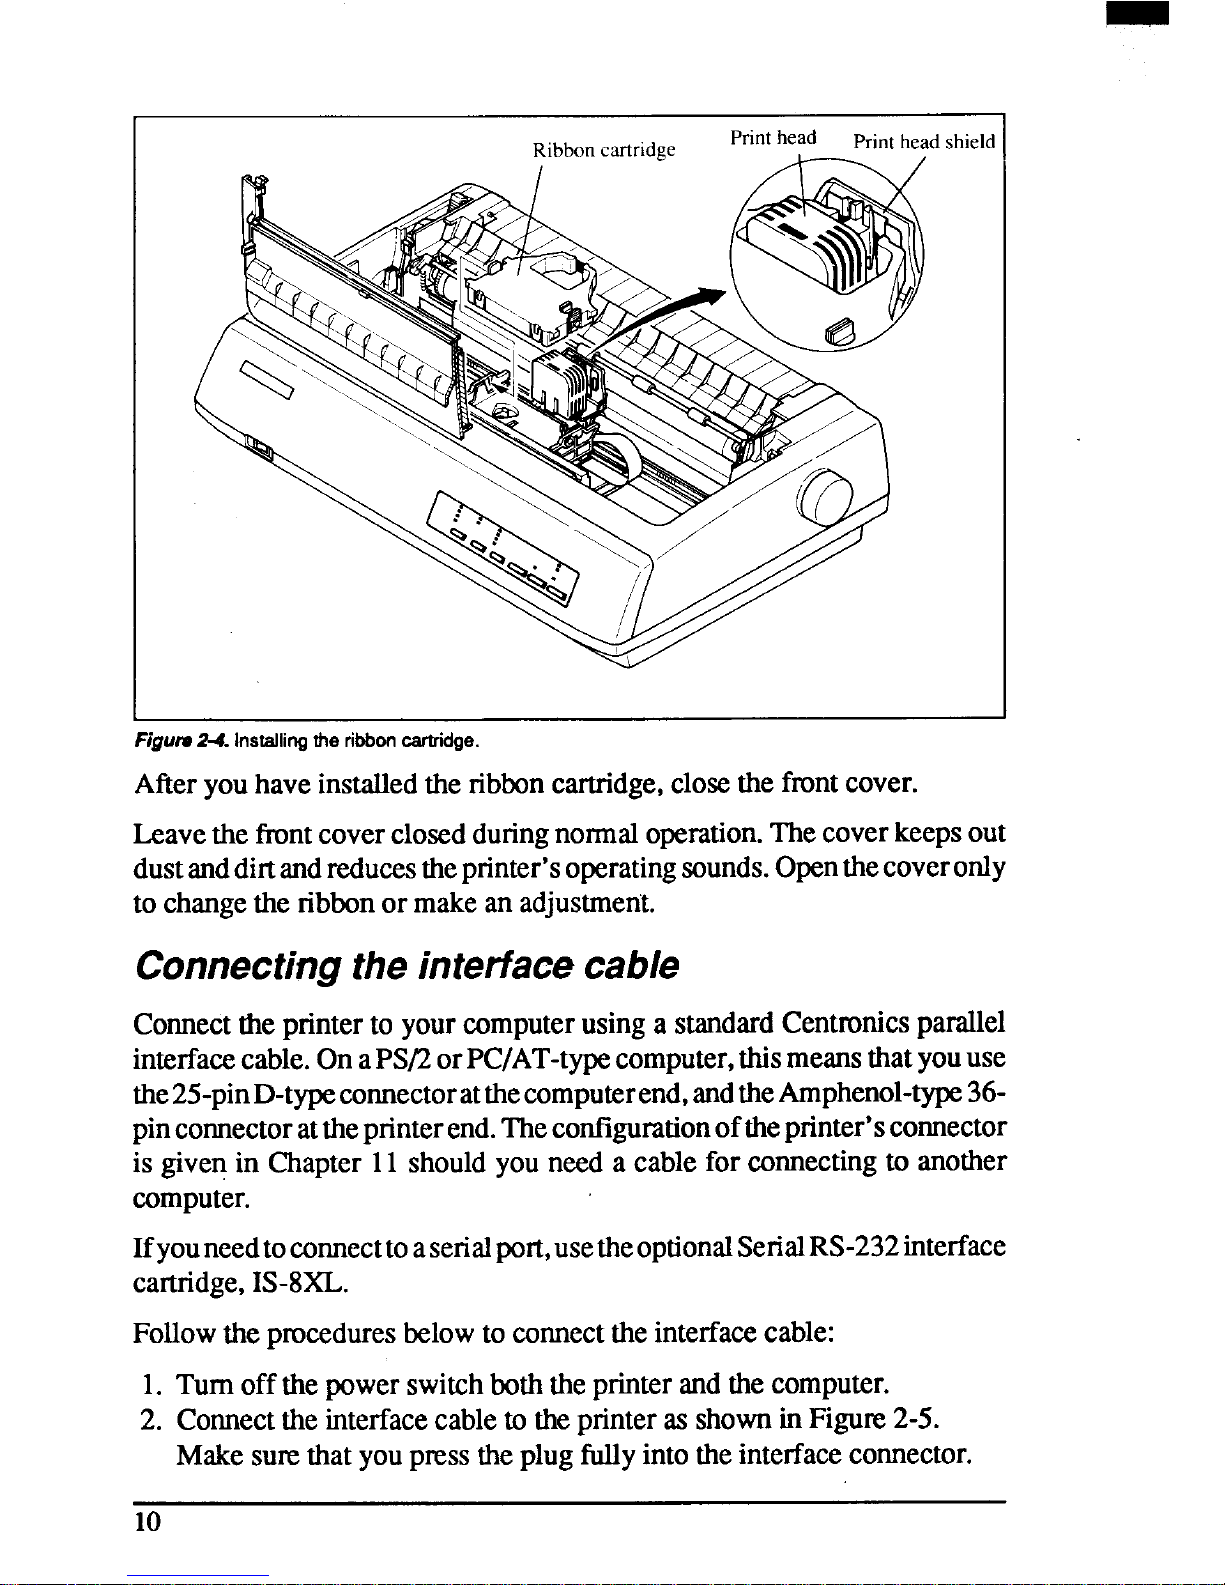
Figum24. Installingthe ribboncartridge.
Afteryouhaveinstalledthe ribboncartridge,closethe frontcover.
Leavethe frontcoverclosed duringnormaloperation.Thecoverkeepsout
dustanddirtandreducestheprinter’soperatingsounds.Openthecoveronly
to changethe ribbonormakean adjustment.
Connectingtheinterfacecable
Connecttheprinterto yourcomputerusinga standardCentronicsparallel
interfacecable.OnaPS/2orPC/AT-typecomputer,thismeansthatyouuse
the25-pinD-typecomectoratthecomputerend,andtheAmphenol-type36pinconnectorattheprinterend.Thecontlgurationoftheprinter’sconnector
is givenin Chapter11shouldyouneeda cableforcomecting to another
computer.
Ifyouneedtoconnecttoasenalport,usetheoptionalSerialRS-232interface
cartridge,IS-8XL.
Followthepmedures below to comect theinterfacecable:
1. Turn offthepowerswitchboththeprinterandthecomputer.
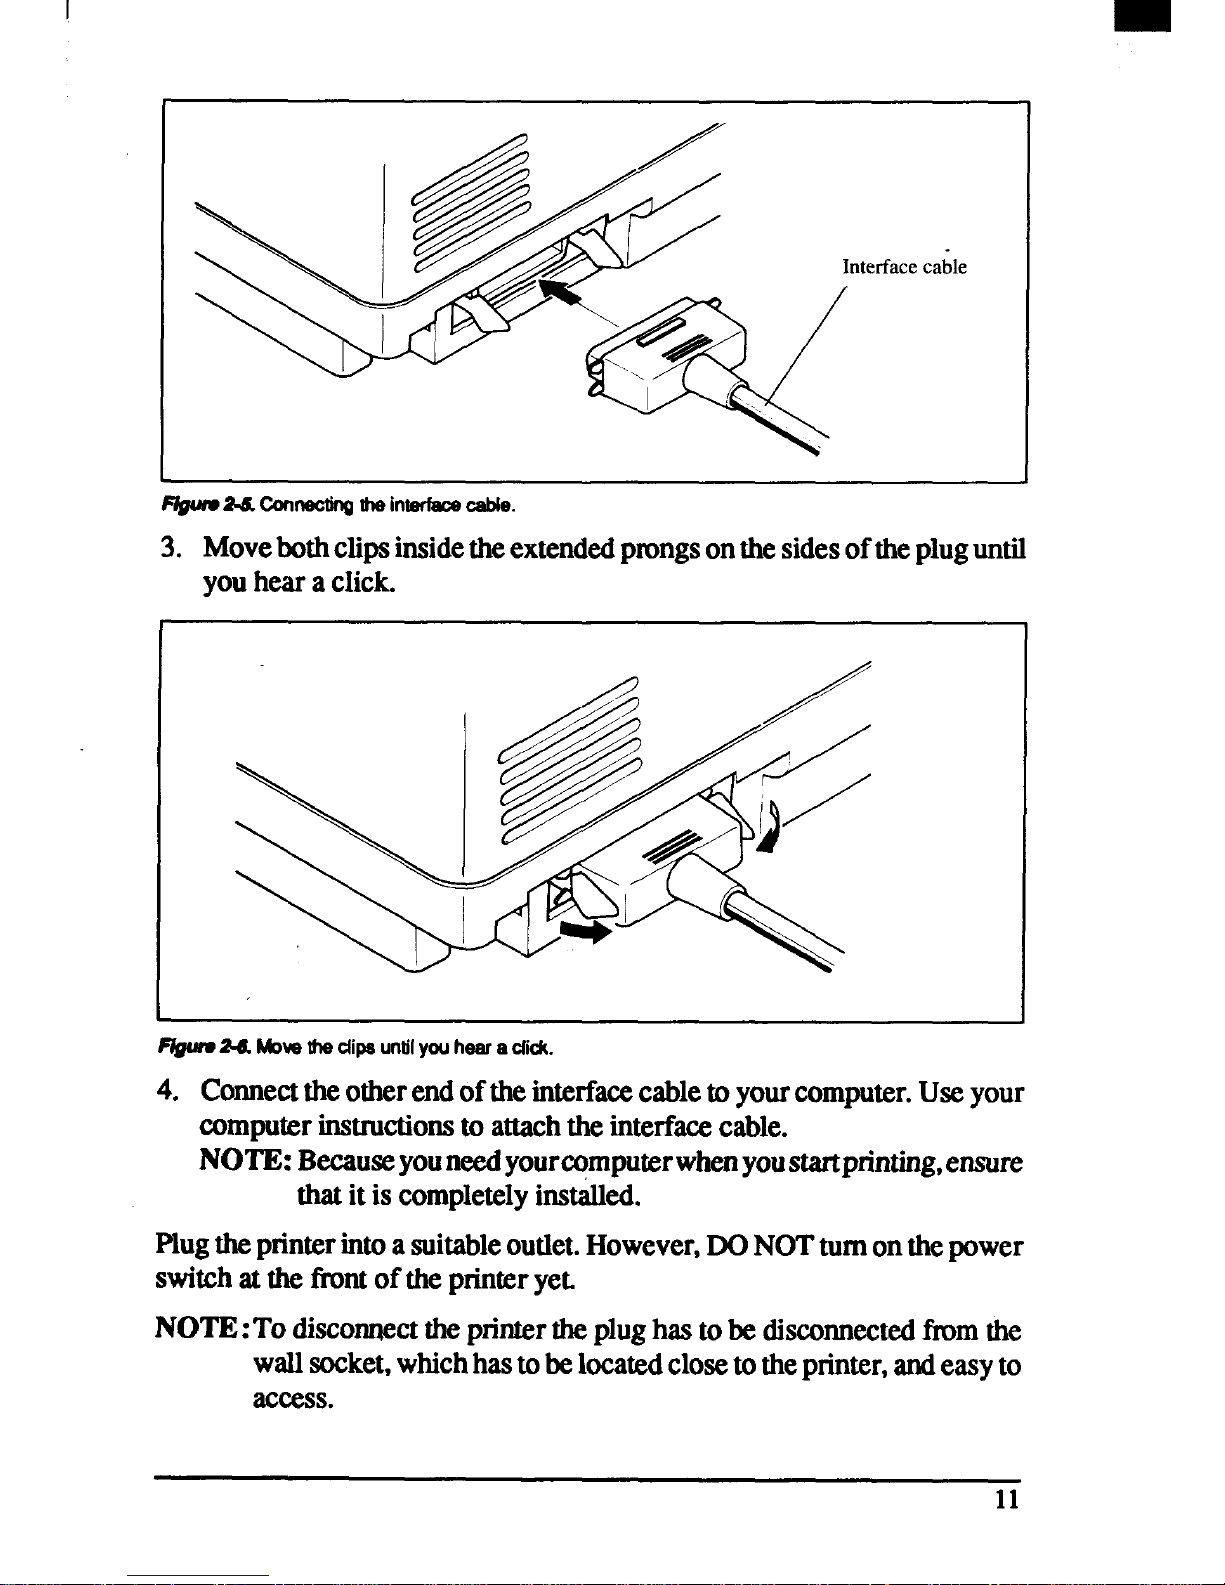
2. Connecttheinterfacecabletotheprinteras shownin Figm. 2-5.
Makesumthatyoupresstheplugfullyintotheinterfaceconnector.
10
Page 20
I
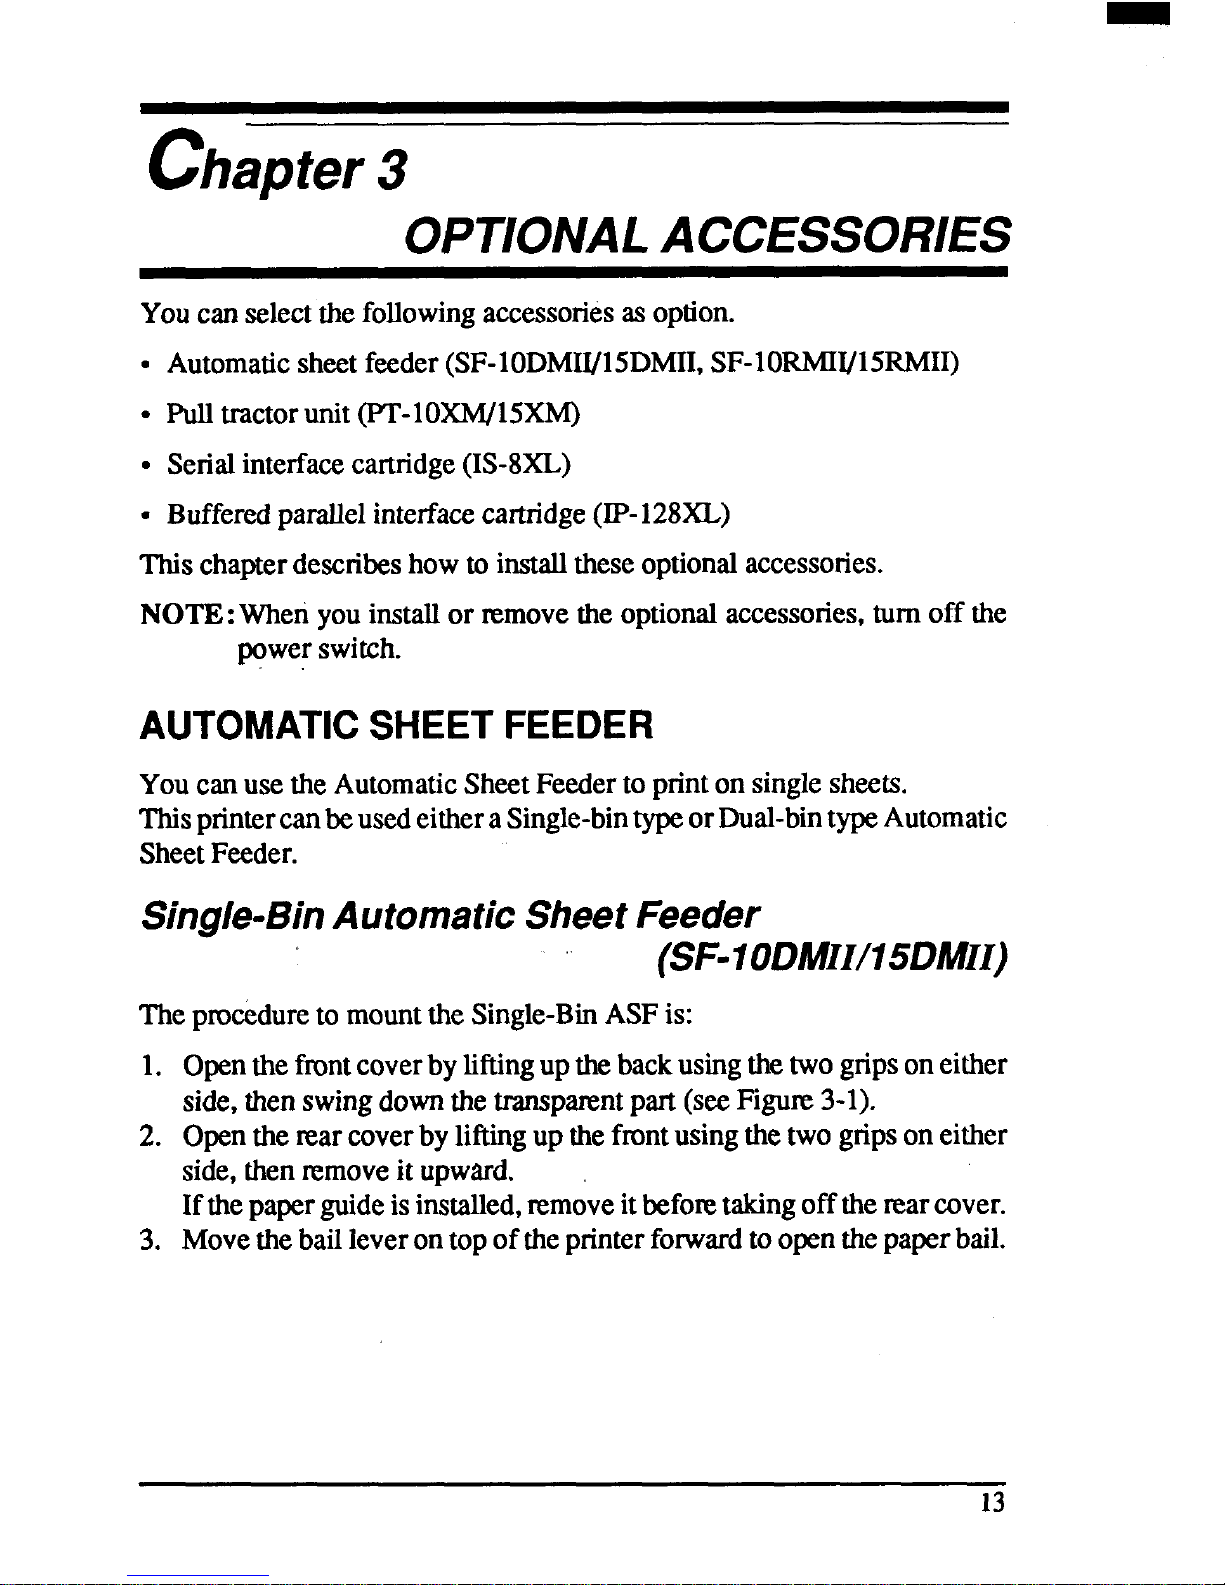
3. Movebothclipsinsidetheextendedpmngsonthesidesof thepluguntil
youheara click.
F@wu24 MOW thadips untilyouhaar adick.
4. Connecttheotherendofthe interfacecabletoyourcomput.er.Useyour
computerinstructionsto attachthe interfacecable.
NOTE: Becauseyouneedyourcomputerwhenyoustartprinting,ensure
thatit is completelyinstalled.
Plugtheprinterintoasuitableoutlet.However,DONOTturnonthepower
switchat thefrontofthe printerye~
NOTE:To disconnecttheprintertheplughasto be disconnectedfmm the
wallsocket,whichhasto belocatedclosetothe printer,andeasyto
access.
11
Page 21

12
Page 22
chapter3
OPTIONALACCESSORIES
Youcan selectthefollowingaccessoriesasoption.
● Automaticsheetfeeder(SF-10DMII/15DMII,SF-1ORMW15RMH)
● Pulltractorunit(P’I’-1OXW15XM)
s Serialinterfacecartridge(IS-8XL)
c Bufferedparallelinterfacecartridge(IP-128XL)
Thischapterdescribeshowto installtheseoptionalaccessories.
NOTE: When youinstallor ~move theoptionalaccessories,turn off the
powerswitch.
AUTOMATICSHEETFEEDER
Youcanusethe AutomaticSheetFeedertoprinton singlesheets.
ThisprintercanbeusedeitheraSingle-bintypeorDual-bintypeAutomatic
SheetFeeder.
Single-BinAutomaticSheetFeeder
(SF-10DMII/15DMII)
Thepm&dureto mountthe Single-BinASFis:
1.
2.
3.
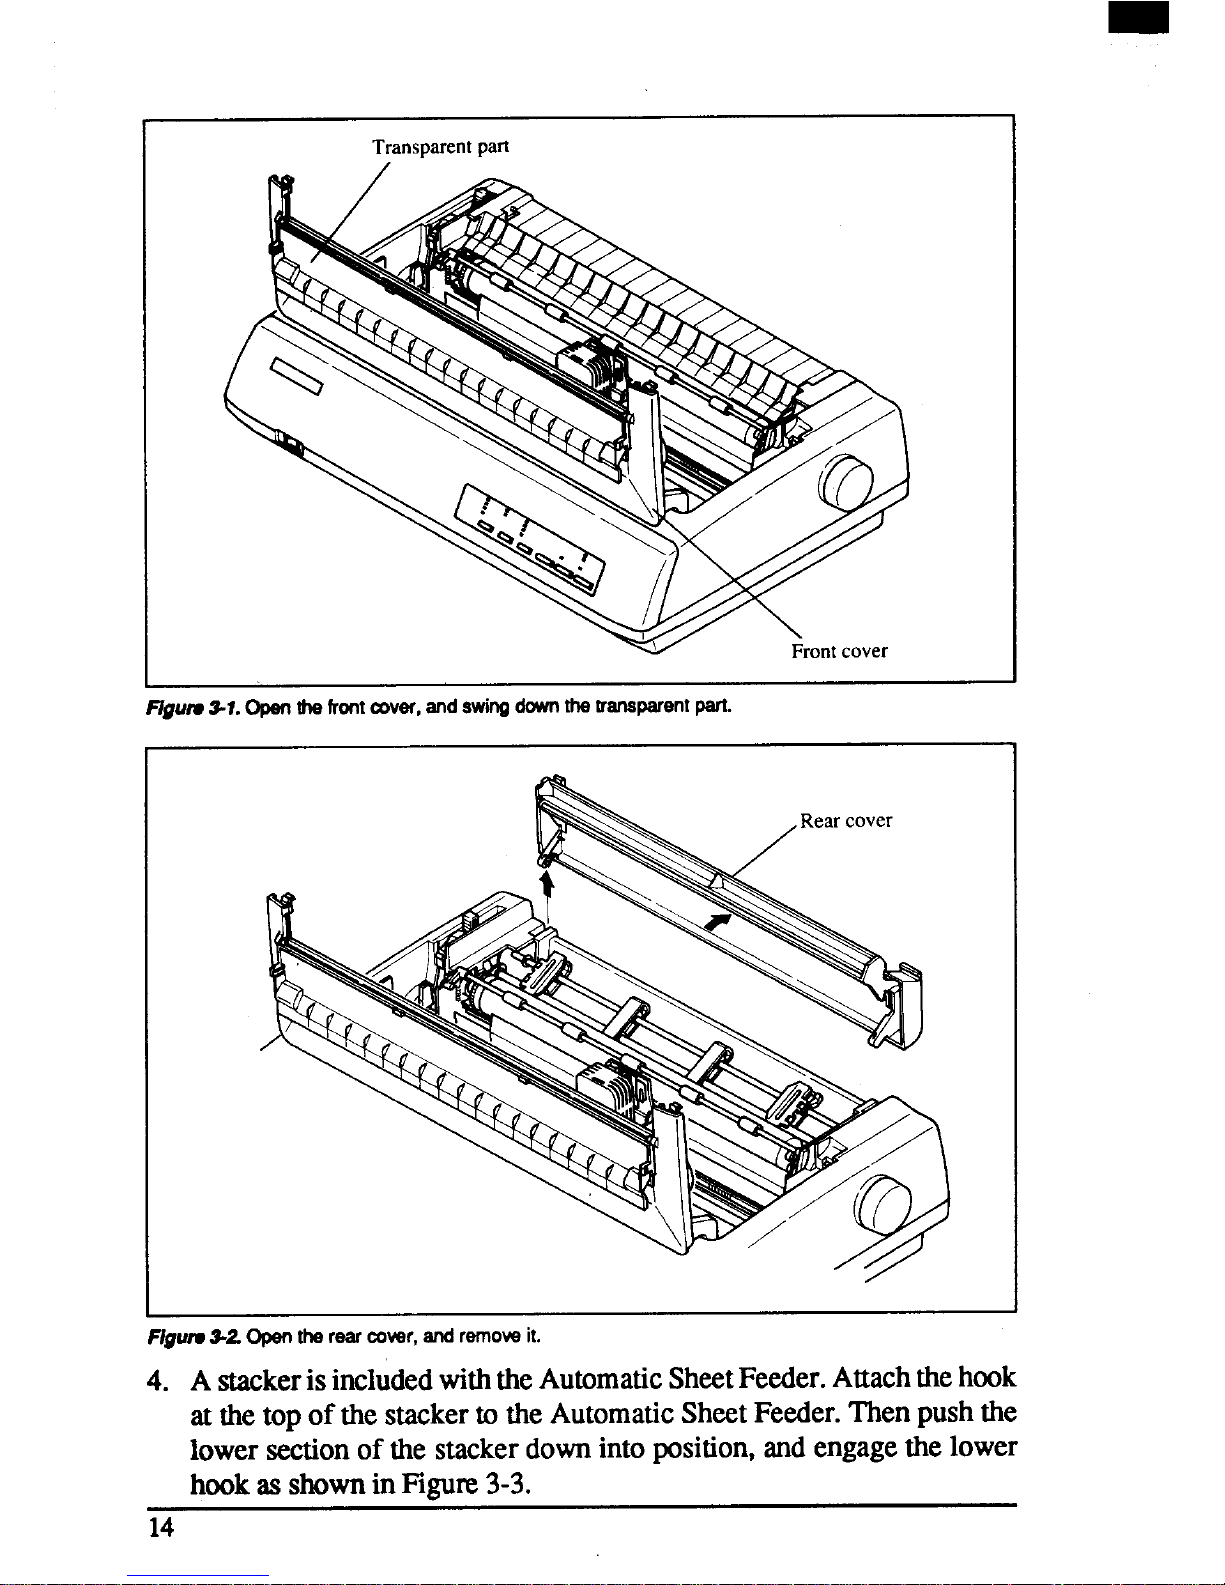
Openthefrontcoverbyliftingupthebackusingthetwogripsoneither
side,thenswingdownthetransparentpart(seeF@me3-l).
Openthemarcoverby liftingup thefrontusingthetwo gripsoneither
side,thenremoveit upward.
Ifthepaperguideis installed,removeitbeforetakingofftherearcover.
Movethebailleveron topoftheprinterforwardto openthepaperbail.
Page 23
Transparent part
Figure3-T.Openrhe
frontcover,andswingdmvrtthetransparentpart.
FJgutw3-2Opentherearcover,andremoveit.
4. A stackerisincludedwiththeAutomaticSheetFeeder.Attachthehook
at thetop of the stackerto theAutomaticSheetFeeder.Thenpushthe
lowersectionof the stackerdownintoposition,andengagethe lower
hookas
ShOWll in Fi$jwe 3-3.
14
Page 24
-. - .—
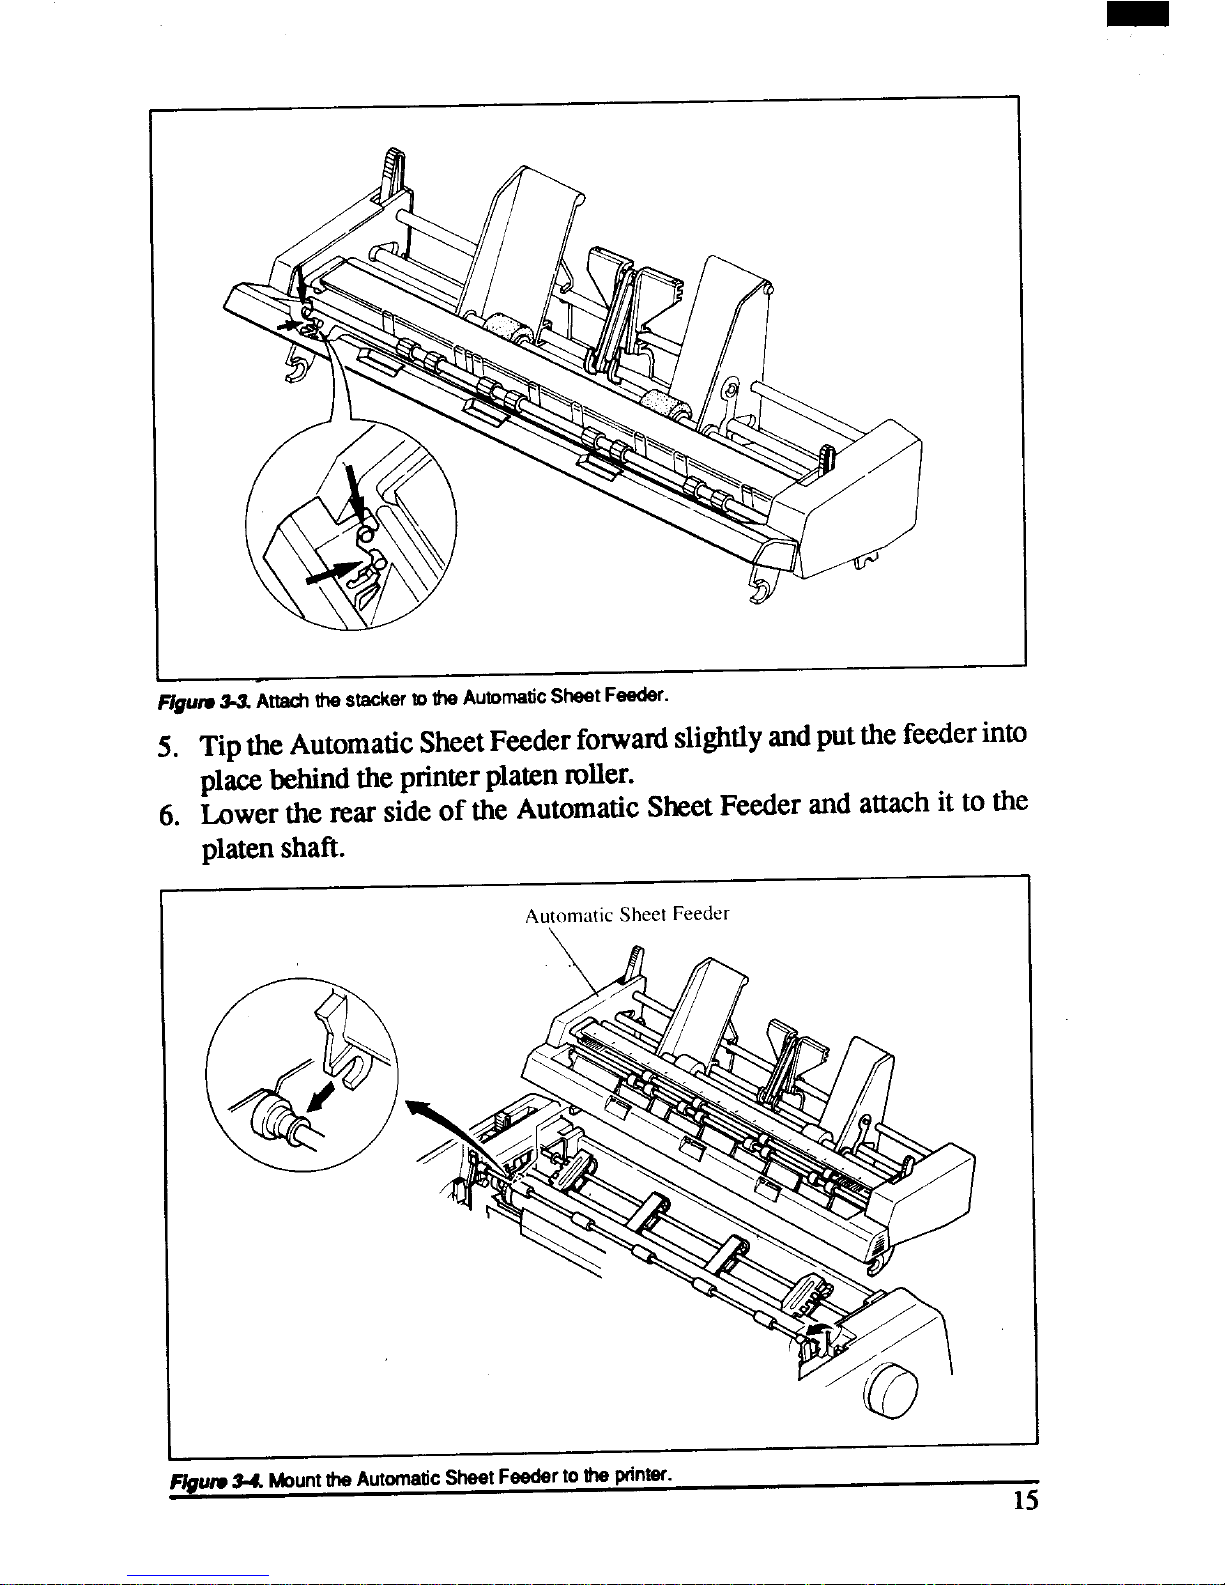
F/@Irv3-3Attachtlwstsckef toU’teAutomstIc sneert-wow.
5. TiDtht3 AutomaticSheetFeederforwardslightlyandputthe feederinto
pl& behindtheprinterplatenroller.
6. Lowerthe rear sideof the AutomaticSheetFeederandattachit to the
platenshaft.
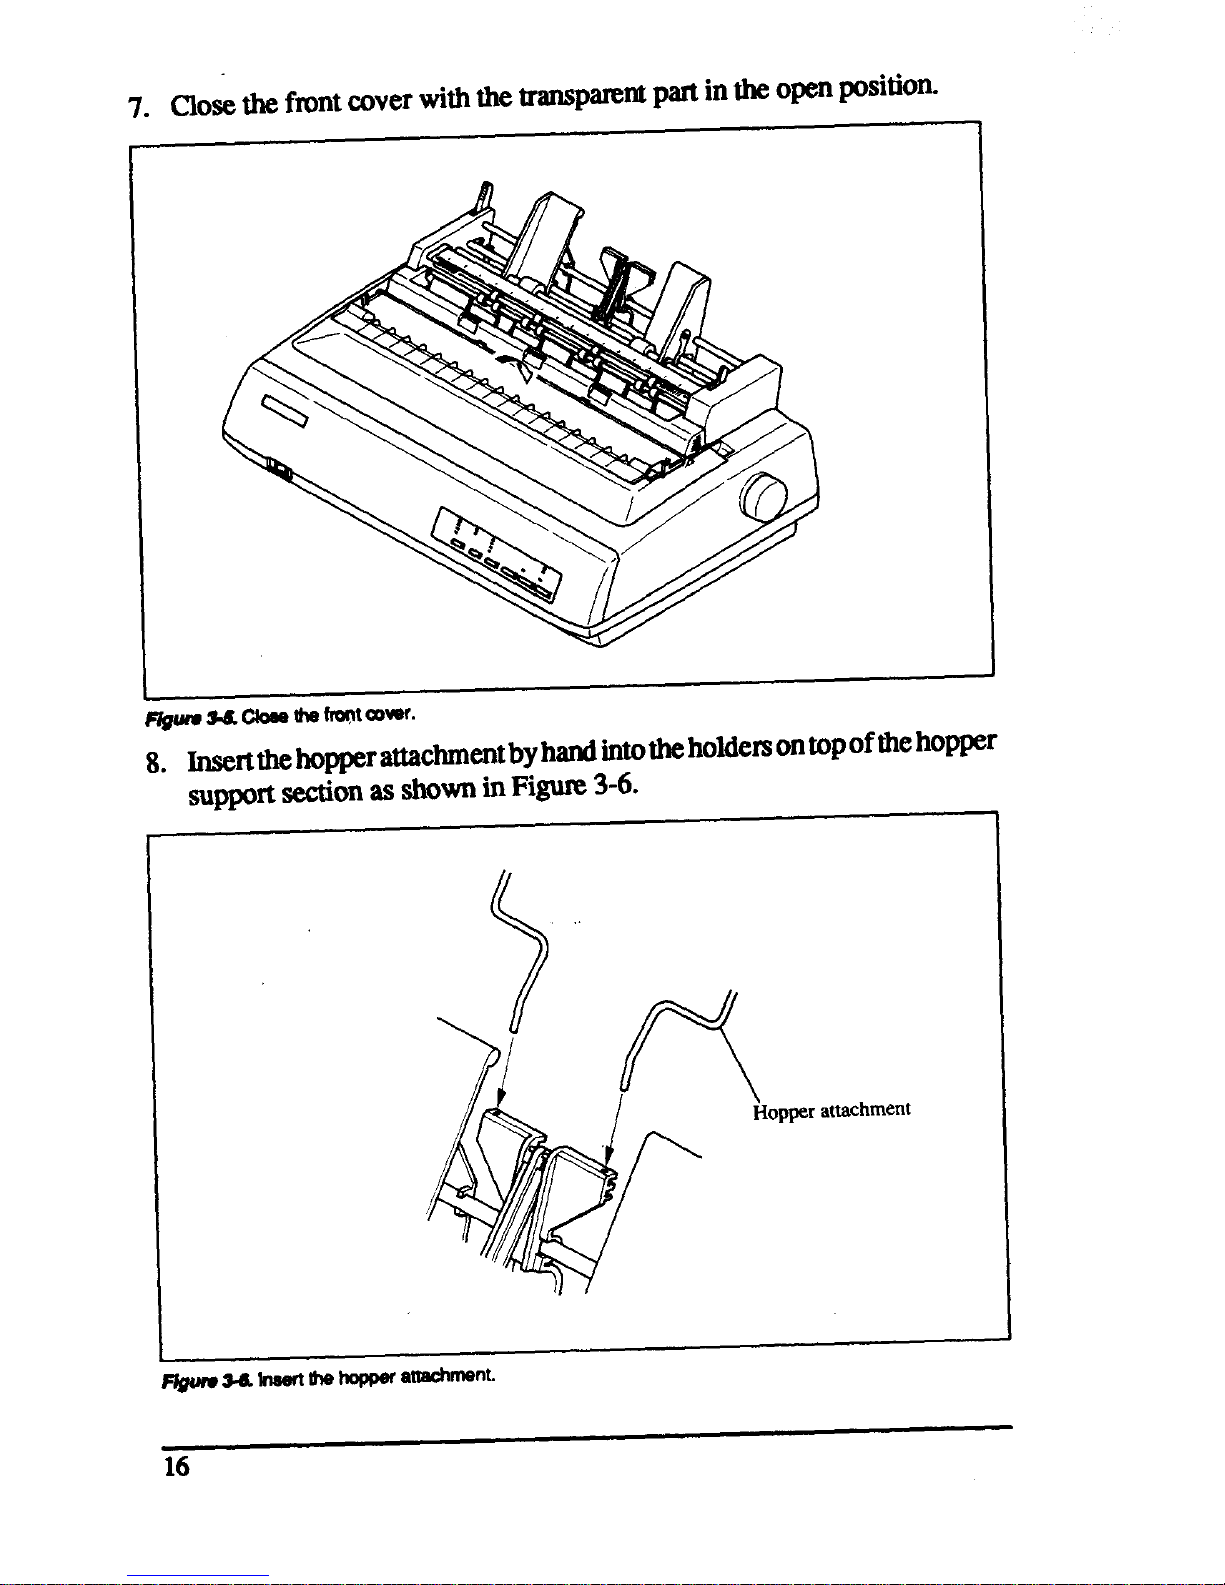
AufomaticSheet Feeder
Flgu#v9-4. MounttheAutomsticSheet Fesderto the printer.
15
Page 25
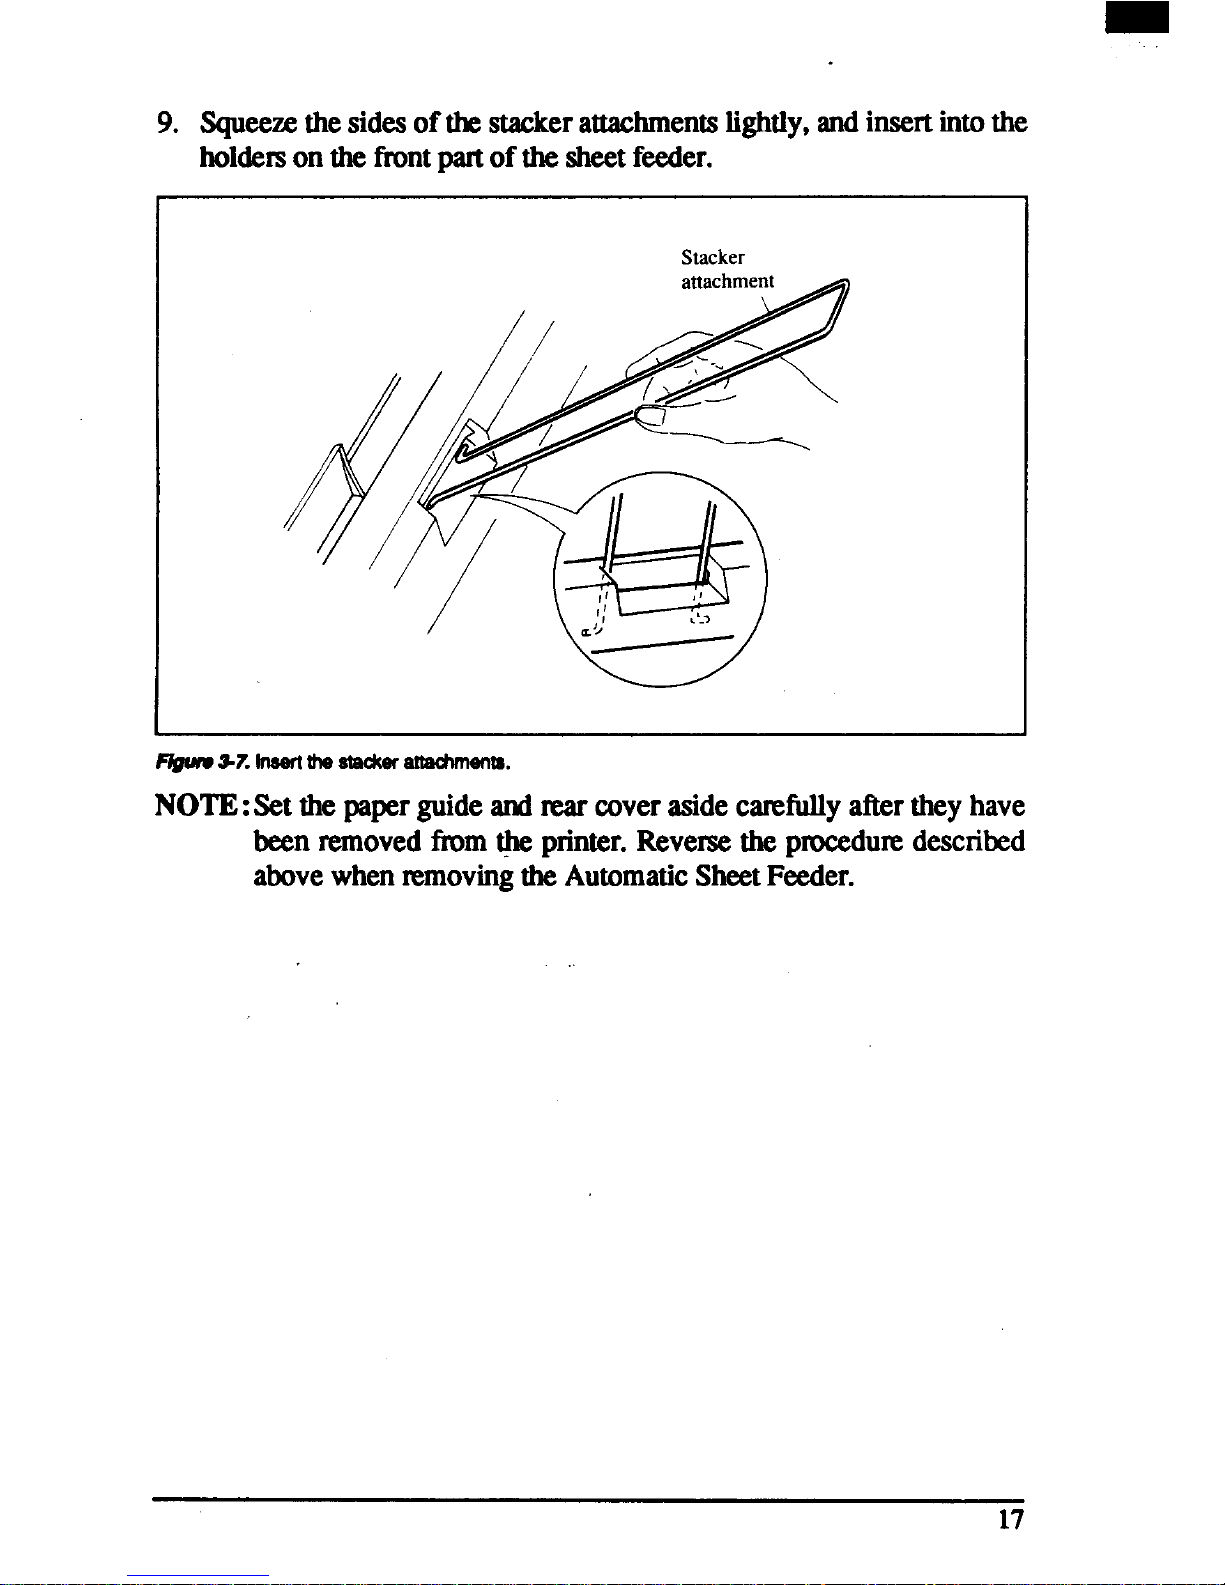
7. ~owtifmnt cxwerwiththe
tmsparent partintheopenposition.
Figurv SRObwhe mtcowr.
8. lnwxtthe-r@c~~tbyhd intotheho~e~ontoPof ~ehO~r
supportsectionas showninFigure3-6.
attachment
16
Page 26
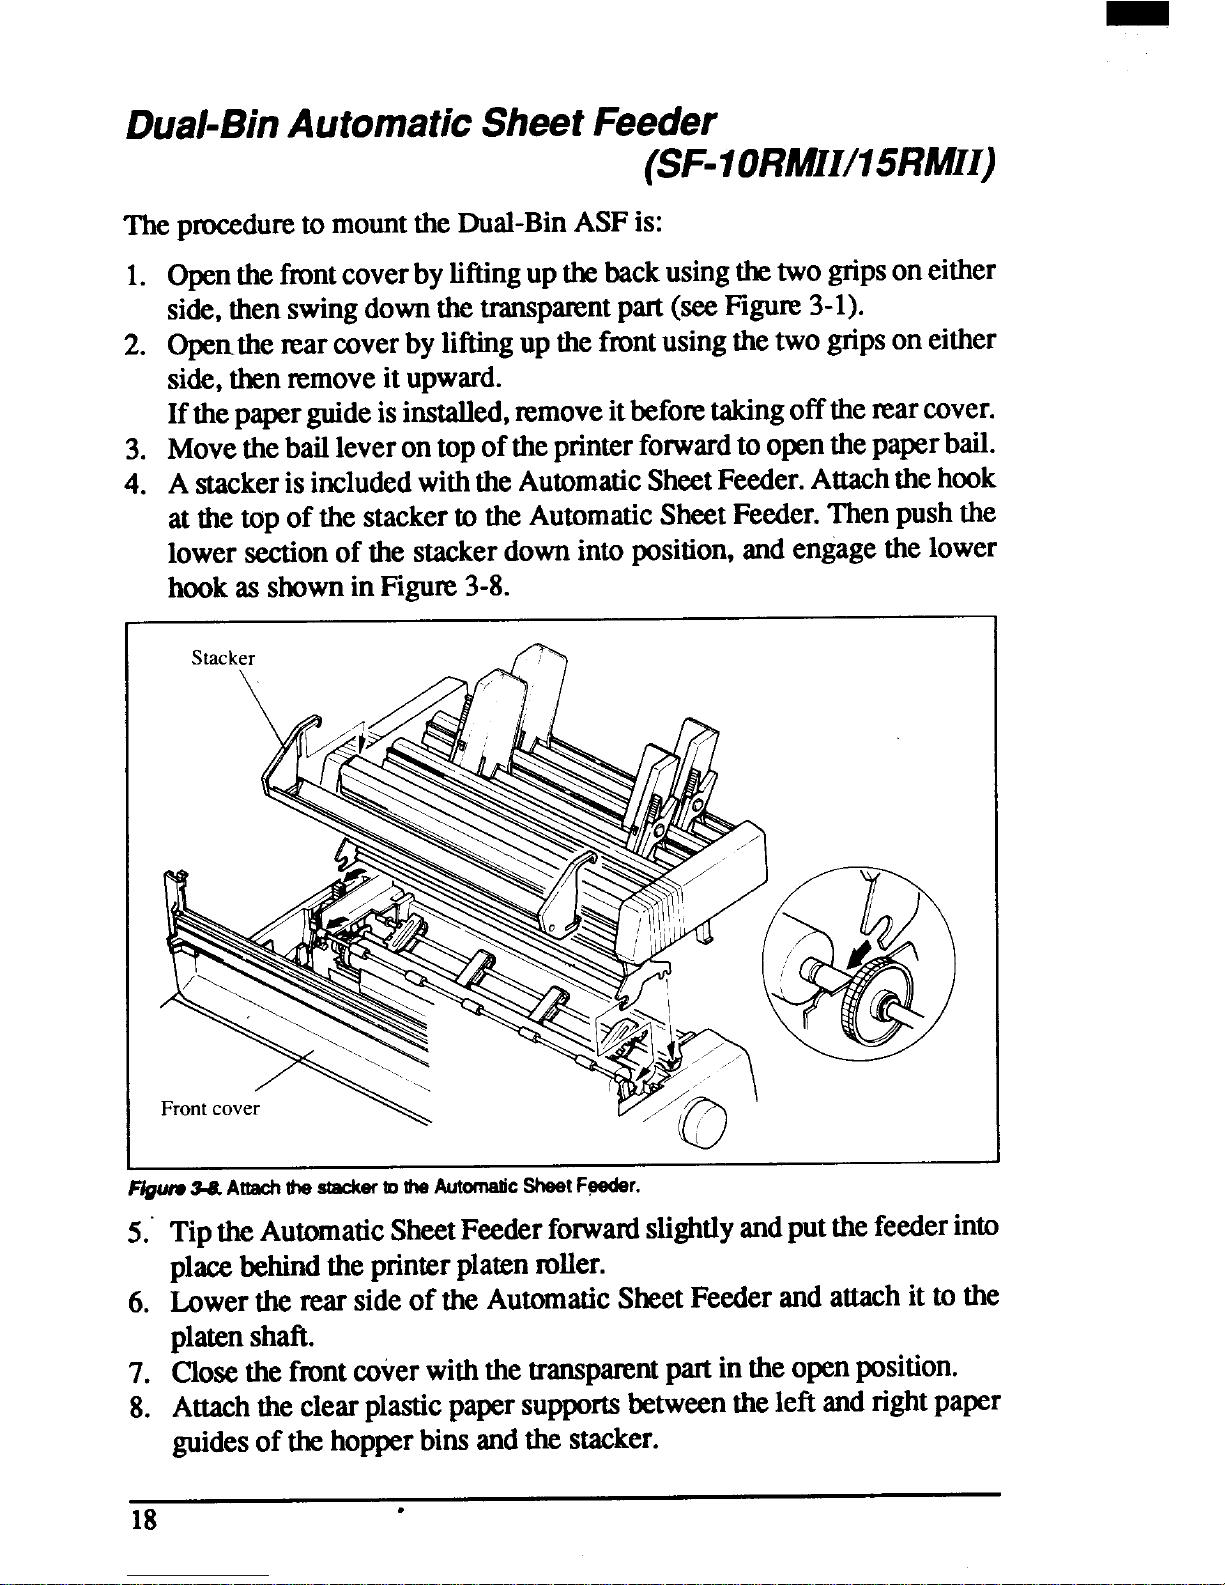
9. Squwx the sidesof thestackerattachmentslightly, andinsert intothe
holderson theIlontpartof thesheetfeeder.
Stacker
attachment ~
F/gLuw3z In8efl
the Stackeratmdments.
NOTE: Setthe paperguideandm coverasidecarefullyaftertheyhave
been removedfromthe printer.Reversethe pmcedwe described
abovewhen~moving theAutomaticSheet Feeder.
17
Page 27
Dual-BinAutomaticSheetFeeder
(SF-IORMIII15RMII)
TheproceduretomounttheDual-BinASFis:
1.
2.
3.
4.
Openthetint coverbyliftingupthebackusingthetwogripsoneither
side,thenswingdownthetransparentpart(seeFlgum3-l).
Openthe rearcoverbyliftingup thefnmtusingthetwogripson either
side,thenremoveit upward.
Ifthepaper guideisinstalled,removeitbeforetakingofftherearcover.
Movethebailleverontopoftheprinterforwardtoopenthepaperbail.
Astackeris includedwiththeAutomaticSheetFeeder.Attachthehook
atthe top of the stackerto the AutomaticSheetFeeder.Thenpushthe
lowersectionof the stackerdownintoposition,andengagethelower
hookas shownin Figwe 3-8.
I
I
Figwv3&?.Attachhe stacker10 theAutomaticSheetFeeder.
5.”Tipthe AutomaticSheetFeederfonvardslightlyandputthe feeder into
placebehindthe printerplatenroller.
6. Lowerthe rear sideof the AutomaticSheetFeederand attachit to the
platenshaft.
7. Closethefrontcxwerwiththetranspanmtpartintheopenposition.
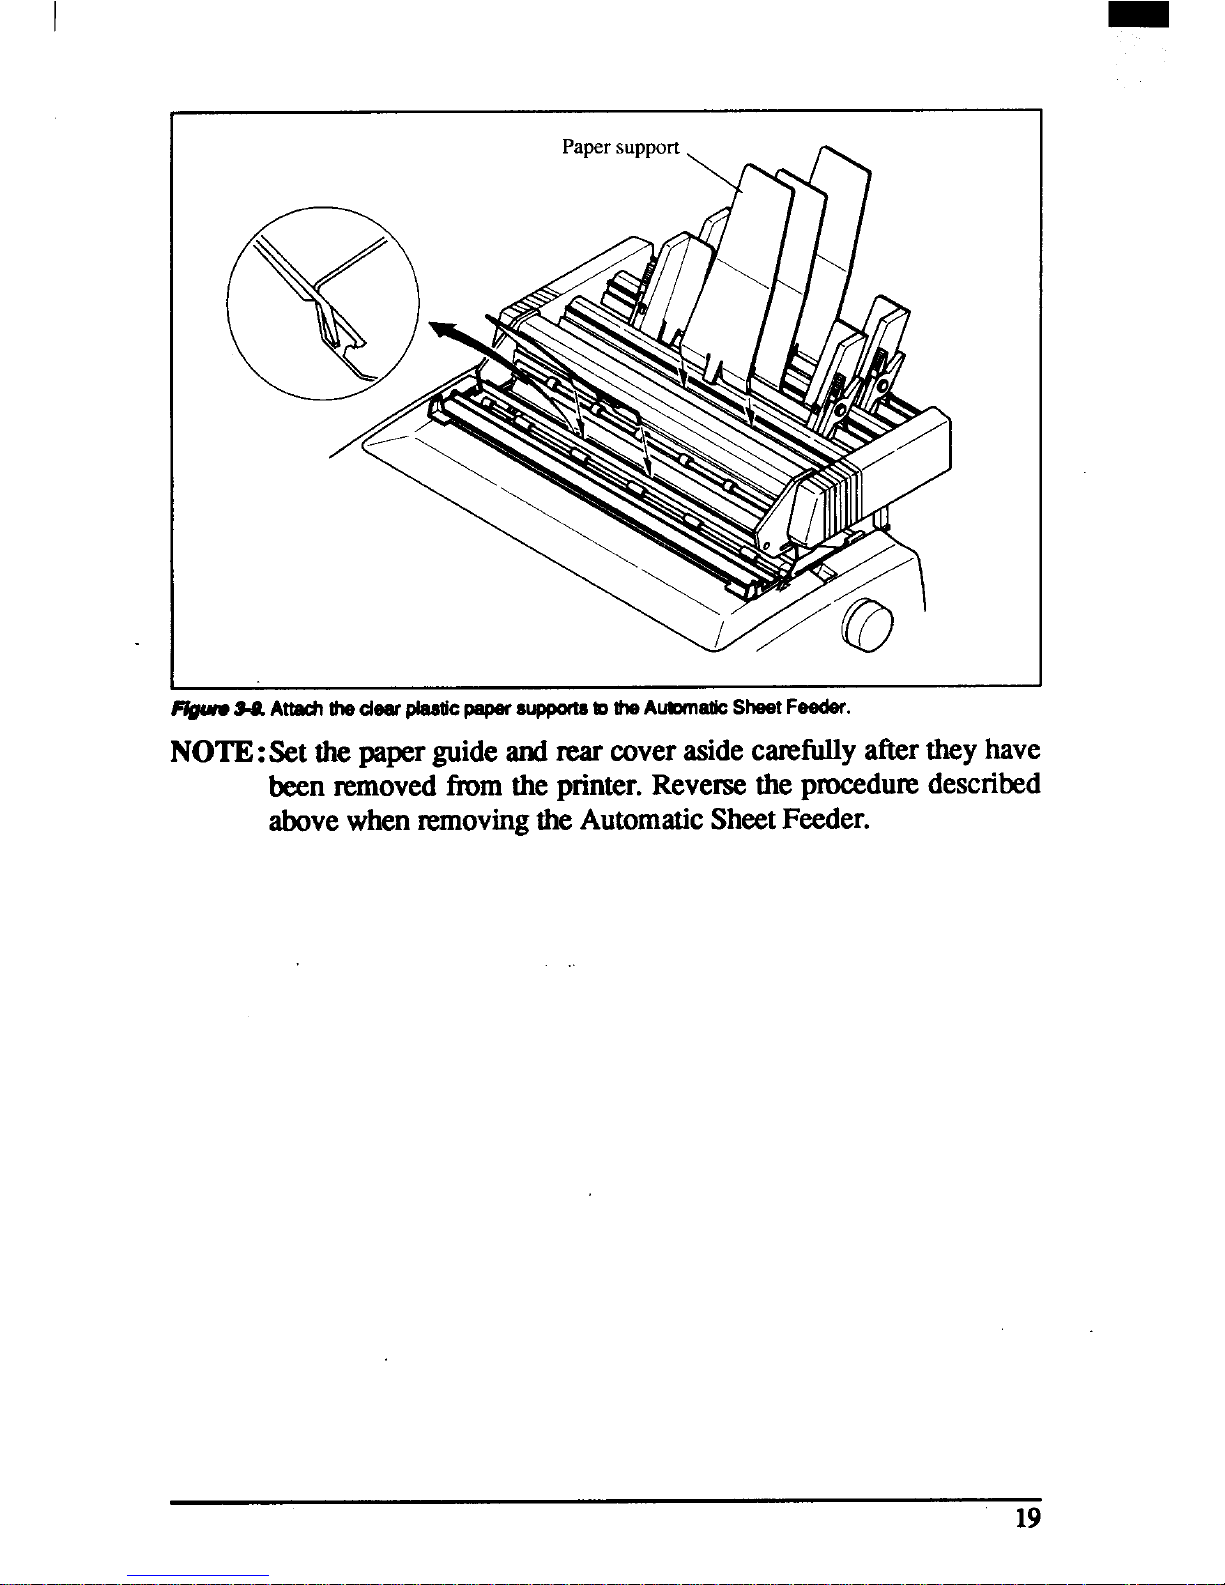
8. Attachtheclearplasticpapersupportsbetweentheleft andrightpaper
guidesof thehopper bins andthe stacker.
18
.
Page 28
-. -.
F@-= A- fhedeaf@8tiCpU@fS~ tslheAIJIDMaUCmeetFeeder.
NOTE:Set the paperguideandmarcoverasidecmfully aftertheyhave
been removedfium the printer.Reversethe proceduredescribed
abovewhenremovingtheAutomaticSheetFeeder.
Page 29
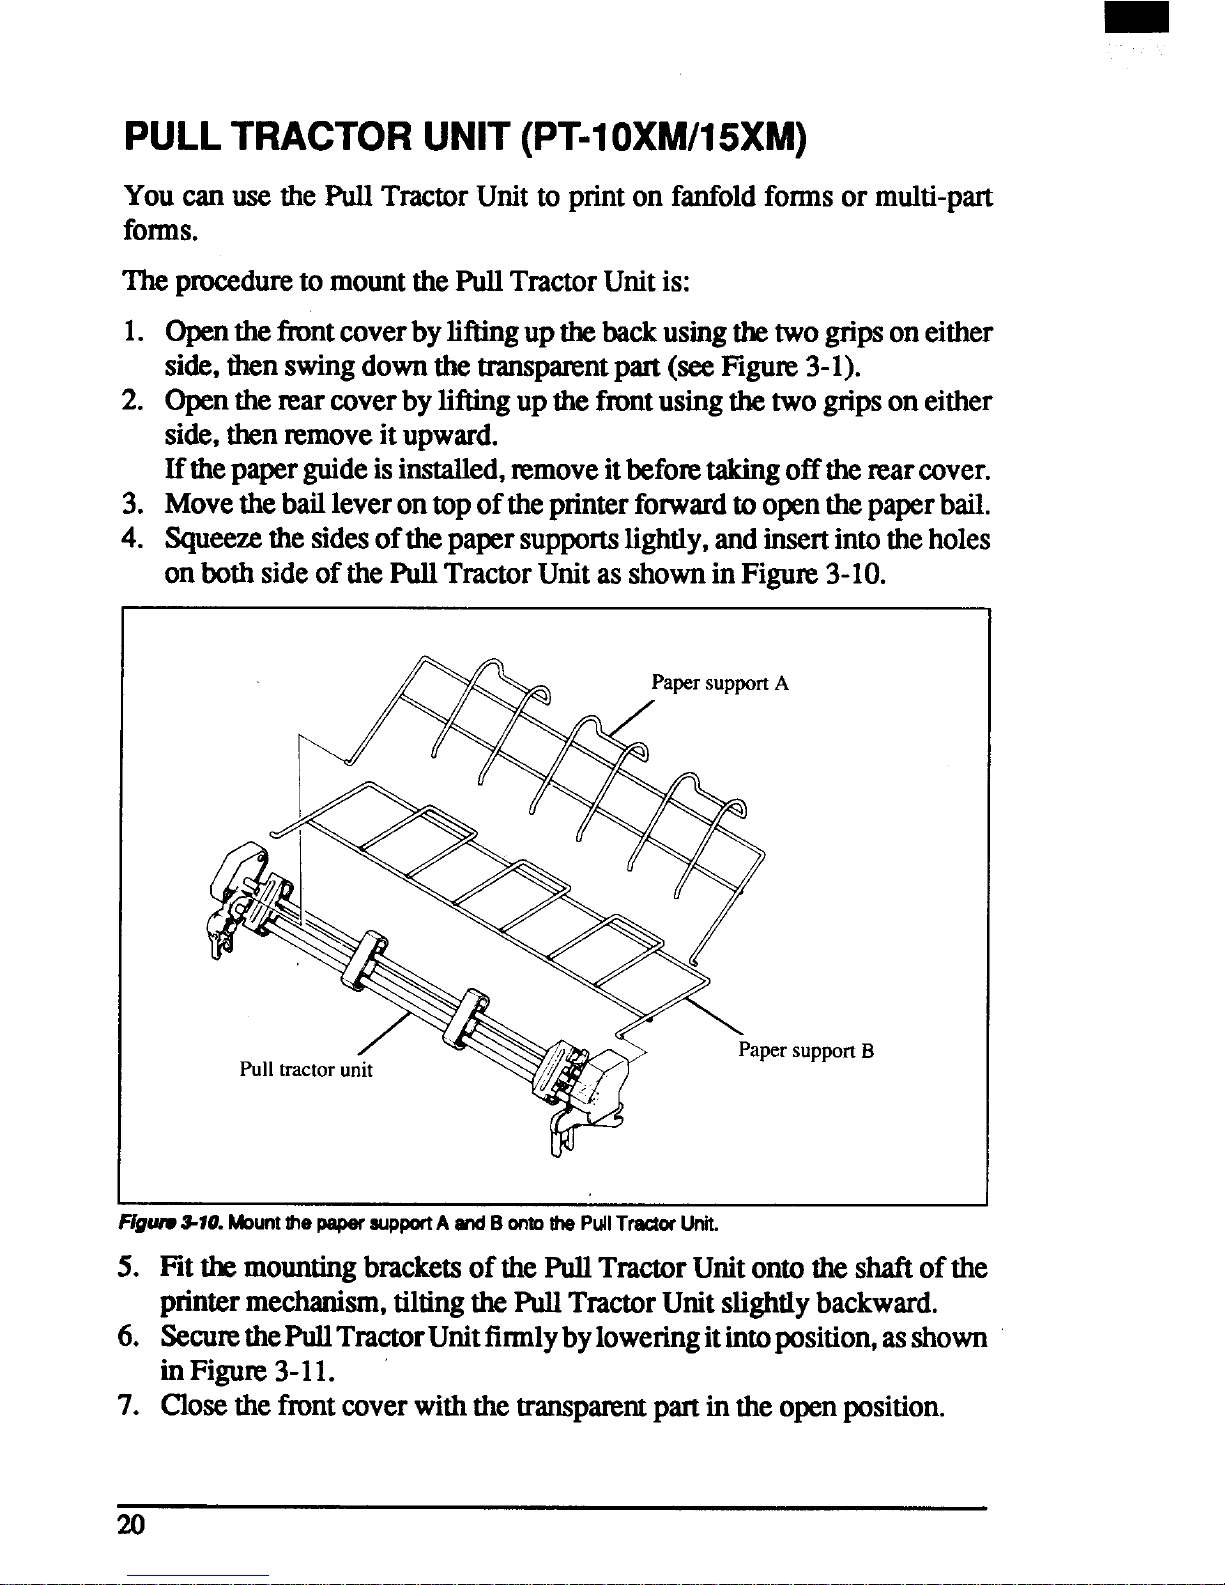
PULLTRACTORUNIT(PT-10XM/15XM)
Youcan use the PullTractorUnitto printon fanfoldformsor multi-part
folms.
Theprocedureto mountthePullTractorUnitis:
1. ~ti~nt~verbylitigupti backusingthetwogripsoneither
side,thenswingdownthetranspanmtpart(seeF&w 3-l).
2. @nthe marcoverby liftingup thefrontusingthetwogripson either
side,thenremoveit upward.
Ifthepaperguideisinstalled,~move itbefo~ takingoffthemarcover.
3. Movethebailleverontop oftheprinterfonvardtoopenthe paperbail.
4. Squeemthe
sidesofthepaper supportslightly,andinsertintothe holes
onboth sideofthePullTractorUnitas showninFigu~ 3-10.
FiguiwWO. Mournrhe paperaupportA andBontothePullTractorUnit.
5. Fitthemountingbracketsofthe PullTractorUnitontotheshaftofthe
printermechanism,tiltingthePullTractorUnitslightlybackward.
6. SecuxethePullTractorUnitfinnlybyloweringitintoposition,asshown
inFigure3-11.
7. Closethefrontcoverwiththetranspiumtpart inthe openposition.
20
Page 30
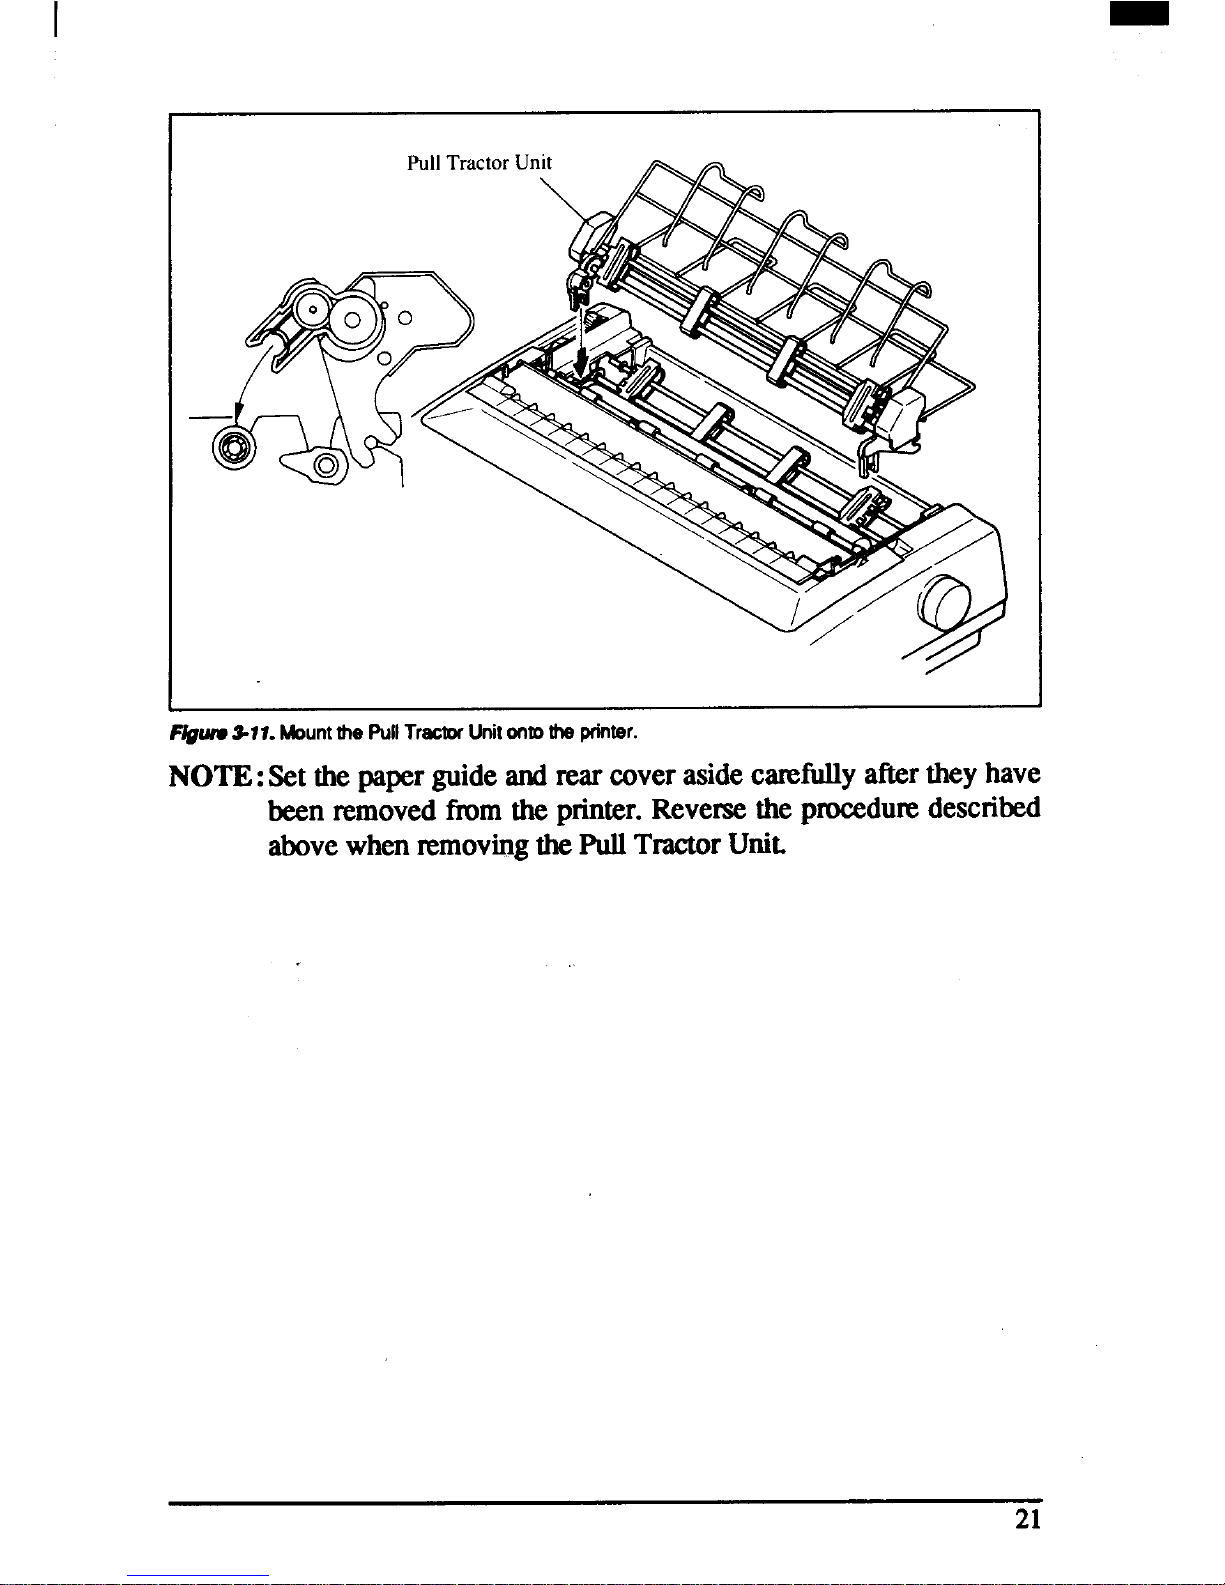
F~ww3.11. Mountthe PullTractorUnitontothe printer.
NOTE: Setthepaperguideandrear coverasidecarefullyaftertheyhave
been removedfromthe printer.Reversethe pmeedwe described
abovewhenremovingthePullTractorUnit.
21
Page 31

INTERFACECARTRIDGES
YoucanusetheRS-232SerialInterfacewiththeoptionalSerialInterface
Cartridge(IS-8XL),or extendthe printbufferby installingthe optional
BufferedParallelInterfaceCartridge(IP-128XL),insteadof the Standard
InterfaceCartridge.
IfyouwanttousetheSerialInterfaceCartridge,settheDIPswitchesonthe
boardbeforeinstallit to theprinter.
1. Tumoffthepowerswitch anddisconnectthepowercordfromthepower
source.
2. Disconnecttheinterfacecableif attached.
●
3. Compmsthe projectedpartsonthe rightandleft,andpulltheStandard
InterfaceCartridgeto xemoveit fmm theprinter.
1
Figure3-12.
Remove@wStandardInterfaoeCarkidgefromthe printer.
4. InserttheoptionalInterfaceCartridgesecurelyintoplace.Ifitisnotfully
inserted,theprinterwillnotproperlyprint.
5. Connecttheinterfacecableto theconnector.
NOTE: StemtheremovedInterfaceCartridgein a safeplace.
22
Page 32

DIPSwitchFunctionson TheSerialInterface
Cartridge
Itis necessarytomakecompatiblethedatatransferconditionsbetweenthe
computerandtheserialinterfaceboardwiththe DIPswitchsettingsonthe
serialinterfaceboard.
Followingtable shows the fimctionsof the DIP switcheson the Serial
Interface-Cartridge.
Iswitchl
Function
I
ON I
OFF
1
Datalength 8-bit I 7-bit
2 Paritycondition
(Referbelow)
l--i
3
4
Data
Protocol (Referbelow)
[Transferspeed]
[Paritycondition]
ISwitch21Switch5! Condition I
I OFF I OFF I Evenuaritv I
[Dataprotocol]
Switch6 Switch7 Switch8 Transferspeed
OFP OFF OFP
150BPS
OFF OFF ON
300BPS
OFF ON OFF
600BPS
OFF ON ON
12(NBPS
ON OFF OFF
2400BPS
ON OFF ON
48(X)BPS
ON ON OFF
96(MBPS
ON ON ON
19200BPS
23
Page 33

24
Page 34

I
chapter4
PAPERINSTALLATIONAND USE
Thischapterdescribesinstructionsforprintingsuchasselectingpapertypes,
adjustingtheprintinggap,andinstallingpaper.
SELECTIONOF PAPER
Yourprinteracceptsanyof thefollowingpapem:
● Singlesheets(cutforms)andstationery
Usethe ftictionfeedor theoptionalAutomaticSheetFeeder.
● Fanfoldforms
Fanfoldformshaveholesalongthe sidesandperforationsbetweenthe
sheets.They= alsocalledsprocketforms,punchedforms,orjust plain
“computerpaper”.
Printingon or near the perforationsof continuousfanfoldforms may
reduceprintingquality,misalignthefanfold forms,or causeapaperjam.
Itis nxommendednotto printwithinanamaofoneinchbeforeandafter
theperforations.
c Multi-partforms
You canuse multi-partforms that have up to five pats includingthe
originalwhenthe Multi-partmodeis selectedwiththeMemorySwitch
setting.(Fordetails,pleasereferto Chapter6.)
Usepmssumsensitivemulti-partformswithbothsideedgesgluedanda
differencein thicknessof 0.05mmor less betweenthe sideedges.It is
recommendedtousethebottomfeedwiththeoptionalPullTractorUnit
to get finealignment.
NOTE: Cmeshouldbetaken incolorprintingwithcontinuousmulti-part
forms.Sideedgesofpapermightbe damaged.
● F3tprintedforms
25
Page 35

Figwe4-1 showsthenxommendedprintamaforeachtypeofpapers.
Fanfold forms
Single sheets
Figww4-1.
Racom
mendedprintarea foracceptablepapers.
ADJUSTINGTHEPRINTINGGAP
The distancebetween the print head and the platen can be adjustedto
accommodatedifferentpaperthicknesses.Tomakethisadjustment,openthe
frontcover.The adjustmentleveris locatedat the left sideof the printer
mechanism.Pushing the adjustmentlever backwardsnarrows the gap;
pullingit forwardswidensthegap.
There are seven positions,and you can feel the lever clickinginto each
position.Thesecondpositionfmmtherear(madcedwith’’=”)istheonemost
commonlyusedfor singlesheetsof paper.
Try differentpositionsuntilyougetthebestprintingresults.
NOTE:Printingwith aninappropriategapmaydrasticallyshortenthelife
of theprinthead.
26
Page 36

FJ#nv&2
Locauon
oflheiid@3mmtIevw.
The followingtable providesthe xwmnmendedlever positionsfor each
papertypesas a refetence.
Weight(g/@
‘fhickness(mm) Recommended
‘P’TW
(Eachpaper)
(Total)
Leverposition
Single
52-90
0.07-0.12
2ndor3rd
2-ply 40-58
0.12-0.16
2ndor3rd
3-ply 40-58
0.18-0.25
3rdor4th
4Jply 40-58
0.24-0.30
5thor6th
5-ply
40-58
0.30-0.35
6thor7th
LOADINGFANFOLDFORMS
Thisprinter accepts fanfoldformsup to 10”wide for thenormalcarriage
pfiter, and upto 16”wideforthewidecartiage ptinter.
Youcanload fanfoldpaperwiththefollowingthreeways:
● Pushfeedwithinternaltractorunit
● Bottomfd withoptionalPullTractorUnit
● Push/Pullfwd withinternaltractorunit andthe optionalPullTractor
unit.
Thissectionwilltakeyouthroughtheproceduresforloading,paxkingand
_ng fanfoldforms.
Page 37

I
Loadingthepaperfromtherearof theprinter
(Pushfeed)
Youcan loadthefanfoldpaperwiththeinternalpushtractorunit.
1.
2.
3.
4.
5.
Placeastackoffanfoldpaperbehindandatleastonepage-lengthbelow
theprinter.
Turn-theprinter’spowerOFF.
Pushthereleaseleverbackward.Thishastheeffectofreleasingthe paper
fromtheplatenroller,andengagingthetractorfeed.
Removethepaperguide andputit asideforthemoment.
Openthetmnsparentpartofthefrontcover,andtherearcoverusingthe
twogripson eitherside,asinFigure
4-3.
I
F/gum4-~ Openingthe rear cover.
6.
Passthepaperbetweentheprintercaseandthemrcover.
7. Withthetractorcoversopen,mountthepaperby aligningholeswiththe
pinsonthetractorunit.
8. Adjustthespacingofthetractorunitsbyslidingthemalongthebar,using
the clamp lever at the back of each unit to releaseand lock them in
position.Whentheclampleveris up,theunitis released,andwhenit is
down,theunitis locked.
28
Page 38

Tractor cover
Clamp lever
Figutv4-4.
Mountthe fanfoldpaparowr tie tractorunits
9. Nowclosethetractorcovers,againmakingsurethatthepaperholesare
alignedwiththepinsonthetractorunits.Iftheyarenotalignedproperly,
youwillhaveproblemswithpaperfeeding,possiblyresultingintearing
andjammingof thepaper.
10.Turnonthepowerusingtheswitchlocatedatthefrontoftheprinter.The
printerwill beep,indicatingthatthe paperis not yet fullyloaded.The
PAPER indicatorwillalsoilluminatetoconfirmthis.
11.Nowpressthe 1=-&L*<Eeq
button.Thepaperwillbefedandadjusted
pastthe printheadto apositionreadyforprinting.
12.If youwanttosetthepaperto adifferentposition,settheprinteroff-line
by pressingthe I
ON LINE
1
button,then set thepaper by usingthe
micro-feedfimction.(Fordetails,referto Chapter5.)
13.Close tbe rear cover and the transparentpart of the frontcover,then
mountthepaperguideinthe horizontalpositionshowninFigure4-5,so
thatit willseparatetheprintedfromtheunprintedpaper.
Page 39

Figutv4-5. Mount@Ithe paperguideforfanfoldforms.
Loadingthepaperfromthebottomof theprinter
You can load the fanfoldpaperfmm the bottomof the printerwith the
optionalPullTractorUnit.
1. Install the optionalPullTractorUnitas describedinChapter3.
‘— ---- . “ ,— -.-,, -c- -— -.-—-, m. .,, ‘..— —.— , ,—..
gur8+o. HWMIIIrreopnormruli iraaor urw.
30
Page 40

2. Withthe tractorcoversopen,mountthepaperfmm the bottomof the
printer,by aligningholeswiththepinson thetractorunit.
1
F/gum47. Mountthefanfoldpeperfromthebotlwnoftheprinter.
3.
4.
Adjustthespacingofthetractorunitsbyslidingthemalongthebar,using
the clamp lever at the back of each unit to releaseand lock them in
position.Whentheleverisup,theunitisreleased,andwhenit isdown,
theunitis locked.
Nowclosethet.mctorcoven,againmakingsurethatthepaperholesare
alignedwiththepinsonthetractorunits.Iftheym notalignedproperly,
youwillhaveproblemswithpaperfeeding,possiblyresultingintearing
andjammingof thepaper.
Loadingthepaper withPush/Pullfeed
Youcanload thefanfoldpaperwithPush/PuUfeedbyusingboththeinternal
pushtractorunit andtheoptionalPullTractorUnit.
1. Placeastackoffanfoldpaperbehindandatleastonepage-length below
theprinter.
2. Turnthepnnter’spewer OFF.
3. Pushthereleaseleverbackward.ThishastheeffectofreleaSingthepaper
fromtheplatenroller,andengagingthetractorfeed.
.
31
Page 41

4.
5.
6.
7.
Openthetransparentpartofthefrontcover,andremovethepaperguide
andtherearcover.
Withthetractorcoversopen,mountthepaperbyaligningholeswiththe
pinson thetractorunit.
Adjustthespacingofthetractorunitsbyslidingthemalongthebar,using
the clamp lever at the backof eachunit to releaseand lock them in
position.Whentheclampleveris up,theunitisxeleased,andwhenit is
down,theunitis locked.
Nowclosethetractorcovem,againmakingsure thatthepaperholesare
alignedwiththepinsonthetractorunits.Iftheym notalignedproperly,
youwillhaveproblemswithpaper feeding,possiblyresultingintearing
andjammingof thepaper.
Release lever
Flgurv4-8.
Mountthe fanfoldpaperoverthe internaltractorunits.
8.
9.
10.
Turnonthepowerusingtheswitchlqxatedatthefrontoftheprinter.The
printerwillbeep, indicatingthatthepaperis notyet fullyloaded.The
PAPER indicatorwillalsoilluminateto confirmthis.
Nowp~ss thel“s=~~d%~~
button.Thepaperwillbefedpasttheprint
head.
Tumoffthepower,andinstalltheoptionalPullTractorUnitasdescribed
in Chapter3.
11.Withtheoptionaltractorcoversopen,turntheplatenknobclockwiseto
mountthepaperby aligningholeswiththe pinsontheoptionaltractor
unit.
32
Page 42

Clamp lever
I
FIgIwwM MountthefanfoldpapermfhePullTractorUnif~ turningthe platenknob.
12.Adjustthespacingoftheoptionaltractorunitsbyslidingthemalongthe
bar,usingtheclampleveratthebackofeachunitto ~lease andlockthem
inposition.Whentheleverisup,theunitisreleased,andwhenitisdown,
theunitis locked.
13.Nowclosethetractorcovers,againmakingsurethatthepaperholesare
aligned.withthepinsontheoptionaltractorunits.Iftheyarenotaligned
properly,you willhaveproblemswithpaperfeeding,possiblyresulting
intearingandjammingof thepaper.
14.Removetheleverstoppertlom theslotof thereleaseleveras shownin
Figure4-1o.
15.Set the release lever to the “J’ position, and turn the platen knob
clockwisetotighten thepaperif itisslack.
33
Page 43

Platen knob
Ygww&lo.Rullow the Ieverstopper,andtightentheW.
16.Push the releaseleverbackward,andremounttheleverstopperto the
originalposition.
Paperparking
AfterloadingfanfoldpaperwithPushfeedmode,youdonothavetounload
itwhenyouwant toprintonasinglesheet.Theprinterwill“park”itforyou
if you followtheprocedurebelow.
1.
2.
3.
4.
5.
To beginpaperparking, stiutwith powerON,fanfoldpaperloadedin
printingposition,andthereleaseleverbackward.
Pressthe I
ONLINE
1
buttononthecontrolpaneltosettheprinteroff-
line.ON
LINE indicatorwilltum off.
Tearoff theprintedformat thelastperforation,leavingnot morethan
abouthalfapageshowingabovethefrontcover.Ifnecessary,pms the
1
PAPER FEED I buttontofeedpaperforwarduntilaperforationislocated
just above thefrontcover,andtearthere.
Pressthe ~? buttonon thecontrol panel.
Theprinter willautomaticallyfeedthefanfoldformbackwanluntilthe
paperis completelyfnx of theplaten.
Movethe nAeaselevertothe front.
34
Page 44

Release lever
F@wwM1. Tear offtheprintedfanfoldpaper.
6.
Mountthepaperguideintheupright position.
Nowyoucanloadsinglesh~ts. The fanfoldpapermmainsPwkedattheback
of rheprinter.
NOTE: Youcannotpmlcthefanfoldpaperif youhaveloadedit usingthe
optionalPull TractorUnit.
Paperunparklng
Whenyouwantto nxune usingfanfoldpaper,thepmcechmis asfollows.
1. Removeall singlesheetsfromtheprinter.
2. Mountthepaperguideinthehorizontalposition.
3. Movethe releaseleverto thebackward.
4.
PRSS the p-q button.Theprinterwillautomatic-allyfeedthe
parkedfanfoldpaperback intopositionforprinting.
NOTE:Theprinterbeepsintermittentlyifyoumovethereleaseleverwhile
thepaperis loaded.
Page 45

LOADINGSINGLESHEETS
Thissectionwilltake
youthroughtheprocethmsforloadingsinglesheets
ofpaper.
Loadingthepaper withoutoptionalaccessories
If
youamusingtheoptionalAutomaticSheetFeeder,referto nextsection.
1. Placethe paperguidein positionby inserting the tabs, locatedon the
bottomof theassembly,intoh slotsonthe marcoverof theprinter.
Paper guide
figwu4-12. Mountingtie paperguideforsinglesheem.
2.
3.
4.
Adjustthepaperguidestomatchthesizeofthepaperyouwillbeusing.
Rememberthatprintingwillstartsomedistancefmmtheleft-handedge
of thecarnage.
Turnonthepowerusingtheswitchlocatedatthefrontoftheprinter.The
printerwillbeep,indicatingthatthemisnopaperinpositionforprinting.
The
PAPER indicatorwillalsoilluminateto confirmthis.
MakeSUIEthatthe releaseleveris at frontposition.
If fanfold paper is already mounted _in the printer, press the
~1 buttontoparkthepaperintheoff-linestate,thenmovethe
releaseleverforward.
36
Page 46

I
5.
6.
7.
Placea singlesheetbetweentheguides, placingthe sideon whichyou
wanttoprinttowardsthebackoftheprinter.Gentlypushthepaperdown
inthe guidesuntilyoufeelit stop.
Now
PIWS the 1“’==d=c” {
button.The paper will be fed into the
printerandadjustedpasttheprintheadto a position~ady forprinting.
Ifyouwanttosetthepapertoadifferentpositiomsettheprinteroff-line
by pressingtheI ON
LINE
]
button,then set the paper positionby
usingthe mictu-feedfunction.(Fordetails,referto Chapter5.)
I
6
1“
Figure4-13.Loadinga singlaahaet.
NOTE: Youcan alsoloadpapermanuallyfmmthe slotat thefrontof the
ASF rolleror thefrontof theASFbin whenusingthe Automatic
SheetFeeder.
Page 47

Loadingthepaper withoptionalAutomaticSheet
Feeder
If you are not using the optionalAutomaticSheet Feeder, refer to the
previoussection.
1. InstalltheoptionalAutomaticSheet Feederas describedin Chapter3.
F/guIv4-14. Installthe optionalAutomaticSheet Feeder.
2.
3.
4.
5.
Usetheprinter’sMemorySwitchmodetoselectASF.(Fordetails,please
referto Chapter6.)
If fanfoldpaperhas alreadybeenloadedin the printer,park the paper
throughthe Ear slot.
pullthe printerreleaseleverforwardto loadsingle sheets.
WhenyouareusingSingle-BinASF,puUthepaperloadingleverforward
to pullthehopperoutuntilit is in position.
In case of the Dual-BinASF,pullbothpressurebar leversforwardto
openthe pressuxebar.
Page 48

1-
Paper loading lever
IDual-Bin]
ISingle-Bin]
Figiuv415, Meke reedytoIoedpaper.
6. Adjusttheleft paperguideto the desiredleft positionby movingit
horizontallyineitherdinxtion.(Unlockthepaperguidesbypressing
downonthelockingleversincaseofDual-BinASF.)
7. Locktheleftpaper@idesinpositionbymovingthelockingleverupfor
theDual-BinASF.
F/gwv4-16.Adjuetthepeperguidesto
~thewidth ofmepepef.
39
Page 49

8.9.Adjusttherightpaperguidetoaccommodatethewidthofthepaper.The
guidesshouldbeadjustedtonxmicttheamountofhorizontalplaywhile
allowingthepaperto slideup and downfreelybetweenthe twopaper
guides.Theidealdistance
betwwnpaper~am andpaperguidesis0.25
mm(0.01”)on bothsidesat thenarrowestpartof thepaperguides.
Fanthepaperstackandsquareitoffproperlybeforeinsertingitintothe
AutomaticSheetFeeder.
I
L
FlguIw~77.FanW paperbeforeinswdngIntotheASF.
10.InserttlwpaperstackintoAutomaticSheetFeeder.
Thestackshouldn't bemorethan15mm(5/8”)equivalentto 150sheets
of 20lb paper.
Ifnecessary,~move somesheets.TheASFmaynot performsatisfacto-
rilyif it is overloaded.
11.WhenyouareusingSingle-BinASF,pushthepsperloadinglevertoward
theback.
In caseof the Dual-BinASF,pushboth pressurebarleverstowardthe
backto “FEED”.
Pa
al’lever
I
Y
/--’1
I
Figure4-78.PuehthepaperIomdingIeverorpreseurebarleveretoholdthepaperstd.
40
Page 50

chapter5
CONTROLPANELOPERATIONS
The control panel buttons can be pressed individuallyto perform the
operationsindicated by their names.Otherfunctionscan be achievedby
holdingthesebuttonsdownwhenyouturn theprinter’spoweron, or by
pnxsing thecontrolpanelbuttonsincombination.
Thischapterexplainsallthebuttonandindicatorfunctions.
●
●
●
●
●
9
●
●
●
●
●
●
Pauseprinting
Feedpaper(fastandslow,forwardandmerse)
Parkfanfoldforms
Setthetop-of-formposition
Selecttheprintpitch
Selecta font
Printtestpatterns
Preventsoftwarefromchangingthepanel pitchand fontselections
Printa hexadecimaldump
Cleartheprinter’sbuffer
Changetheprintcolor
Storemacmdeftition
BUTTONSAND INDICATORS
The printeris equippedwithsix buttonson thecontrolpanel.Fmmleftto
right they are ml, [={ and -1 (smaller buttons), and
I*E===TI
a
, 1
PAPERFEED] and 1
ON
LINE j (largerbuttons).
The followingis a briefguideto thebuttonsandindicatomon thecontrol
panel.
■ SANSE.IF ~:;A:;AFT
■ IOcpl
■ COURIER
■ .LO
m v CP4
WO..70.
■ PROP
■ .Cnbp,
■ cO.0
FONT MODE
PITCH
~7 ~ ~~
H,,
■ POWER
■ PAPER
M,CFIOFEED
&
SETIEJECT
9 -OIJIET
m
PARK PAPER FEED ‘ON LINE
~~~
F/gum5-1.Controlpanel.
41
Page 51

ONLINE Wtton
The I ONLINE
[
buttonsets theprinteron-lineand off-line.The status
changeseachtimeyoupressthebutton.
Whentheprinterison-line,itcanreceiveandprint datafim thecomputer.
Whentheprinterisoff-line,itstopsprintingandsendsthecomputerasignal
indicat@gthatit
cannotacceptdata.
Theprinterpowersupin theon-linestatusifpaperisloaded.Ifpaperisnot
loaded,thepnnterpowerxupoff-linewiththe
PAPER indicatorilluminating.
Whenyouloadpaper,theprintergoeson-line.
Youwillwanttopnxs the1
ONLINE
[
button:
9
●
●
Beforeandafteranyother paneloperation
The other panel buttons operate only in the off-line state. Press the
ON
LINF
]
buttontogooff-line.Afterperfonningthepaneloperation(s),
pressthe
I
ON
LINE
I
buttonagainto gobackon-line.
To pauseduringprinting
If you pnxs the [
ON
LINE
1
buttonduringprinting,theprinterstops
printingandgoesoff-line,allowingyou tochecktheprintoutorchangea
control panel setting. Printing resumes when you press the
~] buttonagaintogo backon-line.
Tocutfanfoldformsattheendofprinting
Whenyouholdthe I
ON
LINE
1
buttondownfor one secondwiththe
pushtractormode,theprintergoesoff-line,then theprinteralsofeedsthe
papertlmvad approximatelytwoinchesforwad. This allowsyoutocut
it offjust belowthelastlineprinted.
Whenyou pressthe \ ON
I INE
[
buttonagainto go backon-line,the
paperfeedsbackwardstoppingwhe~ youleft off.
NOTE: Thisfunction is validonlywhenthebufferis empty.
PAPERFEEDbutton
If youpnxs thisbuttonwhiletheprinteris off-line,the paperwill feed
forwad If youholdthebuttondown,the printerwillperformconsecutive
linefeeds.
If youalsopressthe I
ON
LINE
1
buttonwhileyou m! line-feeding,the
paperwillfeed automaticallyto thetopof thenextpage.Thisis explained
later.
42
Page 52

If youpnxs thisbu&mwhileon-line,thiswillalternatelyflashtheQUIET
indicator.WheninQuietmodewiththeQUIET indicatorlit,theprinterwill
printslightlyslower,butat areducednoiselevel.
SETIEJECT/PARKbutton
NOTE:This buttonhasno effectifthebottomfd modeis selected.
Pressingthisbuttoncausestheprintertobeginpaperloadingifthepaperhas
notloadedwhilein theoff-linestate.
If the paper has been loaded, this button mults in different functions
dependingon thepositionof thereleaselever.
If the~lease leverisbackforthefanfoldforms,pnxsingthisbuttonparks
theforms.
Ifthereleaseleverisforwad forthesinglesheets,pnxsingthisbuttonejects
thepaper.
PITCHbutton
Thisbuttonallowsyoutoselecttheprintingpitch.Rememberthattheprinter
mustbe off-linefor youto do this.Successivep~sses of this buttonwill
illuminate(andselect)thefollowingoptionsinorder(Notethatcondensed
eliteis notavailableinthe IBMmode):
Pitch
Indicator(s)
Pica(1OCPI)
10CPI
Elite(12CPI) 12CPI
Condensedpica(17CPI)
10CPI,COND
Condensedelite(20CPI)
12CPI,COND
Proportional
PROP
43
Page 53

MODEbutton
Thisbuttonallowsyoutoselecttheprintingmode.Rememberthattheprinter
mustbe off-linefor you to do this. Successivepnxes of thisbuttonwill ‘
illuminate(andselect)the followingoptionsinorder:
1
Printmode
Indicator(s)
I
I
HS-Draft
HS-DRAFT
Draft
HS-DRAFT,NLQ
NearLetterQuality
NLQ
FONTbutton
ThisbuttonselectstheNLQ fontto beprinted.SanSeriffontis selectedat
power-upunlessthedefaultsettingsm changed.Tochangethefont,setthe
printeroff-line,thenpnxsthe -[ buttonrepeatedlyuntiltheindicator
besidethedesiredselectionillumimte.Theselectionscycleinthefollowing
order:
Font
Indicator
Sanserl
“f SANSERIF
Courier
COURIER
Orator
ORATOR
script
SCRIPT
Page 54

POWER-UPFUNCTIONS
In additionto their normalfunctions,all the controlpanel buttonshave
specialfunctionsthatoperateifyouholdthemdownwhileswitchingpower
on.
(
\
■ SANSERIF y;4A;yFT
■ 10 CPI
■ POWER
■ COURIER
■ .LQ
■ 12CPI
W PAPER
■ onmo.
■ PROP
MICROFEED
A
■ scnlPr ,COND
SETIEJECT ■ -OutET
FONT
MODE PITCH
PARK PAPER FEED
n n q qqa
\
J
‘itch&FOntlwk ~~h’’’’ushontest
!,u1‘qwlq T
lock
Dotadjustmentmode
F/gun?5-2. Power-upfunctionsofcontrolpanel.
Shorttestmode
Iftheprinteristumedonwhilethe I
ONLINE
1
buttonispressed,thepnnter
willentertheshortself-testmode.Theprinterwillprinttheversionnumber
ofthe printer’sROM,followedbysevenlinesofthecharacterset.
Eachlinewillbe offsetby onecharacterfromtheone beforeit.The final
resultwill&somethinglike Figure5-3.(Ifthecolorribbonisused,eachline
printsin a differentcolor.)
&**
.+, ., . a $ * t
‘,#%;:??. .4, , *+ , –
,’01:34%7s? : : ~ =. r -
-,afiB,:DEFGHIJt:. LMNOF,06:51- UVk4XYZ[ t,] .,.,ab,zde+”qnl .1,:.lmnO
, ,, #*i..!,., , ) *+, —. ,?..!12:, +567s., , ; ..= .,n,~
A13(:K!EFGH IJI:.LMNOFQF:STUVWXY Z [ ;,1 “’..’ abcde?’ghl j~. lmnOD
>,a#+EtCDEFGHIJt:.:LMNOF!Jk;STUVWKY Z [ \ 1 “-.’ abc’de+gnl J i llllnOPq
‘,#57.1: , , * + ---- /012:4%)785 : : ..=. .
*%:.!, f , , * . , . .,,:,12:45 e:.13,9 : :
=..7IIABCOEFGHI JI.. LMNOFUF:STUVWKYZ [ \ 1 ..” abcde+uhl.3 t. lmnODc!,-
. :.= ..;@&3coEFGH1Jh. LMNoFQS:5TUVWXYZ [ \ 1“-” abc. de+qtll J k lmnOPqt.5
$;:~., , , *+. , -. !:!l:. y4:, <,7Ef,; : .
?.$< ( ! *+ , . : ,:’>.:::4%~@= : ;
= .?,l ABC DE Fi3HIJt:.LMNOF, Ofi:51-UVWXYZ[ \ 1“’-’abcde+yt, 1 JI lmr, nPQt-5t
t, , ( ( m+ , ,:’1:745? !7’!,
.s : : = .,:’@AHCDEFGHI JF..LMNOF,Qfi:ST UVWXYZ[ \ 1 ‘-’a bcde+qhl J&.l, nnoPqt-5tu
Figure 5-3. Short self-lest.
Sincetheself-testoccupiesthefullwidlhofthecarnage,itisrecommended
thattheprinterisloadedwiththewidestpaperpossibletoavoiddamageto
theprintheadand/or platen.
45
Page 55

Longtestmode
Iftheprinteristurnedonwhilethe[PAPERFEED1buttonispressed,theprinter
willenterthelongself-testmode.Theprinterwillprinttheversionnumber
of the printer’sROM, the Memory SwitchTree, followedby the whole
charactersetprintedin eachfontandpitchavailable.
Thetestcyclesendlessly,so youmustturnthepoweroff to stopit.
,,,“., ,.1 ,..
Figulvs4. Longself-test.
Page 56

Sincetheself-testoccupiesthefullwidthofthecarriage,itisrecommended
thattheprinteris loadedwiththewidestpaper possibleto avoiddamageto
theprintheadand/orplaten.Inaddition,thetotalnumberoflinesprintedis
considerable,morethancanbeaccommodatedona singlesheet,so fanfold
paperis recommendedfor thistest.
Printarea testmode
Byholdingthe~!
buttondownduringpower-up,theprinterwill
entertheprint axeatestmode.Thisway,youcanfmdhowmanylinesonyour
paperareavailableforprinting.Theprinterwillprintthefirstlinemessage,
thenprintthelastlinemessageafterfeedingto the bottomofthepage.
If youhaveloadedthefanfoldpaper,onlythefirstlinemessageis printed.
Pitchlockmode
Byholdingthe ITiRZilbuttondownduring power-up,theprintpitchcan
ordybetilected fmmthecxmtrolpanel.Thispreventssoftwareinterference.
Youwillhear an acknowledgingbeepas powercomeson.
Afterthebeeptone,youcansettheprinteroff-line,selectaprintpitch,then
returnto on-lineandstartprinting.Thepitchyouselectedwillnotbe reset
orotherwisechangedby anycommandsyoursoftwaremayissue.
Fontlockmode
Byholdingthe [~1 buttonduringpower-up,printmodeandfontscan
ordybexlected fromthecontrolpanel.Thispreventssoftwareinterference.
Therewillbean acknowledgingbeepaspowercomeson.Afterwhichyou
cansetthepnnteroff-line,selectaprintmodeandfont,thenretumtotheonlinestateand beginprinting.Theselectedprintmodeandfont willnotbe
changedby anycommandsyoursoftswuemayissue.
Pitchand Fontlockmode
Ifyouwanttoprotectboththepitchandfontsettingsfmmsoftwatechanges,
pmssboththe [~1 and ~[ buttonsduringpower-up.The~ willbe
two acknowledgingbeeptones.
Pressingthesebuttonsduringpower-updoesnotpreventyoufmmmaking
anynumberof changeslaterfromthecontrolpanel.
Page 57

Hexadecimaldump
Thisfeatureisusefidforprogrammemwhoaedebuggingprinting programs
andwantto seethe actualcodestheprinterisnxeiving.(Somecomputers
changethecodestheprogrammerintended.)
Inthismode,all datareceivedwillbepfid inahexadecimaldumpformat,
ratherthanthecontrol codesbeingactedon ascommandcodes.
Thismodeis accessedwiththe followingpmctxhue:
1.
2.
3.
Whileholdingboththe[
PAPER FEED j and
~
buttonsdown
turnpowerON.A beeptonewillbeheard.
Beginprinting.In placeof the usualprintoutyou willgeta formatted
dumpshowingexactlywhatdatatheprintermxeives.Eachlinepnxents
sixteencharactem, their hexadecimalcodes to the left and printable
charactersprintedontheright.
At the end of thehexadecimaldump,set the printeroff-linewith the
[
ONLINE
[
button.Thisis necessaryto printthelastline.
ThefollowingBASICprogramisasimpletestyoucanruninhexadecimal
mode:
10
WIDTH “LPT1 :“,255
20 FOR 1=0 TO 255
30
LPRINT CHR$ ( I ) :
40
NEXT I
50
LPR INT
60 END
Ifyoursystempassesthecodesdirectlytotheprinterwithoutchangingthem,
youwillgetaprintoutlikeFigwe 5-5. -
.. ... .. .. .......
.. ..... .. .. .... .
.. . .... .........
.. . .. .. ...,,... ..
..
F@nwM Samplehexdecimaidump.
48
Page 58

MostBASICS,however,arenotquitethatstraightfonvmd.Forexample,the
IBM-PCwillgiveyou aprintoutsimilartoFigtue5-6.
(:1(:> (:)1. (:,;? (c’:! (:,4 ‘:!:, {:”6 1:,7
FigtwvS4LSamplehexadecimaldumpwithIBM-PC.
WhentheIBM-PCBASICinterpretersendshexcodeOD(carriagereturn)
itaddsanextrahexOA(linefeed).HexcodeIA(end-of-file)alsogetsspecial
matment:theinteqxeterdoesnotsenditatall.l’hiscancaus epmblemswith
gra@icsordotioad characterdata.However,youcansolvethisproblem
bychangingline 30inthepnxxdingprogramandaddingthecodingshown
below.
CodingforIBM-PCwithmonochromedisplay:
30
G05UB 100
100 X=1 NP (& H3813)
:
IF X<128 THEN 100
110
OUT &H3BC , I
: OUT &H3BE ,5 : OUT &H3BE ,4
120 RETURN
Cading
forIBM-PCwithcoloradapter
30
t30SUB 100
100
X=INP (& H379)
:
IF X<128 THEN 100
110 OUT &H378, I
: OUT &H37A. 5 : OUT &H37A ,4
120 RETURN
Page 59

I
SWITCHCOMBINATIONFUNCTIONS
Severaladditionalfunctionscanbe achievedbypressingthecontrolpanel
buttonsincombinations.
Topofform
m
■ SA.SERW
~;; ASO;AFT
■ 10 CP8
■ POWER
■ Courter
■ .LO ■ 12CPI ■ PAPER
¤0m~70n
■ PROP
MICRO ,,,.
■ SCRIPT ■ CO..
h
SETIEJECT
FONT
■ -O”IET
MODE PITCH PARK PAPER FEED
CT g r m A
< >
ENTER
\
A
Store macro definmon
‘u ‘
Form feed
Select ASF bm number
Bufferclear/Allreset
FIgutu 5-Z Switohoornbinstionfuncfions of control psnel.
Formfeed
If youareusingsinglesheets,thisoperationejectsthecurrentpage.If you
areusingfanfoldforms,it feedstothetopofthenextpage.
1.
2.
3.
Pressthe
I
ON
LINE
1
buttonto settheprinteroff-line.
PresstheI
PAPERFEEDI buttonandholdit down.The printerwillstart
performingsuccessivelinefeeds.
WhileholdingtheI
PAPERFEED] buttondown,pnmthe I
ON
LINE
button, then release bQthbuttonsat the sametime. The printer will
smoothlyeject the currentpage.
Topof form
Whenyoupowerontheprinter,thetop-of-formpositionisautomaticallyset
tothecurrentposition.Ifthisisnotwhereyouwantthetopofthepagetobe,
youcanchangethetop-of-formpositionasfollows:
1. Pressthe I
ON
LINE
I
buttonto settheprinteroff-line.
2. Move the paper to the desired top-of-formpositionby pressing the
I
PAPERFEED1 button,orbyperformingaforwardorreversemicro-feed.
50
Page 60

3. PressandholdtheI
ONLINE
I
button.
4. Whileholdingthe [
ONLINE
I
buttondown,pressthe ml but-
ton,thenreleasebothbuttonsatthesametime.Theprinterwillbeepto
indicatethatthetop-of-formpositionhasbeenset.
Forwardmicro-feed
Forfinealignment,youcanfeedthepaperforwardinverysmallincrements
as follows:
1. Pressthe [ ON
LINE 1 buttonto settheprinteroff-line.
2. Pressthe I ON
LINE
[
buttonagainandholdit down.
3. Whileholdingthe I
ON
LINE
]
buttondown,pressthe IPAPERFEED1
button.’l%epaperwillstartadvancinginaseriesofsmallsteps.Whenyou
wantto stop,releasebothbuttons.
Reversemicro-feed
Youcm”alsofeed thepaperin smallincrementsin reverse,to returnto a
higherposition onthesamepage.
NOTE: With fanfoldforms,do not try to returnto a previouspage.The
1.
2.
3.
perforationmaycatchinsidetheprinter.
Pressthe i ON
LINE I buttonto settheprinteroff-line.
Pressthe
I ON
LINE 1
buttonagainandholdit down.
Whileholdingthe ~
ON
LINE
I
buttondown,pressthe ls%zx&ECTl
button.Thepaperwillstartmovingbackwardsin aseries of small steps.
Whenyouwantto stop,release bothbuttons.
Changingtheautoloadingvalue
Normally, the printerautomaticallyloadsthe paperonelinefromthe top
edge.
If youwantto changethisvalue,followthisprocedure:
1. Loadthepaperusingthe IS’
PZ&EC”lbutton.
2. Changetheprintpositionusingthemicm feedfunction.
3. Afteryougetthedesimdposition,presstheI
ON
LINE
I
buttontosave
thevalue.
51
Page 61

Thisvaluewill~main unlessyoupowerofftheprinter.Ifyouwanttoretain
this value even after you turn off the power, store it using the Macro
Deftition function,whichis describedlater.
Notethatyoucanonlychangethisvalueimmediatelyafterloadingpaper.If
youfeedpaper,youcannot changethe autoloadingvalue.
Clearingthebuffer/Allreset
The printerstoresreceiveddata in a largememorybuffer.Thiscxeatesa
problemwhenyouwanttoabandonaprintingjobandrestart:theprintermay
be holdingmore data in its buffer than it has actuallyprinted,and this
unprinteddatamustbeclearedoutbeforerestating.‘l’’urningpowerof fisone
wayto clearthebuffer,butthemis anotherway:
1.
2.
3.
4.
5.
Halttheprintingprogramonthecomputer.Ifprintingstopsimmediately,
thebufferisclearandtherestofthispmcedumisunnecessary.Ifprinting
doesnot stop,continueas follows:
Pressthe I
ON
LINE
I
buttonto setthe printeroff-line.Printingwill
nowstop,buttheremaybe dataremaininginthebuffer.
Pressandholdthe r
ONLINE [ button.
While pnxsing the
I
ON
LINE
1
button down, press and hold the
m button. Continueholdingthese two buttons down. In few
secondsyou willhear a beep tone signalingthat the buffer has been
cleared.
If youholdtheseswitchesmom threeseconds,youwillhearthreebeep
tones signalingthat the printer has been initializedto the power-on
defaultsettings.
Releasethesebuttons,makeanynecessarycontrolpanelsettings,then
settheprinterbackon-line.
Itisessentialtohaltthepnntingprogramonthecomputerbeforeyougooffline.Otherwise,whenyougobackon-linethecomputerwillstartsending
dataagainandthepnnterwillcontinueprinting,withmissingdatawherethe
bufferwas cleared.
Selectingtheprint color
Normally,theprinterpMts withblackevenif thecolor ribbonis installed.
Withouttheaidofsoftware,youcanchangetheprintingcolorasfollows:
1. Pressthe 1 ON
LINE
I
buttonto settheprinteroff-line.
2. Pressthe ~] buttonandholdit down.
52
Page 62

3.
4.
5.
Whileholdingthe 1~[ button,pressthe [L- ‘z&Jb
PARK
~
button.The
indicatombesidethe -l buttonwillblinktoshowthecurrentcolor
setting.
If you want to changethe color,pressthe p“’=~
F=ARK buttonwhile
holdingthe m button.
Therelationbetween the indicatorsandthecoloris shownbelow.
Color
Indicators
Black
SANSERIF
I Red I SANSERIF,COURIER
Blue
COURIER
Violet
COURIER,ORATOR
Color
Indicators
Yellow ORATOR
IOrangeI ORATOR,SCRIPTI
IGreen
I SCRIPT I
Releasebothbuttonsafteryousetthedesiredprintingcolor.Ifyouwant
tosavetheselectedcolorforlateruse,storeitusingtheMacroDefinition.
NOTE: Thisfimctionisvalidonlywhenthecolorribbonisinstalledintothe
printer.
SelectingtheASF bin number
Youcanusethedual-bintypeAutomaticSheetFeeder(SF-IORMH/15RMII)
withthisprinter.
YoucanselectthisASFbinnumberbythecontrolpaneloperationasshown
below:
1.
2.
3.
4.
5.
Pressthe [
ONLINE
[
buttonto settheprinteroff-line.
Pressthe [Ti5ii71buttonandholdit down.
Whileholding downthe -[ button,pressthe 1
PAPERFEED~but-
ton.
Eachtime youpressthe [PAPER
FEEDJbuttonwhileholdingdownthe
m button,twoindicatorsabovethe - buttonwillblink(to
indicatethatbin#1 isselected),orallindicatorsabovethe -~ but-
tonwillblink(to indicatethatbin#2 is selected).
ReleasebothbuttonsafteryousetthedesiredASFbin number.
NOTE:ThisfimctionisvalidonlywhentheDual-binASFisselectedbythe
MemorySwitchsetting.
Page 63

StoreMacroDefinition
You can store the curnmt settingsto the printer for later use with the
followingpmcedunz
1.
2.
3.
4.
Press
the I
ON
LINE
1
buttonto settheprinteroff-line.
Pressthe IZQNZlbutton andholdit down.
Whileholdingthe
1’1 buttondown,pnixsthe-1 buttonand
holdthemdownuntilthetwobeeptones heard.
Releaseboth buttonsat thesametime afterthebeeptonesto stemthe
curnmtsetting.
If you releasethese buttonsafter the three beep tones, the macm is
cleami.
NOTE:You can storethe followingsettingswiththisprocedure.
● CumentFontandPitch
cCurrentauto-loadingamountforcutsheet
● Currentauto-loadingamountforcontinuouspaper
● Currentauto-loadingamountin ASFmode
● Current printcolor
DatatobestoredwecontrolledinStandardmodeandIBMmodeseparately.
Forexample,thedatastoredintheStandanlmodem not effectivein the
IBMmode,andviceversa.
54
Page 64

chapter 6
SETTINGUP THE
MEMORYSWITCHES
Inadditiontothepitch,printmode, andfont, manyother optionsregarding
thesetupoftheprintercanbecarriedoutfromthecontrolpanel. To access
theseoptions,itisnecessarytoturnofftheprinter,andthenturnitonagain,
while~lding downthe lsE&’=&E~, 1P
APERFEEDj and
I
ON
LINE
I
buttonstoge~er.Thiswillcausetheprinterto printa seriesofquestionsto
whichyou can answerusingthe controlpan?lbuttons.This is calledthe
MemorySwitchmode.
In the MemorySwitchmode,thebuttonson thecontrolpanelm used as
shownbelowh Figure6-1.
● SAMSER,,
B ;;
A:;AFT■ 10CPI
m POWER
m COURIER
■ NLO m 42 CPI
■ PAPER
■ OR*TOR
9 PROP
.,C,O FEED
A
● SCRWT
■ ,...
SET/EJECT
■ -wE,
MODE
PITCH PARK
pAPER FEED
~-FONT ,
—...——,
I
~-—.
.—-—
; ~.–= ‘-:”-’E.
I
I
I ~ ~ IL
,.,,
< >
EN,,,
Exit menu
Move to right
Flgutu c&f.ButtonfunctionsintheMemotySwitchmode.
Theprincipleinvolvedisthattheprinterwillprinta listofoptionsononeline.
You use the p “’”e-~
PARK and [
PAPERFEED] buttonsto movethe print
headsothatit isbelowtheoptionyouwanttochoose.
Theprinterwillmovethepaperupanddownasappropriate,sothat themenu
optionsarevisible.
The Iae ‘e’L=
PARK
~
buttonmovestheprintheadoneoptiontotheleft,andthe
]
PAPERFEED] button mc)vtx one optionto theright.Holdingdownoneof
thesebuttonswillstill movetheprintheadonlyoneoptionforwardorback.
55
Page 65

I
Whentheprint headis belowthe desiti option,pressthe I
ON
LINE
buttontoenterthisintothepnnter’smemory.Anyoptionchosenatthisstage
willnowbe stored,evenwhentheprinteris turnedoff.
Whenyoupressthe I
ON
LINE
]
buttontoenteradoption, a“*’’(asterisk)
willbe printedonthe paperto confirmthattheoptionhasbeenchosen.
Themenus am organizedin a hierarchical(tree-struchued)fashion.Some
menus do not chooseoptionsdirectly,but instead,move down to other
menus. To move up throughthe menu structuretowards the “root” of
“trunk”,usethe lTiT5Rlbuttonasan ~1 button.
Thestructure of themenusam shownbelow:
MAINMENU
r
PRINTCURRENTSE’ITINGS
INSTALLATIONMENU
E
COMMANDMENU
FONTMENU
CHARACTERMENU
PRINTMENU
PAPERMENU
FORMSMENU
- USEFACTORY
SETTINGS
Theoptions withineachmenuaregivenbelow.
Asmentionedabove,whenyoupressthe -1 (EXIT)buttonfromany
sub-menuorfromanoptionwithinamenu,youwillmum tothemenulevel
abovethecurrentone.Ifyoupressthe -j (EXIT)buttonfmmthemain
menu,theprinterwillprint“***
END ●**” andexitto being on-line,withthe
settingschosen in MemorySwitchmodebeingnowsetin theprinter.
56
Page 66

MENUOPTIONS.
Thefollowingisalistoftheoptionswithinthemenus,andtheirmeanings,
togetherwiththepromptsprintedinMemorySwitchmode.Thepromptsare
givenin capitallettersin squarebrackets,thus:[OFF]. Factorysettingsare
markedhere with an asterisk(forexample,[*ON]).A summaryof factory
settingsis alsoprovidedfollowingthis seetion.
Printcurrentsettings
Whenyouselectthisoption,theeurrentsettingswillreprinted,similartothe
samplebelow.
:M6LE;
EW6LE2
S:N6LE
Ouw::
2 LiNE5
3 LINES
2 LINES
; LINES
; LINES ? LIMES
Page 67

hwtallationmenu
In thismenu,youcan select the followingsub-menus.
sCommandmenu(whichcommandstheprinteraccepts)
● Fontmenu(whichfontto print)
● Charactermenu(whichcharactersetto print)
● Printmenu(whichstyleto print)
● Papermenu(whatpapertheprinterwilluse)
● Formsmenu(howpageswillbe formatted)
Communalmenu
Thismenuallows you to setup variouspararnetemcontrollingthe overall
setupof theprinter.
c Emulation
Selectthemodecompatiblewithyourcomputerandsoftware.InStandard
mode,
[*STANDARD], the printeroperateslike the Epson EX-800/EX-
1000.InIBMmode,[IBM],it operatesliketheIBMPmprinterIII.
● RAMusage
In order to downloadcharactersthis switch must be set
[DOWNLOAD
BUFFER]. The
printerthen uses itsRAMmemoryfor storingcharacter
patternsandprovidesonlya one-lineprintbuffer.
If youleavethis switchto
[*INPUT BUFFER], the printerusesits RAM
memoryasaninputbuffer,allowingthecomputertosenddatafasterthan
theprinterprints.
If you wanttheprintbufferonlyoneline,setto [1 LINEBUFFER].
c Quietmode
You can selectthe Quietmode as the power-ondefaultby settingthis
switchto [ENABLED].
WheninQuietmode,theprinterwillprintslightlyslower,butatareduced
noiselevel.
c Graphicsdi~ction
When printingin dot graphicsmode, the printer may eitherprint bi-
dimctionally(inalternatedirections),[*BI-DIRECTIONAL],forspeedorin
onedirection only(uni-directionalfor increasedaccuracy),[UNl-DIREC-
TIONAL].
Forpracticallyallpmposes,however,bi-directionalprintingissufficiently
accurate.
58
Page 68

AutoOn-Line
Setthestatusjust afterloadedthepaperintothepfiter.
Whenthe Auto-Onlineisset[*ENABLED],theprinterautomaticallygoes
on-line.
*nit isset[DISABLED],youmustpxesstheI
ON
LINE
J
buttontoset
on-lineafterloadthepaper.
STROBEtiming
Thisswitchcontrolsthetimingof theinterface.
MostcomputemcancommunicatewiththeNonnaJtiming,asthe factory-
setting,[*NORMAL].
Ifyouwerenotpossibletocommunicatewithyourcomputertotheprinter,
setthisswitchto [REVERSE].
Fontmenu
TheFontmenuallowsyoutosettwoparametersconceding fontswhichwill
be automaticallyselectedwheneveryouturnon theprinter.
.
Zerostyle
Thismenutellstheprinterhowto printzero’s.
Whenthe[*NORMAL]isselected,theprinterprintsthenormalzero;when
itis[SLASHED],theslashzem(whichisoftenusedindraftmodetopmvent
anypossibleconfusionwiththe letter“O”).
NLQFont
The&aremanyfontstylesforNLQprintmode.Youcanselectoneof them
asthepower-ondefaultby settingthisswitch.
Churactermenu
The Charactermenu allowsyouto selectthe characterset whichwill be
printed.
● standard
Chmct.erTable
If you selected Standard mode, you can set either italic or graphic
Charactelx.
Whenyouselectthe[ITALIC]chamctem,thecharactertableisthesameas
theEpsonprintem.
Whenyouselectthe [*GRAPHICS]characters,in placeofitalicsyouwill
get the graphiccharacters,internationalcharacters,and mathematical
symbolsof IBMcharacterset#2.
Page 69

. IBMCharacterTable
If youselectedIBMmode,youcanselecteither characterset#l [IBM#1]
or#k?[*IBM#2].
Characterset#2isforcomputemwithan8-bitinterface(themostcommon
kind),and set#1 is for computemwith a 7-bitinterface.
GIBMCodePage
Exceptin the StandardItalic characterset,thisswitchselectsthedefault
charactercode page.
NOTE:Since there a.Rmany code pages you can select,the [OTHER]
optionindicatestoselectotheroptionson thenextline.
● International ChamcterSet
Internationalcharactersetsdifferintheirassignmentof14charactercodes
in theStandardItaliccharacterset.
Printmenu
This menu allowsyou to set up vtious printingoptionswhich will be
automaticallyselectedwheneveryoummtheprinteron.
“ PrintQuality
select thepMt quality.
HSDra& [HS-DRAFTI,pints withthehighestspeed,butthedotmatrixis
reducedtoprintfaster.Draft[4Y3A~ hasaI@uceddotmatrixcompared
to NLQ,but theptit qualityis betterthantheHS Draft.
NearLetterQualityis mfemdas [NLQ],andthereammanyfontstylesas
showninthe “NLQFont”menu.
. Printpitch
Selectsthedefaultprintpitch,suchas[*1OCPI](pica), [12CPIJ(elite),and
[PROPORTIONAL].
● Condensedprint
Selectscondensedprintto be either[*DISABLED]or [ENABLED].
G Italicprint
selects to printall
chamcterswithItalicstyie,or not.
Thisisdiffenmtfmmtheitalic charactersintheStandanlItaliccharacter
table.
60
Page 70

Papermenu
Thismenuallowsyouto setup varioushandlingoptionsofpaper,
● Paper-outdetector
Whenthisswitchis [DISABLED]theprinterignoresthe paper-outdetector
and prints down to (and beyond)the bottomedge. Otherwiseleave it
[*ENABLED].
● Multi-partmode
Youcanuseupto 3-plypaperwithnonnalmode,[*DISABLED].Ifyouwant
to printon 4-plyor5-plypaper,settheMulti-partmodeto [ENABLED].
● AutomaticSheetFeeder
InordertousetheoptionalAutomaticSheetFeeder,setthisswitchtothe
Aated position. [SINGLE]forsingle-binASF,[DUAL-1]forthe tint bin
of Dual-binASF,and [DUAL-2]forthemarbinoftheDual-binASF.
If youdonotusetheoptionalAutomaticSheetFeeder, leavethis [*OFF].
● Autoloadingamountforeachpapertype
Setsthe firstlinepositiononthe eachpapertype.
Formsmenu
TheForms menu allowsyou to set variousoptions associatedwithpaper
handling.
● Tear-Offfunction
Youcan selecttheTearOfffunctionwiththisswitch[ENABLED].
Whenusingfanfoldpaper,theTearOfffunctionallowsyoutotearoffone
sheetofpaperwithoutfullyadvancingthefollowingshee&
● Skip-over-perforation
Youcan selecttheSkip-over-perforationwiththisswitch[ENABLED].
, Itis recommendedto skipclose totheperforationoffanfoldformsto get
goodprintquality.
Ifyoucannotsetthisfunctionwithyoursoftvwm,setthisswitch[ENABLED].
Theprinterautomaticallyskipstheperforations.
● AutoLineFeedwith CR
If you setthis switch[*DISABLED],a separateline-feedcodeis required
horn yourcomputerto obtainaline feed.
If you set this switch [ENABLED],the printerperformsboth a carriage
mtumandlinefeedeachtimeit receivesa carriage-mtumcode.
Mostcomputersystemssendalinefeedcode,orbothacarriagereturnand
linefeed,attheend ofeachline,sothisswitchshould beleft[*DISABLED].
61
Page 71

Ifyougetdoublelinespacingwhenyouexpectsinglespacing,orif lines
oveqxinteachother,try changingthesettingof thisswitch.
● AutoCarriageReturnwithLF
E youset this switch [DISABLED],a separatecaniage-nxum codeis re-
quiredfromyourcomputerto returnto theleftmargin.
H you set this switch [*ENABLED],theprinterperformsboth a carriage
@urn andlinefeedeachtimeit receivesa line-feedcode.
● Carriagecentering
If youset thisswitch [ENABLED],thecarriagemovesto the centereach
timeto feedpaperneartheperforations.It is recommendedtomatchthe
pagelengthsettingtoyourfanfoldpaper,otherwise,thisfunctiondoesnot
workproperlyat theperforations.
E youleavethis switch [*DISABLED],the carriagedoesnot movewhen
feedingpaper.
● Linesper Inch
Setshowmanylinesto bepMted inoneinch.
“ Pagelength
Youcan seta differentpagelength to accommodateyourpaperwiththis
switch.
Factorysettings
Thisoptioncleamallcurnmtsettings,andnxtorestheFactorySettingstothe
MemorySwitch.
62
Page 72

DOTADJUSTMENTMODE
This
modeisusedto adjustthealignmentoftheprintheadonsuccessivebi-
directionalpasses.
Afteraperiodofsomemonths,yourprintermayworkitselfout ofalignment
onletl andrightprintingpasses,showingitselfmostobviouslyingraphics
printing.Thismodewillprobablybeusedveryrmly.
1.
2.
3.
Turn the printeroff and thenturn it on againwhileholdingdownthe
sE1-/E.IEG-r
[ and I ON
LINE
1
buttons.The printer will then print
i I I I
t ,
i I
,
,
backwaxdsduring
I
i
this
operation,allowingyoutoviewthepaperforoptimumalignment.
Tbadjusttheprintfig,usethe~~~ and !
PAPFRFEED[
buttons.
The
IEZSEZl
buttonwill movethe secondpass to the left. The
\
PAPER FEED I buttonwillmovethesecondpassto the right.
:**Mr)r}”:
;tr~l’l..J::-rl’lF:rJ”r !;F:?-”rI N[; * * *
~.l!’j-I”iFl:;:lF”l-
,:i(:,
I
,
I
I
,
I I + I
,
(
)
I
t
PAPERFFFD ]+
,...~:)~;:l/::[;...,:::
.:..,
‘,
I
II
‘i
I
1
,
!
I
,
I
I
4.5.Whenthethe linesarealignedwitheachothertoformonecontinuous
line,thebi-dimctionalalignmenttestis completed.
Tochangethemodeforwhichthebi-dimctionaladjustmentisperformed,
press the \ ON
LINE
]
button.This will cycle between“HS Draft”,
“Draft”,“NLQ-A”,“NLQ-B“,“GRAPHICS-A”and“GRAPHICS-B”.
Repeattheprocess for allprintmodes.
Page 73

HS-DRAFT
[;)(:)
I
I
I
I
I
I
HS–DWFT
+1
1
I
I
1’ 1’ 1’
HS-DRAFT
[:1(:)
1
I
I
I
I
I
(:)(:)
I
I
I
I
I
I
I
$
I
1’
I
I
I
I
HS-DRAF1’
[:)(:)
I
HS-DRAFl”
+ 1
I
1’
14S-DRRFT
(:)(:)
I
DRAFT
cm 1
I
(:)(:)
I
I
I
I
I
1’
I
I
I
I
I
I
!
I
I
I
I
I
I
,
I
1’
I
I
I
I
I
I
I
I
I
I
I
I
I
,
I
I
,
I
I
I
I
I
I
I
1’
I
I
I
I
1
I
I
1’
I
I
I
I
I
(
,
I
I
I
I
I
I
I
I
1’
I
t
I
I
I
I
I
1’
!
t
I
I
i
I
I
I
!
I
I
I
I
Page 74

chapter 7
PRINTERCONTROLCOMMANDS
Theprinterhas twoemulationmodes:StandardmodeandIBMmode.
In staridardmode,theprinteremulatesthefunctionsoftheEpsonEX-800/
EX-1OOO.In IBM mode, the printer emulatesthe IBM Propnnter III.
Additionalcommandcodesareincludedas a supwsetof theseemulations.
The emulationis changedby meansof MemorySwitchmode.Whenthe
Emulationoptionissetto[STANDARD],theprinterwillbeinstandardmode,
andwhen [IBM],theprinterwillbe in IBMmode(seeChapter6).It is not
possibleto changetheemulationby meansof softwarecontrol.
Thischapterdescribestheprinter’scontrolcommands.Somecommandsare
commonto both the standardand IBMmodes.In thedescriptionsof the
commands,all commandswill given by functions.The name of each
commandisfollowedbyatable liketheonebelow:
Mode ASCII
Decimal Hexadecimal
std.
<ESC> “X” “l” 27120 49 10 78 31
<ESC> “x” <1>
27
12U 1
IB 78 01
Mode:
ASCII:
Decimal:
Hexadecimal:
Indicatesthemodeinwhichthecommandisrecognized.
Std. Standardmode
IBM
IBMmode
Both
BothstandardandIBMmodes
IndicatestheASCIIcodingofthecommand.Controlcharactersareenclosedinpointedbrackets:For
example,<1> meanscharactercode1.
Givesthecommandindecimalcharactercodes.
Givesthecommandinhexadecimalchamctercodes.
Parametersforwhichvaluesmustbe suppliedareindicatedbyitalicletters
suchas n,m ord.
65
Page 75

I
FONT
Selectdraftqualitycharacters
Mode ASCII
Decimal Hexadecimal
std.
CEsc>
“x” “o” 27 12U48
lB 7B 30
<ESC> “x” &
27120 0
lB 78 00
Changesflomnearletterqualitytodraftquality.IgnomdiftheFONT
LOCKmodewasselectedduringpower-up.
Selectdraftpica characters
Mode ASCII
Decimal
Hexadecimal
IBM
dtsc~ “r’ d> 27 73 0 lB 49 00
Changestodraftqualitycharactemwithpicapitch(lOcpi).Ignored
iftheFONTLOCKorPITCHLOCKmodewasselectedduringpower-
Up.
Selectdraftelitecharacters
]Model ASCII
I Decimal I Hexadecimal I
IIBM! <ESC>“I” <1>
I
27 73 1
] lB 49 01 I
Changestodraftqualitycharactm withelitepitch(12cpi).Ignored
ifthe.FONTLOCKorPITCHLOCKmodewasselectedduringpower-
Up.
SelectNLQcharacters
Mode ASCII
Decimal
Hexadecimal
std.
<Esc>
“x” “l” 27120 49
IB 73 31
<Esc>
“x” <1> 27120 1
lB 78 01
IBM
*C> “r’ + 27 73 2 lB 49 02
.dzsc> “r’ c3>
27 73 3 lB 49 03
Changes
fromdraftqualityto nearletterquality.The initialNLQ
font is SanSerifunless a different font has been selected by a
pnxedingcommand.Ignoredifthe FONTLOCKmodewasselected
duringpower-up.
66
Page 76

SelectNLQfont
Mode ASCII
Decimal
Hexadecimal
Both 435C> “k” n
27107 n
lB BE
n
SelectsanNLQfontaccordingtothevalueofn.Indraftmode,this
commandremainsdormantand takes effect later when NLQ is
selected.Ignonxlif the FONT LOCKmode was selected during
power-up.
n Font
n Font
O Courier
4 script
1 SanSerif 7 Orator
2 Courier
Selectfont
Model ASCII I
Decimal
I
Hexadecimal
Changestothefontaccordingtothevalue ofd.IgnorediftheFONT
LOCKmode wasselectedduringpower-up.
d Font d Font
O Courier
4 script
1 Sansenf 7 Orator
2 Courier
Seleutitaliccharacters
Mode ASCII
Decimal
Hexadecimal
std.
‘d?sc>
“4”
27 52
lB 24
Causessubsequentcharactemto beprintedinitalics.
67
Page 77

SelectNLQitaliccharacters
Mode
ASCII
Decimal Hexadecimal
IBM 43SG
“r’<m
27 73 11
lB 49 OB
Causes subsequentcharactersto be printed in italics with NLQ
characters.Ignoredif the FONTLOCKmode was selectedduring
power-on.
Selectuprightcharacters
Mode
ASCII
Decimal Hexadecimal
std. CEsc> ‘s5”
27 52
IB 35
Stopsitalicprintingandcauses subsequentcharacterstobeprinted
uprighc
Emphasizedprinting
Mode
ASCII
Decimal
Hexadecimal
Both
~~ ,,~>.
27 W
IB 45
Causessubsequentcharactm to be emphasizedby addingextra
thicknessto verticalstrokes.
Cancelemphasizedprinting
Mode
ASCII”
Decimal Hexadecimal
Both
dtsc> “F”
27 70
IB 46
Cancelsemphasizedprinting.
Double-strikeprinting
Mode
ASCII
Decimal Hexadecimal
Both
~~ ‘y-y
27 71 IB 47
Causessubsequentcharactersto be printedin double-strikemode
withaslightverticalpapermotioninbetween,causingathickening
of horizontalstrokes.
Forboldprin4useofdouble-strikeis recommendedin NLQmode,
andcombineduseofemphasizedanddouble-strikeisrecommended
in draftmode.
68
Page 78

Canceldouble-strikeprinting
Mode
ASCII
Decimal
Hexadecimal
Both
<ESC> “H”
27 72
lB 48
Cancelsdouble-strikeprinting.
Startunderlining
Mode ASCII
Decimal
Hexadecimal
Both
<ESC> “-” “l”
27 45 49
lB 2D 31
<ESC>
“-” <1>
27 4S 1
lB 2D 01
Causessubsequentcharacterstobeunderlined.IBMblockgraphics
charactersand spaces skippedby horizontaltabulationare not
underlined.
Stopunderlining
Mode
ASCII
Decimal
Hexadecimal
Both ,
<ESC> “-” “O”
27 45 48
lB 2D 30
<ESC>
“-” <o>
27 4S O
IB 2D 00
Stopsunderlining.
Startoverlining
Mode ASCII
Decimal
Hexadecimal
IBM ~t3
<Jy.c> ,,–,. ,qm
27 95 49
lB 5F 31
<ESC> “ “ <1>
27 95 1
lB 5F 01
Causessubsequentcharactersto be overlined.Spacesskippedby
horizontaltabulationarenotoverlined.
overlining
Mode ASCII
Decimal
Hexadecimal
IBM
<Esc> ,,–.. ..().!
27 95 4S IB 5F 30
<ESC>
“-” <o>
27 95 0
IB 5F 00
Stopsoverlining.
69
Page 79

Superscript
Mode ASCII Decimal Hexadecimal
Both
@c> “s” “o”
27 S3 40 lB 53 XI
CESc> “s” co> 27 S3 O
lB 53 IX)
Causessubsequentcharacterstoreprinted assupemcripts.Doesnot
changethecharacterpitch.
Subscript
Mode ASCII Decimal Hexadecimal
Both
asc> “s” “l” 27 S3 49
lB 53 31
disc> “s” <1> 27 S3 1 IB 53 01
Causessubsequentcharactm to beprintedas subscripts.Doesnot
changethecharacterpitch.
Cancelsuperscriptor subscript
Mode ASCII Decimal Hexadecimal
Both
CEse ‘“r’
27 34
IB 54
Stops printing
printing.
superscripts
or subscriptsand returns to normal
70
Page 80

CHARACTERSETCOMMANDS
Selectstandardcharacterset
Mode
ASCII
Decimal Hexadecimal
Both
~~ q..
,,099
27116 46 10 74 30
dsc> “t” *
27116 0 10 74 w
Selectsthe standatdcharacter set. Thisis the power-updefaultin
Standard mode when the “Standard Italic” is selected with the
MemorySwitch.
SelectIBMcharacterset
Mode ASCII
Decimal Hexadecimal
Both
CEsc> *’t” “l”
27116 40
10 74 31
<ESCW
“t”<1>
27116 1 IB 74 01
Selectsan IBMchamcterset.Thisisthepower-updefaultin IBM
mode,or the“StandardGraphics”is selectedin standardmode.
Selectcharacterset#1
Mode
ASCII
Decimal
Hexadecimal
Both
dsc> “7”
27 S6
IB 37
Selectscharacterset#1.
Selectcharacterset#2
Mode
ASCII
Decimal Hexadecimal
Both cESG “6”
27 64 IB 36
Selectscharacterset#2.
Page 81

Selectinternationalcharacterset
Mode
ASCII Decimal
Hexadecimal
std. cBSC> “R” n
27 02 n
lB 52 n
Selectsan internationalcharactersetin the Standardcharacterset
accordingtothevalueof n.
n Characterset
n Characterset
O 11.S.A
1 France
2 Germany
3 England
4 DenmarkI
5 Sweden
6 Itiy
7 SpainI
8 Japan
9 Norway
10 DenmarkII
11 SpainII
12 LatinAmerica
13 Korea
14 Irish
64 Legal
Oneof thesecharactersetscanbe selectedaspower-updefaultby
theMemorySwitchmode.
SelectIBMcodepage
Mode
ASCII
Decimal Hexadecimal
Both
CEsc> “[”
‘T’ <4> 4)> 27 91 B4 4 0
lB 5B 54 M m
d)> *
nl n2
O 0 nl n2
m m nl d
Changes the code page of thecummtIBM charactersetaccording
to thevaluesof nl andn2.
nl n2
CodePage
1 181
#437 U.S.A.
3
82
#850 Multi-lingual
3
92
#860 Portuguese
3
93
#861 Icelandic
3
95
#863 CanadianFnmch
3
97
#865 Notiic
Oneofthesecodepagescanbeselectedaspower-updefauhsbythe
MemorySwitchmode.
72
Page 82

I
Enableprintingofall charactercodes
Mode ASCII Decimal
Hexadecimal
IBM cESC> ‘1” nl n2
27 32 d d
IB 5C nl d
EnablesprintingofallcharactersintheIBMcharacterse~including
thoseassignedto charactercodeswhichare normallyconsidered
controlcodes.Thiscommandremainsineffectforthenextnl + nZ
x 256characters,wherenl andn2m numbersbetweenOand255.
Duringtbisintervalnocontrolfunctionsw executed.Ifacodewith
no assignedcharacteris nxeived,theprinterprintsa space.
Enable printing of all character codes on next
character
Mode ASCII Decimal
Hexadecimal
IBM cESC> “A” n
27 94 n
lB 5E
n
This command operateslike ~0 ‘1”exceptthat it remainsin
effectfor onlyonecharacter.
Selectslashzero
Mode ASCII
Decimal
Hexadecimal
CEsc>
,.e,, ‘c,,
std.
1
27126 49
lB 7E 31
CEsc> “-” <1>
27126 1
IB 7E 01
Causessubsequentzemcharacterstobeoverprintedwithaslash((il).
Selectnormalzero
IMode ASCII
Decimal
Hexadecimal
*O ,,-9. ,’(-)9.
std.
27126 48
IB 7E 30
CEsc> “-” +
27126 0
IB 7E 00
Causes subsequentzem charactemto be printed normally (0),
withouta slash.
Page 83

CHARACTERSIZEAND PITCHCOMMANDS
Picapitch
Mode ASCII
Decimal Hexadecimal
std. .&SC> *’P”
27 m
IB 50
IBM a>
18
12
In Standardmode,changesfromelite to picapitch(10cpi)orIlom
condensedelitetocondensedpica(17cpi).In IBMmode,changes
fromeithereliteorccmdensedtopica(10cpi).IgnoredifthePITCH
LOCKmodewasselectedduringpower-up.
Elitepitch
Mode ASCII Decimal
Hexadecimal
std. 43SC>“M”
27 77
IB 40
IBM ‘&C> “:”
27 58 IB 3A
Changes
fmmpicato elitepitch(12cpi)or fmmcondensedpicato
condensedelite(20cpi).Ignoredif thePITCHLOCKmodewas se-
lectedduringpower-up.
Condensedprinting
Mode ASCII
Decimal Hexadecimal
Both
<Sb 15 w
std. CEsc> -b 27 15
IB W
Changesfmm pica to condensedpica (17 cpi) or from elite to
condensedelite(20cpi).
Ignoredif thePITCHLOCKmodewasselectedduringpower-up.
Cancelcondensedprinting
Mode
ASCII Deeimal Hexadecimal
Both -@Cz
18 12
In Standardmode,changesfromcondensedpicato normal picaor
fromcondensedelitetonormalelite.InIBMmode,alwayschanges
tonorrnalpica.IgnoredifthePITCHLOCKmodewasselectedduring
power-up.
74
Page 84

Expandedprinting
Mode
ASCII
Decimal
Hexadecimal
Both
CEsc>“w’4’1”
27 87 49
IB 57 31
<ESC> “W’ <1>
27 87 1
IB 57 01
Causessubsequentcharacterstobe expandedtodoublewidth.
Caneelexpandedprinting
Mode ASCII
Decimal
Hexadecimal
&J~> ,,WW“099
Both
27 87 44
10 57 W
<ESC> “W’ d>
27 87 0
IB 57 00
StopsexpandedprintingandRtums to normalwidth.
Expandedprintingforoneline
Mode Ascll
Decimal
Hexadecimal
Both
<sCb
14
OE
std. <ESC> <S*
27 14
lB O&
Causessubsequentcharacteminthecurrentlineto beexpandedto
doublewidth.Charactersmum tonormalwidthafterthenext line
feed(&F>). The<DC4>,<Vb, @l%, andKESO “W”Ocommandsalsocancelexpandedprinting.
Cancelone-lineexpandedprinting
Mode ASCII
Decimal Hexadecimal
Both
CDC4>
20
14
Stopsone-lineexpandedprintingsetwith<S0> orcESG <S0>.
DoesnotcancelcESb “W’ 1.
Selectpropotfionalspacing
Mode ASCII
Decimal
Hexadecimal
std.
CEsc>
“p” “l”
27112 # lB m 31
<Esc>
“p” <1> 27112 1
lB 70 01
IBM
<ESG “P” <1>
27 S0 1
lB 50 01
Causessubsequentcharactm to beproportionallyspaced.Ignored
if the PITCHLOCKmodewasselectedduring power-up.
75
Page 85

fixedspacing
Mode ASCII
Decimal
Hexadecimal
std.
ac>
“p” “o” 27112 48
IB
m 30
CESG “p” 4>
27112 0
III
m w
IBM
CESc>
“P” * 27 S0 O
IB so w
Causes subsequentcharactersto be printedwith fixed character
spacing. Ignored if the PITCH LOCKmode was selected during
power-up,
Selectmasterprintmode
Mode ASCII Decimal
Hexadecimal
std. <Esc> “!” n 27 33 n
IB 21 n
Selectsacombinedprintmodeaccordingtothevalueofn.Thevalue
ofn isthesumofthevaluesgiven belowfor thedesiredcharacter-
istics.
Function nvalue
Underline
128
Italic
64
Expanded 32
Doublestrike
16
Emphasized 8
Condensed[*]
4
Proportional[*]
2
Elite[*]
1
[*IhwmdifthePITCHLOCKmodewasselectedduringpower-up.
Examples:n= 1giveselite;n
= 9(1 +8) givesemphasizedelite;n
= 137(1 + 8 + 128)givesunderlinedemphasizedelite.
Increasecharacterspacing
Mode ASCII Decimal
Hexadecimal
std. cESC> .&% n 27 32 n
IB 20 n
Increasesthespacebetweencharactembyndots,wherenk anumber
fromOto 127:Usedin micmjustification.
76
Page 86

I
Selectdoubleor quadruplesize
Mode ASCII
Decimal Hexadecimal
std. <ESC> “h” n 27104 n
IB SS n
Selectsthe size of subsequentcharactersas shownbelow.Extrahighcharactersalign alongthecap-lineofnoxmalcharactem,with
thebaselinetemporarilymovingdown.Linespacingistemporarily
doubledwhenn = 1andquadmpledwhenn =2.
n Effect
O Normalsize
1 Double-high,double-wide
2 Quadruple-high,quadruple-wide
Selectcharactersize
IhAodel ASCII I Decimal
I Hexadecimal I
IBoth I “ ‘ “ “ “S” “ “ “ “
(’( ))
d I 4040 S341 41 dI2S2S532929dI
Selectsacombinationofcharacterheightandwidthaccordingtothe
valueof d, as below.
Doesnotmovethebaseline.
d Linespacing Characterheight
O Singlewidth Singleweight
1 Doublewidth Singleheight
2 Singlewidth
Doubleheight
3 Doublewidth Doubleheight
Double-heightcharactersare alwaysprintedat nearletterquality.
Doubleheightprintingtemporarilycancelsthesuper/subscriptand
ccmdensedprintingmodes,butthesemodesresumewhentheprinter
nXurnsto normalmode.
Printdouble-heightcharacters
Model ASCII
I Decimal
/ Hexadecimal
std.
asc>
“w” “l”
27119 4Q I IB 77 31
@.sc> “w” ‘<1>
I 27119 1
I 16 77 01
Printssubsequentcharactersat double heightwithoutmovingthe
base line, and without changingthe line spacing. Temporarily
cancelssuper/subscriptandcondensedmodes.
Page 87

I
Returntonormalheight
Mode ASCII
Decimal
Hexadecimal
std.
CEsc> “w” “o”
27119 4s
IB 77 30
dzsc> “w” d>
27119 0
IB 77 00
Terminatesdouble-heightprintingandprintssubsequentcharactm
at normal height.
Resumessuper/subscriptand condensedprintingif these modes
werein effectbefotedoubleheightwasselected.
Selectcharacterheight,width,andline spacing
Mode ASCII
Decimal
Hexadecimal
Both
<ESG “[” “@” <4> *
27 91 S4 4 0 IB 5B 40 04 W
.Kb& n m
OOnm 0000 nm
Selectsa combinationof characterheigh~width,andline spacing
accmlingtothevalueofnandm,asbelow.Doesnotmovethebase
line.
n Linespacing
Characterheight
o
1
2
16
17
18
32
33
34
Unchanged
Unchanged
Unchanged
Single
Single
Single
Double
Double
Double
Unchanged
Singleheight
Doubleheight
Unchanged
Singleheight
Doubleheight
Unchanged
Singleheight
Doubleheight
m Characterwidth
1 Single width(sameascESO “W”O)
2 Doublewidth(sameasdZSb “W” 1)
Double-heightcharactersare alwaysprintedatnearletterquality.
Doubleheightprintingtemportily cancelsthesuper/subscriptand
condensedprintingmodes,but thesemodesresumewhentheprinter
mums to normalmode.
Page 88

VERTICALPOSITIONCOMMANDS
Setline spacingto
1/8 inch
Mode ASCII
Decimal Hexadecimal
Both &sc> “o”
27 40
IB 30
Setsthedistancethepaperadvancesornwersesinsubsequentline
feedsto 1/8inch.
Setline spacingto 7~2 inch
Mode
ASCII
Decimal
Hexadecimal
Both <ESC> “l”
27 49
IB 31
Setsthe
distancethepaperadvancesorreversesinsubsequentline
feedsto 7f12inch.
Setline spacingto 1/6inch
Mode ASCII
Decimal Hexadecimal
std. <ESC> “2”
27 50 IB 32
Setsthe
distancethepaperadvancesornwersesin subsequentline
feedsto 1/6inch.
Setlinespacington/216inch
Mode ASCII
Decimal Hexadecimal
Both <me “3” n
27 51 n
IB 33 n
Setsthedistancethepaperadvancesormvemesinsubsequentline
feedsto n/216inch, where n is betweenOand 255. If n = O,in
Standatdmodetheline-feeddistanceissetto O,butinIBMmodethis
commandisignored.
79
Page 89

Setlinespacington/72inch
Mode
ASCII
Decimal
Hexadecimal
Both
<ESC> “A” n
27 S5 n
16 41 n
In Standanlmode,setsthedistancethepaper advancesorreverses
insubsequentlinefeedsto ti2 inch,wheren is~twwn O and255.
If n = O,thelinespacingis setto O.
InIBMmodethiscommanddefinesthedistancethepaperadvances
orrevemesinsubsequentlinefeedstonf72inch,wherenisbetween
1and85.ThenewlinespacingdoesnottakeeffectuntilnextcESC>
“2”command.
Execute<ESC>“A”
Mode
ASCII
Decimal
Hexadecimal
IBM
<lXC= “2”
27 50
IB 32
Line
Sets the line spacingto the valuedefinedby the last pnxeding
~SO “A”command.Setsthelinespacingto1/6inchifthereisno
preceding<ESG “A”command.
feed
Mode ASCII
Decimal
Hexadecimal
Both
<LF> 10
OA
Printsthe current line andfeedsthepaperto thenextline.Seethe
pi’ecedingcommandsfortheline spacing.
Reverseline feed
Mode ASCII Decimal
Hexadecimal
std.
<ESC> <LF> 27 10
IB OA
IBM
1
<Esc> “ “ 27 92
IB WI
Printsthecunentlineandfeedsthepaperinthereverse dkction to
theprecedingline.
Seetheprecedingcommandsforthelinespacing.Ignonxlwhenthe
frictionfeedisused.
80
Page 90

Performonen/216-inchline feed
Mode ASCII
Deeimal Hexadecimal
Both
<Eso “J” n 27 74 n
IB 4A n
Feedsthepaperoncebyn/216inches,wherenisbetween 1and255.
Doesnotmovetheprintpositionright orleftinthestandardmode.
Doesnotchangetheline-spacingsetting.
Performonen/216-inchreverselinefeed
Mode ASCII
Deeimal
Hexadecimal
std. *G
“j” n
27106 n
IB M n
Feedsthepaperoncebyn/216inchesinthemwersedirection,whe~
n isbetween1and255.
@s notmovetheprintpositionrightor left.Doesnotchange the
line-spacingsetting.
Feedpaper n lines
Mode ASCII
Decimal
Hexadecimal
std.
<ESb “f’ “l” n
27102 49 n IB S6 31 n
<Eso “f’ <1> n 27102 1 n
IB W 01
n
Feedsthepapern linesfromthecurrentline,whetenisbetweenO
and 127.
Set topofpage at currentposition
Mode ASCII
Decimal Hexadecimal
IBM
<ES6 “4”
27 52
IB 34
Setsthe
cunentposition asthetop-of-pageposition.Notethatthis
canalsobe donefromthecontrolpanel.
81
Page 91

Setpage lengthton lines
Mode
ASCII
Decimal
Hexadecimal
Both
<ESC> “C” n
27 67 n
IB 43 n
Set
Setsthepagelengthton linesinthecurrentlinespacing,wherenis
between1and 127in Standardmodeor between1and64 in IBM
mode. Changingthelinespacinglater doesnot alterthephysical
pagelength.Thecurnimtlinebecomesthetop of thepage.
pagelengthton inches
Mode ASCII
Decimal
Hexadecimal
Both <ESC> “C” <O> n
27 67 0 n
IB 43 00 n
Sets the pagelengthto n inches,wheren is between 1 and 32 in
Standardmodeorbetween1and64inIBMmode.Thecurrentline
becomesthetopof thepage.
Setbottommargin
Mode ASCII
Decimal
Hexadecimal
Both cESC> “N” n
27 78 n
IB 4E n
Setsthebottommarginton lines,wheren isbetween1and 127in
Standardmodeor between 1 and 255 in IBMmode.The bottom
marginis resetwhenyouchangethepagelength.
Cancelbottommargin
Mode
ASCII
Decimal
Hexadecimal
Both <ESC> “O” 27 79
IB 4F
Cancelsthebottommargin.
Formfeed
Mode ASCII Decimal
Hexadecimal
Both
cFF>
12 Oc
Feedsthe paper to thetopofthenextpageaccordingto thecurrent
pagelength,andmovestheprintpositiontotheleftmargin. When
the automaticsheetfeeder(ASF)is selectedwithMemorySwitch
setting,thiscommandejectsthecurrentpage.
82
Page 92

Returnto topof currentpage
Mode ASCII
Decimal
Hexadecimal
std. disc> CFF>
27 12
IB OC
Feedsthe paperbackward to the top of the currentpage.Ignored
whenthe frictionfeedis used.
Disablepaper-outdetector
Mode ASCII
Decimal Hexadecimal
Both <ESC> *’8”
27 56
IB 38
Causesthe printer to disregardthe signal sent by the paper-out
detector,enablingprintingtothebottomofthepaper. Overridesthe
settingof Memory Switch.
Enablepaper-outdetector
Mode
ASCII
Decimal
Hexadecimal
Both
CEsc>
‘9”
27
57 IB 39
Causesthe printer to stop printingbefore the end of the paper.
Overridesthesettingof MemorySwitch.
Set verticaltabstops
Mode ASCII
Decimal Hexadecimal
Both <ESC> “B” td n2 .... + 2786 n] n2 ... 0
IB 42nl d ... W
Cancelsallcurrentverticaltabstopsandsetsnewverticaltabstops
at linesnl, n2,etc.,wherenl, n2,etc. arenumbersbetween1and
255.Amaximumof 16verticaltab stopscanbe set.Thetab stops
mustbe specifiedin ascendingorde~ anyviolationof ascending
otierterminatesthetabstoplist.Standardterminationisbythe<(b
controlcode.“f’hevertical~bstopsaresetintermsofthecunvntline
spacinganddonotmoveif thefinespacingis changedlater.
Page 93

I
Set verticaltabstopseveryn lines
Mode
ASCII Decimal
Hexadecimal
std.
CESC>
“e” “l” n 27101 43 n
IB 65 31 n
cESC> “e” <1> n
27101 1 n IB B5 01 n
Cancelsallcurnmtverticaltabstopsandsetsnewtab stopseveryn
Unes,wheren is between1and 127.
Set verticaltabstopsin channel
Mode ASCII Decimal Hexadecimal
Borh
@SC> “b” nO nl
27 9S nO
d IB S2 M nl
d .... a d ....
0
d ... w
Cancelsall currentverticaltab stopsin channelnO,(whereM is
betweenOand 7) andsetsnewverticaltabstops in thischannel.(A
channelis a set of verticaltab stopsselectedby the cESb “t’
command.)SeecESG “B”forparametersnl, n2,... e(b.
Selectverticaltabchannel
Mode
ASCII
Decimal Hexadecimal
std. <ESG “r’ no
27 47 ni) IB 2F @
Selectsa set of verticaltab stopsdesignatedby a channelnumber
(nO)fmmOto7.Thetabstopsineachchannelaresetby <ESb’’b”.
Verticaltab
Mode ASCII Decimal Hexadecimal
Both <v-b
11 OB
Feedsthe paperto the next vetical tab stop and moves the print
positiontotheleftmargin.Performsalinefeedifnoverticaltabsare
set,as atpower-up.Feedstothetopof thenextpageifverticaltabs
aresetbutthecunentlineis ator belowthelastverticaltabstop.
84
Page 94

I
H P
l m
C
.
M A
D H
s CESG “l” n
27IC% n
IB EC n
S
t l m c n ( n b Oa 2
t c c p ( p p s
s T l m d n m t c p
c l Tha t l
t r m a w t l b
P T
N C
P
n
E
O
C p
o 1
C e
(
E p
(
E e
O
E c p O
E c e O
r m
W C
O
O S
O S
O S
(
O S
O S
O S
M A
D H
w c “ n 27 81 n
IB 51 n
S
t r m c n t c c p (
pis c s C n
t l c p t l
T r m d n m t c p c
l T r m m w t l b
P T
N C W C
P
4
4
E 5 S
5 S 1
C p
7 1
n
C e
8
n
E p
2
n
E e 3 3 S
E c p 4
4 S
E c e 4
4 s
Page 95

I
l r m
M A D
H
I cESC> “X” nl d
27 S0 nl n2
IB 5S nl n2
S t l m a a t r m c n
S pnf a
C r
M A D H
B + 1 C
Pr
t c l a R t n p p t l
m t A m s w t M S
a p a l f
a l f
M A D
H
I 4 “ < 27 53 1
IB 35 01
C t p p b a c m a l f
e t i a T c t p o
t s M S
C a l f
M A D H
I
. “ &
27 53 0 IB 35 00
C t p p o ac r w n
a c T c t p o t s
M S
B
M A D H
B C 8 0
M t p p o c t l I t p
p a ’ c b o
c c
Page 96

L j
M A D
H
s
~ , ‘
27 97 46 tB 61 30
@ ‘ &
27 97 0 IB 61 00
A s t w t l m l t r m
. r
C t
M ASCII
D H
s
& “ “ 27 97 49 IB 61 31
4?“ <
27 97 1 IB 61 01
C s t b t l a r m
R j
M A
D H
s
cE
“ ‘ 27 97 50 IB 61 32
~ M ~
27 97 2 IB 61 02
A s t w t r m l t m
r
F j
M
~A
D
H
s
~ , .
27 97 51 IB 61 33
c “ d
27 97 3 IB 61 ~
A s t b t l a r m
8
Page 97

h s
M A
D
H
B .&SC> “D”
d d .... 6 27 SSnl d . ... 0
IB 44
nld ...00
C a c h t s a s n t s
c n n e t c c p ( p
p s c s w n n e a
n b 1a 2 T m n h
t s a S m a I m T
t s m s a o a v
a o t t t s l S t
t < e c c a t s s 4 “
<
h s e n c
M Ascll D H
s
&~~> ,Oew..().. n
27101 4S n
IB 65 SO
n
cESC> “e”4>
n 27101 0 n
IB 65 W n
C a c h t s a s n t s e
n c w n b 1 a 1
R s
M Ascil D H
I
4 “
2 S
18 52
R t h t s t p v w a
t s s e 8c s c A c a
v t s
H
M
AS
D
H
B C 9 (
M t p p t n h t s I
t i h t s t c l N t w
u s s s h t a
n u
Page 98

R h
M A
D H
s CESC> “1”
nl d
27 92 nl d
IB 5C nl n2
M t p p r l as d I
thn t r o e
f t d a d a f
n b Oa 6 t p h m r ( +n x
2 d
y w m t p h t l d a a o
s t v f 6 a d t r i
h a l b
A h i
M A
D H
s <ESC> “$” nl ~
27 36nl d
10 24d d
S t n p p ( + x i f l
m o c I t p b t r
m
A h c
M A D H
s
cESG “f’ “O”
n 2710248 n IB & W n
<
“f’ 4> n
27102 0 n
IB B6 W n
M thc n l w
n b Oa 1
Page 99

G C
P n g
M
AS
D
H
B
cBSC> “K” nl n2
27 75nl d
IB 4B nf n2
ml m2 ... ml m2 ...
ml d ...
P b g d p i h T
g i 8d h a + x 2 d w M
w 8 i ( d f n c p a 1
i ( d f w c p m m ... a t d
d e a l v i O 2 r 8v d
w t m s b t t a t l s b
t b T n d b m + x 2 D
b t a i t e p
t p r a c m
P d g
W
AS
D H
B
cESC> “L” nl n2
27 7Bnl d IB 4C nl d
d d ... ml m2 ... ml m2 ...
Pr
b g 1 d p i h (
m 9 d w f c p 1 d f w
c p S & “ f o i
P d d g
M
AS
D H
B
CESC> “Y” nl n2
27 S9nl d IB 59 nl d
ml m2 ... ml d ... d m2 ...
Pr
b g 1 d p i h (
m 9 d w f n c p 1 d f w
cas s h d
S c “ f o i
Page 100

P q g
M A D H
B
cESC> “Z” nl n2 27 90 d d IB 5A nl d
ml d ...
ml d ... ml d ...
P b g 2 d p i h (
m 1 d w f n c p 3 d f w
cas e s d h d
S d “ f o i
S g m
M A
D H
s
cESC> “*” n(l nl
27 42 ni-1rd IB 2A nO nl
d nll d .. . d
ml d ...
d ml d ...
S o e g m d t v
d p b g t m S 4 “ f
i n t m m ...
G m
O N ( d p i
1 D
( d p i
2 D d ( d p i
3 Qu
( d p i
4 . g m I ( d p i
5 P g
( d p i
C g m
( d p i
7 D p g ( d p i
C g d
M
A
D H
s CESC> “?”
n m 27 63 n m
IB W n m
C g d s < “ 4 “
< “ o “ c ad m d
< “ n “ “L “ “ i t m
c m ac f < i o t m
43SC>“*”.
9
 Loading...