

Star StarJet SJ-48 User Manual

Federal Communications Commission
Radio Frequency Interference Statement
This
equipmenthas been tested and found to comply with the limits for a Class B digital device, pursuant to
Part 15of FCC
Rules.Theselimitsaredesignedtoprovidereasonableprotectionagainstharmfulinterference
inaresidentialinstallation.Thisequipmentgenerates,usesandcanradiateradiofrequencyenergyand,ifnot
installedand
used in accordance with the instructions, may cause harmful interference to radio communications. However, there is no guarantee that interference will not occur in a particular installation. If this
equipment doescause harmful interference toradioortelevision reception, whichcan redetermined by turning
theequipment offandon, the userisencouraged to trytocorrect the interference byoneormore ofthefollowing
measures:
● Reorient or relocate the receiving antenna.
● Increase the separation between the equipment and receiver.
.
Connect the equipment into an outlet on a circuit different from that to which the receiver is connected.
● Consult the dealer or an experienced radionV technician for help.
Unauthorized modifications of this product by the user will void his authority to operate the equipment unless
expressly approved by the party responsible for compliance.
For compliance with the Federal Noise Interference Standard, this equipment requires a shielded cable.
The above statement applies only to printers marketed in the U.S.A.
Statement of
The Canadian Department of Communications
Radio Interference Regulations
This digital apparatus does not exceed the Class B limits for radio noise emissions from digital apparatus set
out in the Radio Interference Regulations of the Canadian Department of Communications.
Le pr6sent appareil num6rique n’6menpas de bruits radioelectriques d6passant Ies limites applicable aux
Wpy+: nufn6@uesde la classe B prescribesclansle R&glementsur le brouillage radio61ecrrique6dict6 par
le muusere des Commumcatlons du Canada.
The abovt statement applies only to printers marketed in Canada.
Self Declaration
Radio interference regarding this equipment has been eliminated according to Vfg 1046/1984announced by
the DBP.
DBPhas been informed of the introduction ofthis special equipment and has been granted the right to examine
the whole series.
It istheuser’sresponsibility toseethathisown assembled system is inaccordance withthetechnicalregulations
under Vfg 1046/1984.
To conform to ITZ-regulations it is necessary to make all connections to the printer with shielded cable.
The equipment may only be opened by qualified service representatives.
The above statement applies only to printers marketed in Germany.
Trademark Acknowledgements
SJ-48, XB-241O,XB24-10, NX-2420, LC24-200, SC-10, BP-10, SF-1OCA:Star Micronics Co., Ltd.
IBM-PC, PS/2, PC-AT, Proprinter X24/X24E, PC-DOS: International Business Machines Corp.
MS-DOS, Microsoft BASIC: Microsoft Corporation
LQ-850: Seiko Epson Corp.
NOTICE
● All rights reserved. Reproduction of any part of this manual in any form whatsoever without STAR’s
express permission is forbidden.
● The contents of this manual are subject to change without notice.
● All efforts have been made to ensure the accuracy of the contents of this manual at the time of press.
However, should any errors be detected, STAR would greatly appreciate being informed of them.
● The above notwithstanding, STAR can assume no responsibility for any errors in this manual.
0 Copyright 1991 Star Micronics Co., Ltd.
HOW TO USE THIS MANUAL
Thismanualisorganized into tenchapters. Tolearn howto makethebest use of your printer
you are urged to read through chapters 1through 5. The remaining chapters maybe treated
as areference guide for programming operations, etc. It assumes a degree of acknowledge
of the operation of computers (for instance, it assumes you know about hexadecimal
numbers). The chapters are as follows:
Chapter 1
— Introduction
Thischapter indicates thesome features of theprinter, thenames and thosefunctions of the
printercomponents.This chapteralso indicatessomerequirementsto printer,power supply
and Ink Cartridge.
Chapter 2 —
Setting up the printer
This chapter explains how to get the printer unpacked and setup. Read this chapter before
you do anything else.
Chapter 3
— Paper handling
This chapter describes instructions forprinting such as selectingpaper types, adjusting the
printing gap, installing paper, and removing jammed paper.
Chapter 4 —
Control panel operations
There are a number of controls on the front panel which perform various functions related
to paper handling, print modes and font selection.
After getting set up, read this chapter and try out the procedures in it to find out how the
printer works.
Chapter 5
— DIP switch settings
This chapter explains how to set the DIP switches to make system settingson the printer.
Chapter 6 —
Printer control commands
This chapter explains the different emulations provided by your printer, and the software
commands used to drive it. This section is of use if you are writing or modifying programs
to take advantage of the printer’s features.
Chapter 7
— Download characters
This chapter explains the procedures to create your own characters.
Chapter 8 —
MS-DOS and your printer
SincethePS/2 orPC-AT family of computersrunning underMS-DOS iscurrently the most
popular configuration ofmicrocomputer, we have included a fewhints and tipsto help you
use your printer with such systems.
Since virtually allPCs are sold with a Microsoft BASIC interpreter, we have also included
some hints, and a sample program in this language to demonstrate the capabilities of the
printer.
Chapter 9 —
Troubleshooting and maintenance
Thissectiongivesachecklistofpointsto check ifyourprinterisnot working intheexpected
way. It also includes details of some routine maintenance operations you can carry out
yourself. It is not, however, a complete service manual. Call a qualified service engineer
if you are unsure of your ability to carry out any maintenance or servicing operations.
Chapter 10— Reference
This section gives some references of your printer, such as specifications of your printer,
the pinout of interface comecter, the character tables.
The character table charts give the different character sets available.
Chapter 1 INTRODUCTION
Featuresoftheprinter
Printercomponents
Requirements
Chapter 2
SETTING UP THE PRINTER
Unpackingandinspection
Settingup
Connectingthepowersupply
InstalltheInkCartridge
Connectingtheinterfacecable
Chapter 3
PAPER HANDLING
Selectionof paper
Adjustingtheprintinggap
Loadingpaper
Loadingthepaperfromthefrontslot
Loadingthepaperfromtheflatfeed slot
Removingpaperjams
Chapter 4 CONTROL PANEL OPERATIONS
Buttonsandindicators
ONLINEbutton
LINEFEEDbutton
FWDADJbutton
REVADJbutton
PITCHbution
Switchcombinationfunctions
Flatfeed
Formfeed
Topofform
Headclaeaning
Clearingthebuffer/Allreset
Power-upfunctions
Chargetheoptionalbatterypack
Shorttestmode
Longtestmode
Hexadecimaldump
Pitchlockmode
1
1
4
6
7
7
8
8
9
11
13
13
14
15
15
17
18
19
19
19
20
20
20
21
22
22
22
23
23
24
25
25
25
26
27
28
Chapter 5
DIP SWITCH SETTINGS
LocationoftheDIPswitches
FunctionsoftheDIPsettings
Chapter 6
PRINTER CONTROL COMMANDS
Fontcontrolcommands
Charactersetcommands
Charactersizeandpitchcommands
Verticalpositioncommands
Horizontalpositioncommands
Graphicscommands
Downloadcharactercommands
Otherprintercommands
Chapter 7
DOWNLOAD CHARACTERS
Definingyourown24-dotcharacters
Assigningthecharacterdata
Assigninga valueofcharacterspace
Sampleprogram
Definingyourown48-dotcharacters
Chapter 8
MS-DOS AND YOUR PRINTER
Installingapplicationsoftwarewithyourprinter
Embeddingprintercommands
ProgrammingtheprinterwithDOScommands
ProgrammingwithBASIC
Chapter 9
TROUBLESHOOTING AND MAINTENANCE
Troubleshooting
Powersupply
Printing
Paperfeeding
Maintenance
Chapter 10 REFERENCE
Specifications
Pinoutofinterfaceconnector
Charactersets
Standardcharacterset#2
Internationalcharactersets
IBMcharacterset#2
Characterset#l
IBMspecialcharacterset
29
29
30
33
34
39
42
49
53
57
61
64
67
67
68
69
69
72
75
75
76
77
79
87
87
88
88
90
92
93
93
96
97
98
100
101
108
109
INDEX
111
COMMAND SUMMARY
114
Thisprinter has afull complement of features, making it an excellent partner for a personal
computer. It supports the Epson/IBM printer commands and character sets, enabling it to
printjust about anything your computer can generate, both text and graphics.
FEATURES OF THE PRINTER
Some of main features are the following:
●
●
b
●
●
●
●
Ink jet printing system
Auto-capping system
Easy maintenance
2-way power supply
Versatile paper handling
Extensive software support
Easy operation
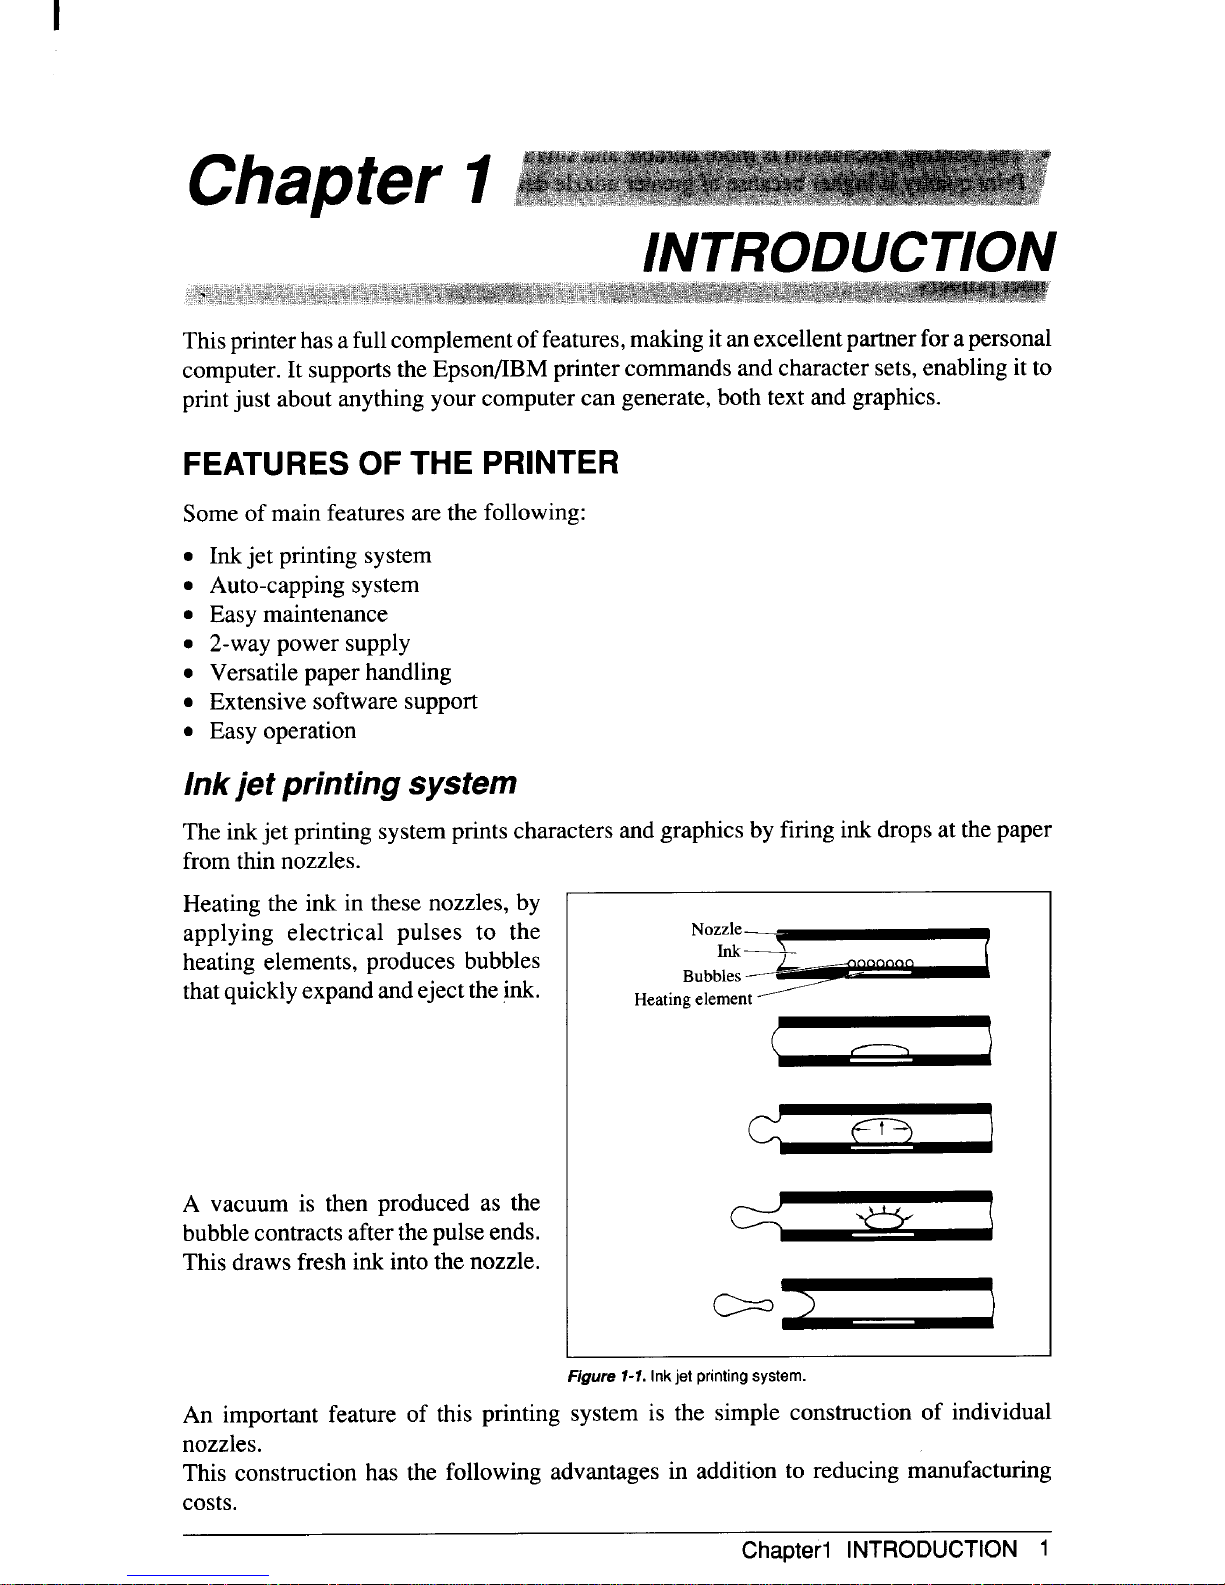
Inkjet printing system
The inkjet printing system prints characters and graphics by firing ink drops at the paper
from thin nozzles.
Heating the ink in these nozzles, by
applying electrical pulses to the
heating elements, produces bubbles
thatquickly expand and eject the jnk.
A vacuum is then produced as the
bubble contracts after the pulseends.
This draws fresh ink into the nozzle.
B
H e
~
[
F 1 p s
An important feature of this printing system is the simple construction of individual
nozzles.
This construction has the following advantages in addition to reducing manufacturing
costs.
Chapterl INTRODUCTION 1
. The printing mechanism is more durable and smaller.
. Print quality is higher because of greater nozzle density.
● Quiet, non-impact operation.
This means that the inkjet printer can be used for a much wider range of applications than
other printers.
Auto-capping system
This printer moves the carriage to the home position and automatically caps the print head
whenever theprinter isturned on and off, or more than 5 secondshave passed sincethe last
data was received.
This auto-capping system prevents the head from drying out or becoming clogged with
dust, and ink dropping or evaporation.
Italsohelpsto reduce inkspillagein theeventthe printerisheld forany reason inother than
the horizontal position or is shipped.
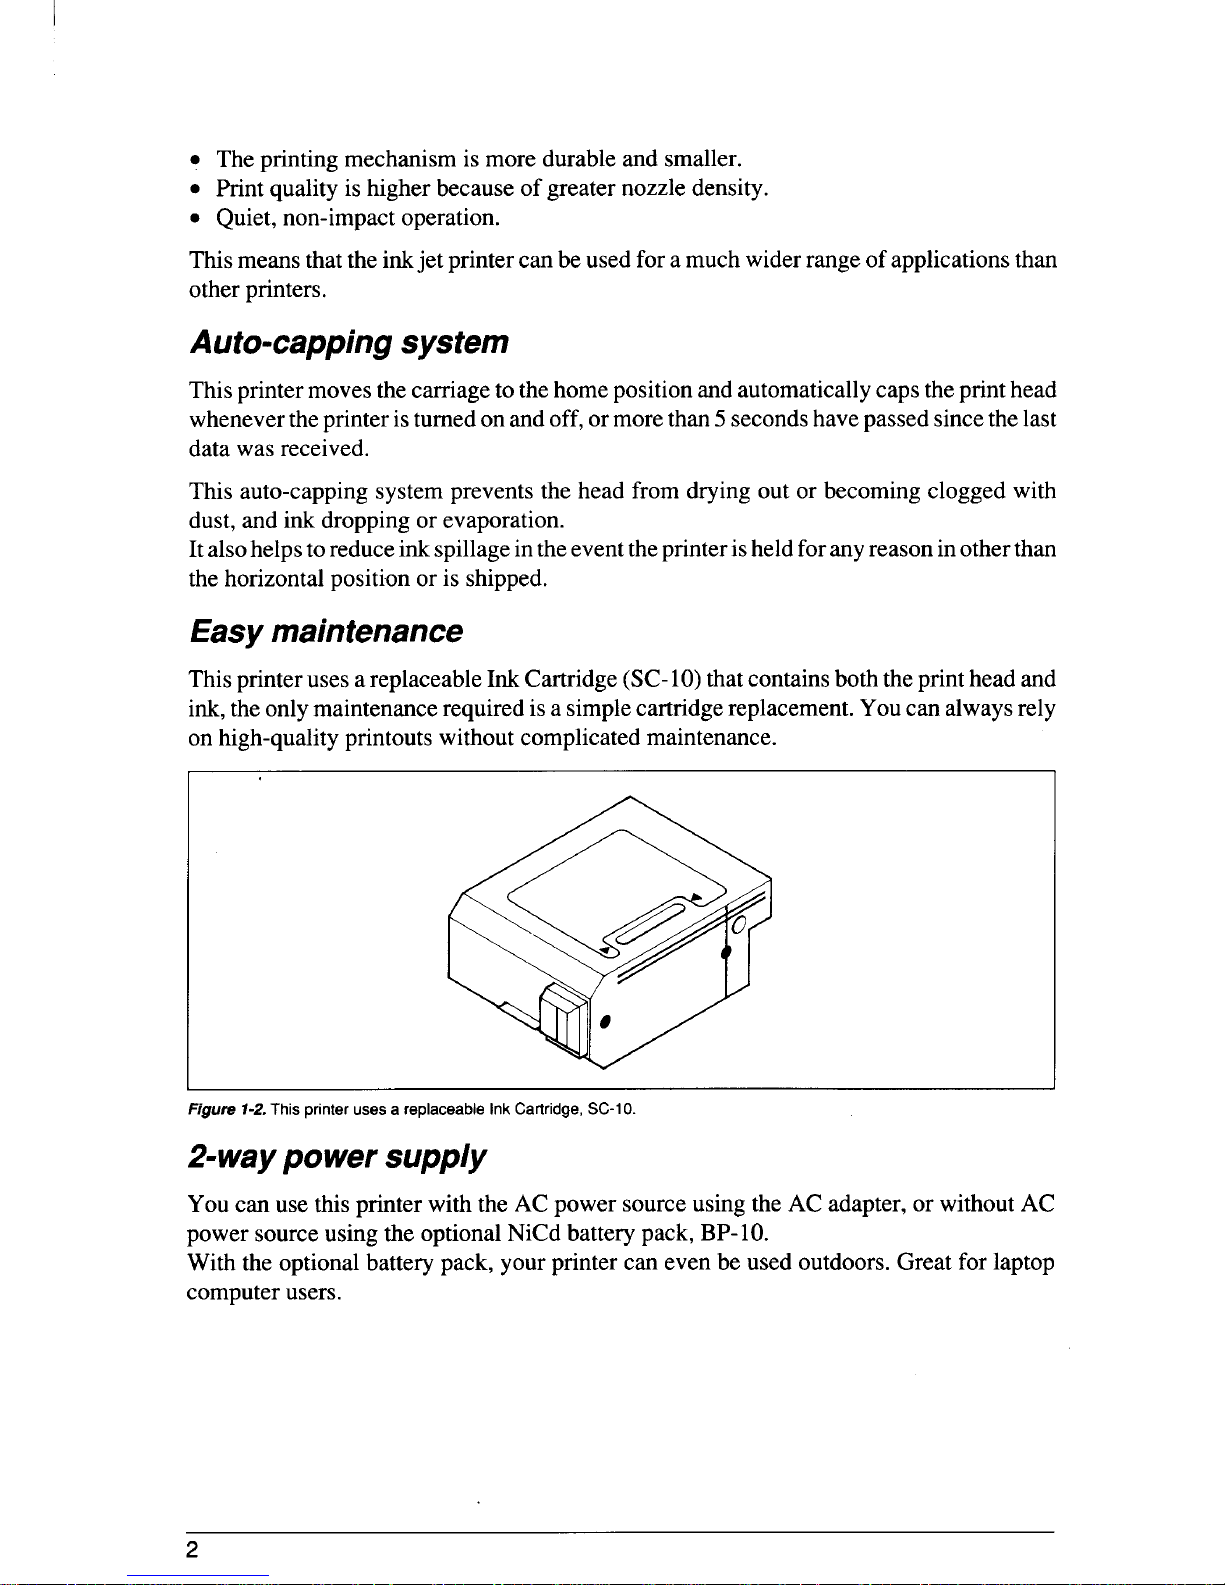
Easy maintenance
This printer uses a replaceable Ink Cartridge (SC-10) that contains both the print head and
ink,the only maintenance required is a simplecartridge replacement. You can always rely
on high-quality printouts without complicated maintenance.
f 1 T p u a r C S
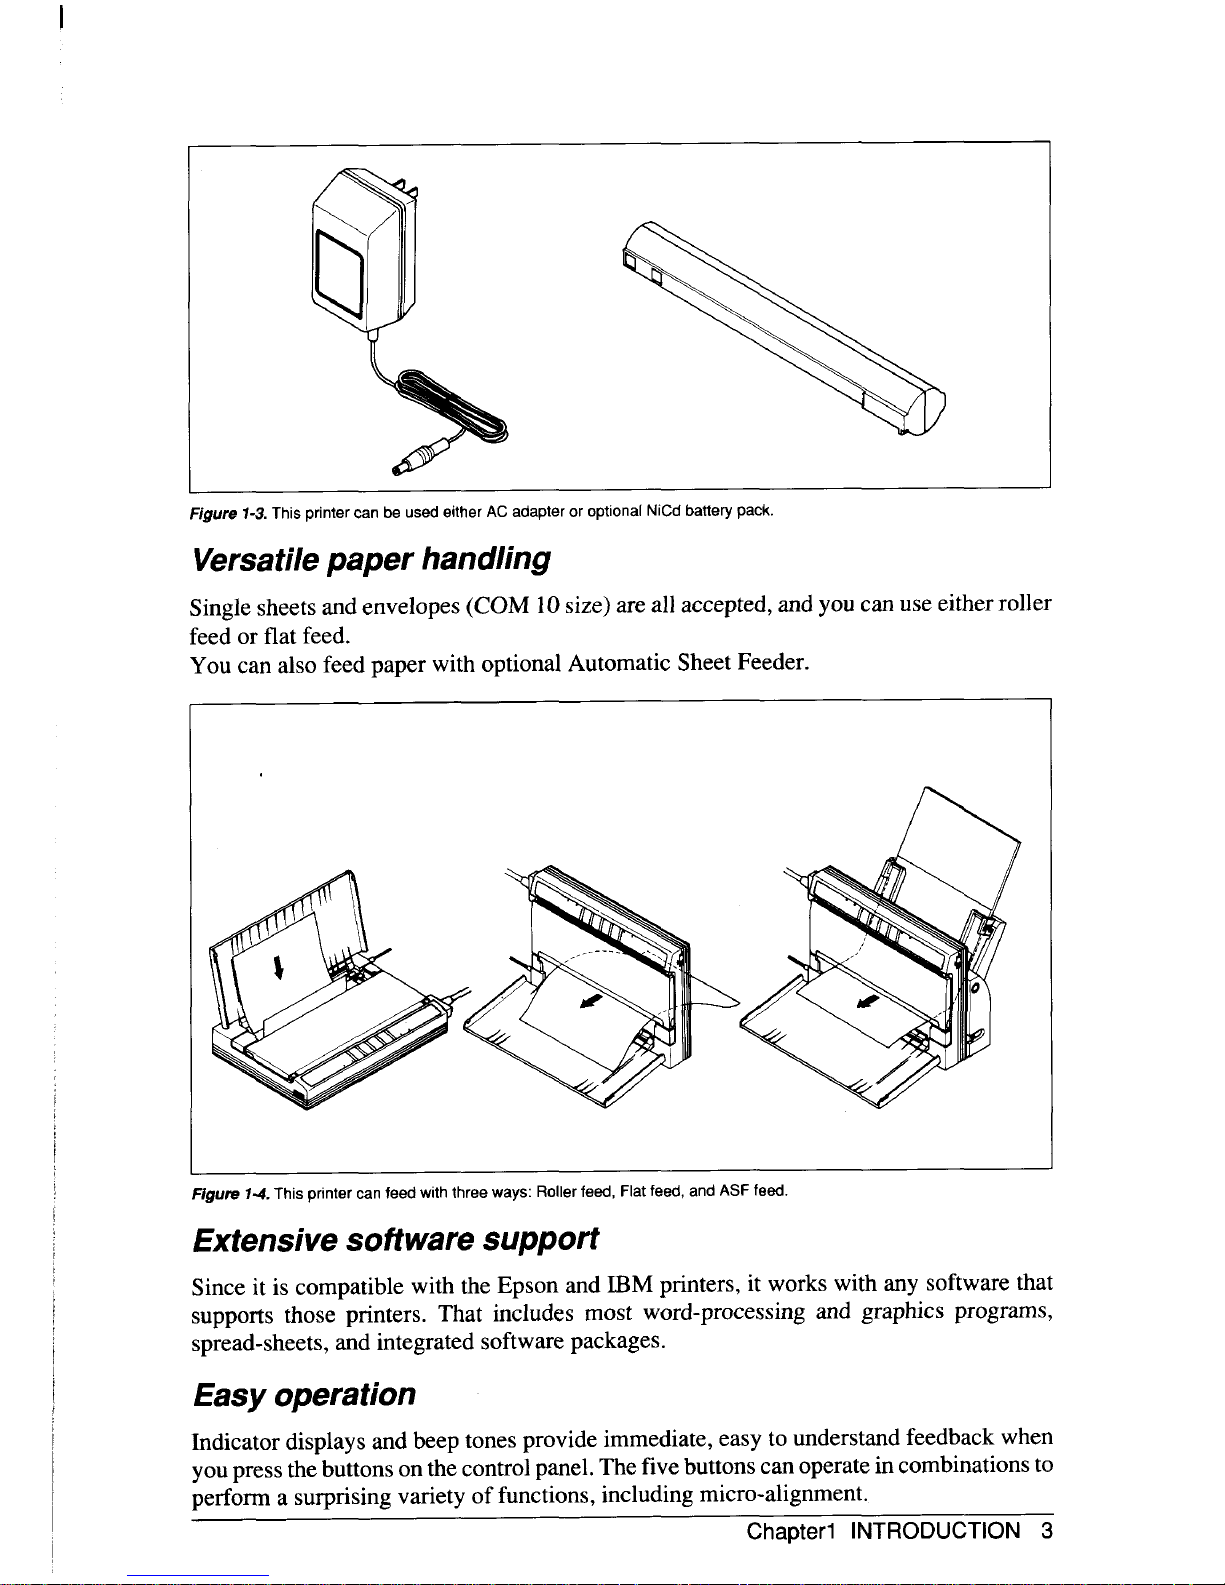
Z-way power supply
You can use this printer with the AC power source using the AC adapter, or without AC
power source using the optional NiCd battery pack, BP-10.
With the optional battery pack, your printer can even be used outdoors. Great for laptop
computer users.
2
F 1 T p u e a o N b p
Versatilepaper handling
Single sheets and envelopes (COM 10 size) are all accepted, and you can use either roller
feed or flat feed.
You can also feed paper with optional Automatic Sheet Feeder.
F 7 T p f w t w R f F f f
Extensive software support
Since it is compatible with the Epson and IBM printers, it works with any software that
supports those printers. That includes most word-processing and graphics programs,
spread-sheets, and integrated software packages.
Easy operation
Indicator displays and beep tones provide immediate, easy to understand feedback when
you press thebuttons on the control panel. The five buttons can operate in combinations to
perform a surprising variety of functions, including micro-alignment.
Chapterl INTRODUCTION 3
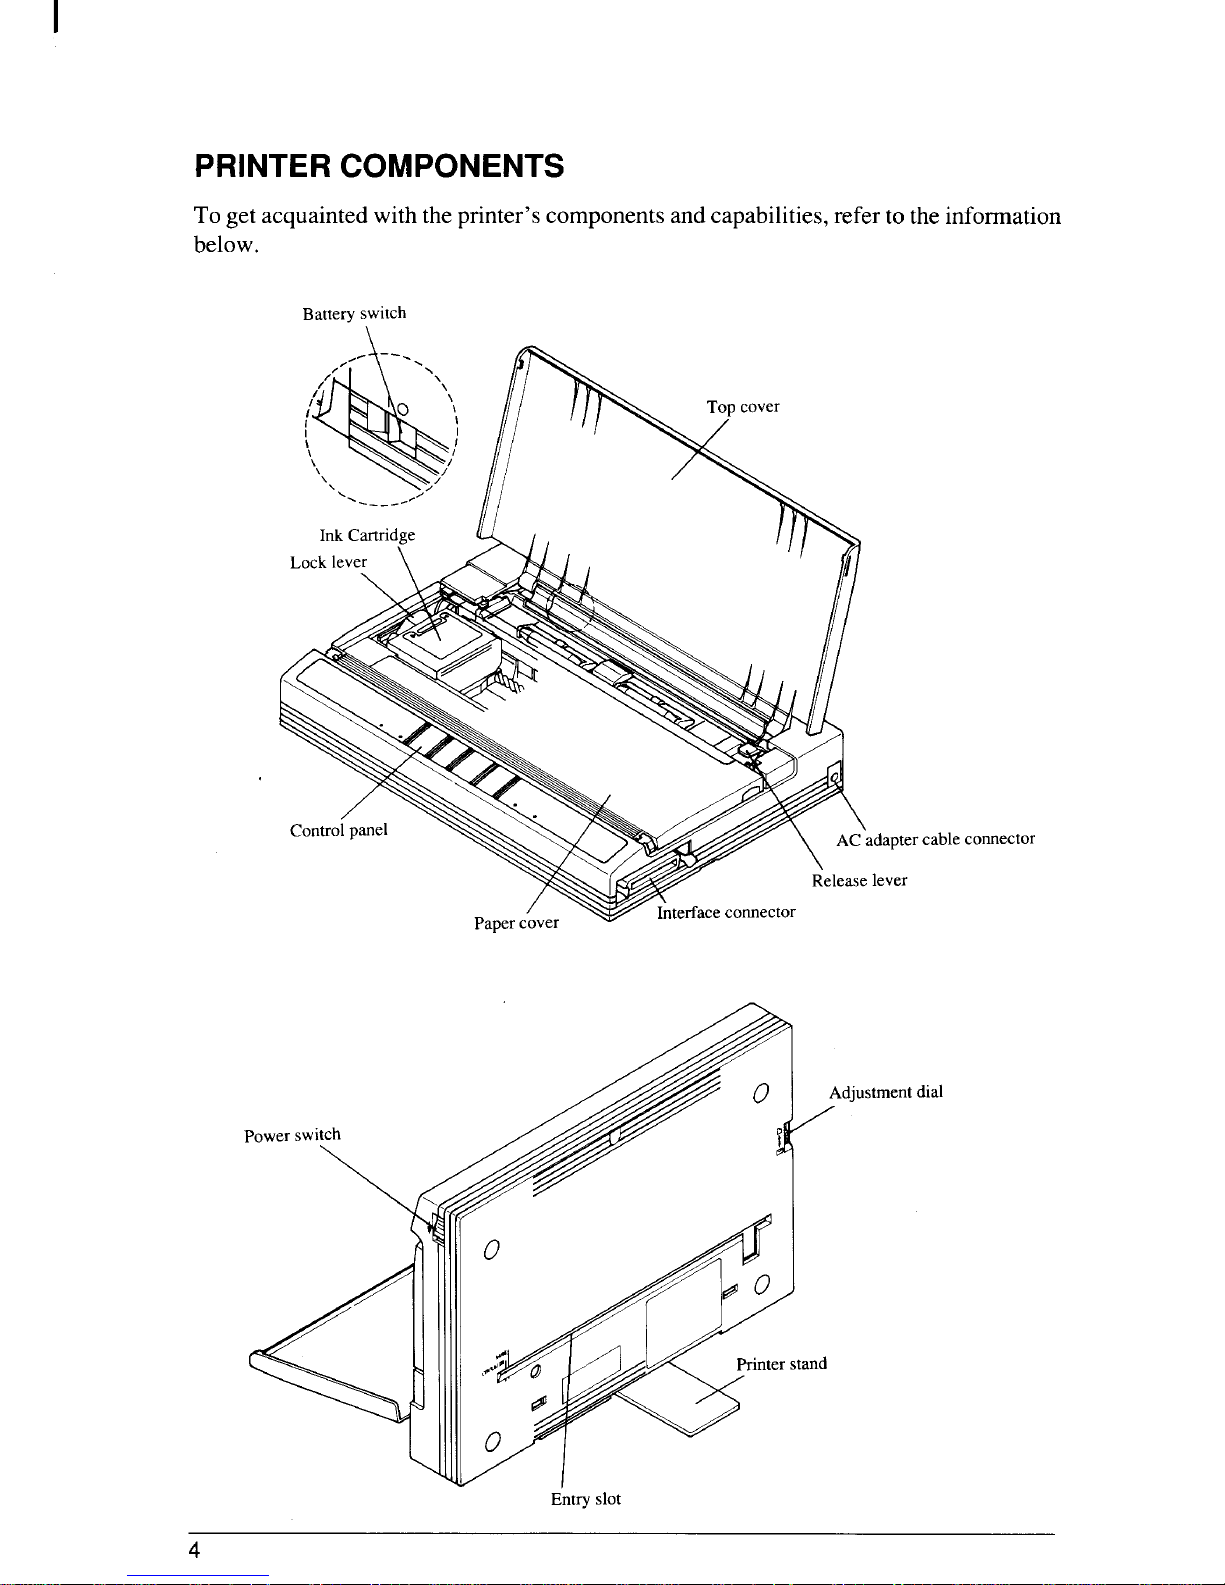
PRINTER COMPONENTS
To get acquainted with the printer’s components and capabilities, refer to the information
below.
B s
rc c
d d
E s
4
Top cover Aligns single sheets (cut forms) to help the printer detect when
paper is inserted.
This cover is used as a paper tray when using the flat feed or
optional Automatic Sheet Feeder.
Interface connector
Connects the computer to the printer.
Adjustment dial
Controls print darkness by adjusting for the thickness of forms
being printed.
AC adapter cable connector
Connects the plug of the AC adapter. Do not remove the plug
when the printer is turned on.
Print head cap
Caps the print head of Ink Cartridge to prevent ink from drying
out.
Ink Cartridge
A disposable cartridge including ink and print head.
Lock lever Locks or releases the Ink Cartridge.
Paper cover ProtectstheInk Cartridge andother internalcomponents ofyour
printer.
Control panel Indicates printer status and makes various control of printer
functions simple and convenient.
DIP switch
Sets the default printer conditions.
Release lever Releases pressure on the paper. This lever must be down to feed
paper, and upward to release paper.
Battery component cover
The optional battery pack is located under this cover.
Entry slot For inserting single sheets of paper with flat feeding.
Power switch
Switches power on or off.
Printer stand Adjustable to raise the printer.
Battery switch
Set the switch to ON position only when charging the optional
battery pack or working the printer with it.
Chapterl INTRODUCTION 5
REQUIREMENTS
Before you start unpacking and setting up your printer, make sure that the following
requirements are satisfied.
Location of the printer
Make sure that you have a suitable place on which to locate the printer. By “a suitable
place”, we mean:
. A firm, level surface which is fairly vibration-free
. Away from excessive heat (such as direct sunlight, heaters, etc)
. Away from excessive humidity or dust
. Use the printer where there is sufficientroom for the paper and any paper being fed in
or printed out.
. Make sure that the interface cable is within 2m (6ft) of the printer.
● Do not place objects on top of the printer.
Requirements of the power supply
. Supplyit with “clean” electricity. Do notconnect it to the same circuit as a large, noise-
prod’ucingappliance such as a refrigerator.
● Make sure the line voltage is the voltage specified on the AC adapter’s identification
plate.
. Do not unplug the AC adapter cable to turn printer off. The print head will be damaged
because itcannot be capped correctly. If theAC adapter cable isunplugged by mistake,
plug it in again and switch the printer on and off to cap correctly.
Requirements of the Ink Cartridge
. Do not remove the Ink Cartridge from the printer unless it has to be replaced.
. Do not touch the print head of the Ink Cartridge. The print head is a special precision
component.
● Do not subject the Ink Cartridge to physical shock or vibration. Ink may be spilled on
your hands or clothes.
● Do not attempt to refill the Ink Cartridges. A clear printout camot be obtained.
. Do not disassemble the Ink Cartridge. Ink may be spilled on your hands or clothes.
. Do not place the head of the Ink Cartridge face down.
6
S T P
This chapter describes the following procedures to setup your new printer.
Before you start unpacking and setting up your printer, make sure that the requirements
described in Chapter 1 are satisfied.
. Unpacking the carton box
● Connecting the power supply
. Installing the Ink Cartridge
. Comecting the printer to your computer
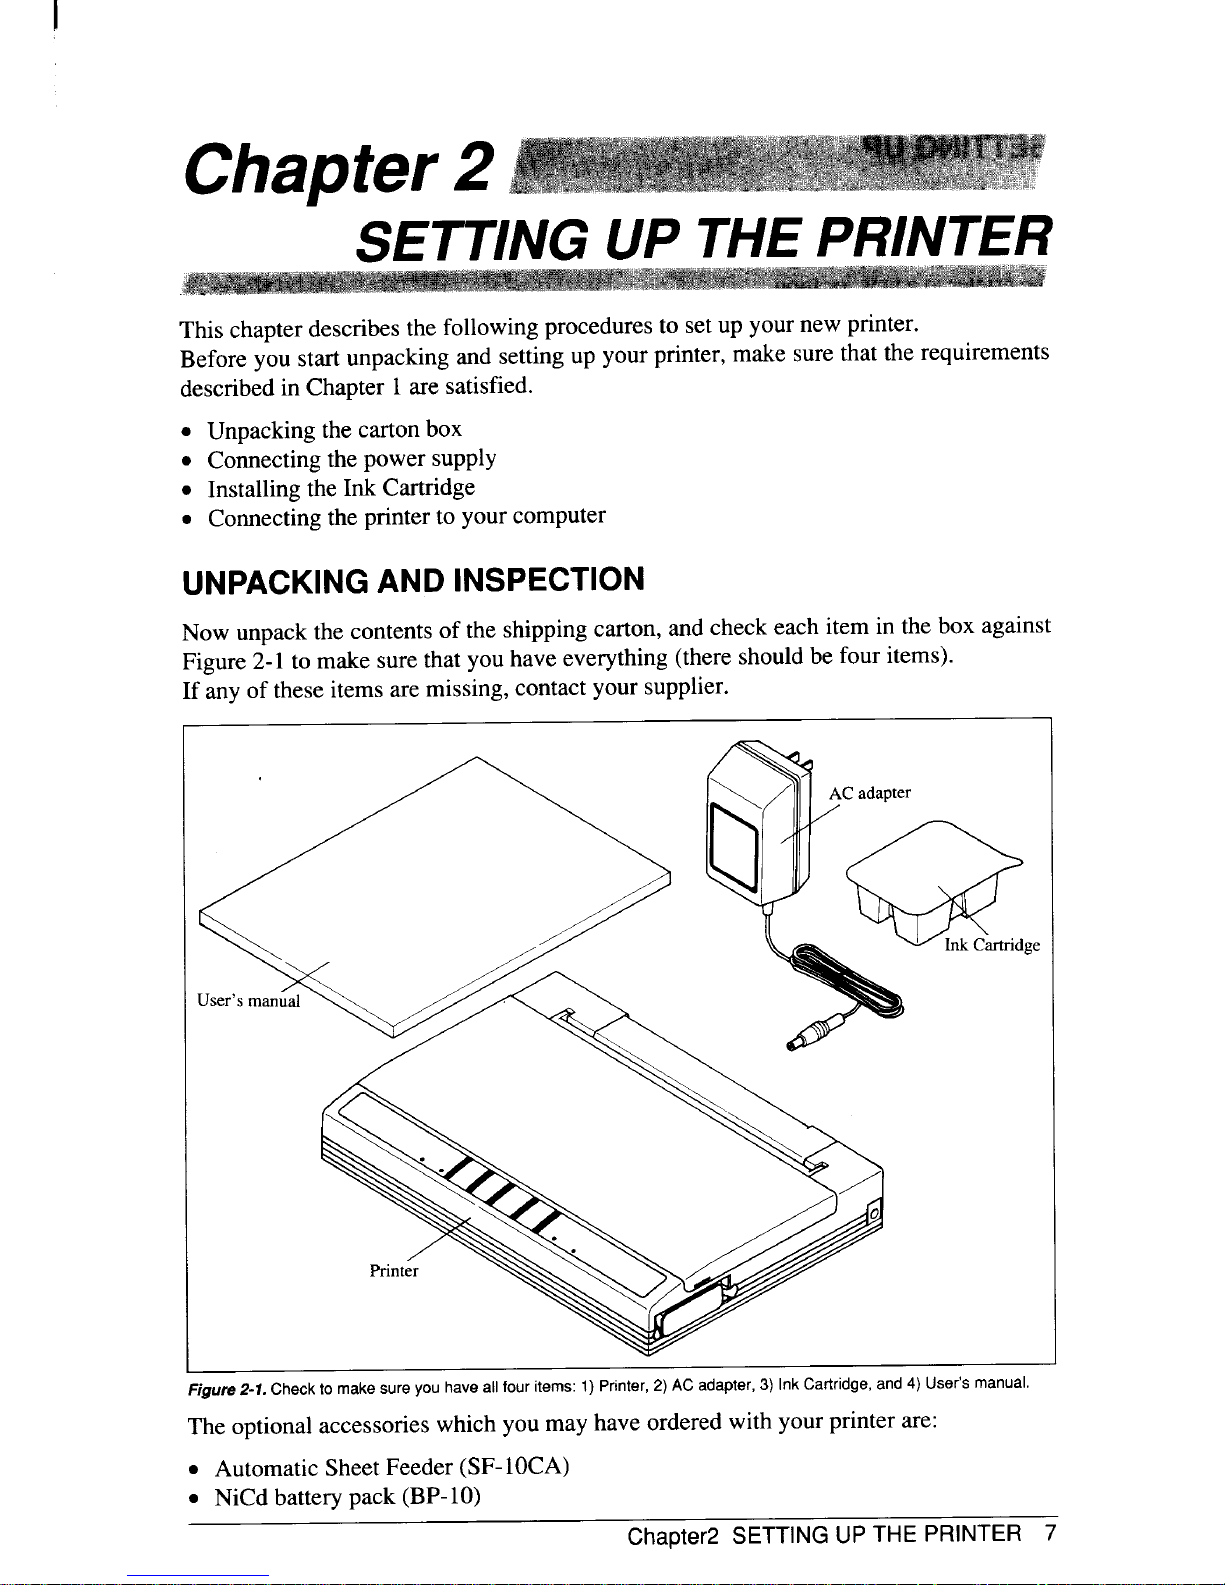
UNPACKINGAND INSPECTION
Now unpack the contents of the shipping carton, and check each item in the box against
Figure 2-1 to make sure that you have everything (there should be four items).
If any of these items are missing, contact your supplier.
>
/
F 2 C m s h f i P a C U m
The optional accessories which you may have ordered with your printer are:
● Automatic Sheet Feeder (SF-1OCA)
● NiCd battery pack (BP-1O)
Chapter2 SETTING UP THE PRINTER 7
SEITING UP
Place theprinter in the desired location, and remove all packing material from the printer.
Thispacking material isintendedto preventdamage to theprinter whilein transit. You will
wanttokeep allthepackingmaterial, alongwith theprintercarton, incaseyouhaveto move
the printer to a new location.
Connecting the power supply
You can use either the AC adapter or the optional NiCd battery pack to supply the power
to the printer.
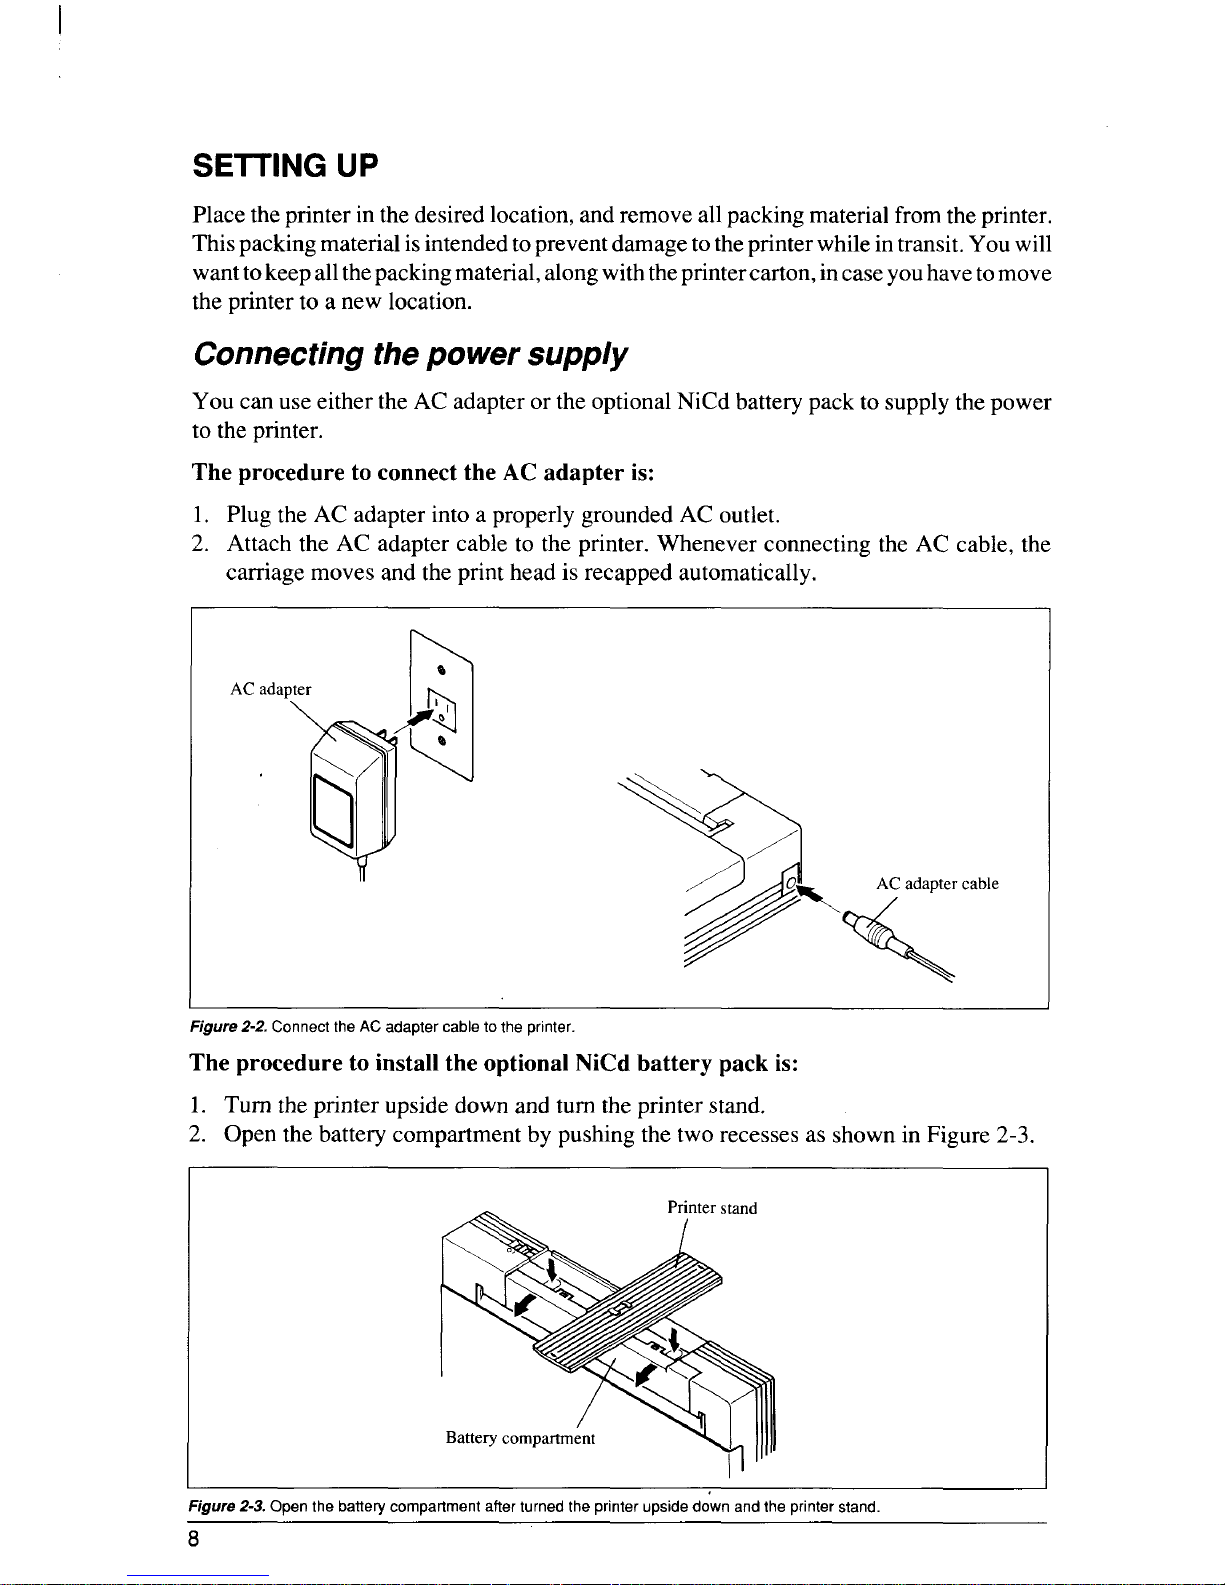
The procedure to connect the AC adapter is:
1. Plug the AC adapter into a properly grounded AC outlet.
2. Attach the AC adapter cable to the printer. Whenever connecting the AC cable, the
carriage moves and the print head is-recapped automatically. -
a
3
\
, A
\
F 2 C a c p
The procedure to install the optional NiCd battery pack is:
1. Turn the printer upside down and turn the printer stand.
2. Open the battery compartment by pushing the two recesses as shown in Figure 2-3.
F 2 O b c a t p u d p s
8

3. Insert the battery pack into the battery compartment with the terminal end first.
f
B
I
F I b p i p w t f
4. Replace the battery compartment cover, and return the stand to its original position.
5. Tu&on the batte~-switch Iocatedbehind theprinter. Wheneveryou turn on the battery
switch, the carriage moves and the print head is recapped automatically.
Install the Ink Cartridge
Your printer uses a replaceable Ink Cartridge contains both the print head and ink.
The procedure to install the Ink Cartridge is:
1. Open the top cover and the paper cover.
2. Lift the lock lever on the carriage.
covel
F Z O c p c t IIrt I l c
3. Open the package of the Ink Cartridge.
4. Push the right side of the head cap carefully as shown in Figure 2-6. It will pop off.
5. Remove the protection tape.
Chapter2 SETTING UP THE PRINTER 9
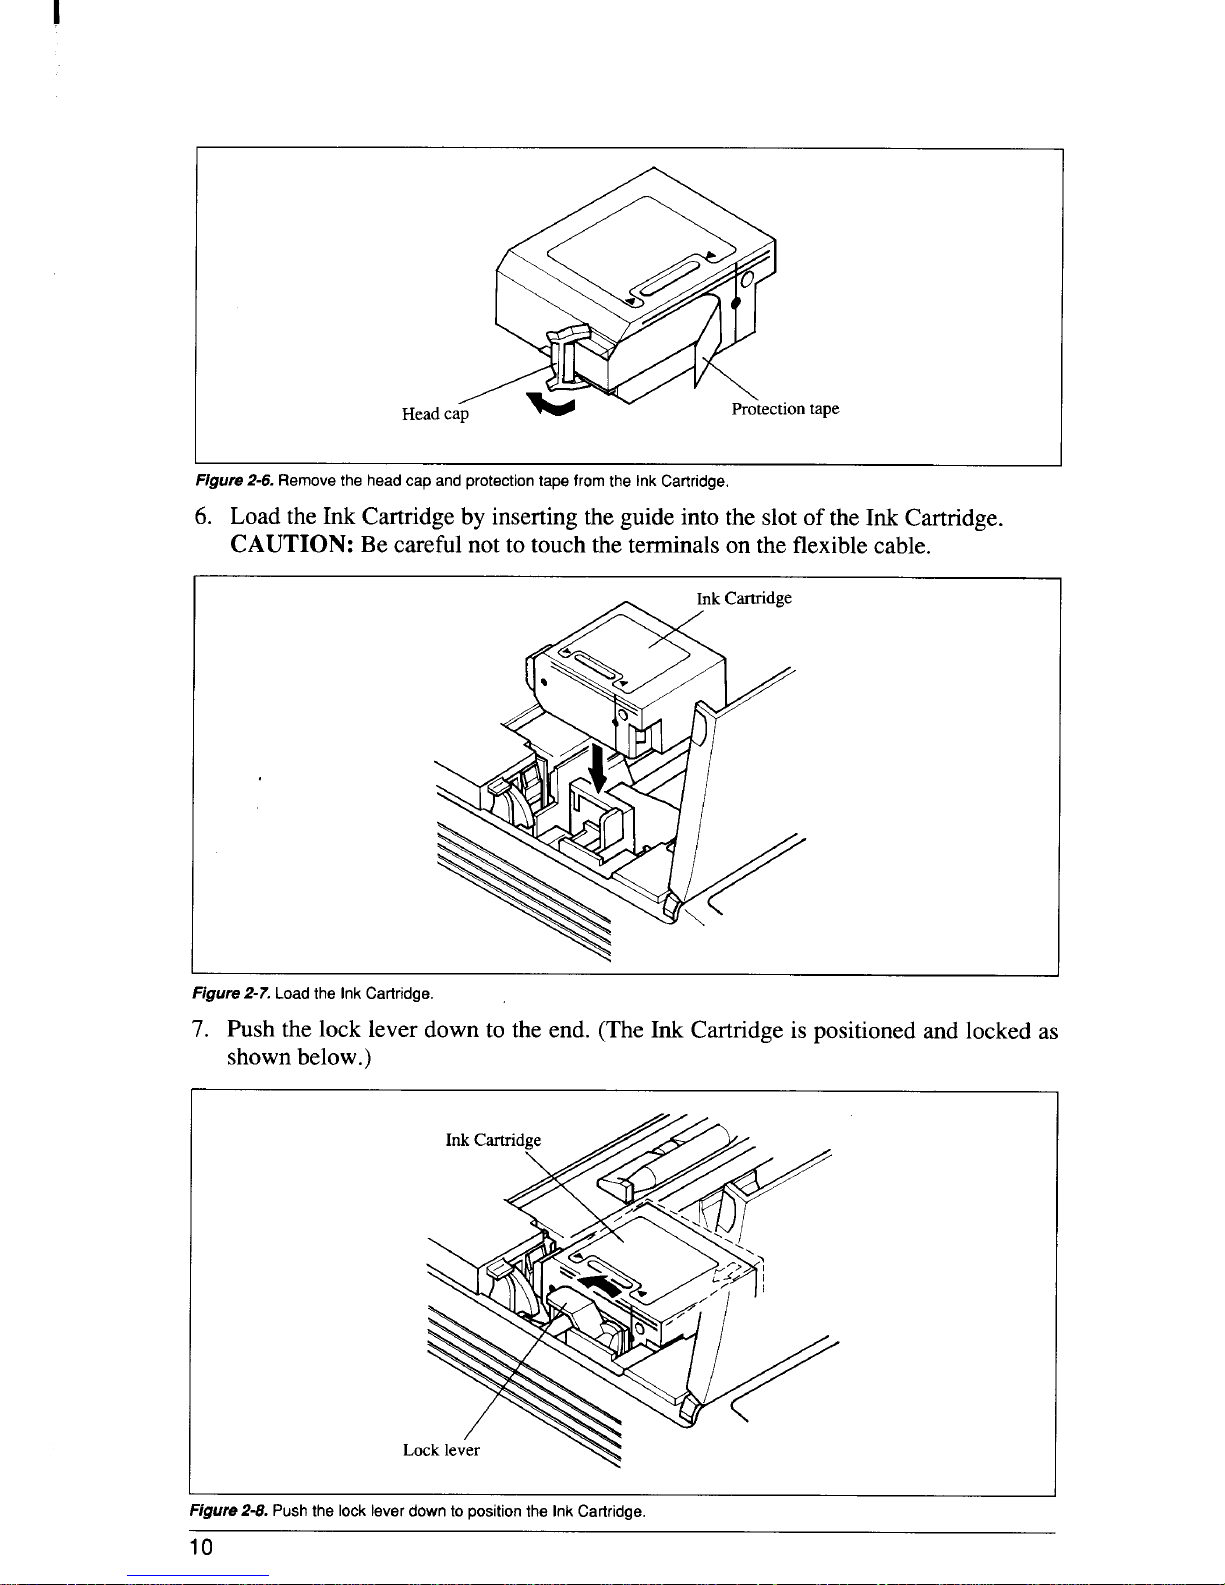
H c
t t
F 2 R h p t f C
6. Load the Ink Cartridge by inserting the guide into the slot of the Ink Cartridge.
CAUTION: Be careful not to touch the terminals on the flexible cable.
F 2 L C
7. Push the lock lever down to the end. (The Ink Cartridge is positioned and locked as
shown below.)
-,.. - - . -
F z r IOCKl a p u
8.9.Close both the paper cover and the top cover.
Turn on the Power switch while holding down the [
REVADJ ]and ~
buttons.
This will execute the head cleaning to fill up the ink into the print nozzles.
Connecting the interface cable
Connect the printer to your computer using a standard Centronics parallel interface cable.
On a PS/2 or PC/AT-type computer, this means that you use the 25-pin D-type connector
at the computer end, and the Amphenol-type 36-pin connector at the printer end. The
configuration of the printer’s connector isgiven in Chapter 10should you need a cable for
connecting to another computer.
Follow the procedures below to connect the interface cable:
1. Turn off the power switch both the printer and the computer.
2. Remove the connector cap from the interface connector.
3. Connect the interface cable to the printer as shown in Figure 2-9.
Make sure that you press the plug fully into the interface connector.
I c
/
/
w
“/
v
R
I c
F 2 C i c
4. Move bothclipsinsidetheextendedprongs onthesides ofthepluguntil youhearaclick.
F 2 M c u h a c
5. Connect the other end of the interface cable to your computer. Use your computer
instructions to attach the interface cable.
NOTE: Because you need your computer when you start printing, ensure that it is
completely installed.
Chapter2 SETTING UP THE PRINTER 11

12
.,.,,.,,,,.,,,.%,,.,,,!=,:,:,,,,.,,., ,= :,,, ,,,
. ,.
,.....:.,,,=,:,,m& f
,
.=,:&<!:,,9.,&:*g&:g&:- --- ~~•
,:.~,,
f : ~,,j:,,i.’.+,, r
,.,#3,,:$,,::,. @ ,
*.,q/,::l)g:J~l:%l~;#WJ*j,m
,.
,,.
,.:.,-
This chapter describes instructions for printing such as selecting paper types, adjusting the
printing gap, installing paper and removing jammed paper.
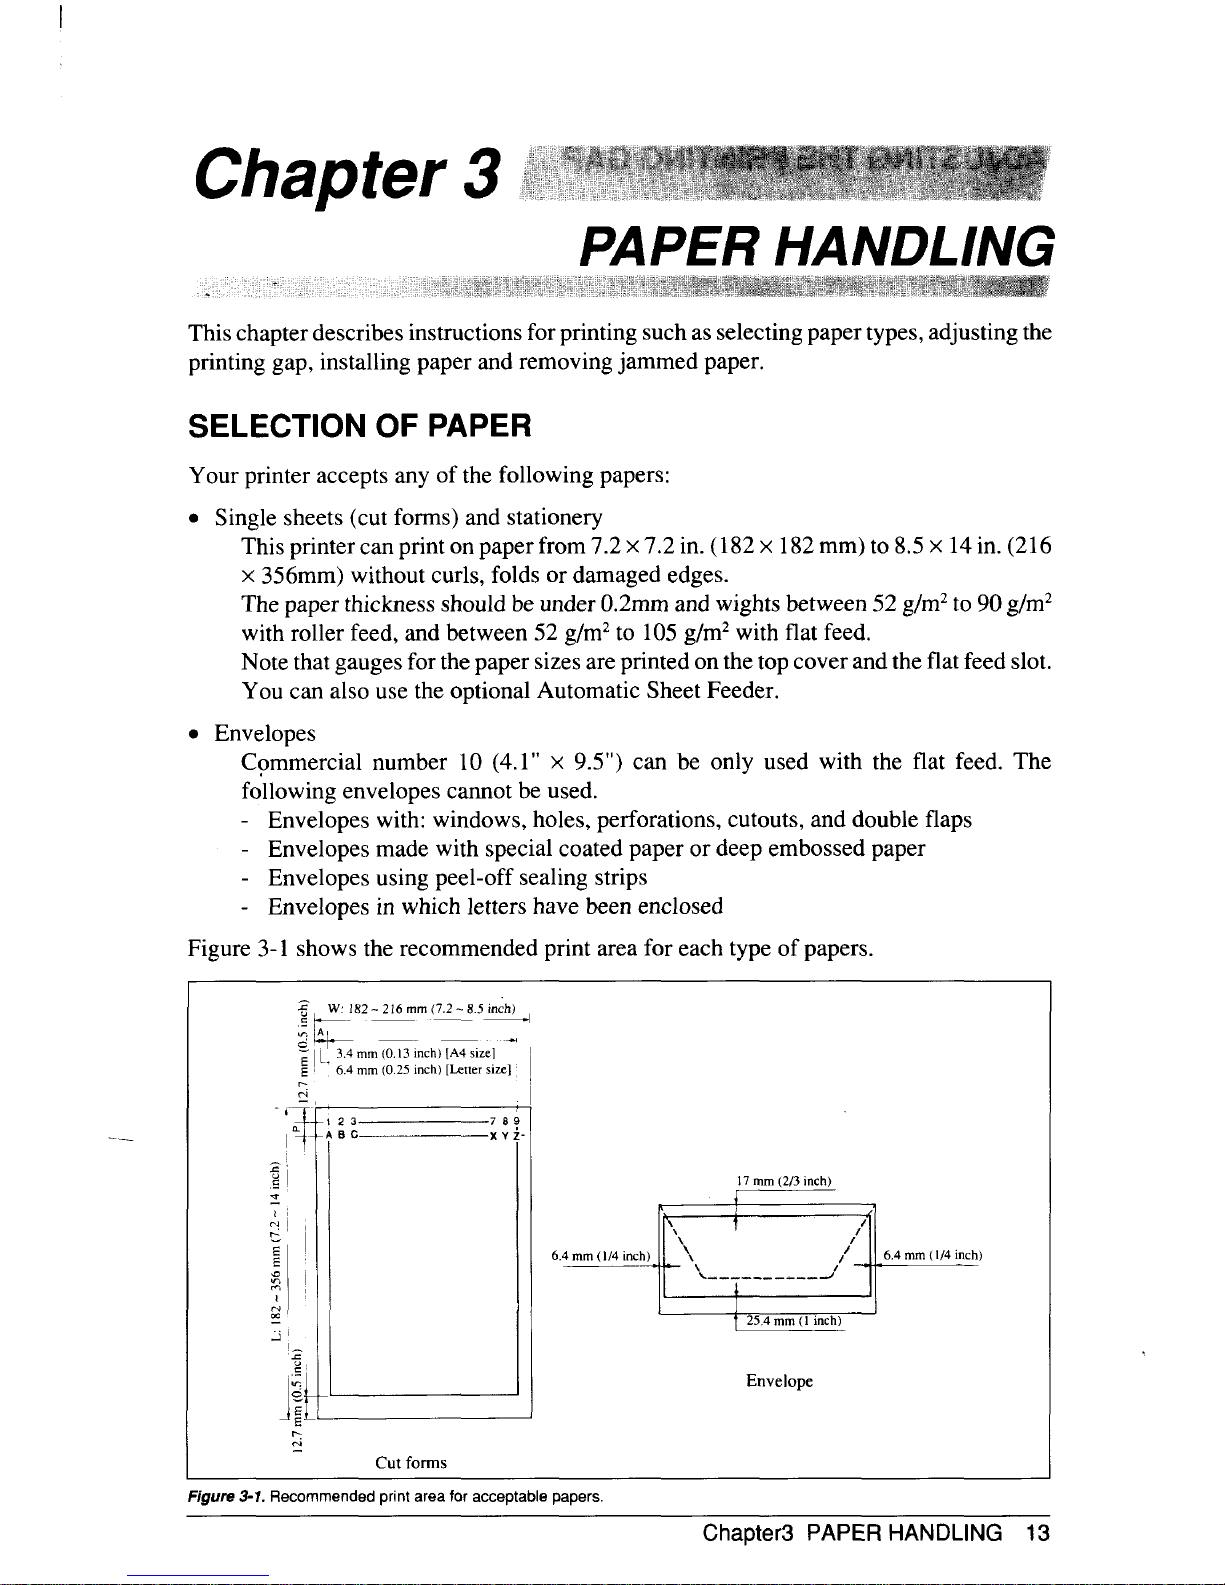
SELECTION OF PAPER
Your printer accepts any of the following papers:
. Single sheets (cut forms) and stationery
This printer can print on paper from 7.2x 7.2 in. (182x 182mm) to 8.5
x 14in. (216
x 356mm) without curls, folds or damaged edges.
The paper thickness should be under 0.2mm and wights between 52 g/m2to 90 g/m2
with roller feed, and between 52 g/m2to 105g/m2with flat feed.
Note that gauges for the paper sizes are printed on the top cover and the flat feed slot.
You can also use the optional Automatic Sheet Feeder.
. Envelopes
Commercial number 10 (4.1”
x 9.5”) can be only used with the flat feed. The
following envelopes camot be used.
Envelopes with: windows, holes, perforations, cutouts, and double flaps
Envelopes made with special coated paper or deep embossed paper
- Envelopes using peel-off sealing strips
- Envelopes in which letters have been enclosed
Figure 3-1 shows the recommended print area for each type of papers.
W: 182-216 mm(7.2 -8.5 inch)
: >-
.— —
~I (013Inch)
6.4 mm(0.25 inch)[letter size]
.
5 — —
17mm(2/3 inch)
1
4
I
cutf
I
‘4mm(4in
I
1
I
1
25,4mm(l inch)
I
E
F 3 R p a a p
Chapter3 PAPER HANDLING 13
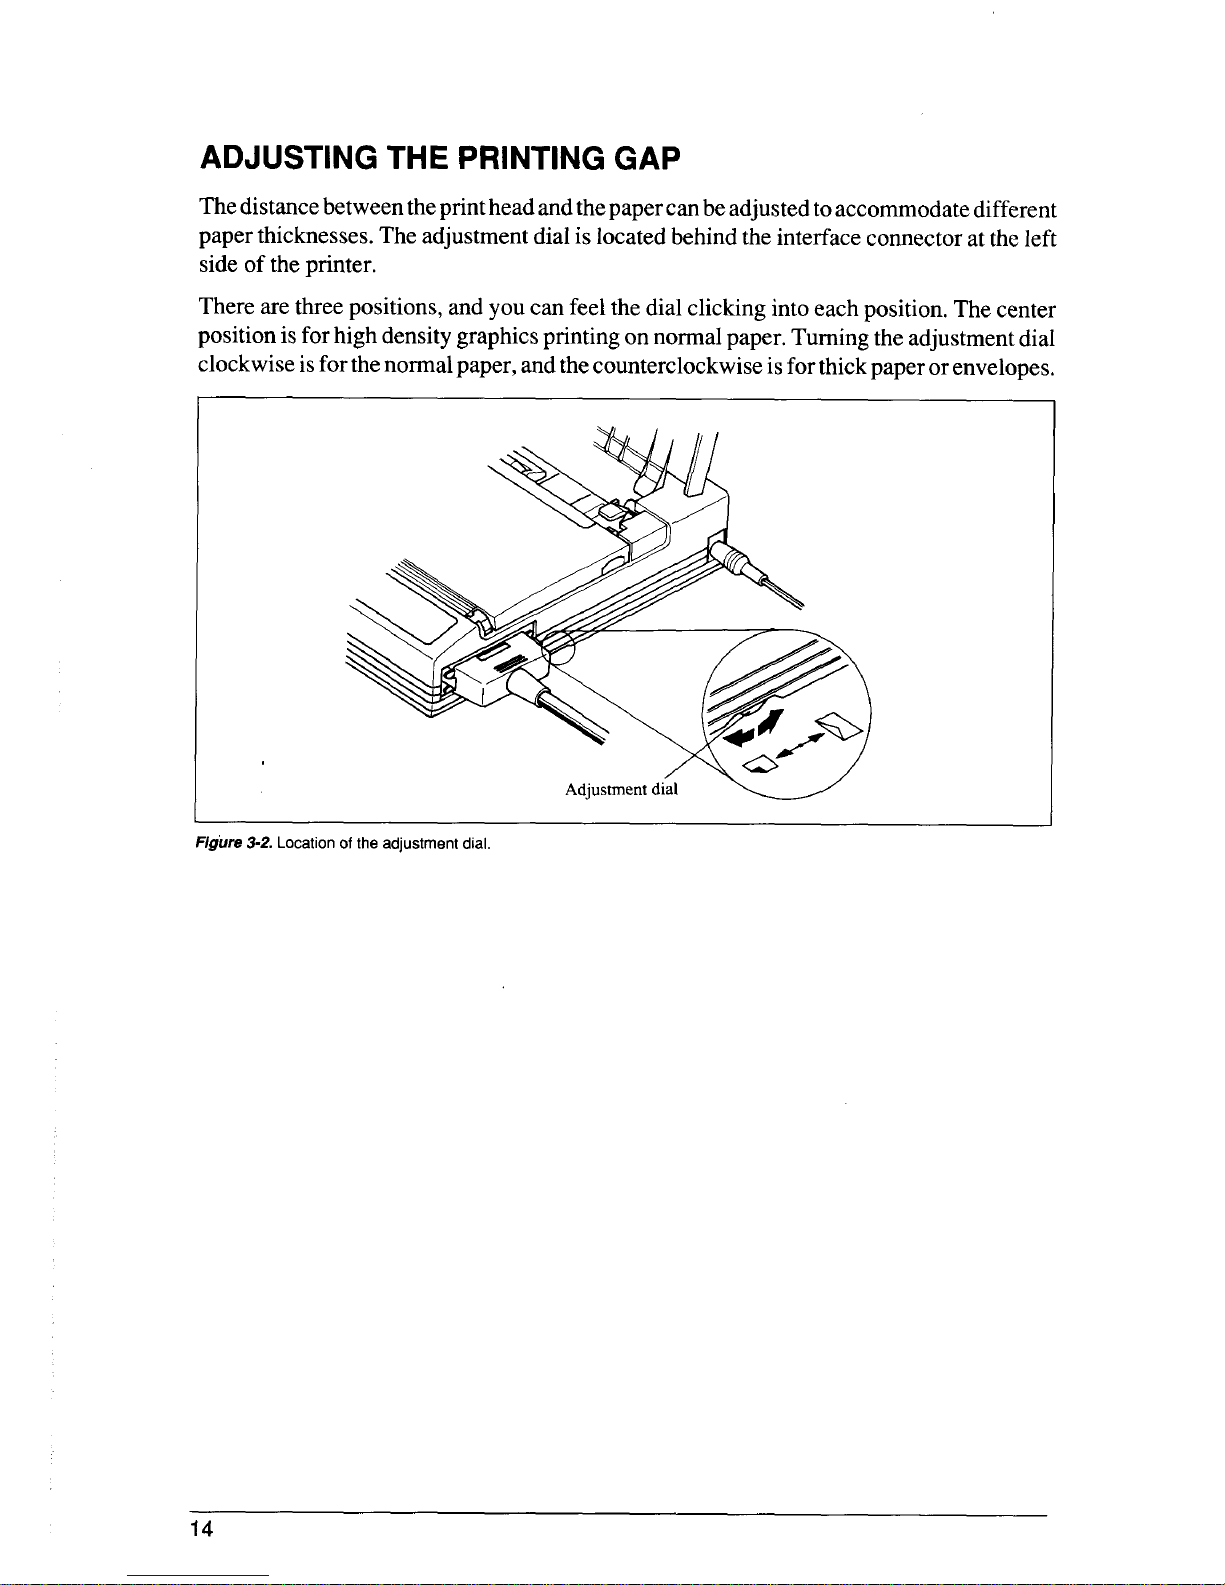
ADJUSTING THE PRINTING GAP
Thedistancebetween theprintheadandthepapercanbe adjustedtoaccommodate different
paper thicknesses.The adjustment dial is located behind the interface connector at the left
side of the printer.
There are three positions, and you can feel the dial clicking into each position. The center
positionis forhigh density graphicsprinting on normal paper. Turning the adjustmentdial
clockwiseisfor thenormalpaper, andthecounterclockwise isforthickpaperor envelopes.
F 3 L a d
14
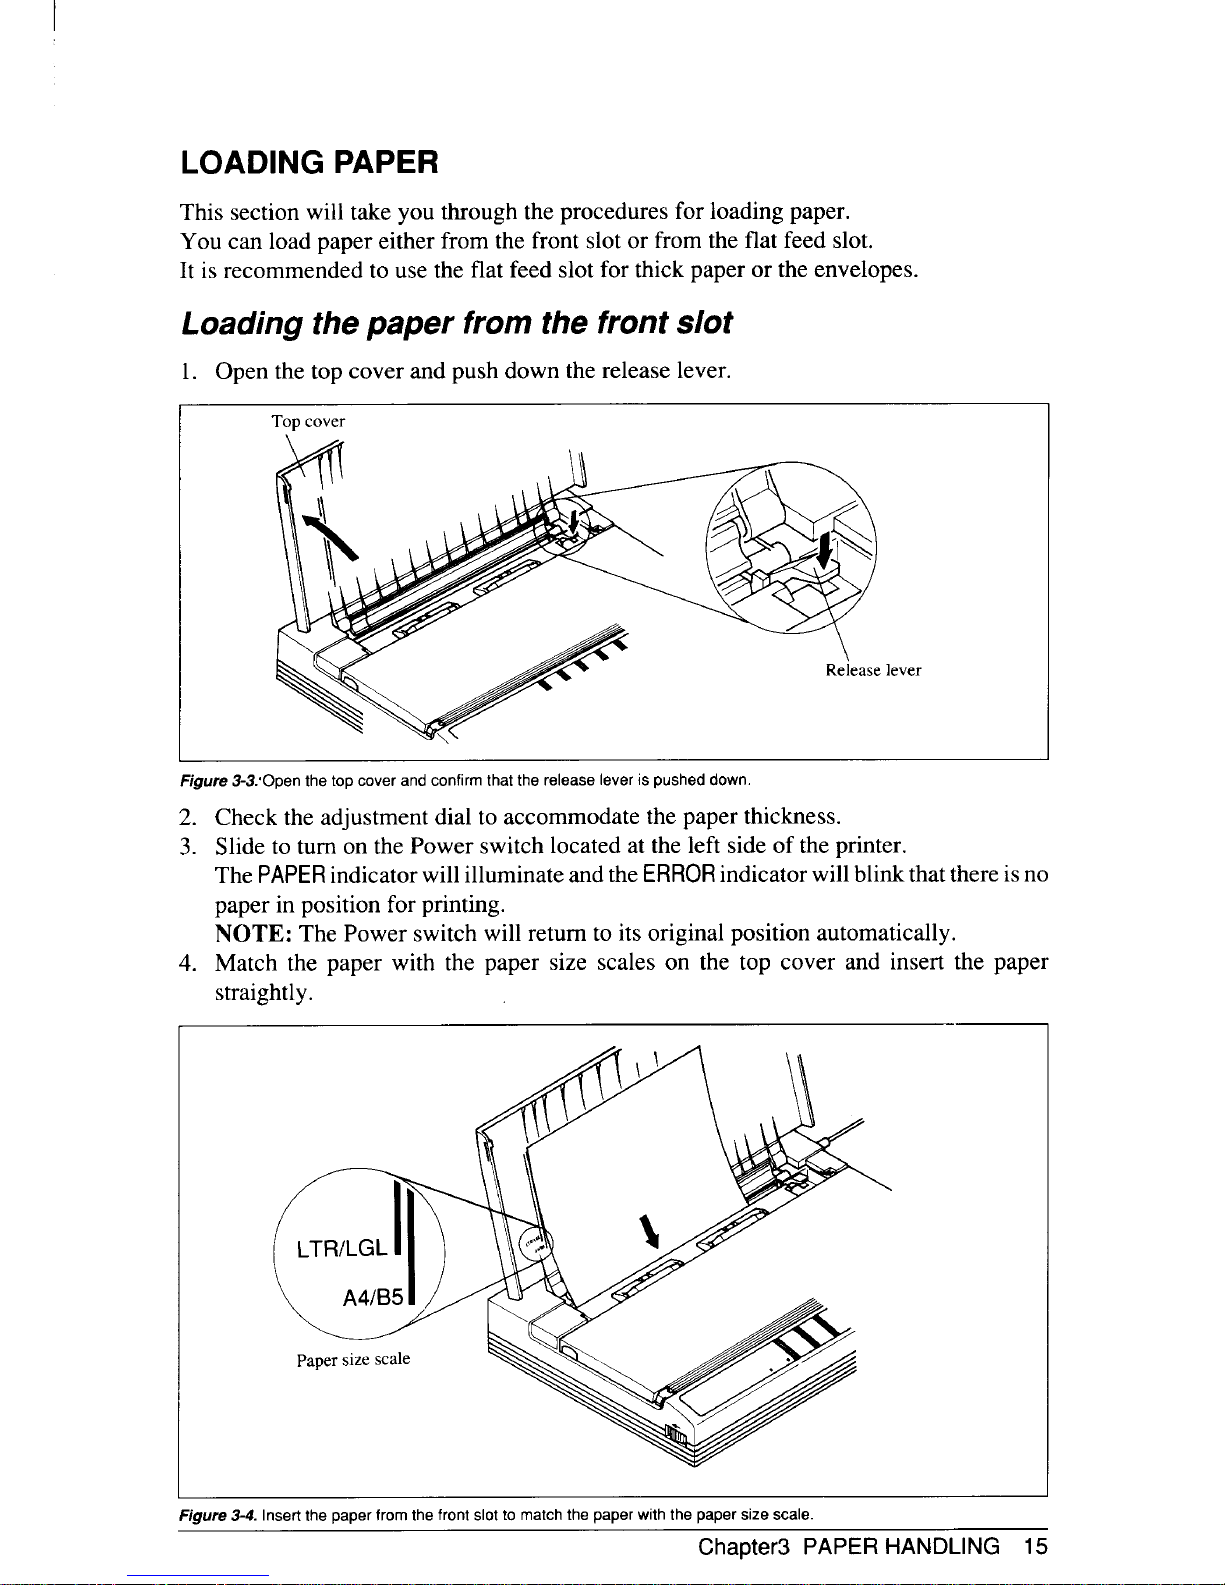
LOADING PAPER
This section will take you through the procedures for loading paper.
You can load paper either from the front slot or from the flat feed slot.
It is recommended to use the flat feed slot for thick paper or the envelopes.
Loading the paper from the front slot
1. Open the top cover and push down the release lever.
c
F 3 c c t r l p d
2. Check the adjustment dial to accommodate the paper thickness.
3. Slide to turn on the Power switch located at the left side of the printer.
The
PAPERindicator willilluminate and the indicator will blinkthat there isno
paper in position for printing.
NOTE: The Power switch will return to its original position automatically.
4. Match the paper with the paper size scales on the top cover and insert the paper
straightly.
F 3 I p f f s m p w p s s
Chapter3 PAPER HANDLING 15
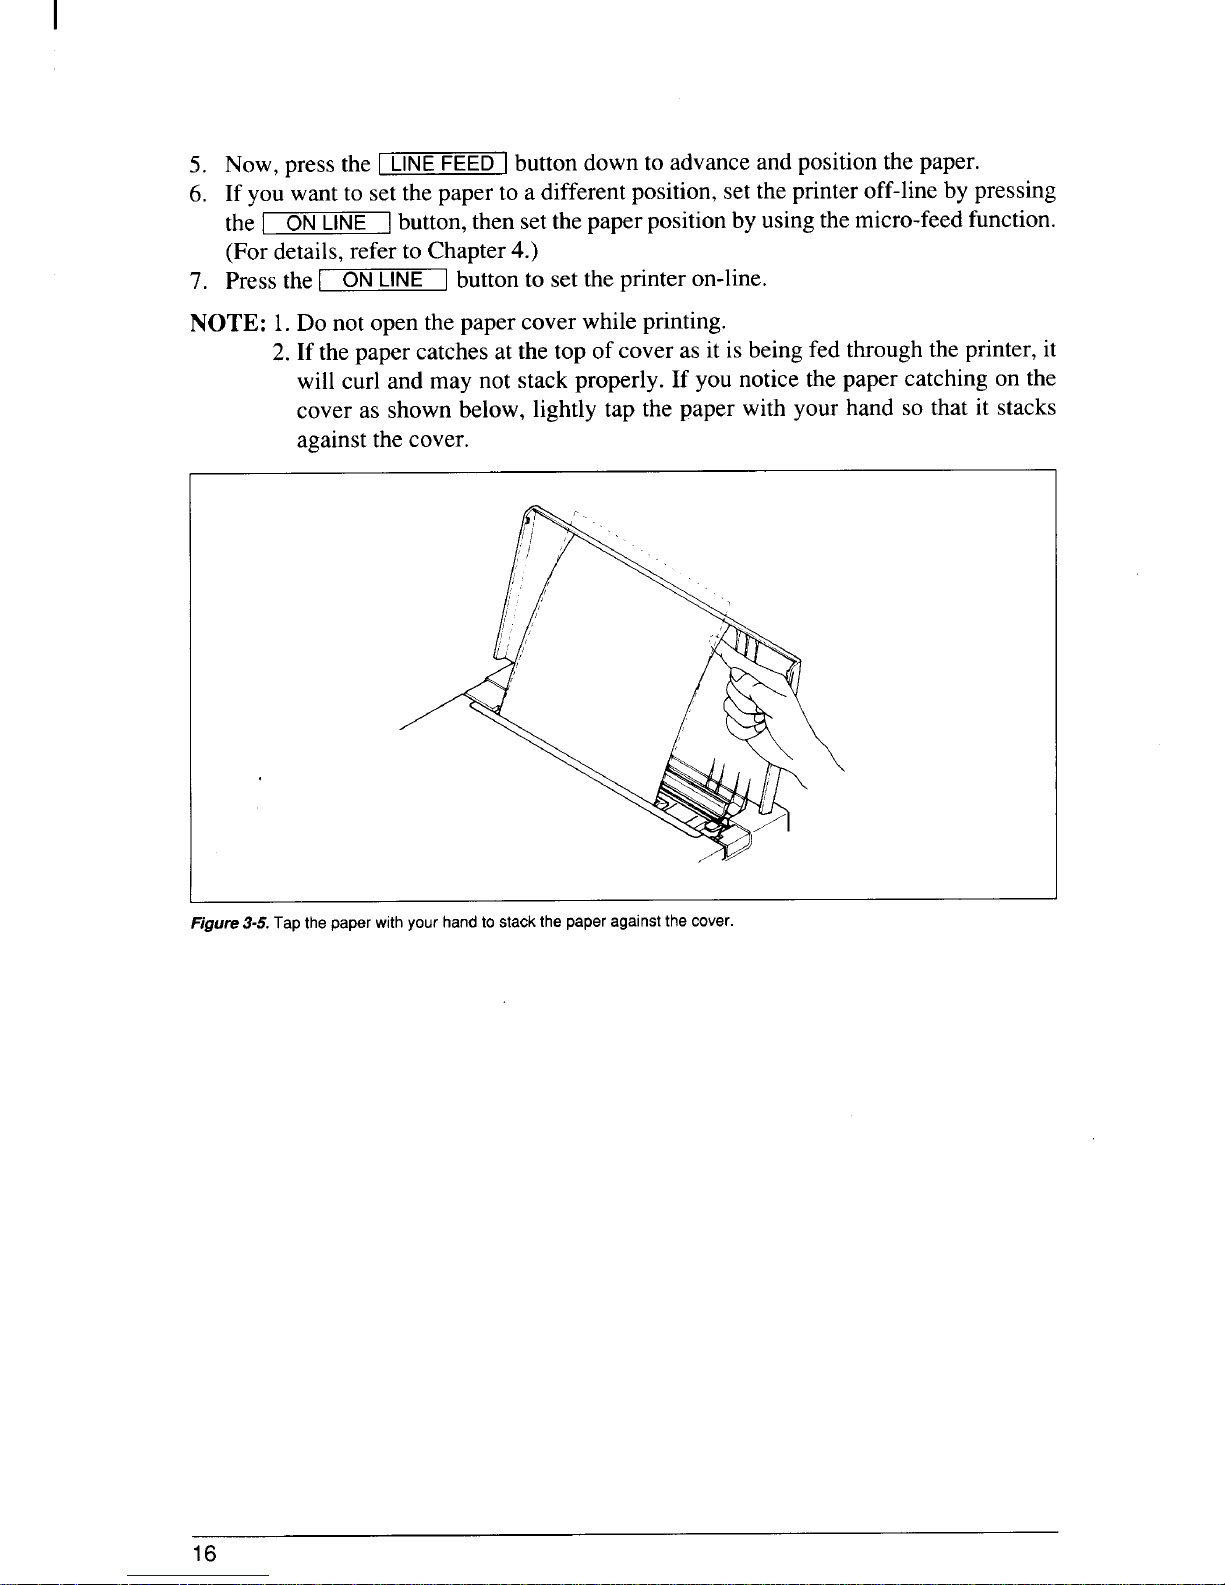
6.
7.
Now, press the I
I button down to advance and position the paper.
If you want to set the paper to a different position, set the printer off-line by pressing
the I
[button, then set the paper position by using the micro-feed function.
(For details, refer to Chapter 4.)
Press the [ ON
] button to set the printer on-line.
NOTE:
1.Do not open the paper cover while printing.
2. If the paper catches at the top of cover as it is being fed through the printer, it
will curl and may not stack properly. If you notice the paper catching on the
cover as shown below, lightly tap the paper with your hand so that it stacks
against the cover.
I
F 3 p w y h s p a c
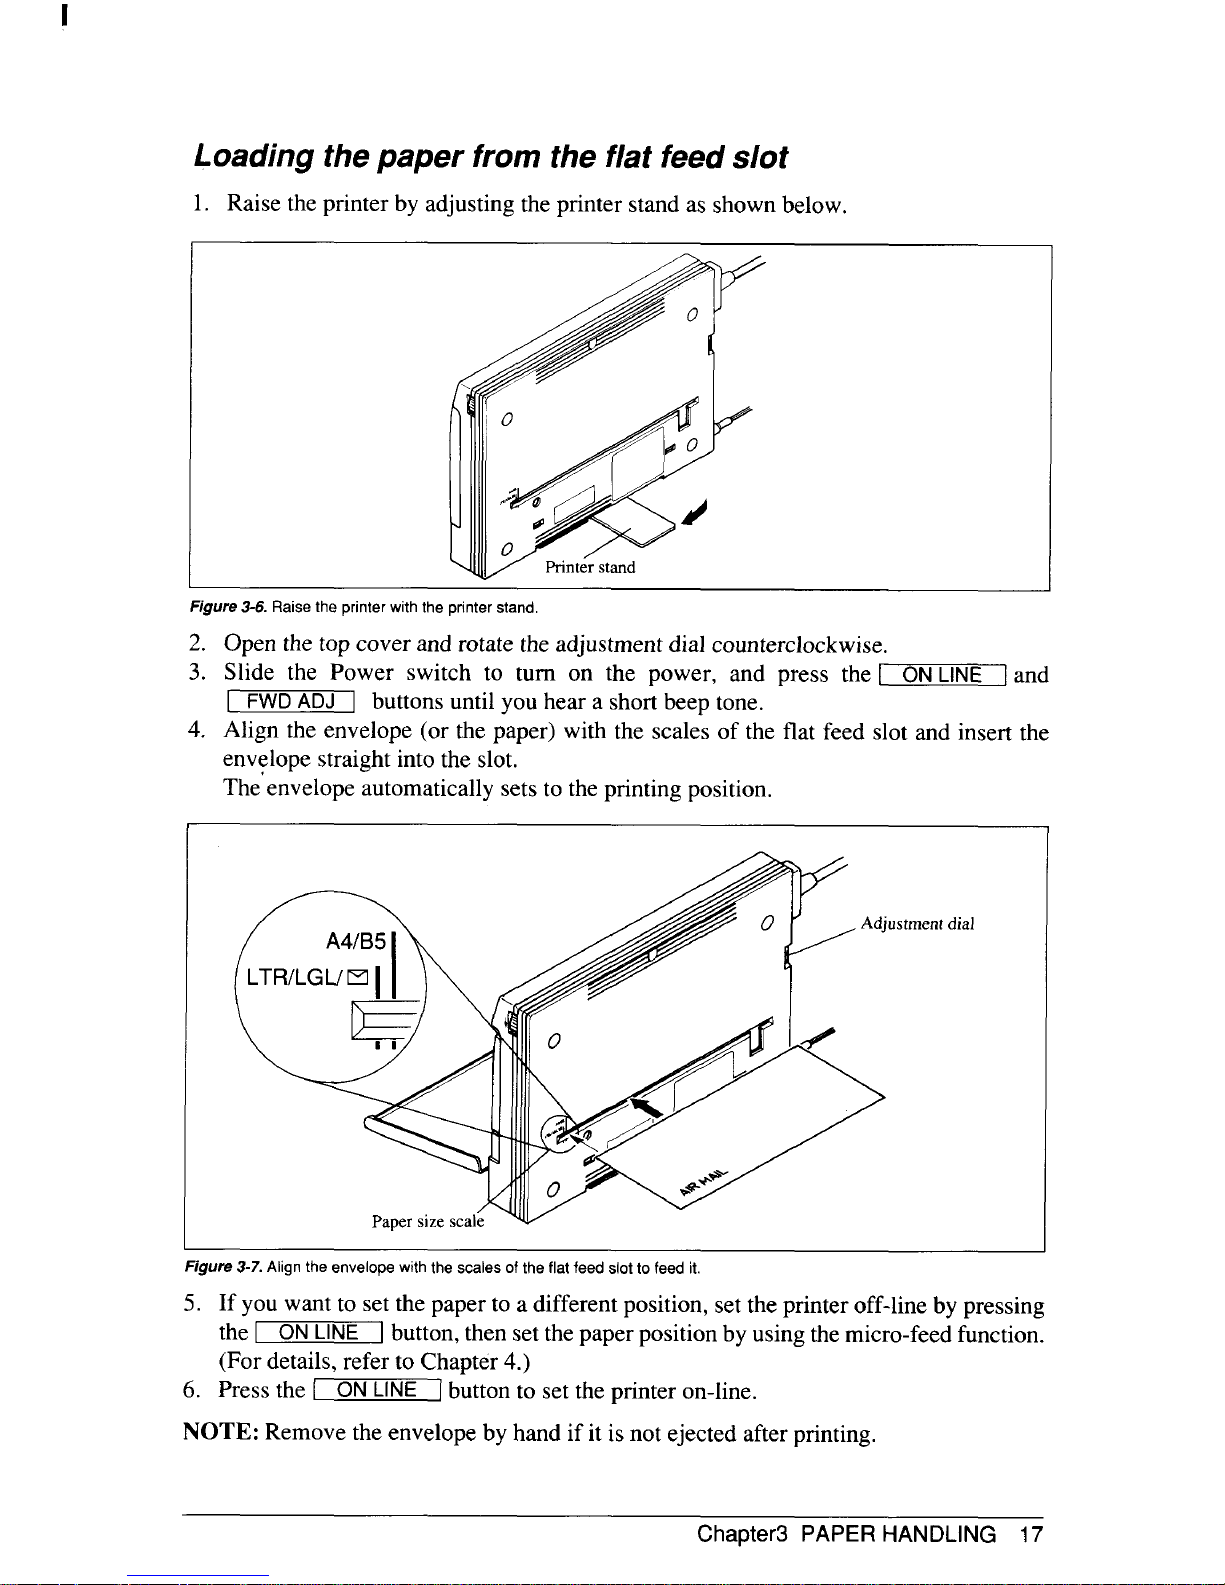
Loading the paper from the flat feed slot
1. Raise the printer by adjusting the printer stand as shown below.
I
F 3 R p w p s
2. Open the top cover and rotate the adjustment dial counterclockwise.
3. Slide the Power switch to turn on the power, and press the I
] and
[
1
buttons until you hear a short beep tone.
4. Align the envelope (or the paper) with the scales of the flat feed slot and insert the
envelope straight into the slot.
The’envelope automatically sets to the printing position.
—.
FlgUre 3-7. A the e w s f f s f
5. If you want to set the paper to a different position, set the printer off-line by pressing
the I
ON
I button, then set the paper position by using the micro-feed function.
(For details, refer to Chapter 4.)
6. Press the [
ON
] button to set the printer on-line.
NOTE: Remove the envelope by hand if it is not ejected after printing.
Chapter3 PAPER HANDLING 17
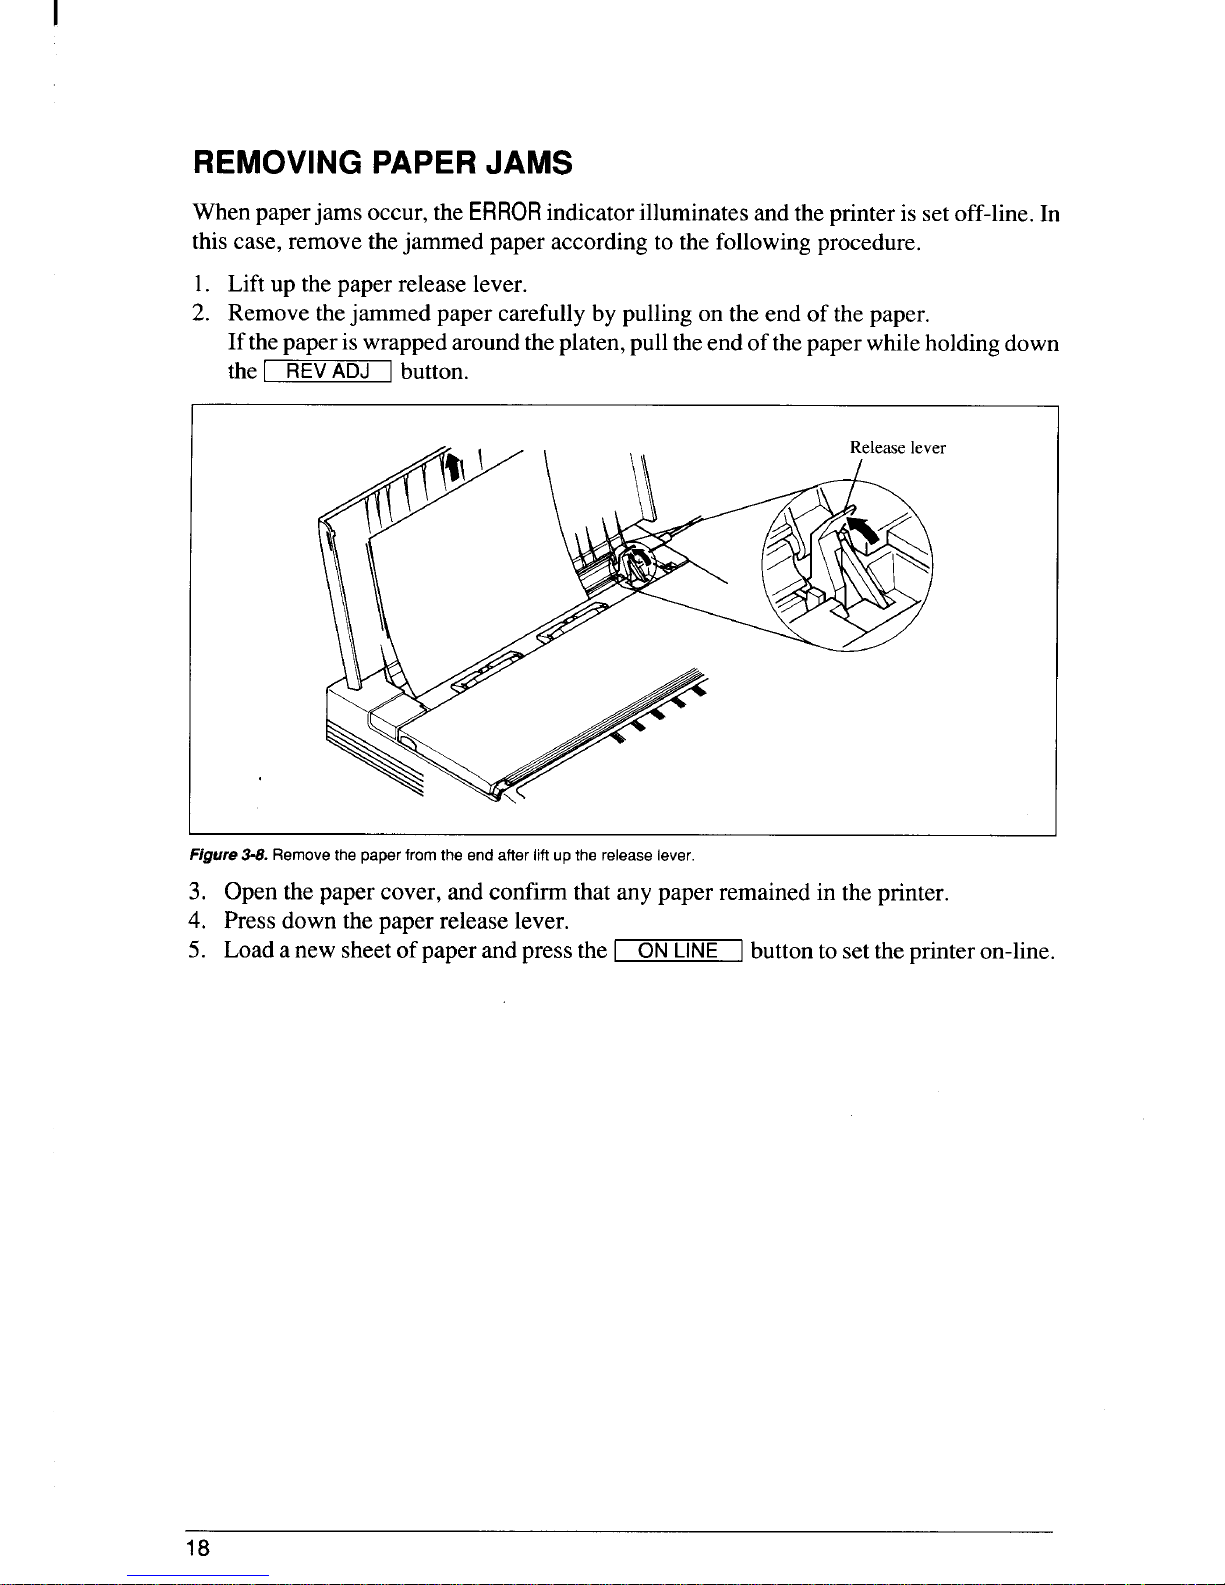
REMOVING PAPERJAMS
When paper jams occur, the indicatorilluminates and the printer is setoff-line. In
this case, remove the jammed paper according to the following procedure.
1. Lift up the paper release lever.
2. Remove the jammed paper carefully by pulling on the end of the paper.
If thepaper is wrapped around the platen, pull theend of the paper while holdingdown
.-
the I
~button.
f 3 R p f a l r l
3. Open the paper cover, and confirm that any paper remained in the printer.
4. Press down the paper release lever.
5. Load anew sheet ofpaperand press the I
ON
] button to set the printer on-line.
18

The control panel buttons can be pressed individually to perform the operations indicated
by their names. Other functions can be achieved by holding these buttons down when you
turn the printer’s power on, or by pressing the control panel buttons in combination.
This chapter explains all the button and indicator functions.
●
●
●
●
●
●
●
●
●
●
●
●
Pause printing
Feed paper (fast and slow, forward and reverse)
Select the print pitch
Select the font
Select paper feed mode
Set the top-of-form position
Cleaning the Ink cartridge
Clear the printer’s buffer
Charge the optional battery pack
Print test patterns
Print,a hexadecimal dump
Prevent software from changing the panel pitch selection
BUTTONS AND INDICATORS
The minter is eauiuDedwith five buttons on the control uanel. From left to right they are
[
I , ~
] \ PITCH - ~. -
The following is a brief guide to the buttons and indicators on the control panel.
$m-llmlll ill: ~~
F 4 C p
ONLINE button
The ONLINE button setsthe printeron-line andoff-line. The statuschanges each time you
press the button.
When the printer is on-line, it can receive and print data from the computer. When the
printer isoff-line, itstops printingand sends thecomputer a signal indicating that itcannot
accept data.
Chapter4 CONTROL PANEL OPERATIONS 19

The printer powers up in the on-line status if paper is loaded. If paper is not loaded, the
printerpowers up off-line with the indicator illuminating and the indicator
blinking.When you load paper, you must press the [
ON
[ button to set the printer
on-line.
You will want to press the I ONLINE ]button:
. Before and after any other panel operation
The otherpanel buttonsoperatein theoff-line state. Press the I ONl-lNE ~buttonto go
off-line.Afterperforming thepanel operation(s), press the I ON
] buttonagainto
go back on-line.
. To pause during printing
Ifyou press the I ON
I button during printing,the printer stopsprinting and goes
off-line, allowing you to check the printout or change a control panel setting. Printing
resumes when you press the I
ON
Ibutton again to go back on-line.
LINE FEED button
If you press this button while off-line, the paper will feed forward. If you hold the button
down, the printer will perform consecutive line feeds.
If you also press the I ON
] button while you are line-feeding, the paper will eject
automatically the current page. This is explained later.
FWDADJ button
For fine alignment, you can feed the paper forward in very small increments as follows:
1. Press the ~ ON button to set the printer off-line.
2. press andholddownthe ~ button.Thepaperwill start advancing inaseries
of small steps. When you want to stop, release this button.
REVADJ button
You can also feed the paper in small increments in reverse, to return to a higher position
on the same page.
1. Press the I
ON button to set the printer off-line.
2. Press and hold down the I
] button. The paper will start moving backwards
in a series of small steps. When you want to stop, release this button.
If you press this button while on-line, this will change the Print Quality between High
Quality (HQ) and Economy. You will hear one beep tone when the Economy mode is
selected, and twice when the HQ mode is selected.The print speed isthe same in both the
Economy and HQ mode, but the Economy mode uses less ink.
When you select the Economy mode with this button, the printer ignores the Print Quality
commands from the computer, and prints all text and graphics with the Economy mode.
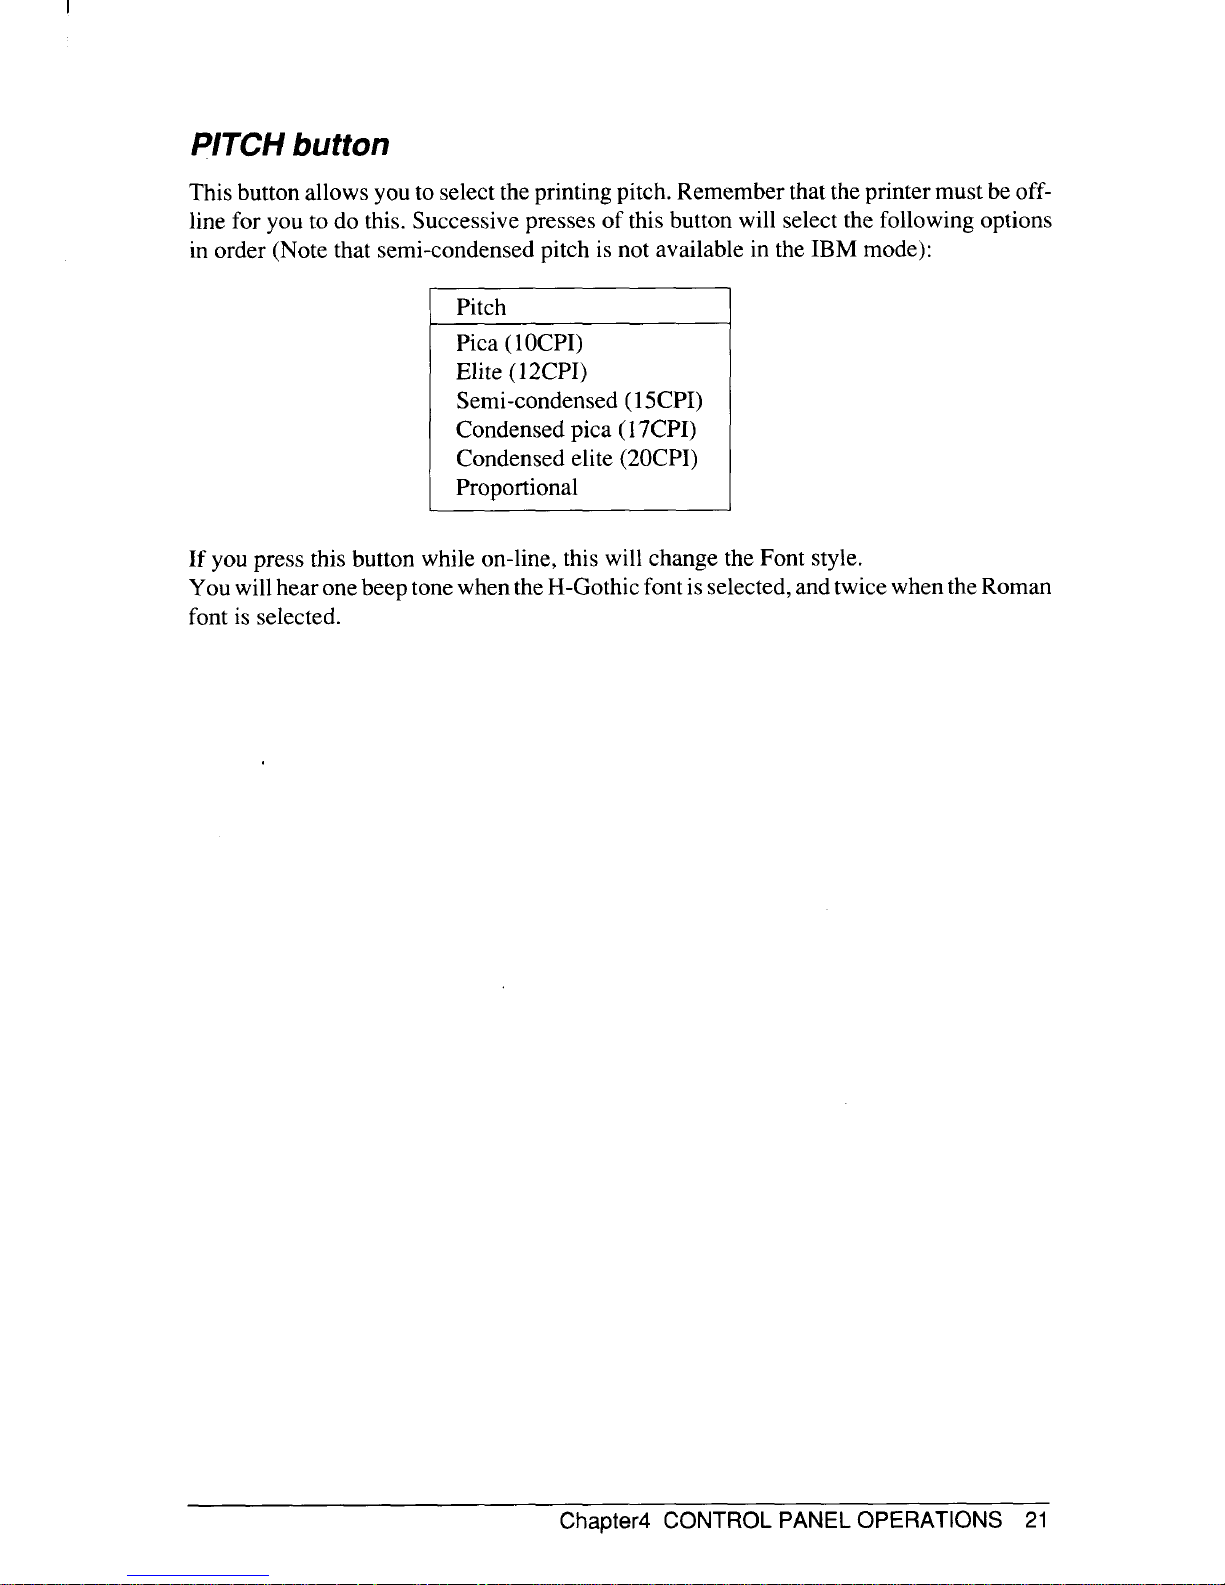
PITCH button
This button allows you to selectthe printing pitch. Remember that the printer must be off-
line for you to do this. Successive presses of this button will select the following options
in order (Note that semi-condensed pitch is not available in the IBM mode):
Pitch
Pica (1OCPI)
Elite (12CPI)
Semi-condensed (15CPI)
Condensed pica (17CPI)
Condensed elite (20CPI)
Proportional
If you press this button while on-line, this will change the Font style.
You willhear onebeep tone when theH-Gothic font is selected, and twice when theRoman
font is selected.
Chapter4 CONTROL PANEL OPERATIONS 21
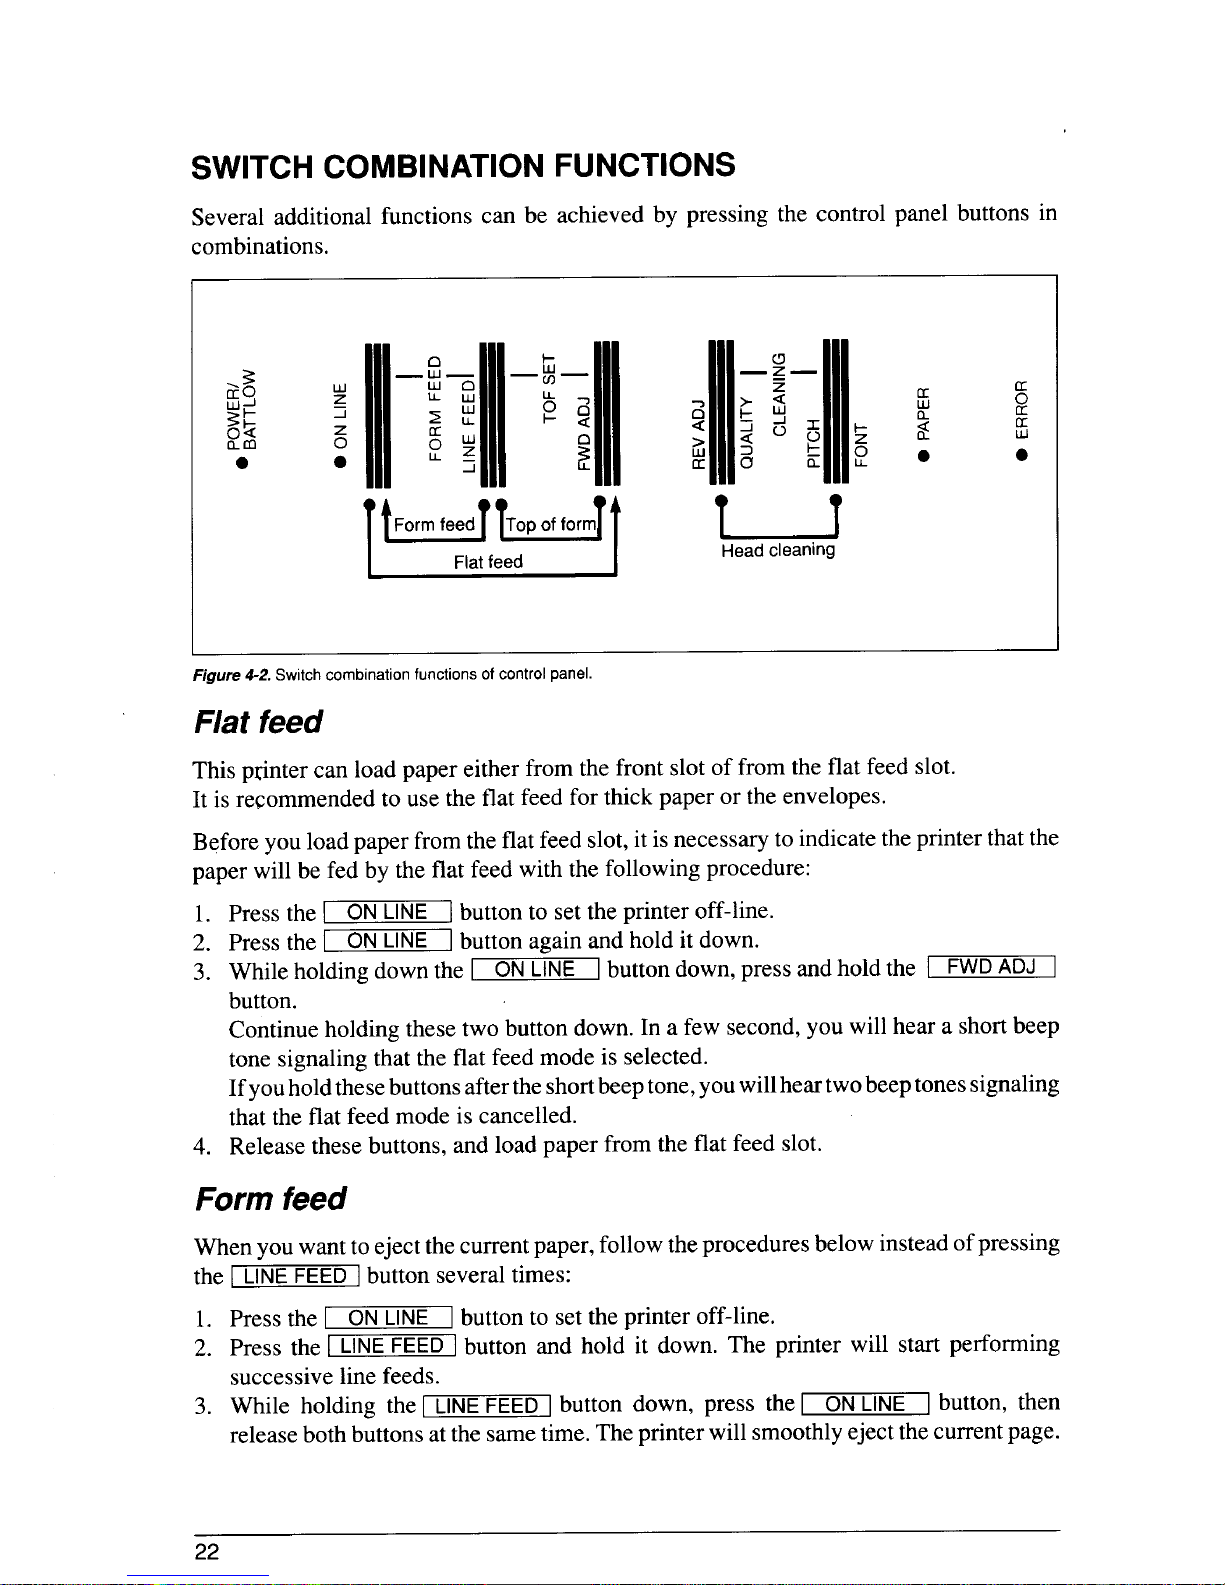
SWITCH COMBINATION FUNCTIONS
Several additional functions can be achieved by pressing the control panel buttons in
combinations.
I
F 4 S c f c p
Flat feed
This ptinter can load paper either from the front slot of from the flat feed slot.
It is recommended to use the flat feed for thick paper or the enveloPes.
Before you load paper from the flat feed slot, it isnecessary to indicatethe printer that the
paper will be fed by the fiat feed with the following procedure:
1.
2.
3.
4.
the I ON
I button to set the printer off-line.
press the ~ ON
J button again and hold it down.
While holding down the I
ON
[ button down, press and hold the I
1
button.
Continue holding these two button down. In a few second, you will hear a short beep
tone signaling that the flat feed mode is selected.
Ifyouholdthesebuttonsafter the shortbeep tone, you willhear two beeptonessignaling
that the flat feed mode is cancelled.
Release these buttons, and load paper from the flat feed slot.
Form feed
When you want to eject the current paper, follow theprocedures below instead of pressing
the I
] button several times:
1. Press the I ON
] button to set the printer off-line.
2. Press the ~LINEFEED\button and hold it down. The printer will start performing
successive line feeds.
3. While holding the I
[ button down, press the I ON [ button, then
release both buttons at the same time. The printer will smoothly eject the current page.
22
Top of form
When you power on the printer, the first line position is automatically set to the current
position.
If this isnot where you want the top line of the page to be, you can change the top-of-form
position as follows:
1. Press the I
] button to set the printer off-line.
2. Movethepapertothe desired top-of-formpositionbypressingthe I
]button,
or by performing a forward orreverse micro-feed with ~
]or ~
button.
3. Press the
I ON
I button to set the printer on-line.
4. While holding the
] button down, press the I FW3 [ button, then
release both buttons atthe same time. You will hear a beep tone indicatingthat the topof-form position has been set.
Head cleaning
The printer’s unique head cleaning system clears paper particles and dust accumulated
aroundthe printhead nozzles thatmay otherwise cause printingproblems. It also clears the
nozzlesandhelps maintain ahighlevel ofprintquality.However, ifprinting problems such
asirregulardotprintordotmissing shouldoccur,perform theprintheadcleaning according
to the procedure below.
1. Make sure that the printer is turned on and the paper is loaded.
2. Press and hold down the I
] and I
I buttons while in on-line.
3. The indicator blinks for five seconds while the print head is being cleaned.
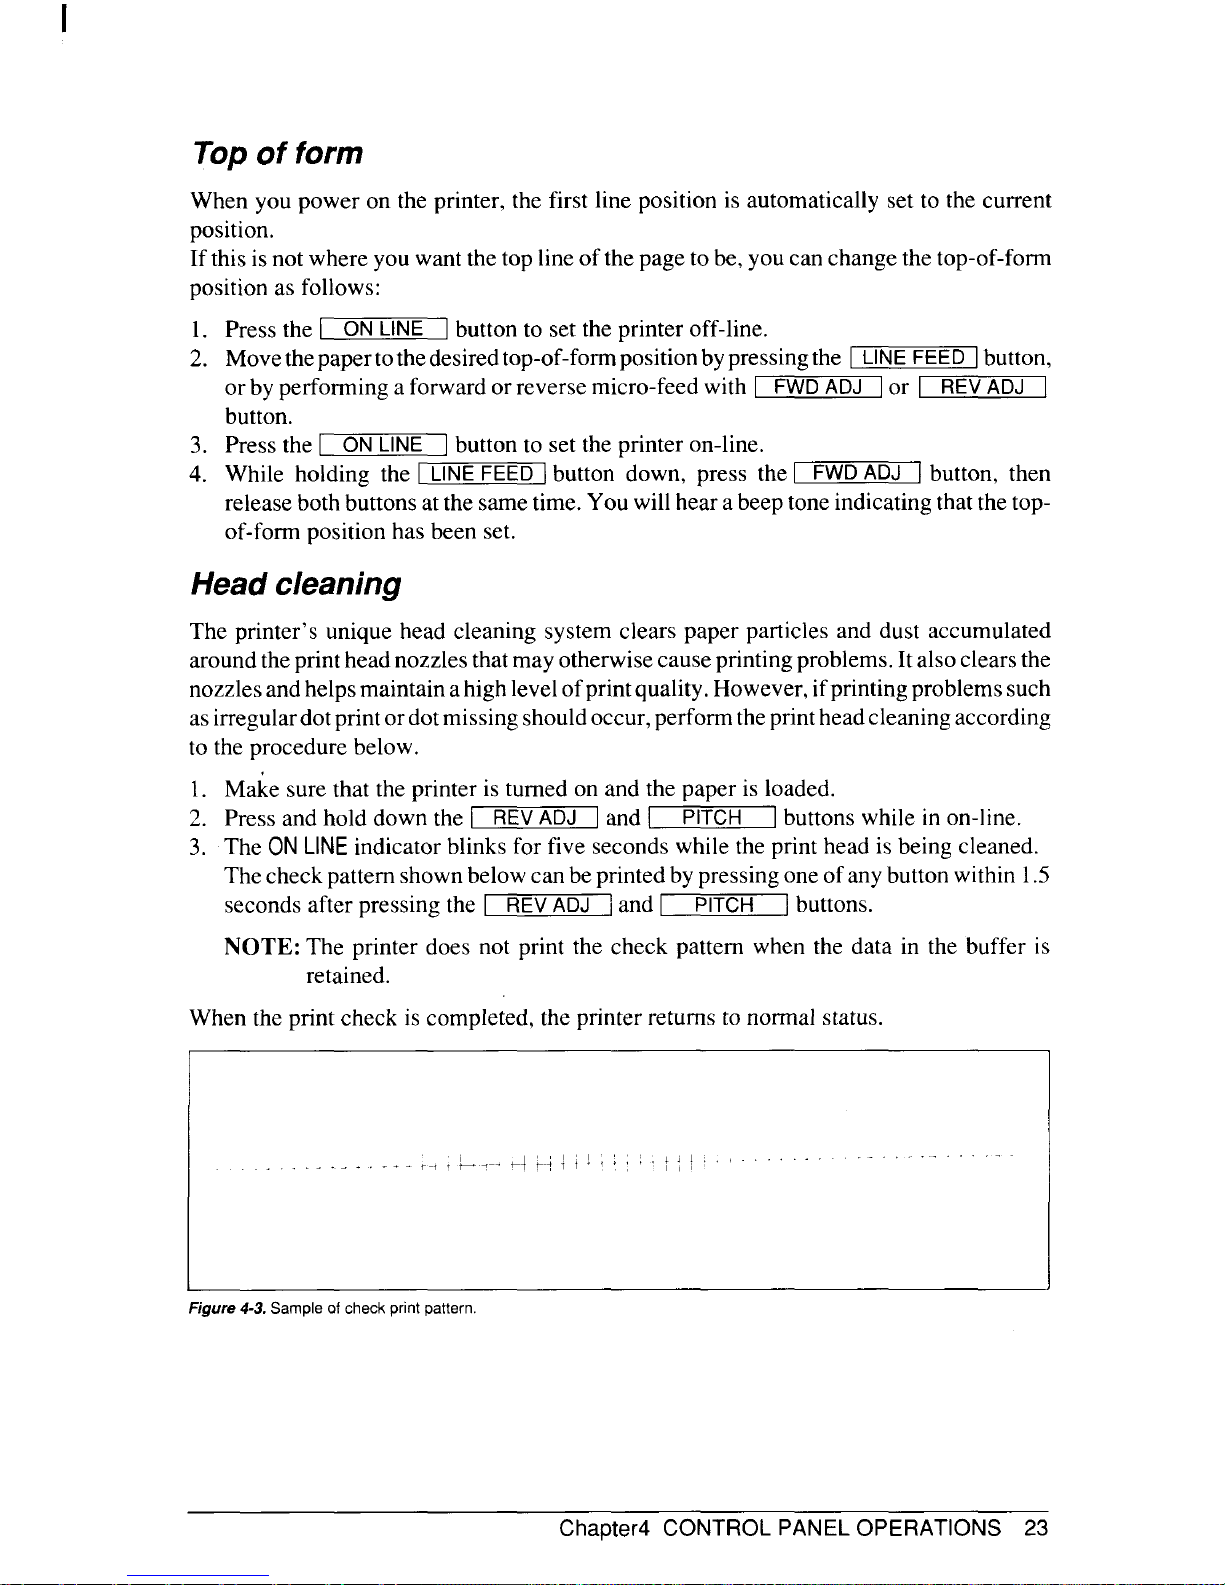
The check pattern shown below can be printed by pressing one of any button within 1.5
seconds after pressing the I
{and I
I buttons.
NOTE: The printer does not print the check pattern when the data in the buffer is
retained.
When the print check is completed, the printer returns to normal status.
I
. . .
F 4 S c p p
Chapter4 CONTROL PANEL OPERATIONS 23
Clearing the buffer/All reset
Theprinter storesreceived data ina largememory buffer. This creates aproblem when you
wanttoabandon aprintingjob andrestart: theprinter maybe holding more data in itsbuffer
than it has actually printed, and this unprinted data must be cleared out before restarting.
Turning power off is one way to clear the buffer, but there is another way:
1. Halt the printing program on the computer. If printing stopsimmediately, the buffer is
clear and the rest of this procedure is unnecessary. If printing does not stop, continue
as follows:
2. Press and hold the I ON
] button.
3. While pressing the I
ON
I button down, press and hold the I
button. Continue holding these two buttons down. In one second you will hear three
beeptonessignalingthattheprinterhasbeen initializedto thepower-on defaultsettings.
4. Release these buttons, make any necessary control panel settings, then set the printer
back on-line.
It is essential to halt the printing program on the computer before you do this panel
operation.
Otherwise, when you go back on-line the computer will start sending data again and the
printer will continue printing, with missing data where the buffer was cleared.
 Loading...