

Star SM-L304 Series, SM-L300 Series User Manual
Portable Thermal Printer
SM-L304& SM-L300 SERIES
User Manual

<USA model>
Federal Communications Commission
Radio Frequency Interference Statement
This device complies with Part 15 of the FCC Rules and Industry Canada licence-exempt RSS standard(s).
Operation is subject to the following two conditions:
(1) This device may not cause harmful interference, and (2) this device must accept any interference received,
including interference that may cause undesired operation.
Le présent appareil est conforme aux CNR d'Industrie Canada applicables aux appareils radio exempts de licence.
L'exploitation est autorisée aux deux conditions suivantes :
(1) l'appareil ne doit pas produire de brouillage, et
(2) l'utilisateur de l'appareil doit accepter tout brouillage radioélectrique subi, même si le brouillage est susceptible
d'en compromettre le fonctionnement.
FCC WARNING
Changes or modifications not expressly approved by the party responsible for compliance could void the user’s
authority to operate the equipment.
For compliance with the Federal Noise Interference Standard, this equipment requires a shielded cable. For RF
interference suppression, if a ferrite core is provided with this evice, affix it to the interface cable.
This equipment complies with FCC radiation exposure limits set forth for an uncontrolled environment. This equipment
should be installed and operated with minimum distance 20cm between the radiator & your body.
Note: This equipment has been tested and found to comply with the limits for a Class B digital device, pursuant to part
15 of the FCC Rules. These limits are designed to provide reasonable protection against harmful interference in a
residential installation. This equipment generates, uses and can radiate radio frequency energy and, if not installed
and used in accordance with the instructions, may cause harmful interference to radio communications.
However, there is no guarantee that interference will not occur in a particular installation. If this equipment does cause
harmful interference to radio or television reception, which can be determined by turning the equipment of and on, the
user is encouraged to try to correct the interference by one or more of the following measures:
Reorient or relocate the receiving antenna.
Increase the separation between the equipment and receiver.
Connect the equipment into an outlet on a circuit different from that to which the receiver is connected.
Consult the dealer or an experienced radio/TV technician for help.
CAN ICES-3 (B) / NMB-3 (B)
This equipment complies with FCC/IC radiation exposure limits set forth for an uncontrolled environment and
meets the FCC radio frequency (RF) Exposure Guidelines in Supplement C to OET65 and RSS-102 of the IC radio
frequency (RF) Exposure rules. This equipment has very low levels of RF energy that it deemed to comply without
maximum permissive exposure evaluation(MPE). But it is desirable that it should be installed and operated keeping
the radiator at least 20cm or more away from person's body (excluding extremities: hands, wrists, feet and ankles).
Cet équipement est conforme aux limites d"exposition aux rayonnements énoncées pour un environnement
non contrôlé et respecte les règles les radioélectriques (RF) de la FCC lignes directrices d'exposition dans le
Supplément C à OET65 et d"exposition aux fréquences radioélectriques (RF) CNR-102 de l"IC. Cet

équipement émet une énergie RF très faible qui est considérée conforme sans évaluation de l"exposition
maximale autorisée. Cependant, cet équipement doit être installé et utilisé en gardant une distance de 20 cm
ou plus entre le dispositif rayonnant et le corps (à l"exception des extrémités : mains, poignets, pieds et
chevilles)
The above statement applies only to equipments marketed in U.S.A.
<Europe model>
English: Hereby, STAR MICRONICS CO.,LTD. declares that this Wireless Device is in compliance with the
essential requirements and other relevant provisions of Directive 2014/53/EU.
Deutsch:
[German]
Hiermit erklärt STAR MICRONICS CO.,LTD., dass sich das Gerät Wireless Device in
Übereinstimmung mit den grundlegenden Anforderungen und den übrigen einschlägigen
Bestimmungen der Richtlinie 2014/53/EU befidet.
Svenska:
[Swedish]
Härmed intygar STAR MICRONICS CO.,LTD. att denna Wireless Device står I överensstämmelse
med de väsentliga egenskapskravoch övriga relevanta bestämmelser som framgår av direktiv
2014/53/EU.
Español:
[Spanish]
Por medio de la presente STAR MICRONICS CO.,LTD. declara que el Wireless Device cumple con
los requisitos esenciales y cualesquiera otras disposiciones aplicables o exigibles de la Directiva
2014/53/UE.
Português:
[Portuguese]
STAR MICRONICS CO.,LTD. declara que este Wireless Device está conforme com os requisitos
essenciais e outras disposições da Directiva 2014/53/UE.
Français:
[French]
Par la présente STAR MICRONICS CO.,LTD. déclare que l’appareil Wireless Device est conforme
aux exigences essentielles et aux autres dispositions pertinentes de la directive 2014/53/UE.
Suomi:
[Finnish]
STAR MICRONICS CO.,LTD. vakuuttaa täten että Wireless Device tyyppinen laite on direktiivin
2014/53/EU oleellisten vaatimusten jasitä koskevien direktiivin muiden ehtojen mukainen.
Italiano:
[Italian]
Con la presente STAR MICRONICS CO.,LTD. dichiara che questo Wireless Device è conforme ai
requisiti essenziali ed alle altre disposizioni pertinenti stabilite dalla direttiva 2014/53/UE.
Dansk:
[Danish]
Undertegnede STAR MICRONICS CO.,LTD. erklærer herved, at følgende udstyr Wireless Device
overholder de væsentlige krav og øvrige relevante krav i direktiv 2014/53/EU.
Nederlands:
[Dutch]
Hierbij verklaart STAR MICRONICS CO.,LTD. dat het toestel Wireless Device in overeenstemming
is met de essentiële eisen en de andere relevante bepalingen van richtlijn 2014/53/EU.
Eesti:
[Estonian]
Käesolevaga kinnitab STAR MICRONICS CO.,LTD. seadme Wireless Device vastavust direktiivi
2014/53/EL põhinõuetele ja nimetatud direktiivist tulenevatele teistele asjakohastele sätetele.
Ελληνική:
[Greek]
ΜΕ ΤΗΝ ΠΑΡΟΥΣΑ STAR MICRONICS CO.,LTD. ΔΗΛΩΝΕΙ ΟΤΙ Wireless Device
ΣΥΜΜΟΡΦΩΝΕΤΑΙ ΠΡΟΣ ΤΙΣ ΟΥΣΙΩΔΕΙΣ ΑΠΑΙΤΗΣΕΙΣΚΑΙ ΤΙΣ ΛΟΙΠΕΣ ΣΧΕΤΙΚΕΣ ΔΙΑΤΑΞΕΙΣ
ΤΗΣ ΟΔΗΓΙΑΣ 2014/53/EE.
Slovensky:
[Slovak]
STAR MICRONICS CO.,LTD. týmto vyhlasuje, že Wireless Device spĺňa základné požiadavky a
všetky príslušné ustanovenia Smernice 2014/53/EÚ.
Slovensko:
[Slovenian]
STAR MICRONICS CO.,LTD. izjavlja, da je ta Wireless Device v skladu z bistvenimi zahtevami in
ostalimi relevantnimi določili direktive 2014/53/EU.
Česky:
[Czech]
STAR MICRONICS CO.,LTD. tímto prohlašuje, že tento Wireless Device je ve shodě se základními
požadavky a dalšími príslušnými ustanoveními smernice 2014/53/EU.
Magyar:
[Hungarian]
Alulírott, STAR MICRONICS CO.,LTD. nyilatkozom, hogy a Wireless Device megfelel a vonatkozó
alapvetõ követelményeknek és az 2014/53/EU irányelv egyéb elõírásainak.
Български:
[Bulgarian]
това Безжично устройство е в съответствие със задължителните изисквания и другите
приложими разпоредби на Директива2014/53/EC.
Polski:
[Polish]
Niniejszym STAR MICRONICS CO.,LTD. oświadcza, że Wireless Device jest zgodny z
zasadniczymi wymogami oraz pozostałymi stosownymi postanowieniami Dyrektywy 2014/53/UE.
Malti: Hawnhekk, STAR MICRONICS CO.,LTD., jiddikjara li dan Wireless Device jikkonforma mal-ħtiġijiet

[Maltese] essenzjali u ma provvedimenti oħrajn relevanti li hemm fid-Dirrettiva 2014/53/UE.
Latviski:
[Latvian]
Ar šo STAR MICRONICS CO.,LTD. deklarē, ka Wireless Device atbilst Direktīvas 2014/53/ES
būtiskajām prasībām un citiem ar to saistītajiem noteikumiem.
Lietuvių :
[Lithuanian]
Šiuo STAR MICRONICS CO.,LTD. deklaruoja, kad šis Wireless Device atitinka esminius
reikalavimus ir kitas 2014/53/ES Direktyvos nuostatas.
Norsk:
[Norwegian]
STAR MICRONICS CO.,LTD. erklærer herved at utstyret Wireless Device er i samsvar med de
grunnleggende krav og øvrige relevante krav i direktiv 2014/53/EC.
Română :
[Romanian]
Prin prezenta STAR MICRONICS CO., LTD. declară că acest dispozitiv este conform cu cerinţele
esenţiale și alte prevederi relevante ale directivei 2014/53/UE.
Hrvatski :
[Croatian]
Ovime Star Micronics CO., LTD. Izjavljuje da je bežični uređaj
u skladu s osnovnim zahtjevima i drugim važnim odredbama direktive 2014/53/EU.
Italy:
The public use is subject to general authorisation by the respective service provider.
Norway: This subsection does not apply for the geographical area within a radius of 20 km from the centre of
Ny-Ålesund.
Trademark acknowledgments
SM-L300: Star Micronics Co., Ltd.
Notice
All rights reserved. Reproduction of any part of this manual in any form whatsoever, without STAR’s
express permission is forbidden.
The contents of this manual are subject to change without notice.
All efforts have been made to ensure the accuracy of the contents of this manual at the time of going
to press. However, should any errors be detected, STAR would greatly appreciate being informed of
them.
The above notwithstanding, STAR can assume no responsibility for any errors in this manual.
iPad, iPhone, iPod, iPod touch, and Retina are trademarks of Apple Inc., registered in the U.S. and
other countries. iPad Air, iPad mini, and Lightning are trademarks of Apple Inc.
IOS is a trademark or registered trademark of Cisco in the U.S. and other countries and is used
under license.
Android is a trademark of Google Inc.

Windows is registered trademarks of Microsoft Corporation.
The Bluetooth® word mark and logos are registered trademarks owned by the Bluetooth SIG, Inc.
Caution Symbol
This symbol is placed near the thermal head to indicate that it may be hot.
Never touch the thermal head immediately after the printer has been used. Let the
thermal head cool for a few minutes before touching it.
This symbol is placed near the thermal head to indicate that it is easily damaged.
Observe the precautions for handling electrostatic sensitive devices.
Safety Precautions
To use this product in safety, please follow the precautions given below.
WARNING
If you notice smoke, a strange smell, or a strange sound, turn off the power immediately, and remove
the USB cable and/or battery pack. Then contact the dealer.
If any foreign material (metal scraps, water, or other fluid) enters the printer, immediately turn off the
printer and remove the USB cable and/or battery pack. Then, contact your dealer for advice.
Continued use of the printer could result in a fire.
Never attempt to repair the printer yourself. Also do not disassemble or modify the product. Doing so
could lead to injury, fire, or electric shock.
Do not touch the tear bar.
There is a tear bar inside the paper outlet slot. Neither put your hand in the paper outlet slot while
printing is in progress, or put your hand into the outlet even when printing is not in progress.
The printer cover can be opened when replacing the paper. However, since the tear bar is on the
inside of the printer cover, be careful not to place your face or hands too close to the tear bar.
During and immediately after printing, the area around the thermal head is very hot. Do not touch it, as
you could be burned.
If any battery fluid gets on your skin or clothing, immediately wash the affected area with fresh water.
Otherwise, skin damage may result.
The battery pack may be hot immediately after the product has been used.
Please be sure to read

Using the Printer
Some semiconductors can be damaged by static electricity. Be sure to turn off the printer when
inserting or removing the battery pack.
Do not drop the printer or hit it against a hard object.
Do not open the printer cover while the printer is printing.
Before you open the printer cover, make sure that printing data is not being sent to the printer.
Do not unplug or plug in a USB cable while the printer is printing or during communication.
Do not touch a USB connector while the printer is printing.
Turn off the printer when you are not using it.
When the printer is used in a low temperature environment, the battery's performance will be
diminished, and the amount of time that you can use the printer for may be reduced.
Do not pull out paper while the printer cover is closed.
The heating element and the driver IC of the thermal head are easily damaged. Do not touch them
with metal objects, sandpaper, etc.
Printing quality may suffer if the thermal head heating element becomes soiled by being touched with
your hands. Do not touch the thermal head heating element.
There is a risk of damage to the driver IC of the thermal head from static electricity.
Never directly touch the IC.
Do not operate the printer if there is moisture on the front surface of the head from condensation, etc.
Thermal Paper Handling
Only use thermal paper with the designated specifications. The printing quality and working life of the
thermal head cannot be guaranteed if any paper other than that recommended is used. In particular, if
ion concentration of [Na+, K+, Cl-] is high, it may drastically reduce the working life of the thermal
head. Please exercise caution.
Store the thermal paper in a cool, dry, dark location.
Do not rub the thermal paper with a hard object.
Do not leave the thermal paper in contact with plastic film, an eraser, or adhesive tape for a long
period of time.
Do not stack the thermal paper on fresh diazo copies or wet-type copies.
Do not use chemical glue on the thermal paper.
Do not use thermal paper that has been stored for a long period.

Operating Environment for the Printer
Before actually unpacking the printer, you should take a few minutes to think about where you plan to
use it. Remember the following points when doing this.
Do not use the printer in an environment in which it will be subject to strong shaking while it is printing.
Be careful to ensure that the printer is not exposed to direct sunlight.
The appropriate environment for using the printer is described below.
Temperature: 0°C to 50°C
Humidity: 20% RH to 85% RH (Must be no condensation)
Do not place the printer near a copying machine or other device that produces a strong
electromagnetic field.
Keep the printer sufficiently removed from heaters and other sources of heat.
Use the printer in a clean, low-humidity environment that is free from dust.
Avoid using the printer in high-humidity rooms.
Printer Maintenance
Please perform the following maintenance every 6 months.
Thermal head
Dip a cotton swab in an alcohol solvent (ethanol, methanol, or isopropyl alcohol), and clean
the heating area of the head.
Platen
While turning the platen, use a soft dry cloth to lightly rub the entire surface of the platen
and remove any foreign objects.
Paper storage unit and the surrounding area
Remove any dirt, dust, pieces of paper, etc., from the paper storage unit.
Card reader
Regularly blow air onto the card reader to remove any dust from the card slot.
Maintenance for using Linerless Label Paper
Please perform the following maintenance every 100 meters .The maintenance is also
required if you find the glue is stuck when a paper roll is ended.
Remove any dirt, dust, pieces of paper, etc.

Using a Magnetic Card
Do not bring magnets near the card, and do not store the card near a device that produces a magnetic
field (such as a mobile phone, speaker, or TV). If you do so, the data on the card may be deleted.
Do not leave the card in a high-temperature environment (such as the dashboard of a car).
Otherwise, the card may bend.
Do not touch the card with dirty or wet hands. Also, do not attach adhesive tape or glue to the card.
Failing to follow the above precautions could cause the card to stop working properly.

Table of Contents
1. Product Overview....................................................................................................................................................... 12
1.1 Printer & Accessories ................................................................................................................................... 13
1.2 Appearance and Components .................................................................................................................... 14
2. Setup .......................................................................................................................................................................... 16
2.1 Battery Pack .................................................................................................................................................. 16
2.1.1 Inserting into the Printer ................................................................................................................... 16
2.1.2 Charging the Battery ......................................................................................................................... 17
2.2 Bluetooth ........................................................................................................................................................ 20
2.2.1 Pairing ................................................................................................................................................. 20
2.3 Loading Paper ............................................................................................................................................... 21
2.3.1 De-curl Setting ................................................................................................................................... 21
2.3.2 Paper Guide Adjustment .................................................................................................................. 23
2.3.3 Loading paper to the printer............................................................................................................. 24
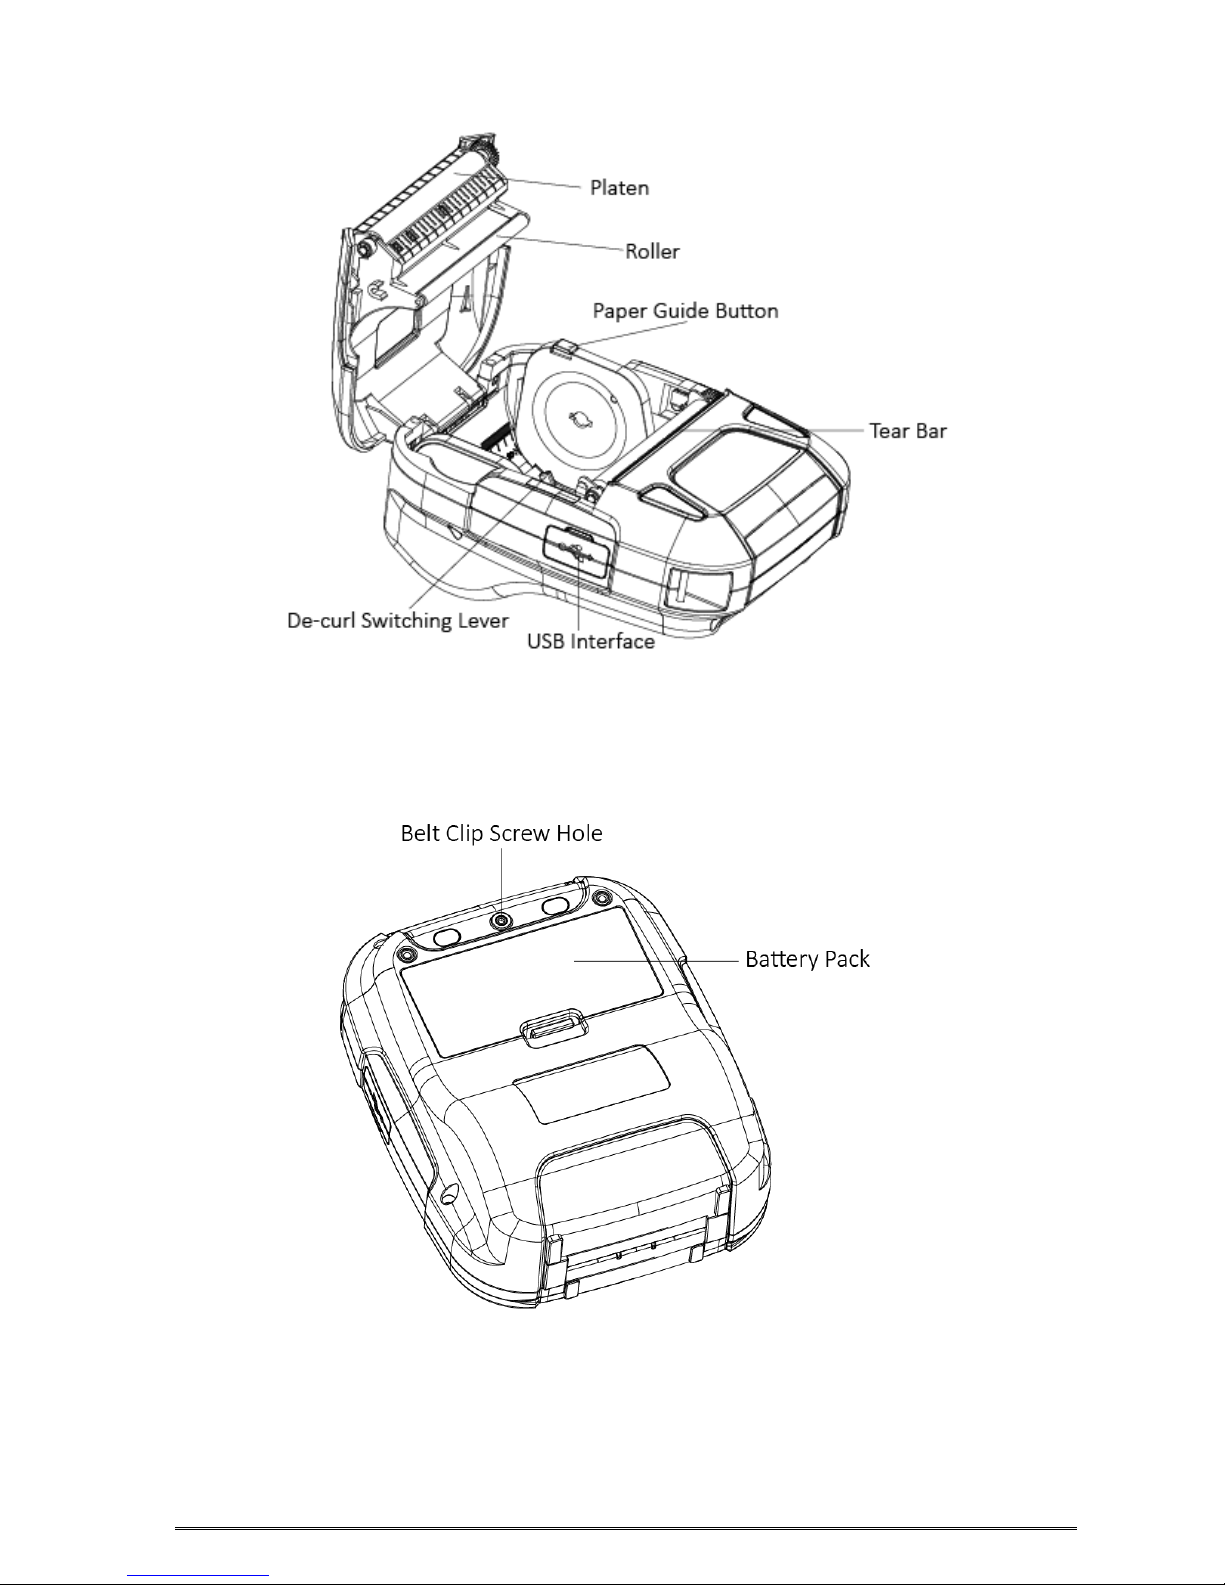
2.4 Belt Clip .......................................................................................................................................................... 26
2.4.1 Attaching to the Printer ..................................................................................................................... 26
2.4.2 Using the Belt Clip ............................................................................................................................. 26
3. Control Panel & Buzzer .............................................................................................................................................. 27
3.1 Button ............................................................................................................................................................. 27
3.2 LED & LCD Display / Error .......................................................................................................................... 28
3.2.1 LED & LCD Display ........................................................................................................................... 28
3.2.2 LED & LCD Display for Error ........................................................................................................... 31
3.3 Self Test ............................................................................................................................................................ 34
3.3.1 Self Test Procedure ........................................................................................................................... 34
3.3.2 Printing the Bluetooth Device Name and MAC Address ............................................................. 34
3.4 Memory Switch Settings (Using Buttons On the Printer) ........................................................................ 35
3.5 Hex Dump Mode ........................................................................................................................................... 41
3.6 Instruction for Power Management ............................................................................................................ 42
3.6.1 Standby Time ..................................................................................................................................... 42
3.6.2 Auto-Off Time ..................................................................................................................................... 42
3.6.3 Smart Power Option.......................................................................................................................... 42
4. Magnetic Card Reader (For MSR model only) ............................................................................................................ 44
5. Paper .......................................................................................................................................................................... 46
5.1 Paper Specification....................................................................................................................................... 46
5.2 Recommended Paper .................................................................................................................................. 49
5.3 Printing Range .............................................................................................................................................. 49
5.3.1 Receipt (thermal) Paper ................................................................................................................... 50

5.3.2 Label Paper ........................................................................................................................................ 50
5.4 Specification of Black Mark ......................................................................................................................... 51
5.4.1 Receipt Paper .................................................................................................................................... 51
5.4.2 Label Paper ........................................................................................................................................ 52
5.5 Specifications of LABEL GAP ..................................................................................................................... 52
6. General Specification ................................................................................................................................................. 53
7. Detailed Specification ................................................................................................................................................ 56
8. Memory Switch Specifications ................................................................................................................................... 58
9. How to Display the Model Name ............................................................................................................................... 73
10. Interface ................................................................................................................................................................... 74
10.1 USB .............................................................................................................................................................. 74
10.2 Bluetooth ...................................................................................................................................................... 75
11. Specifications of Accessories .................................................................................................................................... 76
11.1 Battery Pack ................................................................................................................................................ 76
11.2 Belt Clip ........................................................................................................................................................ 76
11.3 USB Cable ................................................................................................................................................... 76
11.4 Ferrite Core .................................................................................................................................................... 77
12. Troubleshooting Procedure ...................................................................................................................................... 78
12.1 Troubleshooting Guide .............................................................................................................................. 79
12.1.1 Power Supply Failure ..................................................................................................................... 79
12.1.2 Printing Failure ................................................................................................................................ 80
12.1.3 Sensor Failure ................................................................................................................................. 81
12.1.4 Paper Feed Failure ......................................................................................................................... 82
13. Fitting Regulation ..................................................................................................................................................... 83
13.1 Printer ........................................................................................................................................................... 83
13.2 Battery Pack ................................................................................................................................................ 83
14. Release History......................................................................................................................................................... 84
This manual supports the following firmware version.
Firmware Version Ver.1.0
Refer to the appropriate manual which supports the firmware version of you printer.
The firmware version can be confirmed by the self-test.(Refer to 3.3 Self-test)

1. Product Overview
This printer is perfect for mobile banking systems, retail, POS (point of sale) terminals and other
forms of mobile computing.
The characteristics of this printer are listed below:
• Support Adhesive Label Paper and Linerless Label paper
• Support to switch the de-curl function when receipt is used.
• Adjustable range of Roll Paper Width : 40 to 80mm
• Very silent printing direct thermal printing method
• Print maximum speed 65mm/s (Paper feed maximum speed 65mm/s)
• Support Bluetooth Ver3.0/4.0[BLE] Dual Mode
• Support Secure Magnetic Stripe Reader <Model with Card Reader>
*AES or 3DES encryption
*DUKPT Key Management
• Support Graphic LCD(128x64 dots) with Blue Backlight
• Belt Clip as a standard accessory
• Support text, barcode and graphic printing
• Drop-in design that makes it easy to load paper
• This printer is supported with the printer cover open sensor, paper end sensor, black mark sensor,
transmissive sensor(gap sensor), thermal head thermister and printer internal thermister.

1.1 Printer & Accessories
The printer is packaged with the following accessories.
If any of these accessories is broken or missing, please contact the dealer that you bought the
product.
Standard Accessories
Printer Battery Pack Sample Roll Paper
Belt Clip USB Cable Safety Instruction Sheet
Ferrite Core Ferrite Core Instruction Sheet
Optional Accessories
AC adapter
Note: The AC adapter vary by local or region.
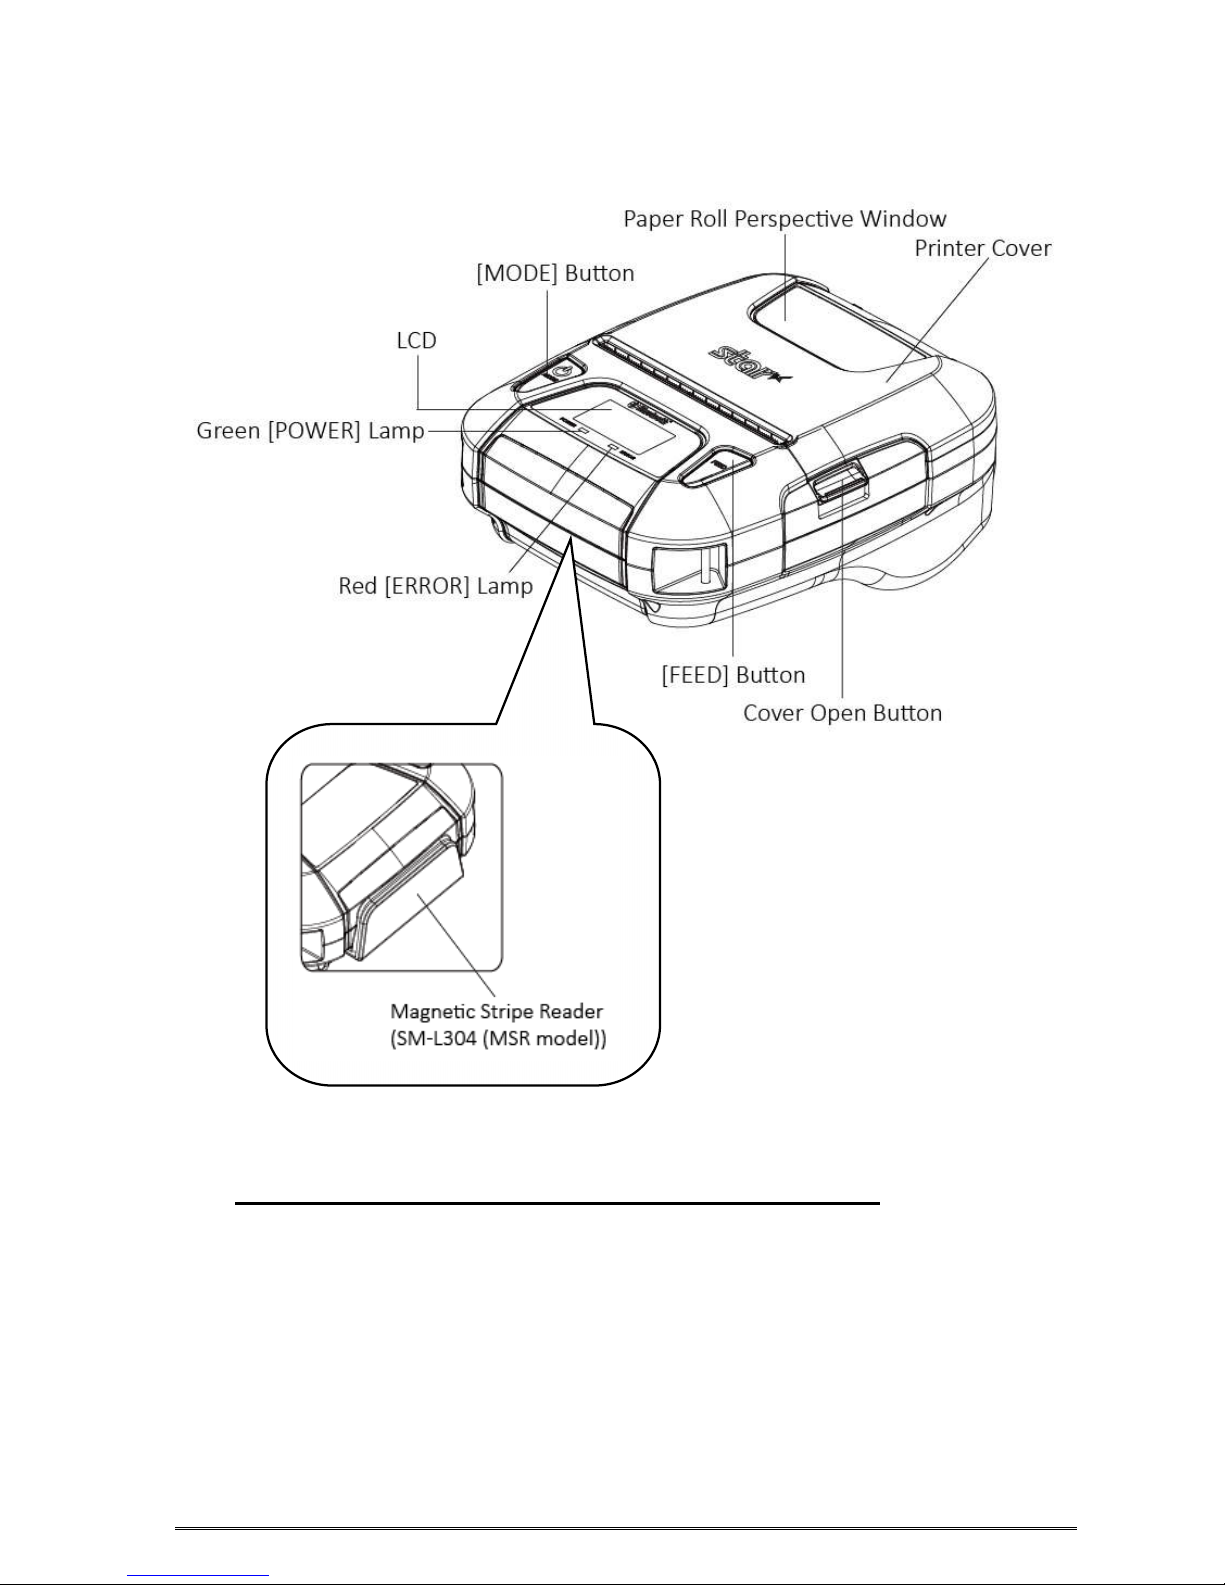
1.2 Appearance and Components
NOTE: Only SM-L304 MSR model has the Magnetic Stripe Reader.
2. Setup
2.1 Battery Pack
2.1.1 Inserting into the Printer
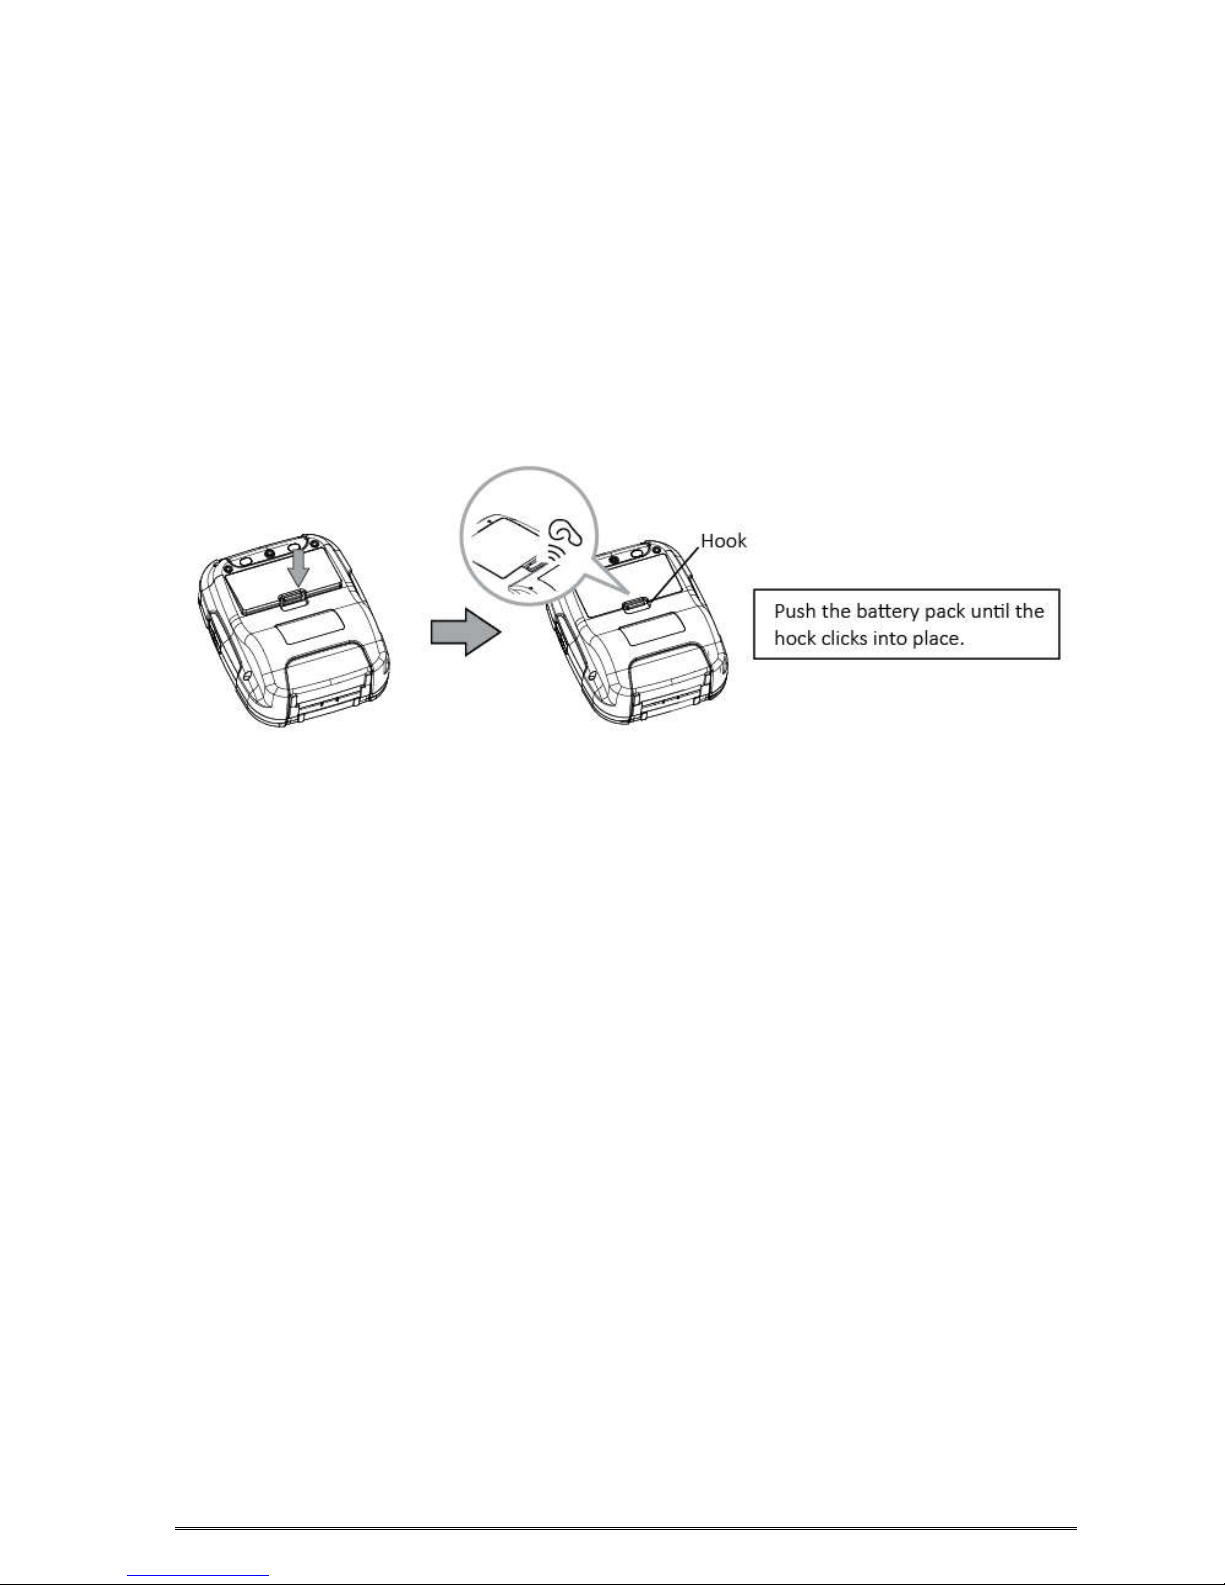
1. Make sure that the printer has been turned off before you insert or remove the battery pack.
2. Insert the battery pack into the back of the printer as in the figure shown below, following the
direction of the arrow.
3. To remove the battery back, pull back the hook, and use the opposite procedure from the one
you used to insert the battery pack.

2.1.2 Charging the Battery
Insert the battery pack into the printer to charge it.
Plug in socket with USB charging.
When battery pack runs out of power, the battery icon will flash. It powers off automatically when
continues printing. If you want to go on, please charge it.
Battery charging:
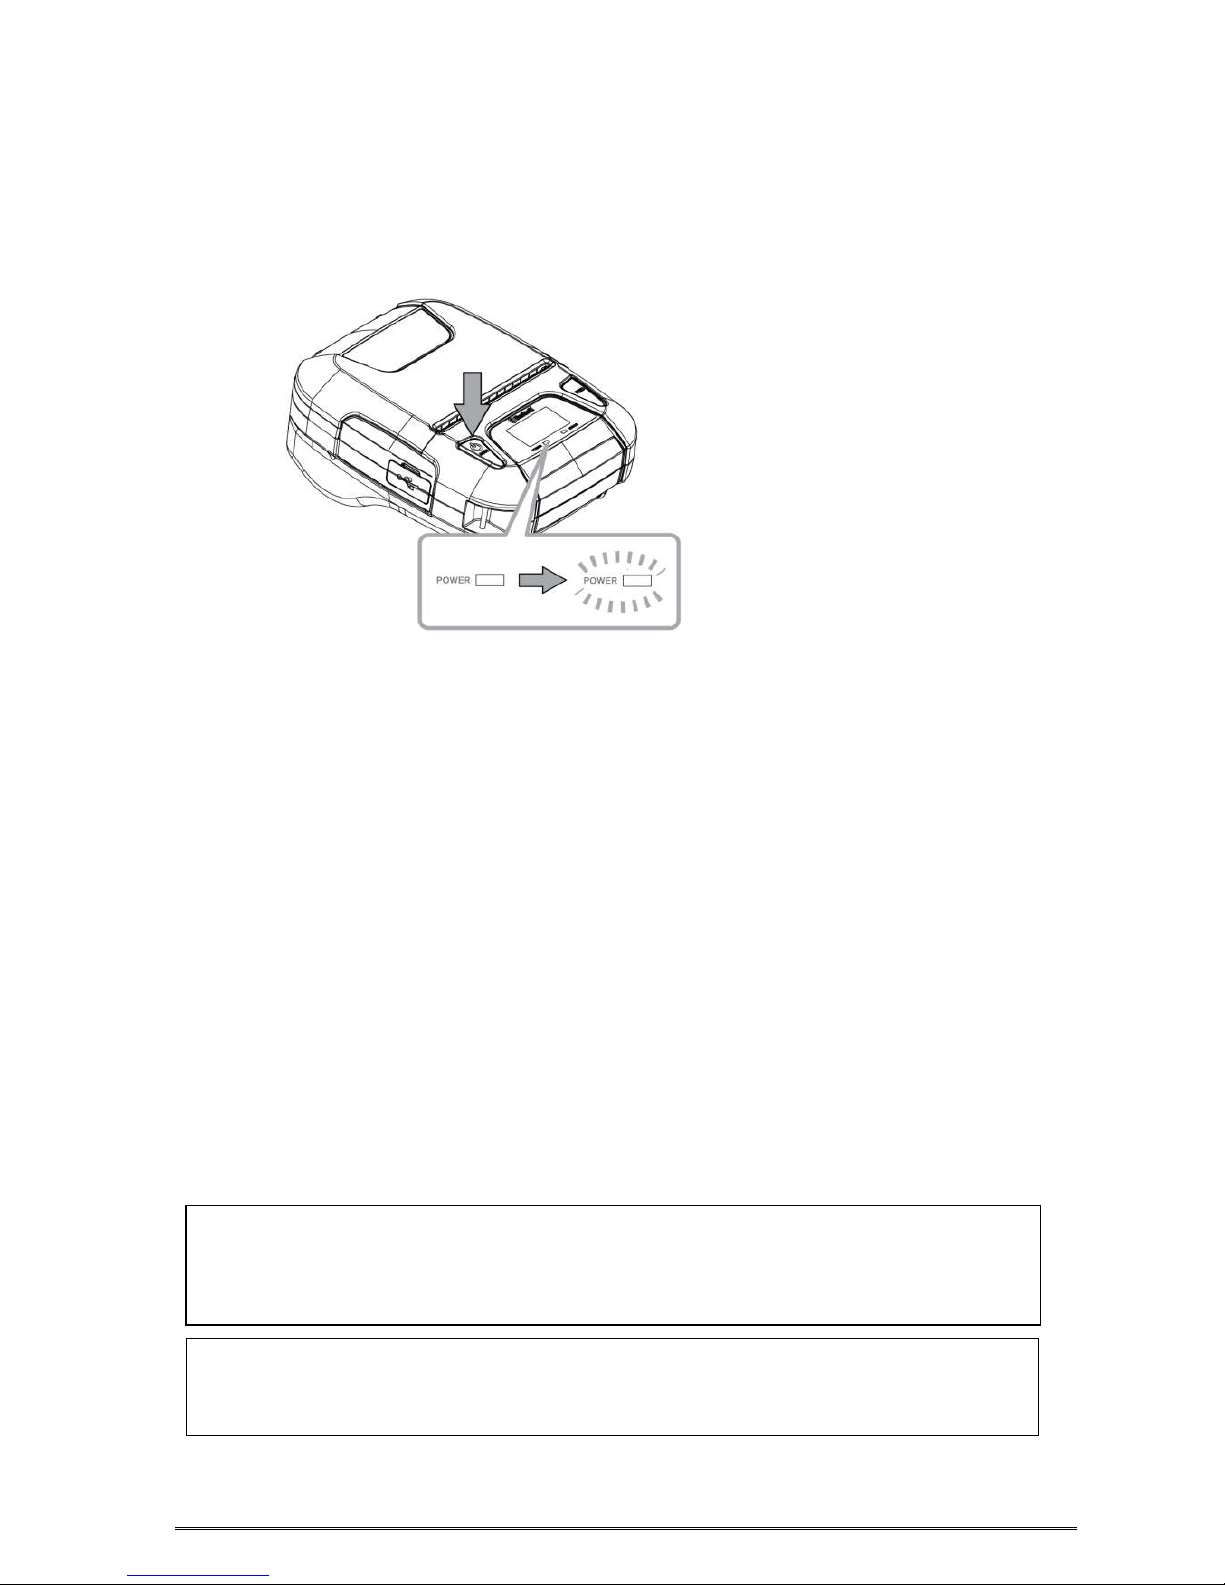
POWER lamp will always flash in green color and goes off when fully charged.
Charging the printer when it is on, even if battery icon on the LCD shows fully charged, turn off
the printer and let the battery charge until the POWER lamp goes off for fully charge.
NOTE: However, a low-grade car charger may cause a trouble due to a sudden change of
voltage. Use the charger that satisfies the USB standard.

General Battery Characteristics
The battery is a consumable and its performance over time gradually decreases.
While not in use of printer, the battery will slowly discharge itself.
Prepare a battery pack that has been charged relatively recently (1 to 2 days earlier).
To ensure that the battery lasts for a long time, we recommend that you turn off the printer
whenever possible.
When used at low temperatures, battery performance will temporarily decline. Be sure to have a
fully-charged spare battery standing by if the printer will operate in a cold environment.
Charging the Battery Pack
The battery pack can be charged at ambient temperatures between 0°C and 40°C.
The time required to charge the battery pack varies depending on the residual amount of battery,
electrical current and the ambient temperature. Normally, it takes 5 to 6 hours to charge the
battery pack.
It will take longer to charge the battery from the PC than by the USB charger.
It will take longer to charge the battery pack if you print while charging the battery pack.
Do not remove the battery pack while it is being charged.
Fully charge the battery prior to using the printer.
There is no need to completely discharge or use up a rechargeable Lithium-ion battery before
recharge it.
It is normal for the battery pack to be hot after it has finished charging or been used.
Do not recharge a battery pack that has just been fully charged.
Battery Pack Life
The battery can be charged approximately 300 times in the normal temperature range without
losing performance. If an extreme decline in the running time of the battery is noticed, the
battery is reaching the end of its usable life. It is recommended to replace the old battery with a
new one.
Notes about Using the Battery Pack
Only use a designated battery pack.
Only use the designated battery charging method.
You cannot use a USB cable other than the designated USB cable.
Do not throw the battery into a fire, place it near a flame or heating device, or leave it in a hot
environment (under direct sunlight, in a car, etc.).
Do not use a battery pack that has been dropped or subjected to a shock in some other way.
Do not disassemble or modify the battery pack.
Notes about the Battery Pack

Do not short the terminals of the battery pack or get it wet.
Do not place the battery pack in a bag with a small metal object (such as a key).
If any battery fluid gets on your skin or clothing, immediately wash the affected area with fresh
water. Otherwise, skin damage may result.
Notes about Storing the Battery Pack
The characteristics of the battery pack may degrade if you store it in a full-charged state for a
long period of time. If you do not intend to use the battery pack for a while, store it in approx.
50%-charged state.
If you do not intend to use the battery pack for a long time, be sure to remove it from the printer.
Keep the battery out of the reach of children. In addition, be careful that children do not remove
the battery.
Store the battery pack in a cool place.
* We recommend that you store the battery pack in a dry area with an ambient temperature
of 15 to 25 ºC.
* Avoid storing the battery in locations with high or extremely low temperatures.
Battery Disposal and Recycling
A battery pack is used to power this device. Since the disposal process of batteries varies from
country to country, refer to the appropriate measures mandating the disposal method of the
country in which this device is used.
To prevent unrecoverable damage to the battery, keep in your mind the following guidelines.
- If the battery pack is not in use for a long time, please remove it after charging up to 50%.
During storage, please charge the battery pack up to 50% every 3 months.
- When power is low, battery should be charged in time.
- If the printer automatically power down because of low power, be sure to charge the battery in 15
days.
< For U.S.A. and Canada >
Lithium-Ion batteries are recyclable. You can help preserve our environment
by returning your used rechargeable batteries to the collection and recycling
location nearest you. For more information regarding recycling of
rechargeable batteries, call toll free 1-800-822-8837, or visit
http://www.rbrc.org/
2.2 Bluetooth
2.2.1 Pairing
1. Press and hold MODE button for approx. 2 seconds, and printer is turned on.
Then, it is ready to pair with another Bluetooth device.
2. Select the device name and enter the PIN code as shown below.
PIN: 1234 (default)
Device name: “STAR L300-XXXXX”(default)
(XXXXX is the last digits of the Product Serial Number. The device name displayed during
pairing varies depending on the product. It can be checked from the [BD Name] that is printed
when printer self-printing is performed (power is turned ON while depressing the FEED button).
Notes:
1.SM-L300 has two Bluetooth modes:
a) One is Bluetooth Ver3.0 with PIN for Android or Windows system. PIN and Device name
can be changed through Star Utility. To obtain this utility, please contact with your dealer.
b) Another is Bluetooth 4.0(BLE) without PIN for iOS system.
2.SM-L300 changes the Bluetooth mode automatically by host system.
3.Pairing sets one by one in order, otherwise it can‘t figure out which one succeeds in
pairing.
You can test the connectivity with a host device by using Star IO SDK Application which
is available on Apple Store and Google play.
The Bluetooth
®
word mark and logos are owned by the Bluetooth SIG, Inc. and any use of
such marks by Star is under license.(Design and specifications subject to change without
notice.)
2.3 Loading Paper
2.3.1 De-curl Setting
This function is to make the receipts straight. It can set ON or OFF by de-curl switching lever.
(*Default: OFF)
Notes: Be careful not to forcibly pull or push the de-curl mechanism part. The decal
mechanism part may become damaged if strong force is applied.
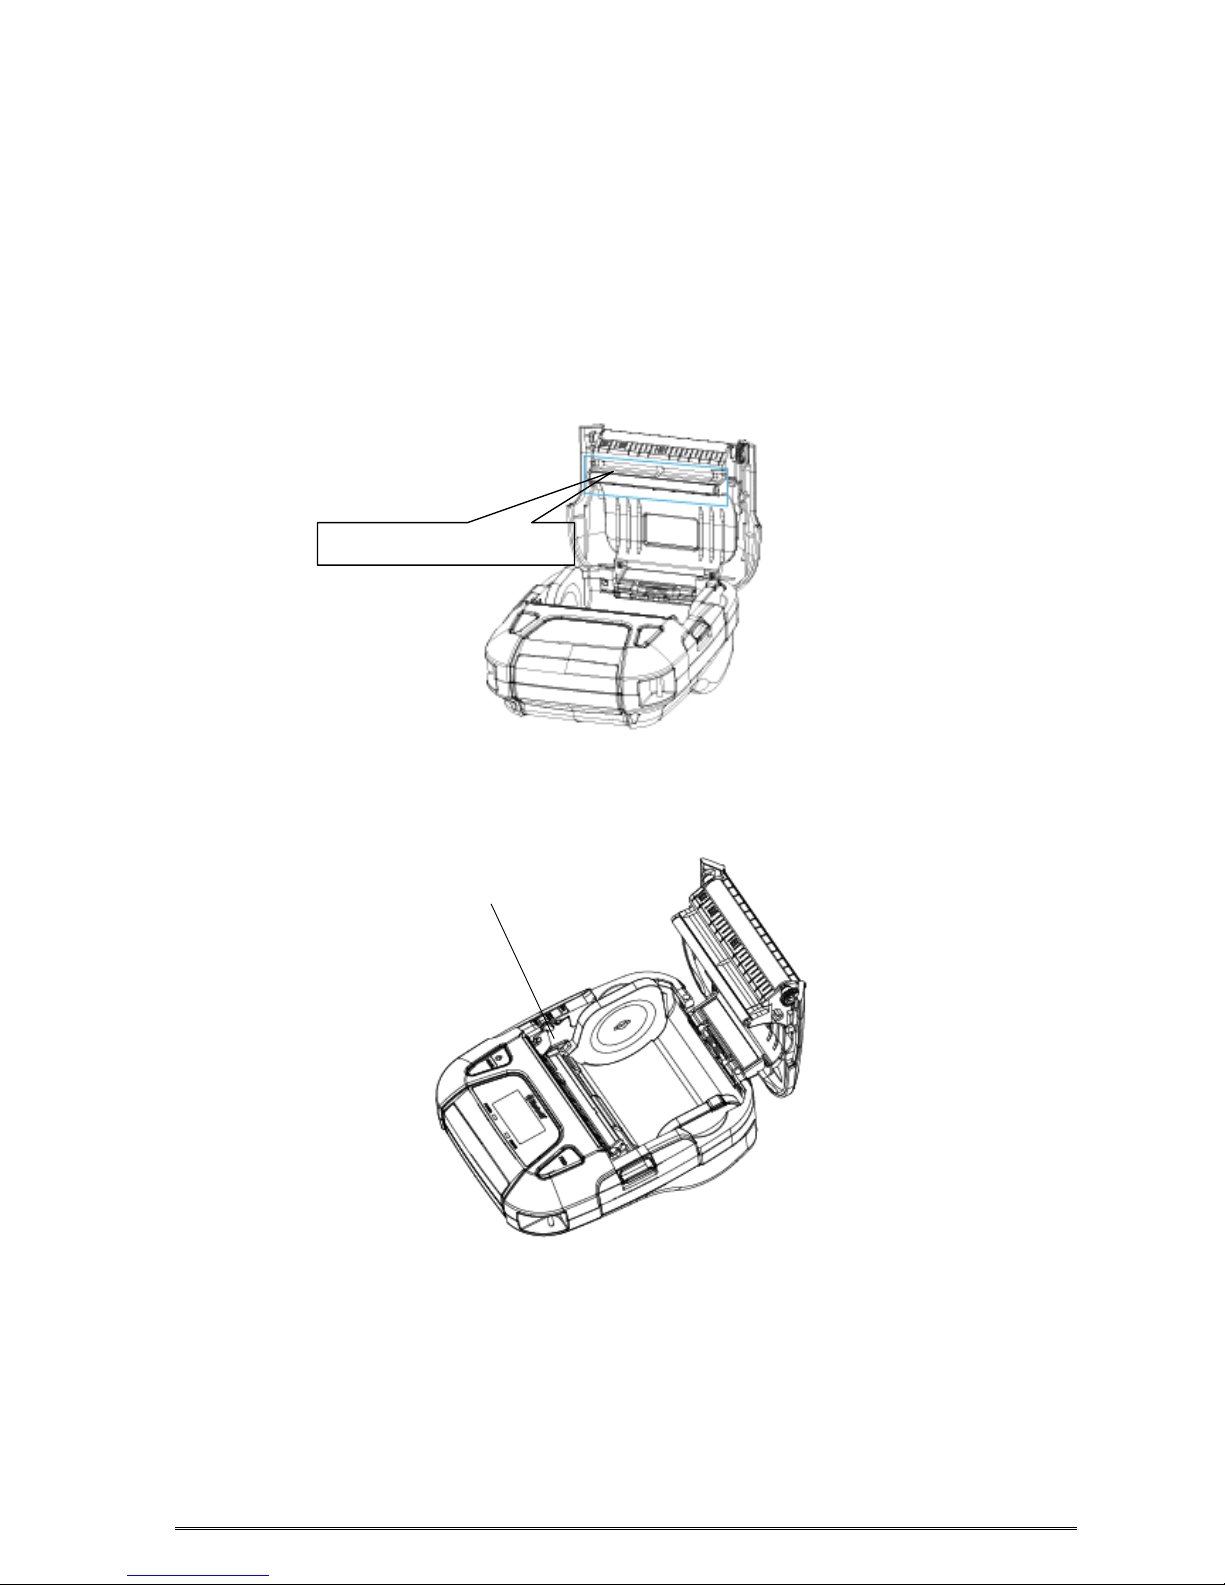
1. Press the cover open button to open the printer cover.
De-curl mechanism part
De-curl Switching Lever
2. The de-curl switching lever is set to OFF by default, and you need to be set to ON if you would
like to use this function.
(Receipt paper/Label paper/Linerless Label paper) (Receipt paper only)
3. Set the de-curl switching lever to OFF when label paper or lineress label paper is used.
Note: If the paper thickness of the receipt is out of specification, it may cause a paper feed
failure. In that case, please set the de-curl switching lever to OFF.
OFF
(default)
ON
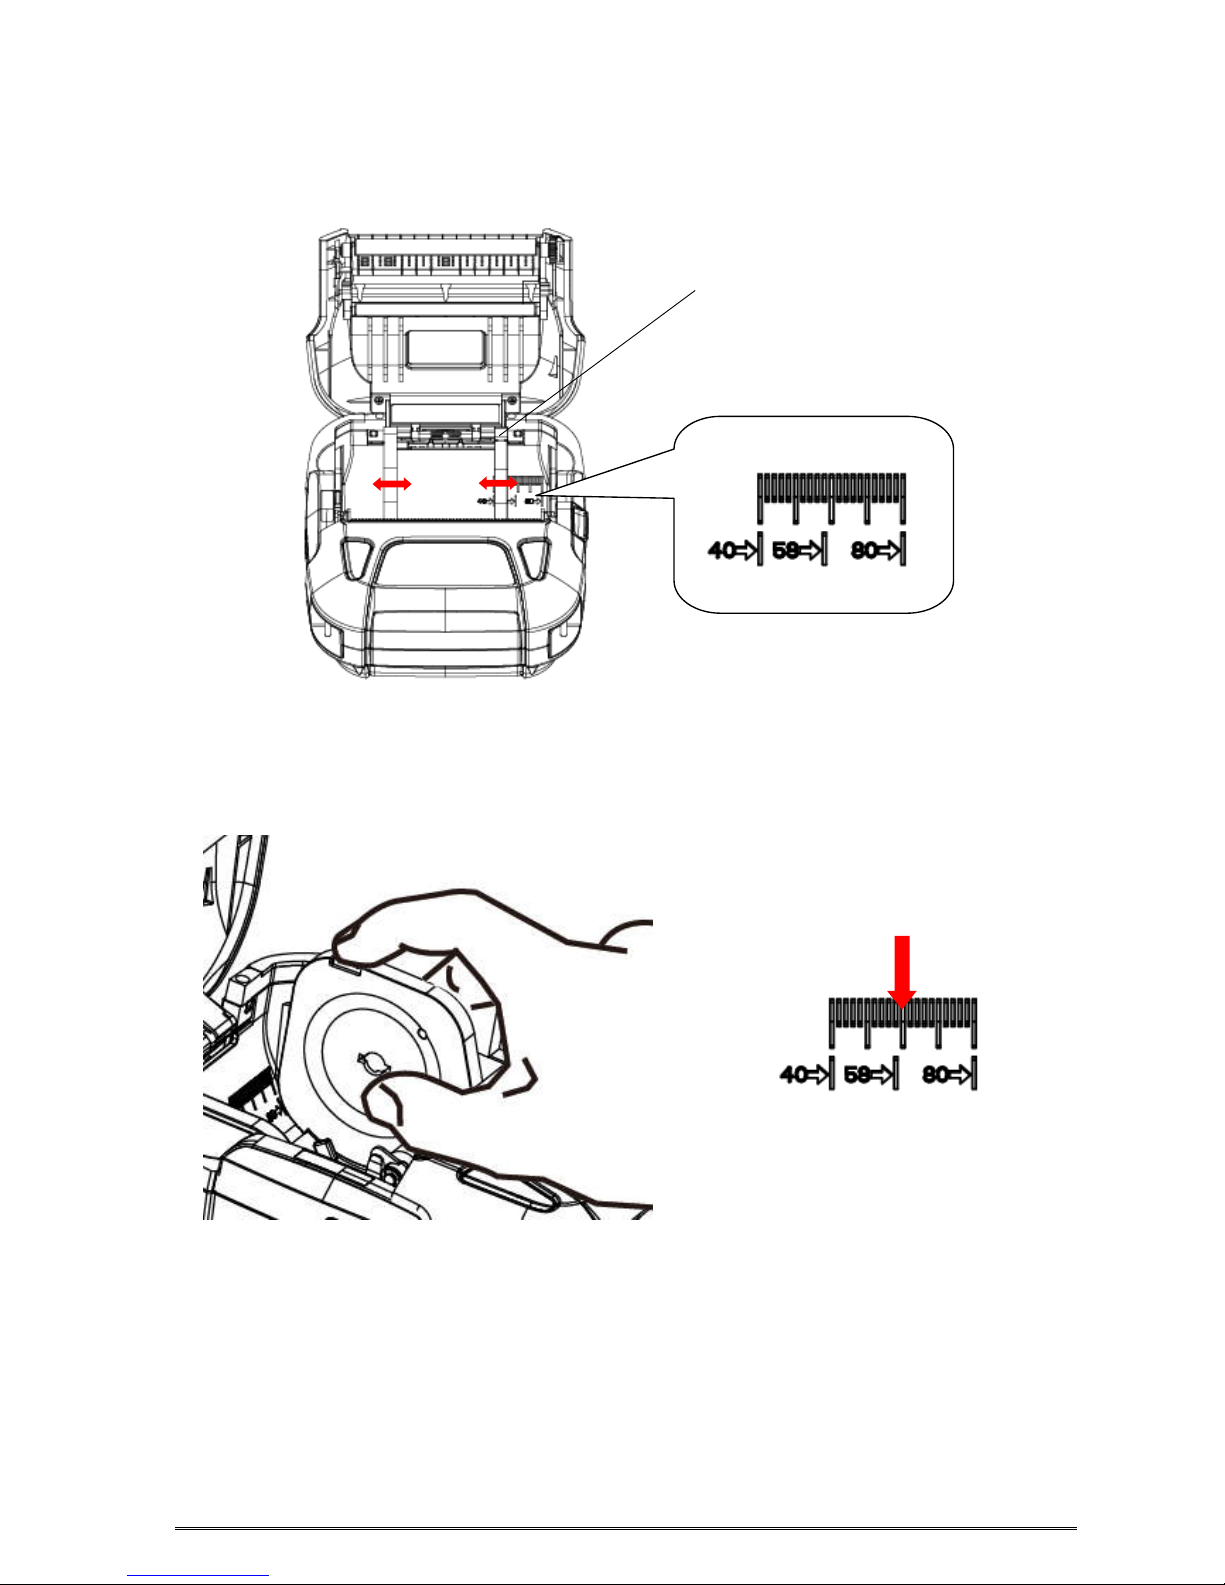
2.3.2 Paper Guide Adjustment
Press and hold the paper guide button, push the paper guide so that it can be moved to adjusted
and fixed the paper roll.
*Example: When using a width 58mm roll paper, press and hold the paper guide button, push the
paper guide to the position of 58 so that it can be adjusted and fixed the width 58mm roll paper.
Paper Guide Button
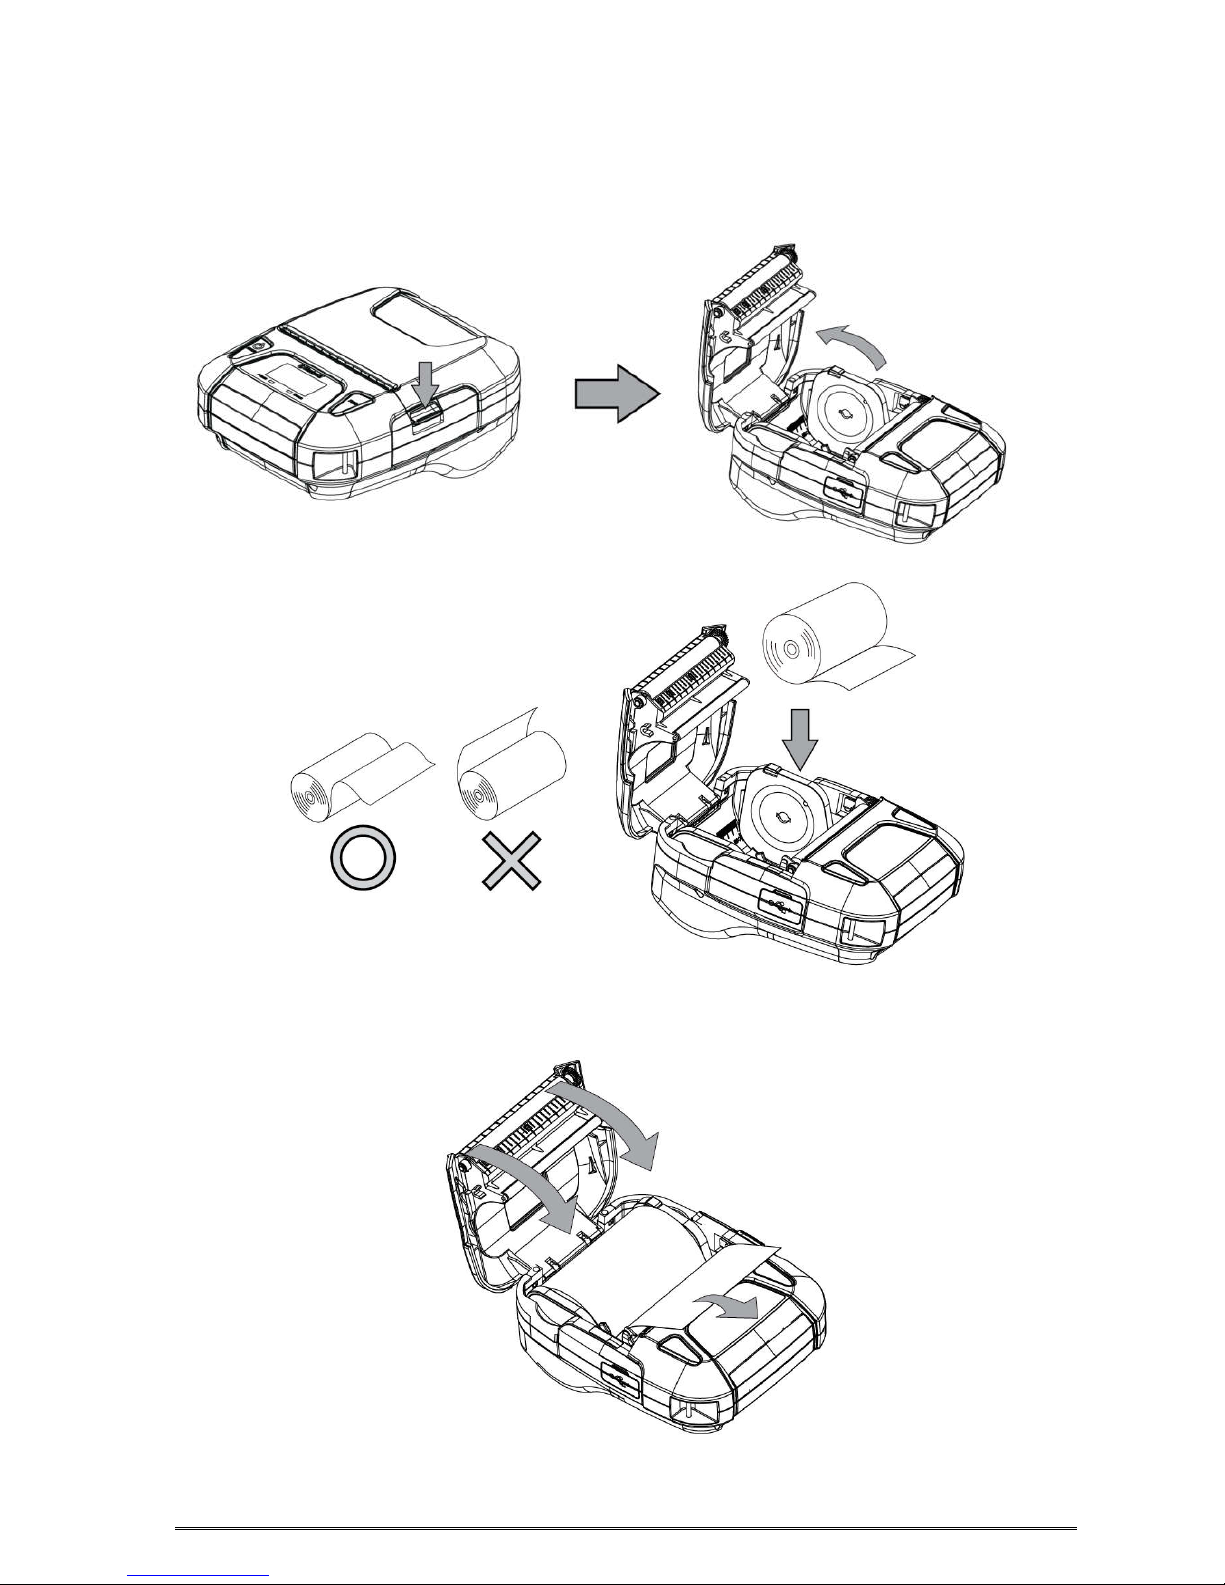
2.3.3 Loading paper to the printer
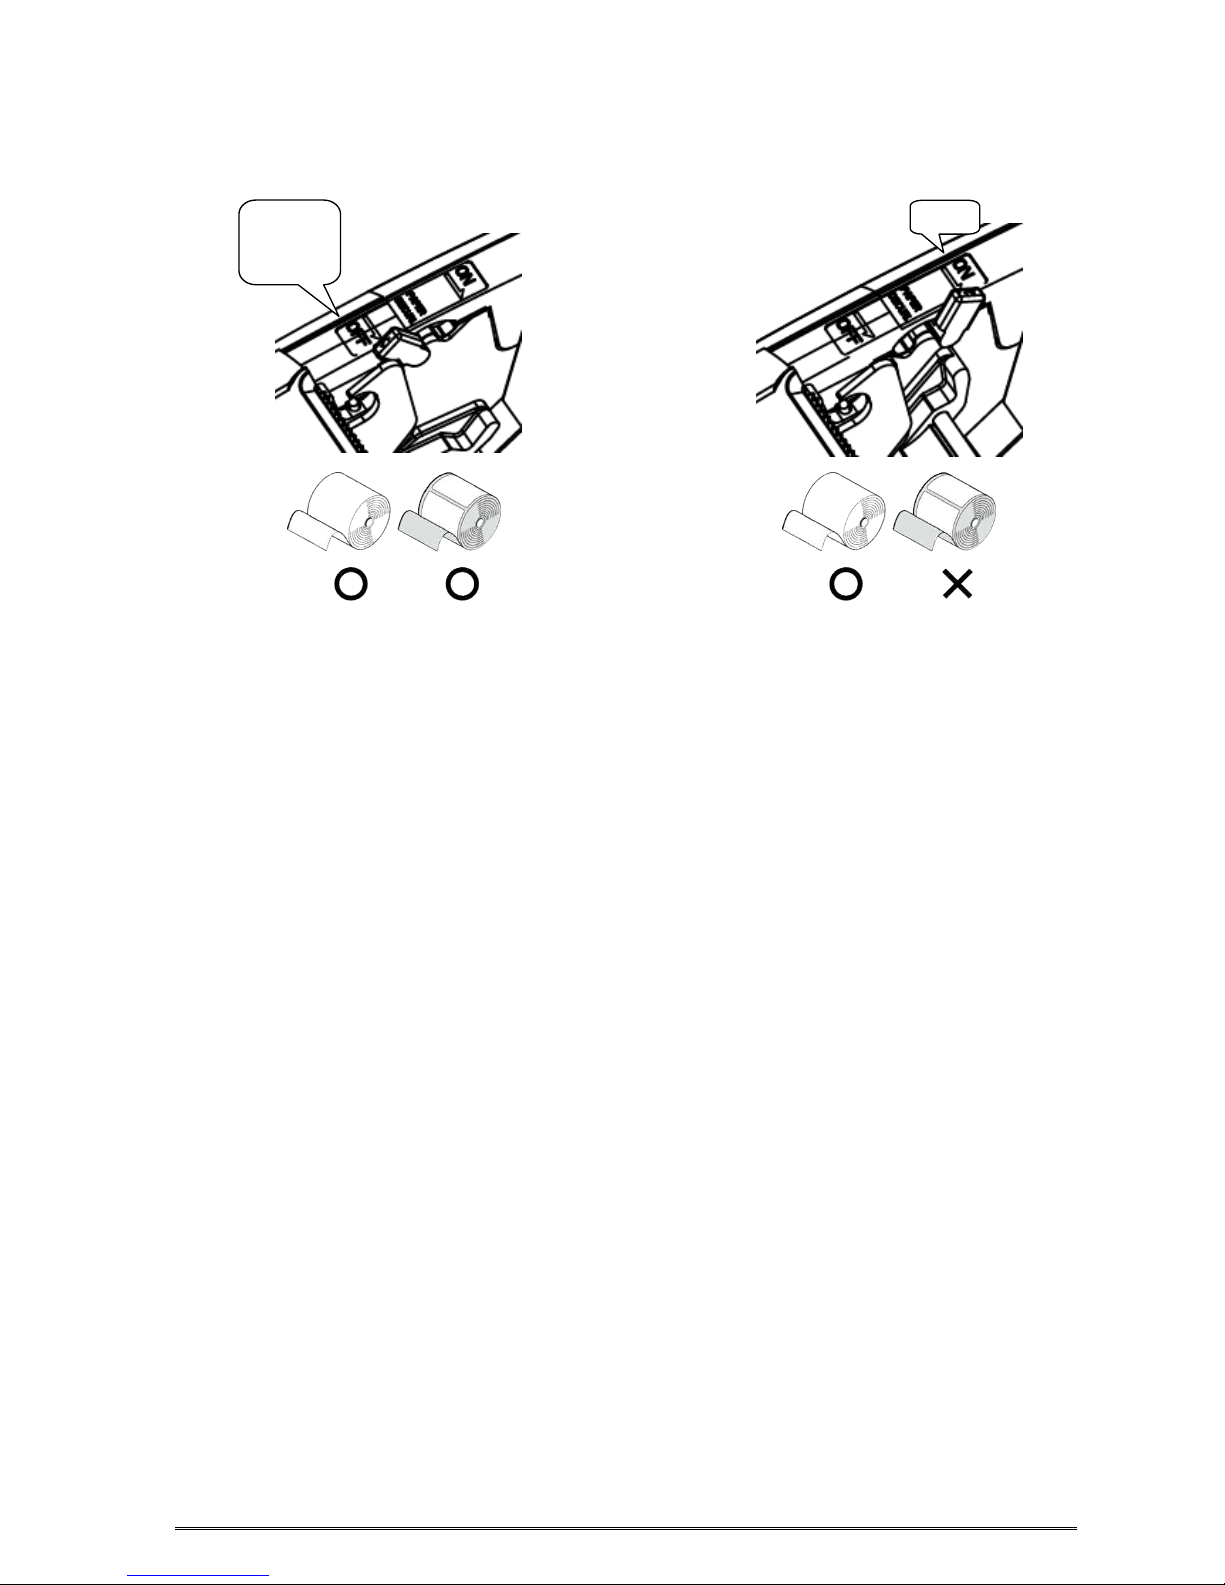
Refer to Section 5 “Paper”, to select roll paper that conforms to the specifications.
1. Press the cover open button to open the printer cover.
2. Load the roll paper in the orientation shown in the figure below.
3. Pull the end of the roll straight toward you. Then press down on both sides of the printer cover to
close it firmly. When you close the printer cover, make sure that it is closed on both sides.
4. Use the tear bar to cut the extra paper.
Caution Symbol
This symbol is placed near the thermal head to indicate that it may be hot. Never
touch the thermal head immediately after the printer has been used. Also, even
when the thermal head is not hot, do not touch it, because static electricity can
damage the devices inside the thermal head.
WARNING
1) Do not touch the tear bar.
• There is a tear bar inside the paper outlet slot. You could neither put your hand in the
paper
outlet slot while printing is in progress nor put your hand into the outlet even when
printing is
not in progress.
• The paper cover can be opened when replacing the paper. However, since the tear bar is
on the inside of the paper cover, be careful not to place your face or hands too close to
the tear bar.
2) During and immediately after printing, the area around the thermal head is very hot. Do
not touch it, as you could be burned.
CAUTION
When ERROR lamp is flashing, please make sure the cover is closed correctly. If it’s not,
open the cover and close it correctly.
When the paper is jammed, be sure to open the printer cover before removing the
jammed paper.
Do not under any circumstances try to pull out the jammed paper forcefully while the
printer cover is closed, doing so may damage parts of the printer.
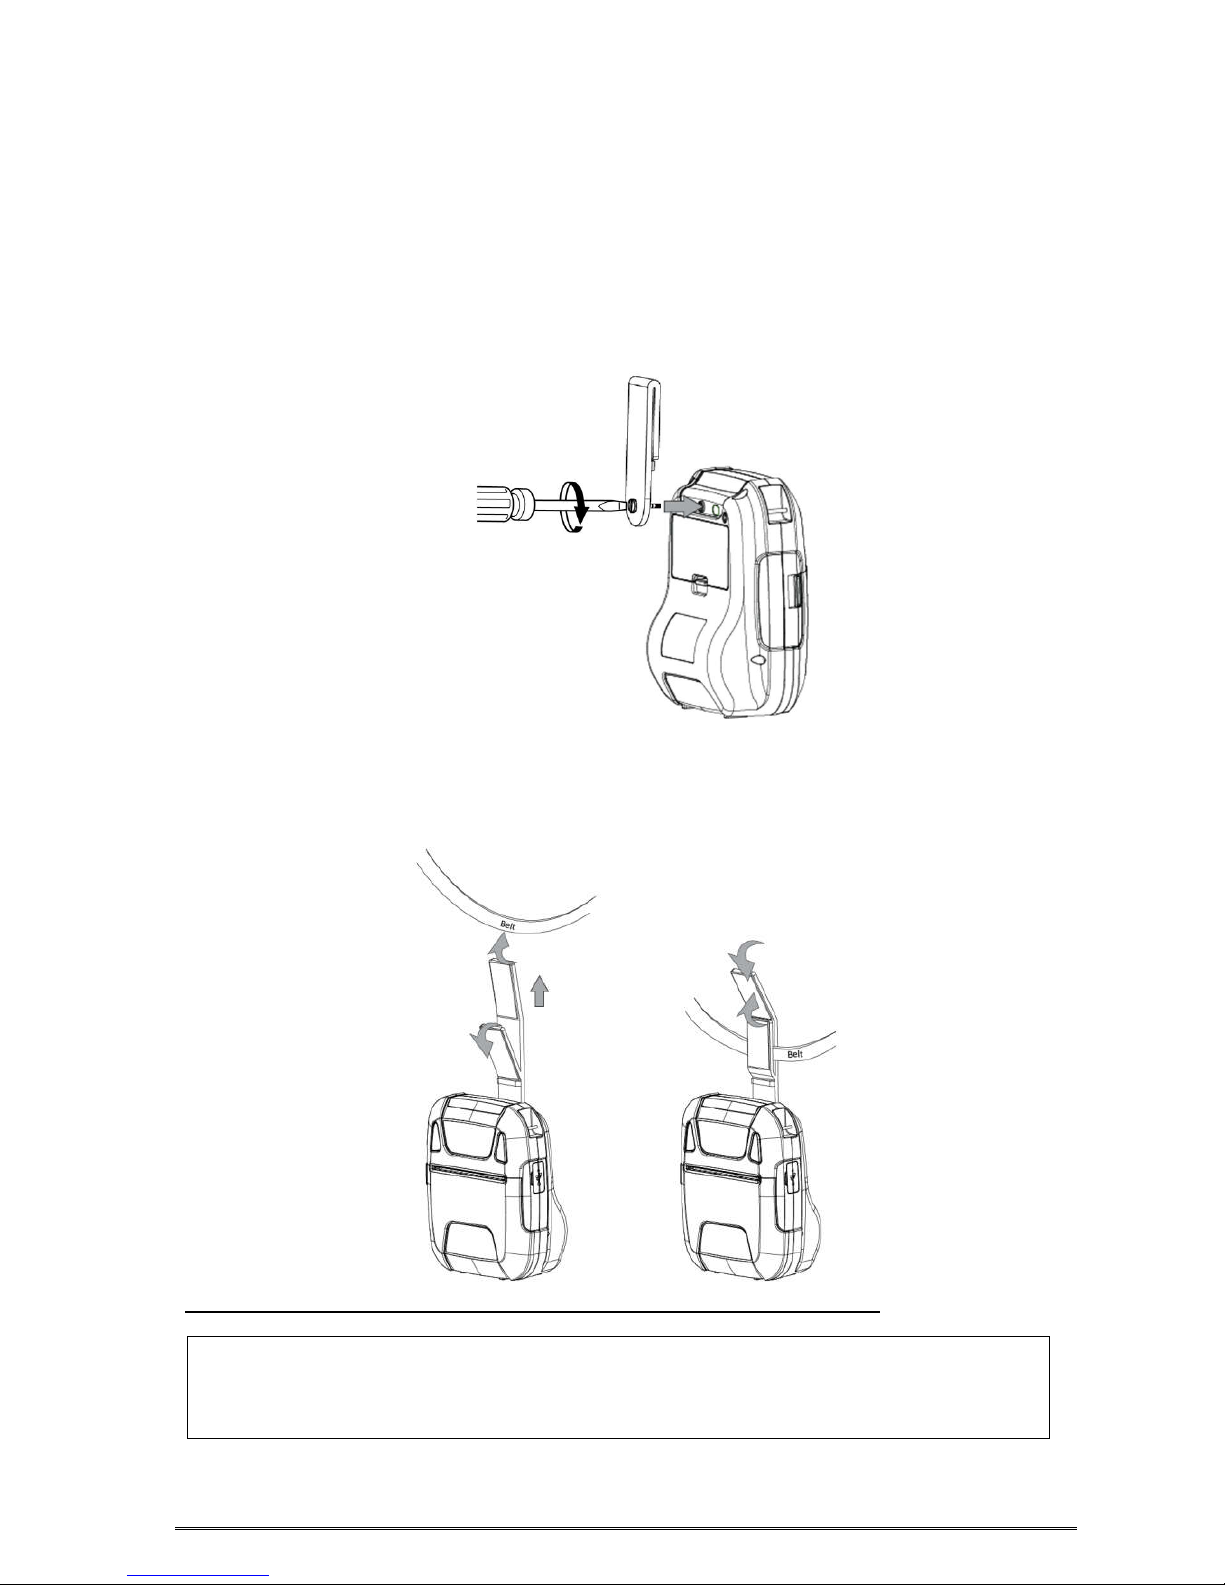
2.4 Belt Clip
2.4.1 Attaching to the Printer
Follow the procedure below to attach the belt clip to the printer.
1. Make sure that you are attaching the belt clip in the right orientation, then turn the screw that
comes with the belt clip into the designated screw hole to attach the belt clip to the printer.
Use a straight slot screw driver to firmly screw in the screw hole.
2.4.2 Using the Belt Clip
When the printer is attached to your belt, you can use it like the picture below.
Note: Be careful not to drop when use a belt clip. Velcro be securely fixed.
Hold the printer firmly with your hand when you swipe a magnetic stripe card or cut
paper. If it is not held firmly, you may fail to read card data or cannot cut paper smoothly
with the tear bar.
 Loading...