

Page 1

Information
This manual contains operating instructions and important safety.
The MTC400 Lithium-Ion Quad Charger is designed to charge up to four LiIon battery packs simultaneously. The contents of this manual are subject to
change without prior notice.
4 Unit Battery Charger
S300/S400 (MTC400)
User’s Manual
536 Nanatsushinya, Shimizu-ku, Shizuoka,
424-0066 Japan
Tel: (int+81)-54-347-0112
Fax: (int+81)-54-347-0409
Safety Guidelines
• Use only the power cord supplied in the package.
• Do not insert foreign objects into the charger.
• Keep the charger in a cool, dry place, away from direct sunlight, high te-
mperature, and moisture.
• Do not operate the charger if it appears damaged.
• Do not disassemble, incinerate, or short circuit batteries, the charger, or
related components.
• Do not operate the charger when your hands or body are wet.
• Do not operate the charger near water.
• To reduce the risk of burn, unplug the charger before cleaning.
• This charger cannot be used for any other types of batteries.
• Never attempt to disassemble or alter any part of this product.
Contact your dealer for assistance.
Suitable Environment for the Use of Quad Charger is as Follows :
1. Operation Temperature : 0℃ to 40℃ (No Condensation)
2. Storage Temperature : -30℃ to +85℃
3. Relative Humidity : 5% to 95% (No Condensation)
4. Altitude : 0-10,000 feet
5. Cooling : Convectional – Non-Vented Case
6. Applicable Battery Pack : A800-001 (Battery Pack S3 / S4)
1. Setting Up the Quad Charger 2. Using the Quad Charger
Connecting the Power Cable
Checking the Components
MTC400
Adapter
<The above items are standard accessories. If an item is missing from
the box, contact your dealer.>
User’s Manual
Power Cord
Part Name
1. Connect the AC cord to the adaptor, and connect the adaptor to
power jack of the Quad.
Membrane
Power Lamp (RED)
Charging Lamp
2. Plug the AC cord into the electrical outlet with an input-power of
100~240VAC, 50~60Hz, 1.7A. When the AC cord is plugged in,
the Red LED on the power lamp () is illuminated up.
1
2
Page 2
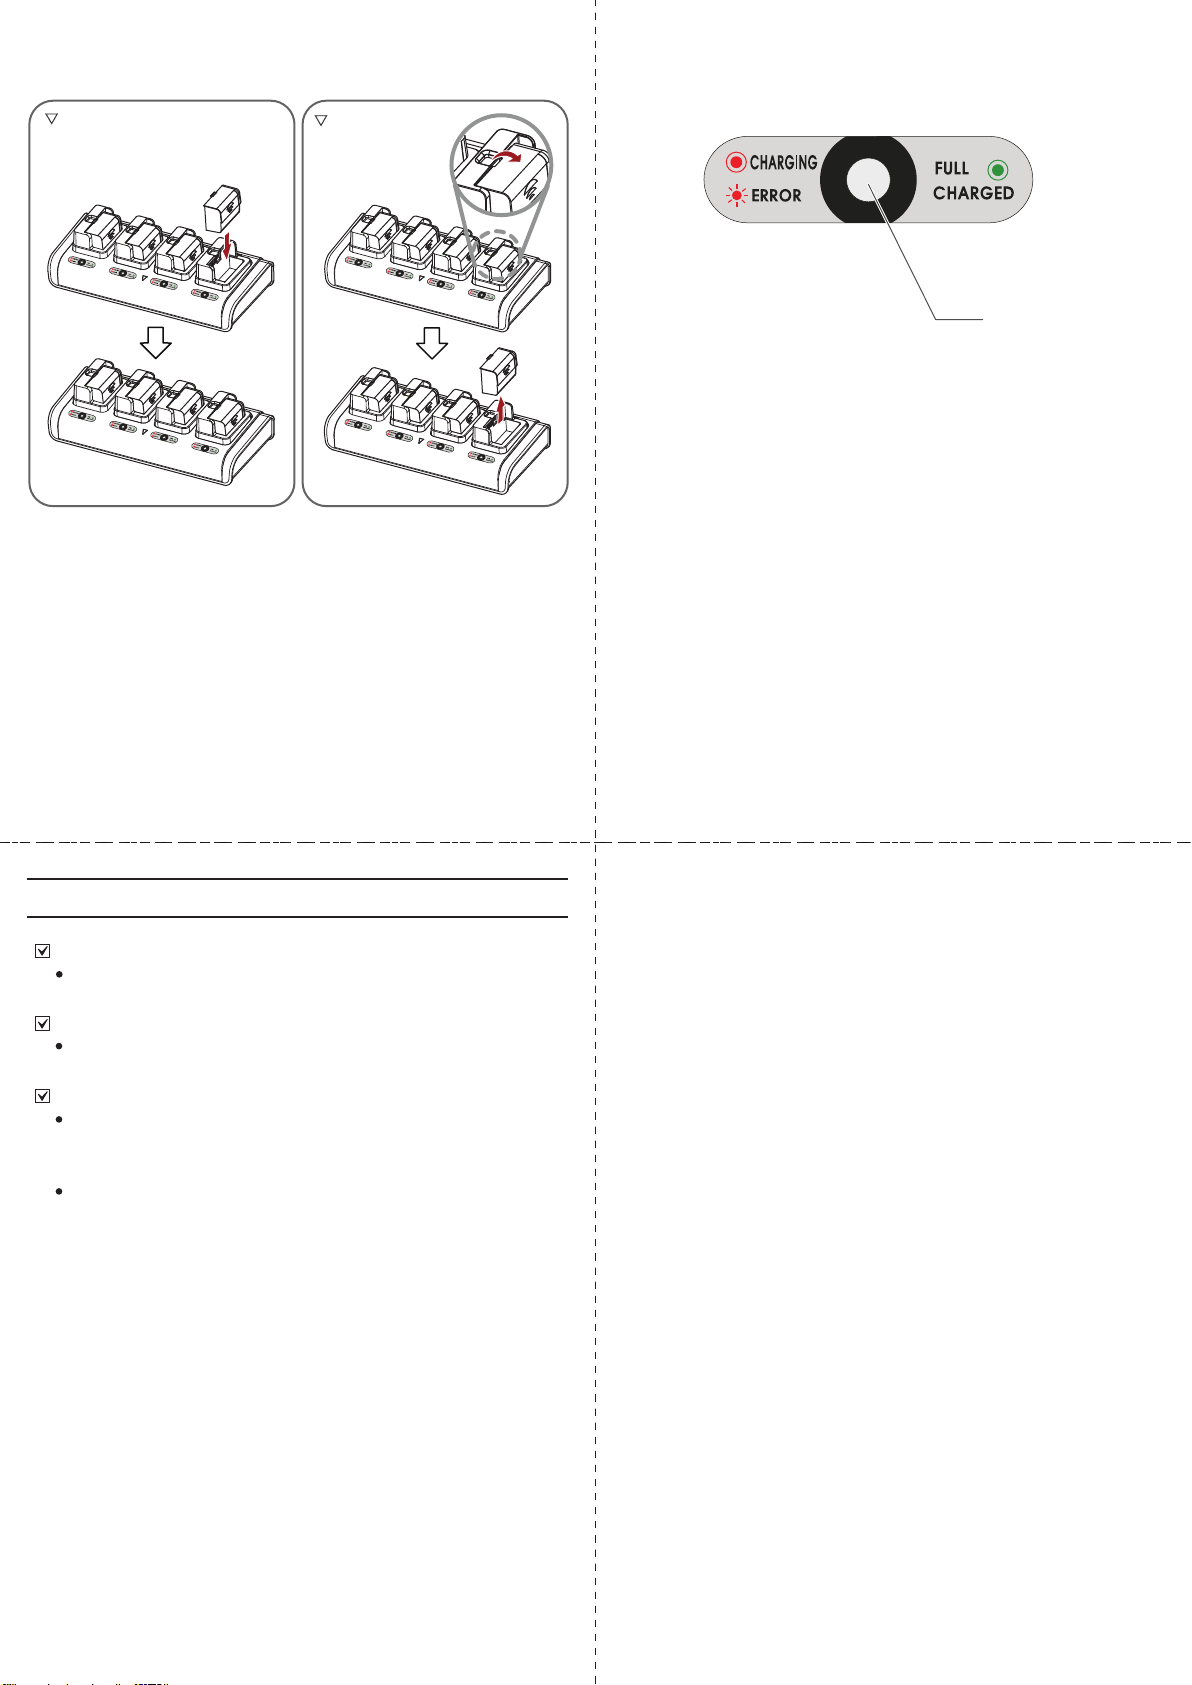
Charging the Battery Pack
Installing the Battery
1. Insert the battery pack into the charging bay as shown above.
2. Push the battery until it snaps into place.
3. If the battery is properly installed, the Quad will charge it.
The 4 charging lamps report status.
For reference, it takes approximately 90 to 120 minutes for the battery
to fully charge.
Removing the Battery
LED Indicator / Battery Status
Charging Lamp
1. Amber-Red-Green 2SEC ON and OFF : POWER ON
2. LED OFF : Battery Unloaded
3. Red LED ON : Charging
4. Green LED ON : Fully Charged, Trickle Charge
5. Red LED Flashing : Error
(see Trouble Shooting on Page 5.)
4. To extract the battery from the Quad, pull up on the side latch and then
remove it.
3. Trouble Shooting
If the power lamp () is turned off
Check if the adaptor is properly connected or not.
If LED is blinking when the battery is being charged
Check if the battery pack is properly installed or not
LED Status on Quad Charger/ Battery Charger
If a battery has been fully charged in the Quad and is then installed
into a printer with its AC adaptor plugged in, the charging lamp will
remain off indicating a full charge.
Likewise, if a battery has been fully charged in a printer and then
transferred to the Quad Charger, the charging lamp will remain off
indicating a full charge.
Consider these points if you see no illumination.
If you have additional questions, contact your dealer.
3
Federal Communications Commission Radio Frequency Interference Statement
is device complies with Part 15 of the FCC Rules. Operation is subject to the
following two conditions: (1) is device may not cause harmful interference, and
(2) this device must accept any interference received, including interference that
may cause undesired operation.
NOTE: is equipment has been tested and found to comply with the limits for a
Class B digital device, pursuant to Part 15 of FCC rules. ese limits are designed to
prov ide reas onabl e p rotec tio n aga ins t har mfu l int erf erenc e in a r esidenti al
installation. is equipment generates, uses and can radiate radio frequency energy
and, if n ot i nstalled and used in accordance with the instructions, may cause
harmful interference to radio communications. However, there is no guarantee that
interference will not occur in a particular installation. If this equipment does cause
harmful interference to radio or television reception, which can be determined by
turning the equipment o and on, the user is encouraged to try to correct the
interference by one or more of the following measures.
• Reorient or relocate the receiving antenna.
• Increase the separation between the equipment and receiver.
• Connect the equipment into an outlet on a circuit different from that to which the
receiver is connected.
• Consult the dealer or an experienced radio/TV technician for help.
is statement will be applied only for the printers marketed in U.S.A.
FCC WARNING
Changes or modications not expressly approved by the party responsible for
compliance could void the user’ s authority to operate the equipment.
For compliance with the Federal Noise Interference Standard, this equipment
requires a shielded cable.
For RF interference suppression, if a ferrite core is provided with this device, affix it
to the interface cable.
4
Copyright © 2010-2011 Star Micronics Co., Ltd. im00131EN
5 6
 Loading...