

Page 1
®
2.0
7” Tabletop
Two-Sided Grill
Electronic Controls
TWO SIDED GRILLS INSTALLATION INSTRUCTIONS
MODEL
These symbols are intended to alert the
user to the presence of important operating
and maintenance instructions in the manual
accompanying the appliance.
Go to:
www.star-mfg.com/scripts/manuals.aspx
to obtain this units installation & operations manual
along with other documents.
NOTICE
Using any part other than genuine Star factory supplied parts
relieves the manufacturer of all liability.
Star reserves the right to change specications and product
design without notice. Such revisions do not entitle the buyer to
corresponding changes, improvements, additions or replacements
for previously purchased equipment.
Due to periodic changes in designs, methods, procedures, policies
and regulations, the specications contained in this sheet are subject
to change without notice. While Star Manufacturing exercises
good faith efforts to provide information that is accurate, we are
not responsible for errors or omissions in information provided
or conclusions reached as a result of using the specications.
By using the information provided, the user assumes all risks in
connection with such use.
CAUTION
This equipment is designed and sold for commercial use only by
personnel trained and experienced in its operation and is not sold
for consumer use in and around the home nor for use directly by
the general public in food service locations.
Before using your new equipment, read and understand all the
instructions & labels associated with the unit prior to putting it into
operation. Make sure all people associated with its use understand
the units operation & safety before they use the unit.
All shipping containers should be checked for freight damage both
visible and concealed. This unit has been tested and carefully
packaged to insure delivery of your unit in perfect condition.
If equipment is received in damaged condition, either apparent or
concealed, a claim must be made with the delivering carrier.
Concealed damage or loss - if damage or loss is not apparent until
after equipment is unpacked, a request for inspection of concealed
damage must be made with carrier within 15 days. Be certain to
retain all contents plus external and internal packaging materials
for inspection. The carrier will make an inspection and will supply
necessary claim forms.
GENERAL SAFETY INFORMATION
GENERAL INSTALLATION INFORMATION
The unit time and temperature are preset by the factory to the
customer requirements. If adjustments are required, refer to the
time or temperature programming sections in this manual.
INSTALLATION
1. Plug unit into dedicated receptacle,
see nameplate for voltage requirements.
2. DO NOT plug into incorrect voltage line.
Doing so will damage the unit and void the warranty.
3. Each unit has been properly wired and inspected at the factory
for operation on the voltage specied on the nameplate.
4. DO NOT operate without burn guards (Certian units only).
DO NOT CONNECT TO ANY OTHER
WARNING
TYPE OF CURRENT OR THE MACHINE
WILL BE SERIOUSLY DAMAGED.
MAINTENANCE AND REPAIRS
Contact the factory, a service representative or a local
service company for service or required maintenance.
Go to www.star-mfg.com to nd a service agent near you.
Replacement cord sets must be purchased from Star Manufacturing
International, Inc. or our authorized agents.
Should you need any assistance regarding the operation or
maintenance of any Star equipment; write, phone, fax or e-mail
our service department. In all correspondence mention the
model number and the serial number of your unit, along with the
voltage.
Business Hours: 8 am to 4:30 p.m. Central Standard Time
Telephone: (314) 678-6303
Fax: (314) 781-2714
E-mail: Parts@star-mfg.com
Service@star-mfg.com
Warranty@star-mfg.com
Website: www.star-mfg.com
Mailing Address: Star Manufacturing International Inc.
10 Sunnen Drive
St. Louis, MO 63143
U.S.A.
2M-Z20466, Rev. - 5/26/15
Page 2
ALL UNITS
ELECTRONIC TEMP CONTROL OPERATION
Initial Start Up
Level unit using the adjustable feet under the unit (approximately
1/2" adjustment).
Before using the unit for the rst time, clean and heat for
approximately 45 minutes. The grill may emit a small amount of
smoke as the cooking surfaces reach 300-350°F. Do not be alarmed,
as the smoke is caused by oils associated with the manufacturing
process and will stop when the grill reaches 400°F. Best to do this
in a well ventilated area.
Seasoning The Cooking Surfaces
First Time Seasoning
Follow your company/corporate guidelines for seasoning cooking
surfaces or:
1. Bring the grill to 275°F by placing the unit in “CLN” mode
by pressing the “TEMP” button and button’s 2 & 3 for 3
seconds.
2. Wait for unit to reach 275°F (press the “TEMP” button to
display units current temperature.
3. Brush the cooking surfaces with a SALT-FREE release
agent. If using an aerosol agent, rst apply into a cup and
then brush onto cooking surface.
4. Let sit for 20 minutes, and then wipe clean using a warm
damp cloth.
5. To Exit “CLN” mode, turn unit “OFF” then “ON” or press any
of the four (4) program buttons.
Daily Seasoning
The grill should not require much seasoning while in use. In most
cases, brush a light coating of a SALT-FREE baking release agent
in the morning and occasionally throughout the day will be enough
to prevent any sticking. It is not necessary to spray before grilling
each item.
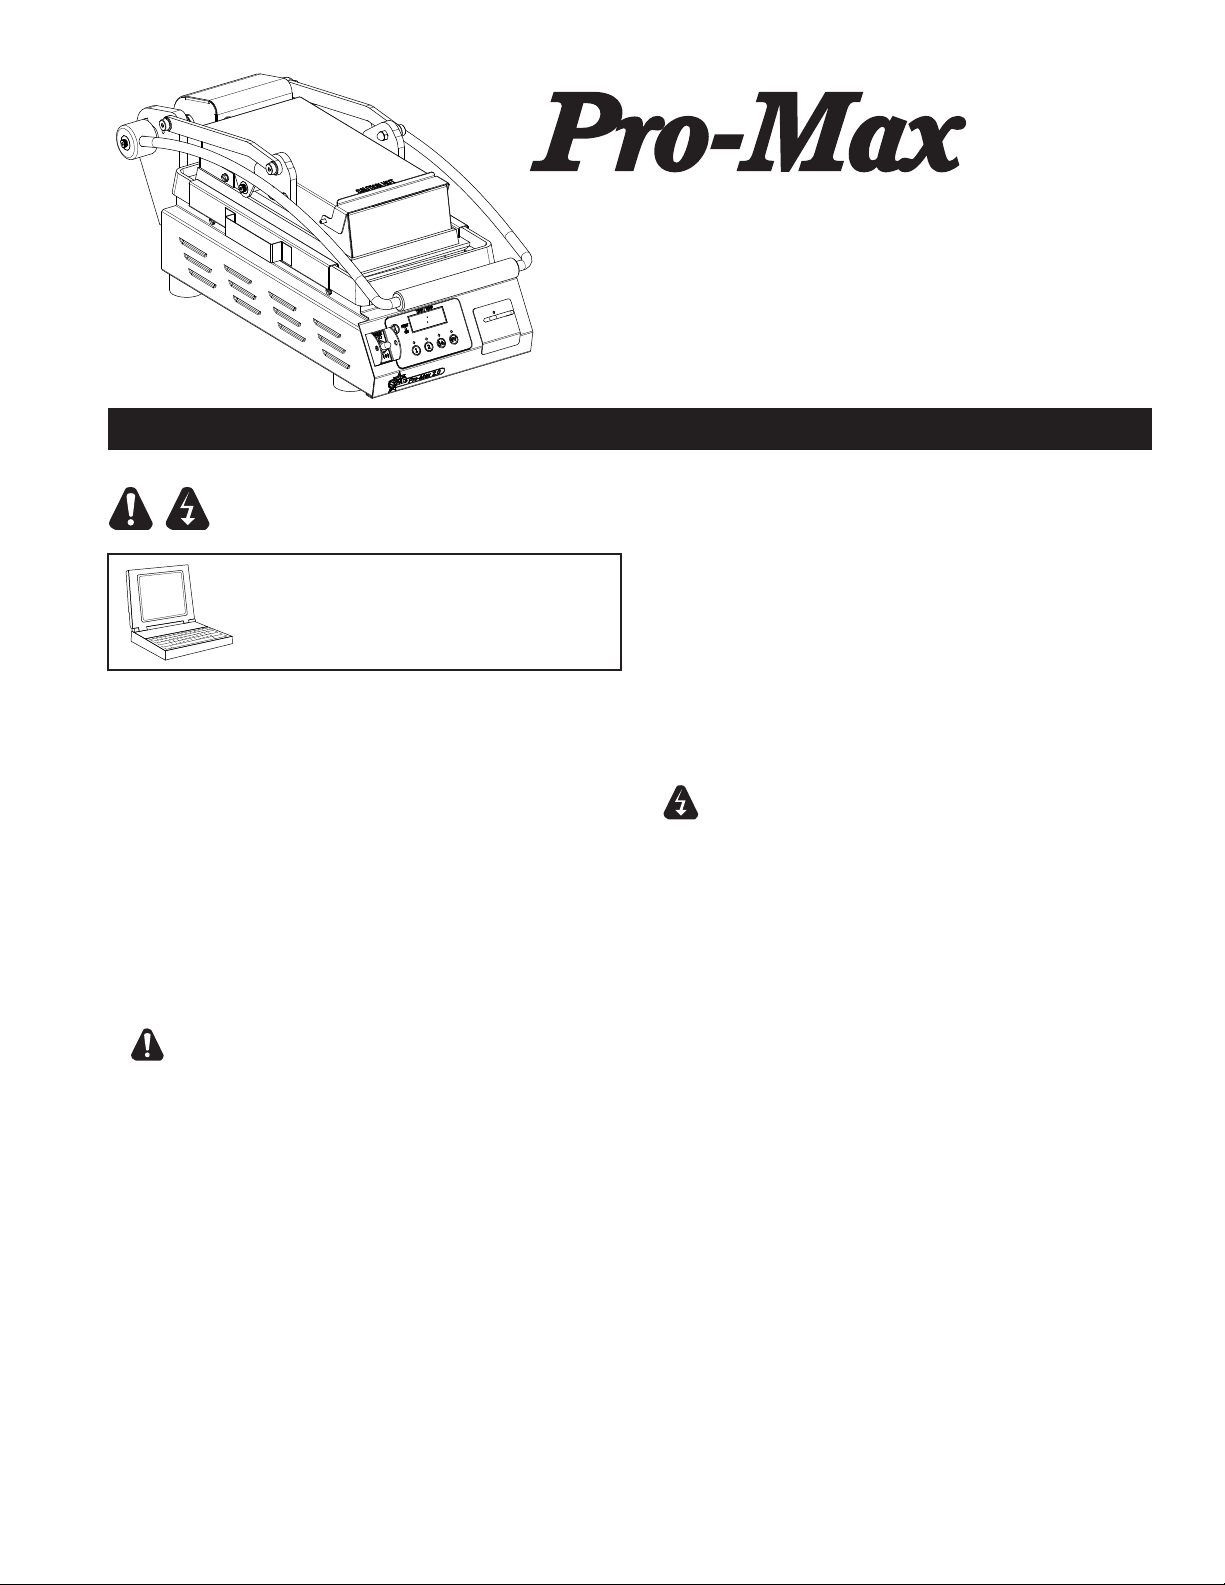
Time & Temp Display
Temp Button
1:30
Heat On
Indicator
LED
Operating Instructions
1. Turn the unit on by placing the switch in the ON position.
The HEAT ON indicator, Time & Temp Display & the LED
indicator will ash until it reaches operating temperature.
Initial startup heating time is approximately 30 minutes.
When the unit reaches operating temperature, the heat
indicator LED will turn off and the program LED and the
Time & Temp Display will stop ashing.
2. Place product on the cooking surface of the unit and close
the lid.
3. Press the PROGRAM button to start the timer, the LED light
above the button will “FLASH” and the displayed time will
count down to “0” at which time the unit will display “done”
and beep. To turn off the beeper, press the PROGRAM
button again.
4. To CANCEL a program during the cooking process, press
and hold the PROGRAM button for 5 seconds.
5. Raise the lid and remove the food product. Using a spatula,
scrape residue into the grease catcher tray.
NOTE: Metal utensils may be used; however, using nonmetal
utensils will prolong the life of the cooking surface.
6. Turn the unit off when it is not in use.
Using Multiple Timers:
1. Place product on the cooking surface and close the lid.
2. Press the (1st) PROGRAM button to start the timer, the
LED light above the button will “FLASH” and the displayed
time will begin counting down.
3. Place second product on the cooking surface and close the
lid.
4. Press the (2nd) PROGRAM button to start the second timer,
the 1st LED will change from ashing to solid, and the 2nd
LED will be ashing. The time countdown will be for the
program with the ashing LED indicator.
5. Pressing the (1st) PROGRAM button will change that LED
indicator back to ashing and the countdown display will
represent this program button. The LED indicator for the
(2nd) program will change from ashing to solid.
6. When the (1st) program is completed, “done” will be displayed
and an alarm will sound. The display will change to the
remaining time on the (2nd) program and that programs
LED indicator will change to ashing.
7. When the (2nd) program is completed, “done” and an
alarm will sound. The countdown time for the last program
selected will be displayed and that programs LED indicator
will remain solid.
Temperature:
You can view the unit’s actual temperature by pressing the temp
button.
Program Buttons
IL3001
Page 3
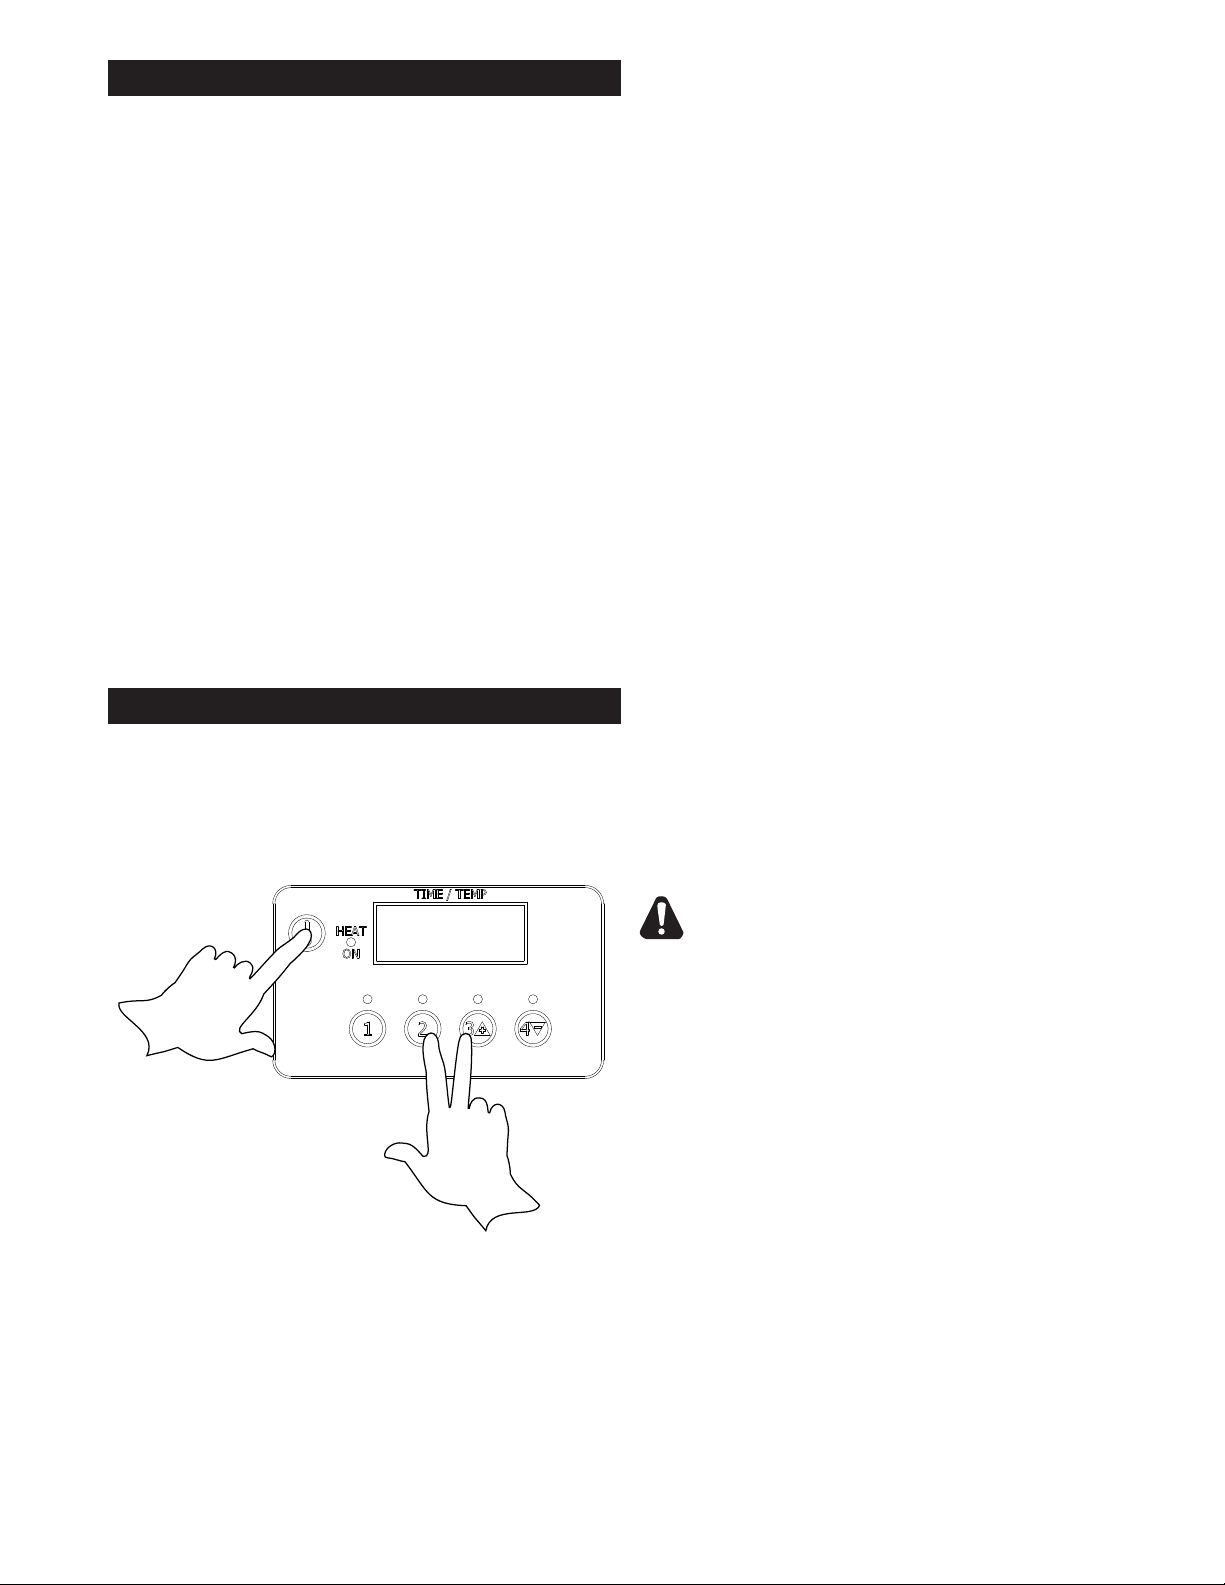
TO PROGRAM TIME AND TEMPERATURE:
1. Press and hold TEMP (actual temperature displays).
2. While holding TEMP, press and hold any program button on
the left for one second. The LED above the program number
will light and the display will read "_ _ _ _." Enter the fourdigit security code sequence: 4, 3, 2, 1. The security code
will not show on the display. Once the correct sequence has
been entered, the preset time will be displayed and the LED
for that program will begin to ash.
3. Set the desired time with the "3” increase or “4" decrease
buttons.
4. Press the TEMP button to save the time.
5. The bottom and top temperature settings can now be
programmed.
6. The bottom temperature setting for the selected switch will
now be displayed.
7. Change the bottom temperature setting using "3” increase or
“4" decrease. Press the “TEMP” buttom when the desired
setting is displayed.
8. The top temperature setting for the selected switch will now
be displayed.
9. Change the top temperature setting using "3” increase or
“4" decrease. Press the “TEMP” buttom when the desired
setting is displayed.
10. Press any other program button within 15 seconds to continue
programming without re-entering the security code.
ALL UNITS
Cleaning
Begin the cleaning procedure by following your corporate guidelines,
or follow the steps below.
1. Enter the cleaning cycle by pressing and holding the “TEMP”
button and buttons 2 & 3 for 3 seconds.
2. “CLN” will be displayed
7. Using a mixture of 1/2 tablespoon dish detergent & 1/2 cup
warm water.
8. Pour 1/4 cup of above cleaning solution onto the bottom
cooking surface.
9. Immediately spread cleaning solution around the surface
with cleaning pad. Use moderate pressure to scrape away
burnt-on food.
10. Apply cleaning solution to cleaning pad.
11. Use moderate pressure to scrape away burnt-on food on
top cooking surfaces.
12. Drain cleaning solution to grease trap.
13. Wipe off remaining cleaning solution with thick damp cloth
until clean.
14. Empty and clean grease catcher cup as required using
detergent and water after removing cup from unit.
15. Reseasoning the grill cooking surfaces by following the
Daily Seasoning procedures.
16. To Exit “CLN” mode, turn unit “OFF” then “ON” or press any
of the four (4) program buttons.
NOTE: It is best not to let food cook onto the grill, as food build-up
on the grill will increase sticking and smoking. In addition, carbon
may build up on the grill surface and reduce the cooking efciency.
Carbon Buildup: A black matter that forms on or near the cooking
surface. Generally this is a combination of: releasing agents, oils,
food particles etc. ,that have cooked to the surface. After a period
of time without cleaning, this will reduce performance and material
may start aking off. When that happens, follow the "Carbon
Cleaning" procedures.
Carbon Cleaning
When carbon build up occurs, use a carbon removal agent (safe
for aluminum surfaces) according to the instructions provided with
the cleaner. When this process is complete, you must re-season
the grill according to your company/corporate guidelines, or the
seasoning instructions in this manual.
CLN
IL3007
3. The cooking surfaces will go to 275°F (135°C), pressing
the TEMP button display the current temperature.
4. When the unit has reached 275°F (135°C), raise the
top platen and remove the non-stick protective sheets.
NOTE: COOKING SURFACES ARE HOT AND CAUTION
MUST BE TAKEN.
5. Scrape cooking surfaces with a spatula to remove any loose
food debris
6. If using a carbon cleaning agent (safe for aluminum or cast
iron) follow those instructions.
CAUTION
DO NOT IMMERSE OR LET THE UNIT STAND IN
WATER.
DO NOT HOSE DOWN THE UNIT OR THE TABLE/
COUNTER IF THE UNIT IS ON THE TABLE/COUNTER.
KEEP AWAY FROM RUNNING WATER.
DO NOT USE SHARP OBJECTS TO REMOVE
CARBON BUILD-UP.
DO NOT USE ICE ON THE COOKING SURFACE!
BEFORE CLEANING MAKE SURE POWER IS TURNED
OFF, UNIT IS UNPLUGGED AND IS NOT TOO HOT.
Apply only cleaners which are safe for aluminum
and iron surfaces.
DO NOT SPLASH FRONT CONTROL PANEL!
DO NOT SPLASH FLEX CONDUIT CONNECTING TOP
AND BOTTOM OF THE UNIT.
Page 4

22
3
23
4
9
8
5
6
7
19
20
21
10
11
24
14
18
13
12
5
5
15
16
3
1
17
2
1
40
36
37
38
39
28
36
34
35
37
26
27
45
44
35
34
25
29
30
29
31
32
33
41
42
43
42
33
40
46
Model: PST7E-CH Platten Assy
47
29
48
49
29
SK2911 Rev. - 6/30/15
Page 5

Model: PST7E-CH Platen Assemblies
Fig. No Part Number Qty Description Application
1 2C-Z18300 2 SCR,SHLDR,SS,3/8 DIA.X1.0
2 2B-Z19515 1 ARM,RIGHT,7 IN.
3 2C-Z18751 4 SCR,SHLDR,SS,3/8 DIA.X.50
4 D9-GR0650 1 LINK AY., LEFT
5 2C-Z18752 4 LOCKNUT, ACORN,1/4-20,SS
6 2C-37498 4 BOLT HEX 3/8-16 X 1 SS
7 2V-Z18468 1 PLATE, LIFTING, LEFT SIDE
8 D9-Z20580 1 PTFE BRACKET, FRONT CLIP
9 D9-GR0746 1 WELD ASY, TOP HOUSING, 7”
10 2C-Z3780 2 RETAINER, CONDUIT
11 2C-Z3917 2 RIVET, POP, .188 (AD66BS)
12 2E-Z2898 1 CONDUIT ASSY. - PTFE
13 2A-Z3827 1 PLATE,STAMPING - CONDUIT
14 2E-Z3768 1 LOCKNUT, CONDUIT, 1/2 IN.
15 2V-Z18311 1 PLATE,LIFTING,RIGHT SIDE
16 D9-GR0651 1 LINK AY., RIGHT
17 2B-Z19514 1 ARM,LEFT.7 IN.
18 D9-Z20575 1 PTFE BRACKET, REAR
19 2R-Z20574 2 MAGNET
20 D9-Z20579 1 INTERNAL BRACKET
21 2C-Z6929 2 NUT, 10/24 KEPS SS
22 2V-Z19512 1 HANDLE,7 IN.
23 2C-Z18749 4 SCREW,SS,10-32X625 PH FHD
24 2C-2853 1 SCREW #8X5/8 A THP STL NP
25 B9-04-WB-0046 1 CLAMP WIRE SUPPORT
26 2C-Y1451 2 RIVET 1/8 x .337 MORISON
27 D9-Z13012 1 WIRE MOUNT
28 D9-Z2133 1 INSULATION FIBERGLAS TOP
29 2C-Z2893 16 NUT 10-24 HEX STL ZP
30 D9-Z13013 2 BRACKET, INSULATION HOLD
31 D9-Z13011 1 PLATE-TOP ELEMENT RET.
32
33 2C-08-07-0285 8 SCREW 10-24X3/4X3/8 TYPE
34 2C-1512 3 SCREW 10-24X3/8 RHP STL
35 2C-1827 3 WASHER #10 EXT STL NP
36 2C-8833 2 SCREW 8-18X1/2 HEX STL NP
37 2C-Z3350 1 HALF CLAMP .188 D STL ZP
38 2E-Z3278 1 RTD PROBE - 60” LONG WIRE
39 D9-Z3903 1 BRACKET, PROBE MOUNT
40 D9-GR0722 2 LOWER BRACKET ASSY
41 PS-GR0356 1 KIT, 2F-Z3237 TOP CASTING, SMOOTH
42 2C-Z5883 8 10-24 X 1/2 FZA SCREW
43 2F-Z17103 1 CASTING,BTTM,SMOOTH,AL,7
44 D9-Z19534 1 BRACKET,PROBE,BOTTOM,7
45 2E-Z1470 1 SNSR-RTD,2K OHM,24”LDS
46
47 D9-Z12012 1 PLATE, BOTTOM ELEMENT
48 D9-Z19424 1 INSULATION,7,BOTTOM
49 D9-Z12885 2 INSULATION HOLD DOWN,
PS-Z9325
PS-Z9326 ELEMENT HEATING TOP 500W 230V, 240V, UK
2N-Z17082
2N-Z19546 ELEMENT,925W,240V, 7 BTTM 230V, 240V, UK
ELEMENT HEATING TOP 500W 120V
1
ELEMENT,925W,120V,7 BTTM 120V
1
Page 6

1
2
3
4
2
5
6
7
8
9
6
29
28
27
30
26
31
33
25
23
32
2
18
2
34
20
21
22
35
19
18
14
15
16
5
10
10
10
10
17
24
Model: PST7E Base Assembly
SK2845 Rev. - 1/26/15
Page 7

Model: PST7E, PGT7E Base
Fig. No Part Number Qty Description Application
1
2 2C-Z2594 19 NUT 6-32 HEX W STL NP
3 D9-GR0680 1 WELD AY.,RELAY & TFMR MT.
4 2E-Z3335 2 RELAY DBL POLE-SNGL THROW
5 2C-Z18302 2 SCR,SHLDR,1/4 DIA.X1.5
6 2A-Z18301 2 COLLAR AND STOP
7 D9-Z19543 1 SPRING COVER, 7”
8 D9-GR0704 1 ASSY.,HINGE,7,Z18289 SPRG
9 2C-41180 12 BOLT HEX 1/4-20X1 1/4
10 2C-20301-20 6 NUT LOCK STOVER 1/4-20
11 2K-Y2968 1 BUSHING - HEYCO 7W-2 120V, 240V
12 2C-Y6138 6 RIVET 1/8X.250 POP SS SM
13 D9-Z19225 1 CORD PLATE 120V, 240V
14 2C-Z3447 1 NUT 8-32 HEX W/EXTERNAL
15 2E-Z2894 1 TERMINAL BLOCK (304)
16 D9-Z19226 1 PAN,TERMINAL BLOCK
17 2R-Z18201 4 FOOT 1.69X1 SIL 1/4 20
18 2C-6349 10 SCREW #8X3/8 B THP STL NP
19 D9-Z19505 1 ANGLE,CTRL,7
20 2C-8477 2 CLIP .125 PO STL PHOS
21 2M-Z18452 1 LABEL, PRO-MAX
22 2M-Z15305 1 STAR LOGO, SMALL
23 D9-GR0696 1 WLD & RIVET AY.,7 GRS HSG
24 D9-GR0690 1 GREASE CUP AY.,7
25 2E-Z3808 1 SWITCH(EATON)-30A@120V,
26 Z1-70-07-0343 1 SWITCH GUARD
27 2M-Z18461 1 LABEL, POWER, ON AND OFF
28 2I-05-07-0013 1 BOOT SWITCH
29 2M-Z19409 1 OVERLAY,Z11593 EL CONTROL
30 2J-Z11593 1 CONTROL BOARD, SINGLE SG
31 2K-Z1971 4 SPACER .257X.75X.25 NYLON
32 2K-08-07-0004 4 SPACER ROUND NYLON
33 D9-Z19533 1 INSULATION,ELEC. CTRL.,7”
34 D9-Z19242 1 HEAT SHIELD,CTRL,7
35 2K-Z19330 1 BUSHING HEYCO #2883
NI 2E-Z2935 1 CORD SJTO 14/3 NEMA 5-15P 120V
NI 2E-Y9251 1 CORD SET CONT EUR 16AMP 230V
NI 2E-Z9192 1 CORDSET(DETACHABLE) - UK UK
NI 2E-Y9253 1 INLET IEC 320 16 AMP 230V, UK
NI 2M-Z19532 1 OVERLAY,BEZEL,GRS. CUP,7
2E-05-07-0351
2E-05-07-0350 TRANSFORMER 230V/10V 6VA 230V, 240V, UK
1
TRANSFORMER 115/10V 6VA 120V
Page 8

1
2
3
5
6
1
4
4
IL2986, Rev. B 6/29/15
D9-GR0720; 7” SG NON-STICK SHEET KIT
Fig No Part No Qty Description
1 2C-Z5883 not included SCREW, 10-24 X 1/2 SELF-DRILLING
2 D9-Z20145 not included REAR BRACKET
3 D9-Z20580 not included
4 D9-GR0722 not included LOWER BRACKET ASSY
5 2H-Z20036 6 UPPER NON-STICK SHEET
6 2H-Z20035 6 LOWER NON-STICK SHEET
PTFE BRACKET, FRONT CLIP
STAR MANUFACTURING GROUP
Star - Holman - Lang - Wells - Bloomeld - Toastmaster
10 Sunnen Drive, St. Louis, MO 63143 U.S.A.
(314) 678-6303 (314) 781-2777
www.star-mfg.com
 Loading...