

Page 1

USERS MA
NX-2430w,-m
DOT MATRIX PRINTER
ZB
80825520
Page 2
NX-2430
MU
USMA
NOINTEF SA
Page 3

FedeCommuniComm
RadFrequ
Interf
Sta
Thiequiprnhabe
test
anfnut cmnwit Iif aClB didepu
1 Par1 o FCRuleThelimm desi[ proreasproag
ha
intert’erei a resicfen
installa
‘rhequi
gener
usa c rar t’
cnergamlifnoinstalanusi accorwit instrm cahaint
1 mdico[llrllutlic~i(Howe\thei n gutirthinterw n o i apa
install~i[I thequipmdocwh~ir
intc]-
1 rao tclrecw c
h dcrcrminb turnthequipot’to t usiscnct t t cot int
b ono morotthfollnmewu
. Reorio relocthreceWen
.
lncrea
[hseparabetwthequifirece
. Conne[h
equipm
ina ou!o a cirdit’t’t t w t rei
connect
. [-ons[hdealo a experiradtechf he
IJn~uthori~modifictiof’t
pmb t uswivoh autt opt eq
unleexpresapprob thparrespont’compl
Focompli:iwithFmieNoiIntcrt’Sumthequrea shc
T//(
,/.\r(II[>t}I(//@i(ml/(IJriIIHI<{r/ th[!.
Stato
ThCanaDeparo Commu
RadInterfRegul
Thidigitapparadonoexcth
Cla
B limf rannemif diap
senui thRadInterfeRegulao t
Cana
Depan Comm
L pr:setipptirnum<rin’drpad brumdioc!lddpI liappa
apporeinurndriq
d l claB prescclI R?gls I brnradic
paI minis~deCommunicad
Carm
Th(IIJ(I.st<)rct>(1/J/)(IHI(pIitInw)k<; CuI
TradeAcknowl
NX-243NX-24NX-24SF-1PT-IRC-
DC-
SPS Mi
(’o.
L[d
IBM-PPS/PC-APropriX24Propr24PSprilnteBu
MachinCmLQ436LQ-85SeiEpsCo
N071
● AlrighTesclmReprnduo a pao thmai m f whaw
STARexprpermisi forhid
● Thcontco thmanw subjt chawitnot
● ,41et’fuh~ibematcrent accLot conotmaa t l of
[{nwevshouW errh detecSTwogretippheino t
● Th:the IIotwithst:lfSTc assn responf a cri t m
O Copyr19StMicrC L
Page 4
H T U T MA
Thmani orgainn chaT l h t m t b
uso yopriy a urt r thch1 t 6
Chap7 thr9 m b tra a
ref
g f pr
operatetI assa deo kno t o o
compuT chaa a fol
Chap
1 Intro
Thchaindit pri
fea
o y prt n a
functo t pricompa a acexo t m f
stythyopric pro
Chap
2 — SetU t Pr
Thchaexph t g t pruna s u R t
chapbefy d anyel
Chap
3 — PaInstaa U
Thchadesct instf prs a sep
typadjut prig a inspa
Chap
4 — ConPaOpe
Thea a numo cono t frp w p v
functrelt pahanprm a f se
Aftperfot s u o t prir t cha t o t
procet fio h t prwo
Chap
5 — DefSettim
Thchaexph t s t EleD S ( m t
mayoprimayosya son
Page 5
Chap6 — Trouble
Thsectsha lio chpot foi y p i n
workpropI alincdeo s roma
operay c peryouI i n hoa cos
manuCayoauthsercei y a uno y a
t caro a mainto seropeo t pr
Chap7 — OptiAcce
Thchapexplt optaccet a avf y
prin
an
h t insa u th
Chap8 — PriConCom
Thchapexplt diffemuprb y pra
thsoftcommtha ust dri T sei o u i y
arwrito modiprot t advo t prfe
Chap9 — Refe
Thsectprovrefef y pris a spet
pino inteconna t chata
Thcharatachagit difchas av
Page 6
Chap
1
T O
CO
INTRO
Pricomp
Sumo prifea
Fostexa
Chap
2 SETU T PR
Priplac
Unpaa insp
Setu
Insta
t plk
Remot frco
Insta
t ricar
Insta
t frco
Insta
t pagu
Insta
t muco
Connt intca
Confiyosoff t pr
Chap
3 PAINSTAA U
Seleo pa
Adjut prig
Loafanfo
Loat pa
Papar
Paunpa
Teo fun
Loasinsh
Chap
4 CONPAOPE
Buta indifun
O LI
PAFE
EJECT
PI
FO
1
2
4
6
9
9
1
1
1
1
1
1
1
1
1
1
1
1
2
2
2
2
2
2
2
3
3
3
3
3
3
3
Page 7
Powefunc
Shtemo
Lotemo
Prartemo
Pilomo
Folomo
Foa Pilomo
D adjusmo
Hexaddu
Swicombifunc
Fofe
T o fo
Formicr
Revmicr
Chant auloapos
Cleat buffre
Samadefi
Condiindib mesa to
Sumo dismes
Sumo beto
Chap5 DEFSETTIM
H’t s t E mo
Functo t E set
Chap6 TROUBLE
Chap7 OPTIACCE
AutomShFee
Setu
Loapa
Feea sinsh
PuTraUn
Setu
Loapa
FoCartra R Cart
InterConv
D swifunco t Con
3
3
3
3
3
3
3
3
4
4
4
4
4
4
4
4
4
4
4
4
4
4
5
5
6
6
6
6
7
7
7
7
7
7
7
—
Page 8
Cha8 PRICONCO
Foconcom
Chars com
Charsia picom
Vertposcom
Horizposcom
Grapcom
Downcharcom
Otpricom
Cha9 REFE
Specifi
Pino intecon
Para
inte
Serinte
Charse
Stan
char
s #
Internchas
I chars #
Chars #
I spechas
Proporspata
IND
COMM
SUM
8
8
8
8
8
9
9
9
9
9
9
9
9
1
1
1
1
1
1
1
1
1
1
Page 9

Page 10
ch1
IN
Thprih afucompo feamai a exp
foa perscompI supt Epsprc a
chara
seenai t prj abany c c
gener
botea gra
Th
seleo pay c u i a vaa t t o doy
caprodThpriacca o t fop
● Sinshe(cfoa sta
● Fanfo(confo
● Multifo
. Preprfo
● Lab
ThMultiprih 1 res(inf w y c p
The
inc2 Drfo
● High-Dr
● Dr
An
9 LetQuafo
● Ro
.
● SansPropo●
‘ Pres
●
Ro
Prop
●
Co
●
Pre
Prop
●
Sa
CoPr
S
I addiy c pr
wi
varo f b u o F
Cartri
Th
conpah fibuta o L diT L d
anbetoproimmee t undfew y
pret buto t conpa
Th
fibutc opei combt pea suv
o functinclsaa ma
Th
PaParfuneny t k faf p i
readiwhprio sishpa
T g acquawit pricoma capr t t
inform
o t pathfo
1
Page 11
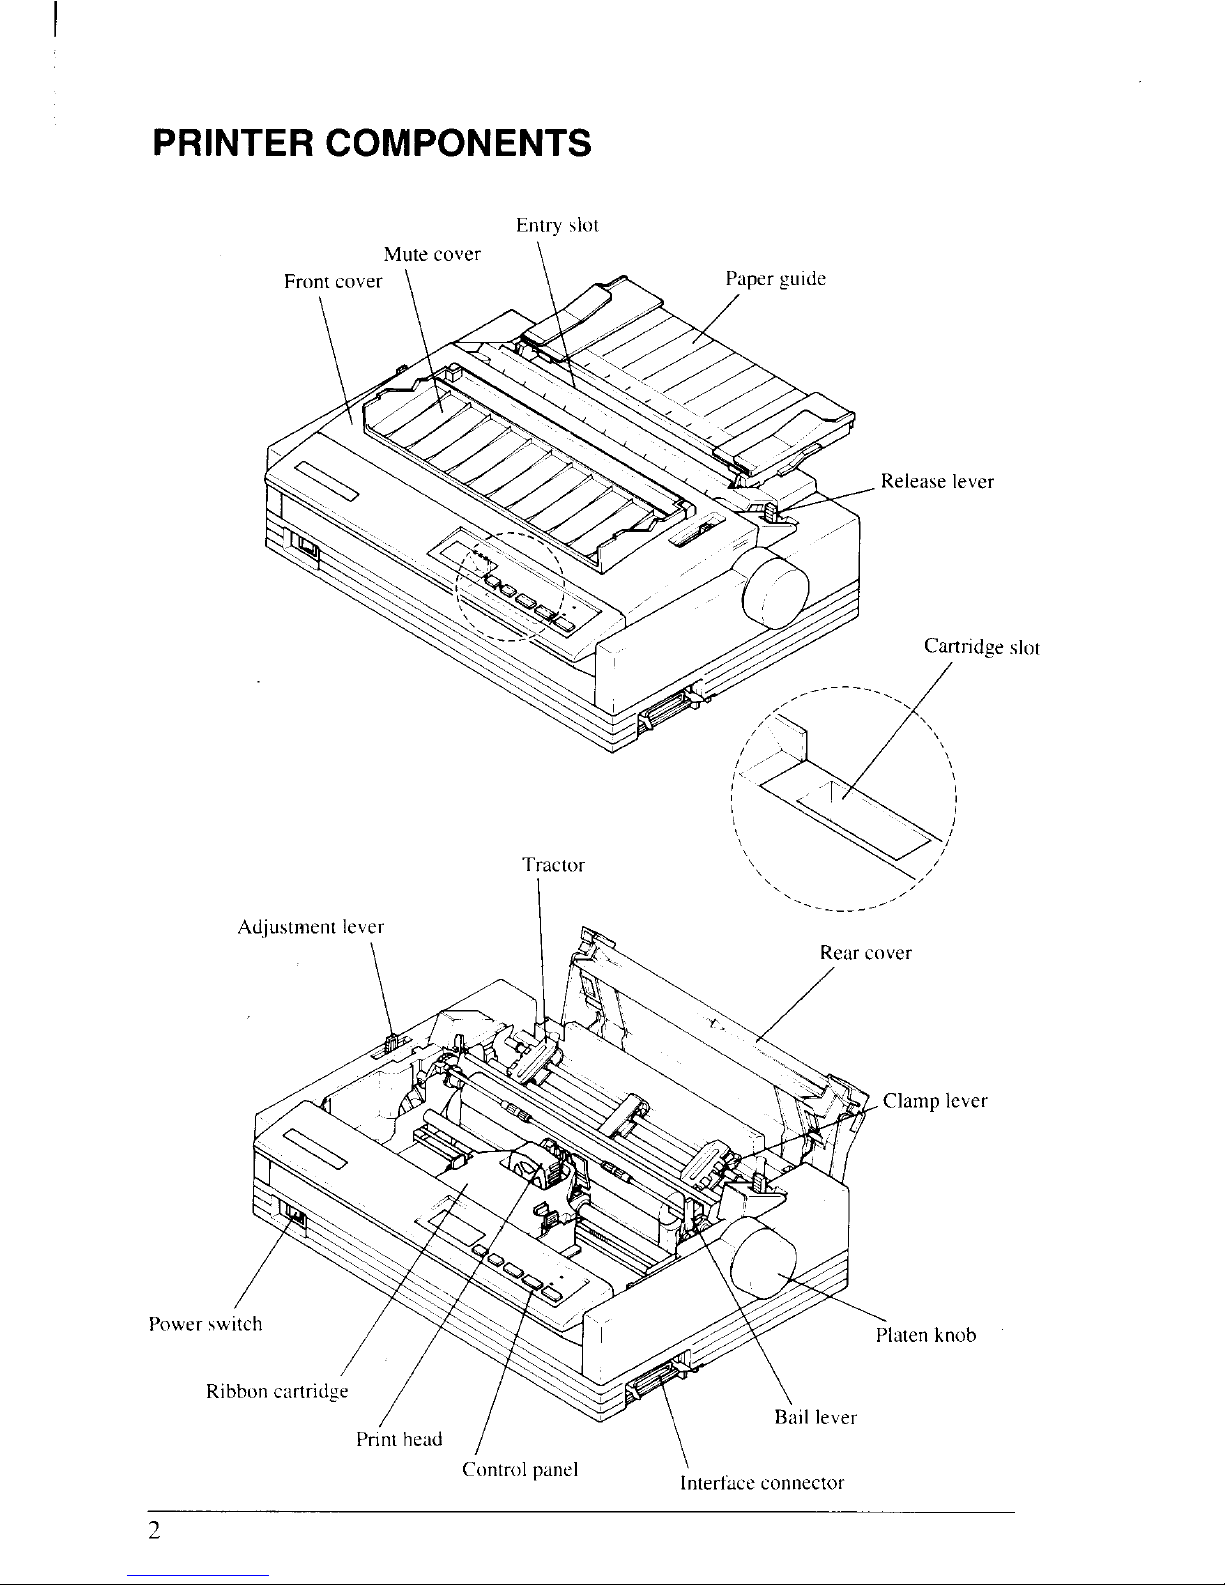
PRI
COM
En$I
Mucov
\
AdjustIek
\
\
Rel
Cas
L
..
/
- — -
‘
R c
A “ ‘ /
Pow
‘ibb/ /
_
Plk
B le
Prihe
/
Contpa
\
Intcon
2
Page 12
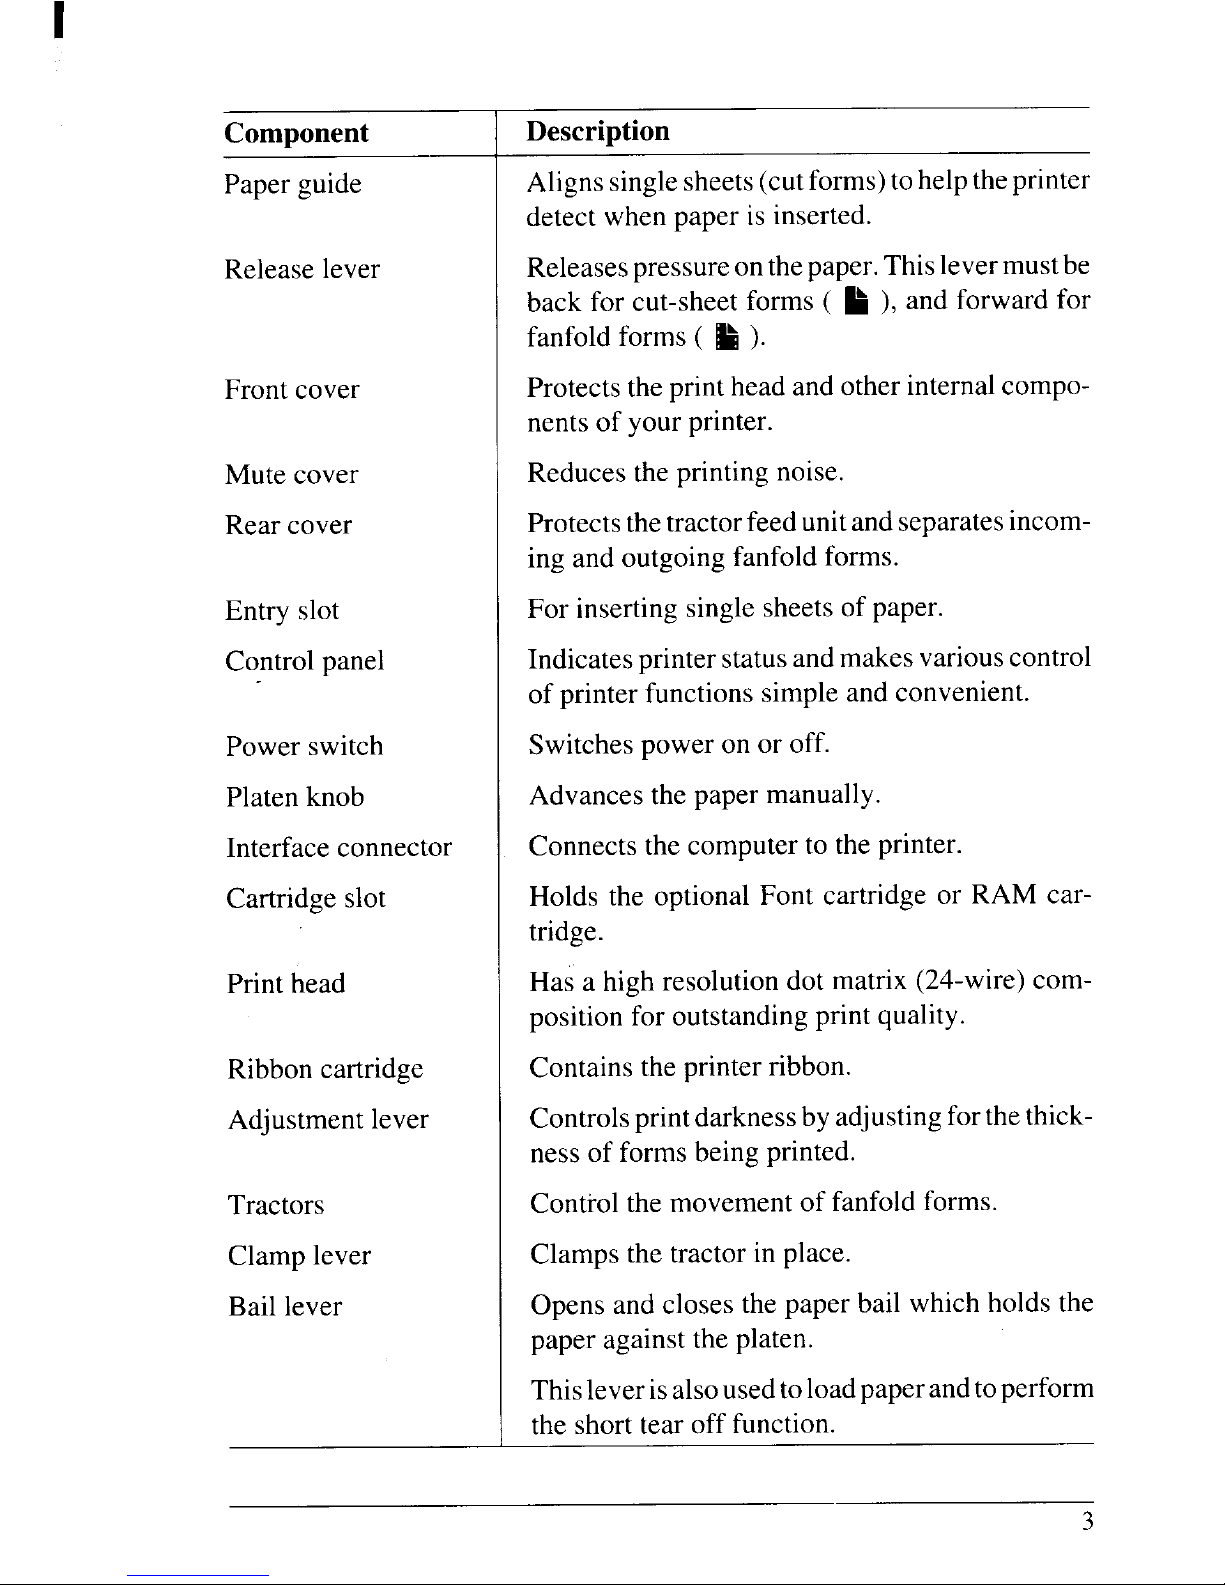
Compo
Pap
gu
Rele
le
Fro
co
Muco
Reco
Ent
sl
Conpa
Pow
swi
Plakn
Inter
conn
Cartr
sl
Pri
he
Ribcart
Adjusle
Trac
Cla
le
Bale
Desc
Alsish( f t h t p
dew pai in
Rel
pre
o t p T l m b
baf cutf ( k ) a f f
fanfo( k )
Prot prh a o i c
neo y pr
Redt prno
Prot trf u a sei
i a outfaf
F inssisho p
Indprsta m v c
o prfunsia co
Swipoo o o
Advt
pa
ma
Cont cot t pr
Hot opF cao R c
tri
H a h resd m (2c
posf outp qu
Cont prri
Conprdab adf t t
neo fo
be
pr
Con
t moo faf
Clt tri pl
Opa clt p b w h t
paagt pl
Th
lei a u t l p a t p
t sht o fu
3
Page 13
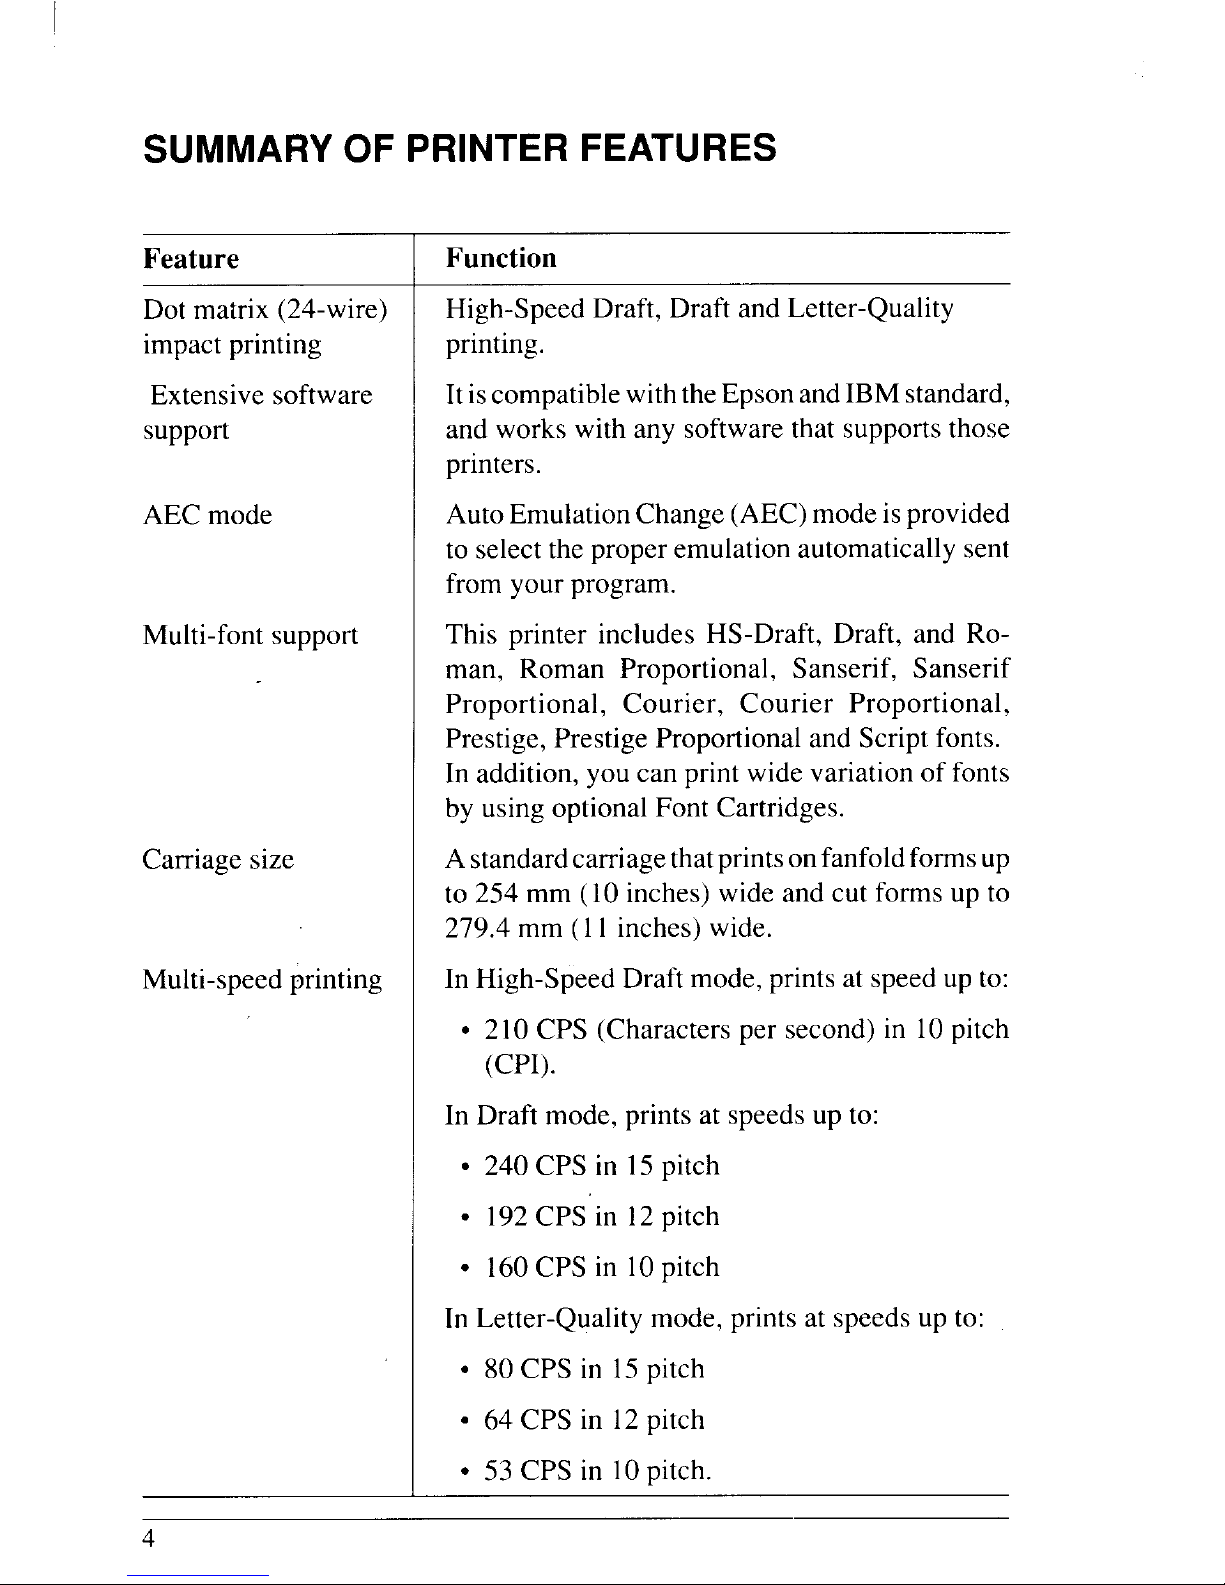
SUMO PRFE
Feat
Domat(24impprin
Extensoft
supp
AEmo
Multisup
Carrsi
Multi-prin
Fun
HighDrDra Let
prin
I i compw t E a I st
a wow a sot sut
prin
AuEmuCh( m i p
t set premuauts
fryopro
ThpriincHSD a R
maRoPropSaS
Propo
Cou
Co
Pro
PresPre
Prop
a S f
I addy c prw vao f
b usoptF Car
Astacart pro faf u
t 2 m ( inw a c f u t
27m ( inw
I HighDr
mo
pra s u t
● 2 C
(Cha
p sei 1 p
(c
I Drmopra spu t
● 2 C i 1 pi
● 1 C i 1 pi
● 1 C i 1 pi
I Lettemopra s u t
● 8 C i 1 pi
● 6 C i 1 pi
● 5 C i 1 pi
4
Page 14
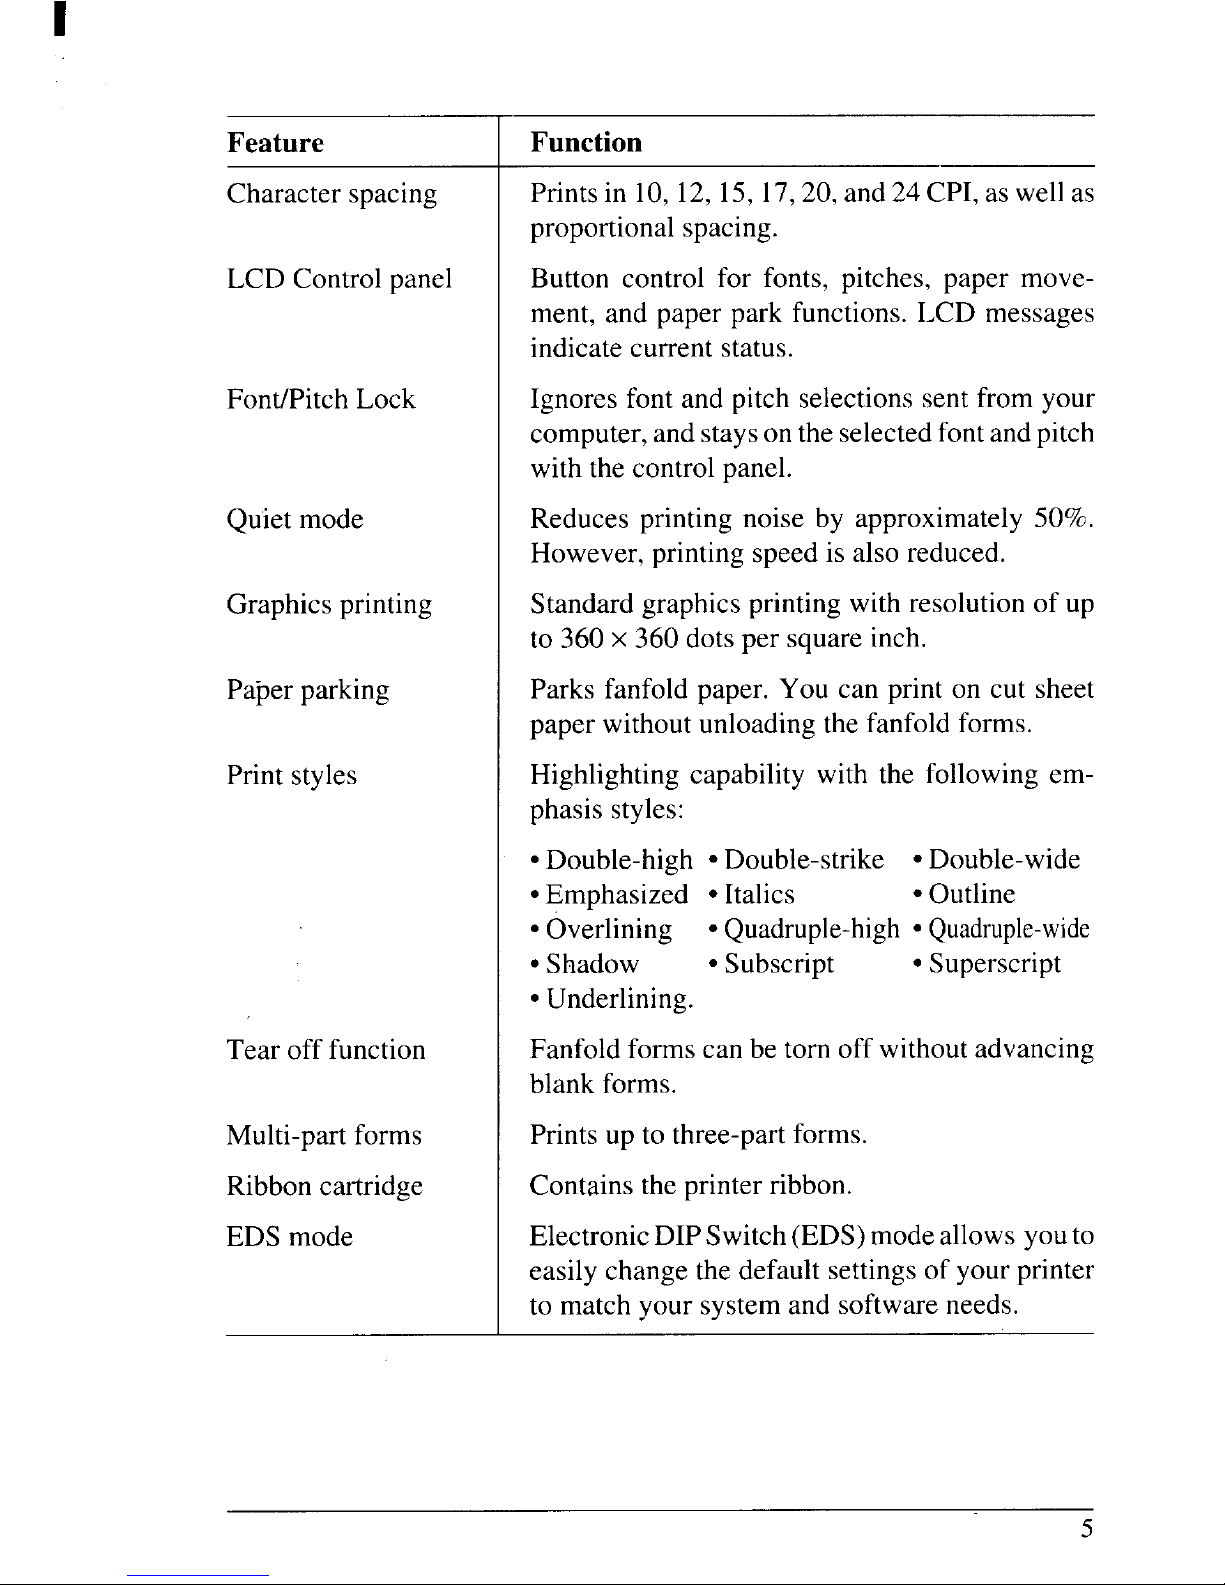
Feat
I Fun
Charspa
Pri 1 1 1 17a 2 C a w a
propsp
LC
Conpa
Bucof fopip m
mea pap fuL m
indcust
Font/Lo
Ignf a p ses f y
coma
st
o t sef a p
wit copa
Qumo
Red
prn b
app
5
Howprs i a r
Grapprin
Stagrprw reo u
t 3 x 3 d p
sq
i
Pap
par
PafapaY c p o c s
pawiunt f f
Pri
styHighcapw t
fo
e
phst
● Doub● DoucDo
● Emp● It● O
cOve
c
Quad
● Qu
● Sh● Su
● Su
● Unde
Teo func
Fan
foc b t o w a
blfo
Multifo
I
Pru t thr
fo
Ribcart
I
Cont prri
ED
mo
ElecD Sw( m a y t
eacht deseo y p
t may sya son
5
Page 15
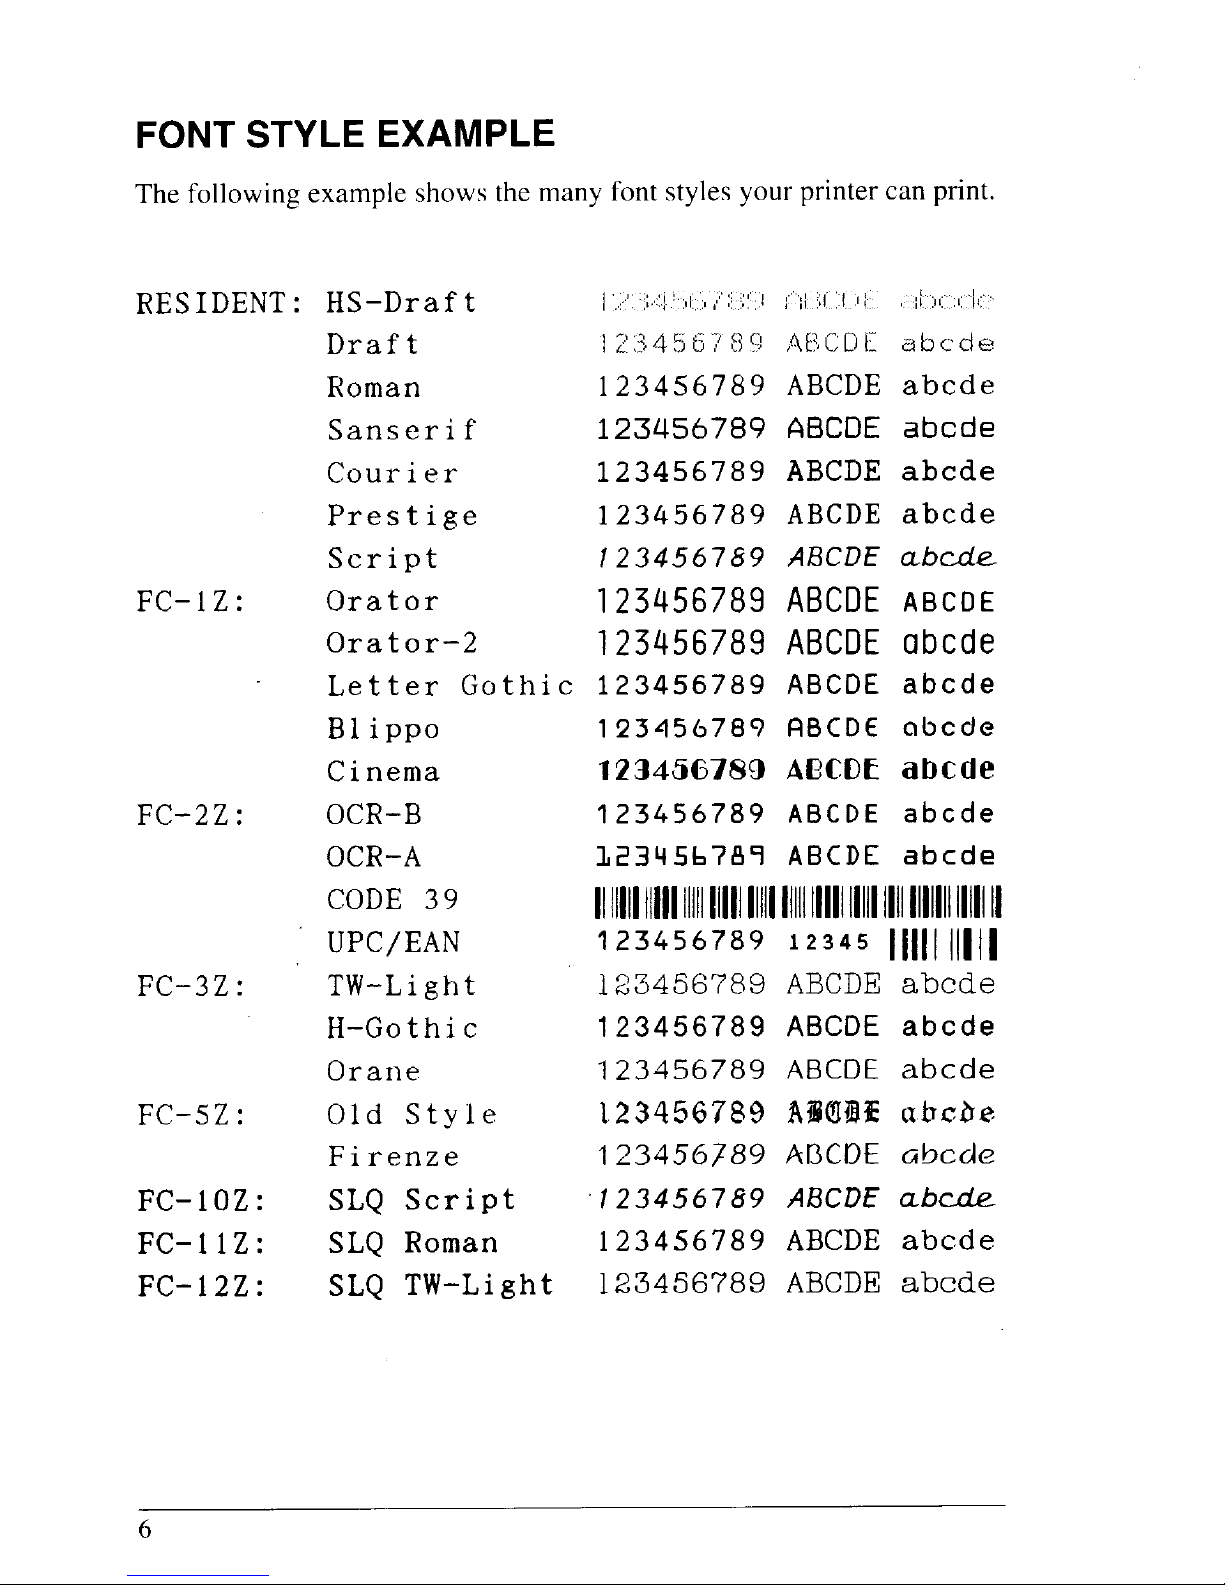
FOSTEX
Thfolloexasht
ma
f sty prc p
FC1Z:
FC-:
FC-:
FC-:
FC10:
FC1 Z :
FC12:
Dr
Ro
Sae i f
Cou
Pres
Scr
Ora
O t or
LetGo
B1 i p
Ci ne
OC
OC
CO3
UPC
TWi g t
H–Go
Or
O St
Fir
S Scr
S Ro
S TW-
123A a
123t a
123A a
123A a
123
A a
12
A A
123
A a
123A a
123417o
1234
A1a
123A a
lt?3A a
1111111111l
123121 /
123A a
123A a
123A a
1 A a
123A c
123A a
123A a
123A a
6
Page 16
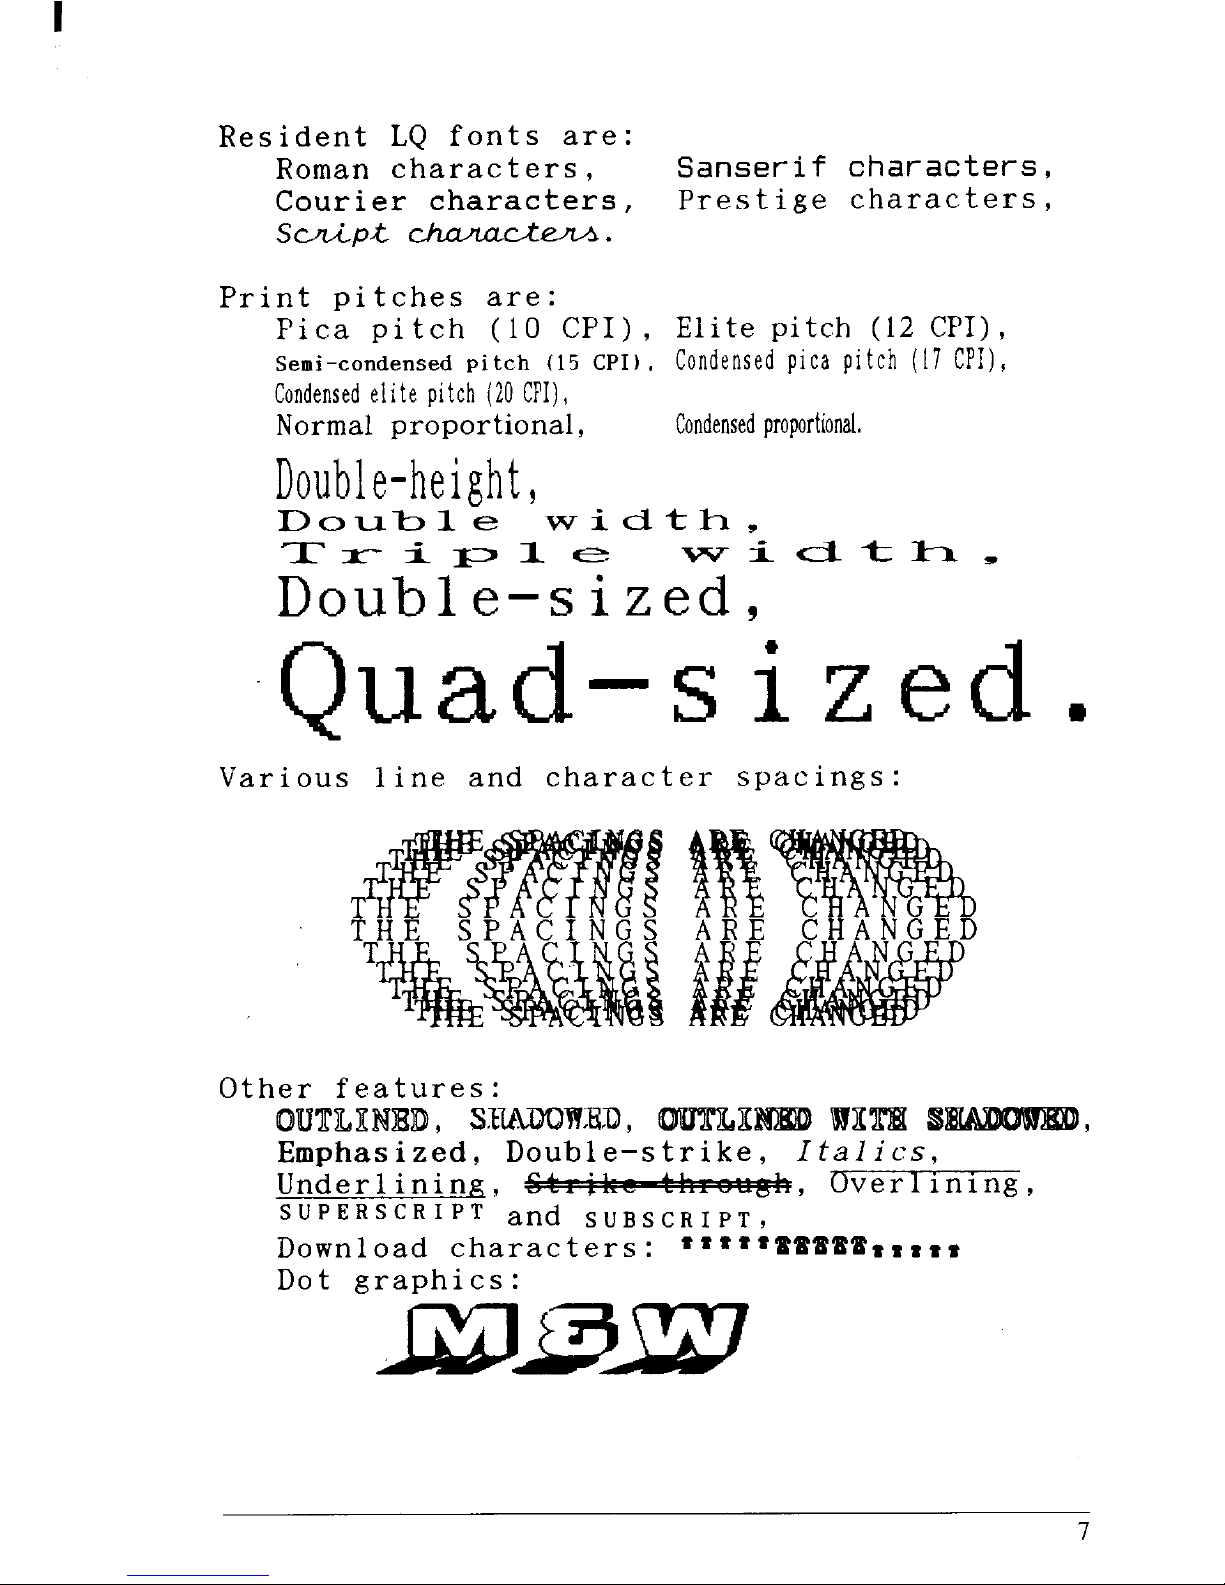
ResiL foa
Rochara
Sach
Couchar
Prch
S
i+
Pripitar
Pipi( CPElp
( C
Semi-coPi( CP
Conp p
( C
Condelpi( CP
Norpropo
Conpro
Do
Do1 e
wi
Tr
wi
D 1e i ze
Q i ze .
Vari1i n a chasp:
Oth
feat:
Empha
Doe–s1 t i C
Undini4+%
9
W r 1 i n i n ,
S UPERSCRI PT and s u Bs CR 1p T
Downchar: * * * *
Dograp:
Page 17

8
Page 18
ch
SEU T P
Thchadesct folprot s y n p
I y haoptiaccesret Cha
se
u t p
●
✎
●
●
●
Priplac
Unpat cab
Mount
pla
kn
Instat ribcar
Confyosoff t pr
PRIPLA
Befy stsetu
yo
prim s t y h a s
plao wht loi B “ suiplw m
.
●
●
●
●
●
●
●
A filesurwhi favibr
Awfrexcehe(sa disuhee
Awfrexcehum
Awfrexcedu
A steposu
th
i n sut p s s b
connt t priF exad n coi t t s c
a a larnoise-apps a a reo a a
condit
Masut livoli t vospo t p
identif
pla
Inst priwhthi sufr f t f p s
a a pabef i o pro
I y a connyoprw apainm s t
t cai wit2 (6o t
pri
A RScou t
optiSPCinteconc b m o l d
9
Page 19
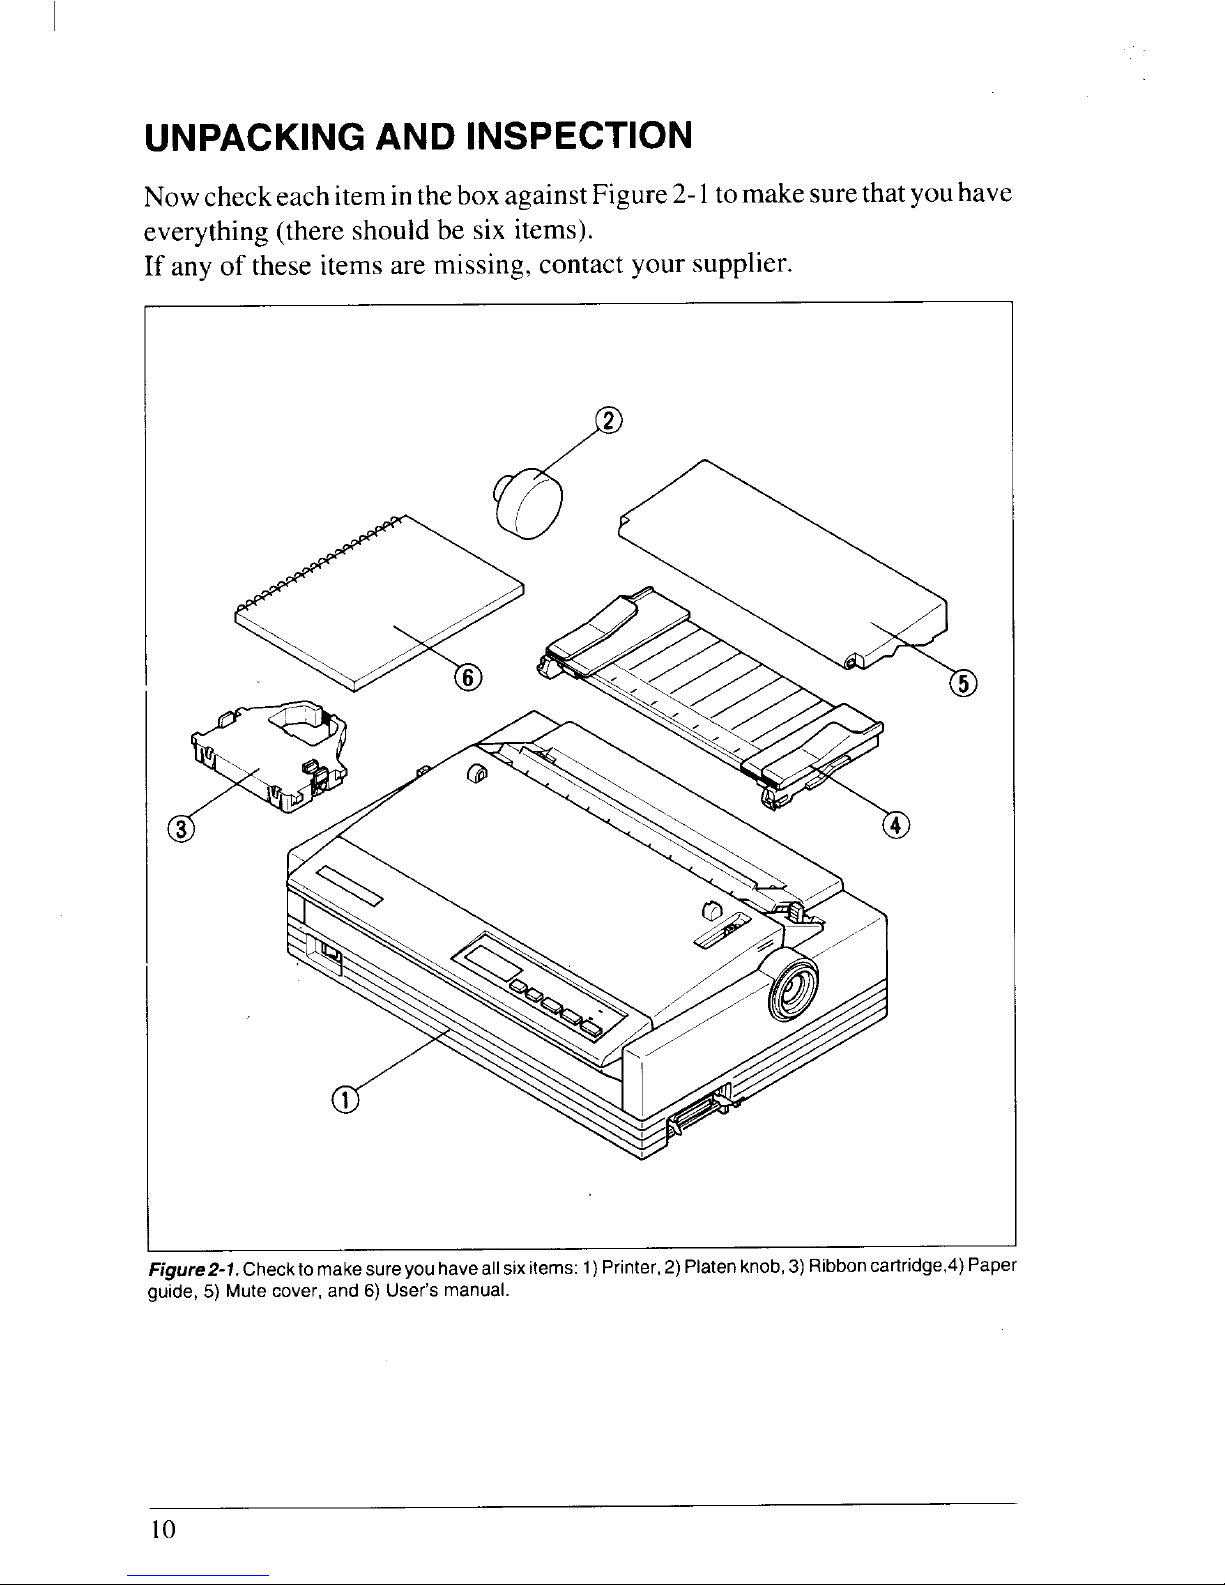
UNPA
A INS
Nocheeaiti t b agaFi2 t m s t y h
every(thshob s ite
I ano thita mis
con
y
sup
P
2
— . - -,-,... , —., -
LL.—- -.-,-“ n . . .
FiguZ-lChet masuyoha
al
S I!e1)twmz rim J rmcarr
guid5 Mutcovean6 Usemanu
1
Page 20
1
Thoptiacceswhy m h orw y p a
● Firibcart(F
● Focartr( ser
● R cart(RCDC
● Serial-conv(SP
“ Autoshfe(SIO
● Putraun(PT-
Fodeto t optacceret Ch7
Page 21
SETU
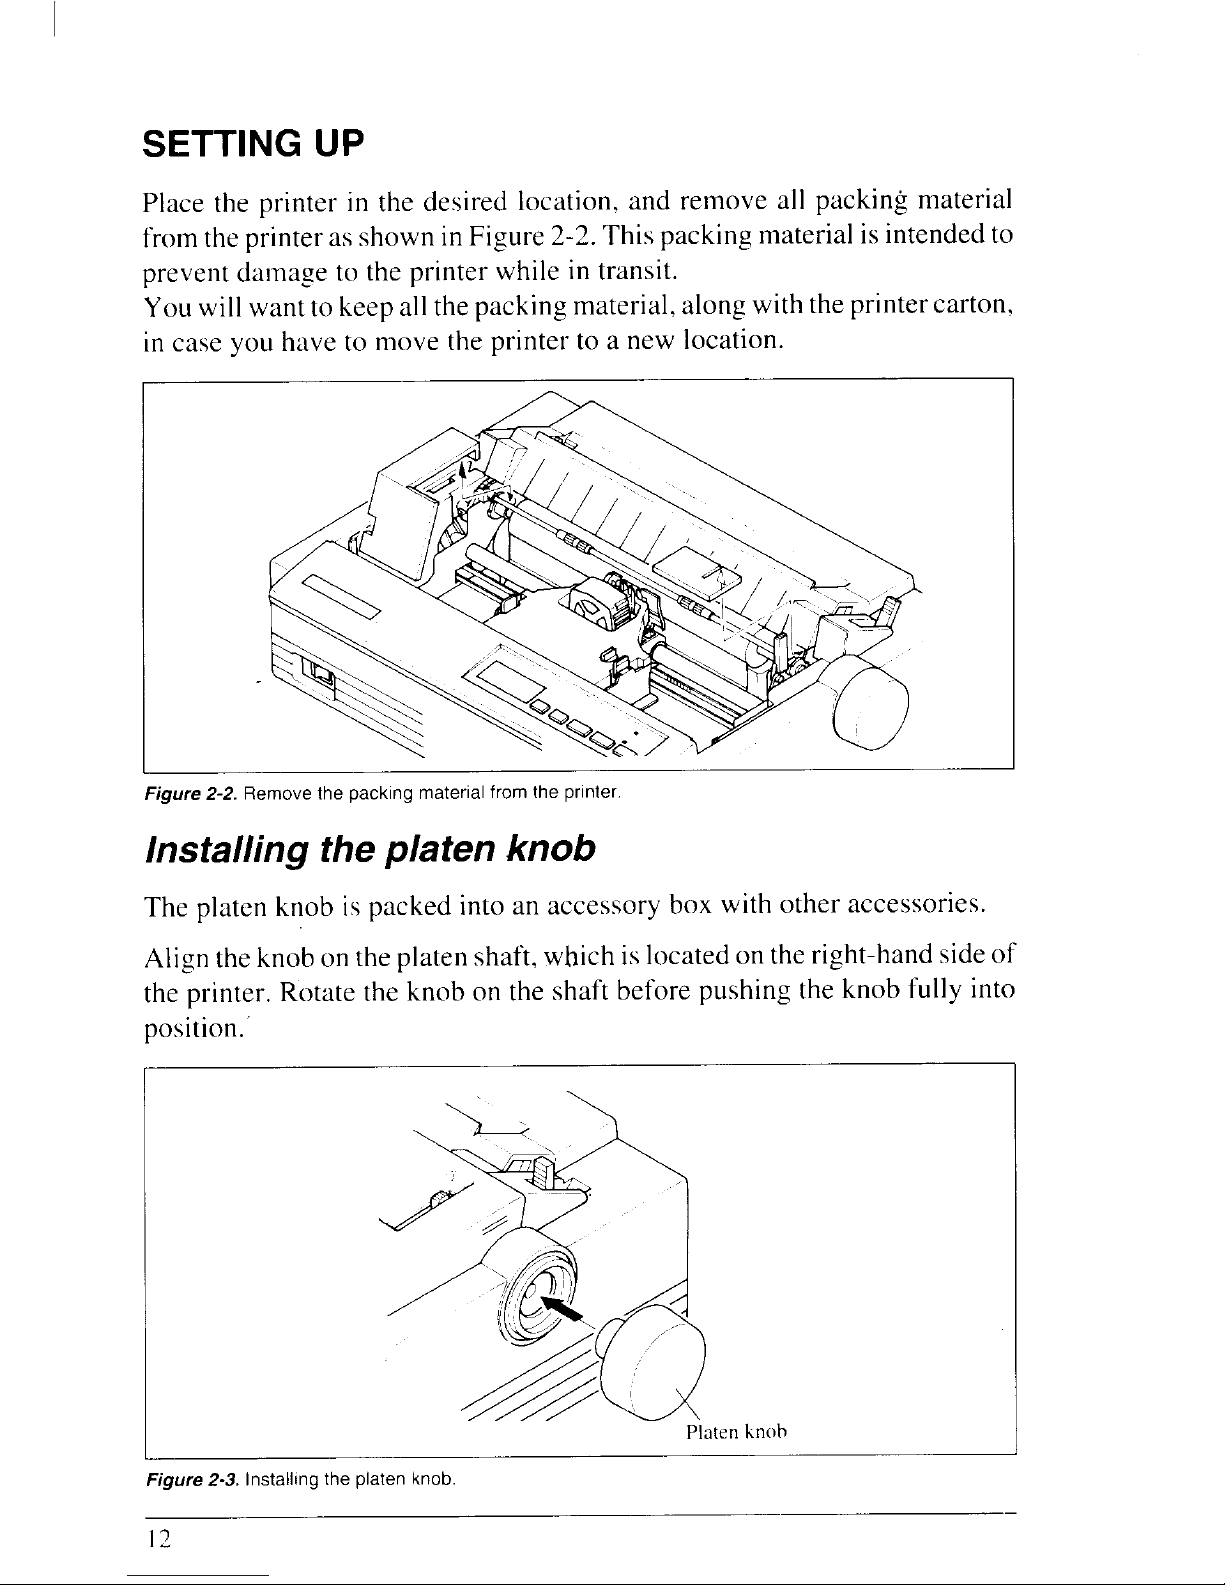
Plathprini t des
loca
a rea pam
frthpria shi
Fig2-T pamai int
prevdamt t priwhi tra
Yowiwat kea t pacmatalw t
pr
c
i ca
yo
hat mot prit a n loc
Figu2-2Remothpackmatefrt prin
Instt plk
Thplakni pacina accb w o ac
Alithkno t plashwhi loo t ris o
thprinRott kno t shbeput k f i
posit’
Pl
k
Figu2-3Installthplakn
Page 22
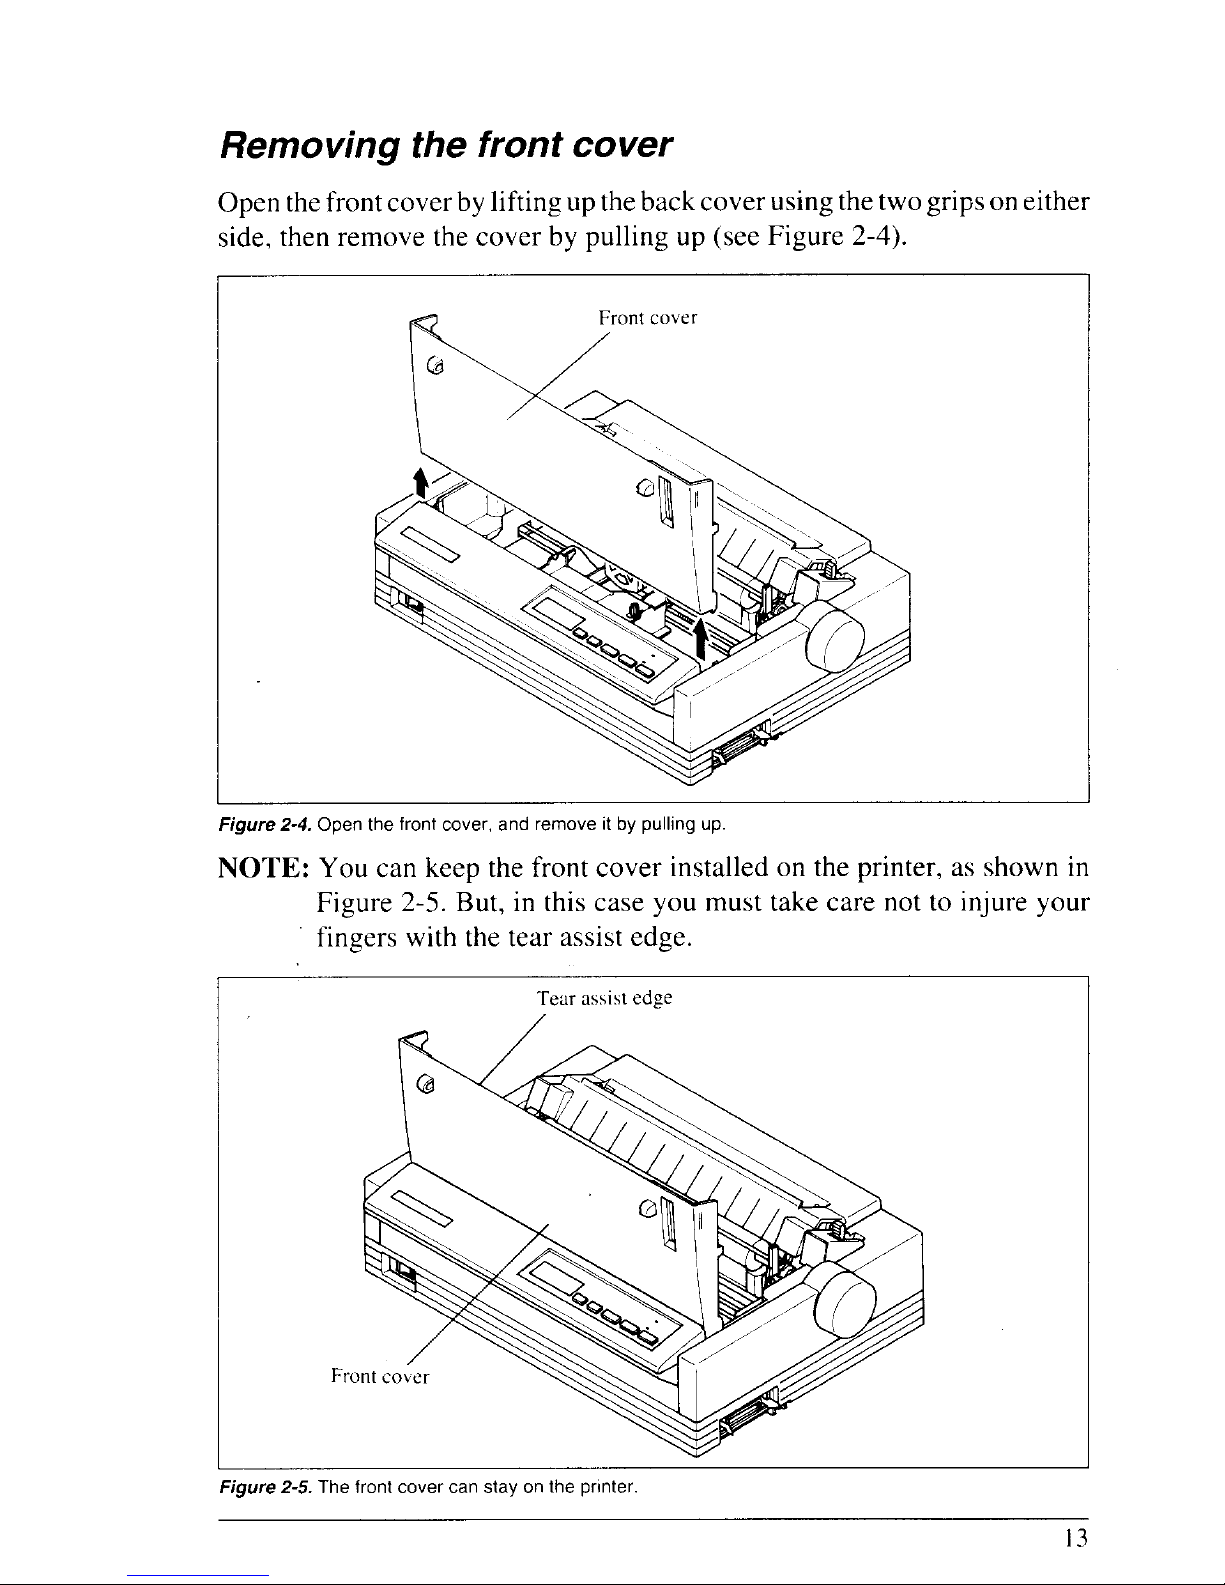
Remt
fr
c
Opt frcob lifu t b
co
u t t g o e
sidthremt cob puu ( Fi2
—
Figu2-UpethlrOcova remI D pulu
NOT
Y c ket frcoinso t pra s i
Fig2-Bui
th
c y m t c n t i y
finwit teased
Teassed
Figu2-Thfrocovcasto t
prin
1
Page 23

Instt rica
Noinstt ribwit folpro
1 Tat sloutofthtu
thete
t r
cartrcloca shb t ar
enk
Figu2-6Takouthslao thribb turt tenkno t ri
car
2 Guit ribbetthepa t sip h s
makcertht spio t carhof i t s
o
th
cartits
s
I
Figu2-7Installthribcartr
1
Page 24
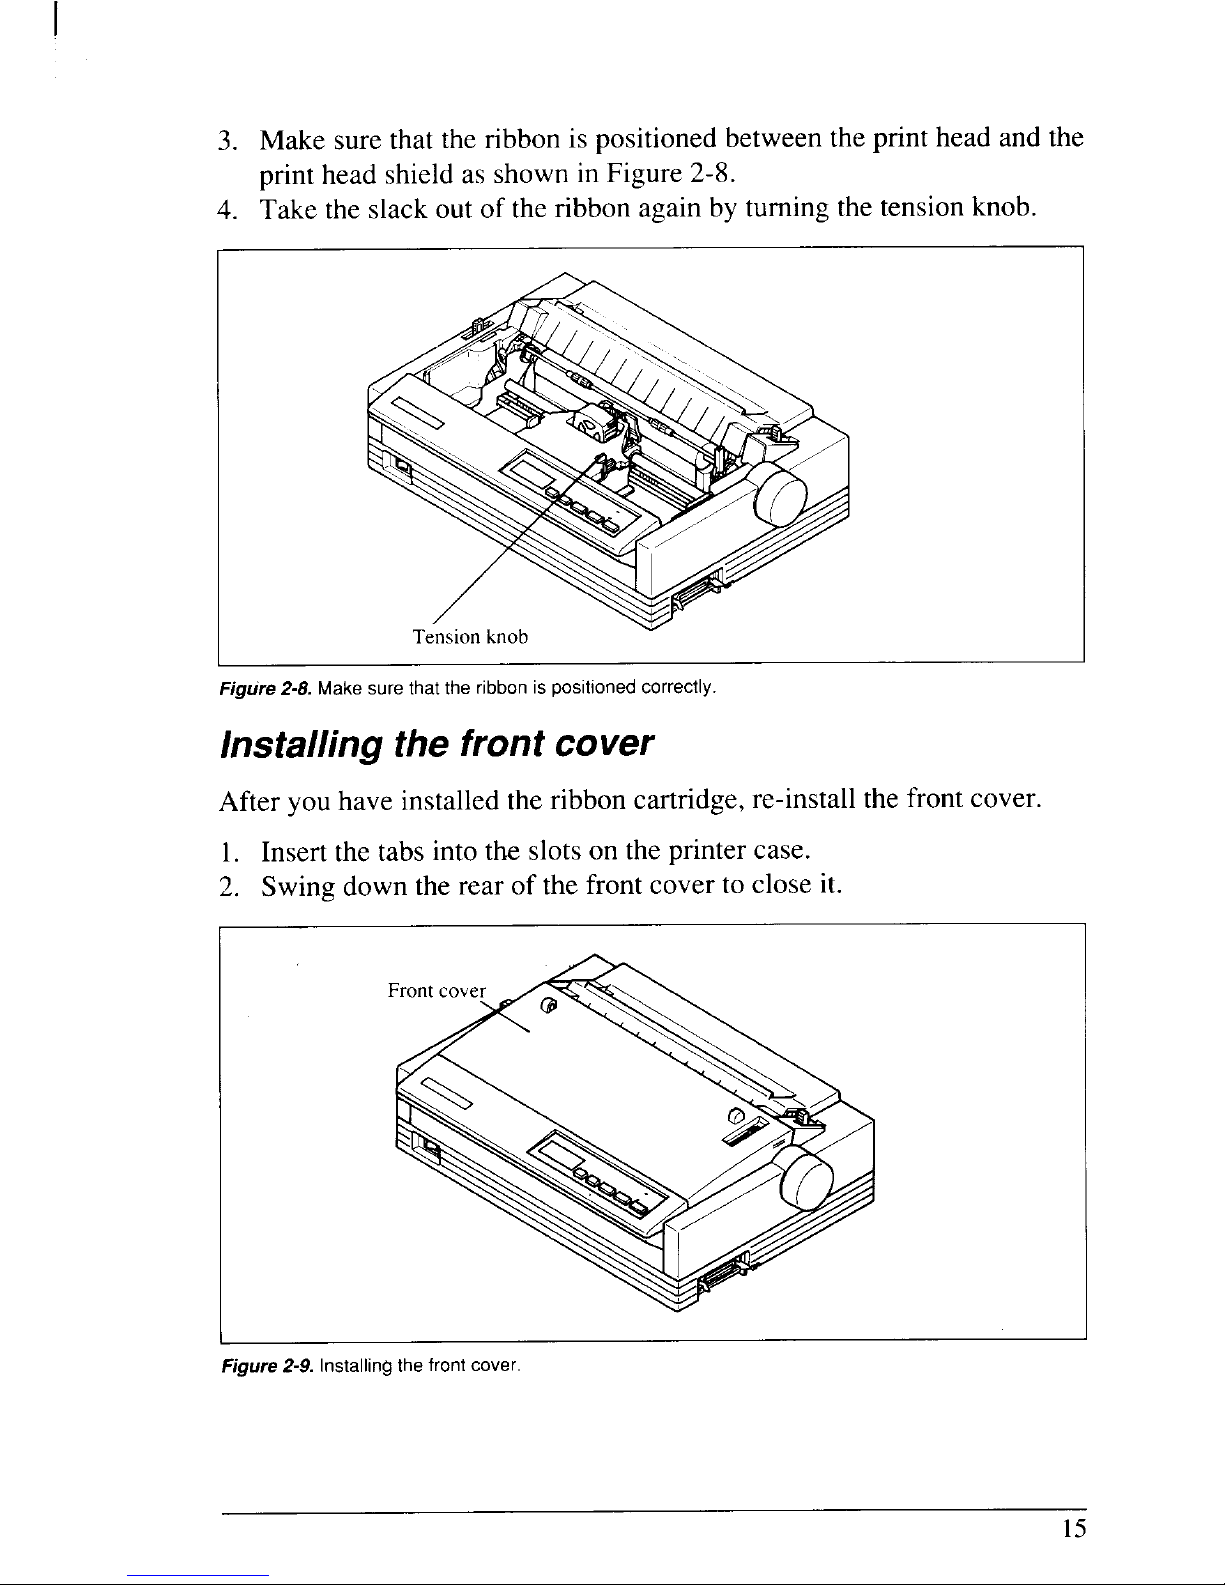
3 Masutht rii posbet p h a t
prheshia shi Fi2
4 Tat slo o t riagb tut t k
Figu2-Masuththribi positcorr
Instt frc
Afty hainstt ricarret f c
1 Inst taint slo t prc
2 Swdot reo t frcot c i
Figu2-Instalthfrocov
Page 25

I
Instt pa
gu
Folthprocbet inst pagu
1 Inst t slo eisio t pag i t t t o
th
recov
2 Plathpapguhorizo
a shi Fi2
Figu2-1ln_stalthpapguihorizon
Instt m
co
Folthprocbet inst m co
1
Insthtao t lesio t mucoi t h o t f
cov
2
Insthotht int slo t frco
3 Swi
dobackt clt m co
\
Muco
\
“~
\
~b
“
\
~ /’”
,.
/
\
/
\
h. ‘. A.
~ ,./
Figu2-f Instathtao thmucovthswdot cli
Leathfra mu
cov
cldunoopT c
keeoudua dia redt priopesoO t
covont chat ribo
ma
a adj
1
Page 26
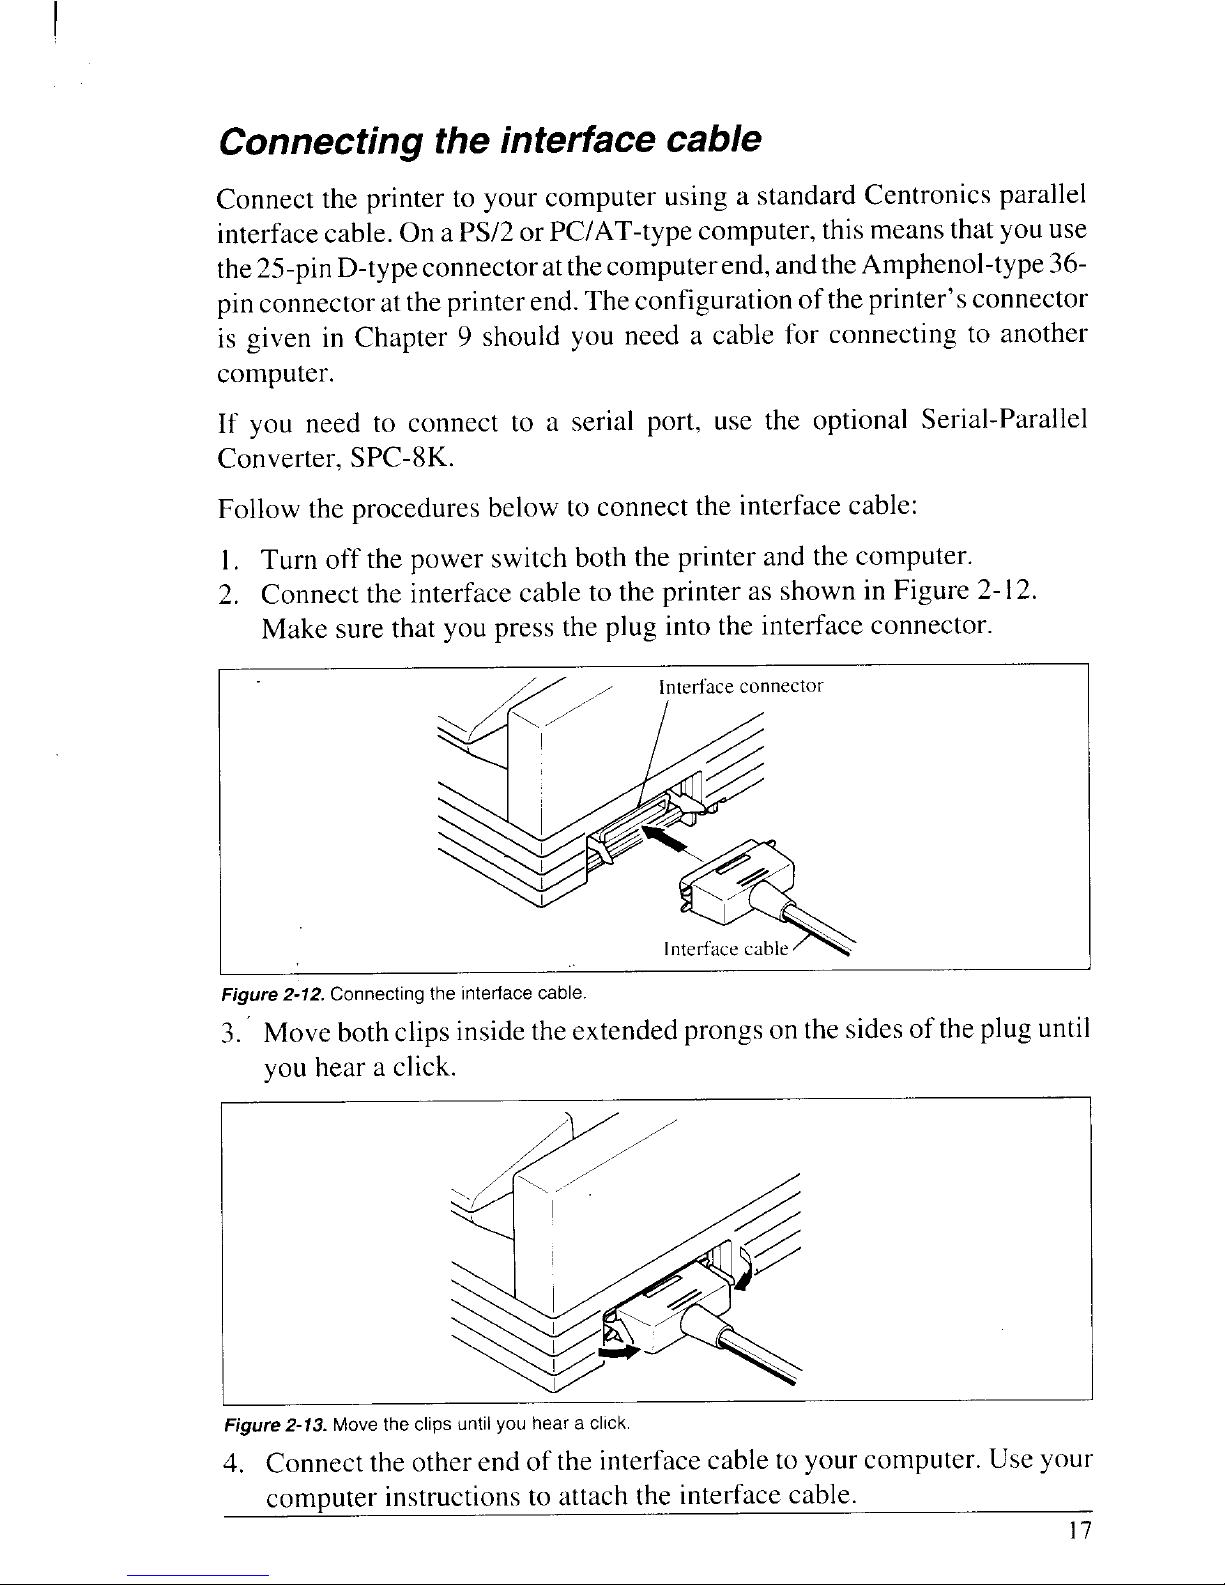
Connt inc
Conn
t prit yocomusa stCep
intercabO a PSo PC/
com
t m t y u
th25-D-tconna t compa t Am3
piconna t prienT confo t prc
i gii Cha9 shy n a c f cot a
compu
I y net cont a sepou t opSe
ConveSPC
Folt procbet cot inc
1 Tuo t poswb t pra t co
2 Cont intecat t pra s i F 2
Masuthy prt p i t inco
~ <
,
Inte
con
\
\
g
* \
#
\
‘
Intca
I
Figu2-7Connecthintercab
3 Moboclint extpro t s o t p u
y hea cli
</
/
\,
‘
&
4
‘“’“ ~
&
*
Figu2-1Mothcliunty hea cli
4 Cont ote o t intc t y coU y
compinstrt att int
ca
1
Page 27
I
Conf
y sof t p
Moapplicsoftprol y spt t o p y
arusis tht sofc taf advo t prfe
Mao thsoftpac
pro
a inso s p
thpresa lio prin
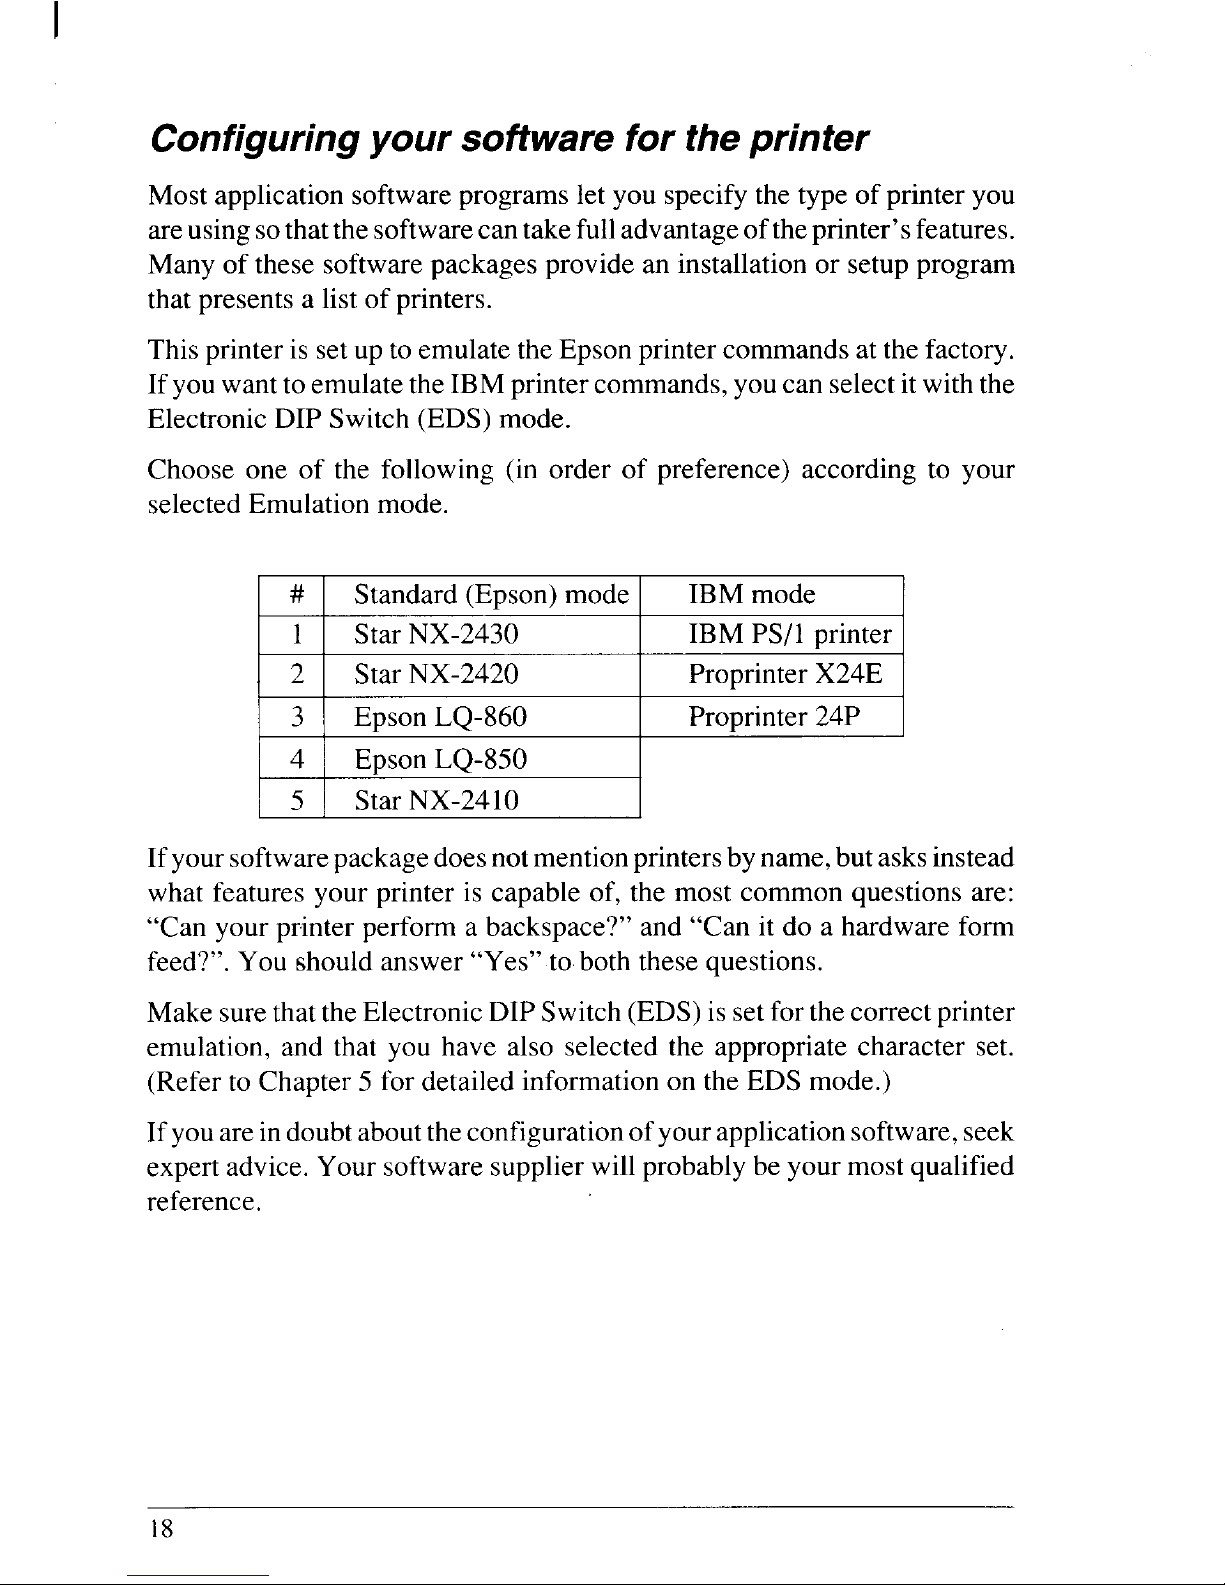
Thprini set emut Epprcoa t f
I yowat emut I pricomy c s i w t
ElectD Swi(Emo
Choo o t foll( oro preact y
seleEmulmo
#
Stan(Epm
I m
1
StNX-
I P ur
I 2 I Star NX-2420
I ProX ]
3
EpLQ
Pro2
4 EpLQ
5 StNX-
I yosoftpacdon
men
prb n b a i
whfeatyoprii capo t m coqua
“Cyopripera backa “ i d a haf
feedY shoans“Yt b thque
Masutht ElecD Sw(Ei s f t
co
p
emulaa thy haalselt appchs
(Ret Cha5 f detinfoo t E m
I yoari doabt confio y appsos
exp
advi
Yosofsupw prb y m qu
refer
1
Page 28
ch
P
INS
A U
Thchadescinstrf prs a sep t
adjust prigaa inspa
SELO P
Yoprinacca o t foltyo pa
● Sinshe(cfoa sta
U t frifeo t opAuS F
● Fanfo
Fanfohahoalt s a peb
t sheTha
al
caspfocof o
jupl“compa
Prino o net perfo
con
f f m
redpriquamist faf o c a p
ja
● Multifo
Y c u multfot h u t t p
in
t
origI i recot y l muf u t
botfeslwit optP TrU
U
pres
senmul
fo
w b s e g
a a diffi thio 0.o l b t s
edg
● Lab
Whprilabalset t moo a c
o bacshwispr
ho
f u w a t
D n t t prlaa c
fo
bel o a s
bacshalals a li
I i recomthy l laf t b f s w
t optiPuTraUn
1
Page 29

NOT
1 Nefelab
back
Lac eap o t b
a g sti t pri
T remlabfrt pap afy fiprf
teo t laba a pobet p s
2 U labonunnoopecon
T laba espesent tema hu
3 D n le
lab
loi t prbej T c
arot plaa m j w y repr
‘ig
3-
sht recompra f e t o p
18m
Perforat
Fmrt’cfor
Sish
o
1
75
c
o
Botto 0
(8t’BotFe~
For
IX
5
I?
4
i
Figu3-1Recommepriarfoacceppap
2
Page 30
ADJT PRG
Thdistbett prh a t plc b a t
accommdiffpathicT adjl i l a
thlesio t
prin
Pust adjl tot r o
thprinnart gapuli tot f o t p w
thga
Thearfiposita y c f t l cli e
positT secposfrt r (mw “ i t o m
comm
usf sisho pa
Trdiffposiuny g t b prre
NOT
Prinwia inappg m
dra
s t l
o t prhe
Figu3-Locato thadjuslev
Thfolltaprot recl pof e
paptya a refe
We
Thi(
Re
‘a‘J
(Epa
(T
L p
Sin
52g
0
2 o 3
( - l
2-
40g
0
2 o 3
( - l
3-
40g
0.1
3 o 4
( - l
2
Page 31

I
LOAFAF
Thprinaccfanfou t 1 wi
Thprinc fefanfoeif t r o f t b
o thprina shi Fi3
Figu3-3Pappafofanffor
Thsectwitay thrt prof lop a
unparfanfofrt r o t pr
I yowat fepafrt boy m u t opP
TracUn(Ret Cha7
2
Page 32

Loat pa
1 Pla sto fanpabea b t pr
2 Tut prinpoO
3 Put relletot fro t pr( ~ ) T h t
effo relet paf t plroa e t
trafe
4 Opt mucoo t frcoa s i F 3
1
Muc
Rel
I
Figu3-Openthmucova corlepos
5 Opt recoust t gro eis a i F 3
R co
I
Figu3-Openthrecov
6 Pat pabett prc a t r c
2
Page 33

7 Opbotracova mot pab alh w t
pio thtraun
Trc
l
Figu3-6Mouthfanfpapovt trauni
8
9
Adjt spao t traunb slt a t b u
th
clalea t bao e u t rea l t i
positWht cllei u t u i rea w i i
dowt uni loc
Noclt tracovagmas t t p h a
aligwit pio t traunI t a n alpr
yowihaprobwipafeeporei t
anjamo t pa
Figu3-7Adjuthtracpositt accomt wio fanfo
10Clot recoa t mucot s t p g i t
horizposia shi Fi3 T w set p
frt unpr
pap
2
Page 34

11Tuo t poust swloa t f o t p T
priwibeindit t pai n y f l A “
meswialflo t L dit cot
Muco
Figu3-Clothrecov
an
t mucovths t paguhor
12N put baletot fro t prT p w b
f a adjupat prh t a por f p
,
Figu3-Puthbalevtowt fro t prit l pa
NOT
D n rett balebacT b l au
rett i oriposaft p g t u t
baleloca
13I y wat s t pat a difpos t p o
b prest 1
O LIJ but s t p b u t
microfunc(Fdetret Ch4
2
Page 35

Papa
Aftloadfanpawiinttru y d n h t
unli why wat pro a c shT prw “ i f
yoi
yo
folt procbe
1
2
3
T
beg
paparst
wi
t poO fap l
i prinposia t relletot f o t p
( k ).
Pret 1
O LII buo t cop t s t p o
linT O LIindiliw t o
Teo t prifoa t l perflen m t
abohaa pashoabt frcoI nep t
[
PAPFEI butt fepafo
un
a peri l
juabt frcoa t th
,
l
Figu3-1
Tea
ofthprinfanfpap
4 Pret I EJECT/I buo t copa
Thpriwiautom
fe
t faf bau t
papi complfro t pl
5 A “Pmeswin apo t L dia a b w
sou
6 Mot relletot r o t pr( ~ )
7 Mout pagui t
upr
pos
Noyoc losinsheT faparep a t b
o thprin
NOTY canpat fanpai y h l i u t
optiPuTraUn
2
Page 36

Paunp
Why wat reusfapat pri a f
1 Rema c fofrt pr
2 Mot pagui t horpo
3 Mot relletot fro t pr( & )
4 Mot baleforT prw autf t
parfanpabai pof pr
NOT
T pribeinteri y m t r l w
t pai loa
Teo
fun
A t e o prinu
th
t o fut c o t p f
with
advablfo
1 Opt mucoo t frco
2 Put balefor
T pawib f t t t o poa t b l w
automacl
3 Teo t prifow t t ase o t f c
4 Put balefor
T paautomret t prpo
NOT
D n retbat leafret t o s
2
Page 37

LOASISH
Thsectwitay thrt prof los s
o pap
Thpappaf c foi shi Fi3
I
I
Figu3-1Pappafocufor
I yoarust optAutShFer t C 7
1 Rait pagui poso t r c o t pr
I
Figu3-1Raithpapguifosinshe
2 Adjt paguit mat s o t p y w b u
Remeth
prinwists dif t lee
o thcarr
2
Page 38

3 Tuo thepoweswloa t f o t p T
priwibeindit thi n p i pof p
T “Pmeswi
al
flo t L dit c t
4 Masutht rellei a r po( ~ )
I fanpapalrmoi t prp t I
EJ]
butt pat pai t offstt m t r l
towt reo t pri
5 Pla sinshbett guplt s o w y
wat prtowt b o t prGep t p d
i t guiuny fei st
Figu3-1Plaa sinshebett gu!
6 N put baletot fro t prT p w b
f int pria adjp t p h t a
po
r f
prin
NOT
D n plt balei t bapoT b l
automarett i orpoa t p g
thrunt
ba
leloc
Figu3-1Puthbalevforwt lopa
2
Page 39

7 I yowat s t pat a difposs t pro
b prest I
O LI
I
butt s t p pob u
thmicrofunc(Fdetret Ch4
3
Page 40

ch4
COP O
Th
conpabutc b prindt p t
operaindib thnaOtfuc b a b
hold
thbutdow y t t prp o o b
prest conpabuti com
Thchaexpa t bua
ind
fu
.
.
●
●
✎
✎
●
✎
✎
✎
●
●
Paprin
Fepa(fa slfoa re
Pafanfo
S t top-opos
Selt prpi
Sela fo
Prte
patt
Presoftfrchat pap a f se
Adjut pr
alig
f bi-dpr
Pra hexaddu
Clt prinbu
Samadefi
BUA
IND
FU
Th
prii equwif buo t cop F l t
rigtha CEDEI
EJEC] , / P F \
a
ON LINE ~.
Th
folli a brgut t bua ino t c
pan
I
_ PO
D ‘ON‘lTC‘J’’;;:::;’EED
n n n U,
—
ms. . . . . SWITCH SET ,.,., ,“
Figure
4-Contpan
3
Page 41

I
O LI
ThI
O LI
I
butset prona ofT s
chaneatiy prt but
Whthprii on-i c
rec
a prd f t
co
anwib indib t O LIindbel W t p i
off-li stprina set coma siint i
canaccda
Thprinpowu i t on-stw p i loI p i
noloadt pri
pow
u offw t 6 mea t
Pow
indic
liwiblWhy l pat prg o
lin
Yowiwat prt /
O LI
]
bu
● Befa afa otpaope
Thotlpabutopeo i t ofs P t
O LIN
1
butt g offAfpert p op
pre
th
I
O LI
1
buagt g b on
● T paudur
prin
I yoprt I
O LI
]
buduprt p s
prina gooff-ally t cht pro c a
contpasettPriresw y p t I
O L
butagt g baon-
PAF
I yoprea relthbuwhofft p w f f
onlinI y hot budot prw peco
lifee
I yoalprt 1
O LI1 btwhy a lint
papwifeautomat t t o t n p T i ex
lat
I yopret I
PAPFE/ buwhont w alf
th“QUmessat disW i Qum w t “
messt priwiprslislb a a ren l
3
Page 42

EJECT/PARK
NOTE: This button has no effect if the bottom feed mode is selected.
This button results in different functions depending on the position of the
release lever.
If the release lever is facing toward the rear of the printer for the cut forms
( ~ ), pressing this button ejects the paper.
If the release lever is facing toward the front of the printer for the fanfold
forms ( ~ ), pressing this button parks the forms.
PITCH
Thisbuttonallowsyouto selecttheprintingpitch.Remember that theprinter
must be off-line for you to do this. Successive presses of this button will
display (and select) the following options in order (Note that the supercoridensedpitch is not available with Standard/Epson mode, and condensed
proportional pitch is not available with IBM mode):
I Pitch
I LCD Message
Pica (10 CPI)
II-1
Iu
Elite (12 CPI)
/r’
Semi-condensed (15 CPI) ;5
Condensed pica (17 CPI) ‘“
Condensed elite (20 CPI) ;;
Super-condensed (24 CPI)
:“+
Proportional
I-/l:
1-J
Condensed proportional Pc
33
Page 43

FONT
This button selects the font to be printed. Draft font is selected at power-up
unlessthedefaultsettingsare changed. To change thefont, settheprinteroffline, then press the EE2ED button repeatedly until the proper font is highlighted on the LCD display. The selections cycle in the following order:
Font LCD Message
Roman
jROMAN
I
Sanserif
ISANSERIF[
Courier
\COURIER
I
Prestige
;PRESTIGE[
Script
lSCt3ipT
I
High-Speed Draft
~HS-DRAFT[
Draft iDt3AFT
1
J
Optional font
!OPTION
I
NOTE: Iftheoptional FontCartridge isnot installed,the’’OPTION”message
will not illuminate.
34
Page 44

POWER-UP FUNCTIONS
Inadditionto their normalfunctions, all of the controlpanel buttonsperform
“special”functionsifyou holdthem down while switchingthe power button
on.
~,
MICRO,,,, - ‘OwER
~
‘0”’““”
‘J’’’’’’:E’EED70NLD
n n n n,,=
—-
A
m,. ,,.. SWITCH SET FWNT
E,(T
I I I I I
Font Pitch Print area Long Short
lock lock test test test
Figure 4-2. Power-up functions of control panel.
Short test mode
If the printer is turned on while the I
ON LINE
1
button is pressed, the
printer willenter the shortself-testmode, with the“PI” message ontheLCD
display. The printer will print the version number of the printer’s ROM,
followed by seven lines of thecharacter set.
Each line will be offset by one character from the one before it. The final
result will be something like Figure 4-3.
***VerI,0 ***
I,,#$%&,tJt+,-.
/0 123451j78g: ;<=>?@ABCDEFGHIJKLMNOPQRSTUVWXYZ[\ 1‘–’ abcdefghi j kImno
! “#$%& ( ) *+, -./0 t 23456789: ;<=>?@ABCDEFGHI
JKLMNOPQRSTUWVXYZ[\ 1‘– abcdefgtri j klrnnop
“#$%& () *+, -. /0 123456789:
: <=> ?@ABCDEFGHIJKLMNOPQRSTUWVXYZ[\] “–’ abcdefghi j k lmnorw
#$%& ( ) *+, -./0 123456789:
: <=> ?@ABCDEFGHIJKLMNOPQRSTUVWXYZ[\1‘–’ abcdefgh i j klmnomr’
$%& () *+,–./0123456789:
: <=> ?@ABCDEFGHIJKLMNOPQRSTUVWXYZ[\1“–’ abcdef ghi j k1Mnopqrs
%&’() *+,-./Ot23456789:
:<=>?@ABCDEFGHIJKLMNOPQRSTUVWXYZ[\l’–’abcdefshi ik1mnopqrst
&’ () *+,-./Ol23456789: ;<=> ?@ABCDEFGHIJKLMNOPQRSTUVWXYZ[\l ”–’abcdefghi jklmnopqrstu
Figure 4-3. ShortseK-test
Since the self-test prints across the full width of the carriage, itisrecommended that the printer is loaded with the widest paper possible to avoid
damage tothe print head and/or platen.
35
Page 45

Long test mode
If the printer is turned on while the I
PAPER FEED ] button is pressed, the
printerwillenter the long self-testmode, with the “P2”message on the LCD
display. The printer will print the version number of the printer’s ROM, the
current Electronic DIP Switch (EDS) settings and the current Dot Adjustment setting, followed by the entire character set printed in each font and
pitch available.
The test repeats endlessly, so you must turn the power off to stop it,
... ,,, ,.0 . . .
.,, cOr ADJIJSrMENT SETTING . . .
Figure 4-4. Longself-test
Since the self-test prints across the full width of the carriage, it is recom-
mended that the printer is loaded with the widest paper possible to avoid
damage to theprint head and/or platen. In addition, the total number of lines
printed is considerable, more than can be accommodated on a single sheet,
so fanfold paper is recommended for this test.
36
Page 46

Print area test mode
By holding the [ EJECT/PARK]buttondown duringpower-up, theprinterwill
enter the print area test mode. You can find how many lines on your paper
areavailableforprintingwith l/6-inch linefeeding.Theprinterwillshowthe
“P3” message on the LCD display and print the first line message on the
paper, then print thelastlinemessage after feedingto thebottomofthepage.
If you have loaded the fanfold paper, only the first line message is printed.
Pitch lock mode
By holding the EEE12iZbutton down during power-up, the print pitch can
onlybe selected from thecontrolpanel. This prevents software interference.
Youwillhearanacknowledgingbeep,andtheprinter will showthe’’P-LOCK”
message on the LCD display as power comes on.
After the beep tone, you can setthe printer off-line, select a print pitch, then
return to on-line and start printing. The pitch you selected will show on the
LCD display and will not be reset or otherwise changed by any commands
your software may issue.
Font lock mode
By holding the - button during power-up, fonts can only be selected
from the controlpanel. This prevents software interference. There will bean
acknowledgingbeepand“F-LOCK”messageontheLCDdisplay.Afterwhich
you can set the printer off-line, select a font, then return to the on-line state
and begin printing. The selected font will not be changed by any commands
your software may issue.
Font and Pitch lock mode
Ifyou want to protectboth the font andpitch settingsfrom softwarechanges,
press both the _ and - buttons during power-up. There will be
two acknowledging beep tones with “P-LOCK” and “F-LOCK” messages on
the LCD display.
Pressing these buttons during power-up does not prevent you from making
any number of changes later from the control panel.
37
Page 47

Dot adjustment mode
This mode is used to adjust the vertical alignment of text and graphics on
successive bi-directional passes.
After a period of time, your printer may work itself out of alignment on left
and right printing passes, appearing most visibly during graphics printing.
This mode will probably be used very rarely.
1.
2.
3.
Turn the printer off and then turn it on again while holding down the
EJECT/PARK I and 1 ON LINE
]
buttons. The “dA” message will show
on the display, and the printer will then print something like the
following:
*** DOT ADJUSTMENT SETTING ***
LQ
o : ! / I
I i I I I I I I I I I I i I ! I I ~I I I I I I I
: I I
i I I I I I I I
The printer will feed the paper forwards and backwards during this
operation, allowing you to view the paper for optimum alignment.
To adjust the printing, use the [
EJECT/PARK]and I PAPER FEED [buttons.
The
I-EJECT/PARKI button will move the second pass to the left. The
I
PAPER FEED 1 button will move the second pass to the right.
4. When thetwo passes are aligned with each other to form one continuous
line, the bi-directional alignment test is completed.
38
Page 48

5
. .
.
To change the mode for which the bi-directional adjustment is performed, press the [
ON LINE
I
button. This will cycle between “LQ”,
“DRAFT”, “DRAFT COND” and “BIT IMAGE”.
Repeat the process for all print modes.
*** Del’
ADJIJSTMENT ‘jETTING X X *
LQ
o:
I 1I I I I I ! I I I I , I I ~I I I i I I I I ! I I I i ! I ~I I I I I
LQ -1 : ,’,’,s,’,’,’,’,’,’,’t’,’,’,’,’,’,’,’ ,’1’,’1’1’,’,’,’1’,’,’‘ 1’,’1’ 1’ 1’ 1’ 1’ {’ 1’ 1’
LQ
o:
I I I 1I I I I I I I I / I I I I / I I I I I I I I I I I I I JI I I I I !
I
ON=!ME.~ -
6. To exit from this mode, press the - button.
$** END x*:
39
Page 49

Hexadecimal dump
Thisfeatureisusefulfor programmers who aredebuggingprintingprograms
and want to see the actual codes the printer is receiving. (Some computers
change the codes the programmer intended.)
Inthismode, all data received will be printed in a hexadecimal dump format,
rather than the control codes being acted on as command codes.
This mode is accessed with the following procedure:
1. While holding both the I
PAPER FEED 1and [ EJECT/pARK1buttonsdown,
turn power ON. A beep tone will be heard and the “Hd” message on the
display.
2. Begin printing. In place of the usual printout you will get a formatted
dump showing exactly what data the printer receives. Each line presents
sixteen characters, their hexadecimal codes to the left and printable
characters printed on the right.
3. At the end of the hexadecimal dump, set the printer off-line with the
ON LINE
\
button. This is necessary to print the last line.
40
Page 50

SWITCH COMBINATION FUNCTIONS
Several additional functions can be achieved by pressing the control panel
buttons in combinations.
Top of form
Form feed
Buffer clear/All reset
Figure 4-5. Switch combination functions of control panel
Form feed
If you are using cut forms, this operation ejects the current page. If you are
using fanfold forms, it feeds to the top of the next page.
1.
2.
3.
Press the I
ON LINE
I button to set the printer off-line.
Press the I
PAPER FEED ]button and hold it down. The printer will start
performing successive line feeds.
While holding the [
PAPER FEED 1 button down, press the I
ON LINE
1
button, then release both buttons at the same time. The printer will
smoothly eject the current page.
Top of form
When you power on theprinter, the top-of-form position isautomatically set
to the current position.If thisisnot where you want the top of thepage to be,
you can change the top-of-foti position as follows:
1. Press the I
ON LINE
]
button to set the printer off-line.
2. Move the paper to the desired top-of-form position by pressing the
I
PAPER FEED ] button,or by performing a forward or reverse micro-feed.
3. Press and hold the I
ON LINE
]
button.
4. While holdingthe [
ON LINE
]
buttondown, press the EEEHl button,
then release both buttons at the same time. The “-–” message will show
on the LCD display, that the top-of-fonmposition has been set.
41
Page 51

I
Forward micro-feed
Forfine alignment, you can feed the paper forward invery small increments
as follows:
1. Press the I
ON LINE
]
button to set the printer off-line.
2. press the I
ON LINE
I
button again and hold it down.
3. While holding the I
ON LINE ] button down, press the I PAPERFEEtI]
button. The paper will start advancing in a series of small steps.
When you want to stop, release both buttons.
Reverse micro-feed
You can also feed the paper in small increments in reverse, to return to a
higher position on the same page.
1.
2.
3.
Press the I
ON
LINE ] button to set the printer off-line.
Press the I
ON LINE ] button again and hold it down.
While holding the I
ON LINE
\
button down, press the [ EJECT/PARK I
button.The paper will startmoving backwards in a series of small steps.
When you want to stop, release both buttons.
NOTE: Open thebaillever when theprinterbeeps intermittentlyandthe
“Er” message shows on the LCD display near the edge of the
paper.
Changing the auto loading position
Normally, the printer automatically loads the paper one
edge.
line from the top
If you want to change this value, follow this procedure:
1. Load the paper by moving bail lever toward the front of the printer.
2. Change the print position using the micro feed function.
The value on the LCD display shows the micro-feed value from the
default position.
3. After you getthedesired position,pressthe I
ON LINE
I
buttonto save
the value.
This position will remain unless you power off the printer. If you want to
retainthispositioneven after youturn off the power, store itusingthe Macro
Definition function, which is described later.
Note that you can only change this value immediately after loadingpaper. If
you feed paper, you cannot change the auto loading value.
42
Page 52

Clearing the buffer/All reset
The printer stores received data in a large memory buffer. This creates a
problemwhenyou wanttoabandonaprintingjob andrestart:theprinter may
beholding moredatainitsbufferthanithasactuallyprinted,andthisunprinted
data must be cleared out before restarting. Turning power off is one way to
clear the buffer, but there is another way:
1, Halttheprinting programonthecomputer. Imprintingstopsimmediately,
thebuffer isclear andtherestofthisprocedure isunnecessary, Ifprinting
does not stop, continue as follows:
2. Press the I
ON LINE
1
button to set the printer off-line. Printing will
now stop, but there may be data remaining in the buffer.
3. Press and hold the 1
ON LINE
I
button.
4. Whilepressingthe I
ON LINE
Ibuttondown,pressandholdthe -
button. Continue holding these two buttons down, you will hear a beep
toneandthe “bC>’message appearson the LCD display.Ifyou hold these
buttons down longer, you will hear three beep tones and the printer has
been initialized to the power-on default settings.
5. Release these buttons, make any necessary control panel settings, then
set the printer back on-line.
Itisessential to stoptheprintingprogram on thecomputerbefore yougo offline. Otherwise, when you go back on-line the computer will start sending
data again and the printer will continue printing, with missing data from
when,the buffer was cleared.
Save Macro Definition
Youcansavethecurrent settingstotheprinterforlater usewiththefollowing
procedure:
1. Press the I
ON
LINE
I
button to set the printer off-line.
2. Press the - button and hold it down.
3. While holding the - button down, press the CElEi31button and
holdthemdownuntilthe“MACRO” message appearson theLCD display.
4. Release both buttons at the same time after this message appears on the
LCD display to save the current setting.
If you release these buttonsafter the “MACRO” message has gone out on
the display, the macro has been cleared.
43
Page 53

I
NOTE: You can store the following settings with this procedure.
● Current Font
● Current Pitch
● Current auto-loading amount for cut forms
s Current auto-loading amount for fanfold forms
● Current auto-loading amount in ASF mode
Datato be stored arecontrolled in Standard mode and IBM mode separately.
For example, the data stored in the Standard mode are not effective in the
IBM mode, and vice versa.
44
Page 54

CONDITIONS INDICATED BY MESSAGES AND
TONES
This section helps you identify the messages and the meanings of the tones.
Summary of display messages
Following table shows the summary of the messages on the LCD display.
LCD Message
ISANSERIF {
~PREsTiGE{
;seRlpT
I
~Hs-DRAFT{
;DRAFT
1
]OPTION
I
PITCH
EDS
Iamii3
Meanings and action
ROMAN LQ font is selected.
SANSERIF LQ font is selected.
COURIER LQ font is selected.
PRESTIGE LQ font is selected.
SCRIPT LQ font is selected.
High-Speed Draft font is selected.
You cannot select print pitch except 10CPI.
Draft font is selected.
You cannot select proportional pitch with the Standard/
Epson mode.
Optional LQ font is selected.
Indicates the message below shows the current pitch.
EDS mode is currently selected and the message on the
right indicates the current Bank and Switch number.
Press the 1
ON LINE
]
button to exit the EDS mode.
Font lock mode is selected.
The printer ignores the font selection commands and
prints with the fontdisplayed on the panel.
Turn off the power switch to cancel the font lock mode.
Pitch lock mode is selected.
The printer ignores the pitch selection commands and
prints with the pitch displayed on the panel.
Turn off the power switch to cancel the pitch lock mode.
Page 55

LCD Message
ON OFF
Meaninm and action
DisplaysintheEDS mode. Indicates thecurrent statusof
the displayed EDS bank and switch number.
Press the I
EJECT/PARK]button to change the status.
Quiet mode is selected.
Press the 1
PAPER FEED Ibutton while in the on linemode
to return to the Normal mode.
Front panel setting are saved in the printer’s memory as
a “MACRO”.
Short print test mode is selected.
Long print test mode is selected.
Turn off the power switch to cancel the long print test
mode.
Print area test mode is selected.
Hexadecimal dump mode is selected.
Turn off the power switch to cancel the hexadecimal
dump mode.
Top of form is set manually with the control panel.
Buffer is cleared manually with the control panel.
Paper is not loaded to the printer.
Dot Adjustment mode is selected.
Bail lever is closed before the paper goes through the
location of the bail lever. Open the bail lever.
Release lever is moved while the paper is in printing
position.
The memory of EDS settings is accessed.
Print head error. Turn off theprinter and turn it on again.
Carriage home position error. Turn off the printer and
turn it on again.
Paper handling error. Turn off the printer and turn it on
again.
S.W.I. error. Turn off the printer and turn it on again.
RAM check error. Turn off the printer and turn it on
again.
Watch dogerror. Turn offtheprinterand turn iton again.
46
Page 56

Summary of beep tones
Following table shows the summary of beep tones.
Beep tones
Two seconds
tone
Long tone, once
Four short tone
sequence, two
times
Short tone, once
Short tone, twice
Short tone, triple
One-quarter tone
One-quartertone,
twice
Intermittent tone
One-quarter
tone, twice
Meanings
Printer detects an error condition.
Turn off the power switch and turn it on again.
Printer detects an error condition.
Turn off the power switch and turn it on again.
Printer is out of paper.
● Buffer is cleared.
● Top of form is set.
● Quiet mode is selected.
● Tear off function is selected.
● EDS mode is selected.
● Macro definition is selected.
● Quiet mode is cancelled.
● Macro definition is cancelled.
● Printer is reset.
● Hexadecimal mode is selected.
● Pitch lock mode is selected.
. Font lock mode is selected.
Pitch and Font lock mode is selected at a time.
● Release lever is moved while the paper is in printing
position.
● Bail lever is closed before the paper goes through the
location of the bail lever.
47
Page 57

48
Page 58

chapter 5
DEFAULT SETTINGS=EDSMODE
From thecontrol panel you can change the parameters that define how your
printer works. These parameters become your power-on settings.This function is called the Electronic DIP Switch (EDS) mode.
HOW TO SET THE EDS MODE
The EDS mode in this printer has 16functionsthat you can setas the poweron default.
Turn the printer on while simultaneously holding the -, -, and
EJECT/PARK ] buttons.
The “EDS” message will show on the LCD display. This indicates that you
have entered the EDS mode.
In EDS mode, the buttons on the control panel are used as shown below in
Figure 5-1.
Select Select Change
Print Exit
Bank Switch setting
Figure 5-1. Buttonfunctionsin the EDS mode.
● Use the - button to select the Bank Letter.
● Use the - button to select the Switch Number.
● The LCD display on the control panel shows the current setting, ON or
OFF.
Use the I
EJECT/PARK~button to change the settings.
● Press the ] PAPER FEED ] button to print the current settings.
● Press the I
ON LINE
1
button to save and exit the EDS mode.
49
Page 59

OF THE EDS SETTINGS
The printer stores the parameters that you can select from the control panel
while in the EDS mode.
Adefaultisthe settingthat theprinterwilluse if noneis specifically selected
by a program. When you first turn on or laterreset your printer these default
settings will take effect. By changing the settings, you can alter various
printer functions to match your specific requirements. The following will
help you choose the proper settings.
BanI-Switch Function
ON
OFF
A-1
Emulation
STANDARD/EPSON
IBM
A-2
AEC Mode
Enabled
Disabled
A-3 RAM Usage
Input Buffer
Download Buffer
A-4 Auto LF with CR
Disabled
Enabled
A-5 Auto Sheet Feeder
Not installed
Iristalled
A-6
Graphics Direction
Bi-directional
Uni-directional
B-1 - (Not used)
B-2 Paper-out
Enabled ] Disabled
B-3 (Not used)
B-4 (Reserved)
Leave ON
B-5
Printable Area
Type A
I Type B
B-6 (Not used)
c-1
Print Mode
c-2
(See below)
c-3
c-4
Page Length
(See below)
c-5
D-1
Character Table
(Standard mode)
Graphics
Italics
(IBM mode)
Set #2
[ Set #l
D-2 IBM Code page or
D-3 International
(See below)
D-4 Character Set
D-5
CR Centering
Disabled
Enabled
E-1
E-2
E-3
LQ Font Selection
(See below)
E-4
E-5
F-1 EDS Setting
Current
Reset
NOTE: The factory default is the “ON” position for all functions except
A-6 which is set to the “OFF” position.
50
Page 60

Switch A-1: Emulation
Select the mode compatible with your computer and software. In the
Standard/Epsonmode,theprinteroperates liketheEpson LQ-860/850.
In the IBM mode, it operates like the IBM Proprinter X24E/24P,
Ps/1 .
The ON position selects Standard/Epson mode. The OFF position
selects IBM mode.
Switch A-2: Auto Emulation Change (AEC) Mode
This switch selects the Auto Emulation Change (AEC) mode.
When the AEC mode is enabled, the printer automaticallyjudges the
Emulation which your application program uses.
Switch A-3: RAM Usage
Inordertodownloadcharacters thisswitchmustbeintheOFFposition.
The printer then uses its RAM memory for storing character patterns
and provides only a one-line print buffer. If you leave this switch ON,
the printer uses its RAM memory as an input buffer, allowing the
computer to send data faster than the printer prints.
Switch A-4: Auto LF with CR
If you leave this switch at theON position, a separate line-feed code is
required from your computer to obtain a line feed. If you move this
switch to the OFF position,the printer performs both a carriage return
and line feed each time it receives a carriage-return code.
Mostcomputer systems send a line feed code, or both a carriage return
and line feed, at the end of each line, so this switch should be left ON.
If you get double line spacing when you expect single spacing, or if
lines overprint each other, try changing the setting of this switch.
Switch A-5: Auto Sheet Feeder
In order to use the optional automatic sheet feeder (SF-1ODS),move
this switch to the OFF position.
Otherwise leave it ON.
Switch A-6: Graphics Direction
When printing in graphics mode, the printer may either print bi-
directionally (in alternate directions) for speed or in one directiononly
(uni-directional for increased accuracy). For practically all purposes,
however, bi-directional printing is sufficiently accurate.
51
Page 61

Switch B-2: Paper-out
When this switch isOFF the printer ignoresthe paper-outdetector and
prints down to (and beyond) the bottom edge.
Switch B-4: This switch is used for technical purpose only. Leave this
switch ON.
Switch B-5: Printable area
This printer can use two types of printing area format for single sheets
(cut forms).
ByputtingtheswitchON (’<TypeA“), thetop ofthefirstlineofprinting
willstart 1/6inchfromthetopofthepaper, andtheprintedarea willend
1/6inch from the bottom of the paper.
ByputtingtheswitchOFF (“TypeB“),thefirstlineofprinting will start
at one inch from the top of the paper, and the printed area will end to
print 6 mm from the bottom of the printer.
Switches -C-l and C-2: Print Mode
These switches select the default print pitch and the fonts as shown
below.
Print Mode
c-l c-2
10CPIDRAFT
ON ON
10CPIHS DRAFT
ON
OFF
17CPIDRAFT
OFF ON
10CPILQ
OFF OFF
NOTE: If you change these switches after you have saved a macro,
these new settings will override the macro setting.
52
.
Page 62

I
Switches C-3 to C-5: Page Length
Leave these switches ON if you will be using 1l-inch forms. You will
need to change the switches if you will beusing adifferent page length
as shown below:
Page Length
c-3
c-4
c-5
11inches/Letter ON ON ON
8 inches OFF ON ON
11.7inches/A4
ON
OFF ON
12inches OFF OFF
ON
8.5 inches/Letter ON ON
OFF
14inches/Legal OFF ON
OFF
10.5inches/Executive
ON
OFF OFF
I 7.25 inchesiExecutivel OFF I OFF I OFF I
Switch D-1: Character Table
The action of this switch depends on the mode chosen with switch A-
1.
Movethisswitch OFF to selectItaliccharacter table with theStandard/
Epson emulation mode. If you leave this switch to the ON position, in
place of italics you will get the graphic characters, international characters, and mathematical symbols of IBM character set #2.
In the IBM emulation mode, ON selects character set #2, which has
international characters and fewer control words.
OFF selects character set #1, for computers with a 7-bit interface.
Switches D-2 to D-4: IBM Code Page or International Character Set
Except in the Standard Italic character set, these switches select the
default character code page as shown below:
IBM Code Page
D-2
D-3 D-4 IBMCodePage D-2
D-3 D-4
#437U.S.A.
ON
ON
ON K363CanadianFrenchON ON OFF
#850Multi-lingual
OFF ON
ON #865Nordic
OFF
ON OFF
#860Portuguese
ON OFF ON (Reserved)
ON
OFF OFF
#861Icelandic OFF
OFF
ON (Reserved)
OFF
OFF OFF
Page 63

International character sets differ in their assignment of 12 character
codes in the Standard Italic character set. See the character tables in
Chapter 11.With these switches you can select one of eight character
sets as follows:
Country
D-2 D-3 D-4 Country D-2 D-3 D-4
U.S.A. ON ON ON Denmark I ON ON
OFF
France
OFF ON ON Sweden OFF ON OFF
Germany ON OFF ON Italy ON OFF OFF
En.zland OFF OFF ON Spain I OFF OFF OFF
Switch D-5: CR Centering
If you set this switch OFF, the carriage moves to the center each time
to feed paper near the perforation. This way, you can get better quality
of printing around the preformations.It is recommended to match the
page length setting to yourfanfold paper, otherwise, this function does
not work properly at the perforations.
If you leave this switch ON, the carriage does not move when feeding
paper.
Switches
E-1 to E-5: LQ Font Selection
These switchesallowsyouto choose the default font selectedwhen LQ
mode is selected, as shown below.
FontName
E-1 E-2 E-3 E-4 E-5 Font Name E-1 E-2 E-3 E-4 E-5
Roman ON ON ON ON ON UPC/EAN* ON ON ON ON OFF
Sanserif
OFF ON ON ON ON Old-Style* OFF ON ON ON OFF
Courier
ON OFF ON ON ON Firenze* ON OFF ON ON OFF
Prestige OFF OFF ON ON ON (Reserved)
OFF OFF ON ON OFF
Script ON ON OFF ON ON (Reserved) ON ON OFF ON OFF
OCR-B* OFF ON OFF ON ON (Reserved) OFF ON OFF ON OFF
OCR-A*
ON OFF OFF ON ON (Reserved) ON OFF OFF ON OFF
Orator*
OFF OFF OFF ON ON ‘(Reserved) OFF OFF OFF ON OFF
Orator2*
ON ON ON OFF ON SLQRoman* ON ON ON OFF OFF
TW-Li.ght* OFF ON ON OFF ON SLQTW-Light*OFF ON ON OFF OFF
Letter-Gothic* ON OFF ON OFF ON SLQScript* ON OFF ON OFF OFF
Blippo* OFF OFF ON OFF ON (Reserved) OFF OFF ON OFF OFF
H-Gothic* ON ON OFF OFF ON (Reserved) ON ON OFF OFF OFF
Orane* OFF ON OFF OFF ON (Reserved)
OFF ON OFF OFF OFF
Cinema* ON OFF OFF OFF ON (Reserved) ON OFF OFF OFF OFF
Code39* OFF OFF OFF OFF ON (Reserved)
OFF OFF OFF OFF OFF
54
Page 64

Optional fonts (marked with*) can be selected only when the corre-
sponding font cartridge is installed in the printer.
If the corresponding font cartridge is not installed, the Roman is
selected.
Switch F-1: EDS Setting
Ifyou setthis switch OFF, the currentEDS settingsare all cleared, and
restores the Factory Settings,
55
Page 65

56
Page 66

chapter 6
TROUBLESHOOTING
This chapter helps you identifyprinter conditions andproblems that youcan
often correct yourself.
Remember that your printer is a highly sophisticated electronic device,
which also containshigh voltage inside.Forthatreason, onlycarry outthose
operations described in this chapter.
CAUTION: Any attempt to carry out operations other than those described
here may result in electric shock and/or damage to the printer.
When carrying out any repairs or maintenance, always follow
the instructions carefully.
TROUBLESHOOTING
Your printer is a reliable piece of precision machinery, which should not
causeyou any trouble,provided itisused and treated sensibly.However, the
few elementary tips below should help you avoid having to make unnecessary service calls.
● Power switch is on, but power indicator is off
Probable Cause I Action
Printer is not
Make sure that the power cord is correctly connected.
getting power.
Verify that the power source works.
● Printer sounds as if it is printing but does not; Printing is weak
Probable Cause I Action
Ribbon is jamming,twisted,or
not between the
printheadandthe
printheadshield.
Adjustment
lever is set
incorrectly.
Make sure thatthe ribbon cartridge iscorrectly installed.
Make sure that the ribbon is between the shield on the
print head and the end of the print head.
Replace the ribbon.
Checkthe settingoftheadjustmentlever.Movethelever
to a darker setting.
57
Page 67

● Printer test works, but printer does not print when attached to computer
Probable Cause
] Action
Printer cable has
a problem.
Problem with
the application
program.
Incorrect
emulation is
selected.
Make sure that theprinter cable iscorrectly connected at
both ends, printer and computer.
Refer to your application program manual.
Select the other emulation with the EDS setting.
See Chapter 5.
● Printer sounds the audible alarm
Probable Cause I Action
Thismightindicatf
anerrorornormal
operation.
Check the message on the display and the status of the
controlpanel indicatorsandsee“Conditionsindicatedby
messages and tones” in Chapter 4.
● Pitch or font selected is being changed
Probable Cause
I Action
Your software is
overriding your
control panel
selection.
Set your printer in Font/Pitch lock. See “Pitch lock
mode” and “Font lock mode” in Chapter 4.
58
Page 68

● Printer does not feed paper
Probable Cause
Paperisjamming.
Bailleverisclosed
before paper goes
throughthebailleverlocation.
Adjustment lever
is set incorrectly.
Fanfold form is
parked.
Action
Remove all forms and pieces of paper.
Openthebaillever.Bailleverautomatically closedwhen
the paper goes through the bail lever location.
Checkthesettingof theadjustmentlever.See“Adjusting
the printing gap” in Chapter 3.
Move bail lever forward to unpark the fanfold paper.
● Line spacing is incorrect or overprinting occurs
Probable Cause
The tractor posi-
tions are incorrectly adjusted.
Incorrect emulation is selected.
Problem with the
application
program.
Platen knob was
manually turned
while the Power
indicatorwas on.
Forms are jamming between
printing surface
and the print
head.
Action
Adjustthetractorpositions.See“Loadingfanfoldforms”
in Chapter 3.
Select the other emulation with the EDS setting. See
Chapter 5.
Refer to your application program manual.
Set the top of form. See “Top of form” in Chapter 4.
Do not manually turn the platen knob when the power is
on. Use the I
PAPER FEED [button.
Resetadjustmentlever. See“Adjustingtheprintinggap”
in Chapter 3.
59
Page 69

● Incorrect number of lines on a page
Probable Cause
Paper is adjusted
incorrectly.
Paper has shifted
backwards after
several forms
printed correctly.
Incorrect emulation is selected.
Problem with the
application
program.
Distance printer
must pull paper
is too far.
Paper is getting
stuck on cables.
Action
Set the top of form. See “Top of form” in Chapter 4.
Readjust forms,
Select the other emulation with the EDS setting.
See Chapter 5.
Refer to your application program manual.
Move paper closer to the printer.
Move the paper away from any wires or cables.
● Line length is wrong; Graphics do not print; Lines are not starting at left
margin
Probable Cause I Action
Incorrect emula-
tion is selected.
Problem with the
application
program.
Select the other emulation with the EDS setting.
See Chapter 5.
Refer to your application program manual.
60
Page 70

● Characters are wrong or missing; formatting control codes do not work
Probable Cause
Action
Problem with the Refer to your application program manual.
application
program.
Some wires are
Printer needs repair.
missing from the
print head.
Wrong default Check the current EDS setting. Modify the EDS setting.
setting with
EDS switches.
● Dots are missing or print quality is poor
Probable Cause
] Action
Adjustment lever Check the position of the adjustment lever.
is set incorrectly. See Chapter 3.
Print head is not Printer needs repair.
working.
● Forms are smudged or printing is too dark
Probable Cause
Action
Adjustmentlever
issetincorrectly.
Ribbonistwisted
or isnot between
theprintheadand
the print head
shield.
Print head shield
(or print head) is
damaged or
missing.
Check the position of the adjustment lever.
Movethe lever to a lighter setting (front). See Chapter 3.
Install the ribbon correctly. See “Installing the ribbon
cartridge” in Chapter 2.
See “Installing the ribbon cartridge” in Chapter 2 to
locate the print head shield and print head. Contact your
dealer.
61
Page 71

● Printer is unstable; Wrong characters are printed; Left margin changes;
printing stops
Probable Cause
] Action
I
Static electricity
is resulting from
low humidity or
interference from
nearby electrical
devices.
Increase the humidity.
Movedeviceswithelectric motors away fromtheprinter.
● Left margin moves to the right during printing
Probable Cause I Action
The print head
is not moving
correctly.
Problem with the
application
program.
Theadjustment
lever is in the
wrong position.
Check that the ribbon and paper are correctly installed.
See“Installing ribbon cartridge” in Chapter2 and“Loading paper” in Chapter 3.
Refer to your application program manual.
Reset the adjustment lever. See “Adjusting the printing
gap” in Chapter 3.
● Printer is printing beyond side edge of forms
Probable Cause
Action
Paper is adjusted Adjust both forms tractors and the paper.
incorrectly.
Problem with the Refer to your application program manual.
application
program.
Aprintheadjam
Make surethatthe ribboncartridge iscorrectly installed.
caused by the
See “Installing the ribbon cartridge” in Chapter 2.
ribbonorapaper
Clear the paperjam.
jam.
62
Page 72

● Printer case is hot to the touch
Probable Cause
Action
printer’s vents Move object away from the air vents, including the
are blocked.
bottom of the printer.
● Printer is noisy
Probable Cause
I Action
---J
The printer
vibrates.
Printer covers
are open.
Move any objects that touch the printer.
Ensure that the printer is on a level, study surface.
Close covers.
63
Page 73

MAINTENANCE
Essentially,your printer isarobustpieceofequipment, but shouldbetreated
with a modicum of care in order to avoid malfunctions. For example:
● Keep your printer in a “comfortable” environment. Roughly speaking, if
youare comfortable, then theenvironment issuitablefor your printer (see
Chap[er 2).
● Do not subject the printer to physical shocks or excessive vibration.
● Avoid over-dusty environments. Dust is the enemy of all precision
mechanical devices.
● Toclean theexterioroftheprinter, useacloth barely dampenedwitheither
water with a little detergent or a little alcohol, but do not allow any liquid
to fall inside the printer.
● The interiorof the printermay be cleaned with a small vacuum cleaner or
a compi-essed-airaerosol (sold for this purpose). When performing this
operation, be sure not to bend or damage any cable connections or
electronic components.
64
Page 74

chapter 7
OPTIONAL ACCESSORIES
You can select the following accessories as option.
● Automatic sheet feeder (SF-1ODS)
● Pull tractor unit (PT-1OZS)
● Font cartridges (FC series)
● RAM cartridge (RC-32Z, DC-32Z)
● Serial-Parallel Converter (SPC-8K)
This chapter describes how to install and use these optional accessories.
NOTE: When you install or remove the optional accessories, turn off the
power switch.
AUTOMATIC SHEET FEEDER (SF-1ODS)
You can use the Automatic Sheet Feeder (ASF) to print on cut-sheet forms.
Before installing the ASF, check each item in the box against Figure 7-1 to
make sure that you have everything.
Figure 7-7.Check,tomakesureyouhaveallfweitems:1)SheetFeeder,2) Hopperattachment,3) Stacker
attachment,4) Printer cover, and 5) ASF Usersmanual.
NOTE: The Automatic SheetFeeder isprotected bypacking andtapeduring
shipping. Be sure to remove all of the protective material and tape
before use.
65
Page 75

Setting up
The procedure to install the ASF is:
1. Use the printer’s EDS mode to select ASF as “installed”. (For details,
please refer to Chapter 5.)
2. Open the front cover by lifting up the back using the two grips on either
side, then remove the cover by pulling up.
3. Open the rear cover by lifting up the front using the two grips on either
side.
4. Move the printer bail lever toward the front of the printer to open the
paper bail.
Releaselever
Figure 7-2.Remove the front cover, and open the rear cover
5. Tip theAutomatic SheetFeeder forward slightlyby aligningthe notches
on the ASF cover with the bail rollers, then put the feeder into place
behind the printer platen roller.
ASF cover
Figure 7-3.Align the notches and the bail rollers, then tip the ASF forward slightly
66
Page 76

6. Lower the rear side of the Automatic Sheet Feeder and attach it to the
holder shaft.
7. Install the printer cover provided with the Automatic Sheet Feeder.
I
Figure 7-4. Installtheprintercover.
8. Insert the hopper attachment on top of the hopper support section as
shown in Figure 7-5.
I
Figure 7-5. Insertthe hopper attachment.
9. Insert the stacker attachment intotheholder on the frontpart of the sheet
feeder.
NOTE: The flat sideoftheattachment shouldbelocatedtotherear,asshown
in Figure 7-6.
Now, you can use the ASF by installing the paper stack into the hopper.
Page 77

NOTE: Set the front cover aside carefully after they have been removed
from the printer. Reverse the procedure described above when
removing the Automatic Sheet Feeder.
Figure 7-6. Insert the stacker attachment
Loading paper
1,
2.
3.
If fanfold paper has already been loaded in the printer, park the paper
through the rear slot.
Push the printer release lever toward the rear of the printer ( ~ )to load
single sheets.
Pull the paper loading lever toward the front of the printer to pull the
hopper out until it is in position.
lever
I
Figure 7-7. Pull the paper loading lever forward.
68
Page 78

4. Adjust the left paper guide to the desired left position by moving it
horizontally in either direction.
Figure 7-8.Adjustthepaperguidestoaccommodatethe width of the paper.
5. Adjust the right paper guide to accommodate the width of the paper.
The guides should be adjusted to restrict the amount of horizontal play
while allowing the paper to slide up and down freely between the two
paperguides. The idealdistancebetween paperream and paperguides is
0.25 mm (0.01”) on both sides at the narrowest part of the paper guides.
6. Fan the paper stack and square it off properly before inserting it into the
Automatic Sheet Feeder.
Figure 7-9. Fan thepaperbeforeinsertingintotheASF.
7. Insert the paper stack into the Automatic Sheet Feeder.
The stack should not be more than 50 sheets of 20 lb paper.
Ifnecessary, remove some sheets. The ASF may not perform satisfactorily if it is overloaded.
69
Page 79

8. Push the paper loading lever toward the rear of the printer.
Figure 7-10. PushthepaperIoadmglever to hold the paper stack.
Now. you are ready to start printing with the Automatic Sheet Feeder.
Feeding a single sheet
A single sheet of paper can also be fed manually with the Automatic Sheet
Feeder.
1. Set the paper by inserting into the slot at the front of the stacker
attachment, as shown in Figure 7-11.
I
Figure 7-71. inserta singlesheetintotheslot at the frontof the stackerattachment.
2. With the power on, press thel
ON LINE
I
button to put the printer off-
line. Then press the [
EJECT/PARK ] button. The paper will feed into the
printer.
70
Page 80

PULL TRACTOR UNIT (PT-IOZS)
You can use the Pull Tractor Unit to print on fanfold forms or multi-part
forms through the bottom feed slot.
Setting up
The procedure to mount the Pull Tractor Unit is:
1.
2.
3.
4.
Open the front cover by lifting up the back using the two grips on either
side, then remove it.
Open the rear cover by lifting up the front using the two grips on either
side.
Move the printer bail lever toward the front of the printer to open the
paper bail.
Fit the mounting brackets of the Pull Tractor Unit onto the shaft of the
printer mechanism, tilting the Pull Tractor Unit slightly backward.
Figure 7-12. Fitthemountingbracketsof the Pull Tractor Unit onto the shaft of the printer,
5. Secure the Pull Tractor Unit firmly by pushing the lock levers on either
side, as shown in Figure 7-13.
71
Page 81

I
Lock lever
Figure 7-13. Install the Pull Tractor Unit onto the printer by pushing the lock levers.
6. Install the paper guide provided with the Pull Tractor Unit, as shown in
Figure 7-14.
7. Install the printer cover provided with the Pull Tractor Unit.
Figure 7-14. Mount the papecguide and the printer cover onto the printer.
NOTE: Set the paper guide and front cover aside carefully after they have
been removed from the printer. Reverse the procedure described
above when removing the Pull Tractor Unit.
72
Page 82

Loading paper
1. Open the printer cover.
2. With the tractor covers open, guide the paper from the bottom of the
printer, by aligning holes with the pins on the tractor unit.
Figure 7-15. Mount the fanfold paper from the bottom of the printer.
3. Adjustthespacingofthetractorunitsby slidingthemalongthebar, using
the clamp lever at the back of each unit to release and lock them in
position.When the lever is up, the unit is released, and when it isdown,
the unit is locked.
4. Now close the tractor covers, again making sure that the paper holes are
alignedwith the pinson thetractorunits.Ifthey are not aligned properly,
you will have problems with paper feeding, possibly resulting in tearing
and jamming of the paper.
Page 83

I
p lever
T~actor cover
I
I
I
Figure 7-16. Close the tractor covers after adjust the spacing of the tractor units by sliding them along the
bar.
5. After settingupthe paper from thebottomoftheprinter, installtheprinter
cover.
:1
Figure 7-17. Mount the printer cover.
Now, you are ready to start printing with the Pull Tracter Unit.
74
Page 84

FONT CARTRIDGES AND RAM CARTRIDGES
This printer has five built-in LQ fonts, and a 16K-byte printing buffer.
You can add the following optional fonts or expand the printing buffer by
installing optional cartridges (Font Cartridge or RAM Cartridge).
[Optional Font Cartidges]
I Font Name I Character sample
● FC-IZ
Orator
123456789
ABCDE ABCDE
Orator 2
123456789
ABCDE abcde
Letter Gothic
123456789 ABCDE abcde
I Blippo
I123456789
flBCDE abcde I
Cinema 123456789 AllCLIE iibcde
. FC-2Z
OCR-B
123456789
ABCDE abcde
I OCR-A
Il12345L’78q ABCDE abcde
I
CODE 39
11111111111111111111111111111111111111111111111lllllll
UPC/EAN
123456789
12345 11111 111[[
.
FC-3Z TW-Li.ght
123456789 ABCDE abcde
I H-Gothic 1123456789 ABCDE abcde I
I Orane
I123456789 ABCDE Elt)C~E? I
● FC-4Z
Russian Roman 123456789 ABBrfl =fLLr
GOST
123456789 ~aeii HfIPCT
Cyrillic
123456789 AEBrfl ~e~el
. FC-5Z Old Style
123456789 AIN?!IJEu&TctIe
Firenze
123456?89 At3CDE
CikJCGk?
● FC-1OZ SLQ Script
123456789
A~CDE abuirz
● FC-IIZ SLQ Roman 123456789 ABCDE abc.de
● FC-12Z SLQ TW-Light
123456789 ABCDE abcde
[Optional RAM Cartridge]
● RC-32Z—32K-byte printingbufferwithmemorybackup fordownloading
of data
● DC-32Z—32 K-byte printing buffer
Page 85

To install or change a cartridge, follow the procedure below.
1. Turn off the power switch at the front of the printer, and open the front
cover.
2. Remove the connector cover at the right side of the printer.
1
Figure 7-18.Remove the connector cover at the right side of the printer
3. Push out the cap from the connector cover, as shown in Figure 7-19.
NOTE: Keep this cap in a safe place.
cap
~
\\,
‘\\,
‘,.
-..
...
...>
.. .
.A.
-.>
%
\,\
“’’’\..: “
-’”
\.’\
Connector cover
‘>. , “
t’
I
Figure 7-19. Push out the cap from the connector cover.
4. Install the connector cover into the printer.
76
Page 86

5. Insert the cartridge intothe slotof theconnector cover, and slideitallthe
way in.
Figure 7-20.Insert the carirldge into the slot of the connector cover.
6. Close the front cover.
NOTE: Remount the cap on the connector cover
optional cartridge.
if you are not using an
77
Page 87

INTERFACE CONVERTER (SPC-8K)
To run the printer in serialmode, you should use the optional Serial/Parallel
Converter (SPC-8K).
The procedure to install the Converter is:
1.
2.
3.
4.
5.
-
SettheDIPswitchesonthe SPC-8K before attaching ittotheprinter.(See
next page for detailed information.)
Turn off thepower switch and disconnectthepower cord from thepower
source.
Disconnect the interface cable if attached.
Connect the Parallel connector to the printer.
Move both clips insidetheextended prongs on the sidesofthe plug until
you hear a click,
1
Figure 7-21.Connect the Parallel connector to the printer.
6. Connect the Serial connector to your computer.
NOTE: Place the Converter on a table in order not to damage the cable.
[CORRECTMETHOD] [INCORRECTMETHOD]
Figure 7-22. Place the converter on a table,
78
Page 88

DIP Switch Functions on The Converter
It is necessary to make compatible the data transfer conditions between the
computer and the serial interface board with the DIP switch settings on the
converter.
Following table shows the functions of the DIP switches on the Serial-
Parallel Converter.
3
Data Protocol
(Refer below)
4
5
Parity condition
(Refer below)
6
7
Transfer speed
(Refer below)
8
[Transfer speed]
[Parity condition]
Switch 2
Switch 5
Condition
t-%-%+ ‘oParity
OFF ON Odd parity
OFF OFF Even parity
[Data protocol]
I Switch3 ] Switch4 I Protocol I
I ON I ON I
DTR
I
ON OFF
XON/XOFF
OFF
ON ETX/ACK
rSwitch6 I Switch7 ] Switch8 ] Transfer speed I
[ OFF I OFF I OFF I 150BPS
I I 1
OFF OFF
ON 300 BPS
79
Page 89

80
Page 90

chapter 8
PRINTER CONTROL COMMANDS
Theprinterhastwoemulation modes:Standard/Epson modeandIBM mode.
InStandard/Epsonmode, theprinteremulatesthefunctionsoftheEpson LQ-
860/850.In IBM mode, the printer emulates the IBM Proprinter X24E/24P
and P!Y1printer. Additional command codes are included as a superset of
these emulations.
The emulation is changed by means of EDS switch A-1. When it is ON, the
printer will be in Standard/Epson mode, and when OFF, the printer will be
in IBM mode (see Chapter 5).
In addition, when the EDS switch A-2 is ON, the printer automatically
changes the emulation by means of software control.
Thischapterdescribes theprinter’scontrolcommands. Somecommands are
common to both the standard and IBM modes. In the descriptions of the
commands, all commands will given by functions.
Mode ]ASCII
I Decimal
I Hexadecimal I Description
Std.
<ESC>
“X”
<1>
27 120 1
\
IB 78 01 Select LQ characters
Mode:
Indicatesthe mode in which the command isrecognized.
Std. Standard/Epson mode (EDS switch A-1 is ON.)
IBM IBM mode (EDS switch A-1 is OFF.)
Both Both Standard/Epson and IBM modes
ASCII:
Indicates the ASCII coding of the command. Control
characters are enclosed in pointed brackets: For exam-
ple, <1> means character code 1.
Decimal: Gives the command in decimal character codes.
Hexadecimal: Gives the command in hexadecimal character codes.
Parameters for which values must be supplied are indicated by italic letters
such as n, m or d.
81
Page 91

FONT CONTROL COMMANDS
,,””= ...4.?, ,
. . . . . . .
-,.----.,,,-,
---W,,V.,W,,
;td.
<ESC>
“X” ]1
27 120 n IB 78
n Changes the print quality according to the value of
n, as shown below:
0
Draft
1 LetterQuality
BM <WC> “[”
<d> 27 91 100 IB 5B 64 Changes the print quality according to the wdue of
<1> <O> n i o
n 01 00
n n, as shown below:
o Unchanged
I -127
Draft
128-254 Letter quality
255
Return to EDS setting
loth <ESC> “’k” n
27 107
n
IB 6B n Selects an LQ font accordingto thevalueof n.
O Roman
I Sanserif
2 Courier
3 Prestige
4 Script
5
OCR-B (FC-2Z)
6 OCR-A
(FC-2Z)
7 Orator
(FC-IZ)
8 Orator 2
(FC-IZ)
9 TW-Light
(FC-3Z)
10 Letter Gotbic
(FC-IZ)
1I Blippo
(FC-IZ)
12 H-Gothic
(FC-3Z)
13 Orane
(FC-3Z)
14 Cinema
(FC-lZ)
15 CODE 39
(FC-2Z)
16 UPCIEAN
(FC-2Z)
17 Old Style
(FC-5Z)
18 Firenze
(FC-5Z)
32 SLQ Roman
(FC-I IZ)
33 SLQ TW-Light (FC-12Z)
34 SLQ Script
(FC-IOZ)
;td,
<ESC> “’4” 27 52
IB 34
Causessubsequentcharactersto be
printed in
italics.
ital.
<ESC>
“5” 27 53
IB 35
Stops italic printing and causes subsequent charac-
ters to be printed uprigbt.
)oth
<ESC> “E”
27 69
IB 45 Causessubsequentcharacterstobeemphasized.
%oth
<ESC> “F”
27 70
IB 46
Cancelsemphasizedprinting.
lotb
<ESC> “G”
27 71
IB 47
Causessubsequentcharactersto be printed
in
double-strike mode.
loth
<ESC> “H”
27 72
IB 48‘
Cancelsdouble-strikeprinting.
lotb <ESC> “-” n
27 45
n IB 2D
n Wben
n is 1, causes subsequentcharactersto be
underlined.
Whenn isO,stopsunderlining.
BM <ESC> ‘-”
n
27 95 n
IB 5F n Whenn is 1,causessubsequentcharacterstobe
overlined.
Wben
n is O,stops overlining.
82
Page 92

Mod(
std.
Std.
Both
Both
Both
I
--1-
<ESC> “q” II
27 113 r
-=-L
==7=
Hexadecimal
lB 28 20
03 00 01
nl n2
lB 53 0(
lB 53 01
lB 54
Description
Startscoreaccordingto
the values ofnl and n2, as
shown below.
nl: 1
Underlining
2 Strike-through
3 Overlining
n2: O Cancel score
I
Singlecontinuousline
2 Double continuous line
5 Single broken line
6 Double broken line
Selects an ornament character according to the
value of n, as shown below.
() Normal
I Outline
2 Shadow
3 Shadow and oudine
Causes subsequent characters to be printed as
superscripts.
Causessubsequentcharactersto be printed as
subscripts.
Stopsprinting superscriptsor subscriptsand re-
turns to normal printing.
83
Page 93

CHARACTER SET COMMANDS
.- .-1 AC.r.,, I
n,-,-;-., I Uownrie,-i.nol I mmef-rimtinn
Iluue H-3LII
u~bl,,,a,
I
!Cma”cu!!!!u! , LJG-vllvtl”!l
3oth <Esc> “t”
<0>
27 116
0] IB 74
00] Selects the standard charx~er set.
3oth
<ESC> “t’>
<1>
27 1. ., .- -., . . . . .
loth
<ESC> “7”
27
5.5
knh
;[d.
<E;c> ;’:”<ML>
, ,,
,1
1A 1I IR 74 01 I select, an IBM charackx set.
IB 37
Selects character set #l.
27 5;
IB 36 Seleck character set #2.
27 82
n IB 52
n Selects an international character set in the Stand-
ard character set according to [he \idue of JI.
() U.S.A 8
Japm
I
France
9 Norway
2 Germany 10 Denmark II
3 England I 1 Spain 11
4 Denmark [
j ‘2 La[in Ajn~ri~a
5 Sweden
13 Korea
6 Italy
14 Irish
<ESC> “[”
‘T”
27 91 84 IB 5B
<4> <0>
<()>
40
0 04 00
<()> Ill
112
0
111 n2 00
!11
7 Spain 1 64 Legal
Changes the code page of’the curren[ IBM charac[er set according to the values of n) and n2
n]
n2 Code Page
1 181 #437 U.S.A.
3
82 #850 fvld~i-lingual
3 92 #860 P(mtuguese
3 93 #861 Icelandic
3 95 #863 Canadian French
3 97 #X65 Nordic
.BM <Esc> “\”
27 92
IB 5C
Enables printing ofdl characters in the IBM char
)11 112
/1/
112
11/ n2 wkr set, tw the next tt/ + n2 x 256 characters.
:BM <ESC> ““” r? 27 94
11 iB 5E
n Enables printin~ of all chorac[ers in the IBM char-
acter set. f“m the kalue ot’ n
Std.
<ESC> .’-”’ )1 27 126
?1 IB 7E
rl Selects subsequent mm chmactcr style.
() Normal
I Slasbed
84
Page 94

CHARACTER SIZE AND PITCH COMMANDS
,,VUG -U”!!
---. ..,.-.
-,. ----. ...-,
-W--..y.,-.,
;tcf.
<ESC> “P”
27 80
lB 50
Chmgcs from either elite or senli-condensed to
pica pitch (10 cpi) or from condensed elite [o
condensed pico ( 17 cpi).
B&l <Del>
18 12
Changes from either elite orconcfenswl 10pica ( 10
cpi).
ital.
<ESC> “M
27 77
IB 4D
Changes from either pica or semi-condensed to
elite pitch ( 12 cpi) ur I“ron] cxmdenwd pica to
condensed elite (XI cpi).
BM <ESC> “:”
27 58
IB 3A
Changes f“mm either picu or semi-condensed [o
elite pitch ( 12 cpi) or from condensed pica to
condensed elite (20 cpi).
;td.
<ESC> ‘g,’
27 103 IB 67
Changes from either pica m elite to semi-condensed pitch (15 cpi).
)oth
<s1>
15 OF
Changes from
pka[Ocondensed pica (17 cpi) m
from elite to condensed elite (2O cpi).
)oth <ESC> <S1>
27 15 IB OF
Changes from pica to condensed pica (17 cpi) or
from elite to condensed elite (2(1cpi).
i(d.
<DC?>
18 12
Changes from condensed pica m normal pica or
from ~(l”densed elite to normal elite.
ital.
<ESC> “p” tl
27 112
,1 IB 70 n
Selects or cancels proportional spacing
O Cancel
1 Select
BM <ESC> “P” n
27 80
n
IB 50
n
Selects w cancels proportional spacing.
() Cancel
I
select
BM <ESC> “’l” rl
27 73
n IB 49
n
Changes [he print font and pitch according to the
value ofn, m shown below:
() Ifl CPI Draft
2 10 CPI Letter Quality
3 Proportional Letter Quali[y
4 10 CPI Draft Download
6 10 CPI LQ Download
7 Proportional LQ Download
8 ]~ Cp[ Draf(
10 12 CP1 Letter Quality
12 12 CPI Draft Download
}4 12 CPI LQ Download
16 17 CPI Draft
18 17 CPI Letter Quality
20 17 CP1 Draft Download
22 17 Cpf
LQ f)o~”}~~d
85
Page 95

L
~ode
ASCII Decimal Hexadecimal
Description
BM <ESC> “[”’
“1” 27 91
73 iB 5B 49 Changes the print font and pitch according to the
<~>
<()>
20
02 00
valuesof nl andn2, as shown helm+.
1?/ n2
nl n2
nl
r12 nl n2 Font and pitch
0 11
10 CPI Courier
1
235
[~ Cp[ co~ri~r
I
136 I5 CPI Courier
1 237 17 CPI Courier
I 238 20 CPI C-ourier
1
30
24 CP1 Courier
o 171 Proportional Courier
o
1~
10
CPI Prestige
I
239
I2 CPI Prestige
[ ~J()
I5 CPI Prestige
1 201 I 7 CPI Prestige
[ 202
20 CPI Prestige
1
31
24 CPI Prestige
O [64 Proportional Prestige
o
36
10 CPI Letter Gothic
1 143 12 CPI Letter Gothic
I 142
15 CPI Letter Gothic
I 141 17 CPI Letter Gothic
I [40 20 CP1 Letter C,othic
I
32 24 CPI Letter Gothic
O 174 Proportional Letter Gothic
!oth <ESC> “W” n
27 87 n IB 57
n Selects or cancels expanded printing.
O Cancel
I Select
loth
<s0> 14
OE
Causes subsequent characters in the current line m
be expanded to double width.
loth <ESC> <SO> 27 14
IB OE
Causes subsequent characters in tbc current line m
be expanded to double widtb.
loth <DC.!>
20
14
Stops one-line expanded printing set wi~h <SO>or
<ESC> <SO>.
,td.
<Esc>‘$!” ?1 27 33
n IB 21
n Selects a combined print mode according to tbe
value of n. The tdue of n is the sum of tbe values
giwm below for [be desired characteristics.
Function
n wdue
(-lnder}ine
1~8
Italic
64
Expanded
32
Double swikc
16
Emphasized
8
Condensed
4
Proportional
2
Elite I
td.
<ESC> <Sl% n 27 32
n IB 20
n Increases the space between characters by n dots.
td.
<ESC> “b” r]
27 104 n IB 68
}1 Selects tbe size of subsequent characters as shown
below.
() Normal size
I Double-high. double-wide
2 Quadruple-bigb, quadmple-wide
(d.
<ESC> “w” /i
27 119
n IB 77
11 Selects m cancels double beigbt printing.
O Cancel
1 Select
86
Page 96

BM
<ESC> “[” “@”
<4>
<o> <o>
<O> n m
27 91 64
400
Onm
lB 5B
04 00
00 n
40 Selects a combination of character height, width,
00 and line spacing according to the value of n and m,
m as below.
n
Line spacing Character height
O Unchanged
Unchanged
1
2
16
17
18
j~
33
34
Unchanged
Unchanged
Single
Single
Single
Double
Double
Double
Singleheight
Doubleheight
Unchanged
Singleheight
Doubleheight
Unchanged
Singleheight
Doubleheight
m Characterwidth
I Singlewidth (sameas<ESC>“W”O)
2 Doublewidth(sameas<ESC>”W” 1)
Page 97

VERTICAL POSITION COMMANDS
Mode
Both
Both
std.
ski
IBM
Both
Both
IBM
Both
Std.
IBM
Both
Std.
St[i.
IBM
Both
Bt)th
Both
B[)th
Both
std.
Both
Both
Both
Std.
ASCII Decimal
Hexadecimal Description
<ESC> l)”
27 48
IB 30 Set Iinc spacing 10 1/8 inctl.
<ESC> “1“
27 49
IB 31 Set line spxing [o 7/60 m 7/72 inch.
<Rx> “2’”
27 50
IB 32
Set line xpacing m 1/6 inch.
<Esc> -+”
27 43
,1 IB 2B 11 Sel line SP:ICVIIS10IT136(Iinch.
<Esc’> “[’” ‘:”
27 91
92
IB 5B 5C Se! h:!se unit for lint’ spw’ing. ;Iccordio? [o the
<.$> <()>
<()>
<()> HI )12
<ESC>
..3.. ,,
<ESC> ‘..4” II
<ESC> “2”
<LF>
<ESC’> <LF>
<ESC>
“.1” t!
<ESC>
.....
<1> )1
<Esc’> “4”
<Esc>
“c” 1!
<Esc> ‘c’
400
0
11/ 112
27 51 i?
27 65 IZ
27 50
10
27 10
27 93
27 74 t,
27 106 /i
27 102
1
II
27 52
27 67 ),
27 67
04 00 00 \2due5 01”11/md )1?.
00 111 /12
111 !22 BJSCunit
() 1X() 1/1X()-inch
() ? 16
~1~1 ~.lrlch
I
104 l/36(1-inch
IB 33 1! Set line spacing to {Ill 8(Iinch, n1216 inch, or ti/360
inch. accorciing to the dct’ined hwt’ uml.
IB 41 /1 %( line
Spwit]g[[IIIIN)inch (St:mdarci mod?) m
)1/72 inch (IBM mode),
IB 32 Sets(he Iinespa.ing t(,theval.e(lcfinecl bythe 1,s1
preceding <EsC> “A” command.
OA tlin[s the curtcnl line and feeds the paper to lhc
next Iinc.
IB OA Prin(s [he current line and fcecis [he paper in the
Irwt!rw dit.cction to the preceding Iinc.
IB 5D Prints the current line
an<i feeds the p;ipcr in the
reverse dilmction (o the preccdin$ line.
IB 4A !1 Fee&s the paper once Iw [III X() inches. !?1216
inches. or tJ/3fI(l inche.. acc[wdin? to the dcfimxi
bwe unit.
IB 6A 1? Feeds[he poperoncc by !!/1X()inche~ in the reverse
ciirection,
IB 66 Feeds the paper n line, from [he current line
<()> /1 o
)1
00 11
<Esc> “h” ,?
27 78
1, IB 4E
11 Sets the bottom mmgin [o II line..
<Esc> “o”
27 79
IB 4F Cmcels [be bottorll mwgln.
<FF> 12 Oc
Fwds [he paper 10the top ol’the next page a~wrding to the current p+!c length.
<ESC’> <FF>
27 12
IB OC FCCdSthe p~pcr hackward M the top of the current
page.
<ESC> “X”
27 56
IB 38 Causes [he printct. m disreyrd tbe siytil WI)( b)
the paper-out detector.
<ES~-> .1).
27 57
IB 39 Causes tbe printctlc stop printin$ hefore the cnd ot”
the p:lper.
<ESC> “B” 111
27 66 (1/
IB 42 IZI Cancel~ all currenr lcr!icd tab stop, and wts new
112
<()>
)12
0 [12 00 ~ertical t~h Noph :tt line~ III. II?. CIC.
<WC> “e”
27 101
IB 65
(.:,”celh ~[[ CUrIeIIt vcr[ical tab stop> tind s~t~IIKN’
<1> /1 1
11
01
1! tub stops ever!, II Iinw
88
Page 98

Mode ASCII
Decimal
Hexadecimal Description
std.
<ESC-> “h” !10 27
98 no lB
62 II(I Cancels all current wmical tab stops in channel HO.
11/ 112 <()>
!11
112 0 nl }12 00 (where no is betmeen (1tind 7) and set%ne- iertical
t~b stops in (his channel.
Std.
<ESC> “1” no 27
47 ?10 lB 2F no Selects a set of wrtical tab stops designated by a
channel number (nOJ from () to 7.
Both
<VT>
11 OB
Feeds the paper to the next Lertical tab stop and
mows the mint omition [<ILIIClel’r tmarcin.
89
Page 99

HORIZONTAL POSITION COMMANDS
ulod~
ASCII
Decimal
Hexadecimal Description
$td.
<ESC> “1” )1
27 108
n
IB 6C
,Z Sets the left margin tit column n in the current
character pitch.
$td.
<ESC> “Q” n
27 61
n
IB 51
}1 Sets the right margin at column II h the cu~ent
character pitch.
BM <ESC> “X”
27 66 IB 58
Sets the left mfirgin at column H/ and (hc right
)!/
112
11/ 112 !11
,,2 mugin at column 112.
Both
<Cfl>
13 OD
Prints the current line md returns [he next prinl
position to the Ief[ margin.
[BM <ESC> “S’
<1> 27 53 1 IB 35
01 Cwses the prinlertoperf’orm ho[h ticwriagc return
tnd line feed each time it receiws a <CR> code.
[BM <ESC> “5” <()> 27 53
0 IB
35 00
Ctiuses the prin(ertoperfortn only acarriage return
when it receiws a <CR> code
Both
<BS>
8 08
Mole~ lhc print position one column to the left.
Std.
<Esc> “3”
<()> 27 97 0 IB 61
00 Aligns subsequent text with the Ief[ lmargin. leav-
ing the right margin ragged.
Std.
<~s~> ..d-
<1> 27 97 1 IB 61
01 Centers suhsequcnt text hetwen the lcfl and right
margins.
Std.
<ESC> .:,”
<2> 27 97 2 IB 61
02 Aligns whsequent text with the right margin,
leaking the left margin ragged.
Std.
<ESC> “J”
<3> 27 97 3 IB 61
03 Aligns subsequent [cxt between the left and right
margins.
Both <ESC> ‘D”
!1/ 27 66 HI IB 44
Ml Cancels all current horii’mwd tah wps and W(S
112
<()> ,12 ,,,.
0 n2
00 new tab stops at columns II 1,n2, etc. in the cummt
character pitch.
std.
<ESC> “e”
27 101
IB 65
Cancels Jll current horizontal tab stops md wts
<()> )1
o }? 00
,, nem tuh stops ewry II columns.
IBM <ESC> “R”
27 62
IB 52
Rews the horimmtal tuh stops to [heir power-up
~alues in which Mtah stop is set every X column
stwting at column Y.
Also clews id] wflic~l mh stops.
Both
<HT>
9
09
Mokes the print position to the next horiI.mmd tab
Wp.
ski.
<ESC> “\”
27 92
IB 5C
Mows tbc print position right or IcI( z specified
1!/
)!2
)1/ 112 )11
,,2 disumcc.
IBM <ESC> “d”
27 100
IB 64
Sets the ntxt print position to (tI/ +U2x256)/120
)1/ 112
)!/
?1.
7
1)/
t!2 inches from the current position.
Std.
<ESC> ‘.S”
27 36 IB 24
Sets the next
printpositionto(,11+ ,12~ ~5~11~(1
11/
!12
11/ 11.
?
?1/
,12 inchesfromtheleft marginonthecurrent
]inc.
S(d.
<ESC> “f”’
27 102 IB 66
Mows the next print position to column II irm the
<()> /1
o t1
00
,I kf”t margin.
90
Page 100

GRAPHICS COMMANDS
Aod
k)[h
loth
kxh
knl]
!ld.
!td.
13M
ld.
M3cll
<ESC> “K”
)![
11?
ml
11!2
<ESC> “L”
Ill
112
1111
ttl?
<ESC> “Y”
11/
/12
ml H12
<ESC> “Z”
}1/ ?1?
!11/ m?
<FS>
,,z., ““
Ill
/12
ml
!112
Ill.<
:Esc> “*”
/10
11/ II?
1?1/
m?
:Esc> q“
-g
HI
H?
ml)
/11/ 1112
:Esc> ..?..
1? 111
)ecimal
2!7 75
111 11:
1/ /?12
?7 76
}1/
II’
?/ m? ,.
27 89
12/ ?1:
1/ I?Z2
27 90
11/ ,1:
1/ m?
?8 90 11>
112
}1!,
,2
{Id
?7 42 II(
?1/ 11;
1/ Ill?
?8 91 10:
)1 )12 III(
!1
1112
?7 63
11 ,?,
hexadecimal
IB 4B
17/ )1;
II 1112
IB 4C
!1/ !1:
!/
1112 ,,
IB 59
tl / ,,:
1/
m2 ,.
IB 5A
>1/ ,1:
1/ }1!2
c 5A IT,
)12 1!1,
12 1}1.<
IB 2A II(
Ill 11:
1/
1112 ,,
B
5B
6;
11 112
11?[
1/ 1112
B 3F
t] t?,
description
Pr;nts hit-im~gc g!mphics Jt 60 dots pcr inch
m-izonlall},. The graphic image is X(lots high and
l/ + n? x 256 dots wide.
‘rints hi(-im:ige graphics at 120 dots per inch
m-imntdl).
‘rints hit-i nmge graphics d 120 do[i per inch
Ioti[ontally. skipping cwr! w’ond dot in the
mrizontui direction.
%ints hit. image .graphics :1[ 240 do(~ per inch
mri~ontal direction.
%ints 24-hit dot graphics zt 360 (lots per inch
mrizon(dly. The grophics image IS 24 do(s high
md u/ + n2 x 256 clots wide,
;elect, (mc of ele!,cn graphics mode, deptmllng
m the L:IIUCof’ti)mw prints h]t-image graphics In
his mode,
8-hit Norm;ll-dcn~~ty
I 60 dpi)
X-hi( [),whle-den>ily
(I20 dpi)
$hi( Douhh-denslly, double- spud
X-hit Qu:tciruple-derlsit)
X-hit C’RT graphics. tmodc I
X-hit CRT graphics, Im(xk II
24-hit h’~mnul-dcn,ity
?.1.hit Douhlc-densil}
24-hi[ (’RT gmphics
I20 dpi)
240 dpi)
80 dpi)
90 dpl)
60 dpi)
I20 dpl)
90 dpi I
24-hit Triple-dcnsi{)
(IX()dpi )
24-bi( Hex-density
(36[) d“i )
ielec!s onc ot”cight gmphics modt+ depending <m
he i:tluc 01”t!(() *MI prints dot graphics in this
node.
() X-hit ?Jormi~l-densil} ( 60 dpi)
I X-hi( I){mhlc-derls](y, (I20 dpi)
2 X-hit Double-densit>, douhlc-ipecd
(I20 dpi)
3 R-hit Quadruple. dcnsit]
(240 dpi)
X 24-bit Nom?o-densit} ( 60 dpi)
Y 24-hit D~]uhle-dens~l}
( 120 dpi)
I I 24-hit Ttiplc-dcnki[y
( I X()dpi)
12 ?-l-hit Hcx-densi(!
(36(1dpi)
.’on\erts grtiphics defined hy ~uhscqucnt <ESC>
‘K”, <ESC> “L”. <ESC> ‘Y” or <l-SC> “Z”
wmm:mds m o den, i(y !mode dcl’incd h) <E SC>
,*,.
91
 Loading...