

Page 1
18 Inch 143 6 mm
20x1.75 156 4
20 Inch 159 6
22 Inch 175 9
ATB 24x1.75 188 8
24 Inch 191 6
24x 13/8 194 2
ATB 26x1.40 199 5
ATB 26x1.50 203 0 mm
ATB 26x1.75 204 5
26Inch (650A) 207 3
ATB26x2.0(650B) 209 9
700C TUBULAR 2117
700x20C 209 2
700x25C 212 4
700x28C 213 6
27 Inch (700x32c) 215 5 mm
700x35C 216 4
700x38C 217 4
27.5 Inch 2 193
28 Inch (700B) 223 4
28.6 Inch 2 281
ALL CLEAR OPERATIONS (Initiate the Computer)
Press the ALL CLEAR (AC) key to initiate the computer or use ALL CLEAR if any irregular
data appears. It will clear all stored data.
RESET OPERATION
1. Hold down the “MODE” button till the LCD digit is blanked, then release it. The computer
will RESET the DST.
2. It cannot reset and ODO data.
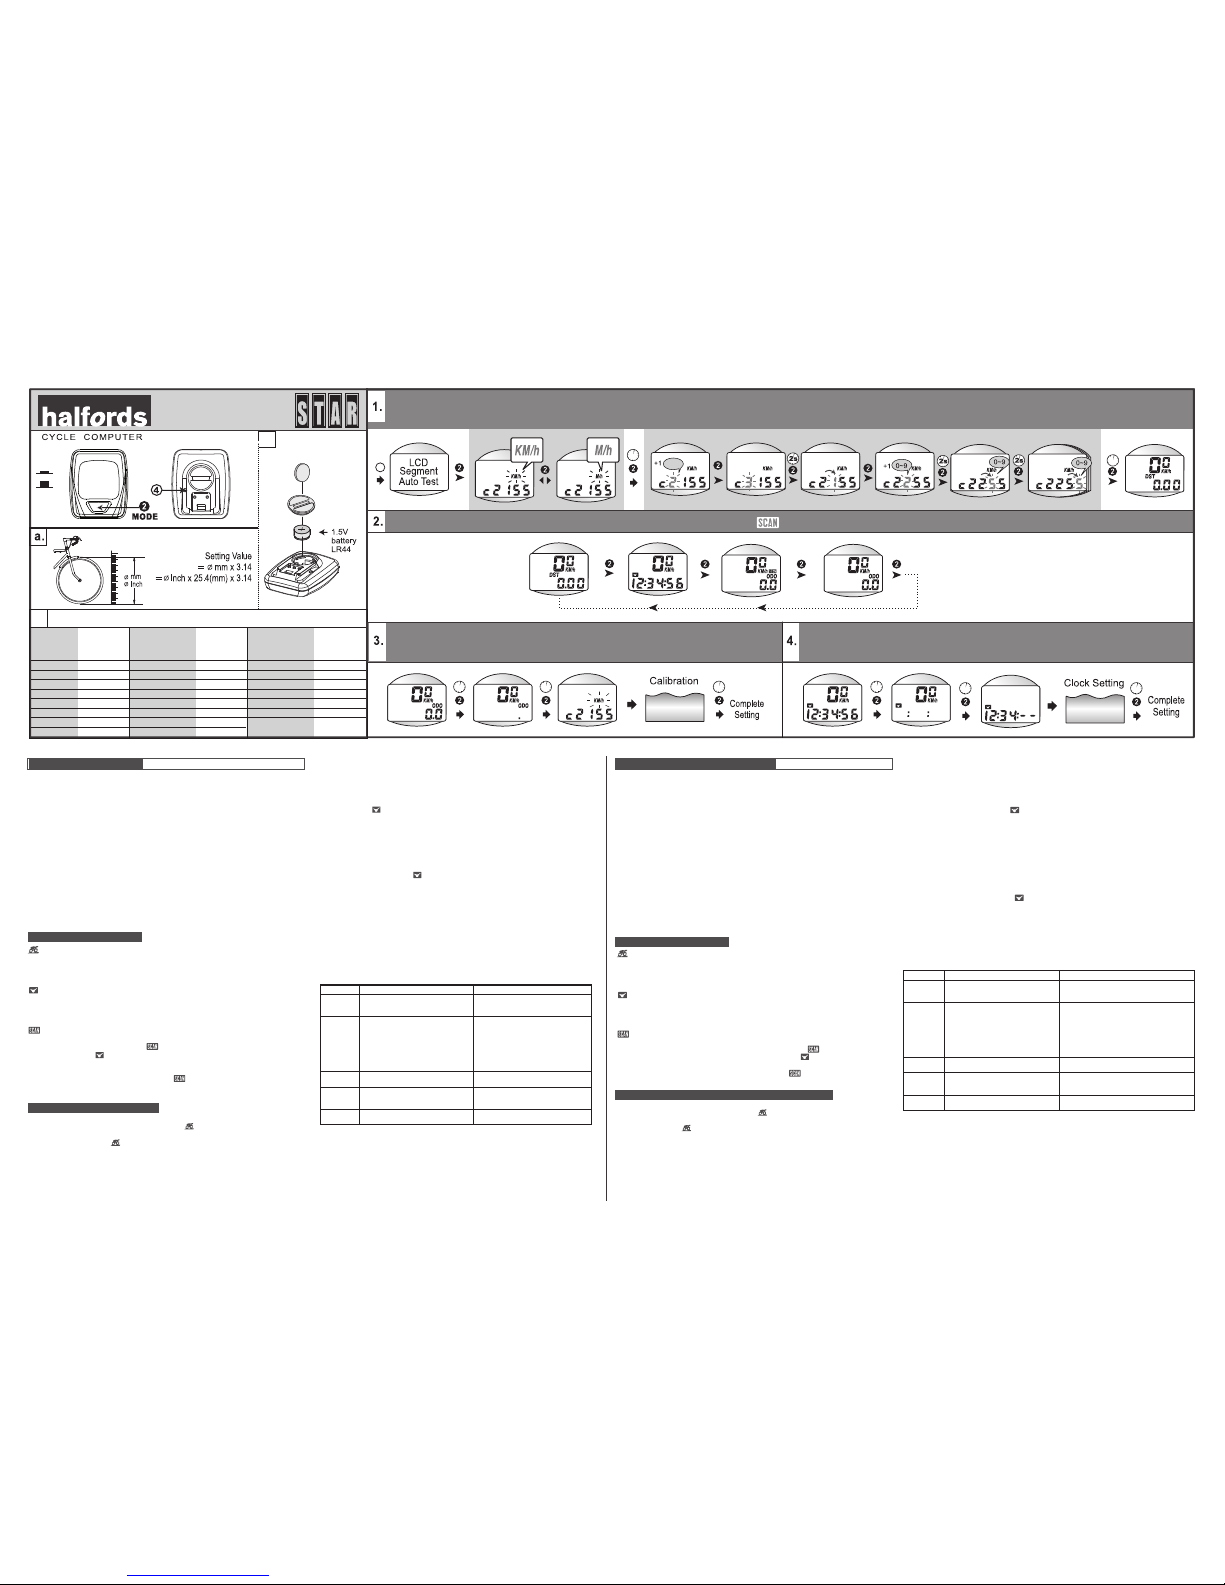
RECALIBRATIONS (Fig. 3)
1. Change the LCD display to ODO screen, hold down the “MODE” button till (about 6
seconds) it jumps into the calibrating screen.
2. Refer to the main unit setup process to adjust the circumference.
3. Hold down the “MODE” button till (about 6 seconds) it jumps out the recalibration mode to
store the desired data and complete recalibrations.
12HR CLOCK SETTING (Fig. 4)
1. Change the LCD display to “ ” screen.
2. Press the “MODE” button till (about 6 seconds) it jumps into the clock adjusting screen to
set the clock.
3. A quick press of the “MODE” button advances the flickering digit by 1.
4. To change the flickering digit, hold down the “MODE” button till the flickering digit moves
to the next digit.
5. Hold down the “MODE” button till (about 6 seconds) it jumps out the setting to store the
desired data and complete clock setting.
BATTERY CHANGE (Fig. c)
1. When the brightness of the LCD display is dim, it means that the battery is nearly exhausted.
2. Replace with a new LR44 (Cross reference type A76, AG13 or V13GA) battery in the
compartment on the back of the computer with the positive (+) pole toward the battery cap.
TROUBLE SHOOTING
Check the following before taking unit in for repairs.
4403005030_20080104_v1
2s
2s 4s 6s
2s
4s 6s
1~3
DST CLOCK ODO / ODO
6s
MAIN UNIT SETUP (Fig.1) ENGLISH
INITIATE THE COMPUTER
1. Be sure to press the All Clear (AC) key to clear all stored data and initiate the
computer before using it or when replacing battery otherwise the unit may malfunction.
2. The LCD segments will be tested automatically after the All Clear key is pressed.
3. Press the “MODE” button to stop the LCD test, then the flicking “KM/h” and “c2155”
will be displayed.
CALIBRATION
1. UNIT SELECTION
1). Press the “MODE” button to select “KM/h” or “M/h”(Mile/h).
2). Hold the “MODE” button till the flickering digit is changed to the digit “2” of the
c2155 to recognize either KM/h or M/h as desired.
2. CIRCUMFERENCE DATA SETTING
1). The default is set at 2155mm. Measure the value for your wheel (Fig. a) or refer to
the quick table provided in the manual for your bicycle. (Fig. b)
2). A quick press of the “MODE” button advances the flickering digit by 1.
3). To change the flickering digit, hold down the “MODE” button till the flickering digit
moves to the next digit.
4) Hold down the "mode" button until it jumps out of the setting to store the desired
data and complete setup.(about 6 seconds)
FUNCTIONS (Fig. 2)
: Current Speed 0.0–199.9KM/h (120.0 M/h), 0.1KM/h (M/h), +/- 1%
The current speed is always displayed on the 4 digits set when riding.
DST: Trip Distance 0.00–999.99Km (Miles), 0.01Km (Mile), +/- 0.01%
The DST function accumulates the distance data from the last RESET operation as long
as the bicycle is being ridden.
: 12HR Clock 1H00M00S-12H59M59S, 1 Second, +/- 0.05%
It displays the current time in 12HR clock.
ODO: Odometer 0.0–19999.9Km (Miles), 0.1Km (Mile), +/- 0.1%
The ODO accumulates the total distance as long as the bike is moving. The ODO data
can be cleared by the ALL CLEAR operation only.
: SCAN
1. Auto-Scanning Display Mode
Press the MODE button till the “ ” symbol is displayed. The computer will
change the DST, and ODO display modes in a loop sequence automatically every
6 seconds.
2. Fixed Display Mode
Press the MODE button to turn off the “ ” symbol and select a desired display
mode; the computer will stop the auto-scanning display operation and the display
mode is set.
BUTTON AND OPERATIONS
AUTOMATIC START/STOP
1. The computer will automatically begin counting , ODO, DST data upon riding and
stop counting data when riding is stopped.
2. The flickering symbol “ ” indicates that the computer is at START status.
POWER AUTO ON/OFF
To preserve battery, this computer will automatically switch off when it has not been used for
about 10 minutes. The power will be turned on automatically by riding the bicycle or by
pressing the button.
MODE BUTTON
Quickly press this button to move in a loop sequence from one basic function screen to
another. (Fig. 2)
NASTAVENÍ HLAVNÍ JEDNOTKY (Obr.1) ČESKY
SPUŠTĚNÍ CYKLOCOMPUTERU
1. Zmáčknutím tlačítka mazání (AC) zajistíte vymazání všech uložených dat. Tato
operace je nutná při každém zapnutí computeru nebo výměně baterií, jinak by mohlo
docházet k chybnému zobrazování dat.
2. Po zmáčknutí tlačítka mazání (AC) budou automaticky testovány jednotlivé části LCD
displeje.
3. Zmáčkněte tlačítko “MODE” a zastavíte test LCD. Potom začne blikat “KM/h” a “c2155”.
● NASTAVOVÁNÍ DAT
1. VÝBĚR JEDNOTEK
1). Pro výběr jednotek “KM/h” nebo “M/h”(míle/h) zmáčkněte tlačítko “MODE”.
2). K uložení požadovaných jednotek podržte tlačítko “MODE” tak dlouho, až začne blikat
číslice “2” z čísla c2155.
2. NASTAVENÍ OBVODU KOLA
1). Z výroby je obvod kola nastaven na 2155mm. Změřte hodnotu obvodu vašeho kola
(Obr. 5) nebo použijte tabulku (Obr. 6)
2). Rychlé zmáčknutí tlačítka “MODE” zvýší blikající číslici o 1.
3). Pro změnu blikající číslice podržte tlačítko “MODE” po dobu, než začne blikat další
číslice.
4). Podržte tlačítko “MODE” delší dobu (asi 6 sec.), čímž nastavování ukončíte a data
uložíte.
FUNKCE (Obr. 2)
SPD: Okamžitá rychlost 0.0–199.9 KM/h nebo 120.0 mil/h +/- 1%
Okamžitá rychlost je vždy zobrazována během jízdy čtyřmi číslicemi.
DST: Cestovní vzdálenost 0.00 – 999.99 km nebo mil +/- 0.1%
Funkce DST načítá vzdálenost od poslední RESET operace po dobu, kdy je kolo v
pohybu.
CLK: Hodiny (12-ti hodinový režim)
Zobrazují reálný čas ve 12-ti hodinovém režimu.
ODO: Ujetá vzdálenost 0.0 – 19999.9 km nebo mil +/- 0.1%
Funkce ODO načítá vzdálenost po dobu, kdy je kolo v pohybu. Data lze vymazat jen
operací úplné mazání (AC).
: Postupné zobrazování jednotlivých funkcí
1. Režim postupného zobrazování jednotlivých funkcí
Podržte tlačítko MODE do té doby, než se rozsvítí symbol “ ”. Computer bude
automaticky po 6 sec. zobrazovat jednotlivé funkce DST, a ODO.
2. Stálý režim
Podržte tlačítko MODE tak dlouho, až zmizí symbol “ ” a vyberte požadovanou
funkci.
AUT. FUNKCE A FUNKCE JEDNOTLIVÝCH TLAČÍTEK
AUTOMATICKÝ START/STOP
1. Computer začne automaticky načítat data , ODO, DST a při jízdě a skončí při
zastavení.
2. Blikající symbol “ ” znamená, že computer je v režimu START.
AUTOMATICKÉ ZAPNUTÍ A VYPNUTÍ ON/OFF
Z důvodu úspory energie baterie se computer sám po 10 min nečinnosti vypne. Pokud
zmáčknete jakékoli tlačítko nebo se kolo rozjede, cyklocomputer se automaticky zapne.
TLAČÍTKO MODE
Rychlým mačkáním tlačítka MODE měníte postupně jednotlivé zobrazení základních
funkcí.
PRECAUTIONS
1. This computer can be used in the rain but should not be used under water.
2. Don’t leave the main unit exposed to direct sunlight when not riding the bike.
3. Don’t disassemble the main unit or it’s accessories.
4. Check relative position and gap of sensor and magnet periodically.
5. Clean the contacts of the bracket and the bottom of the main unit periodically.
6. Don’t use thinner, alcohol or benzine to clean the main unit or its accessories when they
become dirty.
7. Remember to pay attention to the road while riding.
PROBLEM
CHECK ITEMS SOLUTION
1. Replace the battery.
2. Be sure that the positive pole of
the battery is facing the battery cap.
1. Refer to the adjusting procedure
and complete the adjustment.
2. Wipe contacts clean.
3. Refer to the installation and
readjust data correctly.
4. Repair or replace wire.
5. Refer to "CALIBRATION" and enter
correct value.
Refer to the "MAIN UNIT SETUP" and
initiate the computer again.
Place main unit in the shade to return
to normal state.
No adverse effect on data.
Unit will return to normal state when
the temperature rises.
1. Is the battery dead?
2. Is there incorrect battery
installation?
1. Is it at the recalibrating or 12HR
clock setting screen?
2. Are the contacts between the
main unit and the bracket poor?
3. Are the relative positions and gap
of sensor and magnet correct?
4. Is the wire broken?
5. Is the circumference correct?
Did you leave main unit under
direct sunlight when not riding
the bike for a long time?
Is the temperature below 0°C
(32°F)?
No display
No current
Speed or
incorrect
data
Irregular
display
LCD is
black
Display is
slow
All Clear Unit Selection Circumference Data Setting End Setting
Nastavení hlavní jednotky Nastavení ( hlavní jednotky a obvodu kola) Konec nastavení
AC
4
c.
Pop ular tir es circ umfer ence re feren ce tabl e / Tabulk a rozmě rů pláš ťů
b.
Circumference RecalibrIations
Opětovné nastavení
Clock Setting
Nastavení hodin
ÚPLNÉ VYMAZÁNÍ COMPUTERU (spuštění computeru)
Zmáčknutím tlačítka (AC) spustíte cyklocomputer. Tlačítko (AC) použijte i v případě, že dojde k
zobrazení nesmyslných dat, potom budou všechna data vymazána.
RESET OPERCE
1. Podržte tlačítko “MODE” do té doby, než se vymaže LCD displej a potom ho pusťte.
Computer vynuluje funkce DST.
2. Tato operace nevynuluje data a ODO.
OPĚTOVNÉ NASTAVENÍ (Obr. 3)
1. Nastavte LCD displej do režimu ODO, Podržte tlačítko “MODE” (asi 6 sec.) až computer
přejde do režimu “nastavení”.
2. Následujte postup “Nastavení hlavní jednotky” a nastavte obvod kola.
3. Podržte tlačítko “MODE” (asi 6 sec.) až se data uloží a computer přejde z režimu
“Nastavení”.
4. Ke změně blikající číslice podržte tlačítko “MODE”, až začne blikat další číslice.
5. Podržte tlačítko “MODE” (asi 6 sec.) do doby, než displej přejde do režimu zobrazení
reálného času. Tím dojde k uložení nastavených dat.
NASTAVENÍ REÁLNÉHO ČASU (Obr. 4)
1. Změňte LCD displej do režimu “ ”.
2. Podržte tlačítko “MODE” (asi 6 sec.) až displej přejde do režimu “nastavení hodin”.
3. Rychlým mačkáním tlačítka “MODE” zvýšíte blikající číslici o 1.
VÝMĚNA BATERIE (Obr. C)
1. Jestliže je ostrost LCD displeje slabá, znamená to, že baterie je vybitá.
2. Vyměňte starou baterii za novou LR44 (A76, AG13 nebo V13GA) v zadní části hlavní
jednotky, kladným polem + směrem ke krytu baterie.
● NEFUNGUJE ??
Zkontrolujte následující předtím, než ho odnesete do opravny:
● UPOZORNĚNÍ
1. Tento cyklocomputer můžete používat v dešti, ale neměl by být používaný pod vodou.
2. Když zrovna nejedete na kole, nenechávejte hlavní jednotku na přímém slunečním světle.
3. Nerozebírejte hlavní jednotku ani příslušenství.
4. Kontrolujte průběžně mezeru mezi magnetem a snímačem.
5. Průběžně čistěte kontakty na zadní straně hlavní jednotky a držáku.
6. K čištění hlavní jednotky a příslušenství nepoužívejte ředidlo, alkohol ani benzín.
7. Pamatujte, že při jízdě musíte hlavně dávat pozor na cestu!!
1. Vyměňte baterii.
2. Ujistěte se, že kladná polarita baterie + je
umístěna směrem ke krytu baterie.
1. Dokončete nastavování podle návodu.
2. Očistěte kontakty.
3. Zkontrolujte znovu instalaci podle.
4. Opravte nebo vyměňte kabel.
5. Zkontrolujte obvod kola a zadejte
správnou hodnotu.
Zasuňte znovu hlavní jednotku a spusťte
znovu computer.
Umístěte hl. jednotku do stínu, než se vrátí
do normálního stavu. Nemá vliv na data.
Až se zvýší teplota, začne displej ukazovat
správně.
1. Není vybitá baterie?
2. Není špatně nainstalovaná
baterie?
1. Nejste v režimu nastavení obvodu
kola nebo nenastavujete čas?
2. Není špatný kontakt mezi hl.
jednotkou a držákem?
3. Je poloha snímače a magnetu v
pořádku?
4. Není poškozený kabel?
5. Je správně zadaný obvod kola?
Nebyla vystavena hlavní jednotka po
dlouhou dobu přímému slunečnímu
záření?
Je teplota pod 0°C (32°F)?
Prázdný
displej
Neukazuje
okamžitou
rychlost
nebo
ukazuje
špatná data
Blikající
displej
LCD displej
je černý
Displej je
pomalý
PROBLÉM ZKONTROLUJTE ŘEŠENÍ
Battery change
Coin /
Mince
Battery
Cap /
Kryt
baterie
Tir e Size/
Veli kost
plá ště
Cir cum fere nce
Nun ber /
Obv od ko la
Tire S ize/
Veli kost
plá ště
Cir cum fere nce
Nun ber /
Obv od ko la
Tire S ize/
Veli kost
plá ště
Cir cum fere nce
Nun ber /
Obv od ko la
 Loading...