

Page 1

Star
Manufacturing
International Inc.
10 Sunnen Dr.
St. Louis, MO 63143
Installation
and
Operating
Instructions
Phone: (314) 781-2777
FAX: (314) 781-3636
TOASTSWELLTOASTSWELL
TOASTSWELL
TOASTSWELLTOASTSWELL
AUTOMATICAUTOMATIC
AUTOMATIC
AUTOMATICAUTOMATIC
2M-Z1181 Rev. - 3/26/97
SPEED GRILLSPEED GRILL
SPEED GRILL
SPEED GRILLSPEED GRILL
Model# GR131L
"SONIC"
1
Page 2

INSTALLATION AND OPERATING
INSTRUCTIONS
INSTALLATION
For your protection, we recommend that a
qualified electrician install this appliance. The
electrician should be familiar with electrical
installations and your local electrical
requirements. Proper connections and power
supply are essential for efficient performance.
The supply circuit should be properly fused as
required by local electrical code.
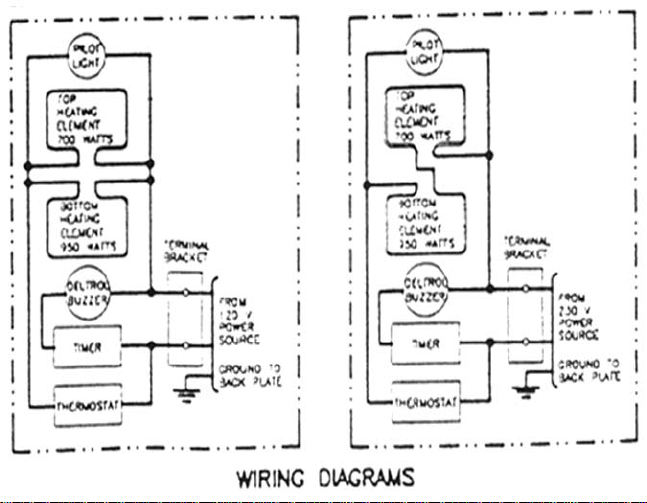
Plug into any 110-120V A.C. outlet. Slow
performance will indicate the grill is connected to
a line of insufficient capacity or to one already
loaded to capacity. Unless you have ordered a
220V Speed Grill, do not plug into a 220V line.
Doing so will ruin the elements very quickly and
void the guarantee. If this appliance does not
heat, check plug and receptacle for loose
connections.
OPERATING PROCEDURE
The thermostat dial is marked wit temperature
degrees from 100 to 450 degrees Fahrenheit. Set
the dial to 350 degrees and wait until the pilot
light goes out. This indicates the temperature
has been reached and the thermostat will
automatically maintain proper temperature using
current as needed. Do not attempt to cook food
before the pilot light goes out. When starting
from cold, food will stick to grids if they are not
up to proper temperature. Setting thermostat to
a higher temperature will not speed up the
heating time. If grill is too hot, set dial at a lower
temperature, if not hot enough, set at a higher
temperature. Turn to "OFF" when the grill is not
needed during slack periods.
PILOT LIGHT
The pilot light will glow while your grill is gaining
temperature. It will wink on and off to show
temperature is being maintained. The bulb
burning out will not affect the operation of the
grill.
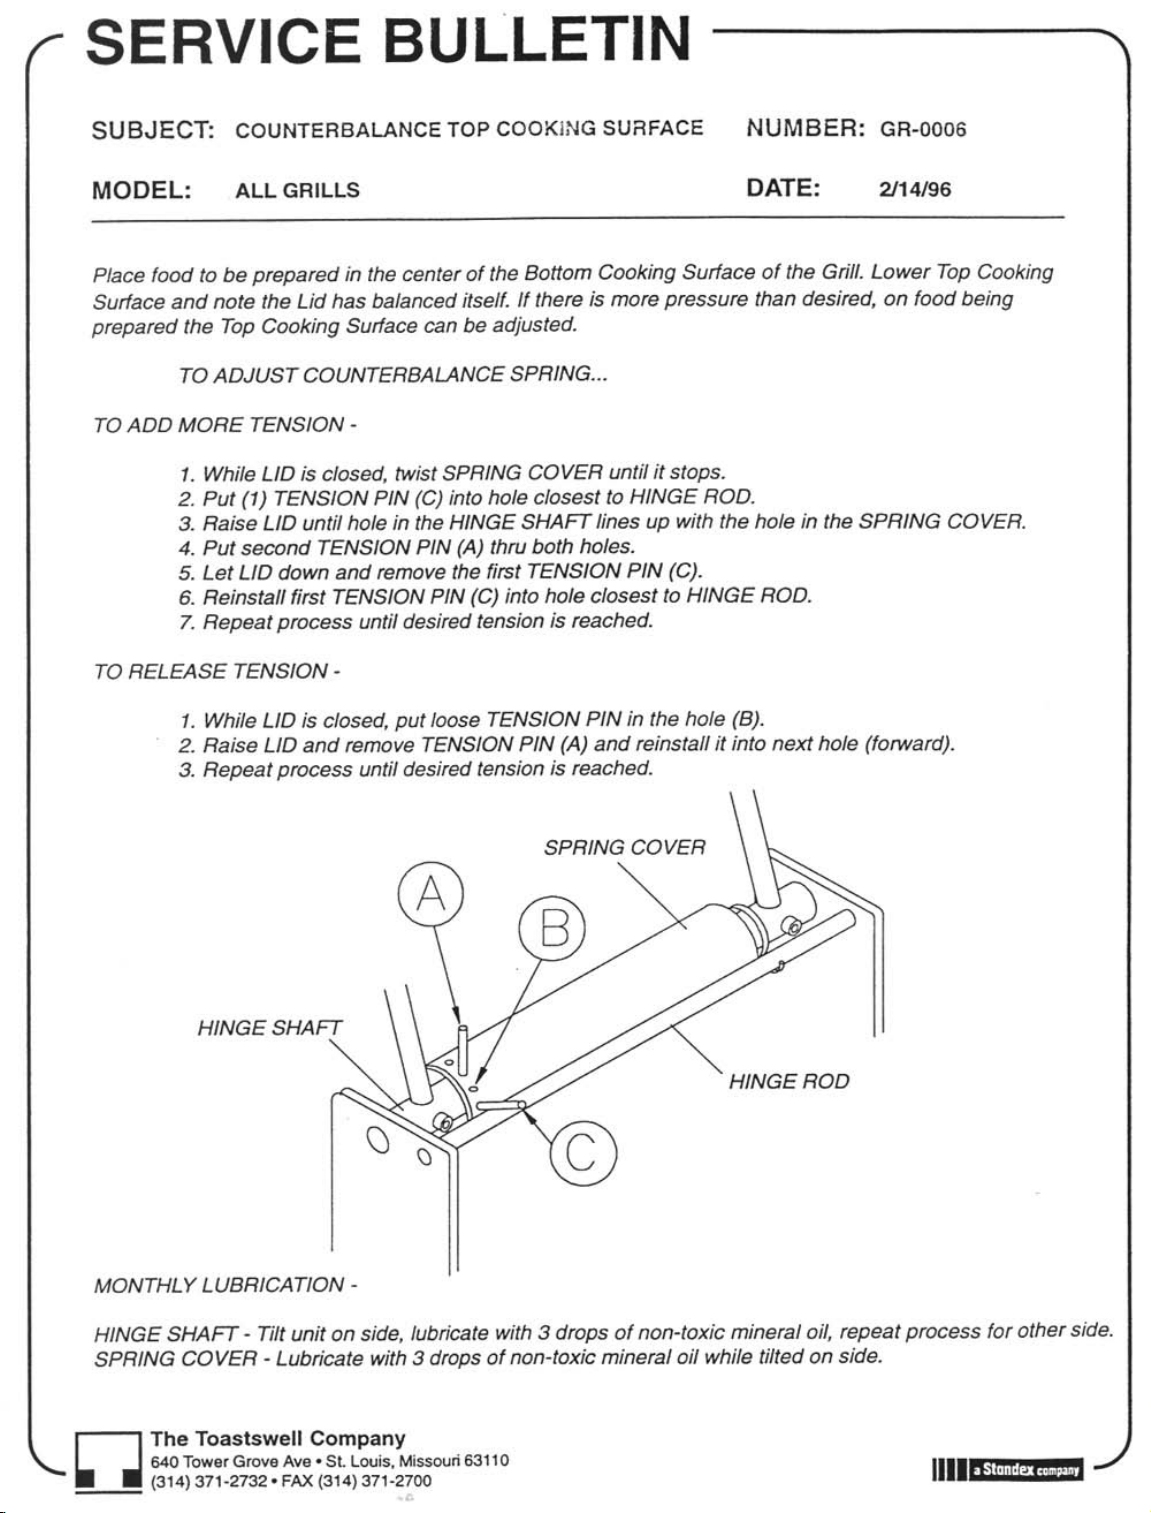
COUNTER BALANCE TOP
Place the food to be prepared in the center of the
cooking surface of the grill. Lower the upper
grid. You will note, it has balanced itself at the
desired height. There is no undue pressure from
the upper grid on the food being prepared. Fresh
bread, being very moist in itself, becomes quite
soggy. Overcome this entirely by use of bread 1
or 2 days old. Oil both ends of the top hinge
with 3 drops of oil every 30 days. Tilt the unit on
end and drop 3 or 4 drops of oil down each end
of the cylinder which holds the counterbalance
spring only every 30 days.
GRID TILTER AND LEVELER
You can level your unit by adjusting the front legs.
If you want to drain grease from grids as you
cook you can tilt grill back by unscrewing front
legs approximately 1/4" to 3/8". When in this or
regular flat position, make sure the grease can is
in place to catch grease. The round fat catcher
slips under the drain lip. This can is not
necessary, nor included with special Kmart units.
The grids are cast aluminum. They have been
seasoned and silicon treated to prevent sticking.
You may want to brush your meats and
sandwiches with cooking oil as excessive
moisture sometimes causes food to adhere to
grids. Salt is the enemy of aluminum. Avoid its
use until after the food is off the grill. When
idling, set the grids 3/4 " apart, this allows the
extra heat to escape and preserve the seasoning.
The counterbalance top will hold the grids in
place.
CORD PLUG AND GROUNDING
INSTRUCTIONS
For your protection, this appliance is equipped
with a 3 conductor load cord, having a grounding
type plug. A special grounding adaptor is
available to permit the use of this appliance with
conventional 2-wire receptacles on 115V only.
To use the adaptor, first determine if this system
is grounded. For grounded electrical systems,
connect the green wire of the adaptor to the
mounting screw on the receptacle. For wire of
ungrounded electrical systems, attach the green
2
adaptor to a known permanent ground.
Page 3

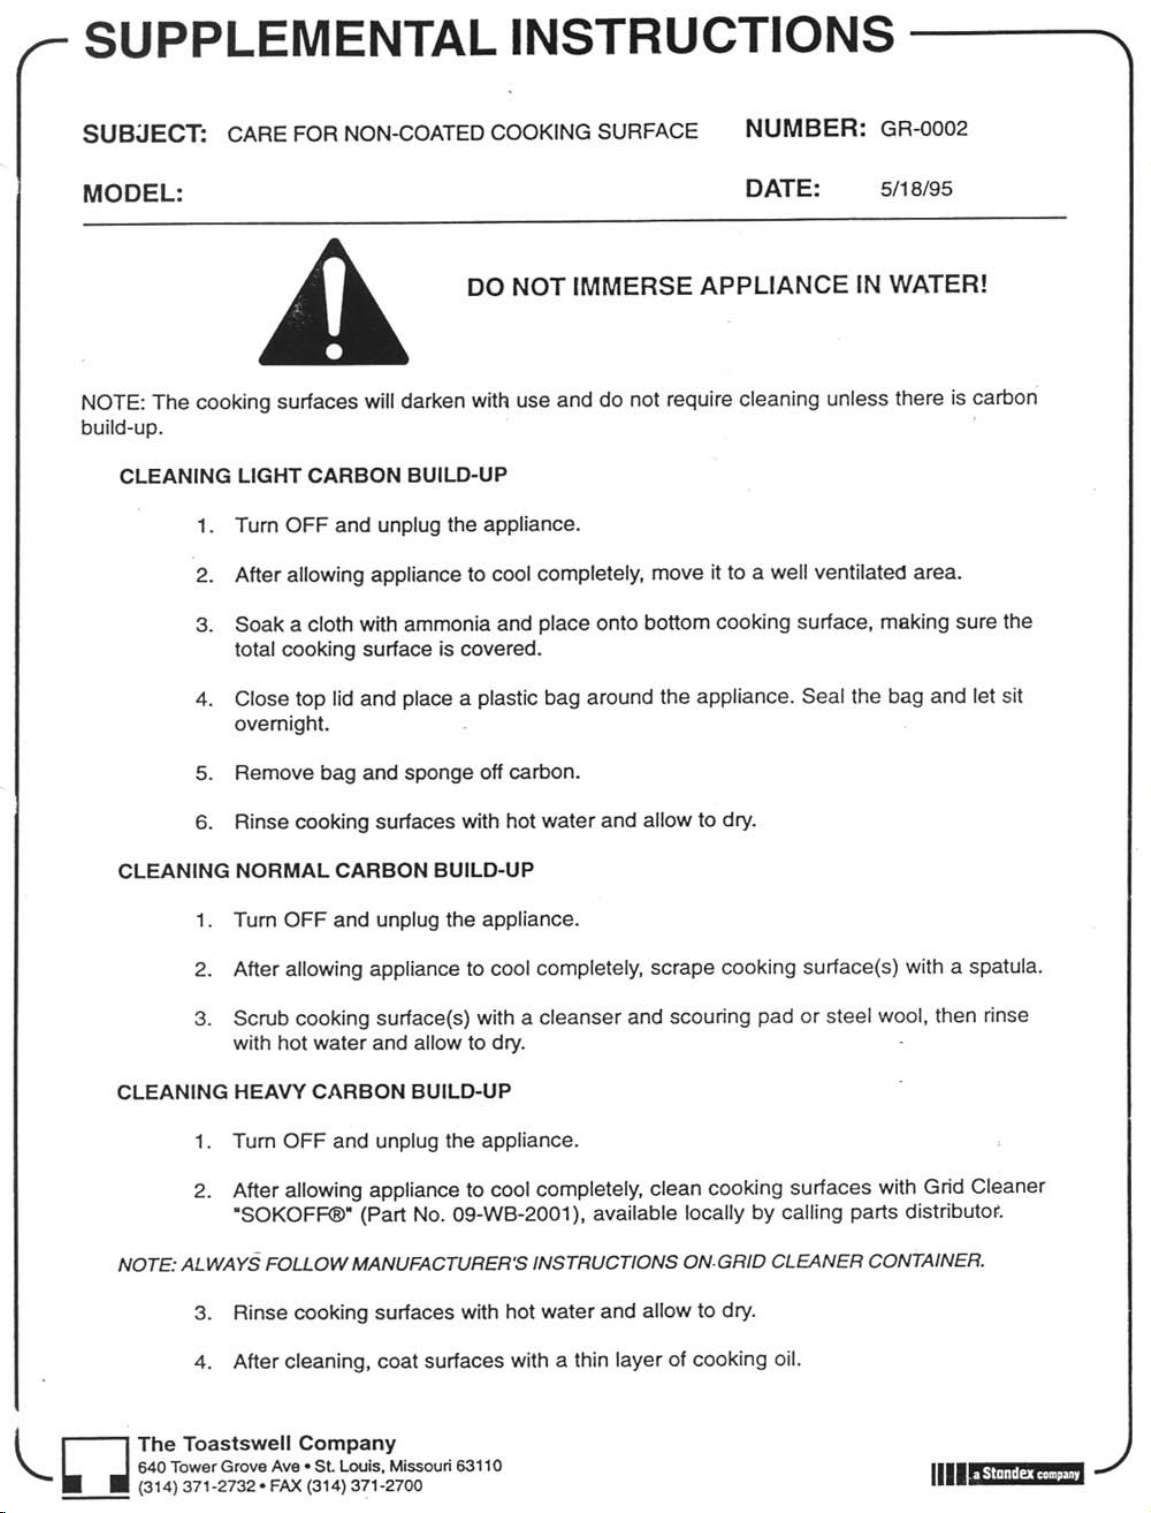
CLEANING
All surfaces, except the cooking grids, are
stainless steel and can be cleaned with a warm,
damp cloth and detergent. The cooking surfaces
are cast aluminum and will darken with use and
should not be cleaned unless there is a carbon
buildup. When buildup does occur, you can
scrape with a spatula or with a scouring pad and
cleaners. When this is done you should season
grids with a good grade of vegetable oil before
using.
Before the first use, lightly rub cooking oil onto
the surface. Heat for 2 to 3 minutes on medium
heat. When cool, rinse with warm water and
mild detergent. Metal utensils may be used
without damaging the coating surface. However,
using plastic or wood utensils will prolong the life
of the coating. Do not overheat empty units or
surfaces. Always clean unit after several uses and
prior to use with a mild detergent. Burned
grease or food residue may collect on the surface.
It can be removed by a thorough cleansing with
the follow solution: 3 tablespoon bleach, 1
tablespoon liquid dish detergent, and 1 cup
water. Apply this to the cooking surface with a
sponge or plastic scrubbing pad. Metal scrubbing
pads are not recommended. After cleaning,
recondition the surface with a light wipe of
vegetable oil.
MAINTENANCE AND REPAIRS
Contact the factory or one of its representatives
or a local service company for service or
maintenance if required.
RETAIN THIS MANUAL FOR FUTURE REFERENCE
Part No. 2M-Z1181 Rev. - 4/4/97
3
Page 4
Page 5
Page 6

Star Manufacturing 10 Sunnen Drive (800) 807-9054 (800) 396-2677 Fax
St. Louis, MO 63143 www.star-mfg.com
International, Inc. P.O. Box 430129 (314) 781-2777 (314) 781-2714 Fax
STAR Sandwich Grill
Set Up, Seasoning and Cleaning
Set Up
1. Unpack the grill.
2. Read the Owners manual and then put it in a safe place for future reference.
3. If surface rust is visible, use a steel wool brush and scrub it off.
4. Wipe down the exterior and grilling area with a damp cloth.
5. Take the grill to a well ventilated area and turn the thermostat to 8-9. If your unit has an
electronic control then set the temperature for 450°F. Allow the unit to burn off the
factory oil. (the oil is there to prevent surface rust during shipping and storage)
6. The “burn off” is complete when the smoke is gone, approximately 30 minutes.
7. Brush any debris from the grill surfaces.
8. Allow the grill to cool and then place it in its permanent position.
First Time Seasoning
1. Bring the grill to 300°F and leave it on while doing the next three steps.
2. Spray the cooking area heavily with a baking release agent.
3. Let sit for 20 minutes.
4. Wipe surface clean with a warm, damp, cloth.
Daily Seasoning
The grill should not require much seasoning while in use. In most cases, a light spray of the baking
release agent in the morning and occasionally throughout the day will be enough to prevent any
sticking. It is not necessary to spray before grilling each item.
Daily Cleaning
1. If particles adhere to the cooking surface during the day, scrape them off with a
spatula.
Note: It is best not to let food cook on to the grill, as build up of food on the grill
will increase sticking and smoking. In addition, carbon may build up on the grill
surface and reduce the cooking efficiency.
2. At the end of the day, wipe down all surfaces with a warm, damp, cloth and mild
detergent. Dry with a soft towel.
Carbon Cleaning
When carbon build up occurs, use a carbon removal agent according to the instructions provided with
the cleaner. When this process is completed, you must re-season the grill according to the First Time
Seasoning instructions above.
Please reference your owner’s manual for additional information
concerning the operation of your grill.
Ask for Quality and Performance by Name…Star and Holman
Commercial Gas and Electric Equipment for the Foodservice Industry.
Page 7
Page 8
Page 9
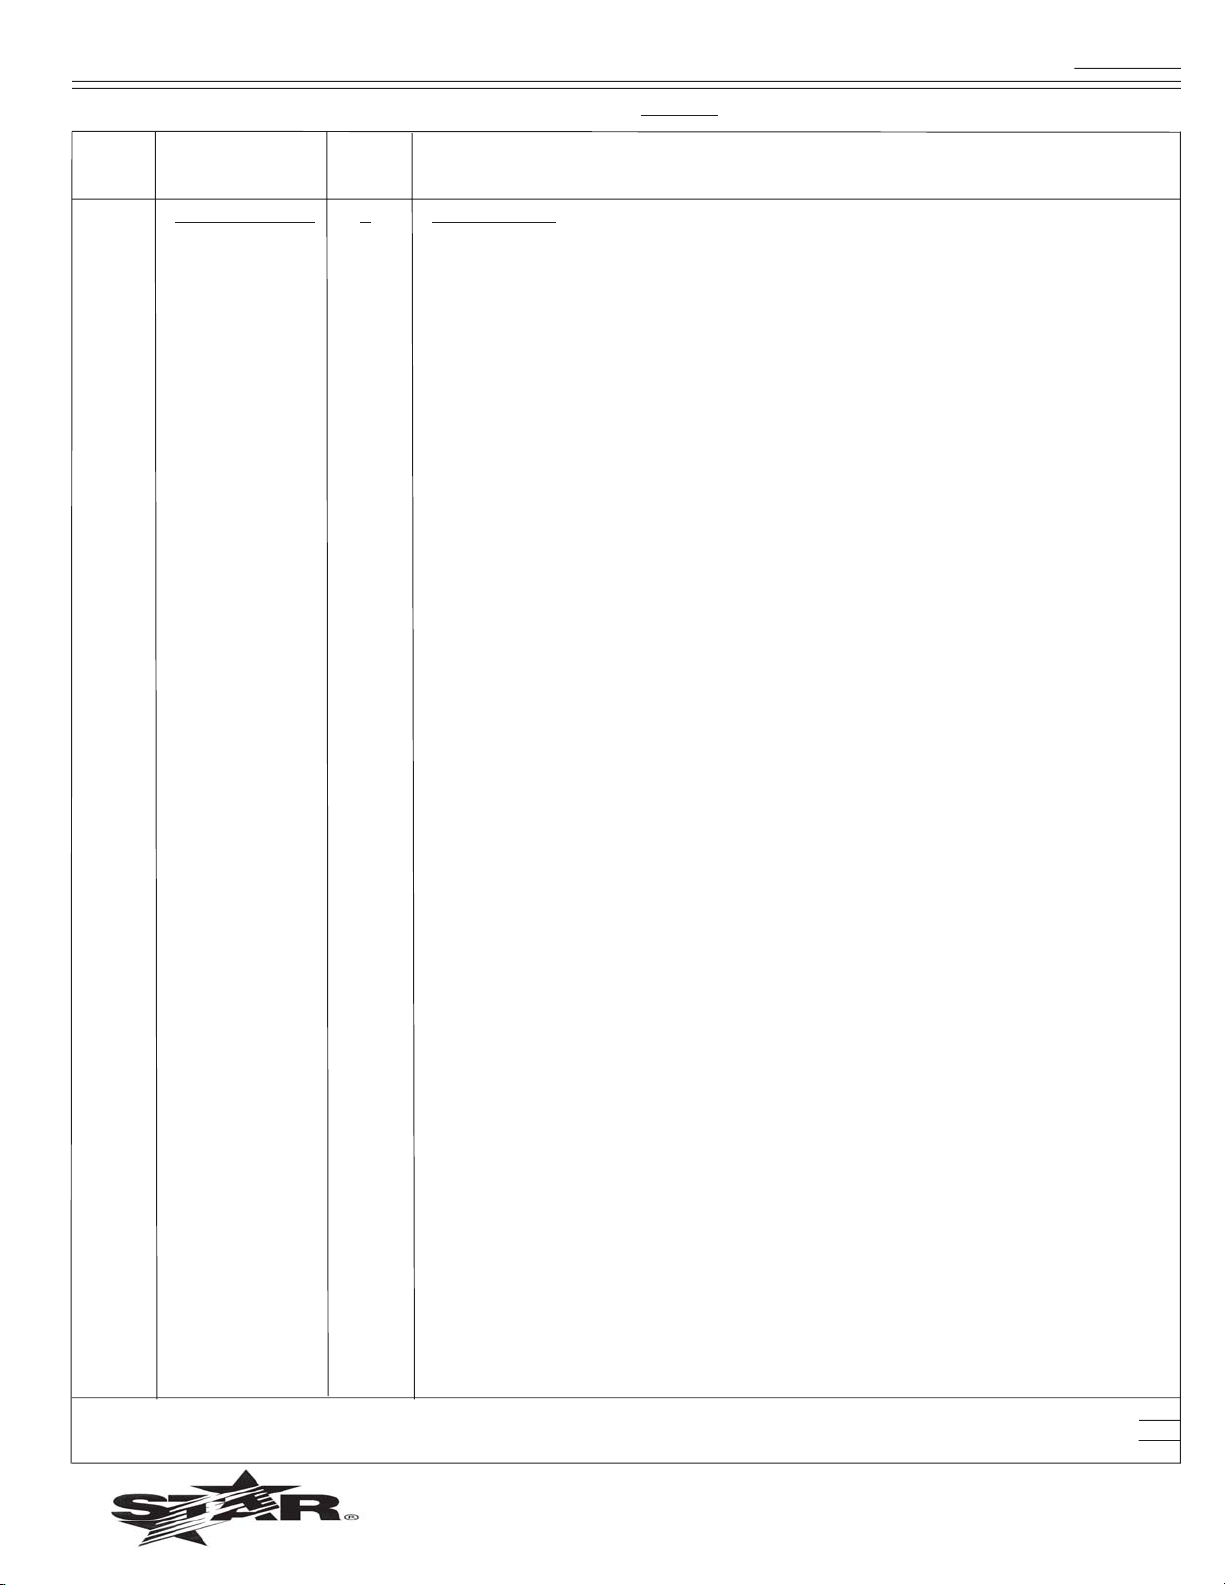
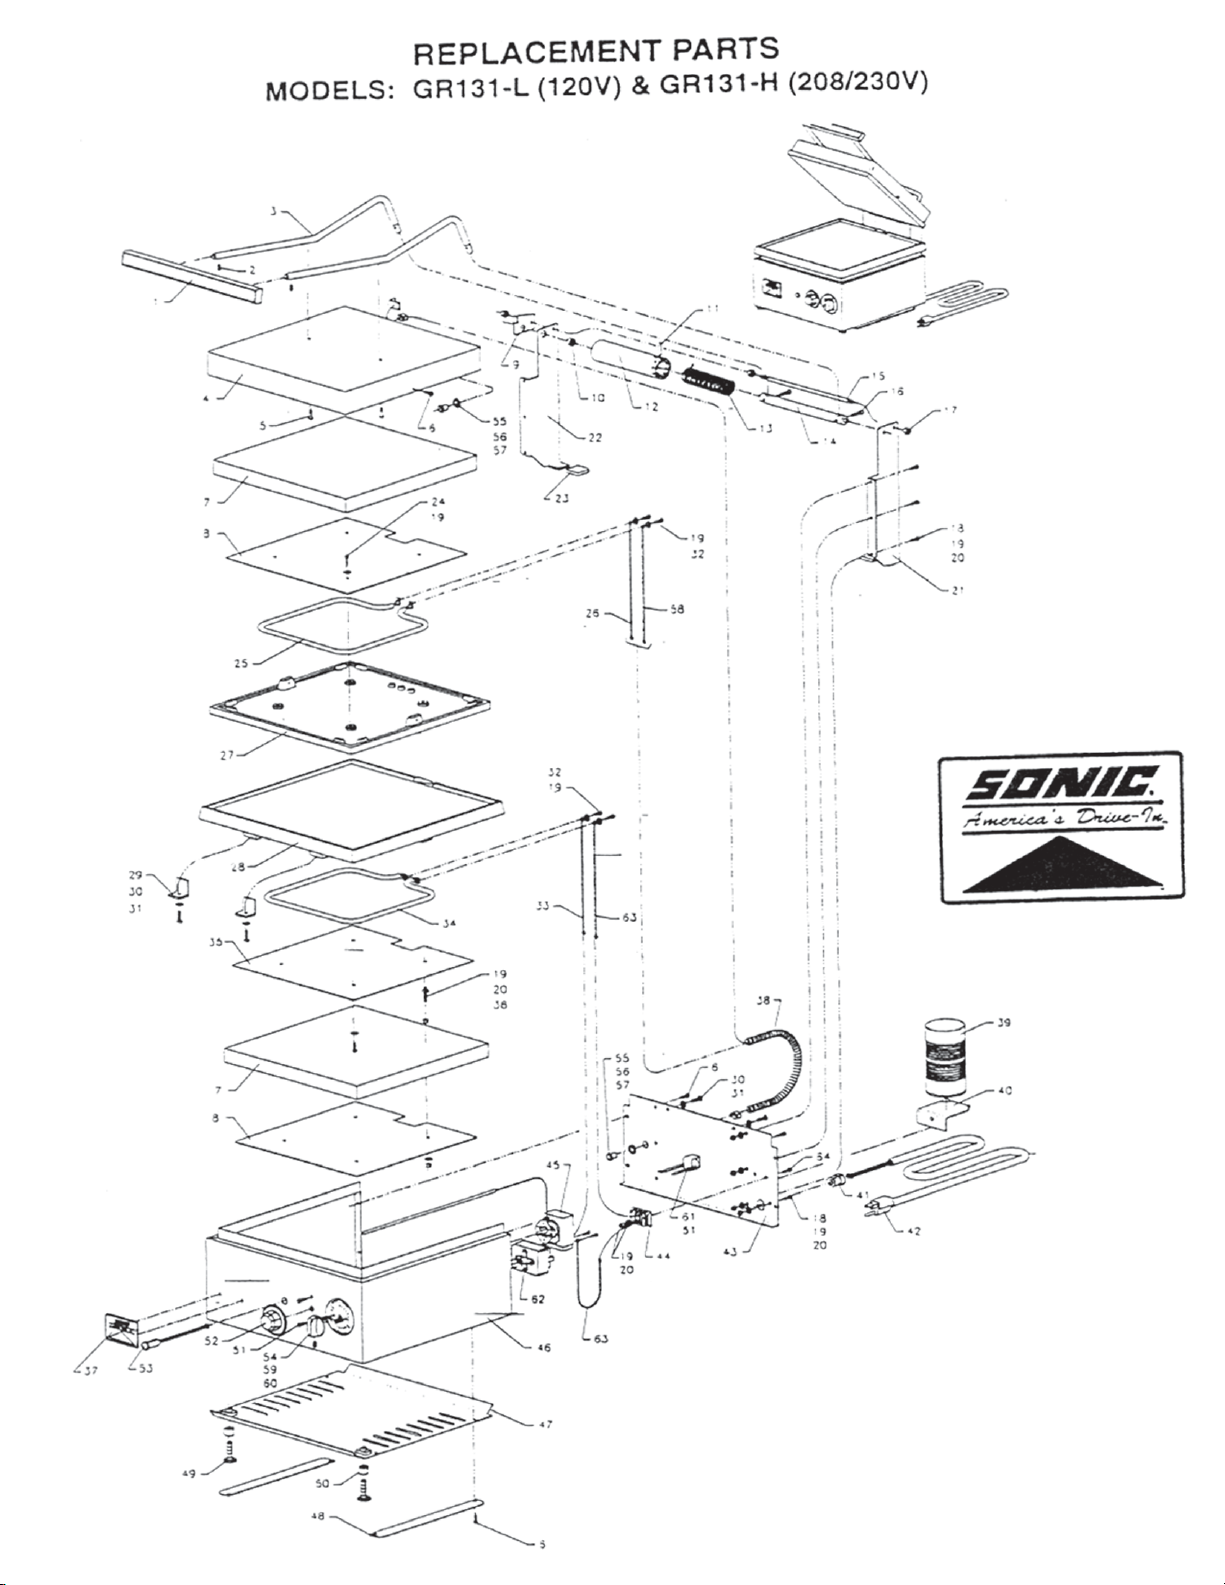
PARTS LIST EFFECTIVE 02-15-06 RB
MODEL GR131
Key
Number
1 D9-30-GR-0035 1 HANDLE: LID No Longer Available
2 2C-08-07-0089 2 SET SCREW, 1/4-20 x 3/8
3 D9-30-GR-0040 2 ROD: HANDLE
4 D9-30-GR-0013 1 HOUSING: UPPER
5 2C-08-07-0001 2 SCREW, 10-32 x 5/8
6 2C-08-07-0038 10 SCREW, 6-32 x 17/32
7 Z1-06-GR-0001 2 INSULATION, 12” x 12”
8 D9-04-GR-0030 2 PLATE: ELEMENT RETAINER
9 D9-04-GR-0185 1 BRACKET: LID STOP
10 2A-09-GR-0003 1 BUSHING: HINGE SHAFT
11 D9-70-GR-0045 1 PIN: SPRING RETAINER
12 D9-30-GR-0034 1 TUBE: SPRING COVER
13 2P-09-GR-0001 1 SPRING: HINGE
14 D9-30-GR-0032 1 SHAFT: HINGE
15 D9-30-GR-0033 1 ROD: HINGE
16 2C-08-07-0066 2 SCREW, 10-32 x 3/8
17 2C-08-07-0044 3 NUT, 1/4-20
18 2C-08-07-0042 7 SCREW, 8-32 x 5/8
19 2C-08-07-0017 23 LOCKWASHER, # 8
20 2C-08-07-0018 15 NUT, 8-32 brass
21 D9-30-GR-0038 1 HINGE BRACKET: RIGHT
22 D9-30-GR-0037 1 HINGE BRACKET: LEFT
23 2I-09-GR-0008 2 BOOT: BLACK VINYL
24 2C-08-07-0099 6 SCREW, 8-32 x 3/8
25 2N-05-GR-0165 1 ELEMENT: TOP, 700W (120V)
26 D9-30-GR-0057 1 LEAD WIRE: RED, 30” w/LOOP CONNECTIONS
27
28 2F-Z1491 1 GRILL PLATE: BOTTOM
29 D9-04-GR-0039 2 BRACKET: ANCHOR GRILL PLATE
30 2C-08-07-0092 4 SCREW, 10-L4 x 3/4
31 2C-08-07-0093 4 LOCKWASHER, #10
32 2C-08-07-0039 4 SCREW, 8-32 x 3/8
33 D9-30-GR-0059 1 LEAD WIRE: WHITE, 6” w/LOOP CONNECTIONS
34 2N-05-GR-0164 1 ELEMENT: BOTTOM, 950W (120V)
35 D9-30-GR-0039 1 PLATE: ELEMENT RETAINER
36 D9-30-GR-0009 2 STUD: ELEMENT PLATE
37 2M-12-GR-0013 1 LOGO LABEL: SONIC
38 D9-04-GR-0029 1 CONDUIT: FLEXIBLE
39 2L-09-GR-0004 1 CUP: GREASE CATCHER
40 D9-30-GR-0036 1 BRACKET: GREASE CATCHER CUP
41 2K-05-07-0017 1 STRAIN RELIEF: CORDSET
42 2E-05-07-0051 1 CORDSET: 14/3, NEMA 5-15P (120V)
43 D9-30-GR-0011 1 PLATE: BACK
44 2C-05-07-0057 1 TERMINAL STRIP: DOUBLE ROW
45 2T-05-GR-0005 1 THERMOSTAT: #K-388-42
46 D9-04-GR-0038 1 HOUSING
47 D9-30-GR-0012 1 COVER: BOTTOM
48 D9-04-GR-0040 1 SPACER STRIP: HOUSING
49 2C-08-GR-0004 2 LEG SCREW: ADJUSTABLE
50 2C-09-GR-0006 2 SPACER: LEG
51 2C-08-07-0037 2 SCREW, 6-32 x 3/8
Part
Number
2N-05-GR-0164 1 ELEMENT: TOP, 950W (208/240V)
2F-01-GR-0002 1 GRILL PLATE: TOP
2N-05-GR-0165 1 ELEMENT: BOTTOM, 700W (208/240V)
2E-05-07-0049 1 CORDSET: 14/3, NEMA 6-15P (208/240V)
Number
Per
Unit
Description
IMPORTANT: WHEN ORDERING, SPECIFY VOLTAGE OR TYPE GAS DESIRED PAGE 1
INCLUDE MODEL AND SERIAL NUMBER OF 2
Some items are included for illustrative purposes only and in certain instances may not be available.
Star Manufacturing International, Inc.
Page 10
PARTS LIST EFFECTIVE 02-15-06 RB
MODEL GR131
Key
Number
52 2R-09-07-0006 1 KNOB: TEMP CONTROL
53 B9-05-07-0006 1 PILOT LIGHT (120V)
54 2R-09-07-0018 1 KNOB: TIMER
55 2C-08-GR-0011 2 BUSHING: CONDUIT
56 2C-08-GR-0001 2 LOCKWASHER: CONDUIT
57 2C-08-GR-0013 2 CLAMP: CONDUIT
58 D9-30-GR-0056 1 LEAD WIRE: BLACK, 30” w/LOOP CONNECTIONS
59 2C-08-07-0116 2 SCREW, 4-32 x 3/8
60 2C-09-07-0008 1 BEZEL: TIMER
61 2E-05-07-0056 1 BUZZER: DELTROL
62 2P-05-GR-0007 1 TIMER: ELECTRO/MECHANICAL
63 D9-30-GR-0058 1 LEAD WIRE: WHITE, 15” w/LOOP CONNECTIONS
64 2C-08-07-0053 2 SCREW, 8-32 x 3/4
Part
Number
2J-05-07-0010 1 PILOT LIGHT (208/240V)
Number
Per
Unit
Description
IMPORTANT: WHEN ORDERING, SPECIFY VOLTAGE OR TYPE GAS DESIRED PAGE 2
INCLUDE MODEL AND SERIAL NUMBER OF 2
Some items are included for illustrative purposes only and in certain instances may not be available.
Star Manufacturing International, Inc.
 Loading...