

Page 1
ECO Setting Manual
Applicable model:
Rev. 1.0
TSP100
II
U
Page 2

Contents
Introduction ................................................................................................................ 1
1. Starting the Configuration Utility .................................................................... 1
2. ECO Settings ........................................................................................................... 3
2-1. Auto Reduction Setting ..........................................................................................3
2-2. Top Margin to First Line .......................................................................................... 4
2-3. On demand .................................................................................................................5
3. Indicator ................................................................................................................... 9
4. Revision History ................................................................................. 10
Page 3
ECO Setting Manual
Introduction
The TSP100IIU is equipped with an ECO function to help protect the environment while also reducing
costs.
This manual contains information about the ECO function.(*1)
How to set the ECO function and the results of the settings are the same for both the Star line mode
and ESC/POS mode.
*1) To install or uninstall the software, and for details about functions other than the ECO function,
refer to the Software Manual.
1. Starting the Configuration Utility
Use one of the following methods to open the Conguration Application dialog box. At the Windows
Start menu, select All Programs " StarMicronics " Star TSP100 " Configuration Utility, or
perform steps 1–4 below.
At the Windows Start menu, select Devices and Printers (or Printers and Faxes if using
1
Windows XP).
Right-click the Star TSP100 printer icon in the folder that appears, and then select Printer
2
Properties (or Properties if using Windows XP).
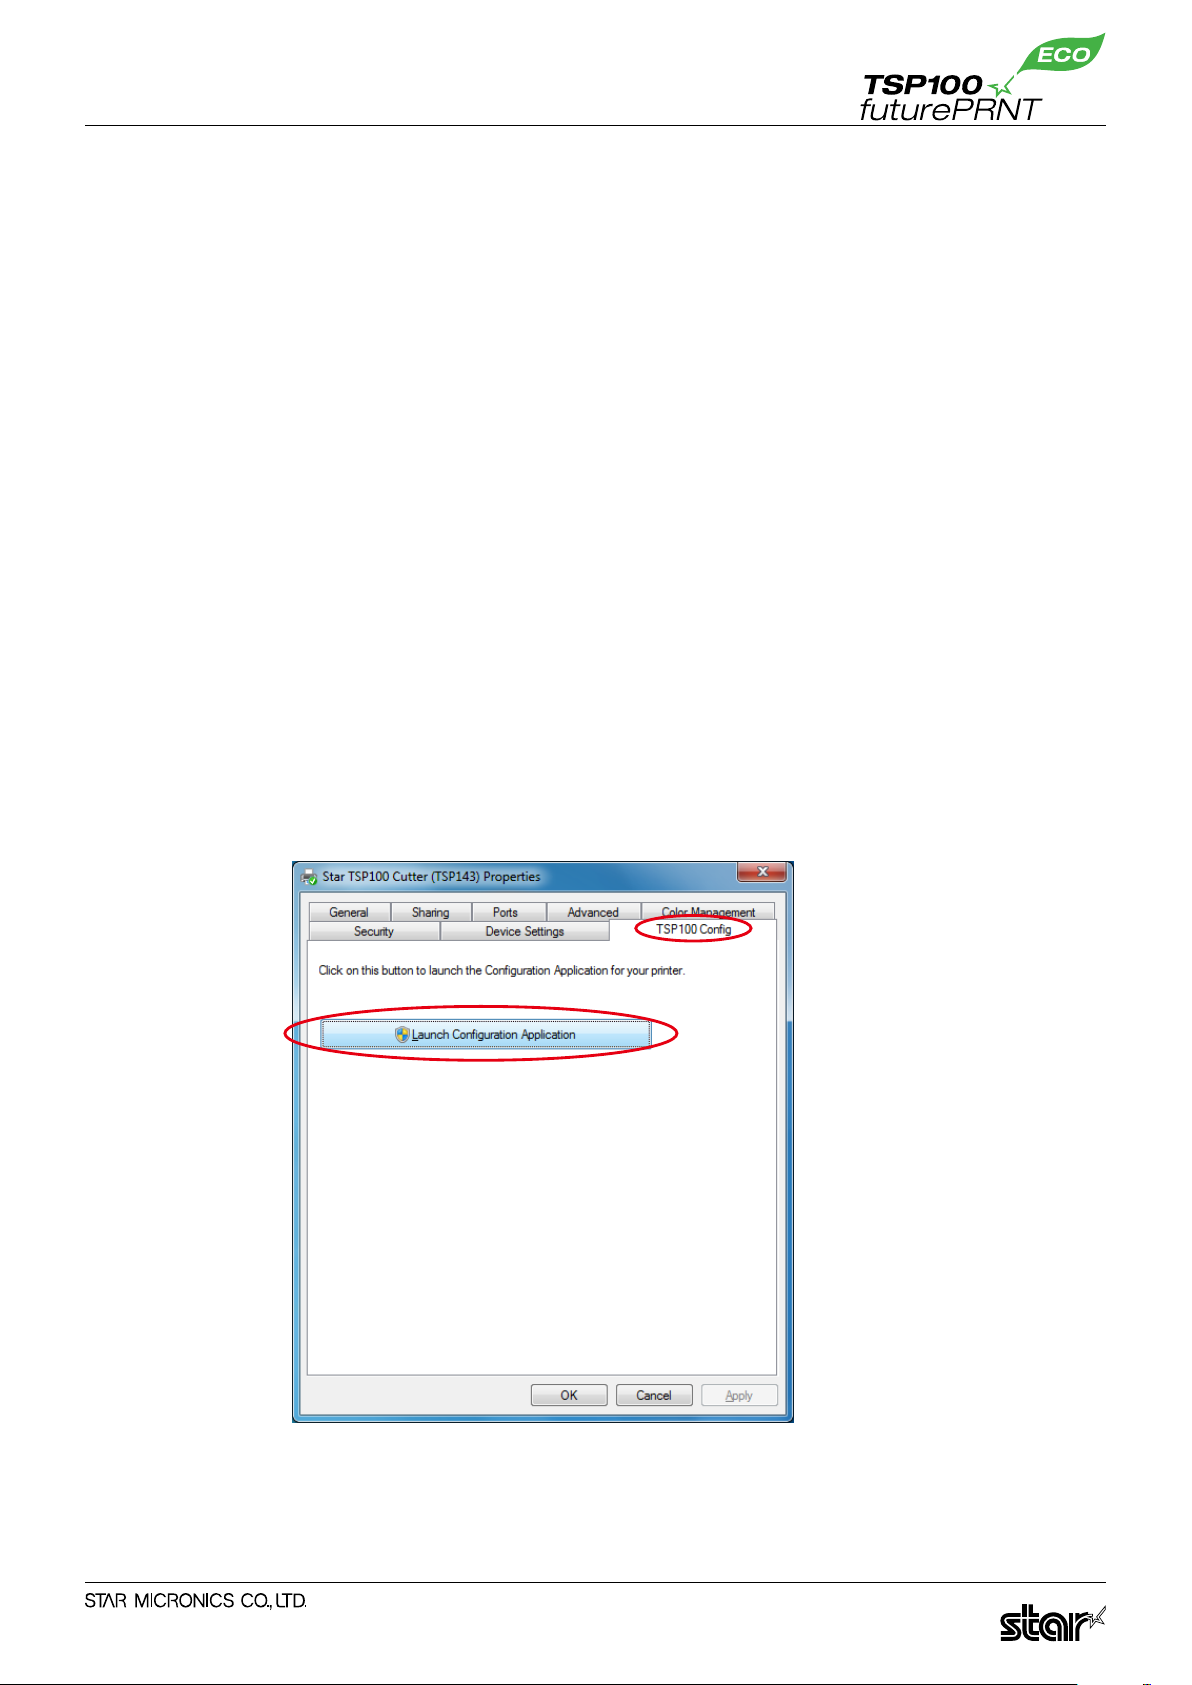
At the Properties dialog box, click the TSP100 Cong tab.
3
Click the Launch Conguration Application button.
4
-
1
-
Page 4
ECO Setting Manual
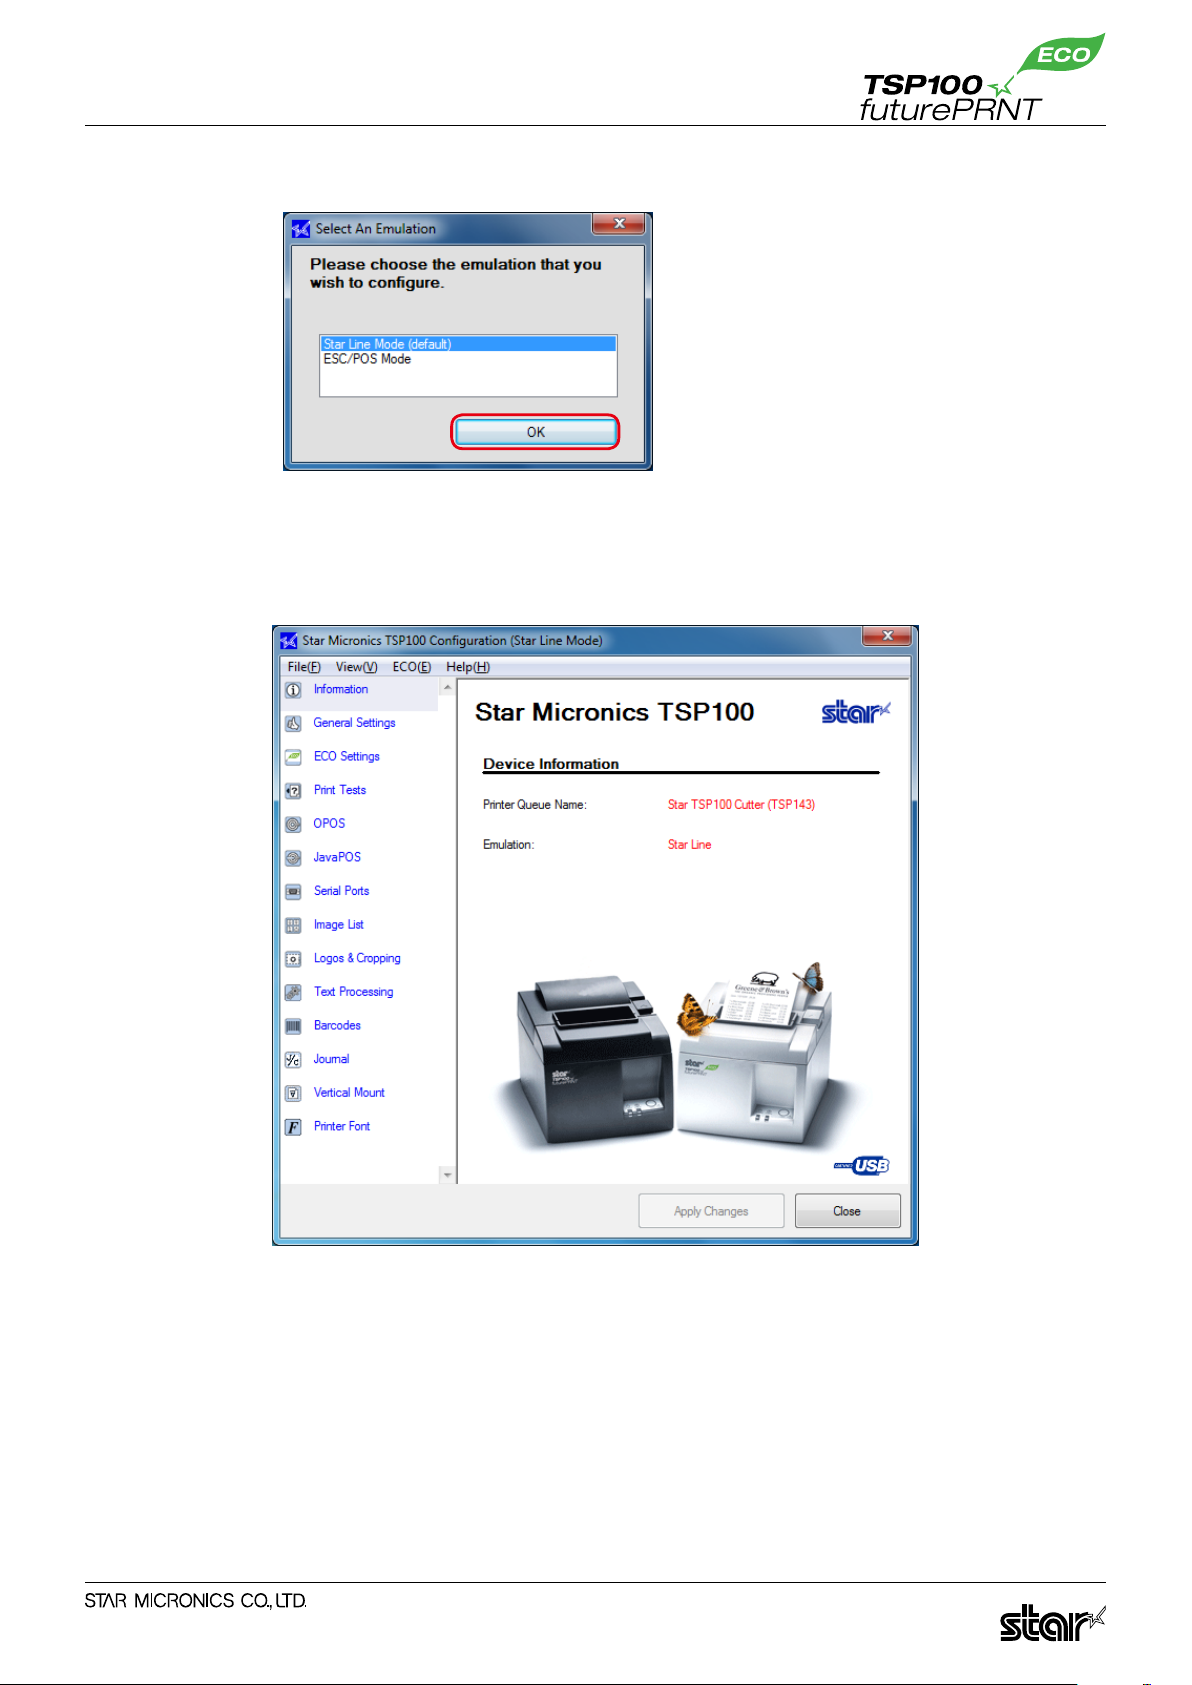
Select an emulation, and then click the OK button.
5
The conguration utility starts and the following dialog box appears.
6
-
2
-
Page 5

ECO Setting Manual
Memo
Memo
2. ECO Settings
Click the ECO Settings tab on the left side of the dialog box.
When changing the settings, be sure to click the Apply Changes button after changing the settings.
The changed settings are enabled when the Apply Changes button is clicked.
2-1. Auto Reduction Setting
This function reduces the overall size of the printing.
However, to prevent any scanning errors, the size of printed barcodes is not reduced even
if the reduction settings are selected.
Paper width used
n
The default setting is 80mm (Do Not Compress).
By changing the setting to 80mm->58mm, the printing area is compressed widthwise so that 58 mm
width roll paper can be used instead of 80 mm width roll paper.
1) If the printing width is set to 51 mm using General Settings in the conguration utility,
the
2) When Paper width used is set to
margin of the paper when printed.
If the printed barcode will be wider than
printed.
80mm->58mm
setting in Paper width used is disabled.
80mm->58mm
, the barcode will be aligned on the left
80mm->58mm
, the barcode data will not be
-
3
-
Page 6

ECO Setting Manual
Memo
Receipt length reduction
n
The default setting is Original (no reduction).
The printing area can be compressed 50% reduction or 25% reduction lengthwise.
Because the size of printed barcodes is not reduced even if the receipt length reduction
Note
settings are selected, the receipt length will be longer than the length for the reduction
ratio when printing data that contains barcodes.
2-2. Top Margin to First Line
The length from the leading edge of the paper to the rst line of printing can be specied.
The default setting is 3mm.
To use the ECO function effectively, 3mm is recommended. However, the paper will be
automatically rewound after each printing if 10 mm or less is specied for the setting. To
reduce the printing time, specify 11mm for the setting.
-
4
-
Page 7

ECO Setting Manual
Memo
2-3. On demand
This function reduces the amount of paper wasted on unnecessary printings by prompting the user to
select whether or not to print the data.
Enable on demand
n
To enable the on demand function, select the check box. When the on demand function is enabled,
the following confirmation dialog box will appear each time data is sent from the computer to the
printer.
When YES is clicked, the data will be printed.
When NO is clicked, the printing will be canceled.
Normally, the confirmation dialog box appears before the data is printed. However, in
Note
Saving Canceled Data
n
rare cases, the conrmation dialog box may not appear, the dialog box may appear after
the data is printed, or other problems with the operation of the function may occur. If any
of these problems occur, restart your computer. After restarting the computer, check that
the on demand function is enabled and that the conrmation dialog box appears at the
proper time.
When the on demand function is enabled, the data for the canceled printing can be saved or deleted.
When Don’t Save is selected, the data for the canceled printing will be deleted.
When Save is selected, the data for the canceled printing will be saved in the following folder.
For Windows 7/Vista: Hard disk:\User\< Folder for logged-on user name >\APPData\Roaming\ Star\
TSP100\Ondemand
For Windows XP: Hard disk:\Documents.and.Setting\< Folder for logged- on user name >\
APPlication.Data\Star\TSP100\Ondemand
1) To check the data saved in the folder above, perform the following setting before
viewing the data.
At the Windows Start menu, select Control Panel " Folder Options, click the View tab,
and then click Show hidden les and folders.
2) The data saved in the folder is not deleted automatically regardless of the elapsed time.
Therefore, it is recommended to periodically delete any unnecessary data.
-
5
-
Page 8

ECO Setting Manual
View Save Data
n
The data for canceled printings can be viewed. In addition, to print data that was saved from a
canceled printing, perform the following procedure.
Click View Save Data.
1
Click Search, specify the search date, and then click the OK button.
2
-
6
-
Page 9

ECO Setting Manual
The saved data appears. Click Print to print the data.
3
Caution
When using the on demand function, check the following information.
When the on demand function is enabled, the time that the conrmation dialog box appears may
vary according to the printing channel that is used.
The time that the conrmation dialog box appears for each channel is as follows:
Printer Driver OPOS JavaPOS WritePrinter API Virtual Serial Port
Display trigger Immediately after a cut command is sent
Immediately after a cut command is sent
(Refer to following *.)
*1) Even if the write data contains several cut commands, the last cut command is
re co gn ized as the trigger and the confirmation dialog box appears. However,
when multiple receipts are sent in a single batch through a virtual serial port,
the data will be divid ed automati cally fo r proces sing if it excee ds the buffer
capacity. In this case, the cut command just before the buffer becomes full is the
trigger.
When using a virtual serial por t, it is recommended to send the data one receipt
(data + cut command) at a time.
*2) Even if the write data is sent one line at a time, the confirmation dialog box will not
appear and the data will not be printed until a cut command is received.
-
7
-
Page 10

ECO Setting Manual
Note
When switching from the TSP100IIU to the TSP100U, the ECO settings may not appear
in the TSP100U configuration utility. If the ECO settings were used for the TSP100IIU,
perform the following procedure to reset all of the settings to the default settings, and
then use the TSP100U.
Inser t th e CD-ROM in to yo ur co mputer's CD -ROM dri ve.
1
Start th e config urati on utili ty.
2
Impor t th e following f iles by selecting File " Impor t.
3
Star line mode : CD-drive:\Windows\CongurationSettingFiles\default.cong.xml
ESC/POS mode : CD-drive:\Windows\CongurationSettingFiles\escpos.xml
-
8
-
Page 11

ECO Setting Manual
3. Indicator
When using the printer with the ECO settings, the percentage of paper saved can be confirmed by
enabling this function.
Select ECO " Show ECO result from the menu bar. The ECO Indicator dialog box appears.
1
Select the Enabled check box. The percentage of paper saved is calculated starting from this
2
point.
After printing, display the ECO Indicator dialog box again to conrm the percentage of paper
3
saved.
To reset the percentage of paper saved to 0%, click the Clear button.
-
9
-
Page 12

ECO Setting Manual
4. Revision History
Rev. No. Date of Revision Changes
Rev. 1.0 Mar. 2010
New release
-
10
-
Page 13

OVERSEAS SUBSIDIARY COMPANIES
STAR MICRONICS AMERICA, INC.
1150 King Georges Post Road, Edison, NJ 08837-3729 U.S.A.
Tel : (int+1)-732-623-5500 , Fax : (int+1)-732-623-5590
SPECIAL PRODUCTS DIVISION
STAR MICRONICS CO., LTD.
536 Nanatsushinya,
Shimizu-ku, Shizuoka, 424-0066 Japan
Tel : (int+81)-54-347-0112 , Fax : (int+81)-54-347-0409
Please access the following URL
http://www.star-m.jp/eng/d1/dl02.htm
for the lastest revision of the manual.
Distributed by
STAR MICRONICS EUROPE LTD.
Star House, Peregrine Business Park, Gomm Road,
High Wycombe, Bucks, HP13 7DL, U.K.
Tel : (int+44)-1494-471111 , Fax : (int+44)-1494-473333
STAR MICRONICS ASIA LTD.
Rm. 1901-5, 19/F., Enterprise Square Two,
3 Sheung Yuet Road, Kowloon Bay, Hong Kong
Tel : (int+852)-2796-2727 , Fax : (int+852)-2799-9344
TSP143IIU ECO Setting Rev. 1.0 2010.03.23
Printed in Japan, 80878390EN
 Loading...