


Models:
ES-13
ES-6
Revised:
March 23, 2010
1

ES–6 & ES–13
TABLE OF CONTENTS
EQUIPMENT WARRANTY ......................................................................... 3
RECEIPT AND INSTALLATION ................................................................. 5
INITIAL START–UP ................................................................................... 8
OPERATING INSTRUCTIONS .................................................................. 10
MAINTENANCE AND CLEANING GUIDE ................................................ 12
REPLACEMENT PARTS LIST ................................................................... 14
ELECTRICAL SCHEMATICS ..................................................................... 16
2

TOASTMASTER® EQUIPMENT WARRANTY
TOASTMASTER® products are warranted against defects in workmanship and materials. No
other express warranty, written or oral, applies. No person is authorized to give any other
warranty or assume any other liability on behalf of TOASTMASTER®, except by written
statement from an officer of TOASTMASTER®.
Your TOASTMASTER® equipment warranty is limited to the following time periods for the
original owner only:
PARTS LABOR
Inside the United States 24 Months 12 Months
All areas outside the United States 24 Months 12 Months
These time limits will apply in all cases unless prior arrangements have been made and agreed to
in writing.
The TOASTMASTER® EQUIPMENT WARRANTY is composed of the following:
PARTS - -
This limited warranty covers certain electrical, electronic, and mechanical parts for the time
periods described above with the exception of those items detailed under Warranty Limitations.
Customers who maintain an open account may purchase against their account. MasterCard, Visa
and American Express credit cards are also accepted.
The return of defective parts is required. The return of a defective part or component must be
made prior to the issuance of a credit on an open account. If a part that is returned tests
satisfactory in the TOASTMASTER® factory or at an authorized TOASTMASTER® dealer or
service agency, TOASTMASTER® may withhold issuing credit. Replacement parts will be
warranted for a period of ninety (90) days provided they are installed in a manner authorized by
TOASTMASTER®.
LABOR - -
We require that you call our TOASTMASTER® Service Department at (314) 678-6347
for service authorization BEFORE you call any service agency if you wish to claim a labor
expense under the warranty. We may be able to solve your problem over the telephone, or we
will schedule a warranty service call by a reliable service agency in your area.
WARRANTY LIMITATIONS:
TOASTMASTER® will pay for parts and labor under warranty if there is a defective
component, but not for:
•Parts damaged in shipment beyond the confines of the TOASTMASTER® factory.
• Normal operational wear and tear on the following parts Light bulbs and fuses
Door handles, catches and gaskets
• Damage attributable to customer abuse, including but not limited to Fan motor damaged from not following outlined Dry-Out Procedure
Lack of regular cleaning and/or maintenance
Leaks resulting from the removal of sealant in the unit
•Power supply problems, including Insufficient or incorrect voltage
Damage to electrical components caused by a power surge or spike
Incorrect installation (i.e., incorrect location of high-voltage power leg for 240-volt
3

3-phase units)
Damage to electrical components resulting from use of an incorrect power supply
cord or circuit breaker
•Operational problems resulting from customer's failure to follow established procedures
outlined in the Owner's Manual.
•A service call if nothing wrong is found (parts still work per spec when tested).
•Recalibration of temperature and humidity controls (all controls are carefully calibrated
and tested at our facility before shipment).
•Any equipment moved from the place of original installation unless TOASTMASTER®
agrees in writing to continue the warranty after the relocation.
•Ongoing operational adjustments due to changing environmental conditions or normal
wear and tear.
•Any overtime charges. TOASTMASTER® will pay straight time only for any work
performed on TOASTMASTER® equipment.
Food service equipment and parts must be installed and maintained in accordance with
TOASTMASTER® instructions. Users are responsible for the suitability of the units or parts to
their application. There is no warranty against damage resulting from accident, abuse, alteration,
misapplication, inadequate storage prior to installation, or improper specification or other
operating conditions beyond our control. Claims against carrier's damage in transit must be filed
by the buyer and, therefore, the buyer must inspect the product immediately upon receipt.
THIS WARRANTY DOES NOT COVER ADJUSTMENTS
DUE TO NORMAL ON-GOING USE!!!
PARTS RETURN PROCEDURES AND CONDITIONS:
The following procedure shall be followed for the return of parts to the factory for credit
consideration:
•All parts received by TOASTMASTER® must have a completed Return Authorization
Form as supplied by TOASTMASTER® with the part. Complete and return this
Authorization Form with the defective part(s).
•Parts MUST be packed securely so that in-transit damage cannot occur.
• Prepay shipment. Any parts returned collect will be refused by our Receiving Department.
Credit will be issued on proper returns only.
•As soon as parts are tested and confirmed as defective, credit will be issued against them.
•If the engineering test shows the component is not defective and in good working
condition, it may be returned to you along with your request for payment.
4

RECEIPT AND INSTALLATION
RECEIPT:
It is essential to inspect the unit immediately when it arrives. TOASTMASTER® has placed
instructions on the packaging to help avoid damage in transit. However, negligent handling can
produce hidden damage. These steps should be carefully followed:
A. Inspect the entire perimeter of the package for damage or punctures to the packing material.
This may indicate damage to the unit inside. Call any and all packing damage to the
attention of the delivery person.
B. If any packing damage is found uncrate the unit immediately in the presence of the delivery
person to determine if the unit is damaged. If any damage is found indicate the type and
amount of damage on the shipping documents and notify TOASTMASTER®
at 314-678-6347 immediately after filing a freight claim.
C. Uncrate the unit carefully and check the entire unit (top, front, back and both sides) for any
visible or hidden damage.
D. Remove the unit from the shipping pallet and inspect the bottom for any damage.
E. If any damage is noted after the driver leaves immediately contact the freight company and
TOASTMASTER®.
F. Check each Oven Door. Make sure the Door closes completely, and that the Door Gasket
seals firmly. If the Gasket does not seal correctly please contact the TOASTMASTER®
Service Department for instructions and assistance in any required adjustments.
INSTALLATION:
A. Check to determine that the power source is the same voltage and phase as that indicated on
the label on the side of the unit.
B. If you have received an ES–6 you should attach the included Appliance Legs to the bottom
of the unit. Each Leg stud screws into a threaded hole in each corner of the base.
C. Position the unit where it is to be operated and adjust the Appliance Legs of the ES–6 so the
unit stands level and solid. If you have an ES–13 you may need to use metal shims under
the Casters to level the unit.
D. Make sure the GREASE PAN is installed inside the bottom of the unit. This PAN will catch
most of the drippings from your product as it is processed, making clean-up that much
easier.
E. Make sure the DRIP TROUGH is installed beneath the unit. This PAN will catch the liquid
that drains out the front of the unit when the door is opened
F. Carefully set all Controls and Switches to their OFF positions.
5
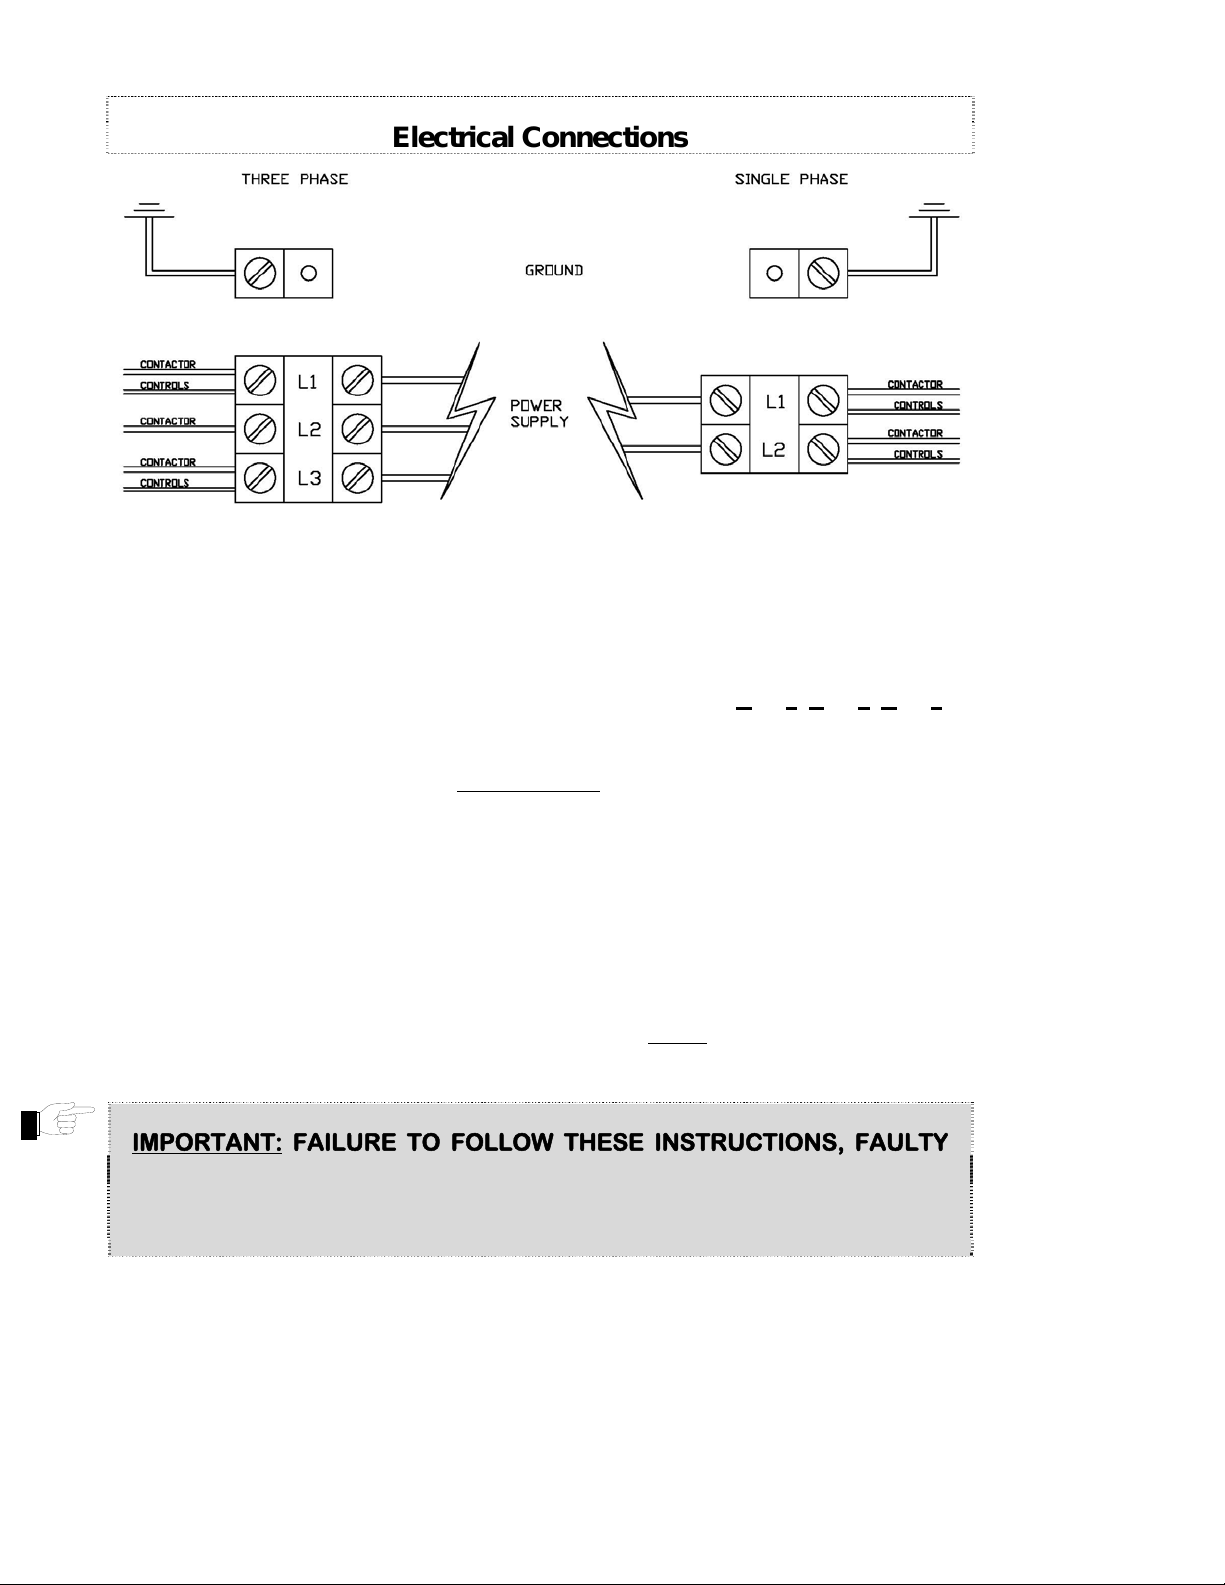
Electrical Connections
F. Install the water supply (refer to WATER SUPPLY CONNECTION on the following page).
G. The installing technician or electrician should complete the electrical connections by
removing the Outside Top of the unit, this panel is held in place with two screws located on
the top of the unit. Connect the unit to the available power supply either through an
attached cord and receptacle or through direct wiring by following these steps:
1.Take note of the labeling on the Power Terminal Block (Line 1, Line 2, Line 3, ).
2.Carefully identify the power source leads and attach them to the appropriate terminal
connections. Make sure all connections are clean and tight.
3.Properly ground the unit BEFORE USE by attaching a grounding wire to the Ground
Lug or Clamp provided next to the Power Terminal Block.
4.Allow enough slack in the wiring to allow for equipment to be moved about during
installation and any future servicing.
H. Check the voltage at the terminals on the Power Terminal Block with a voltmeter and
compare the values with the label listings on the side of the Oven. If the values match the
unit is ready for its INITIAL START–UP. If the readings DO NOT coincide you must call
the TOASTMASTER® Service Department for instructions on changing the voltage
and/or the phase.
I. Carefully position the Outside Top on the unit but do not press it into place. Position the unit
in its final operating location and refer to the appropriate INITIAL START–UP
PROCEDURE for your Smoker.
IMPORTANT: FAILURE TO FOLLOW THESE INSTRUCTIONS, FAULTY
INSTALLATION OR IMPROPER USE MAY CAUSE SEVERE EQUIPMENT
DAMAGE OR PERSONAL INJURY, AND MAY ALSO VOID ALL OR PART
OF YOUR TOASTMASTER® EQUIPMENT WARRANTY!!!
6
 Loading...